> ## Documentation Index
> Fetch the complete documentation index at: https://docs.suprsend.com/llms.txt
> Use this file to discover all available pages before exploring further.
# Amazon SES
> Guide to connect your AWS SES account with SuprSend to send email notifications.
## Pre-Requisites
Before you begin, ensure you have:
* An AWS account with administrative access
* Necessary permissions to create IAM roles/users and SES resources
* Access to AWS Console
If you don't have an AWS account, you can [create one here](https://aws.amazon.com/resources/create-account/).
## Authentication options
SuprSend supports two authentication methods for Amazon SES integration:
### IAM Role (Recommended)
IAM Role-based authentication is the recommended approach as it:
* Provides temporary, scoped access
* Eliminates the need for long-term credentials
* Follows security best practices
If you're using IAM-role authentication at multiple places inside SuprSend, you can consolidate all permission statements within a single policy.
* Navigate to IAM console.
* Select `Policies` tab.
* Click `Create Policy`.
* Either use a 'Visual-editor' or a 'JSON editor' to allow actions `["ses:SendEmail", "ses:SendRawEmail"]`.
For simplicity, choose "JSON editor" and replace the existing content with below JSON.
```json IAM Role Policy theme={"system"}
{
"Version": "2012-10-17",
"Statement": [
{
"Sid": "AllowSesSendActions",
"Effect": "Allow",
"Action": [
"ses:SendEmail",
"ses:SendBulkEmail",
"ses:SendRawEmail"
],
"Resource": "*"
}
]
}
```
* Name your policy (for example `suprsend_trust_role_policy`).
* Add an optional description.
* Click `Create Policy`. This will create a policy with the above permissions.
* Go to IAM console → `Roles` tab
* Click `Create Role`
* Select `Another AWS Account` as trusted entity
* Enter SuprSend's AWS account ID: `924219879248`
* Select the policy created in step 1
* Name your role (for example `suprsend_trust_role`)
* Review and create the role
* Navigate to your created role
* Check Trust Relationships tab
* Verify the trust policy matches:
```json theme={"system"}
{
"Version": "2012-10-17",
"Statement": [
{
"Effect": "Allow",
"Principal": {
"AWS": "arn:aws:iam::924219879248:root"
},
"Action": "sts:AssumeRole",
"Condition": {
"StringEquals": {
"sts:ExternalId": ""
}
}
}
]
}
```
Important:
* Principal must be SuprSend's AWS account ID: "924219879248"
* ExternalId should match the unique ID entered during role creation
* Save the following information for SuprSend setup:
- Role ARN
- External ID
- Maximum session duration
Follow these steps to create an IAM user with programmatic access:
1. Create an [IAM user with Programmatic access](https://docs.aws.amazon.com/IAM/latest/UserGuide/id_users_create.html)
2. Attach `AmazonSESFullAccess` policy
3. Save the `Access-key-ID` and `Secret-Access-Key` securely
Make note of your AWS region (for example `ap-south-1`) as it will be needed for configuration.
## Integration steps to connect AWS SES with SuprSend
* Open AWS SES console
* Navigate to `Verified Identities` tab
* Add and verify either:
* An email address
* A domain/subdomain
* Follow [AWS documentation](https://docs.aws.amazon.com/ses/latest/dg/creating-identities.html) for detailed steps
Configuration-set is a rule set applied to send-email. In configuration-set you can specify to track events (for example send, delivery, open, click, bounce, complaint etc.) and send these to an event destination. Refer to the documentation on how to [create configuration sets](https://docs.aws.amazon.com/ses/latest/dg/creating-configuration-sets.html).
* Go to SES console → `Configuration sets`
* Click `Create set`
* Configure:
* Name: `ses_suprsend_configset`
* IP Pool: Select your pool or use `default`
* Click `Create Set`
Event destinations are used to send email delivery events to SuprSend for tracking notification status (send, delivery, open, click, bounce, complaint etc.) for logs and analytics. To setup event destination,
* Select your configuration set
* Go to `Event Destinations` tab
* Click `Add destination`
* Configure:
* Event Types: Select all
* Destination Type: Amazon SNS
* Enter a destination Name. e.g.: `ses_suprsend_configset_destination`
* Make sure`Event publishing`is marked`Enabled`.
* Select an SNS topic from the dropdown (or create a new topic) for events destination.
* Review and add destination
After setting up the configuration set and SNS topic for email events, you'll need to grant SuprSend permission to subscribe to your SNS topic. This is done through AWS's cross-account SNS subscription feature, which allows external AWS accounts (like SuprSend's) to receive notifications from your SNS topics. For detailed information about cross-account SNS subscriptions, see the [AWS documentation](https://docs.aws.amazon.com/sns/latest/dg/sns-send-message-to-sqs-cross-account.html).
* Go to SNS Console → Topics
* Select the topic created in previous step
* Edit Access Policy
* On the edit page, expand the`Access Policy`section. The policy looks something like below. You'll notice that the current policy gives`sns:Publish`permission to your SES account.
```json Amazon SNS Console theme={"system"}
{
"Version": "2008-10-17",
"Statement": [
{
"Sid": "stmt1651045546197",
"Effect": "Allow",
"Principal": {
"Service": "ses.amazonaws.com"
},
"Action": "sns:Publish",
"Resource": "arn:aws:sns:topic_region:111122223333:topic_name",
"Condition": {
"StringEquals": {
"AWS:SourceAccount": "111122223333"
},
"StringLike": {
"AWS:SourceArn": "arn:aws:ses:*"
}
}
}
]
}
```
Next you need to add a policy to give`sns:Subscribe`permission to SuprSend (Account: 924219879248). Add below json inside the`Statement`list: (replace the "`Resource`" value with your "Resource" value)
```json Amazon SNS Console theme={"system"}
{
"Effect":"Allow",
"Principal":{
"AWS":"924219879248"
},
"Action":"sns:Subscribe",
"Resource":"arn:aws:sns:topic_region:111122223333:topic_name"
}
```
So in effect, the whole policy would look like this. Verify the policy and click on `Save`.
```json Amazon SNS Console theme={"system"}
{
"Version": "2008-10-17",
"Statement": [
{
"Sid": "stmt1651045546197",
"Effect": "Allow",
"Principal": {
"Service": "ses.amazonaws.com"
},
"Action": "sns:Publish",
"Resource": "arn:aws:sns:topic_region:111122223333:topic_name",
"Condition": {
"StringEquals": {
"AWS:SourceAccount": "111122223333"
},
"StringLike": {
"AWS:SourceArn": "arn:aws:ses:*"
}
}
},
{
"Effect":"Allow",
"Principal":{
"AWS":"924219879248"
},
"Action":"sns:Subscribe",
"Resource":"arn:aws:sns:topic_region:111122223333:topic_name"
}
]
}
```
On the SuprSend dashboard, go to vendor page from side panel and click Email -> Amazon SES from the list of Vendors. This will open vendor details page as shown below:
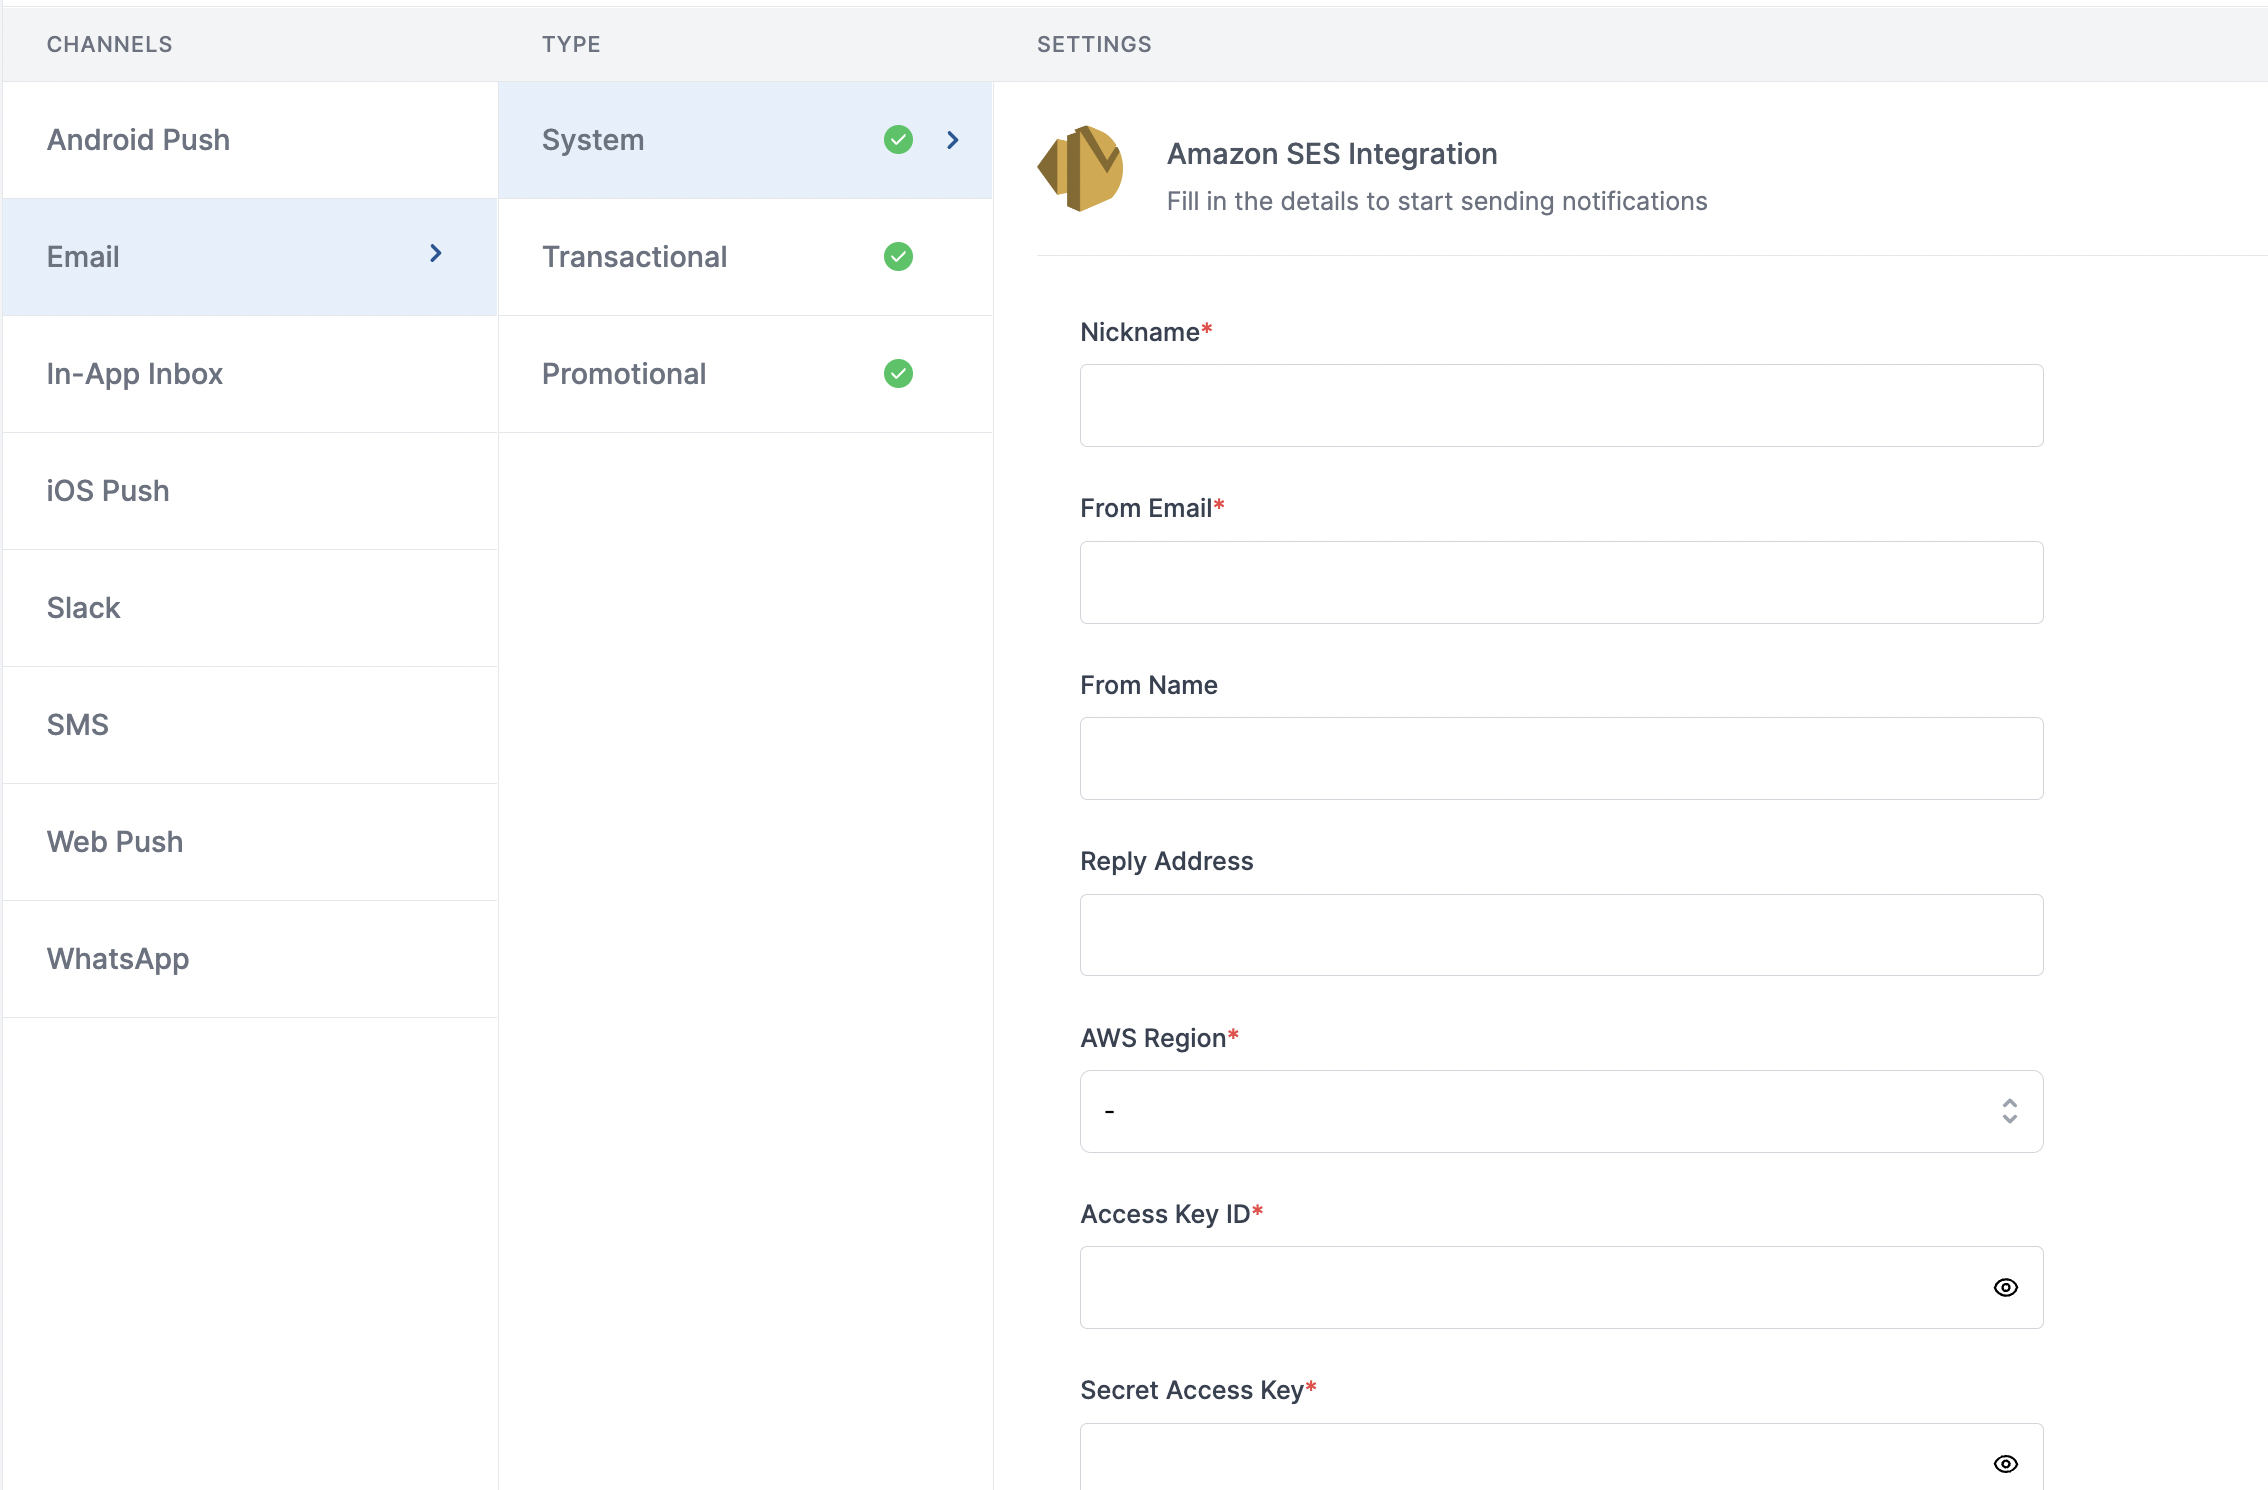 Here's a description on what each of these form fields describe:
| Form Field | Description |
| ---------------------- | ----------------------------------------------------------------------------------------------------------------------------------------------------------------------------------------------------------------------------------------------------------------------------------------------------------------------------- |
| Nickname | You can give any name which may help you to identify this account easily. For example - *AWS SES \[Production]* |
| From Email | Default 'From Email ID' that email will go from. You can override this in the individual template.\*for example [support@suprsend.com](mailto:support@suprsend.com) |
| From Name | Default 'From Name' that email will go from. You can override this in the individual template.*for example SuprSend* |
| Reply Address | Default 'Reply To Email id' on which replies are received. You can override this in the individual template.\*for example [support@suprsend.com](mailto:support@suprsend.com) |
| AWS region | aws-region you are going to use for sending emails. |
| Access Key ID | Access key ID of the IAM user with full access. [Refer step](/docs/amazon-ses#step-1-create-aws-iam-user) to create a new IAM user and generate access key. |
| Secret Access Key | `Secret-Access-Key` of the IAM user with full access. [Refer step](/docs/amazon-ses#step-1-create-aws-iam-user) to create a new IAM user and generate access key. |
| Configuration Set | Configuration-set is used to track email events (for example send, delivery, open, click, bounce, complaint etc.). [Refer Step](/docs/amazon-ses#step-3-create-configuration-set) to define configuration set. |
| SNS Topic ARN | This is the destination where the tracked events will be sent. Configuration set defines what events to be tracked and setting the topic allows SuprSend to receive these events. [Follow step 4 & 5](/docs/amazon-ses#step-4-manange-event-destinations) to setup SNS topic and give SuprSend permission to subscribe to it. |
| Price per notification | This is the amount you pay per email notification to AWS. It helps us to calculate, estimate and optimise your cost spent on notifications. |
## Setting Amazon SES event tracking
One of the platform advantage of using SuprSend as a central communication system is that it shows notification analytics for all channels in your SuprSend account together. For enabling event tracking at SuprSend (such as delivery, opened, blocked, spam etc.), you'll have to `sns:Subscribe`action to SuprSend.
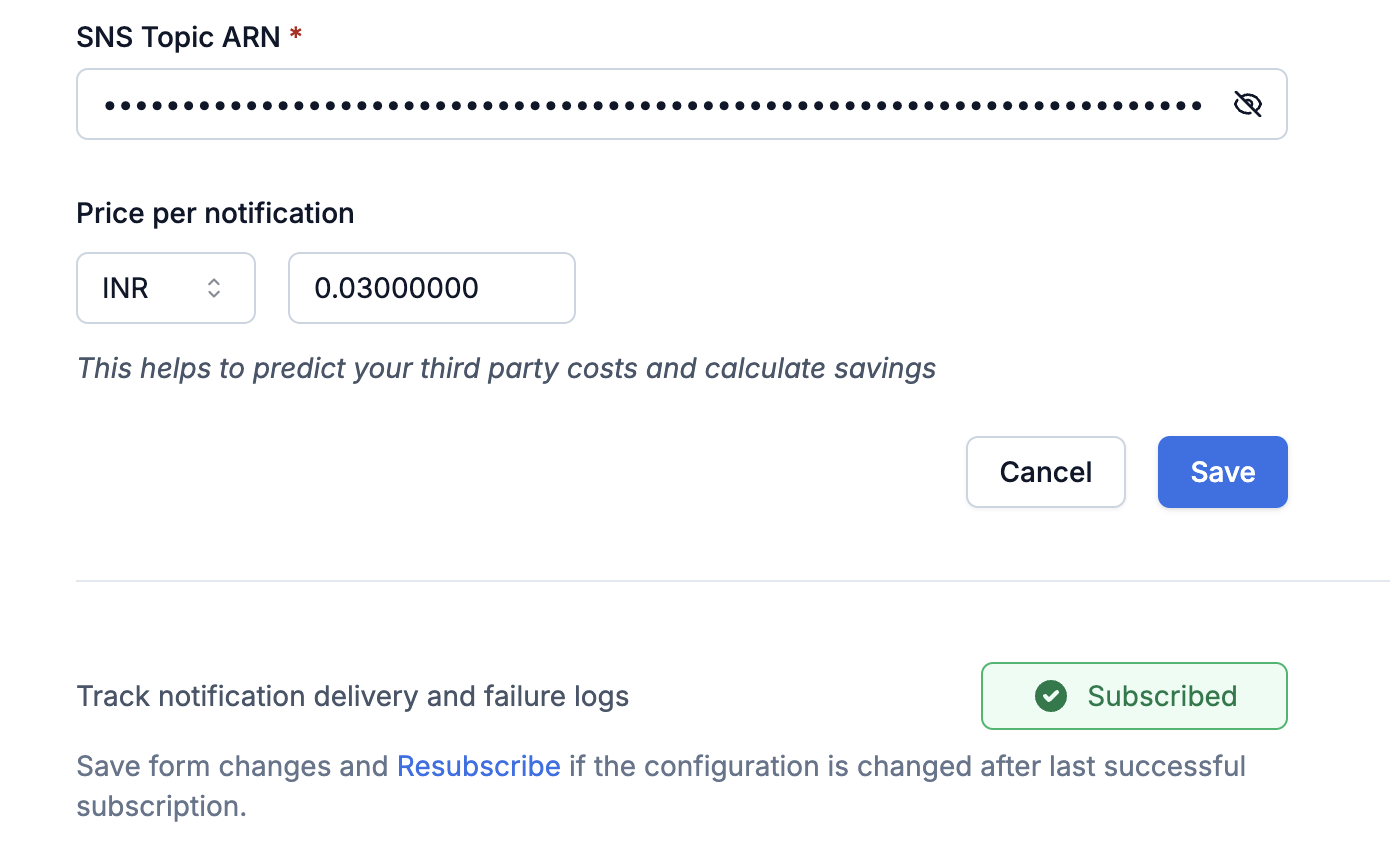
Once you’ve filled in the required fields and saved your changes on the vendor configuration page in the SuprSend platform, you’ll need to manually click the `Subscribe` button to initiate the subscription to your specified SNS Topic ARN. This step is necessary to enable Email Tracking and ensure that notification delivery and failure logs are properly tracked.
If any changes are made to the SNS configuration after a successful subscription, you can click the `Resubscribe` button to re-establish the subscription using the latest configuration. This ensures your email tracking setup stays consistent and up to date.
Successfully Subscription as:
Here's a description on what each of these form fields describe:
| Form Field | Description |
| ---------------------- | ----------------------------------------------------------------------------------------------------------------------------------------------------------------------------------------------------------------------------------------------------------------------------------------------------------------------------- |
| Nickname | You can give any name which may help you to identify this account easily. For example - *AWS SES \[Production]* |
| From Email | Default 'From Email ID' that email will go from. You can override this in the individual template.\*for example [support@suprsend.com](mailto:support@suprsend.com) |
| From Name | Default 'From Name' that email will go from. You can override this in the individual template.*for example SuprSend* |
| Reply Address | Default 'Reply To Email id' on which replies are received. You can override this in the individual template.\*for example [support@suprsend.com](mailto:support@suprsend.com) |
| AWS region | aws-region you are going to use for sending emails. |
| Access Key ID | Access key ID of the IAM user with full access. [Refer step](/docs/amazon-ses#step-1-create-aws-iam-user) to create a new IAM user and generate access key. |
| Secret Access Key | `Secret-Access-Key` of the IAM user with full access. [Refer step](/docs/amazon-ses#step-1-create-aws-iam-user) to create a new IAM user and generate access key. |
| Configuration Set | Configuration-set is used to track email events (for example send, delivery, open, click, bounce, complaint etc.). [Refer Step](/docs/amazon-ses#step-3-create-configuration-set) to define configuration set. |
| SNS Topic ARN | This is the destination where the tracked events will be sent. Configuration set defines what events to be tracked and setting the topic allows SuprSend to receive these events. [Follow step 4 & 5](/docs/amazon-ses#step-4-manange-event-destinations) to setup SNS topic and give SuprSend permission to subscribe to it. |
| Price per notification | This is the amount you pay per email notification to AWS. It helps us to calculate, estimate and optimise your cost spent on notifications. |
## Setting Amazon SES event tracking
One of the platform advantage of using SuprSend as a central communication system is that it shows notification analytics for all channels in your SuprSend account together. For enabling event tracking at SuprSend (such as delivery, opened, blocked, spam etc.), you'll have to `sns:Subscribe`action to SuprSend.
Once you’ve filled in the required fields and saved your changes on the vendor configuration page in the SuprSend platform, you’ll need to manually click the `Subscribe` button to initiate the subscription to your specified SNS Topic ARN. This step is necessary to enable Email Tracking and ensure that notification delivery and failure logs are properly tracked.
If any changes are made to the SNS configuration after a successful subscription, you can click the `Resubscribe` button to re-establish the subscription using the latest configuration. This ensures your email tracking setup stays consistent and up to date.
Successfully Subscription as:
 ## How to add Unsubscription link in email
It's recommended to allow recipients to unsubscribe from emails. You can use SuprSend’s [hosted preference page](/docs/user-preferences#hosted-preference-page) for giving granular control to your users, allowing them to manage preferences per category while also reducing unnecessary vendor API calls for opt-outs.
**Why it's important to give unsubscribe option in email?**
First, it is required by the [CAN-Spam Act](https://www.ftc.gov/business-guidance/resources/can-spam-act-compliance-guide-business). Second, if you don’t give them this option, they are more likely to click on the spam complaint button, which will cause more harm than allowing them to unsubscribe. Finally, many ESPs look for unsubscribe links and are more likely to filter your email if they don’t have them.
## How to add Unsubscription link in email
It's recommended to allow recipients to unsubscribe from emails. You can use SuprSend’s [hosted preference page](/docs/user-preferences#hosted-preference-page) for giving granular control to your users, allowing them to manage preferences per category while also reducing unnecessary vendor API calls for opt-outs.
**Why it's important to give unsubscribe option in email?**
First, it is required by the [CAN-Spam Act](https://www.ftc.gov/business-guidance/resources/can-spam-act-compliance-guide-business). Second, if you don’t give them this option, they are more likely to click on the spam complaint button, which will cause more harm than allowing them to unsubscribe. Finally, many ESPs look for unsubscribe links and are more likely to filter your email if they don’t have them.