> ## Documentation Index
> Fetch the complete documentation index at: https://docs.suprsend.com/llms.txt
> Use this file to discover all available pages before exploring further.
# Amazon S3
> Export SuprSend notification data and message templates to your Amazon S3 bucket as parquet and JSON files for warehousing, analytics, and long term storage.
## How it works?
This integration exports individual [parquet](https://parquet.apache.org/) files for **notification data**, and JSON files for **message templates** to your S3 bucket at a regular interval. You can select what all `data points` you want to sync to your S3 bucket.
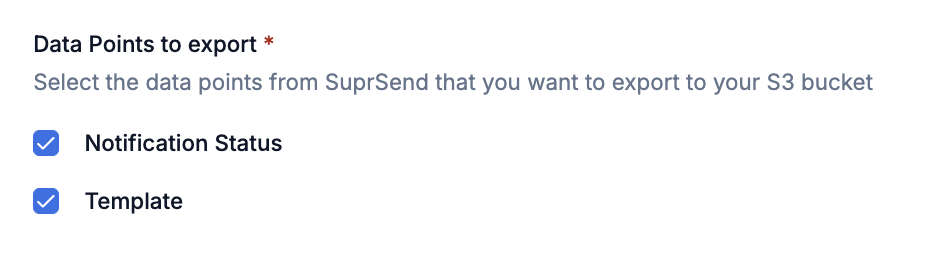 The sync happens every 3-5 minutes, ensuring that you always have the latest data in your S3 bucket. For notifications, there will be a separate parquet file for each day.
This integration only publishes parquet files for notifications to your storage bucket. You can either use Athena to query this data or ingest this data into a data warehouse for analysis.
## Pre-Requisites
Before you begin, ensure you have:
* An AWS account with administrative access
* Necessary permissions to create S3 buckets and IAM roles/users
* Access to AWS Console
## Set up steps
Skip this step if you want to use an existing bucket. Otherwise, follow these steps:
1. Sign in to [AWS S3 Console](https://s3.console.aws.amazon.com/)
2. Click "Create bucket"
The sync happens every 3-5 minutes, ensuring that you always have the latest data in your S3 bucket. For notifications, there will be a separate parquet file for each day.
This integration only publishes parquet files for notifications to your storage bucket. You can either use Athena to query this data or ingest this data into a data warehouse for analysis.
## Pre-Requisites
Before you begin, ensure you have:
* An AWS account with administrative access
* Necessary permissions to create S3 buckets and IAM roles/users
* Access to AWS Console
## Set up steps
Skip this step if you want to use an existing bucket. Otherwise, follow these steps:
1. Sign in to [AWS S3 Console](https://s3.console.aws.amazon.com/)
2. Click "Create bucket"
 3. Configure bucket settings:
* Bucket name: e.g. `suprsend-notification`
* Region: Choose your preferred region
* Object Ownership: **ACLs disabled** (recommended)
* Block all public access: **Enabled**
* Bucket versioning: **Disabled**
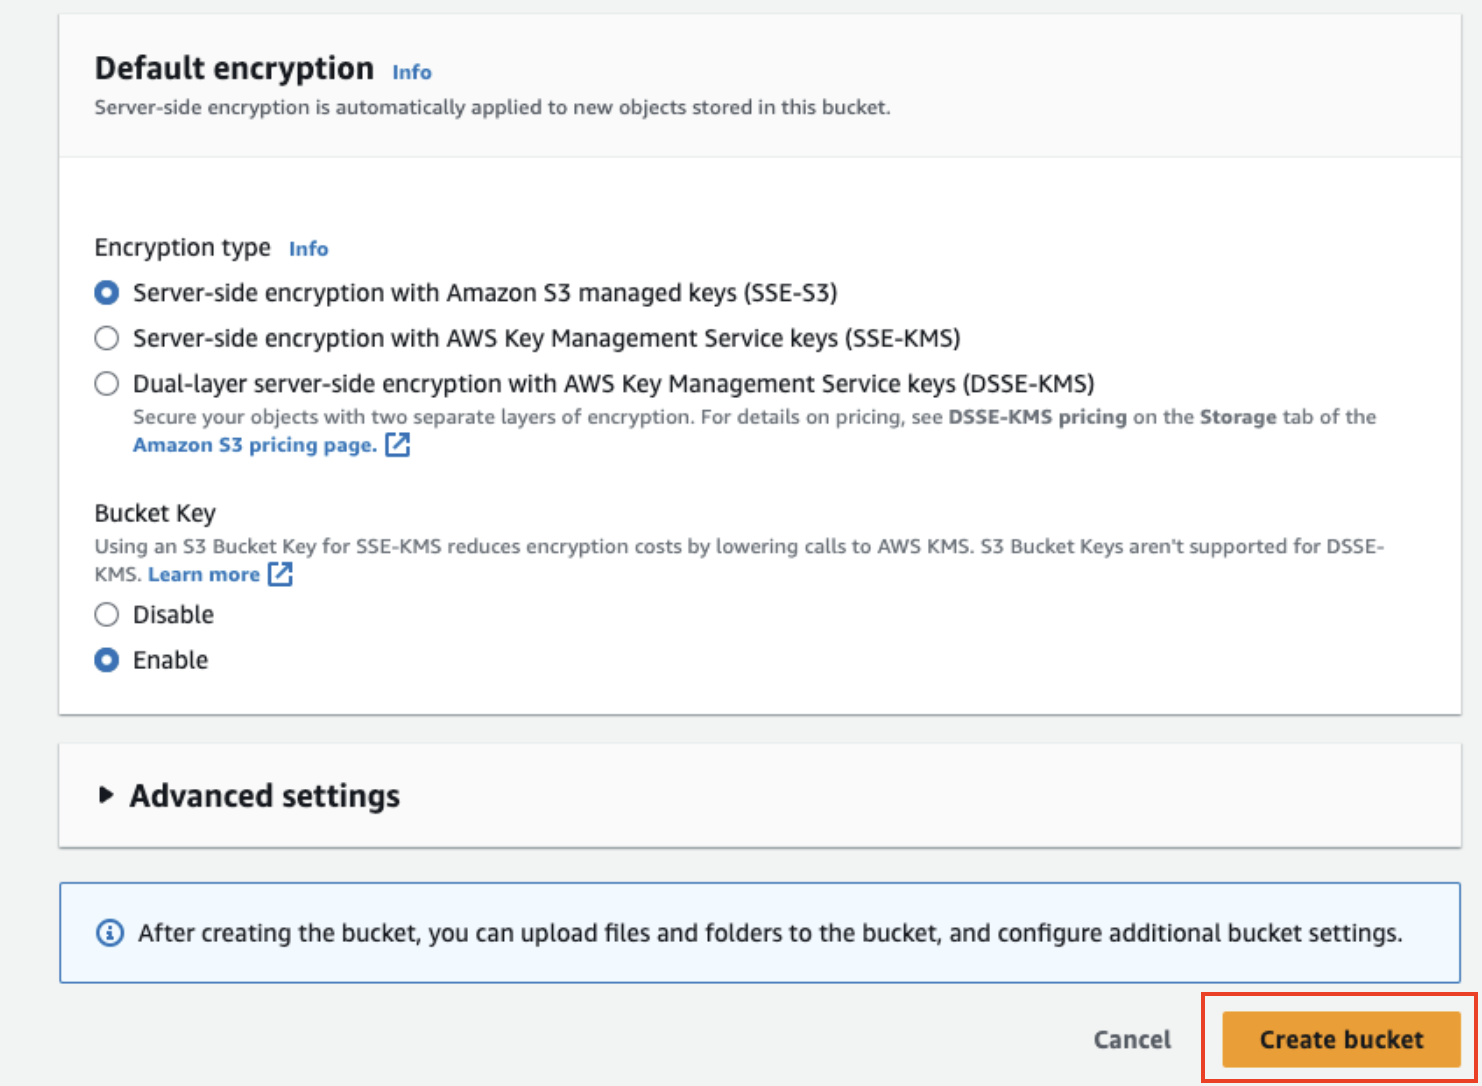
* Default encryption: Server-side encryption with Amazon S3 managed keys (SSE-S3)
* Bucket Key: **Enabled**
4. Click "Create bucket"
3. Configure bucket settings:
* Bucket name: e.g. `suprsend-notification`
* Region: Choose your preferred region
* Object Ownership: **ACLs disabled** (recommended)
* Block all public access: **Enabled**
* Bucket versioning: **Disabled**
* Default encryption: Server-side encryption with Amazon S3 managed keys (SSE-S3)
* Bucket Key: **Enabled**
4. Click "Create bucket"
 We'll need permission to `PutObject` for data ingestion in your bucket. To set permission policy,
1. Go to [IAM Console](https://console.aws.amazon.com/iam/)
2. Select Policies → Create Policy
3. Use JSON editor and paste this policy (replace `suprsend-notification` with your bucket name). Set a relevant name to the policy, something like- **`SingleBucketWriteAccess`**.
```json Amazon AWS IAM Management Console theme={"system"}
{
"Version":"2012-10-17",
"Statement":[
{
"Sid":"AllObjectActions",
"Effect":"Allow",
"Action":[
"s3:PutObject"
],
"Resource":[
"arn:aws:s3:::suprsend-notification/*"
]
}
]
}
```
Choose between IAM Role (recommended) or IAM User authentication. IAM Role-based authentication is the recommended approach as it:
* Provides temporary, scoped access
* Eliminates the need for long-term credentials
* Follows security best practices
If you're using IAM-role authentication at multiple places inside SuprSend, you can consolidate all permission statements within a single policy.
* Go to IAM console → Policies
* Click "Create Policy"
* Either use a 'Visual-editor' or a 'JSON editor' to allow actions `["s3:PutObject"]`.
For simplity, choose "JSON editor" and replace the existing content with below JSON.
Replace the s3-bucket in `Resource` with your own bucket
```json IAM Role Policy theme={"system"}
{
"Version":"2012-10-17",
"Statement":[
{
"Sid":"S3ObjectActions",
"Effect":"Allow",
"Action":[
"s3:PutObject"
],
"Resource":[
"arn:aws:s3:::suprsend-notification/*"
]
}
]
}
```
* Click on `Next`, and enter a Policy Name (e.g. suprsend\_trust\_role\_policy), & other optional Description.
* Finally, clicking on the `Create Policy` button, it will create a new policy with the above permissions.
* Go to IAM console → Roles. To create an IAM Role, refer to this [documentation](https://docs.aws.amazon.com/IAM/latest/UserGuide/id_roles_create_for-user.html).
* Click on `Create Role` button, and select `Another AWS Account` as the trusted entity.
* Enter SuprSend's AWS account ID: `924219879248`
* Next, Select the policy created above
* Enter role name (e.g. `suprsend_trust_role`) and create the role.
* Select the role created above from IAM console → Roles tab
* In Trust Relationships tab, verify this trust policy:
```json IAM Role Policy theme={"system"}
{
"Version":"2012-10-17",
"Statement":[
{
"Effect":"Allow",
"Principal": {
"AWS":"arn:aws:iam::924219879248:root"
},
"Action":"sts:AssumeRole",
"Condition":{
"StringEquals":{
"sts:ExternalId":""
}
}
}
]
}
```
Important:
* Principal must be SuprSend's AWS account ID: "924219879248"
* ExternalId should match the unique ID entered during role creation
* Save these details for SuprSend setup:
* Role ARN
* External ID
* Maximum session duration
Follow these steps to create an IAM user:
1. Create an IAM user with Programmatic access
* Add relevant user Name: e.g. `s3-bucket-suprsend`
* Attach the policy created in step 2
2. Complete the user creation process
3. Continue to step 4 before closing the browser.
4. Save the access credentials securely
This is required to be added in the connector integration form on SuprSend.
For IAM User authentication:
1. Go to IAM Users → Select your user
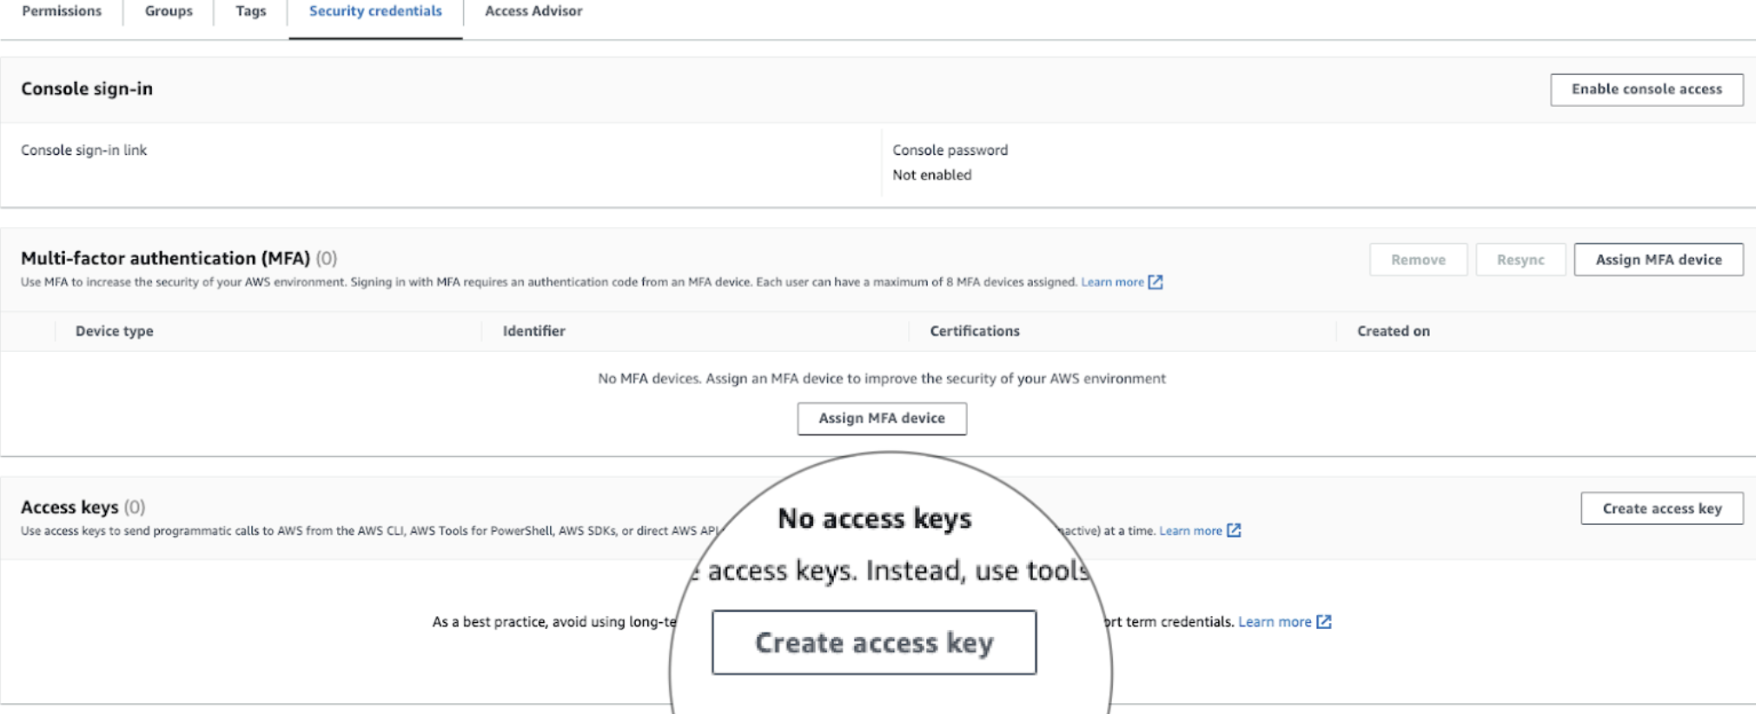
2. Security credentials tab → Create access key
3. Choose "Third party service"
4. Add optional description
5. **IMPORTANT**: Copy and save both access key and secret
6. Click "Done"
We'll need permission to `PutObject` for data ingestion in your bucket. To set permission policy,
1. Go to [IAM Console](https://console.aws.amazon.com/iam/)
2. Select Policies → Create Policy
3. Use JSON editor and paste this policy (replace `suprsend-notification` with your bucket name). Set a relevant name to the policy, something like- **`SingleBucketWriteAccess`**.
```json Amazon AWS IAM Management Console theme={"system"}
{
"Version":"2012-10-17",
"Statement":[
{
"Sid":"AllObjectActions",
"Effect":"Allow",
"Action":[
"s3:PutObject"
],
"Resource":[
"arn:aws:s3:::suprsend-notification/*"
]
}
]
}
```
Choose between IAM Role (recommended) or IAM User authentication. IAM Role-based authentication is the recommended approach as it:
* Provides temporary, scoped access
* Eliminates the need for long-term credentials
* Follows security best practices
If you're using IAM-role authentication at multiple places inside SuprSend, you can consolidate all permission statements within a single policy.
* Go to IAM console → Policies
* Click "Create Policy"
* Either use a 'Visual-editor' or a 'JSON editor' to allow actions `["s3:PutObject"]`.
For simplity, choose "JSON editor" and replace the existing content with below JSON.
Replace the s3-bucket in `Resource` with your own bucket
```json IAM Role Policy theme={"system"}
{
"Version":"2012-10-17",
"Statement":[
{
"Sid":"S3ObjectActions",
"Effect":"Allow",
"Action":[
"s3:PutObject"
],
"Resource":[
"arn:aws:s3:::suprsend-notification/*"
]
}
]
}
```
* Click on `Next`, and enter a Policy Name (e.g. suprsend\_trust\_role\_policy), & other optional Description.
* Finally, clicking on the `Create Policy` button, it will create a new policy with the above permissions.
* Go to IAM console → Roles. To create an IAM Role, refer to this [documentation](https://docs.aws.amazon.com/IAM/latest/UserGuide/id_roles_create_for-user.html).
* Click on `Create Role` button, and select `Another AWS Account` as the trusted entity.
* Enter SuprSend's AWS account ID: `924219879248`
* Next, Select the policy created above
* Enter role name (e.g. `suprsend_trust_role`) and create the role.
* Select the role created above from IAM console → Roles tab
* In Trust Relationships tab, verify this trust policy:
```json IAM Role Policy theme={"system"}
{
"Version":"2012-10-17",
"Statement":[
{
"Effect":"Allow",
"Principal": {
"AWS":"arn:aws:iam::924219879248:root"
},
"Action":"sts:AssumeRole",
"Condition":{
"StringEquals":{
"sts:ExternalId":""
}
}
}
]
}
```
Important:
* Principal must be SuprSend's AWS account ID: "924219879248"
* ExternalId should match the unique ID entered during role creation
* Save these details for SuprSend setup:
* Role ARN
* External ID
* Maximum session duration
Follow these steps to create an IAM user:
1. Create an IAM user with Programmatic access
* Add relevant user Name: e.g. `s3-bucket-suprsend`
* Attach the policy created in step 2
2. Complete the user creation process
3. Continue to step 4 before closing the browser.
4. Save the access credentials securely
This is required to be added in the connector integration form on SuprSend.
For IAM User authentication:
1. Go to IAM Users → Select your user
2. Security credentials tab → Create access key
3. Choose "Third party service"
4. Add optional description
5. **IMPORTANT**: Copy and save both access key and secret
6. Click "Done"
 ## Configure S3 Connector in SuprSend
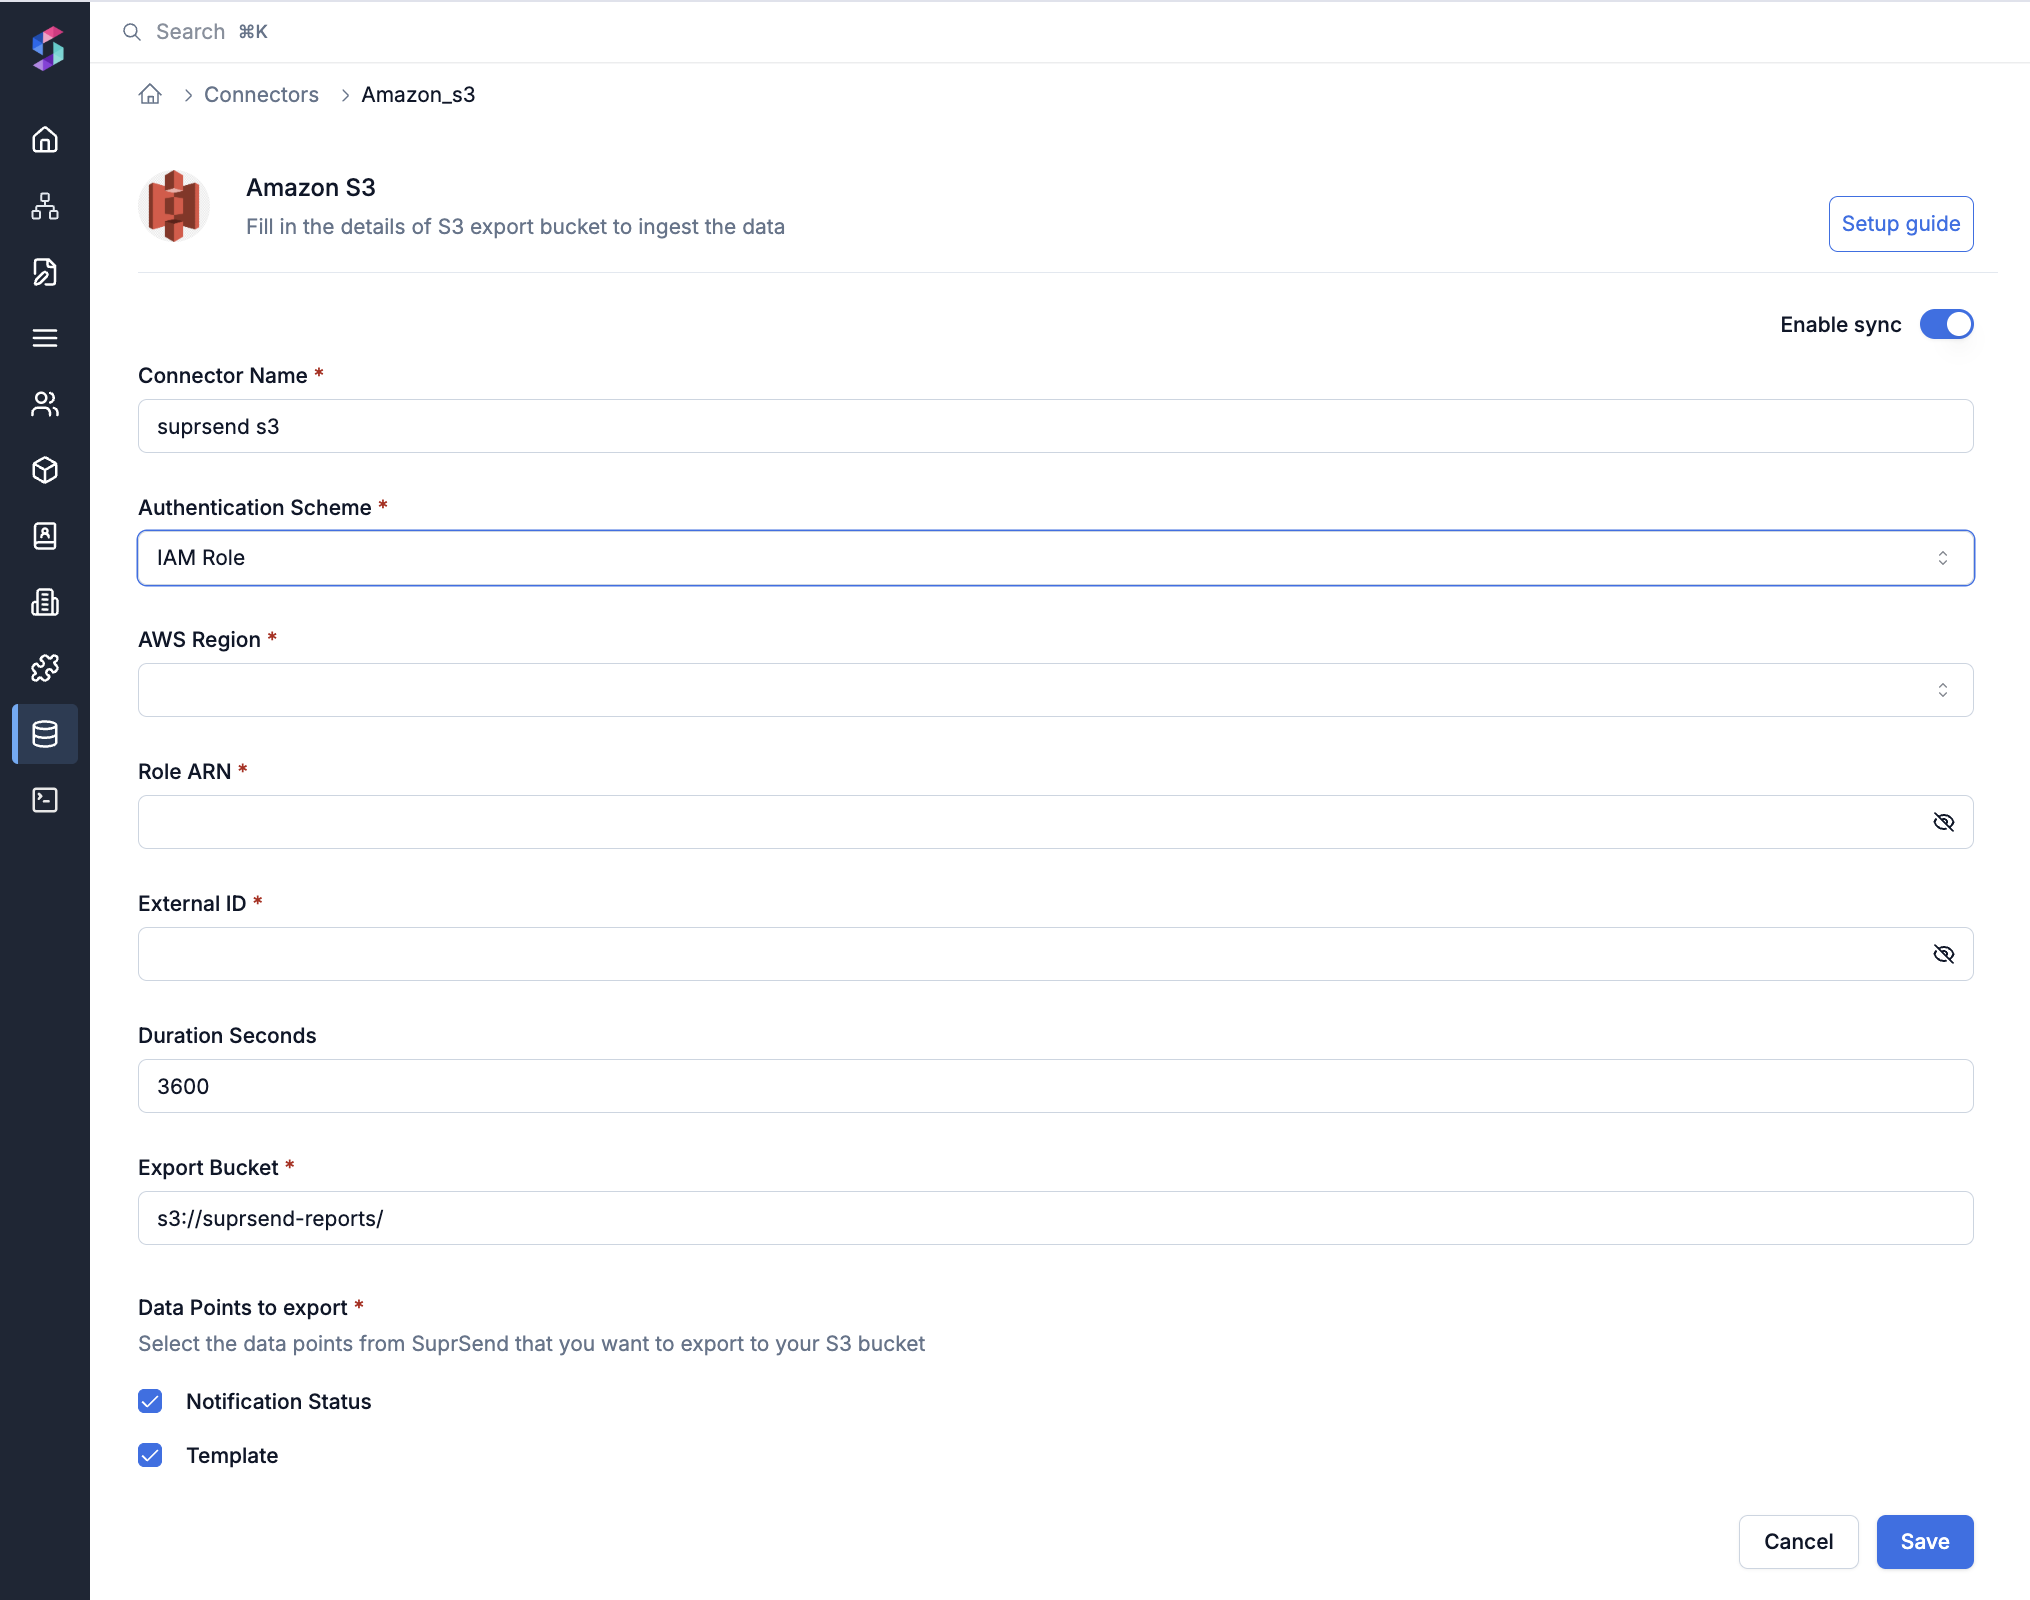
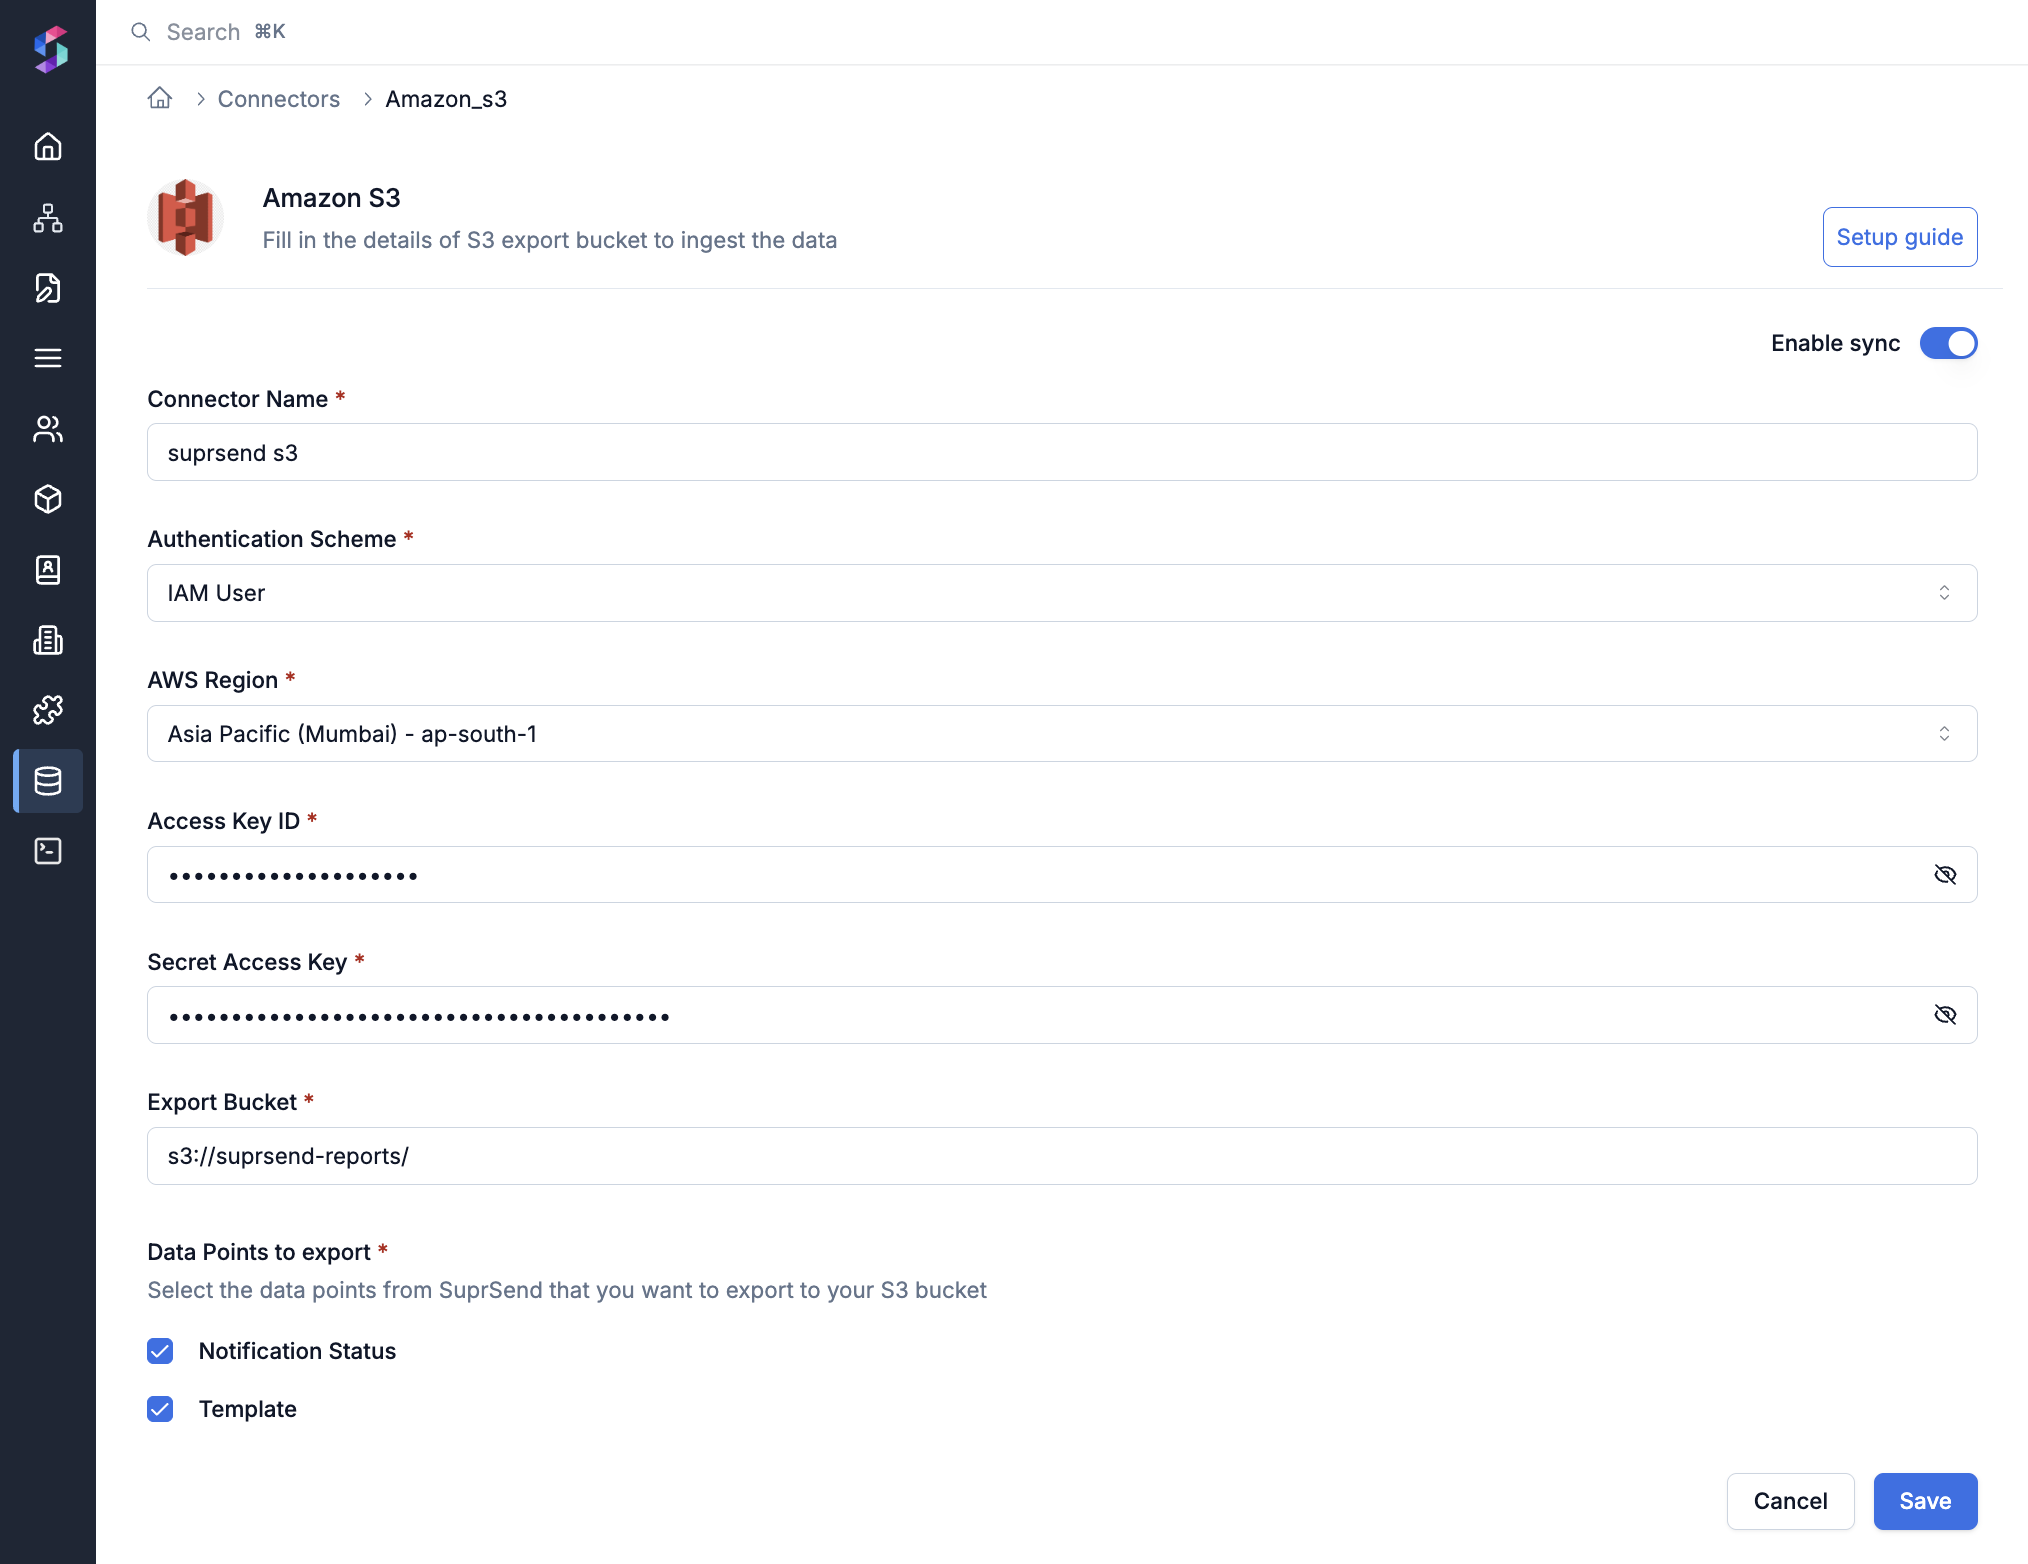
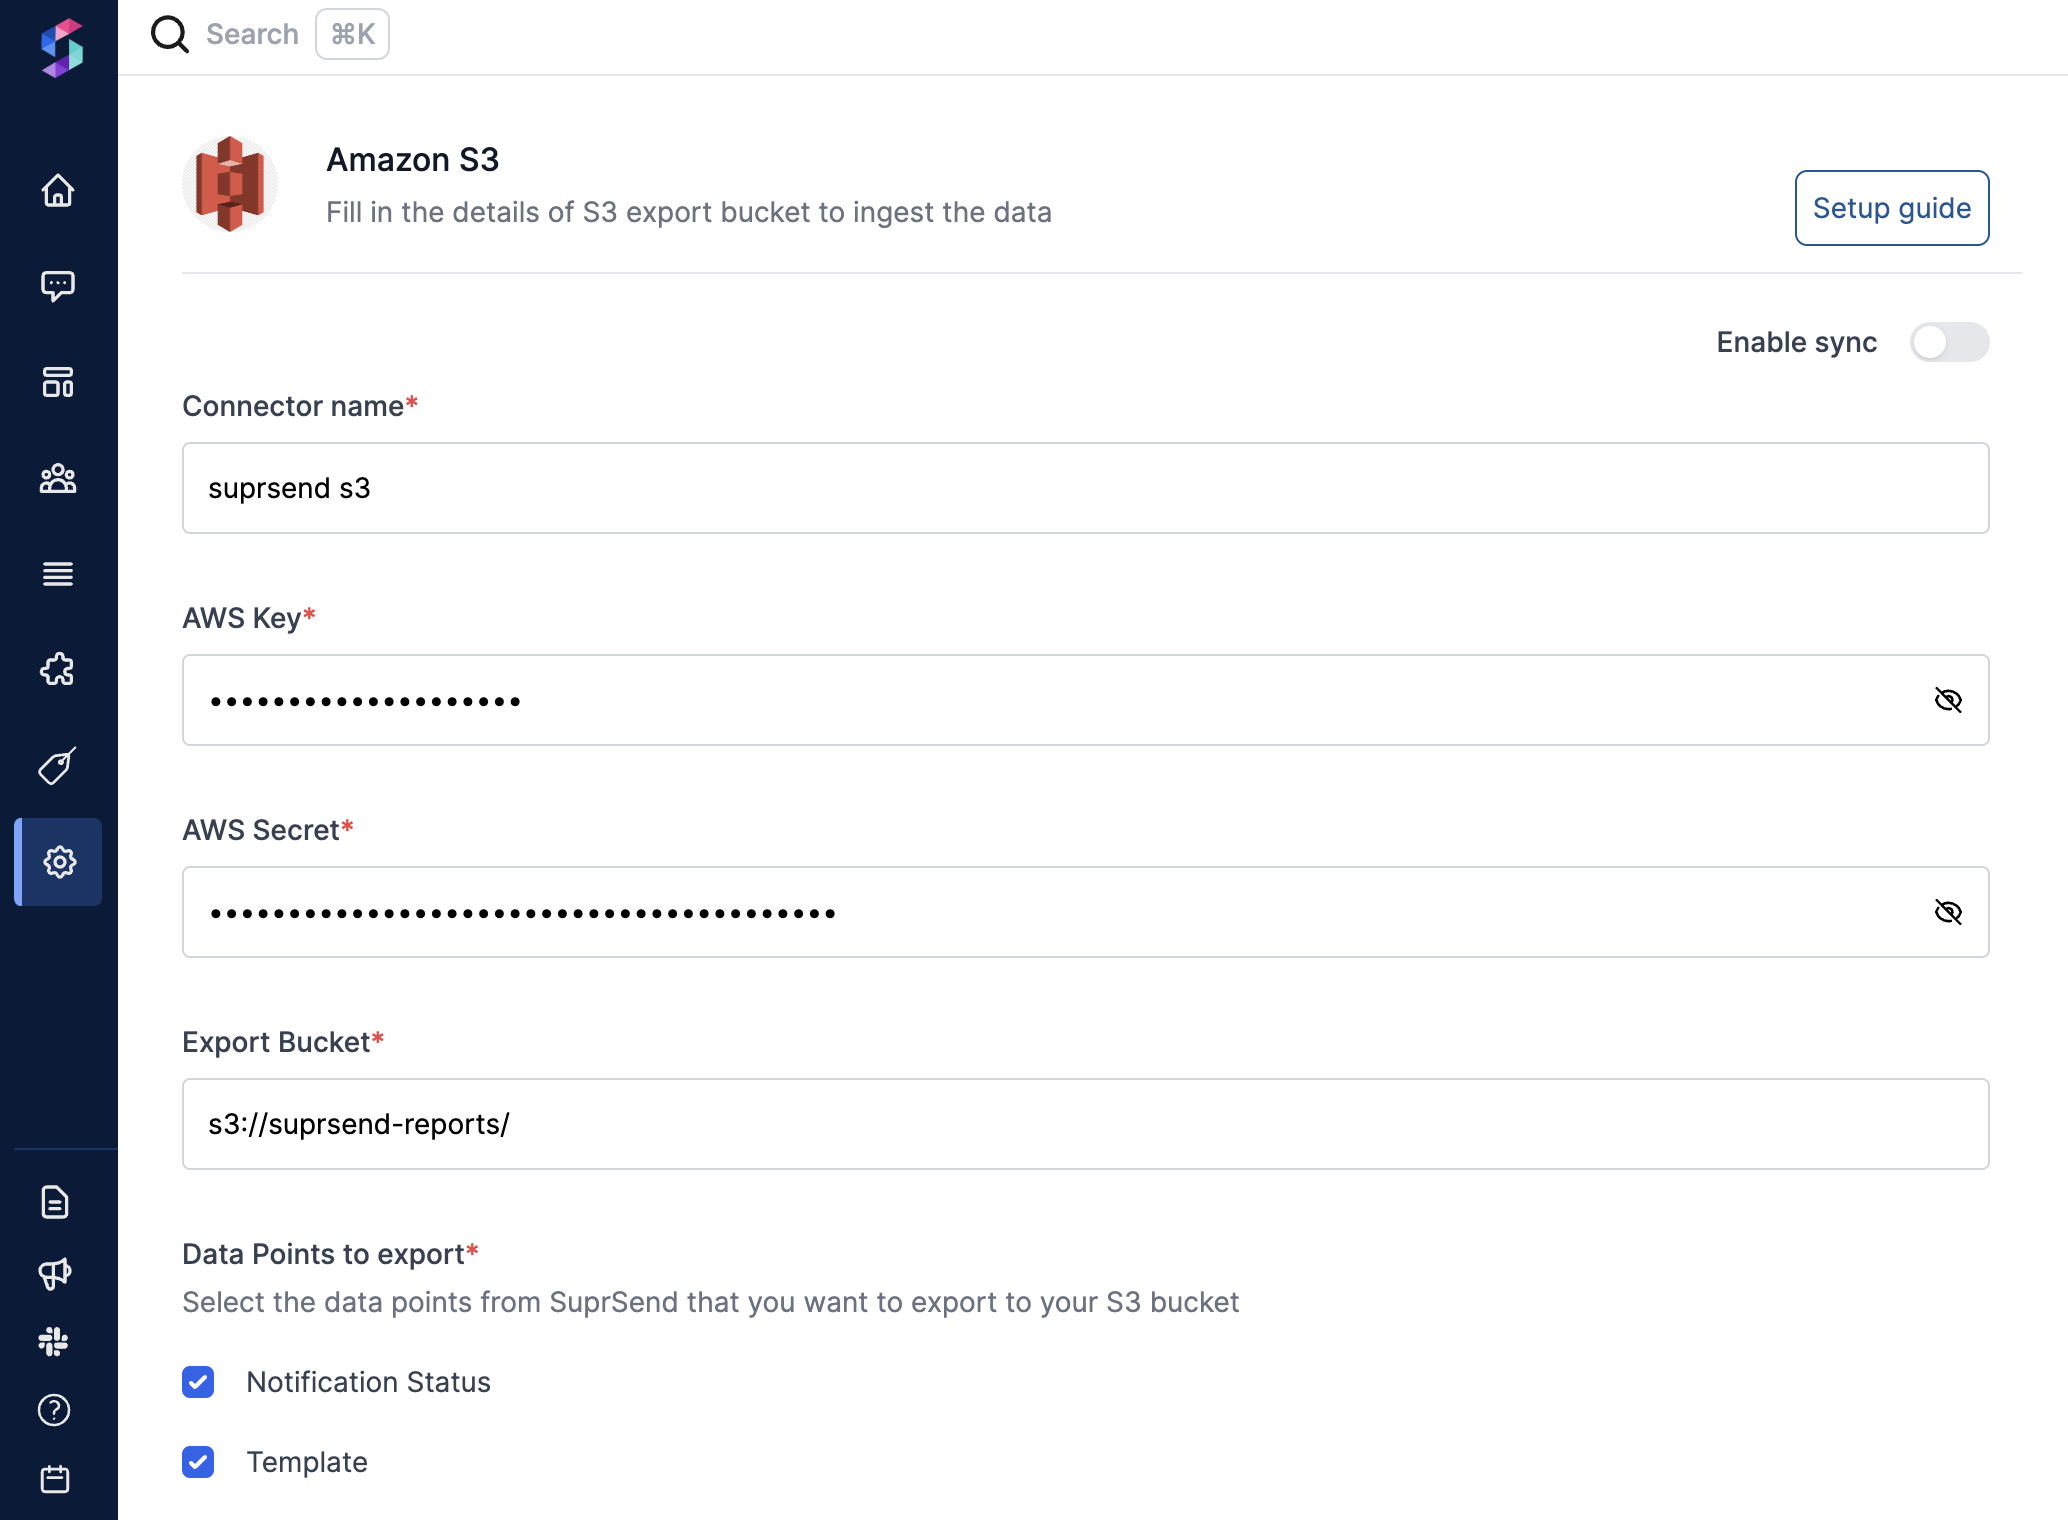 Go to **Settings → Connectors → Amazon S3** and fill in required information.
* **In case of IAM Role:**
Go to **Settings → Connectors → Amazon S3** and fill in required information.
* **In case of IAM Role:**
 * **In case of IAM User:**
 | Form Field | Description |
| --------------------------- | --------------------------------------------------------------------------------------------------------------------------------------------------------------------------------------------------------------------------------------------------------------------------------------------------------------------------------------------------------------------------------------------------------------------------------------------------- |
| **Connector name**\* | This name is identify the connector and is for your reference |
| **Authentication Scheme**\* | Select whether to use IAM Role or IAM User for authentication. |
| **AWS Region**\* | Choose the AWS Region where your S3 bucket is hosted (for e.g.: `us-east-1`, `ap-south-1`, or `eu-west-2`) |
| **Role ARN**\* | The Amazon Resource Name (ARN) of the IAM Role that grants access to the S3 bucket. |
| **External ID**\* | The unique External ID you configured in the IAM Role’s trust policy for SuprSend. This provides an extra layer of security when SuprSend assumes the role. |
| **Duration Seconds** | The amount of time (in seconds) SuprSend can assume the IAM Role for each session (e.g. 3600 = one hour). Leave it at the default unless you have specific session duration requirements. |
| **Access Key ID**\* | This is the access key ID linked to the IAM user. Refer step 4 for steps to create access key |
| **Secret Access Key**\* | This is the secret access linked to the IAM user. Refer step 4 for steps to get secret access |
| **Export Bucket**\* | Name of the S3 bucket where the parquet files should be exported. Refer step 1 to create an export bucket |
| **Data Points to export**\* | Here you can choose what all information should be exported to your S3 bucket: **Notifications Status**- To sync details to the each notification- users, tenants, vendor, channel, DLR status of the notification (delivery, seen, click etc.), and failure reasons for failed notifications **Template**- To sync all templates created in SuprSend in your S3 bucket. Template sync will happen every time you are making change in the template |
Your S3 setup is now complete. Click on **`Enable sync`** to start data export. You can pause and resume your sync anytime you want. To Pause sync for certain data points, deselect the ones not needed from "Data Points to export" and save the changes.
You can also disable your entire sync by disabling the `Enable sync` button, in which case we’ll stop the export. When you enable your sync again, we send all of your historical data as if you’re starting a new integration.
***
| Form Field | Description |
| --------------------------- | --------------------------------------------------------------------------------------------------------------------------------------------------------------------------------------------------------------------------------------------------------------------------------------------------------------------------------------------------------------------------------------------------------------------------------------------------- |
| **Connector name**\* | This name is identify the connector and is for your reference |
| **Authentication Scheme**\* | Select whether to use IAM Role or IAM User for authentication. |
| **AWS Region**\* | Choose the AWS Region where your S3 bucket is hosted (for e.g.: `us-east-1`, `ap-south-1`, or `eu-west-2`) |
| **Role ARN**\* | The Amazon Resource Name (ARN) of the IAM Role that grants access to the S3 bucket. |
| **External ID**\* | The unique External ID you configured in the IAM Role’s trust policy for SuprSend. This provides an extra layer of security when SuprSend assumes the role. |
| **Duration Seconds** | The amount of time (in seconds) SuprSend can assume the IAM Role for each session (e.g. 3600 = one hour). Leave it at the default unless you have specific session duration requirements. |
| **Access Key ID**\* | This is the access key ID linked to the IAM user. Refer step 4 for steps to create access key |
| **Secret Access Key**\* | This is the secret access linked to the IAM user. Refer step 4 for steps to get secret access |
| **Export Bucket**\* | Name of the S3 bucket where the parquet files should be exported. Refer step 1 to create an export bucket |
| **Data Points to export**\* | Here you can choose what all information should be exported to your S3 bucket: **Notifications Status**- To sync details to the each notification- users, tenants, vendor, channel, DLR status of the notification (delivery, seen, click etc.), and failure reasons for failed notifications **Template**- To sync all templates created in SuprSend in your S3 bucket. Template sync will happen every time you are making change in the template |
Your S3 setup is now complete. Click on **`Enable sync`** to start data export. You can pause and resume your sync anytime you want. To Pause sync for certain data points, deselect the ones not needed from "Data Points to export" and save the changes.
You can also disable your entire sync by disabling the `Enable sync` button, in which case we’ll stop the export. When you enable your sync again, we send all of your historical data as if you’re starting a new integration.
***