> ## Documentation Index
> Fetch the complete documentation index at: https://docs.suprsend.com/llms.txt
> Use this file to discover all available pages before exploring further.
# iOS Push Setup
> Set up APNs iOS push notifications in your Flutter app with SuprSend, covering Apple certificates, capabilities, AppDelegate hooks, and token registration.
Starting from iOS version v1.0.0, we have introduced explicit push notification permission and option to add images in your notification. Also, introduced background mode for improved tracking of notification delivery.
If you are using an iOS version older than v1.0.0 and upgrading to the new version. Please ensure to use the latest integration steps, especially for below methods:
1. [Adding Background mode capability](/docs/flutter-ios-push-integration#step-1-add-capabilities-in-ios-application)
2. [Calling registerPush method](/docs/flutter-ios-push-integration#step-2-register-for-push-notification-in-appdelegateswift-file)
3. [Tracking delivery methods](/docs/flutter-ios-push-integration#step-4-enable-sending-and-tracking-of-push-notifications)
Example flutter repository with this implementation can be found [here](https://github.com/suprsend/suprsend-flutter-sdk/tree/main/example)
## Step 1: Add capabilities in iOS application
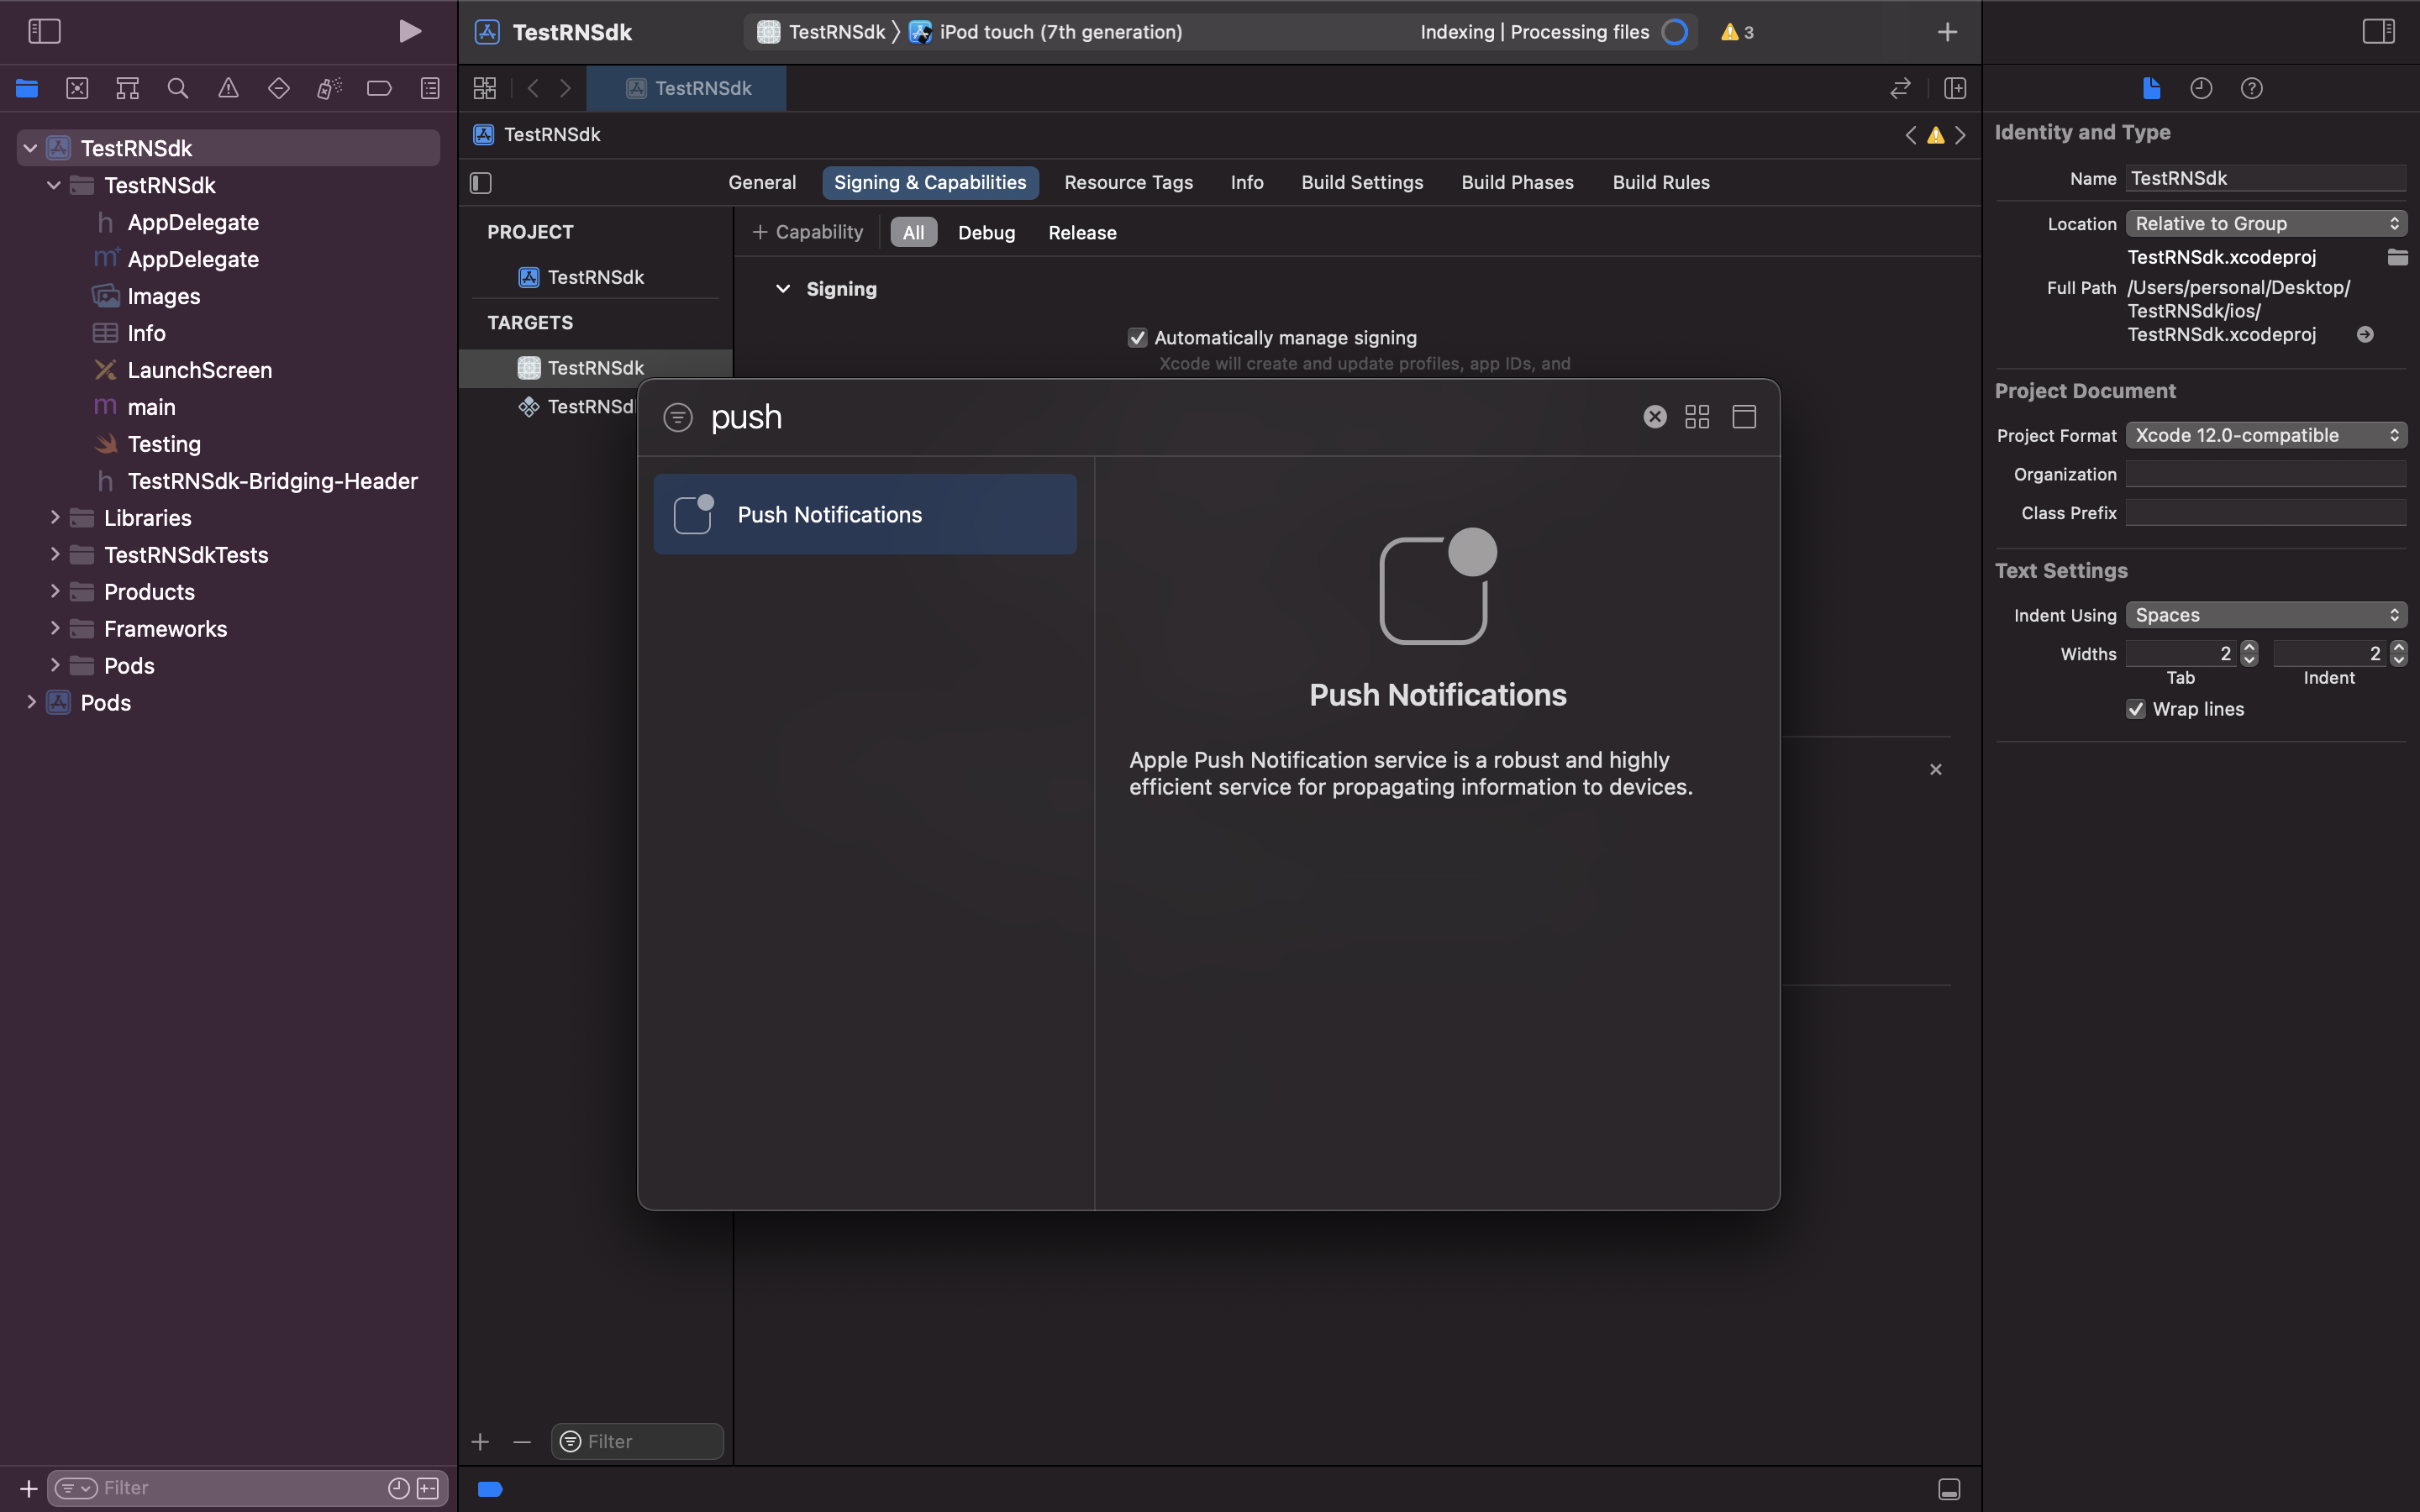
1. Inside Targets select **signing and capabilities**
2. Click on **+capabilities** and select **Push Notifications** and **Background Modes**
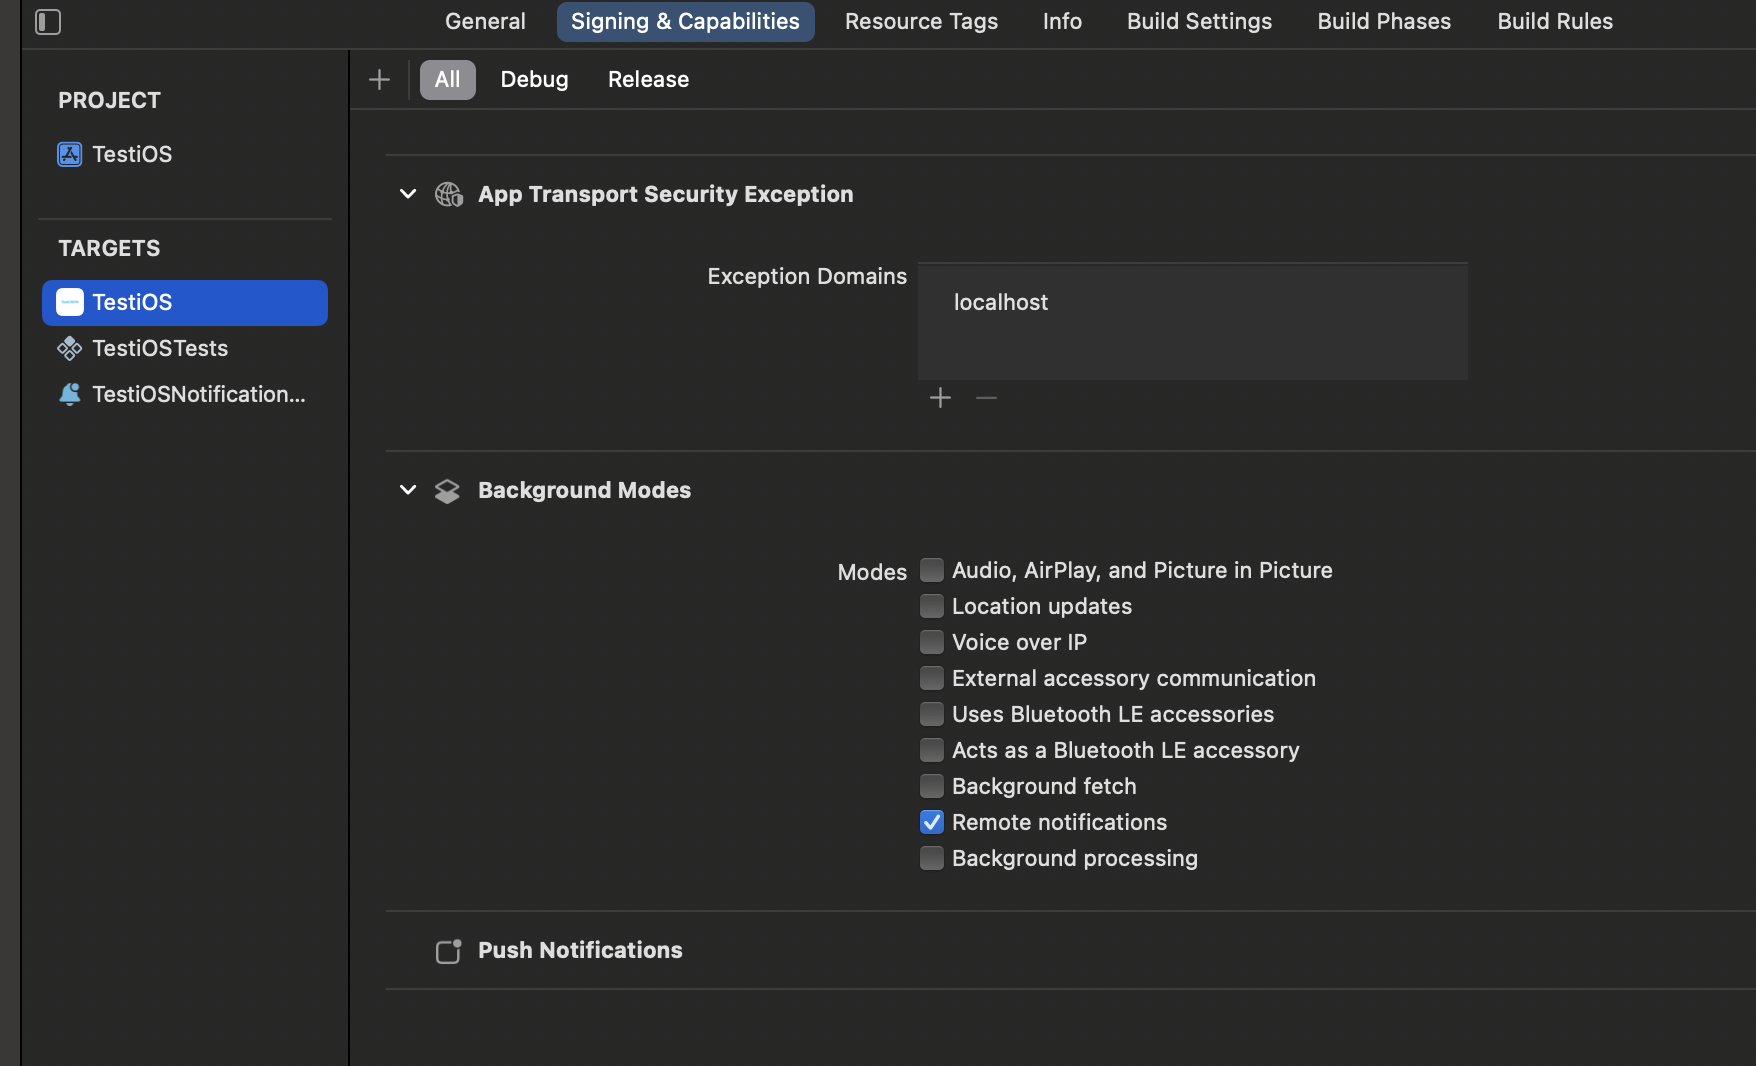
 In Background Modes, select **Remote Notifications** option. We use background notifications to receive delivery reports when your app is in quit and background state. Refer [doc](https://developer.apple.com/documentation/usernotifications/setting_up_a_remote_notification_server/pushing_background_updates_to_your_app) to know more about background notification
 ## Step 2: Register for push notification in AppDelegate.swift file
Call `registerForPushNotifications` method below the SuprSend SDK initialized code which will register the iOS device for push service
```objectivec AppDelegate.swift theme={"system"}
SuprSend.shared.configureWith(configuration: suprSendConfiguration , launchOptions: launchOptions) // init code which is already added at time of initialisation
var options: UNAuthorizationOptions = [.badge, .alert, .sound] // Add this
SuprSend.shared.registerForPushNotifications(options: options) // Add this
```
## Step 3: Asking User to send push notifications
There are 2 ways in which your app can prompt users to allow push notifications on their devices:
### Explicit Authorization
Explicit authorization allows you to display alerts, add a badge to the app icon, or play sounds whenever a notification is delivered. In this type of authorization, the request is made the first time user launches your app. If the user denies the request, you can't send subsequent prompts to send the notification.
## Step 2: Register for push notification in AppDelegate.swift file
Call `registerForPushNotifications` method below the SuprSend SDK initialized code which will register the iOS device for push service
```objectivec AppDelegate.swift theme={"system"}
SuprSend.shared.configureWith(configuration: suprSendConfiguration , launchOptions: launchOptions) // init code which is already added at time of initialisation
var options: UNAuthorizationOptions = [.badge, .alert, .sound] // Add this
SuprSend.shared.registerForPushNotifications(options: options) // Add this
```
## Step 3: Asking User to send push notifications
There are 2 ways in which your app can prompt users to allow push notifications on their devices:
### Explicit Authorization
Explicit authorization allows you to display alerts, add a badge to the app icon, or play sounds whenever a notification is delivered. In this type of authorization, the request is made the first time user launches your app. If the user denies the request, you can't send subsequent prompts to send the notification.
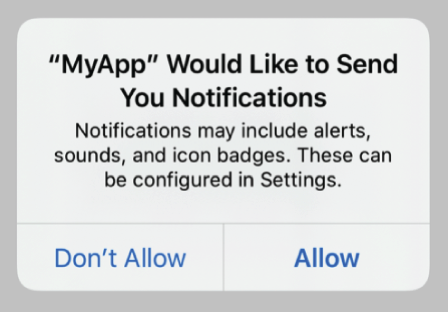 Explicit authorization is default authorization method as it automatically sets alert, sound and badge as soon as the user allows this request.
### Provisional Authorization
Provisional Authorization (Supported in iOS 12.0 and above) are sent quietly to the users -they don’t interrupt the user with a sound or banner. Also, they will not be shown when your app is in foreground. First time this type of notifications are sent, user is asked to "Keep" or "Turn off" the notifications. Further notifications continue to be sent if they click on "Keep".
Explicit authorization is default authorization method as it automatically sets alert, sound and badge as soon as the user allows this request.
### Provisional Authorization
Provisional Authorization (Supported in iOS 12.0 and above) are sent quietly to the users -they don’t interrupt the user with a sound or banner. Also, they will not be shown when your app is in foreground. First time this type of notifications are sent, user is asked to "Keep" or "Turn off" the notifications. Further notifications continue to be sent if they click on "Keep".
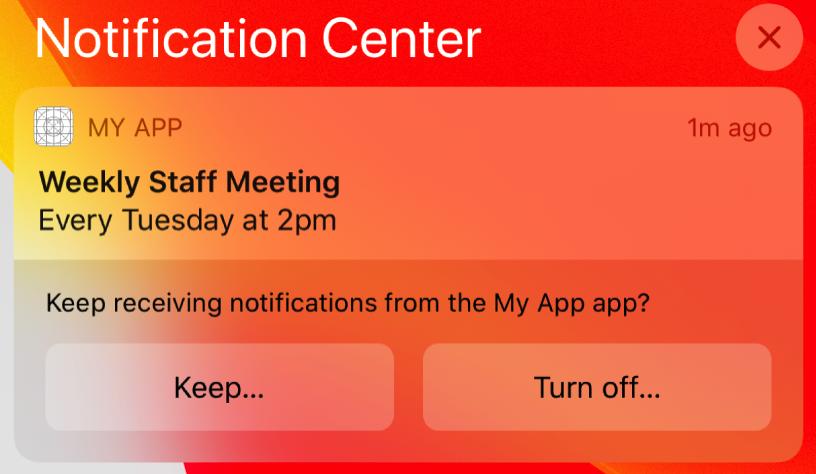 Add below code in `AppDelegate.swift` file for provisional authorization.
```swift AppDelegate.swift theme={"system"}
SuprSend.shared.configureWith(configuration: suprSendConfiguration , launchOptions: launchOptions) // init code which is already added at time of initialisation
var options: UNAuthorizationOptions = [.badge, .alert, .sound, .provisional] // Add this
SuprSend.shared.registerForPushNotifications(options: options) // Add this
```
## Step 4: Enable sending and tracking of push notifications
Receiving iOS APNS token sending to backend and listening for push notification and tracking user notification clicks can be done using the following snippet of code. Directly copy and paste it at end of the AppDelegate.swift file inside *AppDelegate* class.
```swift AppDelegate.swift theme={"system"}
override func application(_ application: UIApplication, didRegisterForRemoteNotificationsWithDeviceToken deviceToken: Data) {
let tokenParts = deviceToken.map { data in String(format: "%02.2hhx", data) }
let token = tokenParts.joined()
SuprSend.shared.setPushNotificationToken(token: token) // Send APNS Token to SuprSend
}
@available(iOS 10.0, *)
override func userNotificationCenter(
_ center: UNUserNotificationCenter,
didReceive response: UNNotificationResponse,
withCompletionHandler completionHandler: @escaping () -> Void
) {
if response.isSuprSendNotification() {
SuprSend.shared.userNotificationCenter(center, didReceive: response)
}
completionHandler()
}
override func application(_ application: UIApplication, didReceiveRemoteNotification userInfo: [AnyHashable : Any]){
SuprSend.shared.application(application, didReceiveRemoteNotification: userInfo)
}
@available(iOS 10.0, *)
override func userNotificationCenter(_ center: UNUserNotificationCenter, willPresent notification: UNNotification, withCompletionHandler completionHandler: @escaping (UNNotificationPresentationOptions) -> Void) {
if #available(iOS 14.0, *) {
completionHandler([.banner, .badge, .sound])
} else {
completionHandler([.alert, .badge, .sound])
}
}
```
iOS Push notifications only work on real devices so while developing/testing use real device to test it instead of simulators. From Xcode-15 push support can be tested in simulators as well.
## Step 5: Adding support for Notification service.
For better notification status (delivered, seen) tracking this step is needed.
Then in Next popup give a suitable name to your notification service, select your team, select swift language and click finish.
Add below code in `AppDelegate.swift` file for provisional authorization.
```swift AppDelegate.swift theme={"system"}
SuprSend.shared.configureWith(configuration: suprSendConfiguration , launchOptions: launchOptions) // init code which is already added at time of initialisation
var options: UNAuthorizationOptions = [.badge, .alert, .sound, .provisional] // Add this
SuprSend.shared.registerForPushNotifications(options: options) // Add this
```
## Step 4: Enable sending and tracking of push notifications
Receiving iOS APNS token sending to backend and listening for push notification and tracking user notification clicks can be done using the following snippet of code. Directly copy and paste it at end of the AppDelegate.swift file inside *AppDelegate* class.
```swift AppDelegate.swift theme={"system"}
override func application(_ application: UIApplication, didRegisterForRemoteNotificationsWithDeviceToken deviceToken: Data) {
let tokenParts = deviceToken.map { data in String(format: "%02.2hhx", data) }
let token = tokenParts.joined()
SuprSend.shared.setPushNotificationToken(token: token) // Send APNS Token to SuprSend
}
@available(iOS 10.0, *)
override func userNotificationCenter(
_ center: UNUserNotificationCenter,
didReceive response: UNNotificationResponse,
withCompletionHandler completionHandler: @escaping () -> Void
) {
if response.isSuprSendNotification() {
SuprSend.shared.userNotificationCenter(center, didReceive: response)
}
completionHandler()
}
override func application(_ application: UIApplication, didReceiveRemoteNotification userInfo: [AnyHashable : Any]){
SuprSend.shared.application(application, didReceiveRemoteNotification: userInfo)
}
@available(iOS 10.0, *)
override func userNotificationCenter(_ center: UNUserNotificationCenter, willPresent notification: UNNotification, withCompletionHandler completionHandler: @escaping (UNNotificationPresentationOptions) -> Void) {
if #available(iOS 14.0, *) {
completionHandler([.banner, .badge, .sound])
} else {
completionHandler([.alert, .badge, .sound])
}
}
```
iOS Push notifications only work on real devices so while developing/testing use real device to test it instead of simulators. From Xcode-15 push support can be tested in simulators as well.
## Step 5: Adding support for Notification service.
For better notification status (delivered, seen) tracking this step is needed.
Then in Next popup give a suitable name to your notification service, select your team, select swift language and click finish.
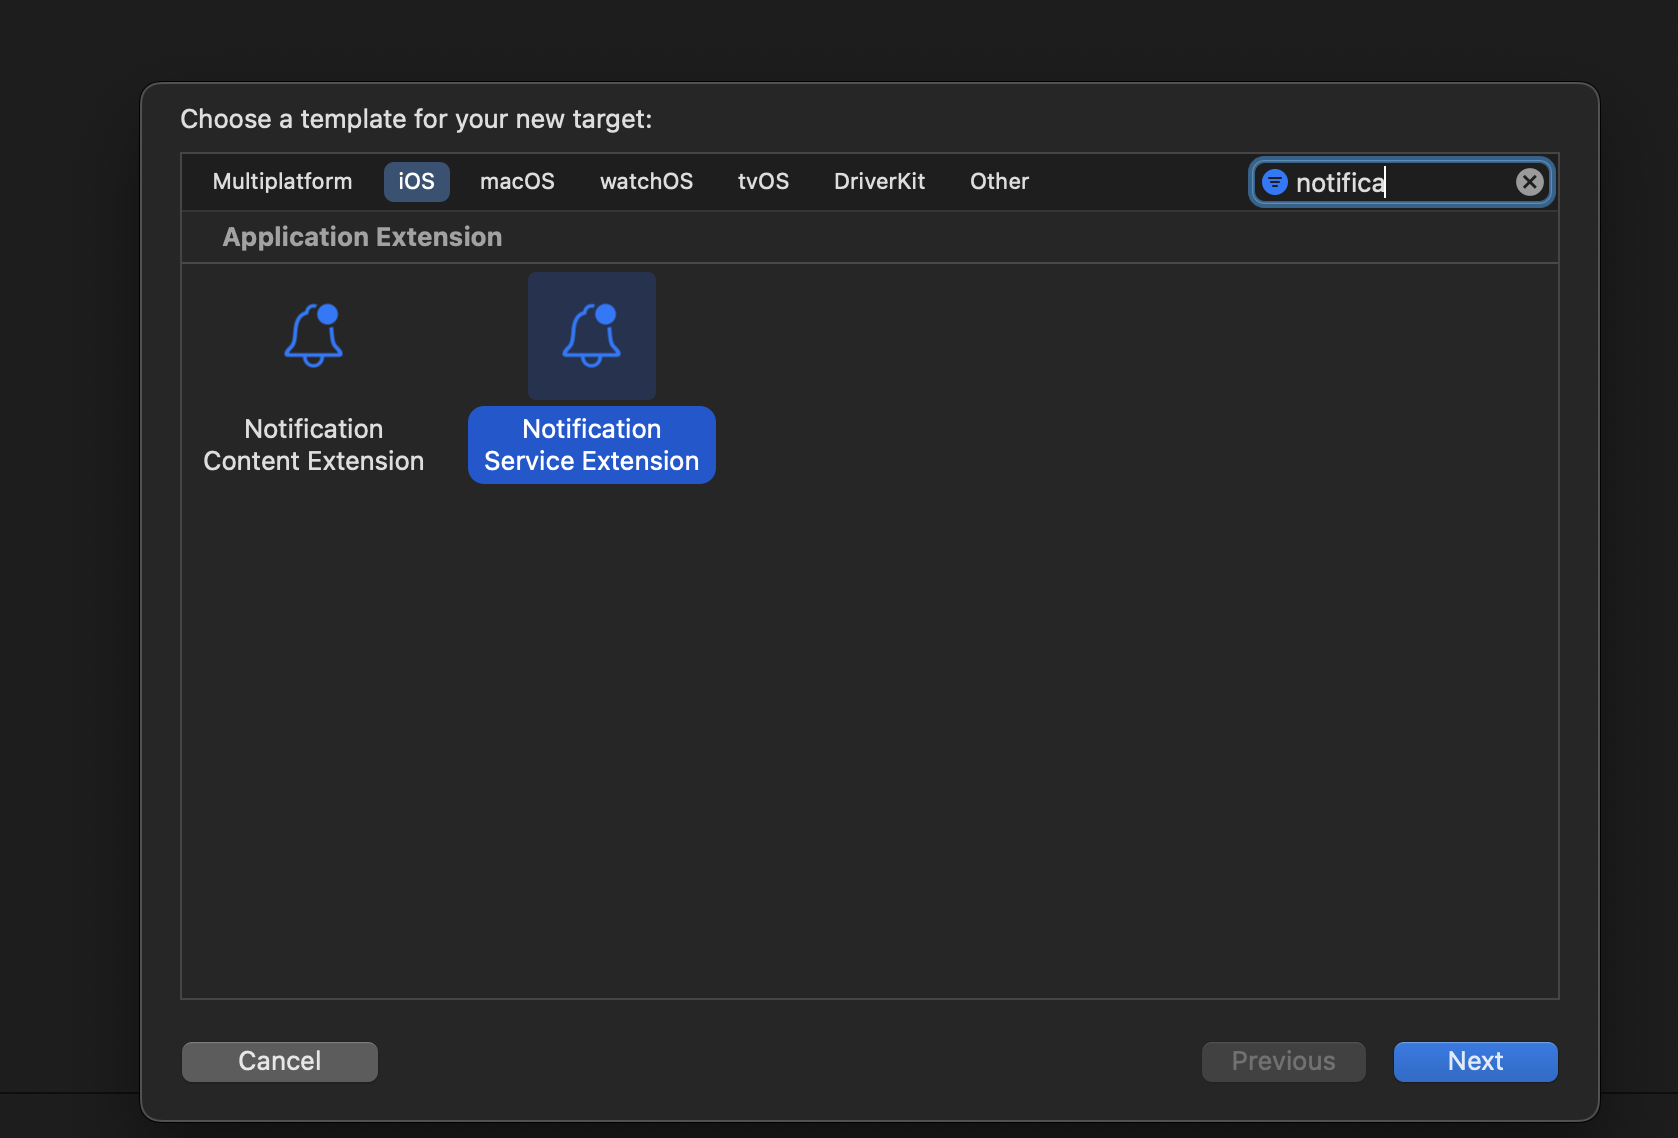 After clicking on `Finish`, a folder will be created with your given product name. Inside that there will be **`NotificationService.swift`** file like below.
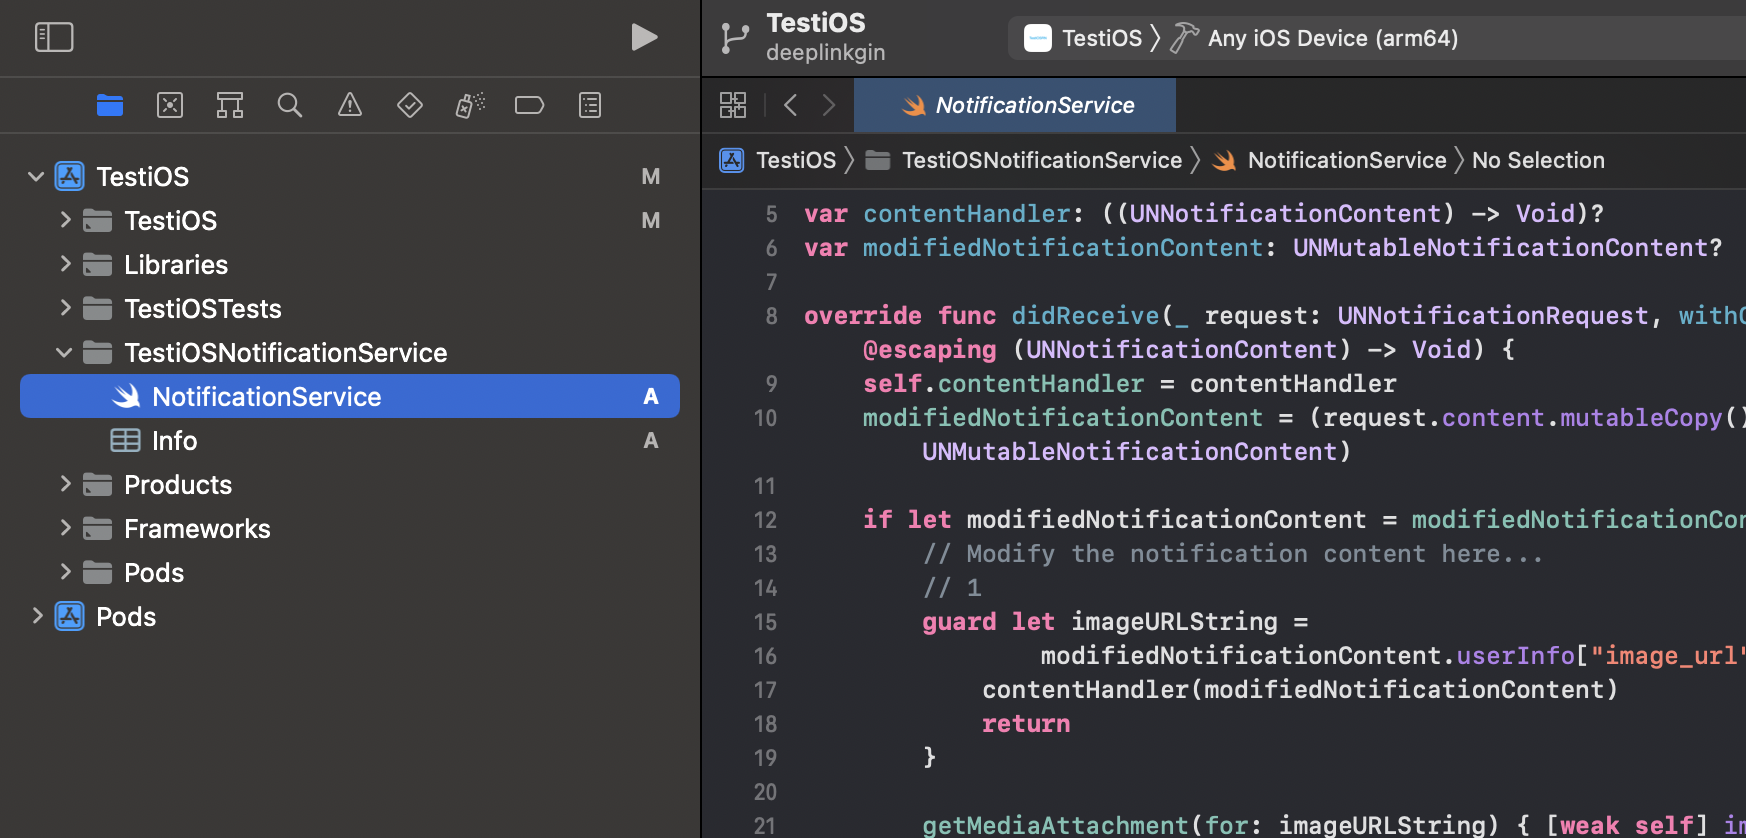 In your project **`podFile`** add following snippet. Replace `` with the name given in step 3. After that, run `pod install`.
```yaml PodFile theme={"system"}
target '' do
use_frameworks!
pod 'SuprsendCore'
pod 'SuprSendSdk'
end
```
In your project **`podFile`** add following snippet. Replace `` with the name given in step 3. After that, run `pod install`.
```yaml PodFile theme={"system"}
target '' do
use_frameworks!
pod 'SuprsendCore'
pod 'SuprSendSdk'
end
```
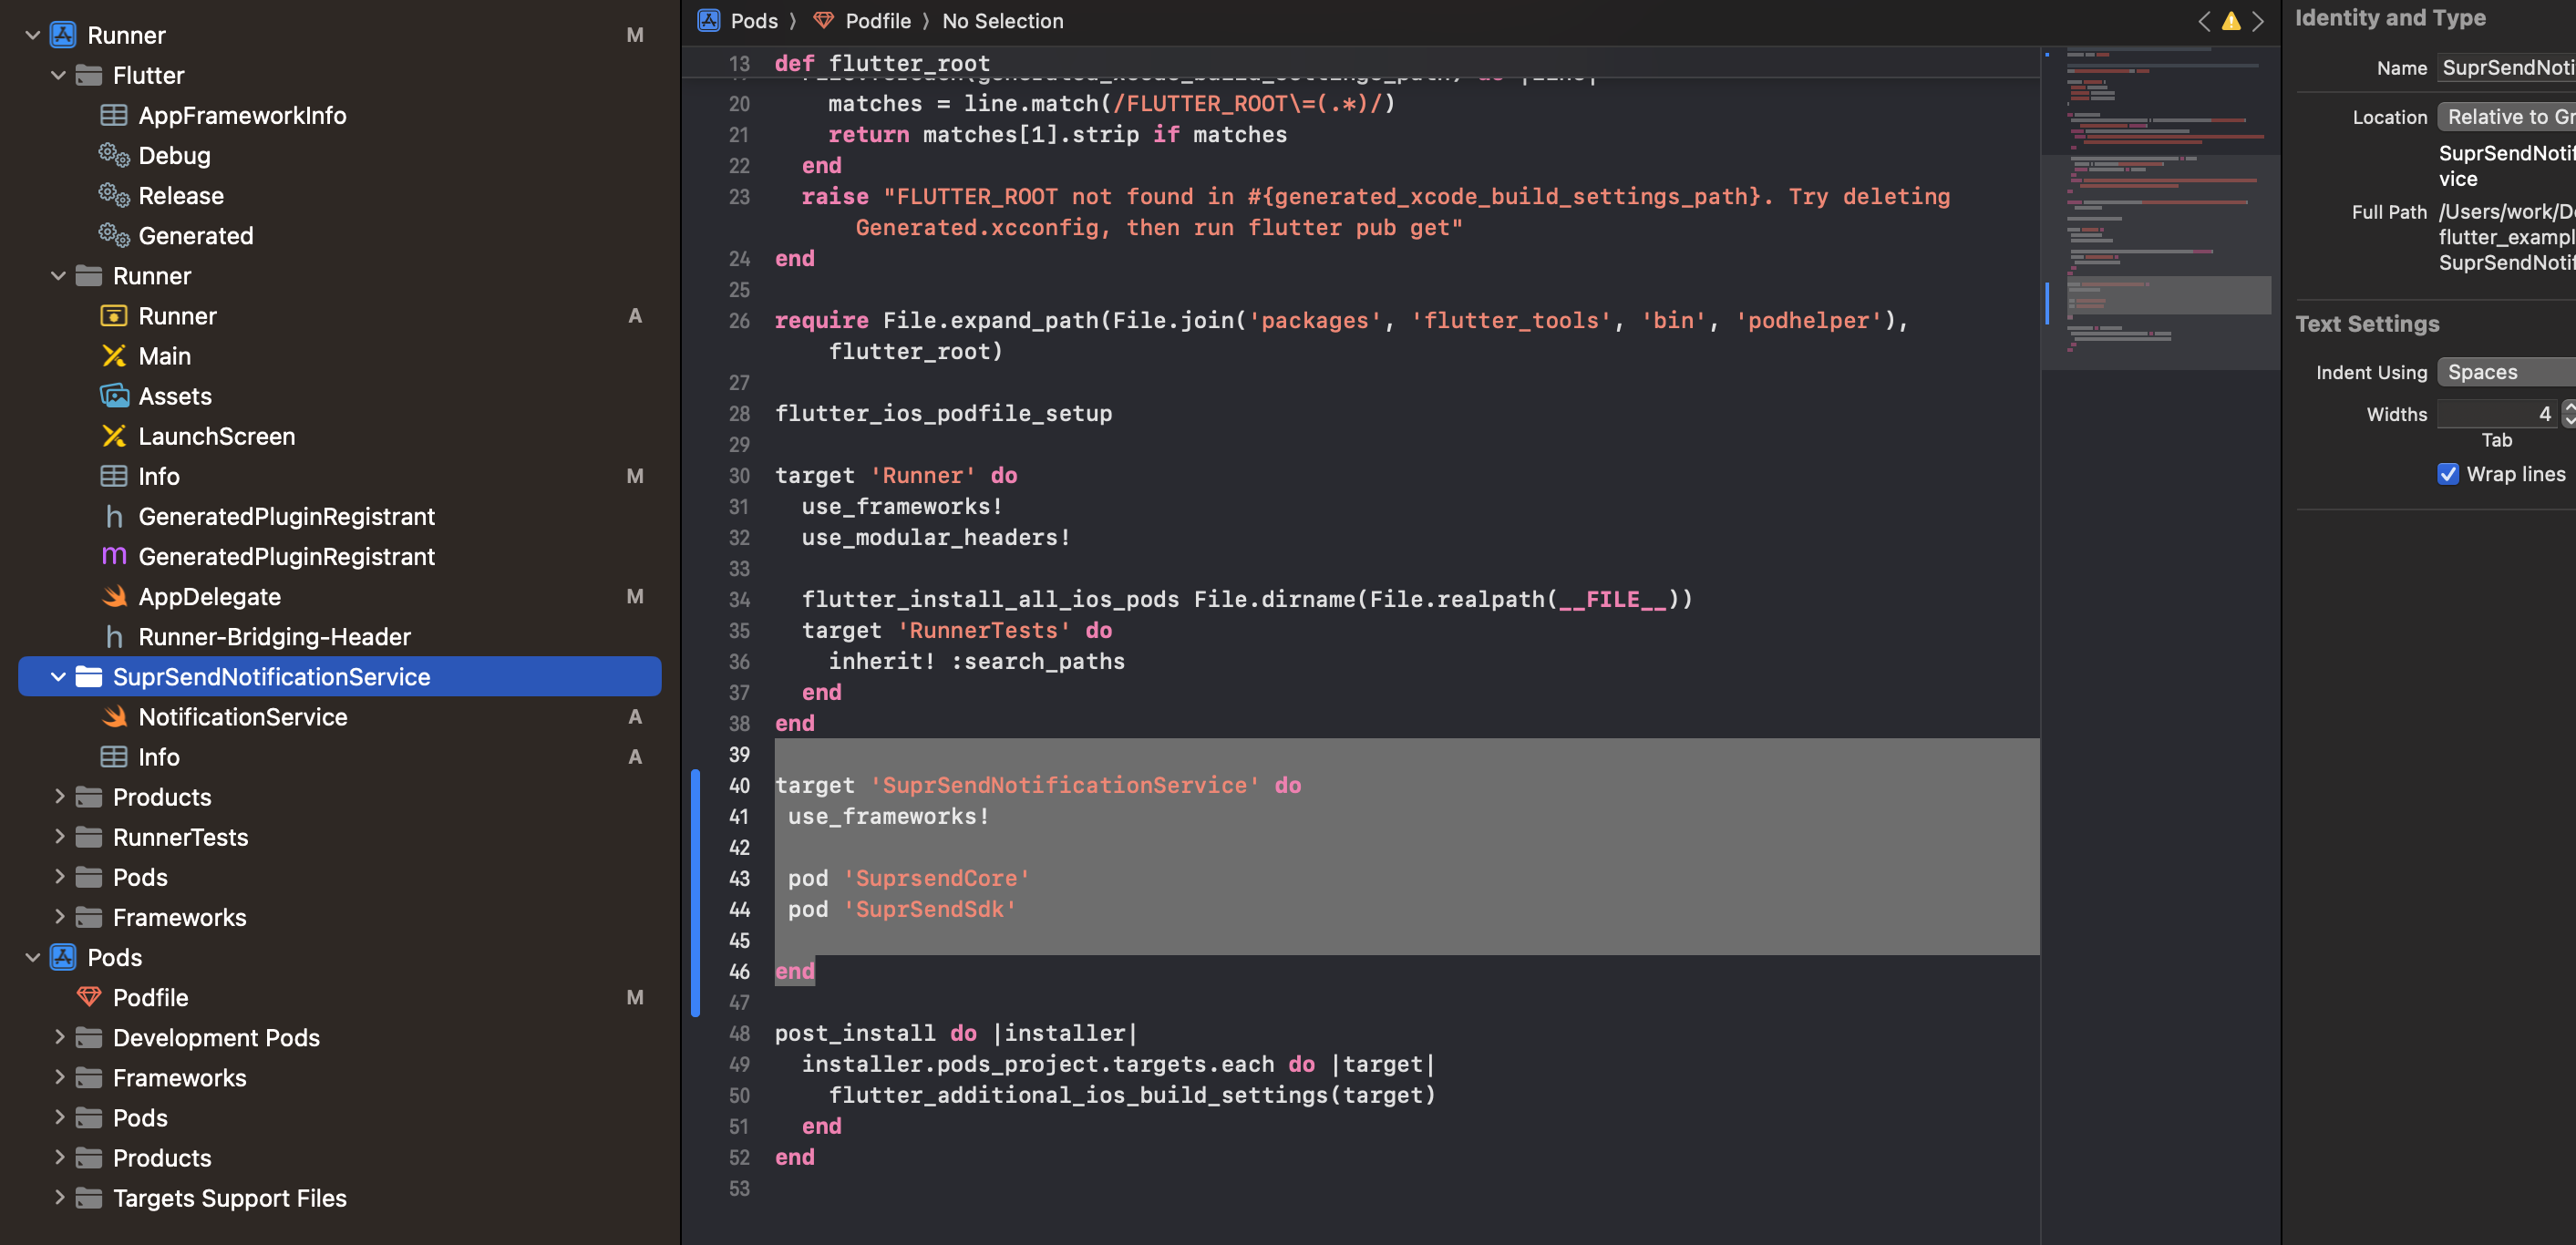 Replace the content in **`NotificationService.swift`** file with below code. In this snippet on line 11, 12 replace values with your workspace key and workspace secret.
```swift NotificationService.swift theme={"system"}
import UserNotifications
import UIKit
import SuprSendSdk
class NotificationService: UNNotificationServiceExtension {
var contentHandler: ((UNNotificationContent) -> Void)?
var modifiedNotificationContent: UNMutableNotificationContent?
private func track(request: UNNotificationRequest, withContentHandler contentHandler: @escaping (UNNotificationContent) -> Void) {
let suprSendConfiguration = SuprSendSDKConfiguration(
withKey: "your workspace key",
secret: "your workspace secret"
)
SuprSend.shared.configureWith(configuration: suprSendConfiguration , launchOptions: [:])
SuprSend.shared.didReceive(request, withContentHandler: contentHandler)
}
override func didReceive(_ request: UNNotificationRequest, withContentHandler contentHandler: @escaping (UNNotificationContent) -> Void) {
self.contentHandler = contentHandler
modifiedNotificationContent = (request.content.mutableCopy() as? UNMutableNotificationContent)
track(request: request, withContentHandler: contentHandler)
if let modifiedNotificationContent = modifiedNotificationContent {
// Modify the notification content here...
// 1
guard let imageURLString =
modifiedNotificationContent.userInfo["image_url"] as? String else {
contentHandler(modifiedNotificationContent)
return
}
getMediaAttachment(for: imageURLString) { [weak self] image in
guard let self = self, let image = image, let fileURL = self.saveImageAttachment(
image: image,
forIdentifier: "attachment.png")
else {
contentHandler(modifiedNotificationContent)
return
}
let imageAttachment = try? UNNotificationAttachment(
identifier: "image",
url: fileURL,
options: nil)
if let imageAttachment = imageAttachment {
modifiedNotificationContent.attachments = [imageAttachment]
}
contentHandler(modifiedNotificationContent)
}
}
}
override func serviceExtensionTimeWillExpire() {
// Called just before the extension will be terminated by the system.
// Use this as an opportunity to deliver your "best attempt" at modified content, otherwise the original push payload will be used.
if let contentHandler = contentHandler, let bestAttemptContent = modifiedNotificationContent {
contentHandler(bestAttemptContent)
}
}
}
extension NotificationService {
private func saveImageAttachment(image: UIImage, forIdentifier identifier: String
) -> URL? {
let tempDirectory = URL(fileURLWithPath: NSTemporaryDirectory())
let directoryPath = tempDirectory.appendingPathComponent(
ProcessInfo.processInfo.globallyUniqueString,
isDirectory: true)
do {
try FileManager.default.createDirectory(
at: directoryPath,
withIntermediateDirectories: true,
attributes: nil)
let fileURL = directoryPath.appendingPathComponent(identifier)
guard let imageData = image.pngData() else {
return nil
}
try imageData.write(to: fileURL)
return fileURL
} catch {
return nil
}
}
private func getMediaAttachment(for urlString: String, completion: @escaping (UIImage?) -> Void
) {
// 1
guard let url = URL(string: urlString) else {
completion(nil)
return
}
let task = URLSession.shared.dataTask(with: url) { data, response, error in
if error != nil {
completion(nil)
return
}
guard let data = data else {
completion(nil)
return
}
guard let image = UIImage(data: data) else {
completion(nil)
return
}
completion(image)
}
task.resume()
}
}
```
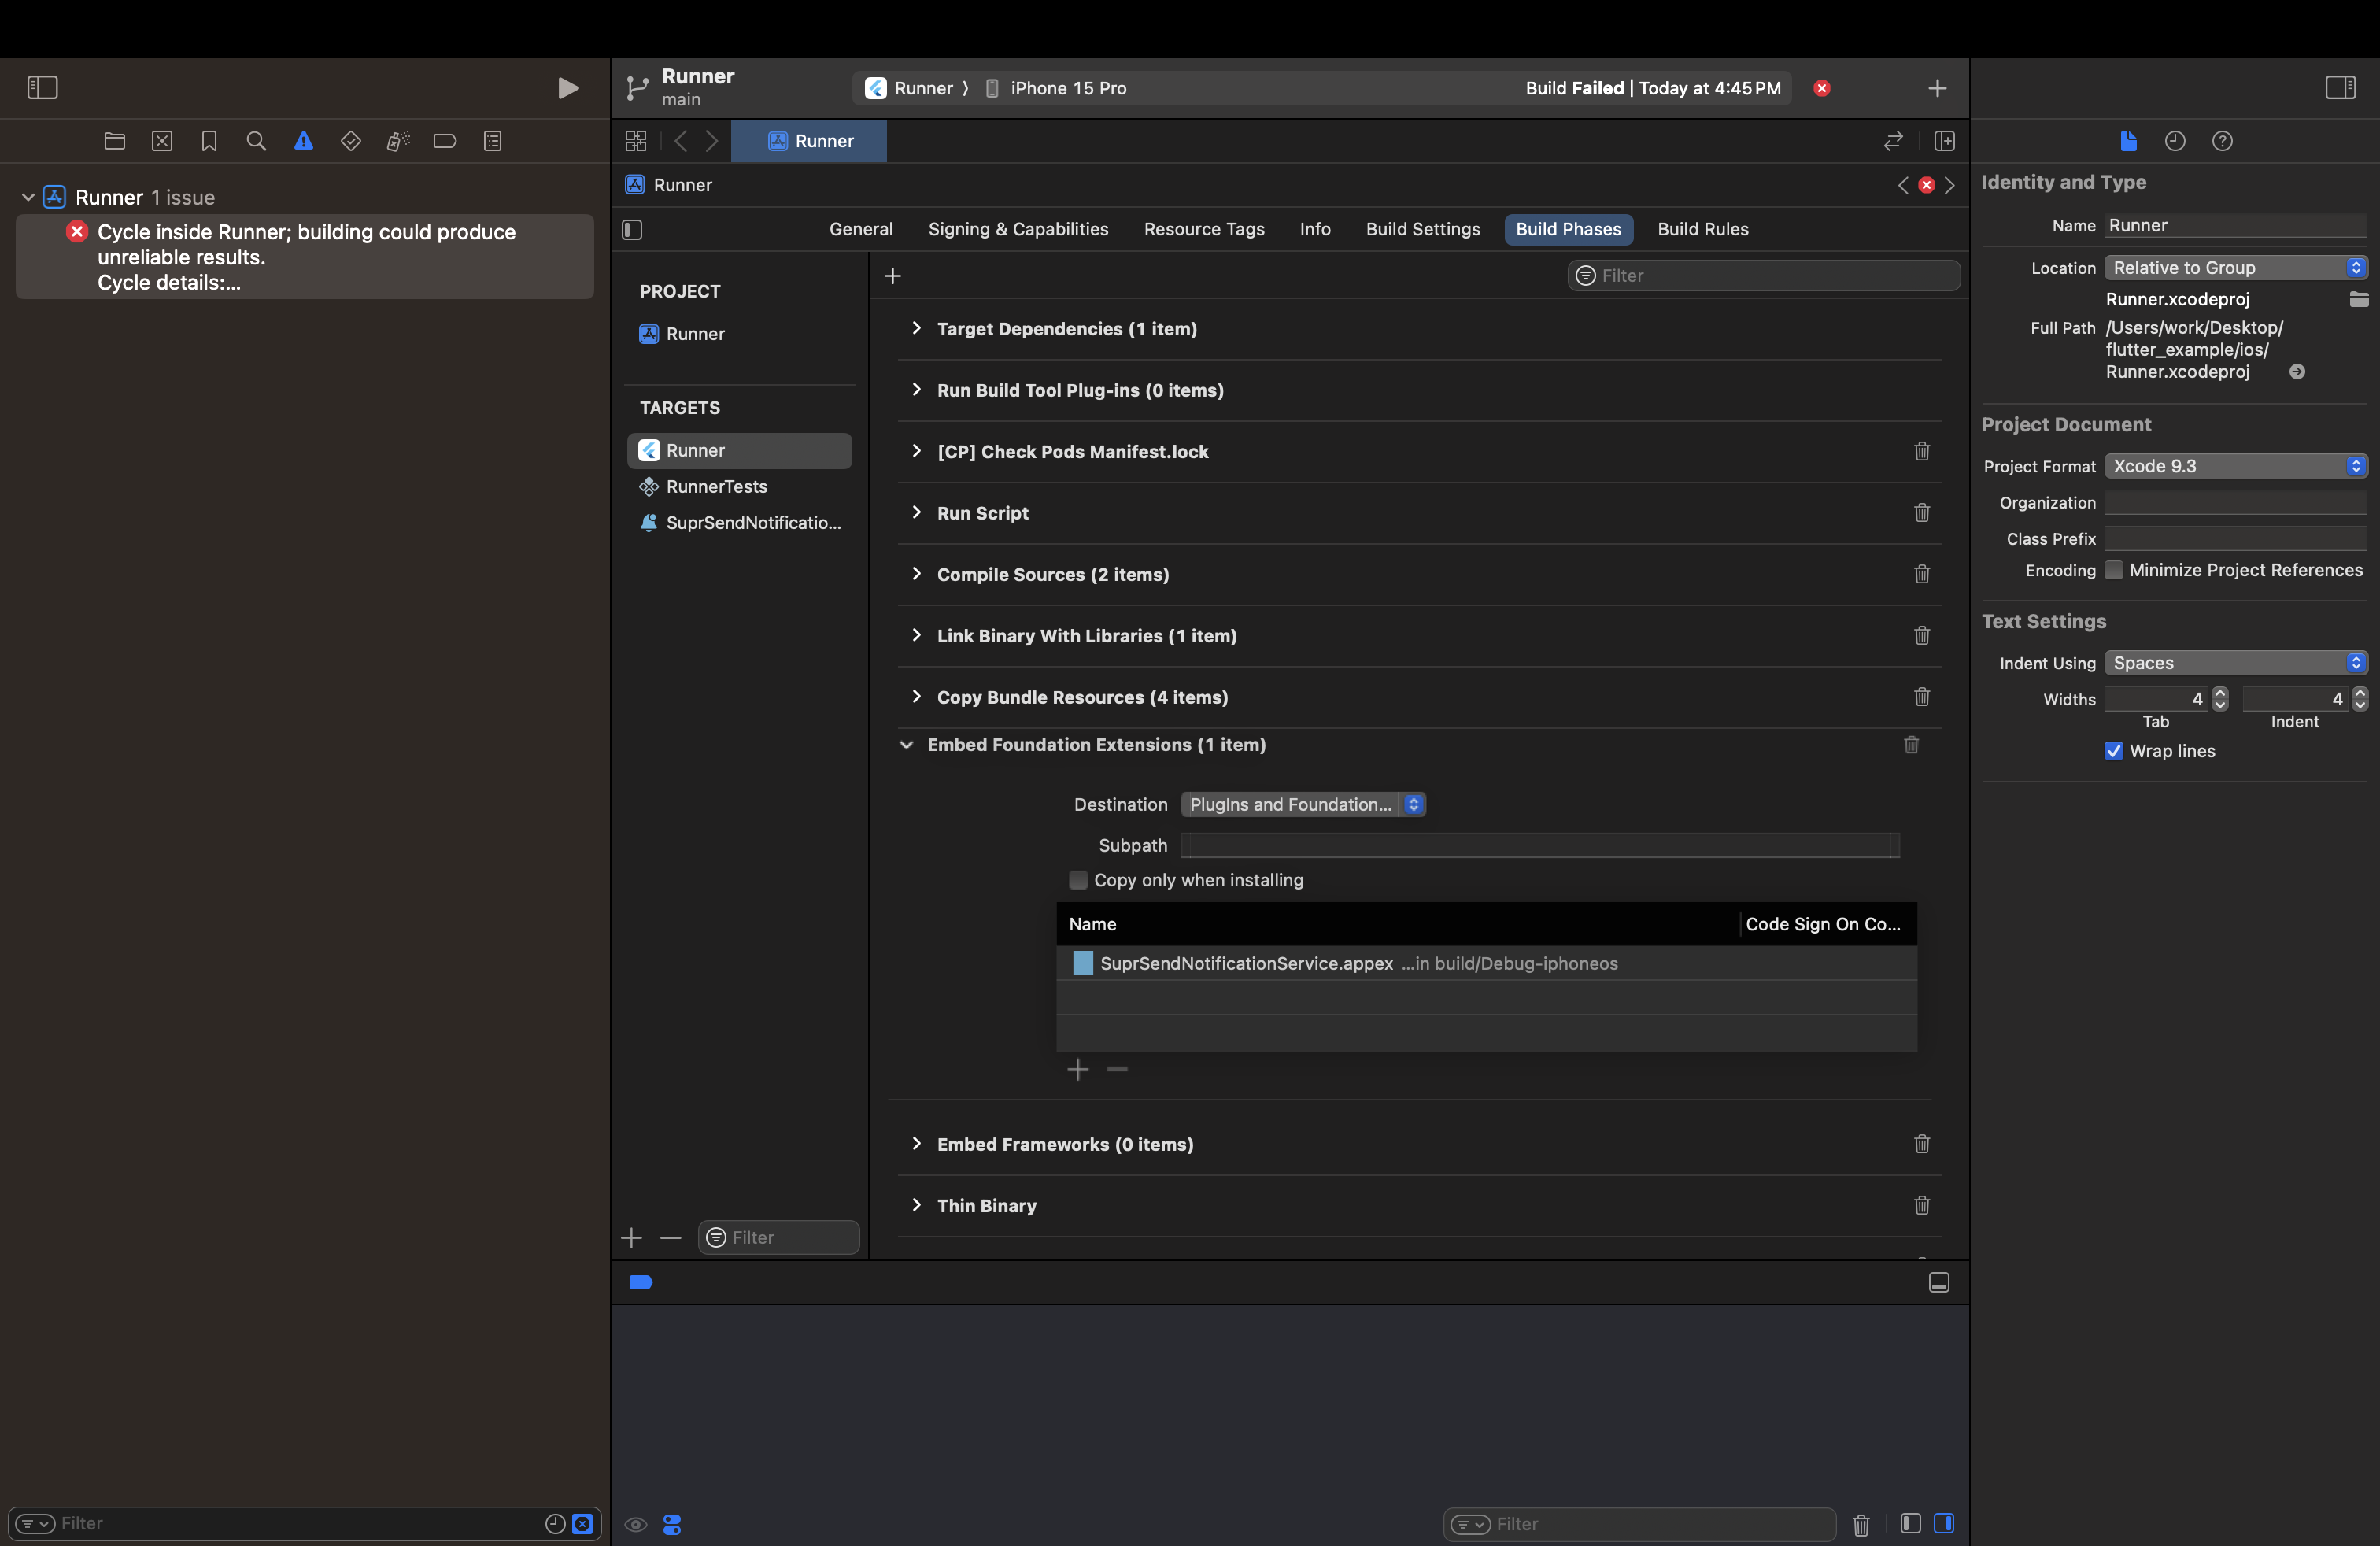
Runner Target inside Build Phases, drag **`Embedded Foundation Extensions`** section and drop it below the**`Copy Bundle Resources`** section like in image.
Replace the content in **`NotificationService.swift`** file with below code. In this snippet on line 11, 12 replace values with your workspace key and workspace secret.
```swift NotificationService.swift theme={"system"}
import UserNotifications
import UIKit
import SuprSendSdk
class NotificationService: UNNotificationServiceExtension {
var contentHandler: ((UNNotificationContent) -> Void)?
var modifiedNotificationContent: UNMutableNotificationContent?
private func track(request: UNNotificationRequest, withContentHandler contentHandler: @escaping (UNNotificationContent) -> Void) {
let suprSendConfiguration = SuprSendSDKConfiguration(
withKey: "your workspace key",
secret: "your workspace secret"
)
SuprSend.shared.configureWith(configuration: suprSendConfiguration , launchOptions: [:])
SuprSend.shared.didReceive(request, withContentHandler: contentHandler)
}
override func didReceive(_ request: UNNotificationRequest, withContentHandler contentHandler: @escaping (UNNotificationContent) -> Void) {
self.contentHandler = contentHandler
modifiedNotificationContent = (request.content.mutableCopy() as? UNMutableNotificationContent)
track(request: request, withContentHandler: contentHandler)
if let modifiedNotificationContent = modifiedNotificationContent {
// Modify the notification content here...
// 1
guard let imageURLString =
modifiedNotificationContent.userInfo["image_url"] as? String else {
contentHandler(modifiedNotificationContent)
return
}
getMediaAttachment(for: imageURLString) { [weak self] image in
guard let self = self, let image = image, let fileURL = self.saveImageAttachment(
image: image,
forIdentifier: "attachment.png")
else {
contentHandler(modifiedNotificationContent)
return
}
let imageAttachment = try? UNNotificationAttachment(
identifier: "image",
url: fileURL,
options: nil)
if let imageAttachment = imageAttachment {
modifiedNotificationContent.attachments = [imageAttachment]
}
contentHandler(modifiedNotificationContent)
}
}
}
override func serviceExtensionTimeWillExpire() {
// Called just before the extension will be terminated by the system.
// Use this as an opportunity to deliver your "best attempt" at modified content, otherwise the original push payload will be used.
if let contentHandler = contentHandler, let bestAttemptContent = modifiedNotificationContent {
contentHandler(bestAttemptContent)
}
}
}
extension NotificationService {
private func saveImageAttachment(image: UIImage, forIdentifier identifier: String
) -> URL? {
let tempDirectory = URL(fileURLWithPath: NSTemporaryDirectory())
let directoryPath = tempDirectory.appendingPathComponent(
ProcessInfo.processInfo.globallyUniqueString,
isDirectory: true)
do {
try FileManager.default.createDirectory(
at: directoryPath,
withIntermediateDirectories: true,
attributes: nil)
let fileURL = directoryPath.appendingPathComponent(identifier)
guard let imageData = image.pngData() else {
return nil
}
try imageData.write(to: fileURL)
return fileURL
} catch {
return nil
}
}
private func getMediaAttachment(for urlString: String, completion: @escaping (UIImage?) -> Void
) {
// 1
guard let url = URL(string: urlString) else {
completion(nil)
return
}
let task = URLSession.shared.dataTask(with: url) { data, response, error in
if error != nil {
completion(nil)
return
}
guard let data = data else {
completion(nil)
return
}
guard let image = UIImage(data: data) else {
completion(nil)
return
}
completion(image)
}
task.resume()
}
}
```
Runner Target inside Build Phases, drag **`Embedded Foundation Extensions`** section and drop it below the**`Copy Bundle Resources`** section like in image.
 You are now all set to send push notifications. All you have to do is add iOS vendor configuration on SuprSend dashboard and your push notifications will be configured. Please refer [vendor integration guide](/docs/ios-push-vendor-integration) to integrate your apns push service.
***
You are now all set to send push notifications. All you have to do is add iOS vendor configuration on SuprSend dashboard and your push notifications will be configured. Please refer [vendor integration guide](/docs/ios-push-vendor-integration) to integrate your apns push service.
***