> ## Documentation Index
> Fetch the complete documentation index at: https://docs.suprsend.com/llms.txt
> Use this file to discover all available pages before exploring further.
# Inbox
> Quick start guide to send In-App Inbox notifications with SuprSend, covering channel setup, SDK install, user subscribe, template design, and workflow trigger.
### Create SuprSend account
Simply [signup](https://auth.suprsend.com/sign-up) on SuprSend to create your account. If you already have your company account setup, ask your admin to invite you to the team.
### See a live demo of Inbox Implementation in playground
You'll also get the sample code for all types of Inbox views in the [GitHub repo](https://inbox-playground.suprsend.com/) linked in the playground.
### Example apps
| Language | Example App |
| ------------------- | ------------------------------------------------------ |
| React drop-in Inbox | [Task Management App](/docs/task-management-app-guide) |
### Start testing in Sandbox workspace
Your SuprSend account includes three default workspaces: Sandbox, Staging, and Production. You can switch between them from the top navigation bar, and create additional workspaces if needed.
1. **Sandbox**
* **Demo Workspace** with pre-configured vendors for quick exploration and POC.
* Includes a sample workflow, a sample user with your registered email and pre-configured channels for quick testing.
* Limitation: Available for a trial period.
2. **Staging**
* **Development workspace** used to test notification flows before pushing it to production.
* You can enable [Test Mode](/docs/developer/test-mode) to safely test notification flows without delivering to real users. In Test Mode, notifications are delivered only to designated internal testers. You can also set up a catch-all channel to redirect all notifications intended for non-test users.
3. **Production**
* **Live workspace** for syncing your actual product users and running production workflows.
* We do not recommend making changes directly in your production workspace as it might disrupt your live notifications.
### Create a workflow
Workflow houses the automation logic of your notification. Each workflow starts with a trigger, processes the defined logic, and sends one or more messages to the end user. You can create a workflow from SuprSend dashboard by clicking on **`+ Create workflow`** button on the [workflows tab](https://app.suprsend.com/en/sandbox/workflows).
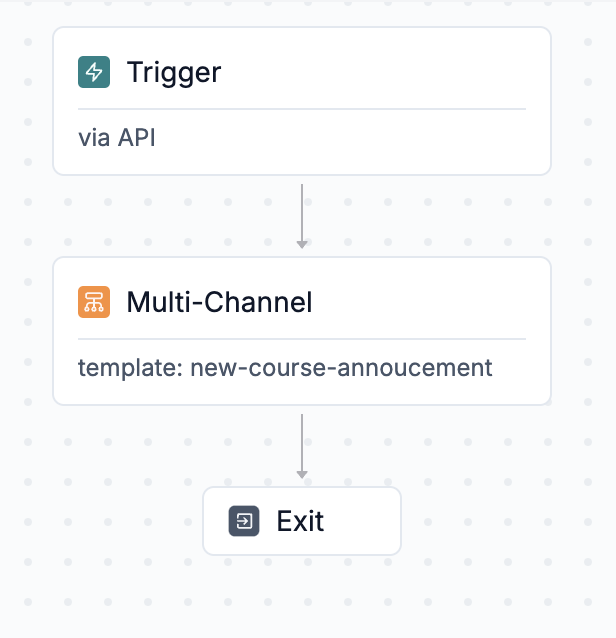 To design a workflow, you need:
1. **A Trigger point**- Trigger initiates the workflow. You can initiate it
* [Using the direct workflow API](/docs/trigger-workflow#triggering-workflow-via-api), where you can include recipient channel information, preferences, and actor details directly in the trigger.
* [By emitting an event](/docs/trigger-workflow#event-based-trigger): You can trigger these events from your frontend application or from your backend systems, depending on the use case. (note: the recipient needs to be pre-created for event-based triggers).
2. **Delivery node**- Delivery Nodes represent the channels where users will receive notifications. You can use:
* [multi-channel](/docs/delivery-multi-channel) nodes, to send messages across multiple channels,
* [smart channel routing](/docs/smart-delivery), to notify users sequentially rather than bombarding them on all channels at once (though it’s generally better to use).
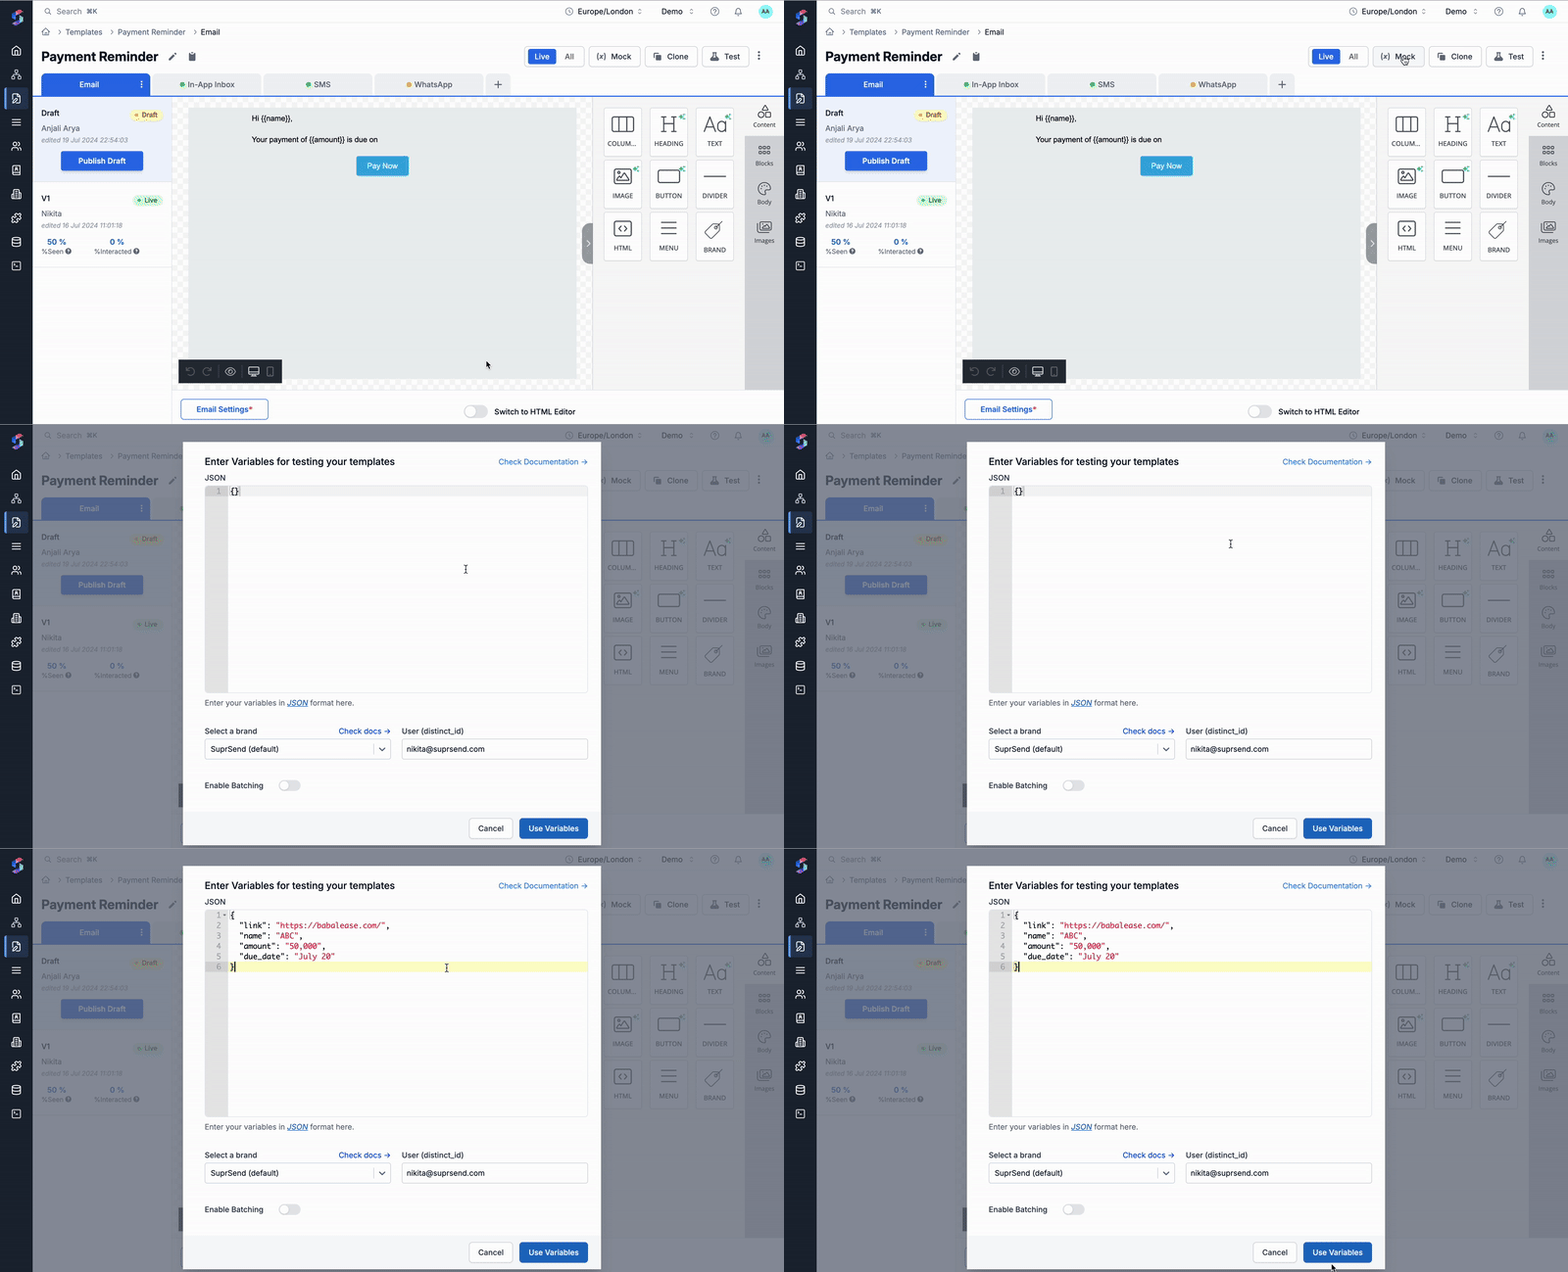
* Template in delivery node contains the content of the notification. You can add both static and dynamic content sourced from user properties or trigger payloads. We use handlebars as our templating language. You can add dynamic content as `{{var}}`.
Add trigger data in the **mock** to get variable auto-suggestions during editing.
Ensure to publish the template before using it in a workflow.
[Learn more about how to design In-app Inbox template here](/docs/in-app-inbox-template).
To design a workflow, you need:
1. **A Trigger point**- Trigger initiates the workflow. You can initiate it
* [Using the direct workflow API](/docs/trigger-workflow#triggering-workflow-via-api), where you can include recipient channel information, preferences, and actor details directly in the trigger.
* [By emitting an event](/docs/trigger-workflow#event-based-trigger): You can trigger these events from your frontend application or from your backend systems, depending on the use case. (note: the recipient needs to be pre-created for event-based triggers).
2. **Delivery node**- Delivery Nodes represent the channels where users will receive notifications. You can use:
* [multi-channel](/docs/delivery-multi-channel) nodes, to send messages across multiple channels,
* [smart channel routing](/docs/smart-delivery), to notify users sequentially rather than bombarding them on all channels at once (though it’s generally better to use).
* Template in delivery node contains the content of the notification. You can add both static and dynamic content sourced from user properties or trigger payloads. We use handlebars as our templating language. You can add dynamic content as `{{var}}`.
Add trigger data in the **mock** to get variable auto-suggestions during editing.
Ensure to publish the template before using it in a workflow.
[Learn more about how to design In-app Inbox template here](/docs/in-app-inbox-template).
 3. **Functional nodes (Optional)**- These are the logic nodes in the workflow. You can use it to add delay, batch multiple notifications in a summary or add conditional branches in the workflow. [Check out all workflow nodes here.](/docs/delay)
### Trigger the Workflow
You can trigger a test workflow directly from dashboard by clicking on '**`Test`**' button in your workflow editor or **"Commit"** changes to trigger it from your code. We follow Git like versioning for workflow changes, so you need to commit your changes to trigger new workflow via the API. You can [check all methods of triggering workflow here](/docs/trigger-workflow).
To trigger a workflow, you need:
1. **Recipient**- End user who would be notified in the workflow run. Recipient is uniquely identified by `distinct_id` within SuprSend and must have the relevant channel identity set in their profile. You can define recipient inline in case of API based trigger or [create user profile](/docs/users#creating-user-profile-on-suprsend) first for event based trigger.In Sandbox workspace, a sample user with your registered email ID is pre-created for testing. You can always add more users or edit existing user profile from subscriber page on UI.
2. **Data or Event Properties**- This will be used to render dynamic content in the template (added in template mock) or variables in the workflow configuration.
We'll be triggering the workflow with direct API trigger for quick testing. You can [check all trigger methods here.](/docs/trigger-workflow)
3. **Functional nodes (Optional)**- These are the logic nodes in the workflow. You can use it to add delay, batch multiple notifications in a summary or add conditional branches in the workflow. [Check out all workflow nodes here.](/docs/delay)
### Trigger the Workflow
You can trigger a test workflow directly from dashboard by clicking on '**`Test`**' button in your workflow editor or **"Commit"** changes to trigger it from your code. We follow Git like versioning for workflow changes, so you need to commit your changes to trigger new workflow via the API. You can [check all methods of triggering workflow here](/docs/trigger-workflow).
To trigger a workflow, you need:
1. **Recipient**- End user who would be notified in the workflow run. Recipient is uniquely identified by `distinct_id` within SuprSend and must have the relevant channel identity set in their profile. You can define recipient inline in case of API based trigger or [create user profile](/docs/users#creating-user-profile-on-suprsend) first for event based trigger.In Sandbox workspace, a sample user with your registered email ID is pre-created for testing. You can always add more users or edit existing user profile from subscriber page on UI.
2. **Data or Event Properties**- This will be used to render dynamic content in the template (added in template mock) or variables in the workflow configuration.
We'll be triggering the workflow with direct API trigger for quick testing. You can [check all trigger methods here.](/docs/trigger-workflow)
**Sample Payload for API based trigger:**
You can get workspace key, secret or API Key for trigger from [Settings tab -> API Keys ](https://app.suprsend.com/en/sandbox/developers/api-keys). Inbox channel is automatically updated in user profile on user creation. So, you won't need to pass Inbox channel in your trigger call.
```curl curl theme={"system"}
curl --request POST \
--url https://hub.suprsend.com/trigger/ \
--header 'Authorization: Bearer __api_key__' \
--header 'accept: application/json' \
--header 'content-type: application/json' \
--data '
{
"workflow": "_workflow_slug_",
"recipients": [
{
"distinct_id": "0gxxx9f14-xxxx-23c5-1902-xxxcb6912ab09",
"name":"recipient_1"
}
],
"data":{
"first_name": "User",
"invoice_amount": "$5000",
"invoice_id":"Invoice-1234"
}
}
'
```
```python python theme={"system"}
from suprsend import Event
from suprsend import WorkflowTriggerRequest
supr_client = Suprsend("_workspace_key_", "_workspace_secret_")
# Prepare workflow payload
w1 = WorkflowTriggerRequest(
body={
"workflow": "_workflow_slug_",
"recipients": [
{
"distinct_id": "0gxxx9f14-xxxx-23c5-1902-xxxcb6912ab09",
"name":"recipient_1"
}
],
"data":{
"first_name": "User",
"invoice_amount": "$5000",
"invoice_id":"Invoice-1234"
}
},
idempotency_key = "_unique_identifier_of_the_request_"
)
# Trigger workflow
response = supr_client.workflows.trigger(w1)
print(response)
```
```javascript node theme={"system"}
const {Suprsend, WorkflowTriggerRequest} = require("@suprsend/node-sdk");
const supr_client = new Suprsend("_workspace_key_", "_workspace_secret_");
// Prepare workflow payload
const body = {
"workflow": "_workflow_slug_",
"recipients": [
{
"distinct_id": "0gxxx9f14-xxxx-23c5-1902-xxxcb6912ab09",
"name":"recipient_1"
}
],
"data":{
"first_name": "User",
"invoice_amount": "$5000",
"invoice_id":"Invoice-1234"
}
}
const w1 = new WorkflowTriggerRequest(body, {
idempotency_key: "_unique_identifier_of_the_request_"})
// Trigger workflow
const response = supr_client.workflows.trigger(w1);
response.then(res => console.log("response", res));
```
```go go theme={"system"}
package main
import (
"log"
suprsend "github.com/suprsend/suprsend-go"
)
// Initialize SDK
func main() {
suprClient, err := suprsend.NewClient("_workspace_key_", "_workspace_secret_")
if err != nil {
log.Println(err)
}
_ = suprClient
triggerWorkflowAPI(suprClient)
}
func triggerWorkflowAPI(suprClient *suprsend.Client) {
// Create WorkflowRequest body
wfReqBody := map[string]interface{}{
"workflow": "_workflow_slug_",
"recipients": []map[string]interface{}{
{
"distinct_id": "0gxxx9f14-xxxx-23c5-1902-xxxcb6912ab09",
"name":"recipient_1",
},
},
// # data can be any json / serializable python-dictionary
"data": map[string]interface{}{
"first_name": "User",
"invoice_amount": "$5000",
"invoice_id":"Invoice-1234",
"spend_amount": "$10",
},
}
w1 := &suprsend.WorkflowTriggerRequest{
Body: wfReqBody,
IdempotencyKey: "_unique_identifier_of_the_request_",
}
// Call Workflows.Trigger to send request to Suprsend
resp, err := suprClient.Workflows.Trigger(w1)
if err != nil {
log.Fatalln(err)
}
log.Println(resp)
}
```
```java java theme={"system"}
package test;
import java.io.IOException;
import java.io.UnsupportedEncodingException;
import java.util.Arrays;
import org.json.JSONArray;
import org.json.JSONObject;
import suprsend.Suprsend;
import suprsend.SuprsendException;
import suprsend.WorkflowTriggerRequest;
public class Workflow {
public static void main(String[] args) throws Exception {
WorkflowTrigger();
}
private static void WorkflowTrigger() throws SuprsendException, UnsupportedEncodingException {
Suprsend suprClient = Helper.getClientInstance();
// payload
JSONObject body = getWorkflowBody();
String idempotencyKey = "_unique_request_identifier";
WorkflowTriggerRequest wf = new WorkflowTriggerRequest(body, idempotencyKey, tenantId);
//
JSONObject resp = suprClient.workflows.trigger(wf);
System.out.println(resp);
}
private static JSONObject getWorkflowBody() {
JSONObject body = new JSONObject()
.put("workflow", "__workflow_slug__")
.put("recipients", new JSONArray()
.put(new JSONObject()
.put("distinct_id", "0gxxx9f14-xxxx-23c5-1902-xxxcb6912ab09")
.put("name", "recipient_1")
))
.put("data", new JSONObject()
.put("first_name", "User")
.put("invoice_amount", "$5000")
.put("invoice_id", "Invoice-1234")
);
return body;
}
}
```
### Check notification logs
You can view the status of any sent notification under the Logs tab. Logs are organized in the following order:
* **Requests**: Captures all API/SDK requests sent to SuprSend from your backend or frontend. You can see the input payload and request response here.
* **Executions**: Workflow executions are logged here. You can click on a log entry to open the step-by-step workflow debugger
* **Messages**: All delivery nodes (including webhooks) are tracked here along with their message status (delivered, seen, clicked). Message preview for delivered notifications will also be available soon.
### Integrate Inbox in your product
**For React/Web apps, install [`@suprsend/react`](https://www.npmjs.com/package/@suprsend/react)** — this is the current SDK with JWT authentication and drop-in Inbox components. The older `@suprsend/react-inbox` package (HMAC `subscriber_id`) is no longer in active development; see the [migration guide](/docs/react-migration-guide) if you're on it.
We have ready UI codes to add In-App Inbox in your web and mobile application. All you have to do is copy the code into your project and you are good to go. Here are respective codes and example apps to implement Inbox as per your tech stack.
| Language | SDK | Documentation | Example App / Code |
| ----------------------------------------------------------------------- | -------------------------- | ---------------------------------------- | ---------------------------------------------------------------------------------------------------------------------------------------------------------------------- |
| React (Web) — drop-in popover, full screen & side sheet | `@suprsend/react` | [link](/docs/react-inbox-integration) | [Task Management App](/docs/task-management-app-guide) |
| React Headless (Web) — design your own Inbox UI | `@suprsend/react-core` | [link](/docs/react-sdk-headless-feed) | [Task Management App](/docs/task-management-app-guide) |
| Angular (Web) | `@suprsend/web-inbox` | [link](/docs/web-components-integration) | [https://github.com/suprsend/angular-example](https://github.com/suprsend/angular-example) |
| Embeddable Inbox (Web) — for non-React apps like **Vue**, **Next** etc. | `@suprsend/web-inbox` | [link](/docs/web-components-integration) | [https://github.com/suprsend/suprsend-web-inbox/blob/main/index.html](https://github.com/suprsend/suprsend-web-inbox/blob/main/index.html) |
| Javascript Headless (Web) — feed methods for non-React apps | `@suprsend/web-sdk` | [link](/docs/js-inapp-feed) | — |
| React Native (Mobile App) | `@suprsend/react-headless` | [link](/docs/inbox-react-native) | [https://codesandbox.io/s/suprsend-react-headless-example-qkxobd?file=/src/App.tsx](https://codesandbox.io/s/suprsend-react-headless-example-qkxobd?file=/src/App.tsx) |
| Flutter (Mobile App) | `suprsend_flutter_sdk` | [link](/docs/inbox-flutter) | [https://github.com/suprsend/suprsend-flutter-sdk/blob/main/example/lib/main.dart](https://github.com/suprsend/suprsend-flutter-sdk/blob/main/example/lib/main.dart) |
### Push to Production
In SuprSend, each environment is isolated — workflows, users, and vendors are configured separately in testing and production workspaces. For client SDKs using JWT authentication (`@suprsend/react`, `@suprsend/web-sdk`), rotate the **signing key** in your server-side code when you move to the production workspace and regenerate user JWTs against the new key. See the [client authentication guide](/docs/client-authentication) for setup.
Follow this [go live checklist](/docs/go-live-checklist) to setup things in production once you are done testing.
***