> ## Documentation Index
> Fetch the complete documentation index at: https://docs.suprsend.com/llms.txt
> Use this file to discover all available pages before exploring further.
# Manage Categories and Preferences
> Create preference categories, sections, and sub-categories in SuprSend to organize workflows and let users manage preferences across channels.
Categories are assigned to workflows and are used to manage notification preferences in SuprSend. For detailed concepts, see [Preference Categories](/docs/notification-category).
***
## Creating sections and sub-categories
Go to [Developers → Preference categories](https://app.suprsend.com/en/staging/developers/preference-categories) and select a root-category (System, Transactional, or Promotional).
* **System** is for critical account related notifications that users can't unsubscribe from.
* **Transactional** is for notifications sent in response to user actions or transactions.
* **Promotional** is for marketing notifications sent to promote products or re-engage users to your platform.
### Creating a section
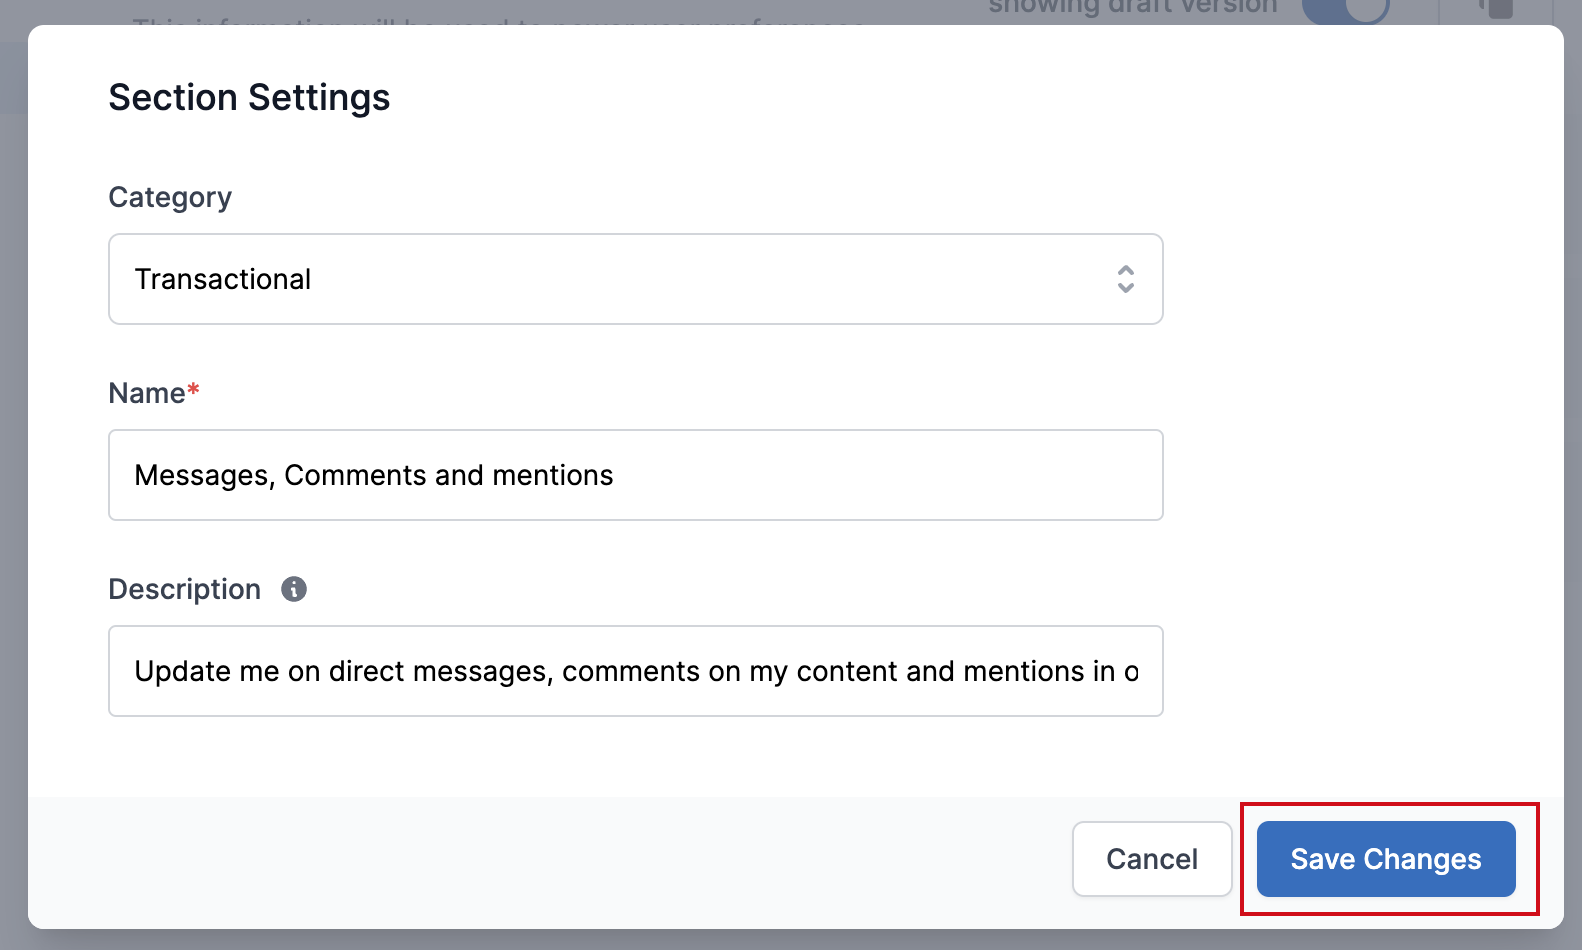
Sections are optional and help organize sub-categories on the preference page. To create a section:
1. Click `+Section`
2. Add name and description for the section
3. Click `Save Changes`
You'll see the updated section inside the category and can edit it later by clicking on the Edit button against that section.
 ### Adding sub-categories
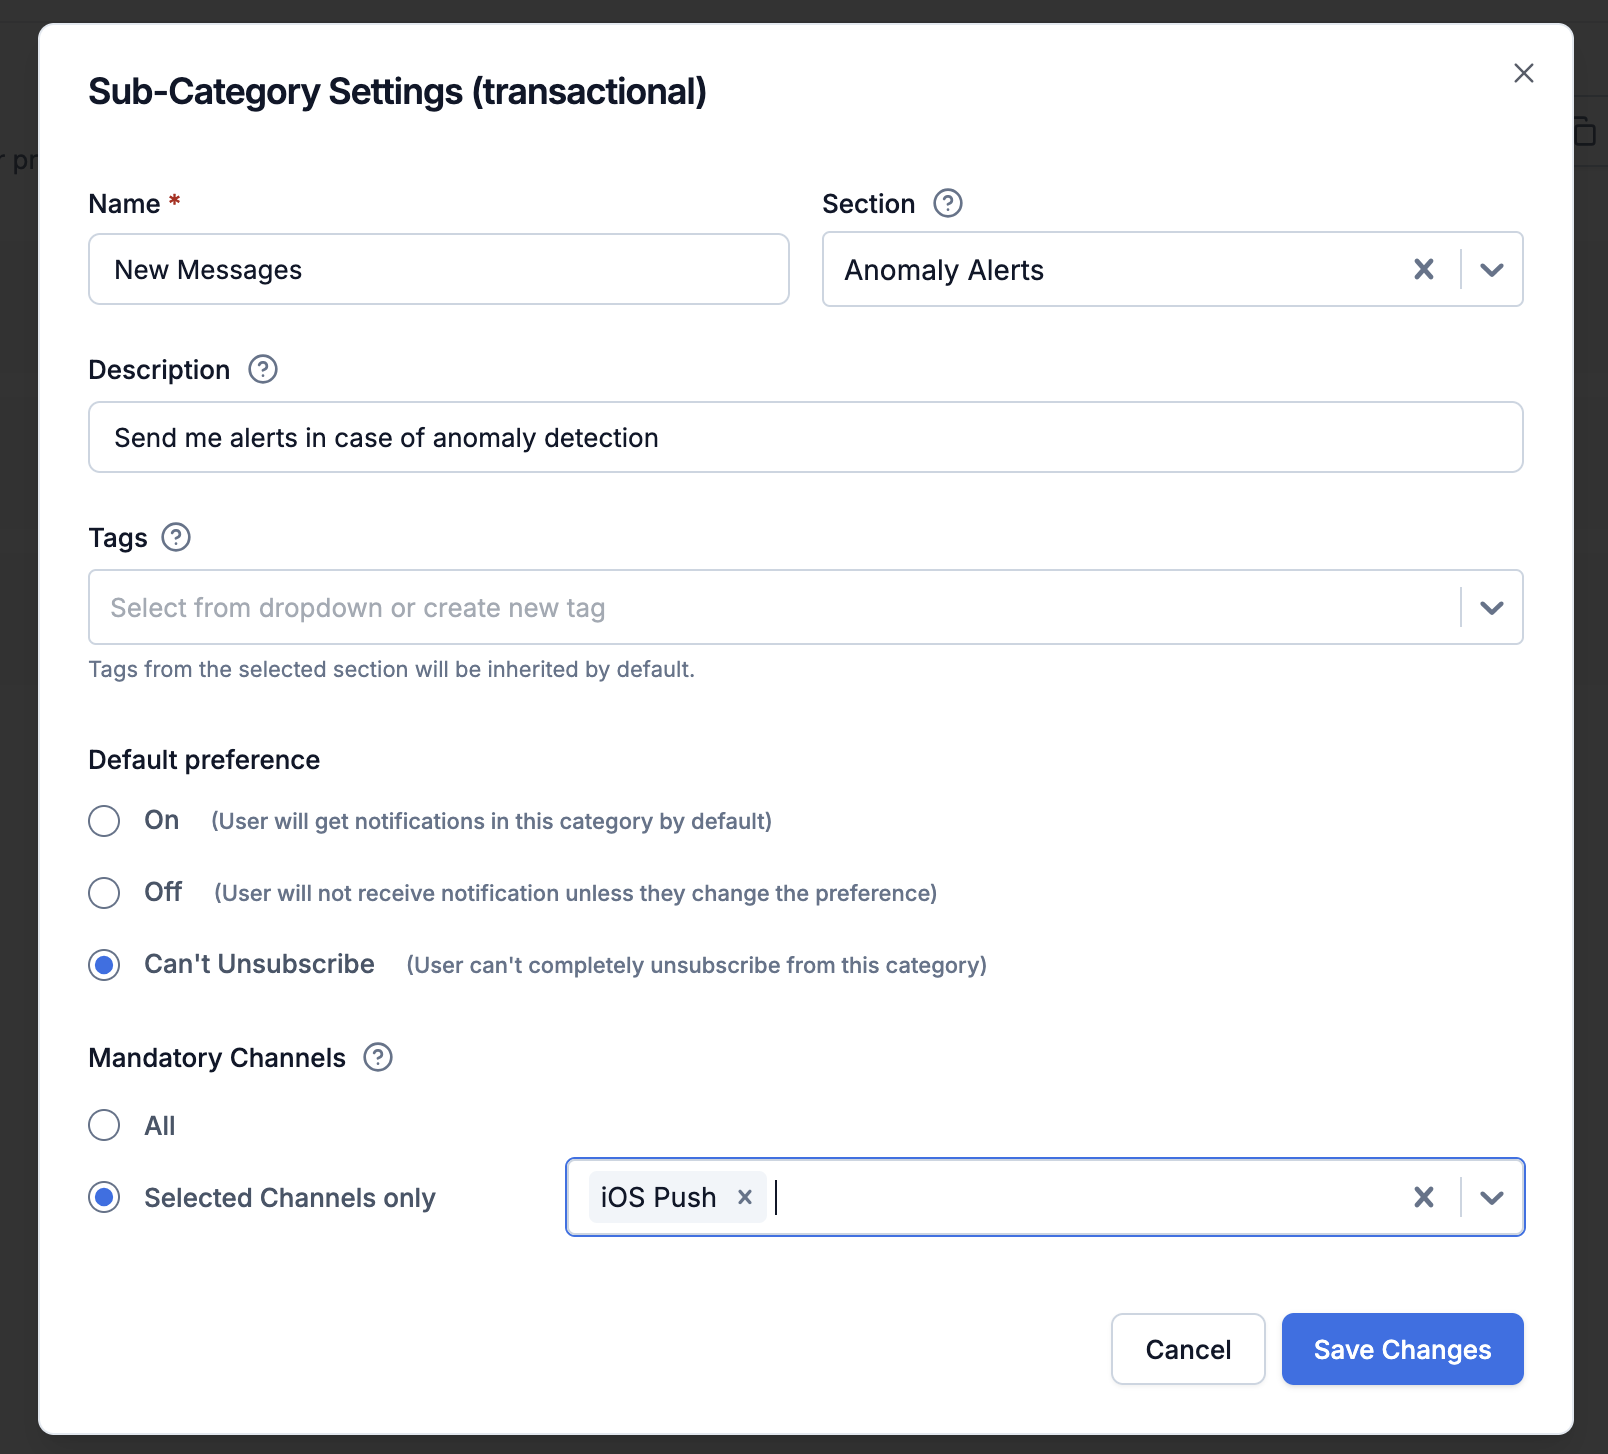
To add a sub-category:
1. Click `+Sub-Category`
2. Fill in:
* **Name**: What users see (slug (assigned to workflow) will be auto-generated from name)
* **Section**: Select the section where this sub-category will be grouped. Leave blank if you don't want to group it under any section.
* **Description (Optional)**: Description is used to describe the kind of notifications sent in the category. Helps users get more context about the category.
### Adding sub-categories
To add a sub-category:
1. Click `+Sub-Category`
2. Fill in:
* **Name**: What users see (slug (assigned to workflow) will be auto-generated from name)
* **Section**: Select the section where this sub-category will be grouped. Leave blank if you don't want to group it under any section.
* **Description (Optional)**: Description is used to describe the kind of notifications sent in the category. Helps users get more context about the category.
 Don't change the sub-category name after using it in workflows-it updates the slug and can break existing workflows.
***
## Configuring default preferences
Select a sub-category and choose a default preference: **On**, **Off**, or **Can't Unsubscribe**. This determines the default behavior for users who haven't set their own preference.
### Preference types
* **On**: Users receive notifications by default (they can opt out)
* **Off**: Users don't receive notifications by default (they can opt in)
* **Can't Unsubscribe**: Users cannot fully opt out of these notifications (typically for critical system messages). Users can still opt out of specific channels, but at least one mandatory channel must remain active.
### Recommended defaults by category type
These defaults are recommendations-adjust them based on your product's requirements and user expectations.
**System**
* **Default:** `Can't Unsubscribe` - Set the channel most users have on as mandatory so they don't miss critical notifications even if they opt out of all channels.
**Transactional**
* **Default:** `Can't Unsubscribe` - These are notifications sent in response to user actions or transactions. You would generally not want users to opt out of these notifications. However, you can adjust the default preference based on the criticality of the notification.
**Promotional**
* **Default:** `ON` - Users receive notifications by default. For optional categories, set to `OFF` so users only receive notifications if they explicitly opt in
***
## Configuring digest schedule
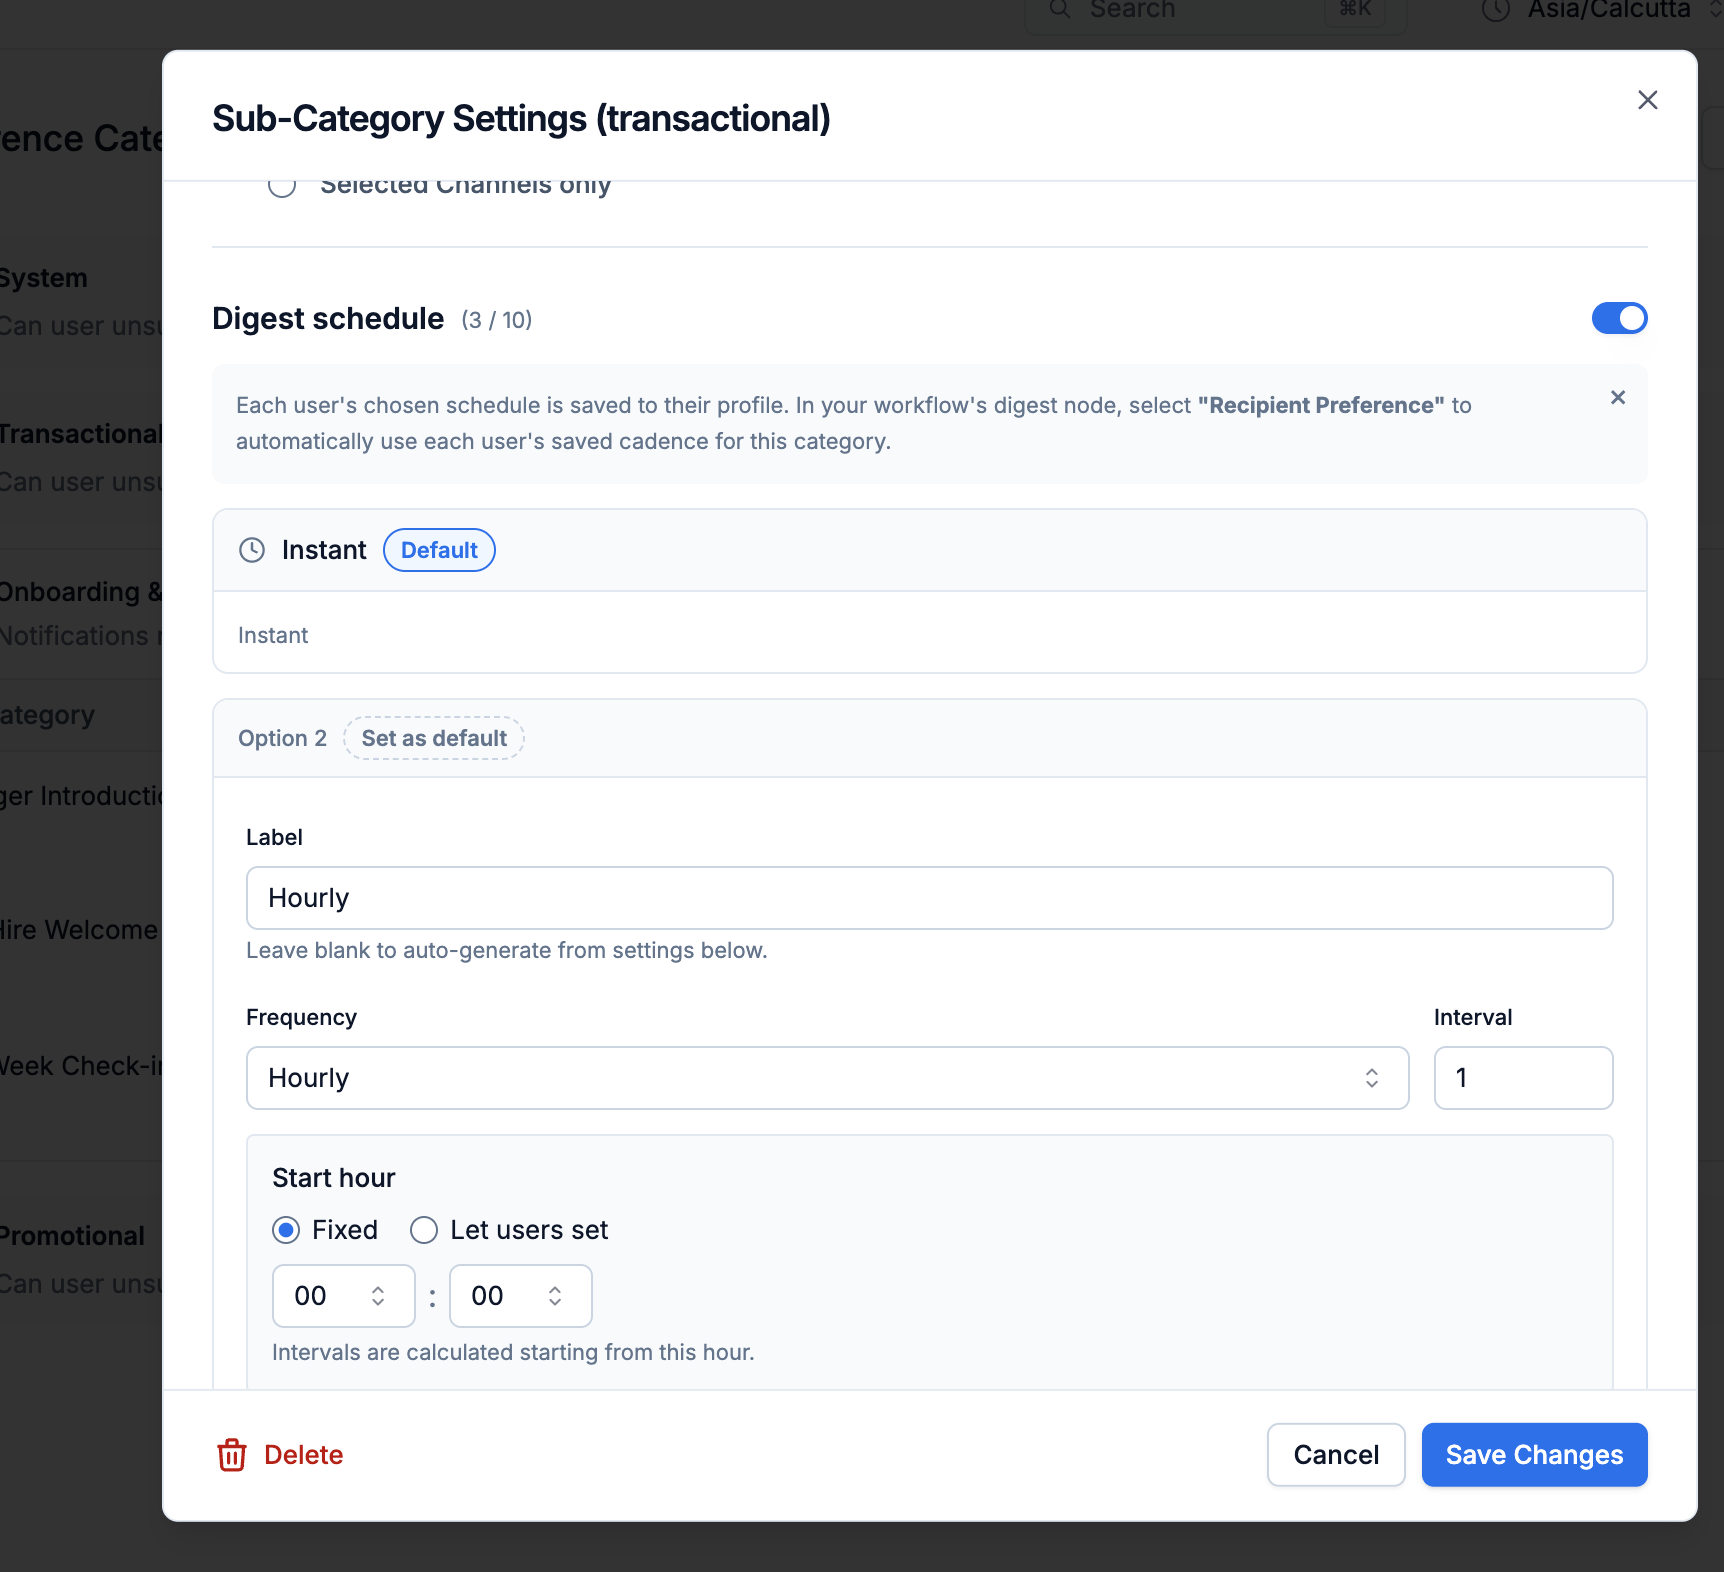
A **digest schedule** lets users pick how often they receive batched notifications for a sub-category (for example, *Instant*, *Daily at 9 AM*, or *Weekly on Monday*) right from their preference page. You define the available cadence options; the option a user selects drives the workflow [Digest node](/docs/digest) at send time.
Don't change the sub-category name after using it in workflows-it updates the slug and can break existing workflows.
***
## Configuring default preferences
Select a sub-category and choose a default preference: **On**, **Off**, or **Can't Unsubscribe**. This determines the default behavior for users who haven't set their own preference.
### Preference types
* **On**: Users receive notifications by default (they can opt out)
* **Off**: Users don't receive notifications by default (they can opt in)
* **Can't Unsubscribe**: Users cannot fully opt out of these notifications (typically for critical system messages). Users can still opt out of specific channels, but at least one mandatory channel must remain active.
### Recommended defaults by category type
These defaults are recommendations-adjust them based on your product's requirements and user expectations.
**System**
* **Default:** `Can't Unsubscribe` - Set the channel most users have on as mandatory so they don't miss critical notifications even if they opt out of all channels.
**Transactional**
* **Default:** `Can't Unsubscribe` - These are notifications sent in response to user actions or transactions. You would generally not want users to opt out of these notifications. However, you can adjust the default preference based on the criticality of the notification.
**Promotional**
* **Default:** `ON` - Users receive notifications by default. For optional categories, set to `OFF` so users only receive notifications if they explicitly opt in
***
## Configuring digest schedule
A **digest schedule** lets users pick how often they receive batched notifications for a sub-category (for example, *Instant*, *Daily at 9 AM*, or *Weekly on Monday*) right from their preference page. You define the available cadence options; the option a user selects drives the workflow [Digest node](/docs/digest) at send time.
 **To configure:**
1. Select a sub-category and enable **Digest schedule**.
2. Add one or more options. For each option, set:
* **Label** — what the user sees in the preference center (for example, "Daily").
* **Frequency** — `instantly`, `hourly`, `daily`, `weekly`, or `monthly`.
* **Interval** — recurrence multiplier (for example, interval =2 with weekly frequency means every 2 weeks).
* **Time / weekdays / month days** — when to send, depending on frequency. Each of these has an **edit policy**:
* **Editable** — the user can change the value in the preference center; the value you set is the default.
* **Locked** — the value is fixed and the user can't change it.
3. Mark exactly one option as the **default** (used when a user hasn't chosen one).
To send on the schedule a user picks, add a [Digest node](/docs/digest) in the workflow linked to this category and set its schedule type to `Preference Category` on UI and `category_digest_schedule` in management API. SuprSend batches notifications using the option the recipient selected (or the default), always in the recipient's timezone.
If digest schedule isn't enabled on the category, a digest node set to `category_digest_schedule` sends notifications immediately without batching.
For the full field reference, see the [Create/Update Category API](/reference/create-update-category). To see how digest schedule appears in the user preference API response, see [Digest schedule in preference API](/docs/user-preferences#digest-schedule).
***
## Configuring condition properties
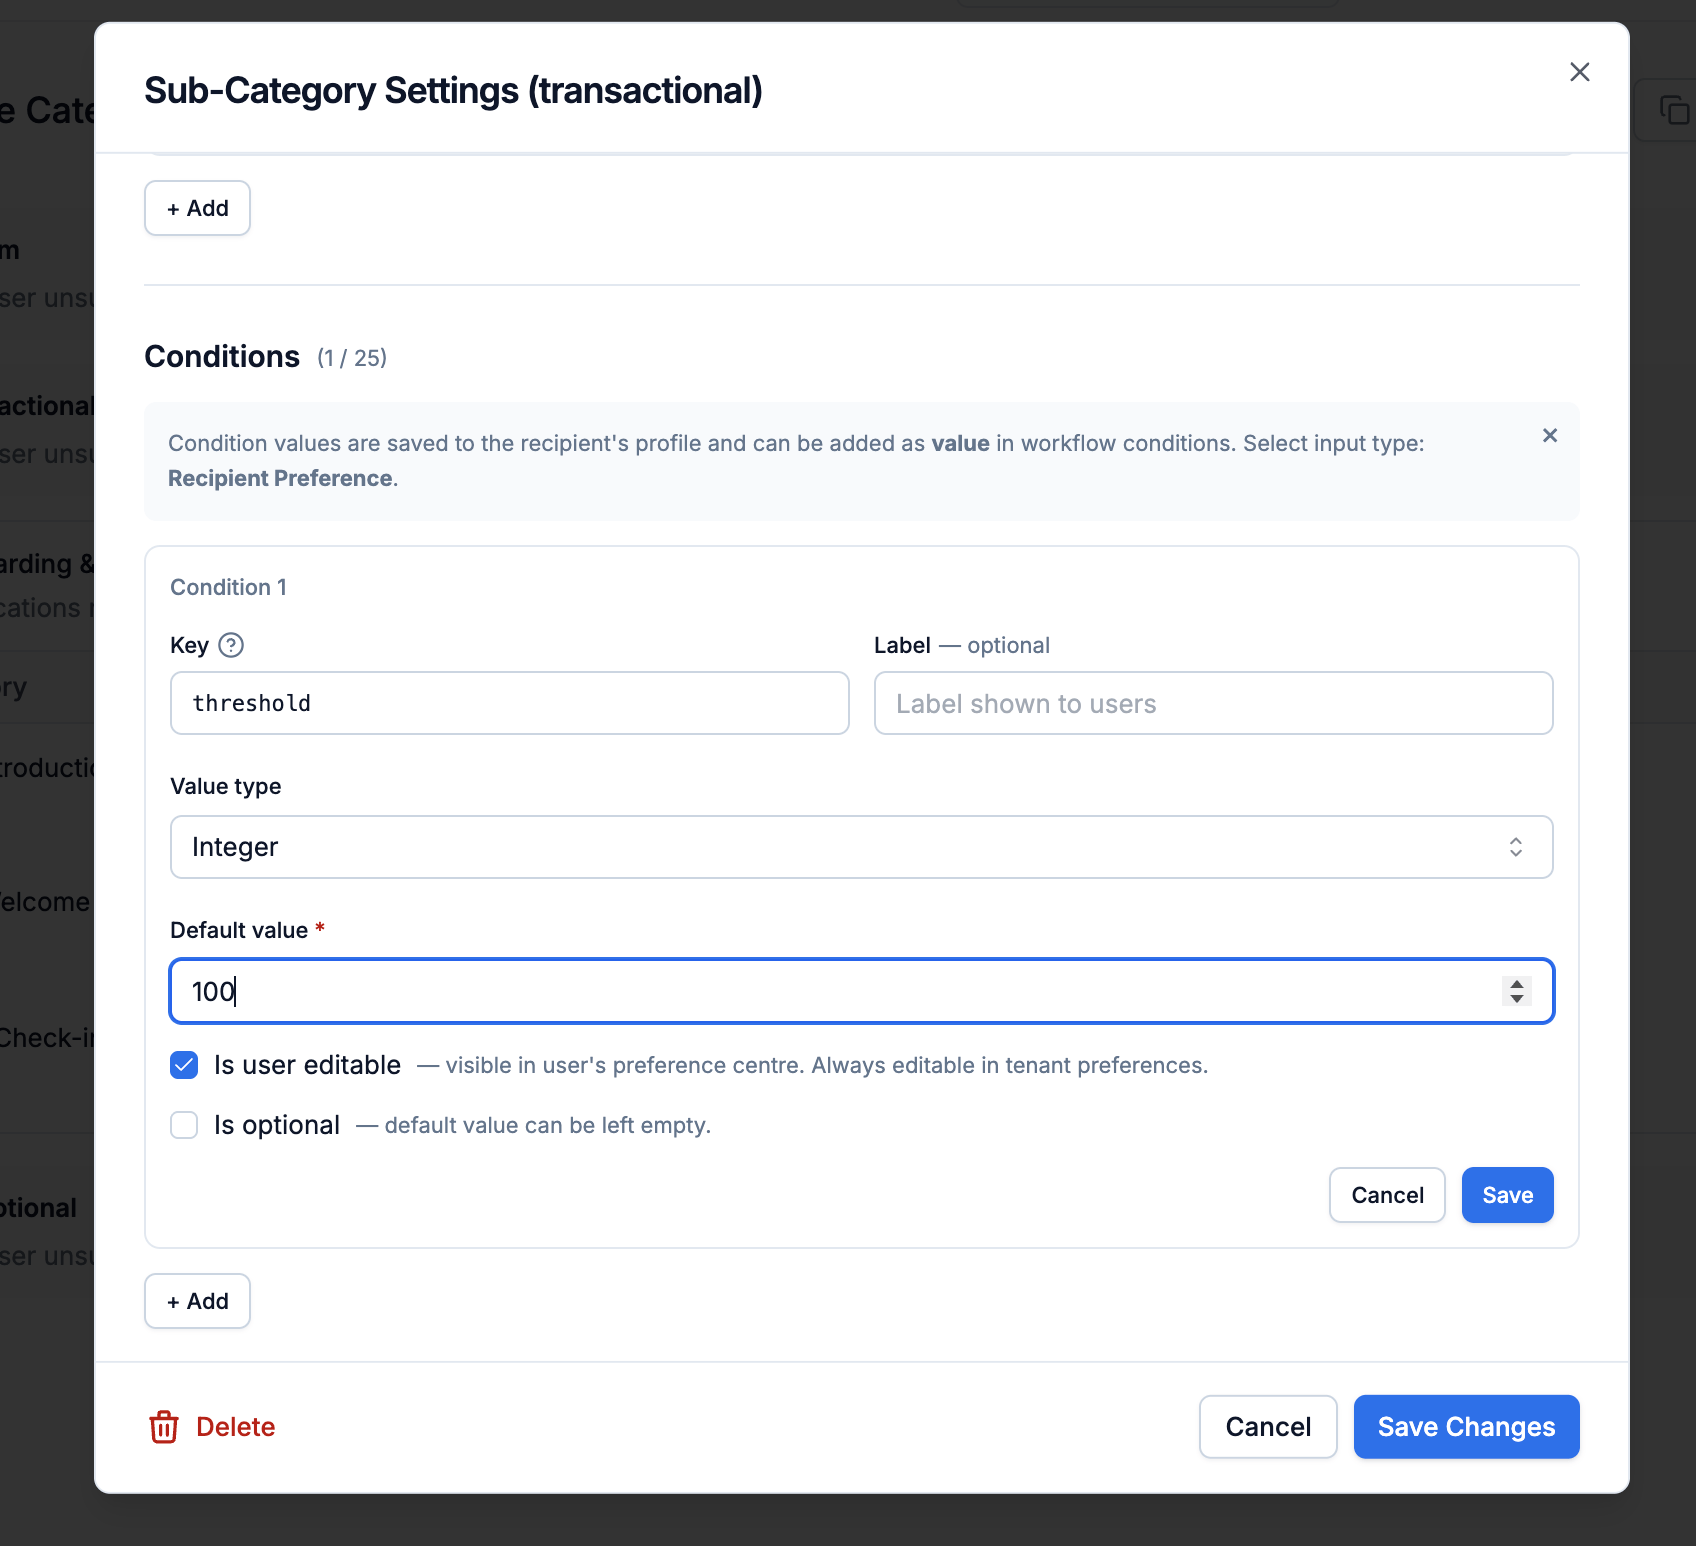
**Condition properties** are custom, configurable values you attach to a sub-category and then reference inside workflow [branch conditions](/docs/branch) or **trigger condition**. Use them to control *when* a category's notifications are sent — for example, a minimum severity, an alert threshold, or which user roles should be notified.
**To configure:**
1. Select a sub-category and enable **Digest schedule**.
2. Add one or more options. For each option, set:
* **Label** — what the user sees in the preference center (for example, "Daily").
* **Frequency** — `instantly`, `hourly`, `daily`, `weekly`, or `monthly`.
* **Interval** — recurrence multiplier (for example, interval =2 with weekly frequency means every 2 weeks).
* **Time / weekdays / month days** — when to send, depending on frequency. Each of these has an **edit policy**:
* **Editable** — the user can change the value in the preference center; the value you set is the default.
* **Locked** — the value is fixed and the user can't change it.
3. Mark exactly one option as the **default** (used when a user hasn't chosen one).
To send on the schedule a user picks, add a [Digest node](/docs/digest) in the workflow linked to this category and set its schedule type to `Preference Category` on UI and `category_digest_schedule` in management API. SuprSend batches notifications using the option the recipient selected (or the default), always in the recipient's timezone.
If digest schedule isn't enabled on the category, a digest node set to `category_digest_schedule` sends notifications immediately without batching.
For the full field reference, see the [Create/Update Category API](/reference/create-update-category). To see how digest schedule appears in the user preference API response, see [Digest schedule in preference API](/docs/user-preferences#digest-schedule).
***
## Configuring condition properties
**Condition properties** are custom, configurable values you attach to a sub-category and then reference inside workflow [branch conditions](/docs/branch) or **trigger condition**. Use them to control *when* a category's notifications are sent — for example, a minimum severity, an alert threshold, or which user roles should be notified.
 **To configure:**
1. Select a sub-category and add a condition property (up to 25 per sub-category). For each property, set:
* **Key** — unique identifier used in workflows. Referenced as `$category.properties.`.
* **Label** — display label shown in the preference center.
* **Value type** — `integer`, `string`, `string_choice` (single-select), `list_choice` (multi-select), `string_dynamic`, or `list_dynamic`.
* **Choices** — for `string_choice` / `list_choice`, the selectable options (`label` shown to the user, `value` used in the workflow).
* **Default value** — applied when no value is set. You can set a property optional to skip adding default value.
* **Edit policy or is\_user\_editable** — selected or `editable` means user can change it or unselected/`locked` means fixed.
* **is\_optional** - you can mark the property as optional if it can have null default value.
2. Reference the property inside a workflow [branch condition](/docs/branch) as `$category.properties.`.
For example, to send only when the recipient's role matches the value configured on the category:
```
$recipient.subscription.role == $category.properties.role
```
If you're triggering workflow on object with conditions on recipient property, always add `$recipient.$type == "object"` as OR condition to ensure that notification is always triggered on object as a user. Otherwise, if workflow trigger condition doesn't match for object as a user, user fanout on that object doesn't happen.
**Common use cases:**
* Send anomaly alerts only when an error rate crosses a user-defined threshold.
* Deliver alerts only at or above a user-selected severity (for example, `High`).
* Let admins choose which user roles receive a category's notifications.
For the full field reference, see the [Create/Update Category API](/reference/create-update-category). To see how condition properties appear in the user preference API response, see [Condition properties in preference API](/docs/user-preferences#condition-properties).
***
## Adding tags (Optional)
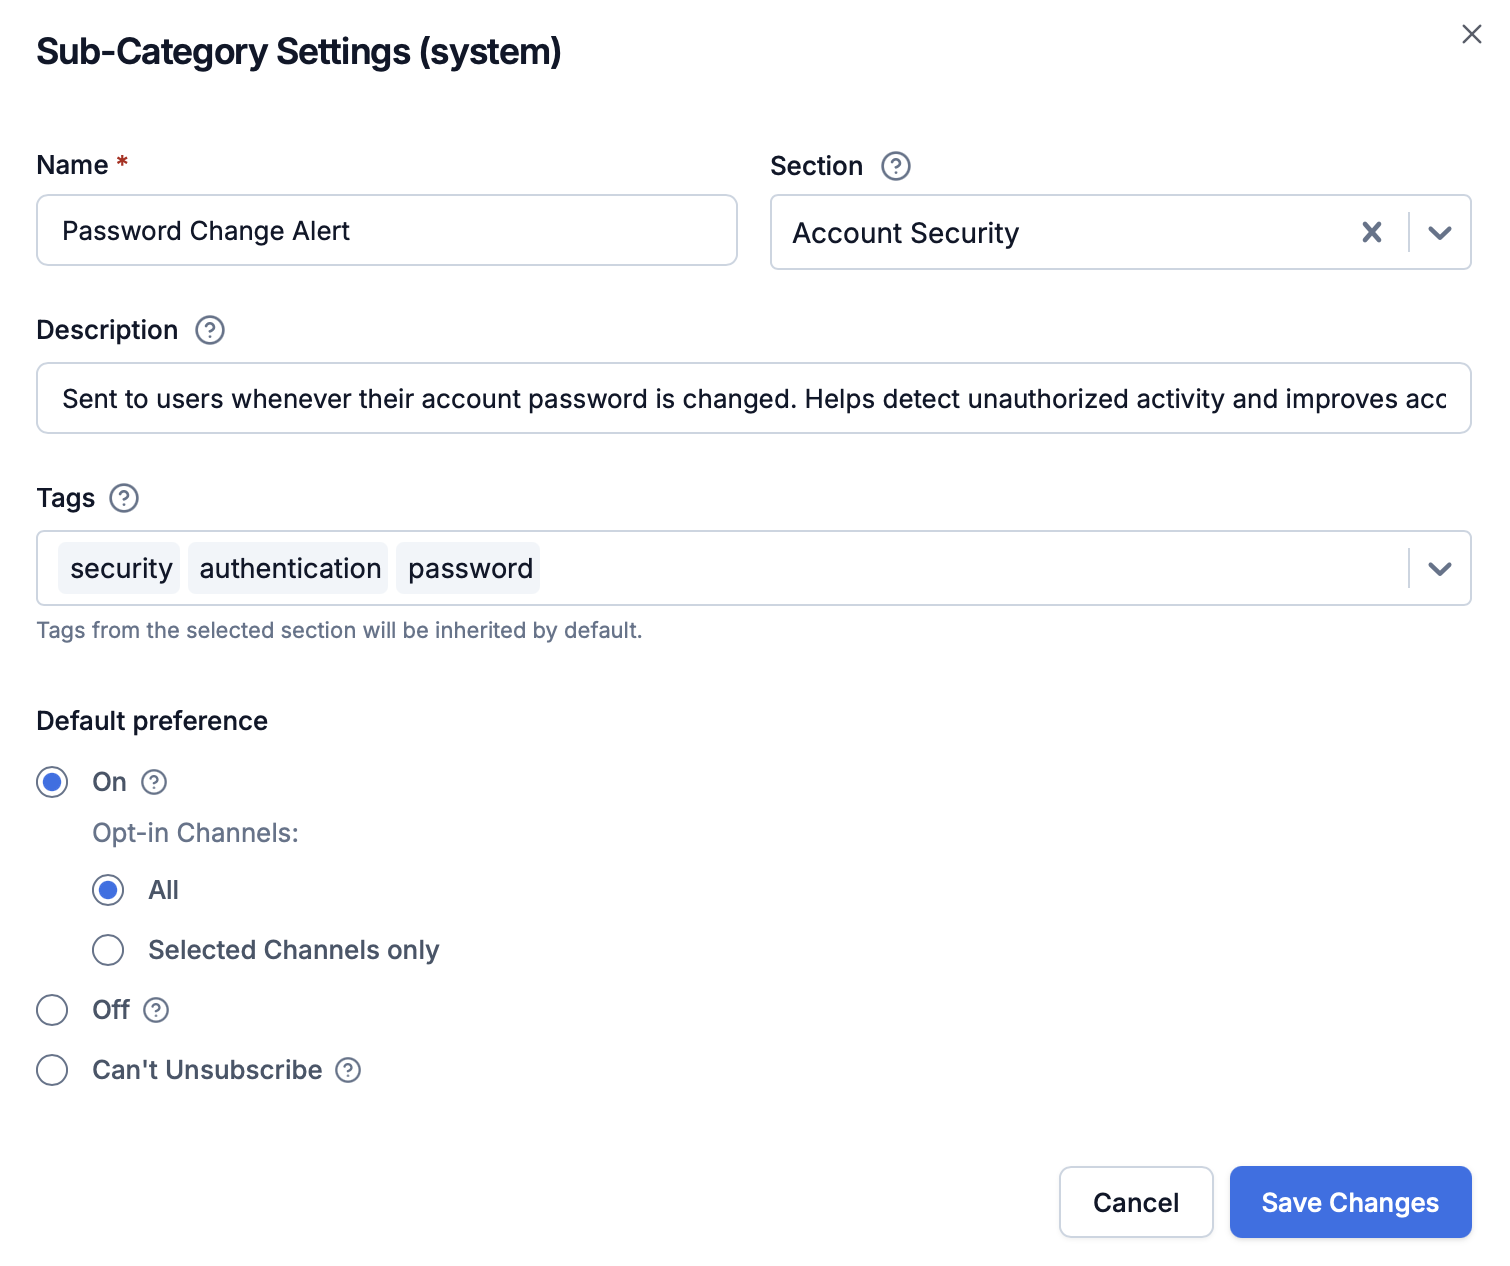
Tags are used to filter categories on the preference page. **Common usecases** are to filter categories based on user role or department. They can be added to sections and sub-categories.
1. Select a section or sub-category
2. Add tags (for example, `finance`, `manager`)
3. Section-level tags apply to all sub-categories in that section
**To configure:**
1. Select a sub-category and add a condition property (up to 25 per sub-category). For each property, set:
* **Key** — unique identifier used in workflows. Referenced as `$category.properties.`.
* **Label** — display label shown in the preference center.
* **Value type** — `integer`, `string`, `string_choice` (single-select), `list_choice` (multi-select), `string_dynamic`, or `list_dynamic`.
* **Choices** — for `string_choice` / `list_choice`, the selectable options (`label` shown to the user, `value` used in the workflow).
* **Default value** — applied when no value is set. You can set a property optional to skip adding default value.
* **Edit policy or is\_user\_editable** — selected or `editable` means user can change it or unselected/`locked` means fixed.
* **is\_optional** - you can mark the property as optional if it can have null default value.
2. Reference the property inside a workflow [branch condition](/docs/branch) as `$category.properties.`.
For example, to send only when the recipient's role matches the value configured on the category:
```
$recipient.subscription.role == $category.properties.role
```
If you're triggering workflow on object with conditions on recipient property, always add `$recipient.$type == "object"` as OR condition to ensure that notification is always triggered on object as a user. Otherwise, if workflow trigger condition doesn't match for object as a user, user fanout on that object doesn't happen.
**Common use cases:**
* Send anomaly alerts only when an error rate crosses a user-defined threshold.
* Deliver alerts only at or above a user-selected severity (for example, `High`).
* Let admins choose which user roles receive a category's notifications.
For the full field reference, see the [Create/Update Category API](/reference/create-update-category). To see how condition properties appear in the user preference API response, see [Condition properties in preference API](/docs/user-preferences#condition-properties).
***
## Adding tags (Optional)
Tags are used to filter categories on the preference page. **Common usecases** are to filter categories based on user role or department. They can be added to sections and sub-categories.
1. Select a section or sub-category
2. Add tags (for example, `finance`, `manager`)
3. Section-level tags apply to all sub-categories in that section
 You can filter categories using the tags query parameter in the [get user preference API](/reference/get-user-full-preference).
Tags do not impact delivery logic or preference rules - they are only used for filtering and organizing the UI. Even if a category is hidden from the user on the preference page due to tag filters, the user can still opt in/out via API, and notifications will still be sent if the default preference is set to opt-in.
***
## Preview and publish
Before making your categories live, preview how they'll appear to users, then publish your changes.
**Category changes are version controlled and are not live until you publish them.** This is done to ensure that your users do not see intermittent changes when they are interacting with the preference page.
Click **Preview** to see how categories will appear to users on the preference page. The preview renders the full preference experience, including:
* **Default preferences** — on/off toggle and can't-unsubscribe states
* **Channel preferences** — which channels are shown as opted in or mandatory
* **Digest schedule** — the cadence options users can choose from
* **Condition properties** — user-editable fields like thresholds or severity selectors
You can filter categories using the tags query parameter in the [get user preference API](/reference/get-user-full-preference).
Tags do not impact delivery logic or preference rules - they are only used for filtering and organizing the UI. Even if a category is hidden from the user on the preference page due to tag filters, the user can still opt in/out via API, and notifications will still be sent if the default preference is set to opt-in.
***
## Preview and publish
Before making your categories live, preview how they'll appear to users, then publish your changes.
**Category changes are version controlled and are not live until you publish them.** This is done to ensure that your users do not see intermittent changes when they are interacting with the preference page.
Click **Preview** to see how categories will appear to users on the preference page. The preview renders the full preference experience, including:
* **Default preferences** — on/off toggle and can't-unsubscribe states
* **Channel preferences** — which channels are shown as opted in or mandatory
* **Digest schedule** — the cadence options users can choose from
* **Condition properties** — user-editable fields like thresholds or severity selectors
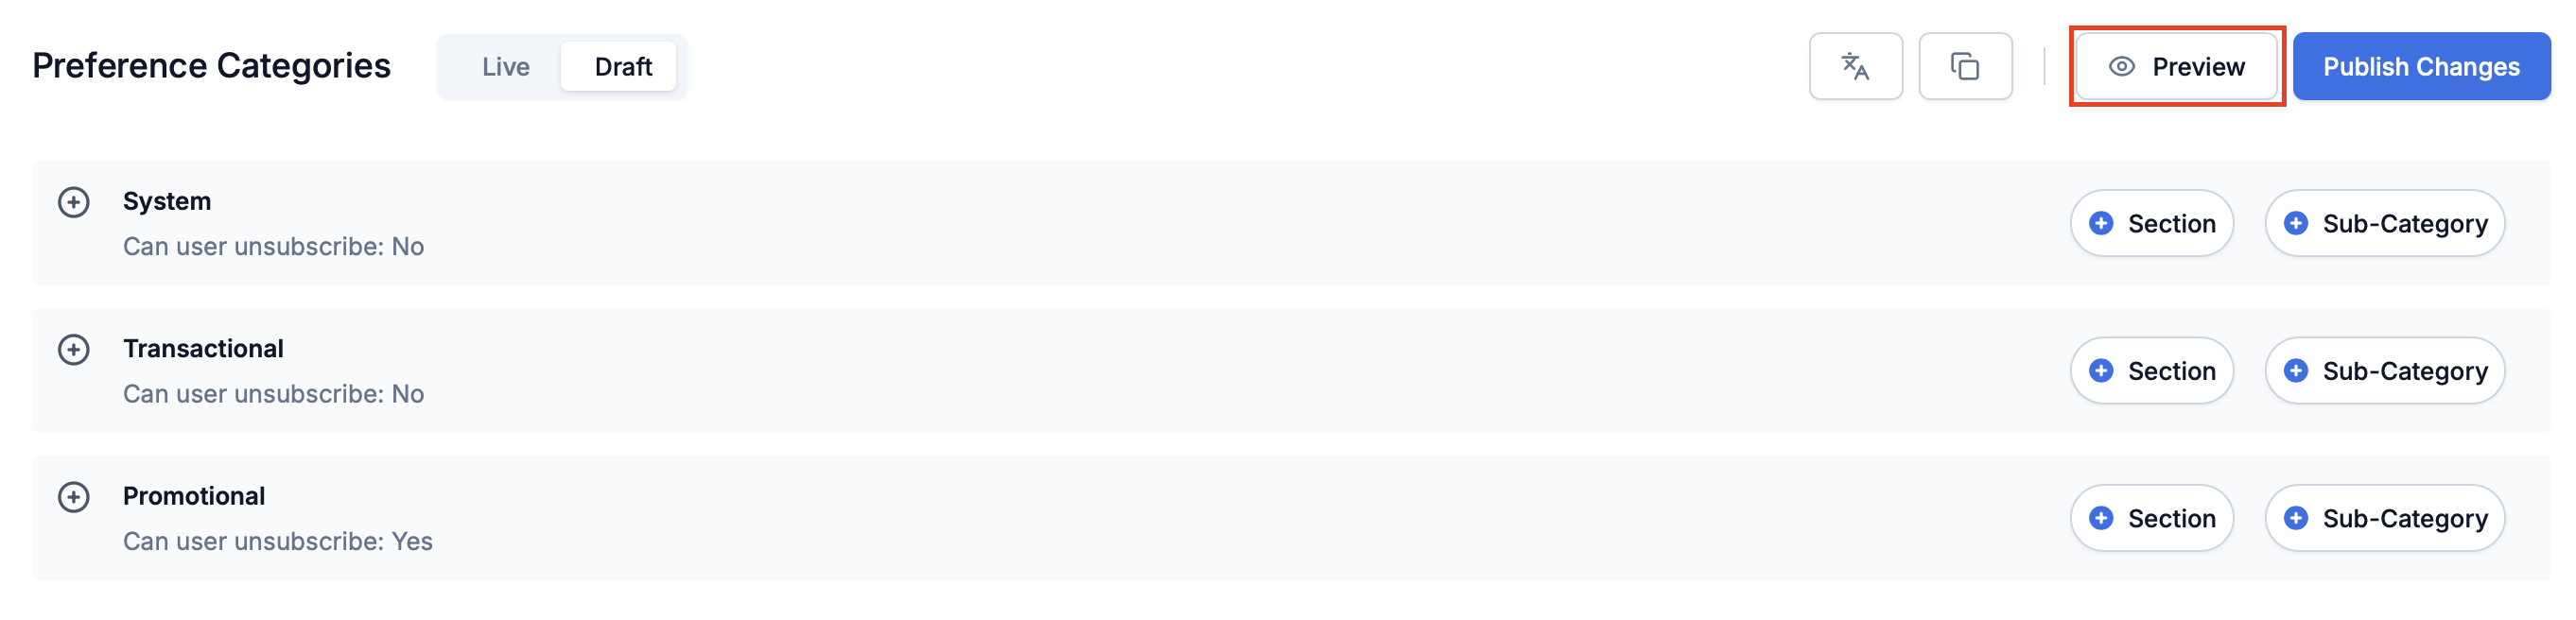 Use the preview to verify that all your preference settings are configured correctly before publishing.
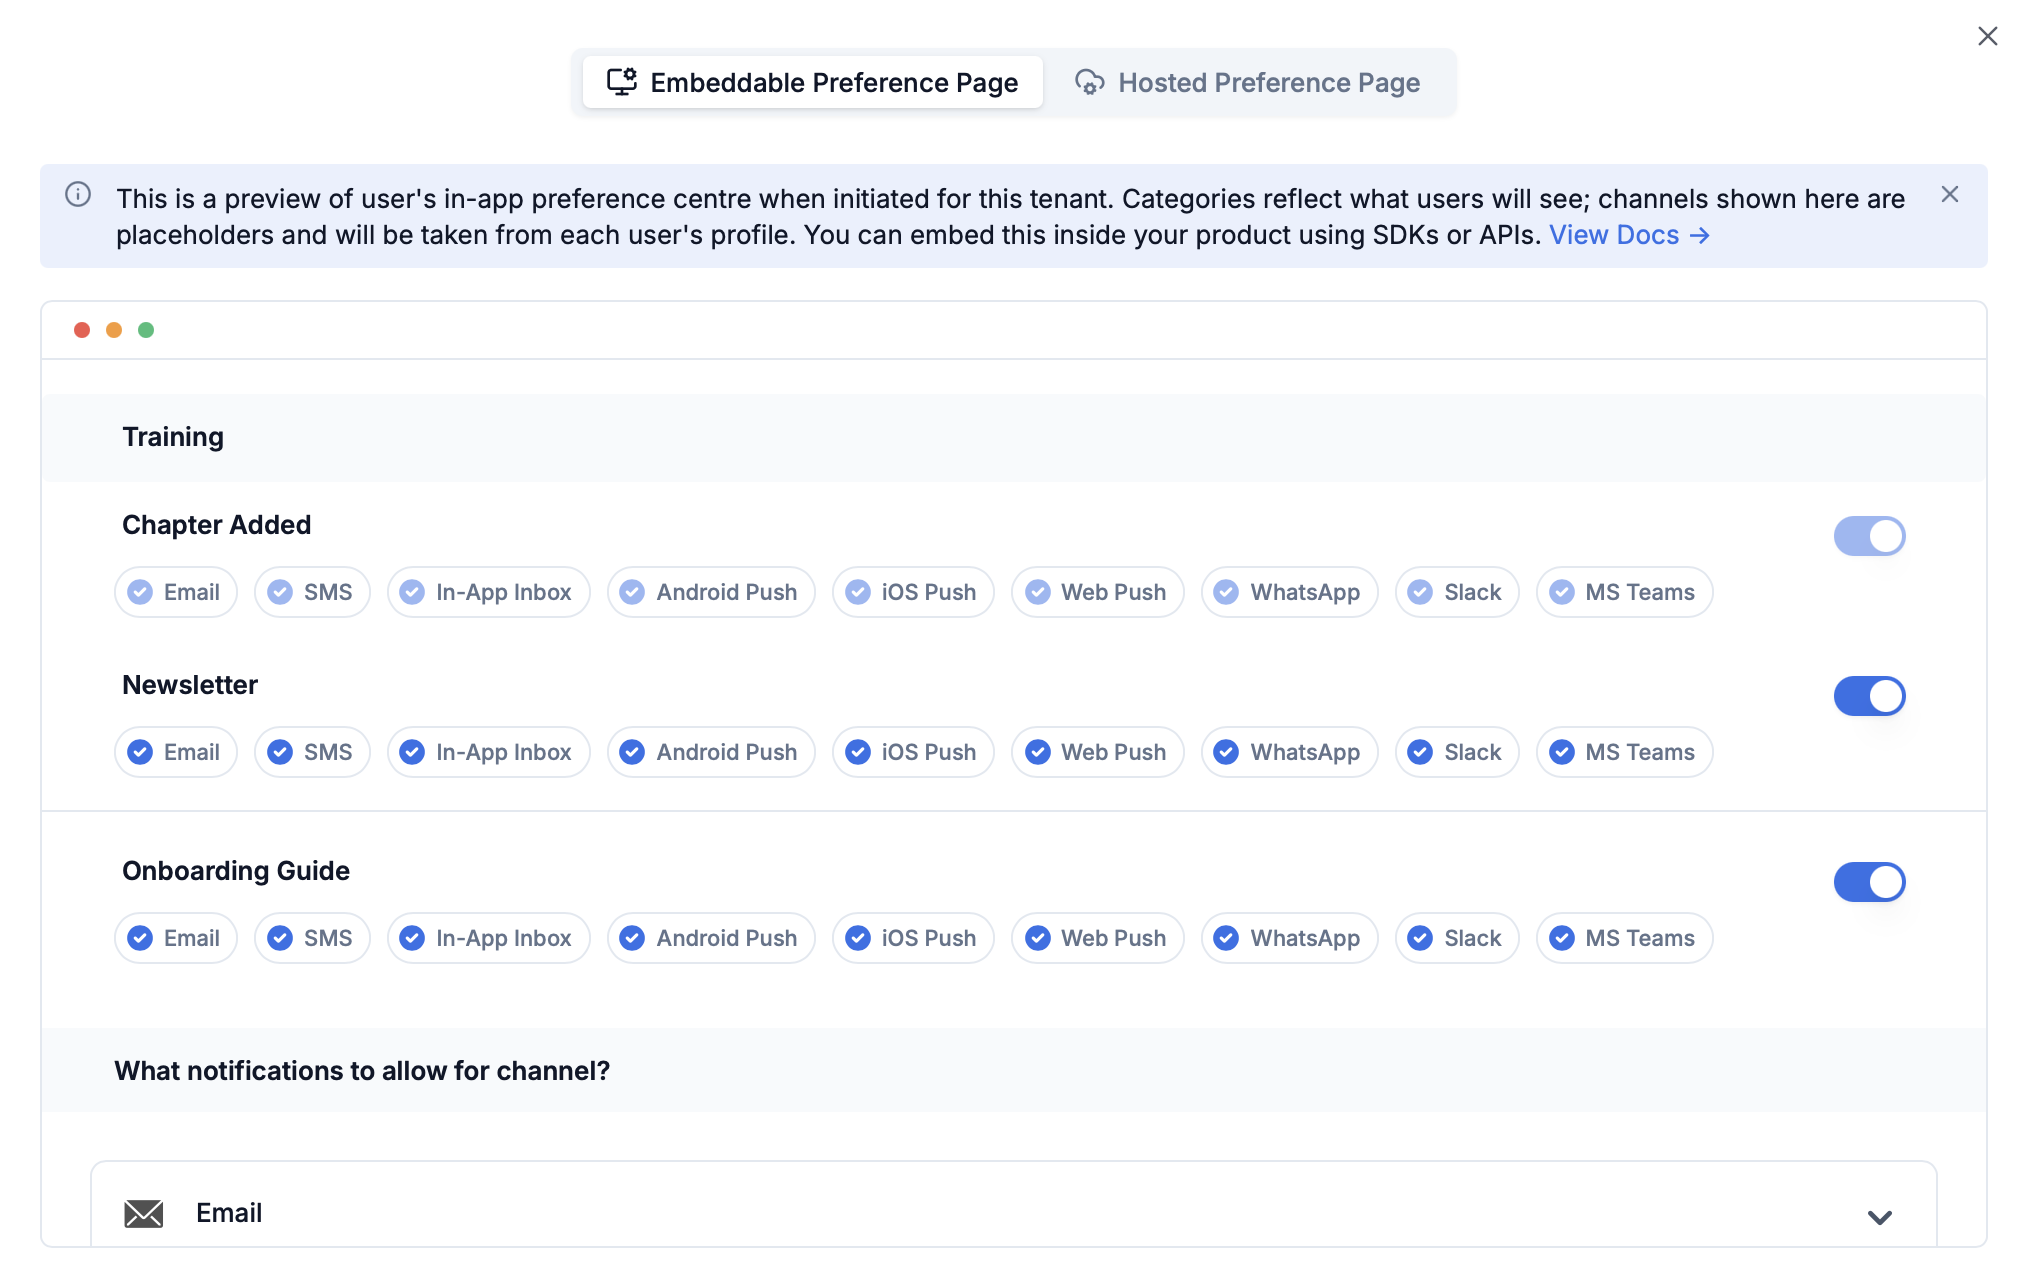 Click **`Publish Changes`** to make categories live. Categories are only available in workflows after publishing and will not appear in workflow dropdowns until published.
 Use **`Clone`** to copy changes from staging to production workspace. Not required if you are directly doing changes in production workspace. Clone option is not currently available on UI.
**Category changes are version controlled and need to be published**
Categories will only appear in workflow dropdowns after they are published. If you don't see your category in the dropdown, make sure you've published your changes.
***
## Assigning category to workflows
For workflows designed on SuprSend dashboard, you can assign a category either via dashboard or via CLI or Management API.
If you choose to not create workflow on SuprSend dashboard and want to keep your workflow config in code for single step dynamic workflow trigger, you can assign category directly in the workflow payload.
In workflow editor, select any delivery node and choose the relevant category from the **Preference Category** dropdown.
Use **`Clone`** to copy changes from staging to production workspace. Not required if you are directly doing changes in production workspace. Clone option is not currently available on UI.
**Category changes are version controlled and need to be published**
Categories will only appear in workflow dropdowns after they are published. If you don't see your category in the dropdown, make sure you've published your changes.
***
## Assigning category to workflows
For workflows designed on SuprSend dashboard, you can assign a category either via dashboard or via CLI or Management API.
If you choose to not create workflow on SuprSend dashboard and want to keep your workflow config in code for single step dynamic workflow trigger, you can assign category directly in the workflow payload.
In workflow editor, select any delivery node and choose the relevant category from the **Preference Category** dropdown.
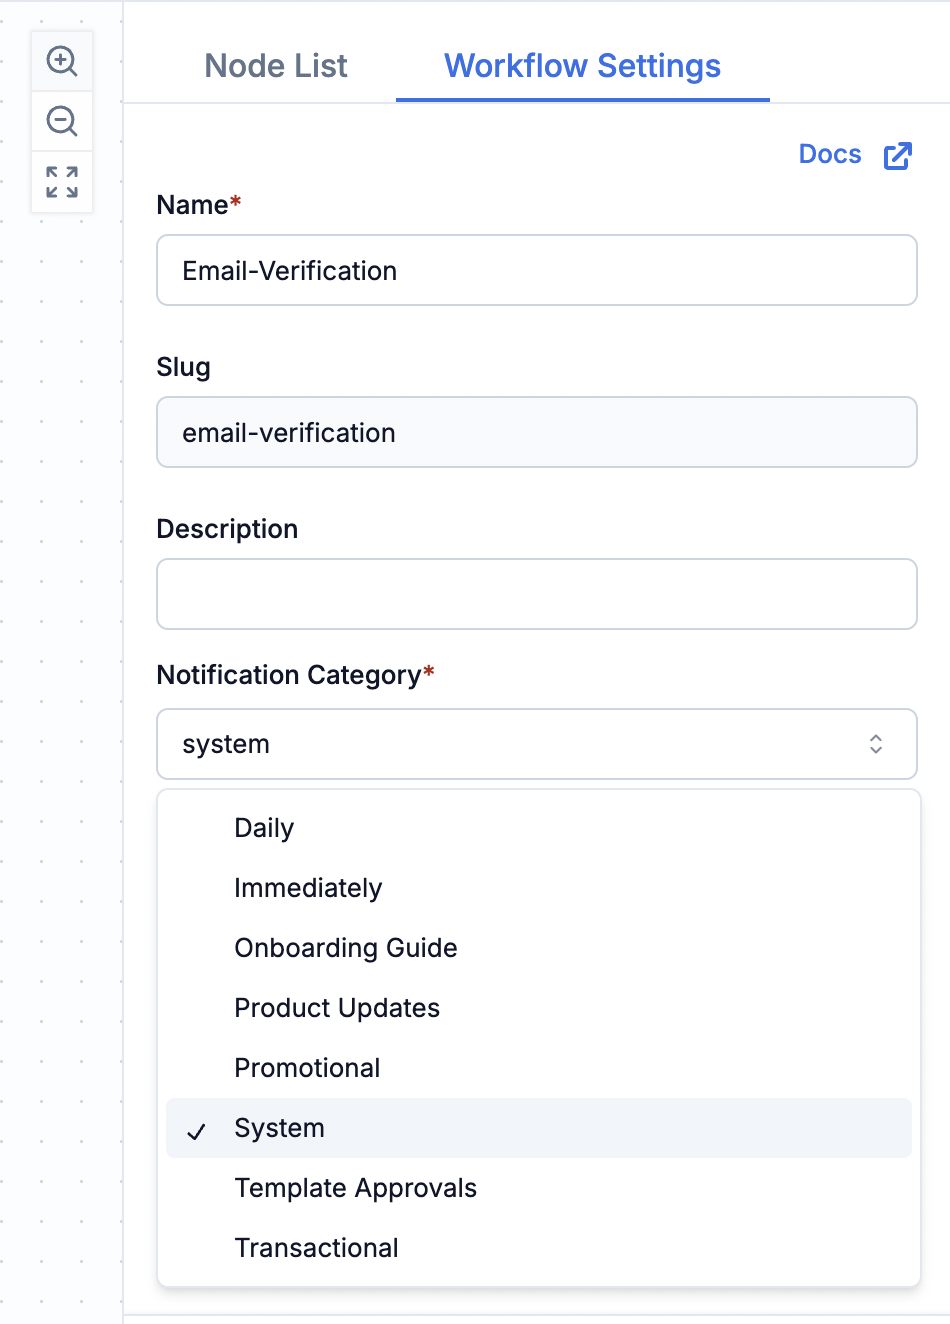 Add the category slug to the `notification_category` field in your dynamic workflow trigger.
**To find the slug:** Click the sub-category name in the categories page to copy it.
Add the category slug to the `notification_category` field in your dynamic workflow trigger.
**To find the slug:** Click the sub-category name in the categories page to copy it.
 **Example:**
```python python theme={"system"}
from suprsend import Suprsend, Workflow
supr_client = Suprsend("_workspace_key_", "_workspace_secret_")
workflow_body = {
"name": "welcome-email",
"template": "template_slug",
"notification_category": "newsletter", # sub-category slug
"users": [
{
"distinct_id": "user-123"
}
]
}
wf = Workflow(body=workflow_body)
response = supr_client.trigger_workflow(wf)
print(response)
```
Checkout complete [API reference](/reference/dynamic-workflow-trigger).
Pass category-slug to `category` field in workflow payload while updating workflow through [management API](/reference/create-update-workflow) or [CLI](/reference/cli-workflow-overview).
***
## Managing category translations
This feature is only available for Enterprise plan customers or the ones who have enabled translation feature in their account.
Upload and manage translations for category and section names and descriptions. Once uploaded, translations go live immediately. You can fetch preference translations by passing locale query parameter in the [get user preference API](/reference/get-user-full-preference).
**Example:**
```python python theme={"system"}
from suprsend import Suprsend, Workflow
supr_client = Suprsend("_workspace_key_", "_workspace_secret_")
workflow_body = {
"name": "welcome-email",
"template": "template_slug",
"notification_category": "newsletter", # sub-category slug
"users": [
{
"distinct_id": "user-123"
}
]
}
wf = Workflow(body=workflow_body)
response = supr_client.trigger_workflow(wf)
print(response)
```
Checkout complete [API reference](/reference/dynamic-workflow-trigger).
Pass category-slug to `category` field in workflow payload while updating workflow through [management API](/reference/create-update-workflow) or [CLI](/reference/cli-workflow-overview).
***
## Managing category translations
This feature is only available for Enterprise plan customers or the ones who have enabled translation feature in their account.
Upload and manage translations for category and section names and descriptions. Once uploaded, translations go live immediately. You can fetch preference translations by passing locale query parameter in the [get user preference API](/reference/get-user-full-preference).
For more details on what it does and how it works, see [Overview of category translations](/docs/notification-category#category-translations).
On the Preference categories page, click the translation icon in the top right corner to open the "Add / View Translation files" modal.
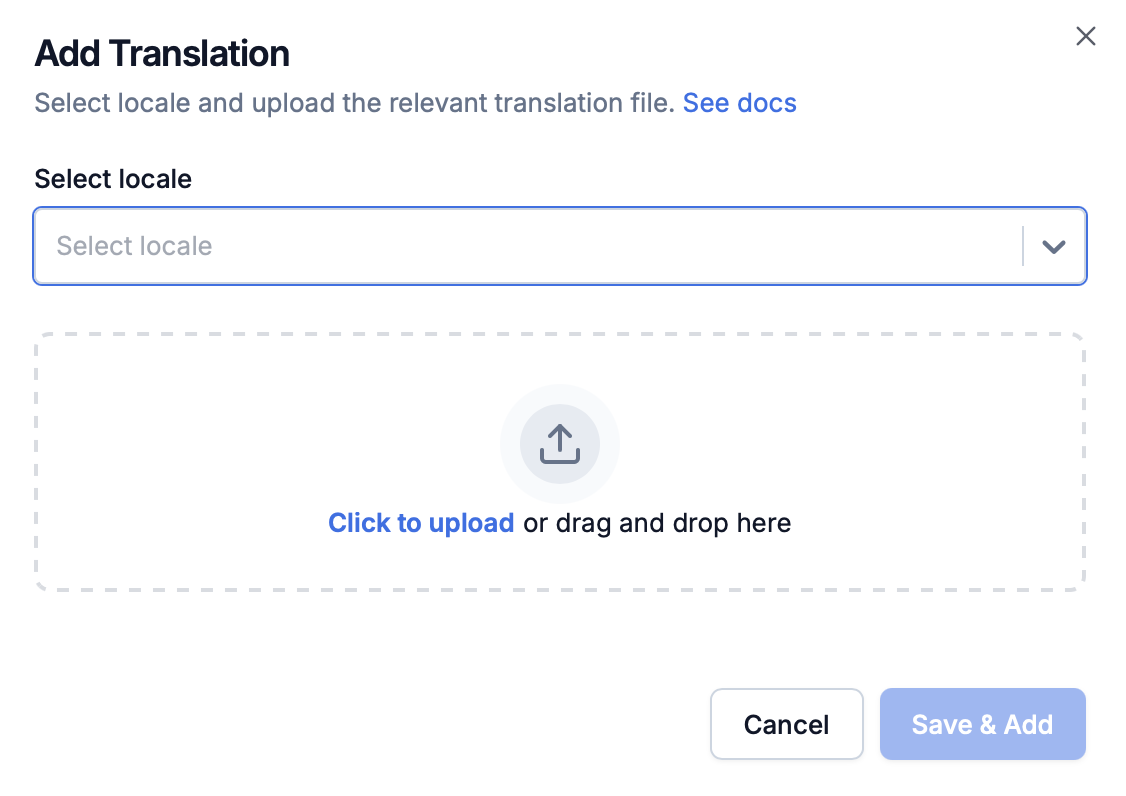
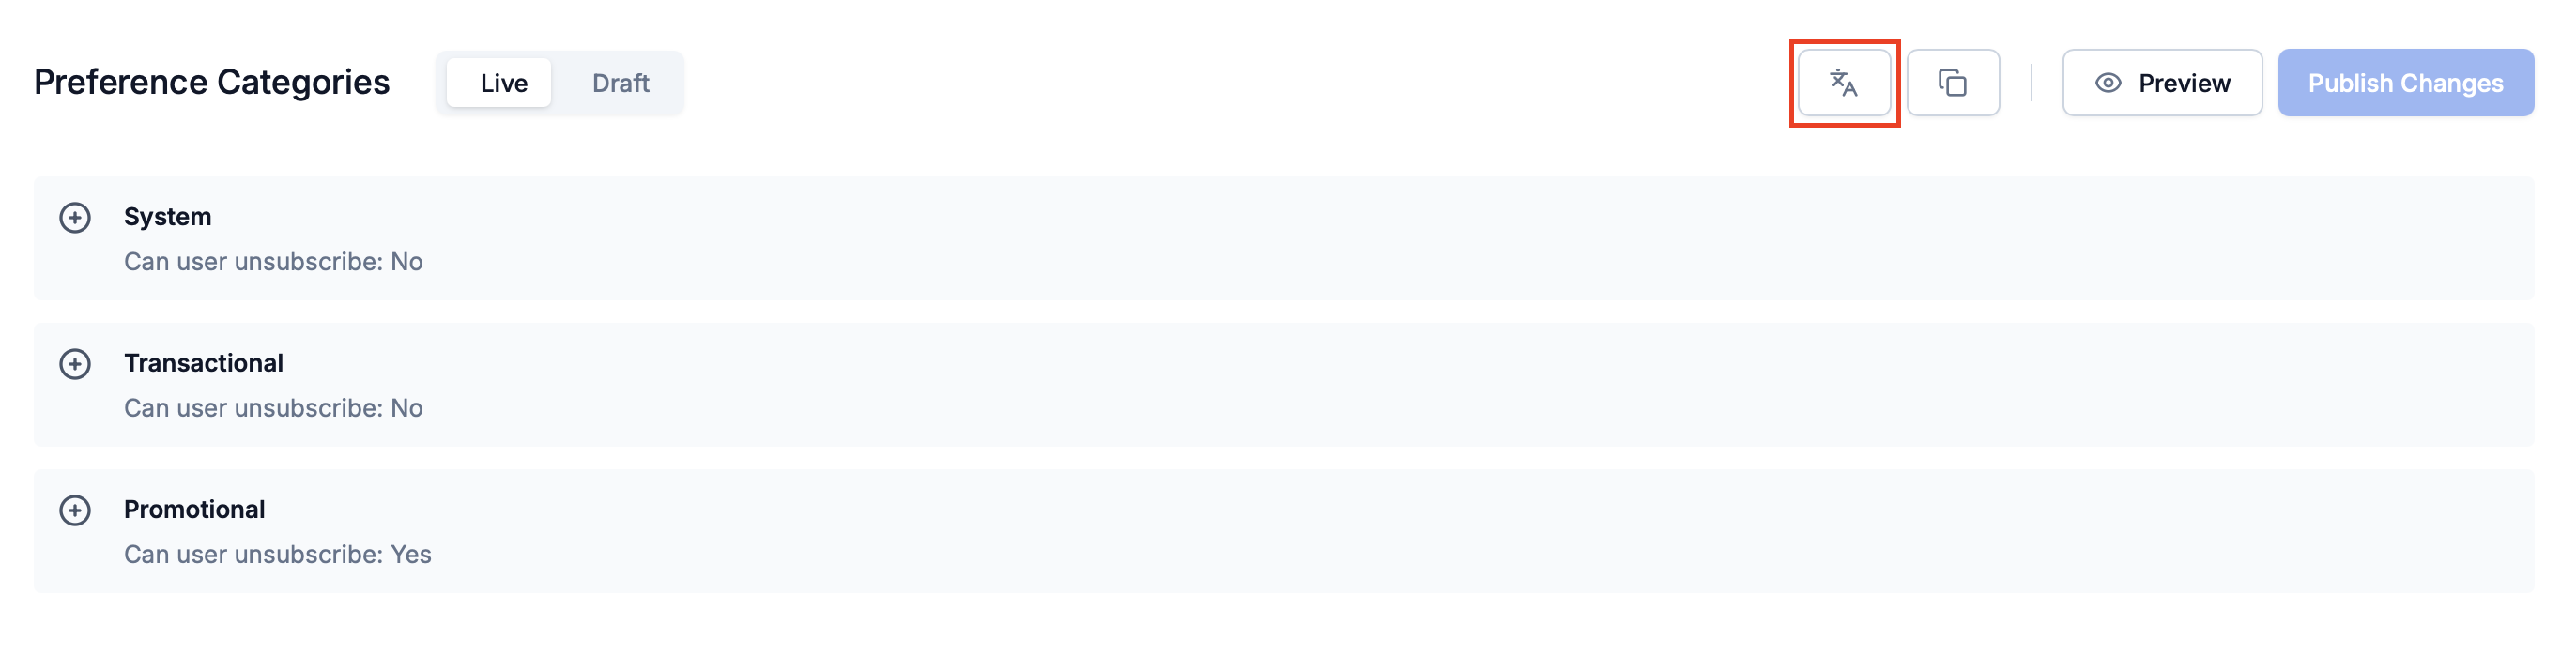 Click **"+ Add Translation"**. Select a locale and upload the translated JSON file (for example, `es.json`, `fr.json`), then click **"Save & Add"**.
 **Translation file structure:**
Translation files follow this JSON structure with `sections` and `categories` objects. Each section and category is identified by its slug.
```json file-structure theme={"system"}
{
"sections": {
"section-slug": {
"name": "Translated section name",
"description": "Translated section description" // or null
}
},
"categories": {
"category-slug": {
"name": "Translated category name",
"description": "Translated category description" // or null
}
}
}
```
```json example theme={"system"}
{
"sections": {
"billing": {
"name": "Facturation",
"description": "Notifications liées à la facturation"
}
},
"categories": {
"invoice-ready": {
"name": "Facture prête",
"description": "Vous recevrez une notification lorsque votre facture est prête"
},
"payment-reminder": {
"name": "Rappel de paiement",
"description": null
}
}
}
```
**Note:** The `en.json` file is automatically generated from your preference settings. Download it to use as a template for translations.
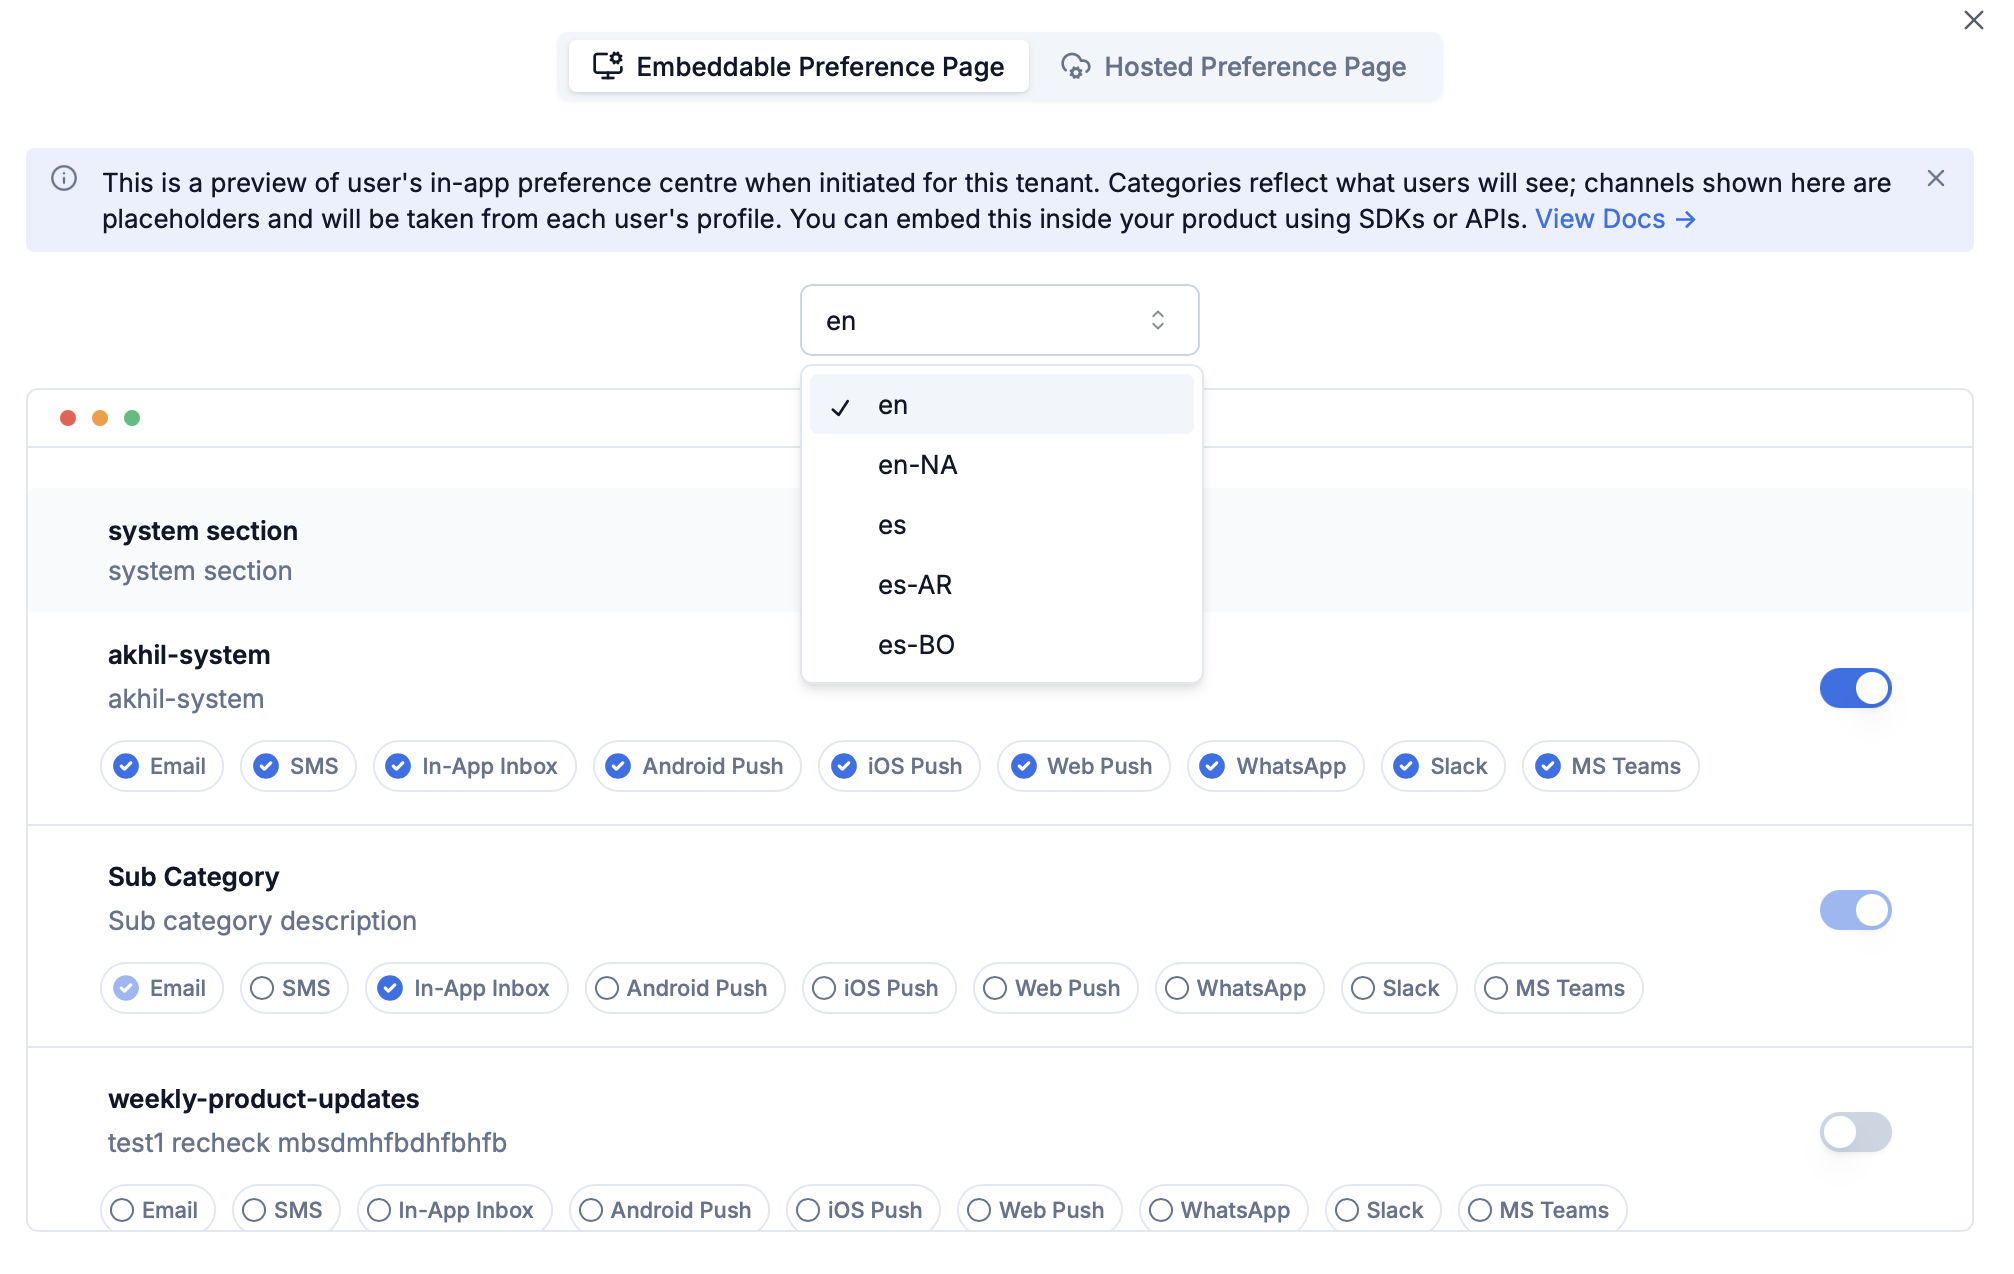
Click the **Preview** button (next to the translations button) on the Preference categories page to see how if your preview is rendering correctly in different languages.
**Translation file structure:**
Translation files follow this JSON structure with `sections` and `categories` objects. Each section and category is identified by its slug.
```json file-structure theme={"system"}
{
"sections": {
"section-slug": {
"name": "Translated section name",
"description": "Translated section description" // or null
}
},
"categories": {
"category-slug": {
"name": "Translated category name",
"description": "Translated category description" // or null
}
}
}
```
```json example theme={"system"}
{
"sections": {
"billing": {
"name": "Facturation",
"description": "Notifications liées à la facturation"
}
},
"categories": {
"invoice-ready": {
"name": "Facture prête",
"description": "Vous recevrez une notification lorsque votre facture est prête"
},
"payment-reminder": {
"name": "Rappel de paiement",
"description": null
}
}
}
```
**Note:** The `en.json` file is automatically generated from your preference settings. Download it to use as a template for translations.
Click the **Preview** button (next to the translations button) on the Preference categories page to see how if your preview is rendering correctly in different languages.
 Use [CLI command](/reference/cli-category-translation-pull) `suprsend category translation pull` and [CLI command](/reference/cli-category-translation-push) `suprsend category translation push` to copy translations from staging to production workspace.
```bash theme={"system"}
suprsend category translation pull
suprsend category translation push --workspace production
```
English (`en.json`) is automatically created and cannot be overridden. It serves as the base language for all translations.
Use Management API to programmatically add, update, or delete translations for specific locales.
See [Category Translation API](/reference/list-category-translation) for complete API reference.
See [CLI Category Translation documentation](/reference/cli-category-overview) for `category translation pull` and `category translation push` commands.
***
## Frequently Asked Questions
Create sections when:
* **Large number of categories**: If you have 10+ sub-categories, sections help users navigate the preference page more easily
* **Similar categories**: Group related sub-categories together (for example, "Billing" section for invoice, payment, and subscription categories)
* **Better organization**: Sections improve the user experience by organizing categories into logical groups
**Example:** If you have categories like "Invoice Ready", "Payment Reminder", and "Subscription Renewal", group them under a "Billing" section for better organization.
Keep your category structure simple and focused on the most important notification types. Here are some guidelines:
* **Recommended**: 5-8 sub-categories or 5-8 sections and within each section, 2-6 sub-categories. Try to keep total number of categories across all root-categories \< 20.
* **Too many categories** can overwhelm users and drive them to use channel-level opt-outs instead
* **Too few categories** may not give users enough granular control
**Best practice**: Create categories based on user actions or notification flows (for example, "Order Updates", "Account Security", "Marketing Newsletters") rather than creating a category for every single workflow.
This typically happens when you're using root-categories instead of sub-categories in your workflows.
User Preferences do not apply to **root-categories** (System, Transactional, Promotional). If you're sending notifications with `notification_category: "promotional"` or `notification_category: "transactional"`, users will continue to receive notifications even after opting out of all sub-categories.
**To fix this**:
1. Check your workflow settings and ensure you're using sub-category slugs (for example, `"marketing"`, `"order-updates"`) instead of root-category names
2. If you don't see the sub-categories in dropdown, it is possible that the sub-categories are not published. Category changes are version controlled and are not live until you publish them.
Use **tags** to filter categories based on user roles, departments, or teams. Tags allow you to customize which categories appear on each user's preference page.
**How it works**:
1. Add tags to sections or sub-categories from the [Preference categories page](https://app.suprsend.com/en/staging/developers/preference-categories)
2. When fetching user preferences via API, pass the `tags` query parameter to filter categories
3. Only categories matching the specified tags will be returned
**Important**: Tags only affect what's shown on the preference page-they don't impact delivery logic. Users can still opt in/out, and notifications will be sent based on default preferences if the category is hidden from the UI.
Read more about tags [here](/docs/managing-notification-categories#adding-tags-optional).
***
## Related documentation
* [Preference Categories](/docs/notification-category) - Concepts and detailed explanations of preference categories
* [User Preferences](/docs/user-preferences) - Overview of how users can set their Preferences
* [Tenant Preferences](/docs/tenant-preference) - How to apply admin-level preference settings to all users belonging to a tenant
* [Preference Evaluation](/docs/preference-evaluation) - How SuprSend evaluates preferences at runtime
Use [CLI command](/reference/cli-category-translation-pull) `suprsend category translation pull` and [CLI command](/reference/cli-category-translation-push) `suprsend category translation push` to copy translations from staging to production workspace.
```bash theme={"system"}
suprsend category translation pull
suprsend category translation push --workspace production
```
English (`en.json`) is automatically created and cannot be overridden. It serves as the base language for all translations.
Use Management API to programmatically add, update, or delete translations for specific locales.
See [Category Translation API](/reference/list-category-translation) for complete API reference.
See [CLI Category Translation documentation](/reference/cli-category-overview) for `category translation pull` and `category translation push` commands.
***
## Frequently Asked Questions
Create sections when:
* **Large number of categories**: If you have 10+ sub-categories, sections help users navigate the preference page more easily
* **Similar categories**: Group related sub-categories together (for example, "Billing" section for invoice, payment, and subscription categories)
* **Better organization**: Sections improve the user experience by organizing categories into logical groups
**Example:** If you have categories like "Invoice Ready", "Payment Reminder", and "Subscription Renewal", group them under a "Billing" section for better organization.
Keep your category structure simple and focused on the most important notification types. Here are some guidelines:
* **Recommended**: 5-8 sub-categories or 5-8 sections and within each section, 2-6 sub-categories. Try to keep total number of categories across all root-categories \< 20.
* **Too many categories** can overwhelm users and drive them to use channel-level opt-outs instead
* **Too few categories** may not give users enough granular control
**Best practice**: Create categories based on user actions or notification flows (for example, "Order Updates", "Account Security", "Marketing Newsletters") rather than creating a category for every single workflow.
This typically happens when you're using root-categories instead of sub-categories in your workflows.
User Preferences do not apply to **root-categories** (System, Transactional, Promotional). If you're sending notifications with `notification_category: "promotional"` or `notification_category: "transactional"`, users will continue to receive notifications even after opting out of all sub-categories.
**To fix this**:
1. Check your workflow settings and ensure you're using sub-category slugs (for example, `"marketing"`, `"order-updates"`) instead of root-category names
2. If you don't see the sub-categories in dropdown, it is possible that the sub-categories are not published. Category changes are version controlled and are not live until you publish them.
Use **tags** to filter categories based on user roles, departments, or teams. Tags allow you to customize which categories appear on each user's preference page.
**How it works**:
1. Add tags to sections or sub-categories from the [Preference categories page](https://app.suprsend.com/en/staging/developers/preference-categories)
2. When fetching user preferences via API, pass the `tags` query parameter to filter categories
3. Only categories matching the specified tags will be returned
**Important**: Tags only affect what's shown on the preference page-they don't impact delivery logic. Users can still opt in/out, and notifications will be sent based on default preferences if the category is hidden from the UI.
Read more about tags [here](/docs/managing-notification-categories#adding-tags-optional).
***
## Related documentation
* [Preference Categories](/docs/notification-category) - Concepts and detailed explanations of preference categories
* [User Preferences](/docs/user-preferences) - Overview of how users can set their Preferences
* [Tenant Preferences](/docs/tenant-preference) - How to apply admin-level preference settings to all users belonging to a tenant
* [Preference Evaluation](/docs/preference-evaluation) - How SuprSend evaluates preferences at runtime