> ## Documentation Index
> Fetch the complete documentation index at: https://docs.suprsend.com/llms.txt
> Use this file to discover all available pages before exploring further.
# Microsoft Teams
> Step-by-step guide to build a Microsoft Teams bot and integrate it with SuprSend so you can send notifications to user DMs or channels.
This is a step-by-step guide to integrating and sending notifications to users on Microsoft Teams.
## Pre-Requisites
To send notifications on Microsoft Teams, you'll need to create a Teams bot. This bot will be responsible for sending notifications to users / channels in their Teams workspace. You'll also need a Microsoft 365 developer account and permission to add apps to your teams. You can ask your admin to assign you relevant permission, or you can sign up for a free Microsoft 365 developer program.
* [Sign up for a Microsoft 365 developer program](https://developer.microsoft.com/en-us/microsoft-365/dev-program/)
* [Create a Teams App](docs/microsoft-teams#create-teams-app)
## Create Teams app
You'll have to create a [Teams App](/docs/microsoft-teams#step-1-create-teams-app) to send notifications via SuprSend. User will have to add this App in their Teams workspace and channel to start getting notifications through the App. You can learn more about Apps [here](https://learn.microsoft.com/en-us/microsoftteams/platform/concepts/build-and-test/teams-developer-portal).
First, [create a Microsoft 365 Developer Account](https://developer.microsoft.com/en-us/microsoft-365/dev-program/). Sign in If you have an existing developer account. You'll need permission to add Apps in your account. Ask your admin to assign you relevant permissions if you are using an existing account.
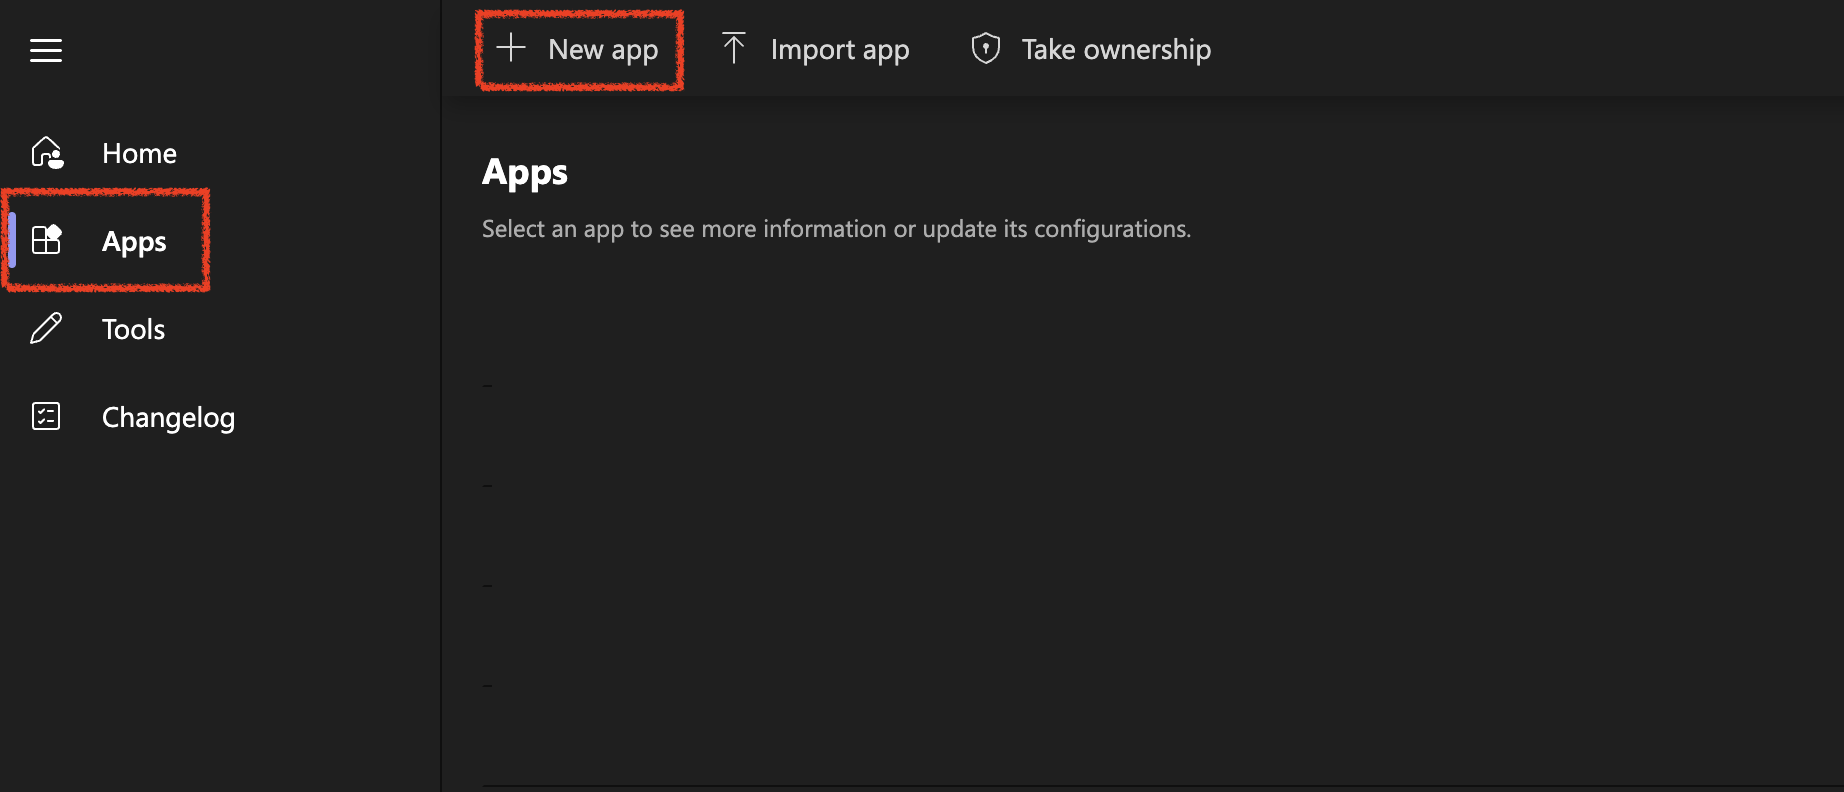
Now, navigate to the Apps section and click on **+New App**.
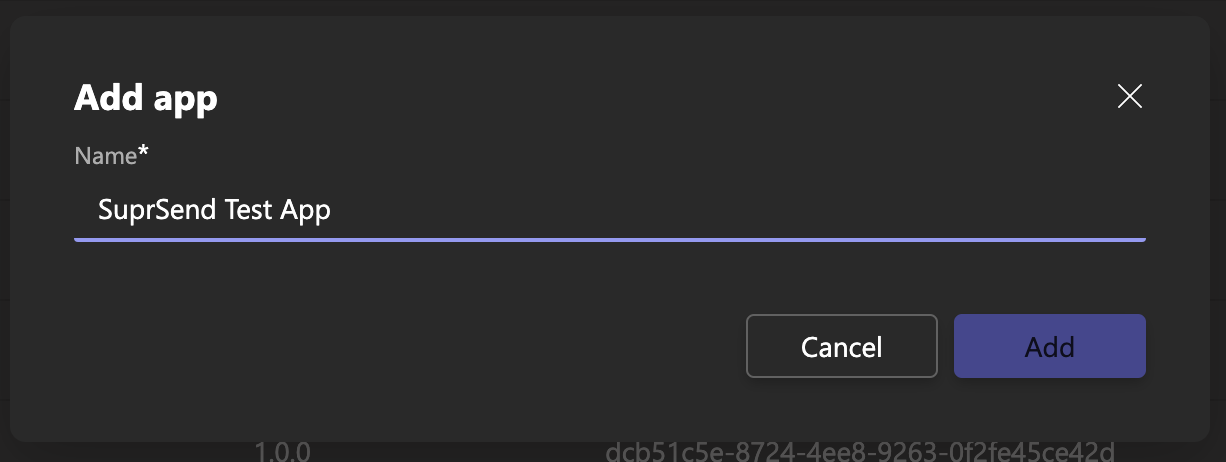
 Give your App a suitable name and Add. For your test app, you can use something like "SuprSend Test App" for app name
 You'll be redirected to a new window where you'll have to add a few information related to your application such as company name, description, website link, URLs to register the App.
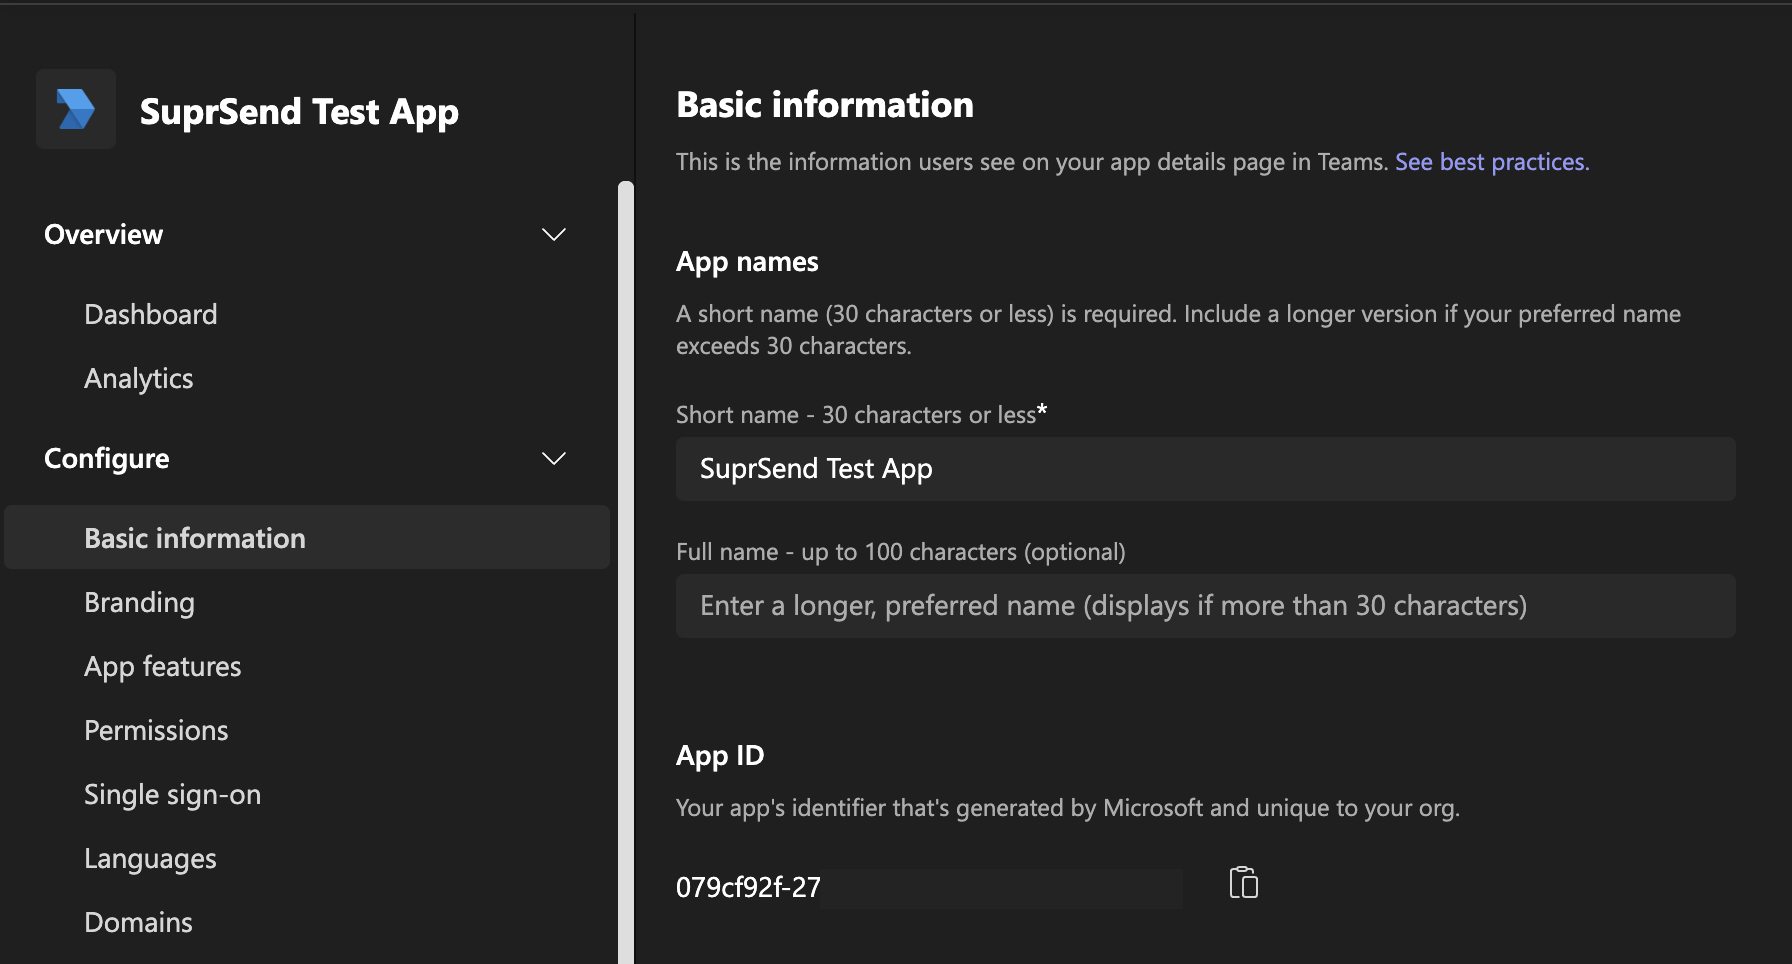 Now select App feature from your left panel to click on Bot.
If you have an existing bot, select it from the list or click on Create a new bot
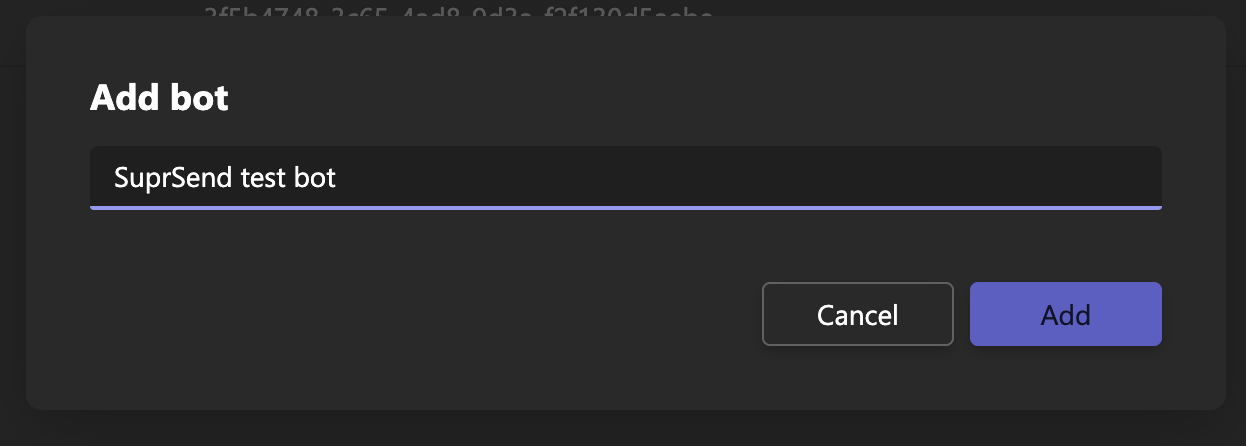
On the [bot page](https://dev.teams.microsoft.com/bots), click on **+New Bot** and add bot name. Add a relevant bot name and **Add**.
Now select App feature from your left panel to click on Bot.
If you have an existing bot, select it from the list or click on Create a new bot
On the [bot page](https://dev.teams.microsoft.com/bots), click on **+New Bot** and add bot name. Add a relevant bot name and **Add**.
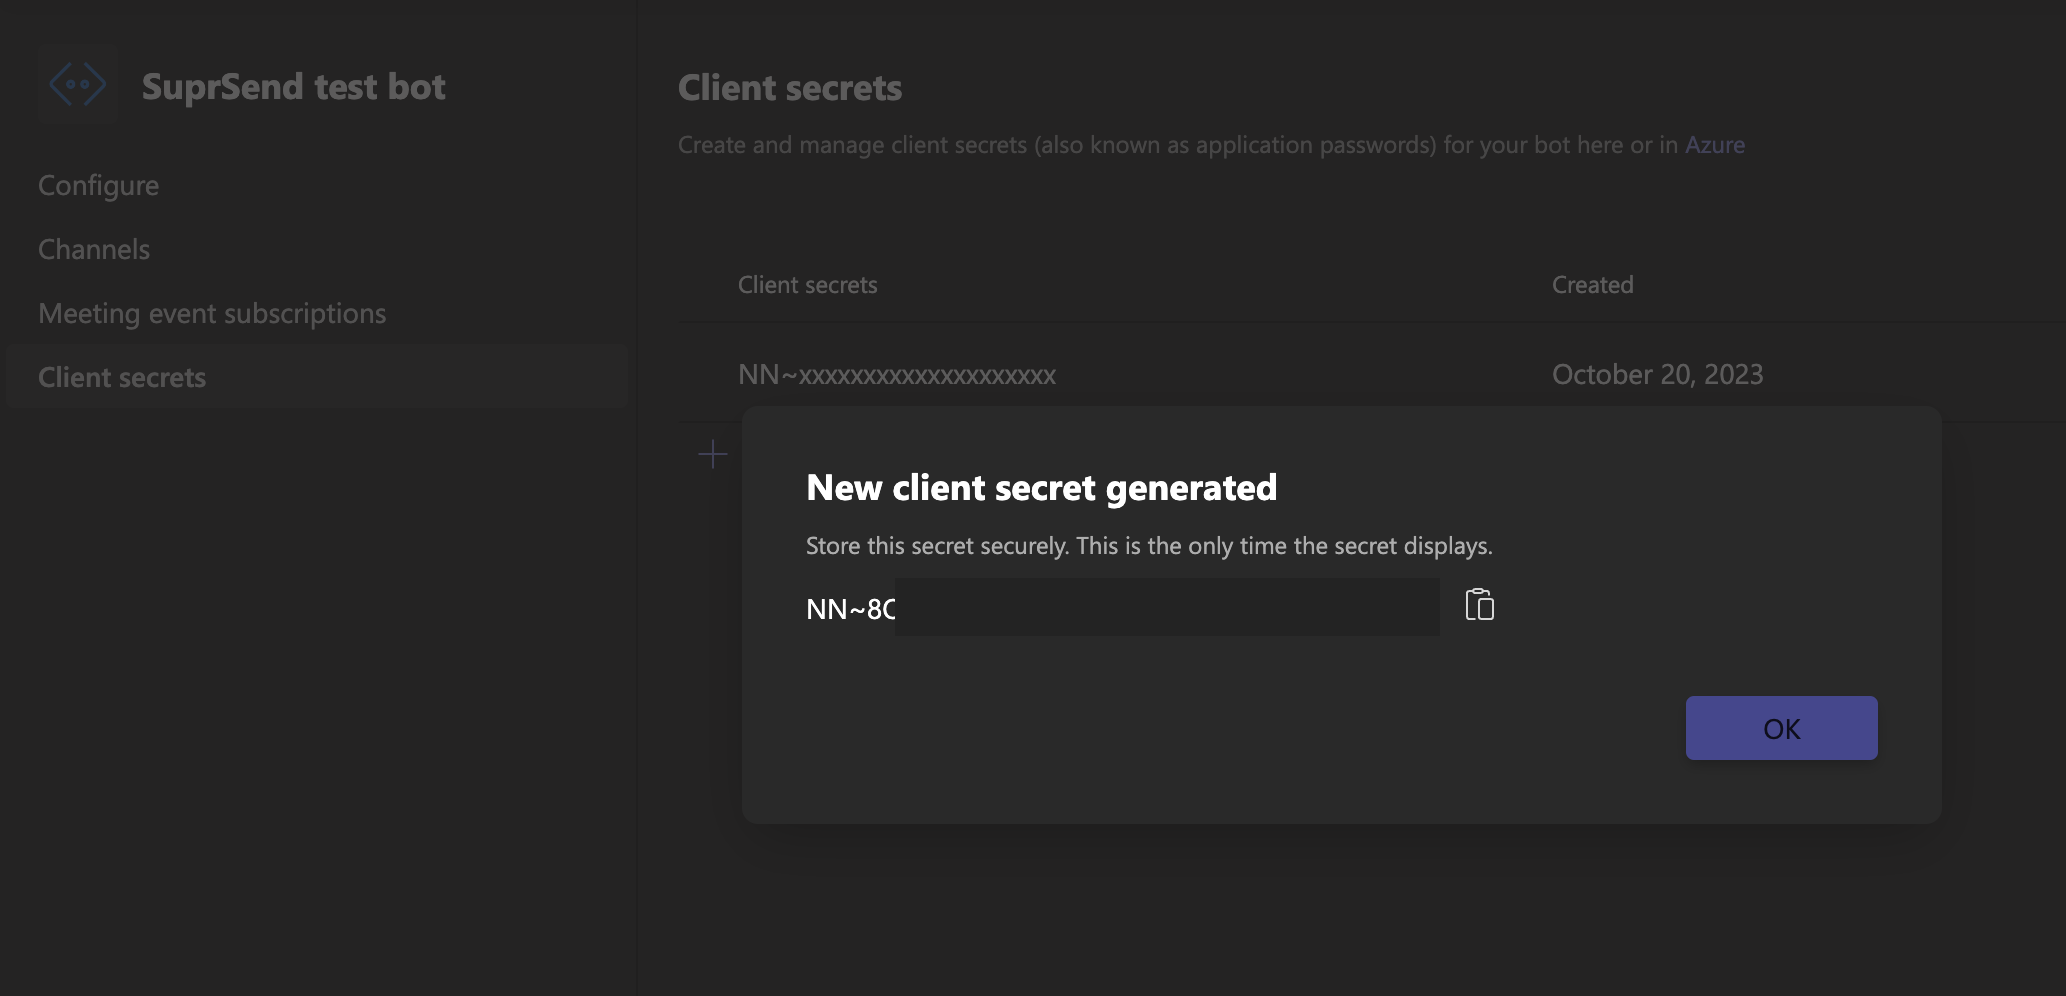
 Once the bot is created, you'll land on bot configuration page. Leave the endpoint blank, select "**Microsoft teams**" in the channel and create **client secret** for your bot. Save your bot secret somewhere safe. You'll need this in SuprSend vendor integration form.
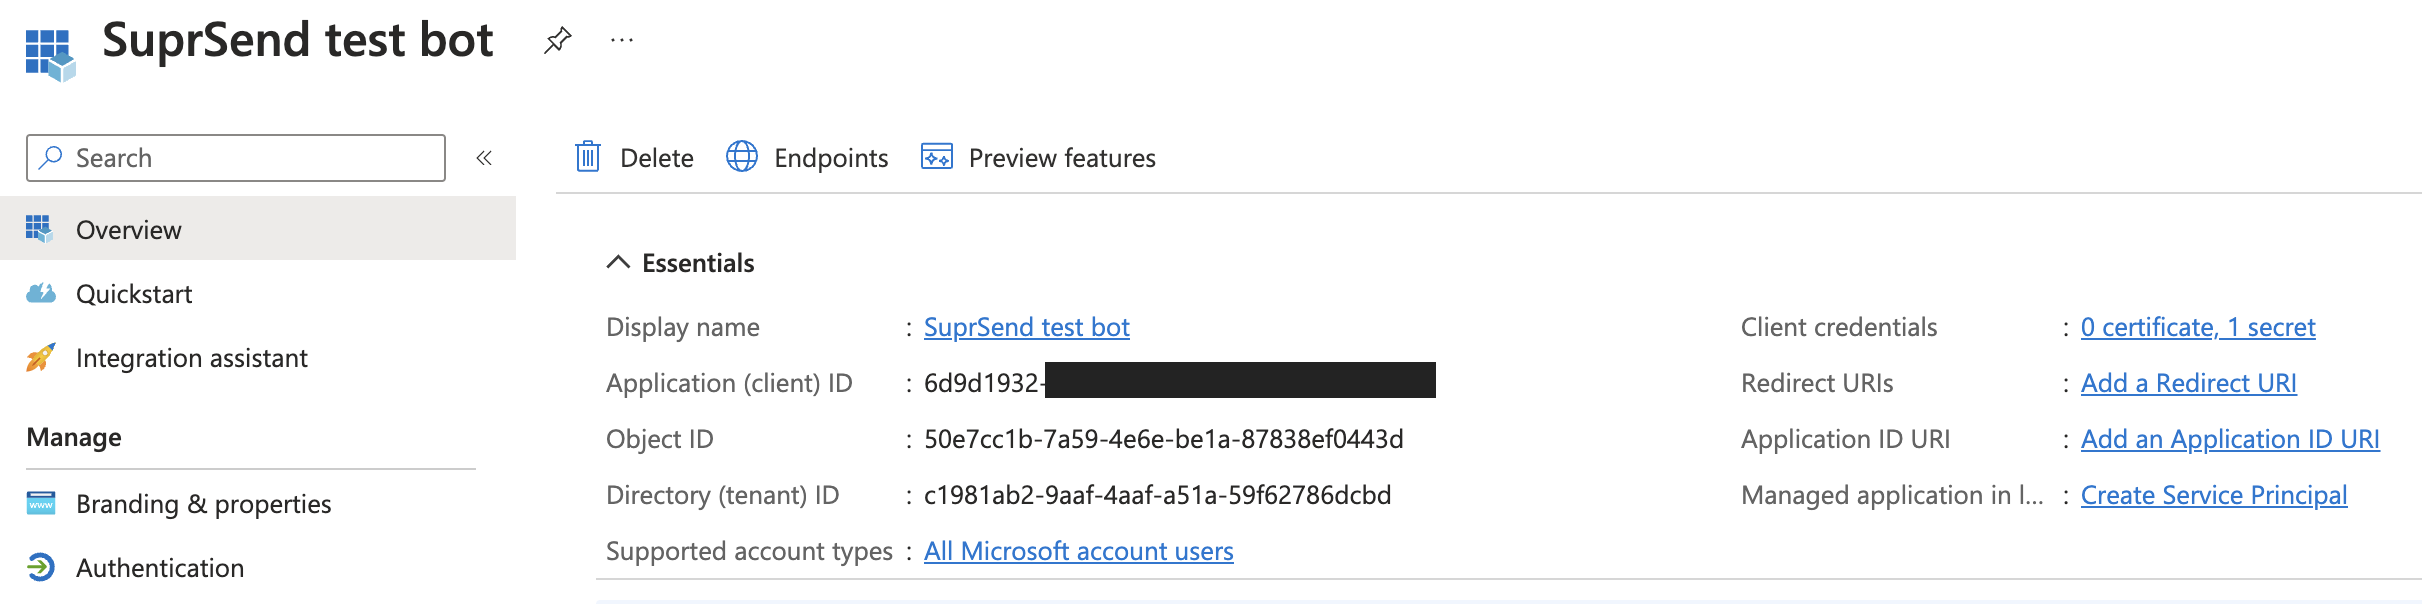
 Now login to [Azure portal](https://portal.azure.com/#view/Microsoft_AAD_RegisteredApps/ApplicationsListBlade) and select All Apps. Here, you'll see the recently created bot. Click on it and copy the **App (client) ID**. You'll need to fill this information in SuprSend vendor integration form.
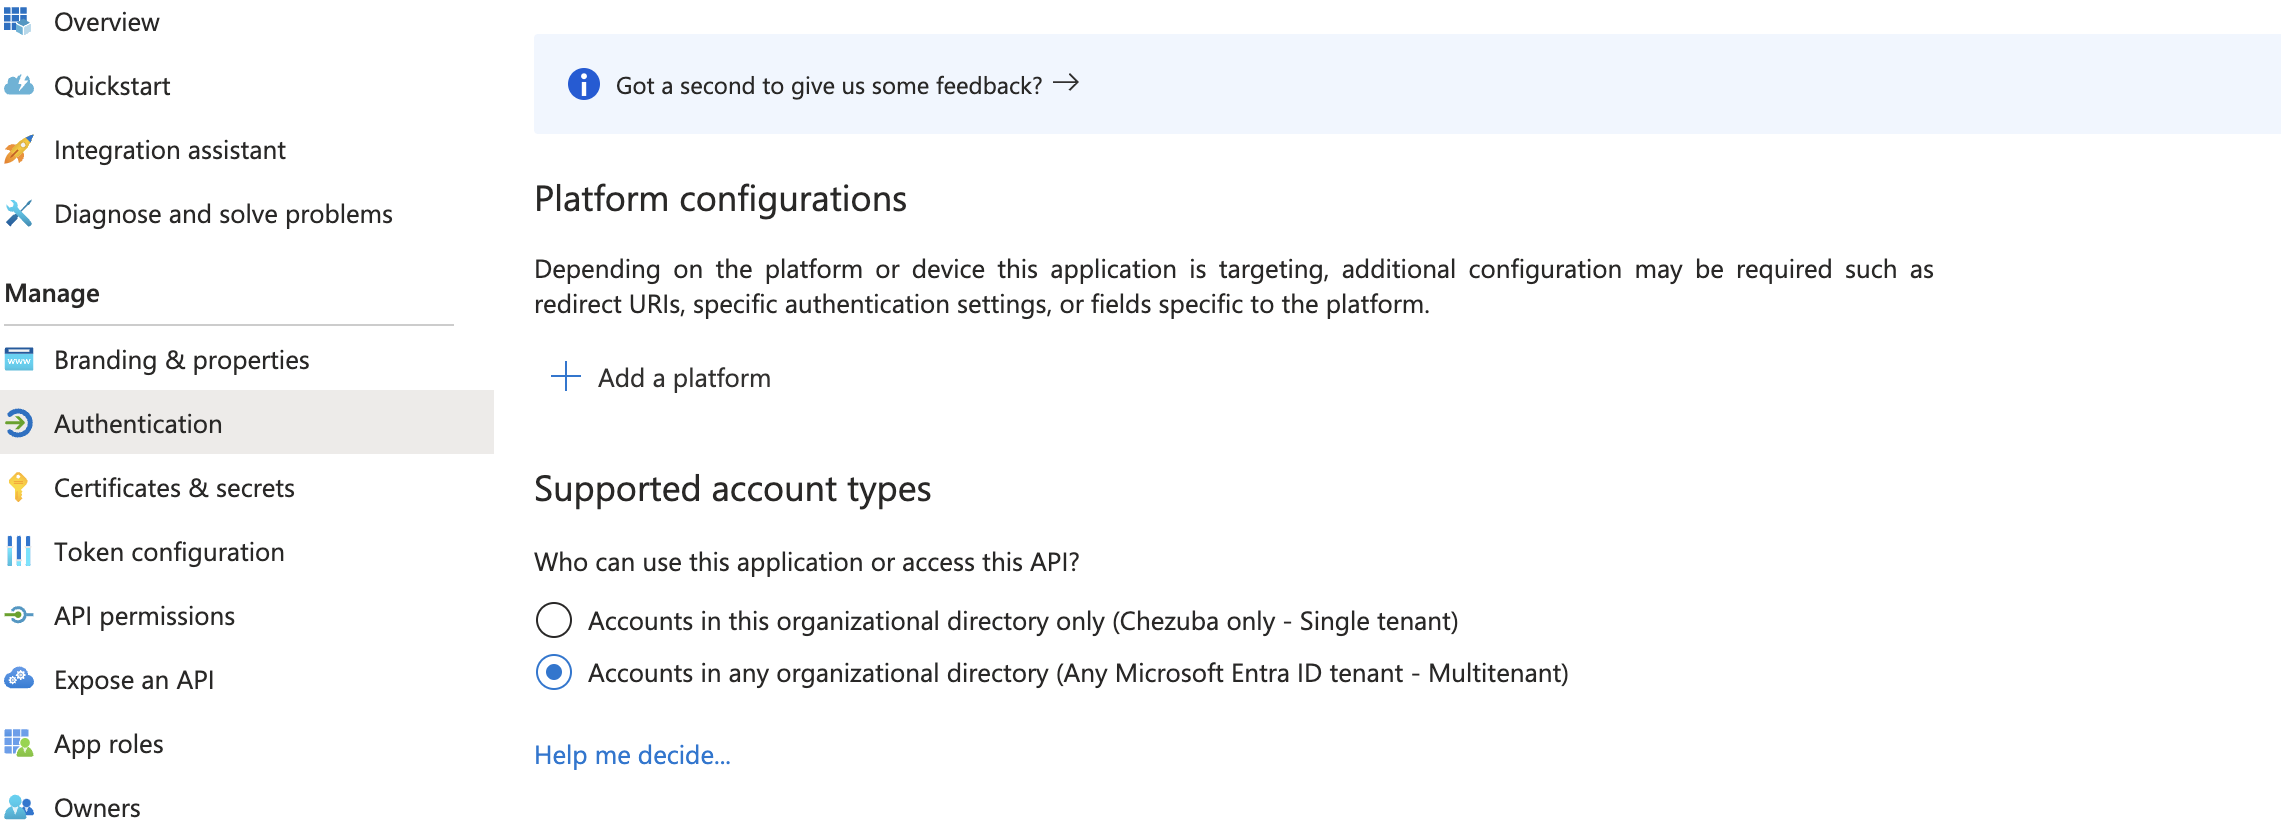
 After navigating, select `Accounts in any organizational directory`and save.
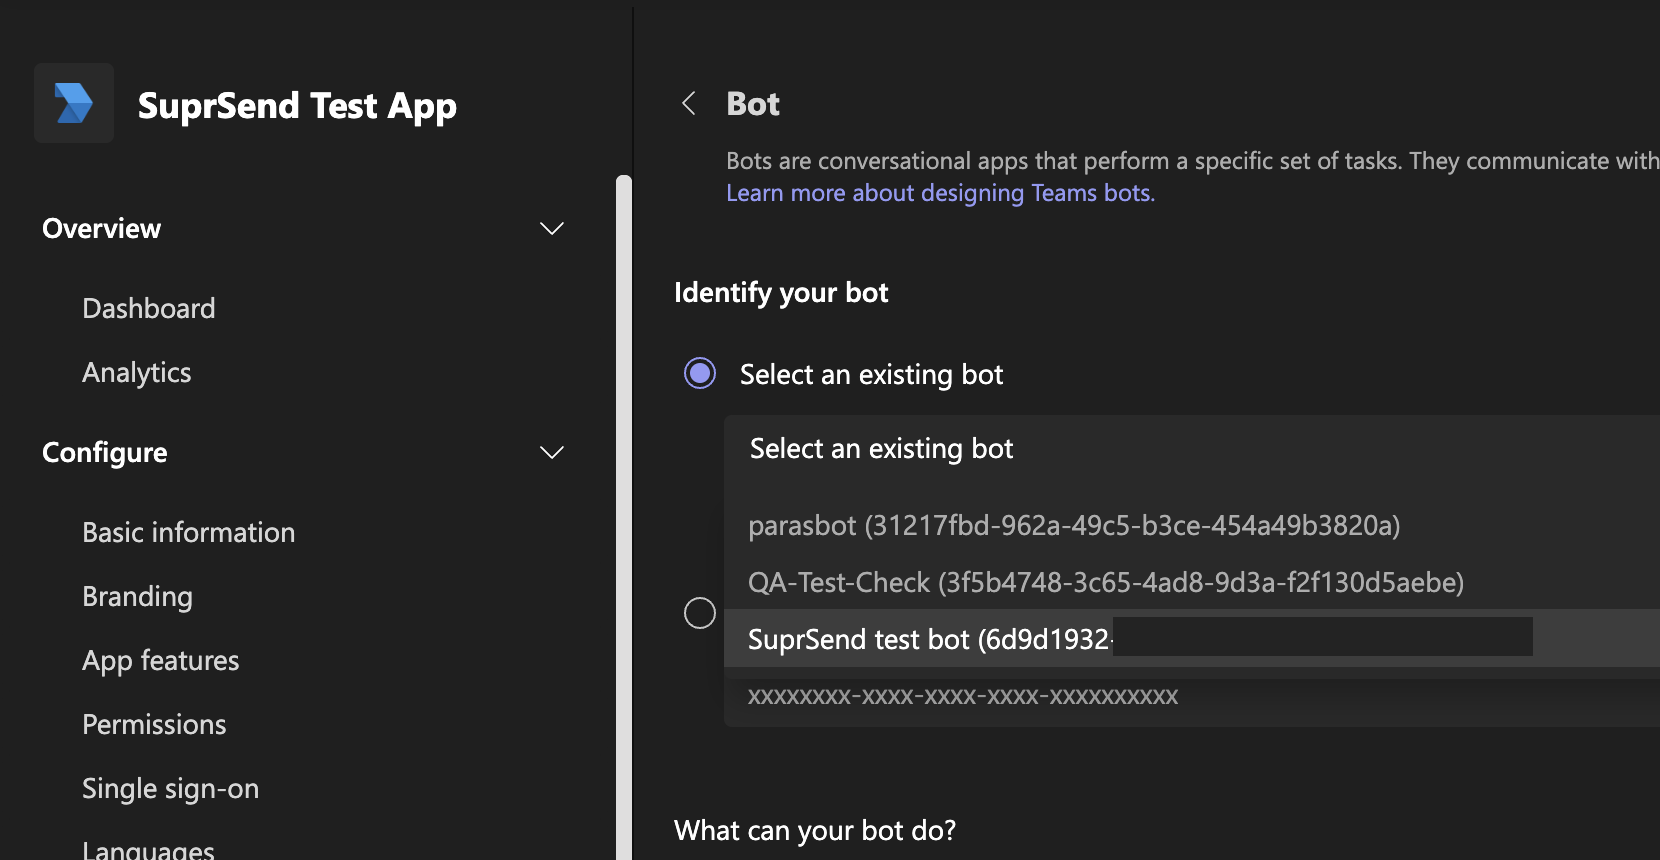
 Now that your bot is created, go back to your developer portal -> Apps and select your last created App. Select App features -> bot. In the bot configuration, add your recently created bot.
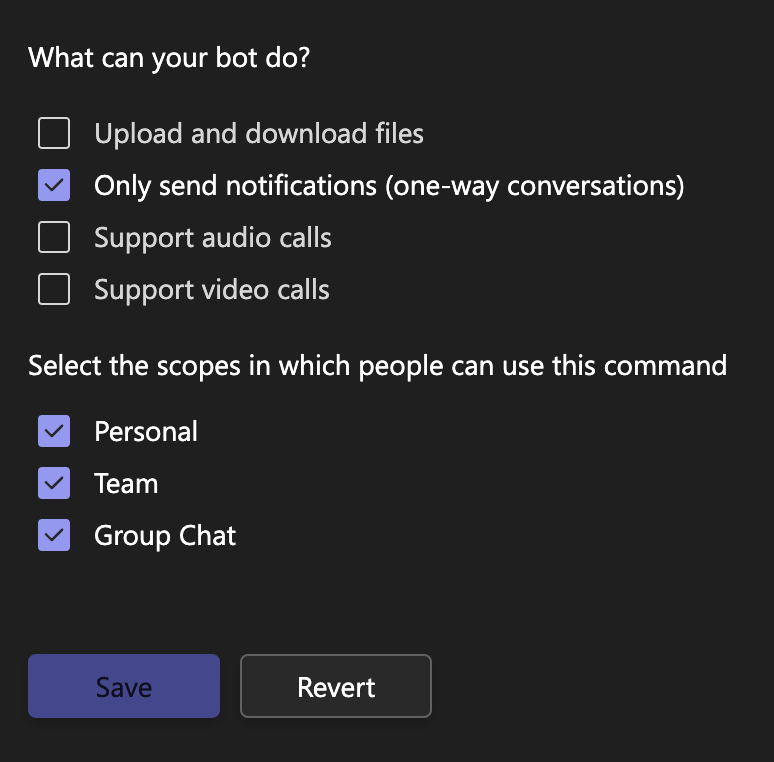
 Choose **Only send notifications** in "what can your bot do?" Add **personal**, **team** and **group chat** in bot scopes and click on Save.
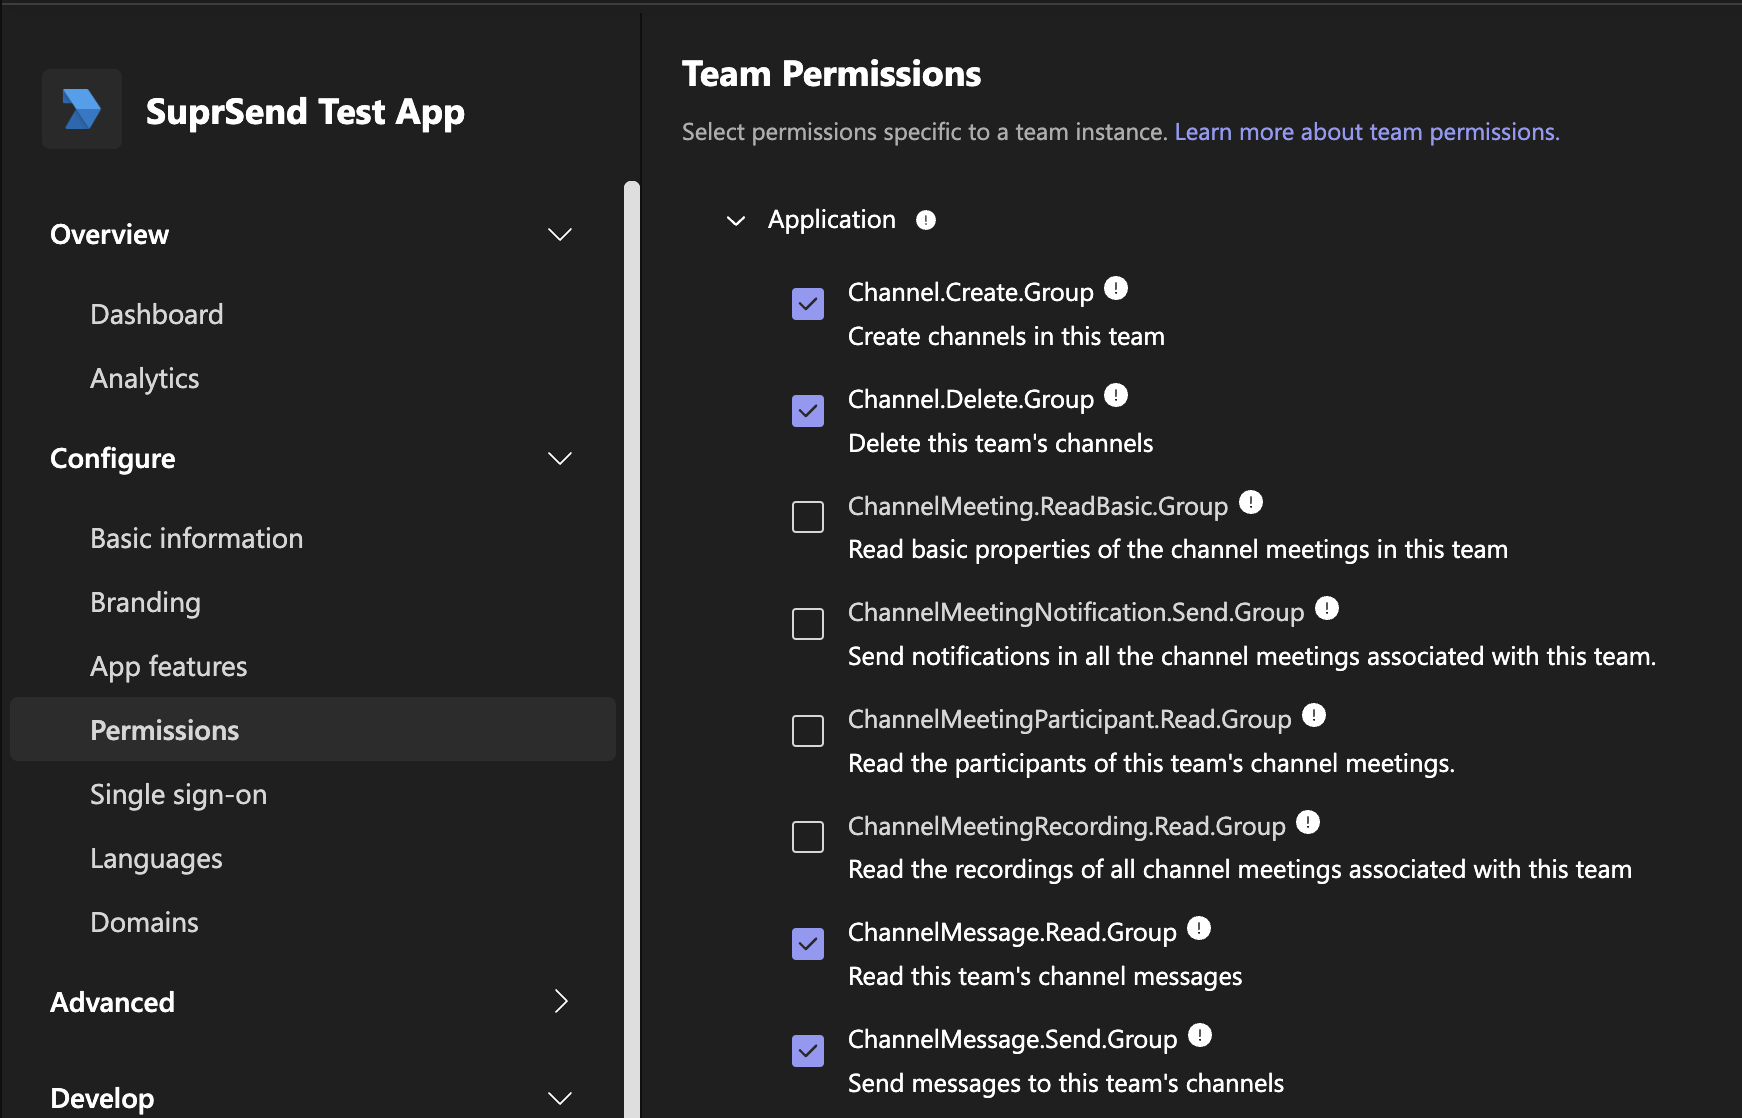
 In your App permissions, add below permission.
| Section | Permissions |
| --------------------------------------- | ------------------------------------------------------------------------------------------------------------------------------------ |
| Team Permissions -> Application | `Channel.Create.Group`, `Channel.Delete.Group`, `ChannelMessage.Read.Group`, `ChannelMessage.Send.Group`, `TeamsActivity.Send.Group` |
| Chat/Meeting Permissions -> Application | `ChatMessage.Read.Chat`, `ChatMessage.Send.Chat` |
| User Permissions -> Application | `TeamsActivity.Send.User` |
In your App permissions, add below permission.
| Section | Permissions |
| --------------------------------------- | ------------------------------------------------------------------------------------------------------------------------------------ |
| Team Permissions -> Application | `Channel.Create.Group`, `Channel.Delete.Group`, `ChannelMessage.Read.Group`, `ChannelMessage.Send.Group`, `TeamsActivity.Send.Group` |
| Chat/Meeting Permissions -> Application | `ChatMessage.Read.Chat`, `ChatMessage.Send.Chat` |
| User Permissions -> Application | `TeamsActivity.Send.User` |
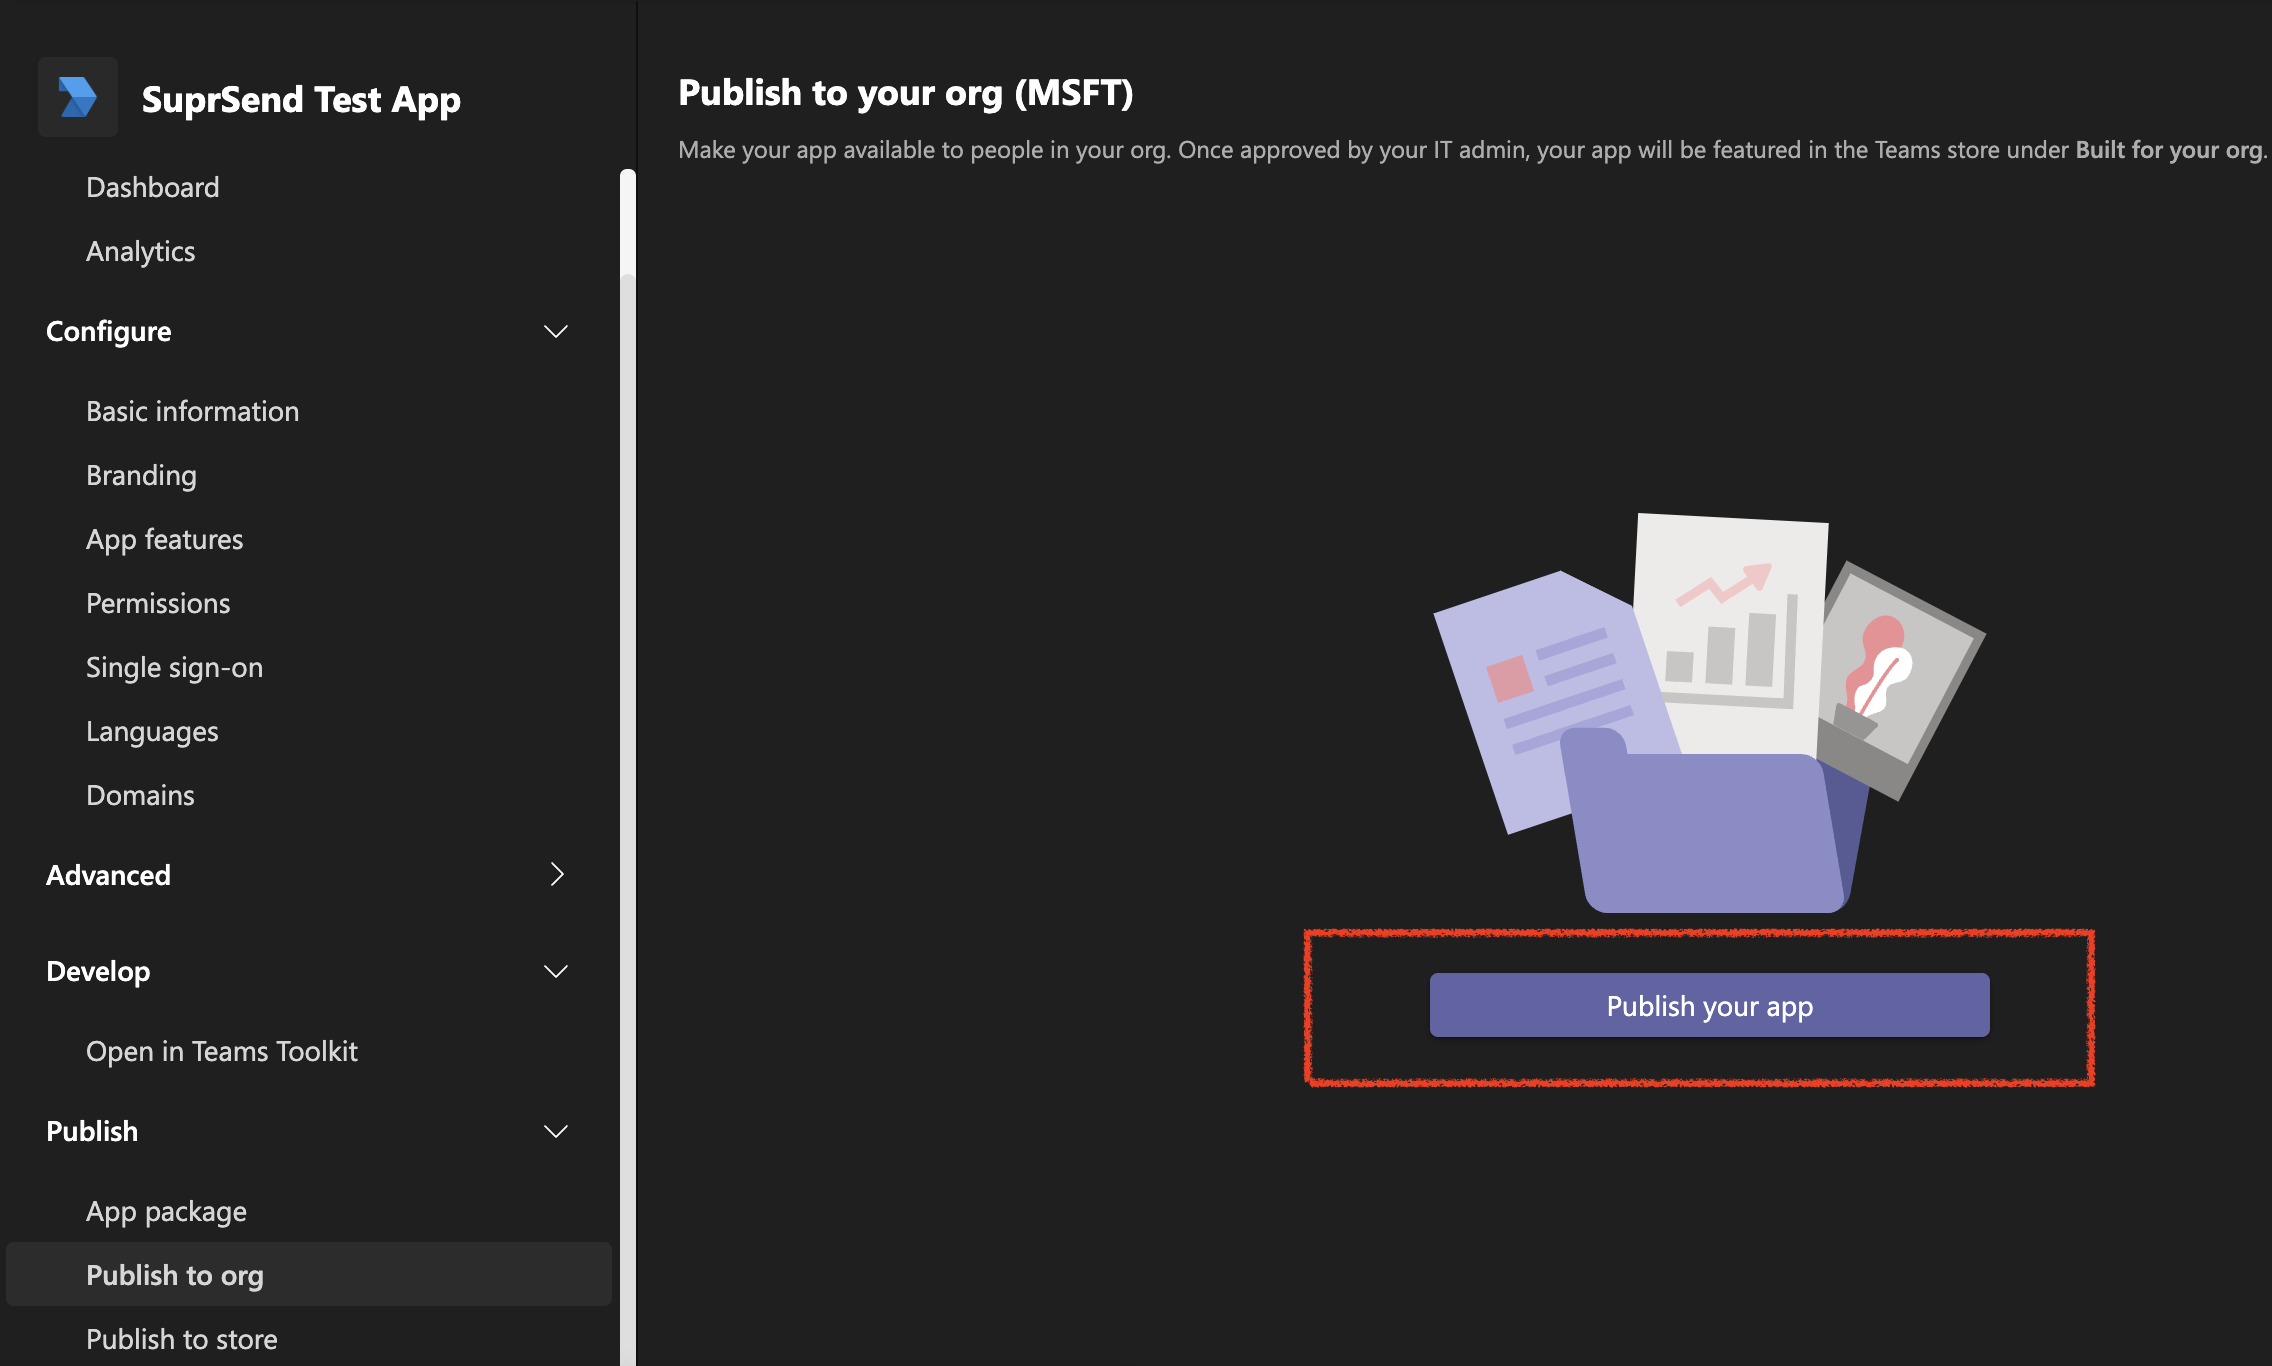
 Publish to org if you want your App to be accessible only inside your organization teams. Publish to store if you want to make it publicly available in the teams App store.
 Your admin will have to approve the App for it to go live. For admin approval, go to [admin portal](https://admin.teams.microsoft.com/policies/manage-apps) and publish it again. Your App might take some time to go live once it is published.
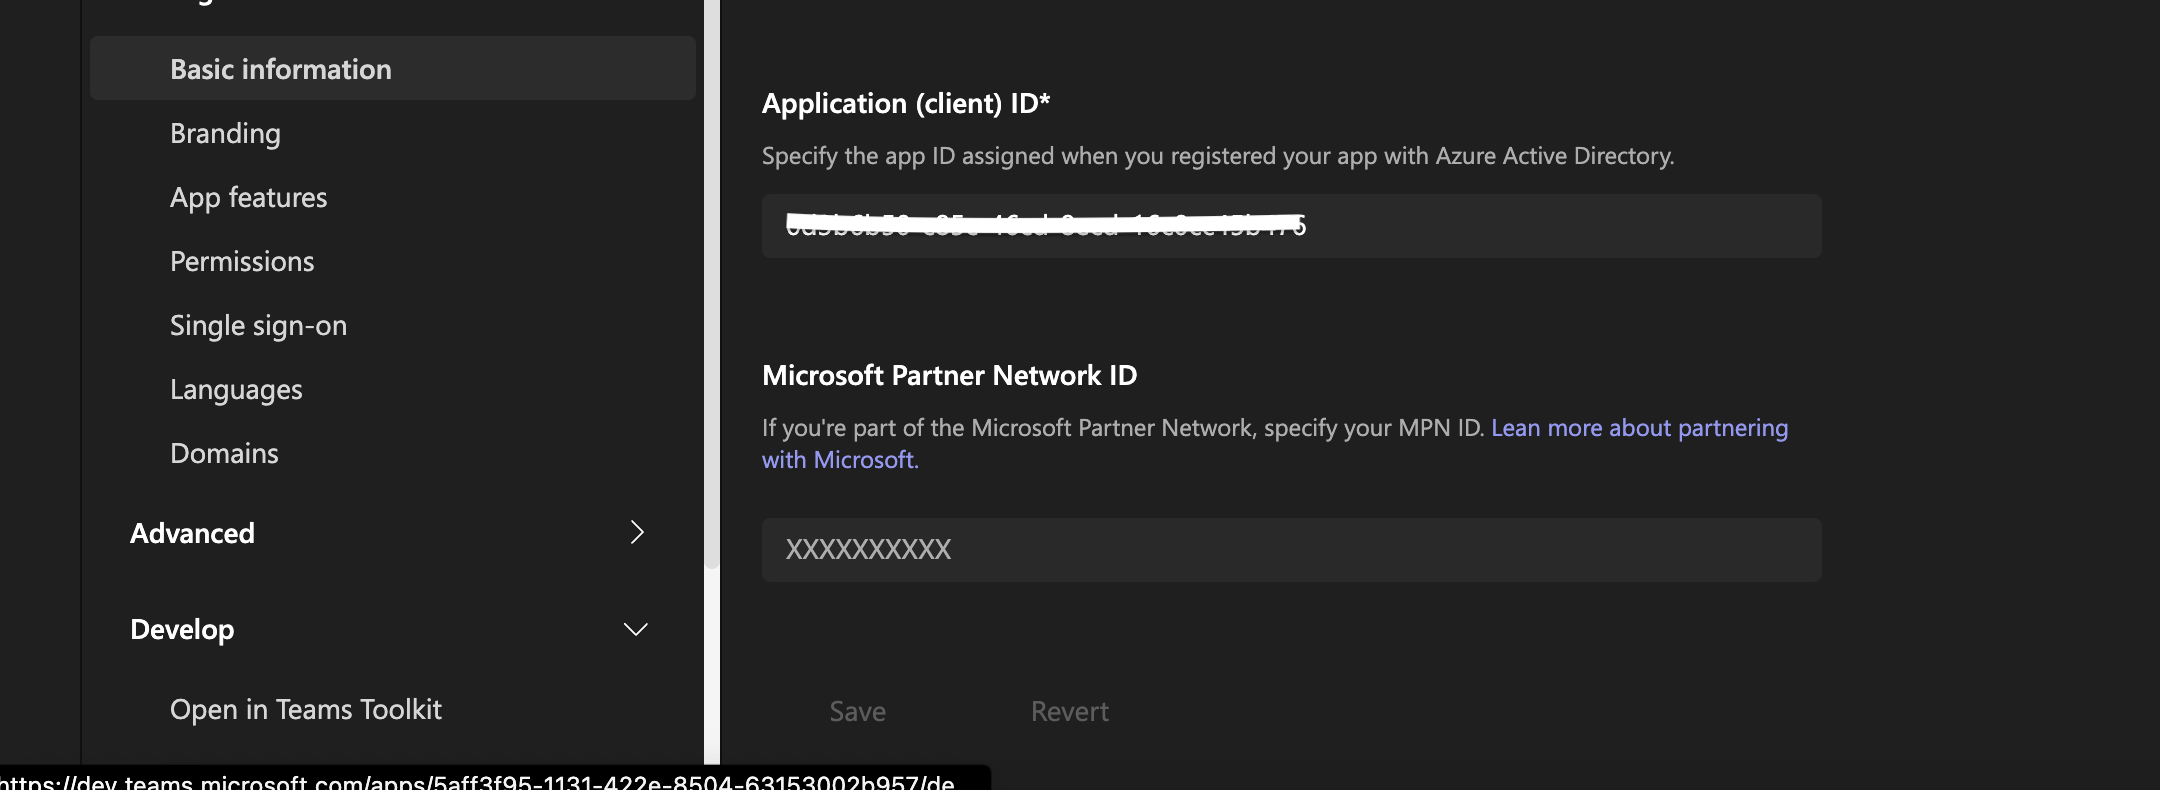
Add client ID that you copied from azure portal into your App Basic Information:
Your admin will have to approve the App for it to go live. For admin approval, go to [admin portal](https://admin.teams.microsoft.com/policies/manage-apps) and publish it again. Your App might take some time to go live once it is published.
Add client ID that you copied from azure portal into your App Basic Information:
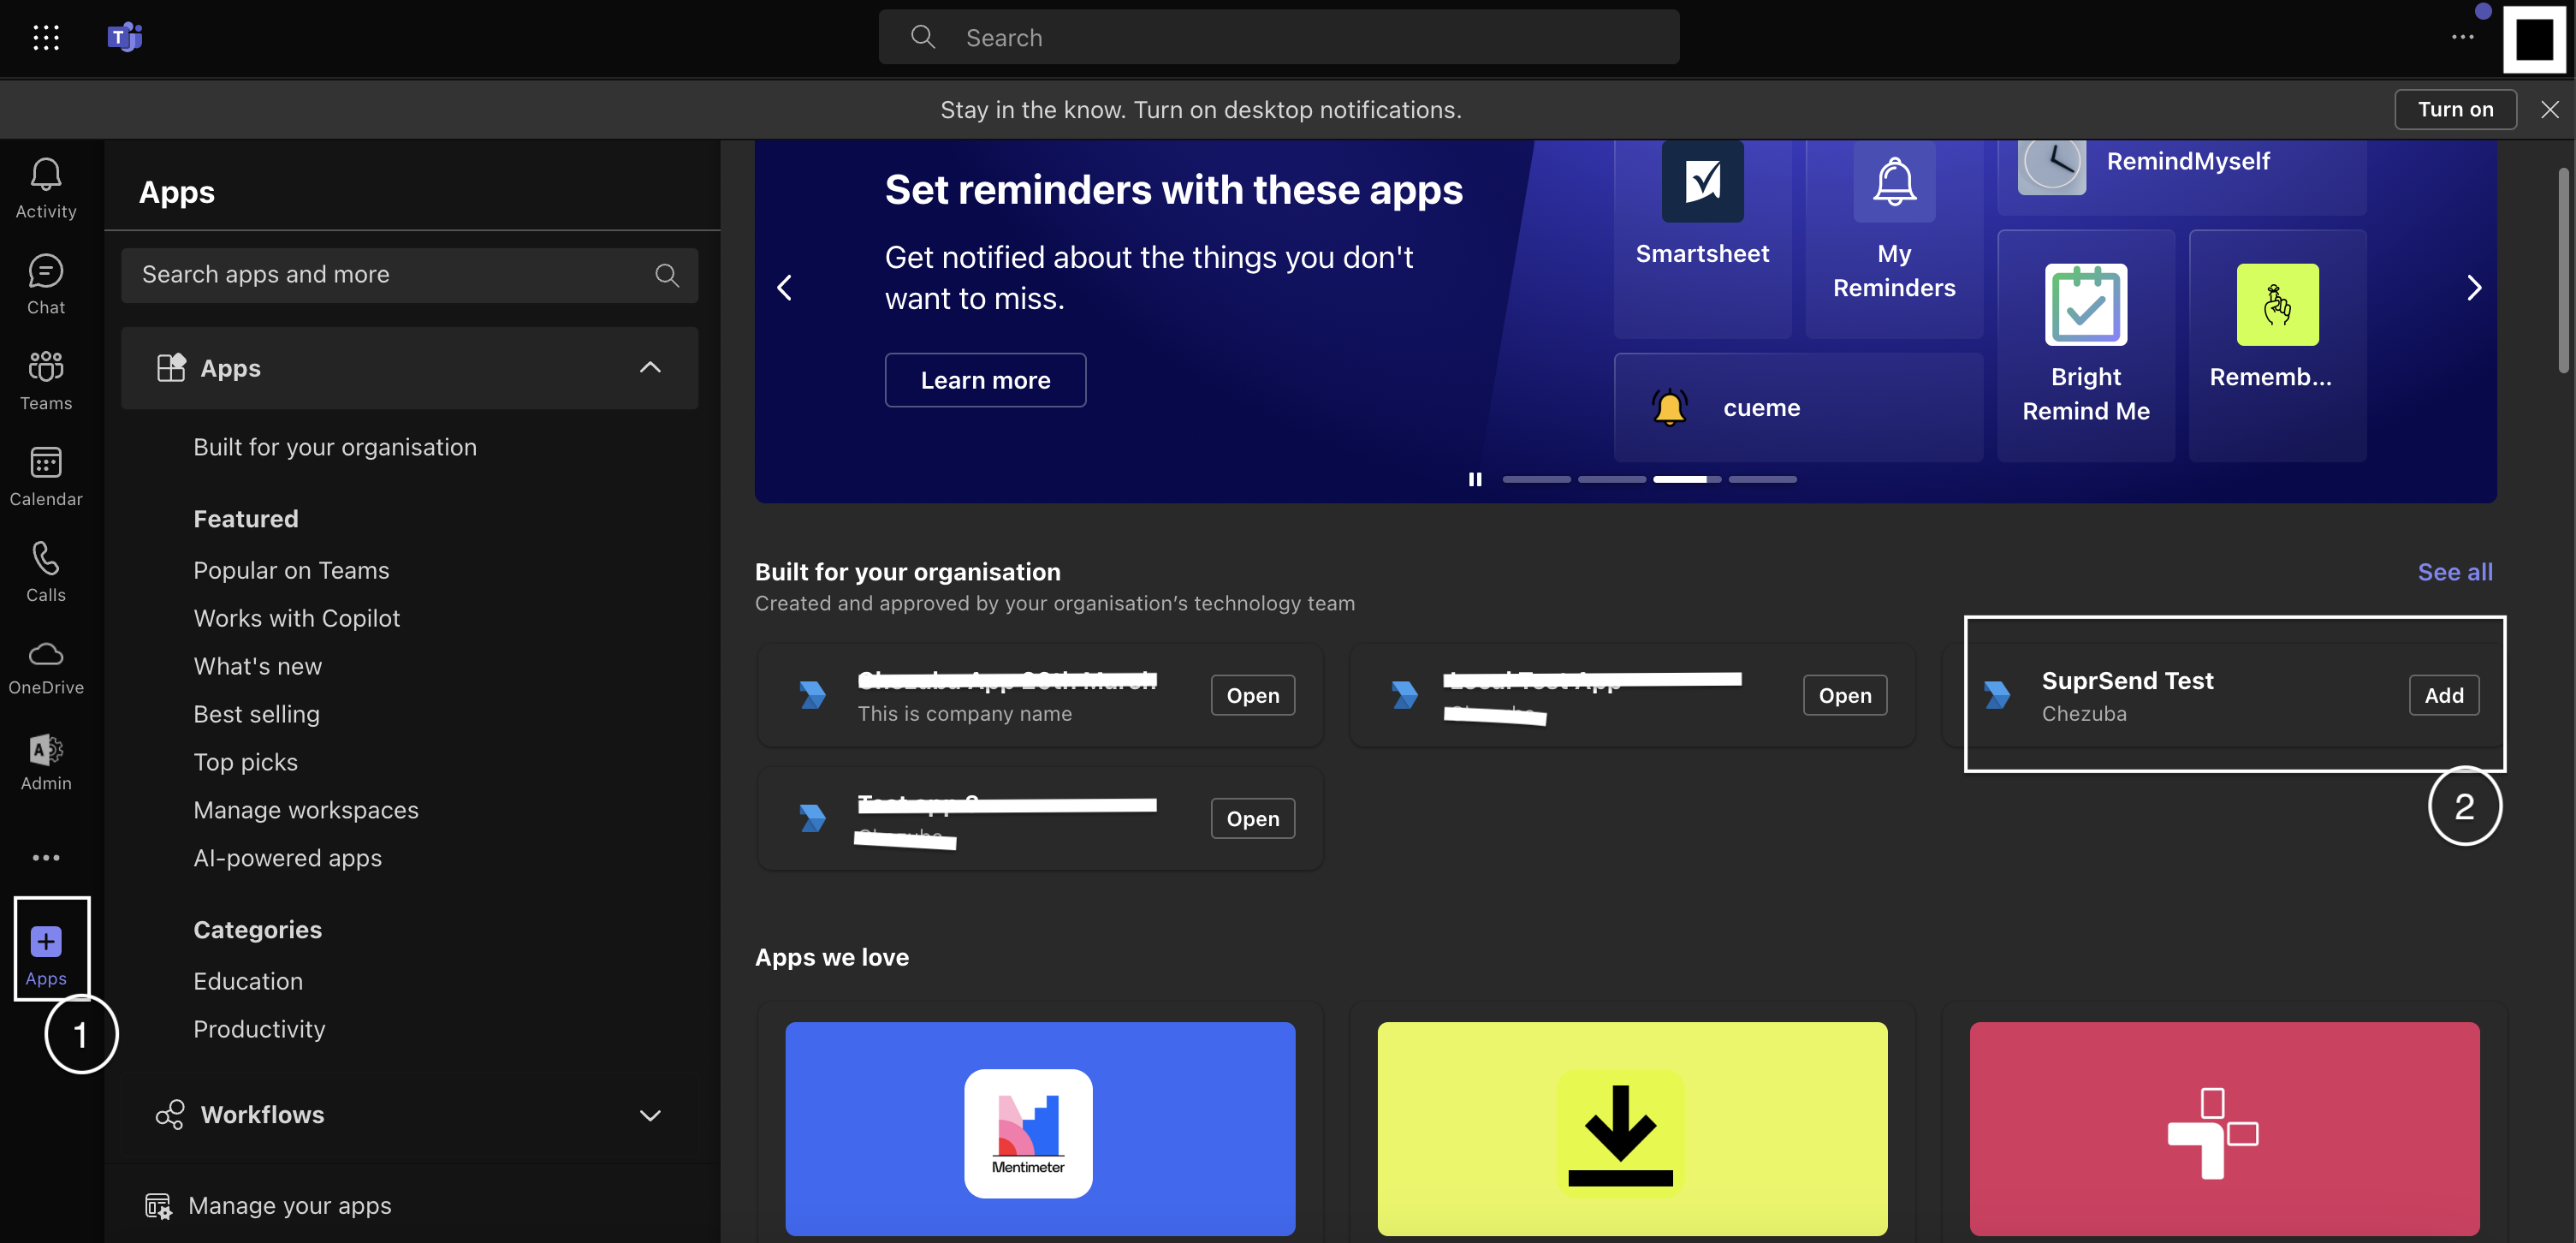
 Now go to [https://teams.microsoft.com/](https://teams.microsoft.com/) and **ADD** the app . First, from left panel select Apps with a + sign and then In the section "Built for this organization", there will be an option to Add the app.
 ## Add Teams integration on SuprSend
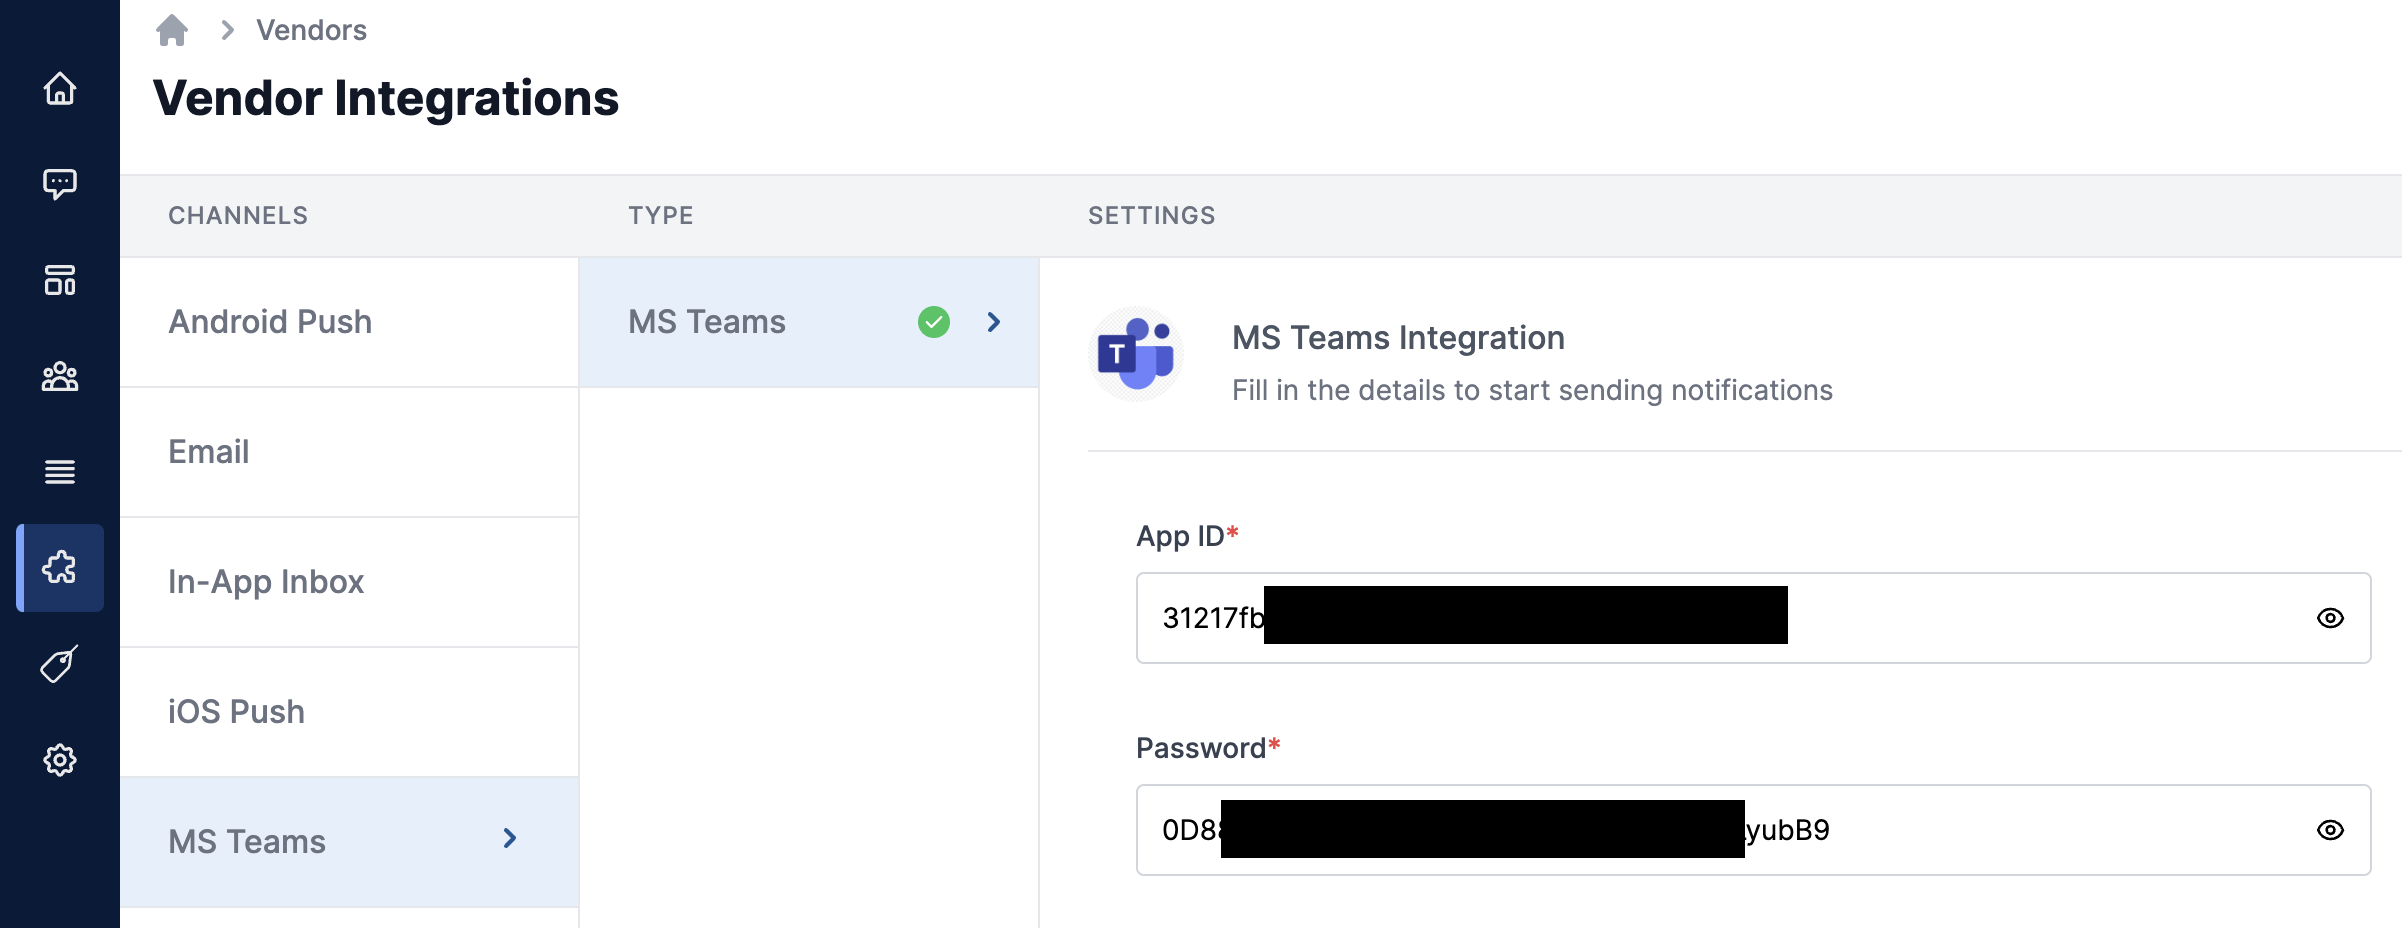
Go to SuprSend dashboard -> [Microsoft teams Vendor Settings](https://app.suprsend.com/en/staging/vendors/ms_teams/ms_teams-ms_teams?brand_id=default) page. Add `Application (client) ID` and `client secret` (in Password field) generated while [creating bot in the above step](/docs/microsoft-teams#creating-a-new-bot).
## Add Teams integration on SuprSend
Go to SuprSend dashboard -> [Microsoft teams Vendor Settings](https://app.suprsend.com/en/staging/vendors/ms_teams/ms_teams-ms_teams?brand_id=default) page. Add `Application (client) ID` and `client secret` (in Password field) generated while [creating bot in the above step](/docs/microsoft-teams#creating-a-new-bot).
 ## Update teams channel in user or object profile
The information required in the user profile is dependent on the type of message you are sending.
To send a direct message to a user, add `tenant_id` , `service_url` of the tenant, and `conversation_id` or `user_id` corresponding to user personal chat.
You can pass this information in a json format using `user.add_ms_teams` method as below:
```python python theme={"system"}
distinct_id = "__uniq_user_id__" # Unique identifier of user in your application
# Instantiate User profile
user = supr_client.user.get_instance(distinct_id=distinct_id)
# using conversation_id
user.add_ms_teams(
{
"tenant_id": "c1981ab2-9aaf-xxxx-xxxx",
"service_url": "https://smba.trafficmanager.net/amer",
"conversation_id": "19:c1524d7c-a06f-456f-8abe-xxxx"
})
# using user_id
user.add_ms_teams(
{
"tenant_id": "c1981ab2-9aaf-xxxx-xxxx",
"service_url": "https://smba.trafficmanager.net/amer",
"user_id": "29:1nsLcmJ2RKtYH6Cxxxx-xxxx"
})
response = user.save()
print(response)
```
```javascript node.js theme={"system"}
const distinct_id = "__uniq_user_id__" // Unique id of user in your application
const user = supr_client.user.get_instance(distinct_id) // Instantiate User profile
// using conversation_id
user.add_ms_teams(
{
"tenant_id": "c1981ab2-9aaf-xxxx-xxxx",
"service_url": "https://smba.trafficmanager.net/amer",
"conversation_id": "19:c1524d7c-a06f-456f-8abe-xxxx"
})
//using user_id
user.add_ms_teams(
{
"tenant_id": "c1981ab2-9aaf-xxxx-xxxx",
"service_url": "https://smba.trafficmanager.net/amer",
"user_id": "29:1nsLcmJ2RKtYH6Cxxxx-xxxx"
})
const response = user.save()
response.then((res) => console.log("response", res));
```
**Getting tenant ID, user ID, conversation ID:**
You'll get **tenant ID** from your developer azure portal.
You'll get **conversation\_id** from the URL of the chat.
## Update teams channel in user or object profile
The information required in the user profile is dependent on the type of message you are sending.
To send a direct message to a user, add `tenant_id` , `service_url` of the tenant, and `conversation_id` or `user_id` corresponding to user personal chat.
You can pass this information in a json format using `user.add_ms_teams` method as below:
```python python theme={"system"}
distinct_id = "__uniq_user_id__" # Unique identifier of user in your application
# Instantiate User profile
user = supr_client.user.get_instance(distinct_id=distinct_id)
# using conversation_id
user.add_ms_teams(
{
"tenant_id": "c1981ab2-9aaf-xxxx-xxxx",
"service_url": "https://smba.trafficmanager.net/amer",
"conversation_id": "19:c1524d7c-a06f-456f-8abe-xxxx"
})
# using user_id
user.add_ms_teams(
{
"tenant_id": "c1981ab2-9aaf-xxxx-xxxx",
"service_url": "https://smba.trafficmanager.net/amer",
"user_id": "29:1nsLcmJ2RKtYH6Cxxxx-xxxx"
})
response = user.save()
print(response)
```
```javascript node.js theme={"system"}
const distinct_id = "__uniq_user_id__" // Unique id of user in your application
const user = supr_client.user.get_instance(distinct_id) // Instantiate User profile
// using conversation_id
user.add_ms_teams(
{
"tenant_id": "c1981ab2-9aaf-xxxx-xxxx",
"service_url": "https://smba.trafficmanager.net/amer",
"conversation_id": "19:c1524d7c-a06f-456f-8abe-xxxx"
})
//using user_id
user.add_ms_teams(
{
"tenant_id": "c1981ab2-9aaf-xxxx-xxxx",
"service_url": "https://smba.trafficmanager.net/amer",
"user_id": "29:1nsLcmJ2RKtYH6Cxxxx-xxxx"
})
const response = user.save()
response.then((res) => console.log("response", res));
```
**Getting tenant ID, user ID, conversation ID:**
You'll get **tenant ID** from your developer azure portal.
You'll get **conversation\_id** from the URL of the chat.
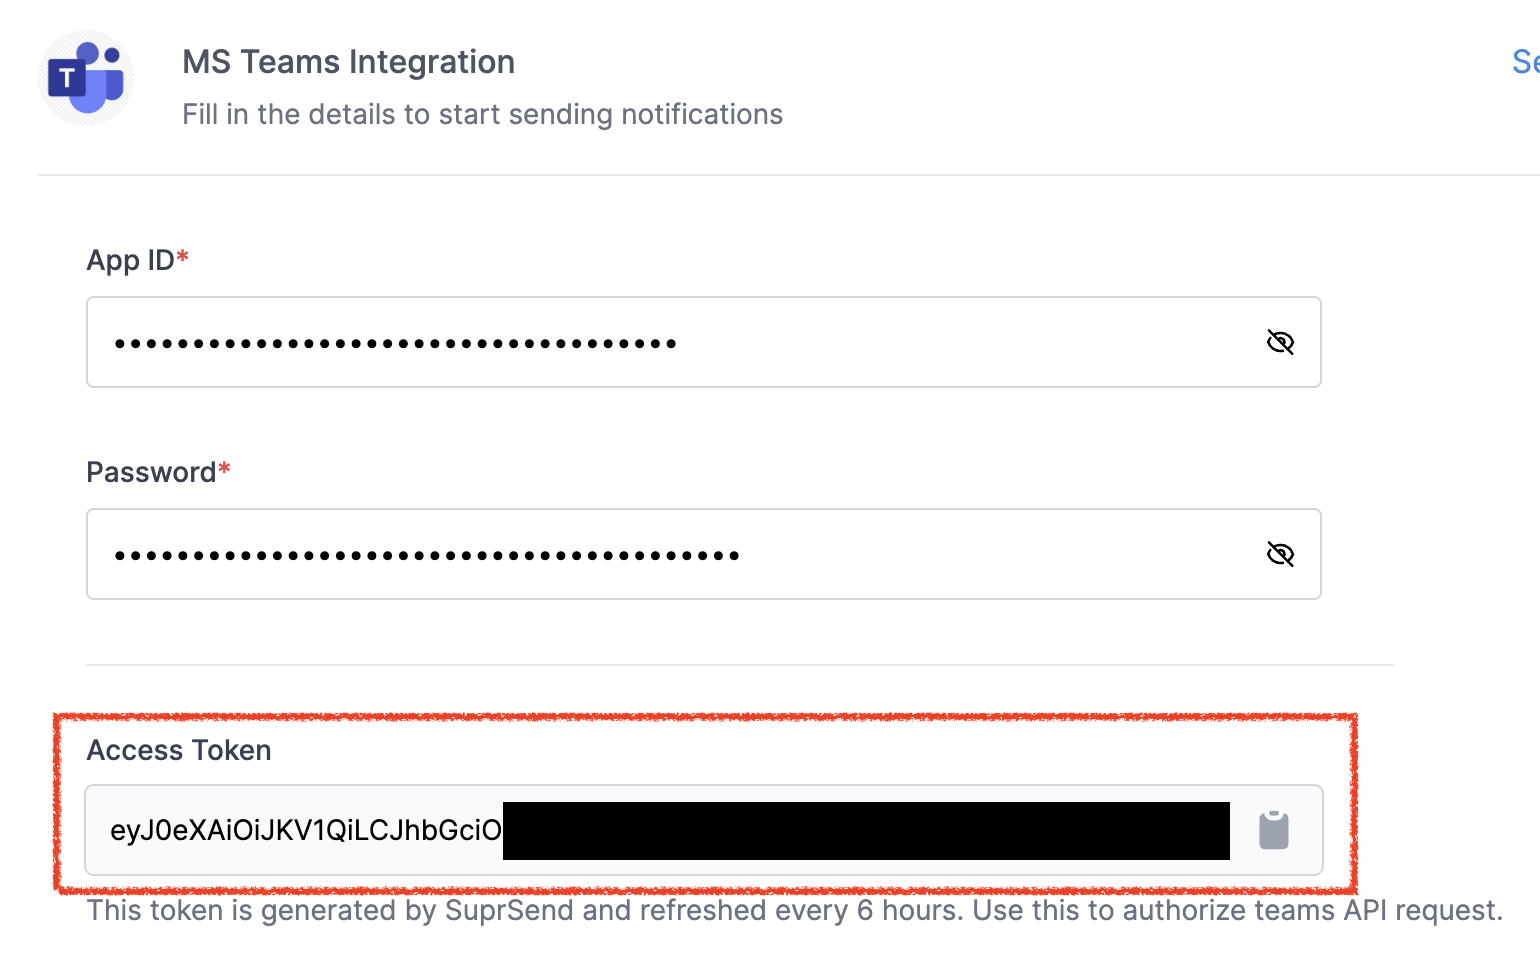
 You can get **user\_id** by following the steps to [fetch the roster or user profile](https://learn.microsoft.com/en-us/microsoftteams/platform/bots/how-to/get-teams-context?tabs=json#fetch-the-roster-or-user-profile). You'll need authentication token to fetch user profile. You can get this token from SuprSend vendor page after saving the form.
 To send a message to a public or private channel, you’ll need to pass `tenant_id` , `service_url` of the tenant, and `conversation_id` of the teams chat channel.
Please note that you'll have to add App in your teams channel to send notification otherwise it will fail.
To add App to your teams channel, click on `+` icon to add a tab. In **Add a tab** modal, click on **"More Apps"**.
To send a message to a public or private channel, you’ll need to pass `tenant_id` , `service_url` of the tenant, and `conversation_id` of the teams chat channel.
Please note that you'll have to add App in your teams channel to send notification otherwise it will fail.
To add App to your teams channel, click on `+` icon to add a tab. In **Add a tab** modal, click on **"More Apps"**.
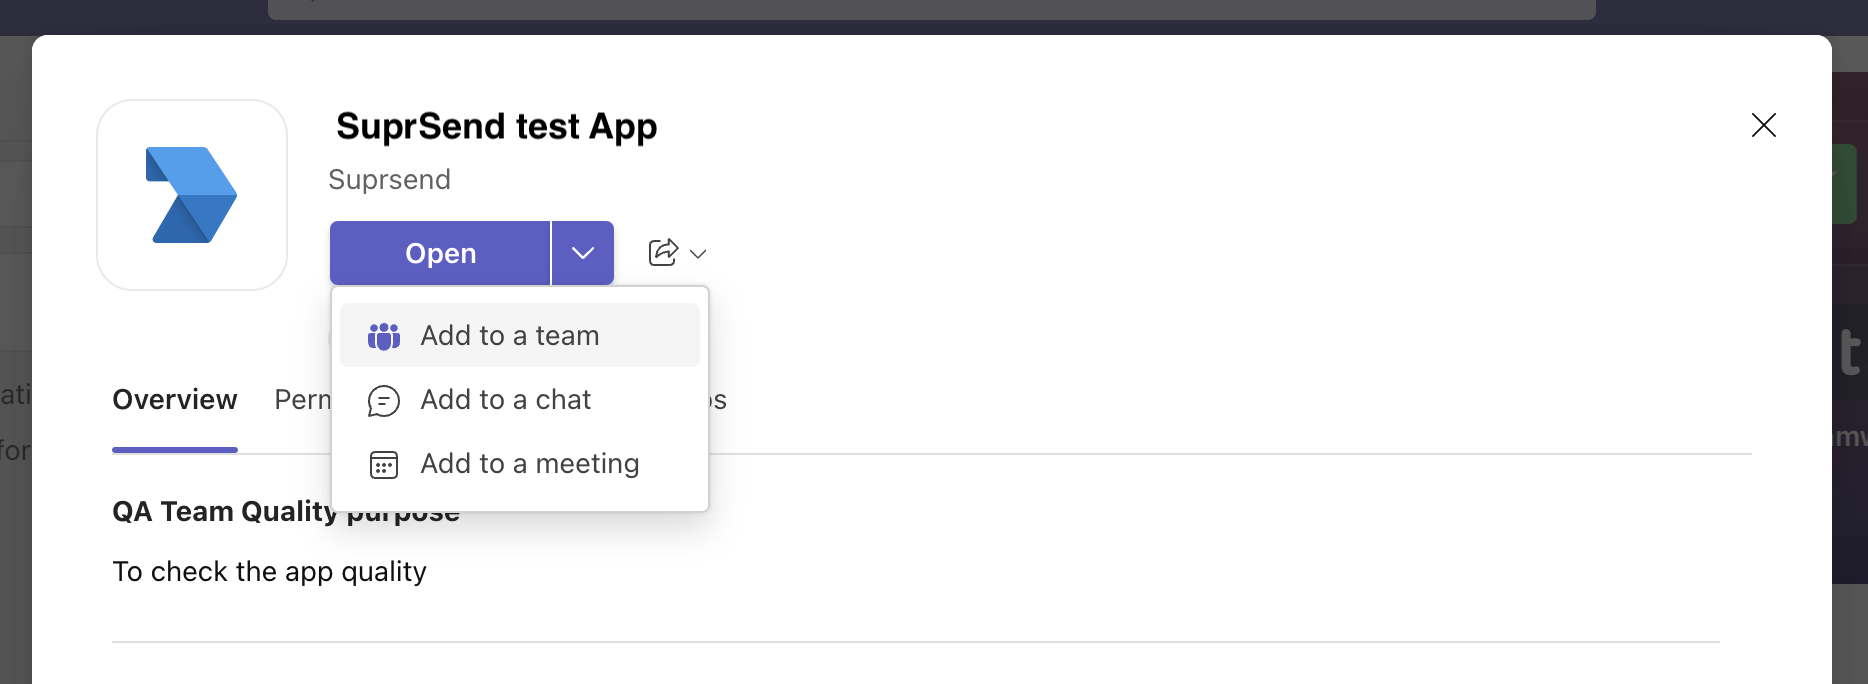
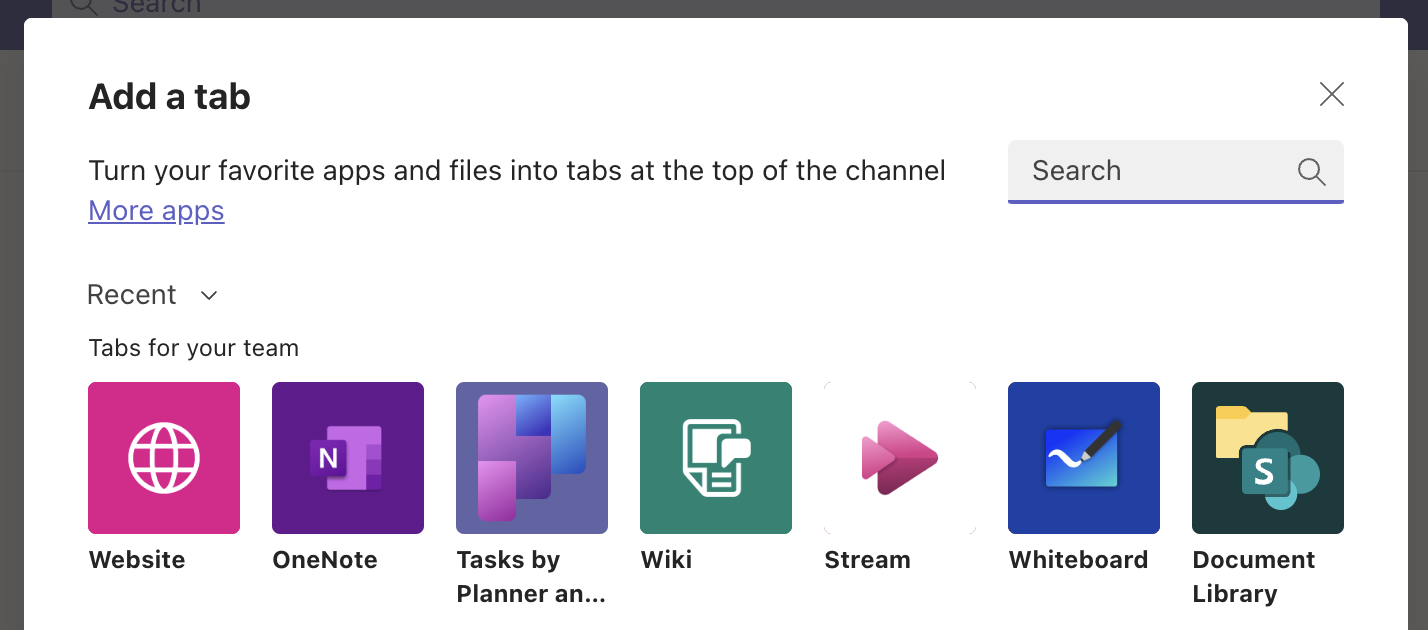 You'll see your App in your organization. Click on the App and **Add to the team**.
 We recommend creating a separate user for identifying channels and not mix it in user profile. You can create a teams channel user with `distinct_id` as `channel_` so it's easy for you to remember and pass in your workflow calls whenever you want to send message on a teams channel.
```python python theme={"system"}
distinct_id = "channel_general" # Unique identifier of user in your application
# Instantiate User profile
user = supr_client.user.get_instance(distinct_id=distinct_id)
user.add_ms_teams(
{
"tenant_id": "c1981ab2-9aaf-xxxx-xxxx",
"service_url": "https://smba.trafficmanager.net/amer",
"conversation_id": "19:c1524d7c-a06f-456f-8abe-xxxx"
})
response = user.save()
print(response)
```
```javascript node.js theme={"system"}
const distinct_id = "channel_general" // Unique id of user in your application
const user = supr_client.user.get_instance(distinct_id) // Instantiate User profile
user.add_ms_teams(
{
"tenant_id": "c1981ab2-9aaf-xxxx-xxxx",
"service_url": "https://smba.trafficmanager.net/amer",
"conversation_id": "19:c1524d7c-a06f-456f-8abe-xxxx"
})
const response = user.save()
response.then((res) => console.log("response", res));
```
To send a direct message using incoming webhook, just pass the webhook URL in user profile. You can pass this information in a json format using `user.add_ms_teams` method as below:
```python python theme={"system"}
distinct_id = "__uniq_user_id__" # Unique identifier of user in your application
# Instantiate User profile
user = supr_client.user.get_instance(distinct_id=distinct_id)
user.add_ms_teams(
{
"incoming_webhook": {
"url": "https://wnk1z.webhook.office.com/webhookb2/XXXXXXXXX"
}
})
response = user.save()
print(response)
```
```javascript node.js theme={"system"}
const distinct_id = "__uniq_user_id__" // Unique id of user in your application
const user = supr_client.user.get_instance(distinct_id) // Instantiate User profile
user.add_ms_teams(
{
"incoming_webhook": {
"url": "https://wnk1z.webhook.office.com/webhookb2/XXXXXXXXX"
}
})
const response = user.save()
response.then((res) => console.log("response", res));
```
Avoid using incoming webhook configuration in the case of a multi-tenant architecture where same set of users may belong to multiple tenants and you want to send notifications via [tenant vendor](/docs/tenant-vendor). The incoming webhook is not tied exclusively to the app configuration used for sending notifications and will invariably be dispatched to all incoming webhooks included in the user profile, regardless of the tenant's vendor configuration.
**Get Incoming webhook for a teams channel:**
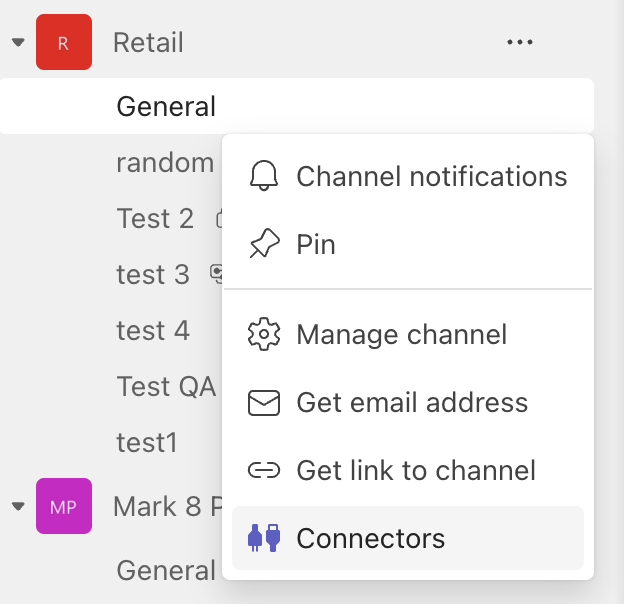
To get incoming webhook, select **connectors** from channel -> more options.
We recommend creating a separate user for identifying channels and not mix it in user profile. You can create a teams channel user with `distinct_id` as `channel_` so it's easy for you to remember and pass in your workflow calls whenever you want to send message on a teams channel.
```python python theme={"system"}
distinct_id = "channel_general" # Unique identifier of user in your application
# Instantiate User profile
user = supr_client.user.get_instance(distinct_id=distinct_id)
user.add_ms_teams(
{
"tenant_id": "c1981ab2-9aaf-xxxx-xxxx",
"service_url": "https://smba.trafficmanager.net/amer",
"conversation_id": "19:c1524d7c-a06f-456f-8abe-xxxx"
})
response = user.save()
print(response)
```
```javascript node.js theme={"system"}
const distinct_id = "channel_general" // Unique id of user in your application
const user = supr_client.user.get_instance(distinct_id) // Instantiate User profile
user.add_ms_teams(
{
"tenant_id": "c1981ab2-9aaf-xxxx-xxxx",
"service_url": "https://smba.trafficmanager.net/amer",
"conversation_id": "19:c1524d7c-a06f-456f-8abe-xxxx"
})
const response = user.save()
response.then((res) => console.log("response", res));
```
To send a direct message using incoming webhook, just pass the webhook URL in user profile. You can pass this information in a json format using `user.add_ms_teams` method as below:
```python python theme={"system"}
distinct_id = "__uniq_user_id__" # Unique identifier of user in your application
# Instantiate User profile
user = supr_client.user.get_instance(distinct_id=distinct_id)
user.add_ms_teams(
{
"incoming_webhook": {
"url": "https://wnk1z.webhook.office.com/webhookb2/XXXXXXXXX"
}
})
response = user.save()
print(response)
```
```javascript node.js theme={"system"}
const distinct_id = "__uniq_user_id__" // Unique id of user in your application
const user = supr_client.user.get_instance(distinct_id) // Instantiate User profile
user.add_ms_teams(
{
"incoming_webhook": {
"url": "https://wnk1z.webhook.office.com/webhookb2/XXXXXXXXX"
}
})
const response = user.save()
response.then((res) => console.log("response", res));
```
Avoid using incoming webhook configuration in the case of a multi-tenant architecture where same set of users may belong to multiple tenants and you want to send notifications via [tenant vendor](/docs/tenant-vendor). The incoming webhook is not tied exclusively to the app configuration used for sending notifications and will invariably be dispatched to all incoming webhooks included in the user profile, regardless of the tenant's vendor configuration.
**Get Incoming webhook for a teams channel:**
To get incoming webhook, select **connectors** from channel -> more options.
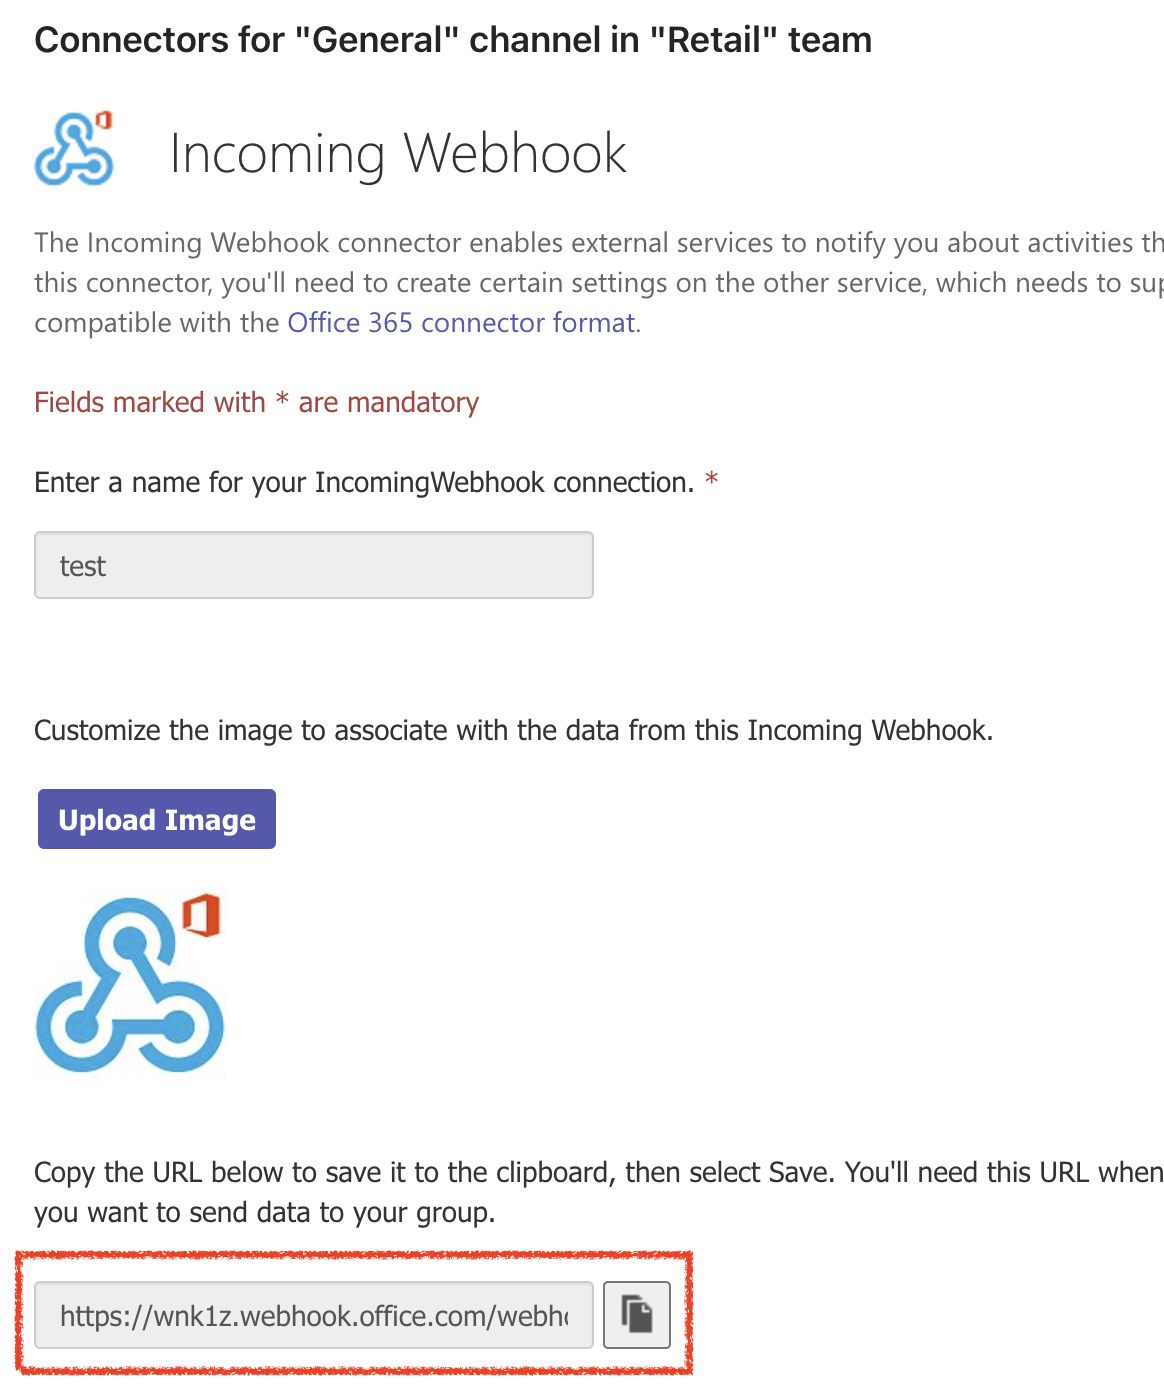
 Configure **Incoming webhook** in connectors. Click on create and copy the webhook URL
 ### Order of precedence
Microsoft teams profile should only contain `incoming_webhook->url`, or the bot configurations like `tenant_id`, `conversation_id` and `service_url` . If there are multiple keys in `user.add_ms_teams()` call, the order of precedence is as follows:
`incoming_webhook->url` > `conversation_id` > `user_id`. E.g., if your add\_ms\_teams argument is as follows:
```python python theme={"system"}
distinct_id = "__uniq_user_id__" # Unique identifier of user in your application
# Instantiate User profile
user = supr_client.user.get_instance(distinct_id=distinct_id)
user.add_ms_teams(
{
"incoming_webhook": {
"url": "https://wnk1z.webhook.office.com/webhookb2/XXXXXXXXX"
},
"tenant_id": "c1981ab2-9aaf-xxxx-xxxx",
"service_url": "https://smba.trafficmanager.net/amer",
"conversation_id": "19:c1524d7c-a06f-456f-8abe-xxxx",
"user_id":"29:1nsLcmJ2RKtYH6Cxxxx-xxxx"
})
response = user.save()
print(response)
```
```javascript node.js theme={"system"}
const distinct_id = "__uniq_user_id__" // Unique id of user in your application
const user = supr_client.user.get_instance(distinct_id) // Instantiate User profile
user.add_ms_teams(
{
"incoming_webhook": {
"url": "https://wnk1z.webhook.office.com/webhookb2/XXXXXXXXX"
},
"tenant_id": "c1981ab2-9aaf-xxxx-xxxx",
"service_url": "https://smba.trafficmanager.net/amer",
"conversation_id": "19:c1524d7c-a06f-456f-8abe-xxxx",
"user_id":"29:1nsLcmJ2RKtYH6Cxxxx-xxxx"
})
const response = user.save()
response.then((res) => console.log("response", res));
```
The profile will be saved as `{"incoming_webhook": { "url": "https://wnk1z.webhook.office.com/webhookb2/XXXXXXXXX"}}`
## Create Teams template
Refer [teams template documentation](/docs/ms-teams-template) for step-by-step guide on how to create, preview and publish the template.
## Tenancy in Microsoft teams
In scenarios where you're sending notifications on behalf of your enterprise clients, each with their own team applications for communicating with end-users, you can define distinct app configurations at the tenant level. In SuprSend, we presently identify tenants as tenants.
To support this, simply include the app configuration for the tenant on the vendor details page. This will override the default tenant vendor at the time of sending notification. This configuration needs to be set up once, and SuprSend will seamlessly direct all notifications associated with that tenant through the vendor configuration specified for the tenant.
> In case you don't have vendor defined for a tenant, notifications will automatically fallback to the default vendor credentials.
Refer Steps to configure tenant level vendor [here](/docs/tenant-vendor)
***
### Order of precedence
Microsoft teams profile should only contain `incoming_webhook->url`, or the bot configurations like `tenant_id`, `conversation_id` and `service_url` . If there are multiple keys in `user.add_ms_teams()` call, the order of precedence is as follows:
`incoming_webhook->url` > `conversation_id` > `user_id`. E.g., if your add\_ms\_teams argument is as follows:
```python python theme={"system"}
distinct_id = "__uniq_user_id__" # Unique identifier of user in your application
# Instantiate User profile
user = supr_client.user.get_instance(distinct_id=distinct_id)
user.add_ms_teams(
{
"incoming_webhook": {
"url": "https://wnk1z.webhook.office.com/webhookb2/XXXXXXXXX"
},
"tenant_id": "c1981ab2-9aaf-xxxx-xxxx",
"service_url": "https://smba.trafficmanager.net/amer",
"conversation_id": "19:c1524d7c-a06f-456f-8abe-xxxx",
"user_id":"29:1nsLcmJ2RKtYH6Cxxxx-xxxx"
})
response = user.save()
print(response)
```
```javascript node.js theme={"system"}
const distinct_id = "__uniq_user_id__" // Unique id of user in your application
const user = supr_client.user.get_instance(distinct_id) // Instantiate User profile
user.add_ms_teams(
{
"incoming_webhook": {
"url": "https://wnk1z.webhook.office.com/webhookb2/XXXXXXXXX"
},
"tenant_id": "c1981ab2-9aaf-xxxx-xxxx",
"service_url": "https://smba.trafficmanager.net/amer",
"conversation_id": "19:c1524d7c-a06f-456f-8abe-xxxx",
"user_id":"29:1nsLcmJ2RKtYH6Cxxxx-xxxx"
})
const response = user.save()
response.then((res) => console.log("response", res));
```
The profile will be saved as `{"incoming_webhook": { "url": "https://wnk1z.webhook.office.com/webhookb2/XXXXXXXXX"}}`
## Create Teams template
Refer [teams template documentation](/docs/ms-teams-template) for step-by-step guide on how to create, preview and publish the template.
## Tenancy in Microsoft teams
In scenarios where you're sending notifications on behalf of your enterprise clients, each with their own team applications for communicating with end-users, you can define distinct app configurations at the tenant level. In SuprSend, we presently identify tenants as tenants.
To support this, simply include the app configuration for the tenant on the vendor details page. This will override the default tenant vendor at the time of sending notification. This configuration needs to be set up once, and SuprSend will seamlessly direct all notifications associated with that tenant through the vendor configuration specified for the tenant.
> In case you don't have vendor defined for a tenant, notifications will automatically fallback to the default vendor credentials.
Refer Steps to configure tenant level vendor [here](/docs/tenant-vendor)
***