> ## Documentation Index
> Fetch the complete documentation index at: https://docs.suprsend.com/llms.txt
> Use this file to discover all available pages before exploring further.
# iOS Integration
> Add the SuprSend React Native SDK to the iOS side of your app with Swift bridging headers, CocoaPods install, and AppDelegate setup for notifications.
## Installation
```javascript npm theme={"system"}
npm install @suprsend/react-native-sdk@latest
```
```javascript yarn theme={"system"}
yarn add @suprsend/react-native-sdk@latest
```
If you are upgrading the SDK version, run `pod update` inside **ios** folder.
This step is needed only if your react native project iOS side doesn't support swift language.
To check for swift support in Xcode, open `Project Settings --> Build Settings --> Swift Language Version` (attached image). If entry is present, you already have swift support in your project.
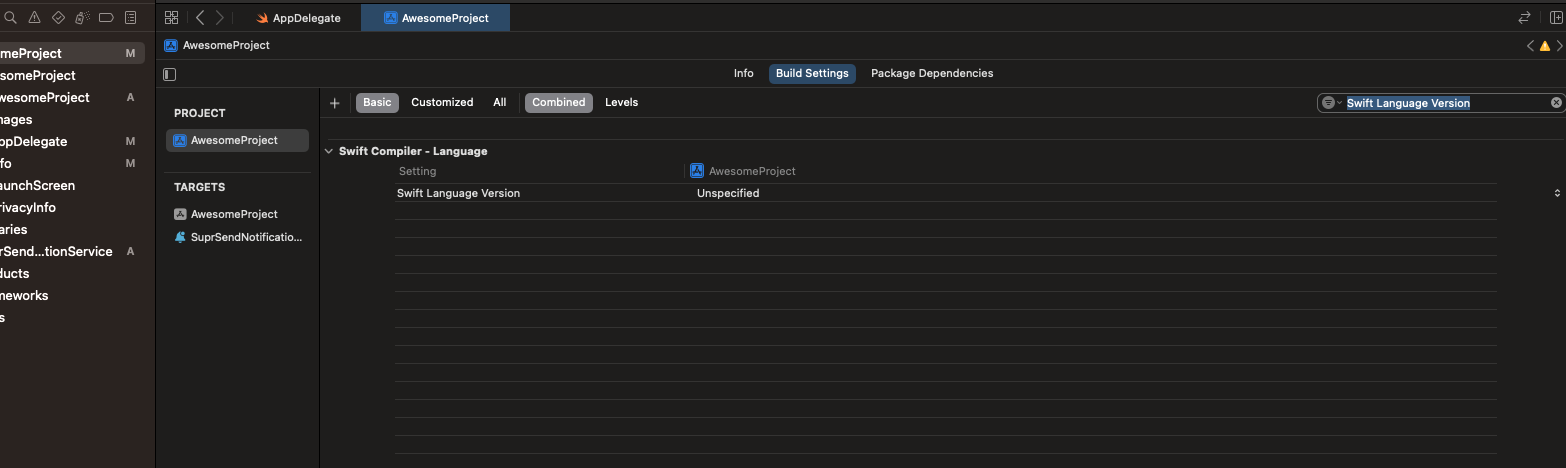 If your project doesn't support swift then its mandatory to add Swift support in your project by following the steps below.
* Open "xcodeworkspace" file inside iOS folder. This will open Xcode.
* Add Swift file to project like shown below.
If your project doesn't support swift then its mandatory to add Swift support in your project by following the steps below.
* Open "xcodeworkspace" file inside iOS folder. This will open Xcode.
* Add Swift file to project like shown below.
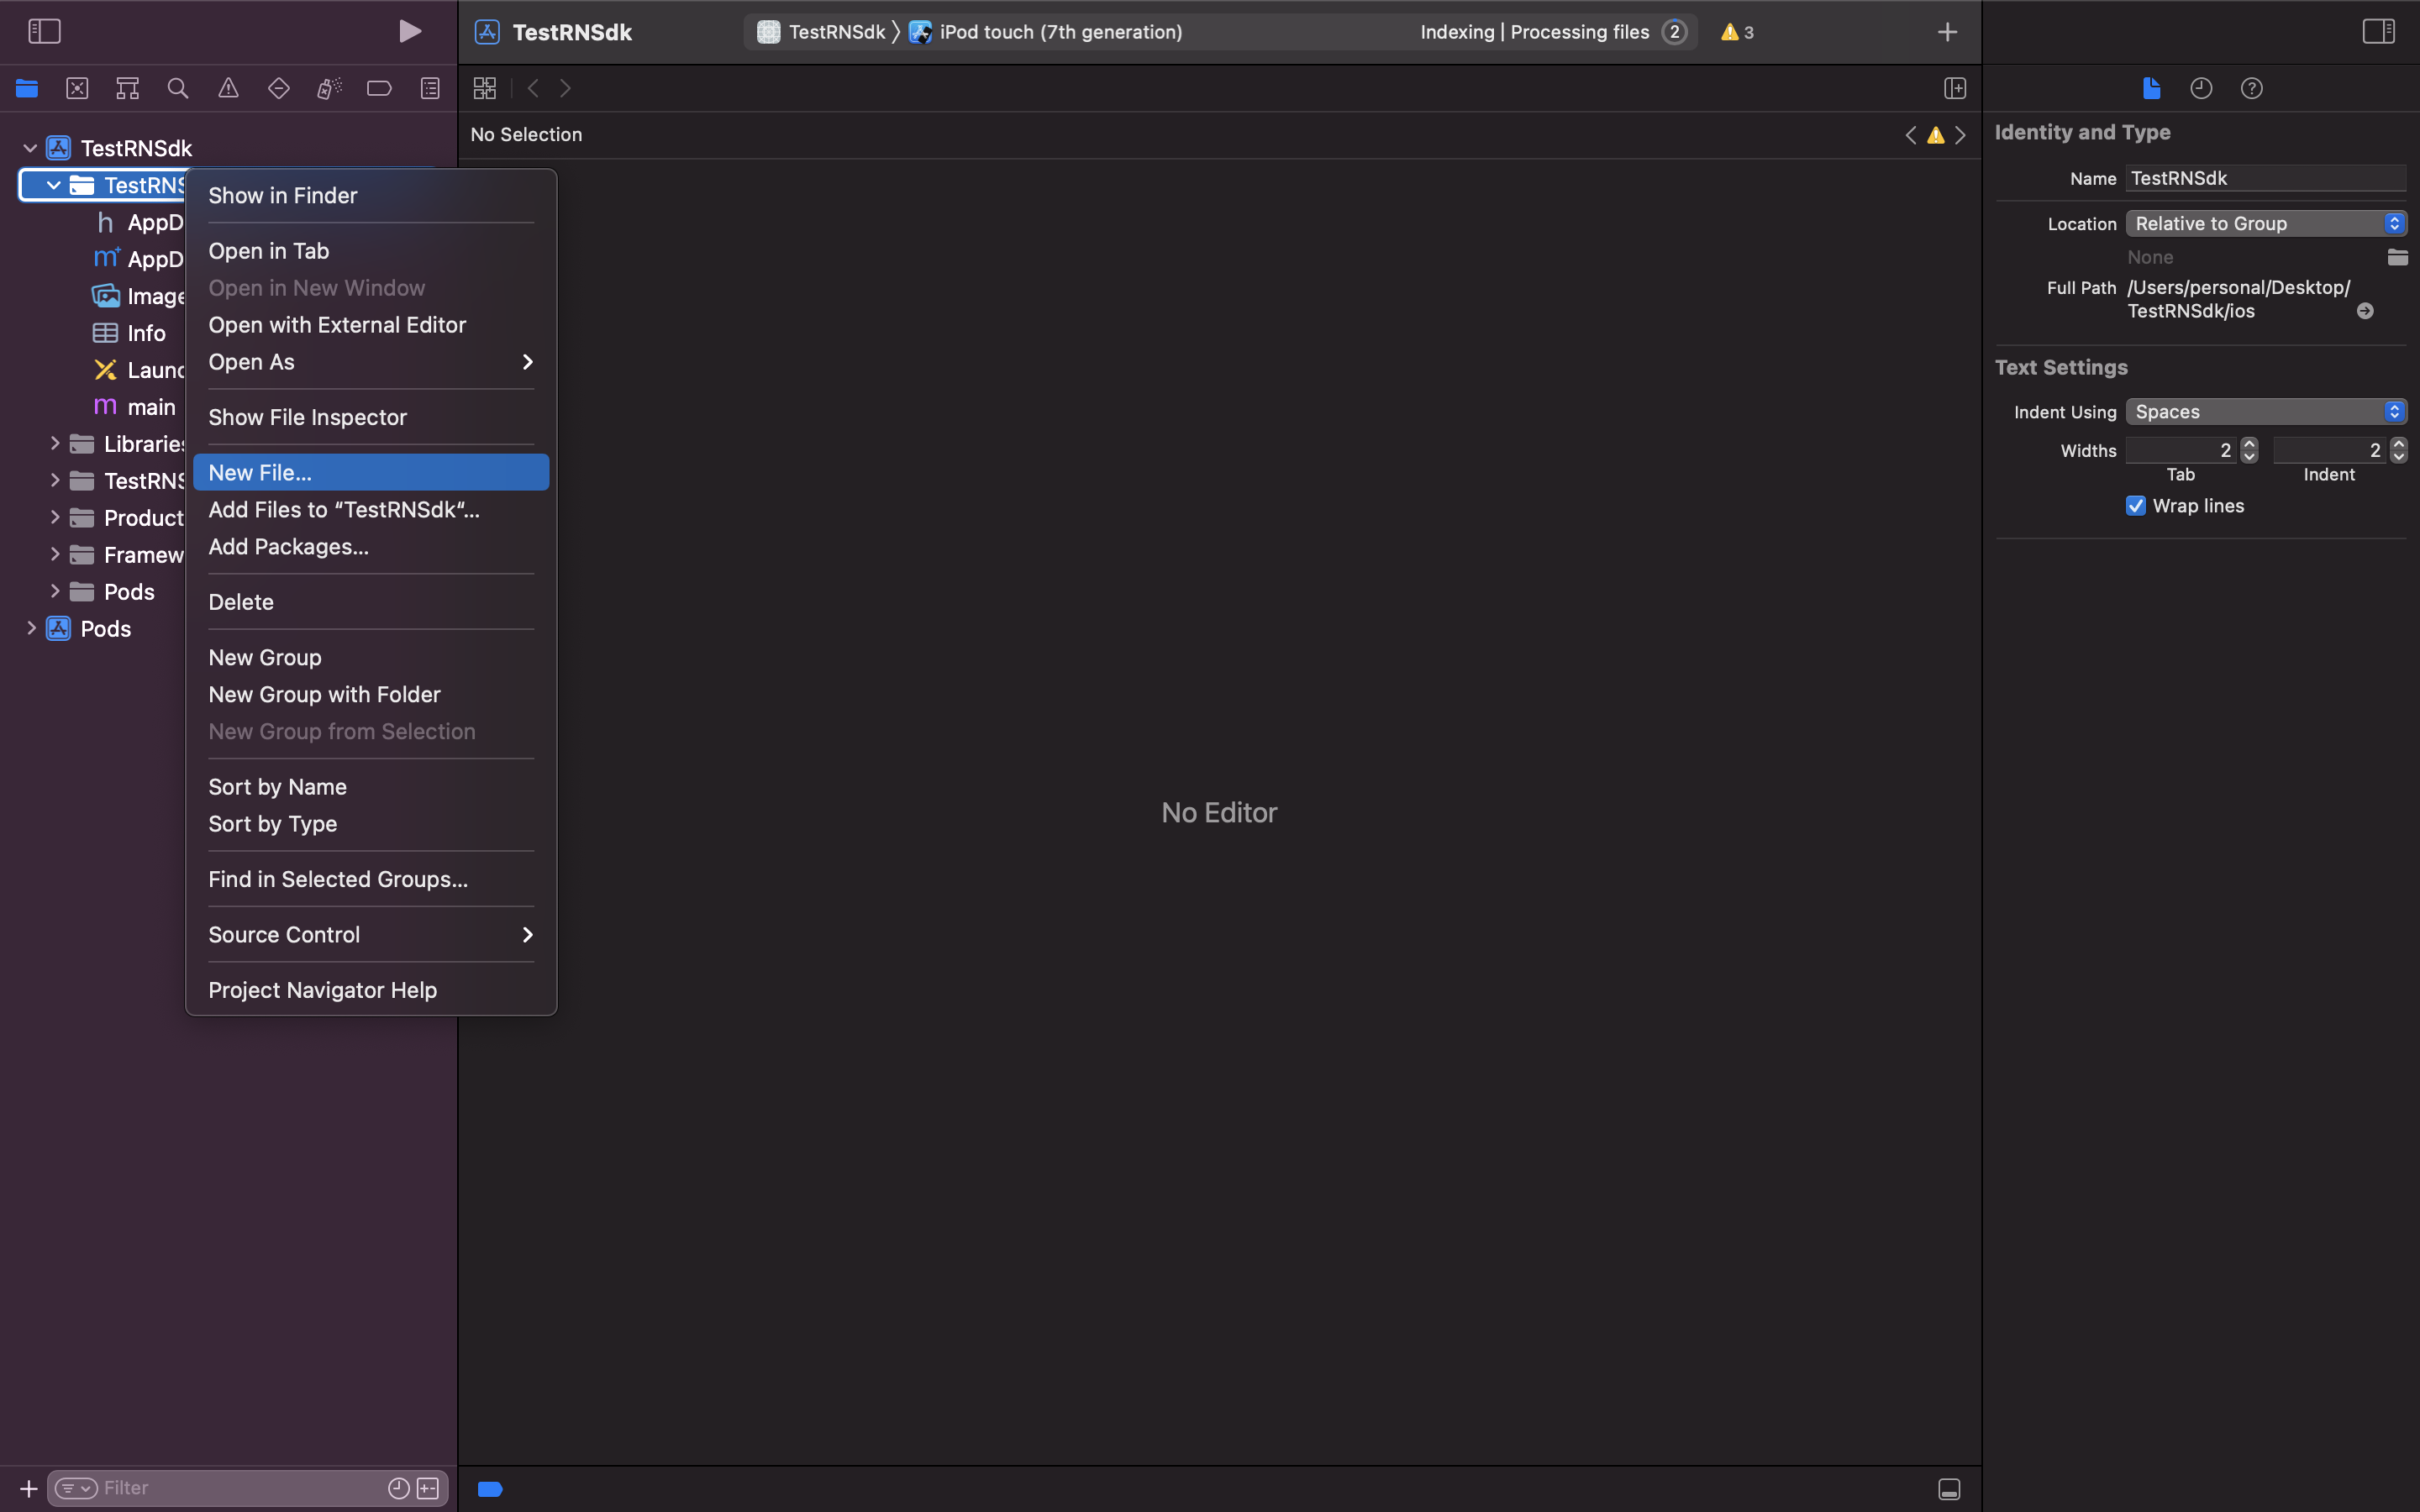 * Select **Swift File** and click on **`Next`** button.
* Now give a suitable name to your file and click Create.
* After that popup will be shown asking to configure Objective-C bridge header. Click on **`Create Bridge Header`**.
* Select **Swift File** and click on **`Next`** button.
* Now give a suitable name to your file and click Create.
* After that popup will be shown asking to configure Objective-C bridge header. Click on **`Create Bridge Header`**.
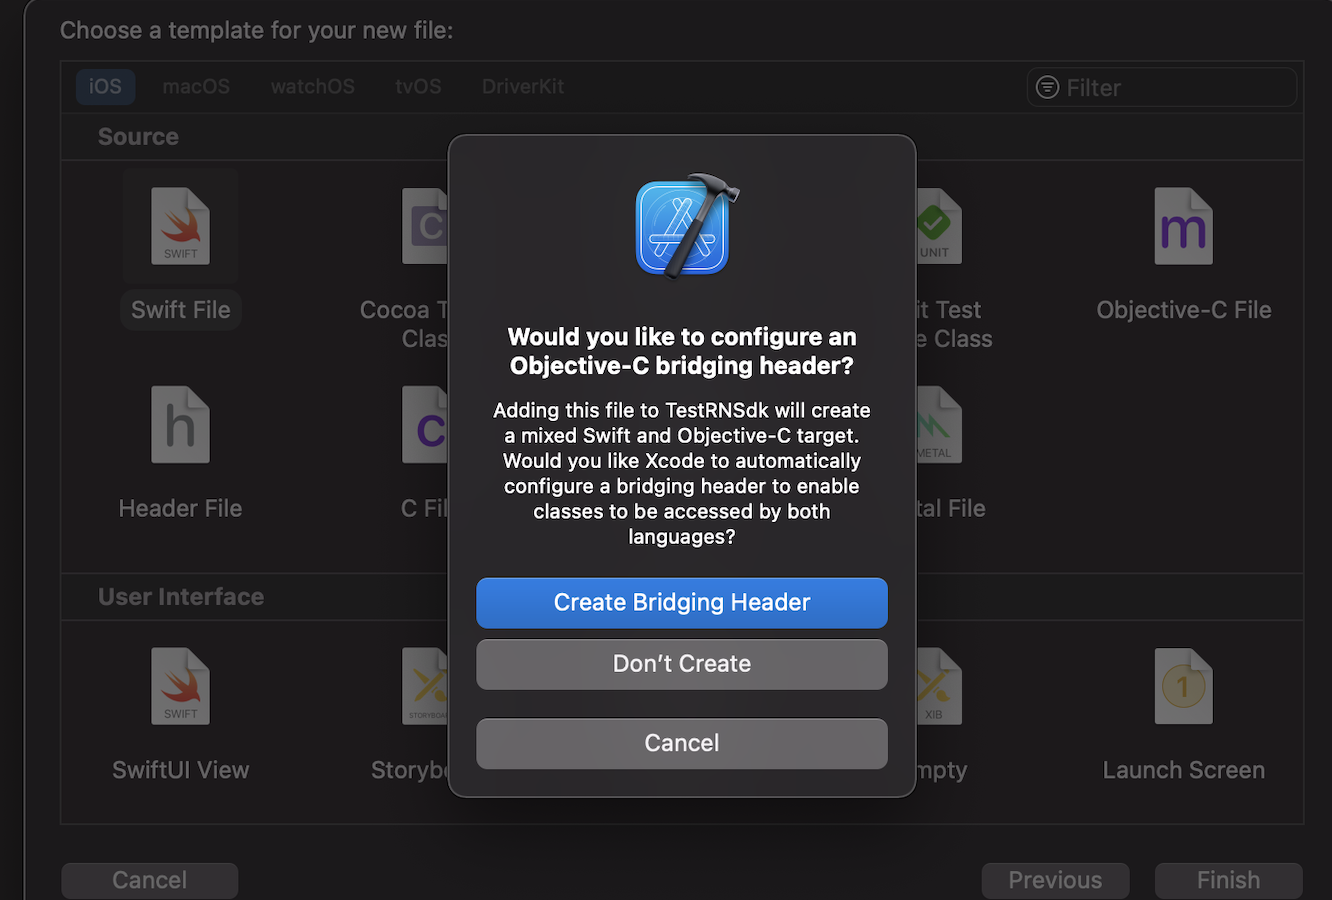 Thats it! your React native iOS project can now understand code written in Swift language.
```ruby PodFile theme={"system"}
platform :ios, '13.0' // this version has to be 13 or greater
```
```
pod install
```
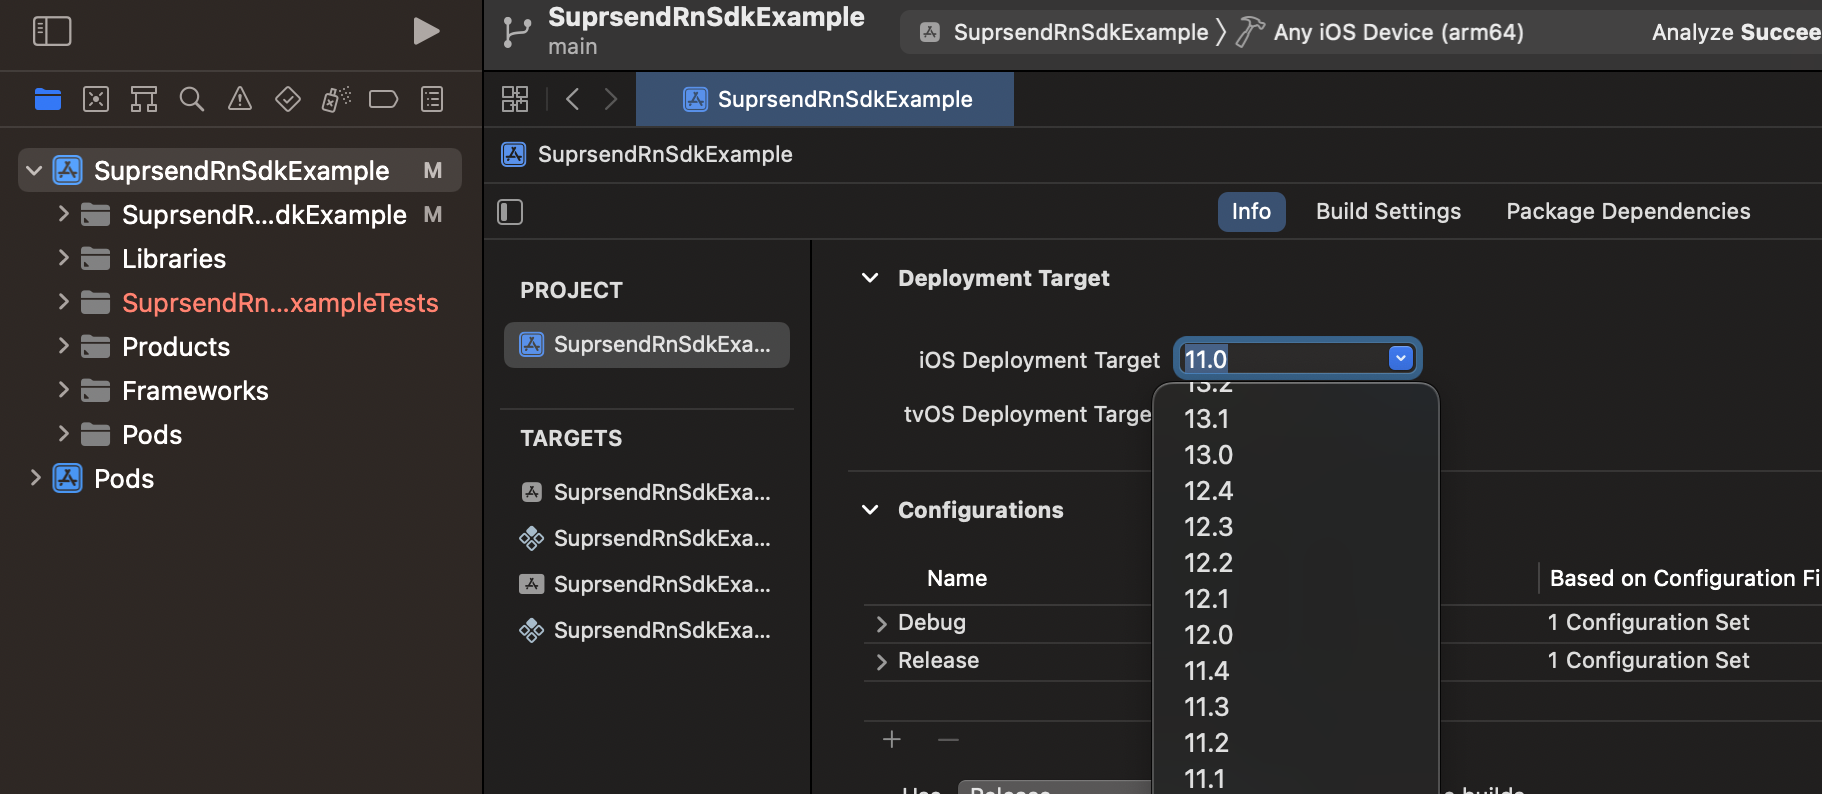
SuprSend SDK needs an iOS deployment target of 11 or above, update the target as given in below image if needed.
Thats it! your React native iOS project can now understand code written in Swift language.
```ruby PodFile theme={"system"}
platform :ios, '13.0' // this version has to be 13 or greater
```
```
pod install
```
SuprSend SDK needs an iOS deployment target of 11 or above, update the target as given in below image if needed.
 ## Initialization
In **AppDelegate** add the below code inside `didFinishLaunchingWithOptions` method, just before last returning line. Refer any one of code snippet below based on your projects AppDelegate file language.
```objectivec AppDelegate.m theme={"system"}
#import //add this
...
- (BOOL)application:(UIApplication *)application didFinishLaunchingWithOptions:(NSDictionary *)launchOptions
{
...
SuprSendSDKConfiguration* configuration = [[SuprSendSDKConfiguration alloc] initWithKey:@workspace_key secret:@workspace_secret]; // add this line
[SuprSend.shared configureWithConfiguration:configuration launchOptions:launchOptions]; // add this line
return YES;
```
```swift AppDelegate.swift theme={"system"}
import SuprSendSdk // Add this
...
override func application(_ application: UIApplication, didFinishLaunchingWithOptions launchOptions: [UIApplication.LaunchOptionsKey : Any]? = nil) -> Bool {
......
// Add below 2 lines
let suprSendConfiguration = SuprSendSDKConfiguration(withKey: "your_workspace_key", secret:"your_workspace_secret")
SuprSend.shared.configureWith(configuration: suprSendConfiguration, launchOptions: launchOptions)
return super.application(application, didFinishLaunchingWithOptions: launchOptions)
}
```
Replace the **`workspace_key`** and **`workspace_secret`** with your workspace values. You will get both the tokens from **Settings -> API Keys** in [SuprSend dashboard](https://app.suprsend.com/).
## Logging
By default the logs of SuprSend SDK are disabled. You can enable the logs just in debug mode while in development by the below condition.
```javascript javascript theme={"system"}
suprsend.enableLogging(); // available from v2.0.2
// deprecated from v2.0.2
suprsend.setLogLevel(level)
suprsend.setLogLevel("VERBOSE")
suprsend.setLogLevel("DEBUG")
suprsend.setLogLevel("INFO")
suprsend.setLogLevel("ERROR")
suprsend.setLogLevel("OFF")
```
***
## Initialization
In **AppDelegate** add the below code inside `didFinishLaunchingWithOptions` method, just before last returning line. Refer any one of code snippet below based on your projects AppDelegate file language.
```objectivec AppDelegate.m theme={"system"}
#import //add this
...
- (BOOL)application:(UIApplication *)application didFinishLaunchingWithOptions:(NSDictionary *)launchOptions
{
...
SuprSendSDKConfiguration* configuration = [[SuprSendSDKConfiguration alloc] initWithKey:@workspace_key secret:@workspace_secret]; // add this line
[SuprSend.shared configureWithConfiguration:configuration launchOptions:launchOptions]; // add this line
return YES;
```
```swift AppDelegate.swift theme={"system"}
import SuprSendSdk // Add this
...
override func application(_ application: UIApplication, didFinishLaunchingWithOptions launchOptions: [UIApplication.LaunchOptionsKey : Any]? = nil) -> Bool {
......
// Add below 2 lines
let suprSendConfiguration = SuprSendSDKConfiguration(withKey: "your_workspace_key", secret:"your_workspace_secret")
SuprSend.shared.configureWith(configuration: suprSendConfiguration, launchOptions: launchOptions)
return super.application(application, didFinishLaunchingWithOptions: launchOptions)
}
```
Replace the **`workspace_key`** and **`workspace_secret`** with your workspace values. You will get both the tokens from **Settings -> API Keys** in [SuprSend dashboard](https://app.suprsend.com/).
## Logging
By default the logs of SuprSend SDK are disabled. You can enable the logs just in debug mode while in development by the below condition.
```javascript javascript theme={"system"}
suprsend.enableLogging(); // available from v2.0.2
// deprecated from v2.0.2
suprsend.setLogLevel(level)
suprsend.setLogLevel("VERBOSE")
suprsend.setLogLevel("DEBUG")
suprsend.setLogLevel("INFO")
suprsend.setLogLevel("ERROR")
suprsend.setLogLevel("OFF")
```
***