> ## Documentation Index
> Fetch the complete documentation index at: https://docs.suprsend.com/llms.txt
> Use this file to discover all available pages before exploring further.
# Slack
> Integrate a Slack app with SuprSend to send notifications to user DMs or channels in any workspace, covering app creation, scopes, and OAuth configuration.
## Pre-Requisites
For sending notifications through Slack, you'll need to create a Slack App. This App will basically be responsible for sending notifications to users / channels in their Slack workspace. To create Slack App, you'll need a Slack account and a Slack workspace where you'll be configuring the App. You will also need permission to create a Slack app. If you do not have access already, you can create your own free Slack workspace.
1. [Create a Slack Account](https://slack.com/get-started#/createnew)
2. [Create a Slack Workspace](https://slack.com/get-started#/landing)
3. [Create a Slack App](/docs/slack#create-slack-app)
## What all is covered here?
In this documentation, we'll create an app to send direct messages to users or channels in a slack workspace. Here's an overview of the steps required to integrate and send messages to a slack workspace:
1. [Enable Slack Channel](/docs/slack#step-1-enable-slack-channel) on SuprSend Platform
2. [Create Slack App](/docs/slack#step-2-create-a-slack-app)- You'll use this app to send direct messages to a user or channel
3. [Building OAuth flow](/docs/slack#step-3-assigning-oauth-scopes-to-app) to get the user permission and access token to send them notifications. This information will be stored as user's slack channel information. Unlike email where if you know user's email id, you can send email to that user. In case of Slack, your users have to authenticate and allow your app to send them notifications on Slack.
By following the above steps, your Slack integration will be setup. The next steps will be to
1. [Update slack channel information in user or channel profile](/docs/slack#step-4-update-slack-channel-in-user-profile) to send message
2. [Create a Slack template](/docs/slack-template) and trigger workflow
This is how you get started:
## Enable Slack channel on SuprSend vendor page
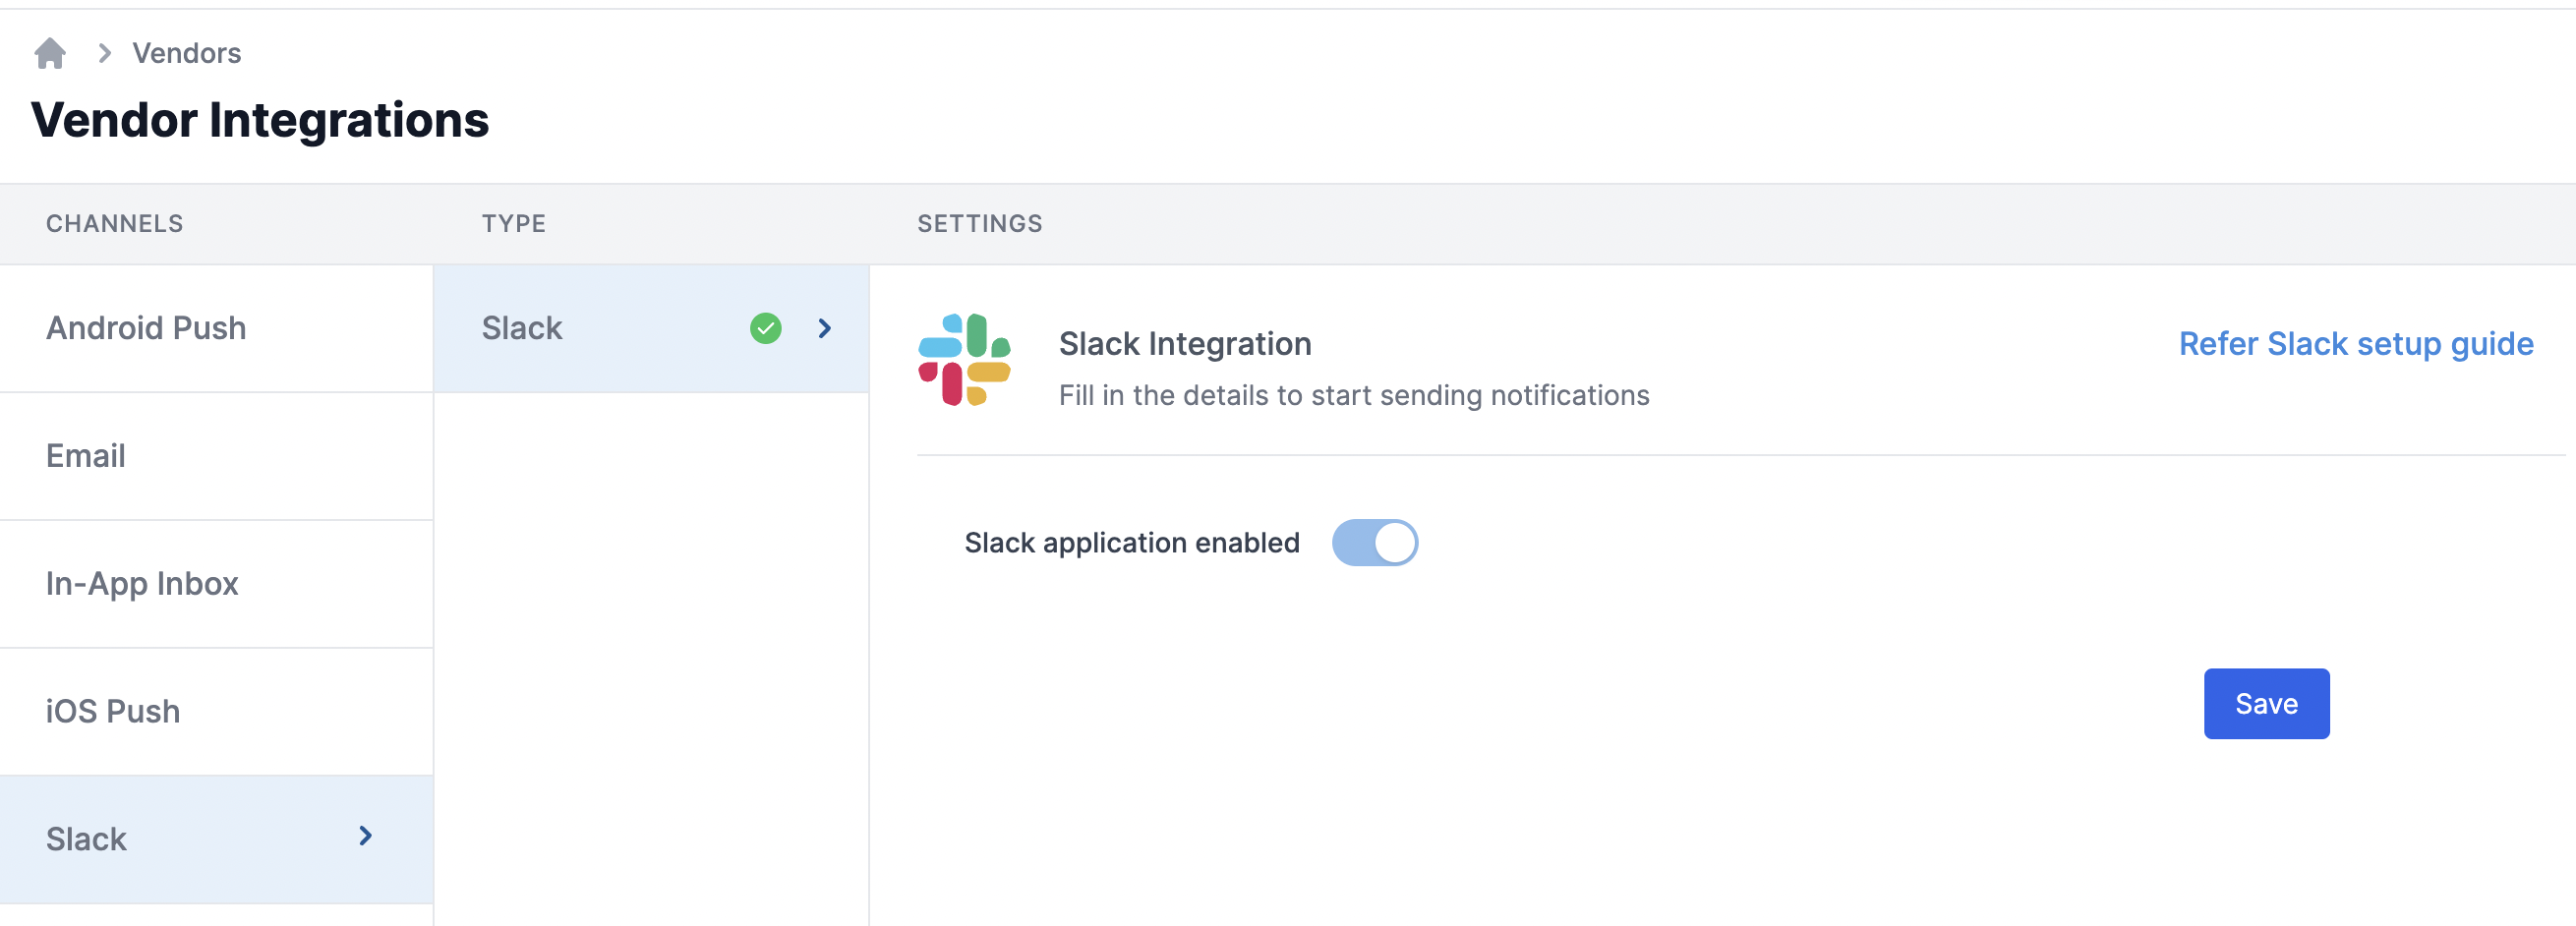
Go to SuprSend dashboard -> [Slack Vendor Settings](https://app.suprsend.com/en/staging/vendors/slack/slack-slack) page. Enable Slack channel
 ## Create Slack app
You’ll need to create a Slack app and assign required OAuth Scopes to that App to send notifications via SuprSend. If you have an existing Slack app, you can directly go to [OAuth Scopes](/docs/slack#step-3-assigning-oauth-scopes-to-app).
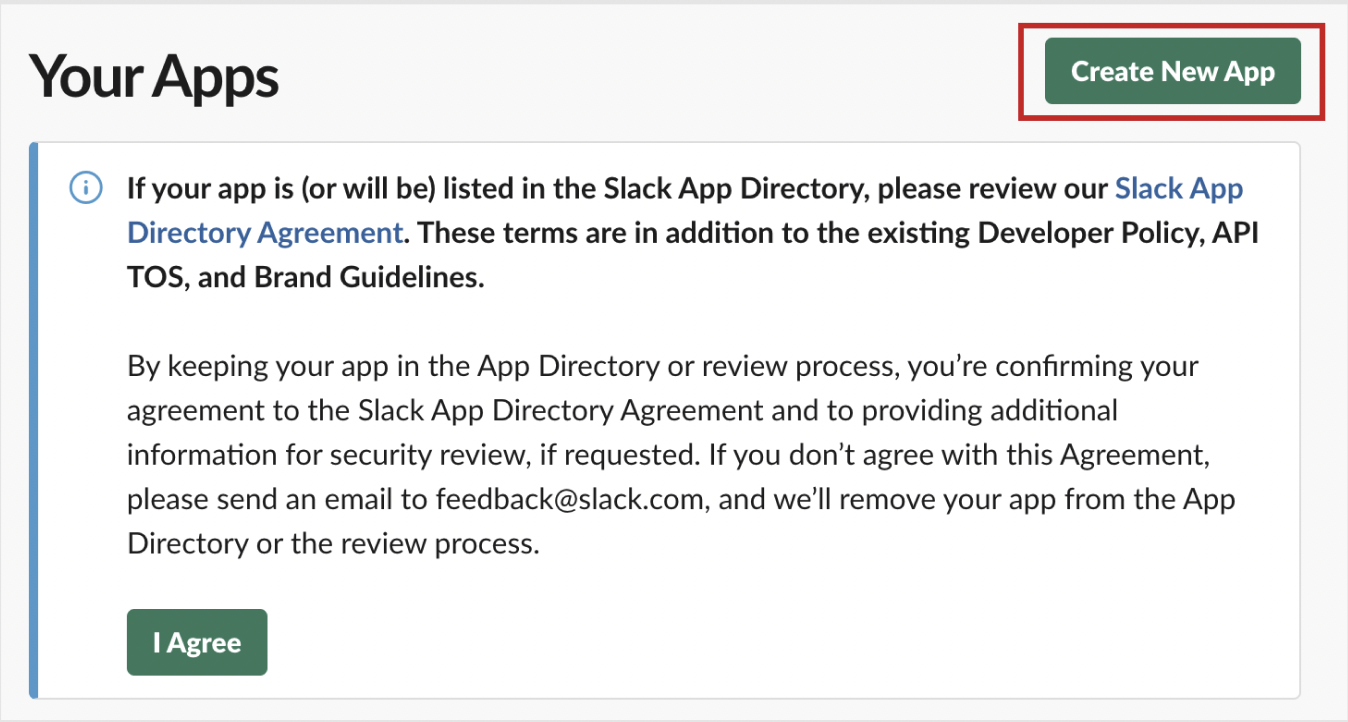
Navigate to [Apps page](https://api.slack.com/apps) and click on "Create New App" button
## Create Slack app
You’ll need to create a Slack app and assign required OAuth Scopes to that App to send notifications via SuprSend. If you have an existing Slack app, you can directly go to [OAuth Scopes](/docs/slack#step-3-assigning-oauth-scopes-to-app).
Navigate to [Apps page](https://api.slack.com/apps) and click on "Create New App" button
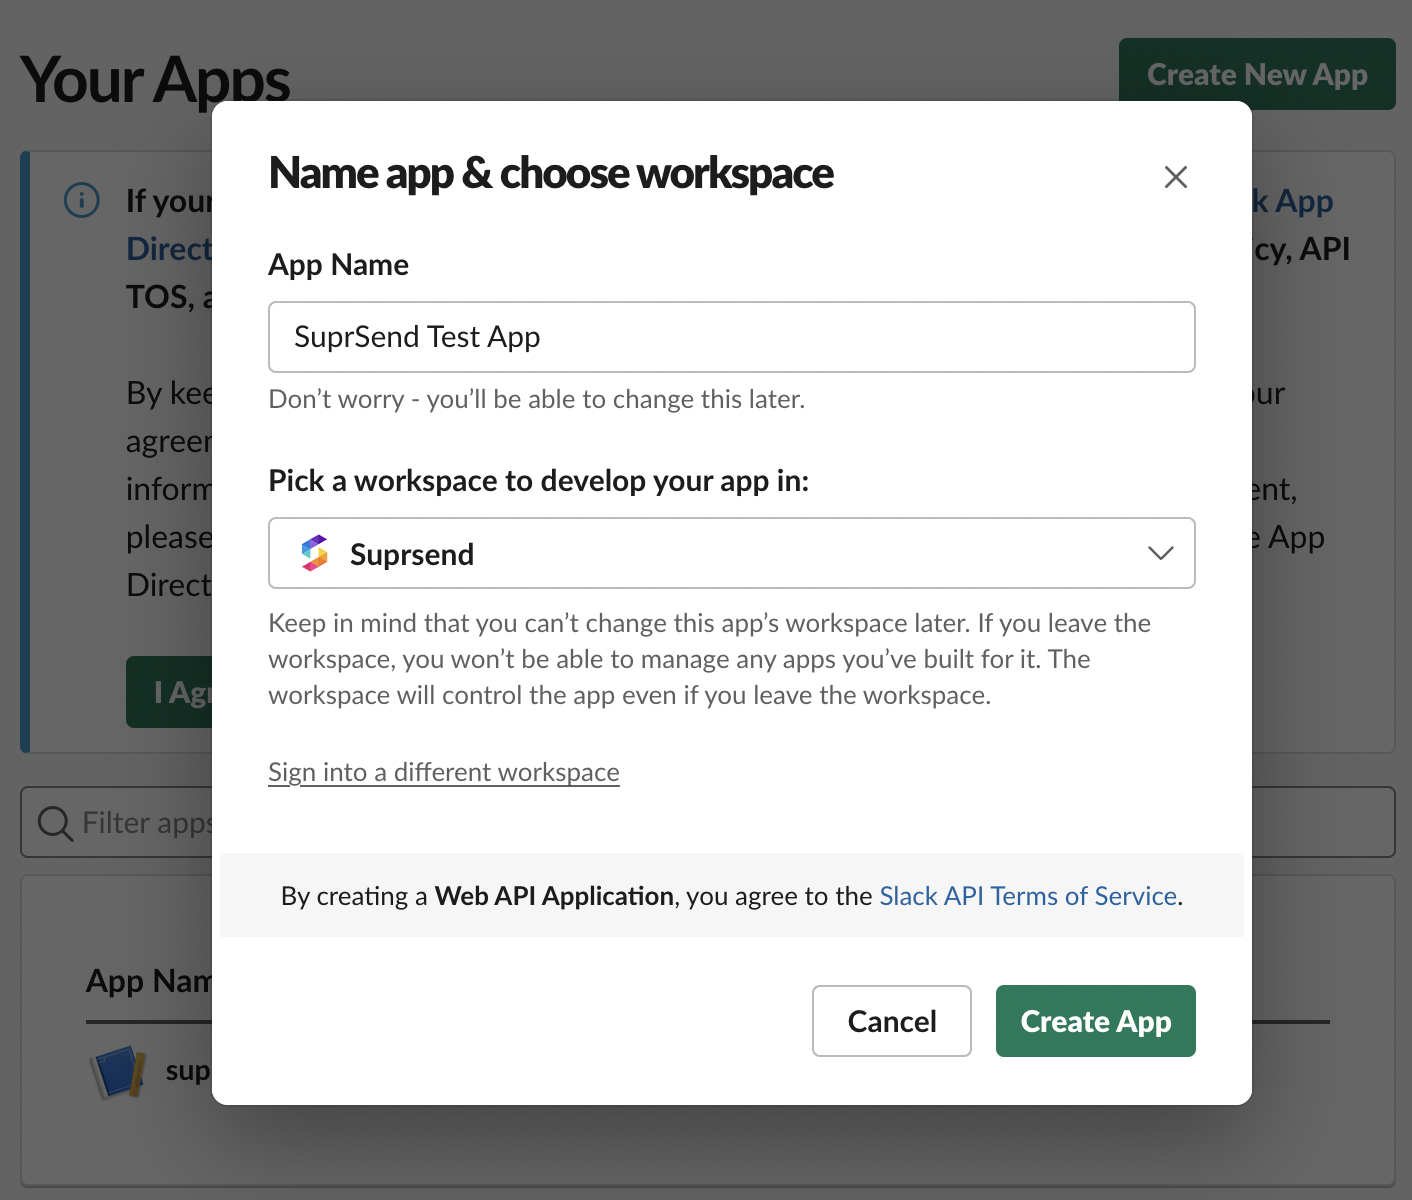
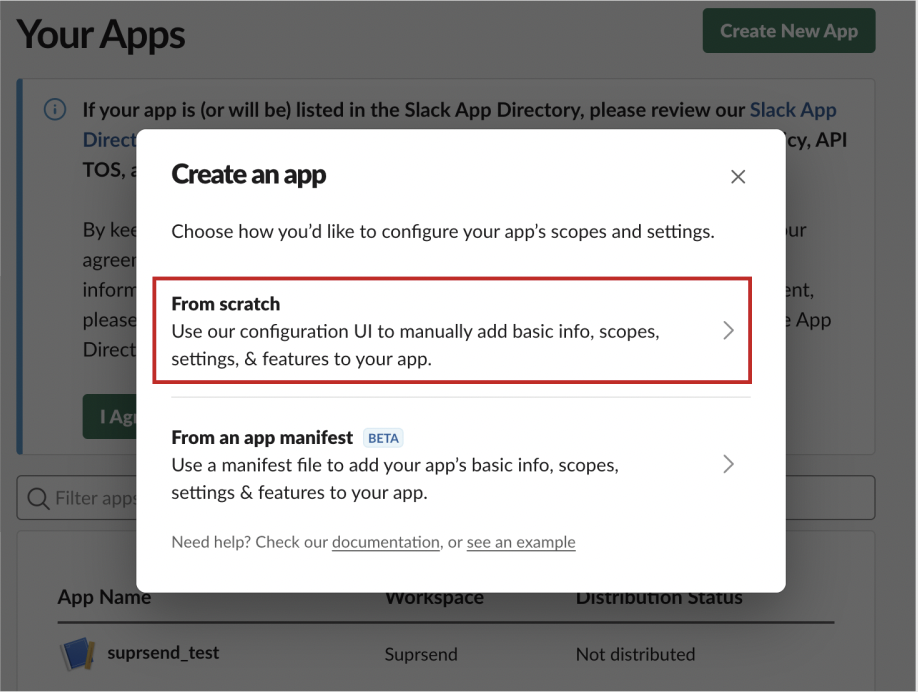 Give your App a suitable name and select the workspace you will be using to develop this app. For your test app, you can use something like "SuprSend Test App" for app name
 OAuth is a protocol that lets your app request authorization to private details in a user's Slack account without getting their password. It's also the vehicle by which Slack apps are installed on a team. You can authorize your app using one of the below methods:
[OAuth V2 method. ](/docs/slack#1-oauth-v2-method)Whenever a user joins a slack workspace or adds your slack app in their existing workspace, your app asks for specific permission scopes and is rewarded with access upon a user's approval.
OAuth is a protocol that lets your app request authorization to private details in a user's Slack account without getting their password. It's also the vehicle by which Slack apps are installed on a team. You can authorize your app using one of the below methods:
[OAuth V2 method. ](/docs/slack#1-oauth-v2-method)Whenever a user joins a slack workspace or adds your slack app in their existing workspace, your app asks for specific permission scopes and is rewarded with access upon a user's approval.
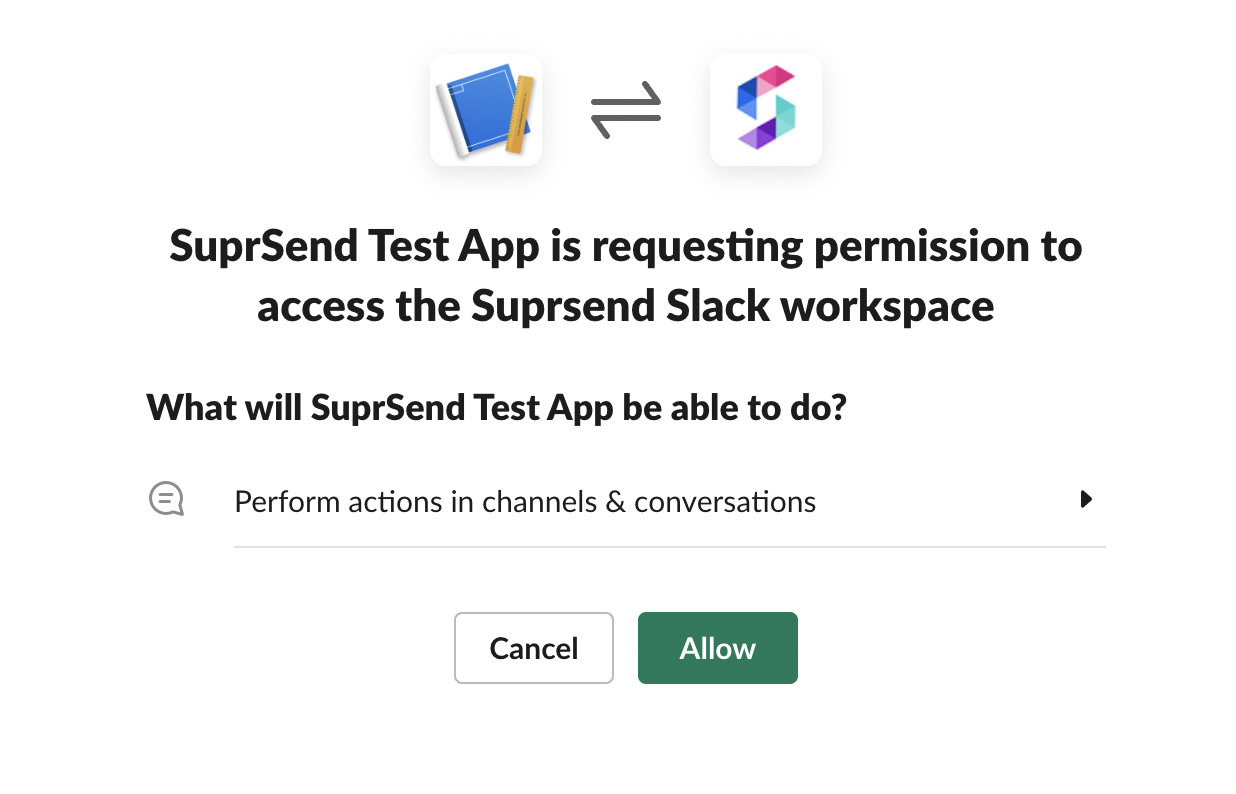 This is how a typical OAuth flow works:
1. You give a button somewhere on your product to add slack channel. The easiest way to enable workspaces to install your app is with the [Add to Slack](https://api.slack.com/docs/slack-button) button. Another way is to give the option to [Sign in with Slack ](https://api.slack.com/authentication/sign-in-with-slack) in your onboarding flow (which is not very common)
2. This will redirect the user to an [authorization link](https://slack.com/oauth/authorize). Refer [OAuth V2](https://api.slack.com/legacy/oauth#send_users) documentation to add slack authorization flow in your product.
3. The user will be asked to give permissions to access their profile information based on the scopes that you define in the OAuth & Permissions sidebar of your [app management page](https://api.slack.com/apps).
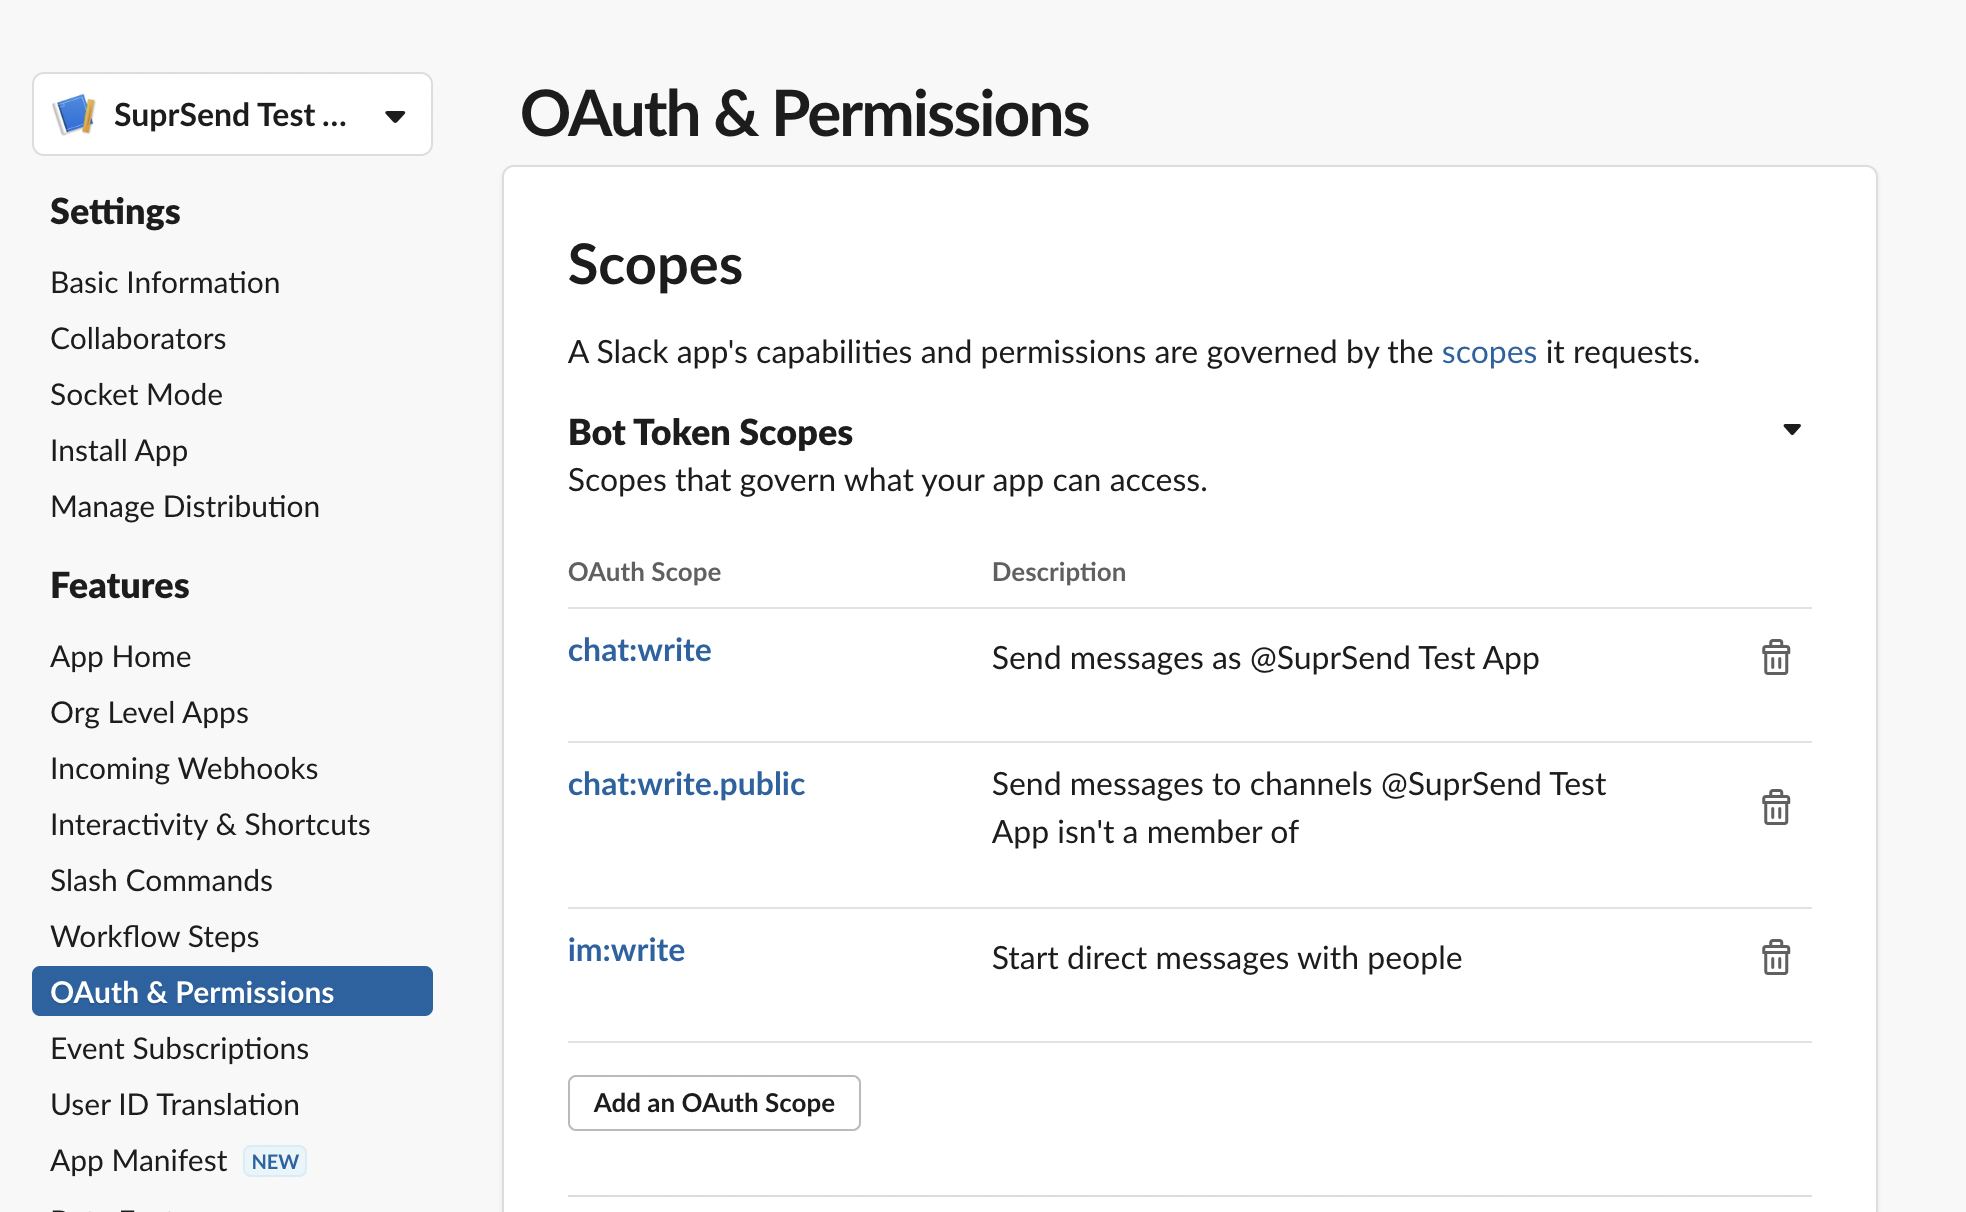
We'll need access to following scopes to be able to send direct message to user's Slack workspace.
| scope | obligation | description | |
| ------------------- | ----------- | ---------------------------------------------------------------------------------------------------------------------------------------------------------------------------------------------------------------- | - |
| `chat:write` | *mandatory* | Post messages in approved channels & conversations. At a minimum your app needs this scope to send notifications to a Slack workspace. | |
| `im:write` | *mandatory* | Send direct messages to users in Slack | |
| `chat:write.public` | *mandatory* | Send messages to public channels your Slack app isn't a member of. If your app doesn’t have this scope, you’ll need to use the `conversations.joins` method to join a public channel before sending it messages. | |
| `users:read` | *optional* | To send DM to user's DM | |
| `users:read.email` | *optional* | To send DM to user using their email id | |
Navigate to ***"Features" -> "OAuth & Permissions"*** page from the left sidebar menu. Scroll down to the Scopes section and add the above scopes as Bot Token Scopes.
This is how a typical OAuth flow works:
1. You give a button somewhere on your product to add slack channel. The easiest way to enable workspaces to install your app is with the [Add to Slack](https://api.slack.com/docs/slack-button) button. Another way is to give the option to [Sign in with Slack ](https://api.slack.com/authentication/sign-in-with-slack) in your onboarding flow (which is not very common)
2. This will redirect the user to an [authorization link](https://slack.com/oauth/authorize). Refer [OAuth V2](https://api.slack.com/legacy/oauth#send_users) documentation to add slack authorization flow in your product.
3. The user will be asked to give permissions to access their profile information based on the scopes that you define in the OAuth & Permissions sidebar of your [app management page](https://api.slack.com/apps).
We'll need access to following scopes to be able to send direct message to user's Slack workspace.
| scope | obligation | description | |
| ------------------- | ----------- | ---------------------------------------------------------------------------------------------------------------------------------------------------------------------------------------------------------------- | - |
| `chat:write` | *mandatory* | Post messages in approved channels & conversations. At a minimum your app needs this scope to send notifications to a Slack workspace. | |
| `im:write` | *mandatory* | Send direct messages to users in Slack | |
| `chat:write.public` | *mandatory* | Send messages to public channels your Slack app isn't a member of. If your app doesn’t have this scope, you’ll need to use the `conversations.joins` method to join a public channel before sending it messages. | |
| `users:read` | *optional* | To send DM to user's DM | |
| `users:read.email` | *optional* | To send DM to user using their email id | |
Navigate to ***"Features" -> "OAuth & Permissions"*** page from the left sidebar menu. Scroll down to the Scopes section and add the above scopes as Bot Token Scopes.
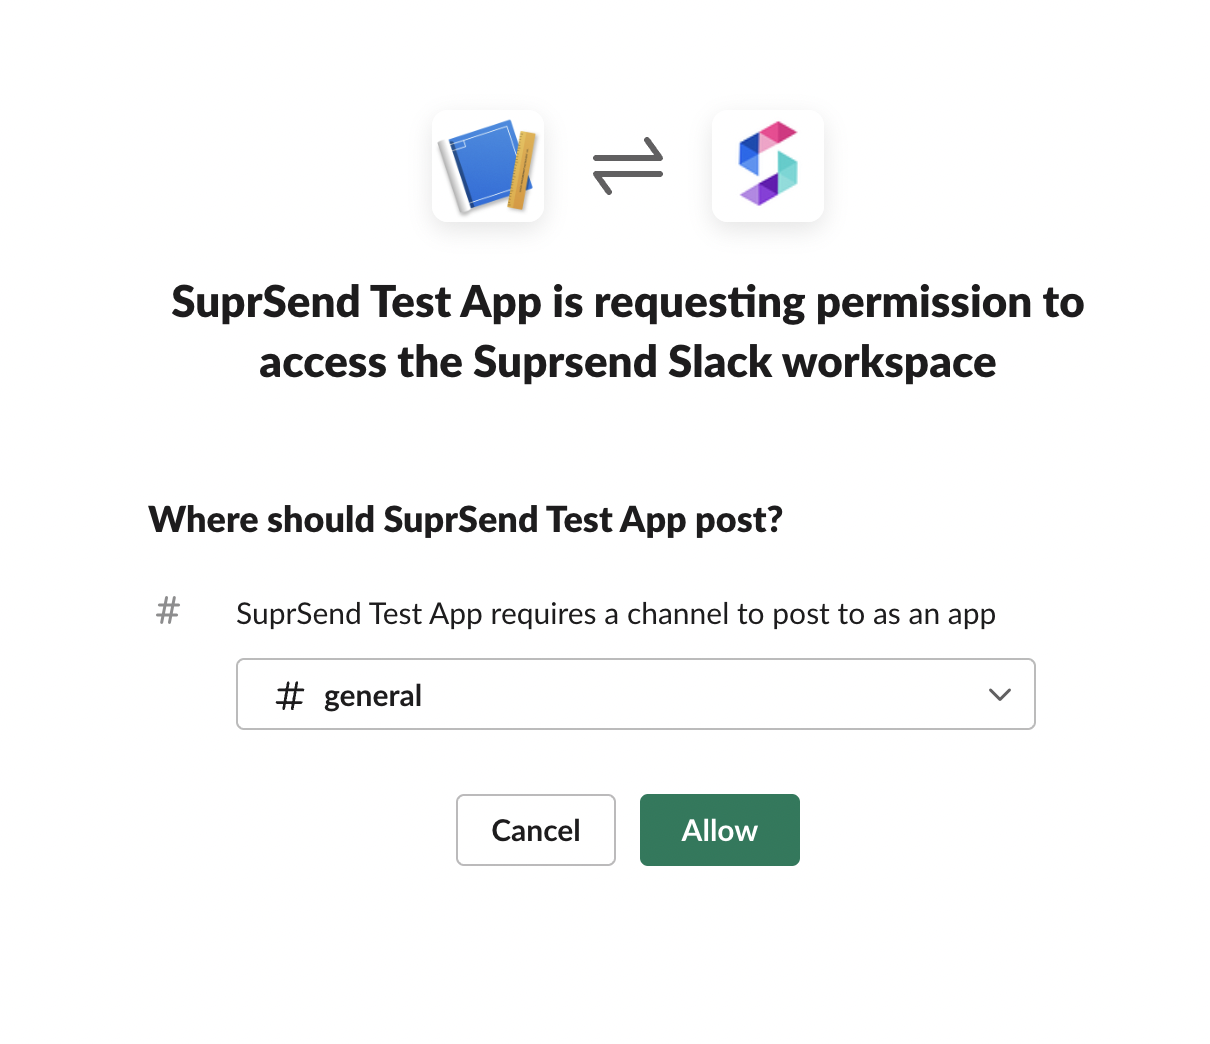
 [**Incoming Webhook Method**](/docs/slack#2-incoming-webhook)**:**
Another way to send slack message is using [incoming webhooks](https://api.slack.com/messaging/webhooks). Incoming webhook is a quick and easy way to send message to a particular channel. During the OAuth flow that uses `incoming_webhook` scope, your user can connect to a particular channel (public, private, or even the direct message channel for that individual user) they have access to in their Slack workspace.
[**Incoming Webhook Method**](/docs/slack#2-incoming-webhook)**:**
Another way to send slack message is using [incoming webhooks](https://api.slack.com/messaging/webhooks). Incoming webhook is a quick and easy way to send message to a particular channel. During the OAuth flow that uses `incoming_webhook` scope, your user can connect to a particular channel (public, private, or even the direct message channel for that individual user) they have access to in their Slack workspace.
 We recommend using [OAuth V2 method](/docs/slack#1-oauth-v2-method) for authentication, since incoming webhook requires your users to explicitly give permission to every channel that you want to send message to and restricts your access to limited channels in users' workspace.
It is best suited for use cases where you want to just update users on a particular channel such as
* Sending announcements and product updates in `#announcement` channel.
* Setting up an internal channel to send a message in case of anomaly detection in a product.
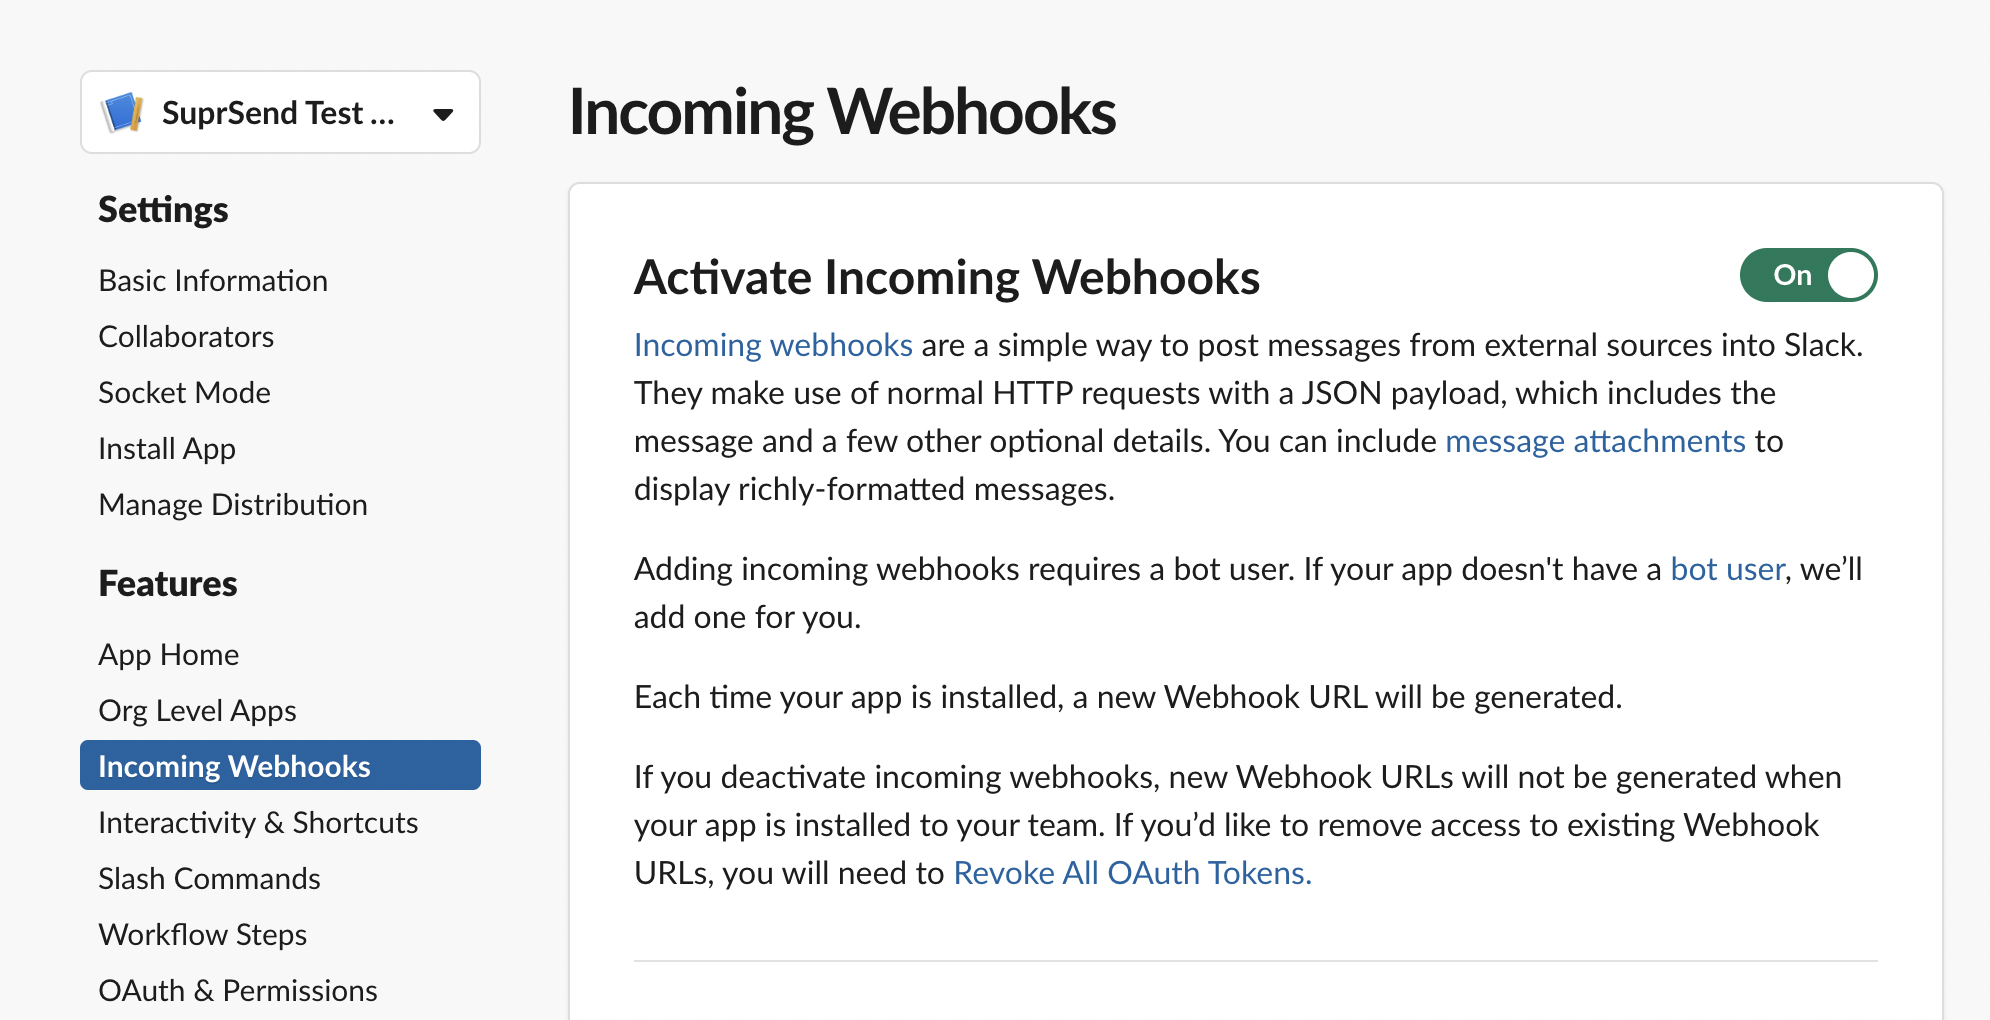
Navigate to ***"Features" -> "Incoming webhooks"*** page from the left sidebar menu to activate incoming webhook. Once enabled, you can use this scope in your [OAuth flow](https://api.slack.com/legacy/oauth#flow) to get user access to send messages on a particular channel
We recommend using [OAuth V2 method](/docs/slack#1-oauth-v2-method) for authentication, since incoming webhook requires your users to explicitly give permission to every channel that you want to send message to and restricts your access to limited channels in users' workspace.
It is best suited for use cases where you want to just update users on a particular channel such as
* Sending announcements and product updates in `#announcement` channel.
* Setting up an internal channel to send a message in case of anomaly detection in a product.
Navigate to ***"Features" -> "Incoming webhooks"*** page from the left sidebar menu to activate incoming webhook. Once enabled, you can use this scope in your [OAuth flow](https://api.slack.com/legacy/oauth#flow) to get user access to send messages on a particular channel
 ## Update Slack channel in user / object profile
The information required in the user profile is dependent on the type of message you are sending.
To send a direct message to a user, you’ll need to add the slack `user_id` or `email` along with bot access token in user profile. You can pass this information in a json format using `user.add_slack` method as below:
```javascript node.js theme={"system"}
const distinct_id = "__uniq_user_id__" // Unique id of user in your application
const user = supr_client.user.get_instance(distinct_id) // Instantiate User profile
// using slack email
user.add_slack(
{
"email": "john@abc.com",
"access_token": "xoxb-xxxxx"
})
//using slack user_id
user.add_slack(
{
"user_id": "U/WXXXXXXXX",
"access_token": "xoxb-xxxxx"
})
const response = user.save()
response.then((res) => console.log("response", res));
```
```python python theme={"system"}
distinct_id = "__uniq_user_id__" # Unique identifier of user in your application
# Instantiate User profile
user = supr_client.user.get_instance(distinct_id=distinct_id)
# using slack email
user.add_slack(
{
"email": "john@abc.com",
"access_token": "xoxb-xxxxx"
})
# using slack user_id
user.add_slack(
{
"user_id": "U/WXXXXXXXX",
"access_token": "xoxb-xxxxx"
})
response = user.save()
print(response)
```
To send a message to a public or private channel, you’ll need to pass its channel\_id along with access token. You can get channel\_id by opening slack in a browser, select the desired channel and copy the channel\_id from the URL
## Update Slack channel in user / object profile
The information required in the user profile is dependent on the type of message you are sending.
To send a direct message to a user, you’ll need to add the slack `user_id` or `email` along with bot access token in user profile. You can pass this information in a json format using `user.add_slack` method as below:
```javascript node.js theme={"system"}
const distinct_id = "__uniq_user_id__" // Unique id of user in your application
const user = supr_client.user.get_instance(distinct_id) // Instantiate User profile
// using slack email
user.add_slack(
{
"email": "john@abc.com",
"access_token": "xoxb-xxxxx"
})
//using slack user_id
user.add_slack(
{
"user_id": "U/WXXXXXXXX",
"access_token": "xoxb-xxxxx"
})
const response = user.save()
response.then((res) => console.log("response", res));
```
```python python theme={"system"}
distinct_id = "__uniq_user_id__" # Unique identifier of user in your application
# Instantiate User profile
user = supr_client.user.get_instance(distinct_id=distinct_id)
# using slack email
user.add_slack(
{
"email": "john@abc.com",
"access_token": "xoxb-xxxxx"
})
# using slack user_id
user.add_slack(
{
"user_id": "U/WXXXXXXXX",
"access_token": "xoxb-xxxxx"
})
response = user.save()
print(response)
```
To send a message to a public or private channel, you’ll need to pass its channel\_id along with access token. You can get channel\_id by opening slack in a browser, select the desired channel and copy the channel\_id from the URL
 We recommend creating a separate user for identifying channels and not mix it in user profile. You can create a slack channel user with `distinct_id` as `channel_` so it's easy for you to remember and pass in your workflow calls whenever you want to send message on a slack channel.
Refer below example to add slack channel shown in above screenshot
```javascript node.js theme={"system"}
const distinct_id = "channel_general" // Unique id of user in your application
const user = supr_client.user.get_instance(distinct_id) // Instantiate User profile
user.add_slack(
{
"channel_id": "CXXXXXXXX",
"access_token": "xoxb-xxxxx"
})
const response = user.save()
response.then((res) => console.log("response", res));
```
```python python theme={"system"}
distinct_id = "channel_general" # Unique identifier of user in your application
# Instantiate User profile
user = supr_client.user.get_instance(distinct_id=distinct_id)
user.add_slack(
{
"channel_id": "CXXXXXXXX",
"access_token": "xoxb-xxxxx"
})
response = user.save()
print(response)
```
To send a direct message using incoming webhook, just pass the webhook URL in user profile. You can pass this information in a json format using `user.add_slack` method as below:
```javascript node.js theme={"system"}
const distinct_id = "__uniq_user_id__" // Unique id of user in your application
const user = supr_client.user.get_instance(distinct_id) // Instantiate User profile
user.add_slack(
{
"incoming_webhook": {
"url": "https://hooks.slack.com/services/TXXXX/BXXXX/XXXXXXX"
}
})
const response = user.save()
response.then((res) => console.log("response", res));
```
```python python theme={"system"}
distinct_id = "__uniq_user_id__" # Unique identifier of user in your application
# Instantiate User profile
user = supr_client.user.get_instance(distinct_id=distinct_id)
user.add_slack(
{
"incoming_webhook": {
"url": "https://hooks.slack.com/services/TXXXX/BXXXX/XXXXXXX"
}
})
response = user.save()
print(response)
```
### Order of precedence
The Slack profile should only contain `incoming_webhook->url`, or the `access_token` with one of these keys: `channel_id`, `user_id`, or `email`. If there are multiple keys in `user.add_slack()` call, the order of precedence is as follows:
`incoming_webhook->url` > `channel_id` > `user_id` > `email`. e.g., if your add\_slack argument is as follows:
```javascript node.js theme={"system"}
const distinct_id = "__uniq_user_id__" // Unique id of user in your application
const user = supr_client.user.get_instance(distinct_id) // Instantiate User profile
user.add_slack(
{
"incoming_webhook": {
"url": "https://hooks.slack.com/services/TXXXX/BXXXX/XXXXXXX"
},
"email": "john@abc.com",
"user_id": "U/WXXXXXXXX",
"channel_id": "CXXXXXXXX",
"access_token": "xoxb-xxxxx",
})
const response = user.save()
response.then((res) => console.log("response", res));
```
```python python theme={"system"}
distinct_id = "__uniq_user_id__" # Unique identifier of user in your application
# Instantiate User profile
user = supr_client.user.get_instance(distinct_id=distinct_id)
user.add_slack(
{
"incoming_webhook": {
"url": "https://hooks.slack.com/services/TXXXX/BXXXX/XXXXXXX"
},
"email": "john@abc.com",
"user_id": "U/WXXXXXXXX",
"channel_id": "CXXXXXXXX",
"access_token": "xoxb-xxxxx",
})
response = user.save()
print(response)
```
The profile will be saved as `{"incoming_webhook": { "url": "https://hooks.slack.com/services/TXXXX/BXXXX/XXXXXXX" } }`
## Update Slack template
Refer section to [create slack template](/docs/slack-template) using JSONNET editor.
***
We recommend creating a separate user for identifying channels and not mix it in user profile. You can create a slack channel user with `distinct_id` as `channel_` so it's easy for you to remember and pass in your workflow calls whenever you want to send message on a slack channel.
Refer below example to add slack channel shown in above screenshot
```javascript node.js theme={"system"}
const distinct_id = "channel_general" // Unique id of user in your application
const user = supr_client.user.get_instance(distinct_id) // Instantiate User profile
user.add_slack(
{
"channel_id": "CXXXXXXXX",
"access_token": "xoxb-xxxxx"
})
const response = user.save()
response.then((res) => console.log("response", res));
```
```python python theme={"system"}
distinct_id = "channel_general" # Unique identifier of user in your application
# Instantiate User profile
user = supr_client.user.get_instance(distinct_id=distinct_id)
user.add_slack(
{
"channel_id": "CXXXXXXXX",
"access_token": "xoxb-xxxxx"
})
response = user.save()
print(response)
```
To send a direct message using incoming webhook, just pass the webhook URL in user profile. You can pass this information in a json format using `user.add_slack` method as below:
```javascript node.js theme={"system"}
const distinct_id = "__uniq_user_id__" // Unique id of user in your application
const user = supr_client.user.get_instance(distinct_id) // Instantiate User profile
user.add_slack(
{
"incoming_webhook": {
"url": "https://hooks.slack.com/services/TXXXX/BXXXX/XXXXXXX"
}
})
const response = user.save()
response.then((res) => console.log("response", res));
```
```python python theme={"system"}
distinct_id = "__uniq_user_id__" # Unique identifier of user in your application
# Instantiate User profile
user = supr_client.user.get_instance(distinct_id=distinct_id)
user.add_slack(
{
"incoming_webhook": {
"url": "https://hooks.slack.com/services/TXXXX/BXXXX/XXXXXXX"
}
})
response = user.save()
print(response)
```
### Order of precedence
The Slack profile should only contain `incoming_webhook->url`, or the `access_token` with one of these keys: `channel_id`, `user_id`, or `email`. If there are multiple keys in `user.add_slack()` call, the order of precedence is as follows:
`incoming_webhook->url` > `channel_id` > `user_id` > `email`. e.g., if your add\_slack argument is as follows:
```javascript node.js theme={"system"}
const distinct_id = "__uniq_user_id__" // Unique id of user in your application
const user = supr_client.user.get_instance(distinct_id) // Instantiate User profile
user.add_slack(
{
"incoming_webhook": {
"url": "https://hooks.slack.com/services/TXXXX/BXXXX/XXXXXXX"
},
"email": "john@abc.com",
"user_id": "U/WXXXXXXXX",
"channel_id": "CXXXXXXXX",
"access_token": "xoxb-xxxxx",
})
const response = user.save()
response.then((res) => console.log("response", res));
```
```python python theme={"system"}
distinct_id = "__uniq_user_id__" # Unique identifier of user in your application
# Instantiate User profile
user = supr_client.user.get_instance(distinct_id=distinct_id)
user.add_slack(
{
"incoming_webhook": {
"url": "https://hooks.slack.com/services/TXXXX/BXXXX/XXXXXXX"
},
"email": "john@abc.com",
"user_id": "U/WXXXXXXXX",
"channel_id": "CXXXXXXXX",
"access_token": "xoxb-xxxxx",
})
response = user.save()
print(response)
```
The profile will be saved as `{"incoming_webhook": { "url": "https://hooks.slack.com/services/TXXXX/BXXXX/XXXXXXX" } }`
## Update Slack template
Refer section to [create slack template](/docs/slack-template) using JSONNET editor.
***