> ## Documentation Index
> Fetch the complete documentation index at: https://docs.suprsend.com/llms.txt
> Use this file to discover all available pages before exploring further.
# Quickstart
> Create your first SuprSend notification template from scratch in under 5 minutes, covering multi-channel content, variables, preview, and sending a test.
A **template** holds the content for your notifications - for all channels in one place. Template is a generic term for the content you write for Email, SMS, Push, WhatsApp, and more. Each channel has its own editor and content structure, but they all live together in one template.
Templates are a separate layer from your workflow logic. This means you can edit and update content without touching your workflow structure. You can also reuse the same template across multiple workflows.
This quickstart walks you through creating a template, writing content, adding variables, and sending a test notification.
***
## Step 1 - Create a template
You can create a template from the **Templates** page or directly from a workflow delivery node. On the workflow canvas, click the delivery node and select **Create Template** and to create from Templates page, click **+ New Template** button. Both options open the same template creation modal.
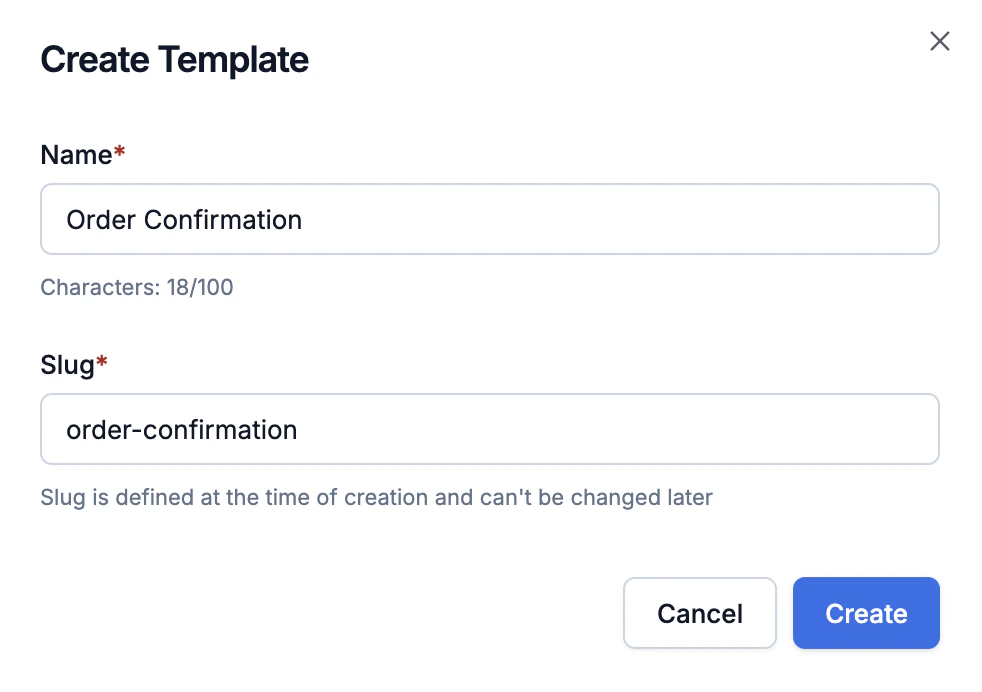 Enter a **Name** (for example, "Order Shipped"). Slug will be auto-generated from the name and shown on UI to edit. The slug is what your [workflow](/docs/workflows) uses to reference this template. So, verify it before saving as it cannot be changed later.
***
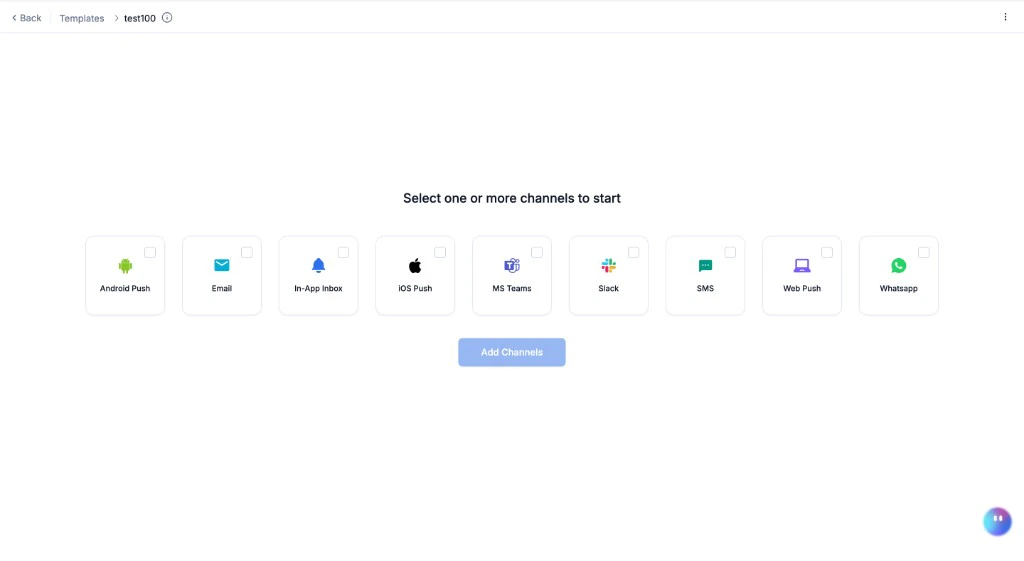
## Step 2 - Pick your channels
Select the channels you want to send on - for example, **Email** and **SMS**. You can always add more channels later by clicking the **+** tab in the editor.
Enter a **Name** (for example, "Order Shipped"). Slug will be auto-generated from the name and shown on UI to edit. The slug is what your [workflow](/docs/workflows) uses to reference this template. So, verify it before saving as it cannot be changed later.
***
## Step 2 - Pick your channels
Select the channels you want to send on - for example, **Email** and **SMS**. You can always add more channels later by clicking the **+** tab in the editor.
 ***
## Step 3 - Write your content
The editor opens on your first channel. Each channel has its own editor with a live preview on the right except Email designer. Here, the preview opens by clicking on eye icon on the bottom left side options.
If you're editing an existing template, click **Edit** first - templates open in read-only view mode by default.
Add your static text, then add **variables** for personalisation. Variables are placeholders like `{{order_id}}` or `{{$recipient.name}}` that get replaced with real data when the notification is sent.
For example, an SMS body might look like:
```
Hi {{$recipient.name}}, your order #{{order_id}} has shipped! Track it here: {{{tracking_url}}}
```
Use `{{double braces}}` for regular values and `{{{triple braces}}}` for URLs or variables where you want to avoid HTML rendering (for example links or values with special characters: `'`, `&`, `?`, `=`, etc.)
Switch between channel tabs to write content for each channel. Each channel's editor is different - see the [channel editor guides](#channel-editors) for details.
***
## Step 4 - Set up your variables
Before variables render in the preview, you need to add sample data. Open the **Variables panel** (`{}` icon in the left sidebar).
**Input Payload** - paste a sample JSON matching what your workflow trigger sends:
```json theme={"system"}
{
"order_id": "ORD-1234",
"tracking_url": "https://yourapp.com/track/ORD-1234"
}
```
**Recipient** - search for a test user by email or distinct ID. Their profile properties (name, email, phone) load into `$recipient`.
**Tenant** - if you're using [tenants](/docs/tenants), select one to load its branding (`$brand.brand_name`, `$brand.logo`, etc.).
Once your data is set up, variables in the editor render in the live preview instantly. Type `{{` in any field to get auto-suggestions.
For the full variable reference, see [Adding dynamic content](/docs/templates#the-variables-panel).
***
## Step 5 - Preview
The live preview on the right updates as you type. Check each channel tab to make sure the content looks right.
Select different **Recipients** and **Tenants** in the Variables panel to see how the template renders for different users and brands.
***
## Step 6 - Commit
Click **Commit** in the top bar to publish your template. This creates a live version - all future workflow triggers that reference this template's slug will use this content.
Editing always works on a draft. Live notifications are never affected until you commit. You can exit and come back - your draft is saved.
***
## Step 7 - Test
Send a real notification to verify everything works end-to-end.
You need a user with at least one channel identity (email address, phone number, or device token). Create one from the [Users page](https://app.suprsend.com/users), via [API](/docs/users), or ask Agent in the dashboard.
Click the **Test** button in the top-right corner. Enter your test user, pick the channels to test, and click **Send Test**.
You can test a single channel or all channels at once - the "Template Group" tab sends on every enabled channel simultaneously.
Go to **[Logs](/docs/logging)** to confirm delivery. If a variable was missing or a channel failed, the error shows up here.
Tests use the **live version** - commit first, then test. For WhatsApp and SMS (DLT), the template must be approved before you can test.
***
## Step 8 - Use in a workflow
Your template is ready. Reference it in a [workflow](/docs/workflows) delivery node by its **slug**. Every time the workflow triggers for a user, SuprSend renders the template with the trigger payload and sends it on the enabled channels.
Copy the slug from the clipboard icon next to the template name.
***
## Key concepts
**One template, all channels** - you don't need a separate template for Email, SMS, and Push. Add all channels to one template. When the workflow triggers, SuprSend sends on every enabled channel - one API call, multiple channels.
**Draft vs Live** - editing always works on a draft. Live notifications are unaffected until you commit. You can exit without committing and your draft is preserved.
**Variables** - personalise with `{{$recipient.name}}`, `{{order_id}}`, `{{$brand.brand_name}}`, etc. Two templating languages: [Handlebars](/docs/handlebars-helpers) (Email, SMS, WhatsApp, Push, Inbox) and [JSONNET](/docs/jsonnet-templates) (Slack, MS Teams).
**Variants** - need different content for different languages, tenants, or segments? Use [variants](/docs/template-variants) instead of creating separate templates.
**Versions** - every commit creates a new version. Roll back to any previous version from the History tab.
***
## Channel editors
Each channel has a dedicated editor. See the guide for your channel:
Designer, HTML, or plain text.
Single text field. DLT for India.
Header, body, footer, buttons.
Title, body, image, buttons.
Title, body, image, action URL.
Title, body, image, buttons.
Cards with avatar, buttons, expiry.
Text or Block Kit (JSONNET).
Markdown or Adaptive Card (JSONNET).
***
## Step 3 - Write your content
The editor opens on your first channel. Each channel has its own editor with a live preview on the right except Email designer. Here, the preview opens by clicking on eye icon on the bottom left side options.
If you're editing an existing template, click **Edit** first - templates open in read-only view mode by default.
Add your static text, then add **variables** for personalisation. Variables are placeholders like `{{order_id}}` or `{{$recipient.name}}` that get replaced with real data when the notification is sent.
For example, an SMS body might look like:
```
Hi {{$recipient.name}}, your order #{{order_id}} has shipped! Track it here: {{{tracking_url}}}
```
Use `{{double braces}}` for regular values and `{{{triple braces}}}` for URLs or variables where you want to avoid HTML rendering (for example links or values with special characters: `'`, `&`, `?`, `=`, etc.)
Switch between channel tabs to write content for each channel. Each channel's editor is different - see the [channel editor guides](#channel-editors) for details.
***
## Step 4 - Set up your variables
Before variables render in the preview, you need to add sample data. Open the **Variables panel** (`{}` icon in the left sidebar).
**Input Payload** - paste a sample JSON matching what your workflow trigger sends:
```json theme={"system"}
{
"order_id": "ORD-1234",
"tracking_url": "https://yourapp.com/track/ORD-1234"
}
```
**Recipient** - search for a test user by email or distinct ID. Their profile properties (name, email, phone) load into `$recipient`.
**Tenant** - if you're using [tenants](/docs/tenants), select one to load its branding (`$brand.brand_name`, `$brand.logo`, etc.).
Once your data is set up, variables in the editor render in the live preview instantly. Type `{{` in any field to get auto-suggestions.
For the full variable reference, see [Adding dynamic content](/docs/templates#the-variables-panel).
***
## Step 5 - Preview
The live preview on the right updates as you type. Check each channel tab to make sure the content looks right.
Select different **Recipients** and **Tenants** in the Variables panel to see how the template renders for different users and brands.
***
## Step 6 - Commit
Click **Commit** in the top bar to publish your template. This creates a live version - all future workflow triggers that reference this template's slug will use this content.
Editing always works on a draft. Live notifications are never affected until you commit. You can exit and come back - your draft is saved.
***
## Step 7 - Test
Send a real notification to verify everything works end-to-end.
You need a user with at least one channel identity (email address, phone number, or device token). Create one from the [Users page](https://app.suprsend.com/users), via [API](/docs/users), or ask Agent in the dashboard.
Click the **Test** button in the top-right corner. Enter your test user, pick the channels to test, and click **Send Test**.
You can test a single channel or all channels at once - the "Template Group" tab sends on every enabled channel simultaneously.
Go to **[Logs](/docs/logging)** to confirm delivery. If a variable was missing or a channel failed, the error shows up here.
Tests use the **live version** - commit first, then test. For WhatsApp and SMS (DLT), the template must be approved before you can test.
***
## Step 8 - Use in a workflow
Your template is ready. Reference it in a [workflow](/docs/workflows) delivery node by its **slug**. Every time the workflow triggers for a user, SuprSend renders the template with the trigger payload and sends it on the enabled channels.
Copy the slug from the clipboard icon next to the template name.
***
## Key concepts
**One template, all channels** - you don't need a separate template for Email, SMS, and Push. Add all channels to one template. When the workflow triggers, SuprSend sends on every enabled channel - one API call, multiple channels.
**Draft vs Live** - editing always works on a draft. Live notifications are unaffected until you commit. You can exit without committing and your draft is preserved.
**Variables** - personalise with `{{$recipient.name}}`, `{{order_id}}`, `{{$brand.brand_name}}`, etc. Two templating languages: [Handlebars](/docs/handlebars-helpers) (Email, SMS, WhatsApp, Push, Inbox) and [JSONNET](/docs/jsonnet-templates) (Slack, MS Teams).
**Variants** - need different content for different languages, tenants, or segments? Use [variants](/docs/template-variants) instead of creating separate templates.
**Versions** - every commit creates a new version. Roll back to any previous version from the History tab.
***
## Channel editors
Each channel has a dedicated editor. See the guide for your channel:
Designer, HTML, or plain text.
Single text field. DLT for India.
Header, body, footer, buttons.
Title, body, image, buttons.
Title, body, image, action URL.
Title, body, image, buttons.
Cards with avatar, buttons, expiry.
Text or Block Kit (JSONNET).
Markdown or Adaptive Card (JSONNET).