> ## Documentation Index
> Fetch the complete documentation index at: https://docs.suprsend.com/llms.txt
> Use this file to discover all available pages before exploring further.
# Creating & Managing Templates
> Step-by-step guide to creating, editing, testing, and managing notification templates in SuprSend.
## Create a template
There are two ways to create a template:
* **From the Templates page** - go to **Templates** in the sidebar and click **+ New Template**. You'll link it to a workflow later.
* **From a workflow** - click **Create Template** inside a delivery node in the [workflow builder](/docs/workflows). The template is automatically linked to that workflow and its name and slug are pre-filled from the workflow and node names. This is the fastest path when building a new notification from scratch.
From the Templates page or a workflow node, open the creation modal.
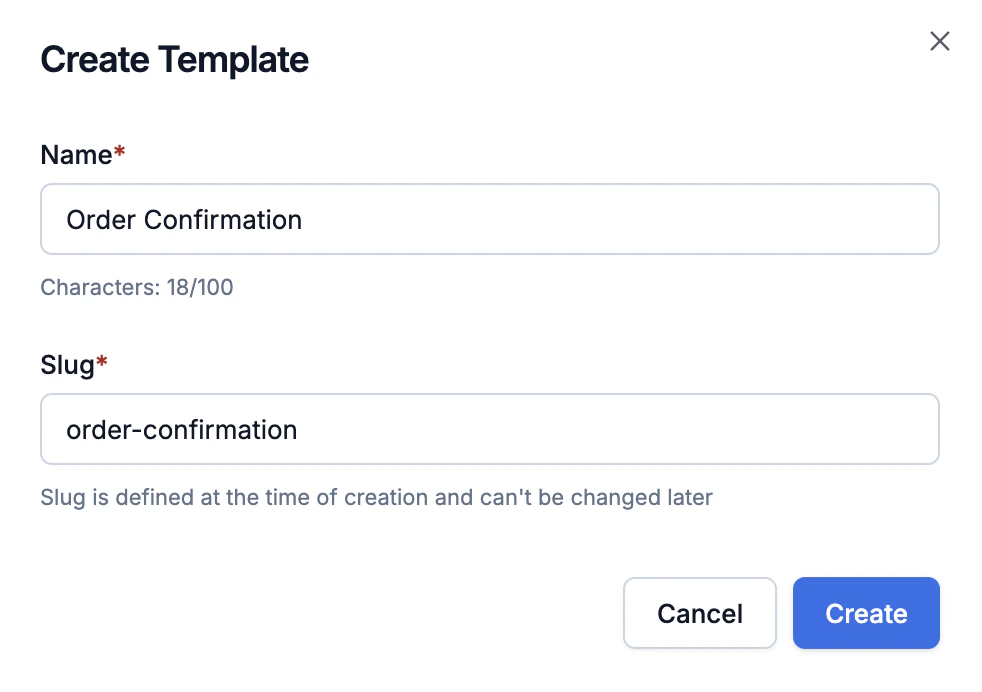 Enter a **Name** (display label, changeable later) and a **Slug** (the identifier your [workflow](/docs/workflows) uses to reference this template - auto-derived from the name, **cannot be changed after creation**). Renaming the template later doesn't affect the slug, so existing workflows keep working.
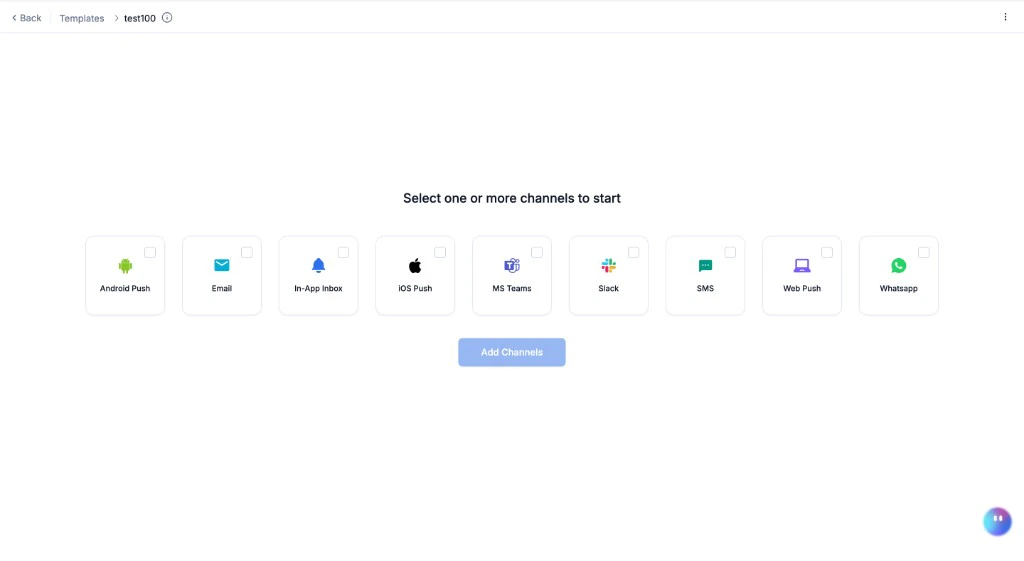
Select the channels you want to send on. You can add more channels later by clicking the **+** tab in the editor, or remove a channel from the channel's three-dot menu.
Enter a **Name** (display label, changeable later) and a **Slug** (the identifier your [workflow](/docs/workflows) uses to reference this template - auto-derived from the name, **cannot be changed after creation**). Renaming the template later doesn't affect the slug, so existing workflows keep working.
Select the channels you want to send on. You can add more channels later by clicking the **+** tab in the editor, or remove a channel from the channel's three-dot menu.
 ***
## Write your content
The editor opens for your first channel. Each channel has its own editor with a live device preview on the right. Click the channel tabs at the top to switch between them.
* **View mode** (default) - shows the published version, read-only.
* **Edit mode** - click **Edit** to open the draft. Content auto-saves as you type. Live traffic is never affected until you commit. If you exit without committing, your draft is saved - you can come back and pick up where you left off.
For channel-specific fields and editor guides, see:
Designer, HTML, or plain text.
Single text field. DLT for India.
Header, body, footer, buttons.
Title, body, image, buttons.
Title, body, image, action URL.
Title, body, image, buttons.
Cards with avatar, buttons, expiry.
Text or Block Kit (JSONNET).
Markdown or Adaptive Card (JSONNET).
### The Variables panel
The left panel has a `{}` tab - the **Variables panel**. This is where you set up all the data your template uses. It powers auto-suggestions, the live preview, and the test flow. Set this up before writing variables in your content.
***
## Write your content
The editor opens for your first channel. Each channel has its own editor with a live device preview on the right. Click the channel tabs at the top to switch between them.
* **View mode** (default) - shows the published version, read-only.
* **Edit mode** - click **Edit** to open the draft. Content auto-saves as you type. Live traffic is never affected until you commit. If you exit without committing, your draft is saved - you can come back and pick up where you left off.
For channel-specific fields and editor guides, see:
Designer, HTML, or plain text.
Single text field. DLT for India.
Header, body, footer, buttons.
Title, body, image, buttons.
Title, body, image, action URL.
Title, body, image, buttons.
Cards with avatar, buttons, expiry.
Text or Block Kit (JSONNET).
Markdown or Adaptive Card (JSONNET).
### The Variables panel
The left panel has a `{}` tab - the **Variables panel**. This is where you set up all the data your template uses. It powers auto-suggestions, the live preview, and the test flow. Set this up before writing variables in your content.
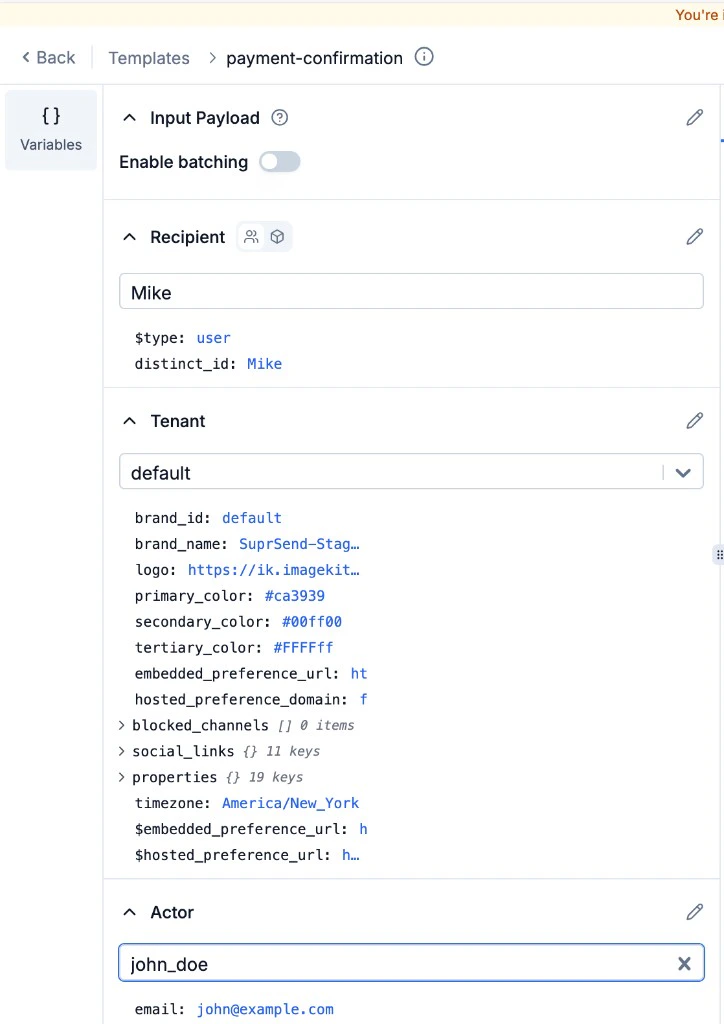 **Input Payload**
This is the data your workflow trigger sends - order details, event info, URLs, etc. Paste a sample JSON that matches the shape of your actual trigger payload. For example:
```json theme={"system"}
{
"order_id": "ORD-1234",
"order": {
"total": "$49.99",
"address": { "city": "San Francisco" }
},
"tracking_url": "https://yourapp.com/track/ORD-1234"
}
```
Use these in your template as `{{order_id}}`, `{{order.address.city}}`, `{{{tracking_url}}}` (triple braces for URLs to avoid escaping `&`, `?`, `=`).
Toggle **Enable batching** to preview [batched](/docs/batch)/[digest](/docs/digest) content - this adds `$batched_events` and `$batched_events_count` to your data context.
You can also click **Pre-fill from last workflow run** (if the template is linked to a workflow) to auto-populate with real data from the most recent trigger.
**Recipient**
Search for a user by name, email, or distinct ID. Their profile properties load into `$recipient` - accessible in your template as:
* `{{$recipient.name}}` - user's name
* `{{$recipient.email}}` - user's email
* `{{$recipient.phone}}` - user's phone number
* `{{$recipient.distinct_id}}` - user's unique ID
* Any custom property you've set on the user profile
This is the person who **receives** the notification. In the live preview, selecting a recipient renders the template with their actual data - so you can see exactly what they'd receive.
Use `$recipient` in templates, not `$user`. Both refer to the same data, but `$recipient` is the standard.
**Tenant**
Select a [tenant](/docs/tenants) from the dropdown. Its properties load into `$brand` - accessible as:
* `{{$brand.brand_name}}` - tenant's display name
* `{{$brand.logo}}` - tenant's logo URL
* `{{$brand.primary_color}}` - brand colour (used in email Tenant blocks)
* `{{$brand.properties.address}}` - custom tenant properties (address, support email, etc.)
* `{{$brand.$hosted_preference_url}}` - hosted unsubscribe/preference page link
* `{{$brand.$embedded_preference_url}}` - embedded preference widget link
If your template uses tenant branding (logo in email header, brand name in SMS, etc.), selecting a tenant in the preview shows you exactly how that tenant's notifications look.
Use `$brand` for tenant data in templates - not `$tenant`. The `$tenant` namespace is not exposed to templates.
**Actor**
The actor is the person who **performed the action** that triggered the notification - separate from the recipient. For example: "Alice commented on Bob's post" - Alice is the `$actor`, Bob is the `$recipient`.
* `{{$actor.name}}` - actor's name
* `{{$actor.email}}` - actor's email
Actor data is only available when your workflow trigger includes an `actor`. If no actor is passed, `$actor` variables render as empty.
### Using variables in content
Once your data is set up, type `{{` in any text field - a dropdown shows all available variables grouped by source (Input Payload, Recipient, Actor, Tenant). Pick one, and it renders instantly in the preview. Variables with missing values are highlighted in **red**.
In the Email Design Editor, use the **Merge Tags** button in the toolbar instead.
For advanced logic (conditionals, loops, date formatting), see [Handlebars Helpers](/docs/handlebars-helpers). For Slack and MS Teams (JSONNET syntax), see [JSONNET Templates](/docs/jsonnet-templates).
The **live preview** on the right updates as you type. Select different Recipients and Tenants in the Variables panel to see how the template renders for different users and brands.
***
## Commit
Click **Commit** in the top bar to publish your draft. Add an optional description. All future workflow triggers immediately use the new content.
For **WhatsApp** and **SMS (DLT)**, committing puts the version into **Approval Pending** - it goes live only after vendor approval.
### Using the template in a workflow
Once committed, the template is ready to be used. Add it to a [workflow](/docs/workflows) delivery node by referencing its **slug**. Every time the workflow triggers, SuprSend renders the template with the trigger payload and sends it to the recipient. You can copy the slug from the clipboard icon next to the template name.
***
## Test
After committing, send a real notification to a real device to verify everything looks right end-to-end.
Click the **Test** button in the top-right corner.
**Need a test user?** You need a user with at least one channel identity (email, phone number, device token). Create one from the [Users page](https://app.suprsend.com/users), via [API](/docs/users), or ask Agent in the dashboard to create one.
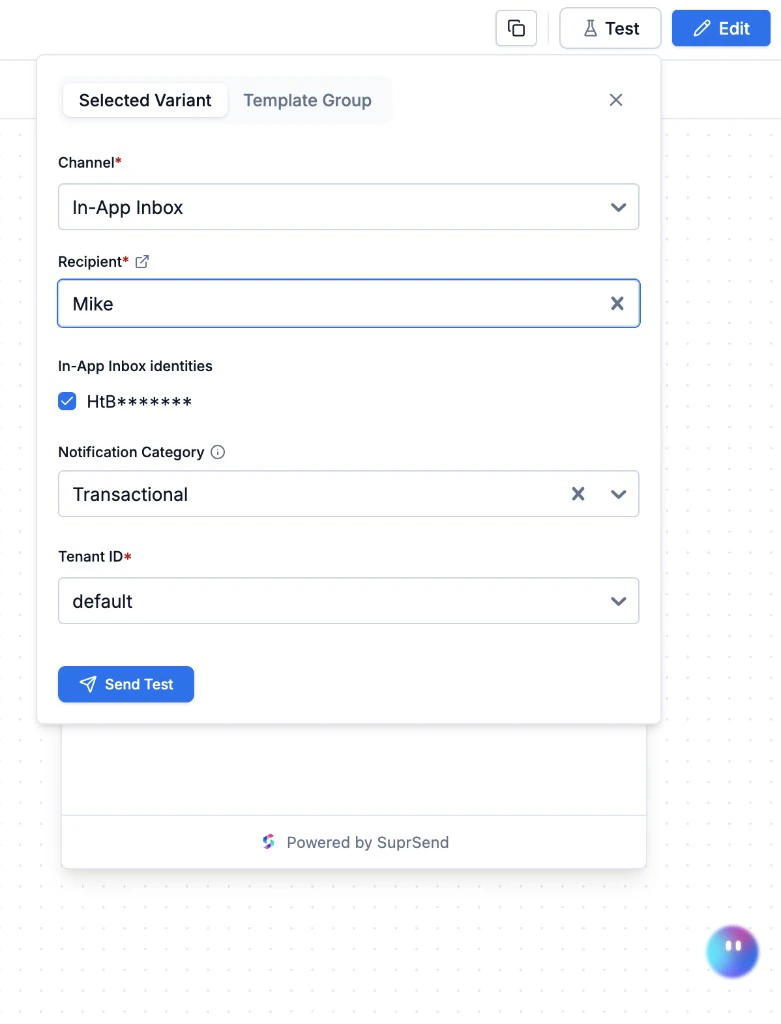
1. Pick the **Channel** (for example, Email, SMS).
2. Enter a **Recipient** (email or distinct ID).
3. Optionally pick a **Notification Category** — determines which [vendor](/docs/vendors) config is used (for example, transactional vs promotional SMS vendor).
4. Optionally pick a **Tenant** — loads that tenant's branding into `$brand` and selects the matching tenant variant. Leave blank to use defaults.
5. Click **Send Test**.
**Input Payload**
This is the data your workflow trigger sends - order details, event info, URLs, etc. Paste a sample JSON that matches the shape of your actual trigger payload. For example:
```json theme={"system"}
{
"order_id": "ORD-1234",
"order": {
"total": "$49.99",
"address": { "city": "San Francisco" }
},
"tracking_url": "https://yourapp.com/track/ORD-1234"
}
```
Use these in your template as `{{order_id}}`, `{{order.address.city}}`, `{{{tracking_url}}}` (triple braces for URLs to avoid escaping `&`, `?`, `=`).
Toggle **Enable batching** to preview [batched](/docs/batch)/[digest](/docs/digest) content - this adds `$batched_events` and `$batched_events_count` to your data context.
You can also click **Pre-fill from last workflow run** (if the template is linked to a workflow) to auto-populate with real data from the most recent trigger.
**Recipient**
Search for a user by name, email, or distinct ID. Their profile properties load into `$recipient` - accessible in your template as:
* `{{$recipient.name}}` - user's name
* `{{$recipient.email}}` - user's email
* `{{$recipient.phone}}` - user's phone number
* `{{$recipient.distinct_id}}` - user's unique ID
* Any custom property you've set on the user profile
This is the person who **receives** the notification. In the live preview, selecting a recipient renders the template with their actual data - so you can see exactly what they'd receive.
Use `$recipient` in templates, not `$user`. Both refer to the same data, but `$recipient` is the standard.
**Tenant**
Select a [tenant](/docs/tenants) from the dropdown. Its properties load into `$brand` - accessible as:
* `{{$brand.brand_name}}` - tenant's display name
* `{{$brand.logo}}` - tenant's logo URL
* `{{$brand.primary_color}}` - brand colour (used in email Tenant blocks)
* `{{$brand.properties.address}}` - custom tenant properties (address, support email, etc.)
* `{{$brand.$hosted_preference_url}}` - hosted unsubscribe/preference page link
* `{{$brand.$embedded_preference_url}}` - embedded preference widget link
If your template uses tenant branding (logo in email header, brand name in SMS, etc.), selecting a tenant in the preview shows you exactly how that tenant's notifications look.
Use `$brand` for tenant data in templates - not `$tenant`. The `$tenant` namespace is not exposed to templates.
**Actor**
The actor is the person who **performed the action** that triggered the notification - separate from the recipient. For example: "Alice commented on Bob's post" - Alice is the `$actor`, Bob is the `$recipient`.
* `{{$actor.name}}` - actor's name
* `{{$actor.email}}` - actor's email
Actor data is only available when your workflow trigger includes an `actor`. If no actor is passed, `$actor` variables render as empty.
### Using variables in content
Once your data is set up, type `{{` in any text field - a dropdown shows all available variables grouped by source (Input Payload, Recipient, Actor, Tenant). Pick one, and it renders instantly in the preview. Variables with missing values are highlighted in **red**.
In the Email Design Editor, use the **Merge Tags** button in the toolbar instead.
For advanced logic (conditionals, loops, date formatting), see [Handlebars Helpers](/docs/handlebars-helpers). For Slack and MS Teams (JSONNET syntax), see [JSONNET Templates](/docs/jsonnet-templates).
The **live preview** on the right updates as you type. Select different Recipients and Tenants in the Variables panel to see how the template renders for different users and brands.
***
## Commit
Click **Commit** in the top bar to publish your draft. Add an optional description. All future workflow triggers immediately use the new content.
For **WhatsApp** and **SMS (DLT)**, committing puts the version into **Approval Pending** - it goes live only after vendor approval.
### Using the template in a workflow
Once committed, the template is ready to be used. Add it to a [workflow](/docs/workflows) delivery node by referencing its **slug**. Every time the workflow triggers, SuprSend renders the template with the trigger payload and sends it to the recipient. You can copy the slug from the clipboard icon next to the template name.
***
## Test
After committing, send a real notification to a real device to verify everything looks right end-to-end.
Click the **Test** button in the top-right corner.
**Need a test user?** You need a user with at least one channel identity (email, phone number, device token). Create one from the [Users page](https://app.suprsend.com/users), via [API](/docs/users), or ask Agent in the dashboard to create one.
1. Pick the **Channel** (for example, Email, SMS).
2. Enter a **Recipient** (email or distinct ID).
3. Optionally pick a **Notification Category** — determines which [vendor](/docs/vendors) config is used (for example, transactional vs promotional SMS vendor).
4. Optionally pick a **Tenant** — loads that tenant's branding into `$brand` and selects the matching tenant variant. Leave blank to use defaults.
5. Click **Send Test**.
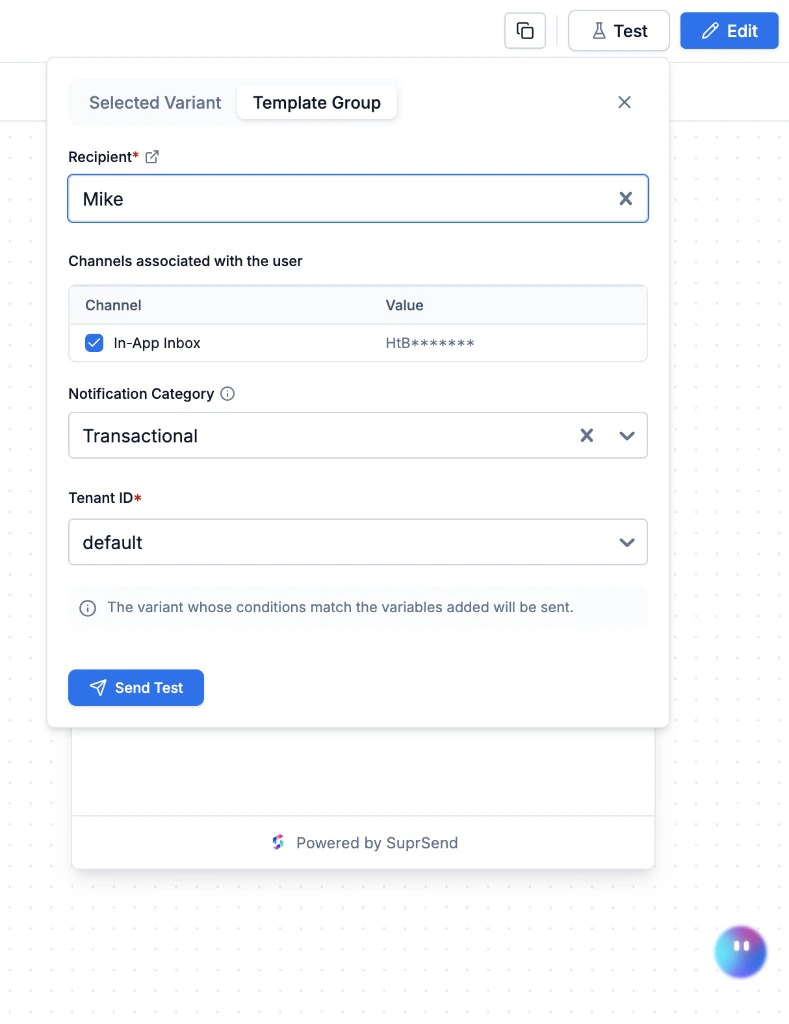
 1. Enter a **Recipient** - the panel shows every channel that user has identities for.
2. Check the channels to include.
3. Optionally pick **Category** and **Tenant**.
4. Click **Send Test**.
1. Enter a **Recipient** - the panel shows every channel that user has identities for.
2. Check the channels to include.
3. Optionally pick **Category** and **Tenant**.
4. Click **Send Test**.
 After sending, go to **[Logs](/docs/logging)** to check delivery status. If a variable was missing or a channel failed to render, you'll see the exact error there.
**WhatsApp** and **SMS (DLT)** templates must be committed and approved before you can test.
***
## Version history
Click the **History** tab (clock icon) in the left panel to see all published versions - who committed, when, and what changed per channel.
After sending, go to **[Logs](/docs/logging)** to check delivery status. If a variable was missing or a channel failed to render, you'll see the exact error there.
**WhatsApp** and **SMS (DLT)** templates must be committed and approved before you can test.
***
## Version history
Click the **History** tab (clock icon) in the left panel to see all published versions - who committed, when, and what changed per channel.
 To rollback: click a previous version → **Rollback**. It becomes the live version. Newer versions are not deleted.
***
## Variants
Every template starts with a **default** variant. That's enough for most use cases. Add more variants only when you need different content for different audiences:
* **Languages** — a Spanish variant for Spanish-speaking users, Hindi for Hindi. SuprSend auto-selects based on the recipient's preferred language. See [Multi-lingual Templates](/docs/multi-lingual-template).
* **Tenants** — Uber's users see Uber branding, Acme's users see Acme's. One template serves all tenants.
* **Payload conditions** — show different content based on trigger data (for example, `plan == "pro"` gets a premium message).
Non-default variants are evaluated in order - the first one whose conditions match is sent. If nothing matches, the **default** variant (always at the top) is sent as the fallback. Name them descriptively: `uber-en`, `acme-es`, `default-hi`.
Full guide: [Template Variants](/docs/template-variants).
***
## Import content
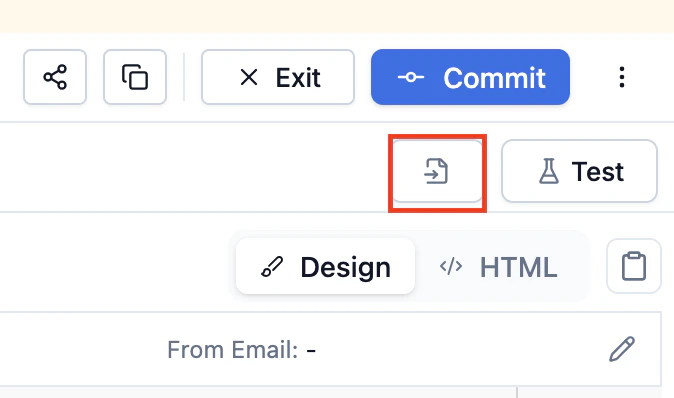
Click the **Import** button (arrow icon) in the editor toolbar to copy content from:
* **This template** — another variant (for example, copy default English into a new Spanish variant, then translate).
* **Other templates** — any template in your workspace. Pick a variant and preview before importing.
To rollback: click a previous version → **Rollback**. It becomes the live version. Newer versions are not deleted.
***
## Variants
Every template starts with a **default** variant. That's enough for most use cases. Add more variants only when you need different content for different audiences:
* **Languages** — a Spanish variant for Spanish-speaking users, Hindi for Hindi. SuprSend auto-selects based on the recipient's preferred language. See [Multi-lingual Templates](/docs/multi-lingual-template).
* **Tenants** — Uber's users see Uber branding, Acme's users see Acme's. One template serves all tenants.
* **Payload conditions** — show different content based on trigger data (for example, `plan == "pro"` gets a premium message).
Non-default variants are evaluated in order - the first one whose conditions match is sent. If nothing matches, the **default** variant (always at the top) is sent as the fallback. Name them descriptively: `uber-en`, `acme-es`, `default-hi`.
Full guide: [Template Variants](/docs/template-variants).
***
## Import content
Click the **Import** button (arrow icon) in the editor toolbar to copy content from:
* **This template** — another variant (for example, copy default English into a new Spanish variant, then translate).
* **Other templates** — any template in your workspace. Pick a variant and preview before importing.
 Imported content is a one-time copy - the source and copy are independent after import.
***
## Clone and promote
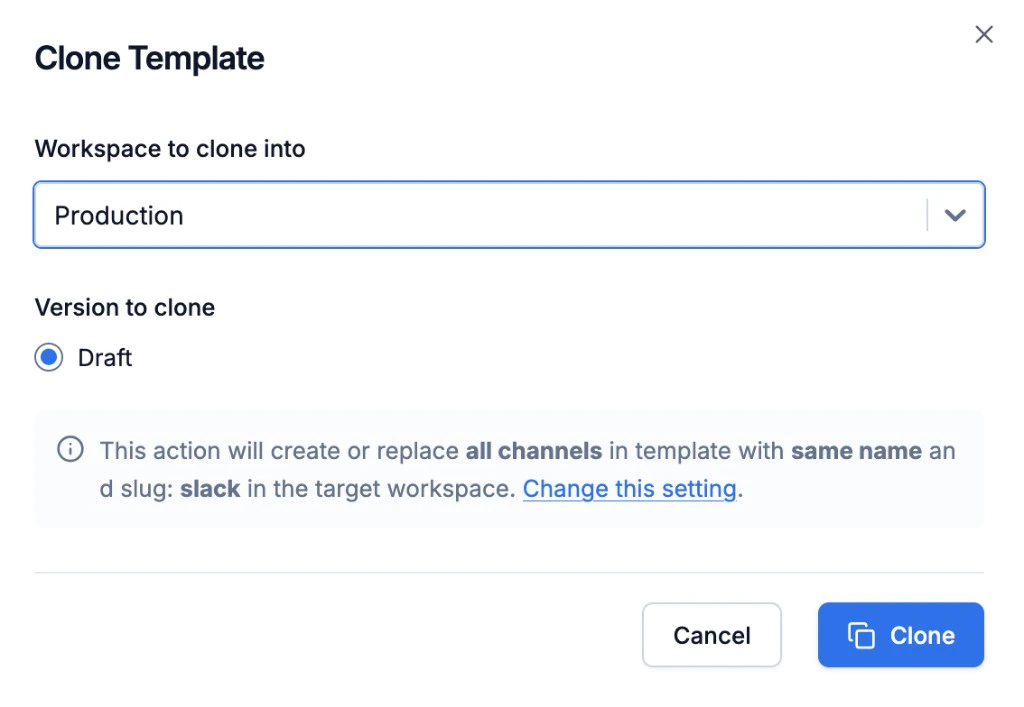
Click **Clone Template** to copy the entire template (all channels, variants, content) to the same or a different workspace — for example, from Staging to Production.
Imported content is a one-time copy - the source and copy are independent after import.
***
## Clone and promote
Click **Clone Template** to copy the entire template (all channels, variants, content) to the same or a different workspace — for example, from Staging to Production.
 ***
## Managing templates
**Metadata** - click the info icon next to the template name to edit Name, Description, and Tags. The Slug is immutable after creation.
**Finding templates** - the Templates listing page shows all templates with status, channels, linked workflow, and last updated. Use **Filters and Sort** to narrow by channel, tag, status, or templates you edited. The **Approvals** tab shows pending WhatsApp/DLT approvals.
**Archive** - archive unused templates from the overflow menu. Cannot be recovered.
**API and CLI** - manage templates programmatically via the [Template Management API](/reference/list-templates-v2) or [CLI](/reference/cli-template-overview).
***
## Managing templates
**Metadata** - click the info icon next to the template name to edit Name, Description, and Tags. The Slug is immutable after creation.
**Finding templates** - the Templates listing page shows all templates with status, channels, linked workflow, and last updated. Use **Filters and Sort** to narrow by channel, tag, status, or templates you edited. The **Approvals** tab shows pending WhatsApp/DLT approvals.
**Archive** - archive unused templates from the overflow menu. Cannot be recovered.
**API and CLI** - manage templates programmatically via the [Template Management API](/reference/list-templates-v2) or [CLI](/reference/cli-template-overview).