 ### What You Can Do
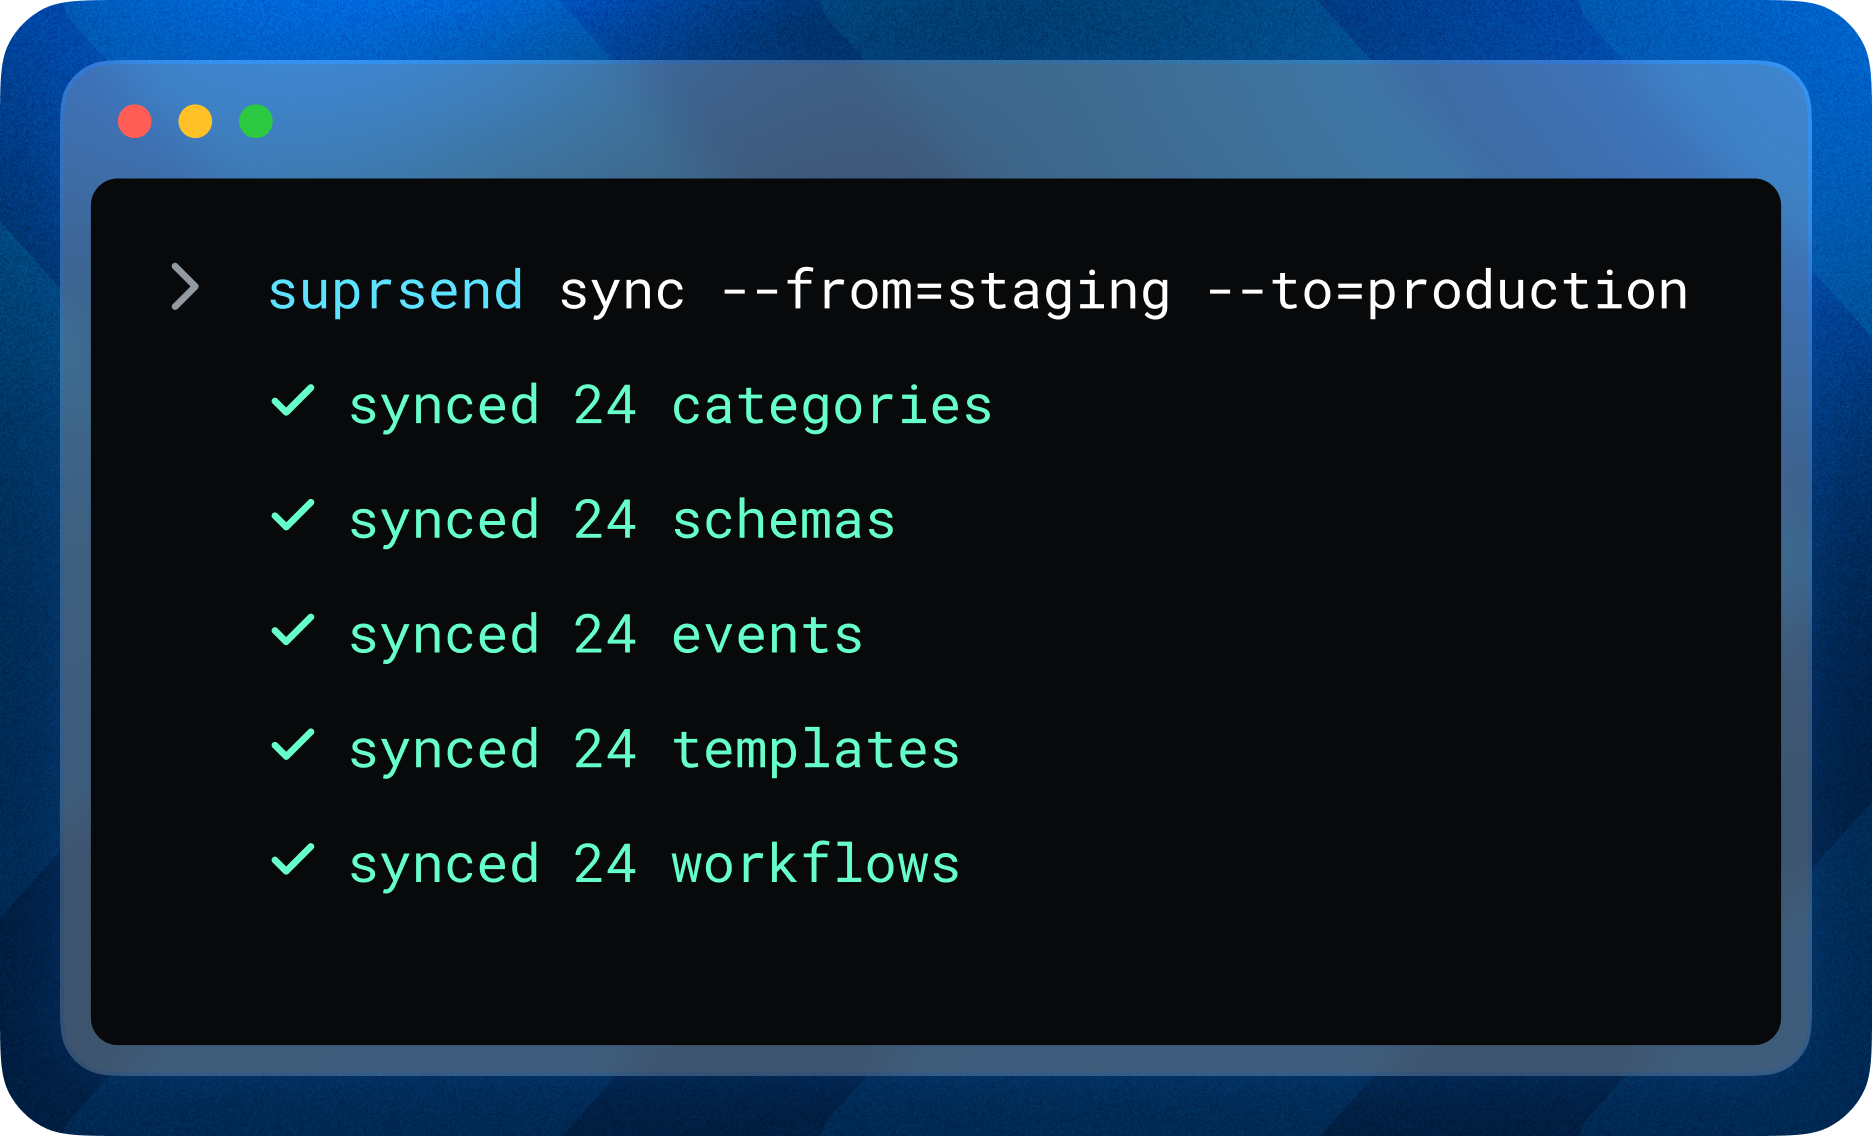
* **Promote assets across workspaces** — move workflows, schemas, events, and categories between environments (e.g., staging → production) with `suprsend sync` or targeted pull/push commands.
* **Automate with CI/CD Deployment** – Release notification changes through feature or bugfix branches, just like any other piece of code: version it, test it, and deploy it.
* **Manage notification changes in Git** — pull assets locally, version them alongside your application code, and push updates as feature branches or bugfix releases.
* **Treat notification infrastructure just like code** — review, branch, merge, and release with the same version control workflows you already use.
### Built for developers
* **Code reviews for notifications** — keep your notification infrastructure in Git, track changes, and roll back when needed.
* **Approval gates for production** — ensure no change goes live without review and approval.
* **Work with assets locally** — create, edit, and test workflows, schemas, and translation files on your machine.
* **Version control & rollback** — maintain change log and safely revert changes when required.
***
This is a **beta release** — we’re actively gathering feedback and making improvements. So, feel free to report an issue and contribute to the project.\
📘 Check out the [CLI documentation](/reference/cli-intro) to get started.
### What You Can Do
* **Promote assets across workspaces** — move workflows, schemas, events, and categories between environments (e.g., staging → production) with `suprsend sync` or targeted pull/push commands.
* **Automate with CI/CD Deployment** – Release notification changes through feature or bugfix branches, just like any other piece of code: version it, test it, and deploy it.
* **Manage notification changes in Git** — pull assets locally, version them alongside your application code, and push updates as feature branches or bugfix releases.
* **Treat notification infrastructure just like code** — review, branch, merge, and release with the same version control workflows you already use.
### Built for developers
* **Code reviews for notifications** — keep your notification infrastructure in Git, track changes, and roll back when needed.
* **Approval gates for production** — ensure no change goes live without review and approval.
* **Work with assets locally** — create, edit, and test workflows, schemas, and translation files on your machine.
* **Version control & rollback** — maintain change log and safely revert changes when required.
***
This is a **beta release** — we’re actively gathering feedback and making improvements. So, feel free to report an issue and contribute to the project.\
📘 Check out the [CLI documentation](/reference/cli-intro) to get started.
 ### What You Can Do with SuprSend MCP
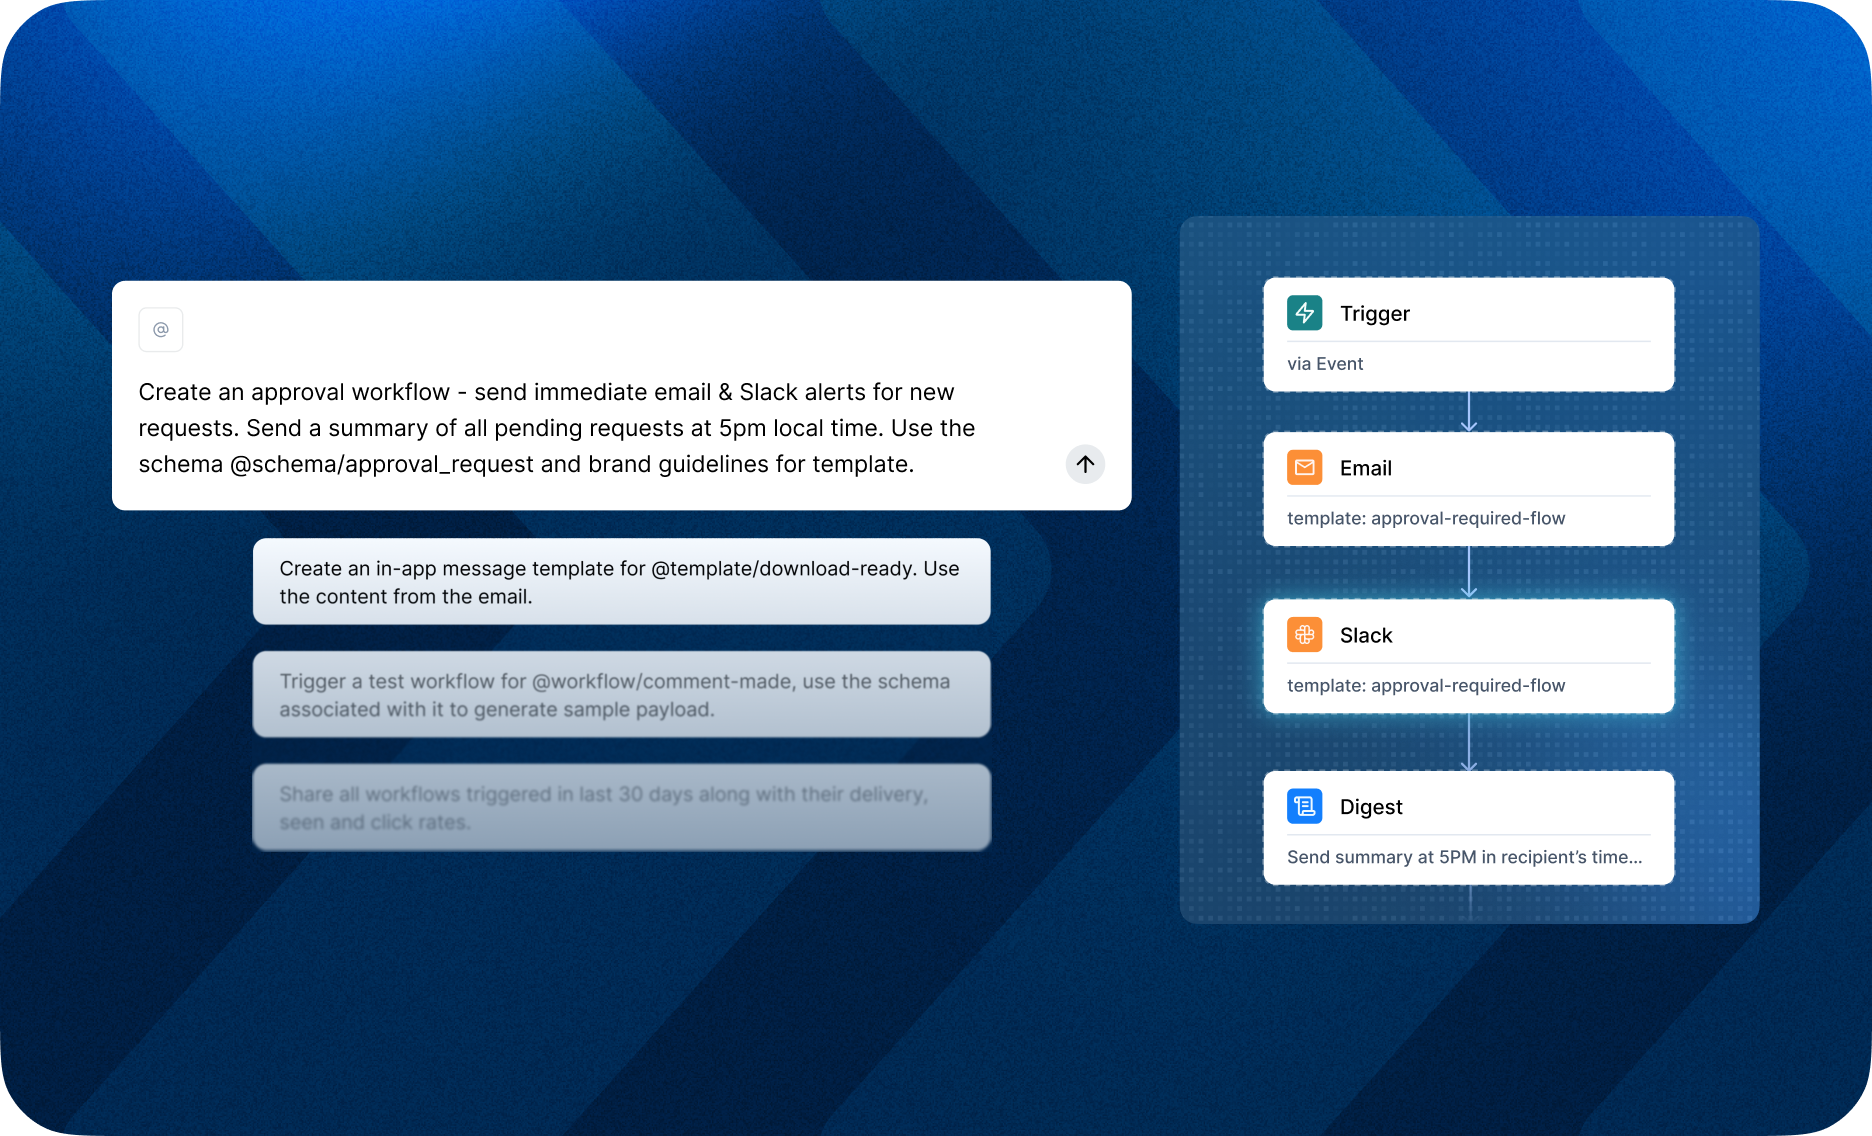
**Everyday workflows with AI:**
* **Trigger workflows on demand**\
*“Run the approval-required workflow for user John Doe to test my setup.”*
* **Bootstrap test data**\
*“Create a sample user named John Doe and a tenant called acme-corp in my workspace.”*
* **Manage preferences**\
*“Enable email notifications for marketing and disable SMS.”*
* **Configure branding**\
*“Update the logo and primary color for the enterprise tenant.”*
**Vibe-code with AI:**
* Ask AI to fetch **setup guides, code examples, or integration snippets** directly from SuprSend docs and apply it in your application code.
* Expose **safe, scoped endpoints** (via MCP) that wrap APIs with context, reducing guesswork and hallucinations.
* Integrate with **LLM-based assistants** (Claude, Copilot, Cursor, Windsurf, etc.) to simplify notification setup with SuprSend.
***
### Compatible AI Tools
Works with Claude, Cursor, Windsurf, and any MCP-compatible AI agent.
### Notes & Caveats (Beta) -
* APIs, behavior, or scopes may change based on feedback.
* We restrict destructive operations (e.g. deletes) initially to reduce risk.
* We welcome your feedback — report issues and share feedback to help us harden MCP for production.
***
### Getting Started
Start the MCP server and configure it with your AI tool. See our [MCP setup guide](/reference/mcp-overview) for detailed instructions.
### What You Can Do with SuprSend MCP
**Everyday workflows with AI:**
* **Trigger workflows on demand**\
*“Run the approval-required workflow for user John Doe to test my setup.”*
* **Bootstrap test data**\
*“Create a sample user named John Doe and a tenant called acme-corp in my workspace.”*
* **Manage preferences**\
*“Enable email notifications for marketing and disable SMS.”*
* **Configure branding**\
*“Update the logo and primary color for the enterprise tenant.”*
**Vibe-code with AI:**
* Ask AI to fetch **setup guides, code examples, or integration snippets** directly from SuprSend docs and apply it in your application code.
* Expose **safe, scoped endpoints** (via MCP) that wrap APIs with context, reducing guesswork and hallucinations.
* Integrate with **LLM-based assistants** (Claude, Copilot, Cursor, Windsurf, etc.) to simplify notification setup with SuprSend.
***
### Compatible AI Tools
Works with Claude, Cursor, Windsurf, and any MCP-compatible AI agent.
### Notes & Caveats (Beta) -
* APIs, behavior, or scopes may change based on feedback.
* We restrict destructive operations (e.g. deletes) initially to reduce risk.
* We welcome your feedback — report issues and share feedback to help us harden MCP for production.
***
### Getting Started
Start the MCP server and configure it with your AI tool. See our [MCP setup guide](/reference/mcp-overview) for detailed instructions.
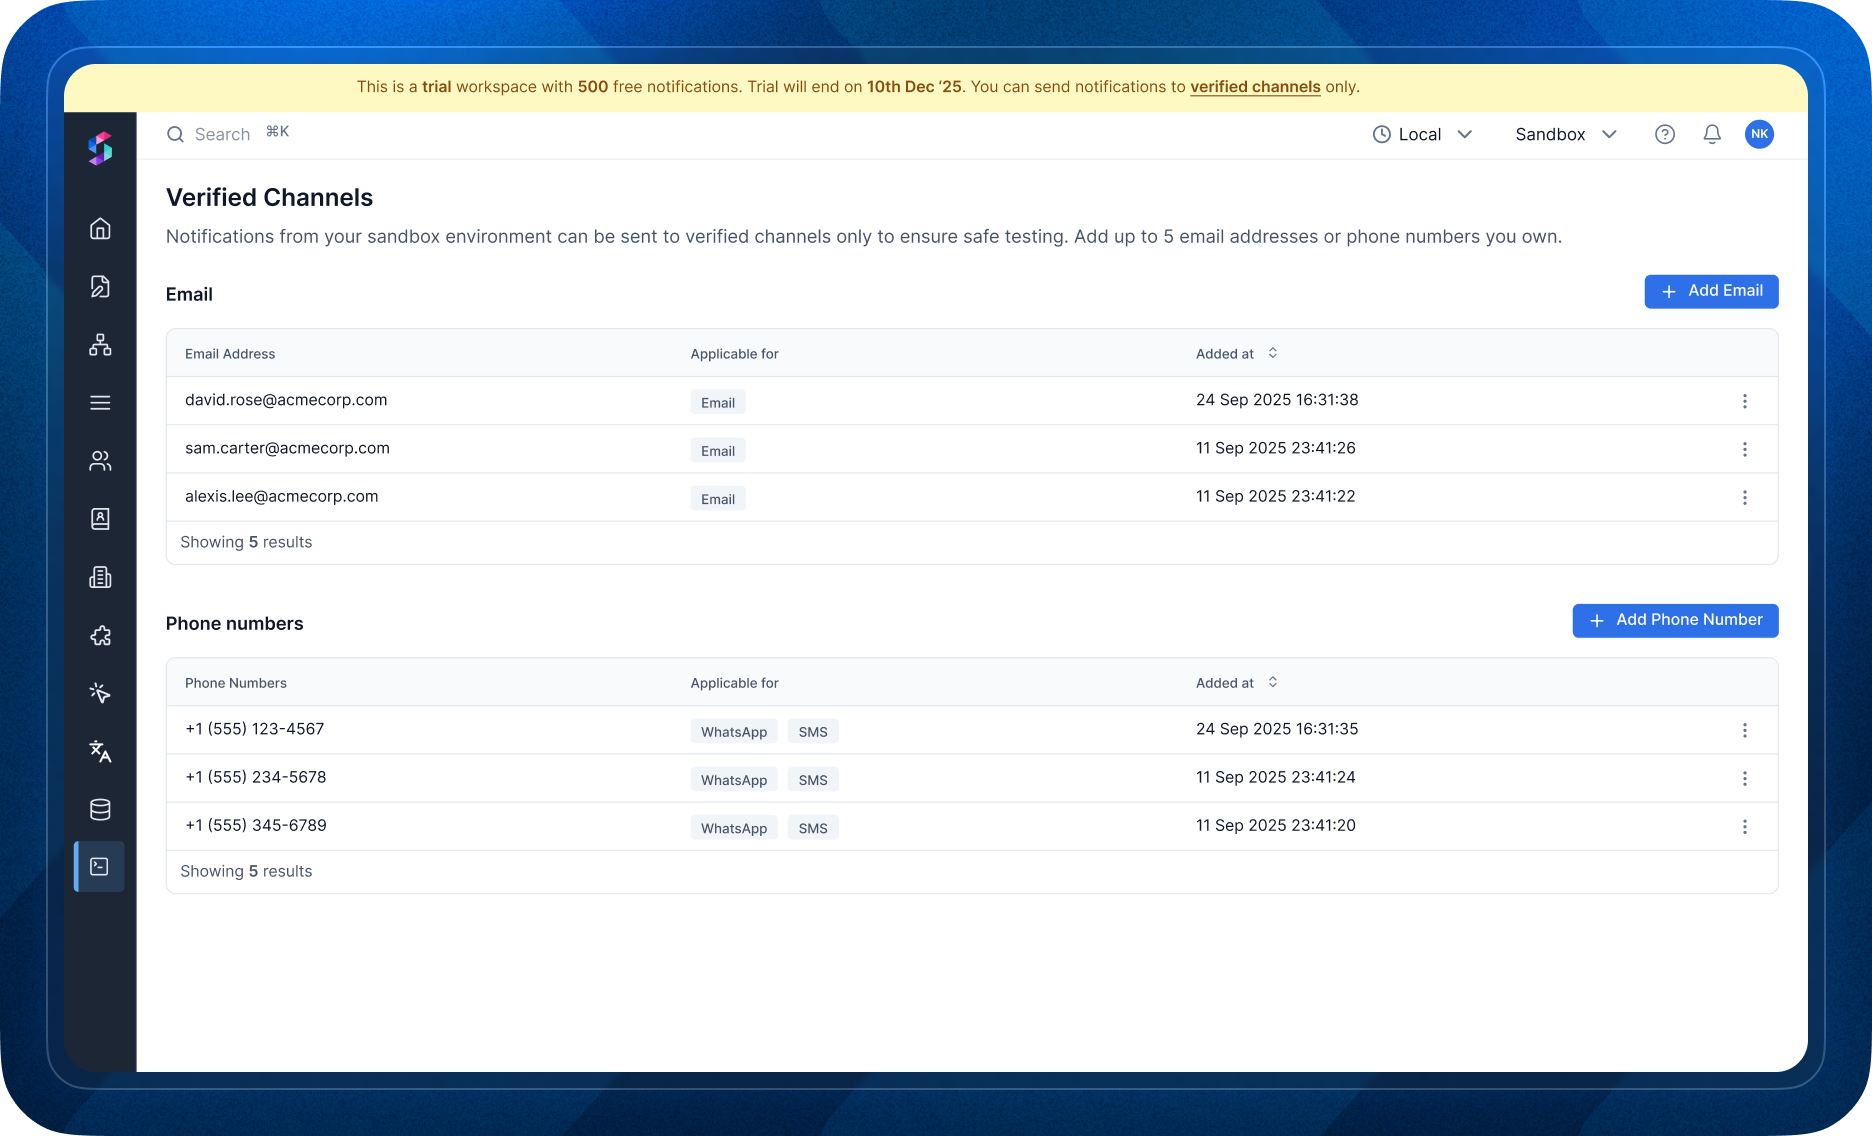
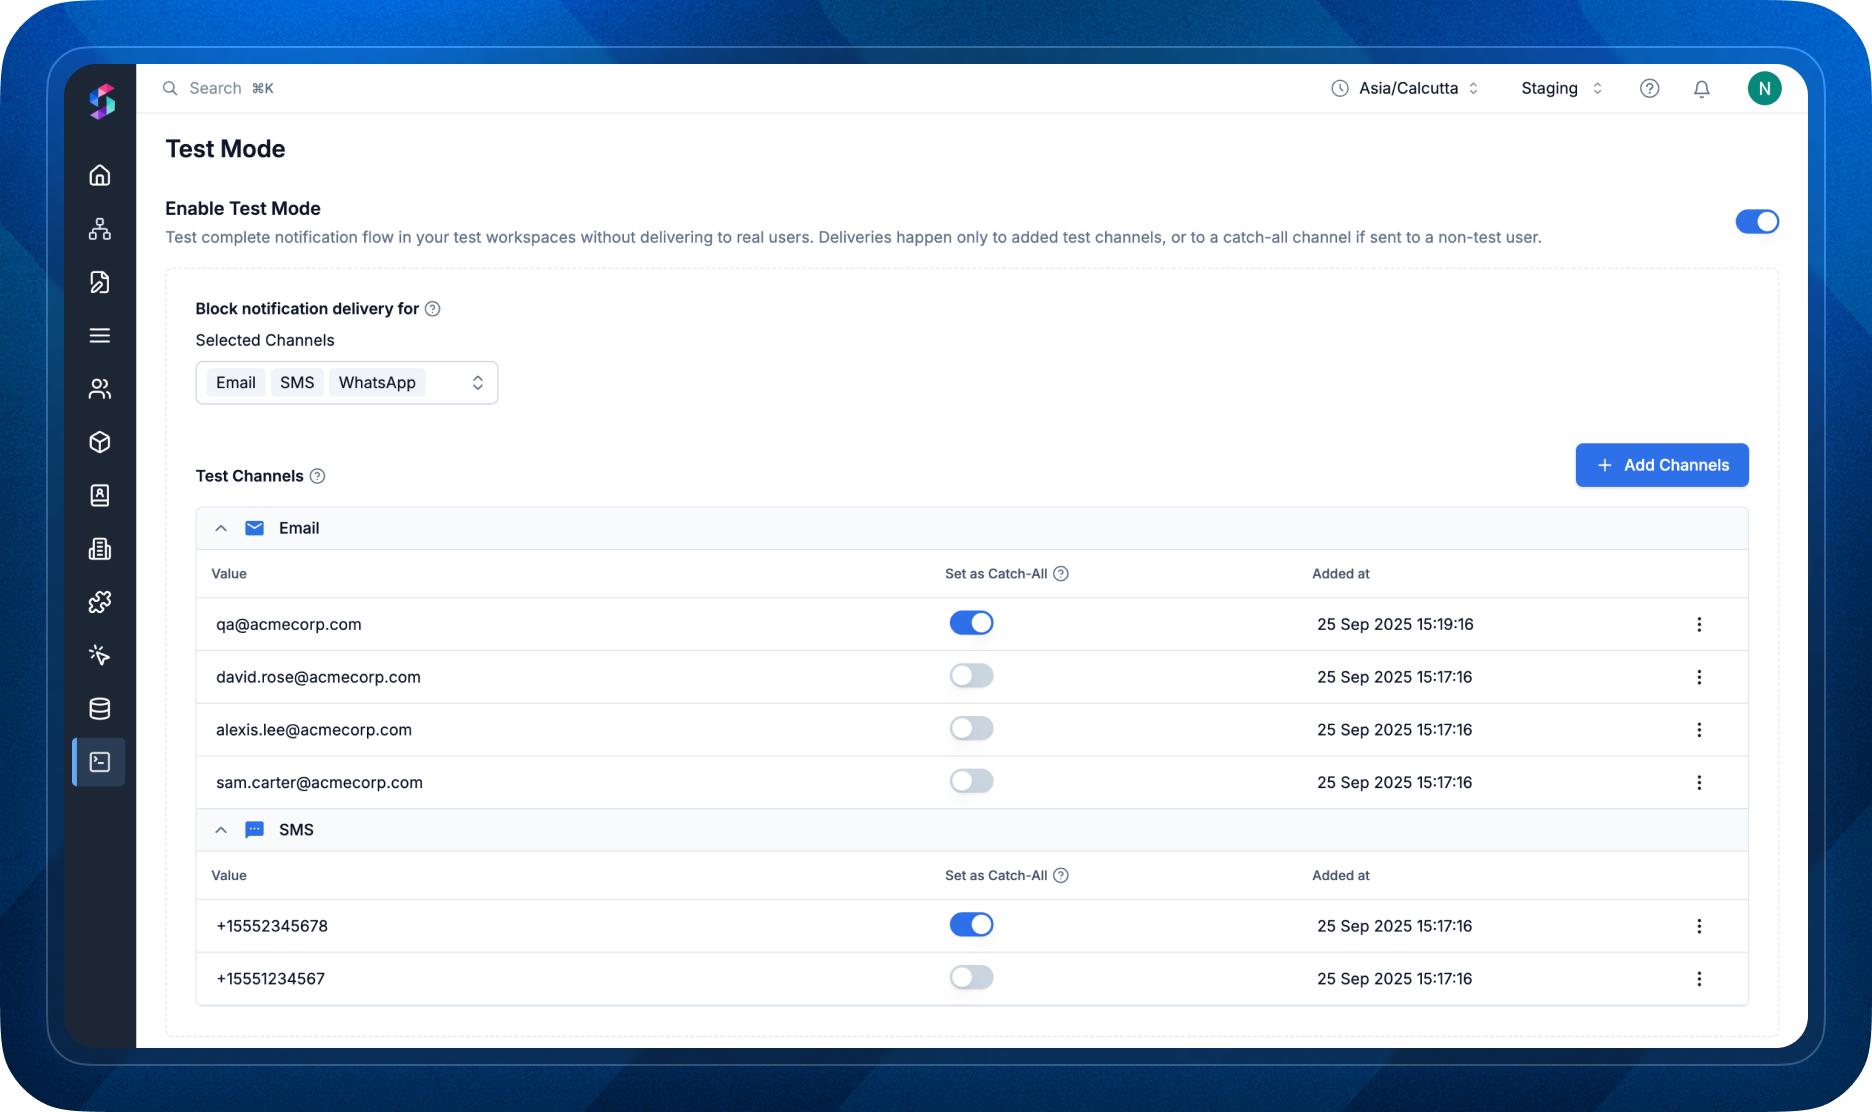 With [Test Mode](/docs/developer/test-mode), you can now replicate this real-world testing flow directly in our platform:
* **Test end-to-end notification flow**: Add channels belonging to internal testers as test channels. In test mode, notifications to these channels are delivered normally—so you can preview messages on real devices.
* **Set Up Test Channels**: You can add channels belonging to your internal testers as test channels. Delivery will not be blocked for test channels in test mode. This helps you see preview of the notification in your real device.
* **Catch-All Routing**: Redirect all non-test notifications to a common channel (e.g., a QA inbox), making it easy to trace and debug every message in one place.
This ensures you can confidently test notification workflows in an environment that mirrors production—without the risk of real users getting test messages.
With [Test Mode](/docs/developer/test-mode), you can now replicate this real-world testing flow directly in our platform:
* **Test end-to-end notification flow**: Add channels belonging to internal testers as test channels. In test mode, notifications to these channels are delivered normally—so you can preview messages on real devices.
* **Set Up Test Channels**: You can add channels belonging to your internal testers as test channels. Delivery will not be blocked for test channels in test mode. This helps you see preview of the notification in your real device.
* **Catch-All Routing**: Redirect all non-test notifications to a common channel (e.g., a QA inbox), making it easy to trace and debug every message in one place.
This ensures you can confidently test notification workflows in an environment that mirrors production—without the risk of real users getting test messages.
 ### Why it matters
When you trigger a workflow, you pass data (payload) that is used to resolve workflow variables and populate dynamic content in templates. Currently, If the payload does not include all the variables expected in the workflow, the execution may fail at different stages. With this change, Validation will happen at API level and there'll be:
* **Fewer runtime failures**: Stop workflows from starting with missing or malformed data.
* **Faster debugging**: Get a clear, structured error list at request time—no more hunting through multi-step logs.
* **More reliable messaging**: Prevent partial runs, inconsistent behavior, and incorrect or incomplete notifications.
***
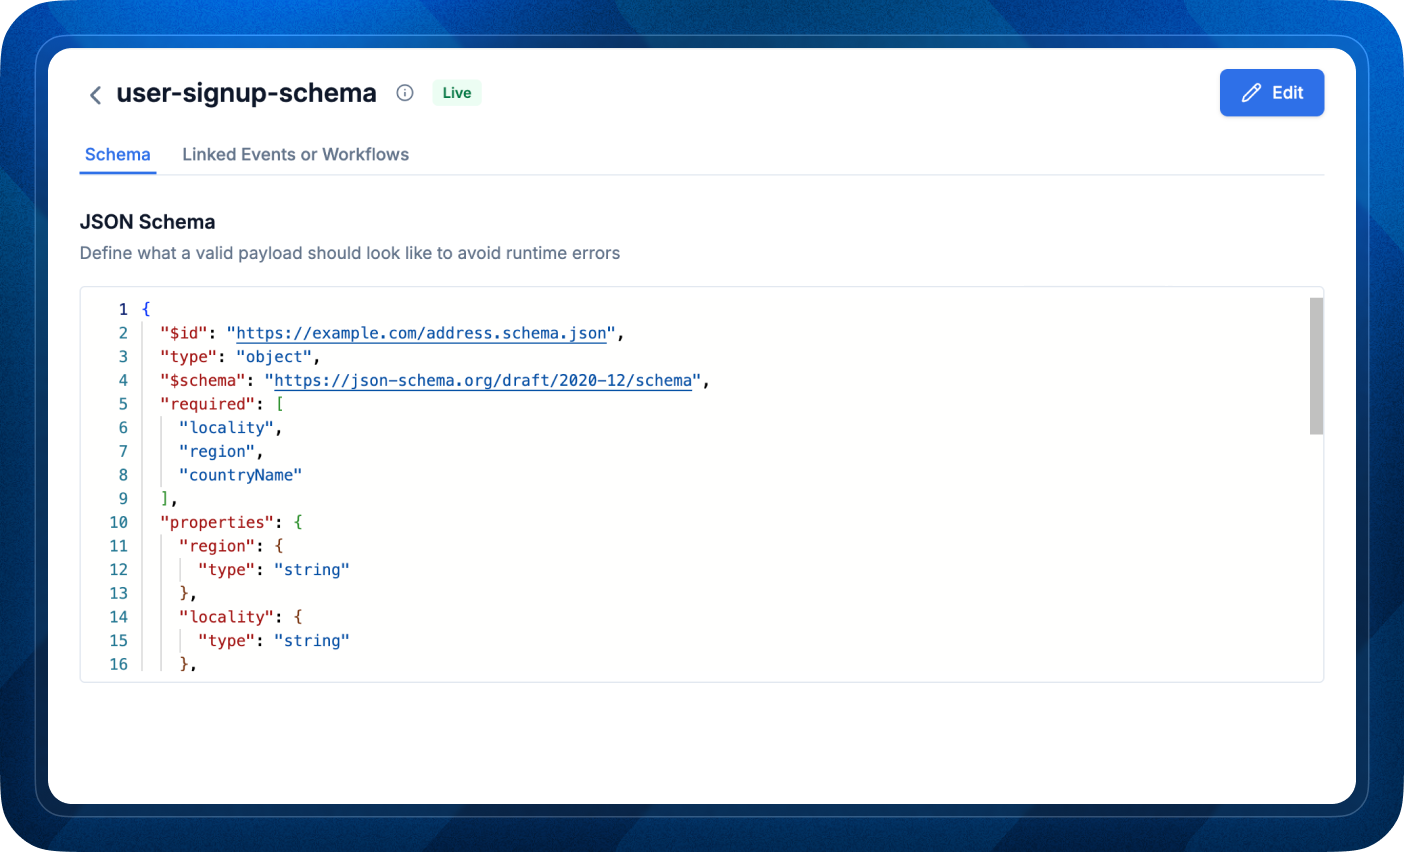
### How it works
You can add JSON schema from [Schema page](https://app.suprsend.com/en/staging/developers/schema) and then link it to the workflow [Trigger step](https://docs.suprsend.com/docs/validate-workflow-payload#linking-schema-to-workflow) or trigger Event from [events page](https://app.suprsend.com/en/staging/events).
* When you trigger a workflow, the payload is validated against a JSON Schema that describes the expected data used to resolve variables and populate dynamic content.
* If the payload doesn’t match the schema, the Trigger API returns error response with a list of validation errors (e.g., path, expected type, missing fields).
* If validation passes, the workflow proceeds as usual.
***
### Fixes and Improvements:
Workflow slug validation at the API layer: If a referenced workflow slug isn’t available, the error is now returned directly in the API response (in addition to request logs) for faster debugging.
### Why it matters
When you trigger a workflow, you pass data (payload) that is used to resolve workflow variables and populate dynamic content in templates. Currently, If the payload does not include all the variables expected in the workflow, the execution may fail at different stages. With this change, Validation will happen at API level and there'll be:
* **Fewer runtime failures**: Stop workflows from starting with missing or malformed data.
* **Faster debugging**: Get a clear, structured error list at request time—no more hunting through multi-step logs.
* **More reliable messaging**: Prevent partial runs, inconsistent behavior, and incorrect or incomplete notifications.
***
### How it works
You can add JSON schema from [Schema page](https://app.suprsend.com/en/staging/developers/schema) and then link it to the workflow [Trigger step](https://docs.suprsend.com/docs/validate-workflow-payload#linking-schema-to-workflow) or trigger Event from [events page](https://app.suprsend.com/en/staging/events).
* When you trigger a workflow, the payload is validated against a JSON Schema that describes the expected data used to resolve variables and populate dynamic content.
* If the payload doesn’t match the schema, the Trigger API returns error response with a list of validation errors (e.g., path, expected type, missing fields).
* If validation passes, the workflow proceeds as usual.
***
### Fixes and Improvements:
Workflow slug validation at the API layer: If a referenced workflow slug isn’t available, the error is now returned directly in the API response (in addition to request logs) for faster debugging.
 ### Fixes and Improvements
* **react-sdk (v0.3.0)** - Introduced a custom infinite-scroll component with robust Shadow DOM compatibility.
* **web-components (v0.3.0)** - Enhanced Shadow DOM rendering support to ensure component isolation and consistent styling.
### Fixes and Improvements
* **react-sdk (v0.3.0)** - Introduced a custom infinite-scroll component with robust Shadow DOM compatibility.
* **web-components (v0.3.0)** - Enhanced Shadow DOM rendering support to ensure component isolation and consistent styling.
 * **Real-time insights** → Trends update as messages go out. Track performance across channels and spot dips in engagement instantly.
* **Workflow-level comparisons** → Compare workflows, templates, channels, and categories side by side to spot under performers and validate experiments.
* **Know when your users opt-out** → See which channels/categories drive opt-outs so you can adjust before churn sets in.
* **Over-messaging trends** → Track avg notifications per user, find patterns by category, and identify fatigue triggers to keep comms helpful—not noisy.
* **Granular filtering** → Multi-select filters for workflow, tenant, template, channel, category, time range
* **Centralized error tracking** → All API, workflow, and provider delivery errors in one place. Filter by tenant/workflow/template/channel, open the exact log, and debug in seconds.
***
* **Real-time insights** → Trends update as messages go out. Track performance across channels and spot dips in engagement instantly.
* **Workflow-level comparisons** → Compare workflows, templates, channels, and categories side by side to spot under performers and validate experiments.
* **Know when your users opt-out** → See which channels/categories drive opt-outs so you can adjust before churn sets in.
* **Over-messaging trends** → Track avg notifications per user, find patterns by category, and identify fatigue triggers to keep comms helpful—not noisy.
* **Granular filtering** → Multi-select filters for workflow, tenant, template, channel, category, time range
* **Centralized error tracking** → All API, workflow, and provider delivery errors in one place. Filter by tenant/workflow/template/channel, open the exact log, and debug in seconds.
***
 ### Fixes in workflows UI
* Resolved an issue where newly published workflow versions wouldn’t appear without a page refresh (introduced after version history was added).
* Fixed a bug in the test trigger modal where object suggestions incorrectly appeared when switching from API to event trigger.
* Removed the success metric from delivery nodes where it's not relevant (except for Smart Delivery Nodes).
### Fixes in workflows UI
* Resolved an issue where newly published workflow versions wouldn’t appear without a page refresh (introduced after version history was added).
* Fixed a bug in the test trigger modal where object suggestions incorrectly appeared when switching from API to event trigger.
* Removed the success metric from delivery nodes where it's not relevant (except for Smart Delivery Nodes).
 ### Fixes and Improvements
* iOS Integration - Fixed the bitcode issue in xcode16
### Fixes and Improvements
* iOS Integration - Fixed the bitcode issue in xcode16
 **Next up:** Deeper analysis into each workflow step - notification engagement (deliver, seen, click), failures, and AI-powered insights.
## Improvements:
* Added data centre field in account settings to check where your data centre region.
**Next up:** Deeper analysis into each workflow step - notification engagement (deliver, seen, click), failures, and AI-powered insights.
## Improvements:
* Added data centre field in account settings to check where your data centre region.
 ### Fixes and Improvements:
* In Inbox drop-in popover component, we fixed scroll bar causing empty padding UI issue in macOS when **Show Scroll bars: Always** is enabled.
* In Inbox drop-in popover component, action menu popup of last notification item was getting cropped. We have fixed this issue.
* In Inbox drop-in popover component, in mobile view actions menu icon (3 dots icon) only appears on touching notification. After the bug fix, the actions menu icon will appear on all notifications in mobile view by default, removing extra touch interaction.
### Fixes and Improvements:
* In Inbox drop-in popover component, we fixed scroll bar causing empty padding UI issue in macOS when **Show Scroll bars: Always** is enabled.
* In Inbox drop-in popover component, action menu popup of last notification item was getting cropped. We have fixed this issue.
* In Inbox drop-in popover component, in mobile view actions menu icon (3 dots icon) only appears on touching notification. After the bug fix, the actions menu icon will appear on all notifications in mobile view by default, removing extra touch interaction.
🔹 Depth 1 → Notify the object’s channels + direct subscribers.
🔹 Depth N → Expand deeper into hierarchical subscriptions as needed. ```json theme={"system"} "recipients": [ { "object_type": "teams", "id":"finance", //optional parameter to define subscription fan-out depth in workflows "$object_subscriptions_query": { "depth": 0 } } ] ``` You can use this to build **Escalation Workflows** or **Tiered Customer Support Notifications**, send notification to a shared slack channel or customer support queue first and then escalate to individual users in case of no response in a given time duration. ### Fixes and Improvements: * \[SDK] [Object methods](/docs/java-objects) and [User APIs](/docs/java-create-user-profile) to fetch user and their subscription exposed in Java SDK * Added support to trigger multi-lingual templates in [broadcast](/docs/broadcast)
 ### Fixes and Improvements:
* \[SDK] We have exposed [object management methods](/docs/objects-node-sdk) in Node SDK
### Fixes and Improvements:
* \[SDK] We have exposed [object management methods](/docs/objects-node-sdk) in Node SDK
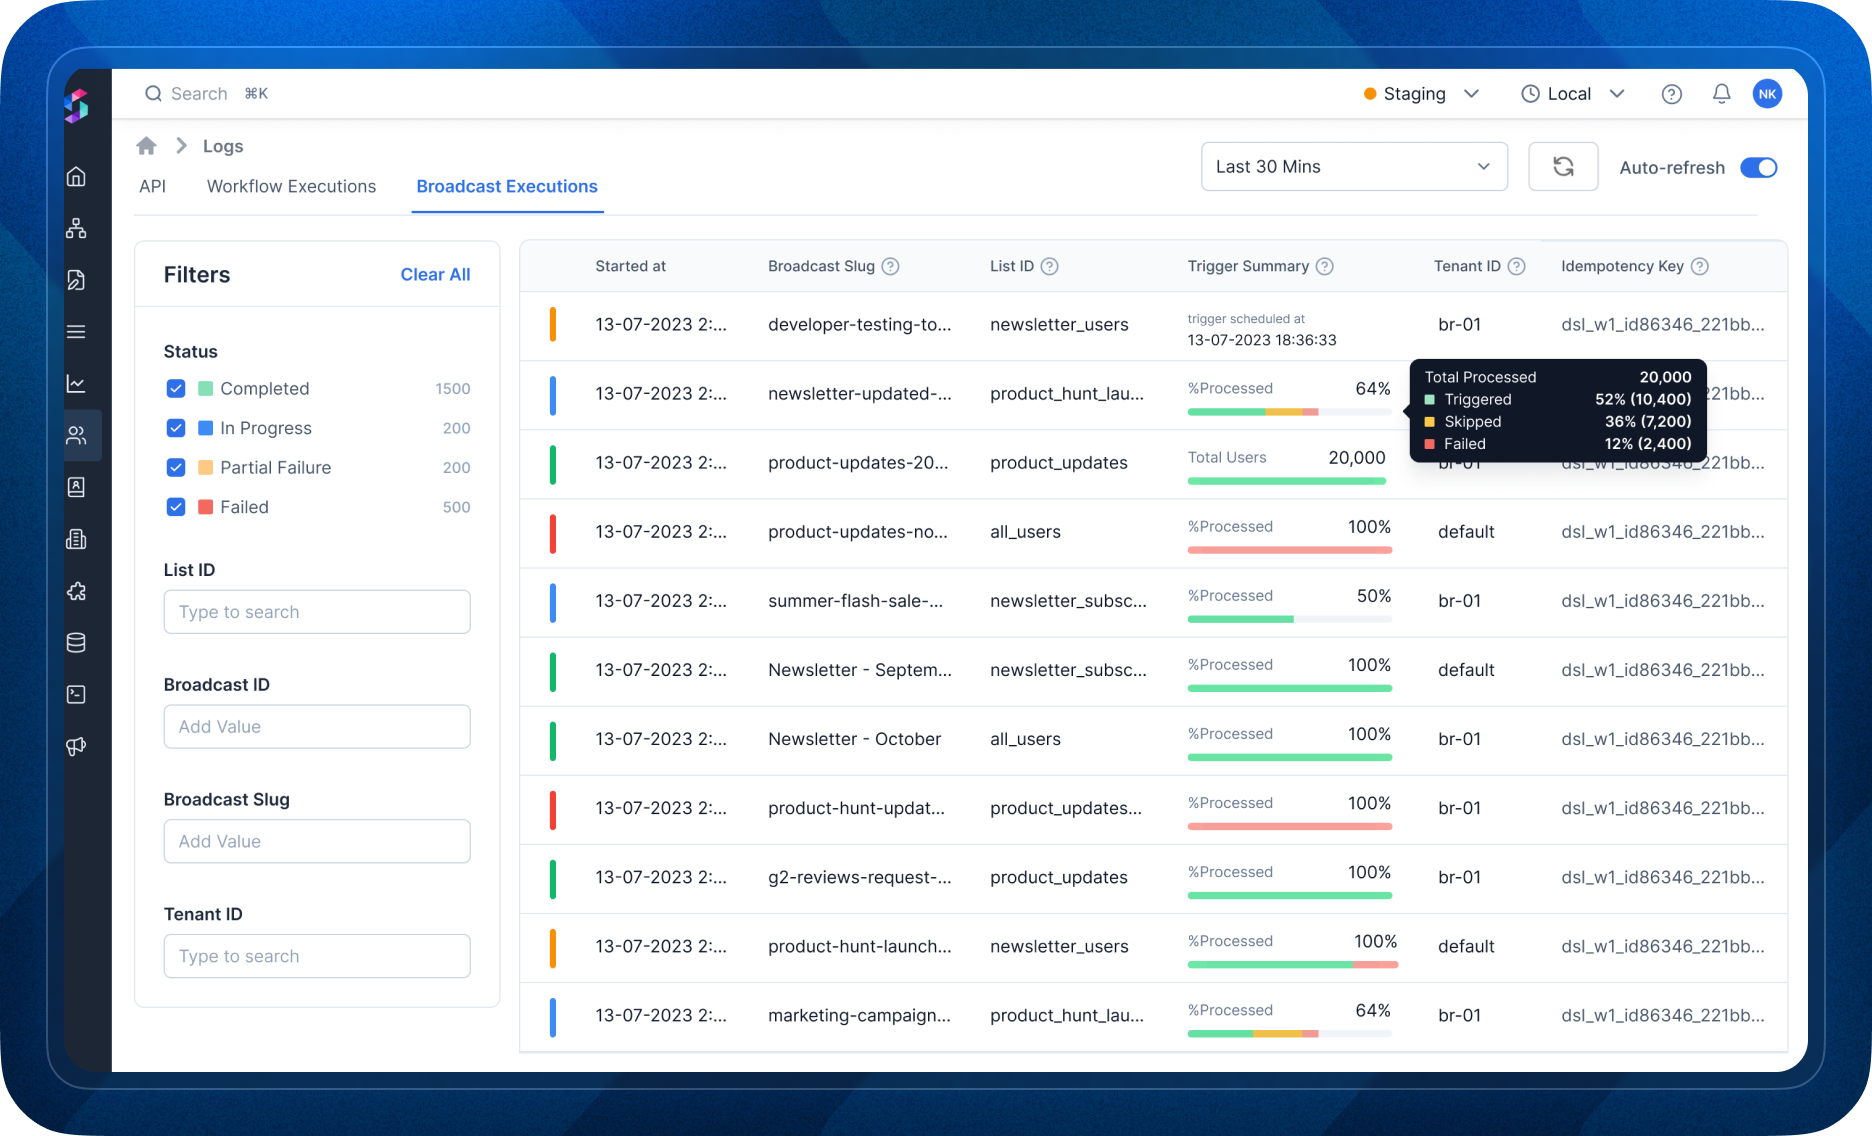 Here’s what’s new:
* **Real-time Execution Tracking**: Monitor broadcast operations as they happen, ensuring you stay informed every step of the way.
* **Step-by-Step Debugging**: View detailed execution logs for each step of your broadcast, helping you pinpoint errors and resolve issues faster.
* **Advanced Filters**: Quickly locate specific broadcasts with filters for tenant, list ID, broadcast slug, idempotency-key, and status. Easily identify and analyze failure logs.
* **Detailed Broadcast Summaries**: Access a comprehensive summary of each broadcast run directly from the listing page, similar to workflow execution logs.
Here’s what’s new:
* **Real-time Execution Tracking**: Monitor broadcast operations as they happen, ensuring you stay informed every step of the way.
* **Step-by-Step Debugging**: View detailed execution logs for each step of your broadcast, helping you pinpoint errors and resolve issues faster.
* **Advanced Filters**: Quickly locate specific broadcasts with filters for tenant, list ID, broadcast slug, idempotency-key, and status. Easily identify and analyze failure logs.
* **Detailed Broadcast Summaries**: Access a comprehensive summary of each broadcast run directly from the listing page, similar to workflow execution logs.
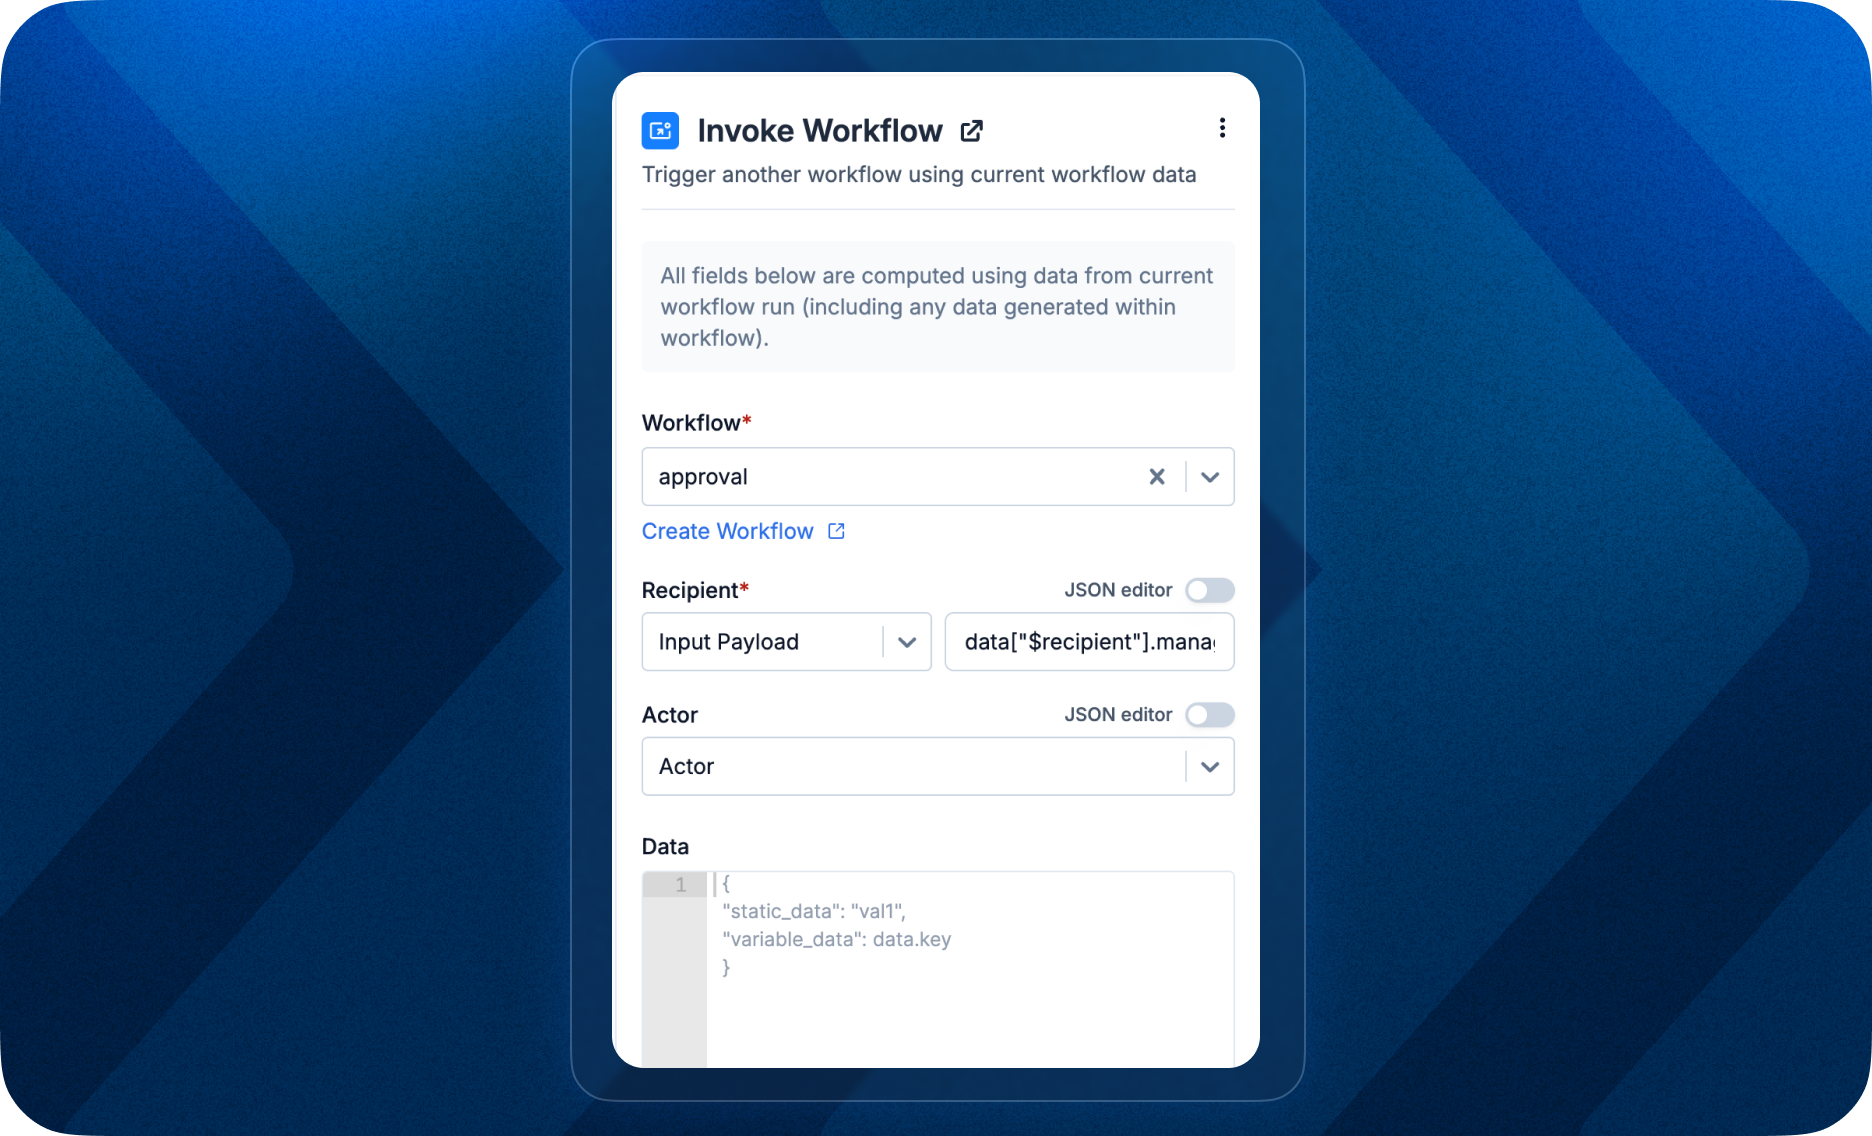 This simplifies complex workflows and supports smooth transitions between related processes, enabling more efficient automation management.
 ### Key use cases
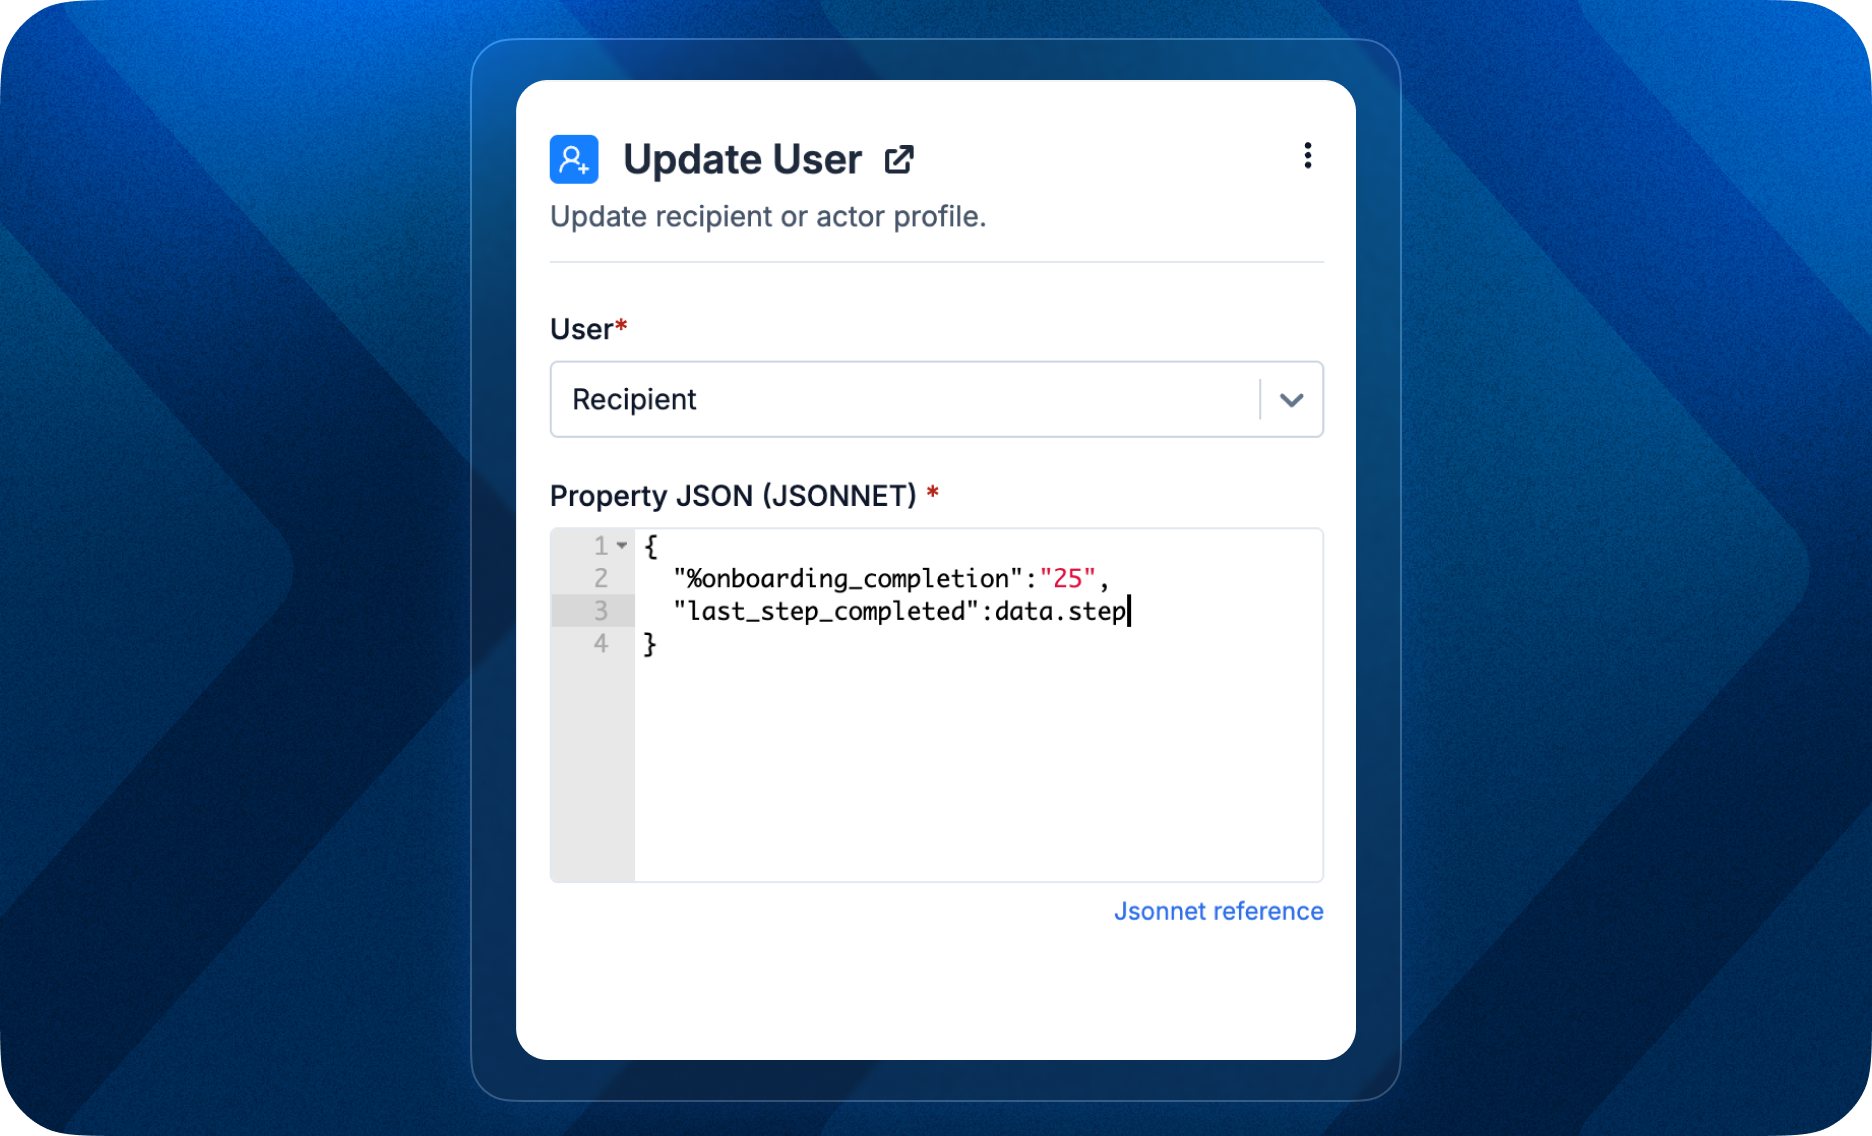
1. **Event-based user profile updates**: Simply send events to SuprSend when user updates their profile in your product or when you are setting custom profile attributes as a side-effect of related action, e.g., in a job board, change user's application status when employer shortlists the profile.
2. **Update user profile based on a workflow step**: Common use cases include fetching data during the workflow to update the user profile or updating the profile when a user successfully completes a step. For instance, while the onboarding process, update `%completion` in user profile when they complete a step.
### Key use cases
1. **Event-based user profile updates**: Simply send events to SuprSend when user updates their profile in your product or when you are setting custom profile attributes as a side-effect of related action, e.g., in a job board, change user's application status when employer shortlists the profile.
2. **Update user profile based on a workflow step**: Common use cases include fetching data during the workflow to update the user profile or updating the profile when a user successfully completes a step. For instance, while the onboarding process, update `%completion` in user profile when they complete a step.
 ### Example use case
When someone subscribes to a topic (like a tournament), add them as a subscriber to the corresponding tournament object. Later, just trigger tournament related events to SuprSend and the object will automatically fan out and send notification to all users subscribed to the topic.
### Example use case
When someone subscribes to a topic (like a tournament), add them as a subscriber to the corresponding tournament object. Later, just trigger tournament related events to SuprSend and the object will automatically fan out and send notification to all users subscribed to the topic.
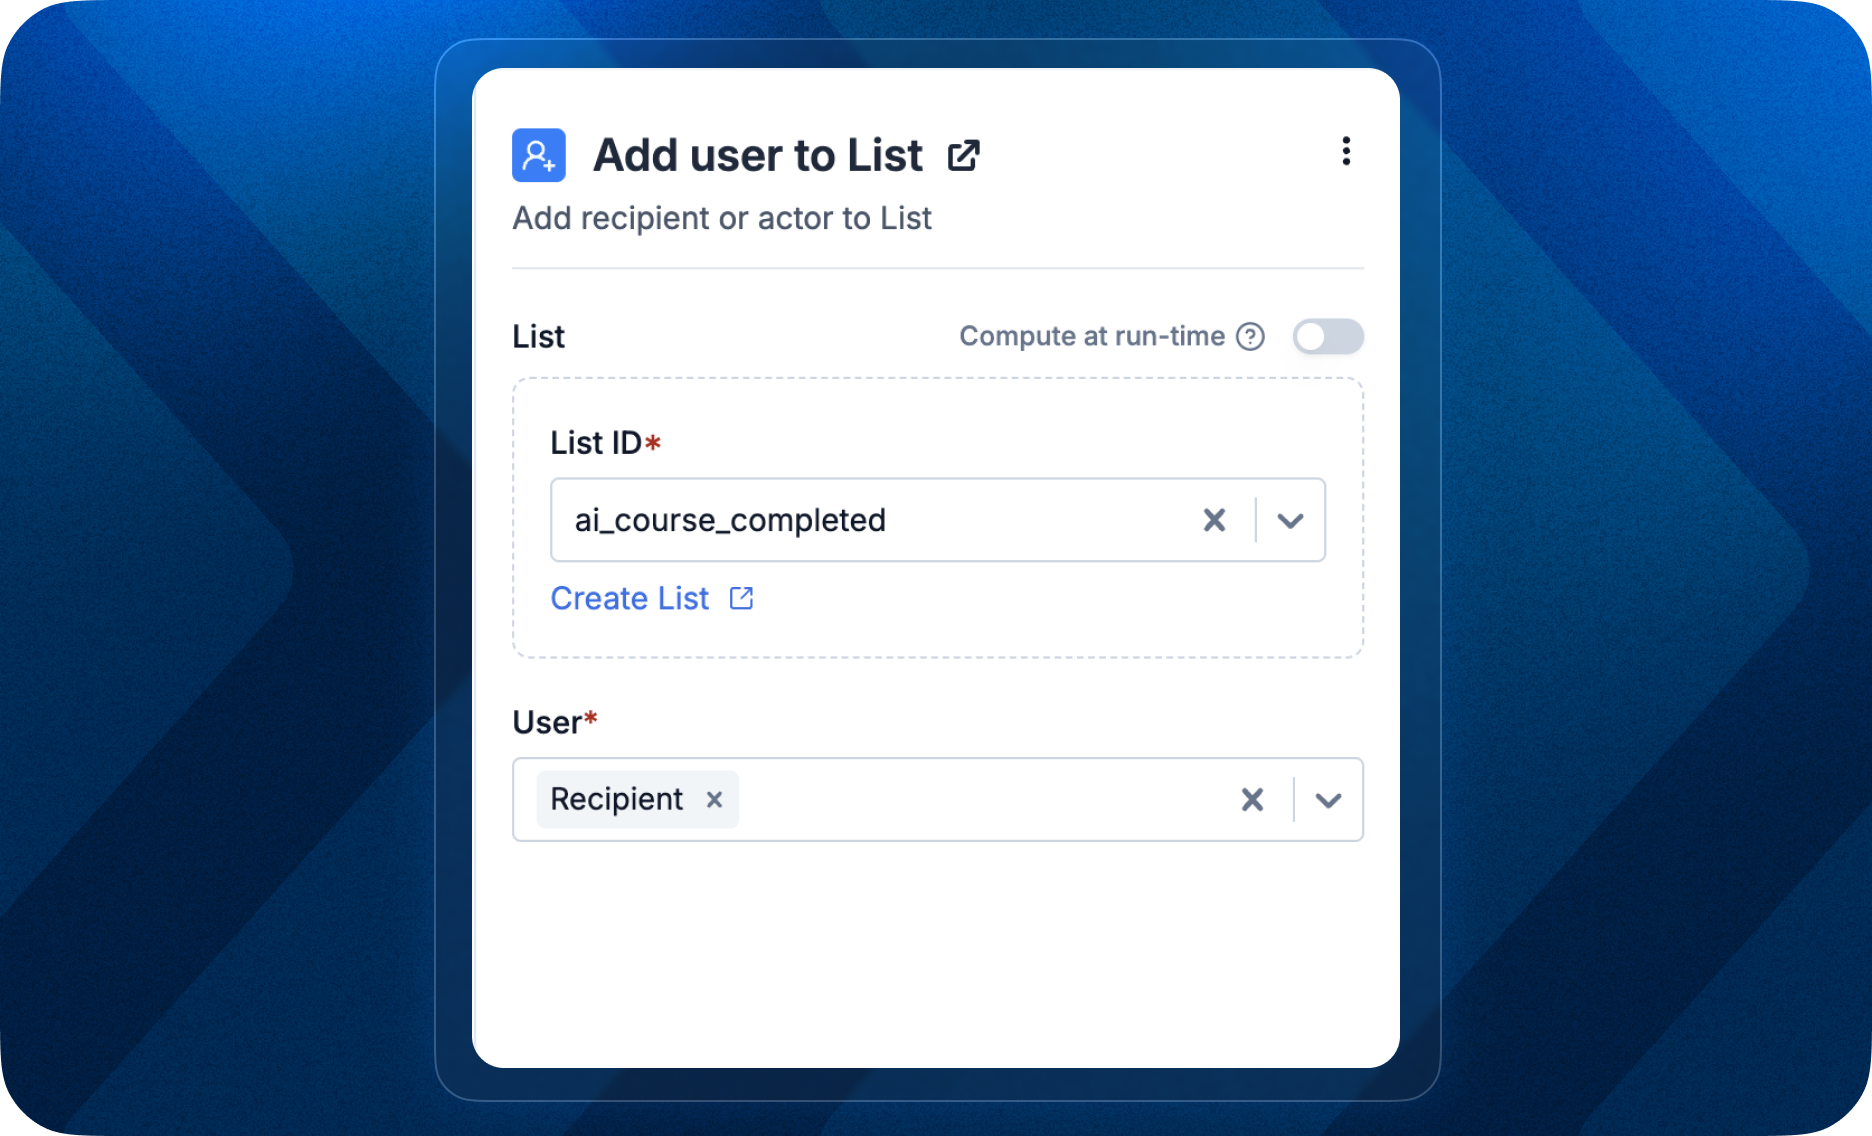 ### Key use cases
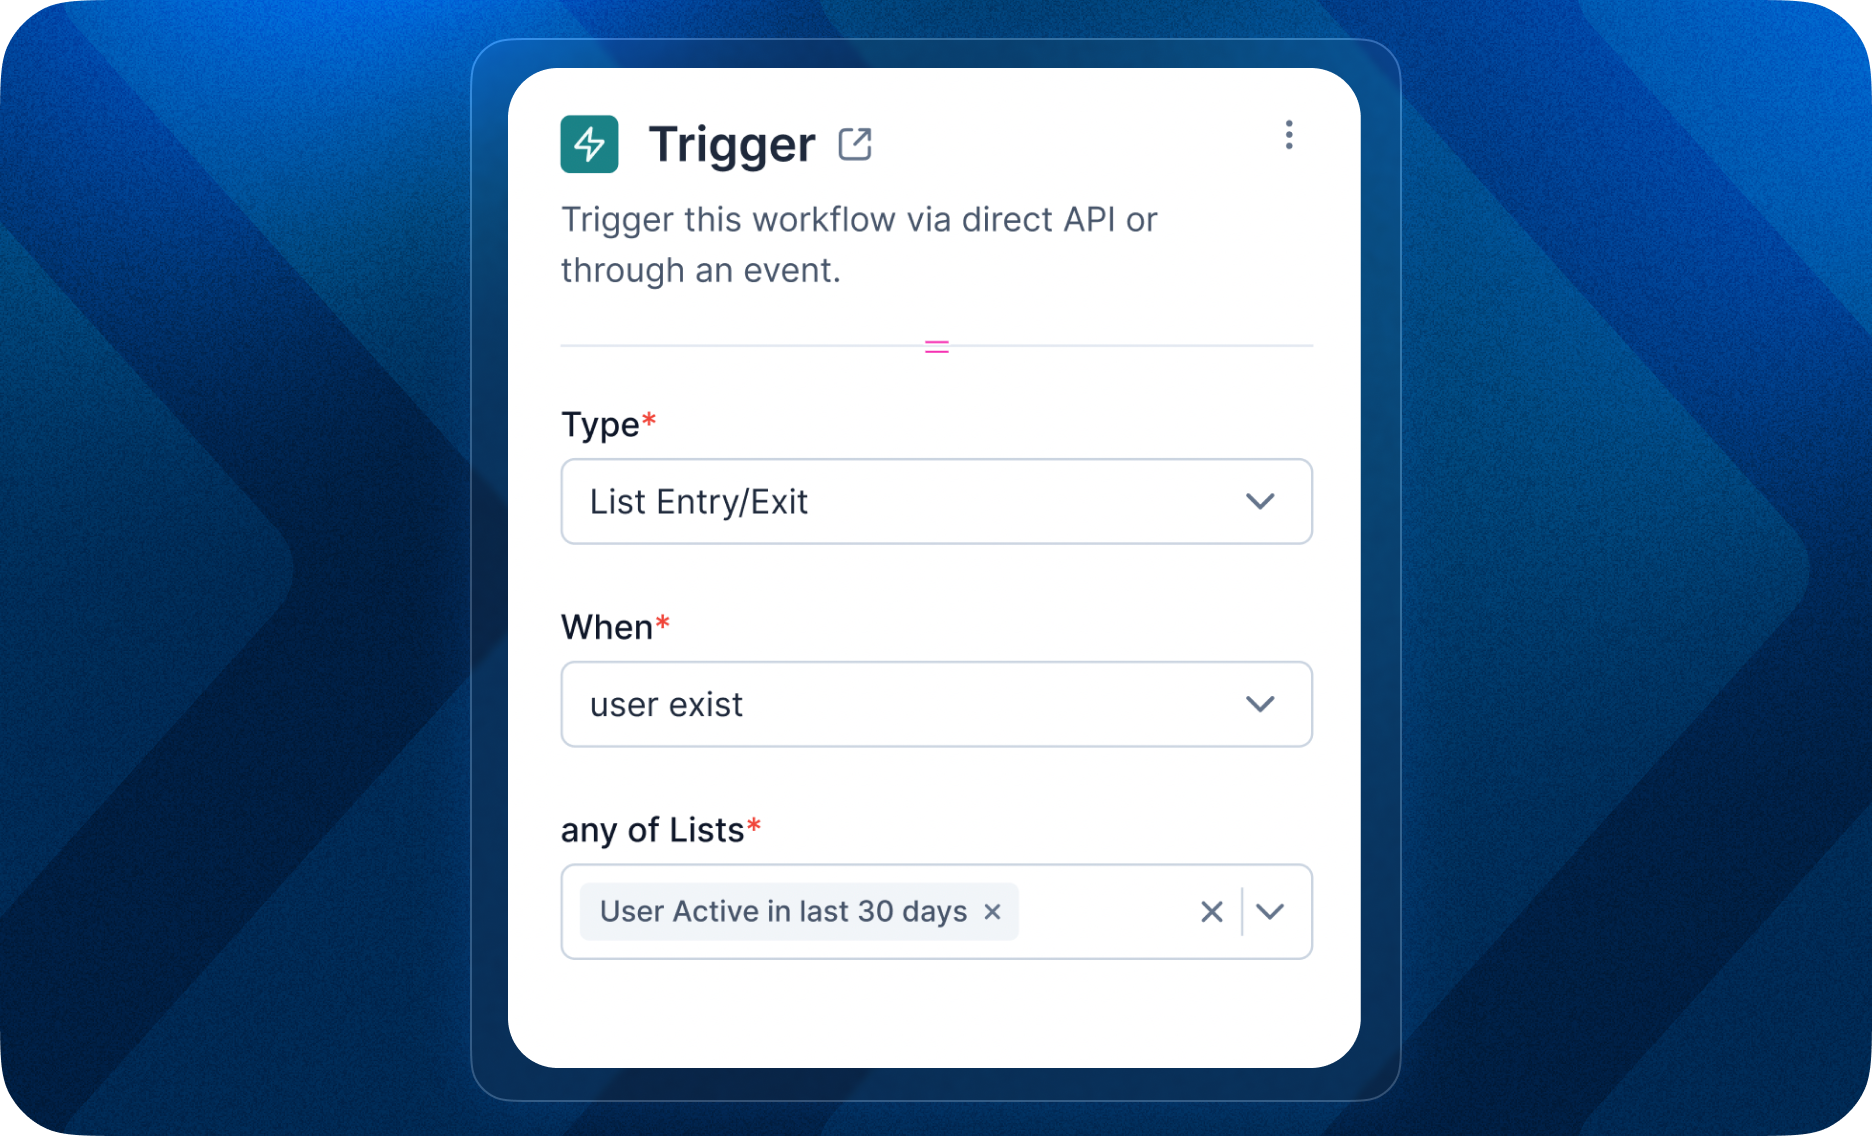
1. **Event-based segmentation**: When an event occurs, trigger notification to the user and simultaneously add them to a list for future updates. e.g., when a user registers for an upcoming event or webinar, you can send them confirmation email and add them to a list to later send further updates related to the event.
2. **Workflow Step-based segmentation**: Another use case is dynamically adding or removing a user from the list when they complete a workflow step. e.g., in a knowledge series designed to onboard new users, remove a user from the POC list once they complete onboarding steps.
### Key use cases
1. **Event-based segmentation**: When an event occurs, trigger notification to the user and simultaneously add them to a list for future updates. e.g., when a user registers for an upcoming event or webinar, you can send them confirmation email and add them to a list to later send further updates related to the event.
2. **Workflow Step-based segmentation**: Another use case is dynamically adding or removing a user from the list when they complete a workflow step. e.g., in a knowledge series designed to onboard new users, remove a user from the POC list once they complete onboarding steps.
 Delete function just deletes the asset and their related data, including preferences. It doesn't have any effect on the historical workflows or broadcasts already executed. While calling the delete function, ensure no active workflows are running for the asset, else the execution will fail.
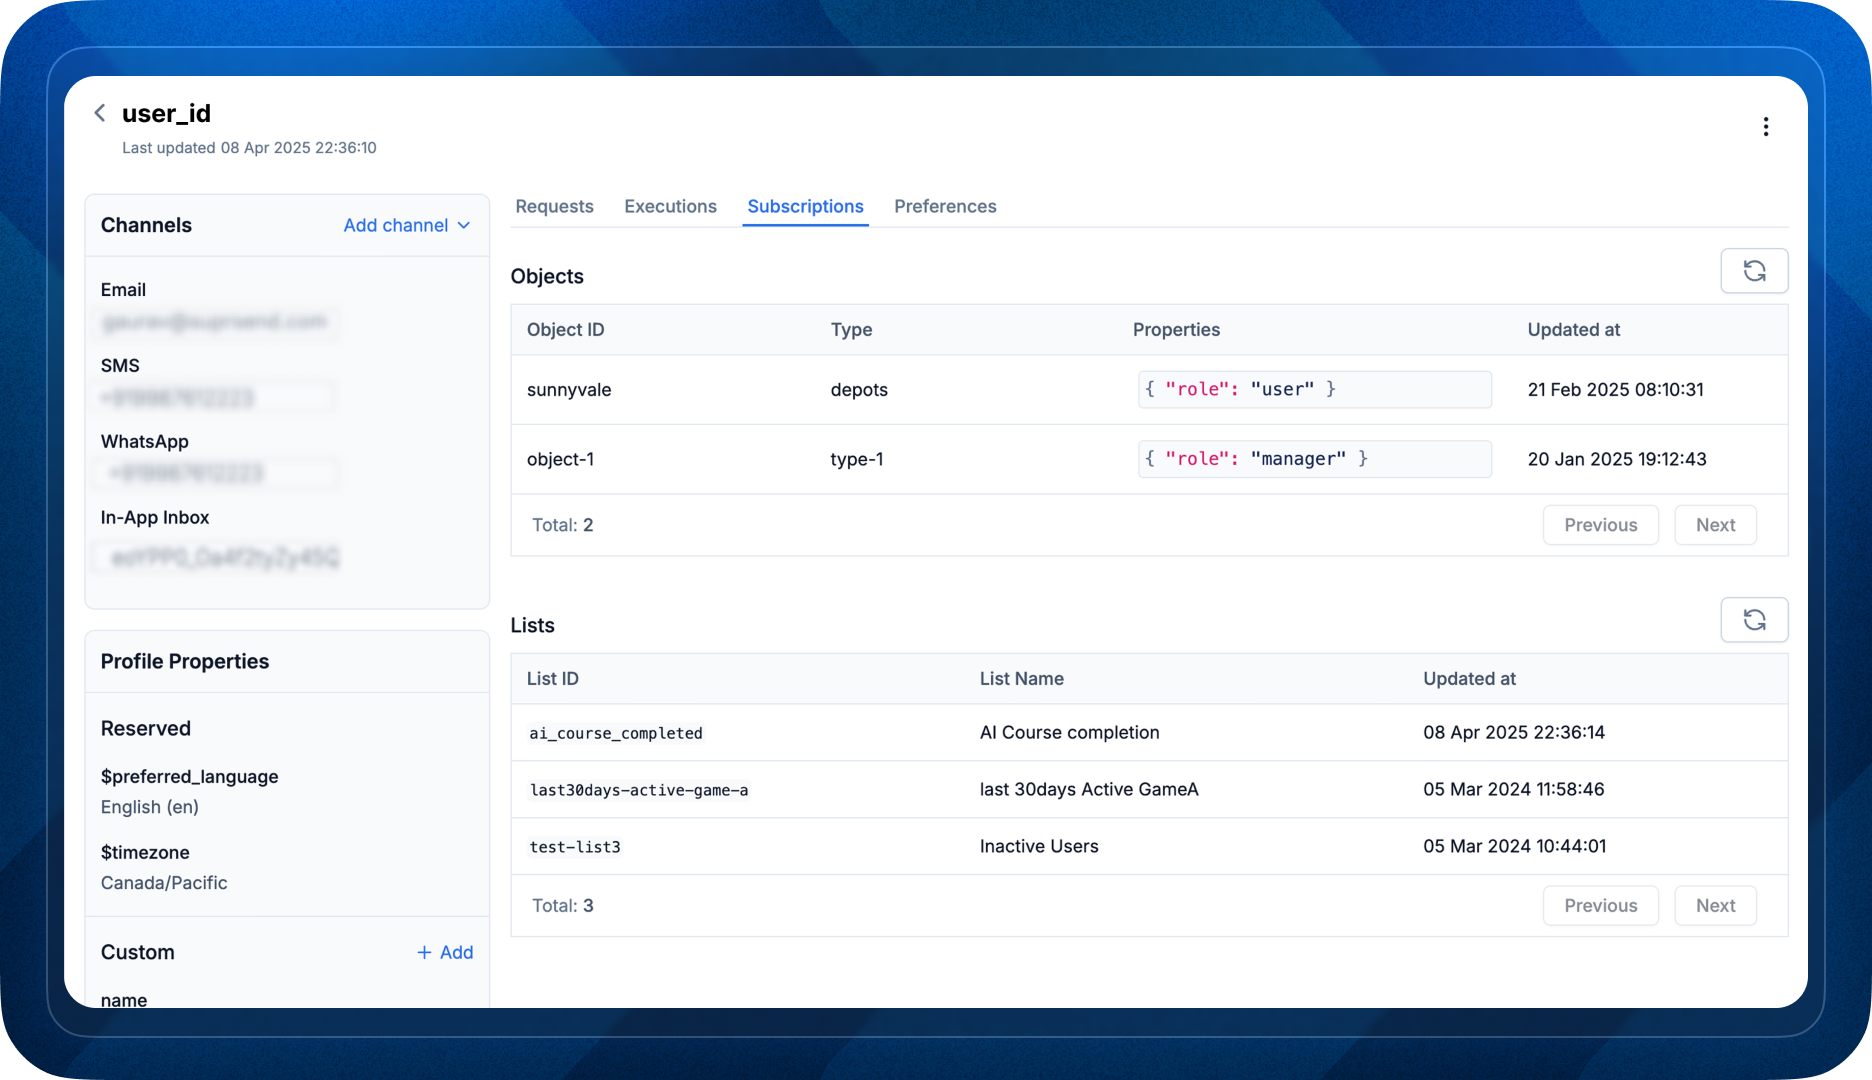
 ### What You Can Do with Objects:
* **Send notifications to non-user entities like group emails, Slack channels, or shared inboxes** (e.g. a Notion feed). Ideal for SaaS applications sending account-level alerts (e.g. anomaly notifications) to shared channels. Objects can have it's own channels and preferences to handle this use case.
* **Group users by topic or subscription and send them alerts without having to call individual recipients in the trigger**. A good example could be SaaS applications managing notifications for end-users, where recipient relationships are coming from a different system, and notification triggers or notification calls are coming from a different system which doesn't have information of the users subscribed to that trigger.
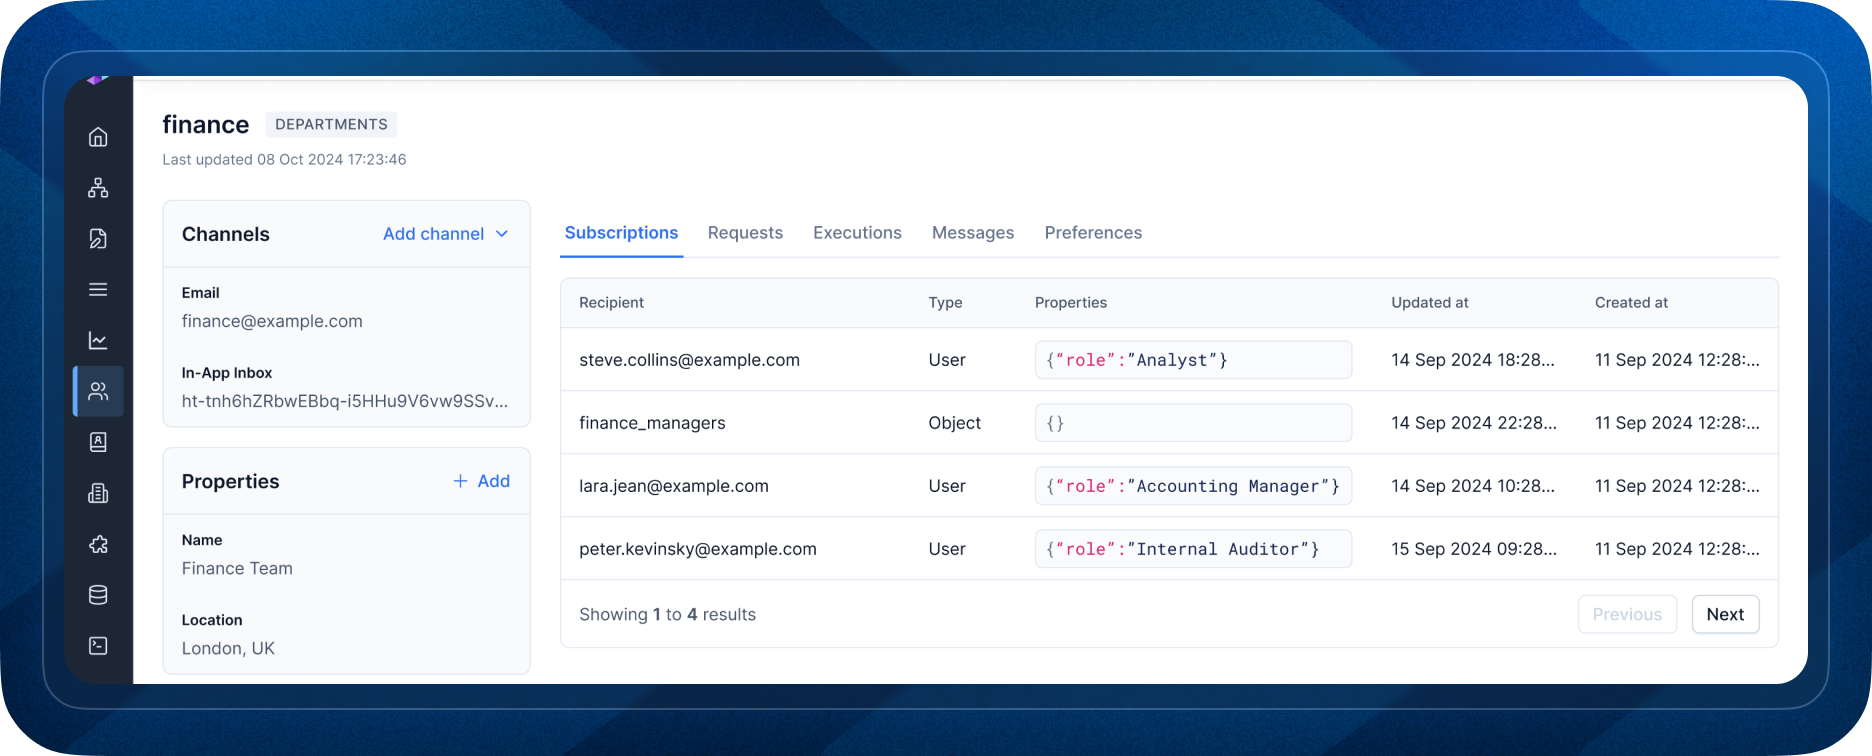
* **Maintain hierarchical user relationship with nested object subscription**. e.g., sending announcements to all the entire team of customer while sending invoice related alerts to finance team. You can handle this by creating object for finance team and then adding it as subscriber to customer object.
Objects can be easily tested from platform with all object related actions available on SuprSend console. You can programmatically manage objects from your codebase using [rest API calls](/reference/create-update-objects). Support for SDKs coming soon...
If there's any use case in object that you think is missing and needs to be solved, please reach out to our [support](mailto:support@suprsend.com).
### What You Can Do with Objects:
* **Send notifications to non-user entities like group emails, Slack channels, or shared inboxes** (e.g. a Notion feed). Ideal for SaaS applications sending account-level alerts (e.g. anomaly notifications) to shared channels. Objects can have it's own channels and preferences to handle this use case.
* **Group users by topic or subscription and send them alerts without having to call individual recipients in the trigger**. A good example could be SaaS applications managing notifications for end-users, where recipient relationships are coming from a different system, and notification triggers or notification calls are coming from a different system which doesn't have information of the users subscribed to that trigger.
* **Maintain hierarchical user relationship with nested object subscription**. e.g., sending announcements to all the entire team of customer while sending invoice related alerts to finance team. You can handle this by creating object for finance team and then adding it as subscriber to customer object.
Objects can be easily tested from platform with all object related actions available on SuprSend console. You can programmatically manage objects from your codebase using [rest API calls](/reference/create-update-objects). Support for SDKs coming soon...
If there's any use case in object that you think is missing and needs to be solved, please reach out to our [support](mailto:support@suprsend.com).

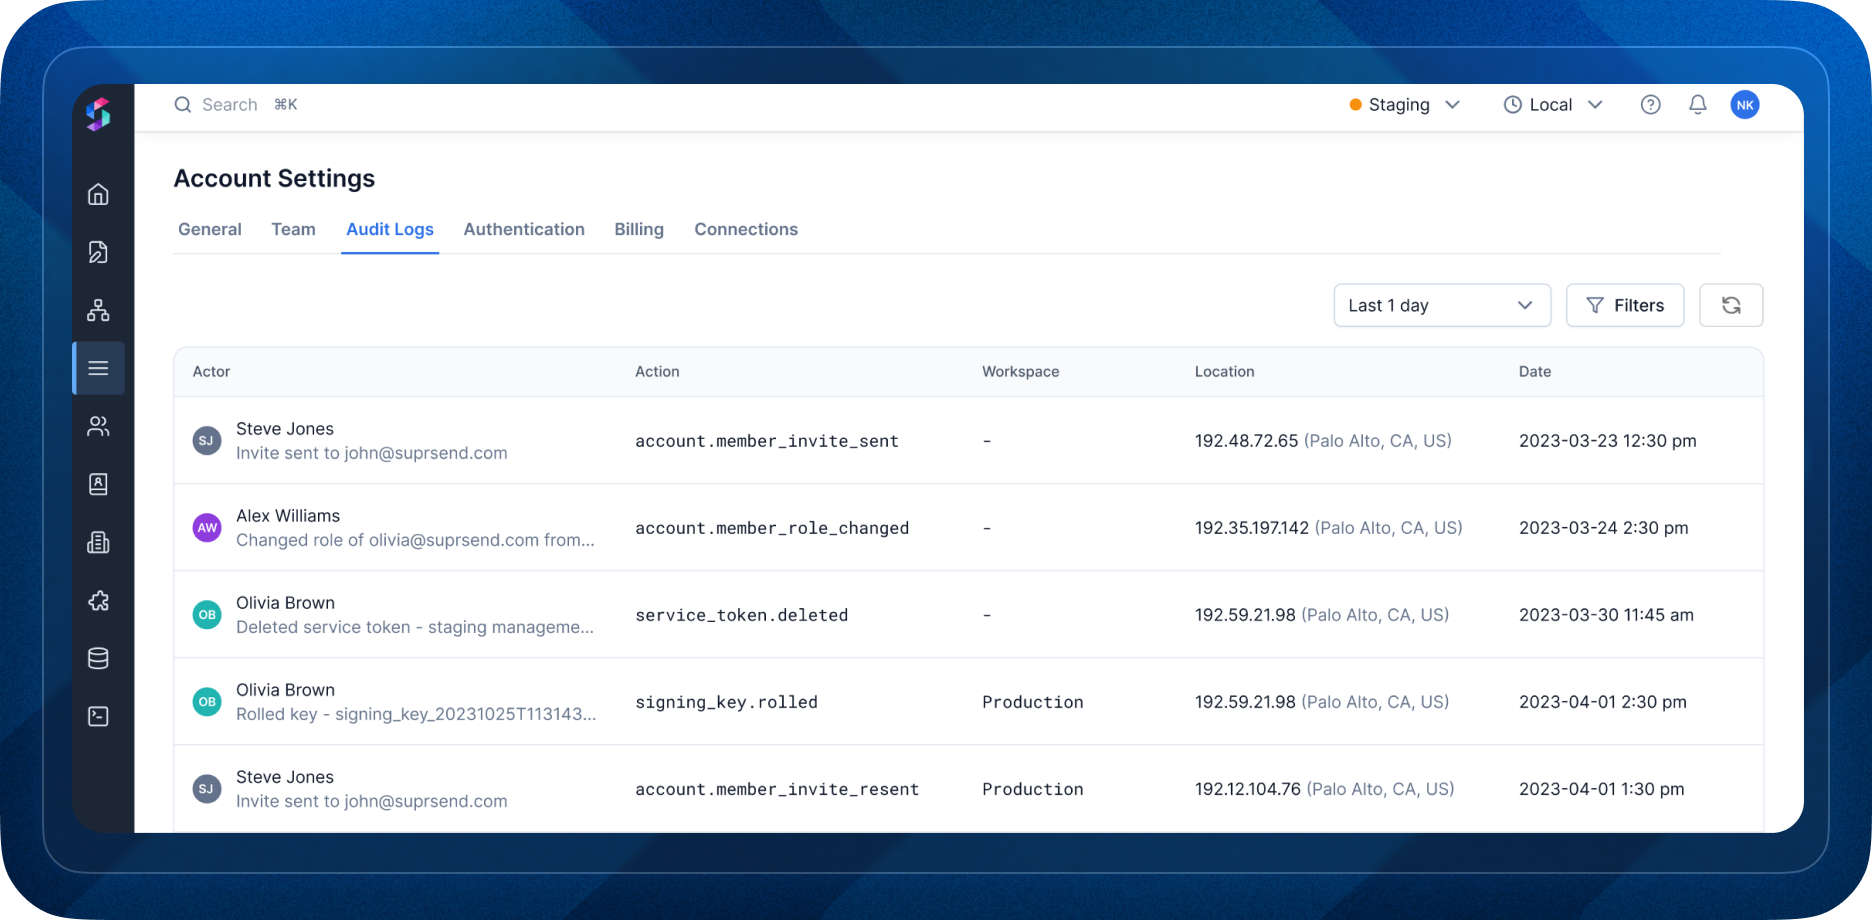 Audit logs are available for enterprise users and have customizable retention period. You can find it in account settings.[
](https://docs.suprsend.com/changelog?page=1)
Audit logs are available for enterprise users and have customizable retention period. You can find it in account settings.[
](https://docs.suprsend.com/changelog?page=1)
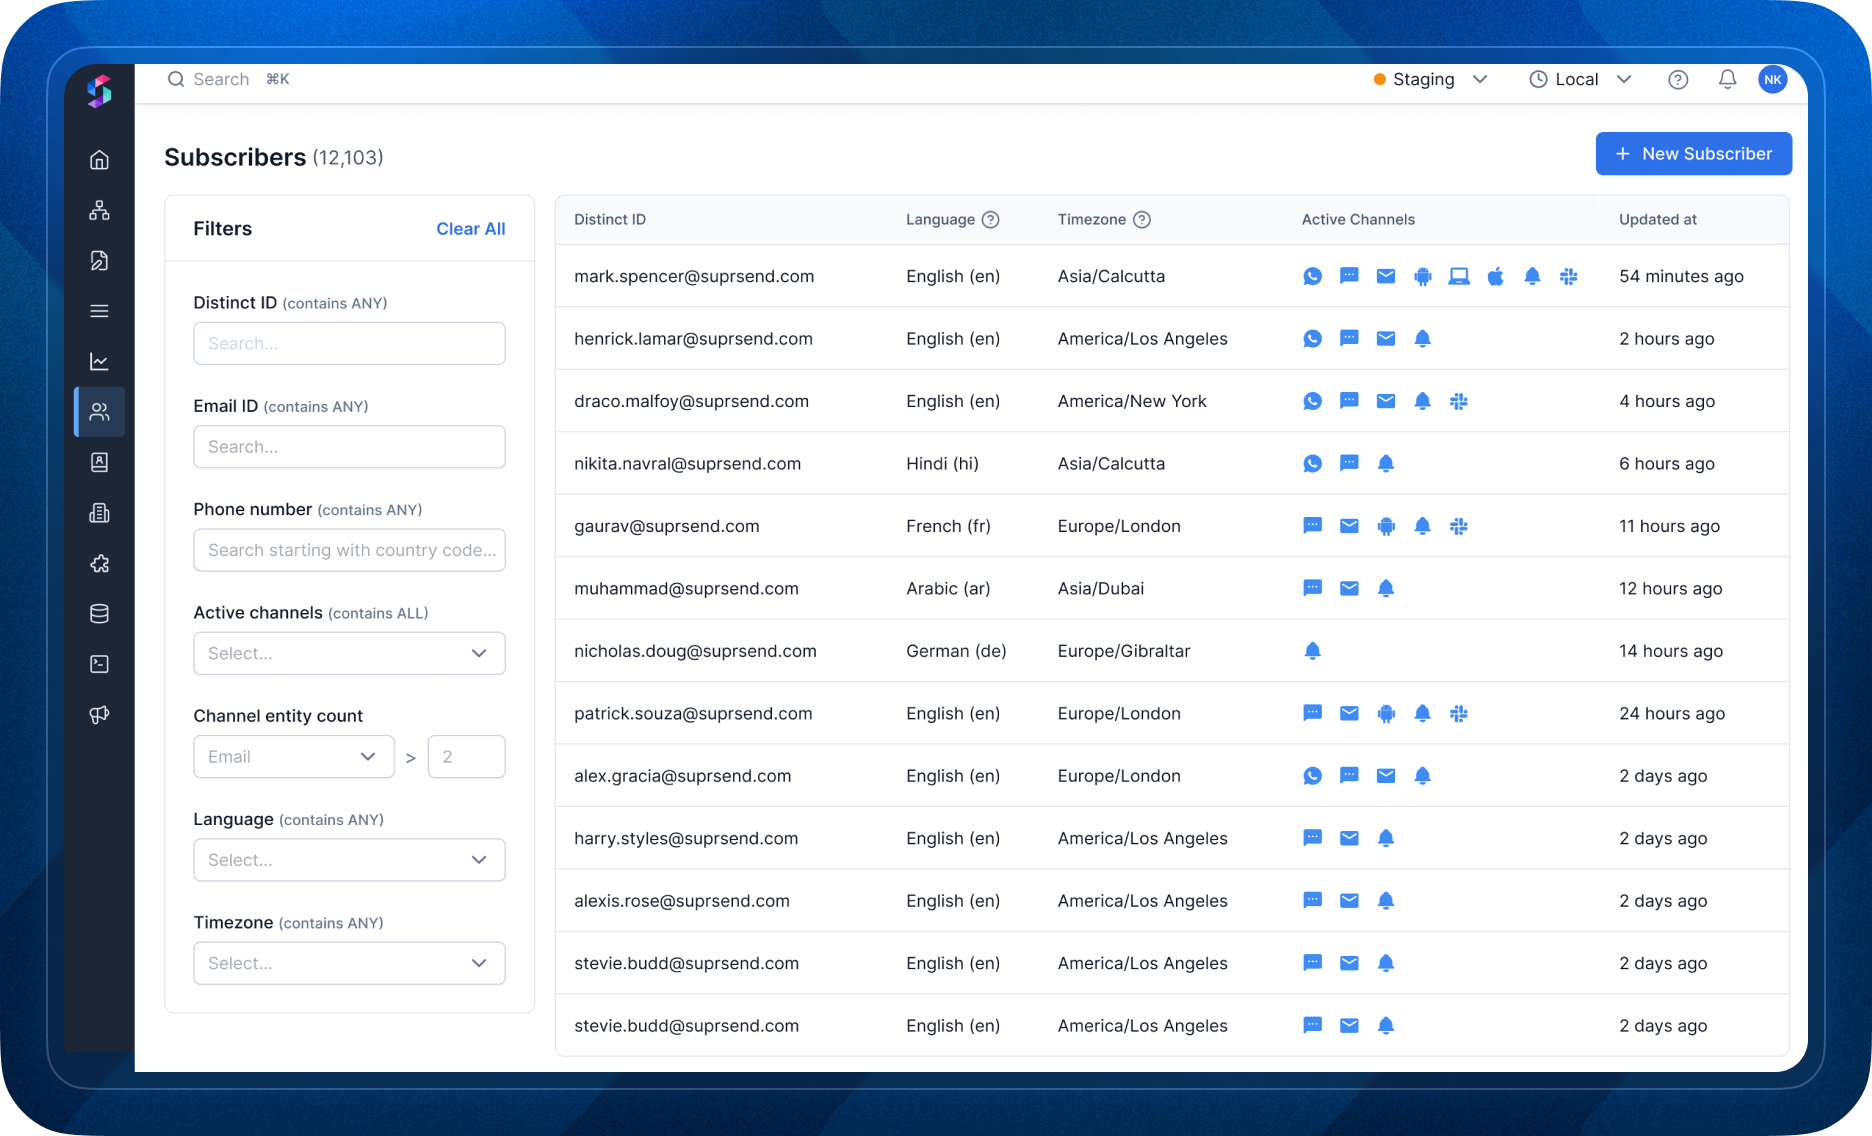
 **API Details:**
The API returns 20 users per response. You can retrieve additional users by using cursor-based pagination (before and after cursors).
**API Details:**
The API returns 20 users per response. You can retrieve additional users by using cursor-based pagination (before and after cursors).
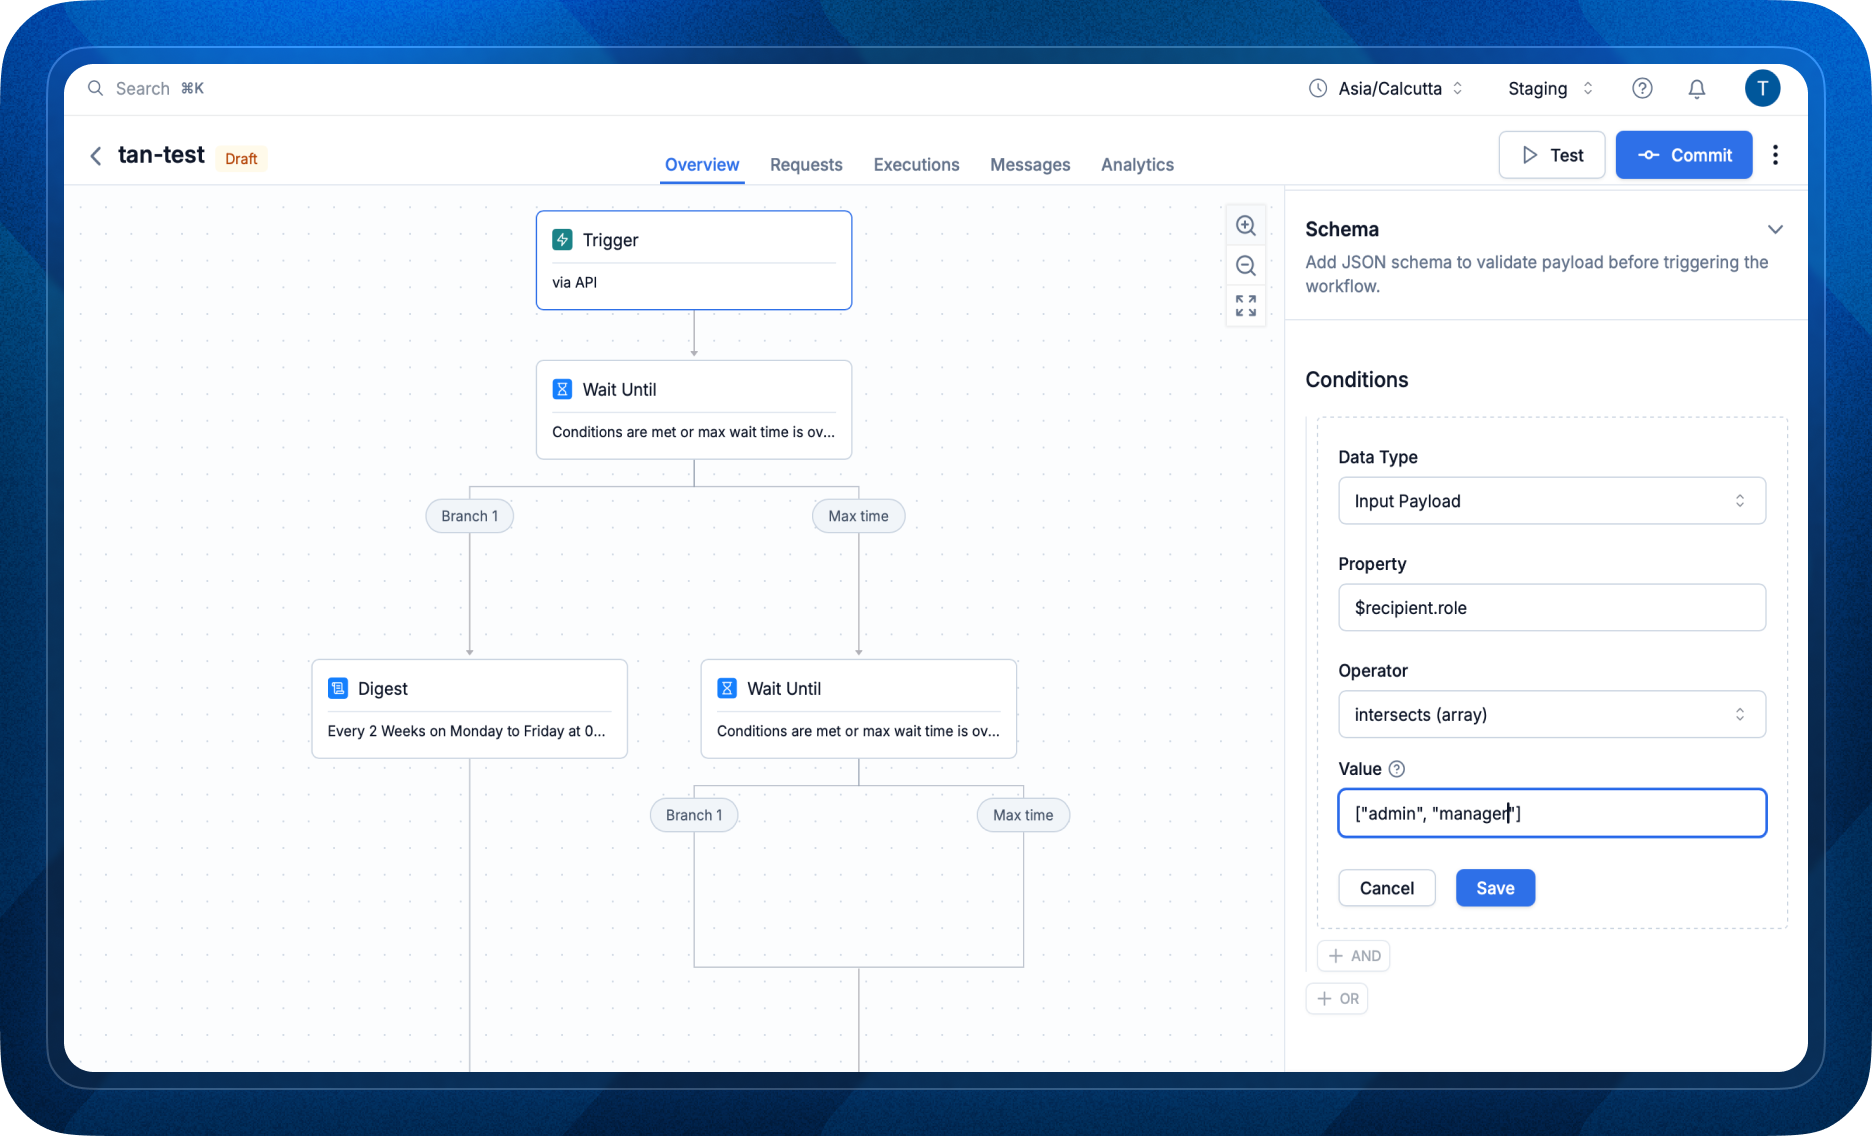
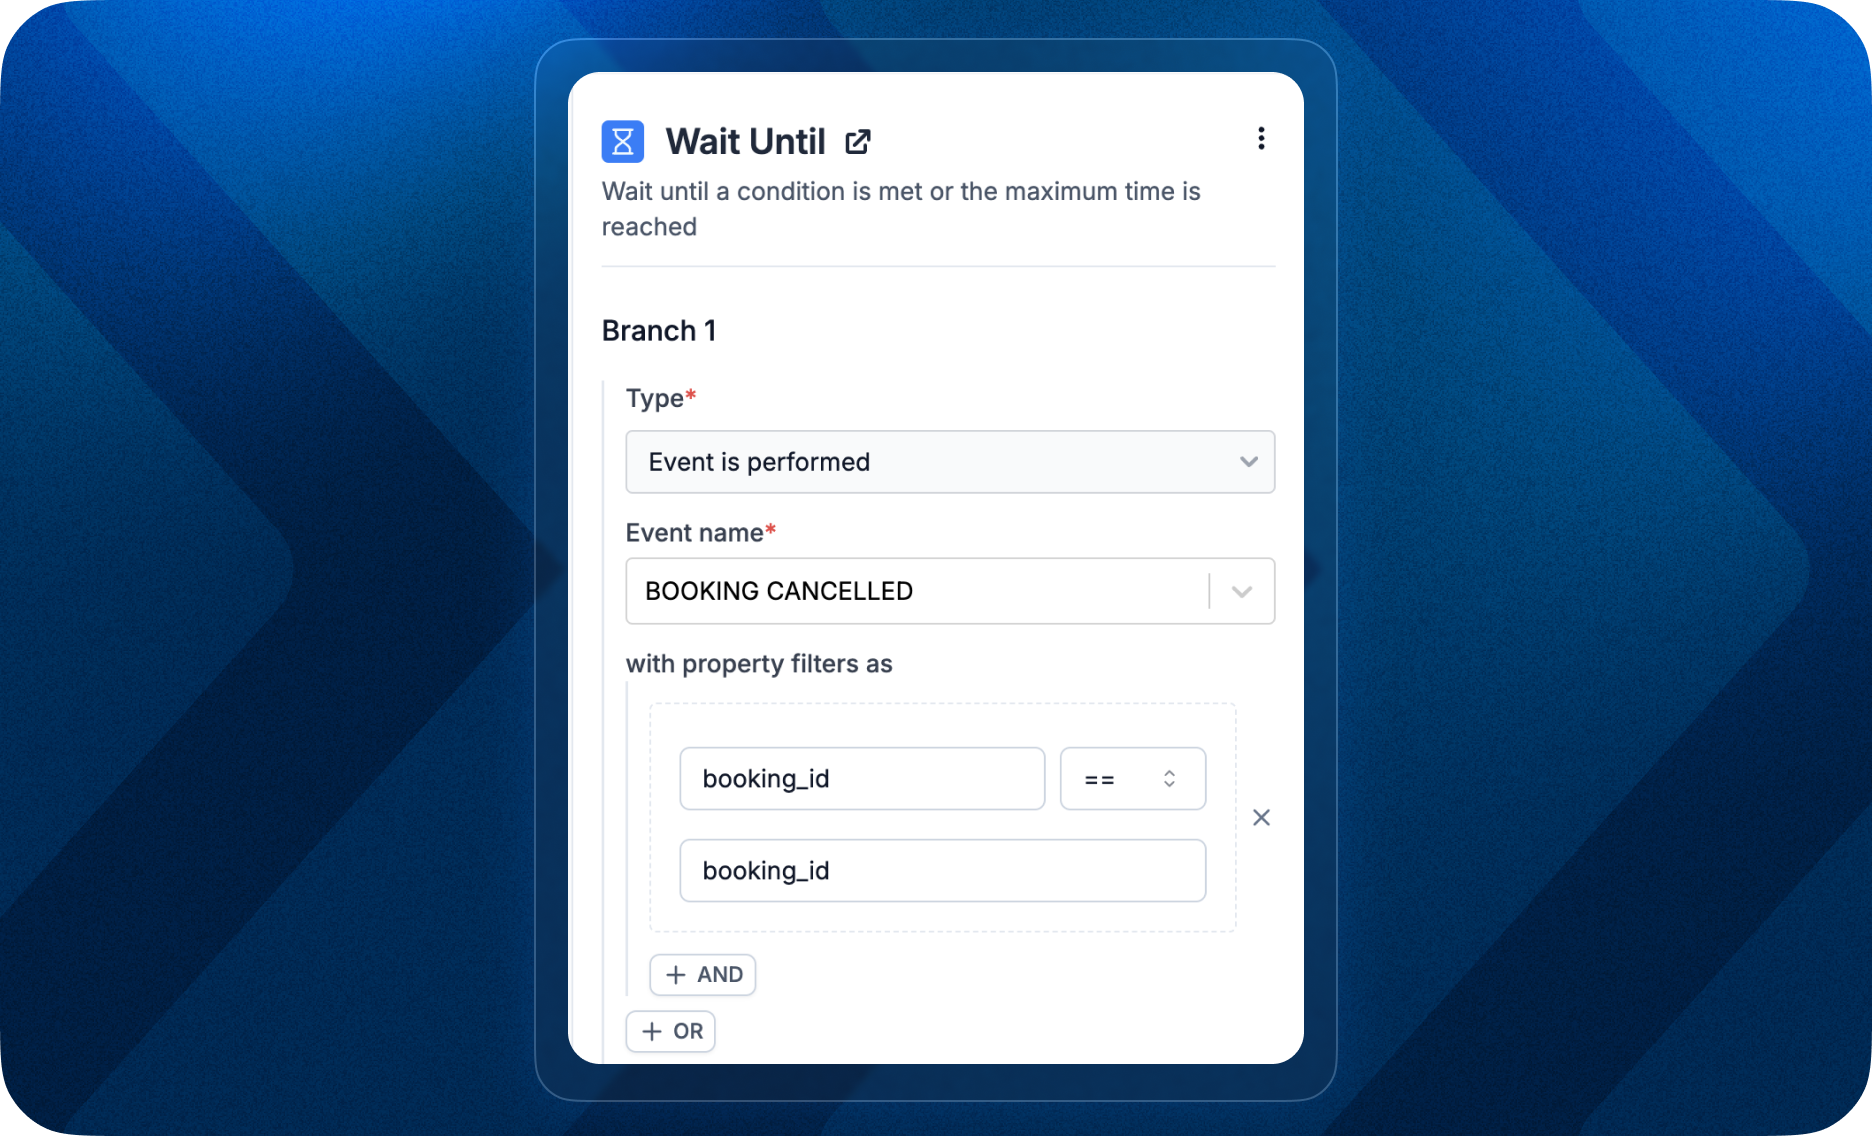 ### Key Changes:
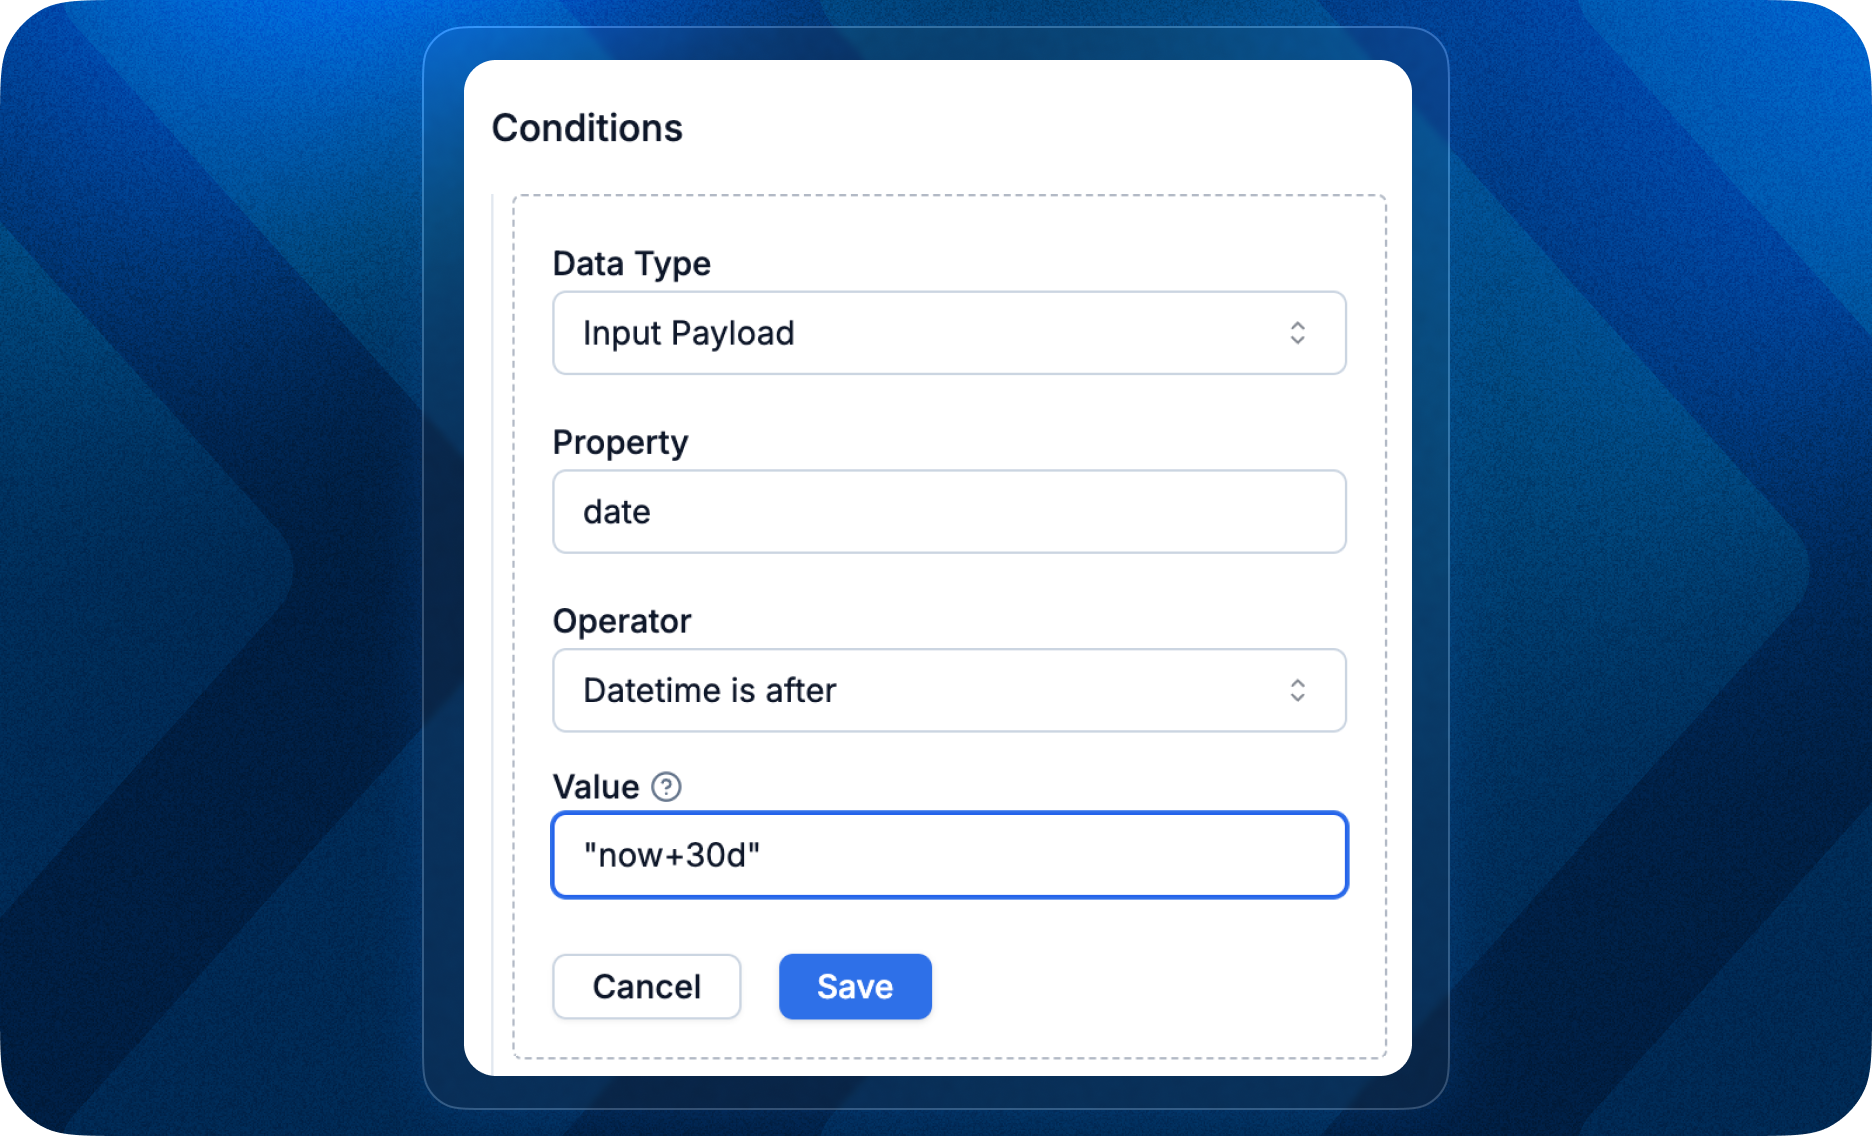
* Add conditions on event properties using a simple key-operator-value expression (e.g. `booking_id = 123`). Add condition on multiple event properties using `AND`,`OR`.
* Apply conditions across multiple events (e.g. avoid sending a notification if a user completes an action or achieves a specific milestone).
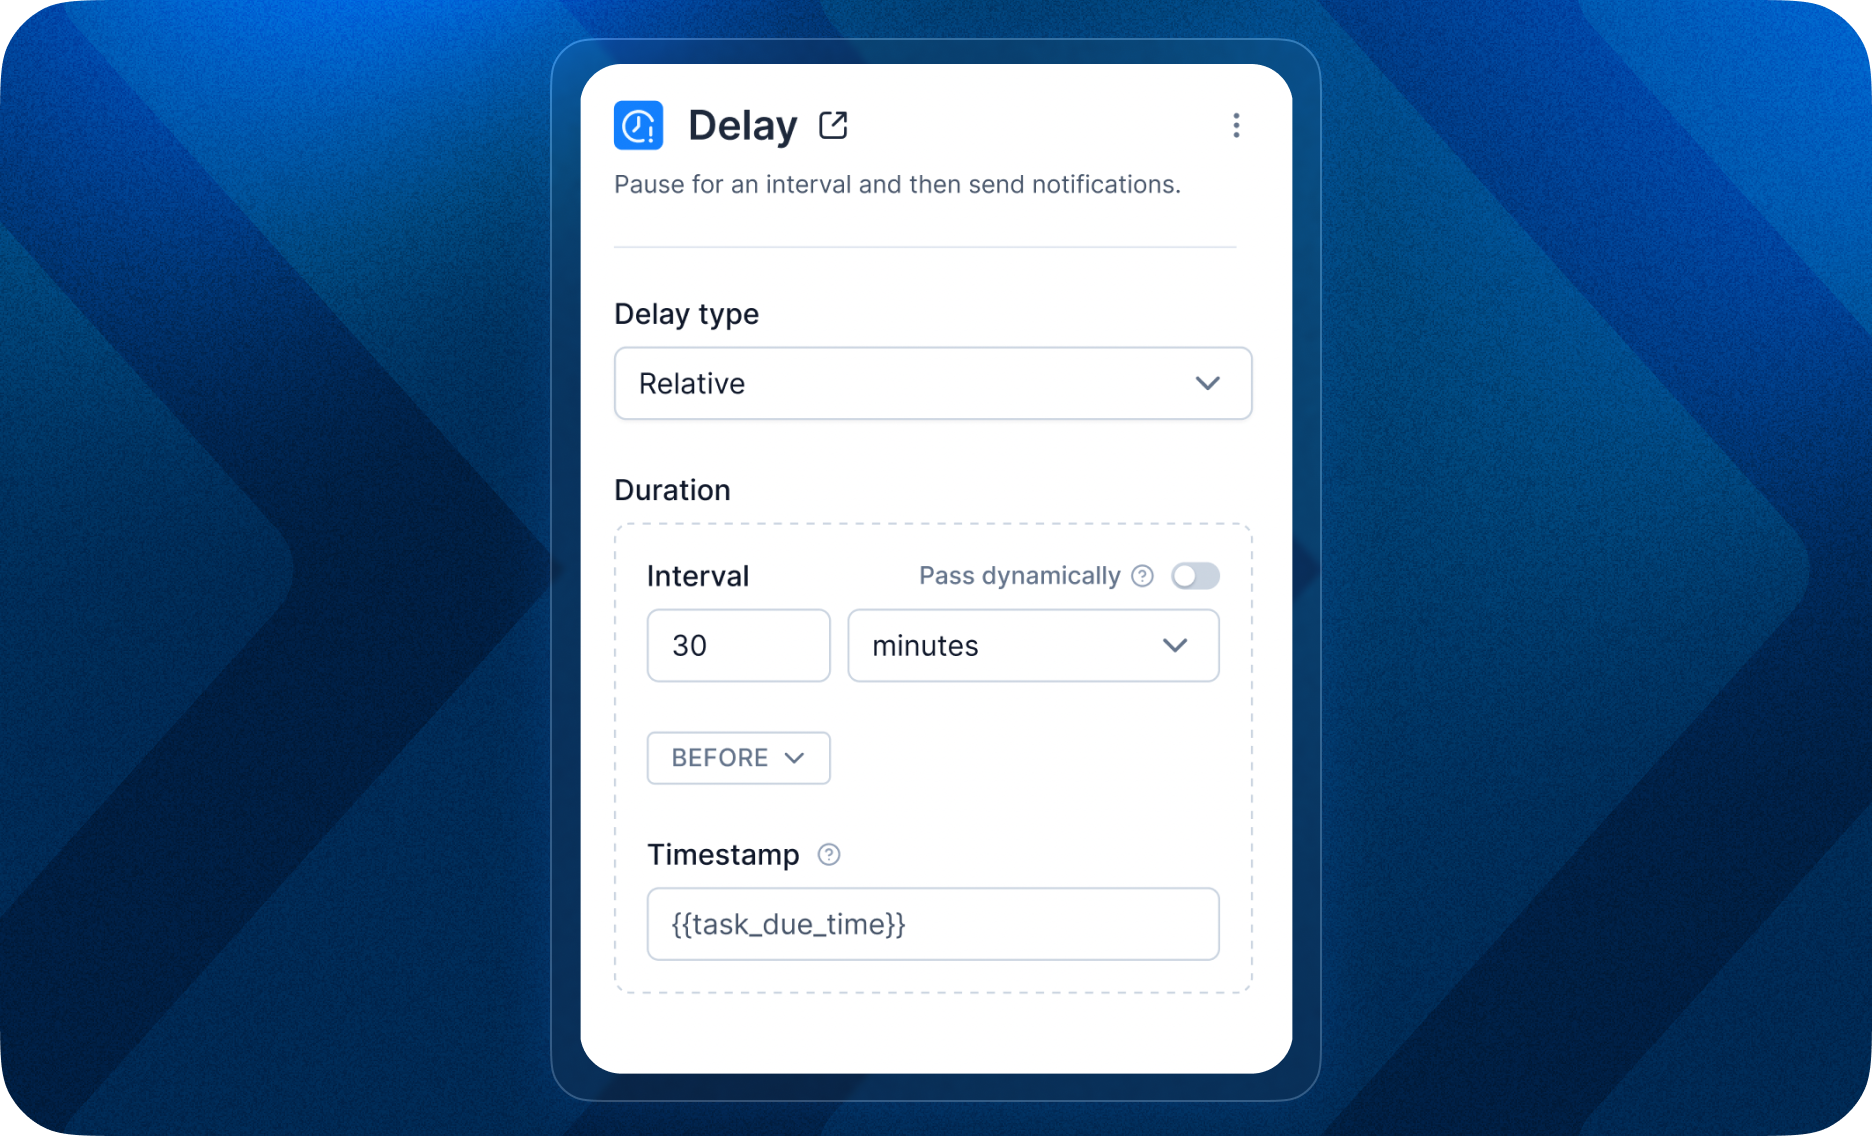
[Refer documentation](/docs/wait-until#fixed-delay) for details on how to implement wait until node in your workflow.
### Key Changes:
* Add conditions on event properties using a simple key-operator-value expression (e.g. `booking_id = 123`). Add condition on multiple event properties using `AND`,`OR`.
* Apply conditions across multiple events (e.g. avoid sending a notification if a user completes an action or achieves a specific milestone).
[Refer documentation](/docs/wait-until#fixed-delay) for details on how to implement wait until node in your workflow.
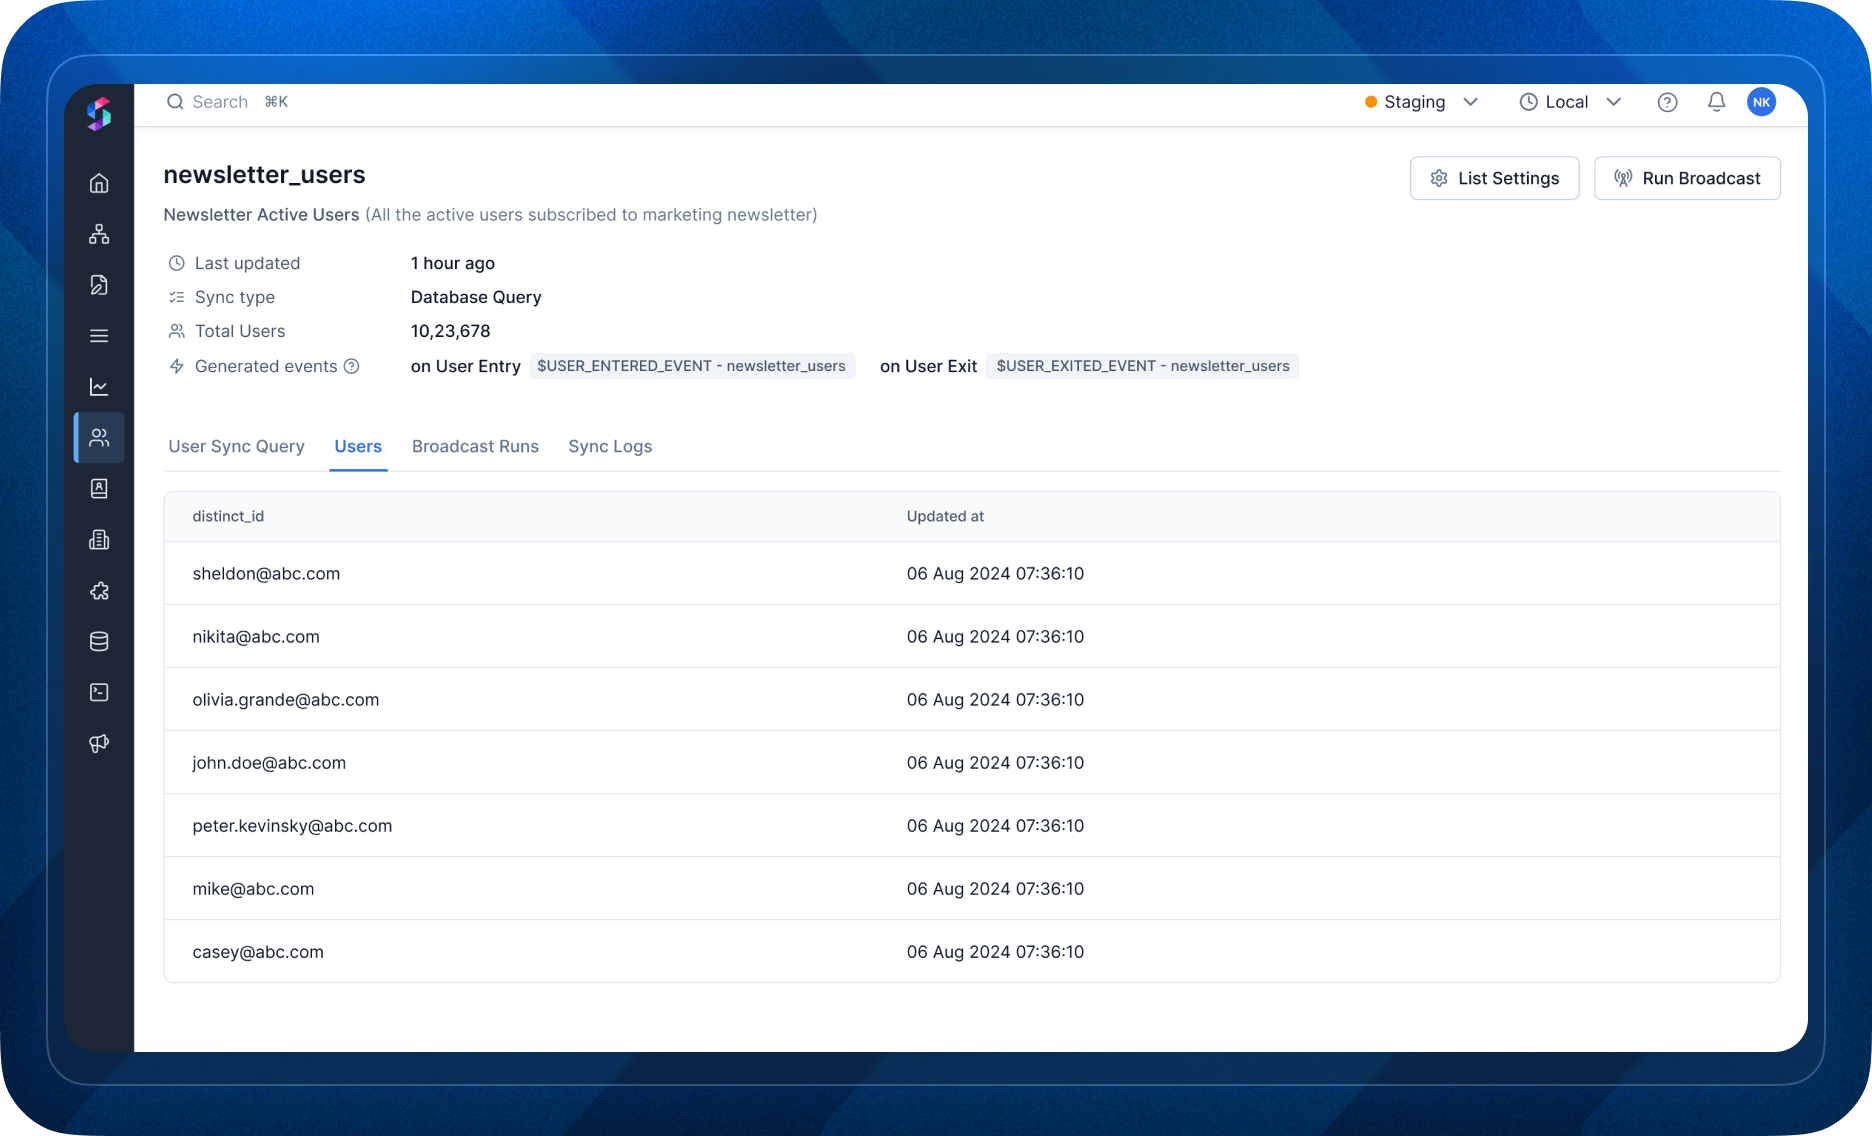
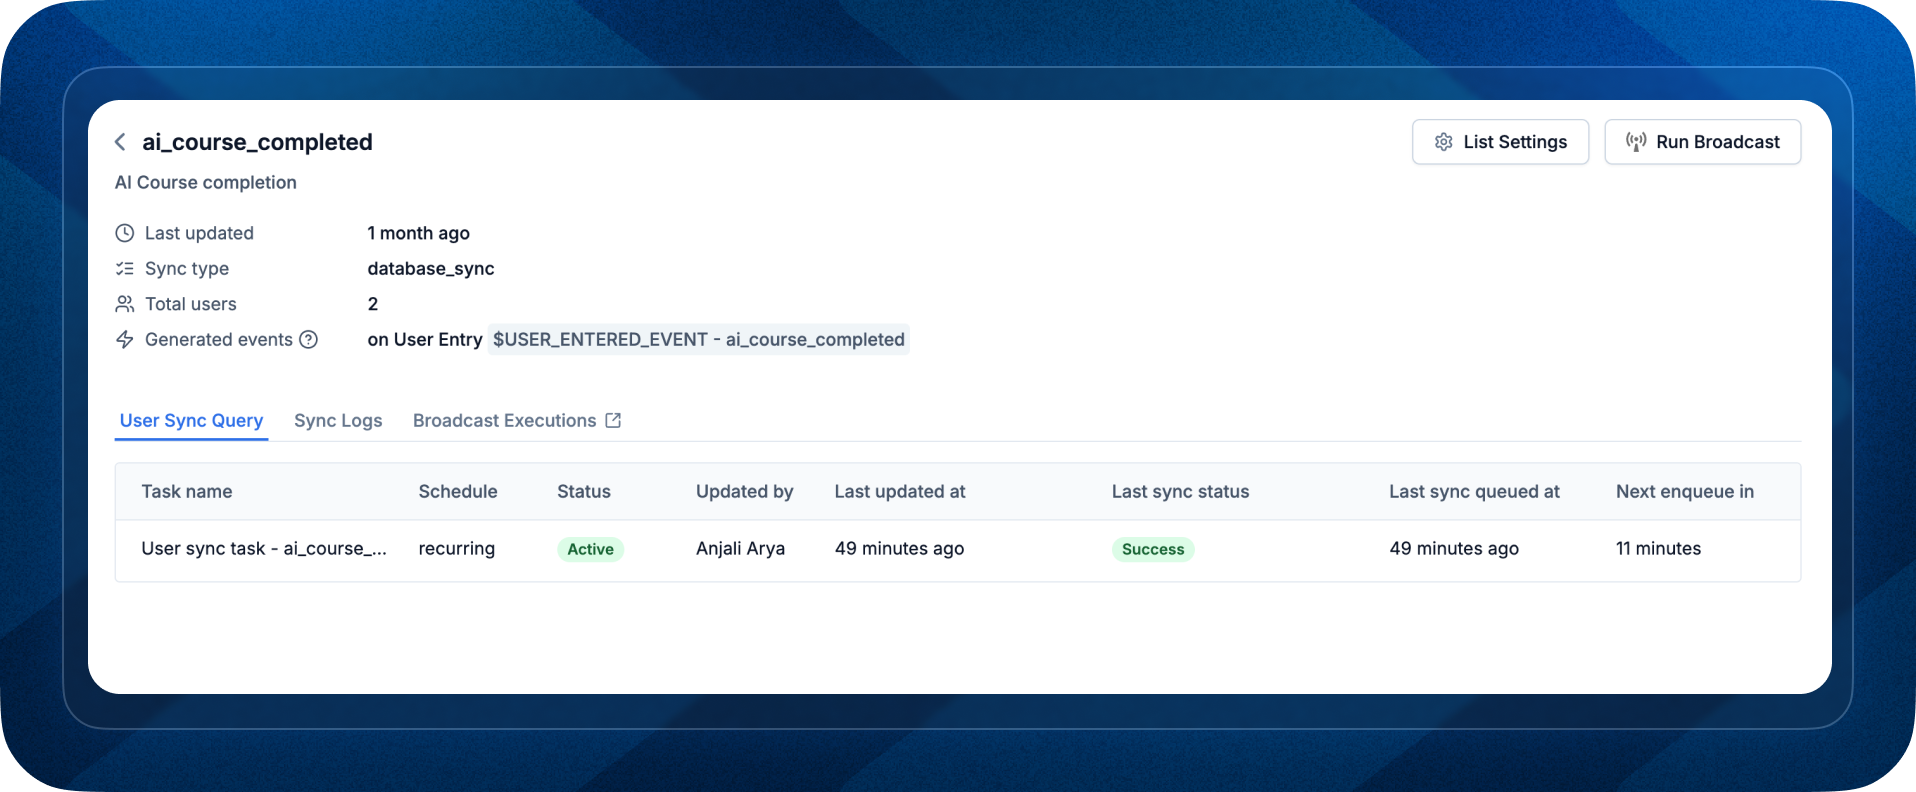 ### Key Improvements:
* New List Details Page: Access all essential information (logs, broadcast runs, list users) and actions for a list (run broadcast, update user) in a single view, making list management much simpler.
* "Sync Now" button on query page: This will enable you to manually sync list users when required.
### Coming Soon:
* List Users Tab and API: We’ll soon be adding a tab to see all list users. The same functionality will also be exposed to hub APIs to fetch list users.
### Key Improvements:
* New List Details Page: Access all essential information (logs, broadcast runs, list users) and actions for a list (run broadcast, update user) in a single view, making list management much simpler.
* "Sync Now" button on query page: This will enable you to manually sync list users when required.
### Coming Soon:
* List Users Tab and API: We’ll soon be adding a tab to see all list users. The same functionality will also be exposed to hub APIs to fetch list users.
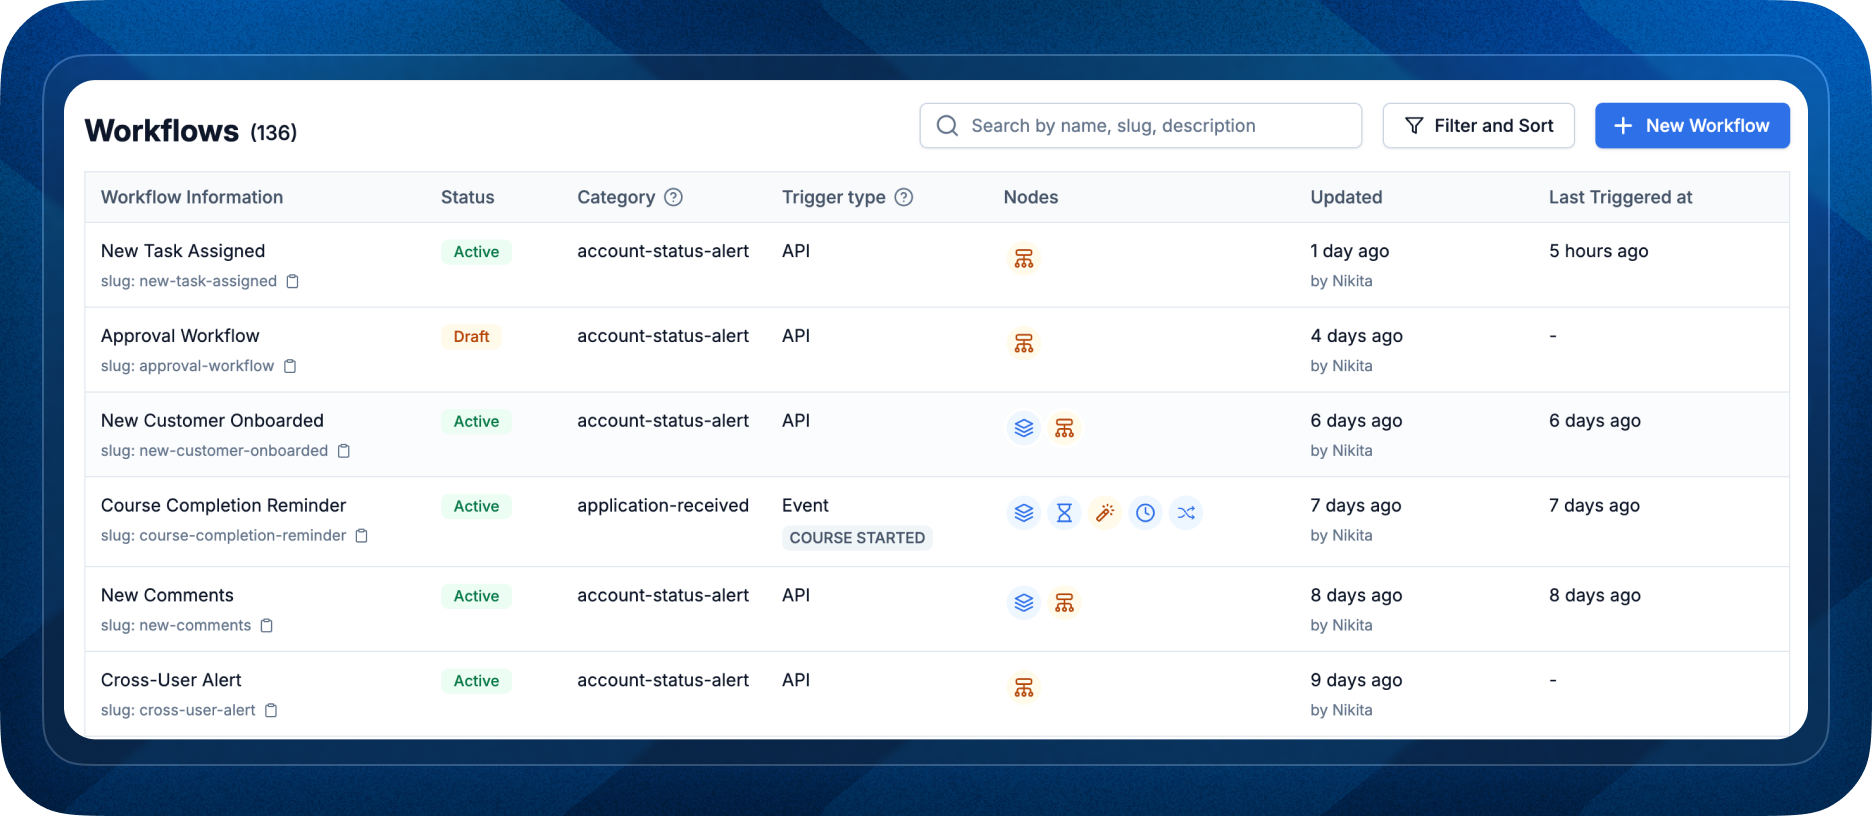 We are excited to announce our latest release, designed to enhance your platform navigation experience. In this update, we have overhauled the [workflow list view](https://app.suprsend.com/en/staging/workflows) to present critical information prominently and introduced robust filtering and sorting capabilities. Here's what's new:
* Effortlessly search workflows by , , or for quick access.
* Utilise advanced filters to refine workflows by trigger events, category, template, and incorporated nodes.
* Sort workflow lists based on the most recent trigger or modification date.
These enhancements will help you search and manage workflows more effectively.
We are excited to announce our latest release, designed to enhance your platform navigation experience. In this update, we have overhauled the [workflow list view](https://app.suprsend.com/en/staging/workflows) to present critical information prominently and introduced robust filtering and sorting capabilities. Here's what's new:
* Effortlessly search workflows by , , or for quick access.
* Utilise advanced filters to refine workflows by trigger events, category, template, and incorporated nodes.
* Sort workflow lists based on the most recent trigger or modification date.
These enhancements will help you search and manage workflows more effectively.
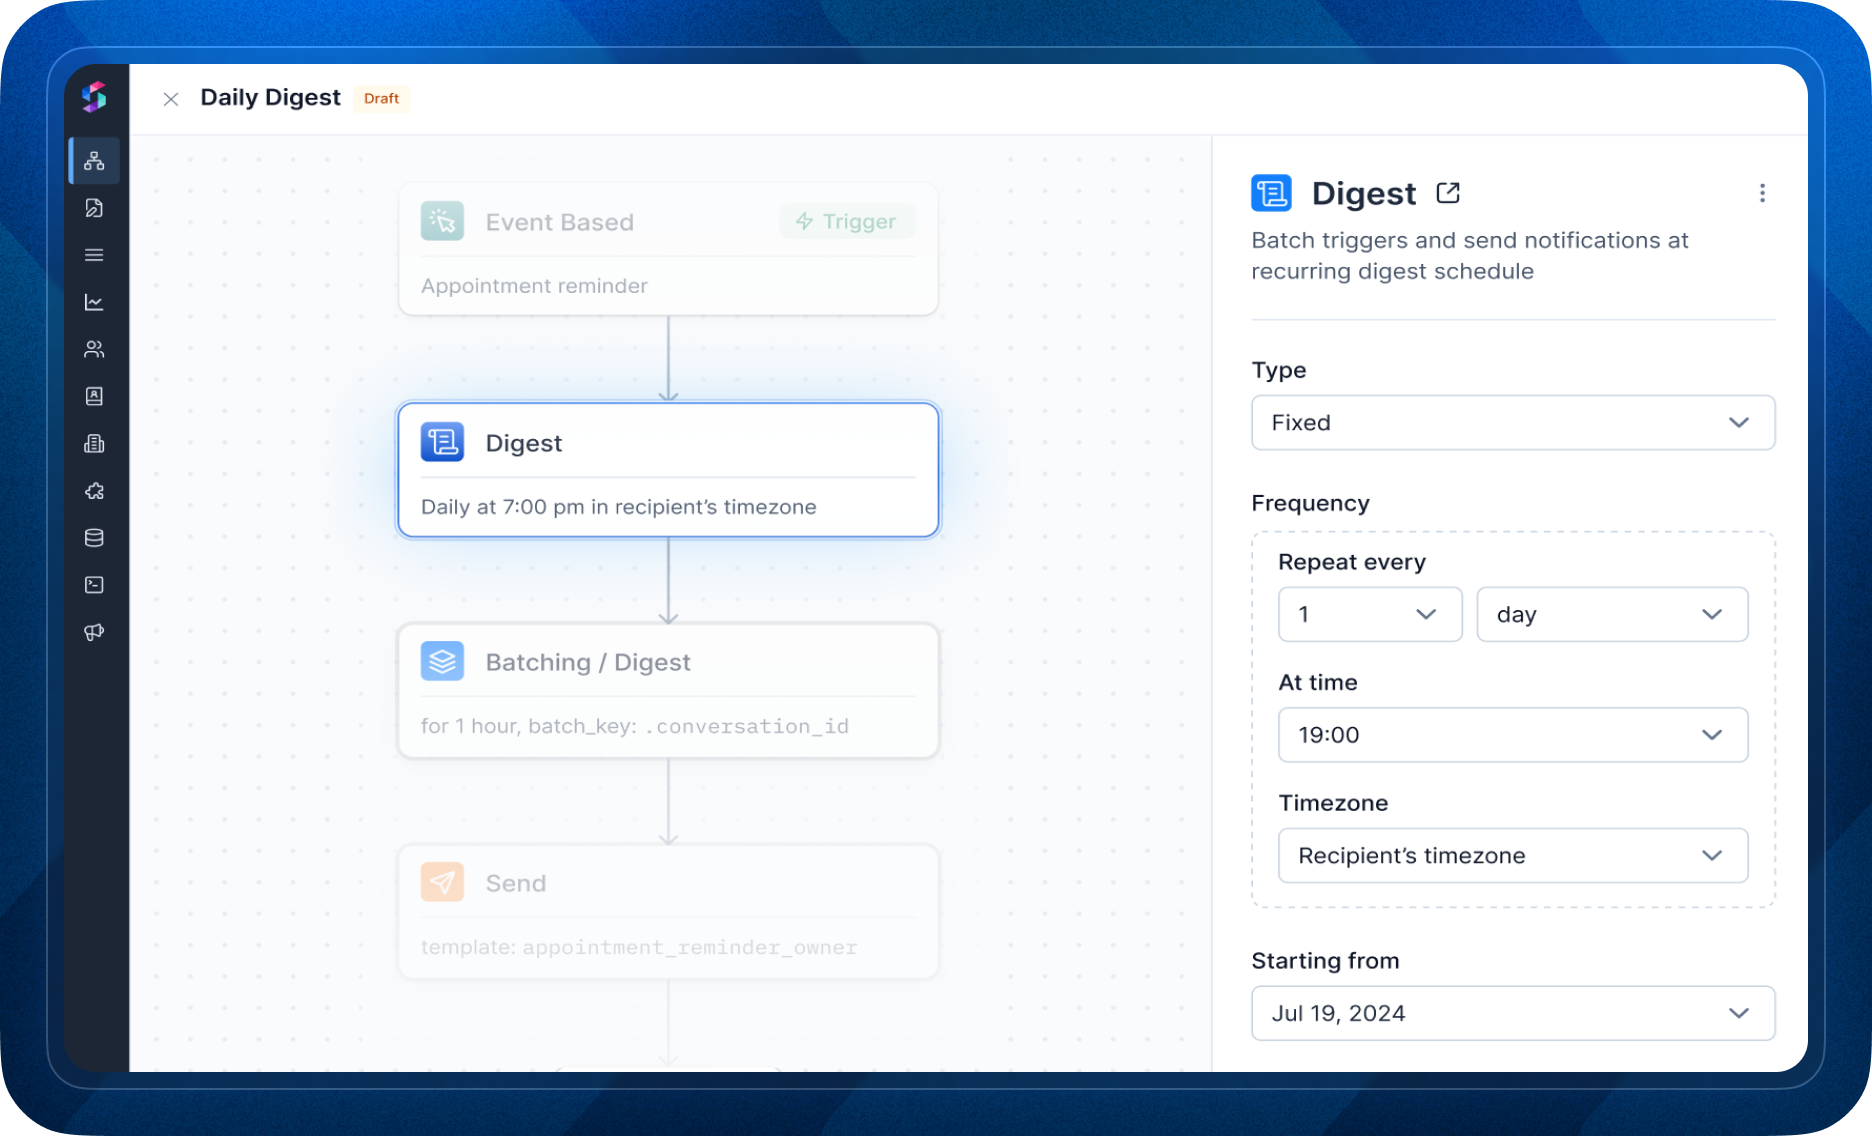 Create a personalized digest experience for your users,
* By picking [digest frequency from recipient’s preferences](/docs/digest#dynamic-schedule-send-digest-based-on-user-preference)
* Making it timezone-aware and sending digest in recipient’s timezone irrespective of where they are located across the globe.
Need help designing your digest use case? [Write back to us](mailto:support@suprsend.com) and our team of experts will be happy to help.
Create a personalized digest experience for your users,
* By picking [digest frequency from recipient’s preferences](/docs/digest#dynamic-schedule-send-digest-based-on-user-preference)
* Making it timezone-aware and sending digest in recipient’s timezone irrespective of where they are located across the globe.
Need help designing your digest use case? [Write back to us](mailto:support@suprsend.com) and our team of experts will be happy to help.
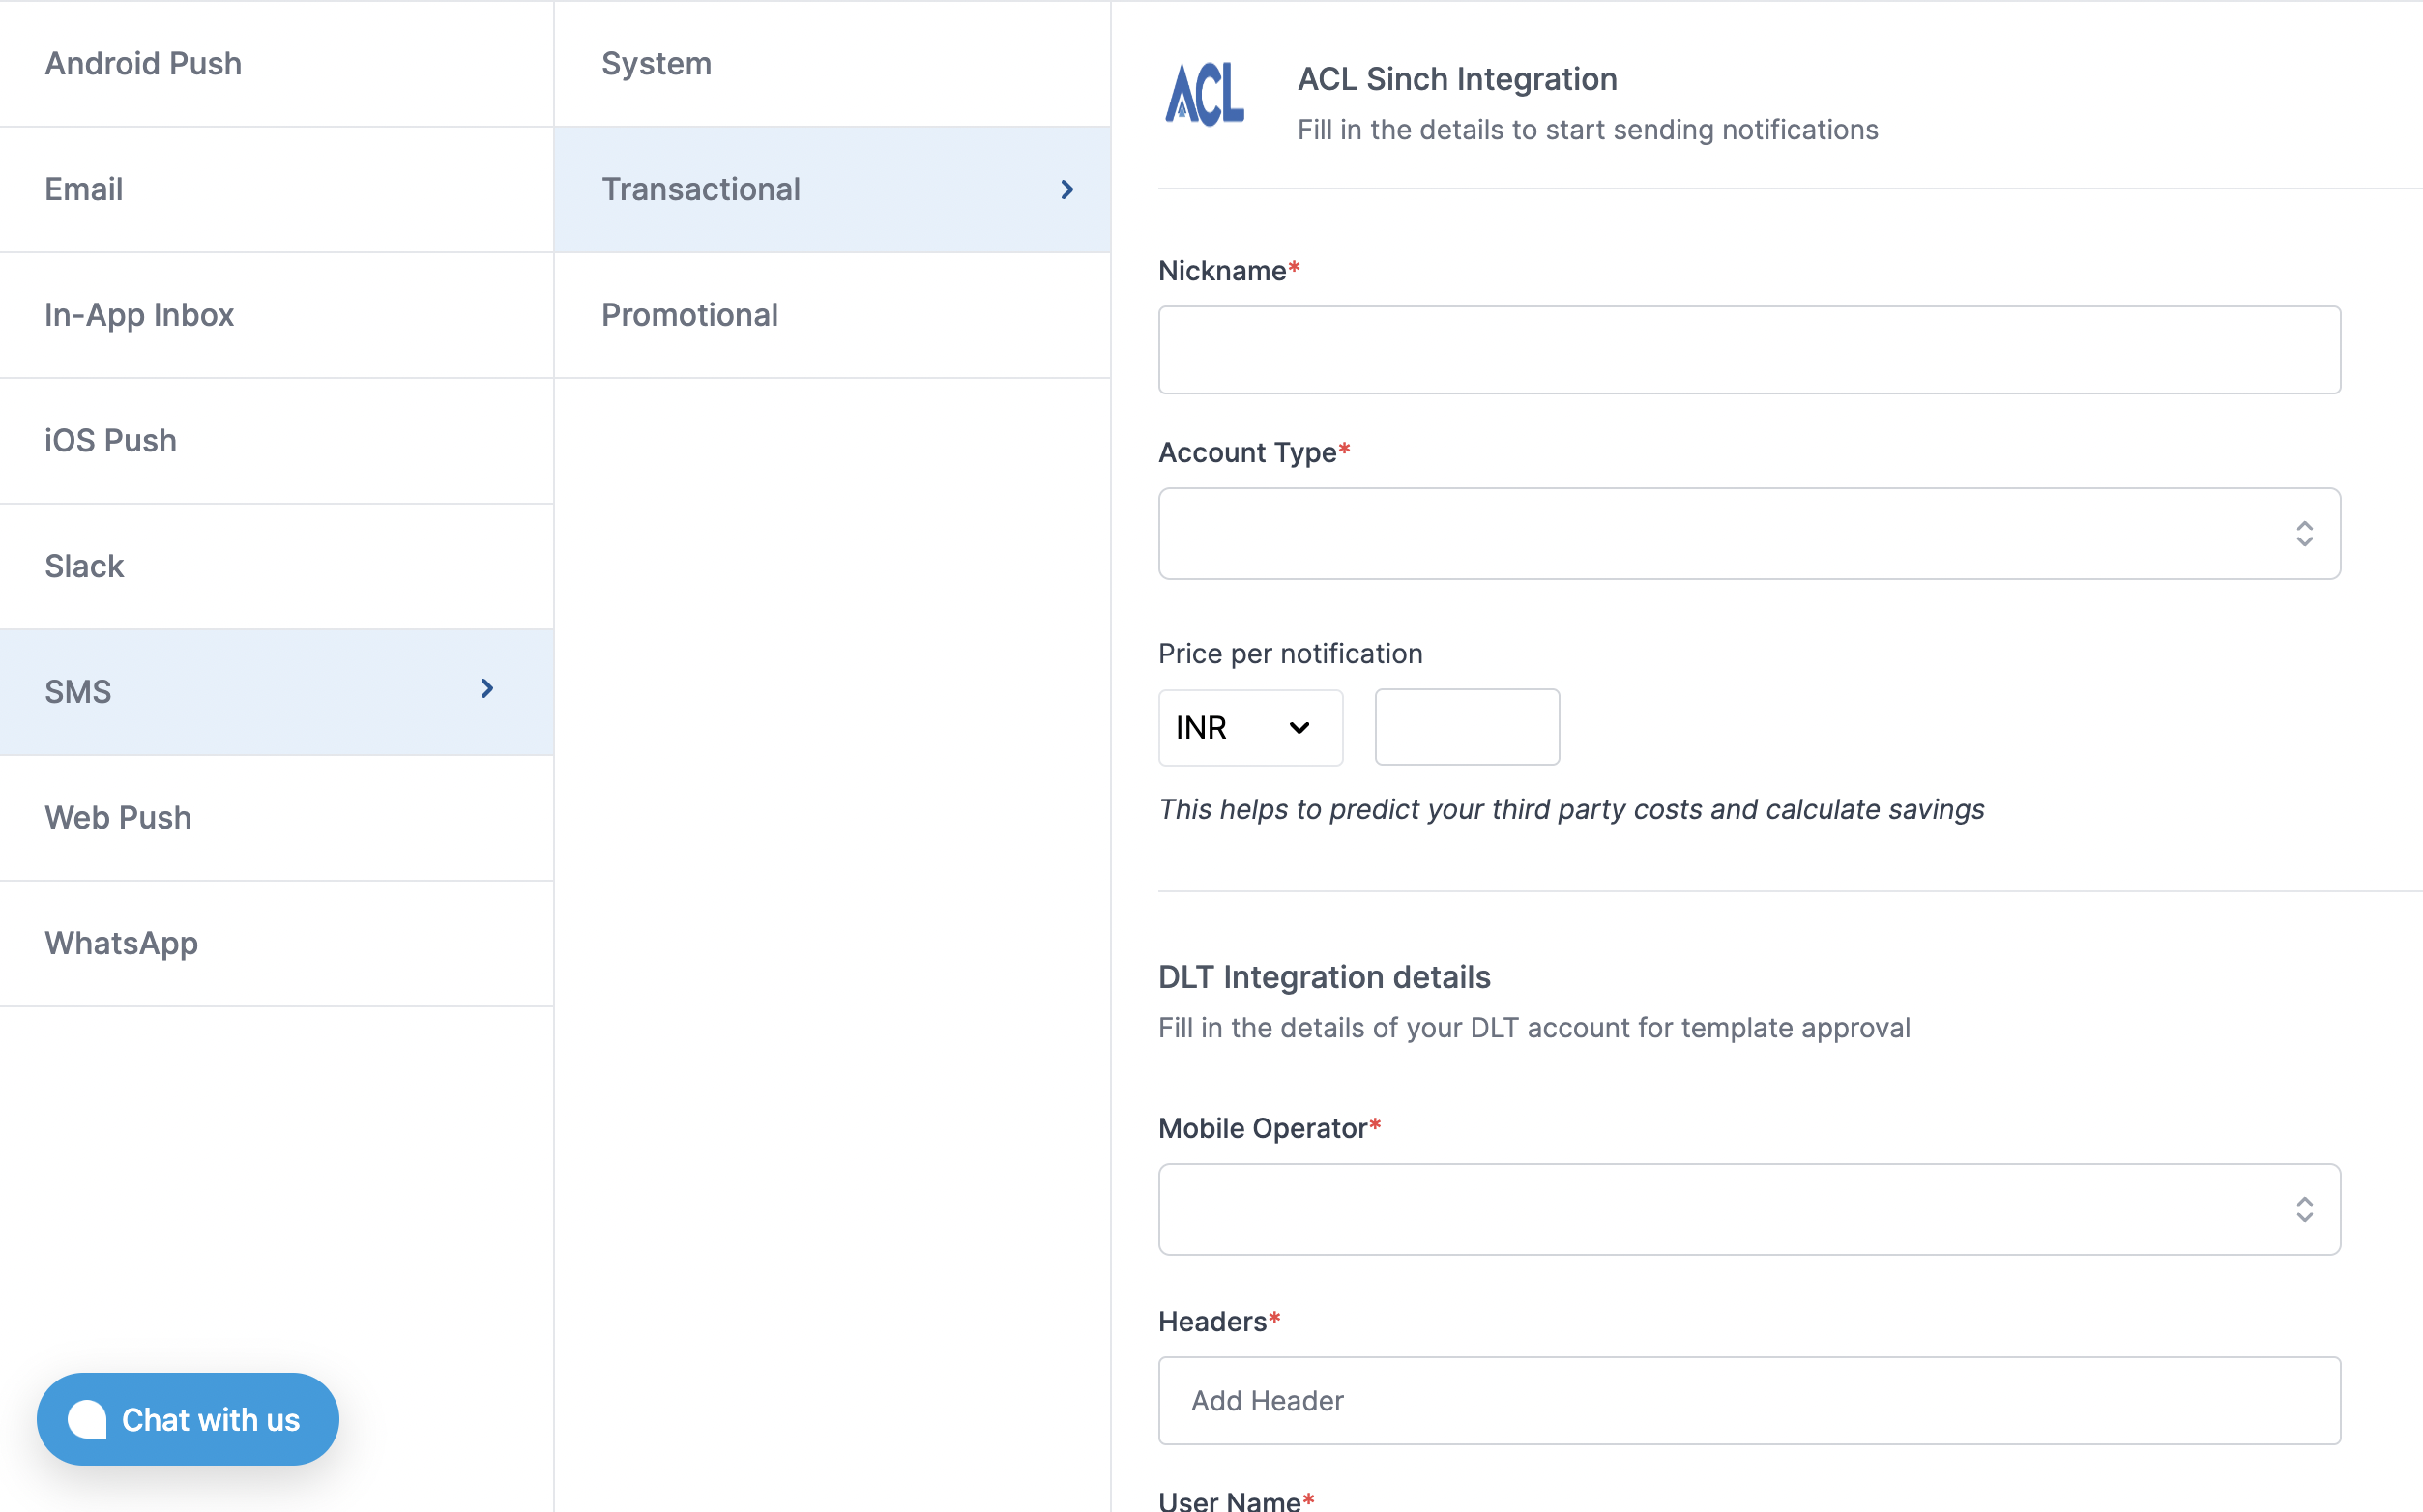 | Form Field | Description |
| ----------------------------------------------- | --------------------------------------------------------------------------------------------------------------------------------------------------------------------------------------------------------------------------------- |
| Nickname | You can give any name which may help you to identify this account easily |
| Account Type | Sinch creates 2 separate accounts, one for OTP messages and one for transactional notification. Add OTP account in "system" notification category |
| Enterprise ID / App ID | Unique identifier for your application (App ID) |
| Sub Enterprise ID / Sub App ID*(Optional)* | Will be same as your App ID if you don't have any sub accounts attached to your app. Leave it blank if you don't have a separate sub app id |
| User ID | User id for ACL account login. SuprSend uses this info to send SMS on your behalf via your registered ACL account. |
| Password | Password for ACL account login. SuprSend uses this info to send SMS on your behalf via your registered ACL account. |
| URL shortener | Enable it to enable URL shortening in your messages. Not supported in OTP message |
| Price per notification | This is the amount you pay per SMS notification to ACL. It helps us to calculate, estimate and optimise your cost spent on notifications. |
| DLT Integration -> 'Telecom Operator' | Telecom Operator of your business SMS account |
| DLT Integration -> 'Headers' | 6 digit/character sender id registered for your entity ( *You can get the header details from your DLT portal*) *e.g. SPRSND* Also, you can add multiple headers in the list by just typing the header name and clicking on enter |
| DLT Integration -> 'User Name' | User Name of your DLT platform login. SuprSend uses this info to register template on your behalf through your registered DLT platform. |
| DLT Integration -> 'Password' | Password of your DLT platform login. SuprSend uses this info to register template on your behalf through your registered DLT platform. |
| DLT Integration -> 'Entity ID' | Entity Registration ID linked to your DLT account. You can get the Registration Id from your DLT account homepage. SuprSend uses this info to send messages on your behalf through your registered DLT platform. |
### How to get App ID, Sub App ID for your ACL(Sinch) account
As soon as your account is created, you'll receive a mail from sinch team sharing the account credentials with you. You'll get all this information in the mail itself
## Setting Callback URL in ACL(Sinch) account
One of the platform advantage of using SuprSend as a central communication system is that it shows notification analytics for all channels in your SuprSend account together.
Send a mail to ACL Sinch team to enable below webhook URL to your account, webhook for OTP and transactional account will be different
> **For OTP account**
> URL: [`https://hub.suprsend.com/webhook/acl/sms/otp`](https://hub.suprsend.com/webhook/acl/sms/otp)
> Request method- POST
> **For Transactional account**
> URL: [`https://hub.suprsend.com/webhook/acl/sms/`](https://hub.suprsend.com/webhook/acl/sms/)
> Request method- POST
## How to register headers through Airtel DLT platform
To register header on Airtel DLT platform, you can refer the section: [Sender ID/Mask/Header Registration- DLT Platform](https://enterprise.smsgupshup.com/DLT/senderidRegistration)
***
# Add User to list
Source: https://docs.suprsend.com/docs/add-user-to-list
Dynamically add users to list within a workflow.
You can use this node to dynamically add recipient or actor in the list. This is one of the ways to create user segment based on an event or action. For example, when someone registers for an event, you can send them a confirmation email and at the same time, add them to a list to send them reminder messages or announcements related to the event.
| Form Field | Description |
| ----------------------------------------------- | --------------------------------------------------------------------------------------------------------------------------------------------------------------------------------------------------------------------------------- |
| Nickname | You can give any name which may help you to identify this account easily |
| Account Type | Sinch creates 2 separate accounts, one for OTP messages and one for transactional notification. Add OTP account in "system" notification category |
| Enterprise ID / App ID | Unique identifier for your application (App ID) |
| Sub Enterprise ID / Sub App ID*(Optional)* | Will be same as your App ID if you don't have any sub accounts attached to your app. Leave it blank if you don't have a separate sub app id |
| User ID | User id for ACL account login. SuprSend uses this info to send SMS on your behalf via your registered ACL account. |
| Password | Password for ACL account login. SuprSend uses this info to send SMS on your behalf via your registered ACL account. |
| URL shortener | Enable it to enable URL shortening in your messages. Not supported in OTP message |
| Price per notification | This is the amount you pay per SMS notification to ACL. It helps us to calculate, estimate and optimise your cost spent on notifications. |
| DLT Integration -> 'Telecom Operator' | Telecom Operator of your business SMS account |
| DLT Integration -> 'Headers' | 6 digit/character sender id registered for your entity ( *You can get the header details from your DLT portal*) *e.g. SPRSND* Also, you can add multiple headers in the list by just typing the header name and clicking on enter |
| DLT Integration -> 'User Name' | User Name of your DLT platform login. SuprSend uses this info to register template on your behalf through your registered DLT platform. |
| DLT Integration -> 'Password' | Password of your DLT platform login. SuprSend uses this info to register template on your behalf through your registered DLT platform. |
| DLT Integration -> 'Entity ID' | Entity Registration ID linked to your DLT account. You can get the Registration Id from your DLT account homepage. SuprSend uses this info to send messages on your behalf through your registered DLT platform. |
### How to get App ID, Sub App ID for your ACL(Sinch) account
As soon as your account is created, you'll receive a mail from sinch team sharing the account credentials with you. You'll get all this information in the mail itself
## Setting Callback URL in ACL(Sinch) account
One of the platform advantage of using SuprSend as a central communication system is that it shows notification analytics for all channels in your SuprSend account together.
Send a mail to ACL Sinch team to enable below webhook URL to your account, webhook for OTP and transactional account will be different
> **For OTP account**
> URL: [`https://hub.suprsend.com/webhook/acl/sms/otp`](https://hub.suprsend.com/webhook/acl/sms/otp)
> Request method- POST
> **For Transactional account**
> URL: [`https://hub.suprsend.com/webhook/acl/sms/`](https://hub.suprsend.com/webhook/acl/sms/)
> Request method- POST
## How to register headers through Airtel DLT platform
To register header on Airtel DLT platform, you can refer the section: [Sender ID/Mask/Header Registration- DLT Platform](https://enterprise.smsgupshup.com/DLT/senderidRegistration)
***
# Add User to list
Source: https://docs.suprsend.com/docs/add-user-to-list
Dynamically add users to list within a workflow.
You can use this node to dynamically add recipient or actor in the list. This is one of the ways to create user segment based on an event or action. For example, when someone registers for an event, you can send them a confirmation email and at the same time, add them to a list to send them reminder messages or announcements related to the event.
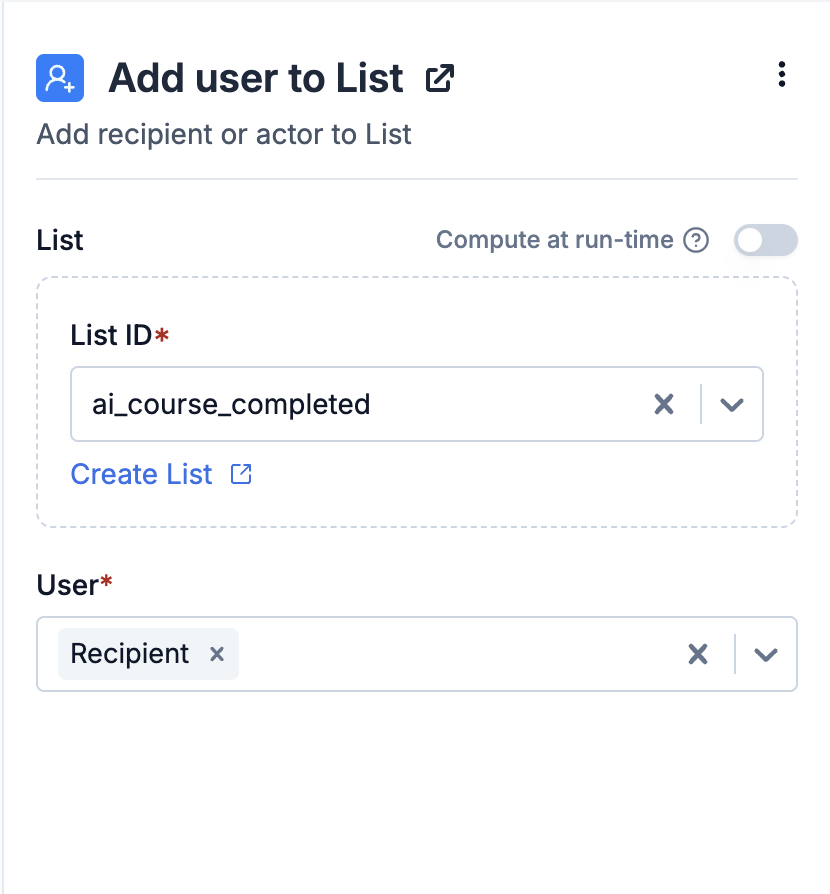 ### Creating list dynamically within workflow
You can either add users to an existing list or create the list on the fly using workflow input data. Dynamic list are defined in handlebars format as `{{...}}`.
List will only be created if the `Create list if it doesn't exist` setting is ON.
One common use case of creating list dynamically is when you need to create different lists based on user topic subscription. e.g., there are multiple events happening and you want to create a separate list for each event. List ID in such case can be `{{event_id}}_subscribers` and List name `{{event_name}} - subscribers`.
### Creating list dynamically within workflow
You can either add users to an existing list or create the list on the fly using workflow input data. Dynamic list are defined in handlebars format as `{{...}}`.
List will only be created if the `Create list if it doesn't exist` setting is ON.
One common use case of creating list dynamically is when you need to create different lists based on user topic subscription. e.g., there are multiple events happening and you want to create a separate list for each event. List ID in such case can be `{{event_id}}_subscribers` and List name `{{event_name}} - subscribers`.
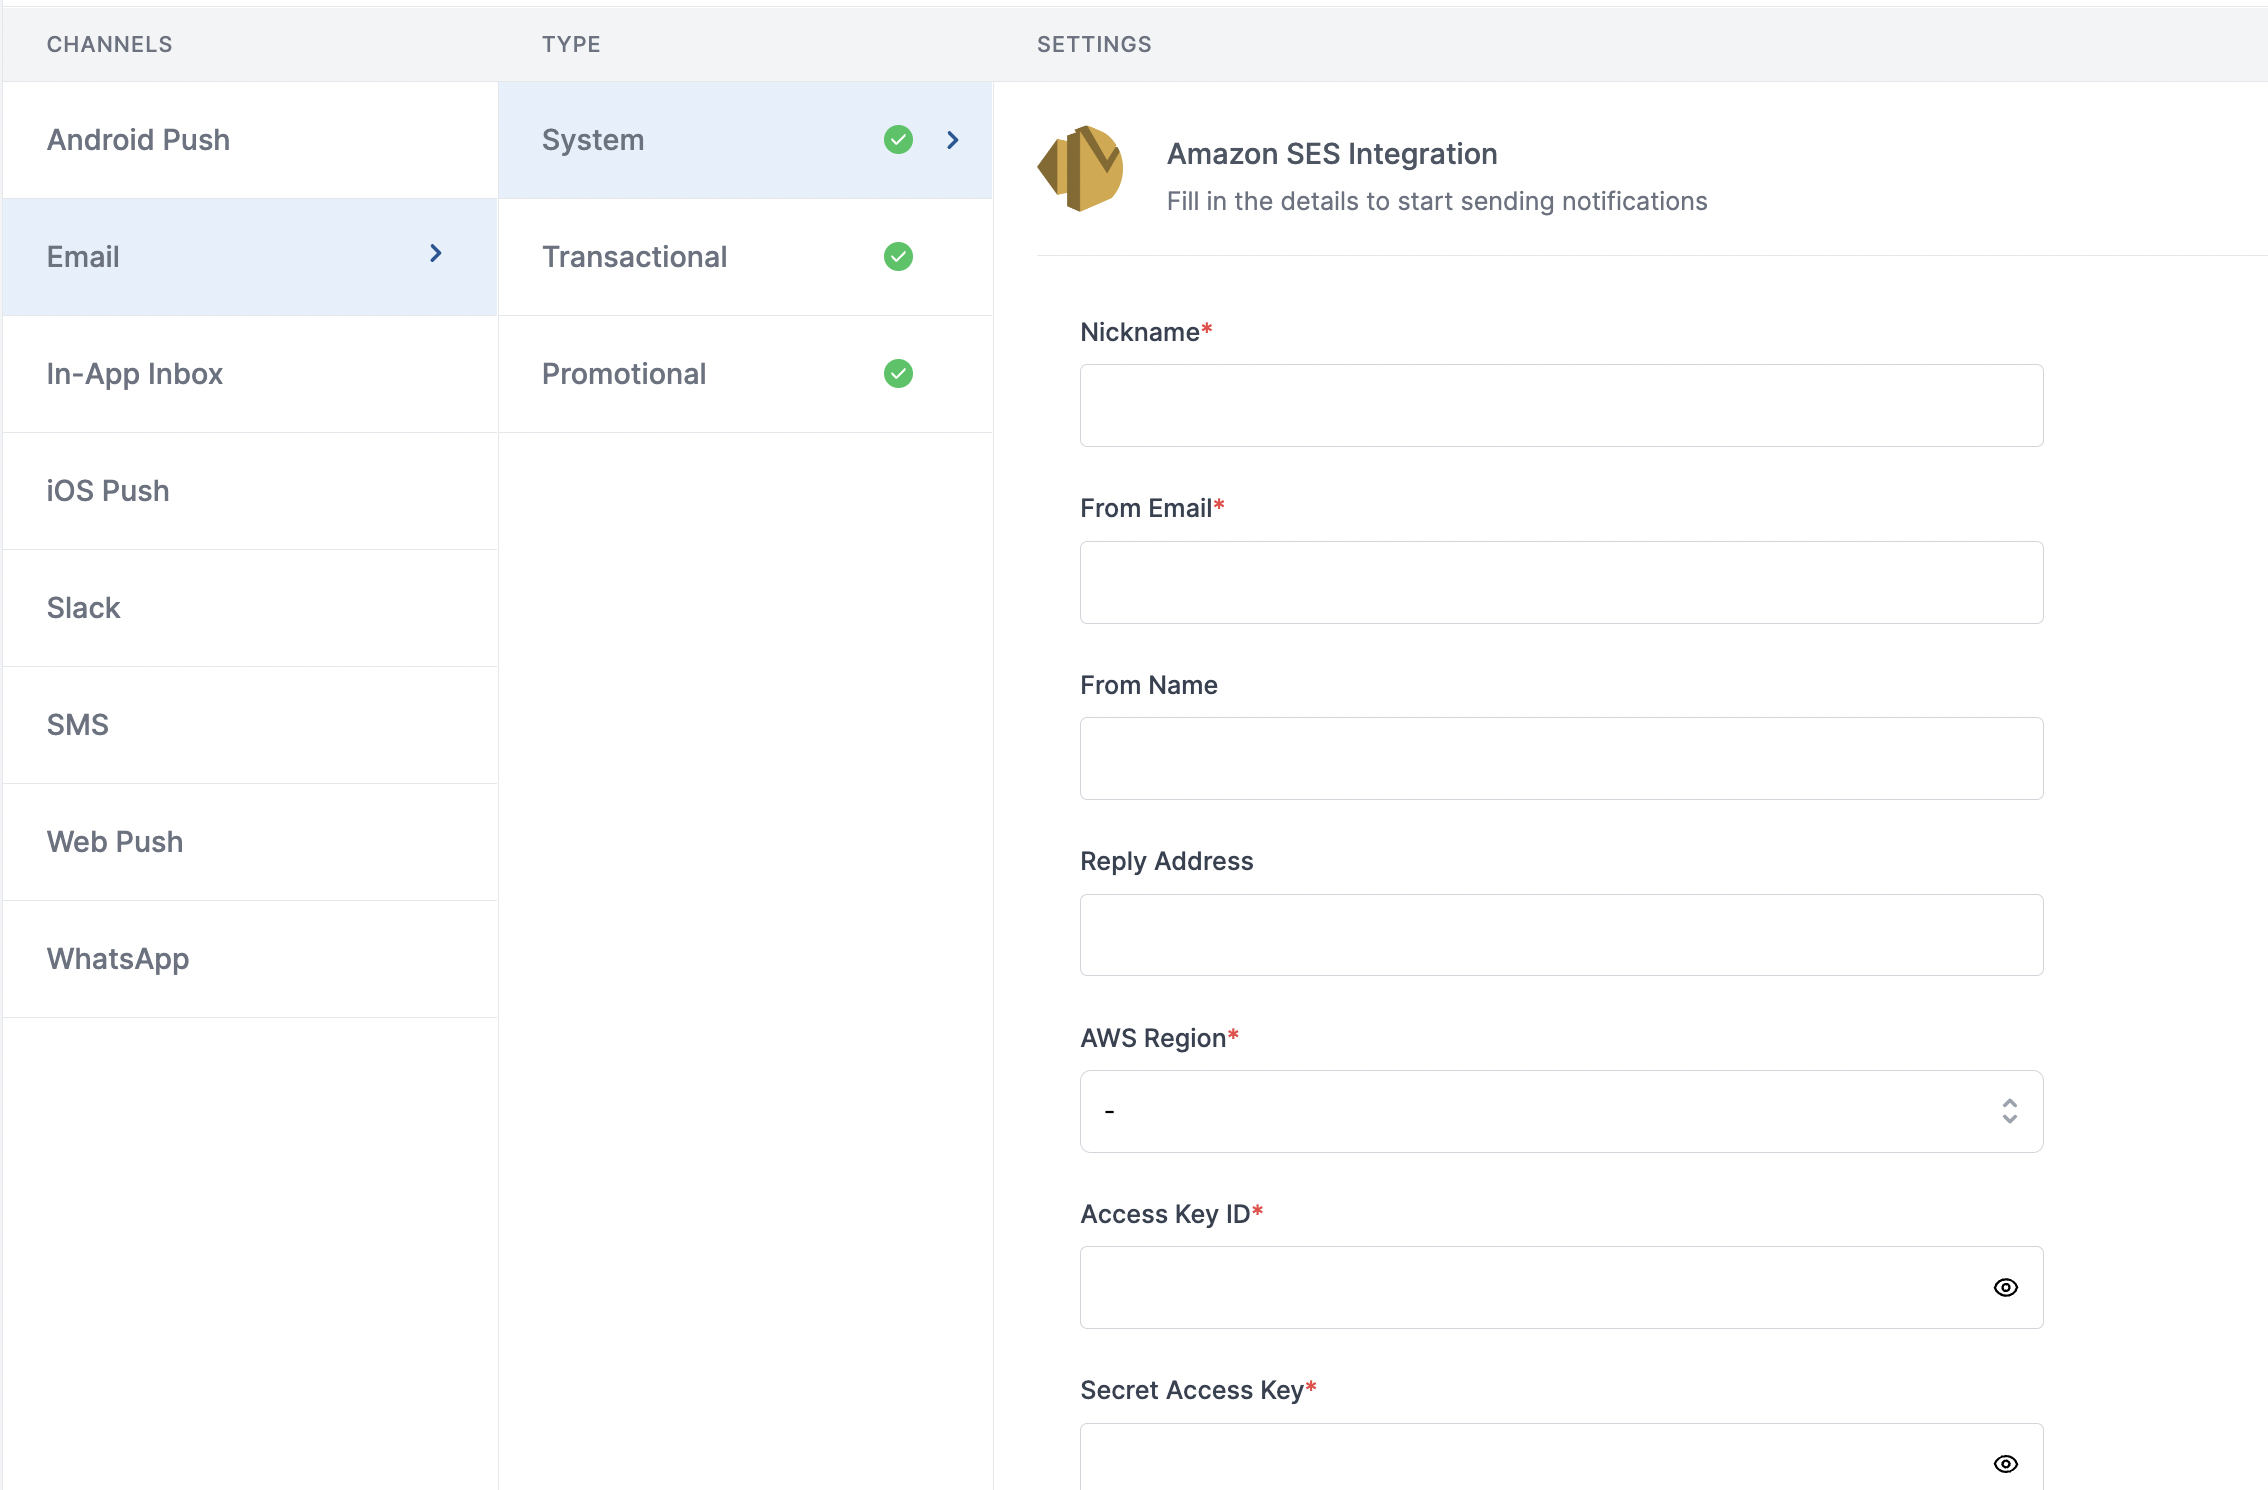 Here's a description on what each of these form fields describe:
| Form Field | Description |
| ---------------------- | ----------------------------------------------------------------------------------------------------------------------------------------------------------------------------------------------------------------------------------------------------------------------------------------------------------------------------- |
| Nickname | You can give any name which may help you to identify this account easily. E.g. - *AWS SES \[Production]* |
| From Email | Default 'From Email ID' that email will go from. You can override this in the individual template.\*e.g. [support@suprsend.com](mailto:support@suprsend.com) |
| From Name | Default 'From Name' that email will go from. You can override this in the individual template.*e.g. SuprSend* |
| Reply Address | Default 'Reply To Email id' on which replies are received. You can override this in the individual template.\*e.g. [support@suprsend.com](mailto:support@suprsend.com) |
| AWS region | aws-region you are going to use for sending emails. |
| Access Key ID | Access key ID of the IAM user with full access. [Refer step](/docs/amazon-ses#step-1-create-aws-iam-user) to create a new IAM user and generate access key. |
| Secret Access Key | `Secret-Access-Key` of the IAM user with full access. [Refer step](/docs/amazon-ses#step-1-create-aws-iam-user) to create a new IAM user and generate access key. |
| Configuration Set | Configuration-set is used to track email events (e.g. send, delivery, open, click, bounce, complaint etc.). [Refer Step](/docs/amazon-ses#step-3-create-configuration-set) to define configuration set. |
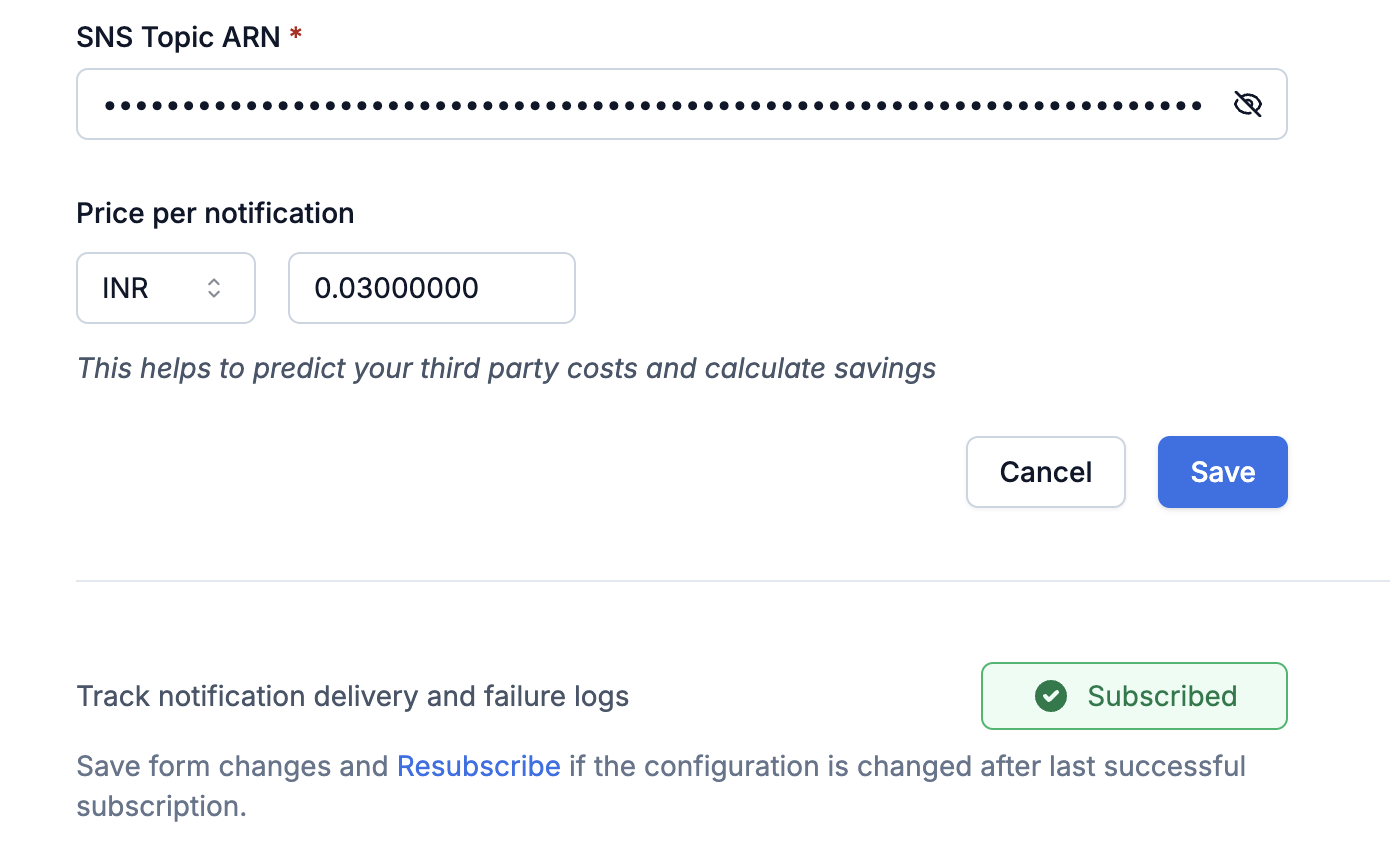
| SNS Topic ARN | This is the destination where the tracked events will be sent. Configuration set defines what events to be tracked and setting the topic allows SuprSend to receive these events. [Follow step 4 & 5](/docs/amazon-ses#step-4-manange-event-destinations) to setup SNS topic and give SuprSend permission to subscribe to it. |
| Price per notification | This is the amount you pay per email notification to AWS. It helps us to calculate, estimate and optimise your cost spent on notifications. |
Here's a description on what each of these form fields describe:
| Form Field | Description |
| ---------------------- | ----------------------------------------------------------------------------------------------------------------------------------------------------------------------------------------------------------------------------------------------------------------------------------------------------------------------------- |
| Nickname | You can give any name which may help you to identify this account easily. E.g. - *AWS SES \[Production]* |
| From Email | Default 'From Email ID' that email will go from. You can override this in the individual template.\*e.g. [support@suprsend.com](mailto:support@suprsend.com) |
| From Name | Default 'From Name' that email will go from. You can override this in the individual template.*e.g. SuprSend* |
| Reply Address | Default 'Reply To Email id' on which replies are received. You can override this in the individual template.\*e.g. [support@suprsend.com](mailto:support@suprsend.com) |
| AWS region | aws-region you are going to use for sending emails. |
| Access Key ID | Access key ID of the IAM user with full access. [Refer step](/docs/amazon-ses#step-1-create-aws-iam-user) to create a new IAM user and generate access key. |
| Secret Access Key | `Secret-Access-Key` of the IAM user with full access. [Refer step](/docs/amazon-ses#step-1-create-aws-iam-user) to create a new IAM user and generate access key. |
| Configuration Set | Configuration-set is used to track email events (e.g. send, delivery, open, click, bounce, complaint etc.). [Refer Step](/docs/amazon-ses#step-3-create-configuration-set) to define configuration set. |
| SNS Topic ARN | This is the destination where the tracked events will be sent. Configuration set defines what events to be tracked and setting the topic allows SuprSend to receive these events. [Follow step 4 & 5](/docs/amazon-ses#step-4-manange-event-destinations) to setup SNS topic and give SuprSend permission to subscribe to it. |
| Price per notification | This is the amount you pay per email notification to AWS. It helps us to calculate, estimate and optimise your cost spent on notifications. |
 ## How to add Unsubscription link in email
It's recommended to allow recipients to unsubscribe from emails. You can use SuprSend’s [hosted preference page](/docs/user-preferences#hosted-preference-page) for giving granular control to your users, allowing them to manage preferences per category while also reducing unnecessary vendor API calls for opt-outs.
**Why it's important to give unsubscribe option in email?**
First, it is required by the [CAN-Spam Act](https://www.ftc.gov/business-guidance/resources/can-spam-act-compliance-guide-business). Second, if you don’t give them this option, they are more likely to click on the spam complaint button, which will cause more harm than allowing them to unsubscribe. Finally, many ESPs look for unsubscribe links and are more likely to filter your email if they don’t have them.
# Amazon S3
Source: https://docs.suprsend.com/docs/amazon_s3
Guide to export notification data & templates from SuprSend to Amazon S3 bucket.
## Overview
SuprSend offers two types of connectors:
* **Source**: Connects event and user data from third-party platforms into SuprSend
* **Destination**: Syncs data (message templates, notification metrics) from SuprSend to your data warehouse
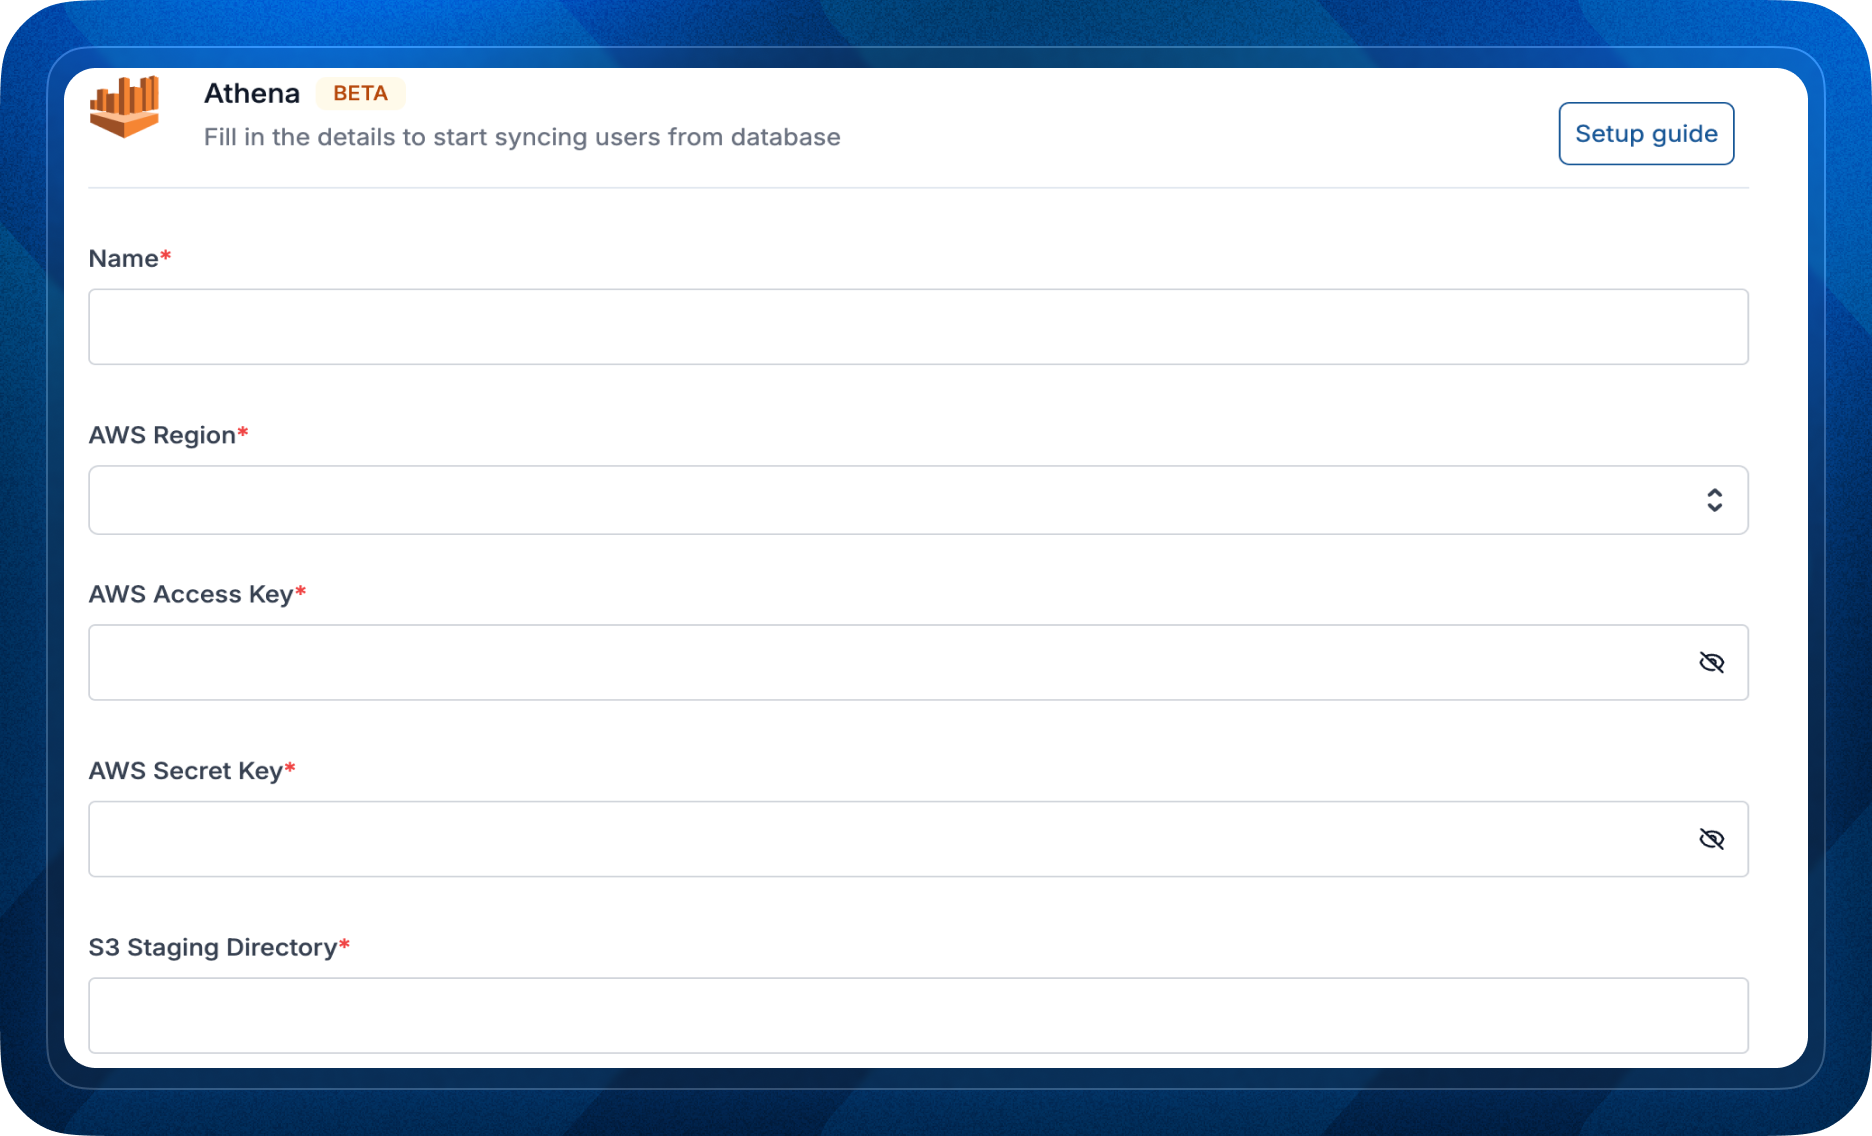
Amazon S3 is a destination used to ingest data from SuprSend into your S3 bucket. You can directly query on this data using Athena or import it to data warehouses like Redshift, Snowflake, ClickHouse etc. for analysis.
## How it works?
This integration exports individual [parquet](https://parquet.apache.org/) files for **notification data**, and JSON files for **message templates** to your S3 bucket at a regular interval. You can select what all `data points` you want to sync to your S3 bucket.
## How to add Unsubscription link in email
It's recommended to allow recipients to unsubscribe from emails. You can use SuprSend’s [hosted preference page](/docs/user-preferences#hosted-preference-page) for giving granular control to your users, allowing them to manage preferences per category while also reducing unnecessary vendor API calls for opt-outs.
**Why it's important to give unsubscribe option in email?**
First, it is required by the [CAN-Spam Act](https://www.ftc.gov/business-guidance/resources/can-spam-act-compliance-guide-business). Second, if you don’t give them this option, they are more likely to click on the spam complaint button, which will cause more harm than allowing them to unsubscribe. Finally, many ESPs look for unsubscribe links and are more likely to filter your email if they don’t have them.
# Amazon S3
Source: https://docs.suprsend.com/docs/amazon_s3
Guide to export notification data & templates from SuprSend to Amazon S3 bucket.
## Overview
SuprSend offers two types of connectors:
* **Source**: Connects event and user data from third-party platforms into SuprSend
* **Destination**: Syncs data (message templates, notification metrics) from SuprSend to your data warehouse
Amazon S3 is a destination used to ingest data from SuprSend into your S3 bucket. You can directly query on this data using Athena or import it to data warehouses like Redshift, Snowflake, ClickHouse etc. for analysis.
## How it works?
This integration exports individual [parquet](https://parquet.apache.org/) files for **notification data**, and JSON files for **message templates** to your S3 bucket at a regular interval. You can select what all `data points` you want to sync to your S3 bucket.
 The sync happens every 3-5 minutes, ensuring that you always have the latest data in your S3 bucket. For notifications, there will be a separate parquet file for each day.
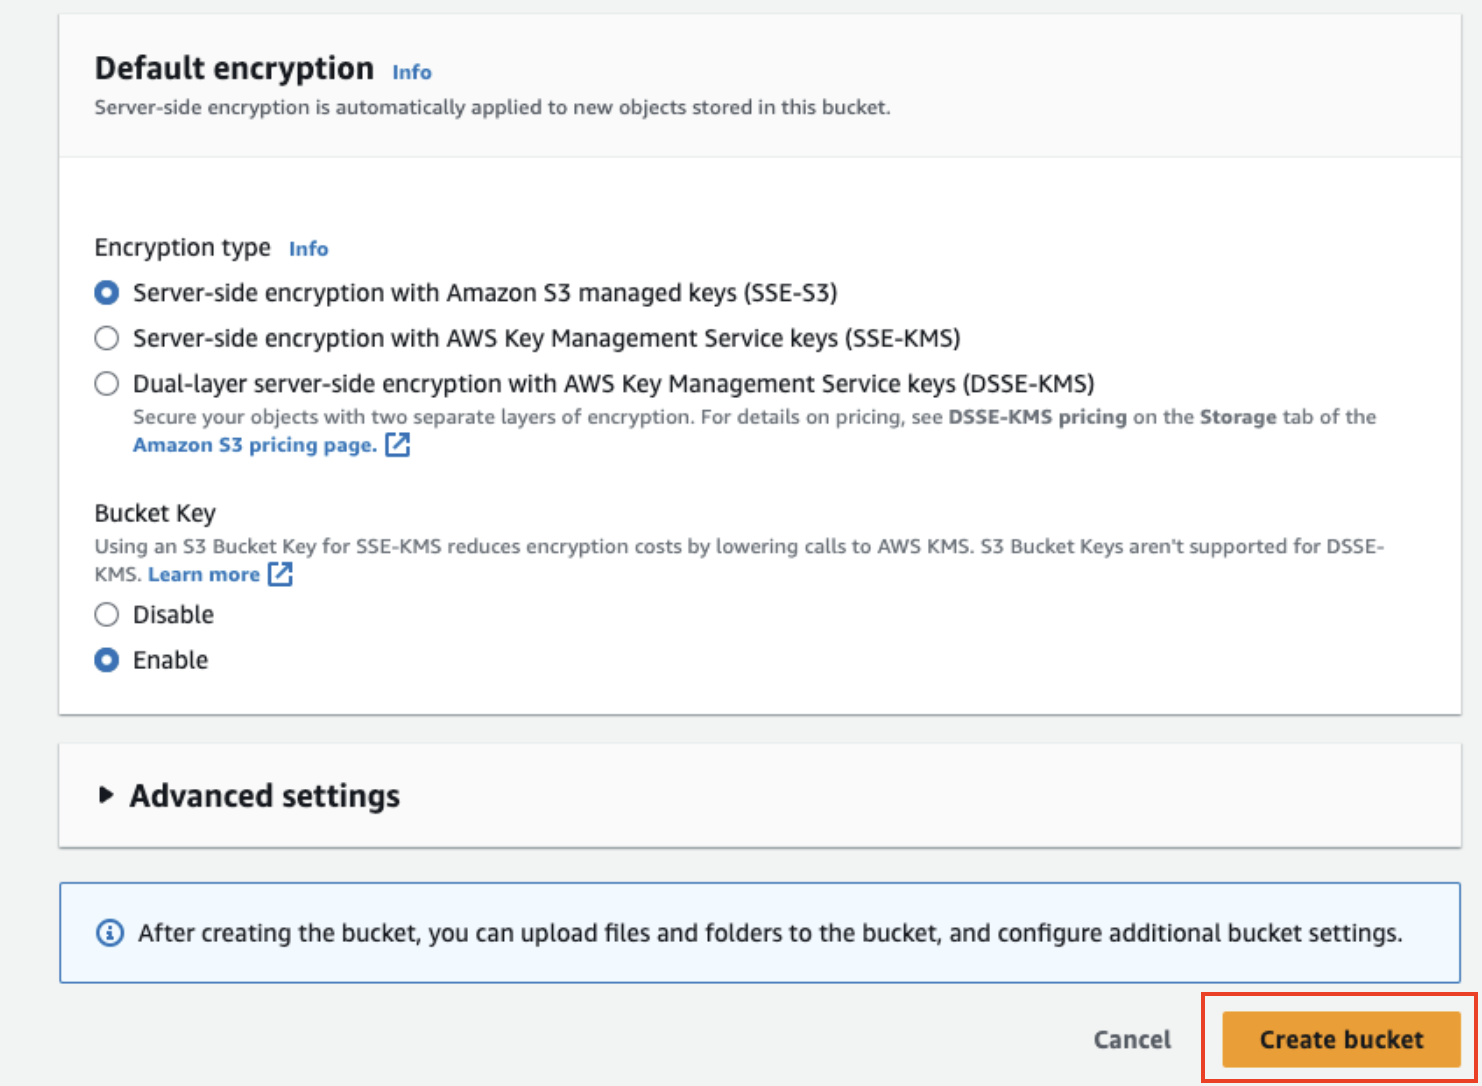
 3. Configure bucket settings:
* Bucket name: e.g. `suprsend-notification`
* Region: Choose your preferred region
* Object Ownership: **ACLs disabled** (recommended)
* Block all public access: **Enabled**
* Bucket versioning: **Disabled**
* Default encryption: Server-side encryption with Amazon S3 managed keys (SSE-S3)
* Bucket Key: **Enabled**
4. Click "Create bucket"
3. Configure bucket settings:
* Bucket name: e.g. `suprsend-notification`
* Region: Choose your preferred region
* Object Ownership: **ACLs disabled** (recommended)
* Block all public access: **Enabled**
* Bucket versioning: **Disabled**
* Default encryption: Server-side encryption with Amazon S3 managed keys (SSE-S3)
* Bucket Key: **Enabled**
4. Click "Create bucket"
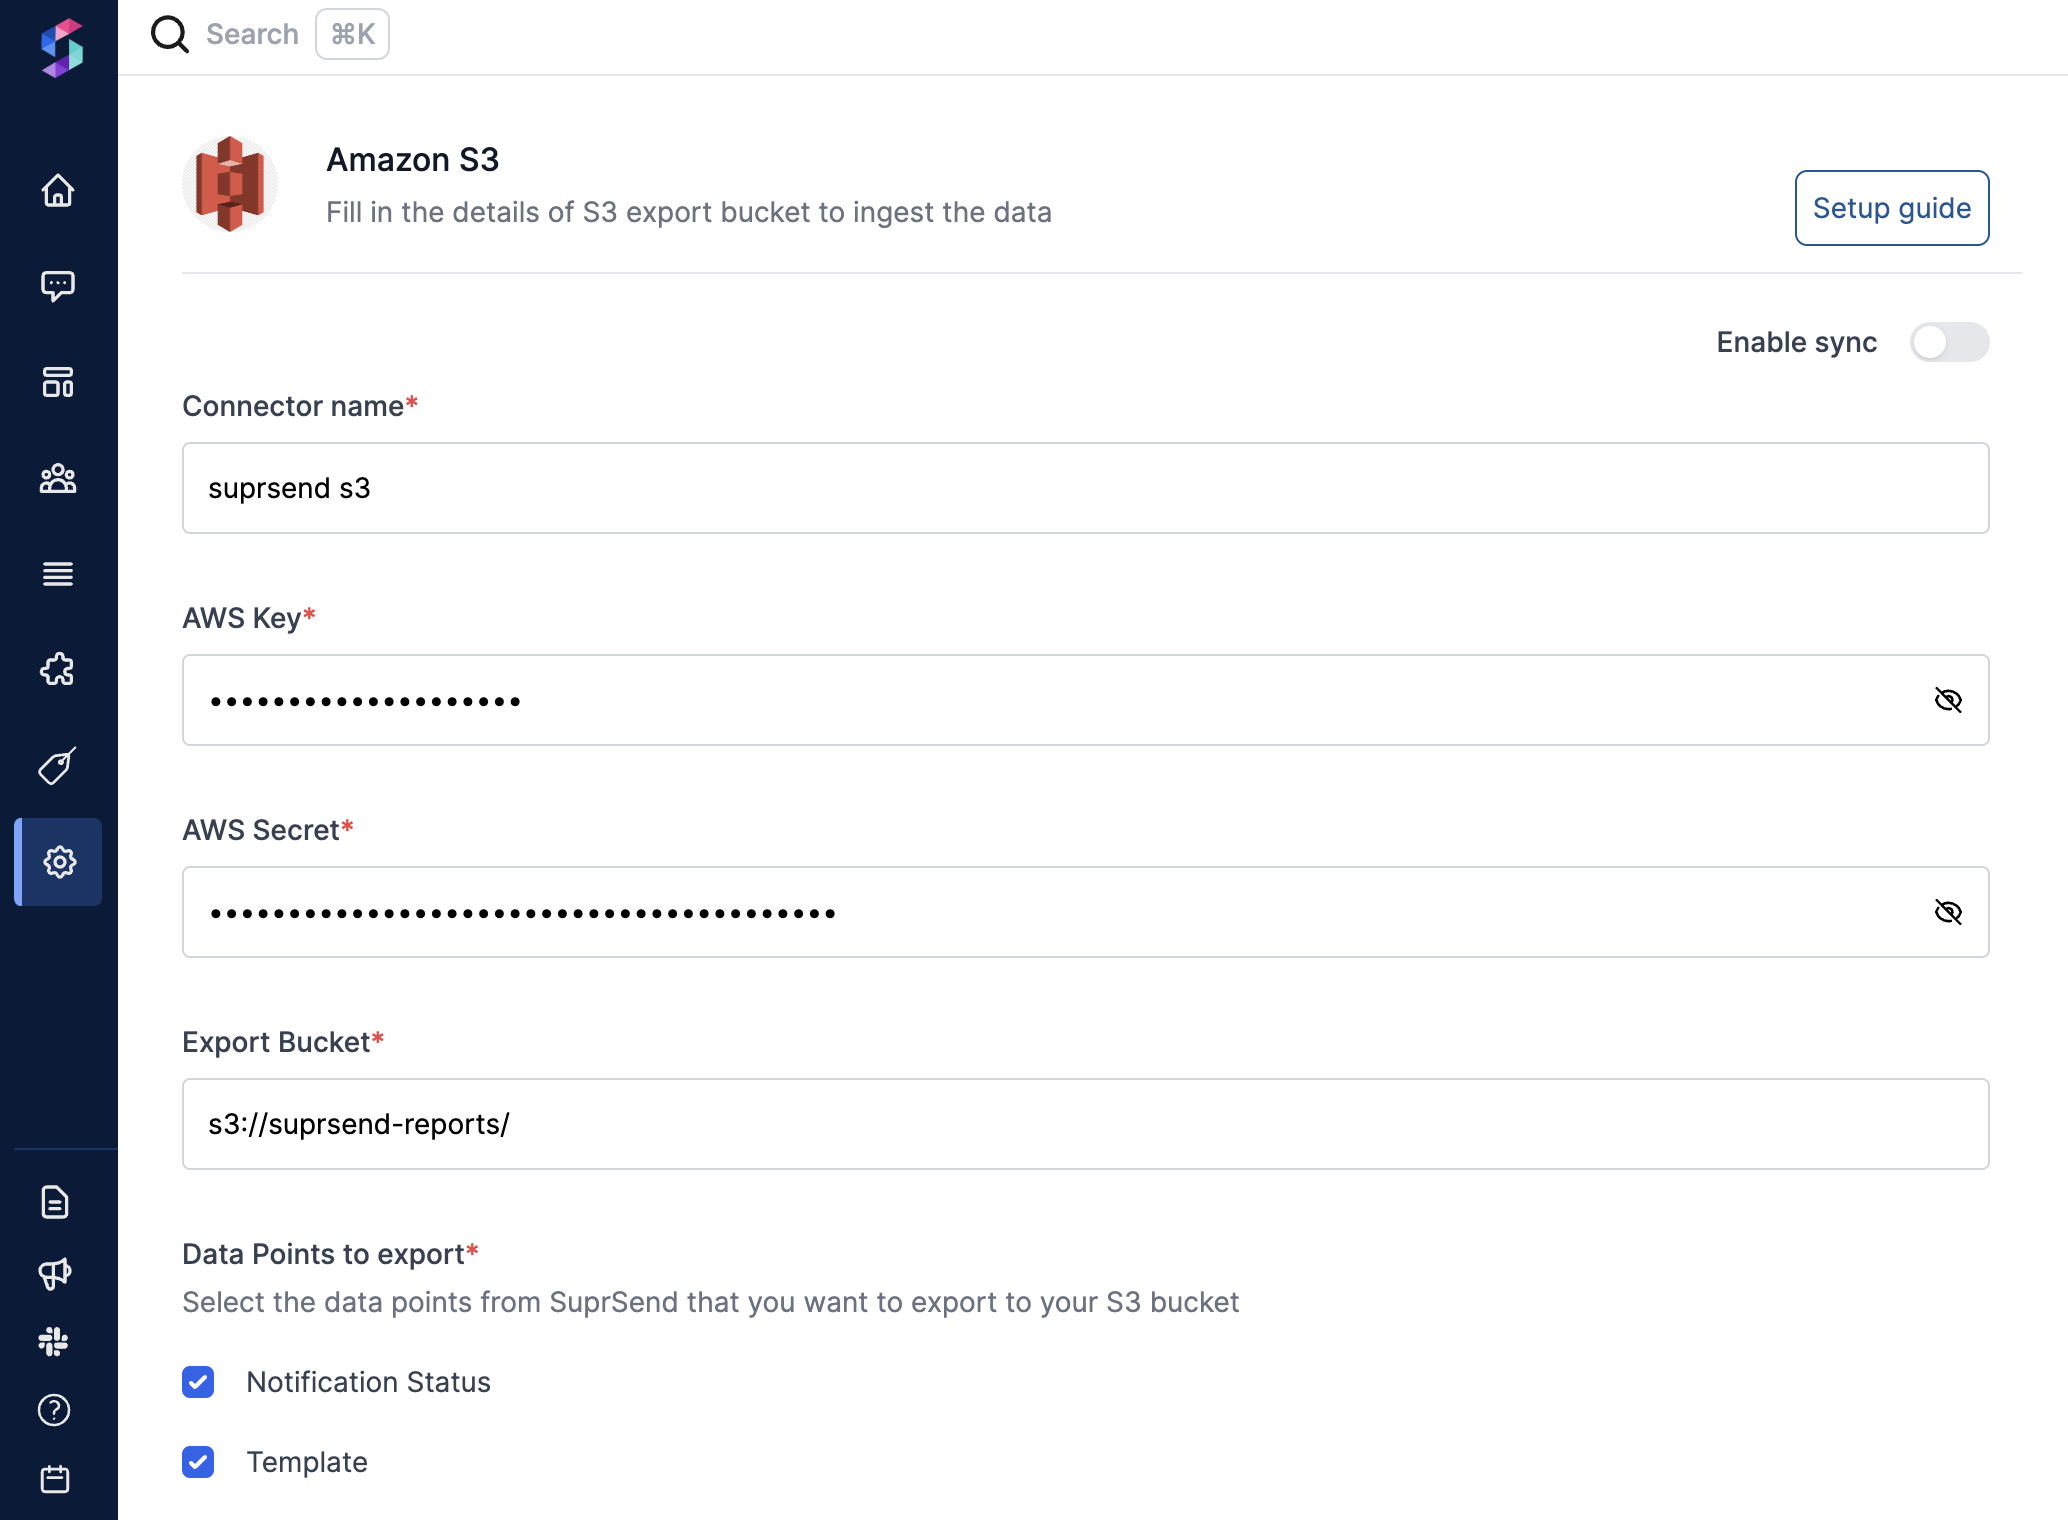 Go to **Settings → Connectors → Amazon S3** and fill in required information.
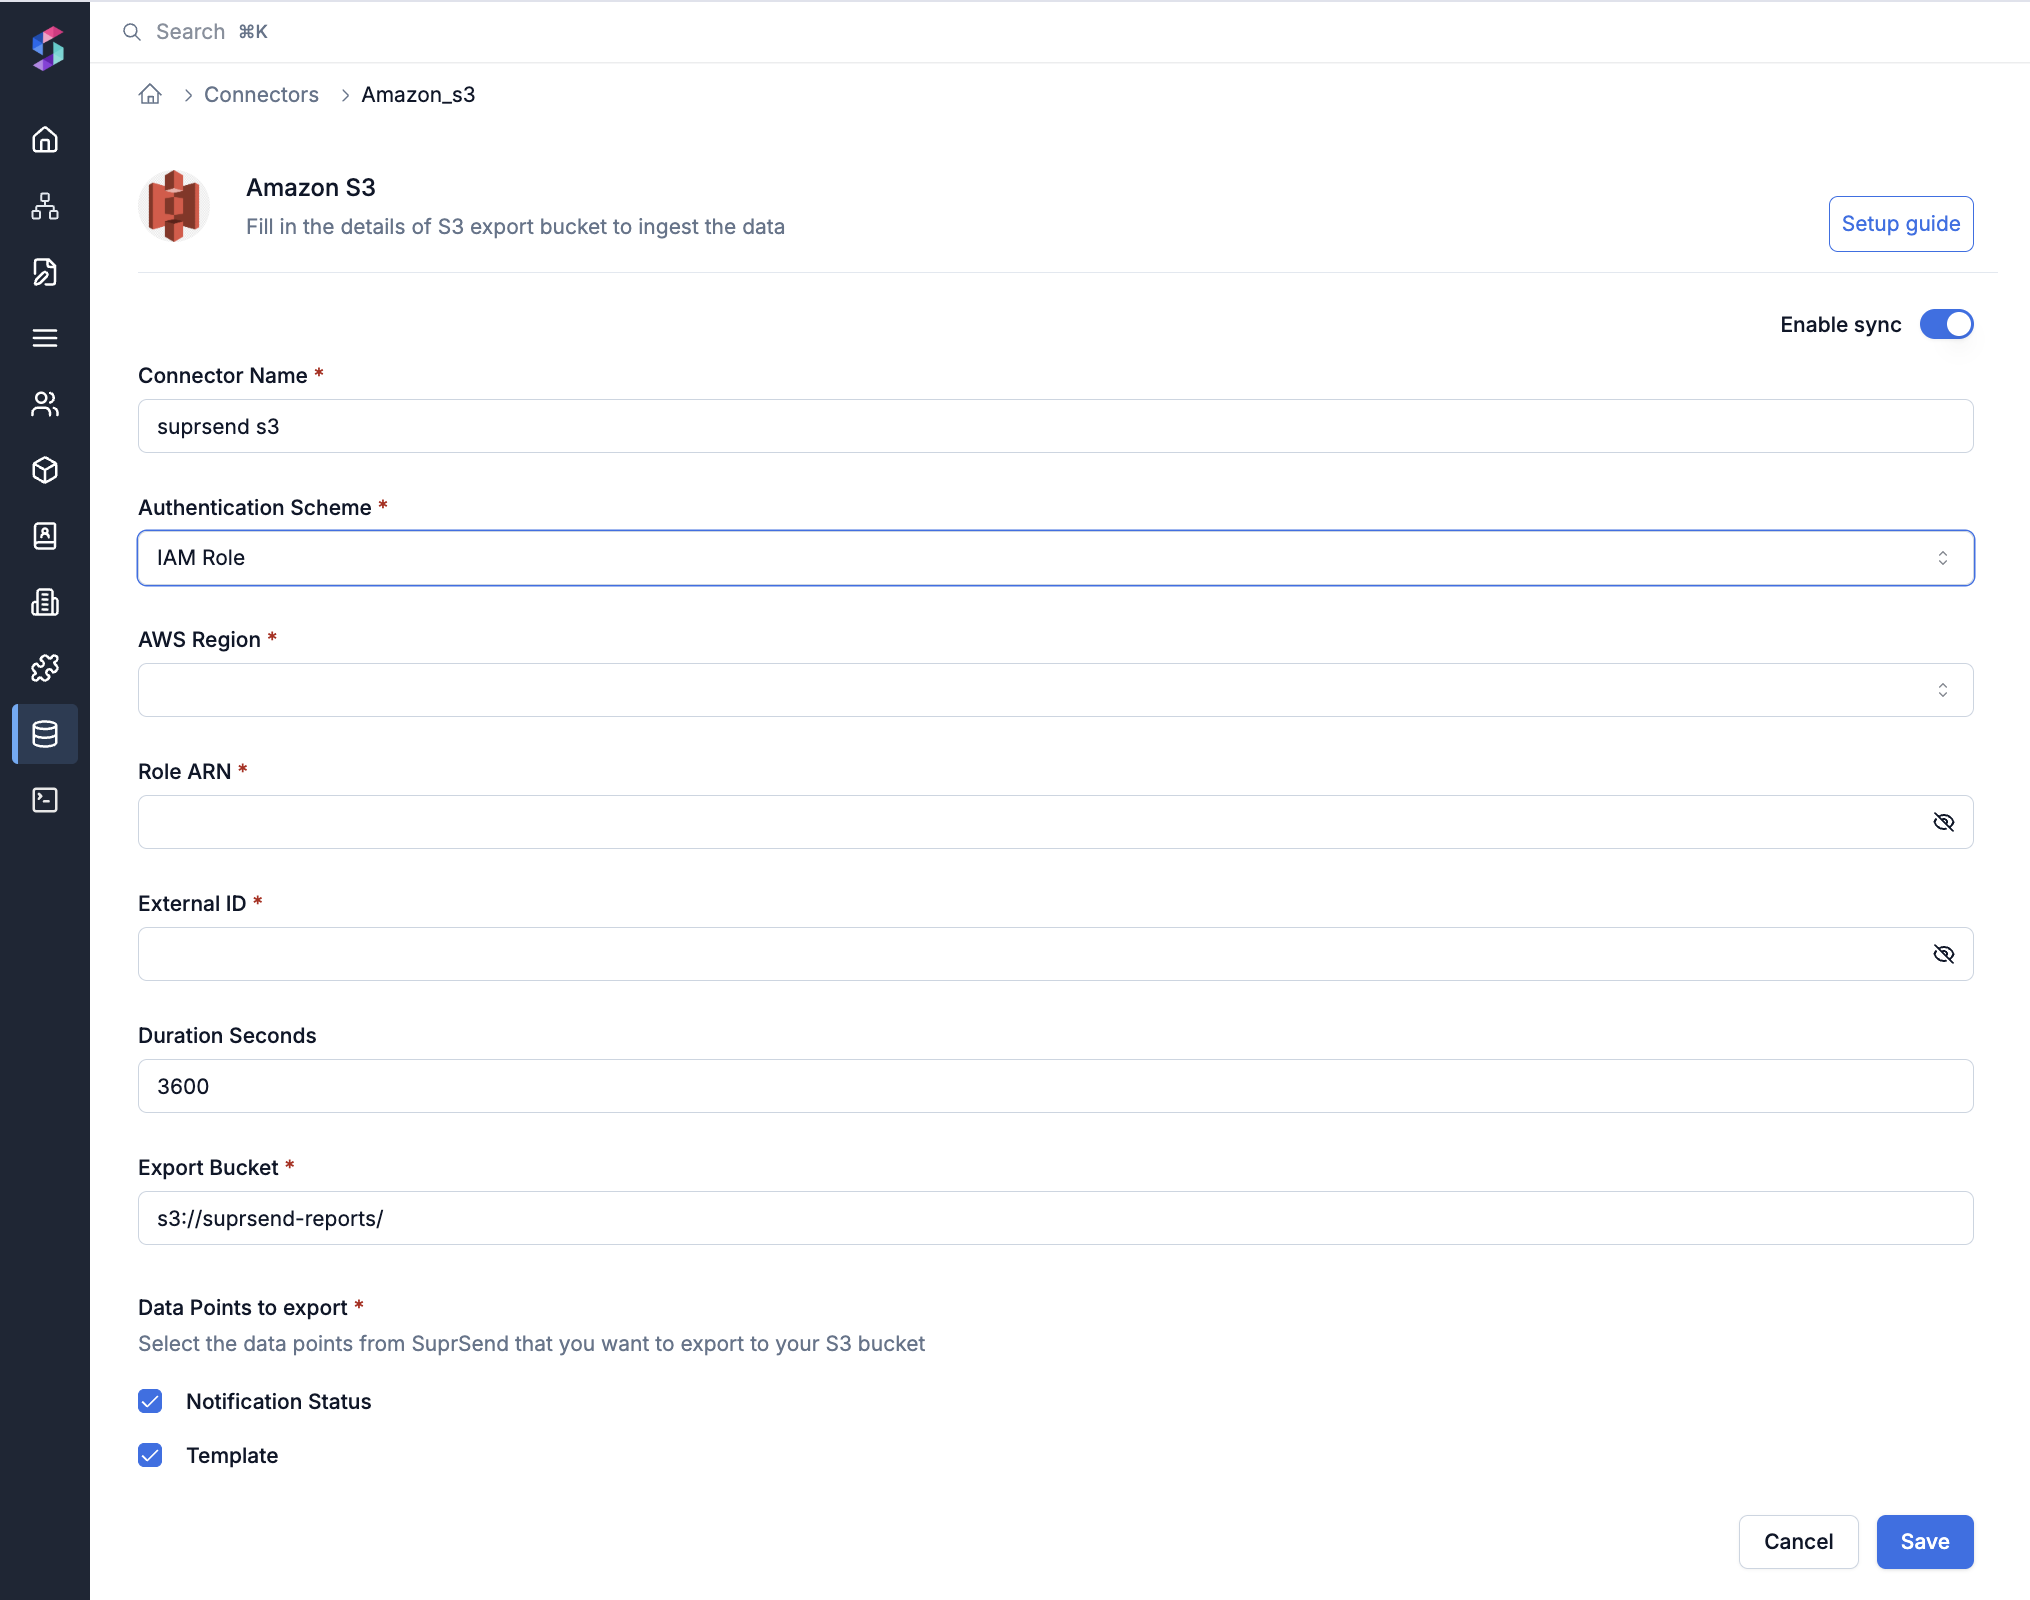
* **In case of IAM Role:**
Go to **Settings → Connectors → Amazon S3** and fill in required information.
* **In case of IAM Role:**
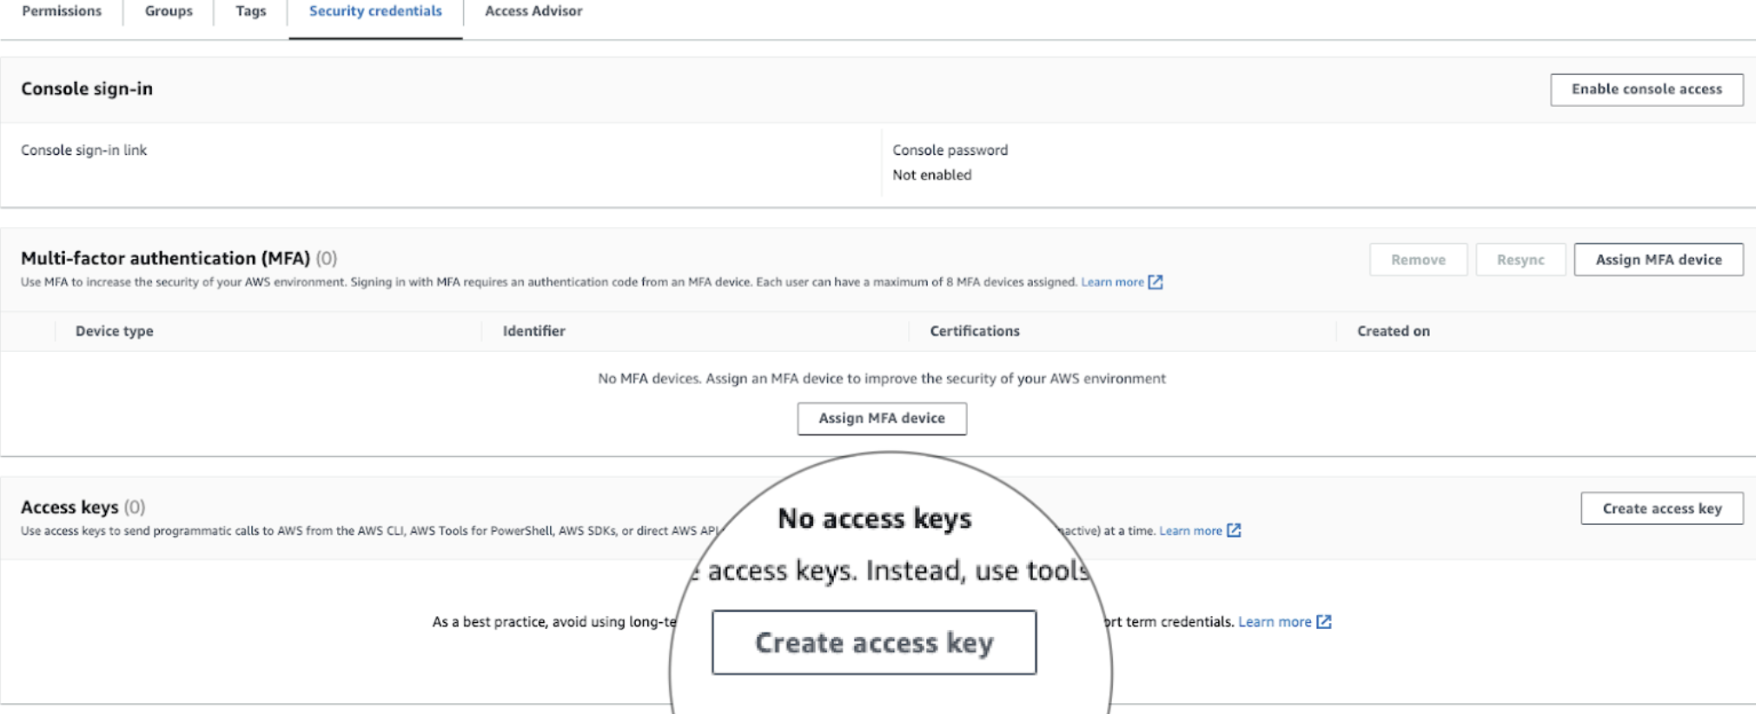
 * **In case of IAM User:**
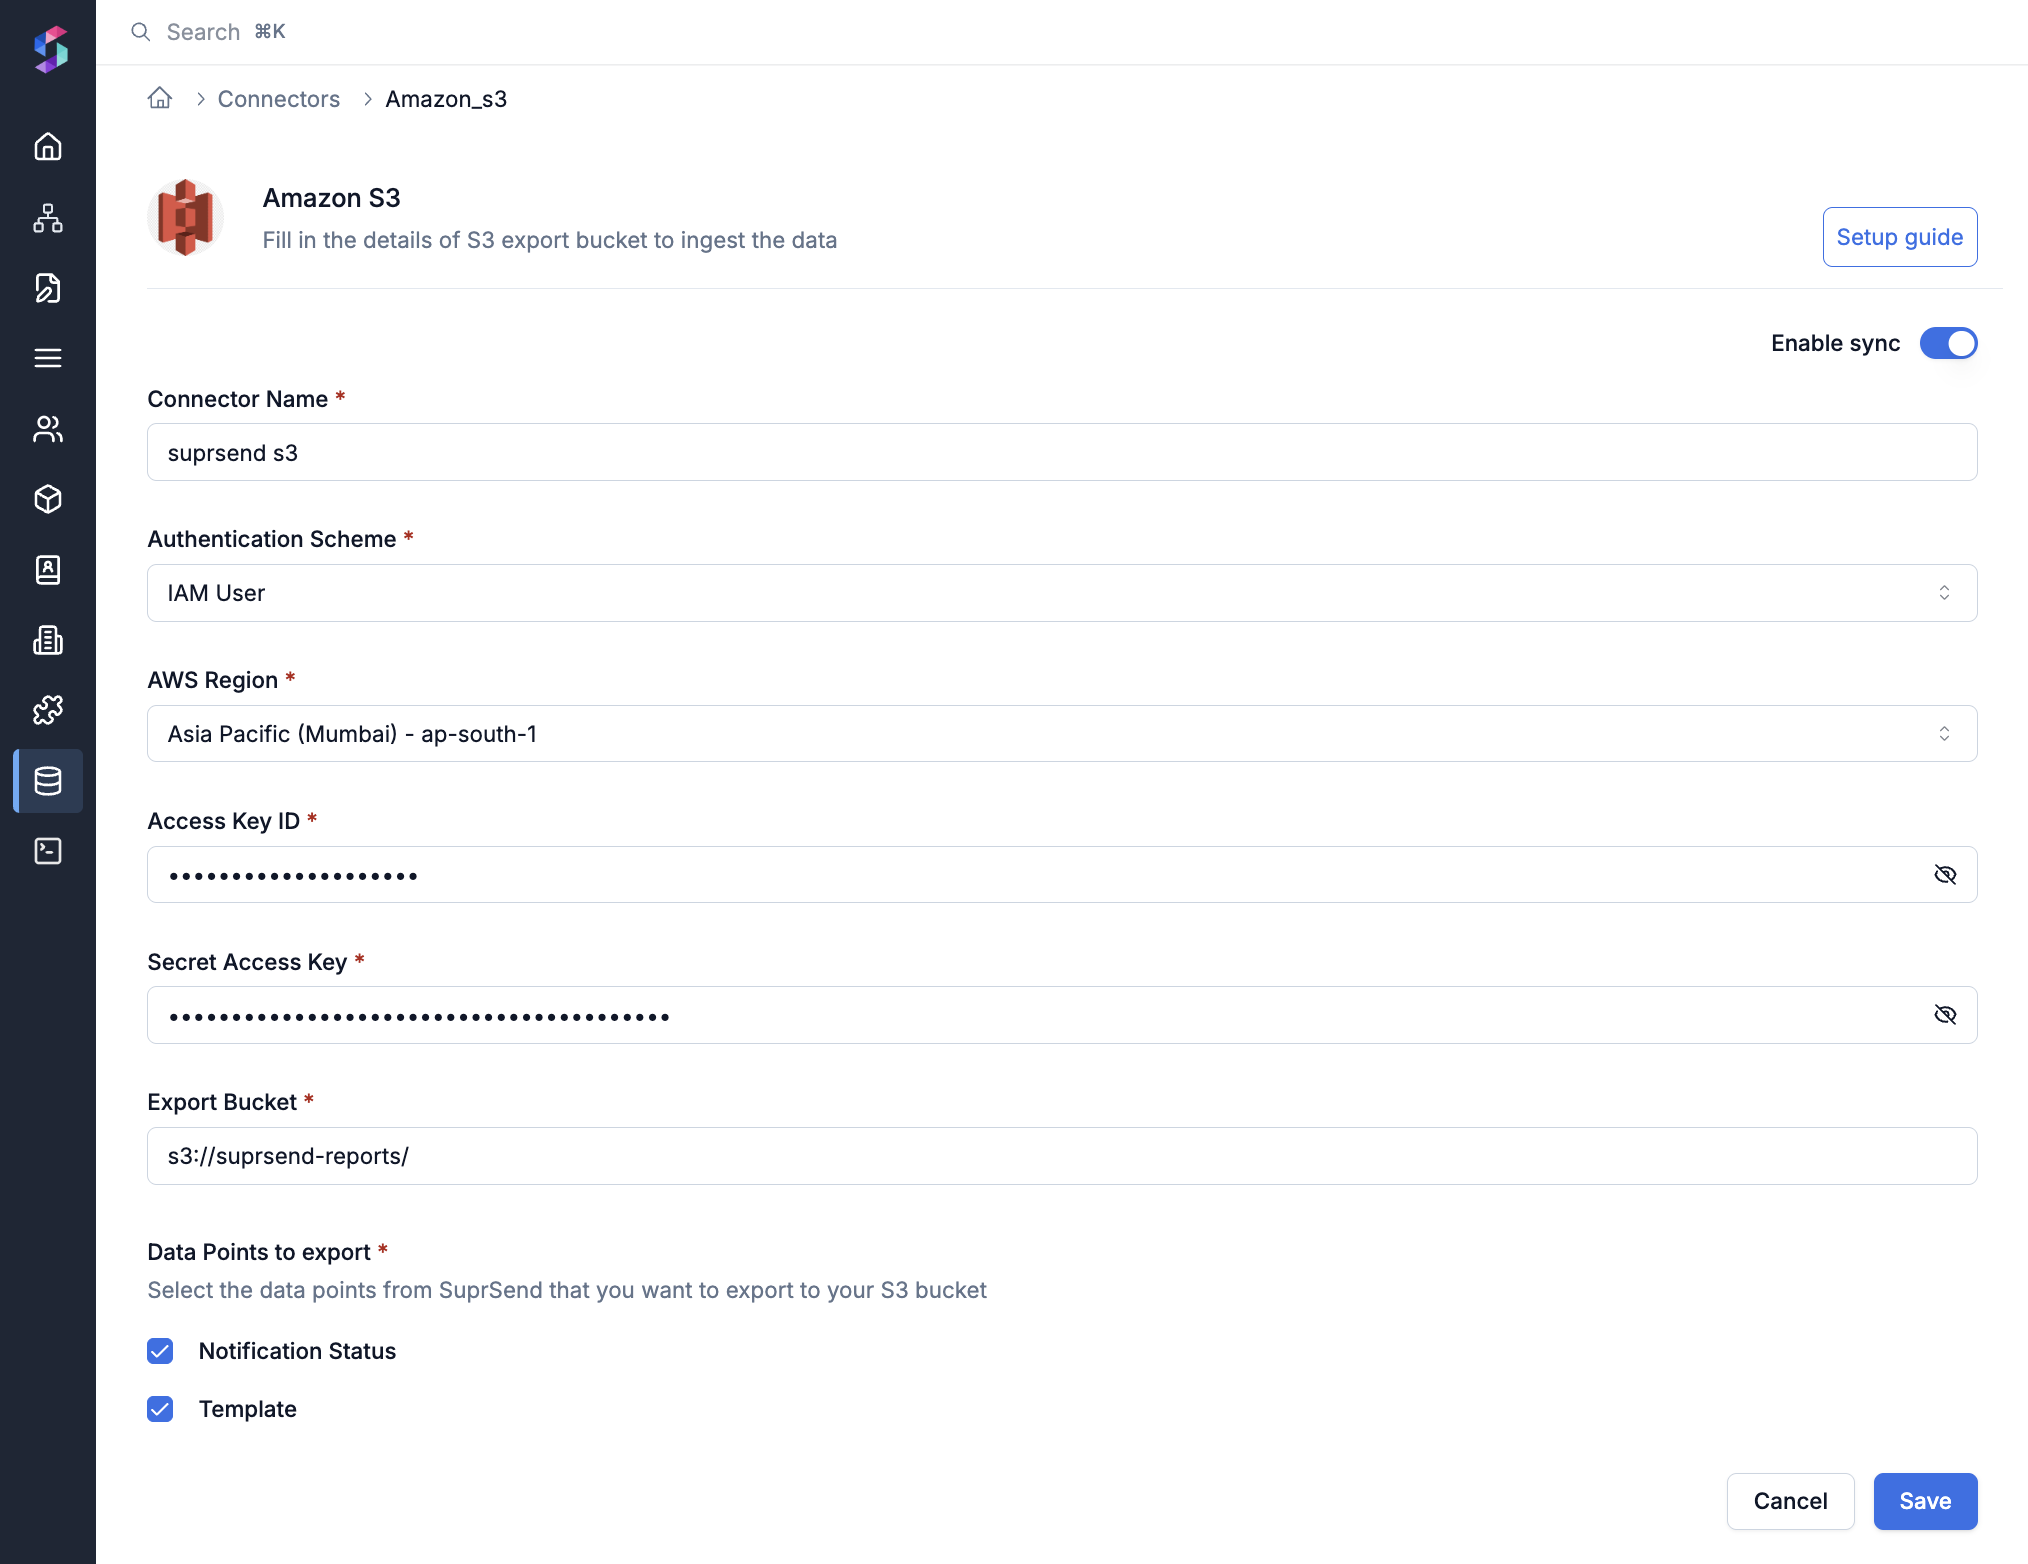 | Form Field | Description |
| --------------------------- | --------------------------------------------------------------------------------------------------------------------------------------------------------------------------------------------------------------------------------------------------------------------------------------------------------------------------------------------------------------------------------------------------------------------------------------------------- |
| **Connector name**\* | This name is identify the connector and is for your reference |
| **Authentication Scheme**\* | Select whether to use IAM Role or IAM User for authentication. |
| **AWS Region**\* | Choose the AWS Region where your S3 bucket is hosted (for e.g.: `us-east-1`, `ap-south-1`, or `eu-west-2`) |
| **Role ARN**\* | The Amazon Resource Name (ARN) of the IAM Role that grants access to the S3 bucket. |
| **External ID**\* | The unique External ID you configured in the IAM Role’s trust policy for SuprSend. This provides an extra layer of security when SuprSend assumes the role. |
| **Duration Seconds** | The amount of time (in seconds) SuprSend can assume the IAM Role for each session (e.g. 3600 = one hour). Leave it at the default unless you have specific session duration requirements. |
| **Access Key ID**\* | This is the access key ID linked to the IAM user. Refer step 4 for steps to create access key |
| **Secret Access Key**\* | This is the secret access linked to the IAM user. Refer step 4 for steps to get secret access |
| **Export Bucket**\* | Name of the S3 bucket where the parquet files should be exported. Refer step 1 to create an export bucket |
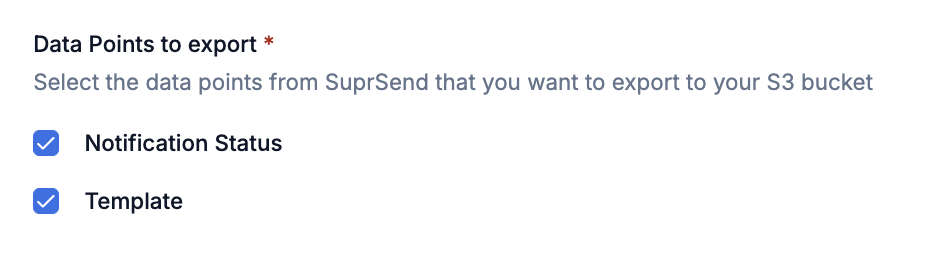
| **Data Points to export**\* | Here you can choose what all information should be exported to your S3 bucket: **Notifications Status**- To sync details to the each notification- users, tenants, vendor, channel, DLR status of the notification (delivery, seen, click etc.), and failure reasons for failed notifications **Template**- To sync all templates created in SuprSend in your S3 bucket. Template sync will happen every time you are making change in the template |
Your S3 setup is now complete. Click on **`Enable sync`** to start data export. You can pause and resume your sync anytime you want. To Pause sync for certain data points, deselect the ones not needed from "Data Points to export" and save the changes.
You can also disable your entire sync by disabling the `Enable sync` button, in which case we’ll stop the export. When you enable your sync again, we send all of your historical data as if you’re starting a new integration.
***
# Manage Users
Source: https://docs.suprsend.com/docs/android-create-user
Android SDK Methods to create user and set their android push token and other communication channels for sending notifications.
## How Suprsend identifies a user
SuprSend identifies users with immutable `distinct_id`. It's best to map the same identifier in your DB with `distinct_id` in SuprSend. Do not use identifiers that can be changed like email or phone number. You can view synced users by searching `distinct_id` on [Users page](https://app.suprsend.com/en/production/users).
## Identify user and Set Push token
| Form Field | Description |
| --------------------------- | --------------------------------------------------------------------------------------------------------------------------------------------------------------------------------------------------------------------------------------------------------------------------------------------------------------------------------------------------------------------------------------------------------------------------------------------------- |
| **Connector name**\* | This name is identify the connector and is for your reference |
| **Authentication Scheme**\* | Select whether to use IAM Role or IAM User for authentication. |
| **AWS Region**\* | Choose the AWS Region where your S3 bucket is hosted (for e.g.: `us-east-1`, `ap-south-1`, or `eu-west-2`) |
| **Role ARN**\* | The Amazon Resource Name (ARN) of the IAM Role that grants access to the S3 bucket. |
| **External ID**\* | The unique External ID you configured in the IAM Role’s trust policy for SuprSend. This provides an extra layer of security when SuprSend assumes the role. |
| **Duration Seconds** | The amount of time (in seconds) SuprSend can assume the IAM Role for each session (e.g. 3600 = one hour). Leave it at the default unless you have specific session duration requirements. |
| **Access Key ID**\* | This is the access key ID linked to the IAM user. Refer step 4 for steps to create access key |
| **Secret Access Key**\* | This is the secret access linked to the IAM user. Refer step 4 for steps to get secret access |
| **Export Bucket**\* | Name of the S3 bucket where the parquet files should be exported. Refer step 1 to create an export bucket |
| **Data Points to export**\* | Here you can choose what all information should be exported to your S3 bucket: **Notifications Status**- To sync details to the each notification- users, tenants, vendor, channel, DLR status of the notification (delivery, seen, click etc.), and failure reasons for failed notifications **Template**- To sync all templates created in SuprSend in your S3 bucket. Template sync will happen every time you are making change in the template |
Your S3 setup is now complete. Click on **`Enable sync`** to start data export. You can pause and resume your sync anytime you want. To Pause sync for certain data points, deselect the ones not needed from "Data Points to export" and save the changes.
You can also disable your entire sync by disabling the `Enable sync` button, in which case we’ll stop the export. When you enable your sync again, we send all of your historical data as if you’re starting a new integration.
***
# Manage Users
Source: https://docs.suprsend.com/docs/android-create-user
Android SDK Methods to create user and set their android push token and other communication channels for sending notifications.
## How Suprsend identifies a user
SuprSend identifies users with immutable `distinct_id`. It's best to map the same identifier in your DB with `distinct_id` in SuprSend. Do not use identifiers that can be changed like email or phone number. You can view synced users by searching `distinct_id` on [Users page](https://app.suprsend.com/en/production/users).
## Identify user and Set Push token
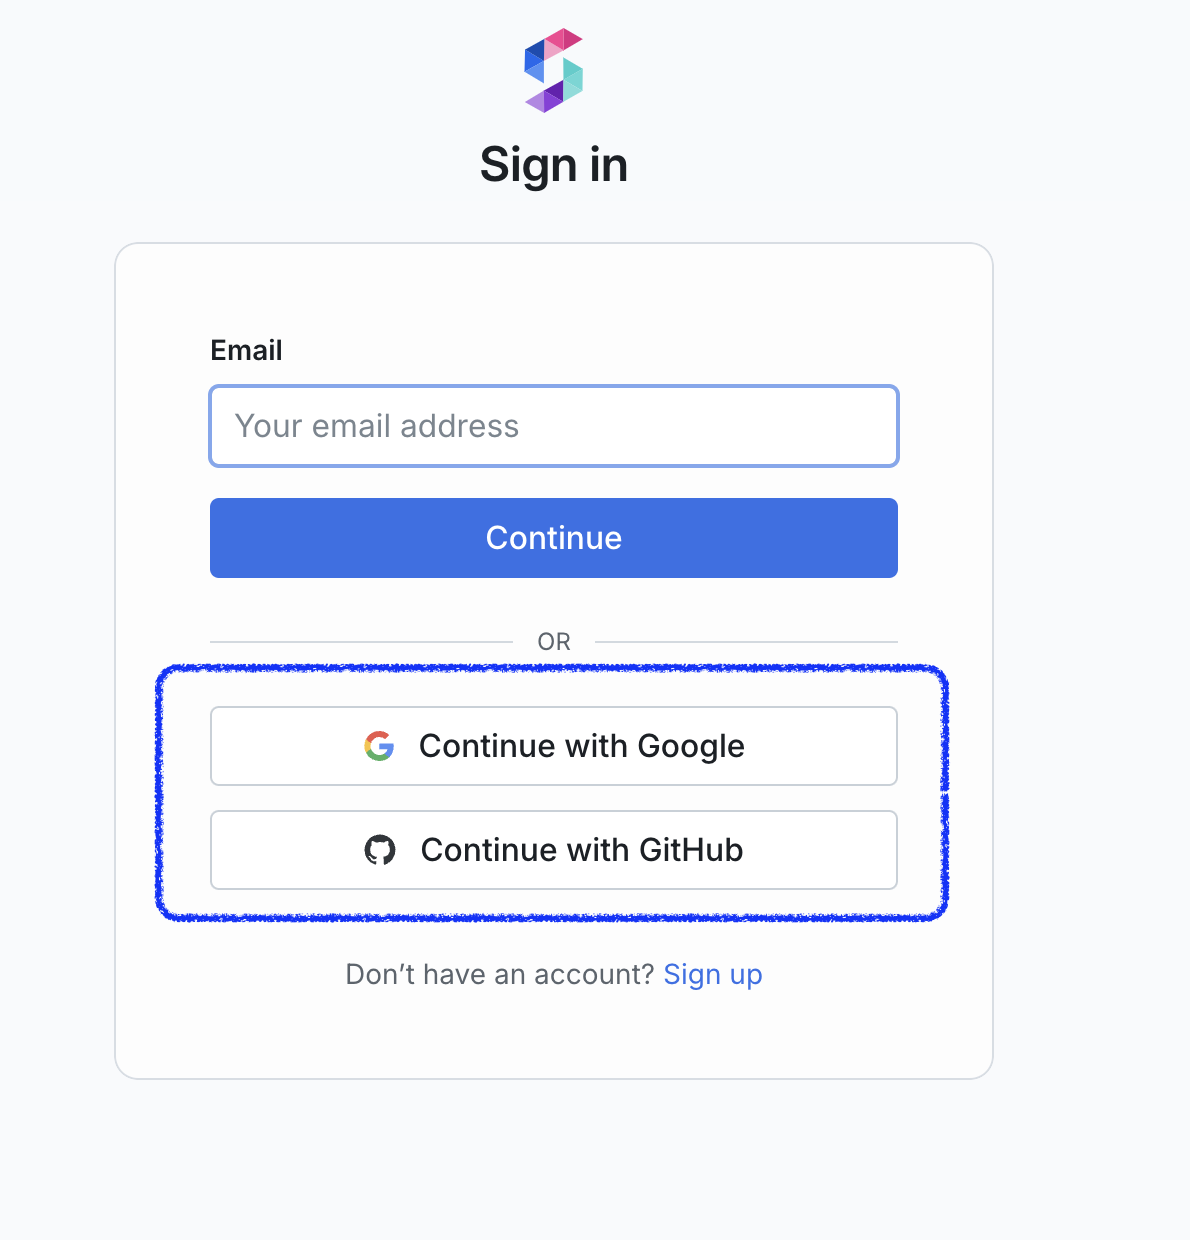
 ## Social Login (Google, GitHub SSO)
Users can login using their existing credentials with OAuth providers such as Google or GitHub.
## Social Login (Google, GitHub SSO)
Users can login using their existing credentials with OAuth providers such as Google or GitHub.
 ## SAML 2.0 SSO
This method enables users to authenticate using their corporate identity provider, such as Okta, to access their SuprSend account. Once SSO is enabled, all members are redirected through the identity provider's authentication flow for access.
## SAML 2.0 SSO
This method enables users to authenticate using their corporate identity provider, such as Okta, to access their SuprSend account. Once SSO is enabled, all members are redirected through the identity provider's authentication flow for access.
 ***
# AWS SNS
Source: https://docs.suprsend.com/docs/aws-sns-sms
Guide to integrate AWS SNS with SuprSend for SMS delivery.
## Pre-Requisites
You'll need a AWS account to complete this tutorial. You can use your existing AWS account to integrate, or [Create an AWS account](https://portal.aws.amazon.com/billing/signup)
## Amazon SNS integration on SuprSend account
Follow below steps to integrate your Amazon SNS account with SuprSend
### Step-1 : Create AWS IAM User
To send email through SNS, you need an IAM user (Access-Key-ID and Secret-Access-Key) with necessary permission. To create an IAM user, refer to this [documentation](https://docs.aws.amazon.com/IAM/latest/UserGuide/id_users_create.html)
* Create an IAM user (with Programmatic access).
* Attach Policy`AmazonSNSFullAccess`to this user.
* Copy and save the`Access-key-ID`and`Secret-Access-Key`securely. You'll need to add this information on SuprSend vendor integration page
An AWS SNS resource resides in a particular region. Make a note of which aws-region you are going to use for sending SMS. In this guide, we'll assume aws-region :`ap-south-1` for all illustrative purposes.
### Step-2 : Add phone number in your SNS account
Before moving into configuration steps, here are a few other things to keep in mind:
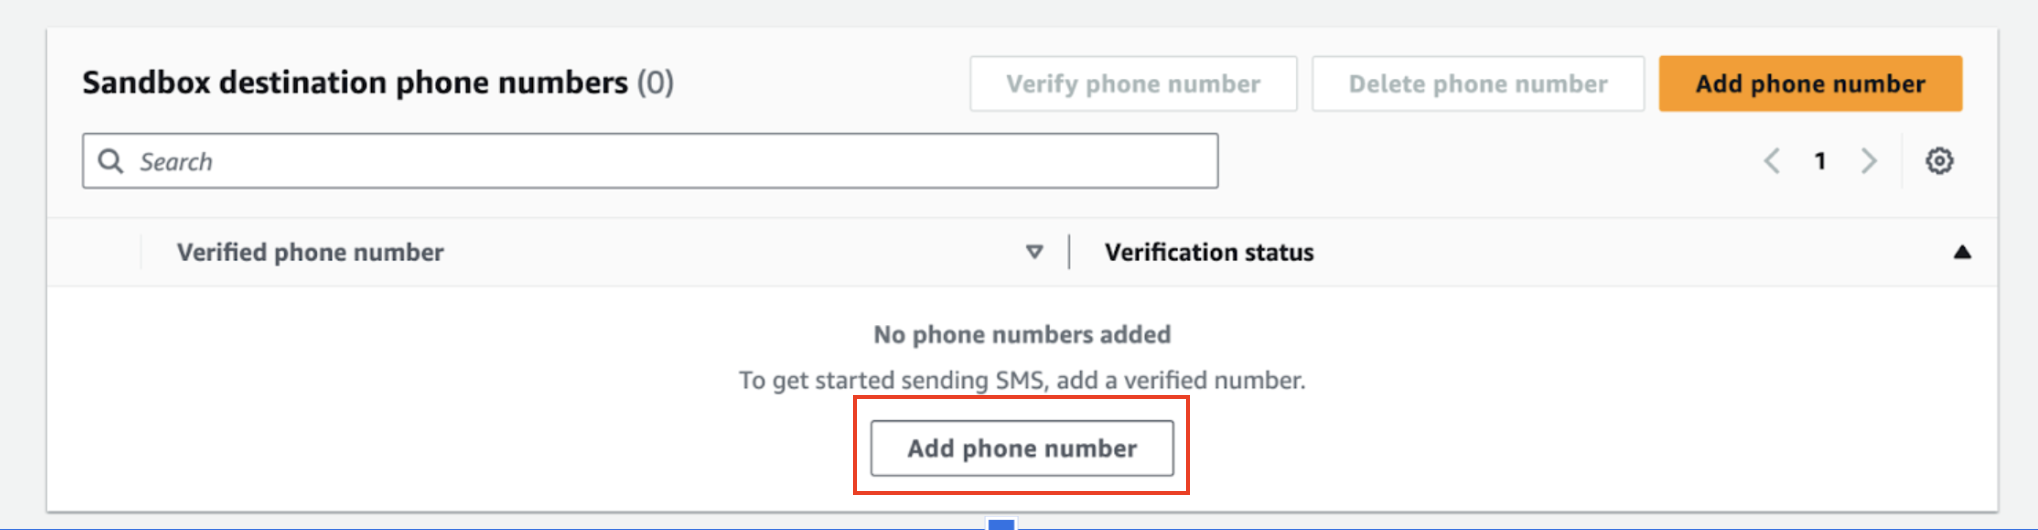
* **SNS Sandbox Mode:**If you are creating a new SNS account. Your account will be in SNS sandbox. AWS adds all new accounts in the SNS sandbox by default. In sandbox mode, you'll be able to send messages to only verified destination phone numbers. Once you're done testing, you can move out of the SNS sandbox. Refer next section for the steps to configure SNS sandbox and how to move your account out of it.
* **Delivery Tracking**. We cannot currently track delivery for SMS sent through AWS SNS. This means that messages sent through SNS will always show on triggered state in logs.
Follow below Steps to add phone number and set tracking in your SNS account:
***
# AWS SNS
Source: https://docs.suprsend.com/docs/aws-sns-sms
Guide to integrate AWS SNS with SuprSend for SMS delivery.
## Pre-Requisites
You'll need a AWS account to complete this tutorial. You can use your existing AWS account to integrate, or [Create an AWS account](https://portal.aws.amazon.com/billing/signup)
## Amazon SNS integration on SuprSend account
Follow below steps to integrate your Amazon SNS account with SuprSend
### Step-1 : Create AWS IAM User
To send email through SNS, you need an IAM user (Access-Key-ID and Secret-Access-Key) with necessary permission. To create an IAM user, refer to this [documentation](https://docs.aws.amazon.com/IAM/latest/UserGuide/id_users_create.html)
* Create an IAM user (with Programmatic access).
* Attach Policy`AmazonSNSFullAccess`to this user.
* Copy and save the`Access-key-ID`and`Secret-Access-Key`securely. You'll need to add this information on SuprSend vendor integration page
An AWS SNS resource resides in a particular region. Make a note of which aws-region you are going to use for sending SMS. In this guide, we'll assume aws-region :`ap-south-1` for all illustrative purposes.
### Step-2 : Add phone number in your SNS account
Before moving into configuration steps, here are a few other things to keep in mind:
* **SNS Sandbox Mode:**If you are creating a new SNS account. Your account will be in SNS sandbox. AWS adds all new accounts in the SNS sandbox by default. In sandbox mode, you'll be able to send messages to only verified destination phone numbers. Once you're done testing, you can move out of the SNS sandbox. Refer next section for the steps to configure SNS sandbox and how to move your account out of it.
* **Delivery Tracking**. We cannot currently track delivery for SMS sent through AWS SNS. This means that messages sent through SNS will always show on triggered state in logs.
Follow below Steps to add phone number and set tracking in your SNS account:
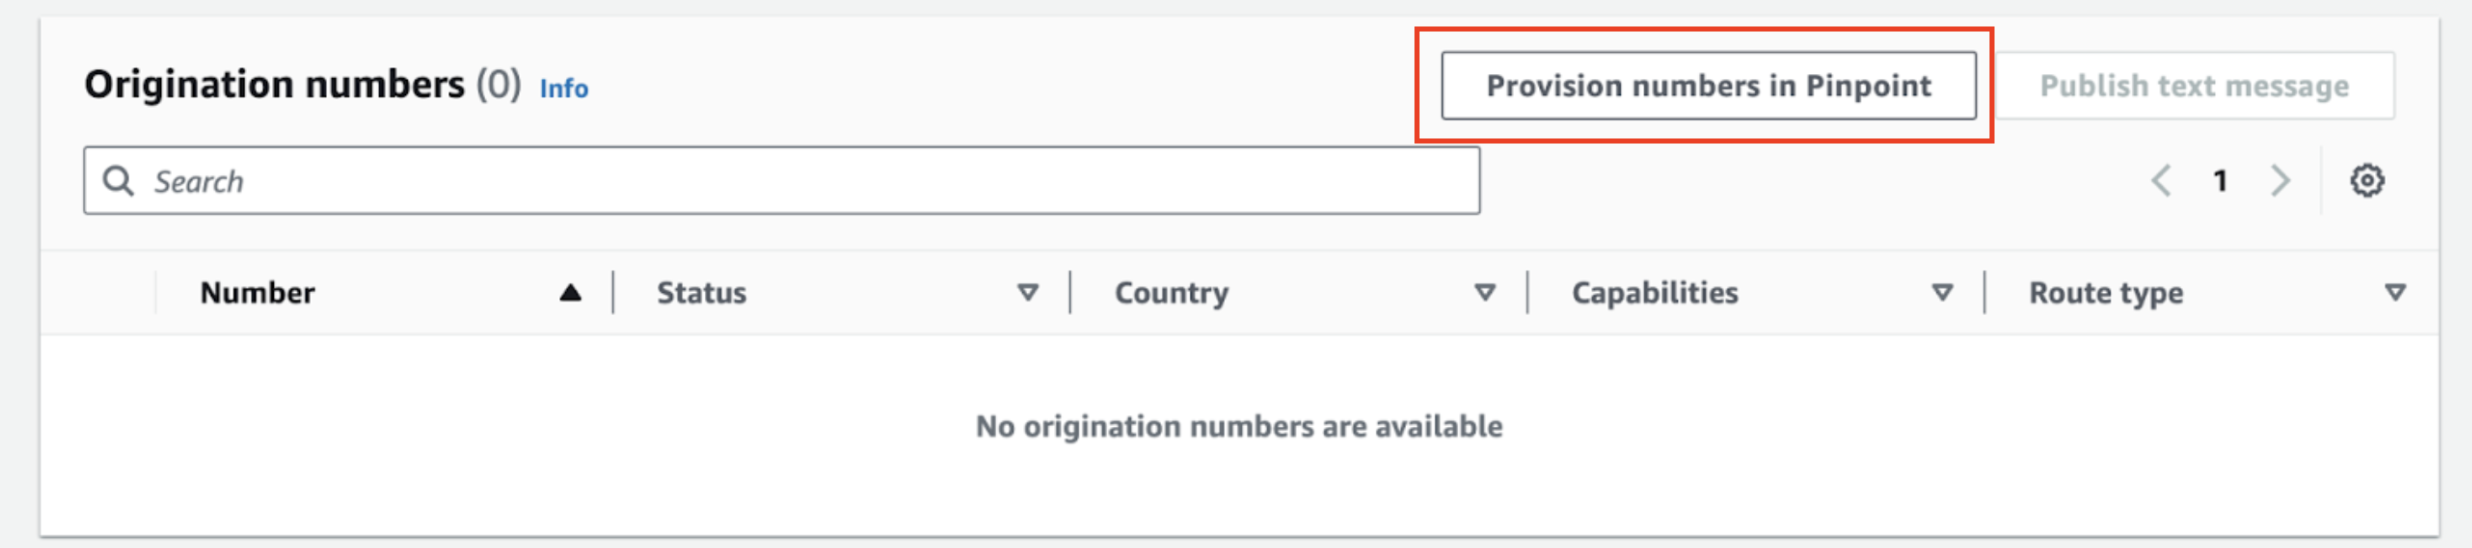 This will open pinpoint console. Click on **"Request Phone Number"** on this screen and provision a phone number from a country where SMS channel is enabled.
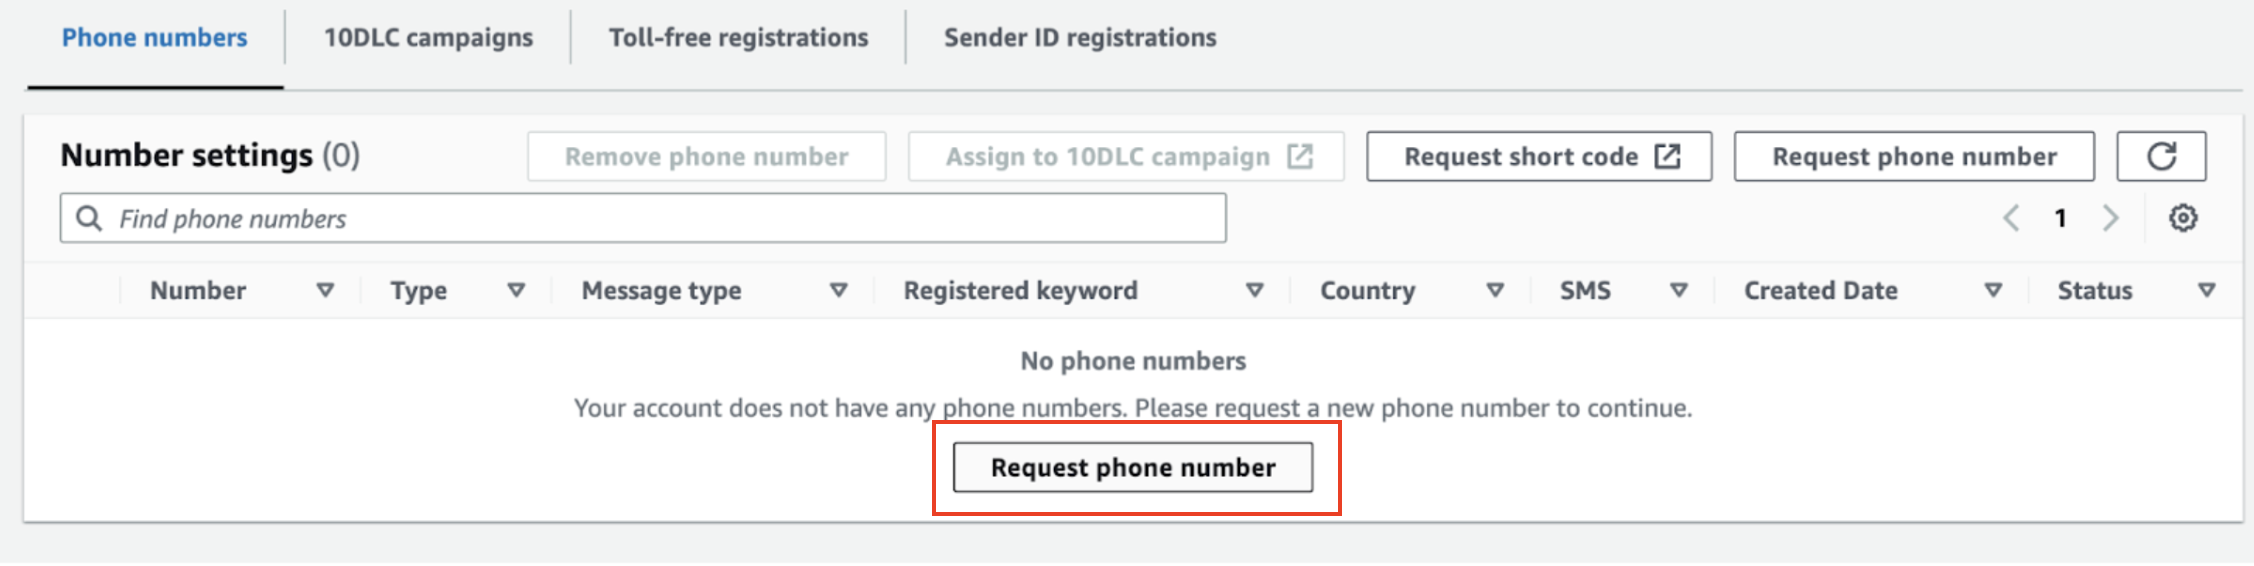 You can also register for Sender ID if you want to send messages with an alphanumeric code. Sender IDs is not supported in all countries. To see if it is supported in your region, see [Supported Regions and Countries](https://docs.aws.amazon.com/sns/latest/dg/sns-supported-regions-countries.html)
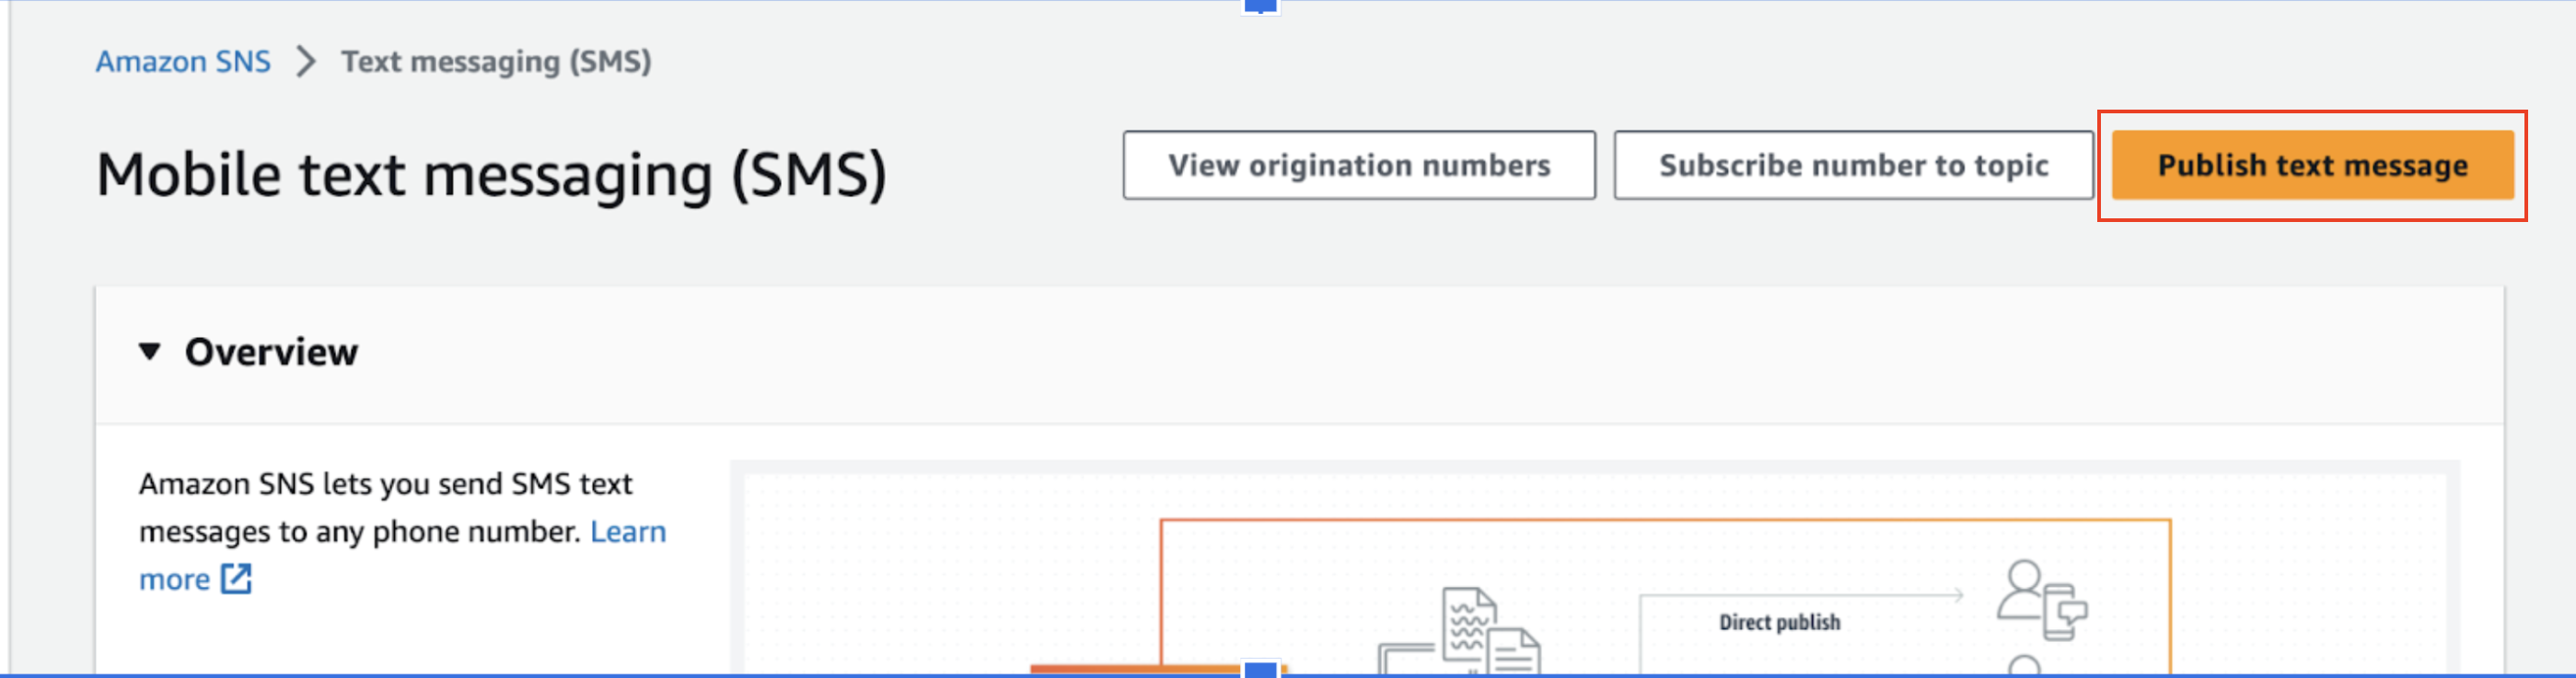
 Once the numbers are added, scroll up the screen and click on **"Publish Text Message"** to send one test message from the console itself to test out the integration.
 If the message is successful, we recommend you to exit sandbox before integrating with SuprSend.
* Click on **`Exit SMS Sandbox`** from console.
If the message is successful, we recommend you to exit sandbox before integrating with SuprSend.
* Click on **`Exit SMS Sandbox`** from console.
 * A prompt will open to raise an AWS support case to exit sandbox and increase spending limits.
* Add relevant information and in the new limit add 100 USD (recommended) or higher if needed.
The account will be production ready within 24 hours of raising this request
* A prompt will open to raise an AWS support case to exit sandbox and increase spending limits.
* Add relevant information and in the new limit add 100 USD (recommended) or higher if needed.
The account will be production ready within 24 hours of raising this request
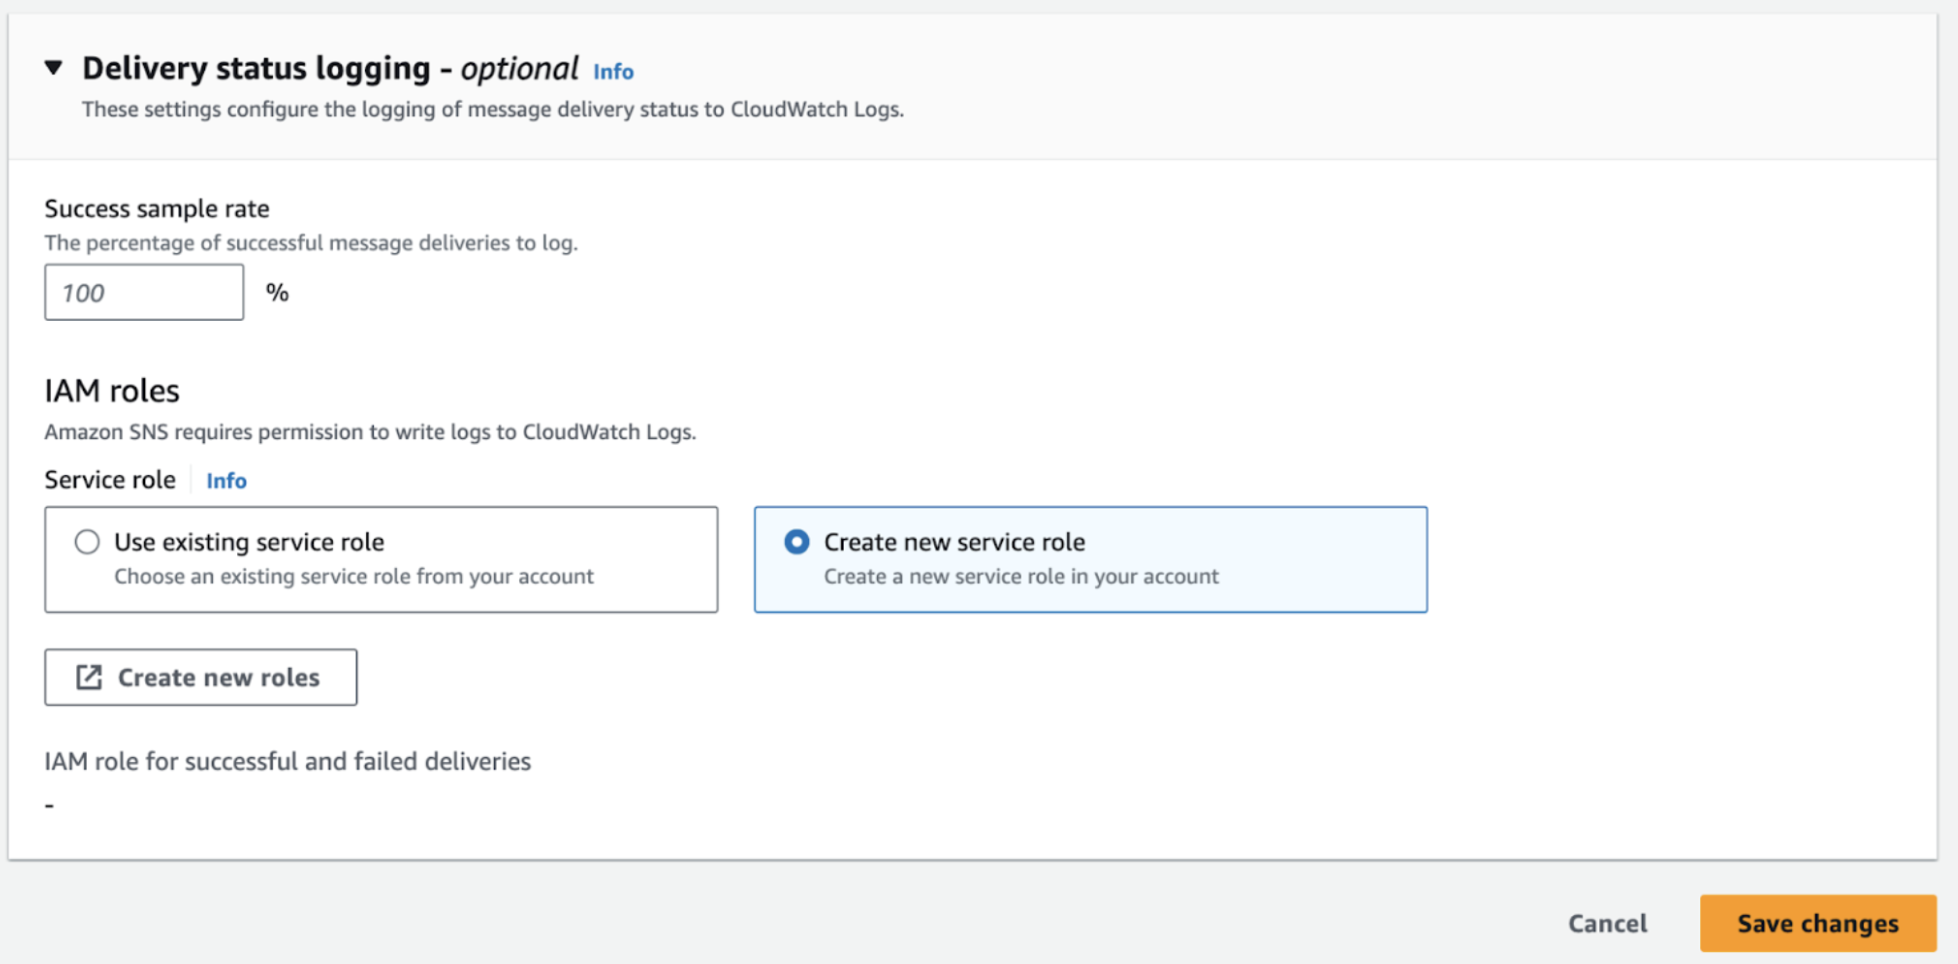
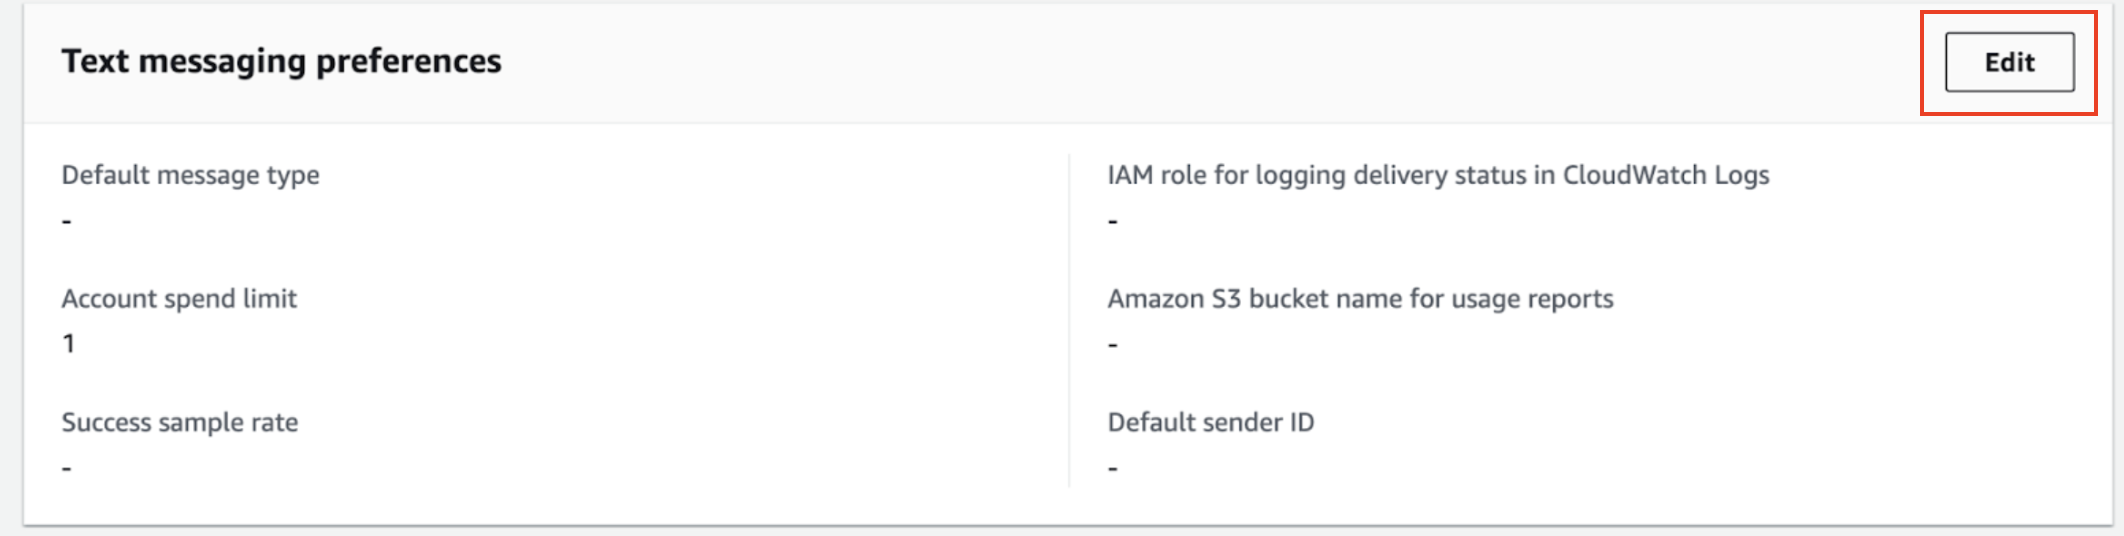 1. Add relevant configuration and expand Delivery status logging.
2. Create a new IAM role on this screen. It will ask for permission to send delivery logs to cloudwatch, allow that and save changes.
1. Add relevant configuration and expand Delivery status logging.
2. Create a new IAM role on this screen. It will ask for permission to send delivery logs to cloudwatch, allow that and save changes.
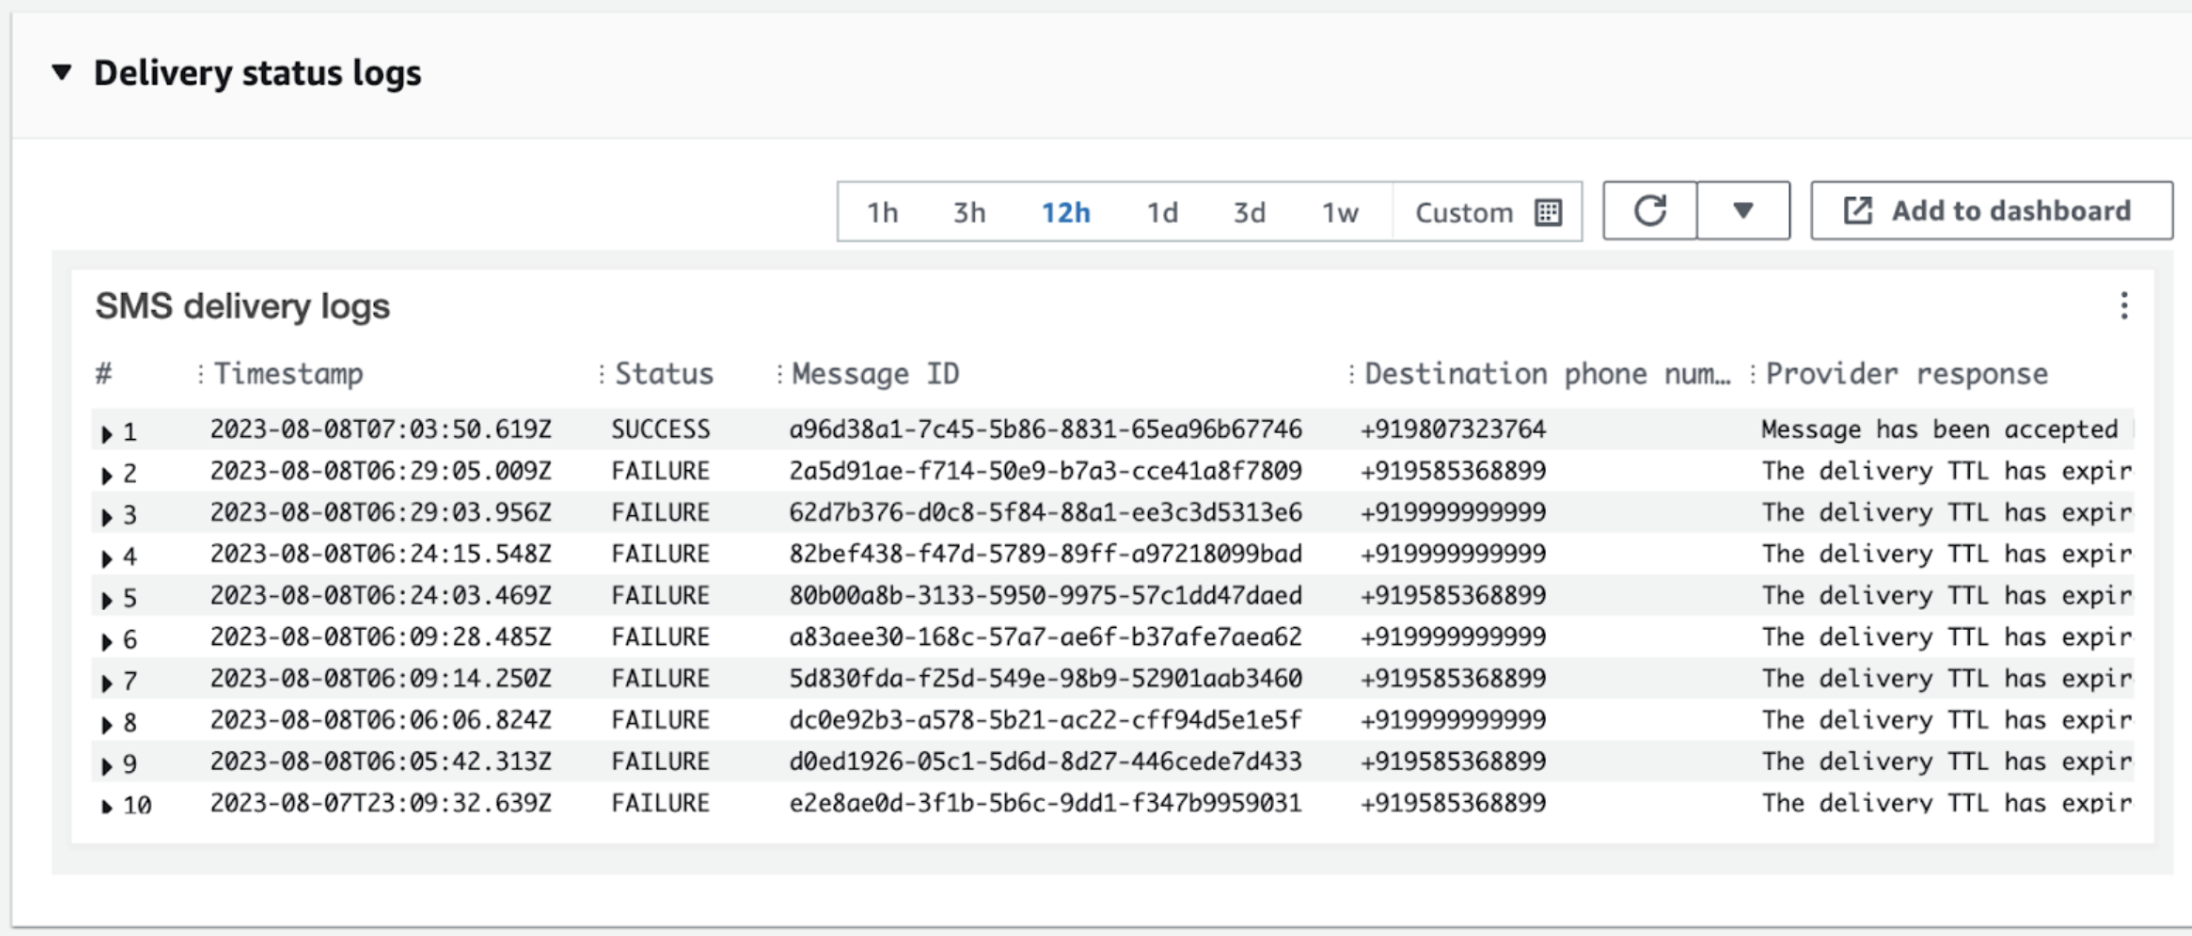
 1. Once configured, you’ll be able to see delivery logs of your sent messages on this console. You can also access it from cloudwatch console.
 You’ll also be able to view message analytics on SNS console.
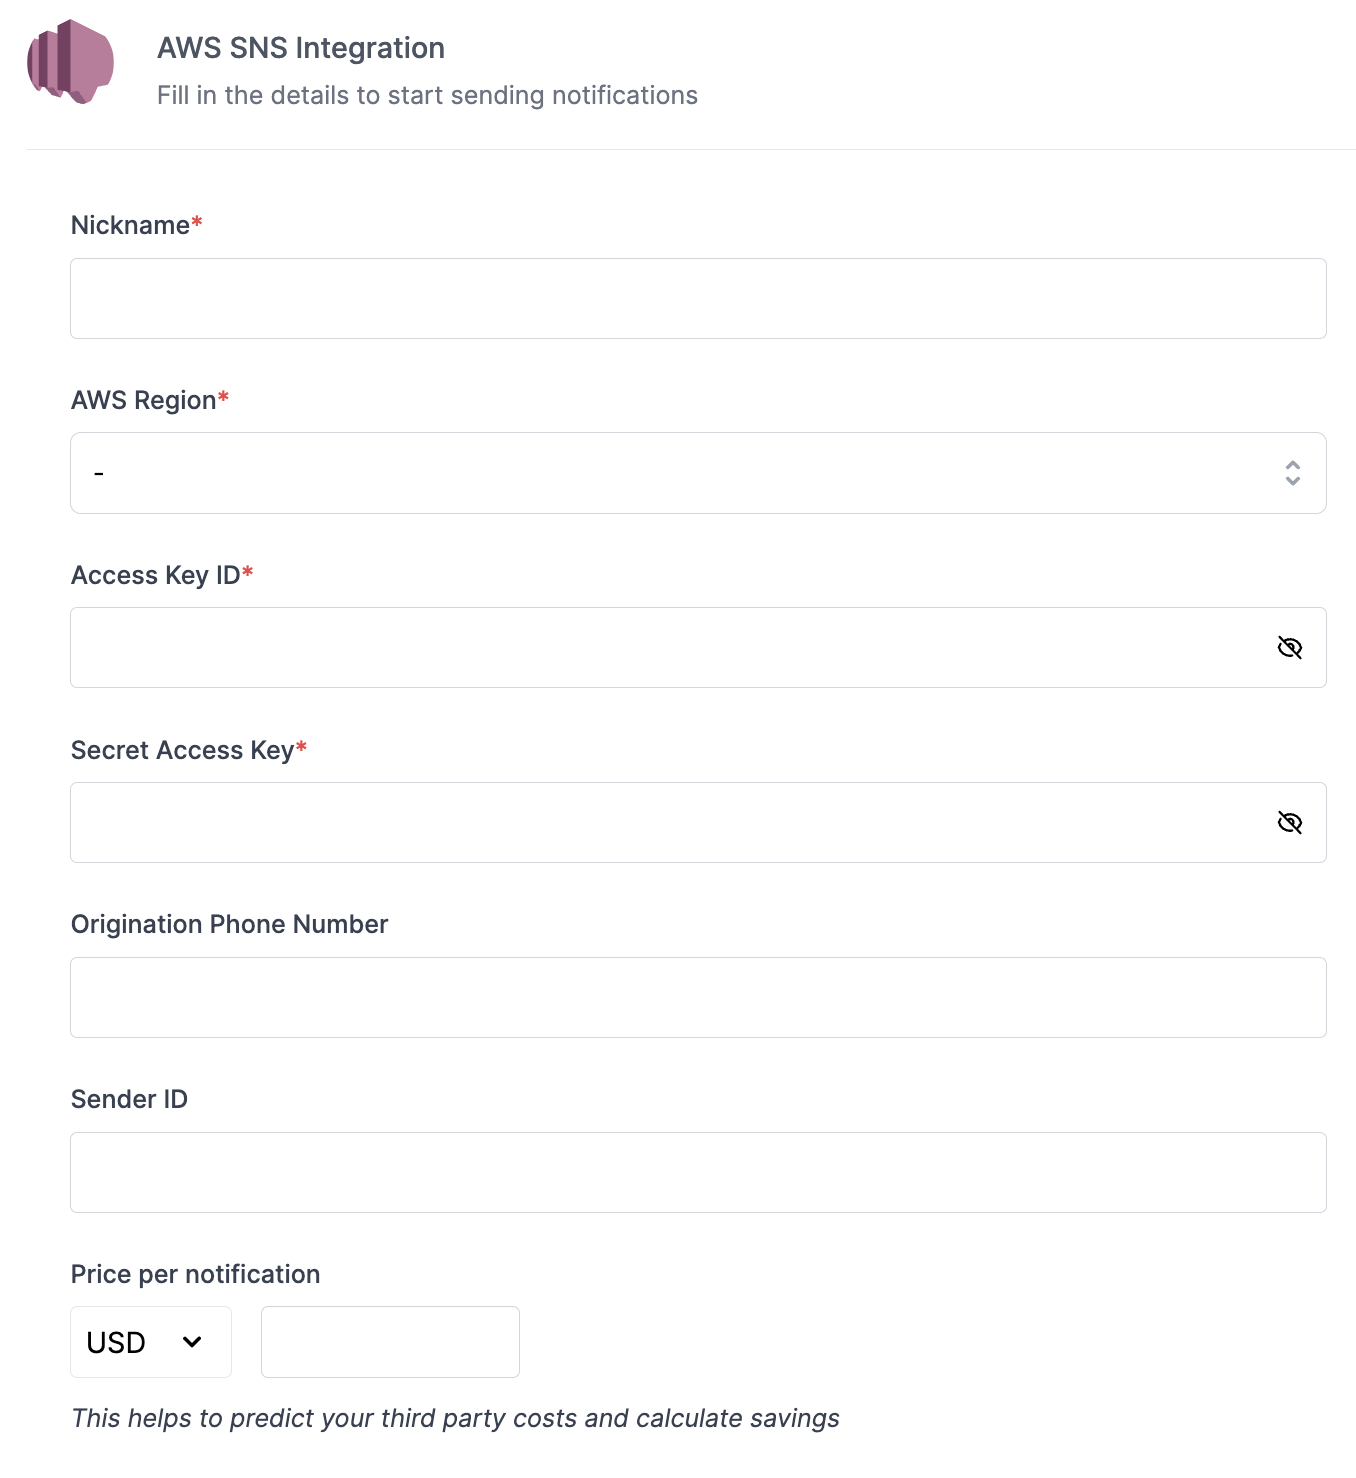 | Form Field | Description |
| ------------------------ | ----------------------------------------------------------------------------------------------------------------------------------------------------------------------------------------------------------------------------- |
| Nickname | You can give any name which may help you to identify this account easily. e.g. - *AWS SNS \[Production]* |
| AWS region | aws-region you are going to use for sending messages. |
| Access Key ID | This is the key ID linked to your IAM user. This is used to send messages on your behalf from your SNS account. [Refer above section](/docs/aws-sns-sms#step-1-create-aws-iam-user) to get access key |
| Secret Access Key | This is the secret access key linked to your IAM user. This is used to send messages on your behalf from your SNS account. [Refer above section](/docs/aws-sns-sms#step-1-create-aws-iam-user) to get access key |
| Origination Phone Number | Number through which your messages will be sent. Origination number is mandatory if you are sending to the USA; otherwise, you can leave this field empty |
| Sender ID | You can add your registered Sender ID here if you want to send messages with an alphanumeric code. [Read more](https://docs.aws.amazon.com/sns/latest/dg/channels-sms-originating-identities-sender-ids.html) about Sender ID |
| Price per notification | This is the amount you pay per email notification to SNS. It helps us to calculate, estimate and optimise your cost spent on notifications. |
***
# Batch
Source: https://docs.suprsend.com/docs/batch
Learn about batch node in workflow and how to use it to group similar notifications into a single notification.
Batch node aggregates multiple triggers into a single batch output to send one consolidated notification rather than sending notification for every user activity. Batching events are useful when a user needs to be notified about a lot of events happening at once but doesn't need a notification for every single event within the batch. e.g., if you have a product where users can interact with each other's content and post 5 comments in 10 minutes. In this case, rather than sending 5 notifications, you can batch the events for 10 minutes and send one notification about the 5 comments that the user received.
## How Batching works
| Form Field | Description |
| ------------------------ | ----------------------------------------------------------------------------------------------------------------------------------------------------------------------------------------------------------------------------- |
| Nickname | You can give any name which may help you to identify this account easily. e.g. - *AWS SNS \[Production]* |
| AWS region | aws-region you are going to use for sending messages. |
| Access Key ID | This is the key ID linked to your IAM user. This is used to send messages on your behalf from your SNS account. [Refer above section](/docs/aws-sns-sms#step-1-create-aws-iam-user) to get access key |
| Secret Access Key | This is the secret access key linked to your IAM user. This is used to send messages on your behalf from your SNS account. [Refer above section](/docs/aws-sns-sms#step-1-create-aws-iam-user) to get access key |
| Origination Phone Number | Number through which your messages will be sent. Origination number is mandatory if you are sending to the USA; otherwise, you can leave this field empty |
| Sender ID | You can add your registered Sender ID here if you want to send messages with an alphanumeric code. [Read more](https://docs.aws.amazon.com/sns/latest/dg/channels-sms-originating-identities-sender-ids.html) about Sender ID |
| Price per notification | This is the amount you pay per email notification to SNS. It helps us to calculate, estimate and optimise your cost spent on notifications. |
***
# Batch
Source: https://docs.suprsend.com/docs/batch
Learn about batch node in workflow and how to use it to group similar notifications into a single notification.
Batch node aggregates multiple triggers into a single batch output to send one consolidated notification rather than sending notification for every user activity. Batching events are useful when a user needs to be notified about a lot of events happening at once but doesn't need a notification for every single event within the batch. e.g., if you have a product where users can interact with each other's content and post 5 comments in 10 minutes. In this case, rather than sending 5 notifications, you can batch the events for 10 minutes and send one notification about the 5 comments that the user received.
## How Batching works
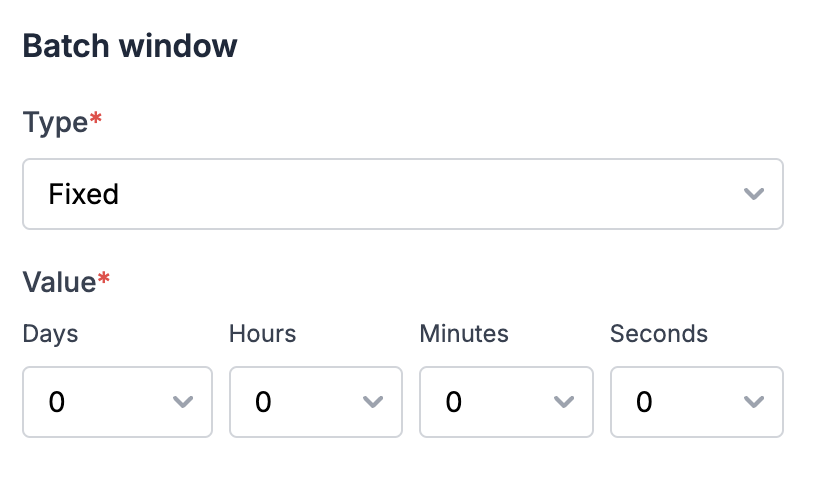
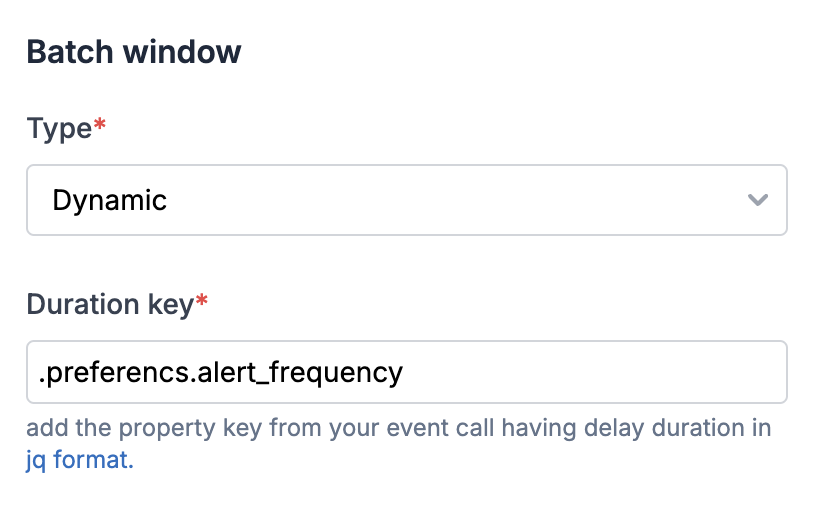 You can add duration key as a [JQ-expression](https://jqlang.github.io/jq/manual/). Below are some examples of how to add duration key in JQ format:
1. General format for duration key at parent level is`.duration_key`
2. If the duration key is a nested event property key like shown below, enter it in the format`.preferencs.alert_frequency`.
You can add duration key as a [JQ-expression](https://jqlang.github.io/jq/manual/). Below are some examples of how to add duration key in JQ format:
1. General format for duration key at parent level is`.duration_key`
2. If the duration key is a nested event property key like shown below, enter it in the format`.preferencs.alert_frequency`.
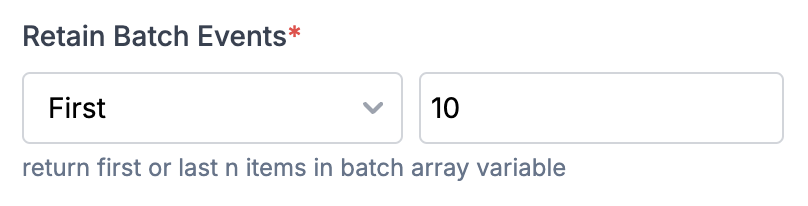
 ## Retain Batch events
It will define the number of event data that will be included in your batch variable. You have the option to display either the first n events or the last n events in your batch output. By default, the first 10 events are included in your batch output variable once the batch window closes. You can customize the number of events to any value between 2 and 100.
## Retain Batch events
It will define the number of event data that will be included in your batch variable. You have the option to display either the first n events or the last n events in your batch output. By default, the first 10 events are included in your batch output variable once the batch window closes. You can customize the number of events to any value between 2 and 100.
 ## Flush first item immediately
When this setting is enabled, the first trigger sends a notification immediately, while subsequent triggers are grouped into a batch.
Here, the batch is opened on receiving the first item irrespective of the flush setting. The only difference is, unlike a normal batch, the first item will not be included in batch events and will continue execution past the batch step.
The output structure of the first notification matches the batch structure, with `$batched_events_count = 1`. You can use this count in your workflow or templates to customize content based on whether the notification is sent immediately or as part of a batch.
**Example Use Case:**
Send anomaly alert with first notification sent at the occurrence of first error and next alert sent after 30 minutes if there are further errors. These could be the template content for single vs batched trigger:
* First notification (sent immediately):`A new error encountered in your account - {{$batched_events.\\\\\\\[0\\\\\\\].error_message}}`
* Batched notification (sent after grouping all errors from second error onwards):`{{$batched_events_count}} errors occurred in your account in the last 30 mins - {{#each $batched_events}}{{error_message}}{{/each}}`
## Using Batch variables in templates
Batch output variable has 2 type of variables:
1. `$batched_events`array : All the event properties corresponding to a batched event is appended to this array and can be used in the template in the array format. The number of event properties returned here is limited by retaining batch events.
2. `$batched_event_count`: This count represents the number of events in a batch and is utilized to render the batch count in a template. For instance, you might send a message like,`Joe left 5 comments in the last 1 hour`where 5 corresponds to \$batched\_event\_count.
## Flush first item immediately
When this setting is enabled, the first trigger sends a notification immediately, while subsequent triggers are grouped into a batch.
Here, the batch is opened on receiving the first item irrespective of the flush setting. The only difference is, unlike a normal batch, the first item will not be included in batch events and will continue execution past the batch step.
The output structure of the first notification matches the batch structure, with `$batched_events_count = 1`. You can use this count in your workflow or templates to customize content based on whether the notification is sent immediately or as part of a batch.
**Example Use Case:**
Send anomaly alert with first notification sent at the occurrence of first error and next alert sent after 30 minutes if there are further errors. These could be the template content for single vs batched trigger:
* First notification (sent immediately):`A new error encountered in your account - {{$batched_events.\\\\\\\[0\\\\\\\].error_message}}`
* Batched notification (sent after grouping all errors from second error onwards):`{{$batched_events_count}} errors occurred in your account in the last 30 mins - {{#each $batched_events}}{{error_message}}{{/each}}`
## Using Batch variables in templates
Batch output variable has 2 type of variables:
1. `$batched_events`array : All the event properties corresponding to a batched event is appended to this array and can be used in the template in the array format. The number of event properties returned here is limited by retaining batch events.
2. `$batched_event_count`: This count represents the number of events in a batch and is utilized to render the batch count in a template. For instance, you might send a message like,`Joe left 5 comments in the last 1 hour`where 5 corresponds to \$batched\_event\_count.
 ## Transforming Batch variable output
There can be cases where you need to split the batch output variables into multiple arrays based on keys in your input data. e.g., to send a message like `You have got 5 comments and 3 likes on your post in the past 1 hour` where post and likes are interaction\_type in your input payload. You can use [data transform node](/docs/data-transform) and generate relevant variables using **JSONNET editor** to handle this use case.
## Transforming Batch variable output
There can be cases where you need to split the batch output variables into multiple arrays based on keys in your input data. e.g., to send a message like `You have got 5 comments and 3 likes on your post in the past 1 hour` where post and likes are interaction\_type in your input payload. You can use [data transform node](/docs/data-transform) and generate relevant variables using **JSONNET editor** to handle this use case.
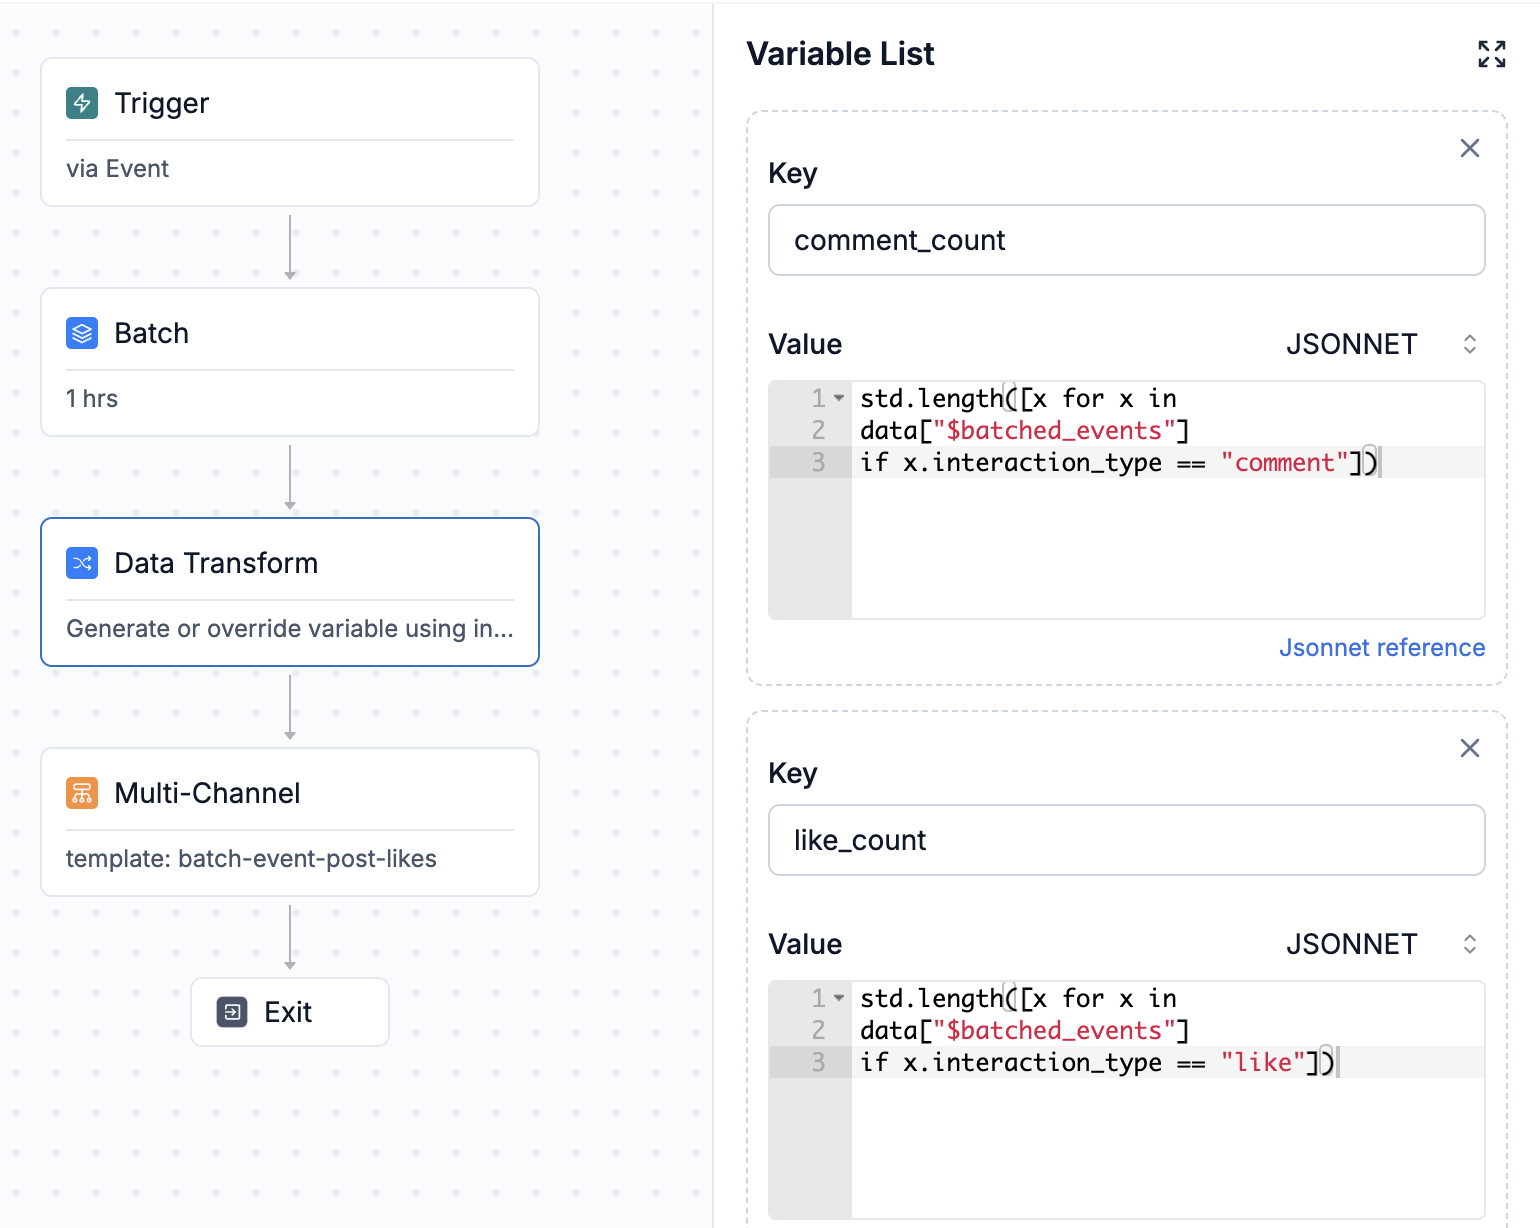 Let's take below example. There are 3 post interactions, 2 comments and 1 like and this is your workflow trigger.
 One of the fundamental principles of effective notification management is grouping similar notifications. The primary goal here is to avoid overwhelming the user with a barrage of alerts. For instance, if a user receives multiple social media notifications, it is more efficient to combine them into a single alert. This approach not only reduces notification fatigue but also makes it easier for users to manage their alerts. By [batching](/docs/batch) similar notifications, you provide a more streamlined and user-friendly experience.
 In addition to grouping notifications by general use case, employing a [grouping key](/docs/batch#batch-key) can further enhance the efficiency of your notification system. For instance, rather than aggregating all comments across various posts, you can group notifications specifically by comments on a single post. This refined approach ensures that users receive more relevant and organised information, reducing clutter and improving the overall user experience.
# Prioritise Important Notifications
Not all notifications are created equal. Some are more critical than others and need to be highlighted or sent immediately. For instance, security alerts or urgent messages should not wait for the next batch or digest but should be delivered instantly. Prioritising important notifications ensures that users do not miss out on crucial information. This practice also helps in building trust, as users know that they will be promptly informed about significant events.
In addition to grouping notifications by general use case, employing a [grouping key](/docs/batch#batch-key) can further enhance the efficiency of your notification system. For instance, rather than aggregating all comments across various posts, you can group notifications specifically by comments on a single post. This refined approach ensures that users receive more relevant and organised information, reducing clutter and improving the overall user experience.
# Prioritise Important Notifications
Not all notifications are created equal. Some are more critical than others and need to be highlighted or sent immediately. For instance, security alerts or urgent messages should not wait for the next batch or digest but should be delivered instantly. Prioritising important notifications ensures that users do not miss out on crucial information. This practice also helps in building trust, as users know that they will be promptly informed about significant events.
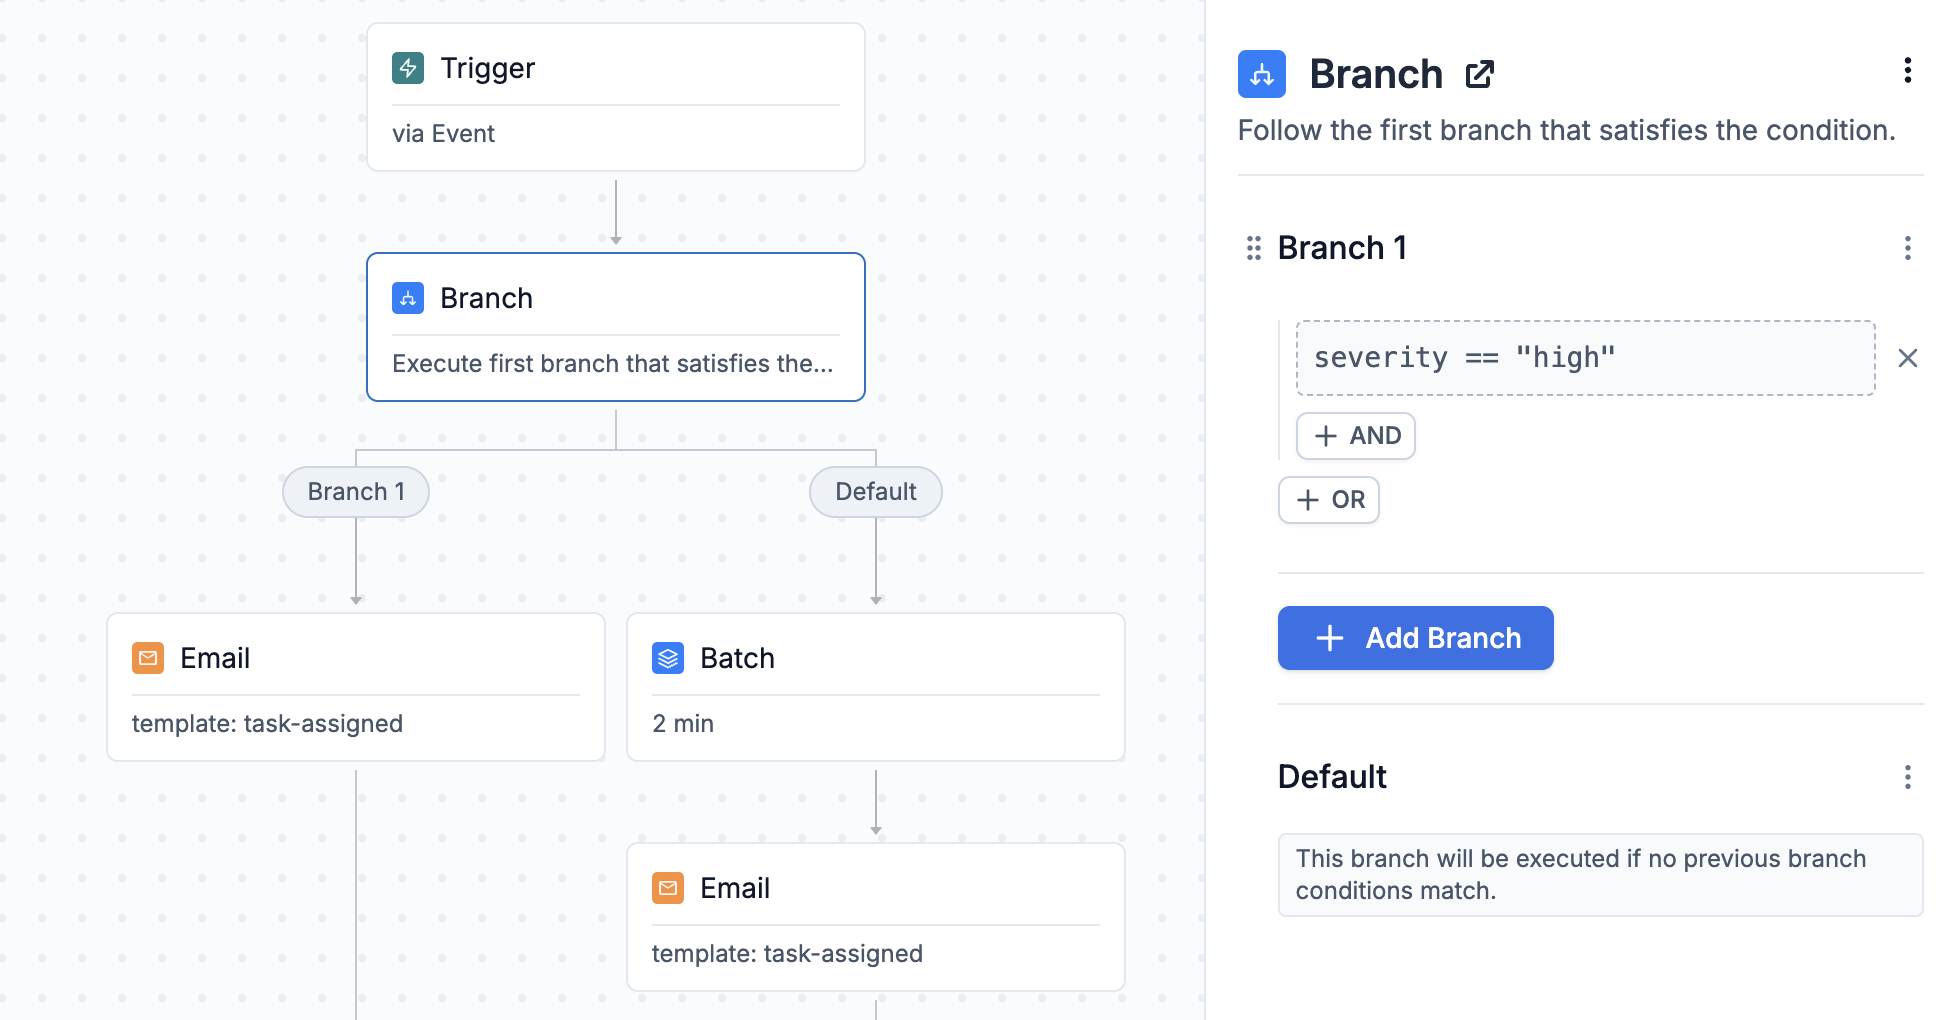 If similar types of alerts can vary in severity, implement [conditional logic](/docs/branch) to determine whether they should be delivered immediately or included in a batch. For instance, critical alerts that require urgent user attention should bypass batching and be sent instantly, while less critical alerts can be aggregated and sent at a later time. This approach ensures that users are promptly informed of urgent issues while reducing the frequency of less critical notifications, thereby enhancing the overall user experience.
# Allow User Customisation
If similar types of alerts can vary in severity, implement [conditional logic](/docs/branch) to determine whether they should be delivered immediately or included in a batch. For instance, critical alerts that require urgent user attention should bypass batching and be sent instantly, while less critical alerts can be aggregated and sent at a later time. This approach ensures that users are promptly informed of urgent issues while reducing the frequency of less critical notifications, thereby enhancing the overall user experience.
# Allow User Customisation
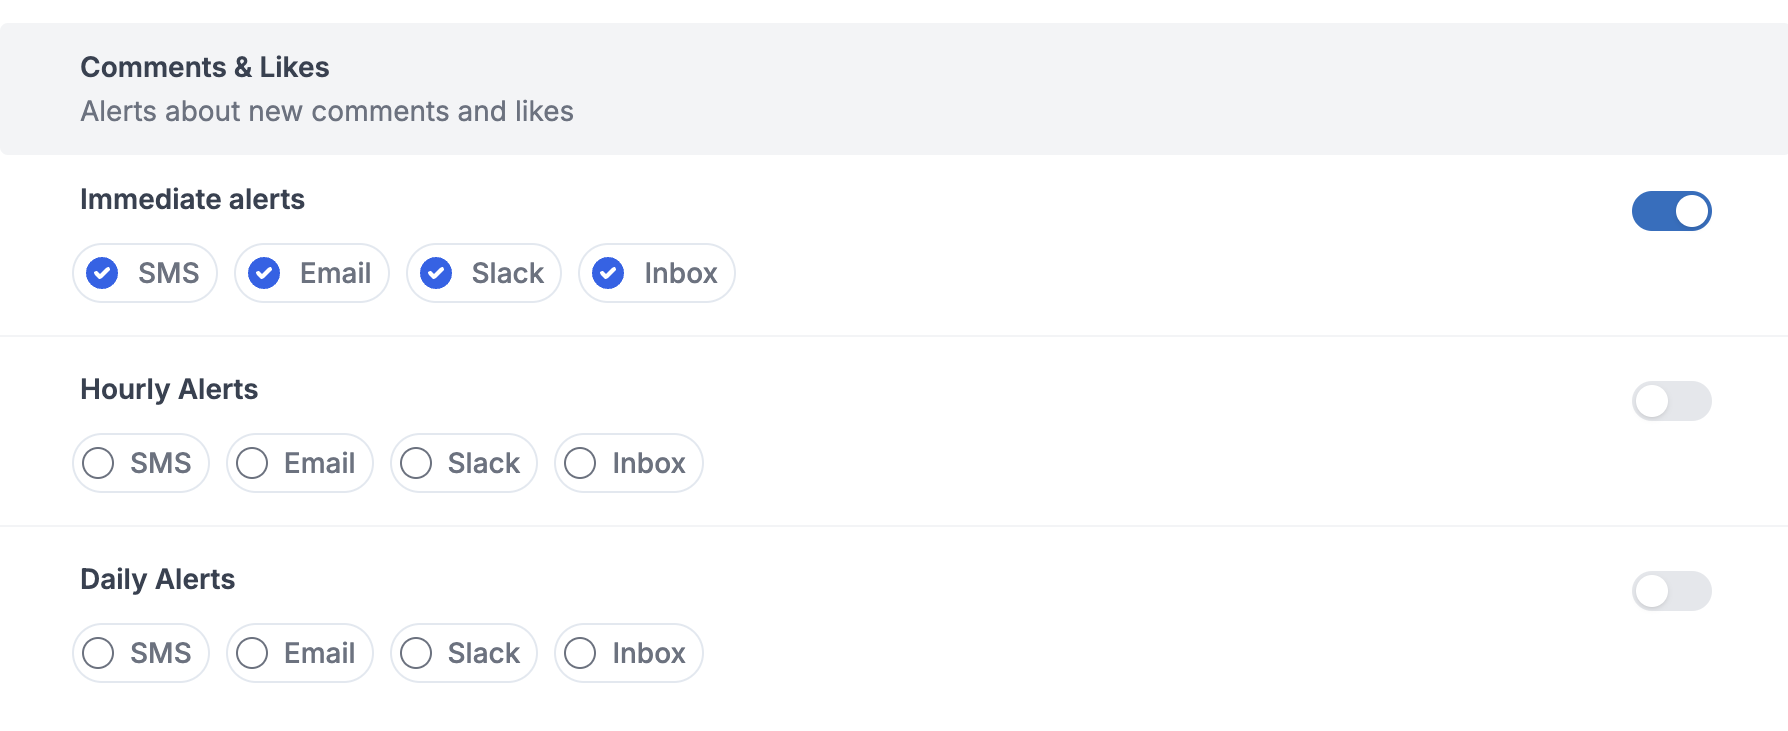 Empowering users to customise their notification [preferences](/docs/user-preferences) is a key aspect of a user-centric approach. Allow users to choose the type of notifications they receive and the frequency of digests. This customisation can include options such as receiving notifications for certain types of activities, setting quiet hours, or choosing between immediate alerts and daily digests. By offering this level of customisation, you respect user preferences and enhance their overall experience.
# Respect Quiet Hours
Implementing respect for user-defined quiet hours is an essential consideration. Allow users to set periods during which they do not wish to receive any notifications. This feature is particularly important for maintaining a healthy work-life balance and preventing notification fatigue. By respecting quiet hours, you show consideration for the user's time and well-being.
> 📘 **We are rolling out support for Schedules soon.**
# Monitor Engagement Metrics
Keeping an eye on how users interact with your notifications and digests is crucial for assessing their effectiveness. Track engagement metrics such as open rates, click-through rates, and user feedback. Low engagement levels might indicate the need for adjustments in your notification strategy. Monitoring these metrics helps you understand user behaviour and preferences, enabling you to refine your approach accordingly.
# Keep Digests Concise
When creating digest emails or messages, brevity is essential. Users are more likely to engage with concise and to-the-point information. Highlight the most important updates at the beginning of the digest to capture the user's attention quickly. A well-structured and concise digest ensures that users can easily grasp the key points without feeling overwhelmed by too much information.
To enhance user experience and ensure that your communications remain concise, [limit the items](/docs/batch#retain-batch-events) in your list to either the last 'n' items or the first 'n' items based on your specific use case. This approach prevents users from having to sift through overly lengthy emails and allows them to focus on the most relevant and recent information. By curating the content in this manner, you can deliver a more streamlined and efficient notification system that respects the user's time and attention.
# Provide Easy Unsubscribe Options
Make it simple for users to unsubscribe from notifications or digests they no longer find useful. An easy and straightforward unsubscribe process helps maintain a positive user experience. Users should not feel trapped by notifications; instead, they should have the freedom to opt-out whenever they choose. Providing this option demonstrates respect for user preferences and contributes to a more user-friendly system.
# Test and Iterate
Regularly testing your batching and digest strategy is vital to ensure it meets user needs and preferences. Collect feedback from users and analyse how they interact with notifications. Use this data to make informed adjustments. Iterative testing helps in fine-tuning your approach, ensuring that your notification system remains effective and aligned with user expectations. This continuous improvement process is essential for maintaining a high level of user satisfaction.
In conclusion, building an effective notification system using batching and digest techniques requires careful planning and consideration of user preferences. By following these best practices, you can create a notification strategy that enhances user experience, maintains engagement, and ensures the timely delivery of important updates.
***
# Notification System Design
Source: https://docs.suprsend.com/docs/best-practices-notification-system-design
Best Practices on designing your backend architecture for seamless integration with SuprSend.
### Integrating SuprSend in backend code
* **Securely store your API Keys**: Store your API Keys, workspace key, and secret as environment variables rather than in source code to prevent unauthorized access. Refer the [best practices of API Key management here](/docs/best-practices-for-api-keys-management).
* **Use** [Idempotency Key](/docs/go-trigger-workflow-from-api#idempotent-requests) **to avoid duplicate requests**: Always include an idempotency key in your requests so that request retries doesn't result in duplicate trigger or duplicate notification being sent to users.
* **Use** [bulk API triggers](/docs/python-trigger-workflow-from-api#bulk-api-for-triggering-multiple-workflows) wherever applicable to improve performance and reduce request processing time.
* **Implement Proper Error Handling**
* Design robust error handling to manage API responses, including timeouts, server errors, and invalid responses.
* Log errors using [webhook](/docs/outbound-webhook) and monitor them to quickly identify and resolve issues.
* **Keep Dependencies Updated**: Regularly update your SDK or API libraries to take advantage of new features and security patches. Monitor for updates in the API or SDK and adapt your implementation as needed.
### Setting up notifications on SuprSend dashboard
* **Keep development and production workspaces separate**: Avoid making direct changes in production workspace to safeguard from accidentally sending a test notification to your production users. Test all changes in staging before deploying them to production to ensure reliability.
* **Use Test Mode for safe testing in staging workspace**: Enable [Test Mode](/docs/developer/test-mode) in your workspace to safely test notification flows without delivering to real users. In Test Mode, notifications to real users are blocked and delivery is allowed only to designated internal testers. You can also set up a catch-all channel to redirect all notifications intended for non-test users.
* **Design one workflow per event or trigger**: Configure entire notification journey corresponding to an event or trigger in a single workflow. It simplifies notification management and helps you to edit and track notifications in a single glance.
* **Be cautious of the number of alerts you send per user**.
* Add [throttle](/docs/throttle) in your workflows to limit the number of alerts you send per user.
* Consider [batching](/docs/batch) notifications to summarize frequent alerts to reduce the volume of notifications sent and prevent notification fatigue.
* **Smartly route notifications across multiple channels to avoid bombarding**: Avoid sending notifications across multiple channels simultaneously. While multi-channel targeting can boost engagement, excessive notifications on all channels may lead to user unsubscriptions over time. Use [smart channel routing](/docs/smart-delivery) to send notifications sequentially if users do not engage, and consider integrating non-intrusive channels like [Inbox](/docs/inbox-overview) as a secondary channel for not so critical updates.
* **Provide** [granular opt-out option](/docs/user-preferences) **to users to reduce channel unsubscription**: It is recommended to give users option to opt-out when sending promotional notifications. Most countries have data privacy and regulation acts, like GDPR (General Data Protection Regulation) in Europe and CCPA (California Consumer Privacy Act) in USA, which mandates taking user’s consent to send them notifications. While users can opt out of channels, offering more granular control to set notification preferences at category level can significantly reduce channel-level unsubscriptions, potentially decreasing them by around 50%.
* **Implement Secure Authentication of SuprSend account**: Use secure [authentication methods](/docs/authentication-methods) such as SSO and Multi-Factor Authentication (MFA) for SuprSend account login. Assign appropriate roles to your team members to prevent data leakage or unintended changes in production notification.
***
# Bigquery
Source: https://docs.suprsend.com/docs/bigquery
Guide to set up BigQuery database connection to auto sync subscriber lists.
With this integration, you can directly send notifications on your 360 degree data sitting in your data warehouse. This enables your data teams or product managers to automate user syncing, setup recurring user cohort sync and create [subscriber lists](/docs/lists) on SuprSend. You can then trigger notification to this list using our [broadcast](/docs/broadcast) API.
## Getting started
To start syncing data from your BigQuery database, you need to add this integration on the connector page.
1. Go to [SuprSend dashboard -> Settings -> Connectors](https://app.suprsend.com/en/staging/connectors) page. Here, you'll see the list of available connectors. If you have already setup any connectors in the past, you'll see a list of existing connectors. Click on **`+New Connector`** button to add the connector.
2. Click on BigQuery and add below information:
* **Name**: A name to uniquely qualify the connection as you'll see it in the connector list on your sync task. You can add the name of database here for easy identification.
* **Service account key json**: Steps to generate this are mentioned in the next section.
Empowering users to customise their notification [preferences](/docs/user-preferences) is a key aspect of a user-centric approach. Allow users to choose the type of notifications they receive and the frequency of digests. This customisation can include options such as receiving notifications for certain types of activities, setting quiet hours, or choosing between immediate alerts and daily digests. By offering this level of customisation, you respect user preferences and enhance their overall experience.
# Respect Quiet Hours
Implementing respect for user-defined quiet hours is an essential consideration. Allow users to set periods during which they do not wish to receive any notifications. This feature is particularly important for maintaining a healthy work-life balance and preventing notification fatigue. By respecting quiet hours, you show consideration for the user's time and well-being.
> 📘 **We are rolling out support for Schedules soon.**
# Monitor Engagement Metrics
Keeping an eye on how users interact with your notifications and digests is crucial for assessing their effectiveness. Track engagement metrics such as open rates, click-through rates, and user feedback. Low engagement levels might indicate the need for adjustments in your notification strategy. Monitoring these metrics helps you understand user behaviour and preferences, enabling you to refine your approach accordingly.
# Keep Digests Concise
When creating digest emails or messages, brevity is essential. Users are more likely to engage with concise and to-the-point information. Highlight the most important updates at the beginning of the digest to capture the user's attention quickly. A well-structured and concise digest ensures that users can easily grasp the key points without feeling overwhelmed by too much information.
To enhance user experience and ensure that your communications remain concise, [limit the items](/docs/batch#retain-batch-events) in your list to either the last 'n' items or the first 'n' items based on your specific use case. This approach prevents users from having to sift through overly lengthy emails and allows them to focus on the most relevant and recent information. By curating the content in this manner, you can deliver a more streamlined and efficient notification system that respects the user's time and attention.
# Provide Easy Unsubscribe Options
Make it simple for users to unsubscribe from notifications or digests they no longer find useful. An easy and straightforward unsubscribe process helps maintain a positive user experience. Users should not feel trapped by notifications; instead, they should have the freedom to opt-out whenever they choose. Providing this option demonstrates respect for user preferences and contributes to a more user-friendly system.
# Test and Iterate
Regularly testing your batching and digest strategy is vital to ensure it meets user needs and preferences. Collect feedback from users and analyse how they interact with notifications. Use this data to make informed adjustments. Iterative testing helps in fine-tuning your approach, ensuring that your notification system remains effective and aligned with user expectations. This continuous improvement process is essential for maintaining a high level of user satisfaction.
In conclusion, building an effective notification system using batching and digest techniques requires careful planning and consideration of user preferences. By following these best practices, you can create a notification strategy that enhances user experience, maintains engagement, and ensures the timely delivery of important updates.
***
# Notification System Design
Source: https://docs.suprsend.com/docs/best-practices-notification-system-design
Best Practices on designing your backend architecture for seamless integration with SuprSend.
### Integrating SuprSend in backend code
* **Securely store your API Keys**: Store your API Keys, workspace key, and secret as environment variables rather than in source code to prevent unauthorized access. Refer the [best practices of API Key management here](/docs/best-practices-for-api-keys-management).
* **Use** [Idempotency Key](/docs/go-trigger-workflow-from-api#idempotent-requests) **to avoid duplicate requests**: Always include an idempotency key in your requests so that request retries doesn't result in duplicate trigger or duplicate notification being sent to users.
* **Use** [bulk API triggers](/docs/python-trigger-workflow-from-api#bulk-api-for-triggering-multiple-workflows) wherever applicable to improve performance and reduce request processing time.
* **Implement Proper Error Handling**
* Design robust error handling to manage API responses, including timeouts, server errors, and invalid responses.
* Log errors using [webhook](/docs/outbound-webhook) and monitor them to quickly identify and resolve issues.
* **Keep Dependencies Updated**: Regularly update your SDK or API libraries to take advantage of new features and security patches. Monitor for updates in the API or SDK and adapt your implementation as needed.
### Setting up notifications on SuprSend dashboard
* **Keep development and production workspaces separate**: Avoid making direct changes in production workspace to safeguard from accidentally sending a test notification to your production users. Test all changes in staging before deploying them to production to ensure reliability.
* **Use Test Mode for safe testing in staging workspace**: Enable [Test Mode](/docs/developer/test-mode) in your workspace to safely test notification flows without delivering to real users. In Test Mode, notifications to real users are blocked and delivery is allowed only to designated internal testers. You can also set up a catch-all channel to redirect all notifications intended for non-test users.
* **Design one workflow per event or trigger**: Configure entire notification journey corresponding to an event or trigger in a single workflow. It simplifies notification management and helps you to edit and track notifications in a single glance.
* **Be cautious of the number of alerts you send per user**.
* Add [throttle](/docs/throttle) in your workflows to limit the number of alerts you send per user.
* Consider [batching](/docs/batch) notifications to summarize frequent alerts to reduce the volume of notifications sent and prevent notification fatigue.
* **Smartly route notifications across multiple channels to avoid bombarding**: Avoid sending notifications across multiple channels simultaneously. While multi-channel targeting can boost engagement, excessive notifications on all channels may lead to user unsubscriptions over time. Use [smart channel routing](/docs/smart-delivery) to send notifications sequentially if users do not engage, and consider integrating non-intrusive channels like [Inbox](/docs/inbox-overview) as a secondary channel for not so critical updates.
* **Provide** [granular opt-out option](/docs/user-preferences) **to users to reduce channel unsubscription**: It is recommended to give users option to opt-out when sending promotional notifications. Most countries have data privacy and regulation acts, like GDPR (General Data Protection Regulation) in Europe and CCPA (California Consumer Privacy Act) in USA, which mandates taking user’s consent to send them notifications. While users can opt out of channels, offering more granular control to set notification preferences at category level can significantly reduce channel-level unsubscriptions, potentially decreasing them by around 50%.
* **Implement Secure Authentication of SuprSend account**: Use secure [authentication methods](/docs/authentication-methods) such as SSO and Multi-Factor Authentication (MFA) for SuprSend account login. Assign appropriate roles to your team members to prevent data leakage or unintended changes in production notification.
***
# Bigquery
Source: https://docs.suprsend.com/docs/bigquery
Guide to set up BigQuery database connection to auto sync subscriber lists.
With this integration, you can directly send notifications on your 360 degree data sitting in your data warehouse. This enables your data teams or product managers to automate user syncing, setup recurring user cohort sync and create [subscriber lists](/docs/lists) on SuprSend. You can then trigger notification to this list using our [broadcast](/docs/broadcast) API.
## Getting started
To start syncing data from your BigQuery database, you need to add this integration on the connector page.
1. Go to [SuprSend dashboard -> Settings -> Connectors](https://app.suprsend.com/en/staging/connectors) page. Here, you'll see the list of available connectors. If you have already setup any connectors in the past, you'll see a list of existing connectors. Click on **`+New Connector`** button to add the connector.
2. Click on BigQuery and add below information:
* **Name**: A name to uniquely qualify the connection as you'll see it in the connector list on your sync task. You can add the name of database here for easy identification.
* **Service account key json**: Steps to generate this are mentioned in the next section.
 ### Step-1: Generating OAuth client key and secret
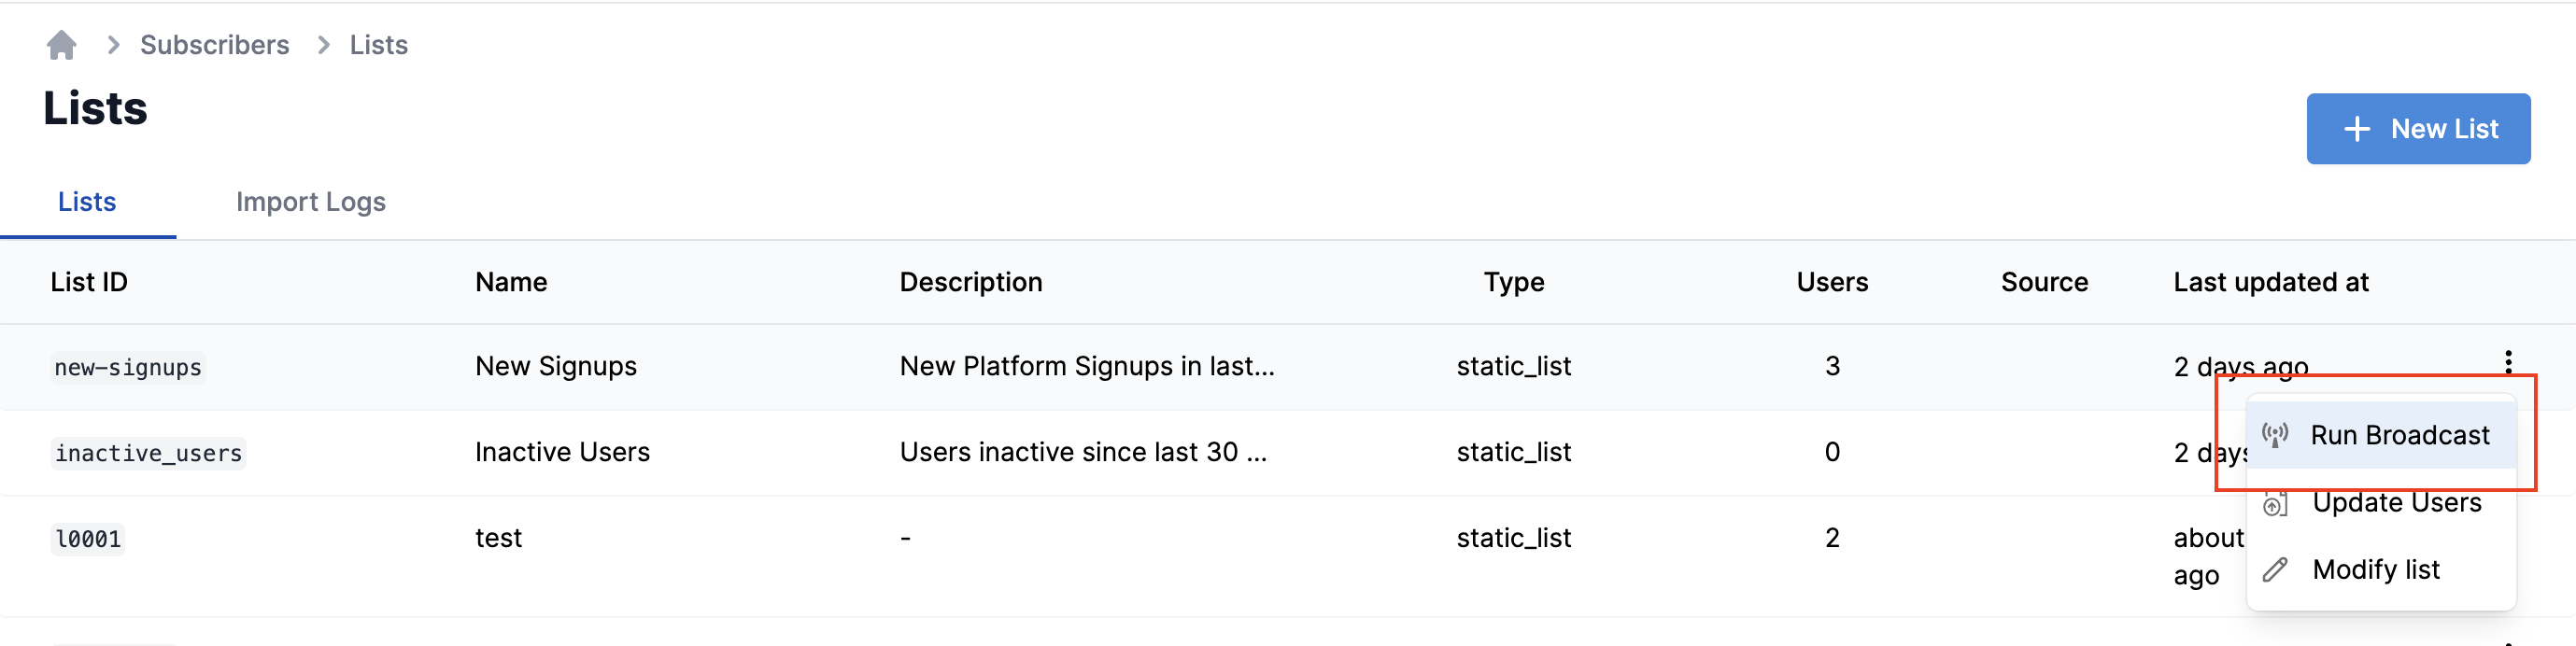 This will open the broadcast form. Fill in the relevant information and click on
| Field | Obligation | Description |
| --------------------- | ----------- | ------------------------------------------------------------------------------------------------------------------------------------------------------------------------------------------------------------------------------------------------------------------------------------------------------------------------------------------------------------------------------------------------- |
| List ID | *Mandatory* | `id` of the list on which broadcast should be sent. |
| Template Name | *Mandatory* | Select the template content to be sent. |
| Notification category | *Mandatory* | [Notification category](/docs/notification-category) will be used to pick up the vendor credential and also to power [preferences](/docs/user-preferences). If you don't have user preferences setup in your product, you can define the category as `promotional`. Do not use `transactional` or `system` category to run broadcast as it can delay your other transactional or system messages. |
| Selected Channels | *Optional* | Add Channels here if you want to send broadcast on particular channel in the template group. |
| Variable data | *Optional* | Add variables JSON here if you have variables in your template. |
| When | *Optional* | -**Immediately** will trigger the broadcast instantly on the click of the button -Choose **After Delay** or **Scheduled time** if you want to schedule broadcast for later time. **After delay** is relative time difference from the instant of button click and **Scheduled time** is for defining absolute datetime of trigger |
Once, you click on button, it will ask for a confirmation. This is just to ensure that a bulk campaigns is not triggered by mistake. Click on to trigger the broadcast. You can check the notification status on Logs page.
***
# Broadcast
Source: https://docs.suprsend.com/docs/broadcast-go
Trigger broadcast notifications to a list of users with Go SDK.
## Pre-Requisites
[Create a list of users](/docs/lists-go)
## Payload Schema
This will open the broadcast form. Fill in the relevant information and click on
| Field | Obligation | Description |
| --------------------- | ----------- | ------------------------------------------------------------------------------------------------------------------------------------------------------------------------------------------------------------------------------------------------------------------------------------------------------------------------------------------------------------------------------------------------- |
| List ID | *Mandatory* | `id` of the list on which broadcast should be sent. |
| Template Name | *Mandatory* | Select the template content to be sent. |
| Notification category | *Mandatory* | [Notification category](/docs/notification-category) will be used to pick up the vendor credential and also to power [preferences](/docs/user-preferences). If you don't have user preferences setup in your product, you can define the category as `promotional`. Do not use `transactional` or `system` category to run broadcast as it can delay your other transactional or system messages. |
| Selected Channels | *Optional* | Add Channels here if you want to send broadcast on particular channel in the template group. |
| Variable data | *Optional* | Add variables JSON here if you have variables in your template. |
| When | *Optional* | -**Immediately** will trigger the broadcast instantly on the click of the button -Choose **After Delay** or **Scheduled time** if you want to schedule broadcast for later time. **After delay** is relative time difference from the instant of button click and **Scheduled time** is for defining absolute datetime of trigger |
Once, you click on button, it will ask for a confirmation. This is just to ensure that a bulk campaigns is not triggered by mistake. Click on to trigger the broadcast. You can check the notification status on Logs page.
***
# Broadcast
Source: https://docs.suprsend.com/docs/broadcast-go
Trigger broadcast notifications to a list of users with Go SDK.
## Pre-Requisites
[Create a list of users](/docs/lists-go)
## Payload Schema
 For production workspaces public API Keys alone isn't enough as they are insecure. To solve this enable enhanced secure mode switch which you can find beside Public Key (shown in above image). This mandates signed user token (a JWT token that identifies the user that is performing the request) to be sent along with client requests.
## Enhanced Security Mode with signed User Token
When enhanced security mode is on, user level authentication is performed for all requests. This is recommended for Production workspaces. All requests will be rejected by SuprSend if enhanced security mode is on and signed user token is not provided. This signed user token should be generated by your backend application and should be passed to your client.
For production workspaces public API Keys alone isn't enough as they are insecure. To solve this enable enhanced secure mode switch which you can find beside Public Key (shown in above image). This mandates signed user token (a JWT token that identifies the user that is performing the request) to be sent along with client requests.
## Enhanced Security Mode with signed User Token
When enhanced security mode is on, user level authentication is performed for all requests. This is recommended for Production workspaces. All requests will be rejected by SuprSend if enhanced security mode is on and signed user token is not provided. This signed user token should be generated by your backend application and should be passed to your client.
 Once signing key is generated it won't be shown again, so copy and store it securely. It contains 2 formats: (i.) **Base64 format:** This is single line text, suitable for storing as an environment variable. (ii.) **PEM format:** This is multiline text format string.
You can use any of the above format. This key will be used as secret to generate JWT token as shown in below step.
Once signing key is generated it won't be shown again, so copy and store it securely. It contains 2 formats: (i.) **Base64 format:** This is single line text, suitable for storing as an environment variable. (ii.) **PEM format:** This is multiline text format string.
You can use any of the above format. This key will be used as secret to generate JWT token as shown in below step.
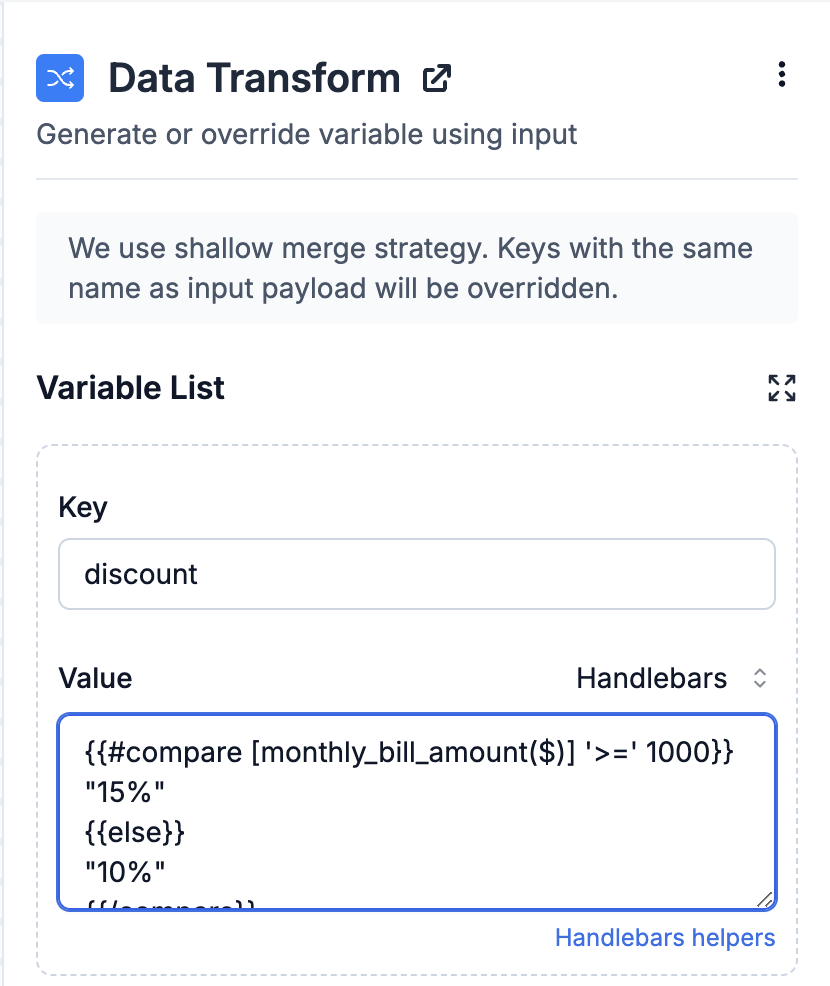 The transformation would modify the discount for User 1, resulting in
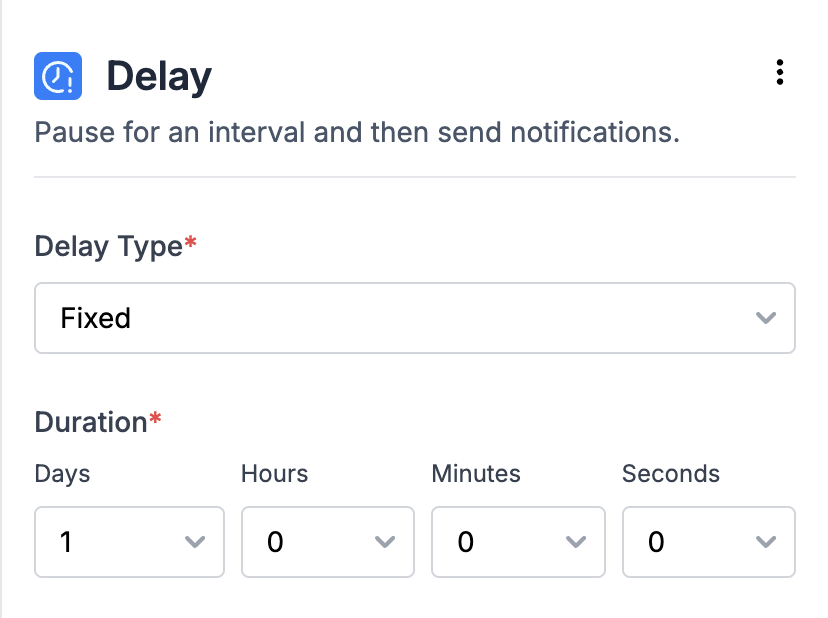 Some examples of fixed delay are:
* Sending multiple payment or activity reminders at predetermined intervals. For instance, sending three payment reminders spaced 24 hours apart from the last due date.
* Implementing conditional sends across multiple channels. e.g., sending an approval notification via Inbox and scheduling an email to be sent one hour later if the approval is not received. [Smart channel routing](/docs/smart-delivery) is a better approach to solve this use case.
Some examples of fixed delay are:
* Sending multiple payment or activity reminders at predetermined intervals. For instance, sending three payment reminders spaced 24 hours apart from the last due date.
* Implementing conditional sends across multiple channels. e.g., sending an approval notification via Inbox and scheduling an email to be sent one hour later if the approval is not received. [Smart channel routing](/docs/smart-delivery) is a better approach to solve this use case.
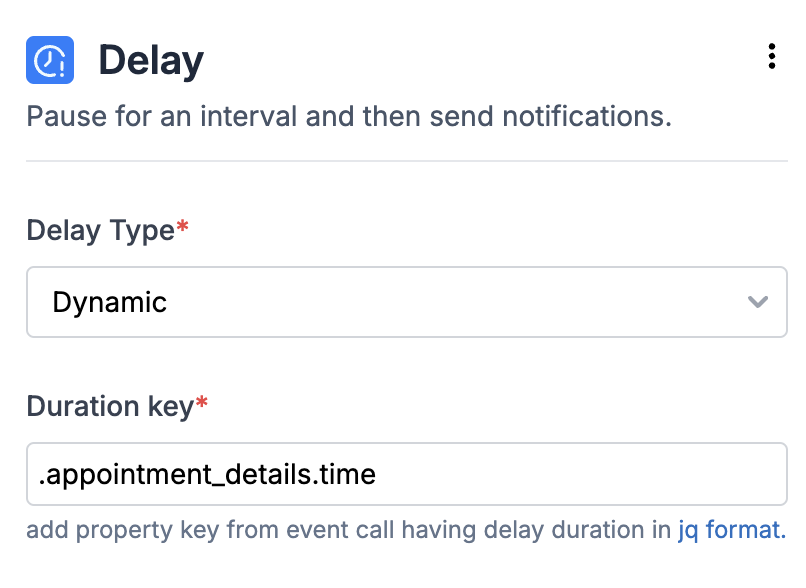 For instance, you might want to send a reminder one day before an interview date. In such scenarios, the reminder schedule can also be user-defined, resulting in variable delays per user. Consider the example of Google Calendar, where each user sets their own reminder schedule for meetings—some opt for reminders 10 minutes before, while others prefer 30 minutes before. Dynamic delays accommodate these individual preferences seamlessly.
You can add duration key as a [JQ-expression](https://jqlang.github.io/jq/manual/). Below are some examples of how to add duration key in JQ format:
* General format for duration key at parent level is `.duration_key`
* If the duration key is a nested event property key like shown below, enter it in the format `.appointment_details.time`
For instance, you might want to send a reminder one day before an interview date. In such scenarios, the reminder schedule can also be user-defined, resulting in variable delays per user. Consider the example of Google Calendar, where each user sets their own reminder schedule for meetings—some opt for reminders 10 minutes before, while others prefer 30 minutes before. Dynamic delays accommodate these individual preferences seamlessly.
You can add duration key as a [JQ-expression](https://jqlang.github.io/jq/manual/). Below are some examples of how to add duration key in JQ format:
* General format for duration key at parent level is `.duration_key`
* If the duration key is a nested event property key like shown below, enter it in the format `.appointment_details.time`
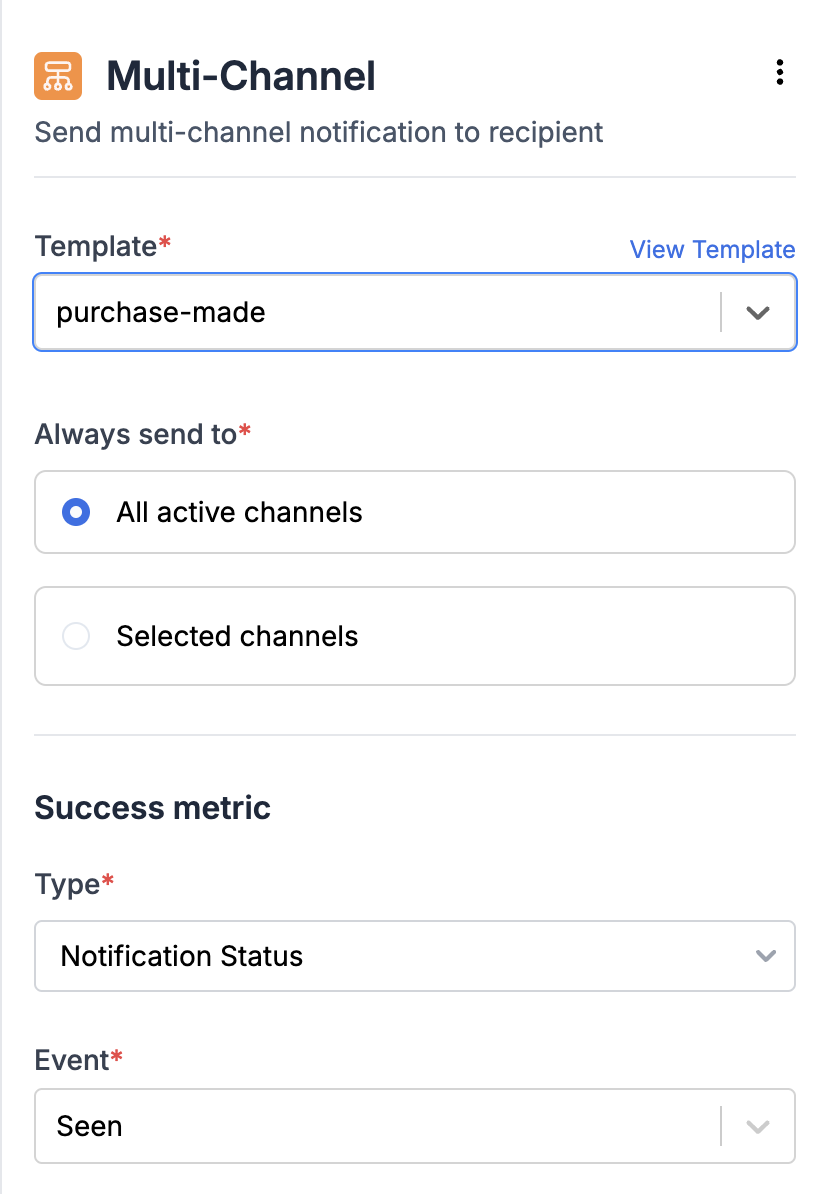 The content of the notification is designed with [templates](/docs/templates). In SuprSend, you can design the content of multiple channels within a single template group.
## How the delivery node is executed?
Delivery node is successfully executed if all of the below checks hold true:
1. The channel should be published and live in the template. For WhatsApp and SMS (Indian vendors), templates become live upon approval by the respective provider.
2. Vendor Configuration is available for the channel. For all out-of-app channels, you need to create an account with the respective [channel provider](/docs/vendors) and add the configuration in the vendor form on SuprSend dashboard. Inbox is an internal offering by SuprSend and doesn't need any third party integration. [Refer Integration guide](/docs/inbox-overview) to setup Inbox Channel.
3. Channel information should be available in user profile and channel status should be active. Template channels not available in user profile are skipped for delivery. A set channel becomes inactive in case the channel is`removed `or `unset`using [SDK or API](/docs/users#via-sdk) or it is marked inactive by SuprSend.
4. User preference is`opt-in `for the given channel and notification category (defined in workflow settings). You can check user preference status using [get user preference API](/reference/get-user-category-preferences).
The content of the notification is designed with [templates](/docs/templates). In SuprSend, you can design the content of multiple channels within a single template group.
## How the delivery node is executed?
Delivery node is successfully executed if all of the below checks hold true:
1. The channel should be published and live in the template. For WhatsApp and SMS (Indian vendors), templates become live upon approval by the respective provider.
2. Vendor Configuration is available for the channel. For all out-of-app channels, you need to create an account with the respective [channel provider](/docs/vendors) and add the configuration in the vendor form on SuprSend dashboard. Inbox is an internal offering by SuprSend and doesn't need any third party integration. [Refer Integration guide](/docs/inbox-overview) to setup Inbox Channel.
3. Channel information should be available in user profile and channel status should be active. Template channels not available in user profile are skipped for delivery. A set channel becomes inactive in case the channel is`removed `or `unset`using [SDK or API](/docs/users#via-sdk) or it is marked inactive by SuprSend.
4. User preference is`opt-in `for the given channel and notification category (defined in workflow settings). You can check user preference status using [get user preference API](/reference/get-user-category-preferences).
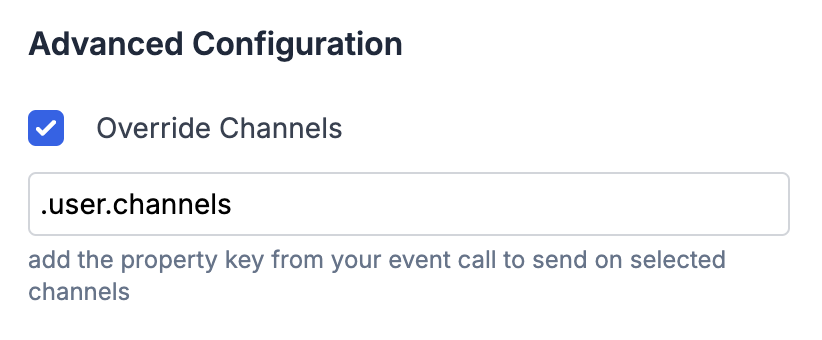 The expected channel values are: `["email", "sms", "whatsapp", "androidpush", "iospush", "webpush", "slack", "inbox", "ms_teams"]`
You can add channel array as a [JQ-expression](https://jqlang.github.io/jq/manual/). So, in case your channel values do not match with the one mentioned in the above table, you can transform it using the JQ-expression. Below are some examples of how to add duration key in JQ format:
1. General format for duration key at parent level is`.channels`
2. If channel is a nested event property key like shown below, enter it in the format`.user.channels`.
The expected channel values are: `["email", "sms", "whatsapp", "androidpush", "iospush", "webpush", "slack", "inbox", "ms_teams"]`
You can add channel array as a [JQ-expression](https://jqlang.github.io/jq/manual/). So, in case your channel values do not match with the one mentioned in the above table, you can transform it using the JQ-expression. Below are some examples of how to add duration key in JQ format:
1. General format for duration key at parent level is`.channels`
2. If channel is a nested event property key like shown below, enter it in the format`.user.channels`.
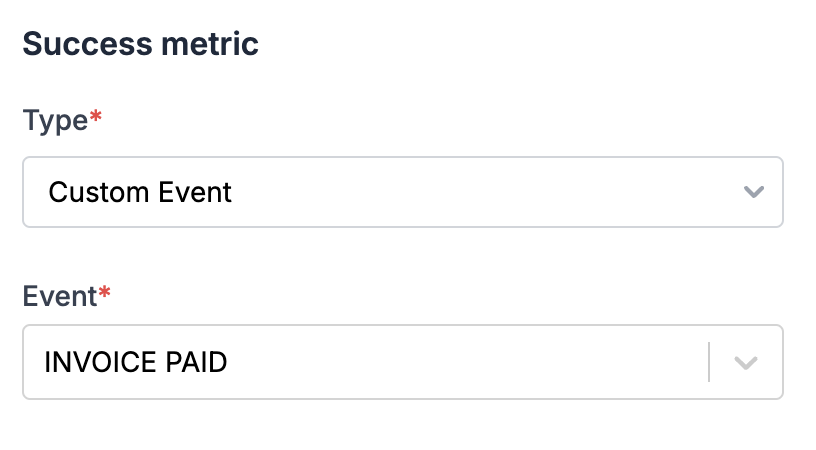 In the context of multi-channel delivery, the success metric is utilized solely to track conversion numbers for display in workflow analytics. However, in the case of [smart channel routing](/docs/smart-delivery), the same success metric serves to halt delivery on further channels once the success metric is achieved.
***
# Delivery- Single Channel
Source: https://docs.suprsend.com/docs/delivery-single-channel
Learn how to use delivery nodes like email, sms, whatsapp, mobile push, web push, slack, ms teams, inbox in workflows.
You can use single-channel delivery nodes - Email, SMS, Whatsapp, Inbox, Slack, MS Teams, MobilePush and Webpush to send notification on a particular user channel. The content of the notification is designed with [templates](/docs/templates).
In the context of multi-channel delivery, the success metric is utilized solely to track conversion numbers for display in workflow analytics. However, in the case of [smart channel routing](/docs/smart-delivery), the same success metric serves to halt delivery on further channels once the success metric is achieved.
***
# Delivery- Single Channel
Source: https://docs.suprsend.com/docs/delivery-single-channel
Learn how to use delivery nodes like email, sms, whatsapp, mobile push, web push, slack, ms teams, inbox in workflows.
You can use single-channel delivery nodes - Email, SMS, Whatsapp, Inbox, Slack, MS Teams, MobilePush and Webpush to send notification on a particular user channel. The content of the notification is designed with [templates](/docs/templates).
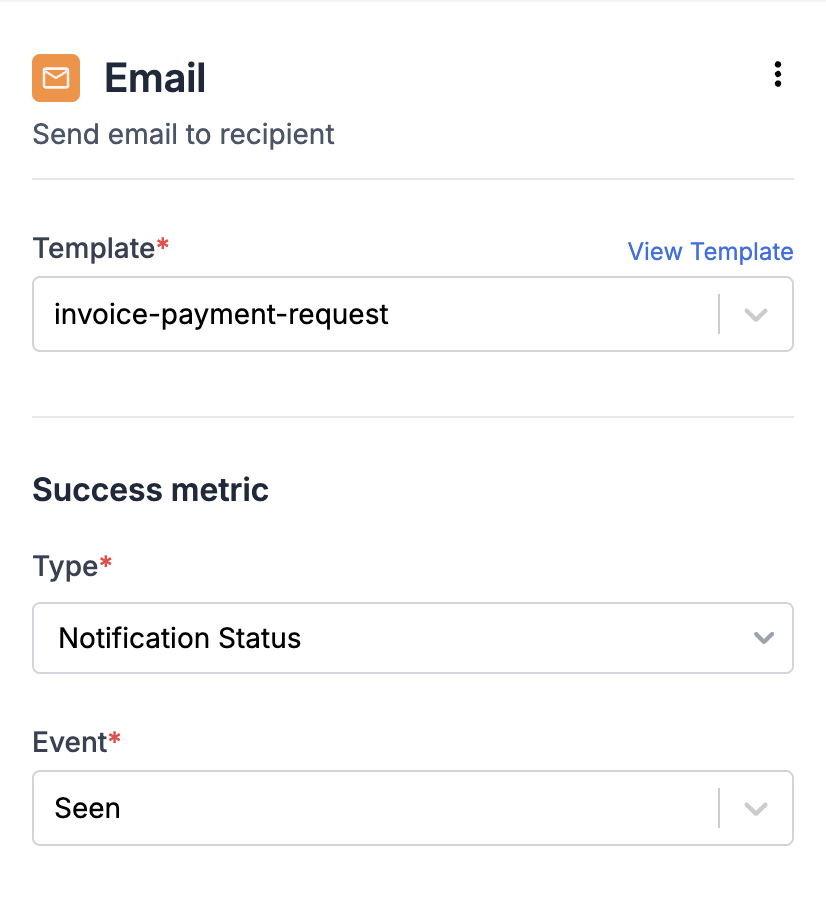 ## How the delivery node is executed?
Delivery node is successfully executed if all of the below checks hold true:
1. The channel must be published and live within the template. For WhatsApp and SMS (Indian vendors), templates become live upon approval by the respective provider.
2. Vendor Configuration is available for the channel. For all out-of-app channels, you need to create an account with the respective [channel provider](/docs/vendors) and add the configuration in the vendor form on SuprSend dashboard. Inbox is an internal offering by SuprSend and doesn't need any third party integration. [Refer Integration guide](/docs/inbox-overview) to setup Inbox Channel.
3. Channel information should be available in user profile and channel status should be active. A set channel becomes inactive in case the channel is `removed`or `unset`using [SDK or API](/docs/users#via-sdk) or it is marked inactive by SuprSend.
4. User preference is`opt-in `for the given channel and notification category (defined in workflow settings). You can check user preference status using [get user preference API](/reference/get-user-category-preferences).
## How the delivery node is executed?
Delivery node is successfully executed if all of the below checks hold true:
1. The channel must be published and live within the template. For WhatsApp and SMS (Indian vendors), templates become live upon approval by the respective provider.
2. Vendor Configuration is available for the channel. For all out-of-app channels, you need to create an account with the respective [channel provider](/docs/vendors) and add the configuration in the vendor form on SuprSend dashboard. Inbox is an internal offering by SuprSend and doesn't need any third party integration. [Refer Integration guide](/docs/inbox-overview) to setup Inbox Channel.
3. Channel information should be available in user profile and channel status should be active. A set channel becomes inactive in case the channel is `removed`or `unset`using [SDK or API](/docs/users#via-sdk) or it is marked inactive by SuprSend.
4. User preference is`opt-in `for the given channel and notification category (defined in workflow settings). You can check user preference status using [get user preference API](/reference/get-user-category-preferences).
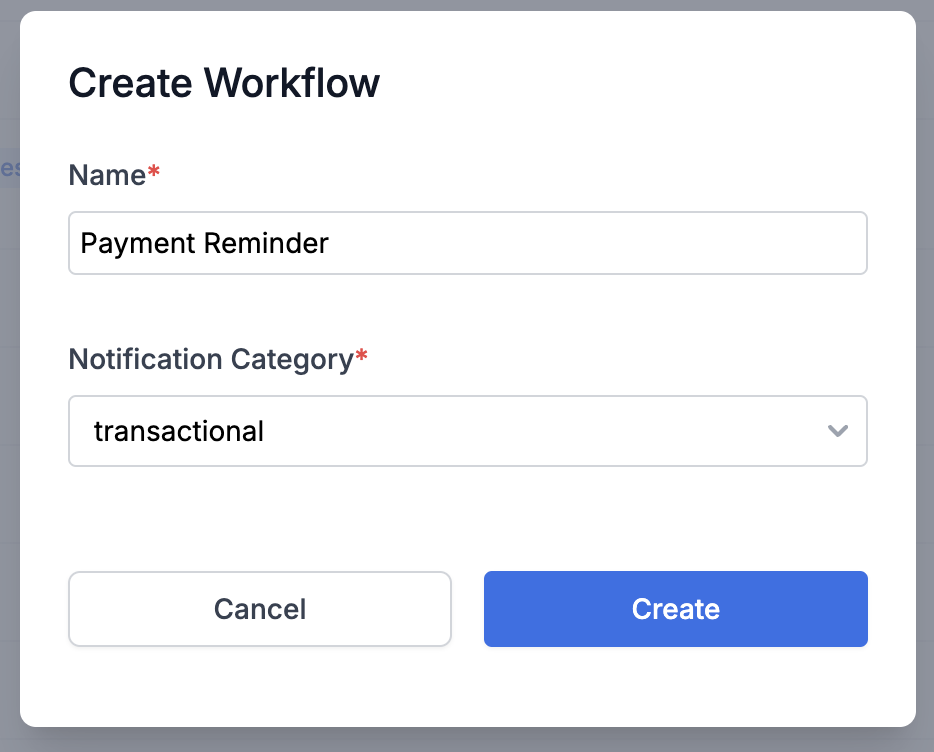 * After entering the required details, click on `Create` button to create a new workflow in draft state. You'll see the created workflow on top of the listing page, click on it to start editing.
* Next, add relevant nodes to your workflow and edit workflow settings.
* Once you've finalized your edits, remember to make the workflow live. If you don't want to make your changes live right away, you can `exit edit mode` and come back later to commit the changes. Rest assured, your modifications will remain saved in the draft state until finalized.
## Designing workflow
Workflows enable you to build complex notifications by defining whom to notify, when, and through which channels. A workflow requires a trigger node to initiate it and a delivery node to send the final notification.
Additionally, you have functional nodes that adds logic, branch nodes to split execution based on conditions, and data update nodes to modify or add data and assets in SuprSend. We've explained and listed down the available workflow nodes below.
### 1. Trigger Node
It is the first step of your workflow and contains information about what initiates the workflow, and related conditions. There are 3 types of workflow triggers possible:
1. **List entry / exit:** Starts the workflow when a user enters or exists a [list](https://docs.suprsend.com/docs/lists).
2. **Event Stream:** Starts the workflow when one of the linked events is sent to SuprSend.
3. **Workflow API:** Here, you explicitly call a workflow using its workflow-slug, specifying the workflow and recipients directly in the API request.
Other than re-engagement notifications, most transactional workflows will either be triggered by passing an event or using workflow API. Compare event vs workflow API here.
* After entering the required details, click on `Create` button to create a new workflow in draft state. You'll see the created workflow on top of the listing page, click on it to start editing.
* Next, add relevant nodes to your workflow and edit workflow settings.
* Once you've finalized your edits, remember to make the workflow live. If you don't want to make your changes live right away, you can `exit edit mode` and come back later to commit the changes. Rest assured, your modifications will remain saved in the draft state until finalized.

## Designing workflow
Workflows enable you to build complex notifications by defining whom to notify, when, and through which channels. A workflow requires a trigger node to initiate it and a delivery node to send the final notification.
Additionally, you have functional nodes that adds logic, branch nodes to split execution based on conditions, and data update nodes to modify or add data and assets in SuprSend. We've explained and listed down the available workflow nodes below.
### 1. Trigger Node
It is the first step of your workflow and contains information about what initiates the workflow, and related conditions. There are 3 types of workflow triggers possible:
1. **List entry / exit:** Starts the workflow when a user enters or exists a [list](https://docs.suprsend.com/docs/lists).
2. **Event Stream:** Starts the workflow when one of the linked events is sent to SuprSend.
3. **Workflow API:** Here, you explicitly call a workflow using its workflow-slug, specifying the workflow and recipients directly in the API request.
Other than re-engagement notifications, most transactional workflows will either be triggered by passing an event or using workflow API. Compare event vs workflow API here.
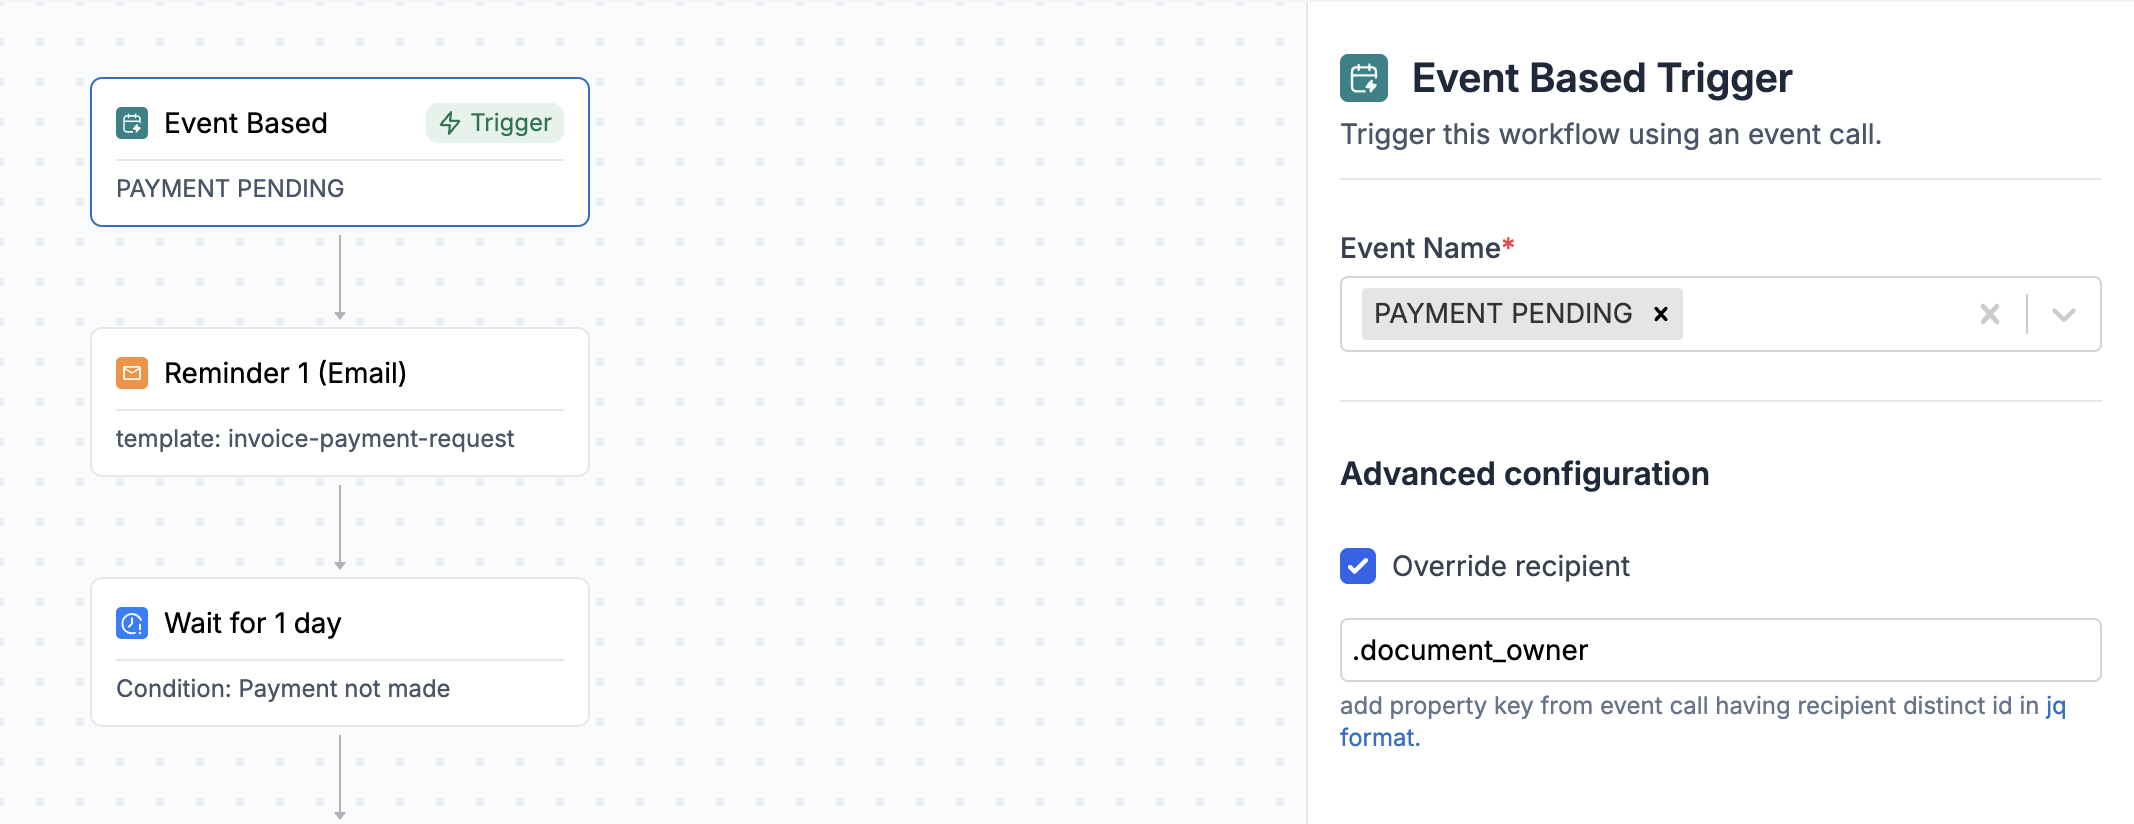 ### 2. Delivery Nodes
These nodes are the final steps in the workflow, responsible for delivering notifications to users. Here's a list of available delivery nodes:
### 2. Delivery Nodes
These nodes are the final steps in the workflow, responsible for delivering notifications to users. Here's a list of available delivery nodes:
 Notification content is picked from the template, and only published and live templates can be added to the delivery node. Therefore, it's essential to [design the template](/docs/templates) before configuring this node.
When the workflow reaches this node, it looks for active channels in the template and user profile, and send the notification to active user channels whose template content is live. [User preferences](/docs/user-preferences) are also taken into account at this stage. If the user has opted out of the given notification category or channel, it will be skipped, and corresponding errors can be seen on the[ logs page](/docs/logging).
### 3. Function Nodes
Functions are logical steps in your workflow. We currently support the following functions:
Notification content is picked from the template, and only published and live templates can be added to the delivery node. Therefore, it's essential to [design the template](/docs/templates) before configuring this node.
When the workflow reaches this node, it looks for active channels in the template and user profile, and send the notification to active user channels whose template content is live. [User preferences](/docs/user-preferences) are also taken into account at this stage. If the user has opted out of the given notification category or channel, it will be skipped, and corresponding errors can be seen on the[ logs page](/docs/logging).
### 3. Function Nodes
Functions are logical steps in your workflow. We currently support the following functions:
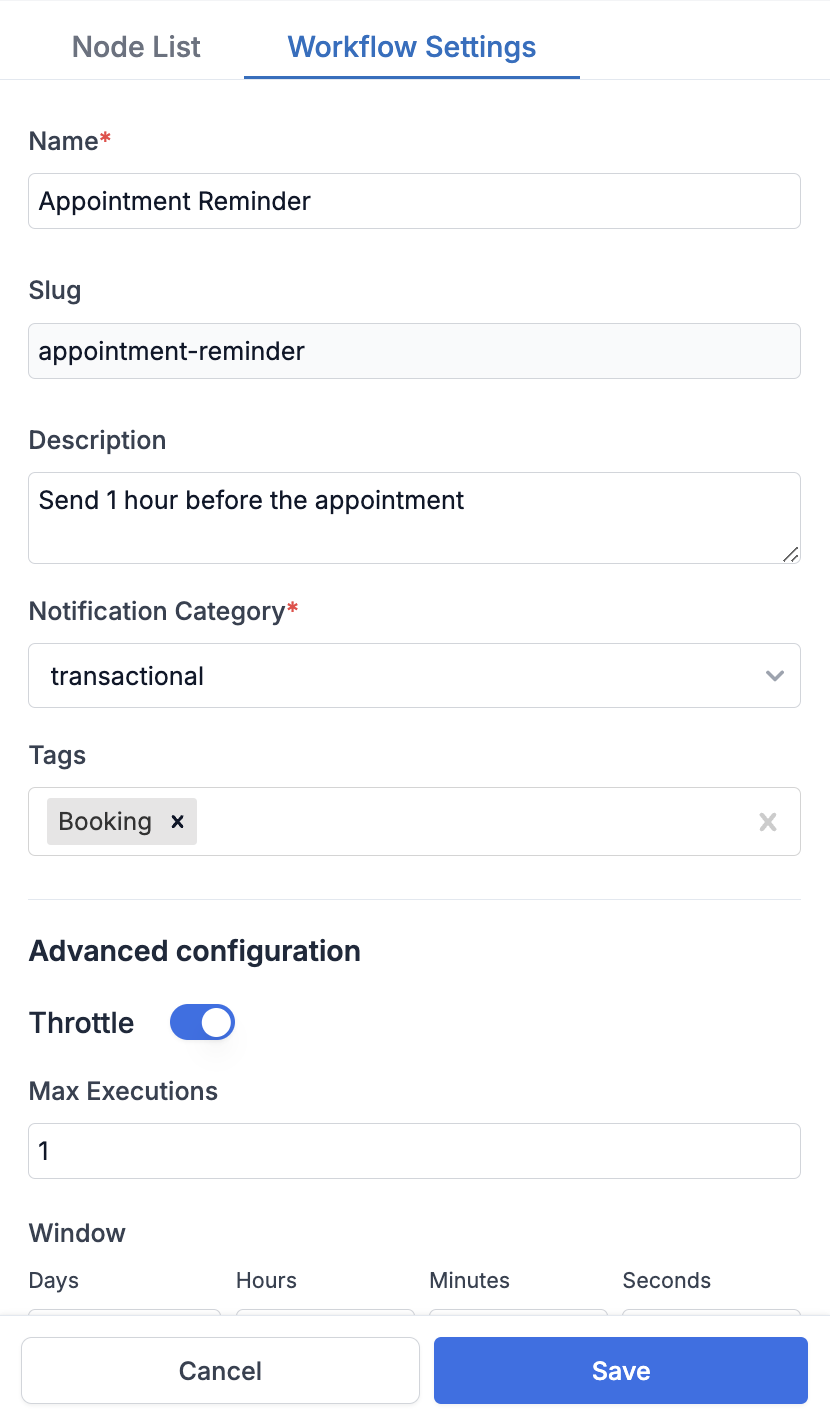 | Field | Obligation | Description |
| ------------------------- | ------------- | ------------------------------------------------------------------------------------------------------------------------------------------------------------------------------------------------------------------------------------------------------------------------------------------------------------------------------------------------------------------------------------------------------------------------------------------------------------------------------------------- |
| **Name** | *\*mandatory* | Unique name of the workflow. The workflow name should be easily identifiable for your reference at a later stage. e.g. - `Appointment Reminder`. You can also use event name as your workflow name if there is only one workflow linked to that event. |
| **Description** | *optional* | You can use this field to add more details about your workflow like the notification logic. e.g. - `Send 1 hour before the appointment`. |
| **Notification Category** | *\*mandatory* | \[Notification category] ("[https://docs.suprsend.com/docs/notification-category](https://docs.suprsend.com/docs/notification-category)") is used to group related workflows together and are also used for users to set their preferences across a group of workflows. There are 3 notification categories by default: `transactional` (user action-based alerts), `promotional` (marketing notifications), and `system` (time-sensitive notifications like OTP and authentication codes). |
| **Tags** | *optional* | Tags are used to group related workflows together. e.g., all booking-related workflows can be tagged as `Booking`. |
| **Throttle** | *optional* | You can use throttle to limit the number of workflow executions per user in a given time window. \[Know more about throttle here] ("[https://docs.suprsend.com/docs/throttle](https://docs.suprsend.com/docs/throttle)") . |
### Change Node name and description
To modify the name and description of a node, click on the `edit metadata` option from the burger menu on your node form. Choose a descriptive name that clarifies the function of the step, and we suggest including node type in the name for easier identification. In the description field, provide a concise explanation of the logic and important elements of the node. For instance, in a send node, you can specify the template being used or provide details about the list of users who will be notified if it differs from the actor.
| Field | Obligation | Description |
| ------------------------- | ------------- | ------------------------------------------------------------------------------------------------------------------------------------------------------------------------------------------------------------------------------------------------------------------------------------------------------------------------------------------------------------------------------------------------------------------------------------------------------------------------------------------- |
| **Name** | *\*mandatory* | Unique name of the workflow. The workflow name should be easily identifiable for your reference at a later stage. e.g. - `Appointment Reminder`. You can also use event name as your workflow name if there is only one workflow linked to that event. |
| **Description** | *optional* | You can use this field to add more details about your workflow like the notification logic. e.g. - `Send 1 hour before the appointment`. |
| **Notification Category** | *\*mandatory* | \[Notification category] ("[https://docs.suprsend.com/docs/notification-category](https://docs.suprsend.com/docs/notification-category)") is used to group related workflows together and are also used for users to set their preferences across a group of workflows. There are 3 notification categories by default: `transactional` (user action-based alerts), `promotional` (marketing notifications), and `system` (time-sensitive notifications like OTP and authentication codes). |
| **Tags** | *optional* | Tags are used to group related workflows together. e.g., all booking-related workflows can be tagged as `Booking`. |
| **Throttle** | *optional* | You can use throttle to limit the number of workflow executions per user in a given time window. \[Know more about throttle here] ("[https://docs.suprsend.com/docs/throttle](https://docs.suprsend.com/docs/throttle)") . |
### Change Node name and description
To modify the name and description of a node, click on the `edit metadata` option from the burger menu on your node form. Choose a descriptive name that clarifies the function of the step, and we suggest including node type in the name for easier identification. In the description field, provide a concise explanation of the logic and important elements of the node. For instance, in a send node, you can specify the template being used or provide details about the list of users who will be notified if it differs from the actor.
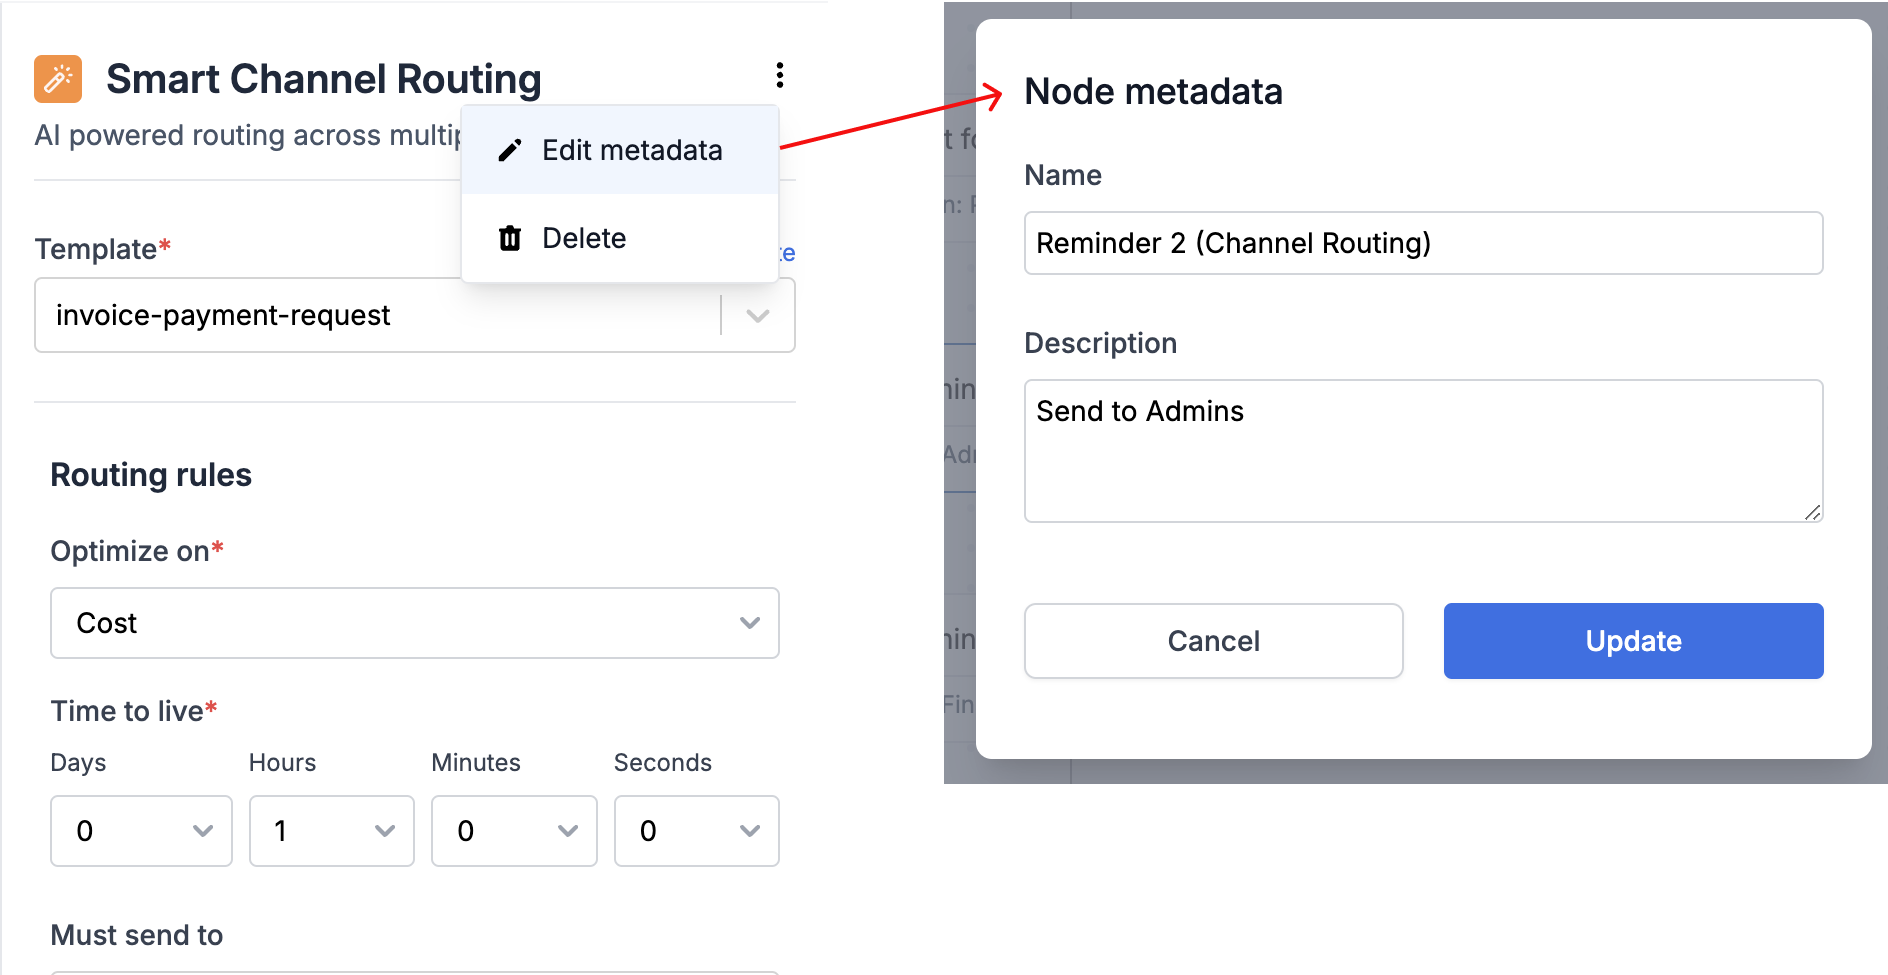 ## Delete Node
If you want to remove a node from the workflow, click on the `delete` option from the burger menu on your node form to delete it.
## Cloning a workflow
We recommend designing and testing workflows in staging workspace first before pushing it to production. You can use clone functionality to duplicate workflows across workspaces or to avoid creating similar workflows from scratch.
To clone a workflow, just click the clone button on workflow details page in view mode. Please note that you won't see this option while editing the workflow.
Once cloned, your workflow will appear as a draft in your chosen destination. You can then commit it to make it live.
***
# API Keys and Secrets
Source: https://docs.suprsend.com/docs/developer/api-keys
Learn the different authentication methods available in SuprSend and how to securely integrate them into your application.
SuprSend supports **three authentication methods**:
* **Workspace Key & Secret** → Used to authenticate requests from **Backend SDKs**.
* **API Keys** → Used to authenticate **REST APIs** as `Bearer
## Delete Node
If you want to remove a node from the workflow, click on the `delete` option from the burger menu on your node form to delete it.
## Cloning a workflow
We recommend designing and testing workflows in staging workspace first before pushing it to production. You can use clone functionality to duplicate workflows across workspaces or to avoid creating similar workflows from scratch.
To clone a workflow, just click the clone button on workflow details page in view mode. Please note that you won't see this option while editing the workflow.
Once cloned, your workflow will appear as a draft in your chosen destination. You can then commit it to make it live.

***
# API Keys and Secrets
Source: https://docs.suprsend.com/docs/developer/api-keys
Learn the different authentication methods available in SuprSend and how to securely integrate them into your application.
SuprSend supports **three authentication methods**:
* **Workspace Key & Secret** → Used to authenticate requests from **Backend SDKs**.
* **API Keys** → Used to authenticate **REST APIs** as `Bearer 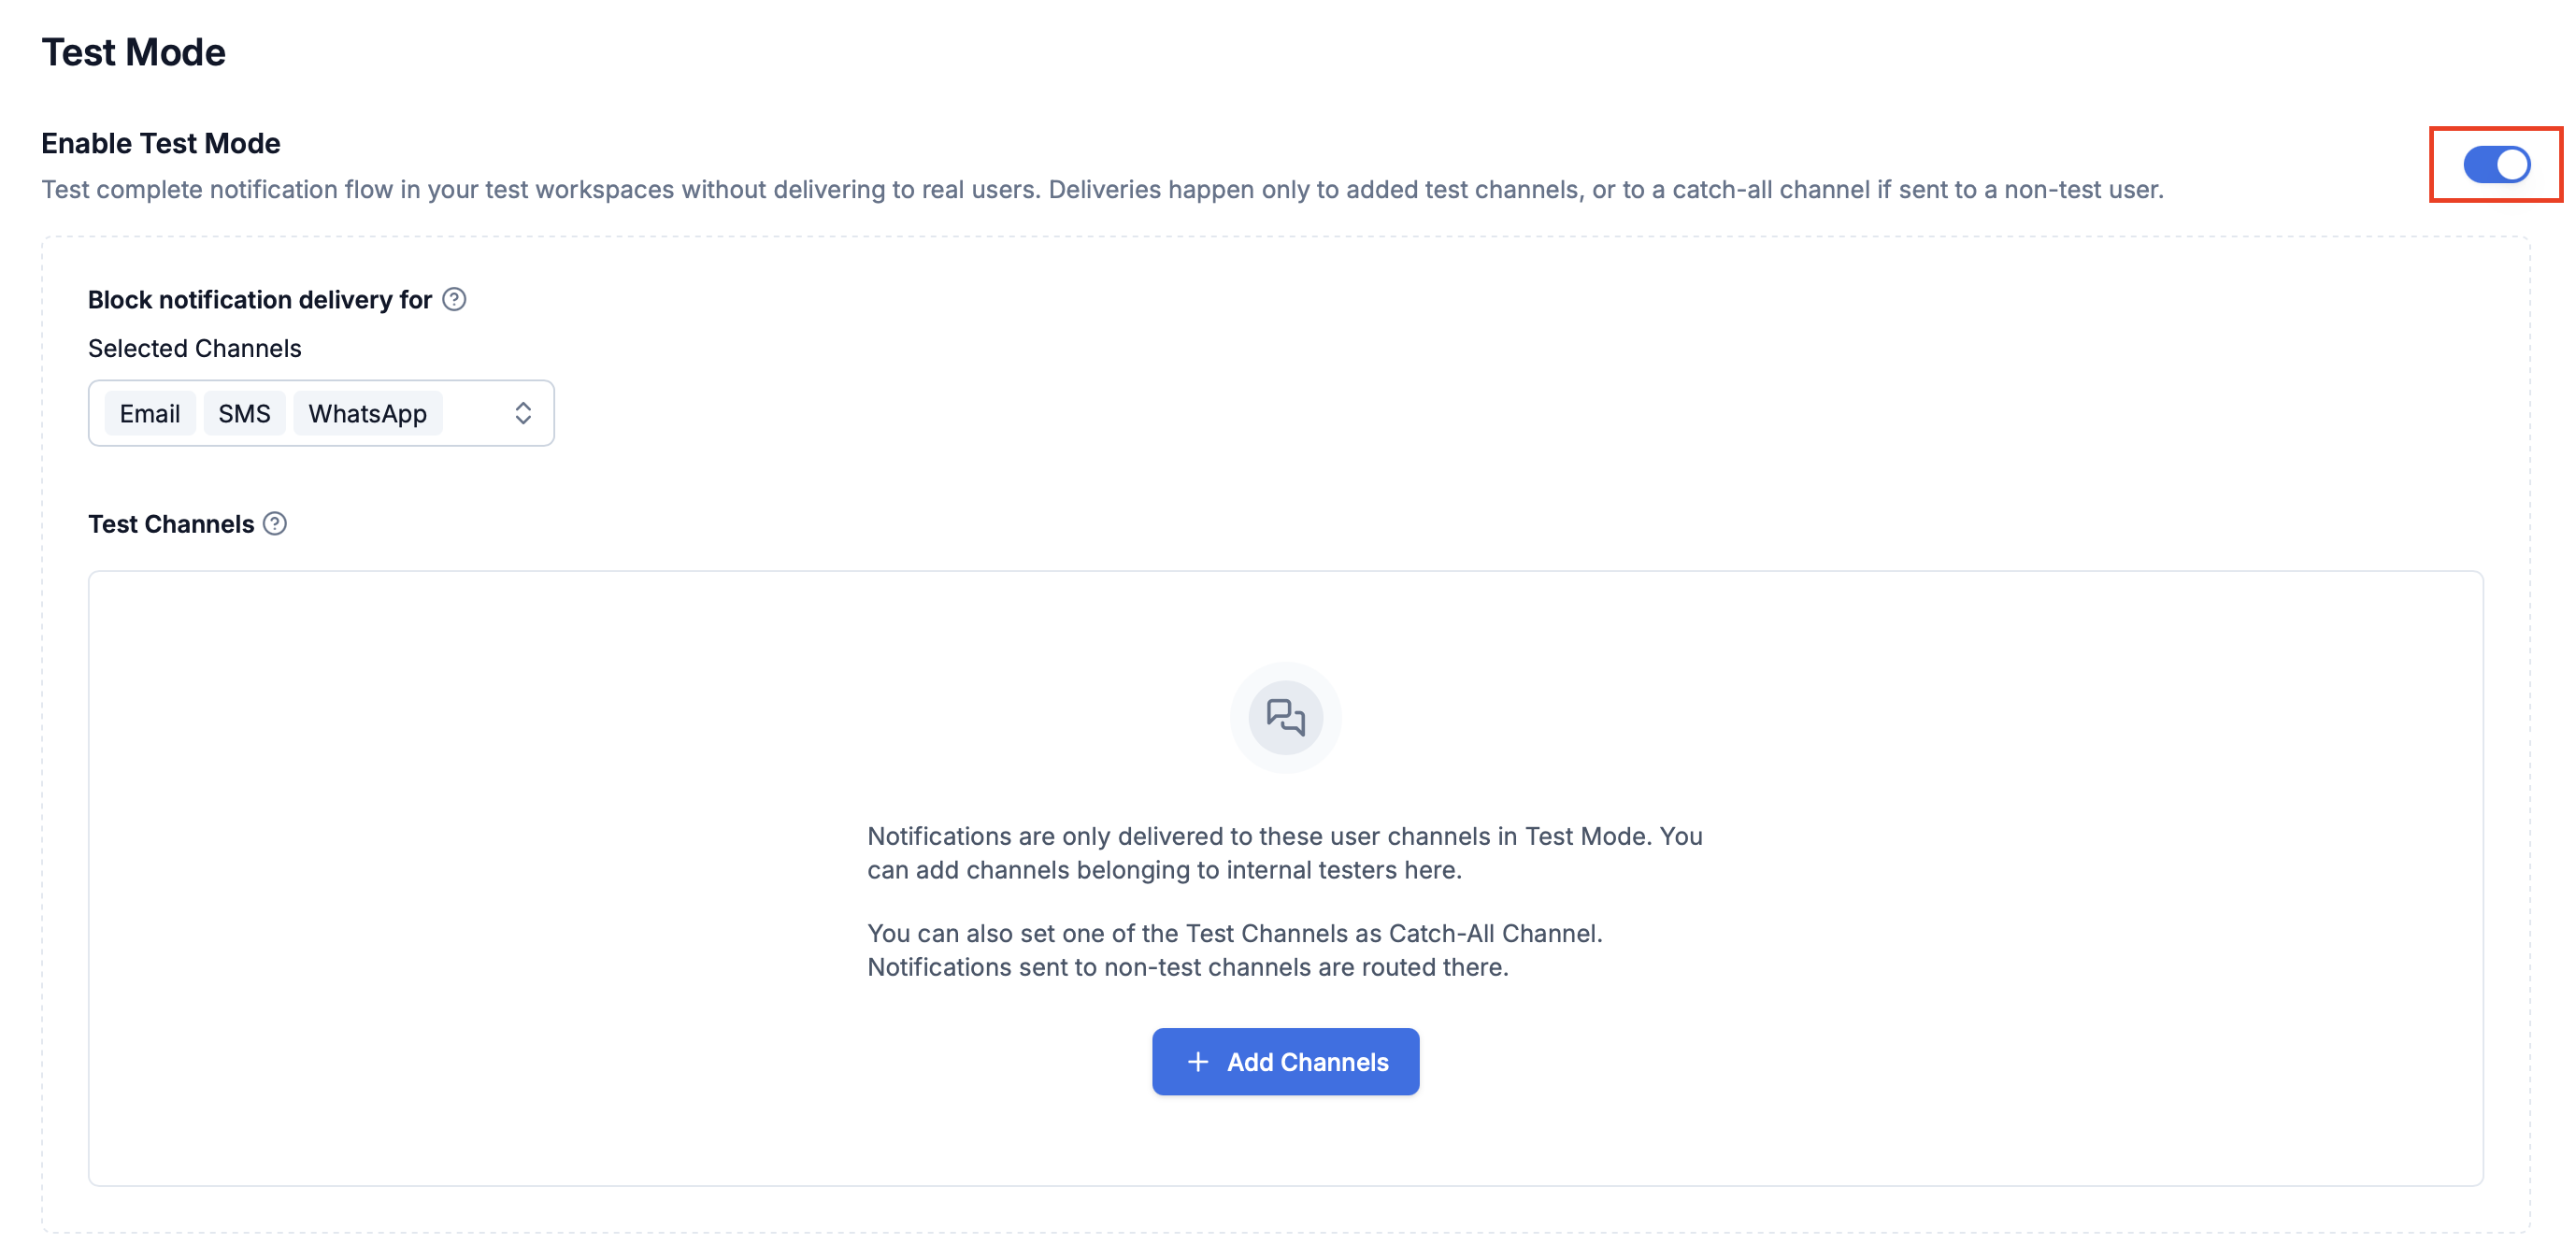
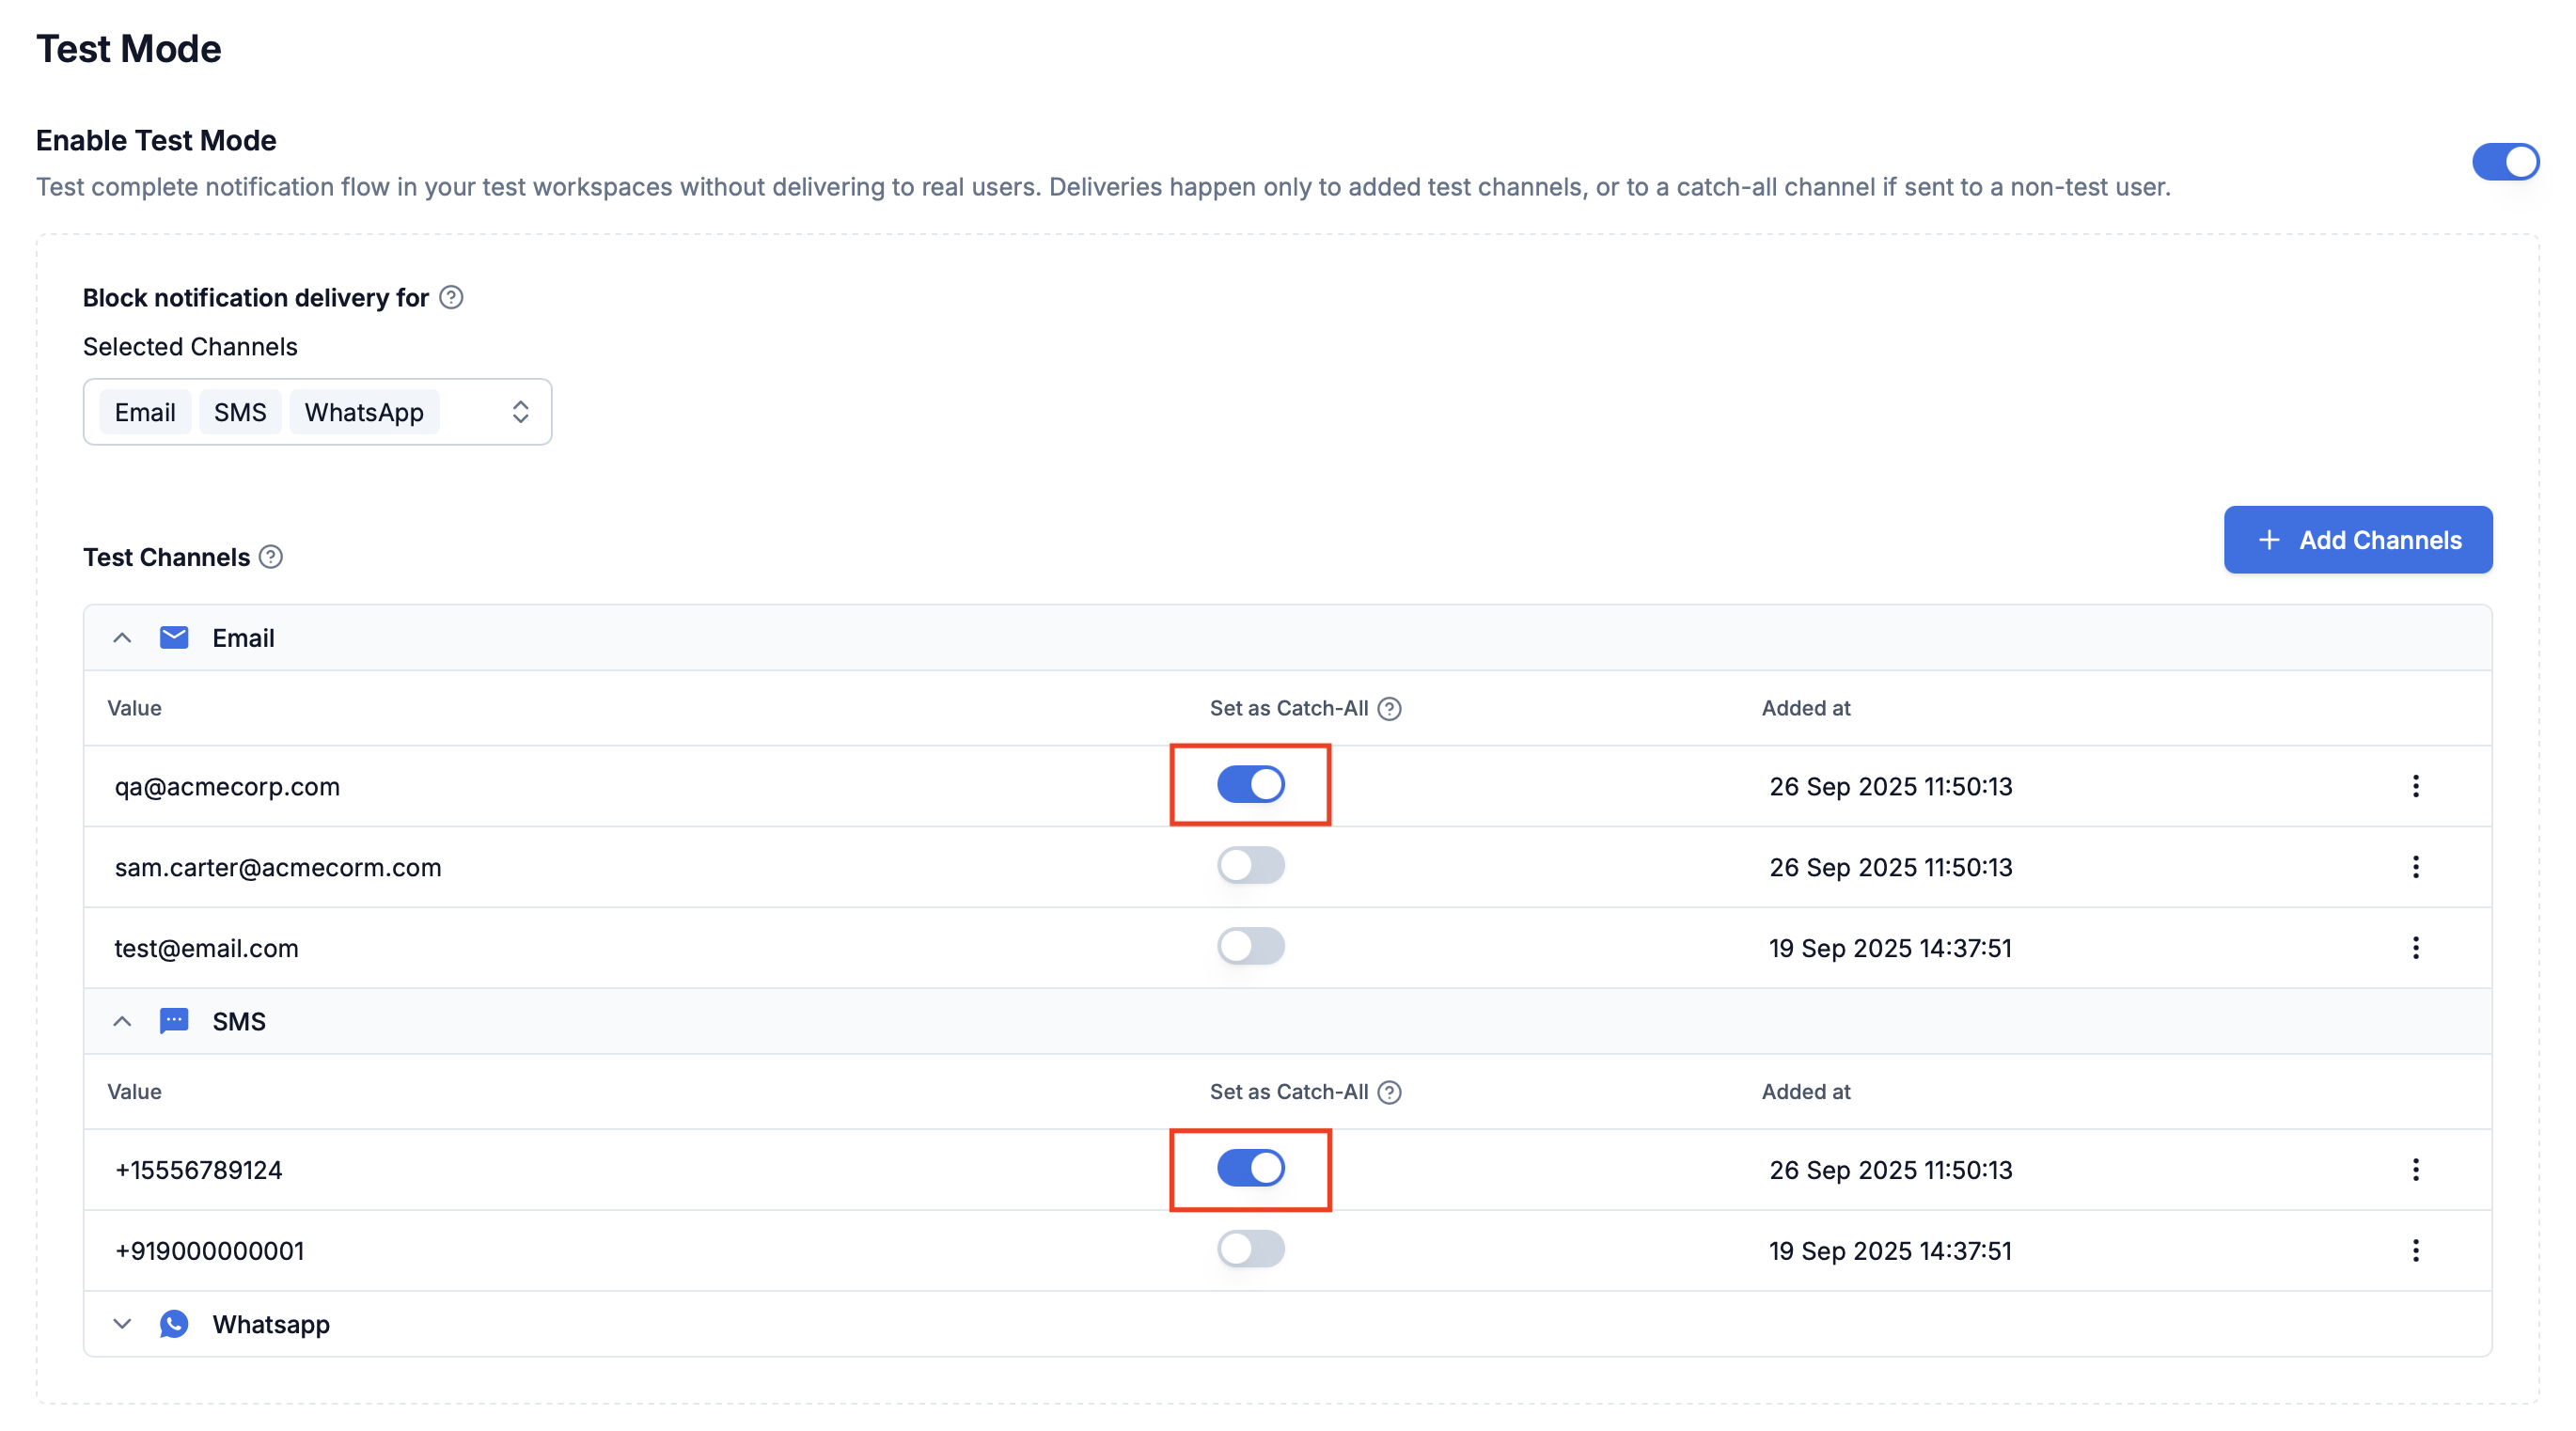
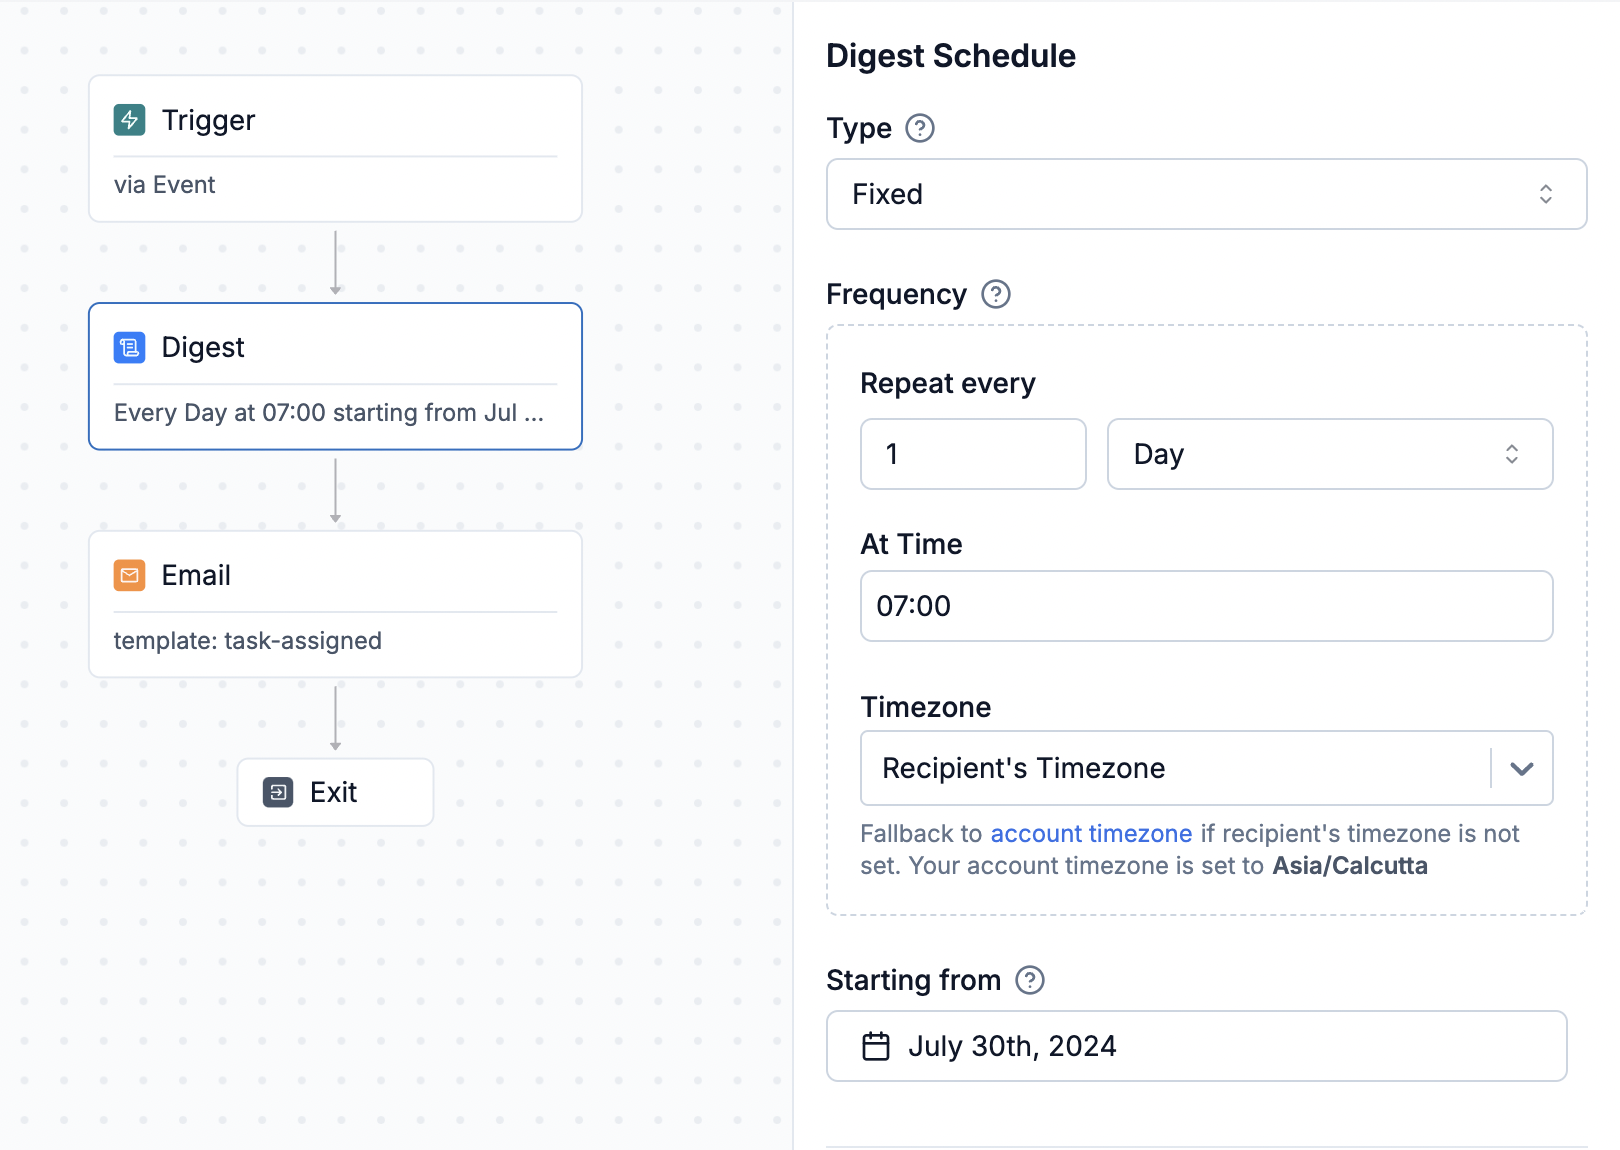 ## Configuring Digest schedule
It is the recurring schedule when an open digest should be closed. This schedule might differ from the time notifications are actually sent. e.g., if you want to send a daily digest summarizing activities from the previous day at 9:00 AM, you would set the Digest schedule to close daily at midnight and follow it with Time Window or Delay node to send the notification at 9:00 AM.
## Configuring Digest schedule
It is the recurring schedule when an open digest should be closed. This schedule might differ from the time notifications are actually sent. e.g., if you want to send a daily digest summarizing activities from the previous day at 9:00 AM, you would set the Digest schedule to close daily at midnight and follow it with Time Window or Delay node to send the notification at 9:00 AM.
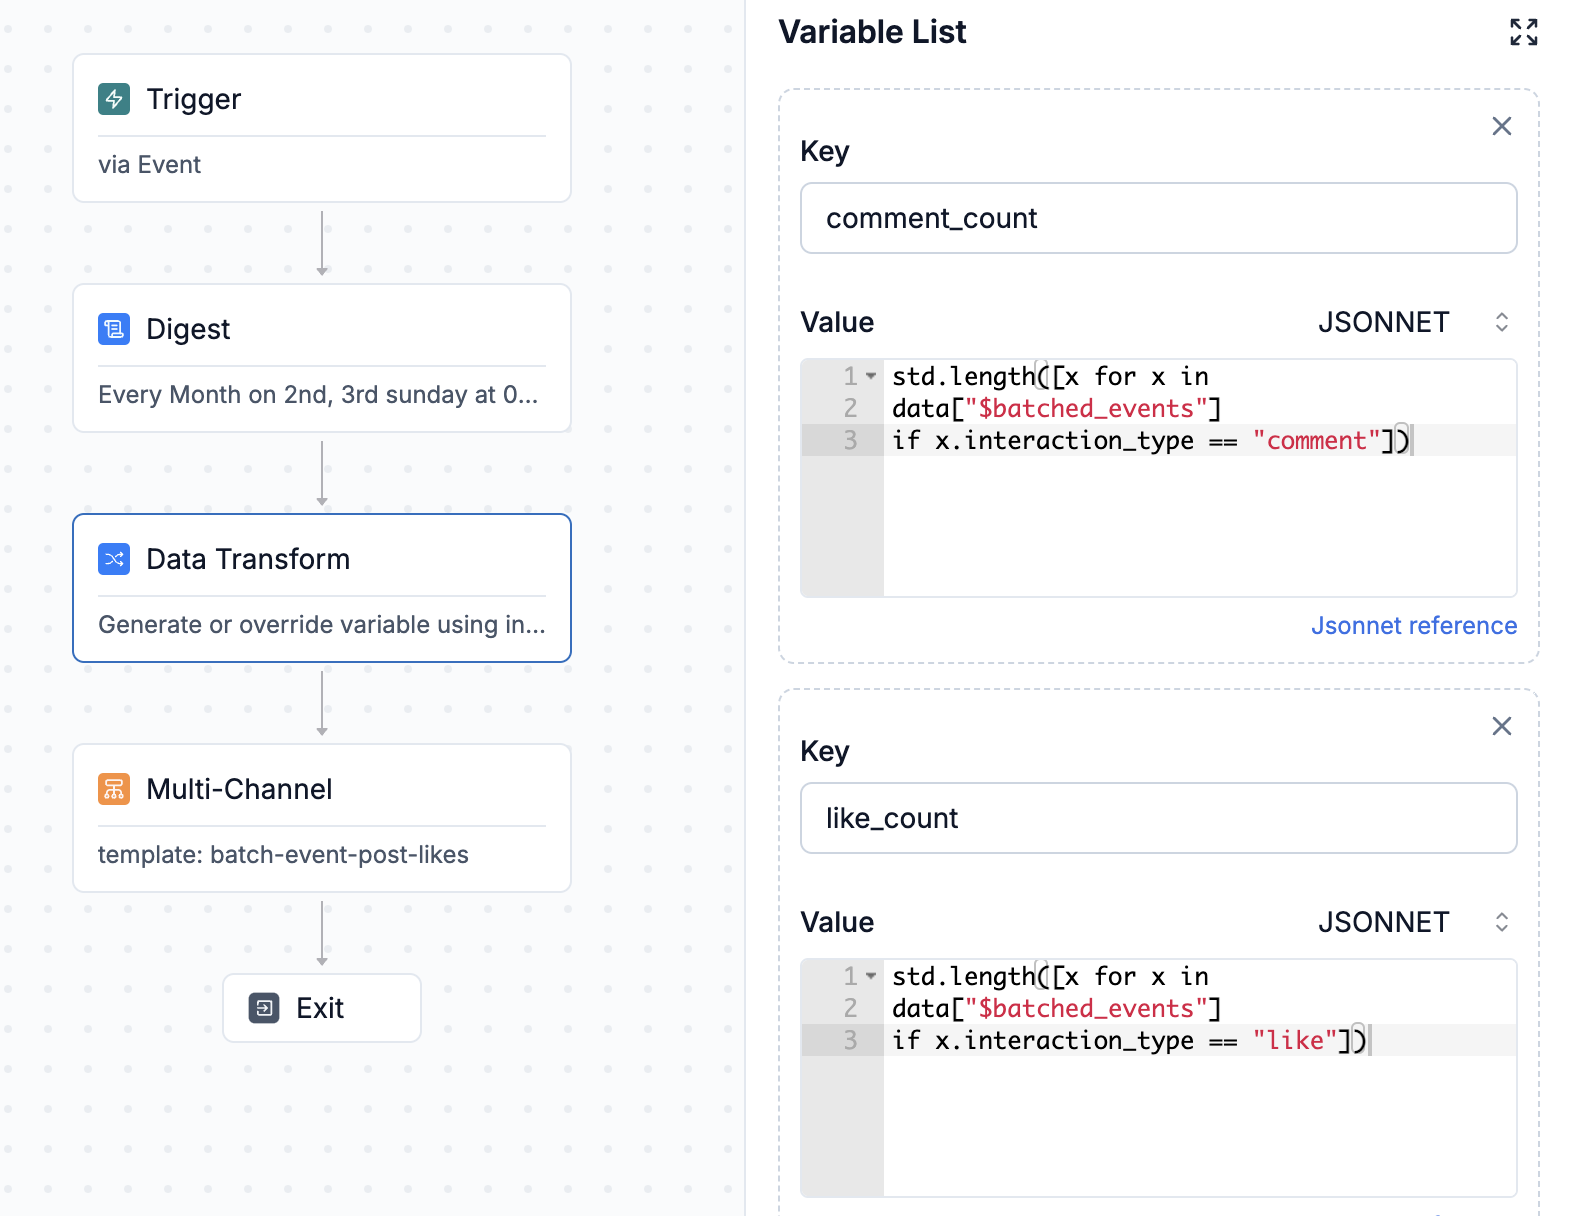 Let's take below example. There are 3 post interactions, 2 comments and 1 like and this is your workflow trigger.
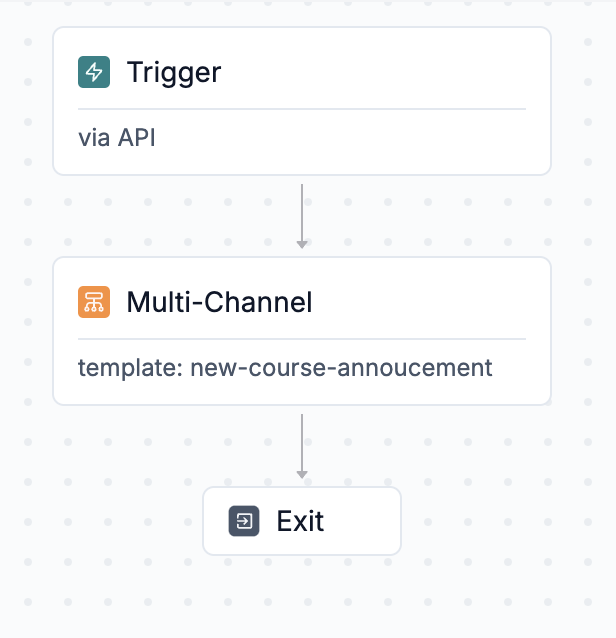 To design a workflow, you need:
1. **A Trigger point**- Trigger initiates the workflow. You can initiate it
* [Using the direct workflow API](/docs/trigger-workflow#triggering-workflow-via-api), where you can include recipient channel information, preferences, and actor details directly in the trigger.
* [By emitting an event](/docs/trigger-workflow#event-based-trigger)(note: the recipient needs to be pre-created for event-based triggers).
2. **Delivery node**- Delivery Nodes represent the channels where users will receive notifications. You can use:
[multi-channel](/docs/delivery-multi-channel) nodes, to send messages across multiple channels,
[smart channel routing](/docs/smart-delivery), to notify users sequentially rather than bombarding them on all channels at once (though it’s generally better to use).
**Template** in delivery node contains the content of the notification. You can add both static and dynamic content sourced from user properties or trigger payloads. We use handlebars as our Whatsapp templating language. You can add dynamic content as `{{var}}`.
Add trigger data in the **mock** to get variable auto-suggestions during editing.
Ensure to publish the template before using it in a workflow.
[Learn more about how to design email template here](/docs/email-template).
1. **Functional nodes (Optional)**: These are the logic nodes in the workflow. You can use it to add delay, batch multiple notifications in a summary or add conditional branches in the workflow. [Check out all workflow nodes here.](/docs/delay)
### Trigger the workflow
You can trigger a test workflow directly from dashboard by clicking on '' button in your workflow editor or **"Commit"** changes to trigger it from your code. We follow Git like versioning for workflow changes, so you need to commit your changes to trigger new workflow via the API. You can check all methods of triggering workflow [here](/docs/trigger-workflow).
To trigger a workflow, you need:
1. **Recipient**: End user who would be notified in the workflow run. Recipient is uniquely identified by `distinct_id`within SuprSend and must have the relevant channel identity set in their profile. You can define recipient inline in case of API based trigger or [create user profile first](/docs/users#creating-user-profile-on-suprsend) for event based trigger.
In Sandbox environment, a sample user with your registered email ID is pre-created for testing. You can always add more users or edit existing user profile from subscriber page on UI.
2. **Data or Event Properties**: This will be used to render dynamic content in the template (added in template mock) or variables in the workflow configuration.
We'll be triggering the workflow with direct API trigger for quick testing. You can check all trigger methods [here.](/docs/trigger-workflow)
**Sample payload for API-based trigger**
You can get workspace key, secret or API Key for trigger from [Settings tab -> API Keys](https://app.suprsend.com/en/sandbox/developers/api-keys)
To design a workflow, you need:
1. **A Trigger point**- Trigger initiates the workflow. You can initiate it
* [Using the direct workflow API](/docs/trigger-workflow#triggering-workflow-via-api), where you can include recipient channel information, preferences, and actor details directly in the trigger.
* [By emitting an event](/docs/trigger-workflow#event-based-trigger)(note: the recipient needs to be pre-created for event-based triggers).
2. **Delivery node**- Delivery Nodes represent the channels where users will receive notifications. You can use:
[multi-channel](/docs/delivery-multi-channel) nodes, to send messages across multiple channels,
[smart channel routing](/docs/smart-delivery), to notify users sequentially rather than bombarding them on all channels at once (though it’s generally better to use).
**Template** in delivery node contains the content of the notification. You can add both static and dynamic content sourced from user properties or trigger payloads. We use handlebars as our Whatsapp templating language. You can add dynamic content as `{{var}}`.
Add trigger data in the **mock** to get variable auto-suggestions during editing.
Ensure to publish the template before using it in a workflow.
[Learn more about how to design email template here](/docs/email-template).

1. **Functional nodes (Optional)**: These are the logic nodes in the workflow. You can use it to add delay, batch multiple notifications in a summary or add conditional branches in the workflow. [Check out all workflow nodes here.](/docs/delay)
### Trigger the workflow
You can trigger a test workflow directly from dashboard by clicking on '' button in your workflow editor or **"Commit"** changes to trigger it from your code. We follow Git like versioning for workflow changes, so you need to commit your changes to trigger new workflow via the API. You can check all methods of triggering workflow [here](/docs/trigger-workflow).
To trigger a workflow, you need:
1. **Recipient**: End user who would be notified in the workflow run. Recipient is uniquely identified by `distinct_id`within SuprSend and must have the relevant channel identity set in their profile. You can define recipient inline in case of API based trigger or [create user profile first](/docs/users#creating-user-profile-on-suprsend) for event based trigger.
In Sandbox environment, a sample user with your registered email ID is pre-created for testing. You can always add more users or edit existing user profile from subscriber page on UI.
2. **Data or Event Properties**: This will be used to render dynamic content in the template (added in template mock) or variables in the workflow configuration.
We'll be triggering the workflow with direct API trigger for quick testing. You can check all trigger methods [here.](/docs/trigger-workflow)
**Sample payload for API-based trigger**
You can get workspace key, secret or API Key for trigger from [Settings tab -> API Keys](https://app.suprsend.com/en/sandbox/developers/api-keys)
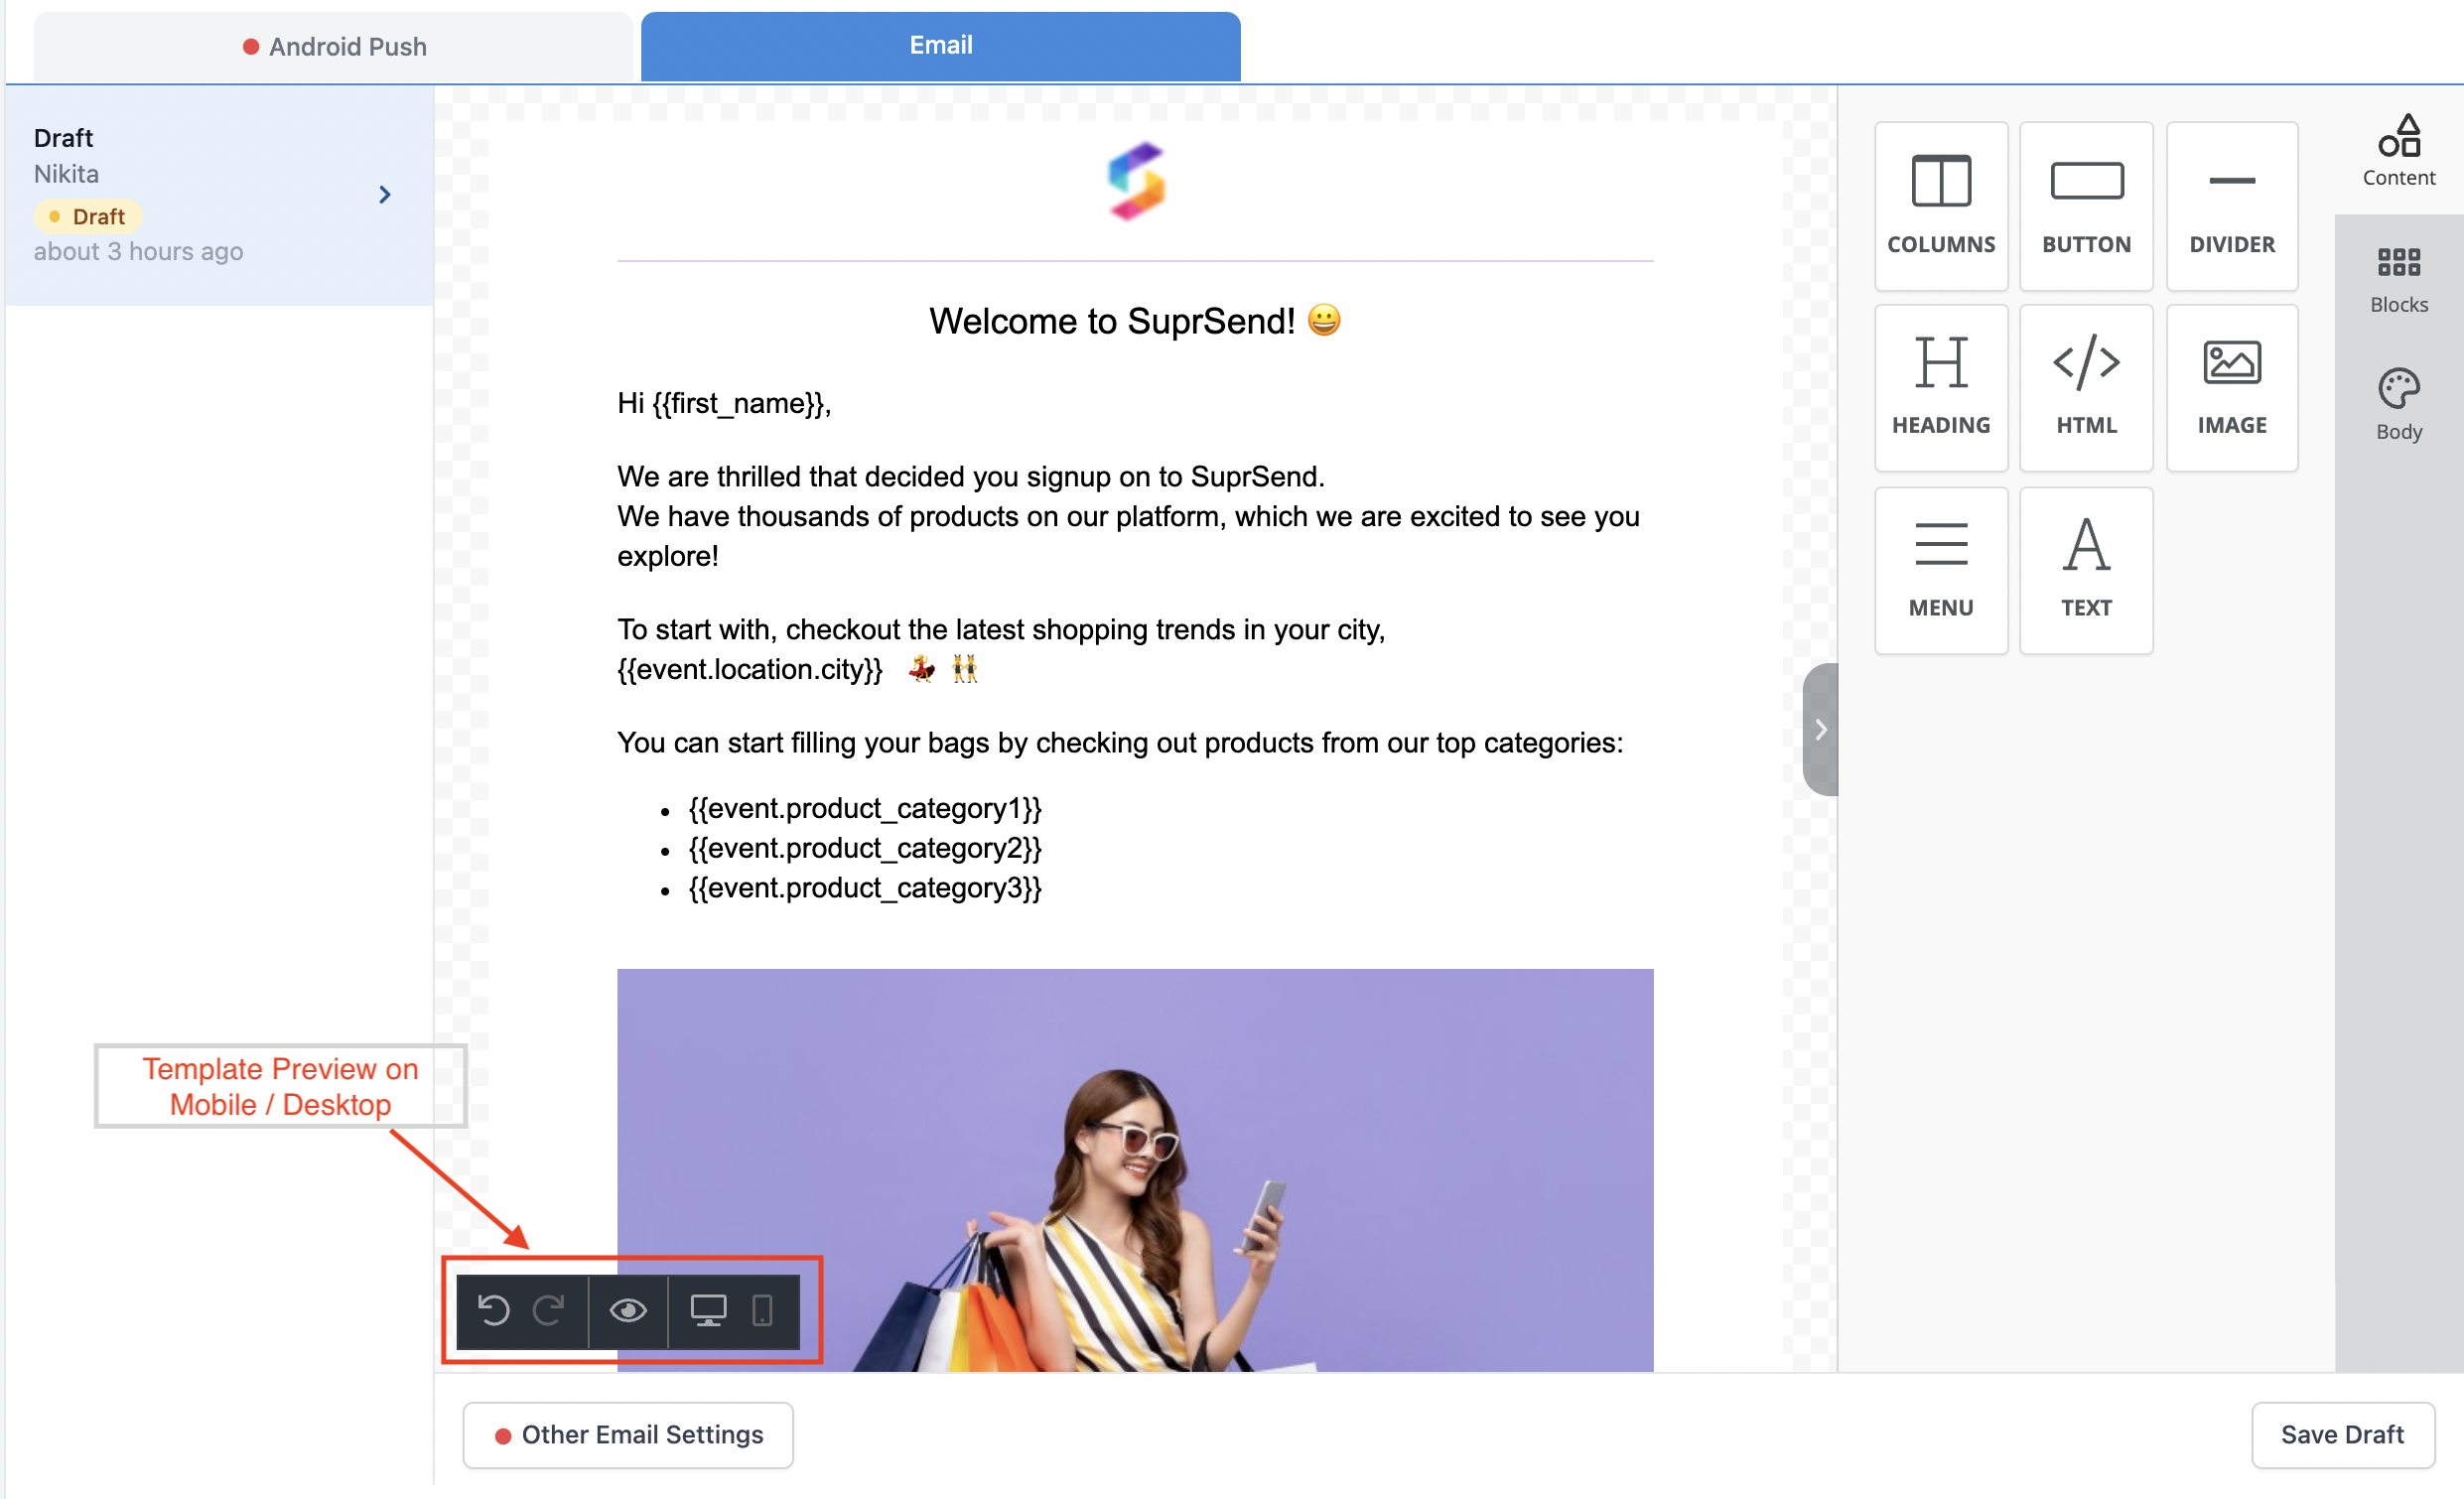 To add other details (subject, from name, from email, reply to and email markup) click on '`Other Email Settings`'.
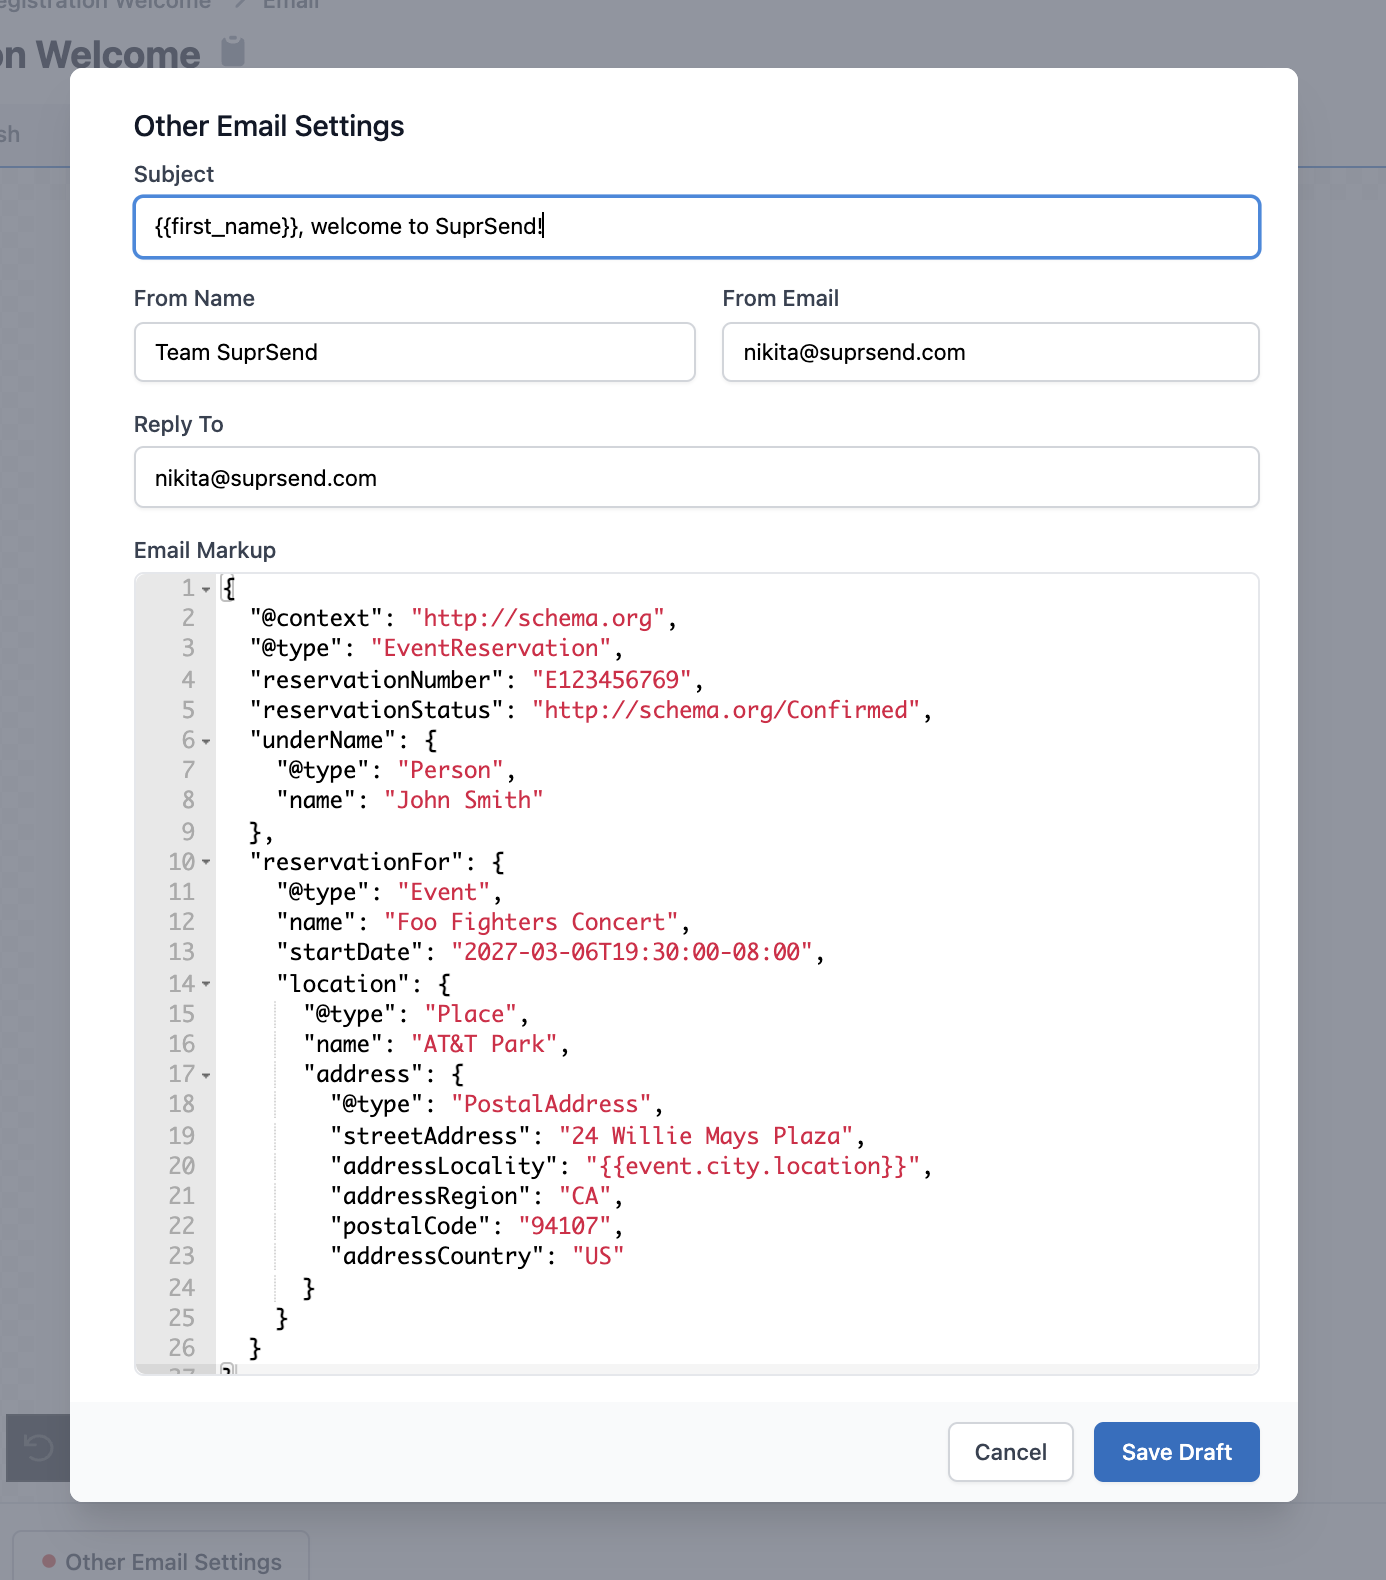 ## Email fields description
| Field | Description |
| ------------ | ----------------------------------------------------------------------------------------------------------------------------------------------------------------------------------------------------- |
| Subject | Small text box. Use **`handlebarsjs`** to add variables |
| From Name | Display name which tells recipient who sent the email |
| From Email | Domain name must be registered with the vendor |
| Reply To | Domain name must be registered with the vendor |
| cc | *Optional* List of email ids. It is not a part of email design. To be sent with Events data or from Workflow Triggered by API |
| bcc | *Optional* List of email ids. It is not a part of email design. To be sent with Events data or from Workflow Triggered by API |
| Attachment | *Optional* Not a part of email design. To be sent as a parameters when [Workflow is triggered from Backend](/docs/trigger-workflow#triggering-workflow-via-api). |
| Email Markup | *Optional* Schema.org markup which allows to add actions in the email itself. Events, tickets, delivery, one click actions, highlights can be sent in email. Use **`handlebarsjs`** to add variables. |
## Email fields description
| Field | Description |
| ------------ | ----------------------------------------------------------------------------------------------------------------------------------------------------------------------------------------------------- |
| Subject | Small text box. Use **`handlebarsjs`** to add variables |
| From Name | Display name which tells recipient who sent the email |
| From Email | Domain name must be registered with the vendor |
| Reply To | Domain name must be registered with the vendor |
| cc | *Optional* List of email ids. It is not a part of email design. To be sent with Events data or from Workflow Triggered by API |
| bcc | *Optional* List of email ids. It is not a part of email design. To be sent with Events data or from Workflow Triggered by API |
| Attachment | *Optional* Not a part of email design. To be sent as a parameters when [Workflow is triggered from Backend](/docs/trigger-workflow#triggering-workflow-via-api). |
| Email Markup | *Optional* Schema.org markup which allows to add actions in the email itself. Events, tickets, delivery, one click actions, highlights can be sent in email. Use **`handlebarsjs`** to add variables. |
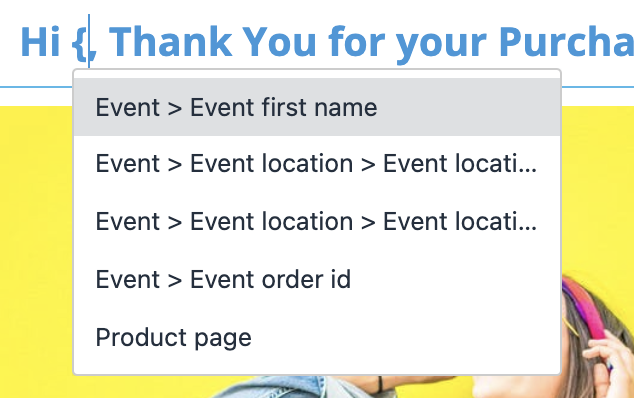 ### Merge Tags
Merge tags allow end-users to dynamically add content to their email. Merge tags can be inserted into a block of text by clicking on the "Merge Tags" button in the text editor toolbar. The button is not shown if no variables are defined in the global **Variables** button. This is how 'Merge Tags' looks when you click on a Content block.
### Merge Tags
Merge tags allow end-users to dynamically add content to their email. Merge tags can be inserted into a block of text by clicking on the "Merge Tags" button in the text editor toolbar. The button is not shown if no variables are defined in the global **Variables** button. This is how 'Merge Tags' looks when you click on a Content block.
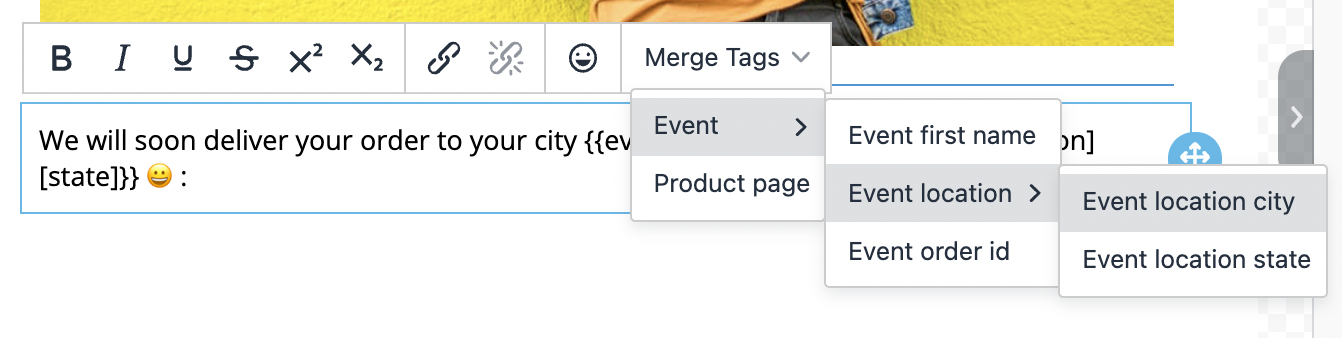 ### Adding array elements
In email, there is a difference on how to add array elements in the template, which can be used to send a list of items which could be dynamic in nature. If you have noticed, you do not get array elements in the drop-down suggestion when you type `{` In order to add array element, you will be required to necessarily use a functionality called **Merge Tags**. Follow these steps to add variable for array element in an email template:
### Adding array elements
In email, there is a difference on how to add array elements in the template, which can be used to send a list of items which could be dynamic in nature. If you have noticed, you do not get array elements in the drop-down suggestion when you type `{` In order to add array element, you will be required to necessarily use a functionality called **Merge Tags**. Follow these steps to add variable for array element in an email template:
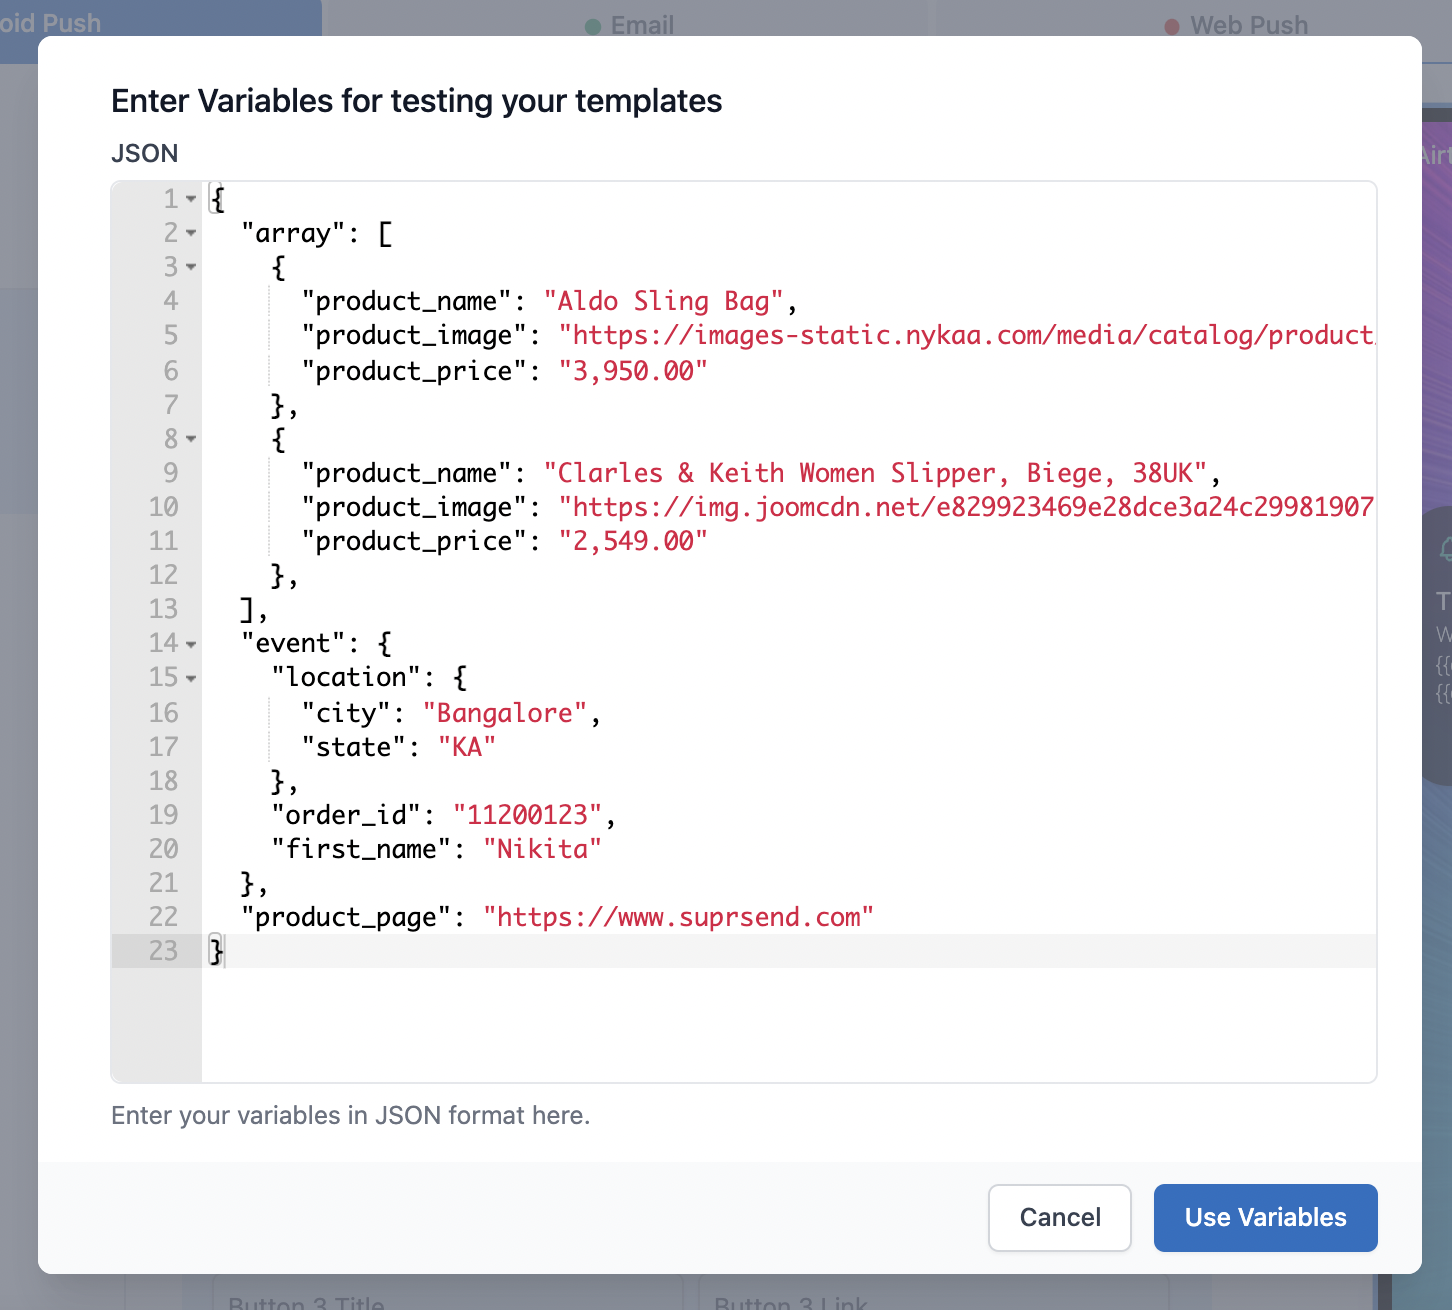

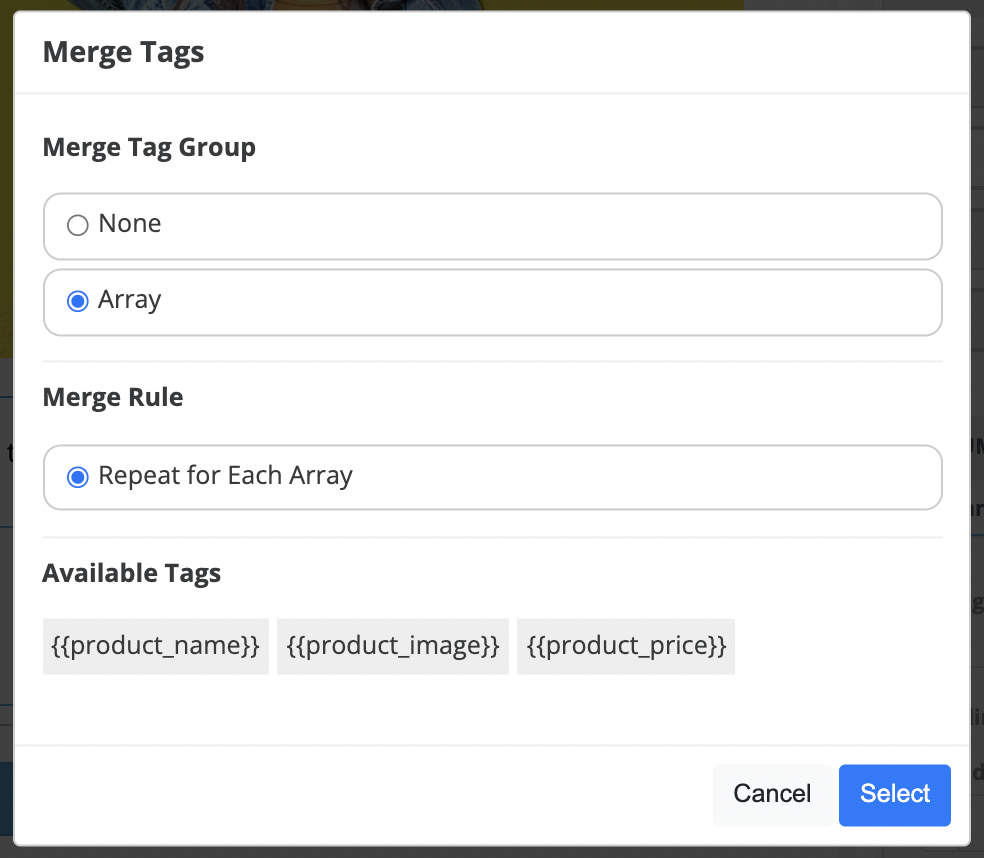
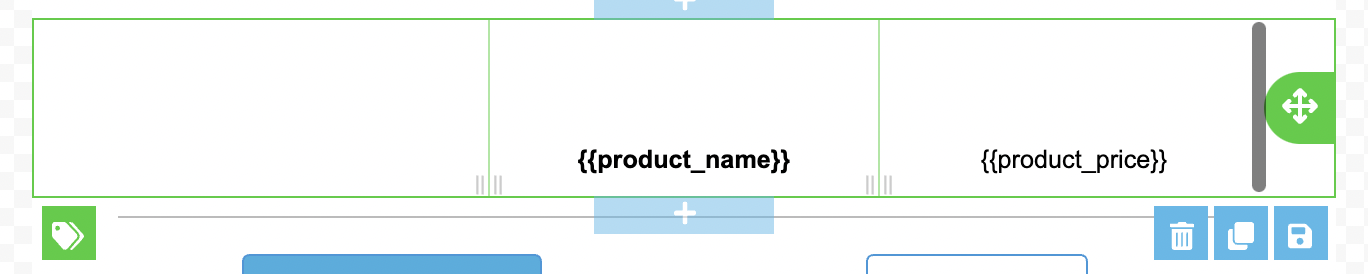


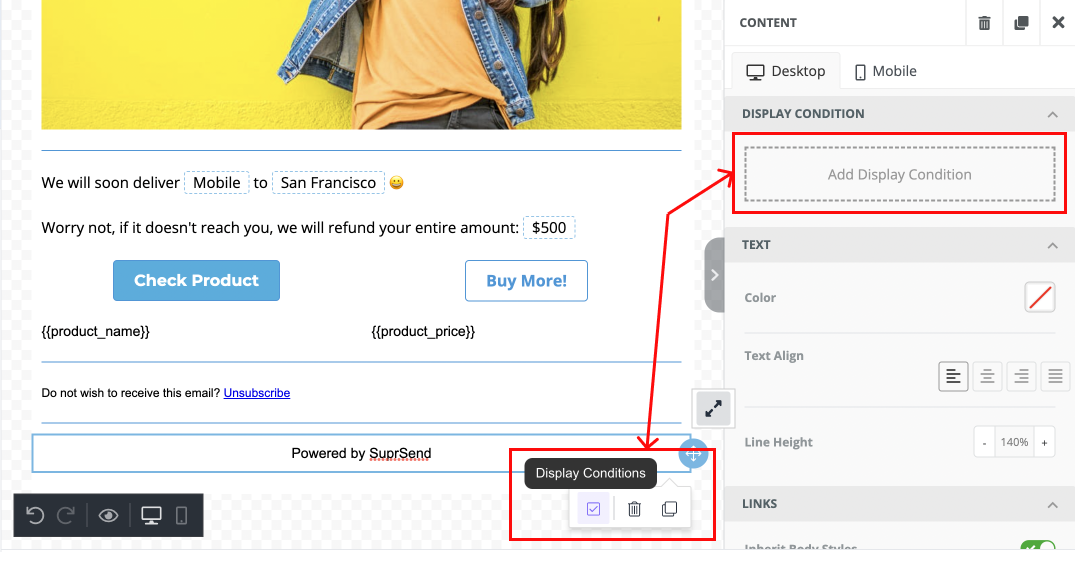
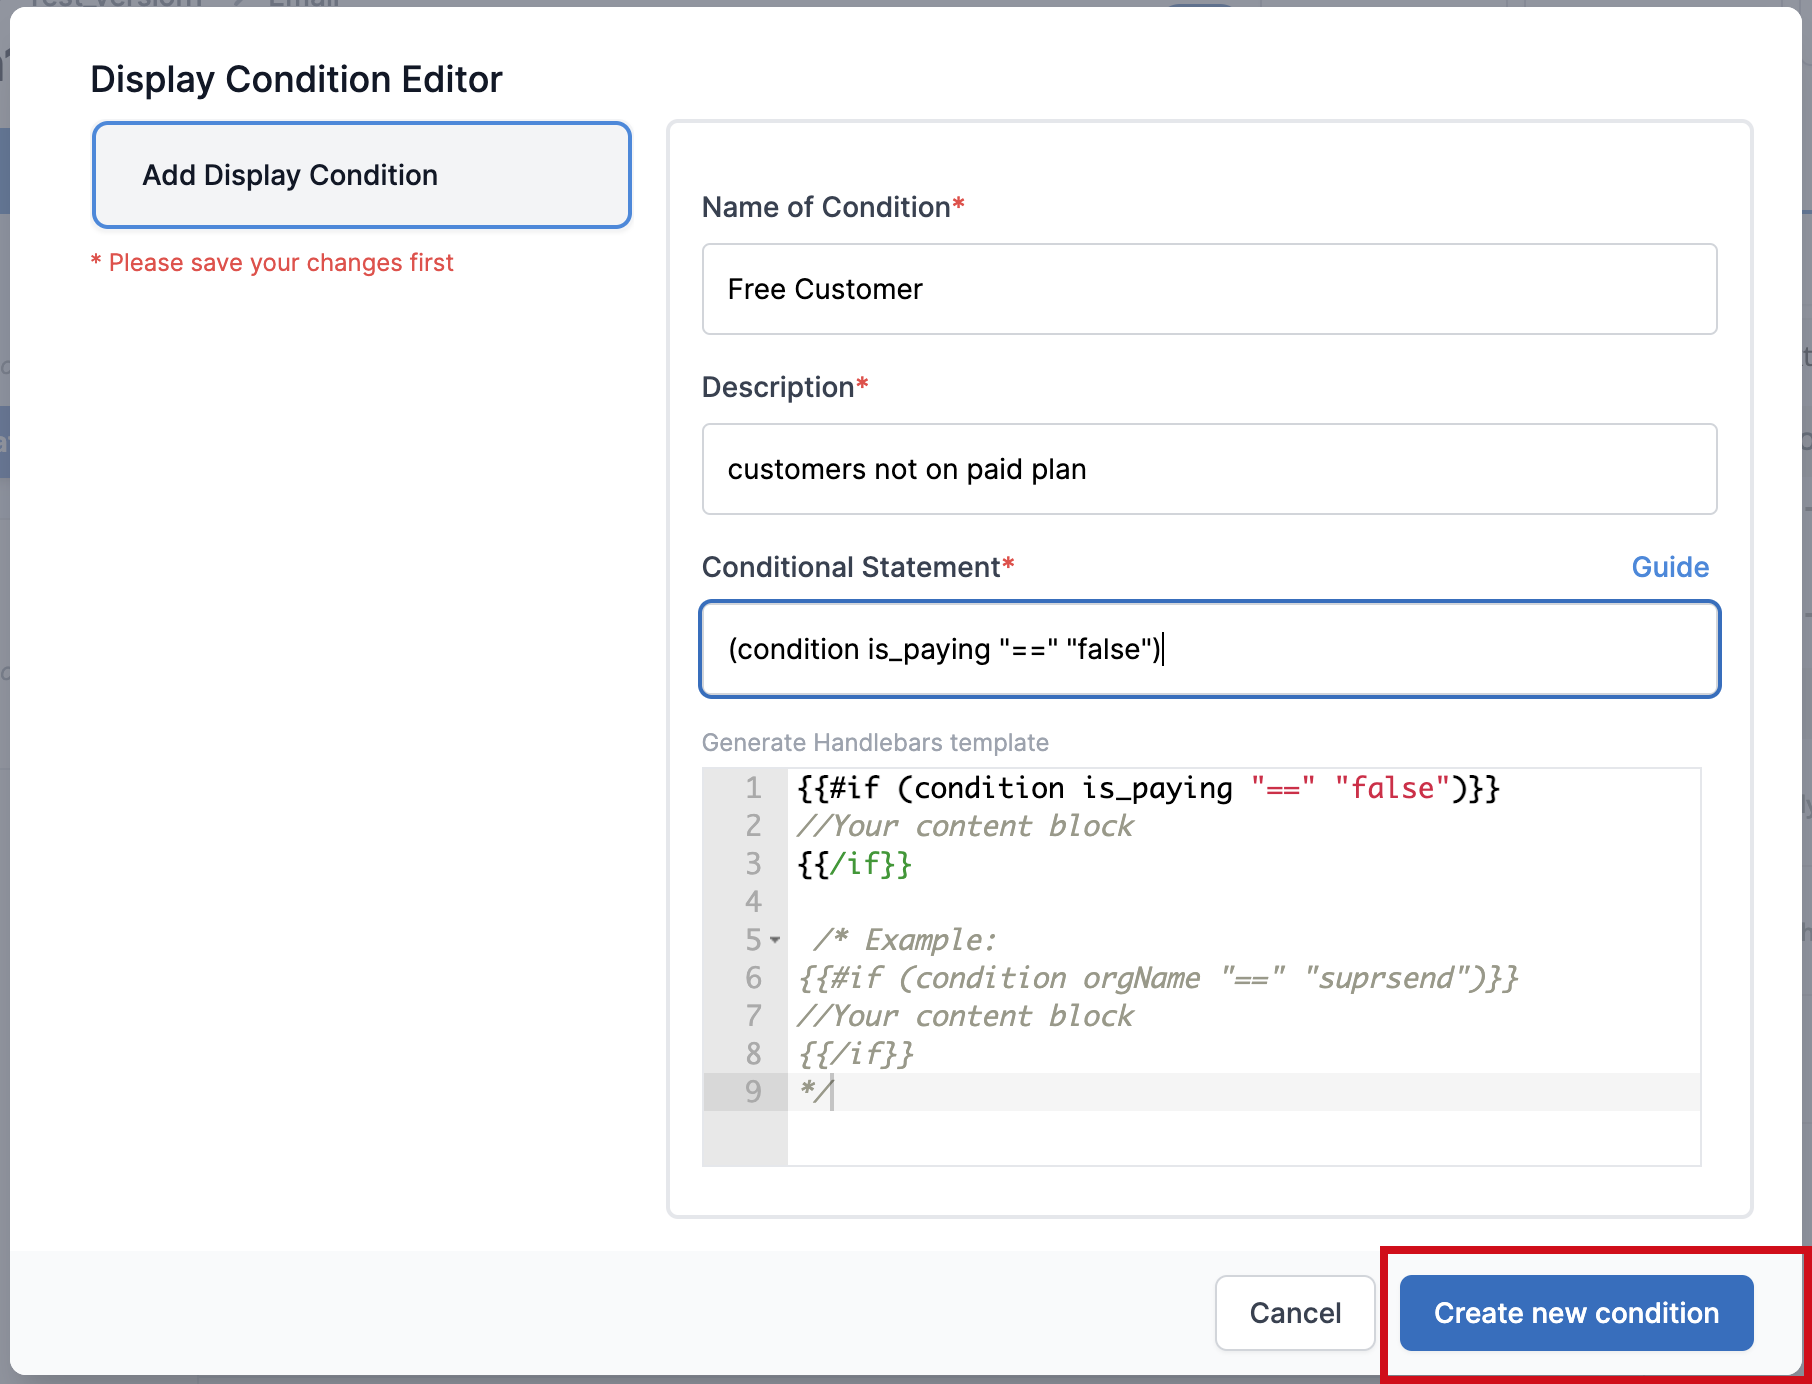 Once the display condition is created, you can use the same display condition across multiple content blocks.
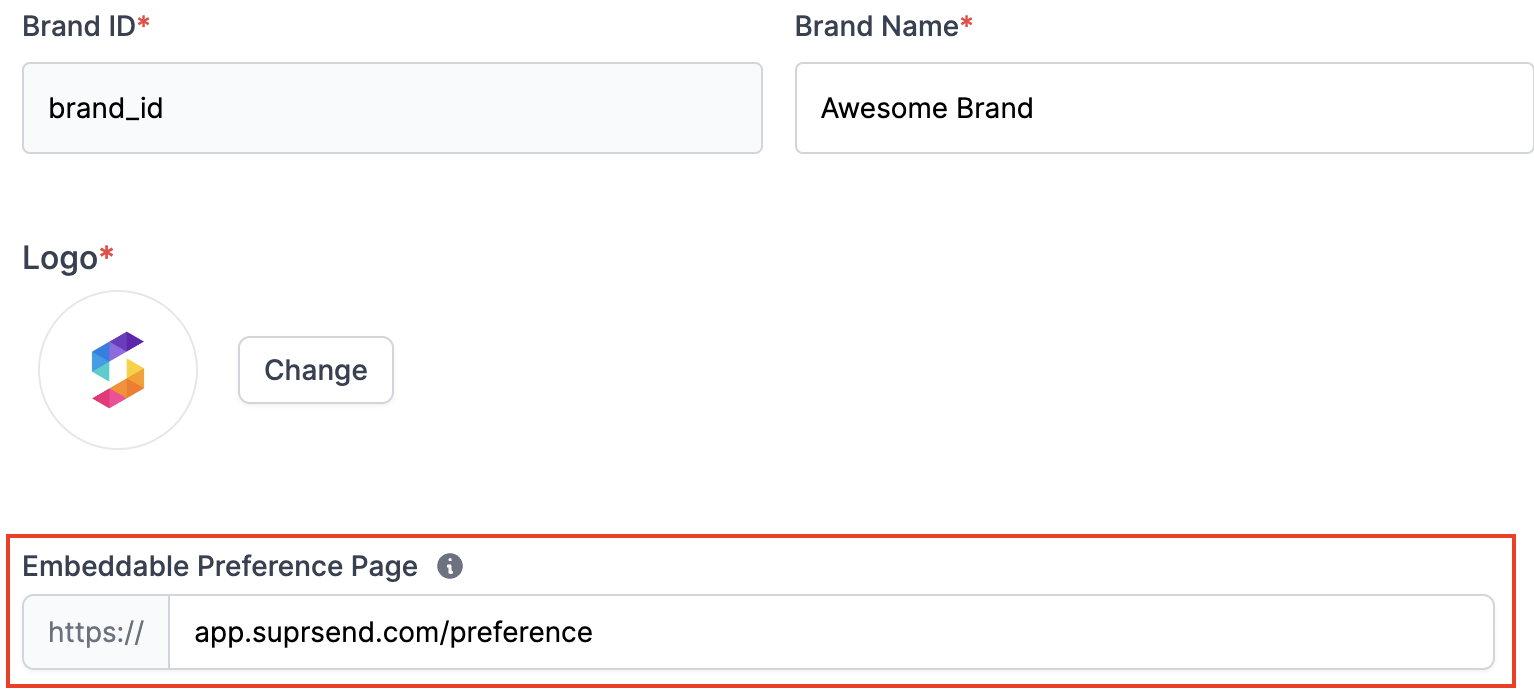
 * **Workflow processed, but notification for one or more channels is not triggered by SuprSend**: This type of error occurs from template rendering failures or incorrect/missing channel information in the user profile. Refer[section below](/docs/error-guides#notification-not-triggered-by-suprsend)to debug these errors.
 * **Vendor didn't accept the sent request or returned delivery failure error**: In such cases, you'll see`Trigger failed`or`Failure by Vendor`status in the third step of the logs. These errors are passed by the vendor when SuprSend initiates a send call to the vendor. Hover over the 'i' icon to view the error message. For detailed troubleshooting, refer to the individual vendor guides.
 ## API Errors
This can happen for two major reasons:
| Failure reason | How to solve? |
| ---------------------------------------------------------------------------------------------------------------------------------------------------------------------------------------------------------------------------------------------------------------------------------------------------------------------------------------------------------------------------------------------------------------------------------- | ------------------------------------------------------------------------------------------------------------------------------------------------------------------------------------------------------ |
| **2 API requests have the same idempotency key.** SuprSend supports idempotency to ensure that requests can be retried safely without duplicate processing. If Suprsend receives more than one request with the same idempotency\_key in a 24 hour window, it will only process the first request and skip all other requests. Know more about idempotency key [here](/docs/python-trigger-workflow-from-api#idempotent-requests). | Try passing another idempotency key in your workflow or event payload. |
| **If workflow is triggered via event and there is no active workflow associated with that event.** | Check if there is an active workflow created on SuprSend dashboard with the given event name. If not, [Refer documentation](/docs/workflows#create-workflow) to create workflow on SuprSend dashboard. |
## API Errors
This can happen for two major reasons:
| Failure reason | How to solve? |
| ---------------------------------------------------------------------------------------------------------------------------------------------------------------------------------------------------------------------------------------------------------------------------------------------------------------------------------------------------------------------------------------------------------------------------------- | ------------------------------------------------------------------------------------------------------------------------------------------------------------------------------------------------------ |
| **2 API requests have the same idempotency key.** SuprSend supports idempotency to ensure that requests can be retried safely without duplicate processing. If Suprsend receives more than one request with the same idempotency\_key in a 24 hour window, it will only process the first request and skip all other requests. Know more about idempotency key [here](/docs/python-trigger-workflow-from-api#idempotent-requests). | Try passing another idempotency key in your workflow or event payload. |
| **If workflow is triggered via event and there is no active workflow associated with that event.** | Check if there is an active workflow created on SuprSend dashboard with the given event name. If not, [Refer documentation](/docs/workflows#create-workflow) to create workflow on SuprSend dashboard. |
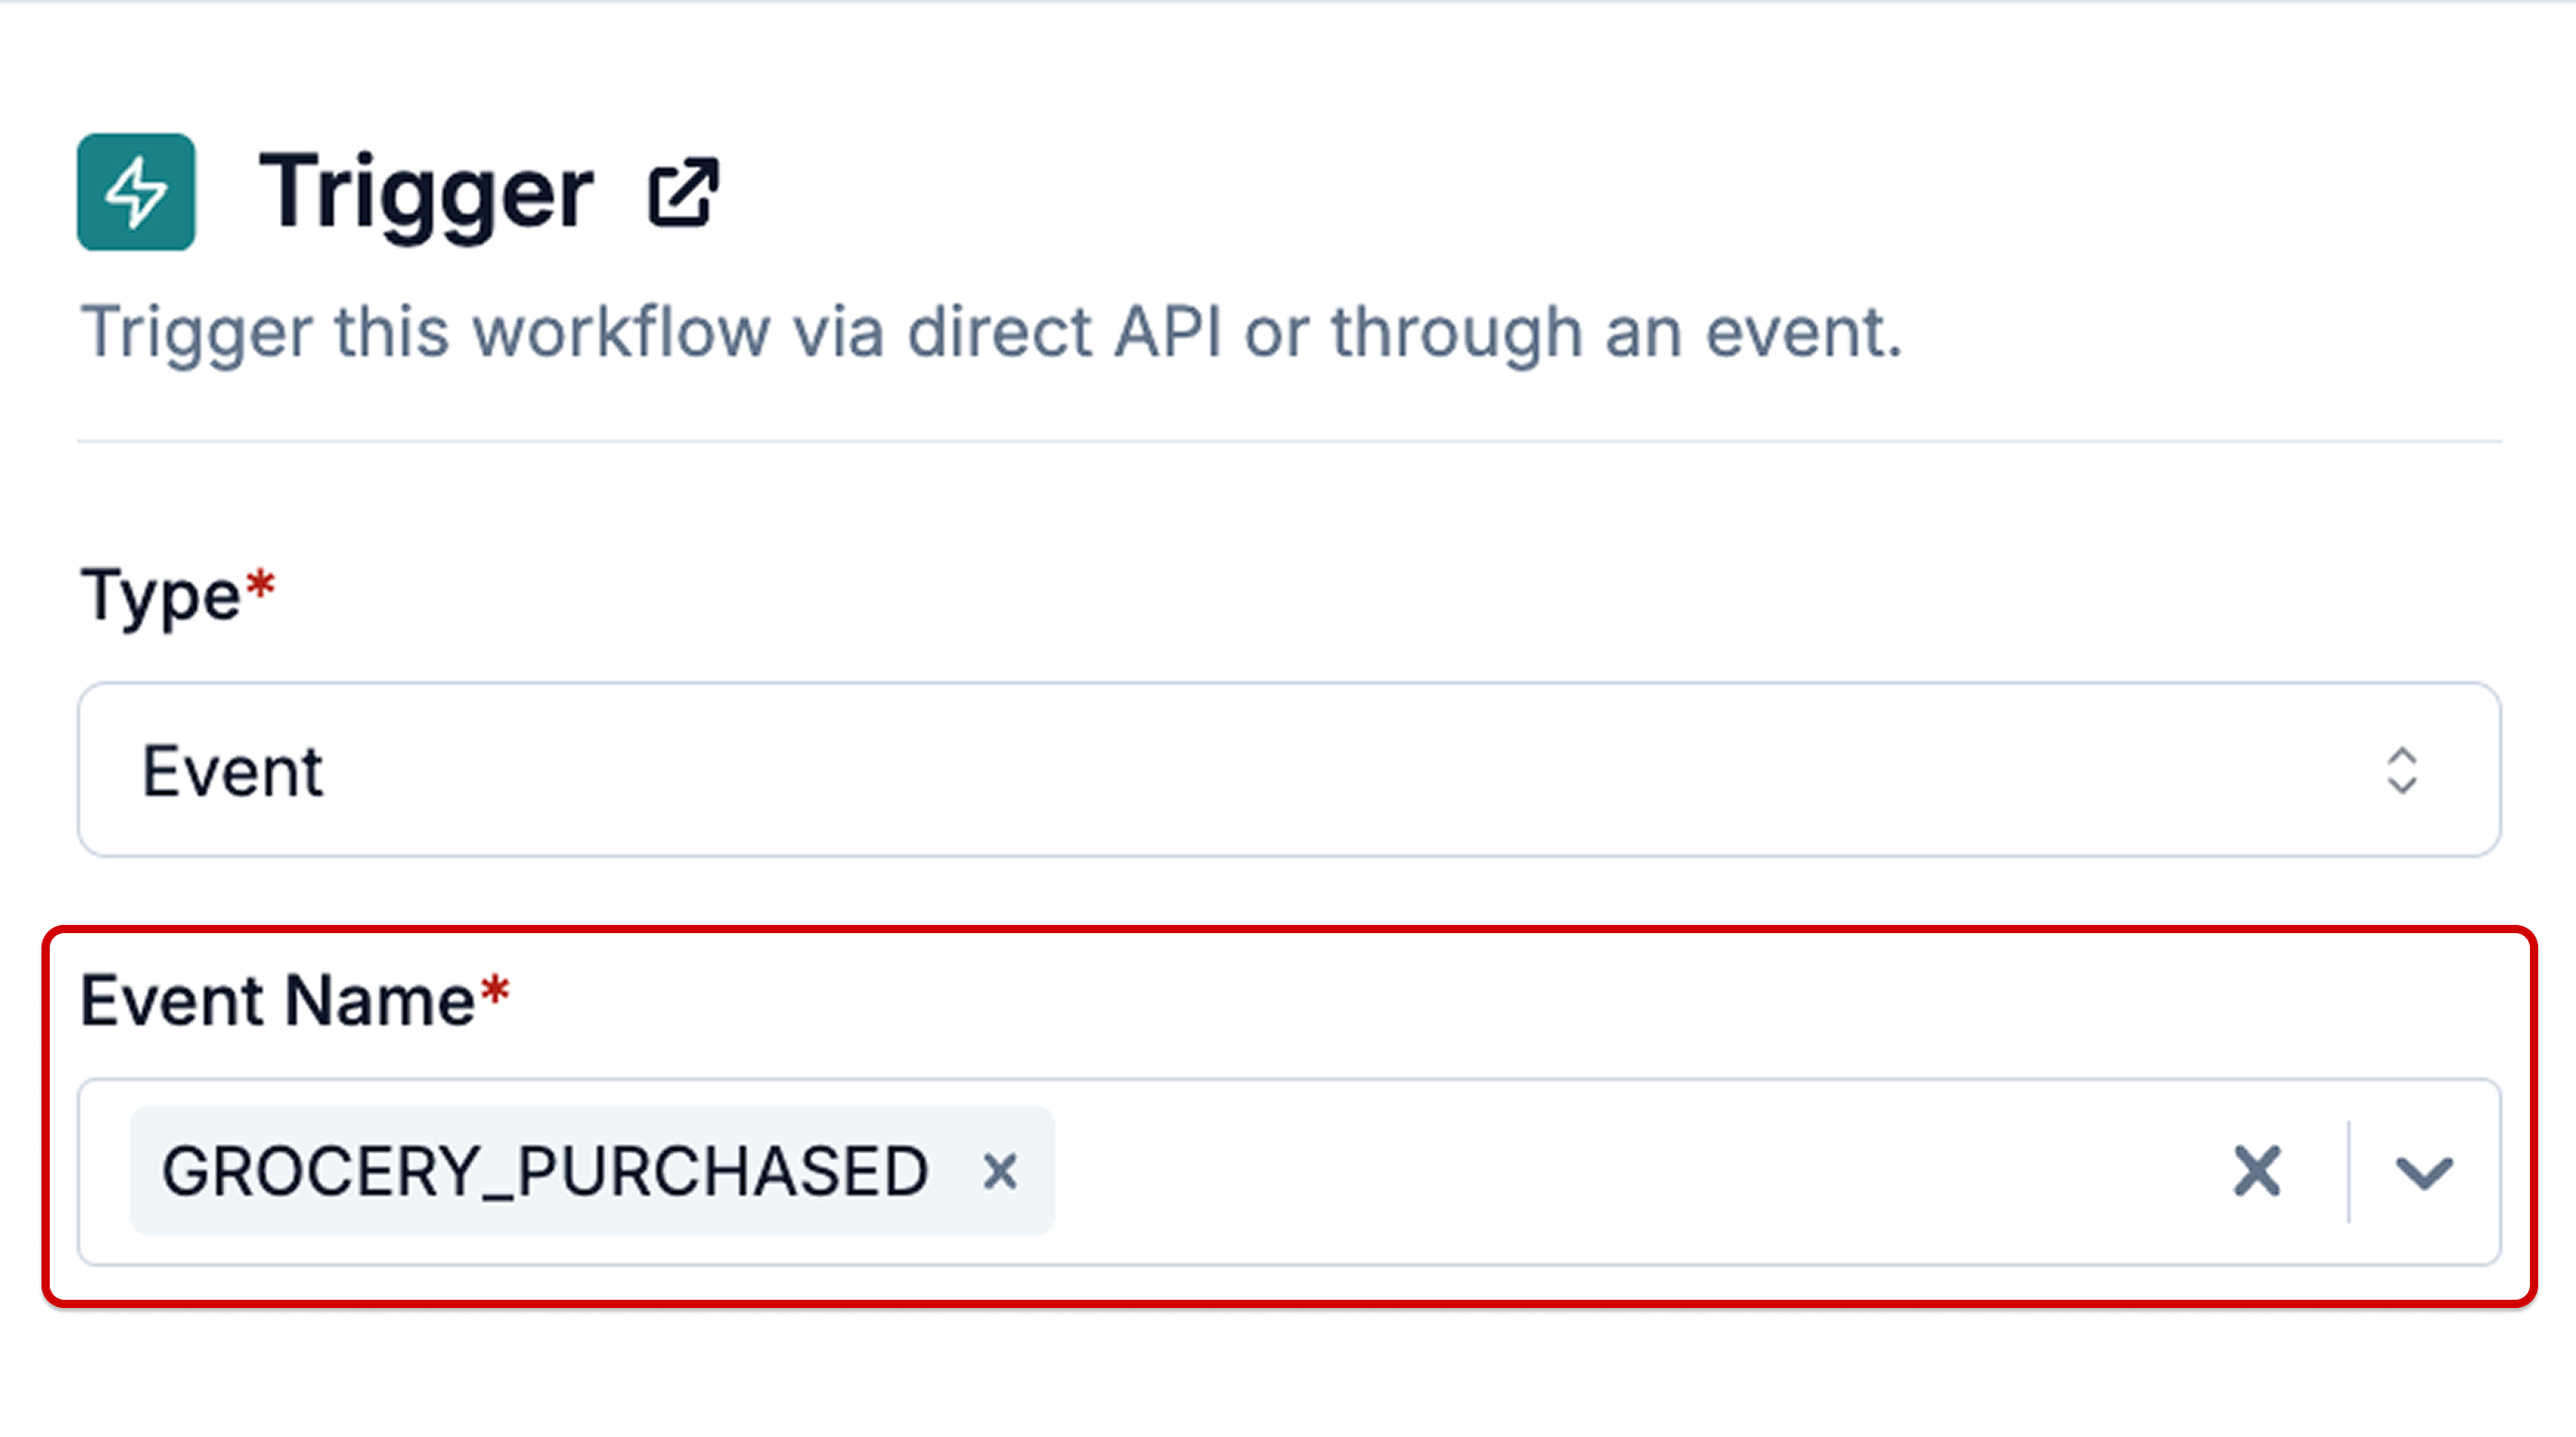 ## Send Event to SuprSend
You can either use [HTTP API](docs/update-user-profile) or our backend SDKs to send events via your backend systems or use Client side SDK to directly sync events from your mobile or web applications.
## Backend SDK:
## Send Event to SuprSend
You can either use [HTTP API](docs/update-user-profile) or our backend SDKs to send events via your backend systems or use Client side SDK to directly sync events from your mobile or web applications.
## Backend SDK:
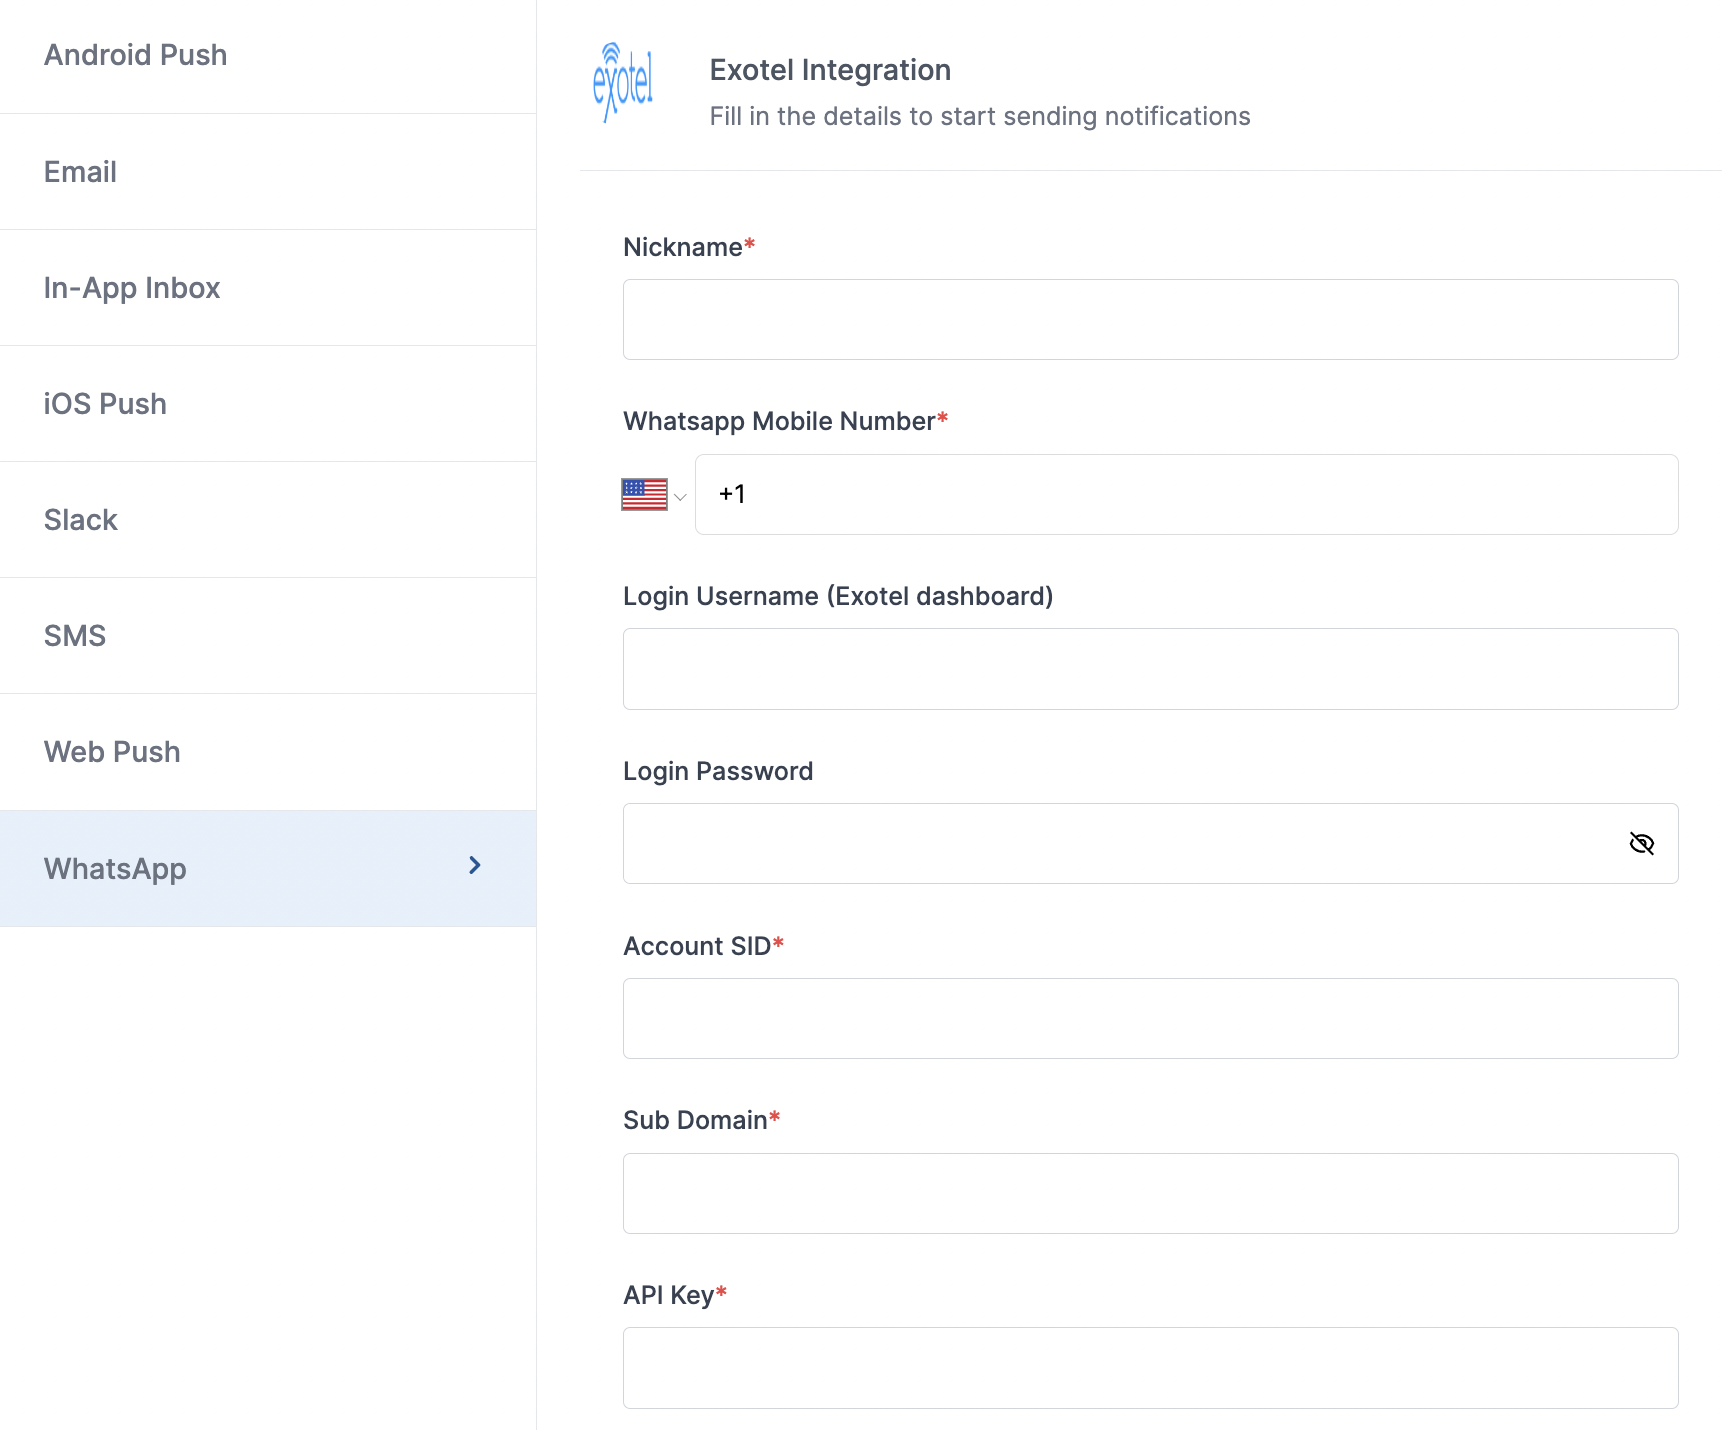 | Form Field | Obligation | Description |
| -------------------------- | ----------- | ---------------------------------------------------------------------------------------------------------------------------------------------------------------------------- |
| **Nickname** | *mandatory* | You can give any name which may help you to identify this account easily |
| **Mobile Number** | *mandatory* | Mobile number of your WhatsApp business account. SuprSend uses this information to send Whatsapp on your behalf via your registered WhatsApp number |
| **Login Username** | *optional* | Username of your Exotel WhatsApp dashboard. SuprSend uses this information to upload WhatsApp template in your Exotel dashboard. |
| **Login Password** | *optional* | Password of your Exotel WhatsApp dashboard. SuprSend uses this information to upload WhatsApp template in your Exotel dashboard. |
| **Account SID** | *mandatory* | Unique identifier of your Exotel account. You'll get it from Exotel dashboard. SuprSend uses this information to send WhatsApp messages via your Exotel account |
| **Sub Domain** | *mandatory* | Sub domain of your Exotel account. You'll get it from Exotel dashboard. SuprSend uses this information to send WhatsApp messages via your Exotel account |
| **API Key** | *mandatory* | API Key for authenticating the WhatsApp API request. You'll get it from Exotel dashboard. SuprSend uses this information to send WhatsApp messages via your Exotel account |
| **API Token** | *mandatory* | API Token for authenticating the WhatsApp API request. You'll get it from Exotel dashboard. SuprSend uses this information to send WhatsApp messages via your Exotel account |
| **Price per notification** | *optional* | This is the amount you pay per Whatsapp notification to Exotel. It helps us to calculate, estimate and optimise your cost spent on notifications. |
### How to get API credentials from your Exotel account
Login to [Exotel account](https://my.exotel.com/) . On the top navigation panel, you'll see "API Credentials" link. Click on it and you'll find all the relevant information required to add in the vendor configuration form.
| Form Field | Obligation | Description |
| -------------------------- | ----------- | ---------------------------------------------------------------------------------------------------------------------------------------------------------------------------- |
| **Nickname** | *mandatory* | You can give any name which may help you to identify this account easily |
| **Mobile Number** | *mandatory* | Mobile number of your WhatsApp business account. SuprSend uses this information to send Whatsapp on your behalf via your registered WhatsApp number |
| **Login Username** | *optional* | Username of your Exotel WhatsApp dashboard. SuprSend uses this information to upload WhatsApp template in your Exotel dashboard. |
| **Login Password** | *optional* | Password of your Exotel WhatsApp dashboard. SuprSend uses this information to upload WhatsApp template in your Exotel dashboard. |
| **Account SID** | *mandatory* | Unique identifier of your Exotel account. You'll get it from Exotel dashboard. SuprSend uses this information to send WhatsApp messages via your Exotel account |
| **Sub Domain** | *mandatory* | Sub domain of your Exotel account. You'll get it from Exotel dashboard. SuprSend uses this information to send WhatsApp messages via your Exotel account |
| **API Key** | *mandatory* | API Key for authenticating the WhatsApp API request. You'll get it from Exotel dashboard. SuprSend uses this information to send WhatsApp messages via your Exotel account |
| **API Token** | *mandatory* | API Token for authenticating the WhatsApp API request. You'll get it from Exotel dashboard. SuprSend uses this information to send WhatsApp messages via your Exotel account |
| **Price per notification** | *optional* | This is the amount you pay per Whatsapp notification to Exotel. It helps us to calculate, estimate and optimise your cost spent on notifications. |
### How to get API credentials from your Exotel account
Login to [Exotel account](https://my.exotel.com/) . On the top navigation panel, you'll see "API Credentials" link. Click on it and you'll find all the relevant information required to add in the vendor configuration form.
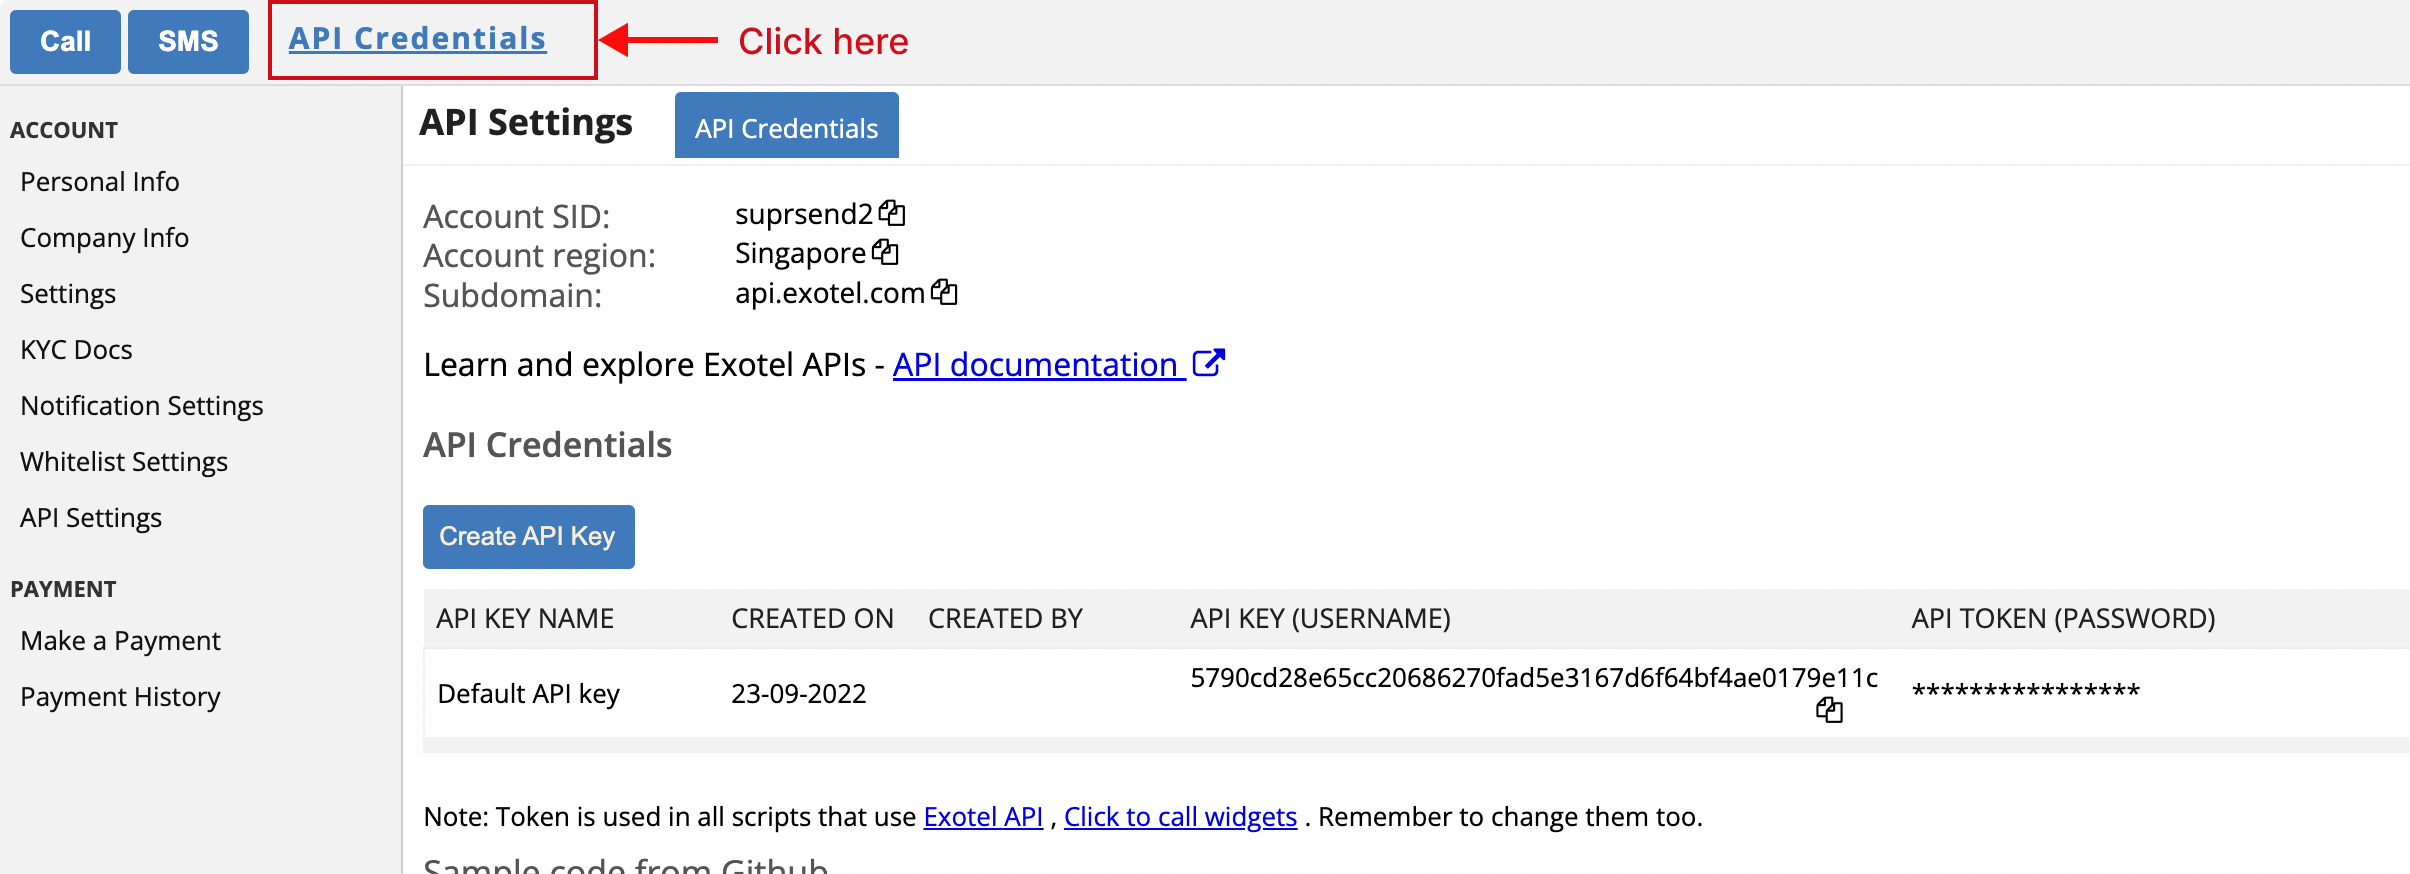 ## Setting callback URL for tracking Exotel DLR response
One of the platform advantage of using SuprSend as a central communication system is that it shows notification analytics for all channels in your SuprSend account together.
In case of Exotel, you don't need to set anything for tracking the DLR reports. Exotel allows the option to pass webhook URL in the message payload itself and so DLR tracking will always be enabled on SuprSend dashboard.
However, for tracking inbound response, you'll have to add inbound webhook in your Exotel dashboard. You can get the webhook URL at the end of the vendor configuration once you have saved your changes.
## Setting callback URL for tracking Exotel DLR response
One of the platform advantage of using SuprSend as a central communication system is that it shows notification analytics for all channels in your SuprSend account together.
In case of Exotel, you don't need to set anything for tracking the DLR reports. Exotel allows the option to pass webhook URL in the message payload itself and so DLR tracking will always be enabled on SuprSend dashboard.
However, for tracking inbound response, you'll have to add inbound webhook in your Exotel dashboard. You can get the webhook URL at the end of the vendor configuration once you have saved your changes.
 ***
# Fetch
Source: https://docs.suprsend.com/docs/fetch
Use Fetch node to dynamically fetch data from an API endpoint in workflow.
Fetch is an HTTP API request call to an endpoint which you can use to fetch data from an endpoint and use it as template or workflow variables. One of the use case of using fetch node could be to send digest notifications where you can add fetch node before a batch or delay function to fetch digest data and then use it inside template to trigger the notification.
Any data returned in the API request response is appended to the response\_key in your fetch function and then merged with the input payload.
## Configuring fetch node
In a Fetch node, you have to define the endpoint, query params and headers. You can add both static and dynamic values in all request fields except response key. All Static values are added within `"static value"` and dynamic data is referred as `data.key`.
| Field | Description |
| ------------ | ----------------------------------------------------------------------------------------------------------------------------------------------------------------------------------------------------------------------------------------------------------------------------- |
| Method\* | Only `GET` method is supported in Fetch. |
| Endpoint\* | A valid URL endpoint for the `GET` method. Add static URL as `"https://static_url"` and dynamic URL as `{{data.url_endpoint}}`. Data for dynamic URL will be picked from trigger payload. You can also combine static and dynamic part as `"https://domain" + {{data.path}}`. |
| Params | Query Params to pass in the request, e.g. (limit 10) to fetch top 10 stories to show in digest notification. Similar to endpoint, you can pass both static and dynamic value in query params. |
| Header | Any header to be passed in the request can be added as key-value pair with key being the header type and value as header value. |
| Response key | Response of your `GET` request is appended against response key and merged in the workflow payload. Data is merged at parent level if response key is not set. |
***
# Fetch
Source: https://docs.suprsend.com/docs/fetch
Use Fetch node to dynamically fetch data from an API endpoint in workflow.
Fetch is an HTTP API request call to an endpoint which you can use to fetch data from an endpoint and use it as template or workflow variables. One of the use case of using fetch node could be to send digest notifications where you can add fetch node before a batch or delay function to fetch digest data and then use it inside template to trigger the notification.
Any data returned in the API request response is appended to the response\_key in your fetch function and then merged with the input payload.
## Configuring fetch node
In a Fetch node, you have to define the endpoint, query params and headers. You can add both static and dynamic values in all request fields except response key. All Static values are added within `"static value"` and dynamic data is referred as `data.key`.
| Field | Description |
| ------------ | ----------------------------------------------------------------------------------------------------------------------------------------------------------------------------------------------------------------------------------------------------------------------------- |
| Method\* | Only `GET` method is supported in Fetch. |
| Endpoint\* | A valid URL endpoint for the `GET` method. Add static URL as `"https://static_url"` and dynamic URL as `{{data.url_endpoint}}`. Data for dynamic URL will be picked from trigger payload. You can also combine static and dynamic part as `"https://domain" + {{data.path}}`. |
| Params | Query Params to pass in the request, e.g. (limit 10) to fetch top 10 stories to show in digest notification. Similar to endpoint, you can pass both static and dynamic value in query params. |
| Header | Any header to be passed in the request can be added as key-value pair with key being the header type and value as header value. |
| Response key | Response of your `GET` request is appended against response key and merged in the workflow payload. Data is merged at parent level if response key is not set. |
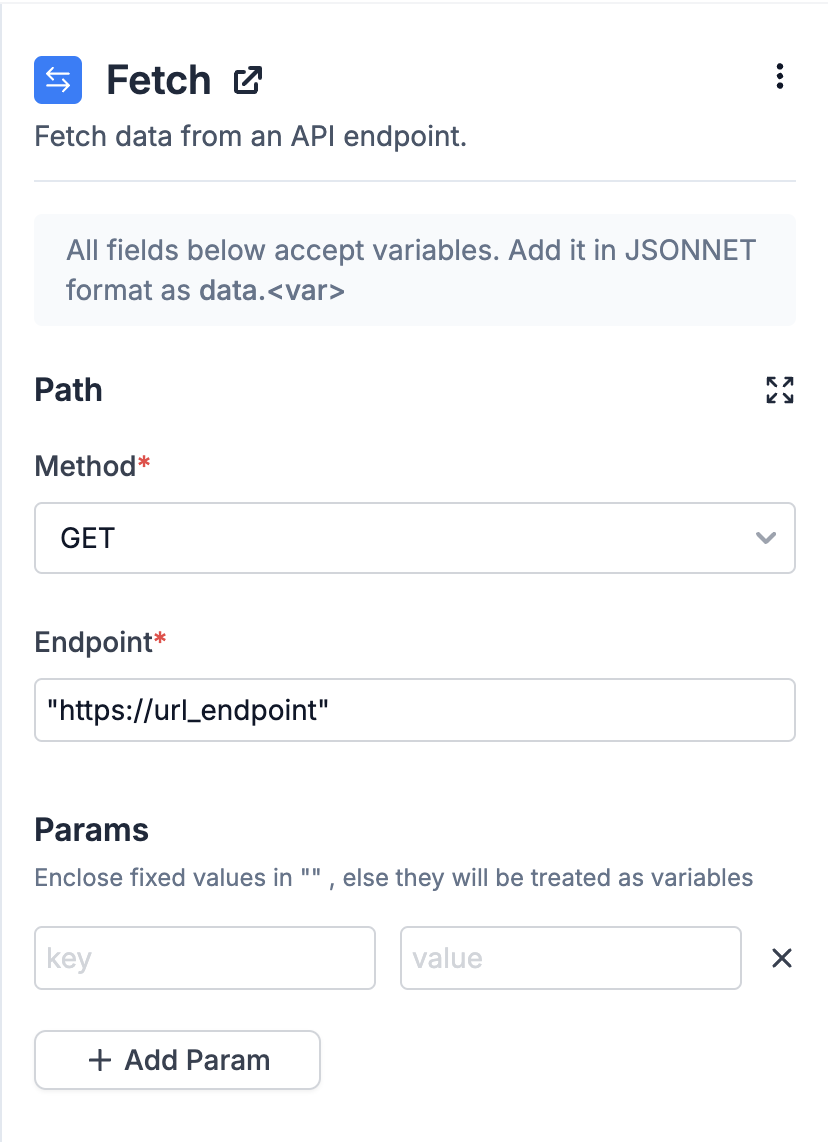 ### Adding variables in Fetch node
Fetch node supports JSONNET rendering language. You can add workflow trigger payload variables as `data.
### Adding variables in Fetch node
Fetch node supports JSONNET rendering language. You can add workflow trigger payload variables as `data.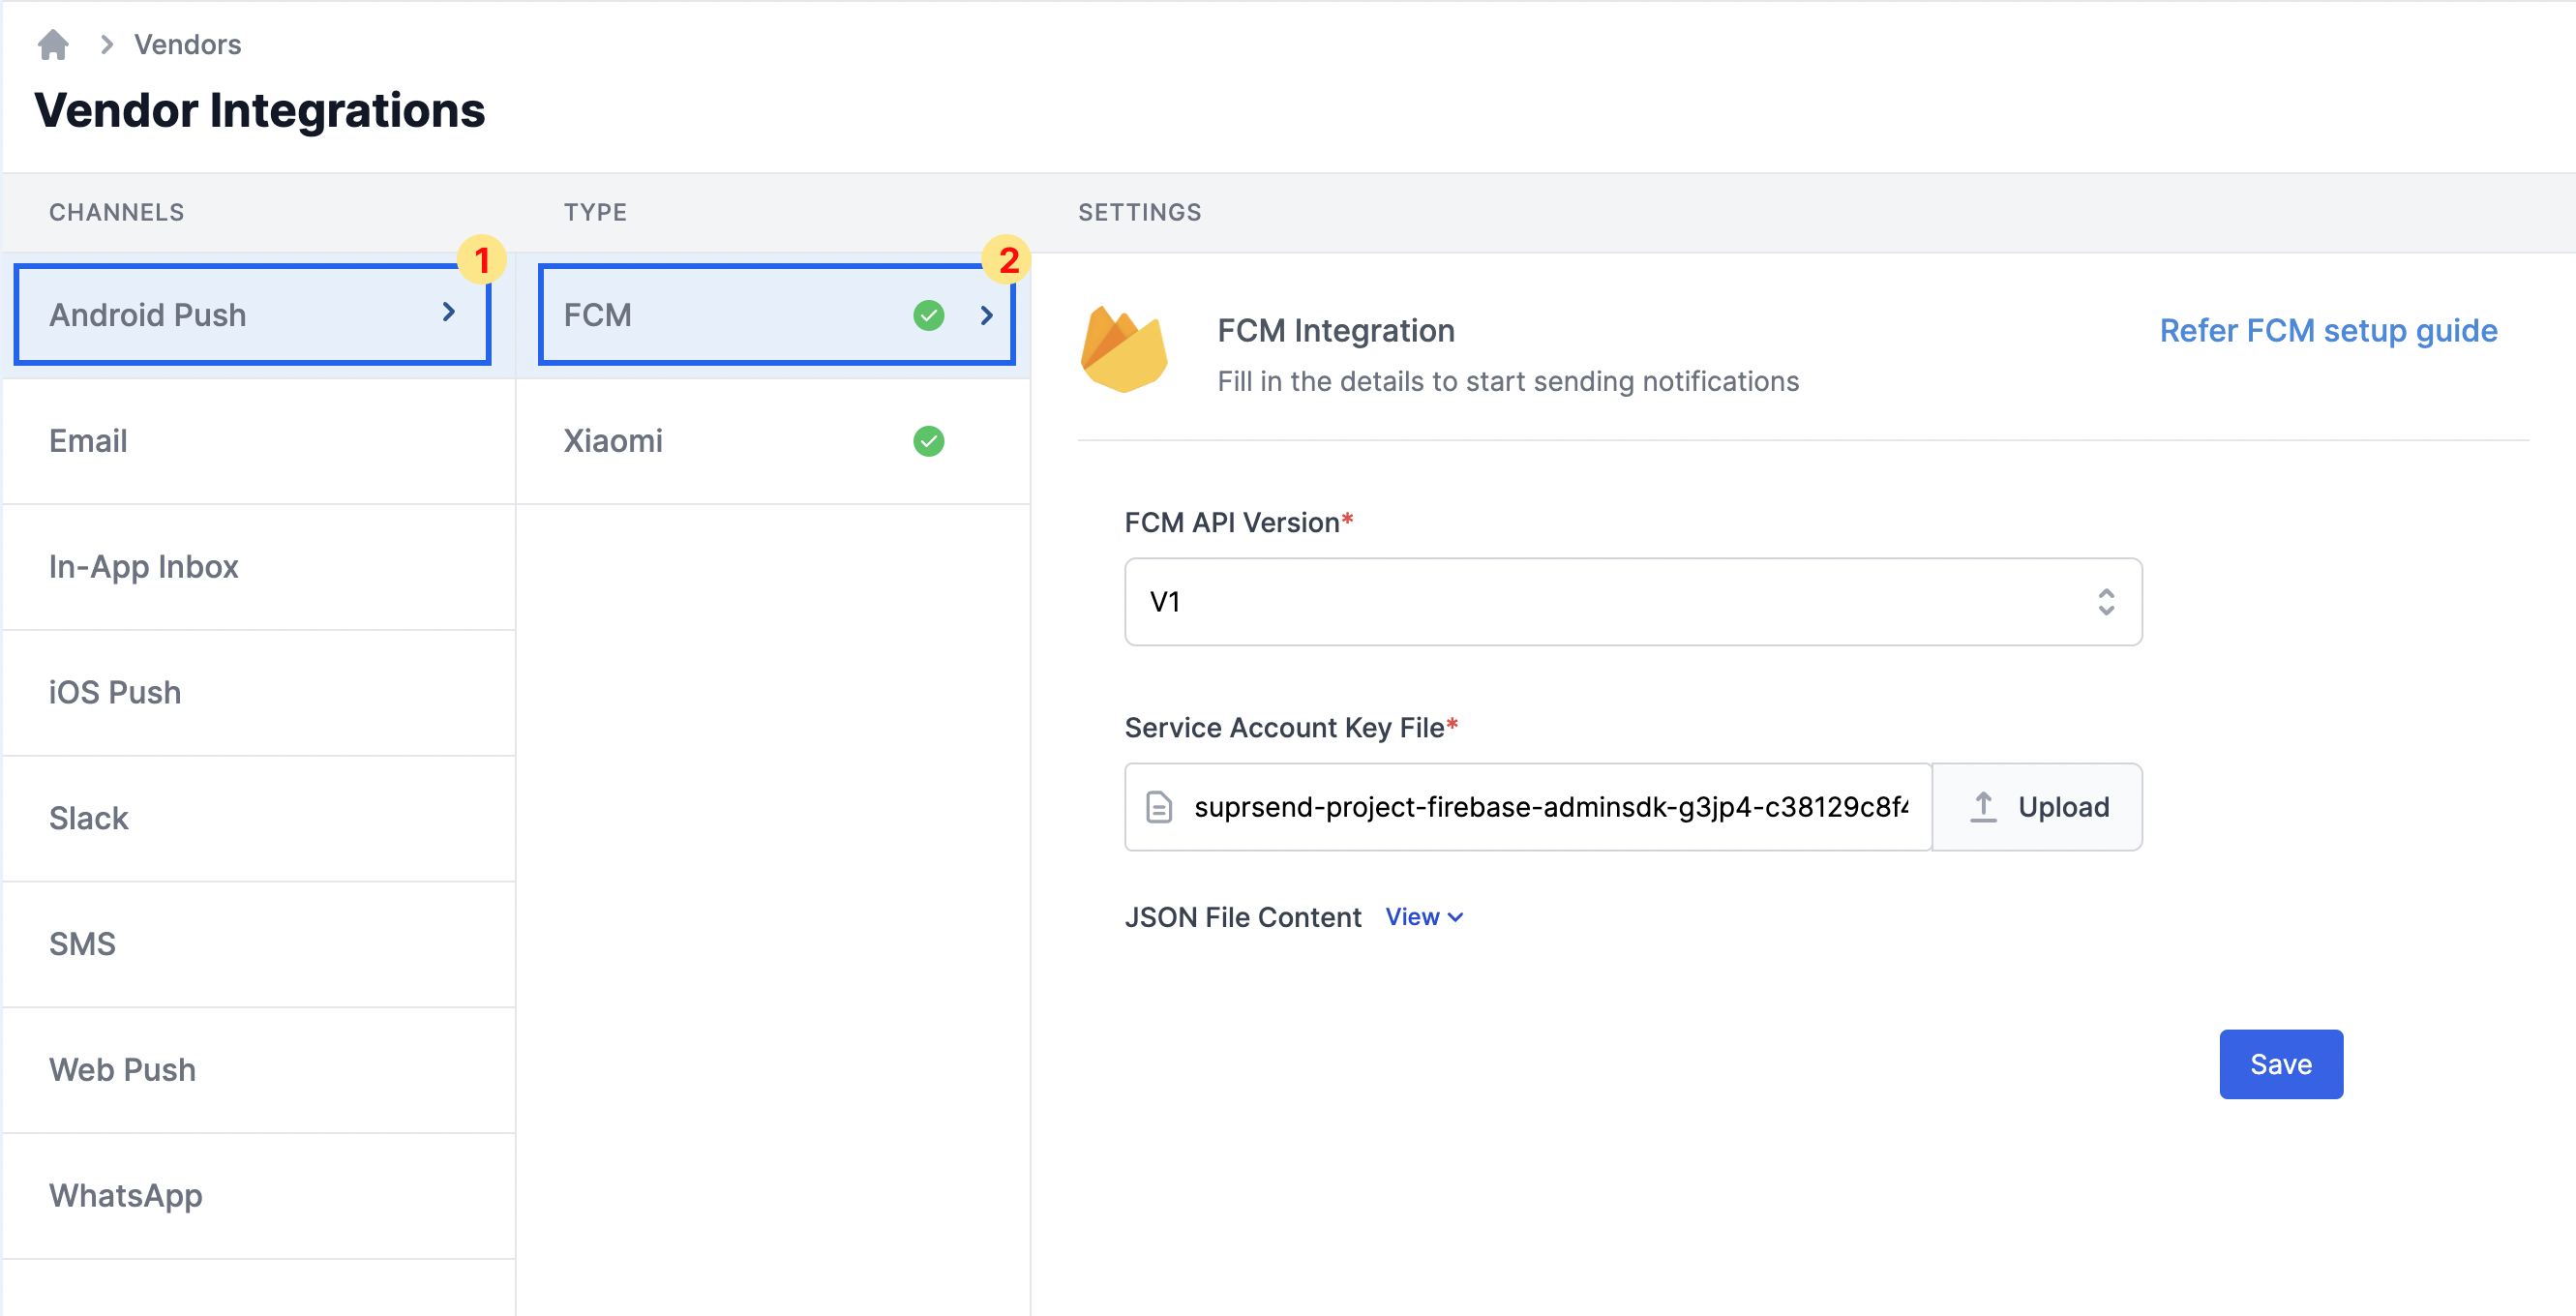 ### Get service account key file
Add Service Account Key json file. You'll get this file from your Firebase Console Project settings -> "Service accounts" tab.
### Get service account key file
Add Service Account Key json file. You'll get this file from your Firebase Console Project settings -> "Service accounts" tab.
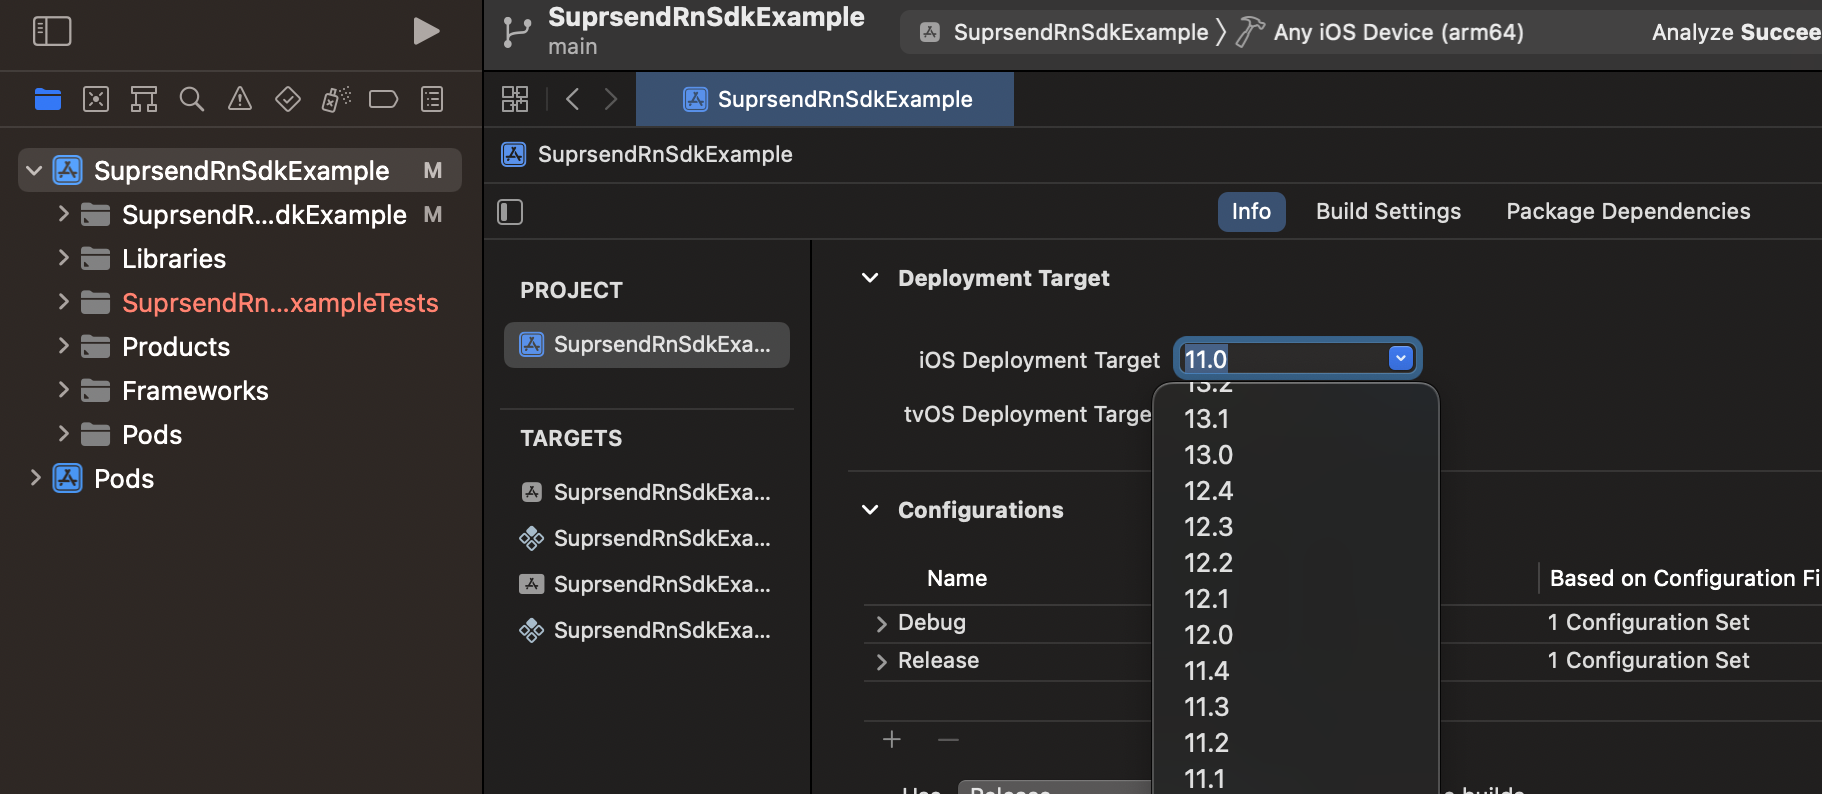
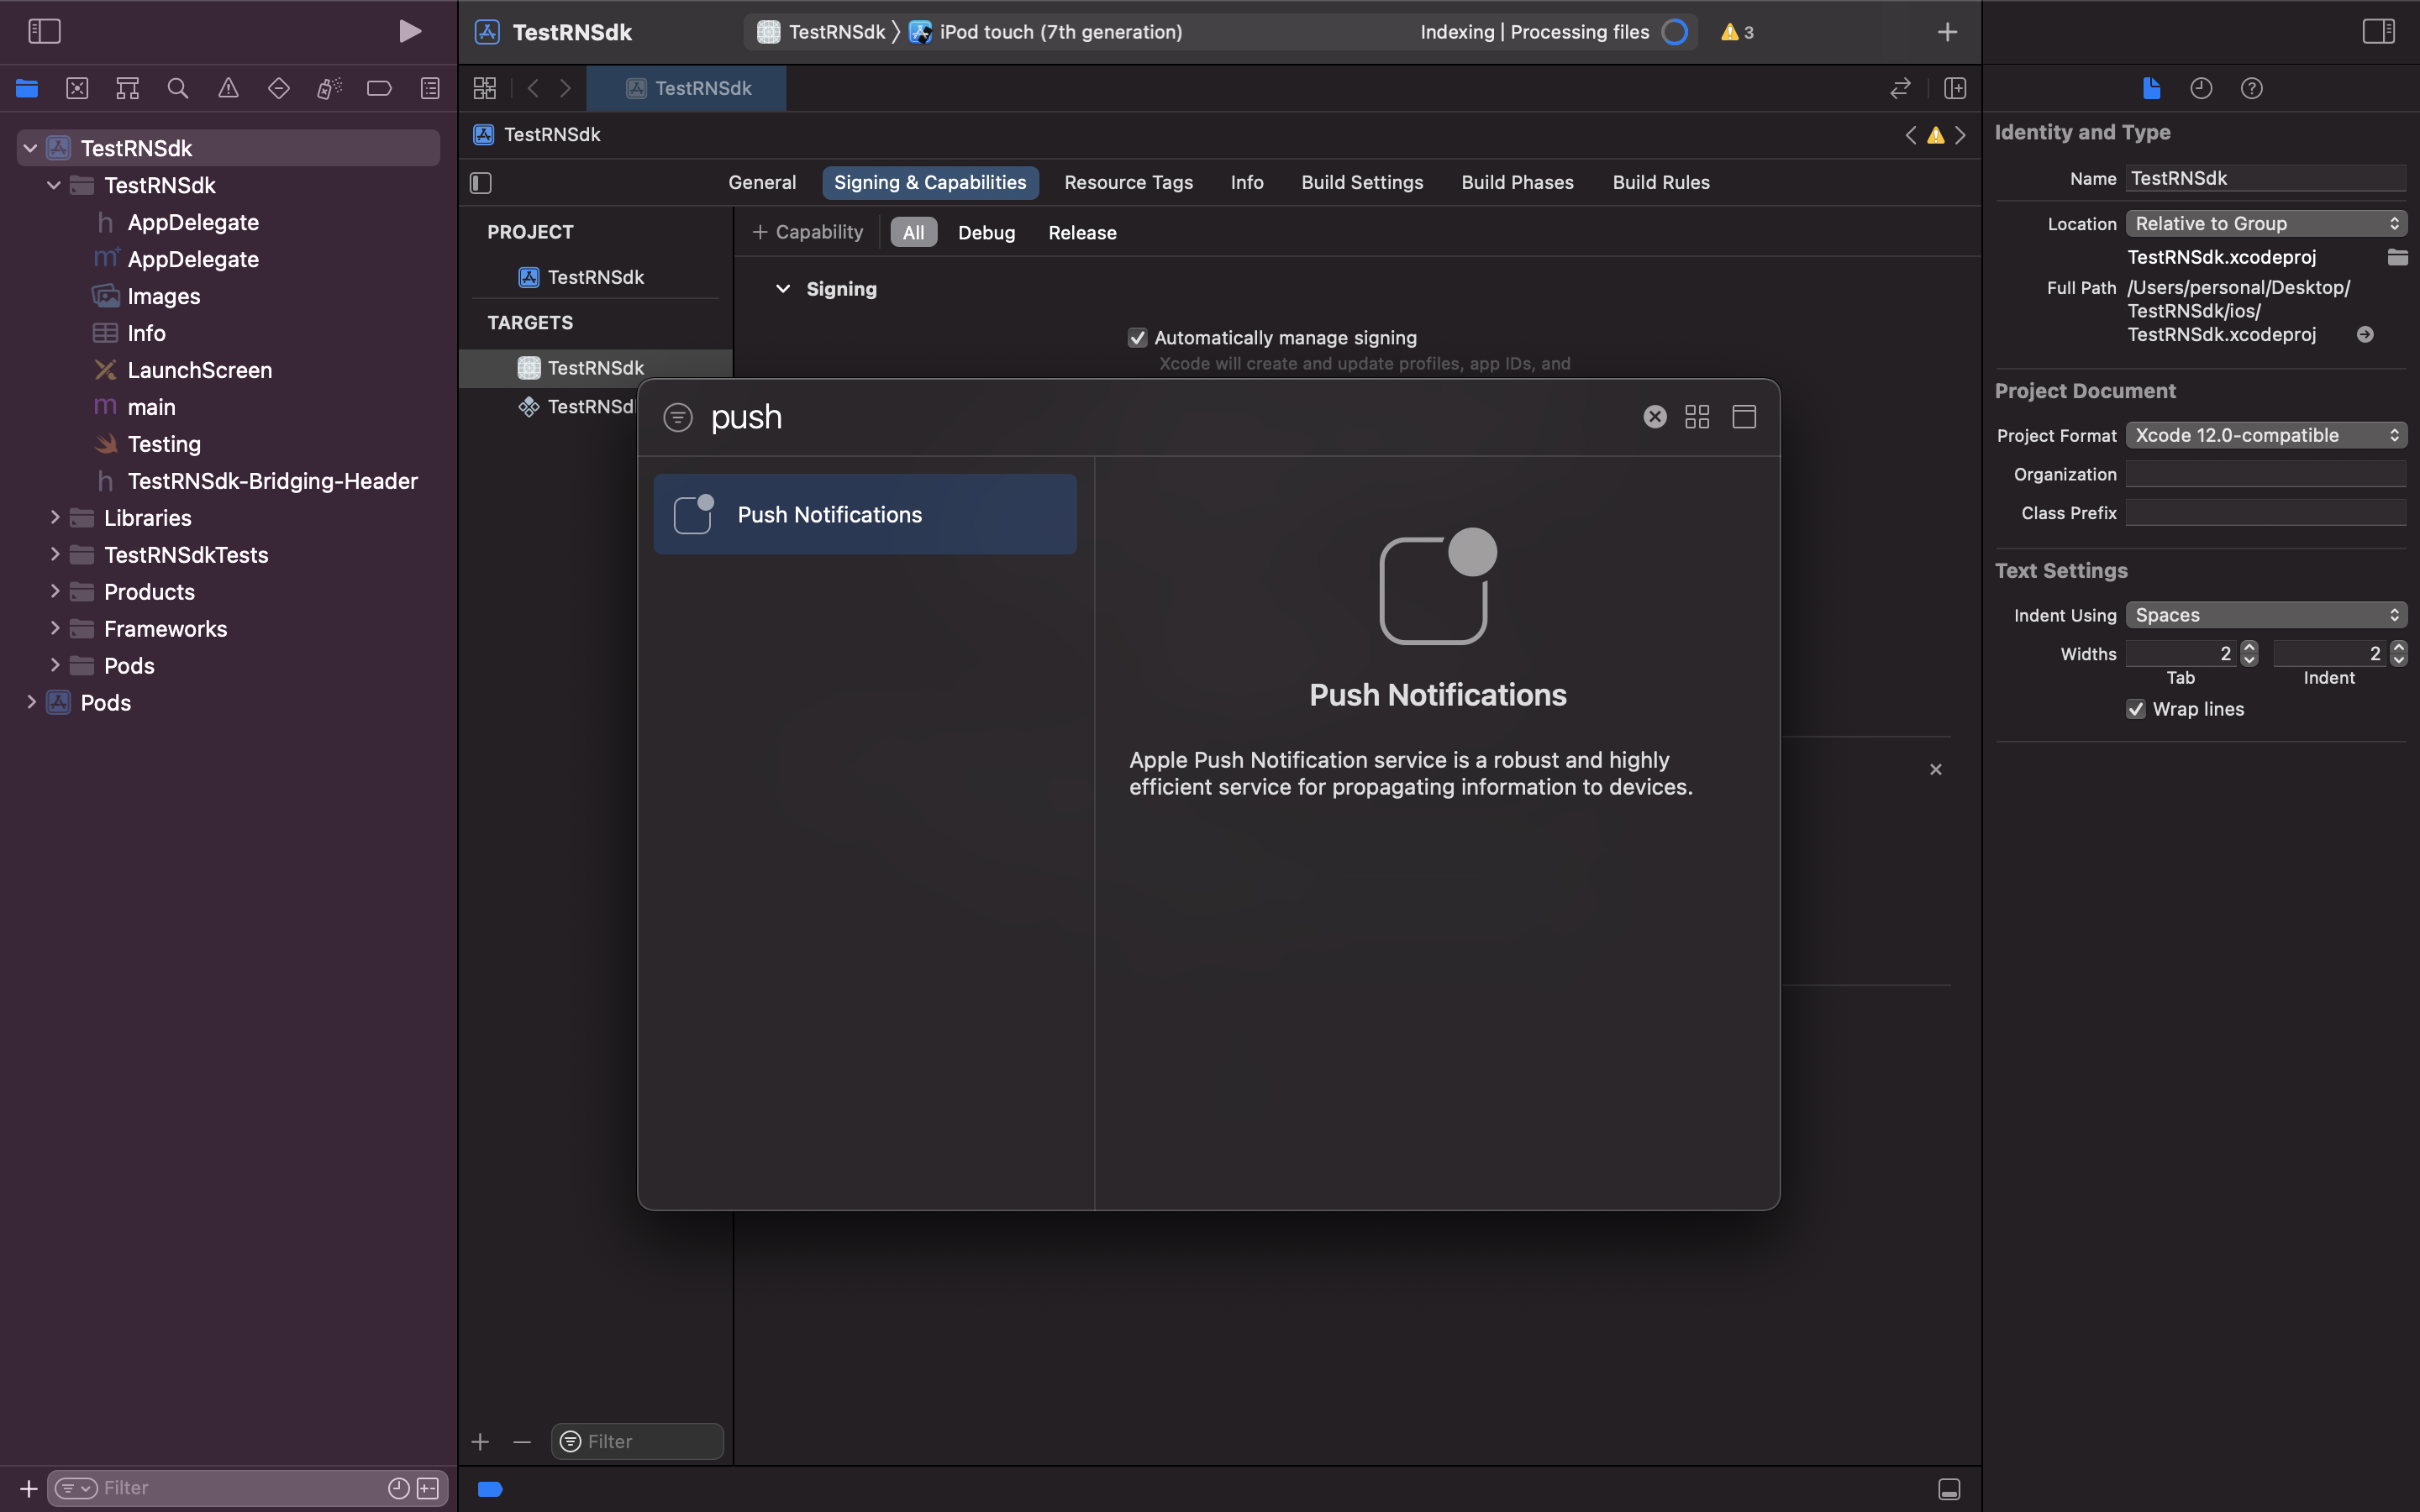 In Background Modes, select **Remote Notifications** option. We use background notifications to receive delivery reports when your app is in quit and background state. Refer [doc](https://developer.apple.com/documentation/usernotifications/setting_up_a_remote_notification_server/pushing_background_updates_to_your_app) to know more about background notification
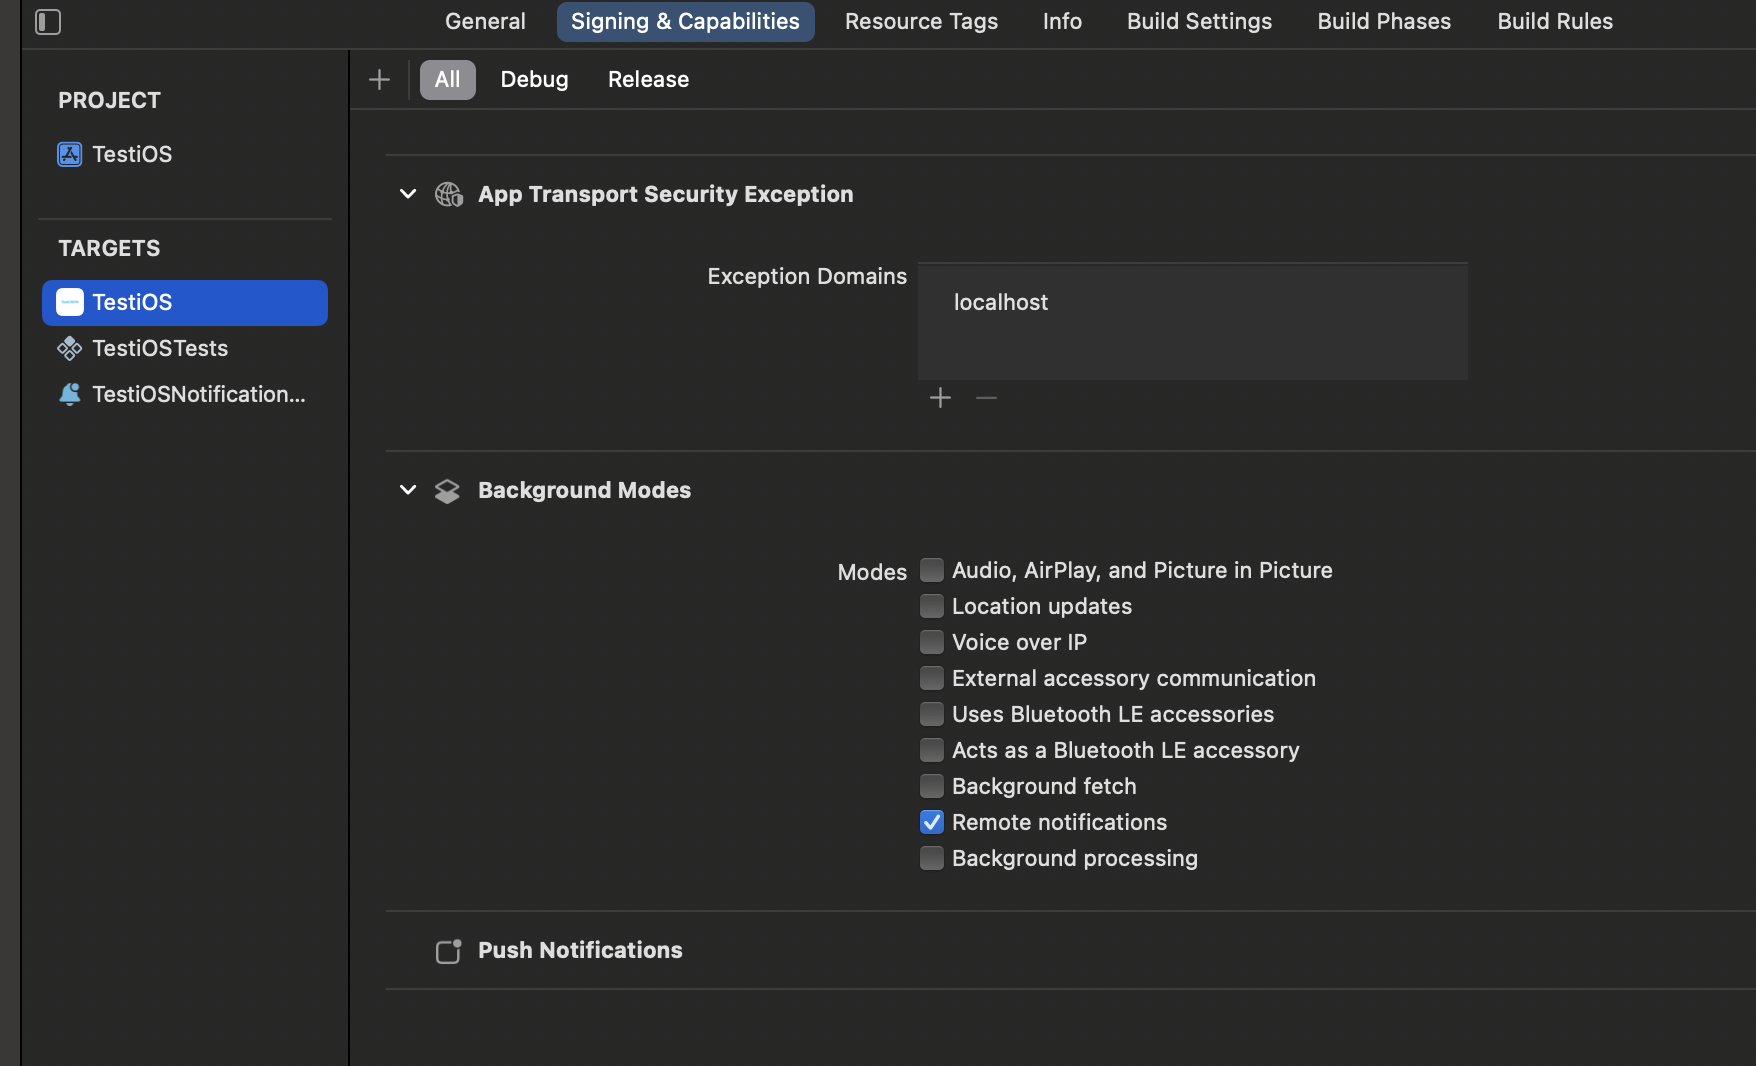
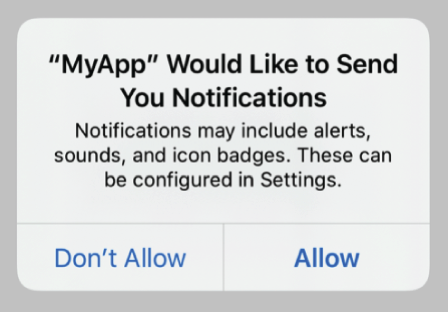
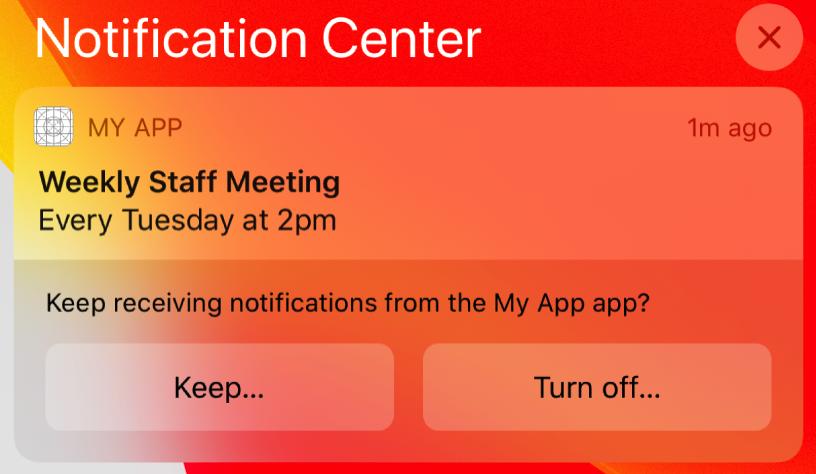 Add below code in `AppDelegate.swift` file for provisional authorization.
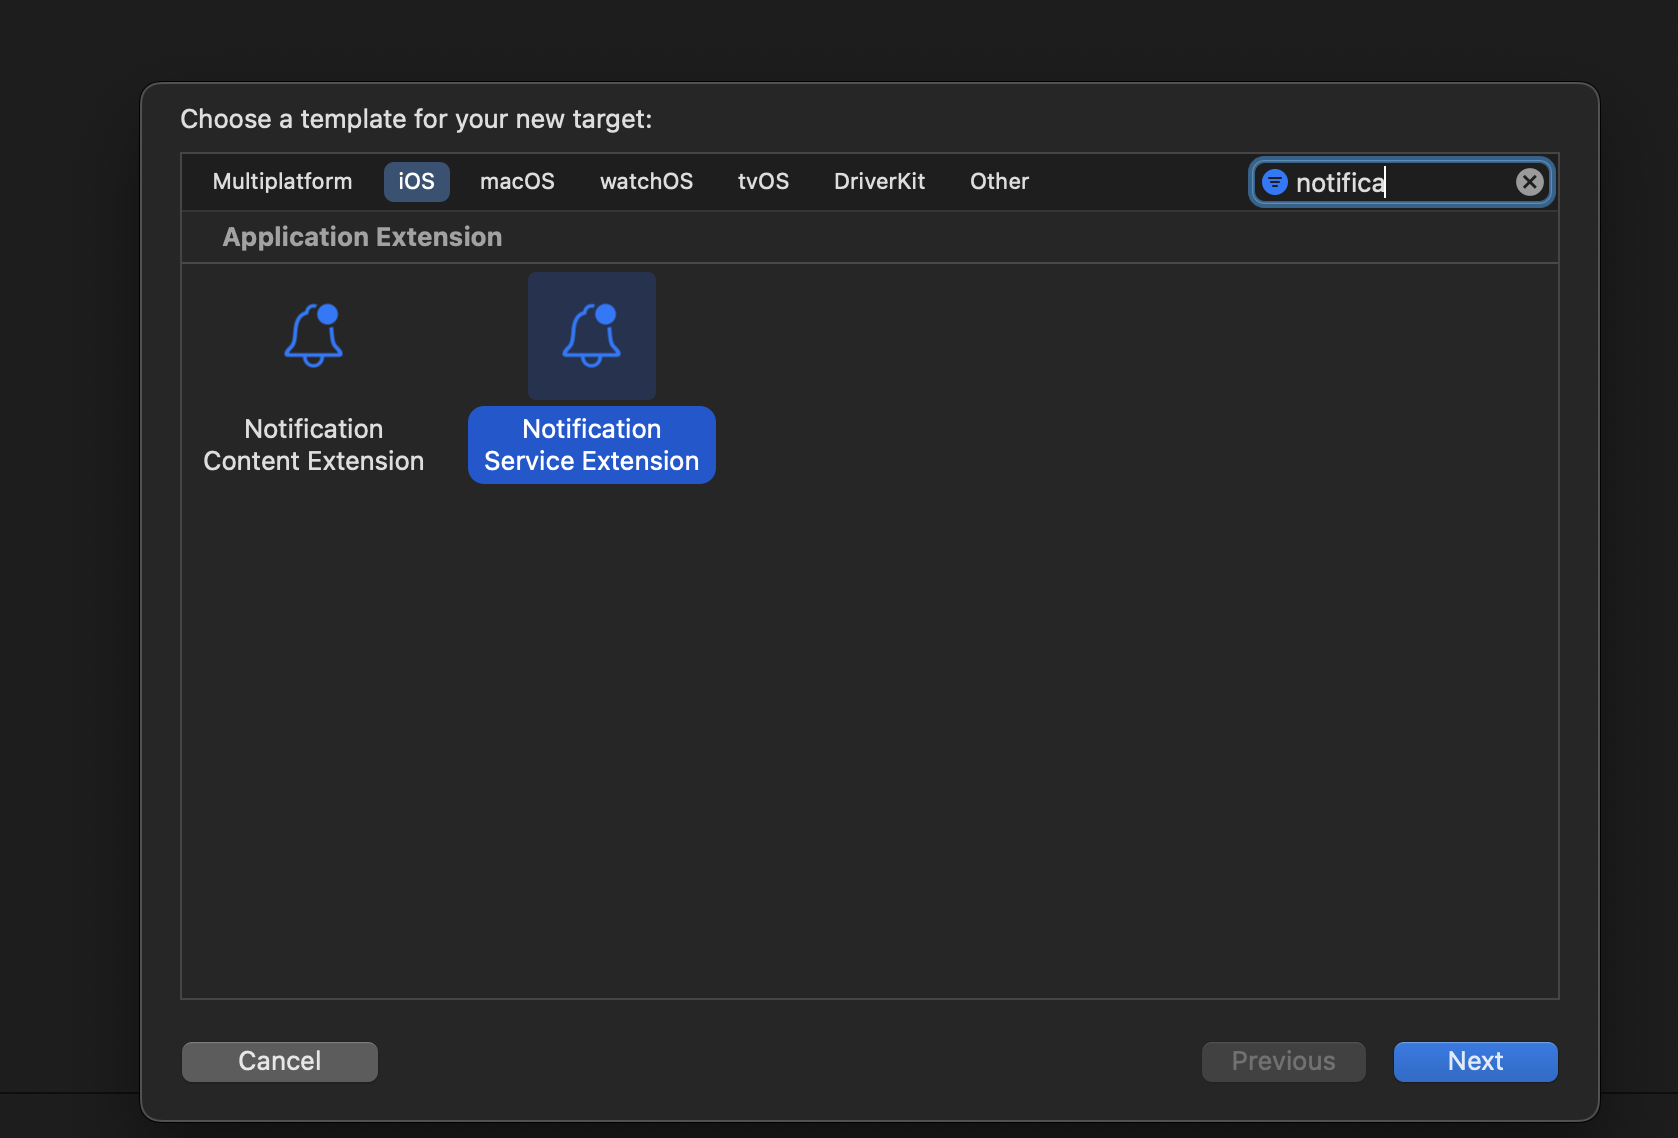
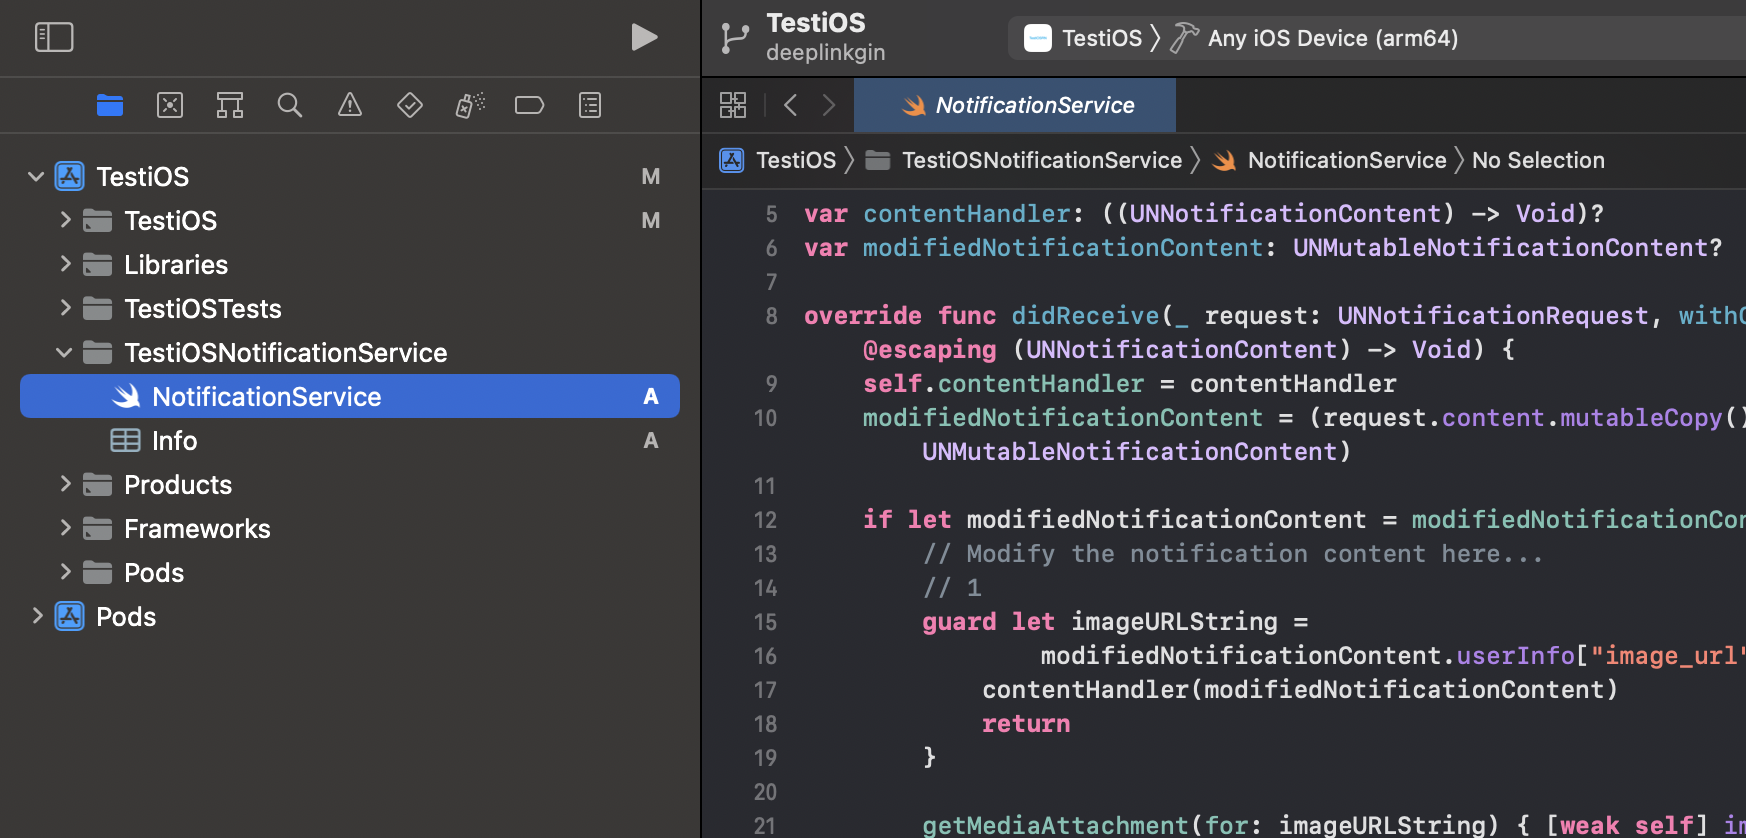
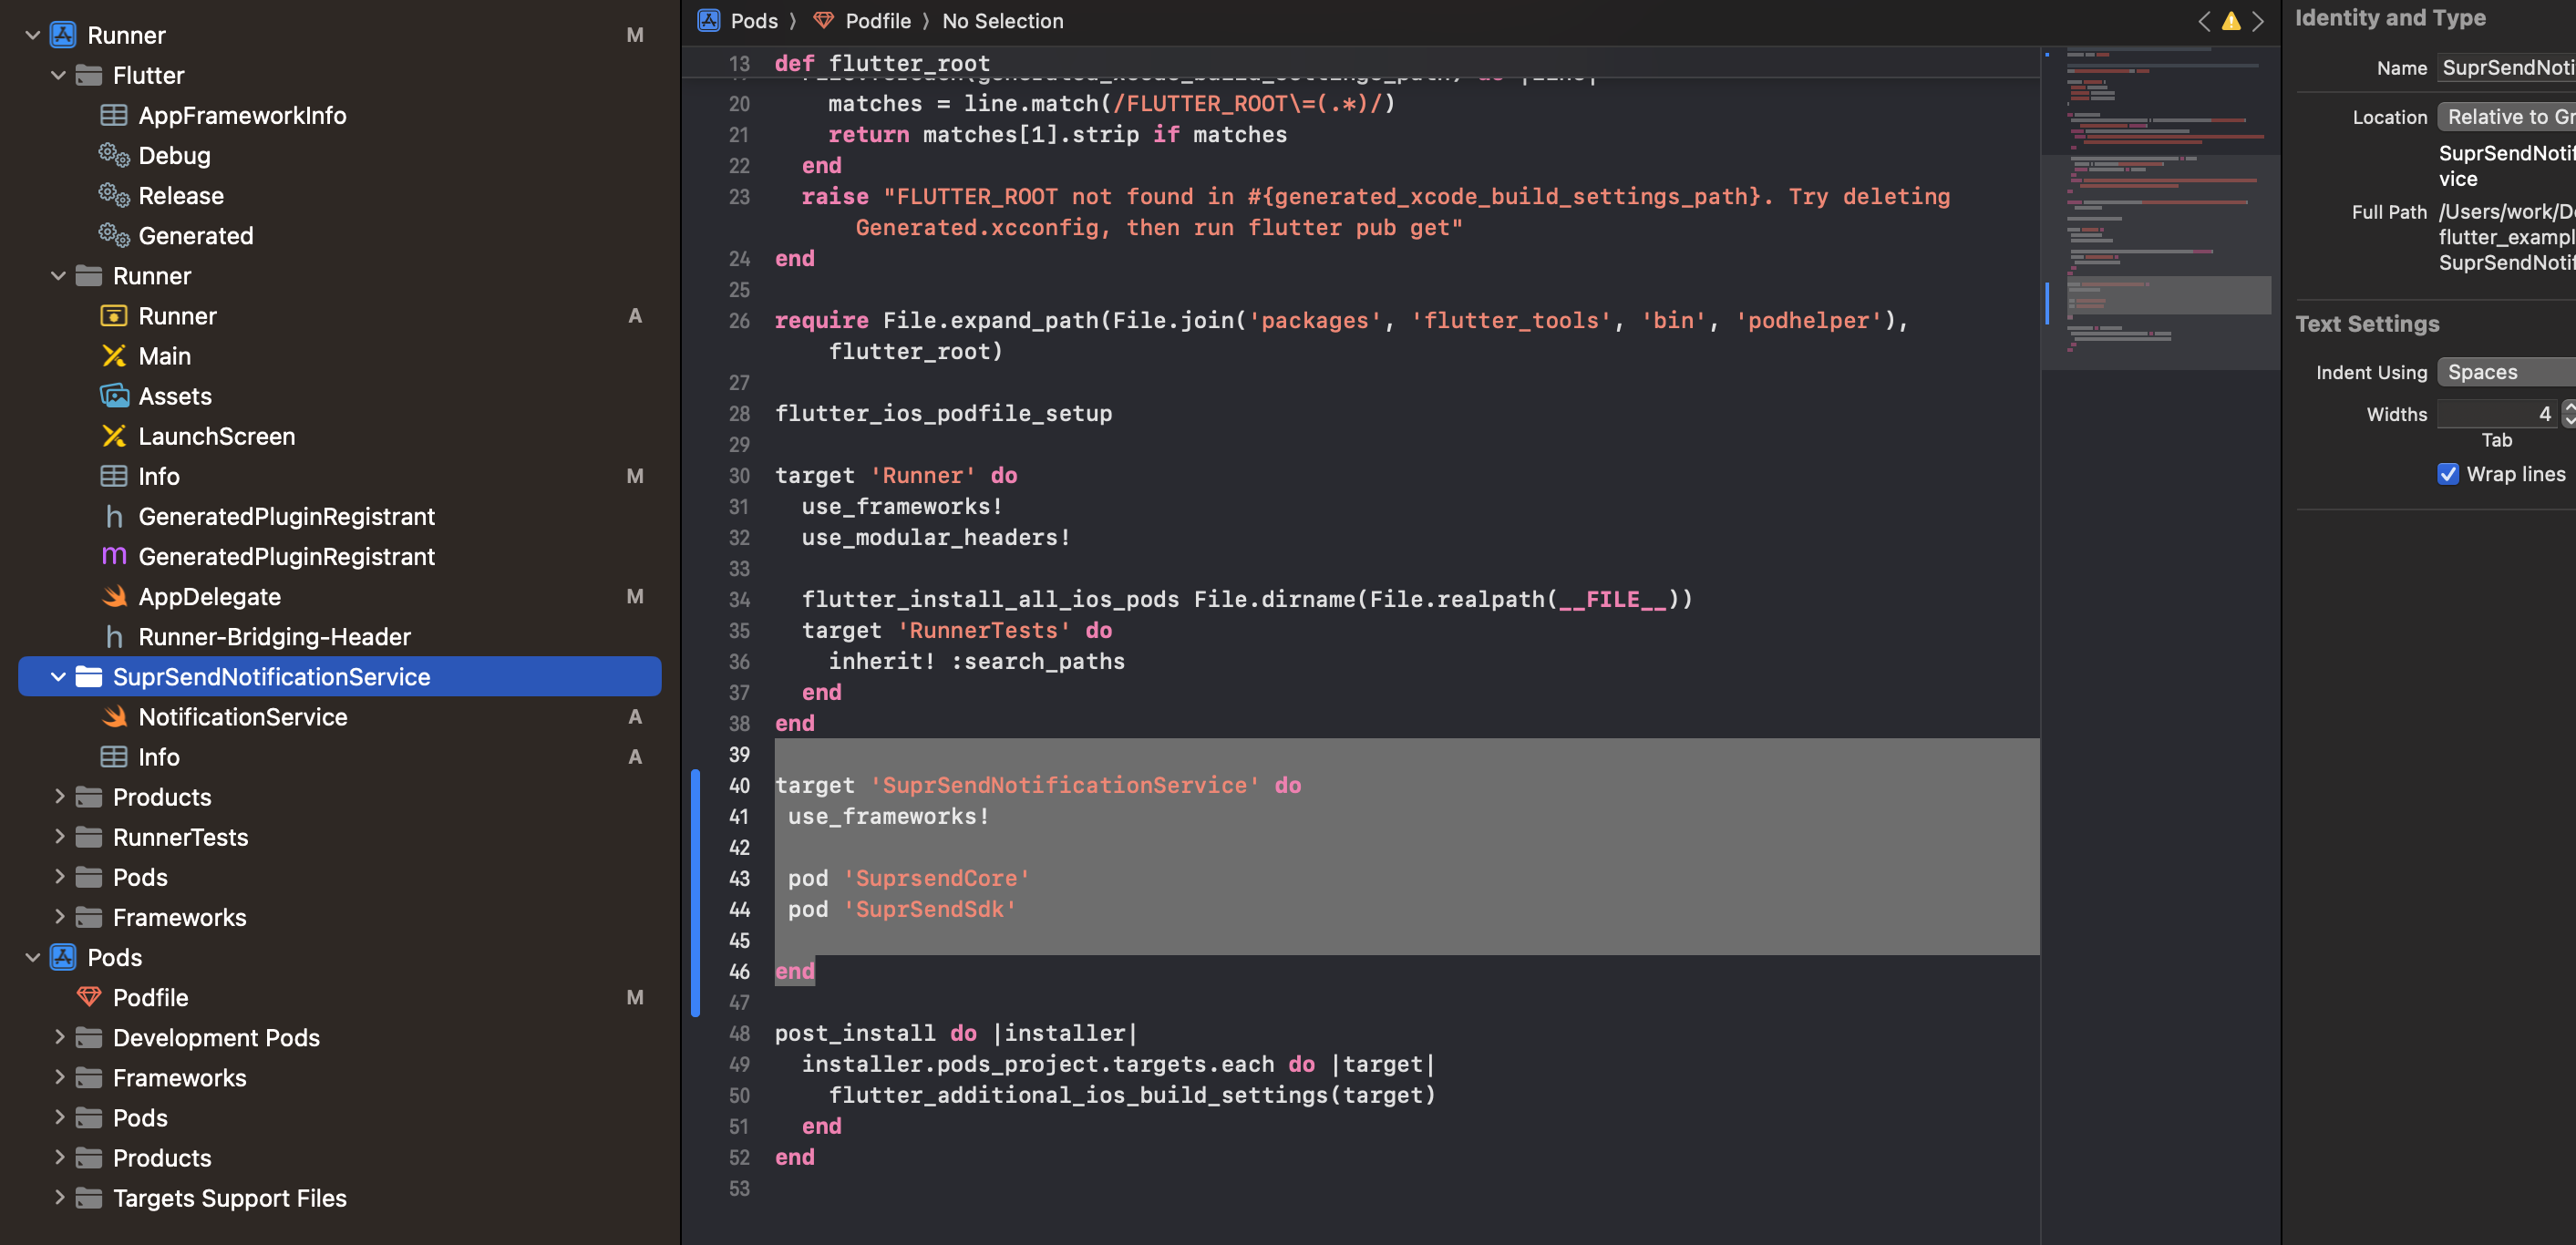
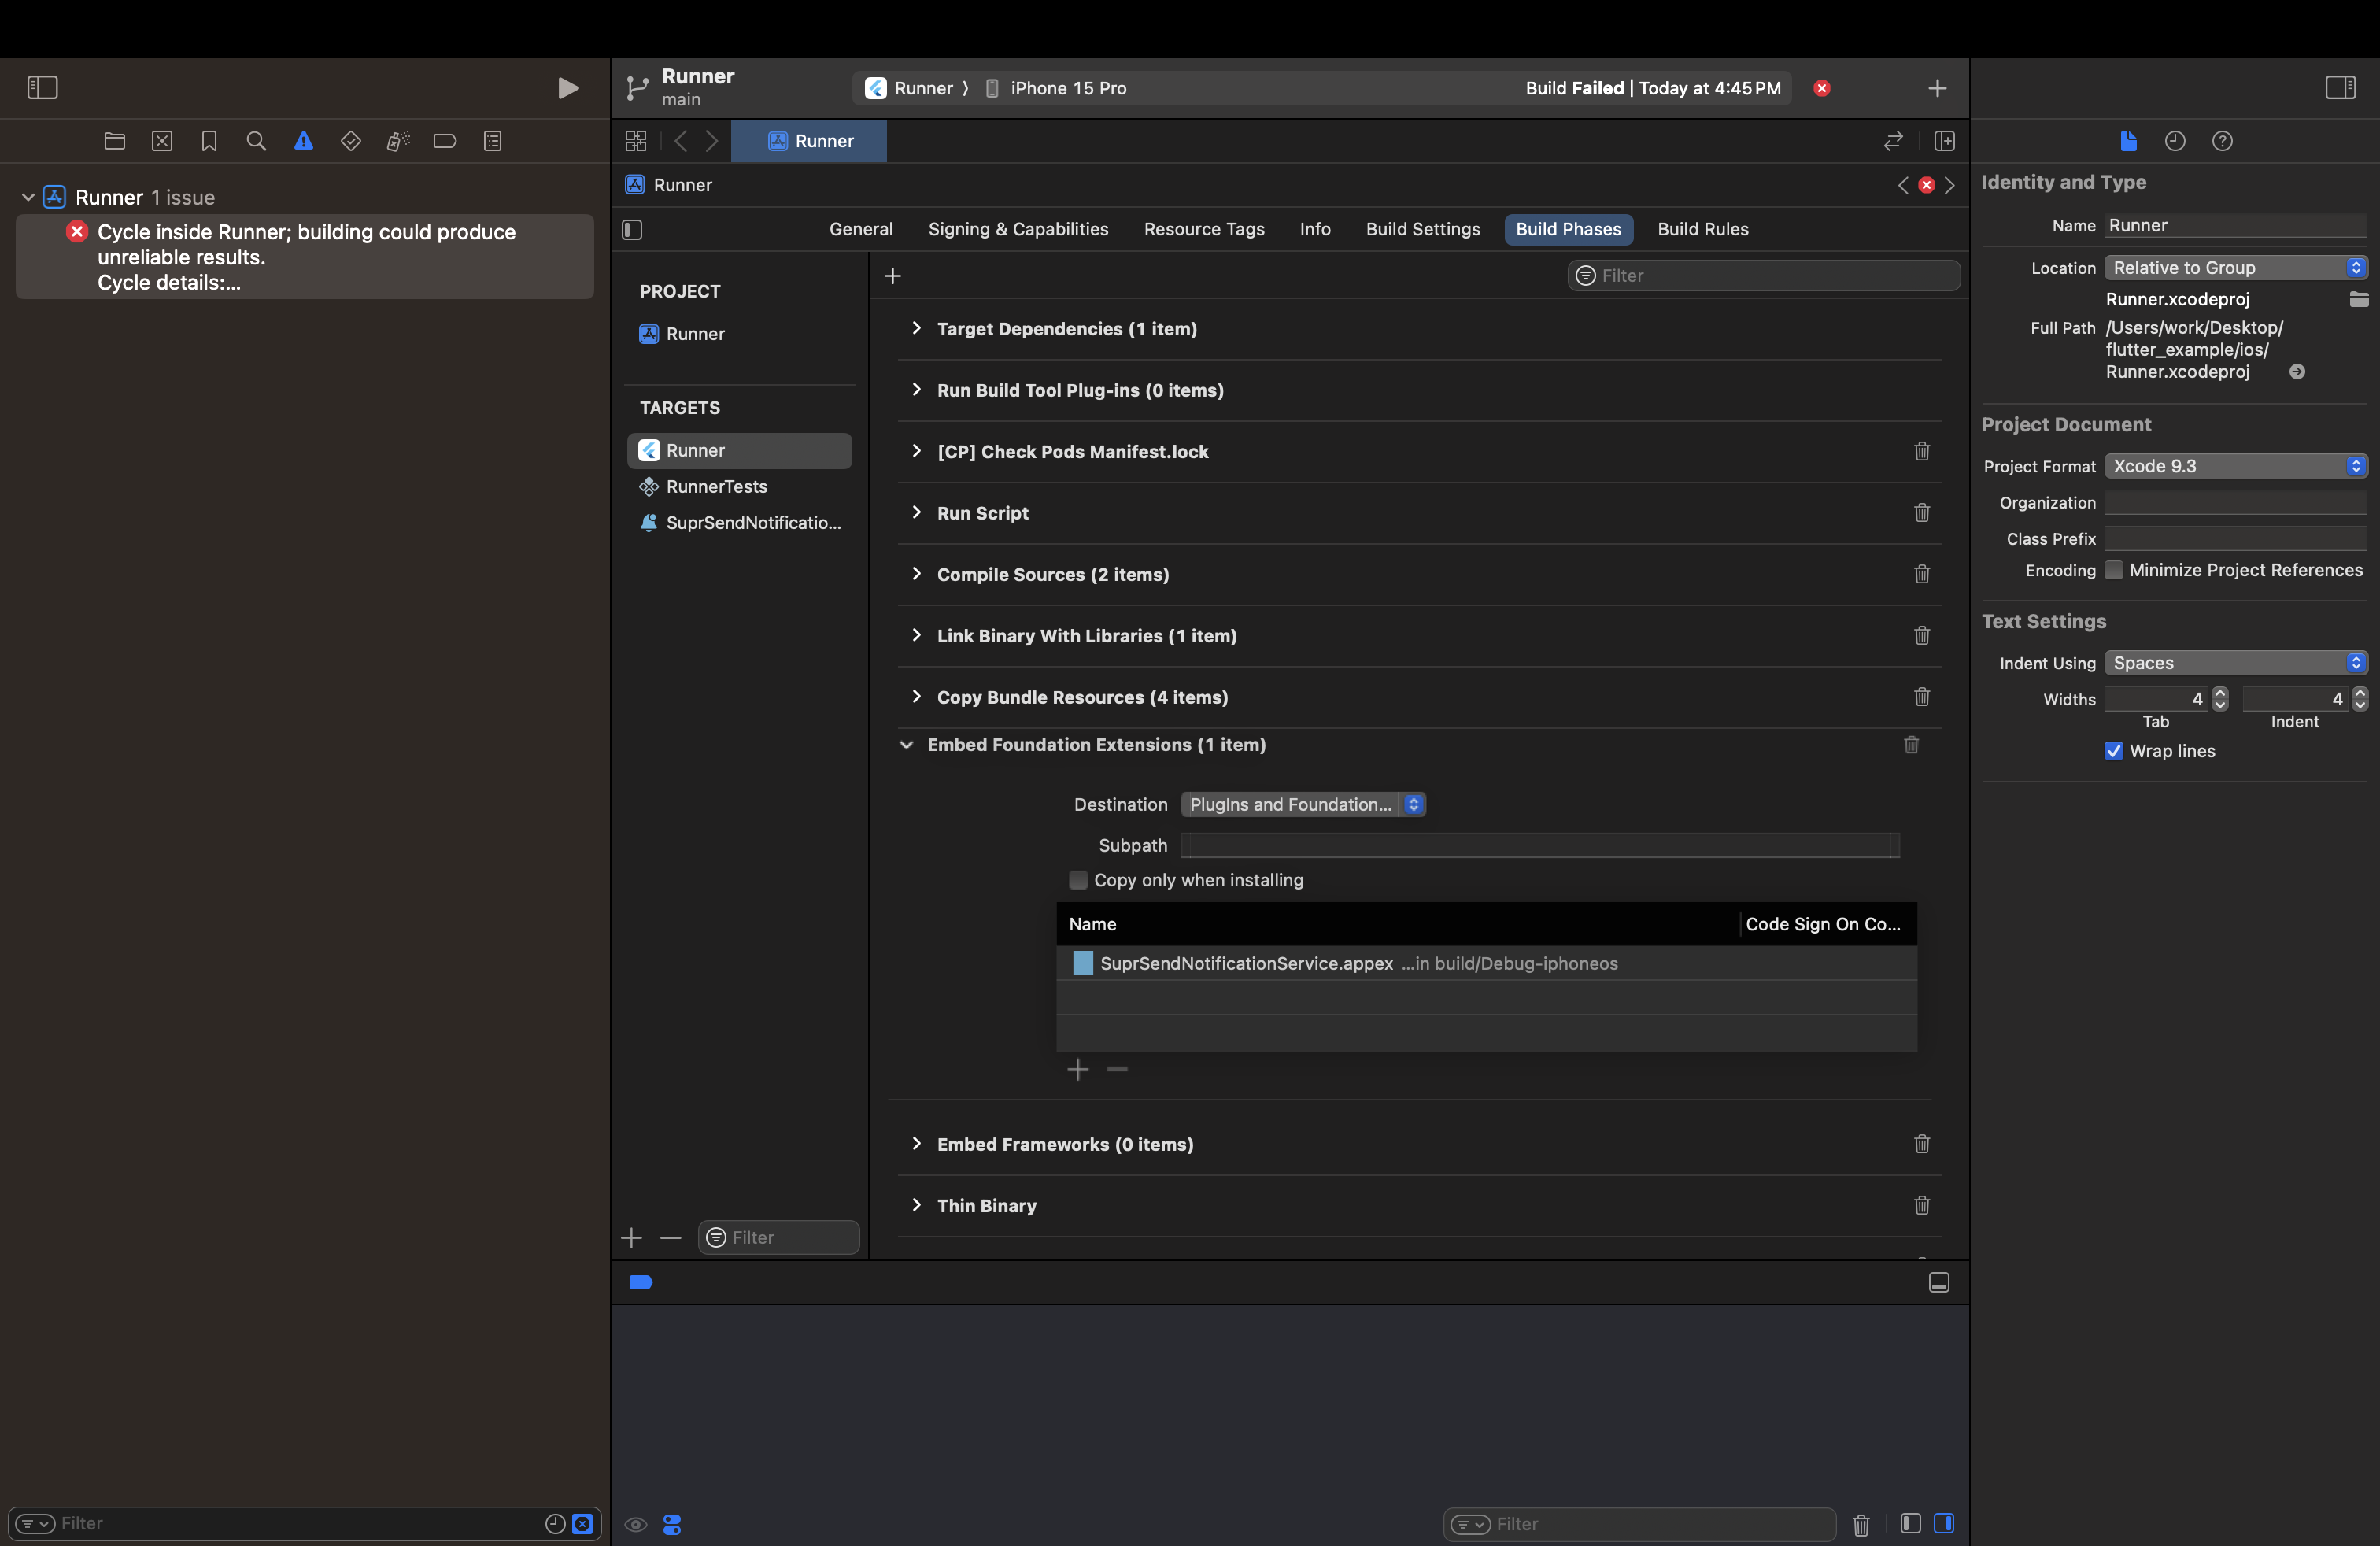
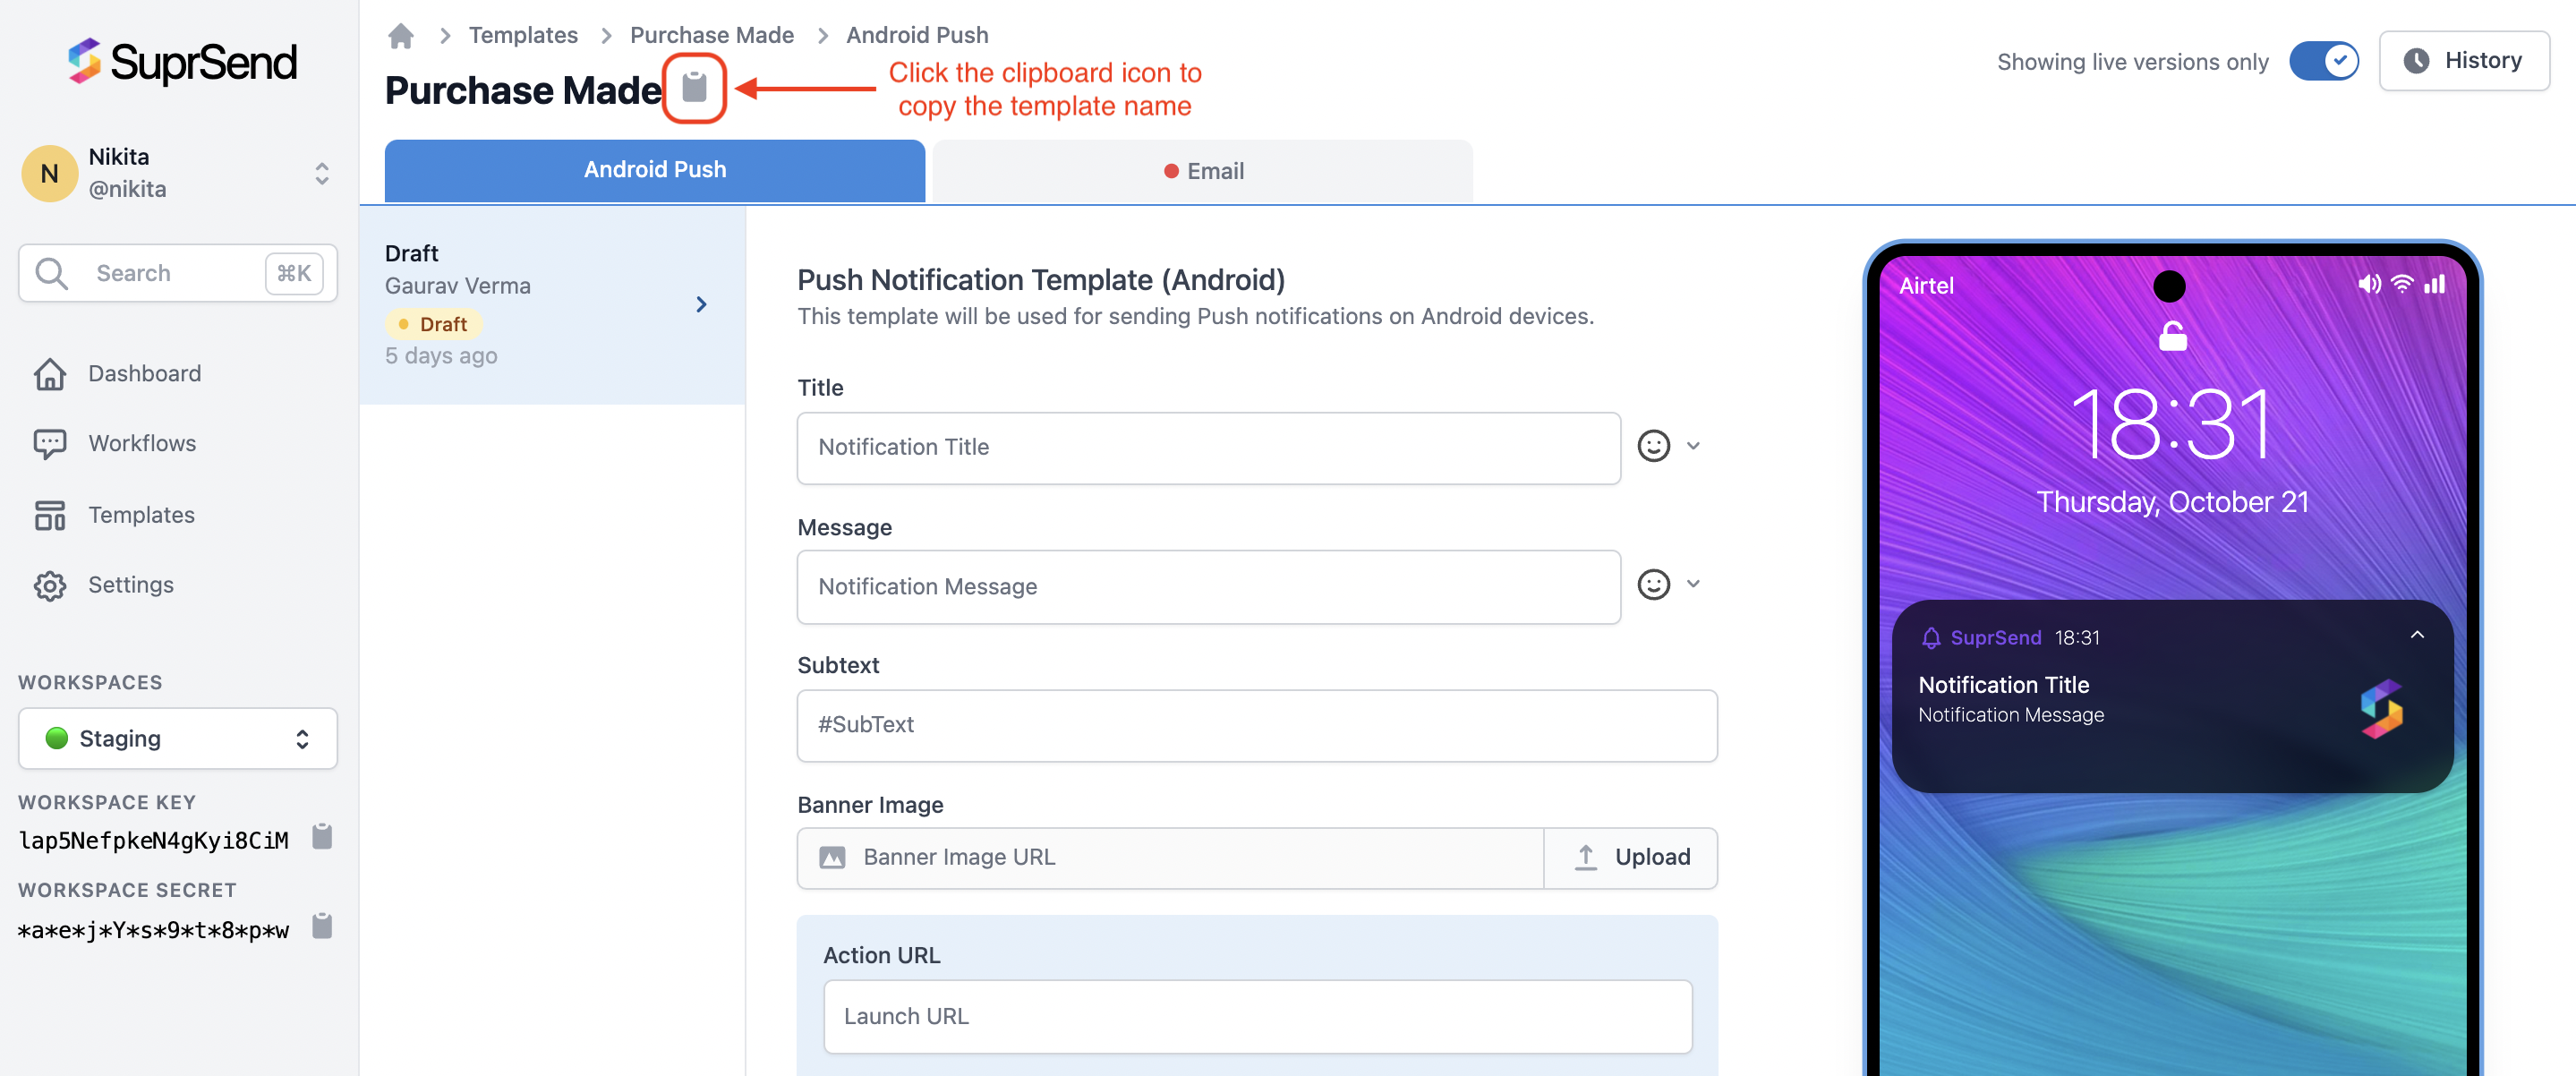 \*\*Response structure: \*\*When you call `suprClient.TriggerWorkflow`, the SDK internally makes an `HTTP` call to SuprSend Platform to register this request, and you'll get an error message if something fails
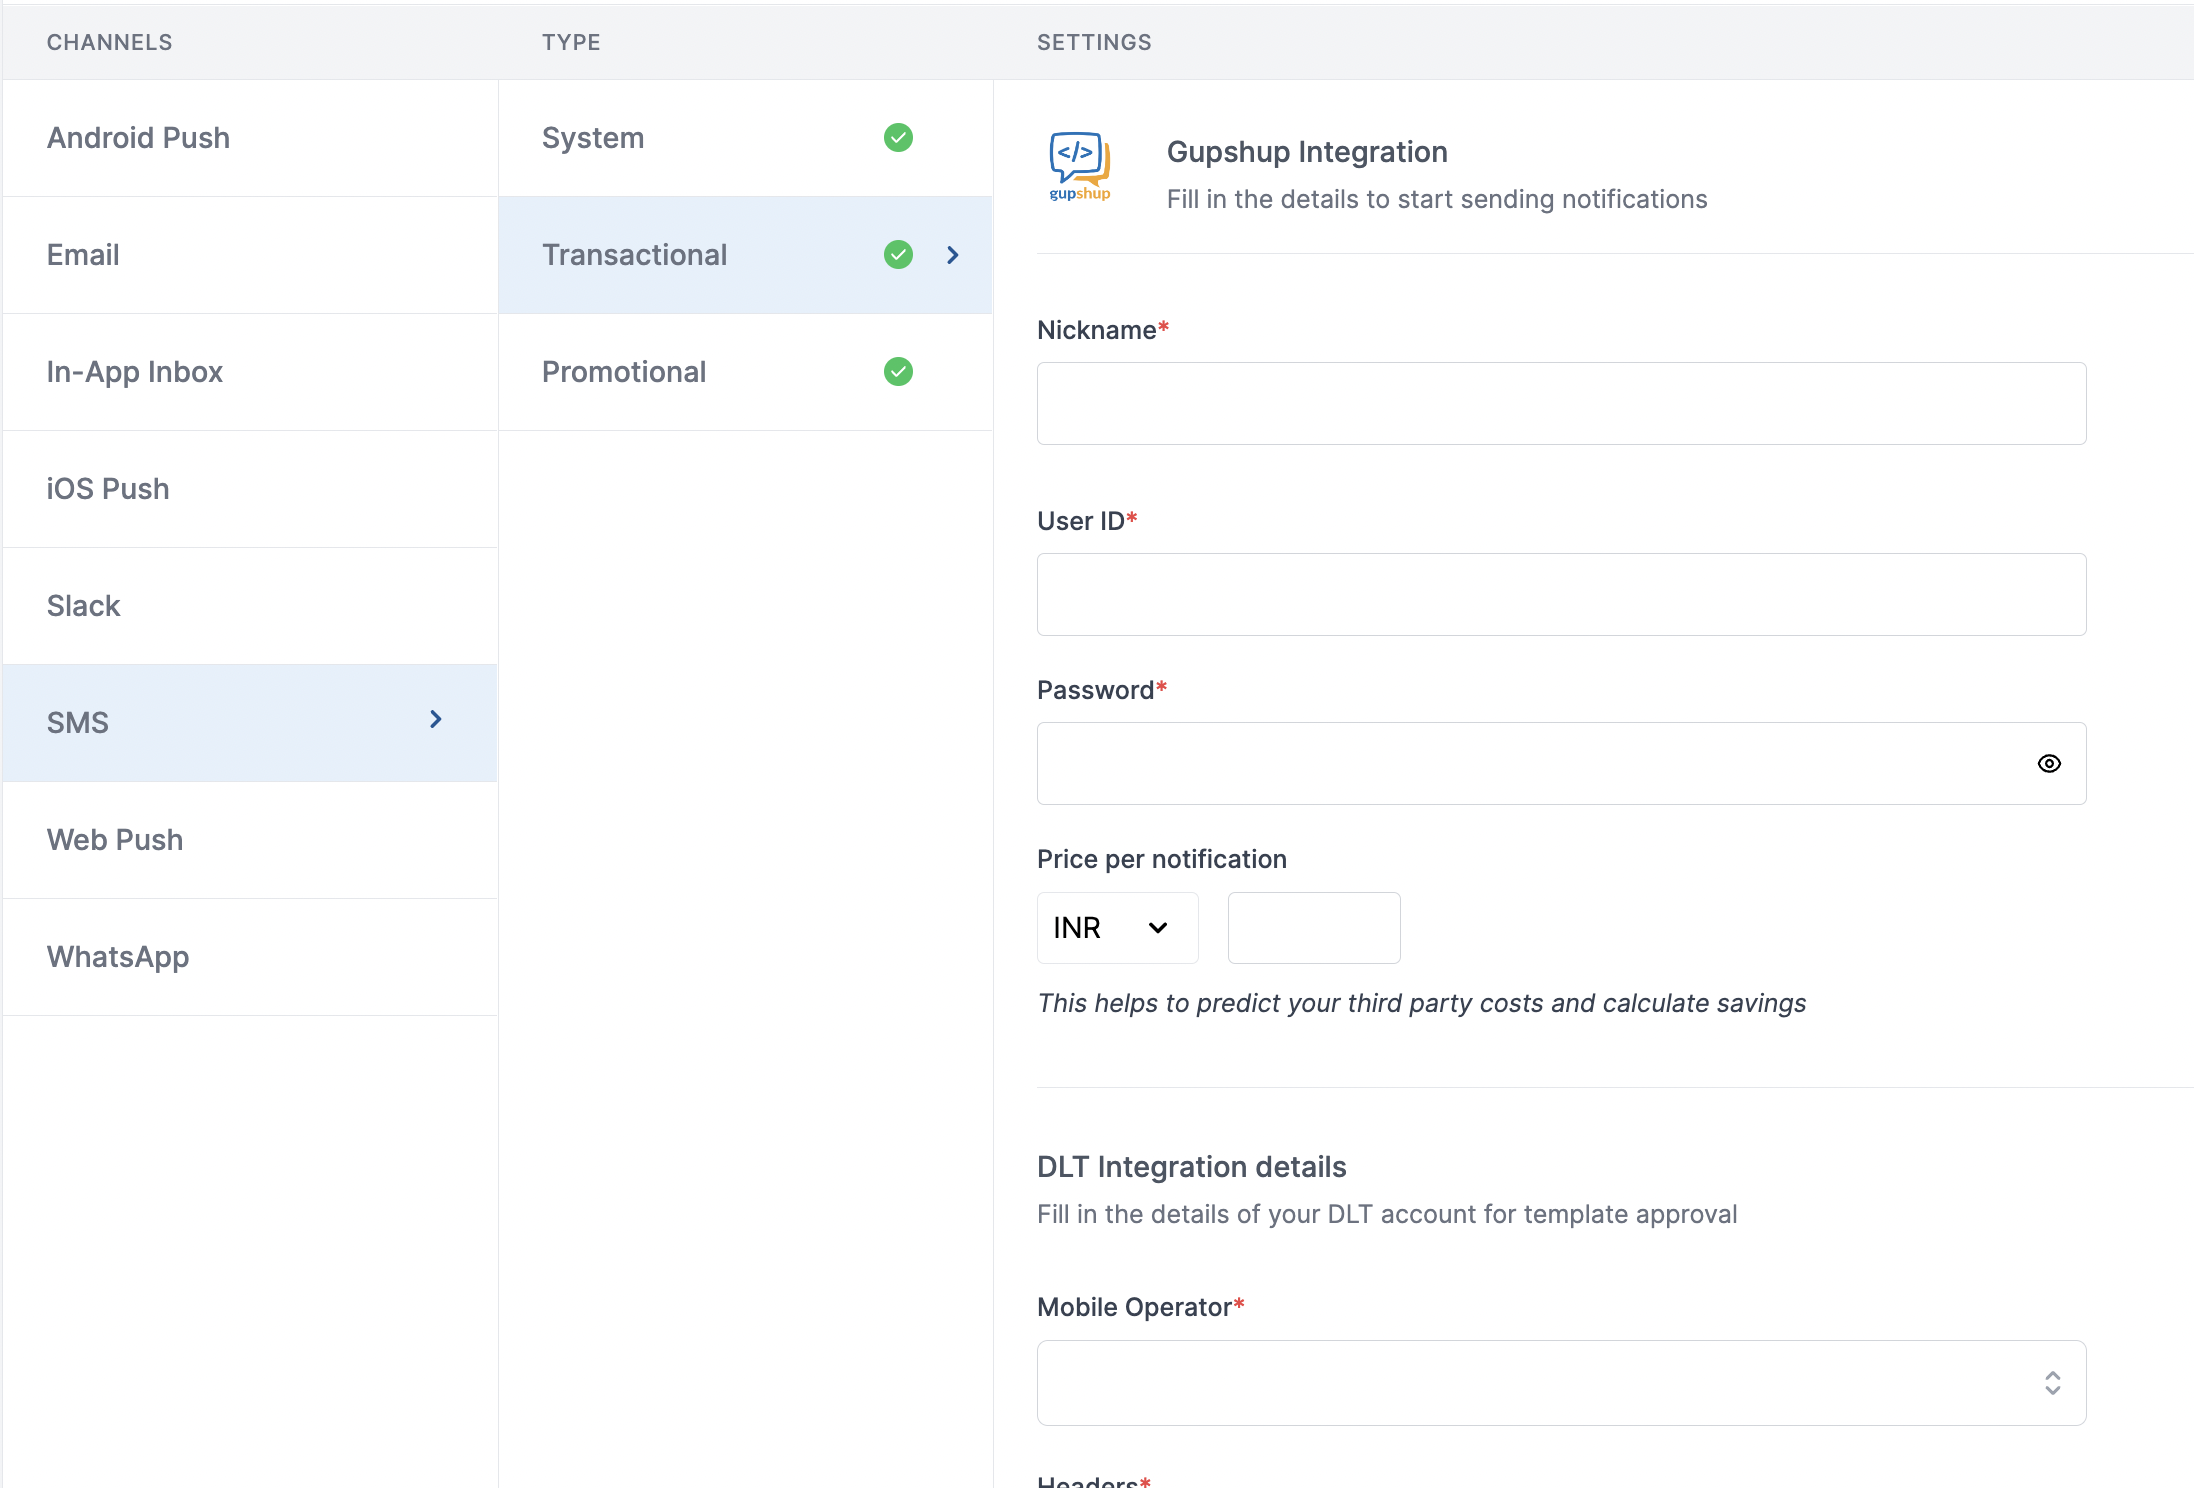 | Form Field | Description |
| ------------------------------------ | -------------------------------------------------------------------------------------------------------------------------------------------------------------------------------------------------------------------------------- |
| Nickname | You can give any name which may help you to identify this account easily |
| User ID | User ID of your Gupshup account. SuprSend uses this information to send SMS on your behalf via your registered Gupshup account. |
| Password | Password of your Gupshup account. SuprSend uses this information to send SMS on your behalf via your registered Gupshup account. |
| Price per notification | This is the amount you pay per SMS notification to Karix. It helps us to calculate, estimate and optimise your cost spent on notifications. |
| DLT Integration -> 'Mobile Operator' | Mobile Operator of your enterprise DLT account |
| DLT Integration -> 'Headers' | 6 digit/character sender id registered for your entity ( *You can get the header details from your DLT portal*)*e.g. SPRSND* Also, you can add multiple headers in the list by just typing the header name and clicking on enter |
| DLT Integration -> 'User Name' | User Name of your DLT platform login. SuprSend uses this info to register template on your behalf through your registered DLT platform. |
| DLT Integration -> 'Password' | Password of your DLT platform login. SuprSend uses this info to register template on your behalf through your registered DLT platform. |
| DLT Integration -> 'Entity ID' | Entity Registration ID linked to your DLT account. You can get the Registration Id from your DLT account homepage. SuprSend uses this info to send messages on your behalf through your registered DLT platform. |
## Setting callback URL in Gupshup account
One of the platform advantage of using SuprSend as a central communication system is that it shows notification analytics for all channels in your SuprSend account together.
Send a mail to Gupshup team to enable below webhook URL to your account:
URL: [`https://hub.suprsend.com/webhook/gupshup/sms/`](https://hub.suprsend.com/webhook/gupshup/sms/) Request method- POST
## Enabling URL shortener service in Gupshup account
URL shortening is essential if you are sending URL links in your SMS content. It reduces the number of characters in your SMS and is required for tracking the click rate of your messages.
To activate URL shortening, write a mail to gupshup enterprise support
## How to register headers through Airtel DLT platform
To register header on Airtel DLT platform, you can refer the section: [Sender ID/Mask/Header Registration- DLT Platform](https://enterprise.smsgupshup.com/DLT/senderidRegistration)
***
# Gupshup (SMS)
Source: https://docs.suprsend.com/docs/gupshup-sms-errors
Possible SMS delivery errors reported by Gupshup and their resolutions.
In case of vendor error, you'll see `Trigger failed` or `Failure by Vendor` status in the third step of the logs. However, you can hover over the failed chip to access the specific error message.
## Error Codes
| Error | How to solve |
| ------------------------------------------------------------------------------------------------------------------------------------------------------------------ | ---------------------------------------------------------------------------------------------------------------------------------------------------------------------------------------------------------------------------------------------------------------------------------- |
| 001 - ABSENT\_SUBSCRIBER | The message could not be delivered because the recipient is temporarily unavailable. This error can occur due to network issues, roaming, recipient's mobile network provider service is temporary down or the SIM card is inactive. You can recheck the number and retry sending. |
| 002 - CALL\_BARRED | Subscribers have some kind of call barring activity on the number due to which messages from unknown sources are blocked. |
| 003 - UNKNOWN\_SUBSCRIBER | Unknown/invalid number. |
| 004 - SERVICE\_DOWN | Operator service is temporarily down. |
| 005 - SYSTEM\_FAILURE | Failure due to a problem in the Operator’s systems (Originating or Destination Operator). |
| 006 - DND\_FAIL | The number is either in DND or Blocked due to being in DND or a complaint. |
| 007 - BLOCKED | From number is blocked by the end user and you can't reach out to this user. |
| 008 - DND\_TIMEOUT | Before sending promotional messages, the DLT system checks if the recipient's number is registered under DND (Do Not Disturb). This error indicates that the system failed to complete this check within the required timeframe. Retry sending after a day. |
| 009 - OUTSIDE\_WORKING\_HOURS | DLT has restrictions on the hours during which promotional or bulk SMS messages can be sent. In India, promotional messages are allowed between 9 AM and 9 PM. You'll get this error if the message is sent outside these hours. |
| error: 175: The "INTERNATIONAL\_PHONE" service is disabled for you. Kindly get the service enabled before using this action | You need to enable international sending in your gupshup account to send messages to numbers outside India. Reach out to Gupshup support to enable it for your account. |
| HEADER\_NOT\_REGISTERED\_FOR\_TEMPLATE | Header added in the template is not registered on DLT or is different from the one added in approved template. |
| 067 - HEADER\_NOT\_FOUND | Header added in the template is not registered on DLT or is different from the one added in approved template. |
| 00b - BLOCKED\_MASK | The sender ID / Header (or mask) you are using to send the SMS has been blocked. It could happen due to non-compliance with regulatory guidelines or have exceeded the allowed limits of sending message. |
| error: 124: Validity of your SMS pack has expired on "Sat Aug 20 00:00:00 IST 2022." You are not allowed to send messages now. | SMS pack on Gupshup has expired. You need to renew the pack to start sending messages again. |
| 038 - MSG\_DOES\_NOT\_MATCH\_TEMPLATE | The template passed in the message content does not match with dltTemplateId uploaded on DLT portal. |
| error: 102: Authentication failed due to invalid userId or password | Userid or password added in Gupshup vendor form is incorrect. Update it to fix this error. Reach out to SuprSend support if the issue persists. |
| TEMPLATE\_NOT\_FOUND | The template\_id of the approved template is not found on DLT portal. Reach out to our support if SuprSend is taking care of SMS template approval for you. |
| Get "[https://enterprise.smsgupshup.com/GatewayAPI/rest?xxxx"](https://enterprise.smsgupshup.com/GatewayAPI/rest?xxxx%22): dial TCP 202.87.33.165:443: i/o timeout | Gupshup server didn't respond within a given duration. Most likely reason being server is unavailable/on high load. If you are getting this error for all requests, it could be possible that you IP whitelisting enabled and SuprSend's IP is not whitelisted. |
| 00a - OTHER | Messages that are sent but can not be delivered for reasons that don’t fall under any mentioned category. |
| 074 - TEMPLATE\_NOT\_MATCHED | The template content of the approved template doesn't match the template content on SuprSend platform. Reach out to our support if SuprSend is taking care of SMS template approval for you. |
| 070 - HEADER\_RESERVED | Indicates that the header (also known as the sender ID) used in the SMS does not match any of the registered headers in the DLT platform |
| error: 106: The method "SENDMESSAGE" is not supported. | The "SENDMESSAGE" method might be outdated or not supported in the current version of the Gupshup API. Verify that you are using a supported method as per the latest API documentation. Reach out to our support if you get this error. |
***
# Gupshup
Source: https://docs.suprsend.com/docs/gupshup-whatsapp
Guide to connect your Gupshup account with SuprSend to send Whatsapp notifications.
## Pre-Requisites
You'll need a Gupshup account to complete this tutorial. You can use your existing Gupshup account to integrate, or [Create a Gupshup account](https://www.gupshup.io/auth/signup)
## Gupshup integration on SuprSend account
On the SuprSend dashboard, go to vendor page from side panel and click WhatsApp -> Gupshup from the list of Vendors. This will open vendor details page as shown below:
| Form Field | Description |
| ------------------------------------ | -------------------------------------------------------------------------------------------------------------------------------------------------------------------------------------------------------------------------------- |
| Nickname | You can give any name which may help you to identify this account easily |
| User ID | User ID of your Gupshup account. SuprSend uses this information to send SMS on your behalf via your registered Gupshup account. |
| Password | Password of your Gupshup account. SuprSend uses this information to send SMS on your behalf via your registered Gupshup account. |
| Price per notification | This is the amount you pay per SMS notification to Karix. It helps us to calculate, estimate and optimise your cost spent on notifications. |
| DLT Integration -> 'Mobile Operator' | Mobile Operator of your enterprise DLT account |
| DLT Integration -> 'Headers' | 6 digit/character sender id registered for your entity ( *You can get the header details from your DLT portal*)*e.g. SPRSND* Also, you can add multiple headers in the list by just typing the header name and clicking on enter |
| DLT Integration -> 'User Name' | User Name of your DLT platform login. SuprSend uses this info to register template on your behalf through your registered DLT platform. |
| DLT Integration -> 'Password' | Password of your DLT platform login. SuprSend uses this info to register template on your behalf through your registered DLT platform. |
| DLT Integration -> 'Entity ID' | Entity Registration ID linked to your DLT account. You can get the Registration Id from your DLT account homepage. SuprSend uses this info to send messages on your behalf through your registered DLT platform. |
## Setting callback URL in Gupshup account
One of the platform advantage of using SuprSend as a central communication system is that it shows notification analytics for all channels in your SuprSend account together.
Send a mail to Gupshup team to enable below webhook URL to your account:
URL: [`https://hub.suprsend.com/webhook/gupshup/sms/`](https://hub.suprsend.com/webhook/gupshup/sms/) Request method- POST
## Enabling URL shortener service in Gupshup account
URL shortening is essential if you are sending URL links in your SMS content. It reduces the number of characters in your SMS and is required for tracking the click rate of your messages.
To activate URL shortening, write a mail to gupshup enterprise support
## How to register headers through Airtel DLT platform
To register header on Airtel DLT platform, you can refer the section: [Sender ID/Mask/Header Registration- DLT Platform](https://enterprise.smsgupshup.com/DLT/senderidRegistration)
***
# Gupshup (SMS)
Source: https://docs.suprsend.com/docs/gupshup-sms-errors
Possible SMS delivery errors reported by Gupshup and their resolutions.
In case of vendor error, you'll see `Trigger failed` or `Failure by Vendor` status in the third step of the logs. However, you can hover over the failed chip to access the specific error message.
## Error Codes
| Error | How to solve |
| ------------------------------------------------------------------------------------------------------------------------------------------------------------------ | ---------------------------------------------------------------------------------------------------------------------------------------------------------------------------------------------------------------------------------------------------------------------------------- |
| 001 - ABSENT\_SUBSCRIBER | The message could not be delivered because the recipient is temporarily unavailable. This error can occur due to network issues, roaming, recipient's mobile network provider service is temporary down or the SIM card is inactive. You can recheck the number and retry sending. |
| 002 - CALL\_BARRED | Subscribers have some kind of call barring activity on the number due to which messages from unknown sources are blocked. |
| 003 - UNKNOWN\_SUBSCRIBER | Unknown/invalid number. |
| 004 - SERVICE\_DOWN | Operator service is temporarily down. |
| 005 - SYSTEM\_FAILURE | Failure due to a problem in the Operator’s systems (Originating or Destination Operator). |
| 006 - DND\_FAIL | The number is either in DND or Blocked due to being in DND or a complaint. |
| 007 - BLOCKED | From number is blocked by the end user and you can't reach out to this user. |
| 008 - DND\_TIMEOUT | Before sending promotional messages, the DLT system checks if the recipient's number is registered under DND (Do Not Disturb). This error indicates that the system failed to complete this check within the required timeframe. Retry sending after a day. |
| 009 - OUTSIDE\_WORKING\_HOURS | DLT has restrictions on the hours during which promotional or bulk SMS messages can be sent. In India, promotional messages are allowed between 9 AM and 9 PM. You'll get this error if the message is sent outside these hours. |
| error: 175: The "INTERNATIONAL\_PHONE" service is disabled for you. Kindly get the service enabled before using this action | You need to enable international sending in your gupshup account to send messages to numbers outside India. Reach out to Gupshup support to enable it for your account. |
| HEADER\_NOT\_REGISTERED\_FOR\_TEMPLATE | Header added in the template is not registered on DLT or is different from the one added in approved template. |
| 067 - HEADER\_NOT\_FOUND | Header added in the template is not registered on DLT or is different from the one added in approved template. |
| 00b - BLOCKED\_MASK | The sender ID / Header (or mask) you are using to send the SMS has been blocked. It could happen due to non-compliance with regulatory guidelines or have exceeded the allowed limits of sending message. |
| error: 124: Validity of your SMS pack has expired on "Sat Aug 20 00:00:00 IST 2022." You are not allowed to send messages now. | SMS pack on Gupshup has expired. You need to renew the pack to start sending messages again. |
| 038 - MSG\_DOES\_NOT\_MATCH\_TEMPLATE | The template passed in the message content does not match with dltTemplateId uploaded on DLT portal. |
| error: 102: Authentication failed due to invalid userId or password | Userid or password added in Gupshup vendor form is incorrect. Update it to fix this error. Reach out to SuprSend support if the issue persists. |
| TEMPLATE\_NOT\_FOUND | The template\_id of the approved template is not found on DLT portal. Reach out to our support if SuprSend is taking care of SMS template approval for you. |
| Get "[https://enterprise.smsgupshup.com/GatewayAPI/rest?xxxx"](https://enterprise.smsgupshup.com/GatewayAPI/rest?xxxx%22): dial TCP 202.87.33.165:443: i/o timeout | Gupshup server didn't respond within a given duration. Most likely reason being server is unavailable/on high load. If you are getting this error for all requests, it could be possible that you IP whitelisting enabled and SuprSend's IP is not whitelisted. |
| 00a - OTHER | Messages that are sent but can not be delivered for reasons that don’t fall under any mentioned category. |
| 074 - TEMPLATE\_NOT\_MATCHED | The template content of the approved template doesn't match the template content on SuprSend platform. Reach out to our support if SuprSend is taking care of SMS template approval for you. |
| 070 - HEADER\_RESERVED | Indicates that the header (also known as the sender ID) used in the SMS does not match any of the registered headers in the DLT platform |
| error: 106: The method "SENDMESSAGE" is not supported. | The "SENDMESSAGE" method might be outdated or not supported in the current version of the Gupshup API. Verify that you are using a supported method as per the latest API documentation. Reach out to our support if you get this error. |
***
# Gupshup
Source: https://docs.suprsend.com/docs/gupshup-whatsapp
Guide to connect your Gupshup account with SuprSend to send Whatsapp notifications.
## Pre-Requisites
You'll need a Gupshup account to complete this tutorial. You can use your existing Gupshup account to integrate, or [Create a Gupshup account](https://www.gupshup.io/auth/signup)
## Gupshup integration on SuprSend account
On the SuprSend dashboard, go to vendor page from side panel and click WhatsApp -> Gupshup from the list of Vendors. This will open vendor details page as shown below:
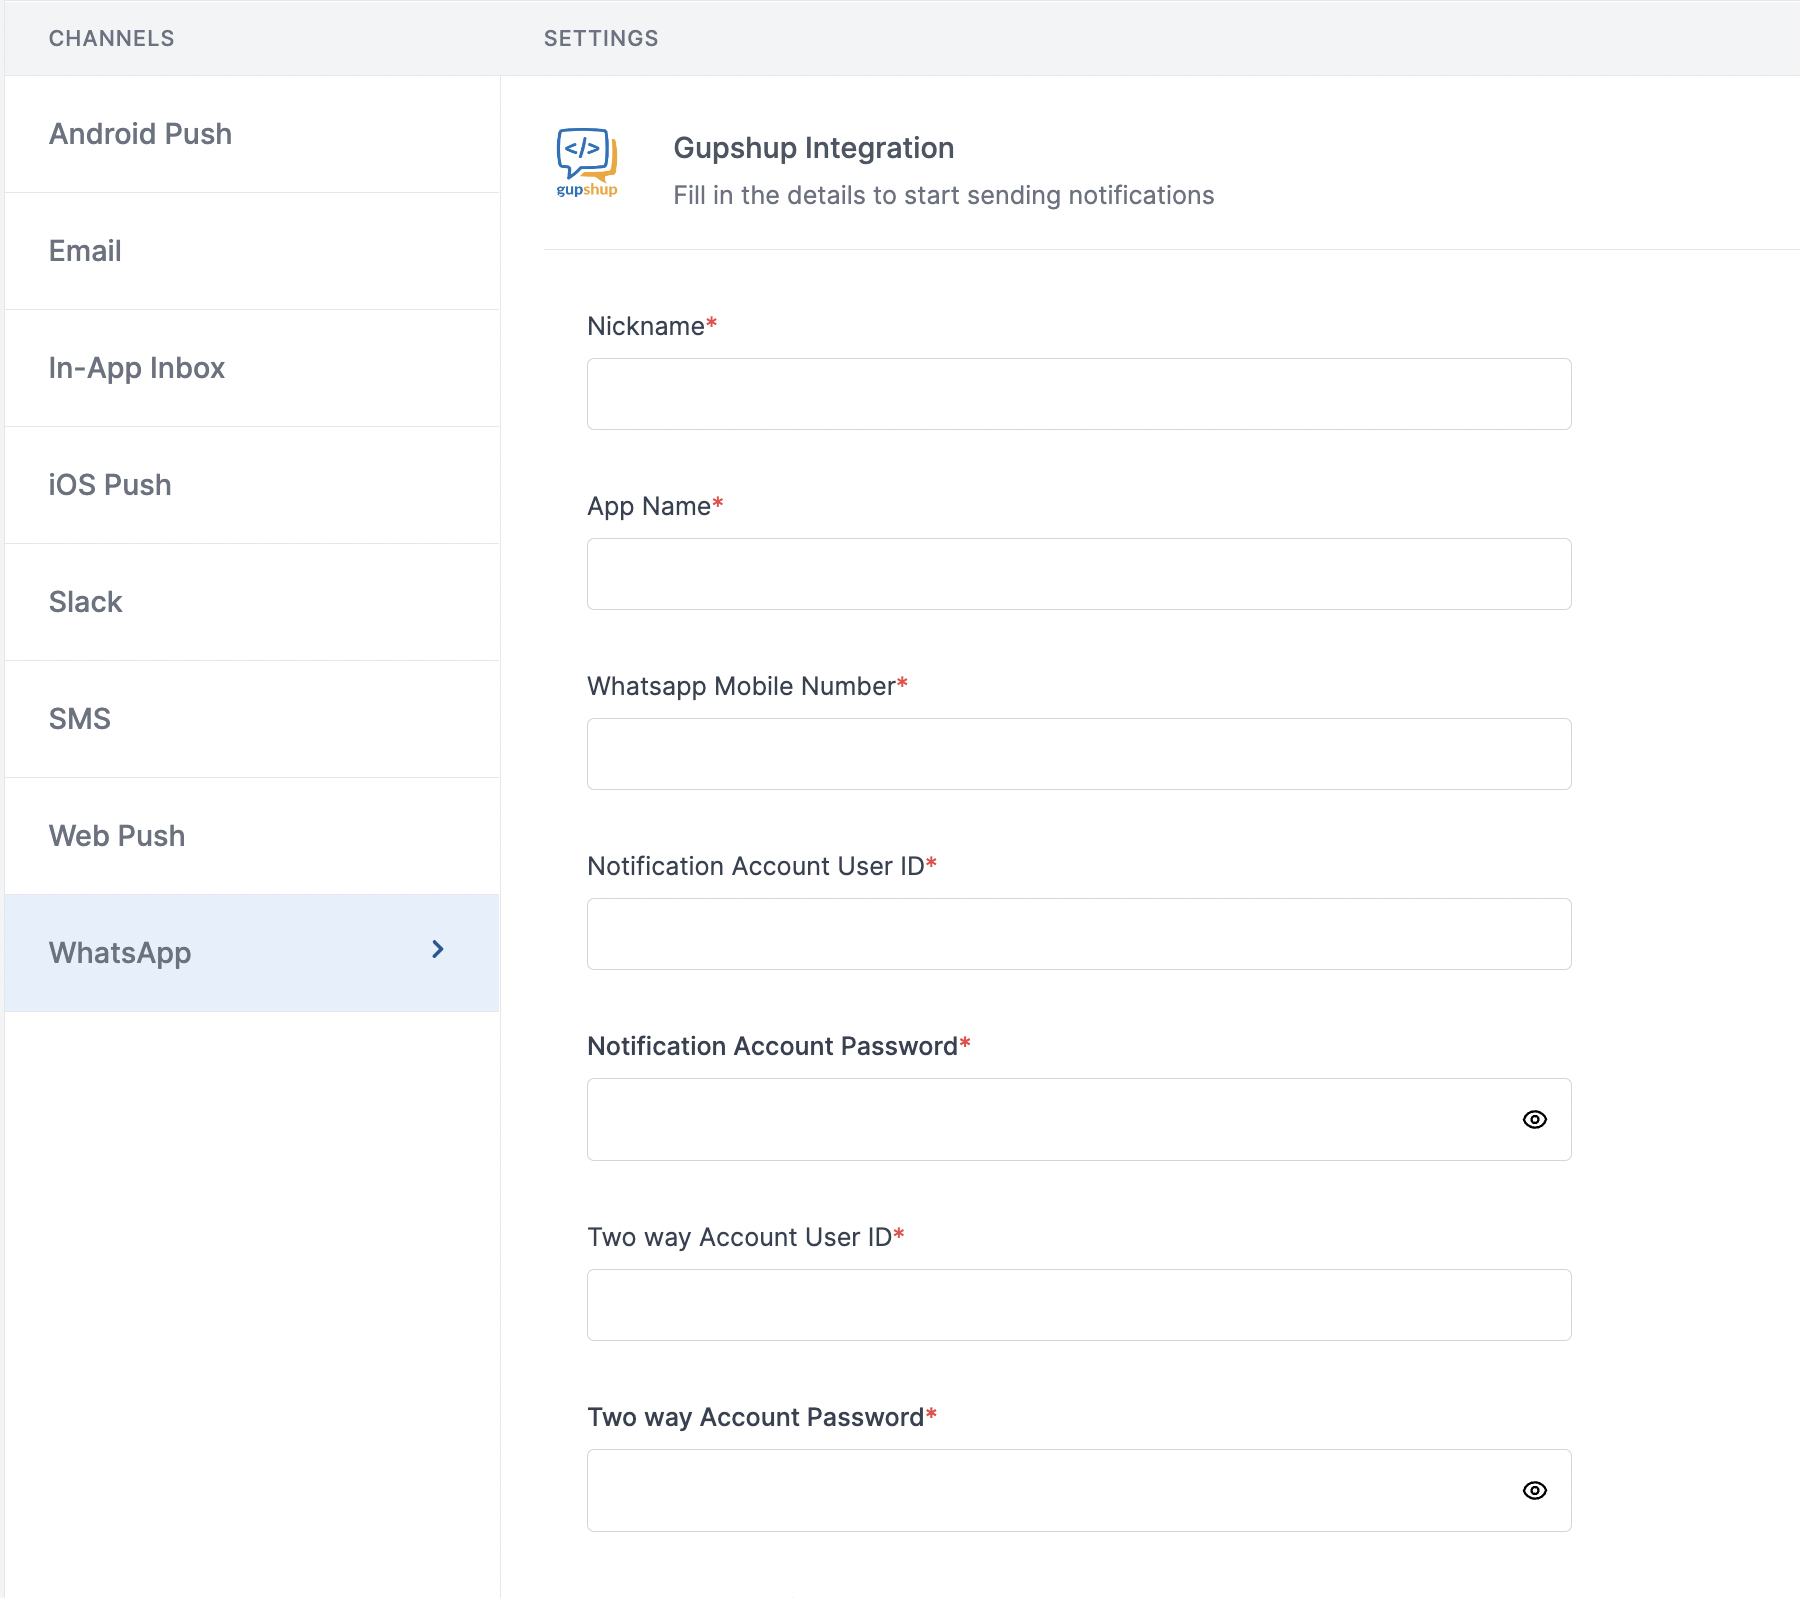 | Form Field | Description |
| --------------------------------- | -------------------------------------------------------------------------------------------------------------------------------------------------------------------------------------------------------------------------------------------- |
| Nickname | You can give any name which may help you to identify this account easily |
| App Name | App name of your gupshup WhatsApp account. SuprSend uses this information to send WhatsApp on your behalf via your Gupshup account |
| WhatsApp Mobile Number | Mobile number of your WhatsApp business account. SuprSend uses this information to send WhatsApp on your behalf via your registered WhatsApp number |
| Notification Account User ID | Gupshup creates 2 accounts - one for sending one way messages and other for 2-way messages. Add the user ID of 1-way message account here. SuprSend will use this information to send 1-way messages on your behalf via your Gupshup account |
| Notification Account Password | Login password of 1-way message account. SuprSend will use this information to send 1-way messages on your behalf via your Gupshup account |
| Two way Account User ID | User ID of 2-way message account. SuprSend will use this information to send 2-way messages on your behalf via your Gupshup account |
| Two way Account Password | Password of 2-way message account. SuprSend will use this information to send 2-way messages on your behalf via your Gupshup account |
| WhatsApp Analytics Panel User ID | User ID of [WhatsApp analytics](https://unify.smsgupshup.com/WhatsApp/Analytics/) account. SuprSend will use this information to upload templates on your behalf in your gupshup account for approval |
| WhatsApp Analytics Panel Password | Password of [WhatsApp analytics](https://unify.smsgupshup.com/WhatsApp/Analytics/) account. SuprSend will use this information to upload templates on your behalf in your gupshup account for approval |
| Facebook Page URL | URL of your Facebook business page |
| Price per notification | This is the amount you pay per SMS notification to Gupshup. It helps us to calculate, estimate and optimise your cost spent on notifications. |
You'll get all the account credentials from Gupshup team as soon as your account is created
## Setting callback URL in Gupshup account
One of the platform advantage of using SuprSend as a central communication system is that it shows notification analytics for all channels in your SuprSend account together.
Send a mail to Gupshup team to enable below webhook URL to your account:
> HTTP Method: POST
>
| Form Field | Description |
| --------------------------------- | -------------------------------------------------------------------------------------------------------------------------------------------------------------------------------------------------------------------------------------------- |
| Nickname | You can give any name which may help you to identify this account easily |
| App Name | App name of your gupshup WhatsApp account. SuprSend uses this information to send WhatsApp on your behalf via your Gupshup account |
| WhatsApp Mobile Number | Mobile number of your WhatsApp business account. SuprSend uses this information to send WhatsApp on your behalf via your registered WhatsApp number |
| Notification Account User ID | Gupshup creates 2 accounts - one for sending one way messages and other for 2-way messages. Add the user ID of 1-way message account here. SuprSend will use this information to send 1-way messages on your behalf via your Gupshup account |
| Notification Account Password | Login password of 1-way message account. SuprSend will use this information to send 1-way messages on your behalf via your Gupshup account |
| Two way Account User ID | User ID of 2-way message account. SuprSend will use this information to send 2-way messages on your behalf via your Gupshup account |
| Two way Account Password | Password of 2-way message account. SuprSend will use this information to send 2-way messages on your behalf via your Gupshup account |
| WhatsApp Analytics Panel User ID | User ID of [WhatsApp analytics](https://unify.smsgupshup.com/WhatsApp/Analytics/) account. SuprSend will use this information to upload templates on your behalf in your gupshup account for approval |
| WhatsApp Analytics Panel Password | Password of [WhatsApp analytics](https://unify.smsgupshup.com/WhatsApp/Analytics/) account. SuprSend will use this information to upload templates on your behalf in your gupshup account for approval |
| Facebook Page URL | URL of your Facebook business page |
| Price per notification | This is the amount you pay per SMS notification to Gupshup. It helps us to calculate, estimate and optimise your cost spent on notifications. |
You'll get all the account credentials from Gupshup team as soon as your account is created
## Setting callback URL in Gupshup account
One of the platform advantage of using SuprSend as a central communication system is that it shows notification analytics for all channels in your SuprSend account together.
Send a mail to Gupshup team to enable below webhook URL to your account:
> HTTP Method: POST
> 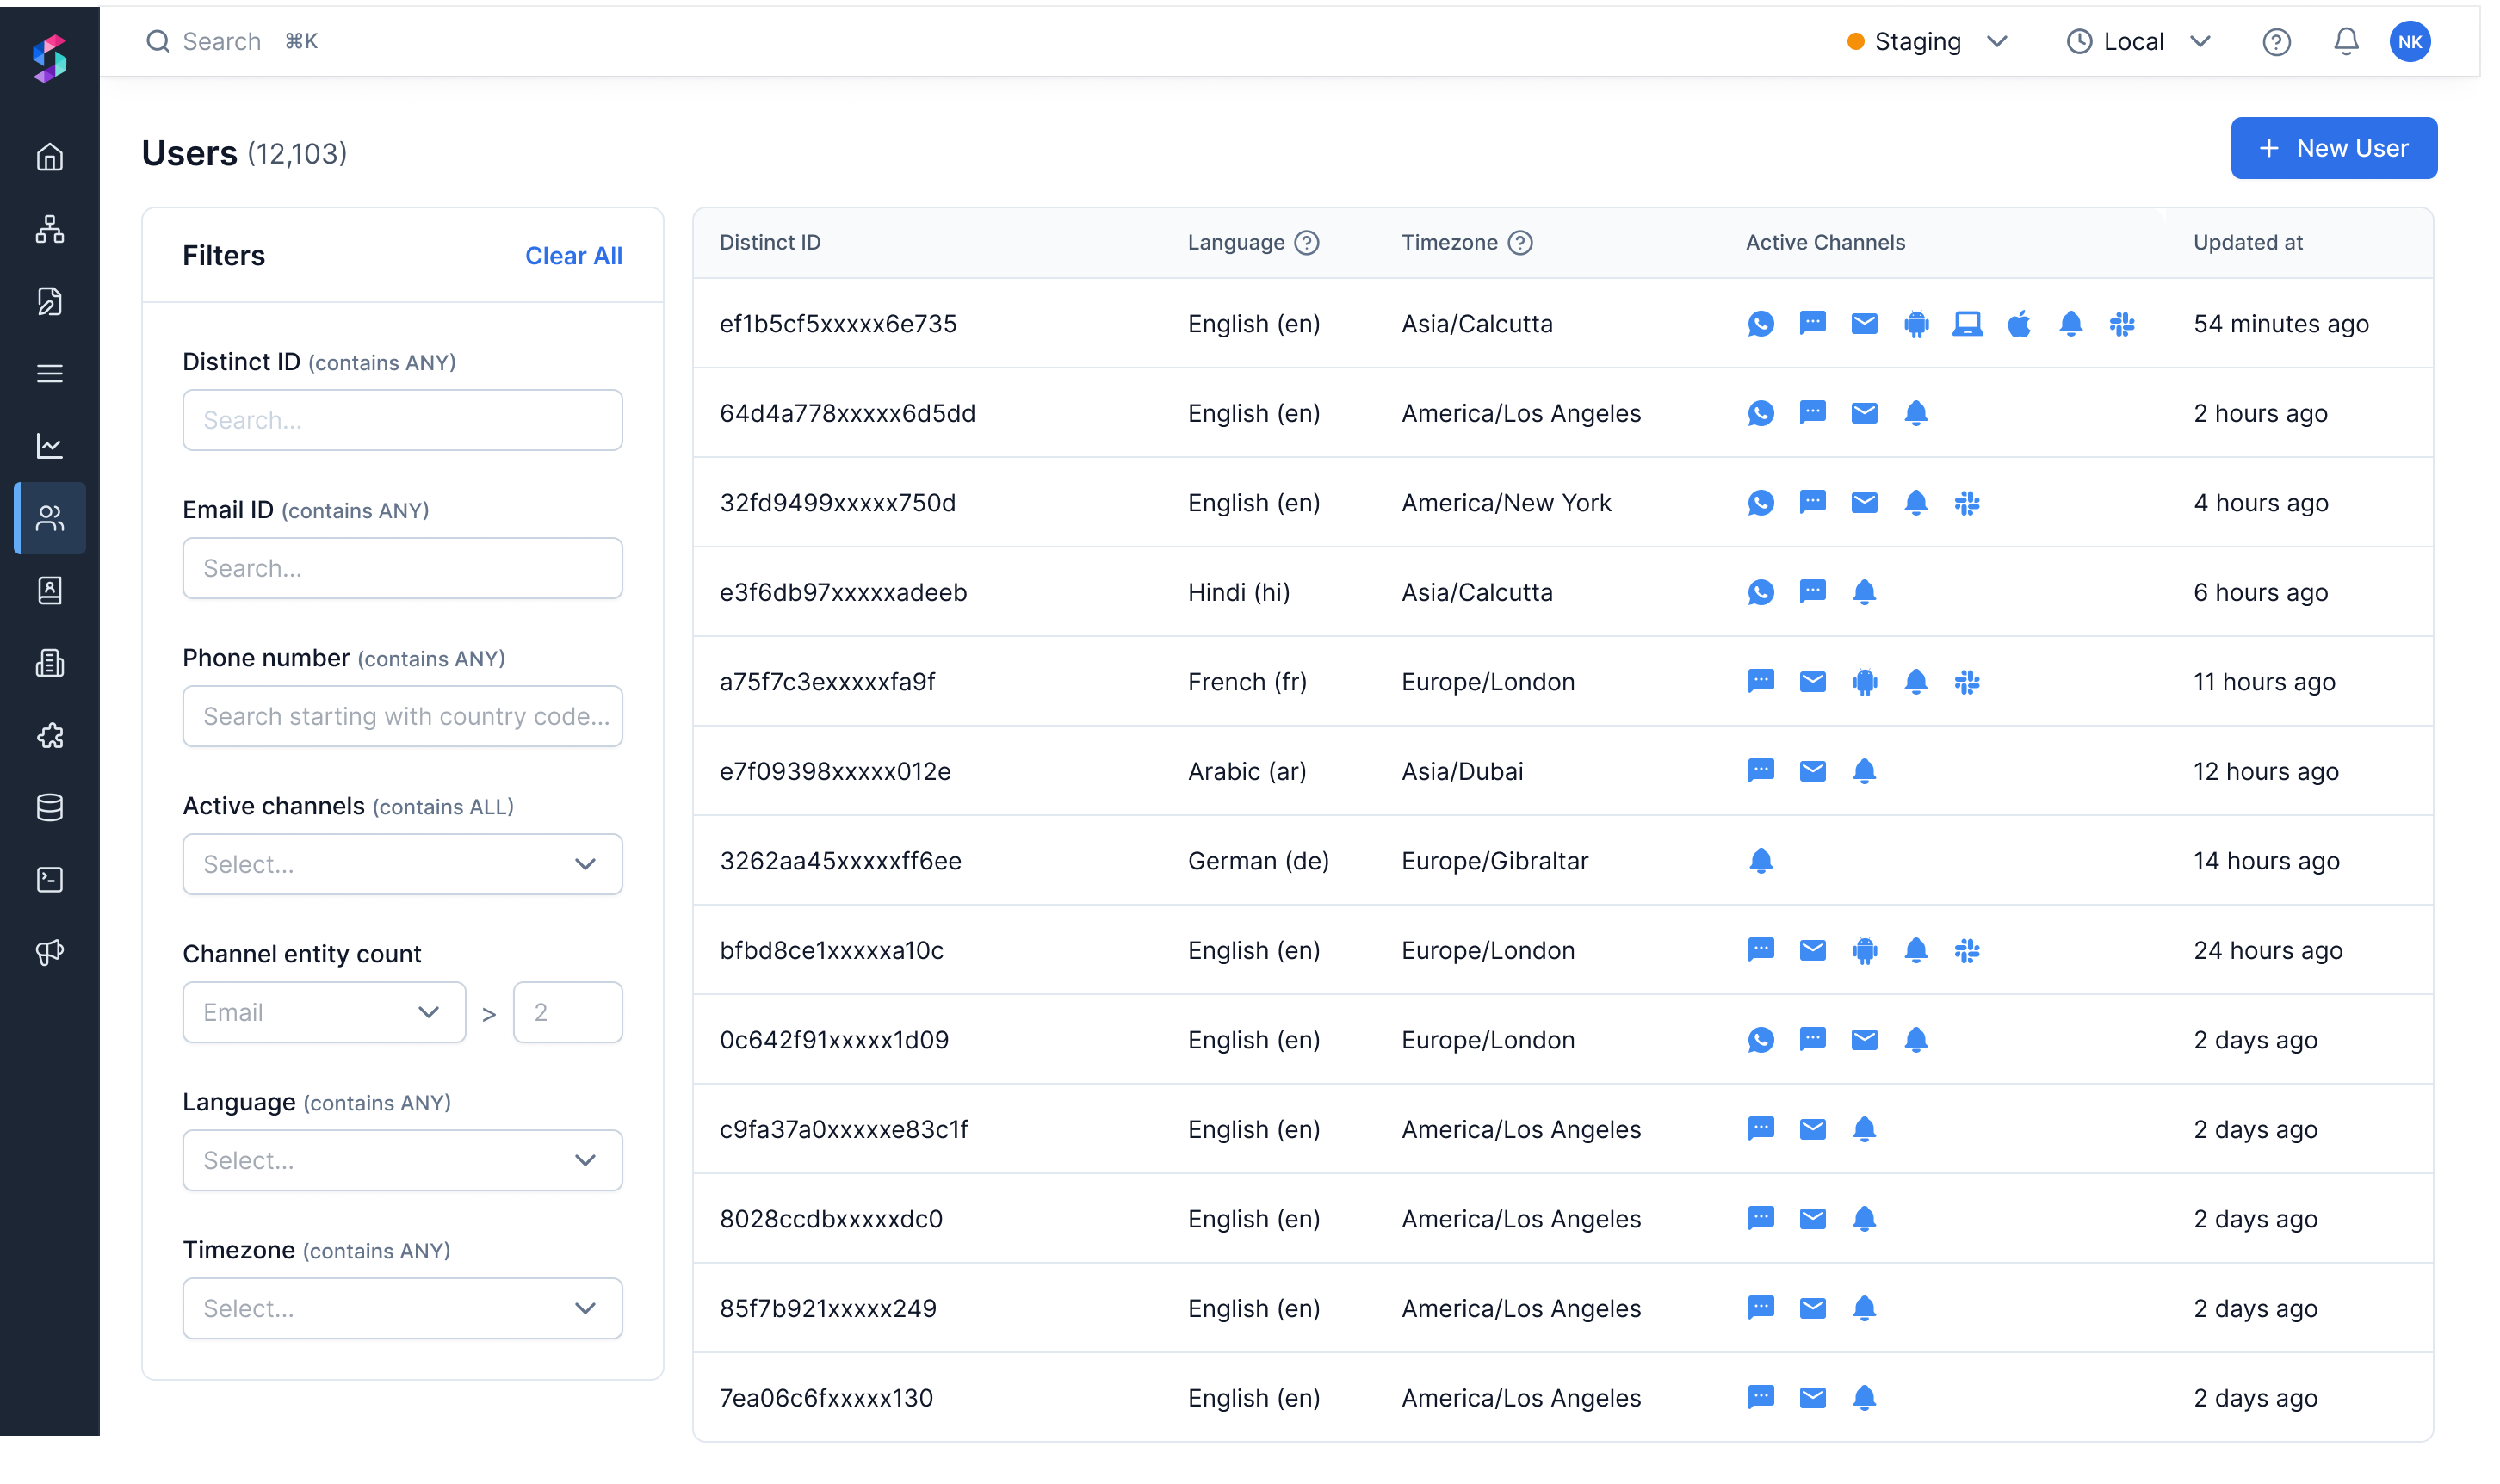 ***
# How Auto Translation works?
Source: https://docs.suprsend.com/docs/how-auto-translation-works
The process of language translation at SuprSend
At SuprSend, we have a team of highly skilled translators who handles the translation tasks in an accurate and timely manner.
### Why manual translation?
Though machine translators are fast, it still lags in accuracy of translation, which are crucial to delivering the right message to users. Even google translate has an accuracy of \~85% which is known to provide one of the best accuracies.
### How it works?
On the language modal, you'll see an option to enable **"Auto Translate"**. Click on it if you want us to translate content in your preferred language.
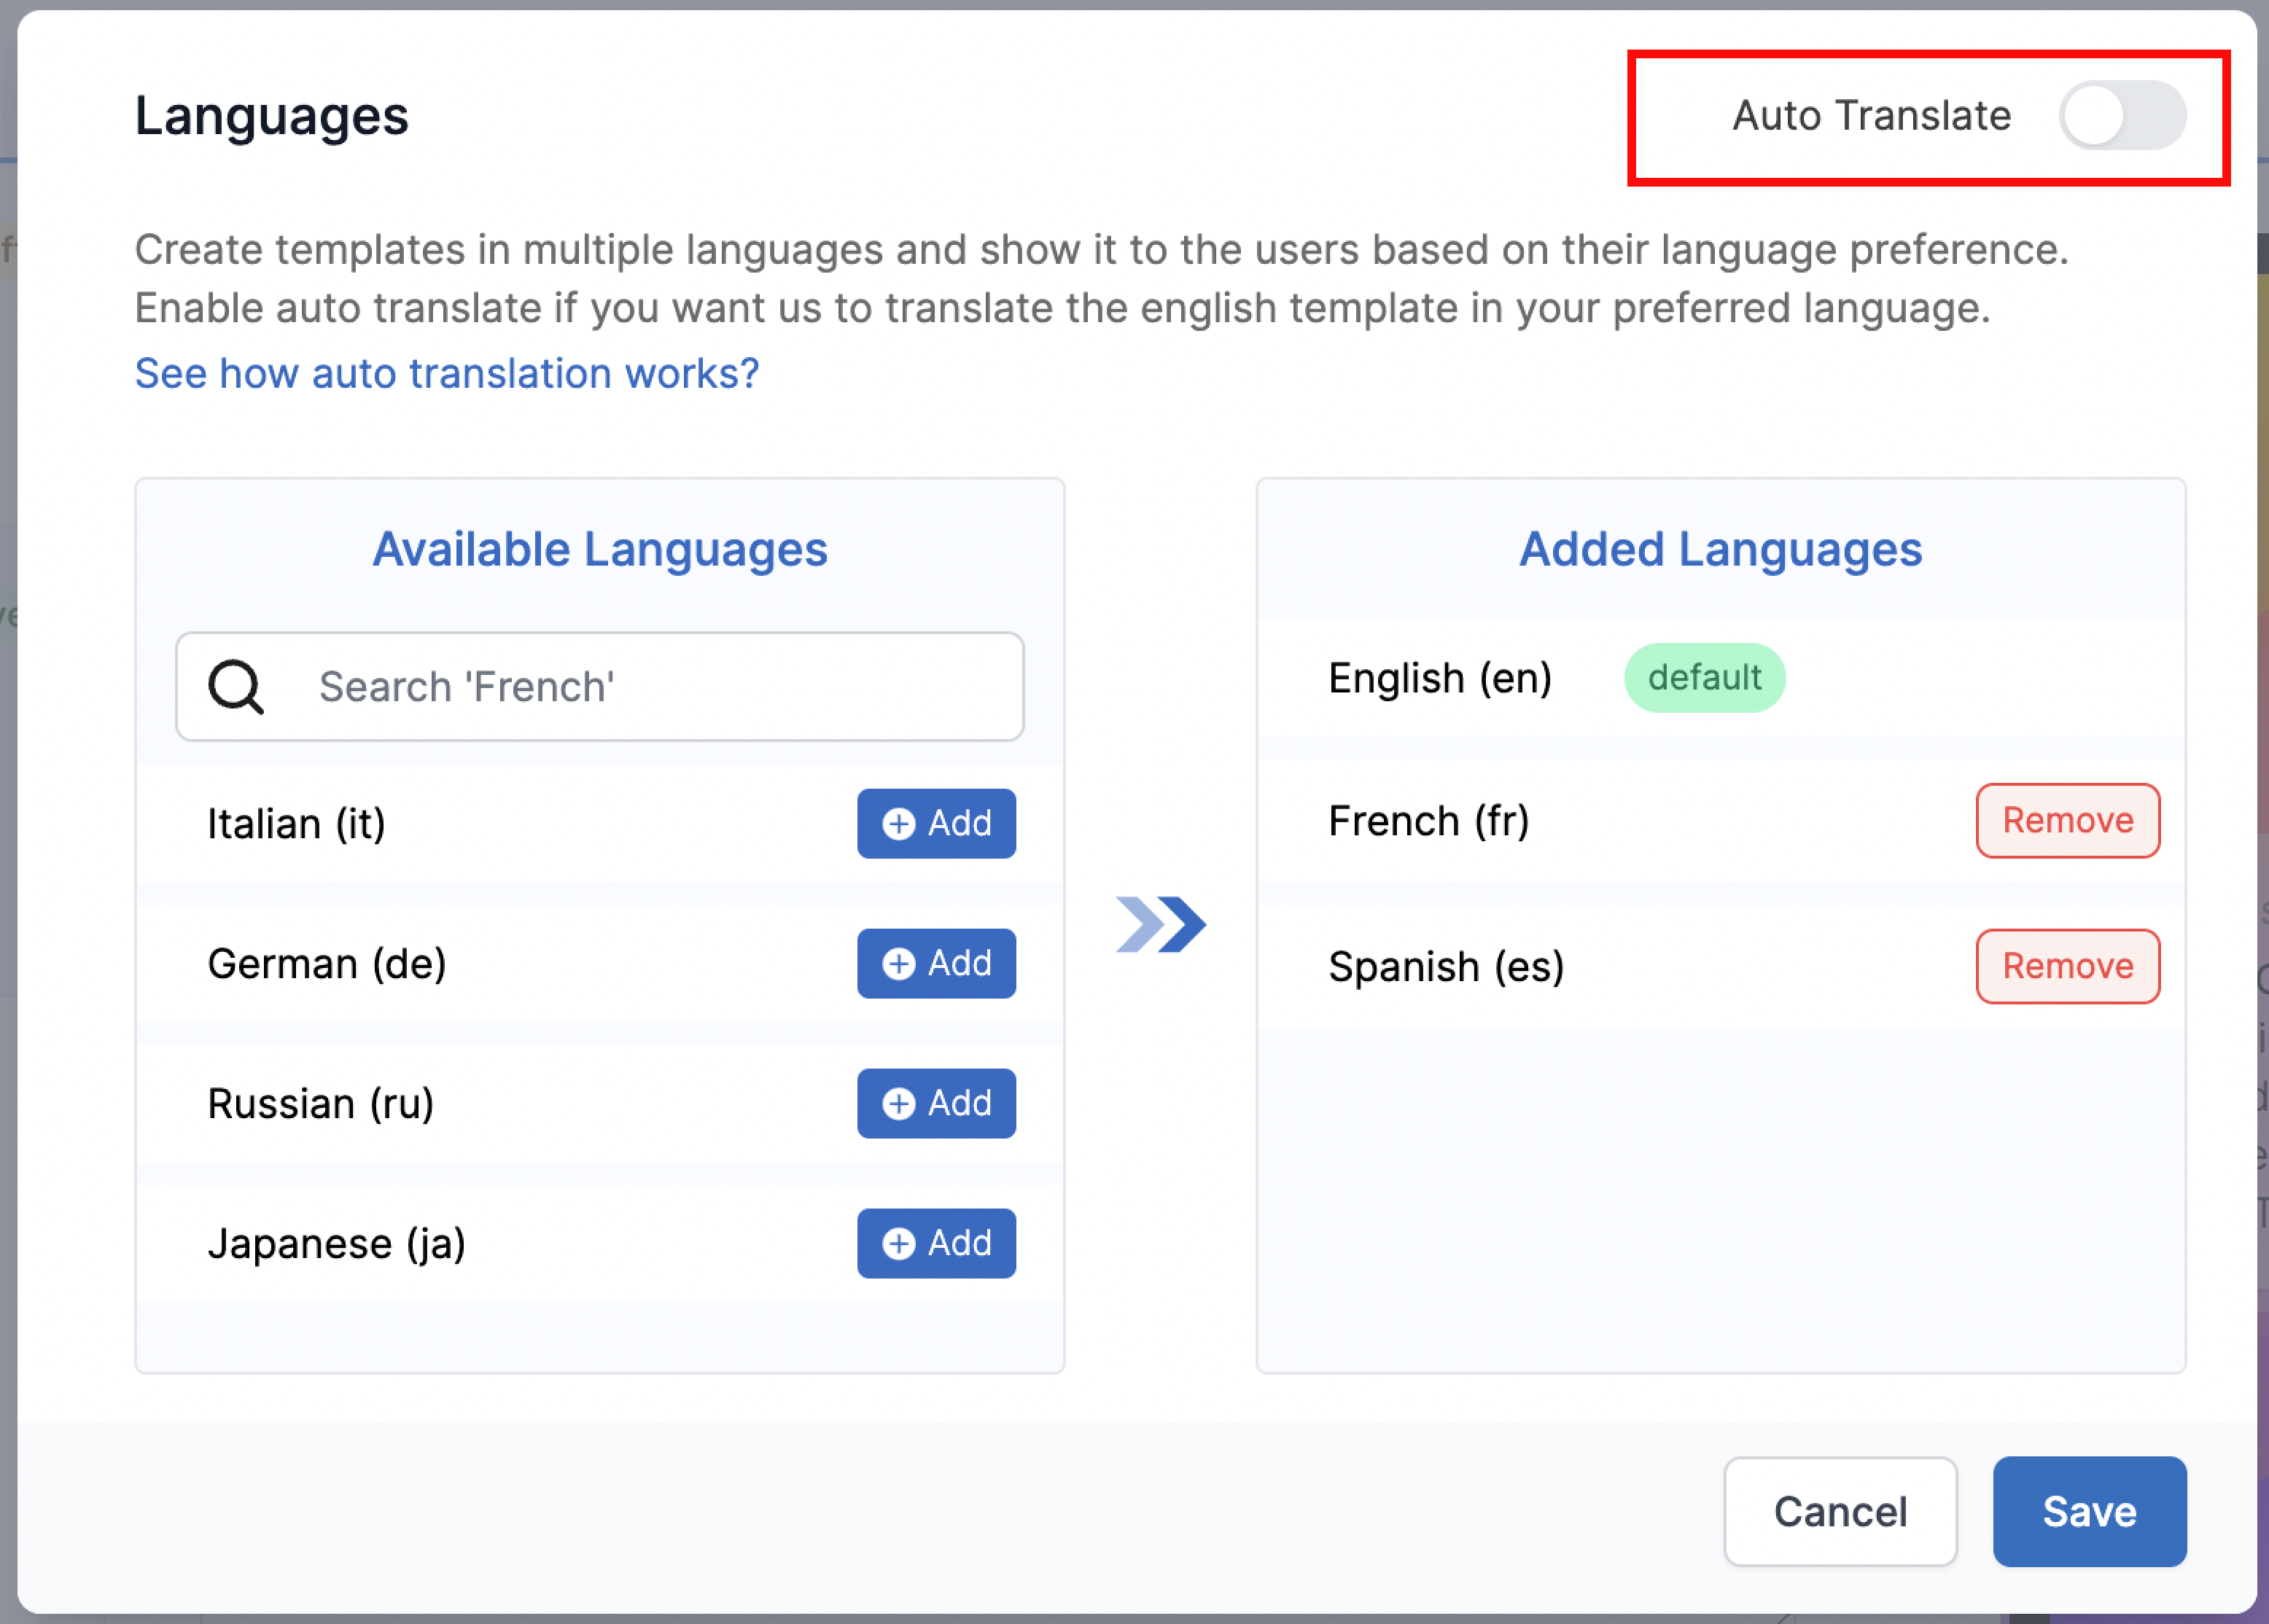
Fig 1. French and Spanish Language added, with Auto Translation off
Once, you enable **"Auto Translate"**, our team will receive a request that you have opted-in for translation. To ensure that we deliver high quality translations, we would reach out to you to better understand your requirement -
* What languages to translate
* What will be the required SLA
* Who is the customer - it will help to set the tone right for translation etc.
After the discussion is done, we'll setup the translation process. All you have to do is then,
***
# How Auto Translation works?
Source: https://docs.suprsend.com/docs/how-auto-translation-works
The process of language translation at SuprSend
At SuprSend, we have a team of highly skilled translators who handles the translation tasks in an accurate and timely manner.
### Why manual translation?
Though machine translators are fast, it still lags in accuracy of translation, which are crucial to delivering the right message to users. Even google translate has an accuracy of \~85% which is known to provide one of the best accuracies.
### How it works?
On the language modal, you'll see an option to enable **"Auto Translate"**. Click on it if you want us to translate content in your preferred language.

Fig 1. French and Spanish Language added, with Auto Translation off
Once, you enable **"Auto Translate"**, our team will receive a request that you have opted-in for translation. To ensure that we deliver high quality translations, we would reach out to you to better understand your requirement -
* What languages to translate
* What will be the required SLA
* Who is the customer - it will help to set the tone right for translation etc.
After the discussion is done, we'll setup the translation process. All you have to do is then,
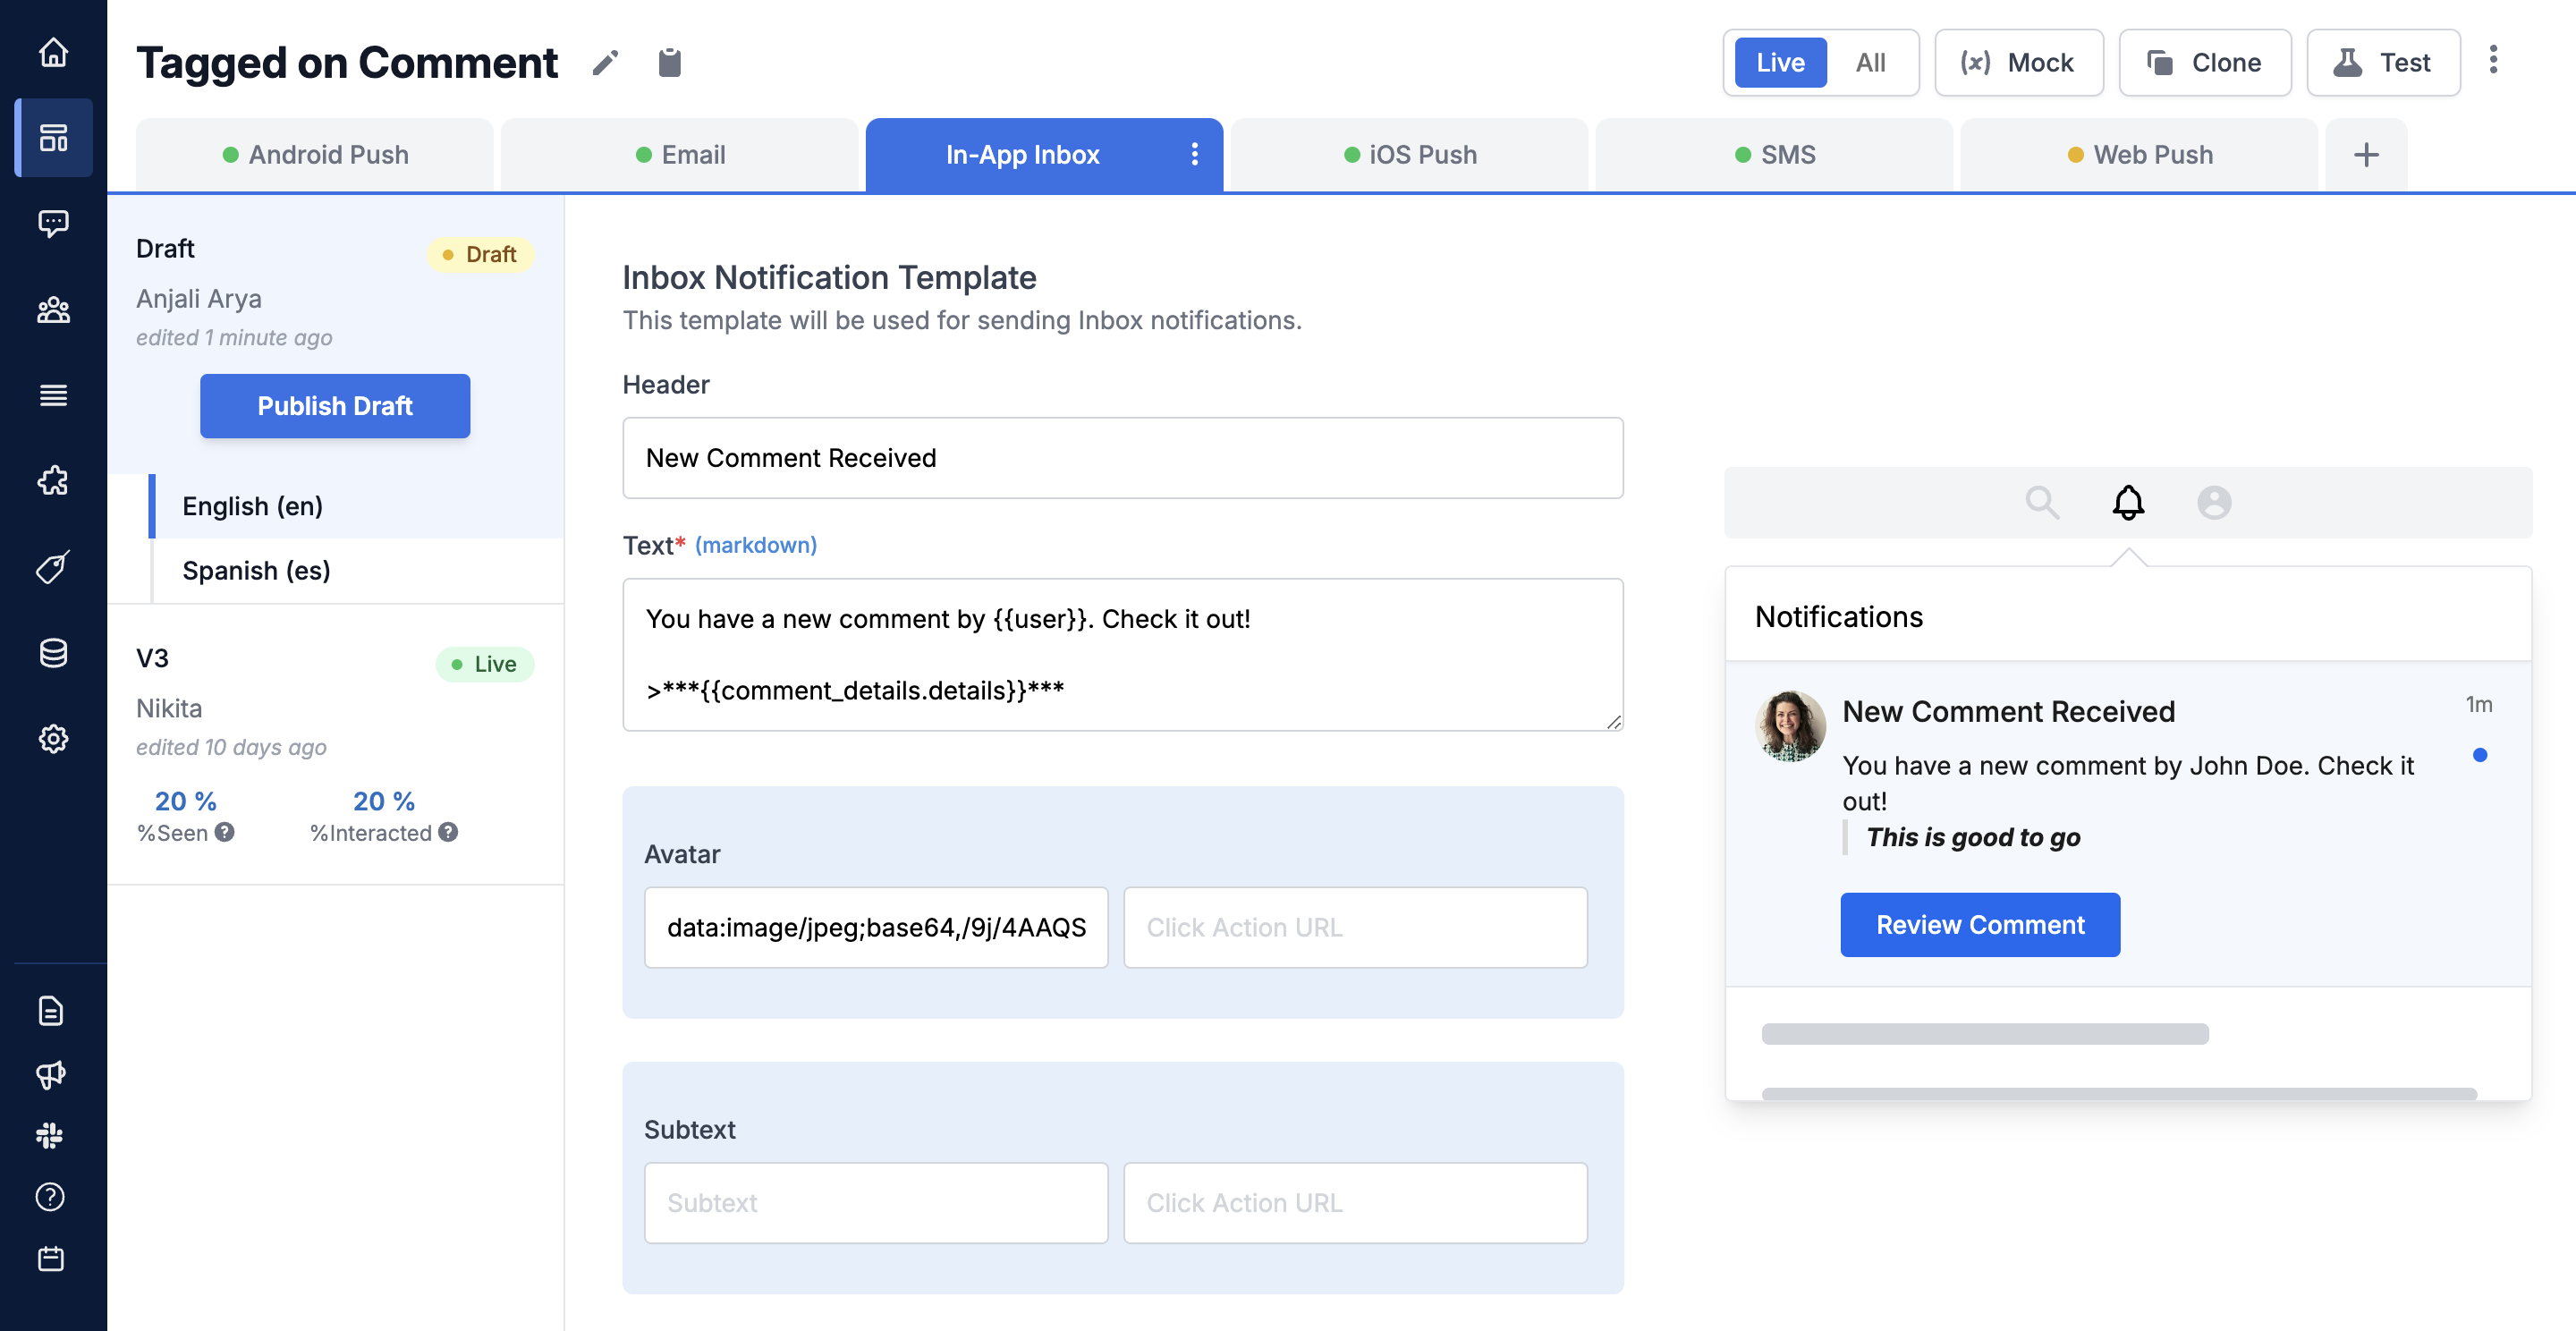 ### Form fields description
| Field | Type | Description |
| -------------- | ------------------------------------------ | ---------------------------------------------------------------------------------------------------------------------------------------------------------------------------------------------------------------------------------------------------------------------------------------------------------------------------------------------------------------------------------------------------------------------------------------------------------------------------------------------------------------------- |
| Header | Single line text field | Heading of the message shown in bold at the top of the content. Use it to show the summary of your message like `New comment received`, `Your story has got 30 views` |
| Text | Multi-line text field | Body of your message. This is where the message content will be shown. We support markdown syntax in body field to add links, blockquotes, showing some content in bold etc. All supported markdown syntax in text field are mentioned here. |
| Avatar | image public URL in `.jpeg`, `.png` format | This can be used to show image of the actor as LinkedIn or some static images based on the type of message as used in HubSpot. |
| Subtext | Single line text field | Subtext is like the footer of your content. It is clickable, so you can use it to show subtle information like in LinkedIn, you would see number of comments and likes in subtext or Jira uses it to show the task's card number. |
| Action URL | `http / https` URL | This is the URL user will be redirected on card click. You can select `Open in new tab` if you want the link to open in a new tab. |
| Action buttons | text - URL pair | You can add up to 2 buttons in your template. Buttons can be used to redirect users to a link or perform any inline actions like opening a modal or calling an internal function like `Approve` button to internally approve the request. Refer [Custom click handler](https://github.com/suprsend/suprsend-react-inbox/blob/main/docs/customization.md#action-button-custom-click-handlers) to customize click action on a button. You can select `Open in new tab` if you want the button link to open in a new tab. |
### Supported markdown syntax in text field
We support [headings](https://www.markdownguide.org/basic-syntax/#headings), [bold](https://www.markdownguide.org/basic-syntax/#bold), [Italic](https://www.markdownguide.org/basic-syntax/#italic), [Blockquotes](https://www.markdownguide.org/basic-syntax/#blockquotes-1), [Nested Blockquotes](https://www.markdownguide.org/basic-syntax/#nested-blockquotes), [links](https://www.markdownguide.org/basic-syntax/#links) and [code](https://www.markdownguide.org/basic-syntax/#code).
## In-App inbox - advanced configurations (Optional)
### Tags
You can add tags to filter and organize notifications inside [multiple tabs](/docs/multi-tabs). Other than tags, you can filter out tabs based on [notification category](/docs/notification-category) or notification read status. e.g., show all `unread` notifications with `mentions` tag inside `Mentions` tab.
### Form fields description
| Field | Type | Description |
| -------------- | ------------------------------------------ | ---------------------------------------------------------------------------------------------------------------------------------------------------------------------------------------------------------------------------------------------------------------------------------------------------------------------------------------------------------------------------------------------------------------------------------------------------------------------------------------------------------------------- |
| Header | Single line text field | Heading of the message shown in bold at the top of the content. Use it to show the summary of your message like `New comment received`, `Your story has got 30 views` |
| Text | Multi-line text field | Body of your message. This is where the message content will be shown. We support markdown syntax in body field to add links, blockquotes, showing some content in bold etc. All supported markdown syntax in text field are mentioned here. |
| Avatar | image public URL in `.jpeg`, `.png` format | This can be used to show image of the actor as LinkedIn or some static images based on the type of message as used in HubSpot. |
| Subtext | Single line text field | Subtext is like the footer of your content. It is clickable, so you can use it to show subtle information like in LinkedIn, you would see number of comments and likes in subtext or Jira uses it to show the task's card number. |
| Action URL | `http / https` URL | This is the URL user will be redirected on card click. You can select `Open in new tab` if you want the link to open in a new tab. |
| Action buttons | text - URL pair | You can add up to 2 buttons in your template. Buttons can be used to redirect users to a link or perform any inline actions like opening a modal or calling an internal function like `Approve` button to internally approve the request. Refer [Custom click handler](https://github.com/suprsend/suprsend-react-inbox/blob/main/docs/customization.md#action-button-custom-click-handlers) to customize click action on a button. You can select `Open in new tab` if you want the button link to open in a new tab. |
### Supported markdown syntax in text field
We support [headings](https://www.markdownguide.org/basic-syntax/#headings), [bold](https://www.markdownguide.org/basic-syntax/#bold), [Italic](https://www.markdownguide.org/basic-syntax/#italic), [Blockquotes](https://www.markdownguide.org/basic-syntax/#blockquotes-1), [Nested Blockquotes](https://www.markdownguide.org/basic-syntax/#nested-blockquotes), [links](https://www.markdownguide.org/basic-syntax/#links) and [code](https://www.markdownguide.org/basic-syntax/#code).
## In-App inbox - advanced configurations (Optional)
### Tags
You can add tags to filter and organize notifications inside [multiple tabs](/docs/multi-tabs). Other than tags, you can filter out tabs based on [notification category](/docs/notification-category) or notification read status. e.g., show all `unread` notifications with `mentions` tag inside `Mentions` tab.
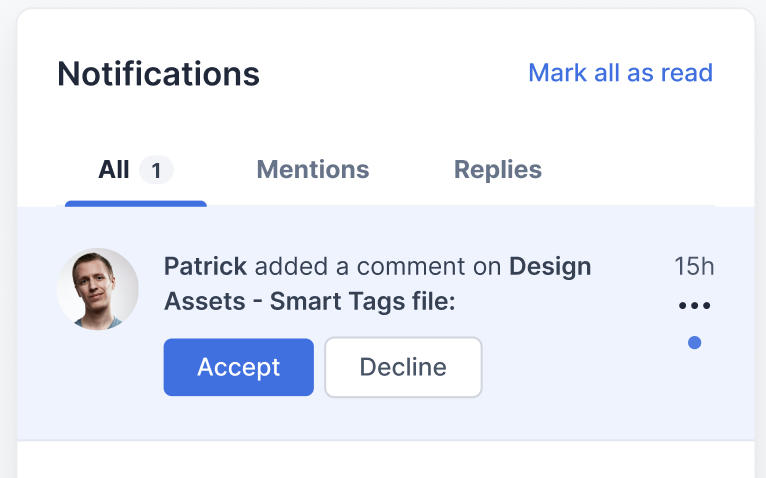 ### Pin notification
Pinned notifications are shown with a `pinned` tag on top in your notification list. Enable the switch to pin the notification. You can use this to send critical alerts where you want user to complete some critical action within your platform like finish compliance or renew plan or some limited time offer.
### Pin notification
Pinned notifications are shown with a `pinned` tag on top in your notification list. Enable the switch to pin the notification. You can use this to send critical alerts where you want user to complete some critical action within your platform like finish compliance or renew plan or some limited time offer.
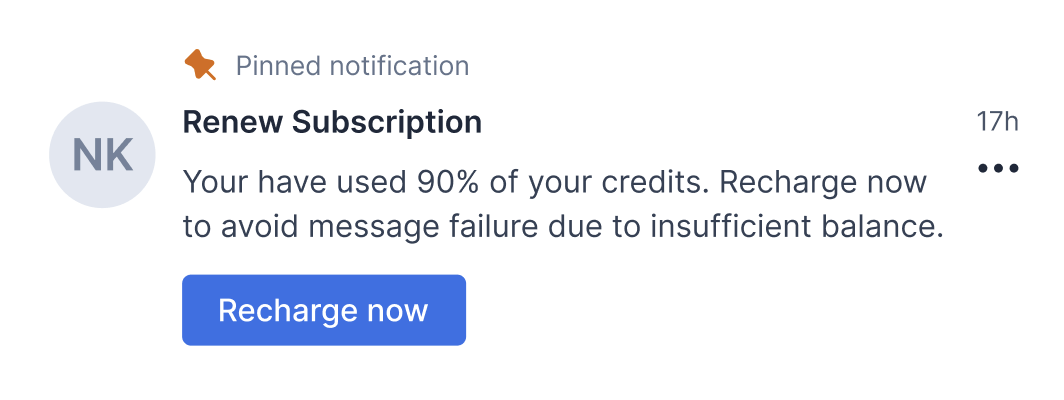 ### Expiry
Setting expiry will auto archive the notification when the expiry period is reached. You can use it to send notifications which are relevant till a particular timestamp like limited time offers or reminder to join an upcoming event or set a fixed expiry to all notifications, in general to keep user's Inbox clean. You can either set [fixed](/docs/in-app-inbox-template#fixed-expiry) or [dynamic](/docs/in-app-inbox-template#dynamic-expiry) expiry. Dynamic expiry are computed using data in your event or user properties and can vary for each user. An example of dynamic expiry could be reminder notifications of some upcoming event.
You can also [show expiry timer](/docs/in-app-inbox-template#show-expiry-timer) on the notification to drive action urgency.
### Expiry
Setting expiry will auto archive the notification when the expiry period is reached. You can use it to send notifications which are relevant till a particular timestamp like limited time offers or reminder to join an upcoming event or set a fixed expiry to all notifications, in general to keep user's Inbox clean. You can either set [fixed](/docs/in-app-inbox-template#fixed-expiry) or [dynamic](/docs/in-app-inbox-template#dynamic-expiry) expiry. Dynamic expiry are computed using data in your event or user properties and can vary for each user. An example of dynamic expiry could be reminder notifications of some upcoming event.
You can also [show expiry timer](/docs/in-app-inbox-template#show-expiry-timer) on the notification to drive action urgency.
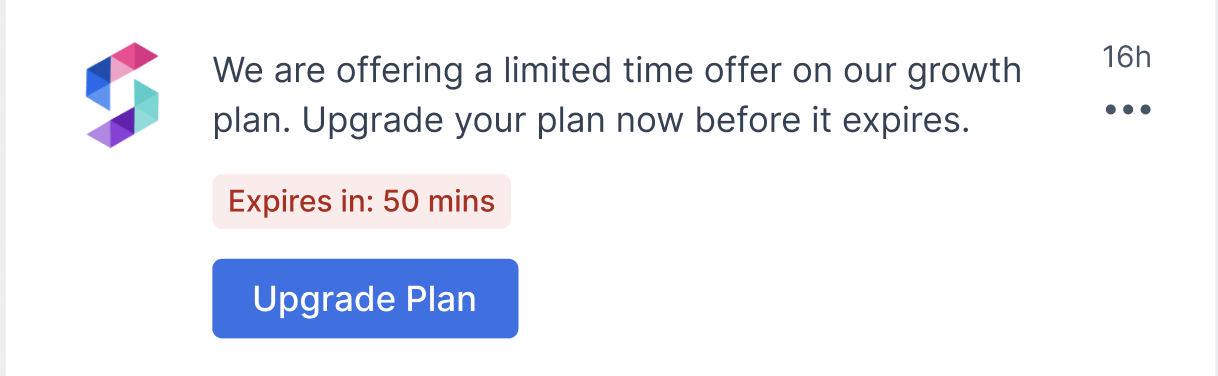 #### Fixed expiry
Fixed expiry can be a relative time, like - `**d **h **m **s` or an absolute timestamp, like `2024-04-01 2:00 pm`. Absolute timestamp added in form takes the time in your local timezone.
#### Fixed expiry
Fixed expiry can be a relative time, like - `**d **h **m **s` or an absolute timestamp, like `2024-04-01 2:00 pm`. Absolute timestamp added in form takes the time in your local timezone.
 #### Dynamic expiry
In case of dynamic expiry, expiry is computed using the data from your event or user properties. You can add dynamic expiry as handlebars variable, like `{{expiry_time}}`.
#### Dynamic expiry
In case of dynamic expiry, expiry is computed using the data from your event or user properties. You can add dynamic expiry as handlebars variable, like `{{expiry_time}}`.
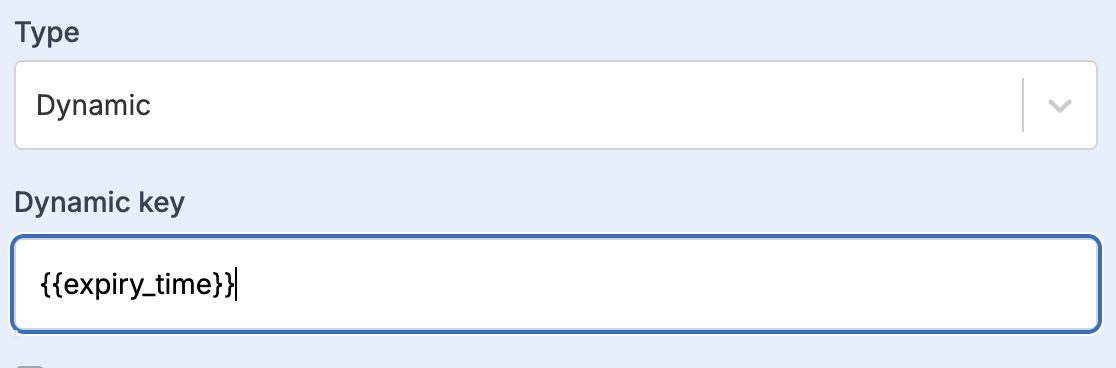 Your duration key variable can be computed to either:
* An ISO-8601 timestamp (e.g. 2024-03-02T20:34:07Z) which must be a datetime in the future, or
* A relative duration unit, which can be
* an integer like `50`, considered as duration in seconds.
* an interval string defined as `**d **h **m **s`, where d = day, h = hour, m = minutes and s = seconds
#### Show expiry timer
Enable it to show expiry timer on your Inbox notification. This helps to drive action urgency. The expiry timer shows in a grey background if the time left is greater than 1 hour and goes red when the difference goes below 1 hour so as to draw user's attention when the expiry time is near.
Your duration key variable can be computed to either:
* An ISO-8601 timestamp (e.g. 2024-03-02T20:34:07Z) which must be a datetime in the future, or
* A relative duration unit, which can be
* an integer like `50`, considered as duration in seconds.
* an interval string defined as `**d **h **m **s`, where d = day, h = hour, m = minutes and s = seconds
#### Show expiry timer
Enable it to show expiry timer on your Inbox notification. This helps to drive action urgency. The expiry timer shows in a grey background if the time left is greater than 1 hour and goes red when the difference goes below 1 hour so as to draw user's attention when the expiry time is near.
 ## Adding dynamic content in the template
There will always be the case where you would require to add dynamic content to a template, so as to personalise it for your users. To achieve this, you can add variables in the template, which will be replaced with the dynamic content at the time of sending the message. You'll need to pass these while triggering the communication from one of our frontend or backend SDKs. Here is a step-by-step guide on how to add dynamic content in Inbox:
## Adding dynamic content in the template
There will always be the case where you would require to add dynamic content to a template, so as to personalise it for your users. To achieve this, you can add variables in the template, which will be replaced with the dynamic content at the time of sending the message. You'll need to pass these while triggering the communication from one of our frontend or backend SDKs. Here is a step-by-step guide on how to add dynamic content in Inbox:
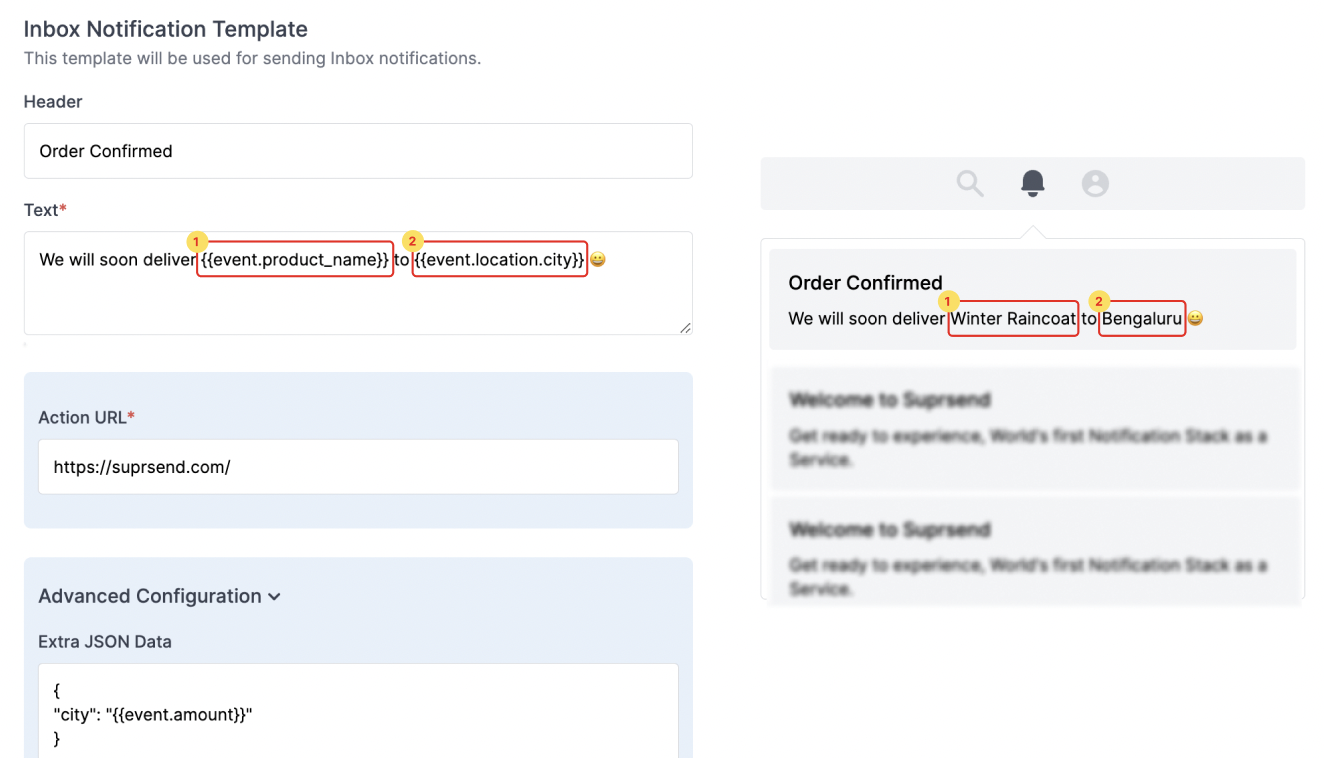
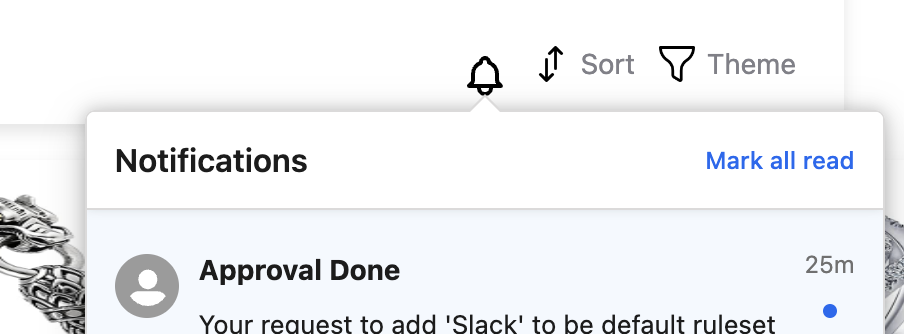
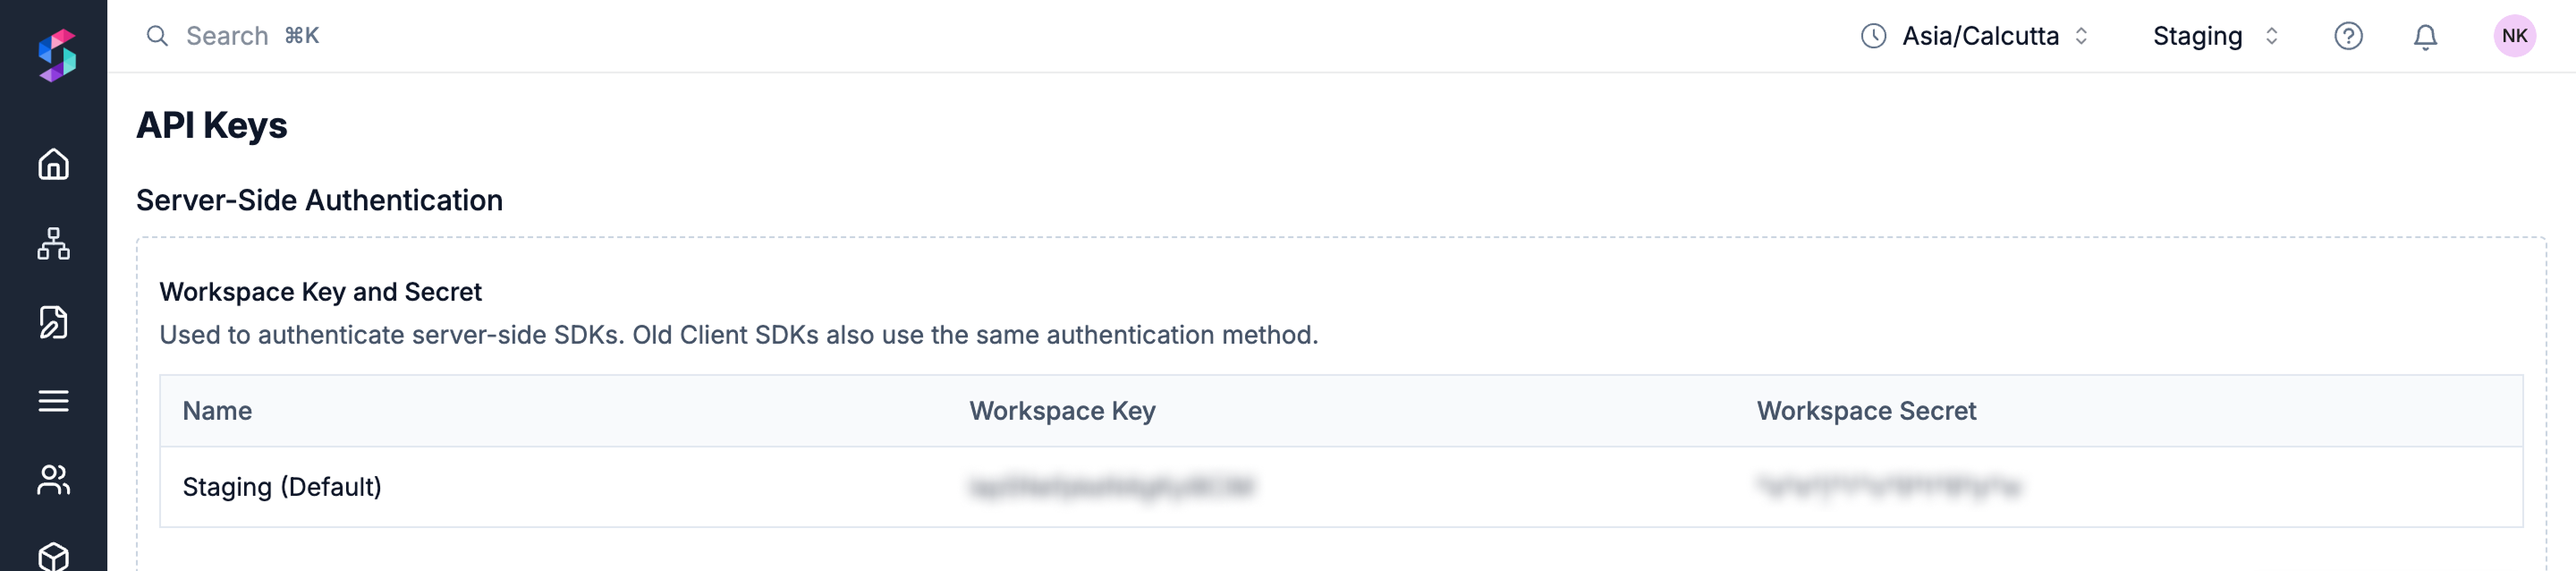
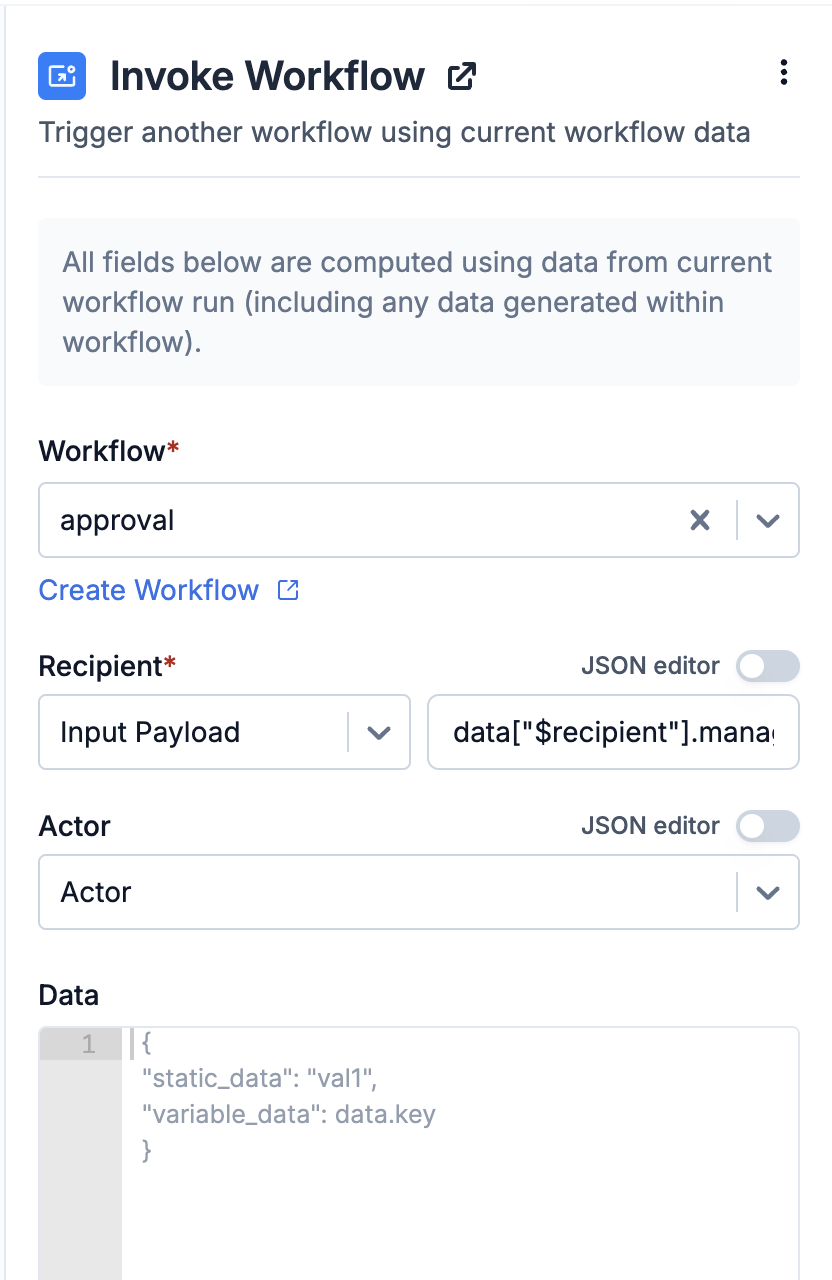 ## Constructing Workflow Payload
### Recipient
Recipient refers to the recipient of the target workflow. It can be:
* The current workflow's **recipient** or **actor**
* Any key from the node's **input data**, including data added or modified during the workflow run (e.g. from fetch or webhook nodes).
## Constructing Workflow Payload
### Recipient
Recipient refers to the recipient of the target workflow. It can be:
* The current workflow's **recipient** or **actor**
* Any key from the node's **input data**, including data added or modified during the workflow run (e.g. from fetch or webhook nodes).
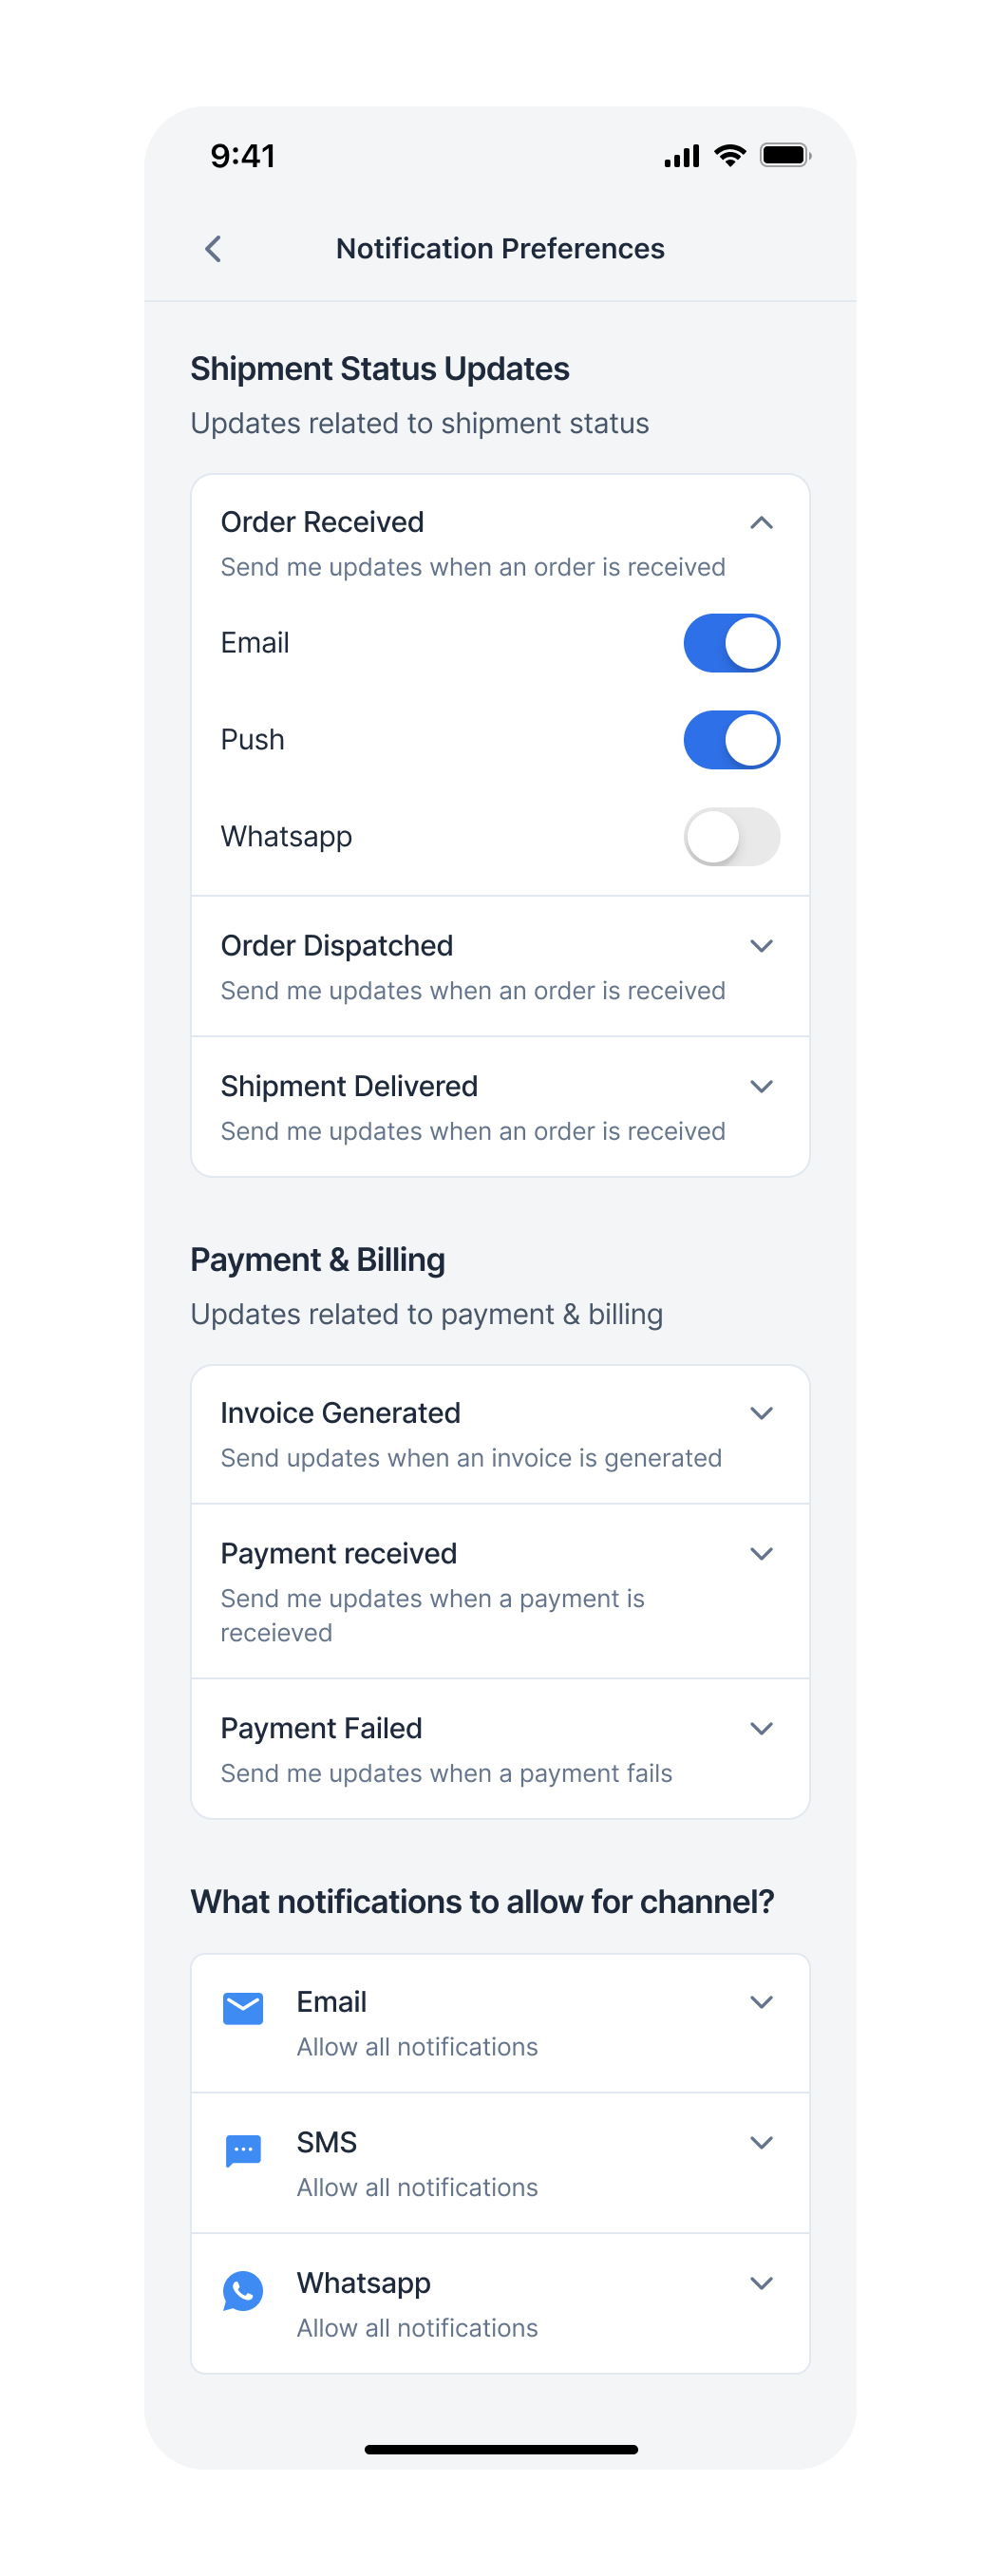 Preference Page contains 2 sections:
1. Category-level preference settings (Sections)
* [Sections](/docs/js-preferences#11-sections)
* [Categories](/docs/js-preferences#12-categories-sections---sub-categories)
* [Category Channel](/docs/js-preferences#13-category-channels-sections---sub-categories---channels)
Preference Page contains 2 sections:
1. Category-level preference settings (Sections)
* [Sections](/docs/js-preferences#11-sections)
* [Categories](/docs/js-preferences#12-categories-sections---sub-categories)
* [Category Channel](/docs/js-preferences#13-category-channels-sections---sub-categories---channels)
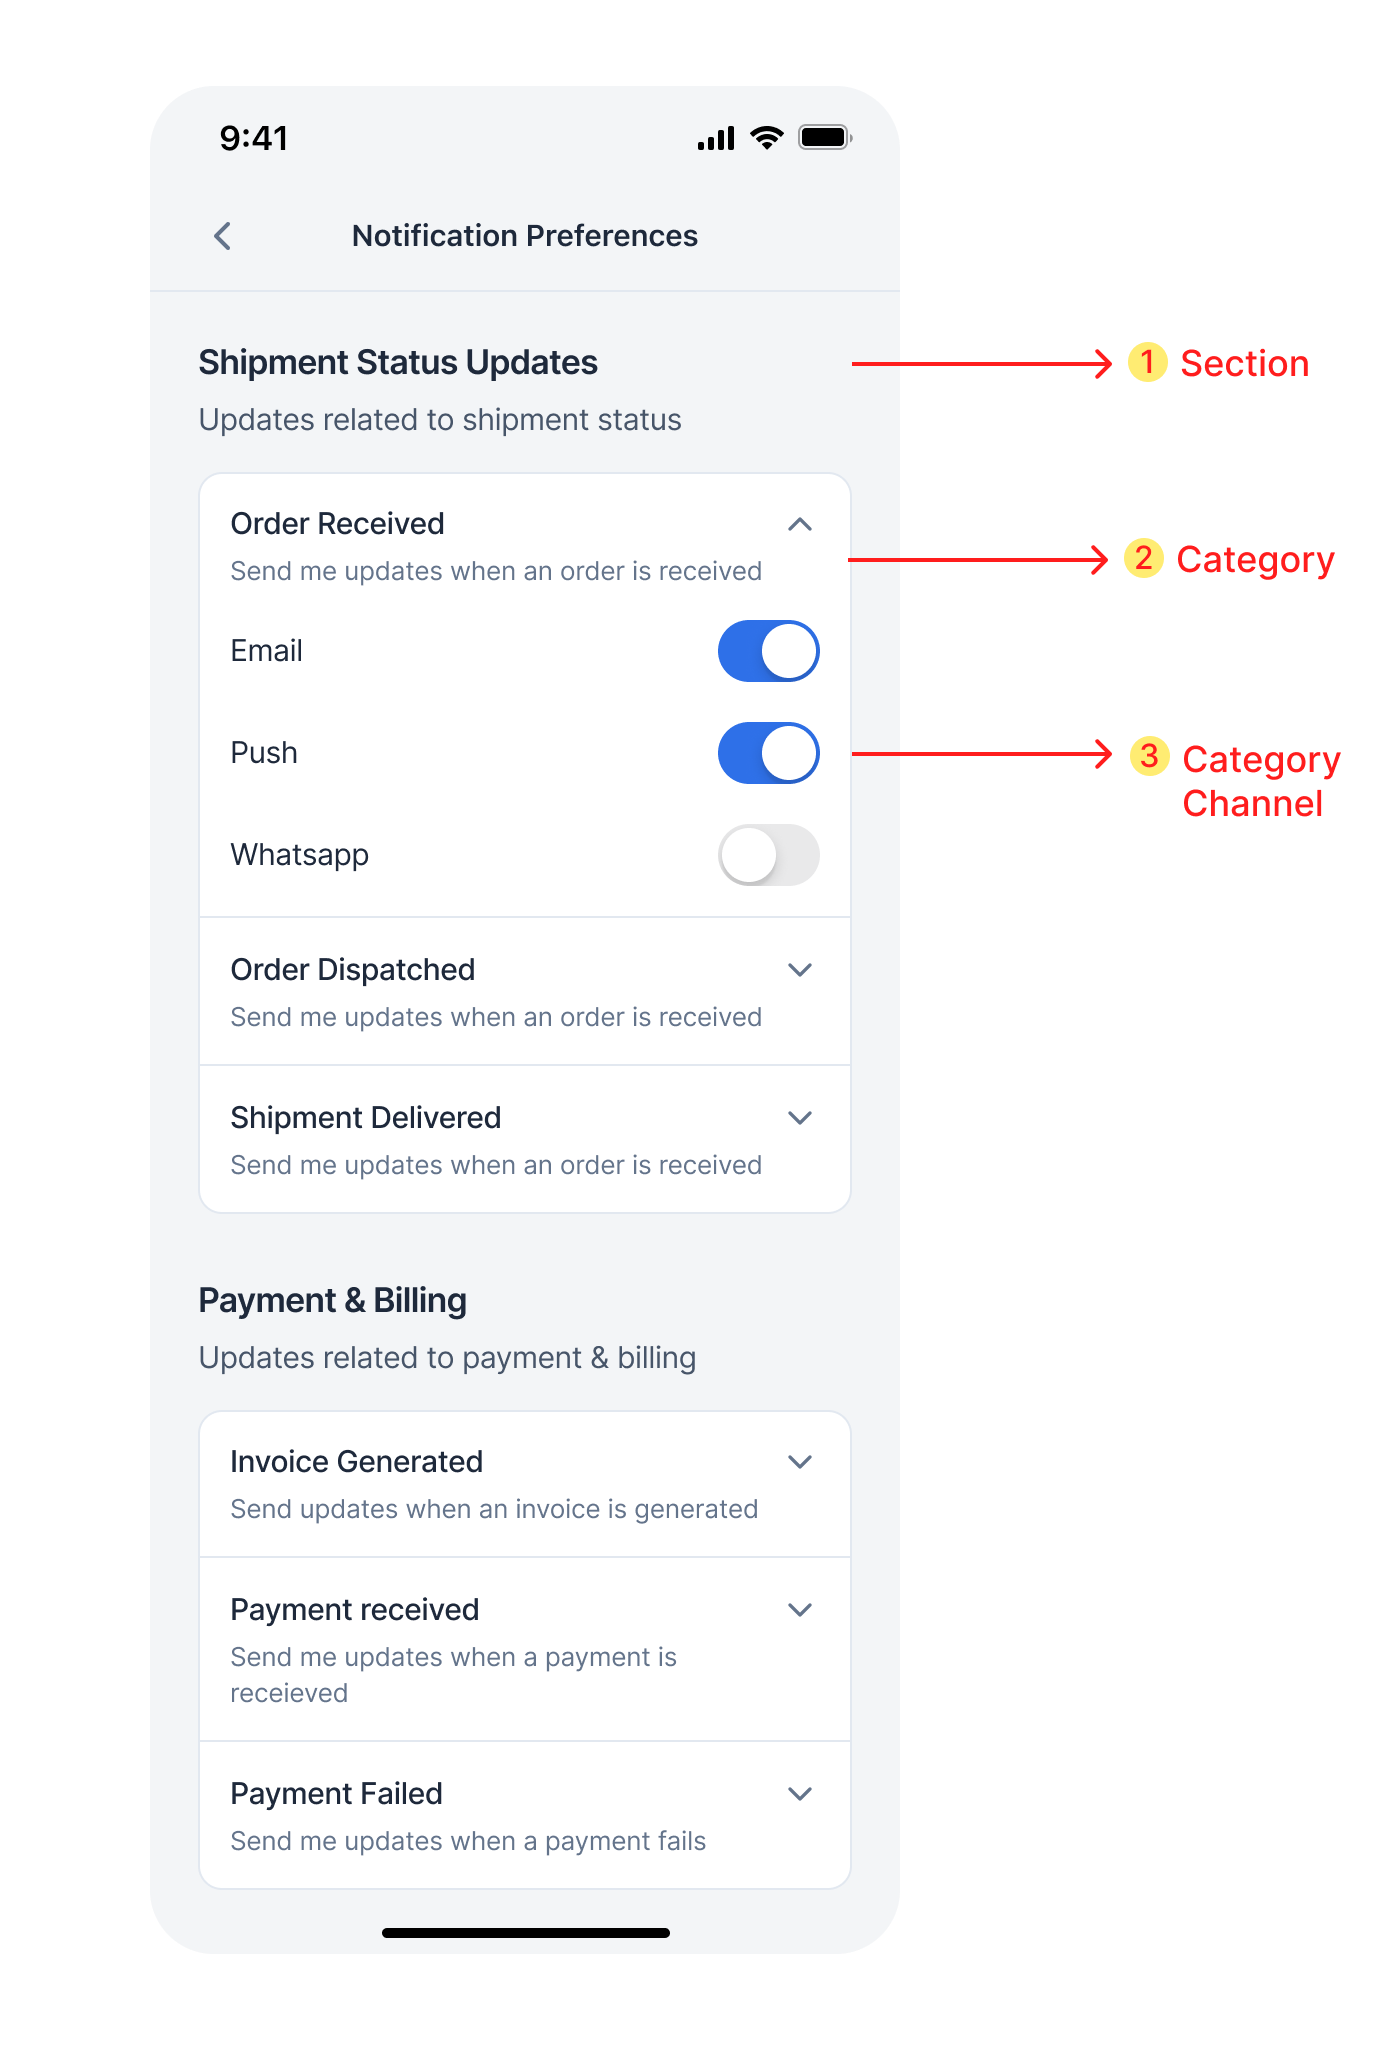 2. [Overall Channel-level preference](/docs/js-preferences#2-overall-channel-preferences)
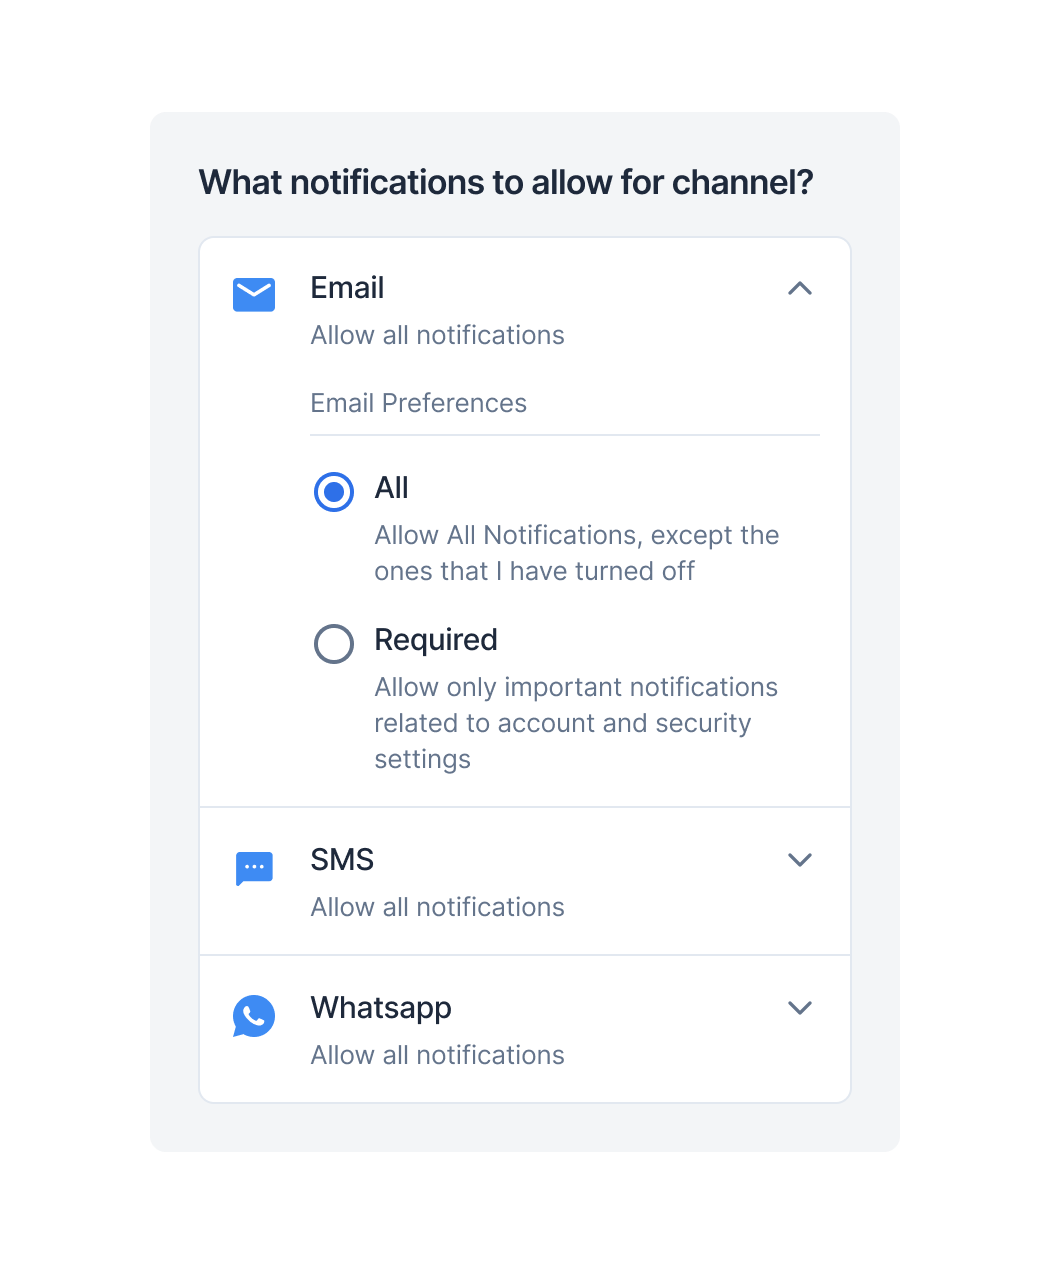 ### Preferences data structure
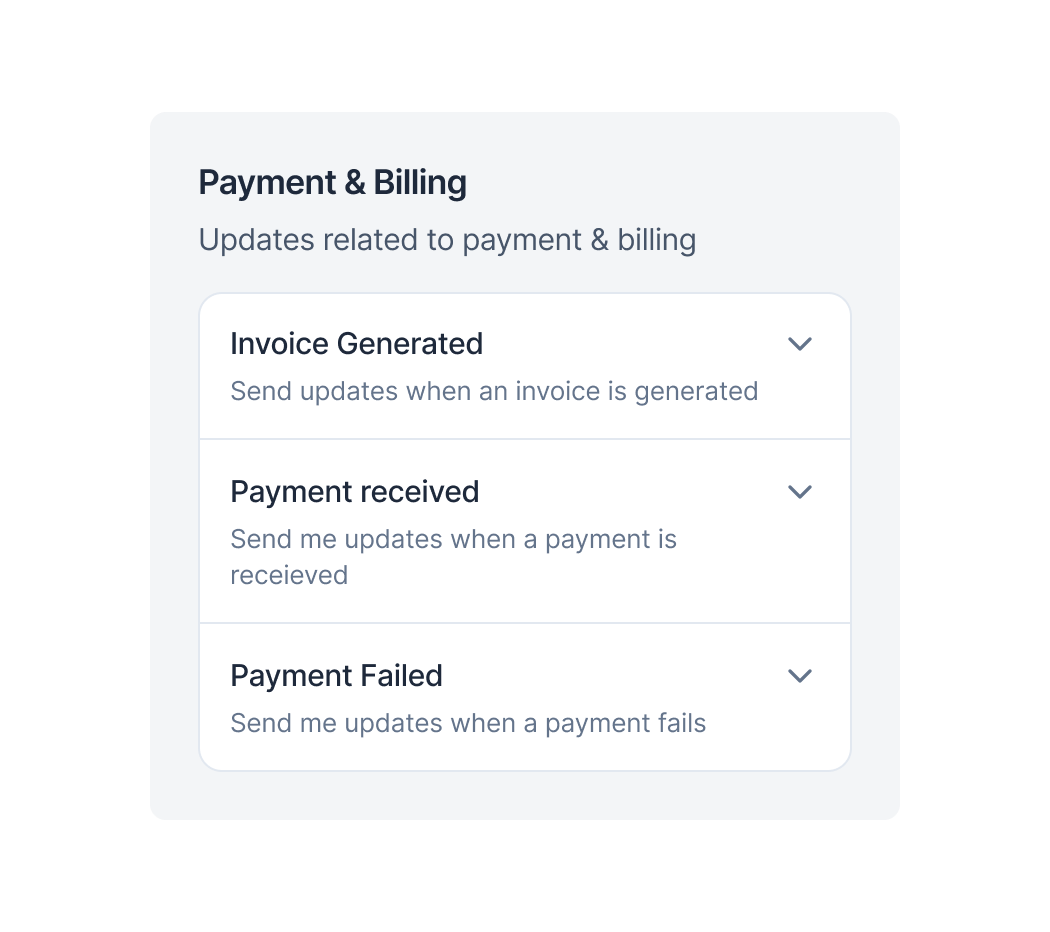
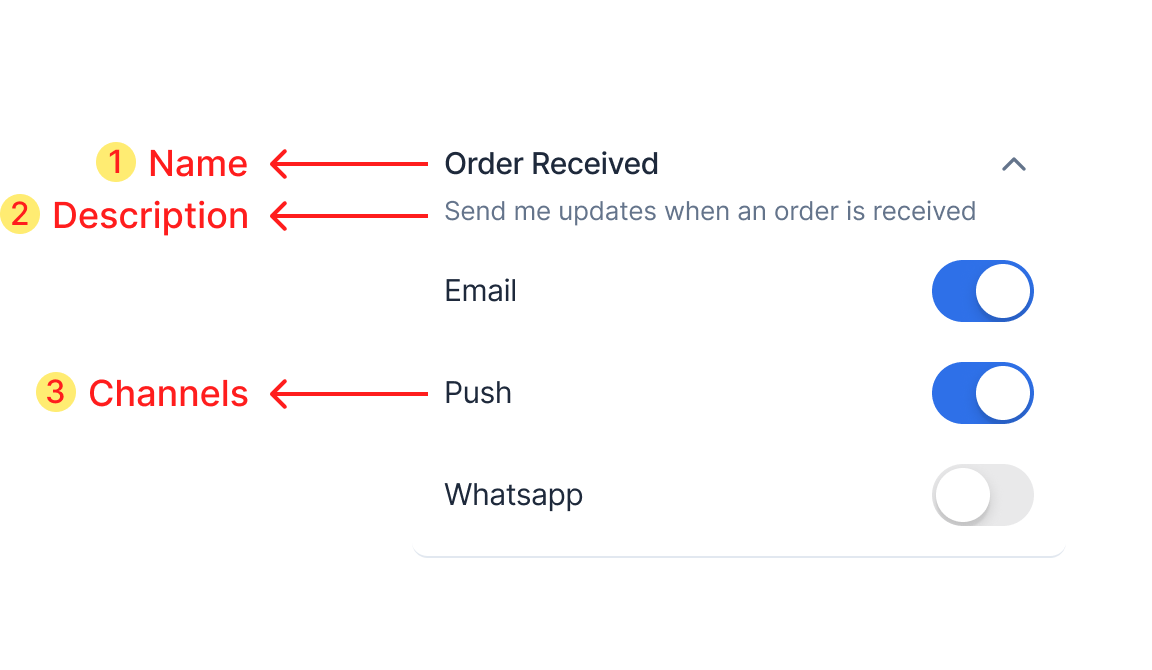
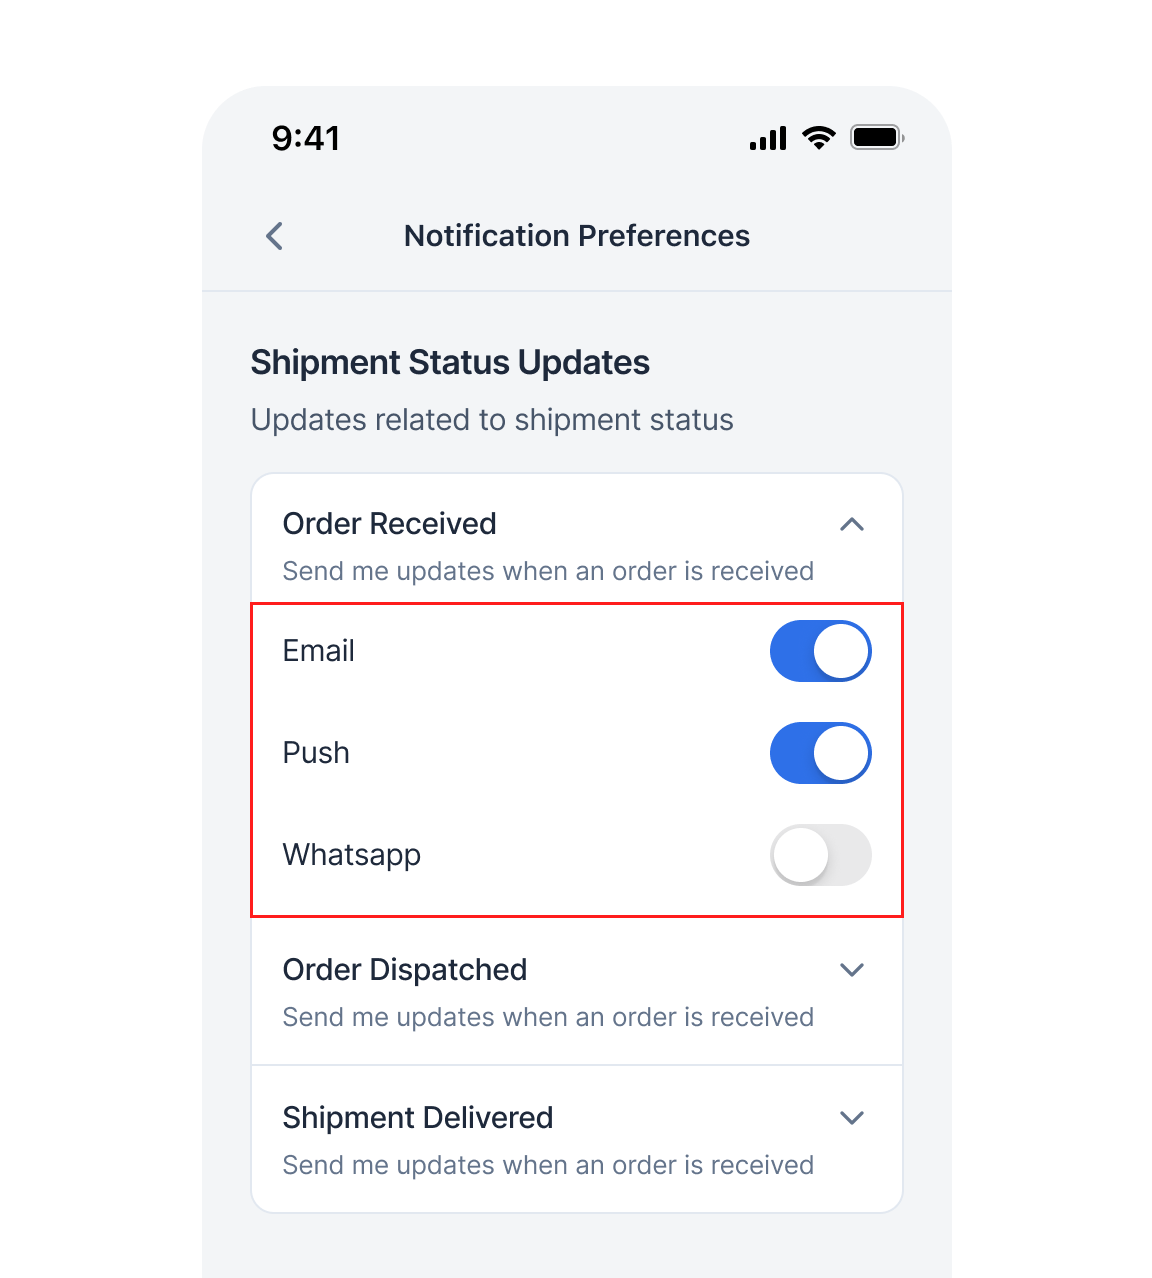
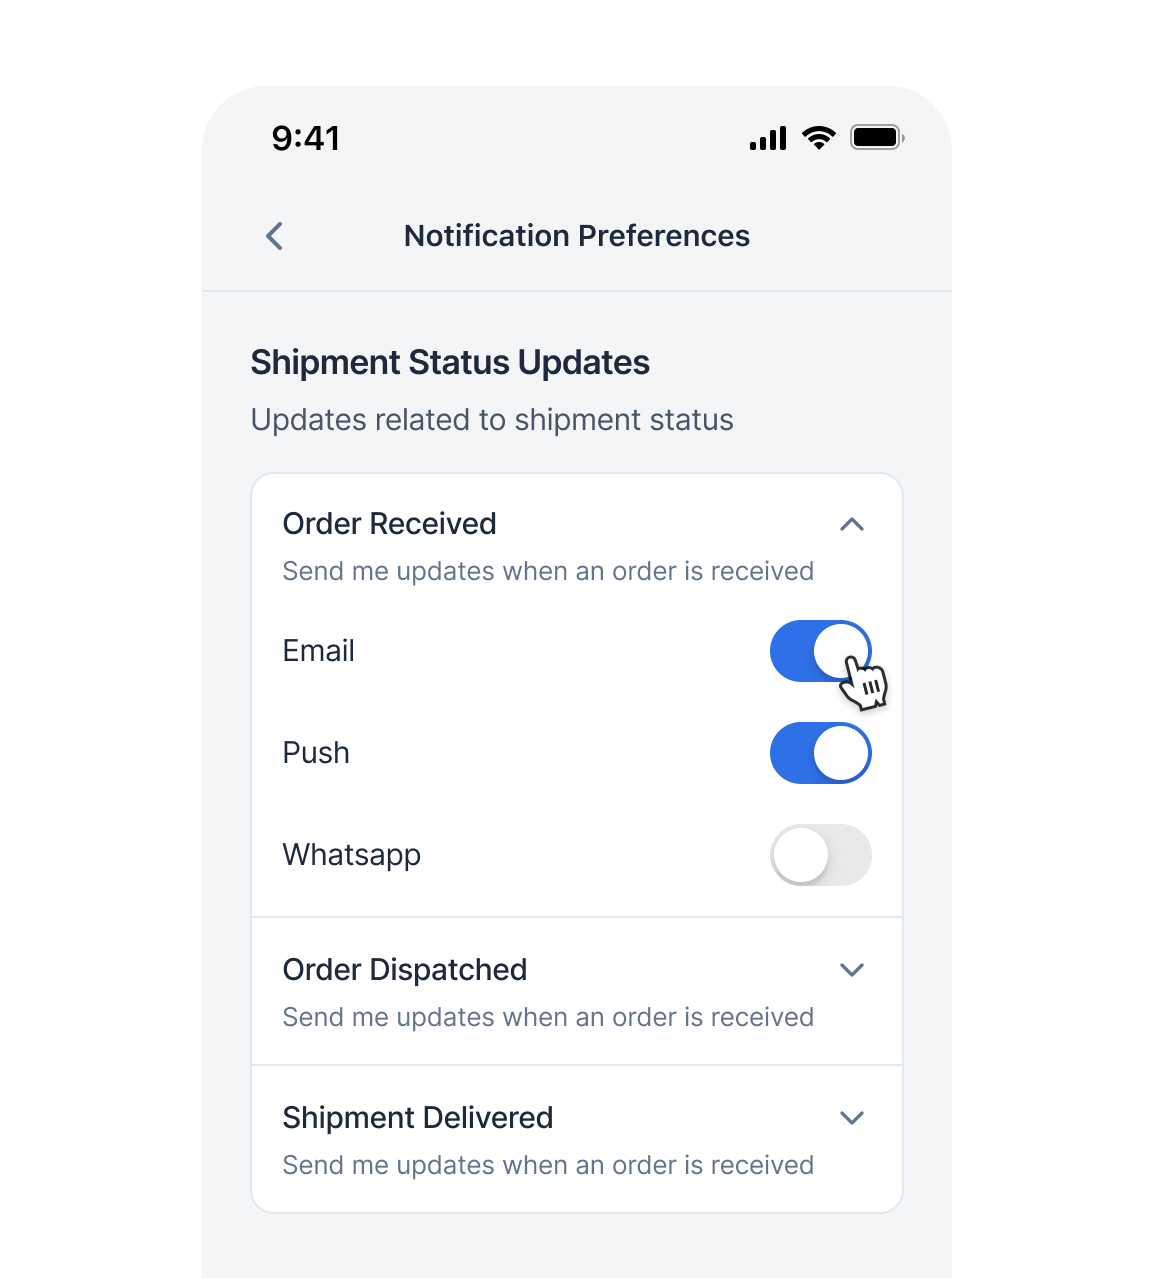 ### Update category preference
This is category level preference changing method. Calling this method will opt-in/opt-out user from that category. When the category is editable and the switch is toggled you can call this method.
### Update category preference
This is category level preference changing method. Calling this method will opt-in/opt-out user from that category. When the category is editable and the switch is toggled you can call this method.
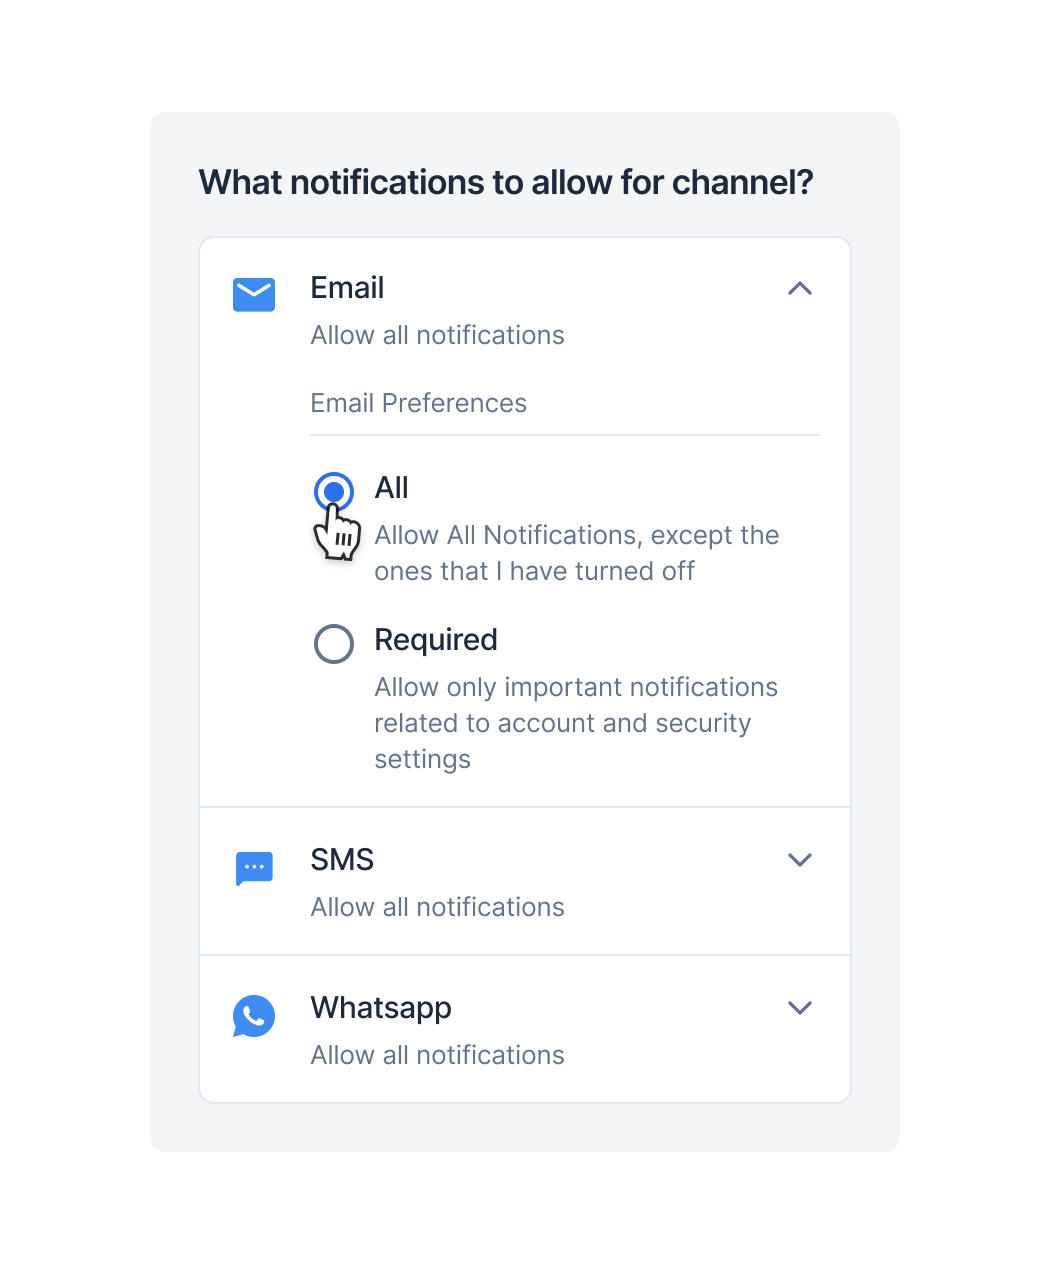 ### Event listeners
All preferences update api's are optimistic updates. Actual API call will happen in background with 1 second debounce. Since its a background task SDK provides event listeners to get updated preference data based on API call status. Listen to this event listeners and update the UI accordingly.
### Event listeners
All preferences update api's are optimistic updates. Actual API call will happen in background with 1 second debounce. Since its a background task SDK provides event listeners to get updated preference data based on API call status. Listen to this event listeners and update the UI accordingly.
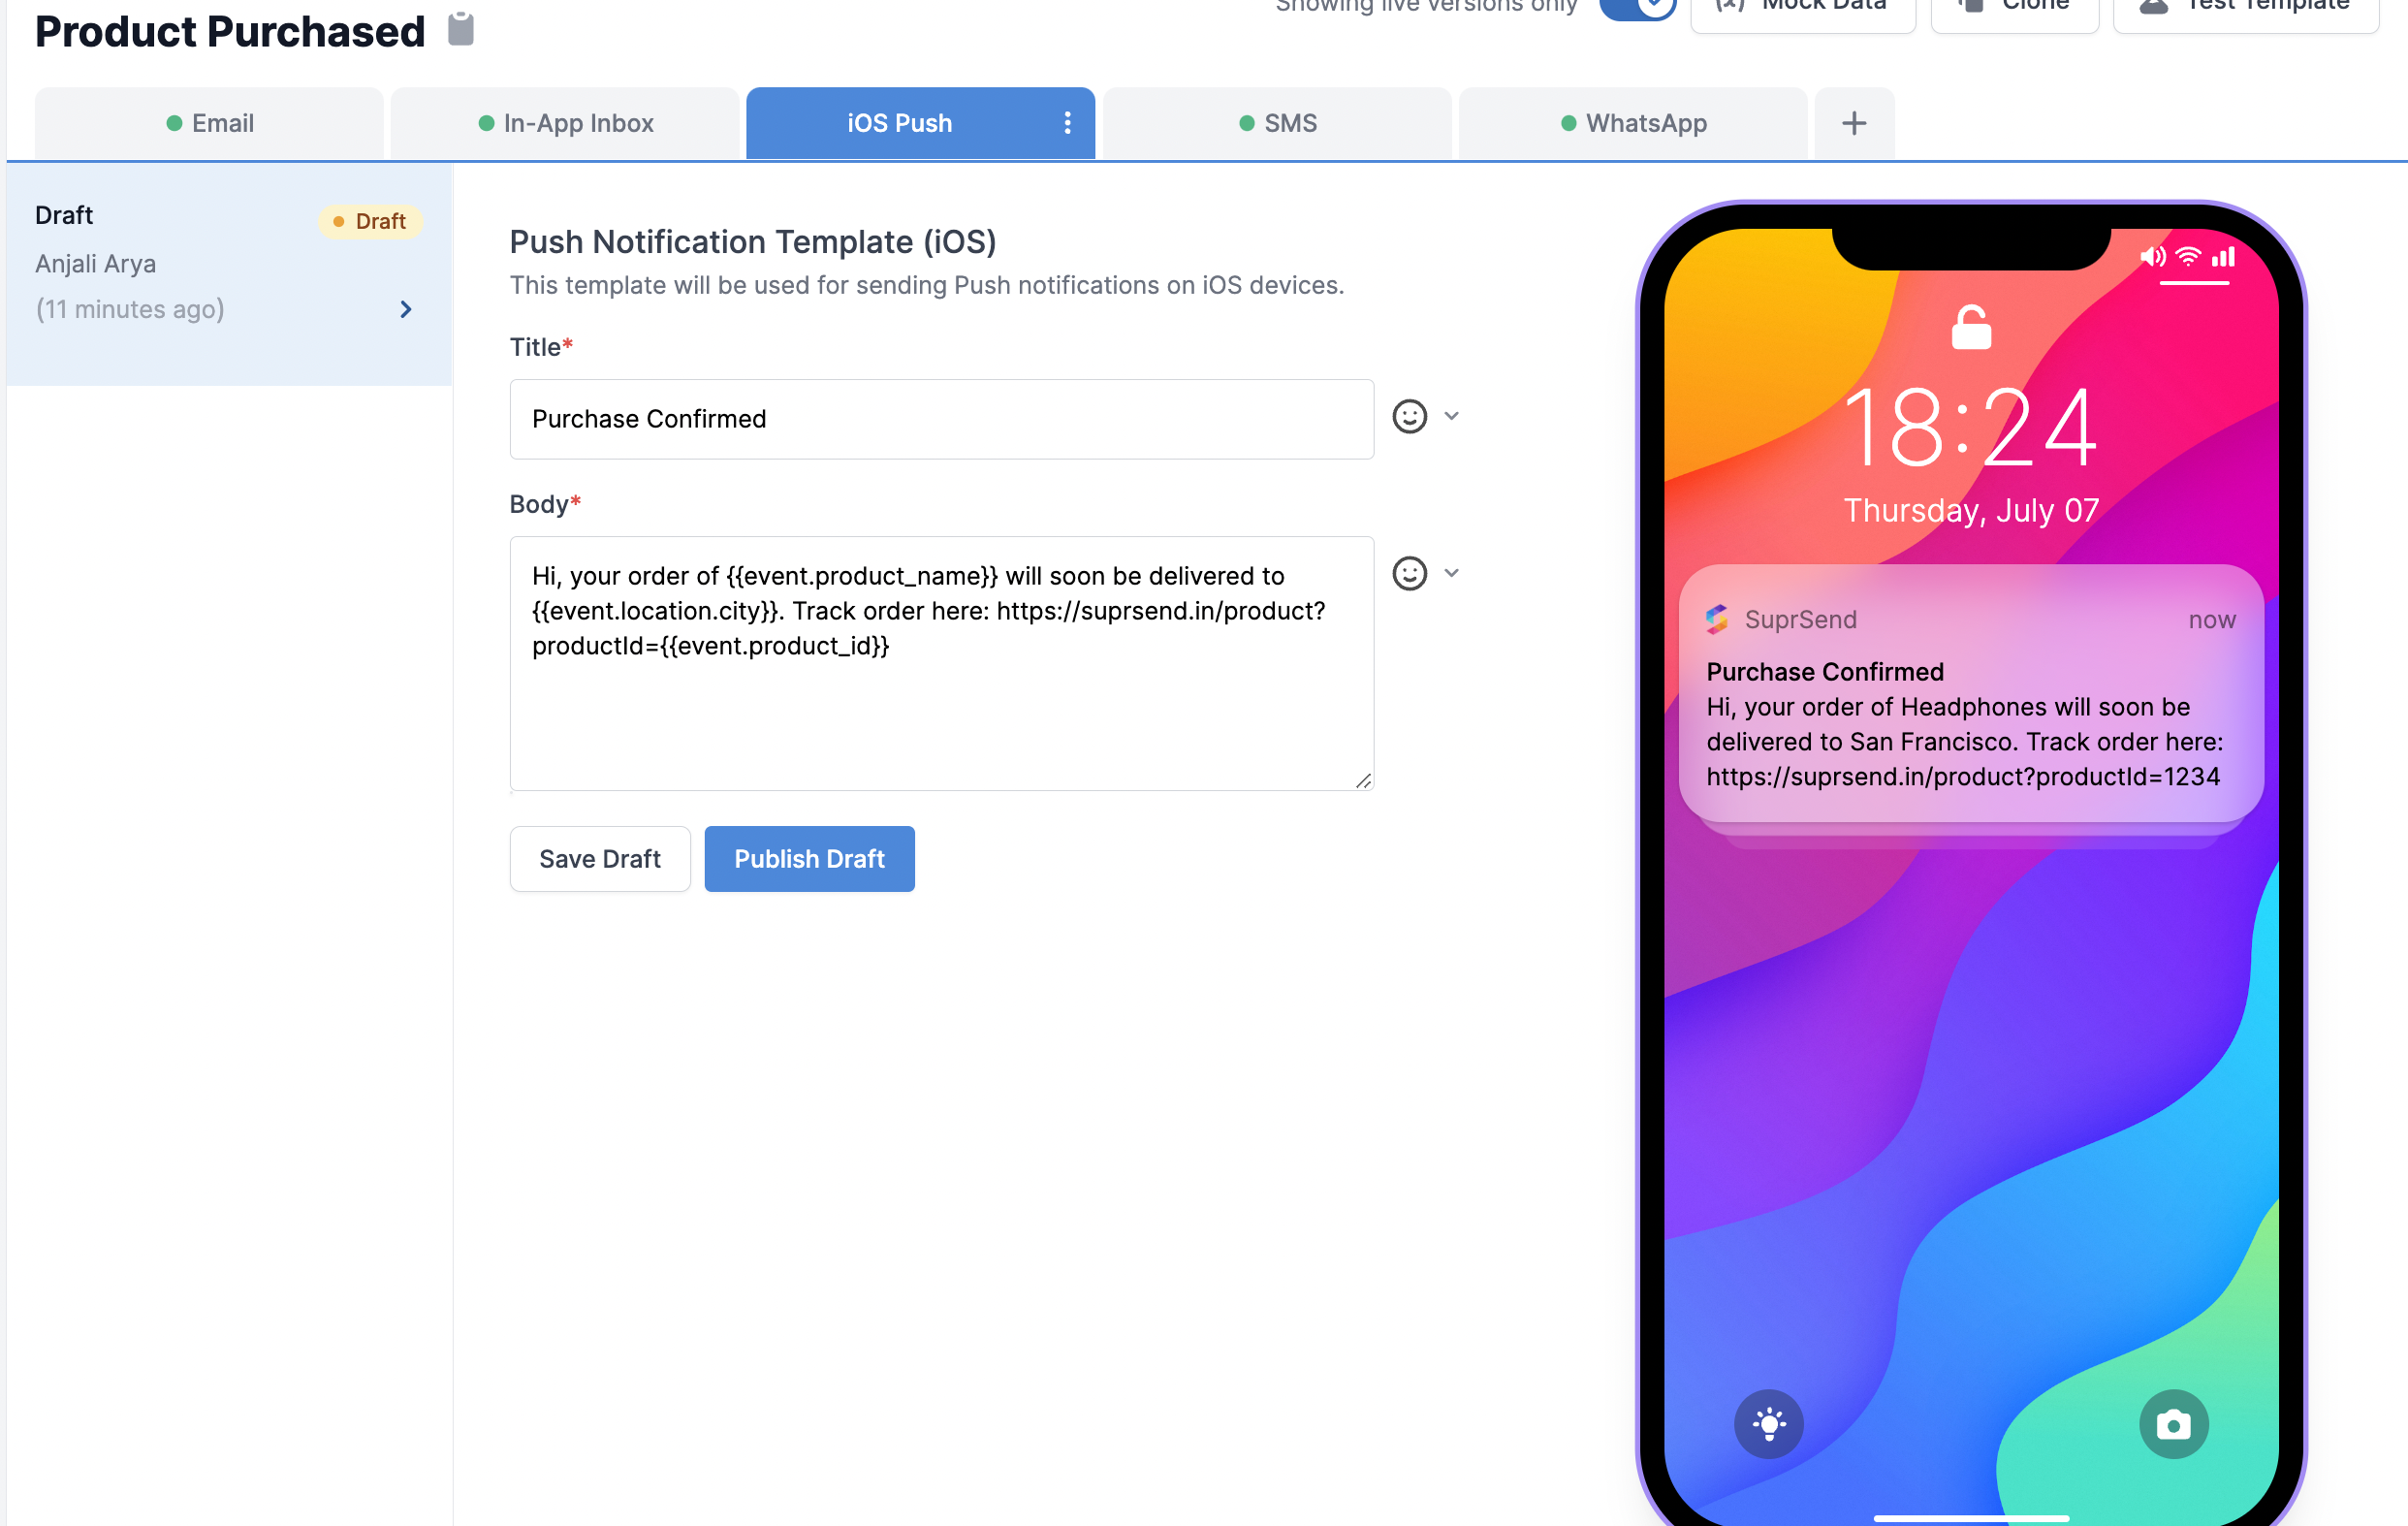 ## iOS Push notification fields description
| Field | Description |
| ----- | --------------------------------------------------------------------------------------------------------------------------------------------------------------- |
| Title | Small message text box. Note that this field will be displayed in single line only, and very long content can get curtailed. Use handlebarsjs to add variables. |
| Body | Large message text box. Use handlebarsjs to add variables. |
## iOS Push notification fields description
| Field | Description |
| ----- | --------------------------------------------------------------------------------------------------------------------------------------------------------------- |
| Title | Small message text box. Note that this field will be displayed in single line only, and very long content can get curtailed. Use handlebarsjs to add variables. |
| Body | Large message text box. Use handlebarsjs to add variables. |
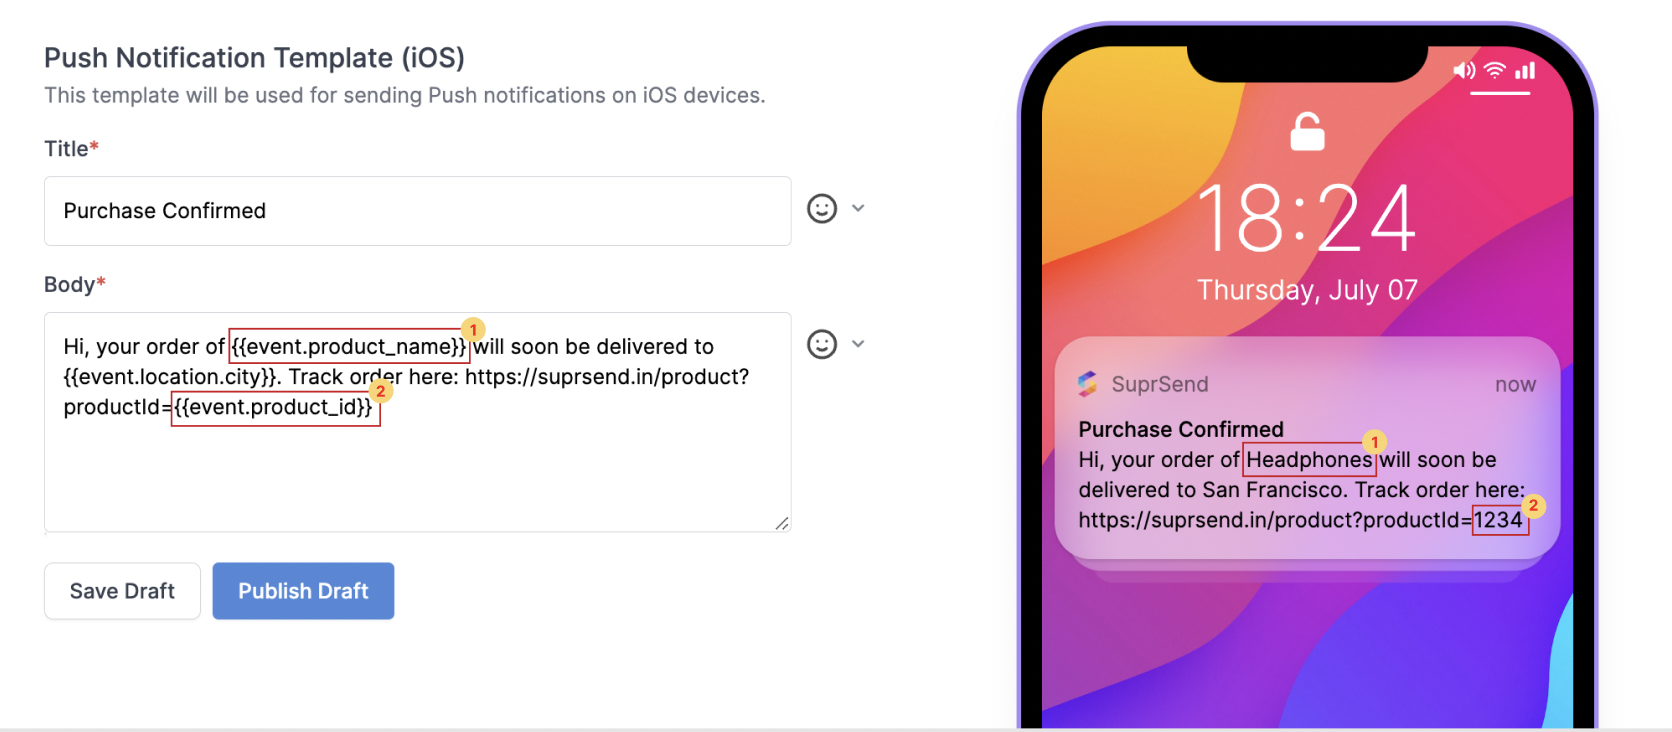
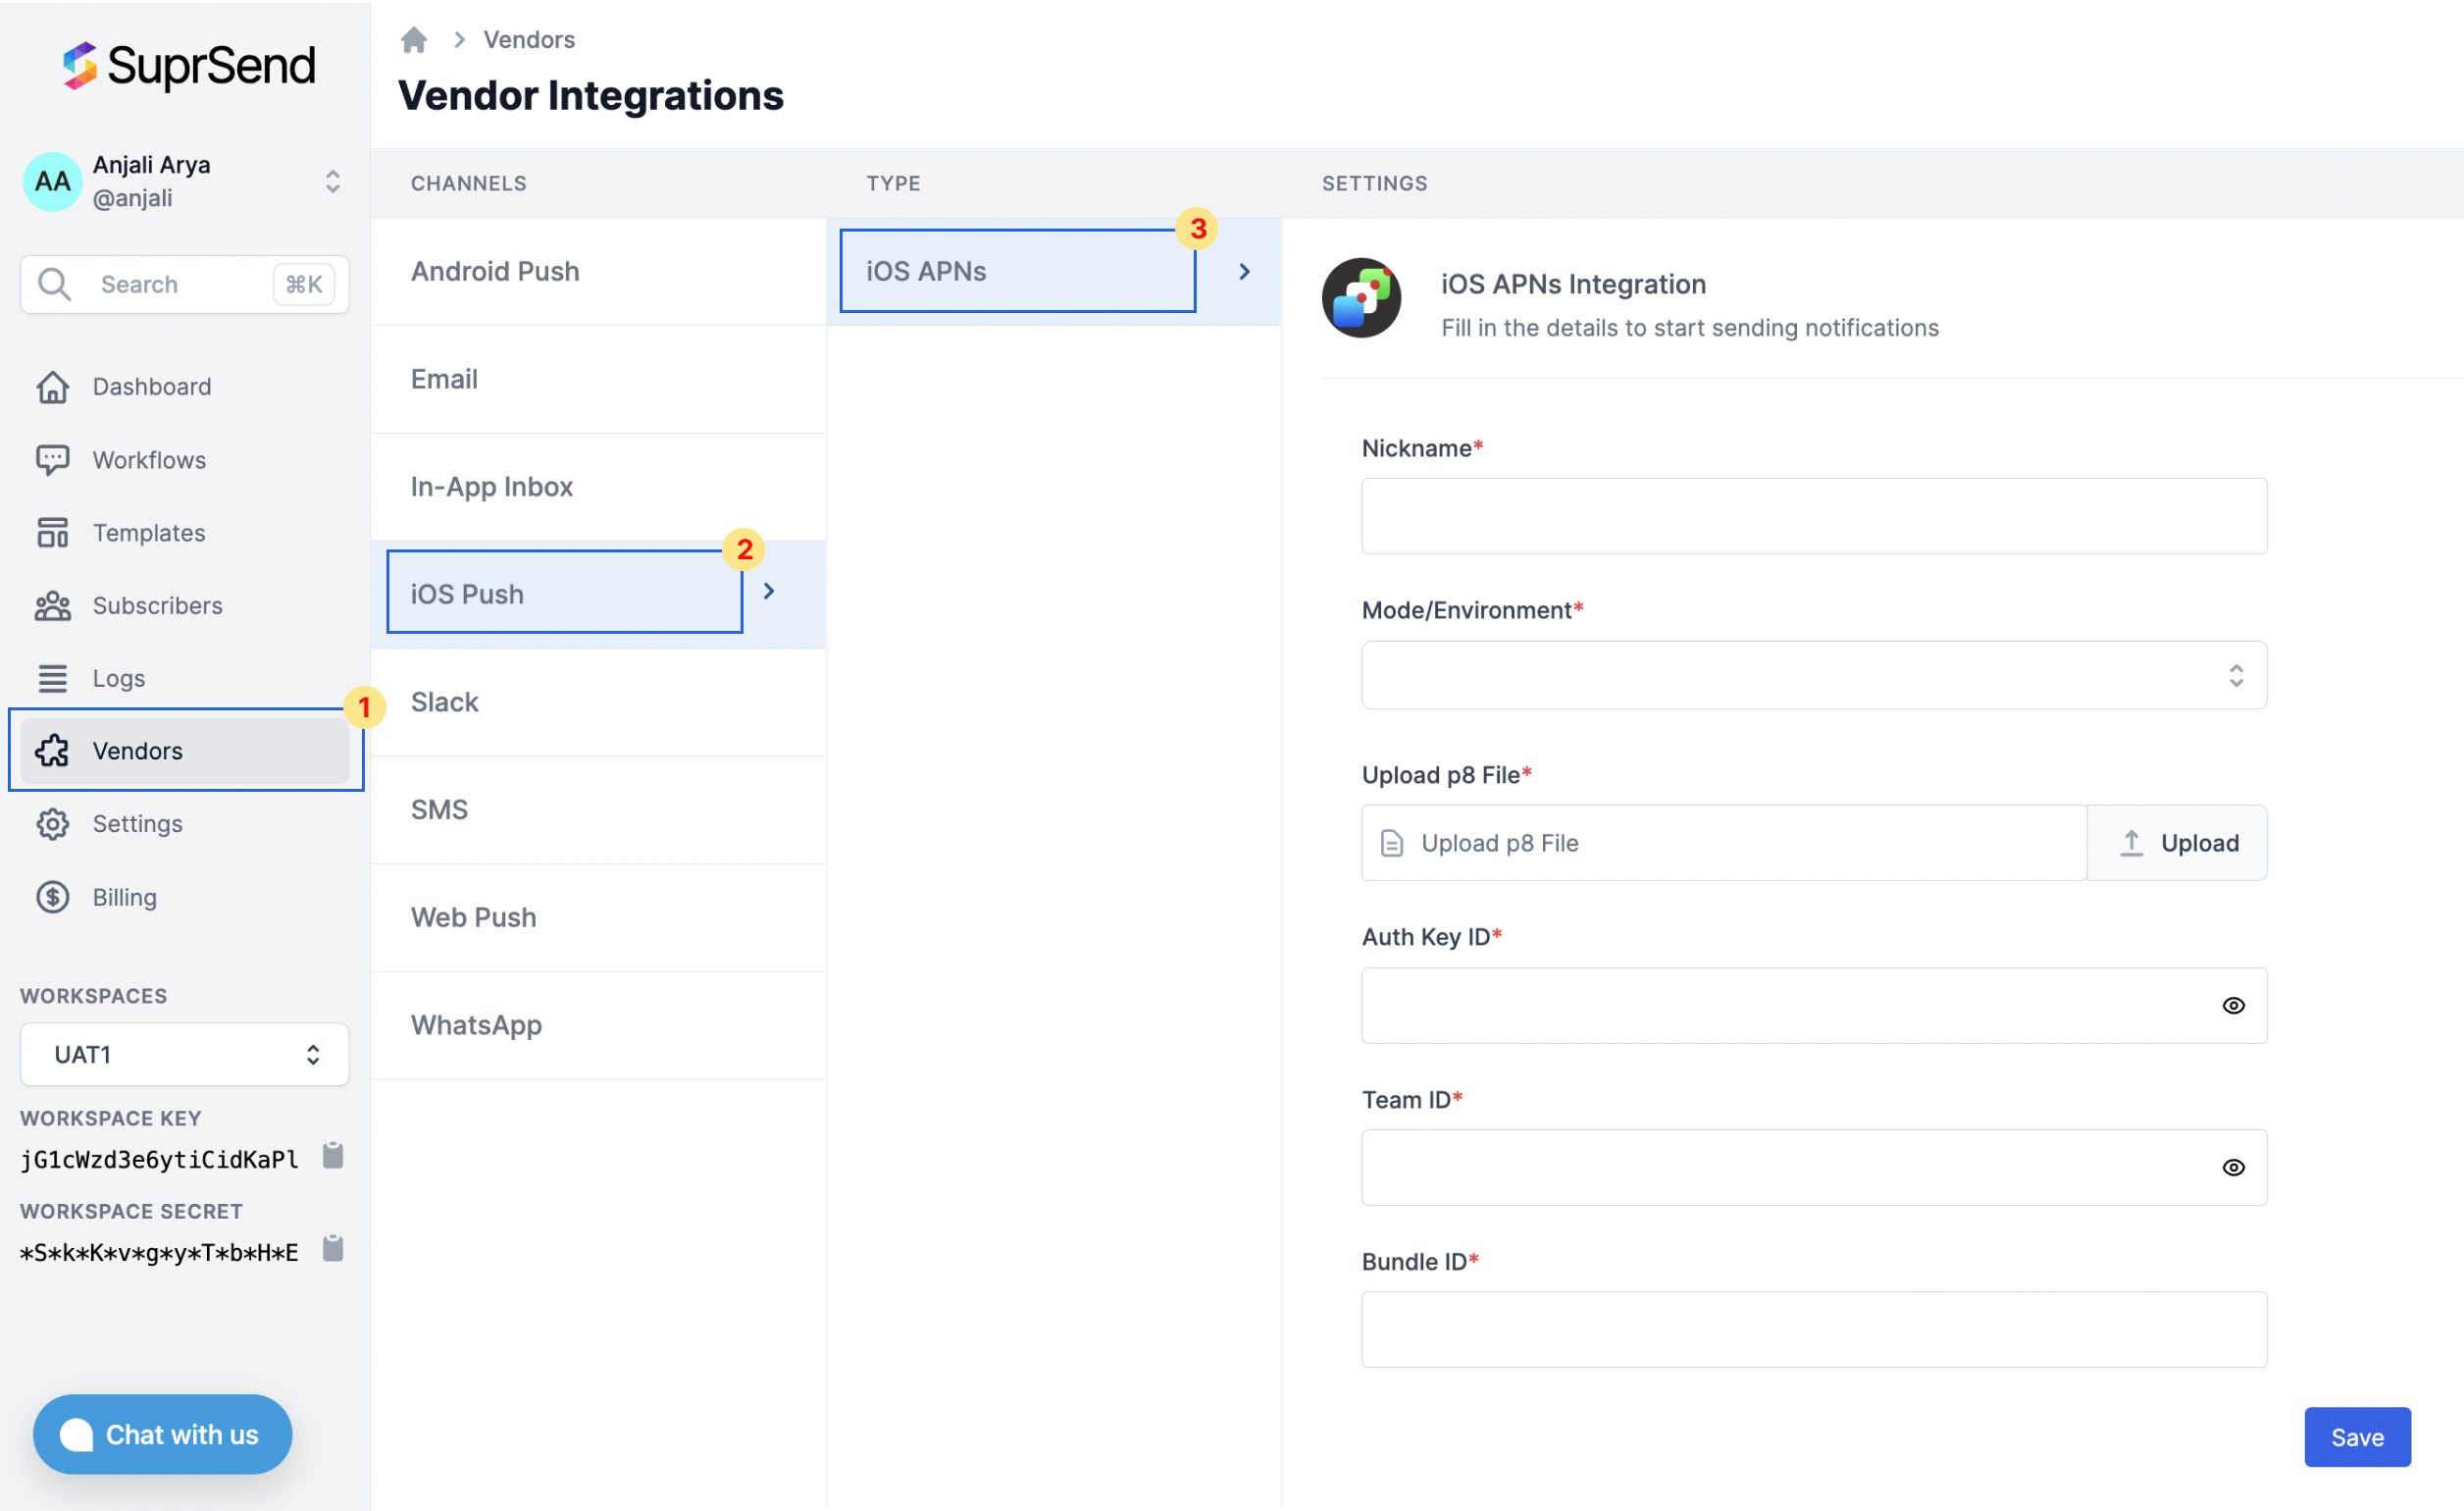 | Form Field | Description |
| ---------------- | ----------------------------------------------------------------------------------------------------------------------------------------------------------------------------------------------------------------------------------- |
| Nickname | You can give any name which may help you to identify this account easily |
| Mode/Environment | Use "Production" if you are adding it in your final app or testing app. Use "Development" if you are testing in your local environment |
| Upload p8 file | You'll get .p8 key file from your apple developer account. Refer [section below](/docs/ios-push-vendor-integration#generating-p8-key-file-and-auth-key-id) to see how to generate .p8 file |
| Auth Key ID | Auth key ID is a part of the filename of your .p8 file. Refer [section below](/docs/ios-push-vendor-integration#generating-p8-key-file-and-auth-key-id) to see how to get Auth key ID |
| Team ID | You'll get Team ID from your apple developer account. Refer [section below ](/docs/ios-push-vendor-integration#how-to-get-team-id)to see how to get Team ID |
| Bundle ID | Bundle ID is a unique identifier of your app. SuprSend will require this key to identify your app for sending push notification.[Refer section](/docs/ios-push-vendor-integration#how-to-get-bundle-id) to see how to get Bundle ID |
### Generate .p8 key file and Auth key ID
| Form Field | Description |
| ---------------- | ----------------------------------------------------------------------------------------------------------------------------------------------------------------------------------------------------------------------------------- |
| Nickname | You can give any name which may help you to identify this account easily |
| Mode/Environment | Use "Production" if you are adding it in your final app or testing app. Use "Development" if you are testing in your local environment |
| Upload p8 file | You'll get .p8 key file from your apple developer account. Refer [section below](/docs/ios-push-vendor-integration#generating-p8-key-file-and-auth-key-id) to see how to generate .p8 file |
| Auth Key ID | Auth key ID is a part of the filename of your .p8 file. Refer [section below](/docs/ios-push-vendor-integration#generating-p8-key-file-and-auth-key-id) to see how to get Auth key ID |
| Team ID | You'll get Team ID from your apple developer account. Refer [section below ](/docs/ios-push-vendor-integration#how-to-get-team-id)to see how to get Team ID |
| Bundle ID | Bundle ID is a unique identifier of your app. SuprSend will require this key to identify your app for sending push notification.[Refer section](/docs/ios-push-vendor-integration#how-to-get-bundle-id) to see how to get Bundle ID |
### Generate .p8 key file and Auth key ID

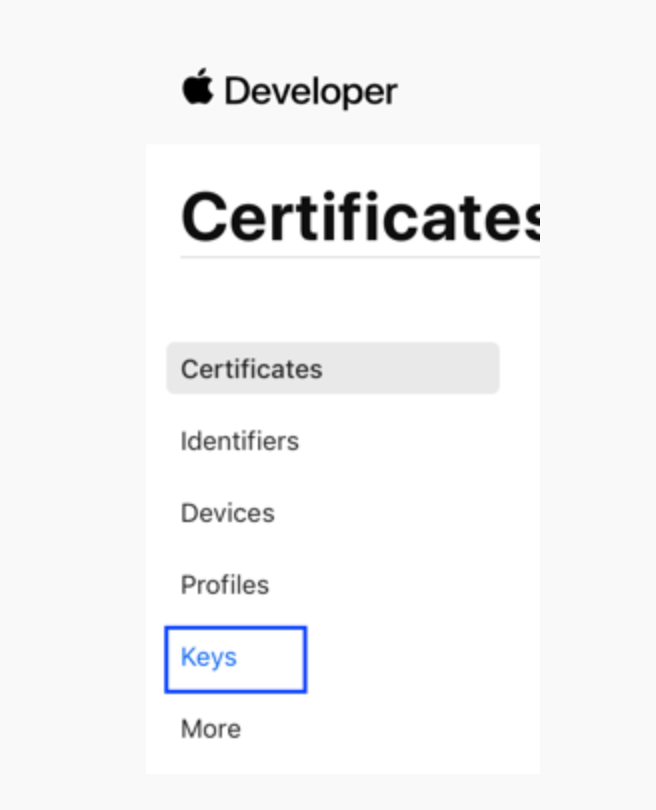
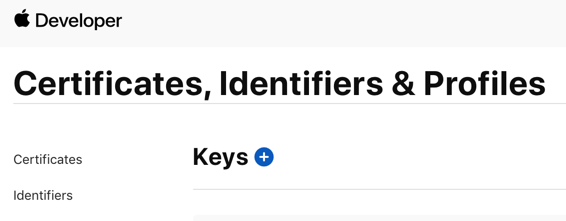
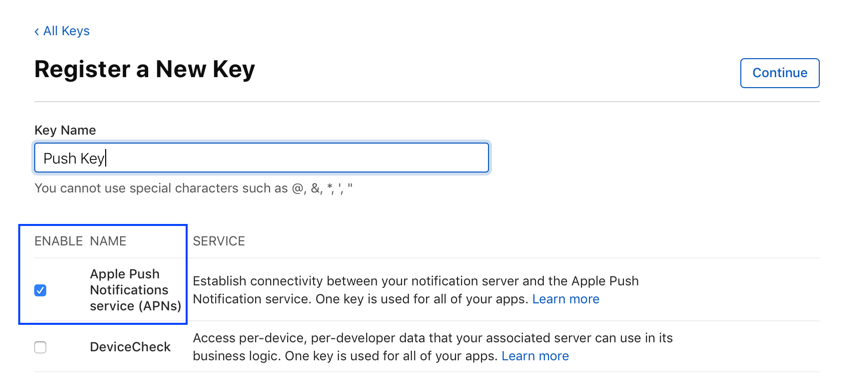
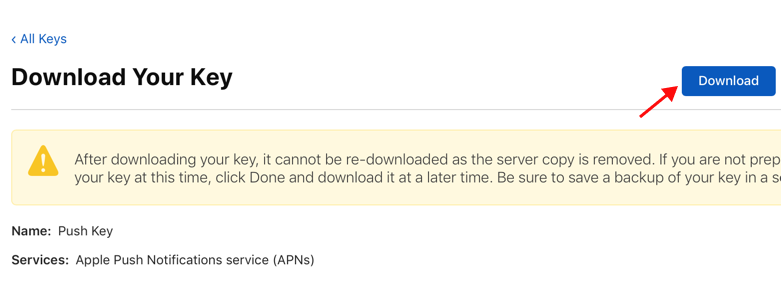
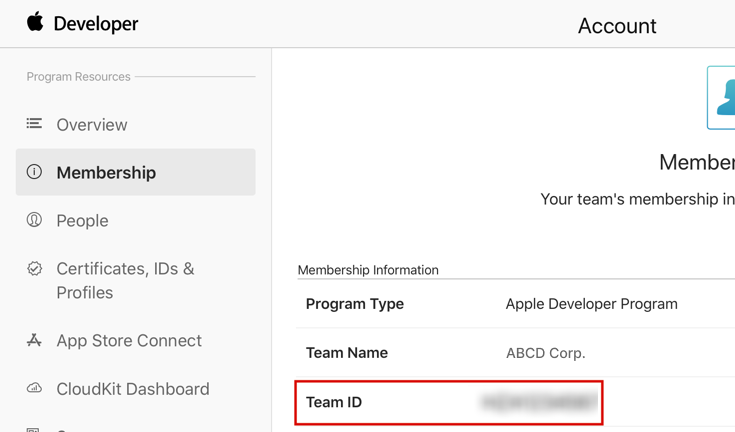 ### How to get bundle ID
You can get this ID from your app project
### How to get bundle ID
You can get this ID from your app project
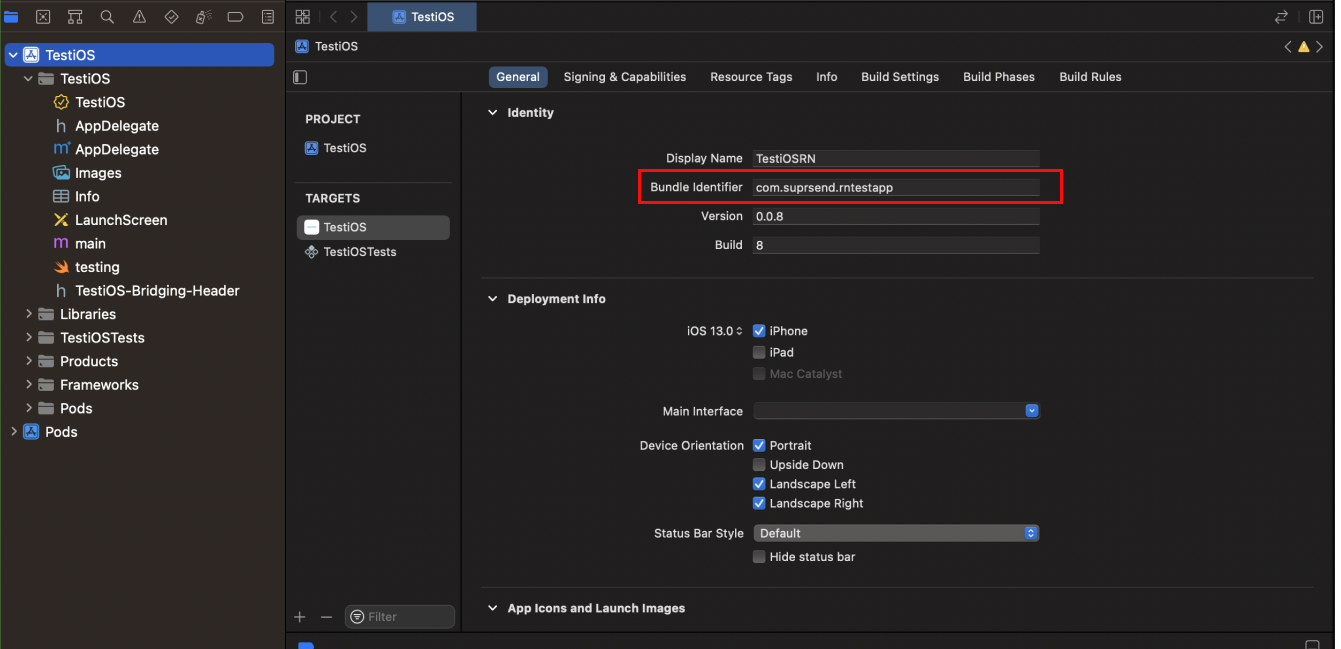 ***
# Manage Users
Source: https://docs.suprsend.com/docs/java-create-user-profile
Manage user profiles and communication channels programmatically with the Java SDK.
## How Suprsend identifies a user
SuprSend identifies users with immutable `distinct_id`. It's best to map the same identifier in your DB with `distinct_id` in SuprSend. Do not use identifiers that can be changed like email or phone number. You can view synced users by searching `distinct_id` on [Users page](https://app.suprsend.com/en/production/users).
***
# Manage Users
Source: https://docs.suprsend.com/docs/java-create-user-profile
Manage user profiles and communication channels programmatically with the Java SDK.
## How Suprsend identifies a user
SuprSend identifies users with immutable `distinct_id`. It's best to map the same identifier in your DB with `distinct_id` in SuprSend. Do not use identifiers that can be changed like email or phone number. You can view synced users by searching `distinct_id` on [Users page](https://app.suprsend.com/en/production/users).
 Preference Page contains 2 sections:
1. Category-level preference settings (Sections)
* [Sections](/docs/js-preferences#11-sections)
* [Categories](/docs/js-preferences#12-categories-sections---sub-categories)
* [Category Channel](/docs/js-preferences#13-category-channels-sections---sub-categories---channels)
Preference Page contains 2 sections:
1. Category-level preference settings (Sections)
* [Sections](/docs/js-preferences#11-sections)
* [Categories](/docs/js-preferences#12-categories-sections---sub-categories)
* [Category Channel](/docs/js-preferences#13-category-channels-sections---sub-categories---channels)
 2. [Overall Channel-level preference](/docs/js-preferences#2-overall-channel-preferences)
 ### Preferences data structure


 ### Update channel preference in category
Calling this method will opt-in/opt-out users from that category-level channel. When the category's channel checkbox is editable and the user clicks on the checkbox you can call this method.
### Update channel preference in category
Calling this method will opt-in/opt-out users from that category-level channel. When the category's channel checkbox is editable and the user clicks on the checkbox you can call this method.
 ### Update overall channel preference
This method updated the channel-level preference of the user.
### Update overall channel preference
This method updated the channel-level preference of the user.
 ### Event listeners
All preferences update api's are optimistic updates. Actual API call will happen in background with 1 second debounce. Since its a background task SDK provides event listeners to get updated preference data based on API call status. Listen to this event listeners and update the UI accordingly.
### Event listeners
All preferences update api's are optimistic updates. Actual API call will happen in background with 1 second debounce. Since its a background task SDK provides event listeners to get updated preference data based on API call status. Listen to this event listeners and update the UI accordingly.
 | Form Field | Description |
| ------------------------------------ | --------------------------------------------------------------------------------------------------------------------------------------------------------------------------------------------------------------------------------- |
| Nickname | You can give any name which may help you to identify this account easily |
| Account key | You will get this API Key from your Karix account. SuprSend uses this API Key to send SMS on your behalf via your registered Karix account. |
| Price per notification | This is the amount you pay per SMS notification to Karix. It helps us to calculate, estimate and optimise your cost spent on notifications. |
| DLT Integration -> 'Mobile Operator' | Mobile Operator of your enterprise DLT account |
| DLT Integration -> 'Headers' | 6 digit/character sender id registered for your entity ( *You can get the header details from your DLT portal*) *e.g. SPRSND* Also, you can add multiple headers in the list by just typing the header name and clicking on enter |
| DLT Integration -> 'User Name' | User Name of your DLT platform login. SuprSend uses this info to register template on your behalf through your registered DLT platform. |
| DLT Integration -> 'Password' | Password of your DLT platform login. SuprSend uses this info to register template on your behalf through your registered DLT platform. |
| DLT Integration -> 'Entity ID' | Entity Registration ID linked to your DLT account. You can get the Registration Id from your DLT account homepage. SuprSend uses this info to send messages on your behalf through your registered DLT platform. |
### How to get account key from your Karix account
Login to Karix lounge account and follow the below steps:
1. Go to **"Whatsapp Campaign" -> "Profiles"** page from your left navigation menu
2. Click on **"Create keys"** button.
3. Enter the *"key name"* and *"description"* in the create keys modal and save
4. Copy the API Key generated by clicking on the "eye" button and add it to SuprSend Vendor settings page
| Form Field | Description |
| ------------------------------------ | --------------------------------------------------------------------------------------------------------------------------------------------------------------------------------------------------------------------------------- |
| Nickname | You can give any name which may help you to identify this account easily |
| Account key | You will get this API Key from your Karix account. SuprSend uses this API Key to send SMS on your behalf via your registered Karix account. |
| Price per notification | This is the amount you pay per SMS notification to Karix. It helps us to calculate, estimate and optimise your cost spent on notifications. |
| DLT Integration -> 'Mobile Operator' | Mobile Operator of your enterprise DLT account |
| DLT Integration -> 'Headers' | 6 digit/character sender id registered for your entity ( *You can get the header details from your DLT portal*) *e.g. SPRSND* Also, you can add multiple headers in the list by just typing the header name and clicking on enter |
| DLT Integration -> 'User Name' | User Name of your DLT platform login. SuprSend uses this info to register template on your behalf through your registered DLT platform. |
| DLT Integration -> 'Password' | Password of your DLT platform login. SuprSend uses this info to register template on your behalf through your registered DLT platform. |
| DLT Integration -> 'Entity ID' | Entity Registration ID linked to your DLT account. You can get the Registration Id from your DLT account homepage. SuprSend uses this info to send messages on your behalf through your registered DLT platform. |
### How to get account key from your Karix account
Login to Karix lounge account and follow the below steps:
1. Go to **"Whatsapp Campaign" -> "Profiles"** page from your left navigation menu
2. Click on **"Create keys"** button.
3. Enter the *"key name"* and *"description"* in the create keys modal and save
4. Copy the API Key generated by clicking on the "eye" button and add it to SuprSend Vendor settings page
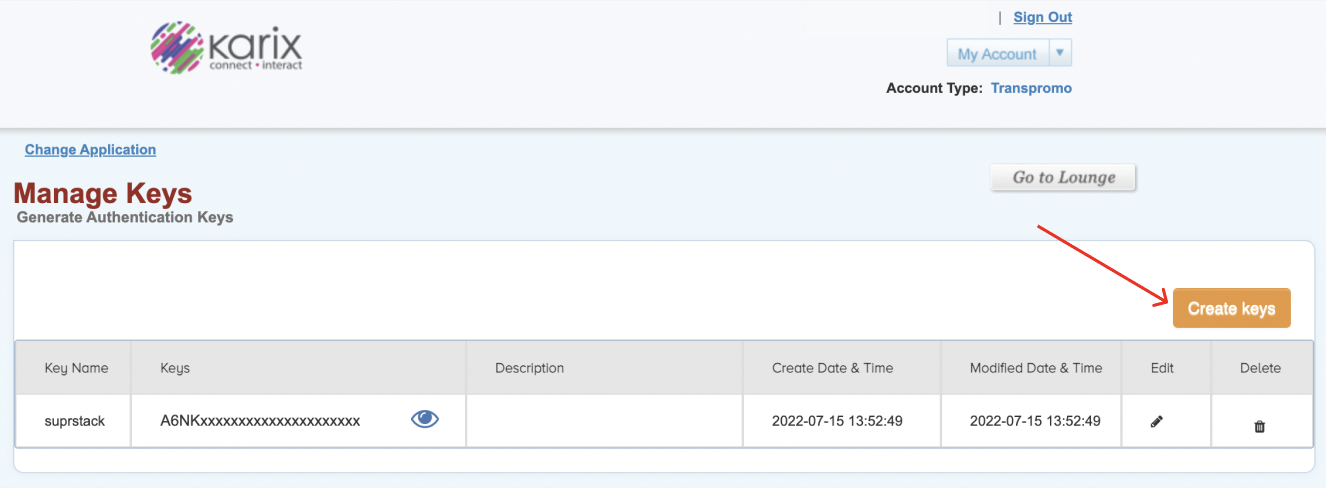 ## Setting callback URL in Karix account
One of the platform advantage of using SuprSend as a central communication system is that it shows notification analytics for all channels in your SuprSend account together.
Send a mail to \[[provisioning@karix.com](mailto:provisioning@karix.com)]]\(mailto:[provisioning@karix.com](mailto:provisioning@karix.com)) to enable below tracking to your account level settings:
1. Add the below webhook URL in your account level DLR settings: Post URL: [`https://hub.suprsend.com/webhook/karix/sms/`](https://hub.suprsend.com/webhook/karix/sms/)
2. Enable cust-ref & all tags parameters in the webhook URL
## Enabling URL shortener service in Karix account
URL shortening is essential if you are sending URL links in your SMS content. It reduces the number of characters in your SMS and is required for tracking the click rate of your messages.
To activate URL shortening, write a mail to \[[provisioning@karix.com](mailto:provisioning@karix.com)]]\(mailto:[provisioning@karix.com](mailto:provisioning@karix.com)) to enable `Auto_shortening service` in your account level settings
## How to register headers through Airtel DLT platform
To register header on Airtel DLT platform, you can refer the section: [Sender ID/Mask/Header Registration- DLT Platform](https://enterprise.smsgupshup.com/DLT/senderidRegistration)
***
# Karix
Source: https://docs.suprsend.com/docs/karix-whatsapp
Guide to connect your Karix account with SuprSend to send Whatsapp notifications.
This section is a step-by-step guide to set Karix as your WhatsApp service provider.
## Pre-Requisites
You'll need a Karix account to complete this tutorial. You can use your existing Karix account to integrate, or [Create a Karix account](https://manage.karix.solutions/register)
## Karix integration on SuprSend account
On the SuprSend dashboard, go to vendor page from side panel and click WhatsApp -> Karix from the list of Vendors. This will open vendor details page as shown below:
## Setting callback URL in Karix account
One of the platform advantage of using SuprSend as a central communication system is that it shows notification analytics for all channels in your SuprSend account together.
Send a mail to \[[provisioning@karix.com](mailto:provisioning@karix.com)]]\(mailto:[provisioning@karix.com](mailto:provisioning@karix.com)) to enable below tracking to your account level settings:
1. Add the below webhook URL in your account level DLR settings: Post URL: [`https://hub.suprsend.com/webhook/karix/sms/`](https://hub.suprsend.com/webhook/karix/sms/)
2. Enable cust-ref & all tags parameters in the webhook URL
## Enabling URL shortener service in Karix account
URL shortening is essential if you are sending URL links in your SMS content. It reduces the number of characters in your SMS and is required for tracking the click rate of your messages.
To activate URL shortening, write a mail to \[[provisioning@karix.com](mailto:provisioning@karix.com)]]\(mailto:[provisioning@karix.com](mailto:provisioning@karix.com)) to enable `Auto_shortening service` in your account level settings
## How to register headers through Airtel DLT platform
To register header on Airtel DLT platform, you can refer the section: [Sender ID/Mask/Header Registration- DLT Platform](https://enterprise.smsgupshup.com/DLT/senderidRegistration)
***
# Karix
Source: https://docs.suprsend.com/docs/karix-whatsapp
Guide to connect your Karix account with SuprSend to send Whatsapp notifications.
This section is a step-by-step guide to set Karix as your WhatsApp service provider.
## Pre-Requisites
You'll need a Karix account to complete this tutorial. You can use your existing Karix account to integrate, or [Create a Karix account](https://manage.karix.solutions/register)
## Karix integration on SuprSend account
On the SuprSend dashboard, go to vendor page from side panel and click WhatsApp -> Karix from the list of Vendors. This will open vendor details page as shown below:
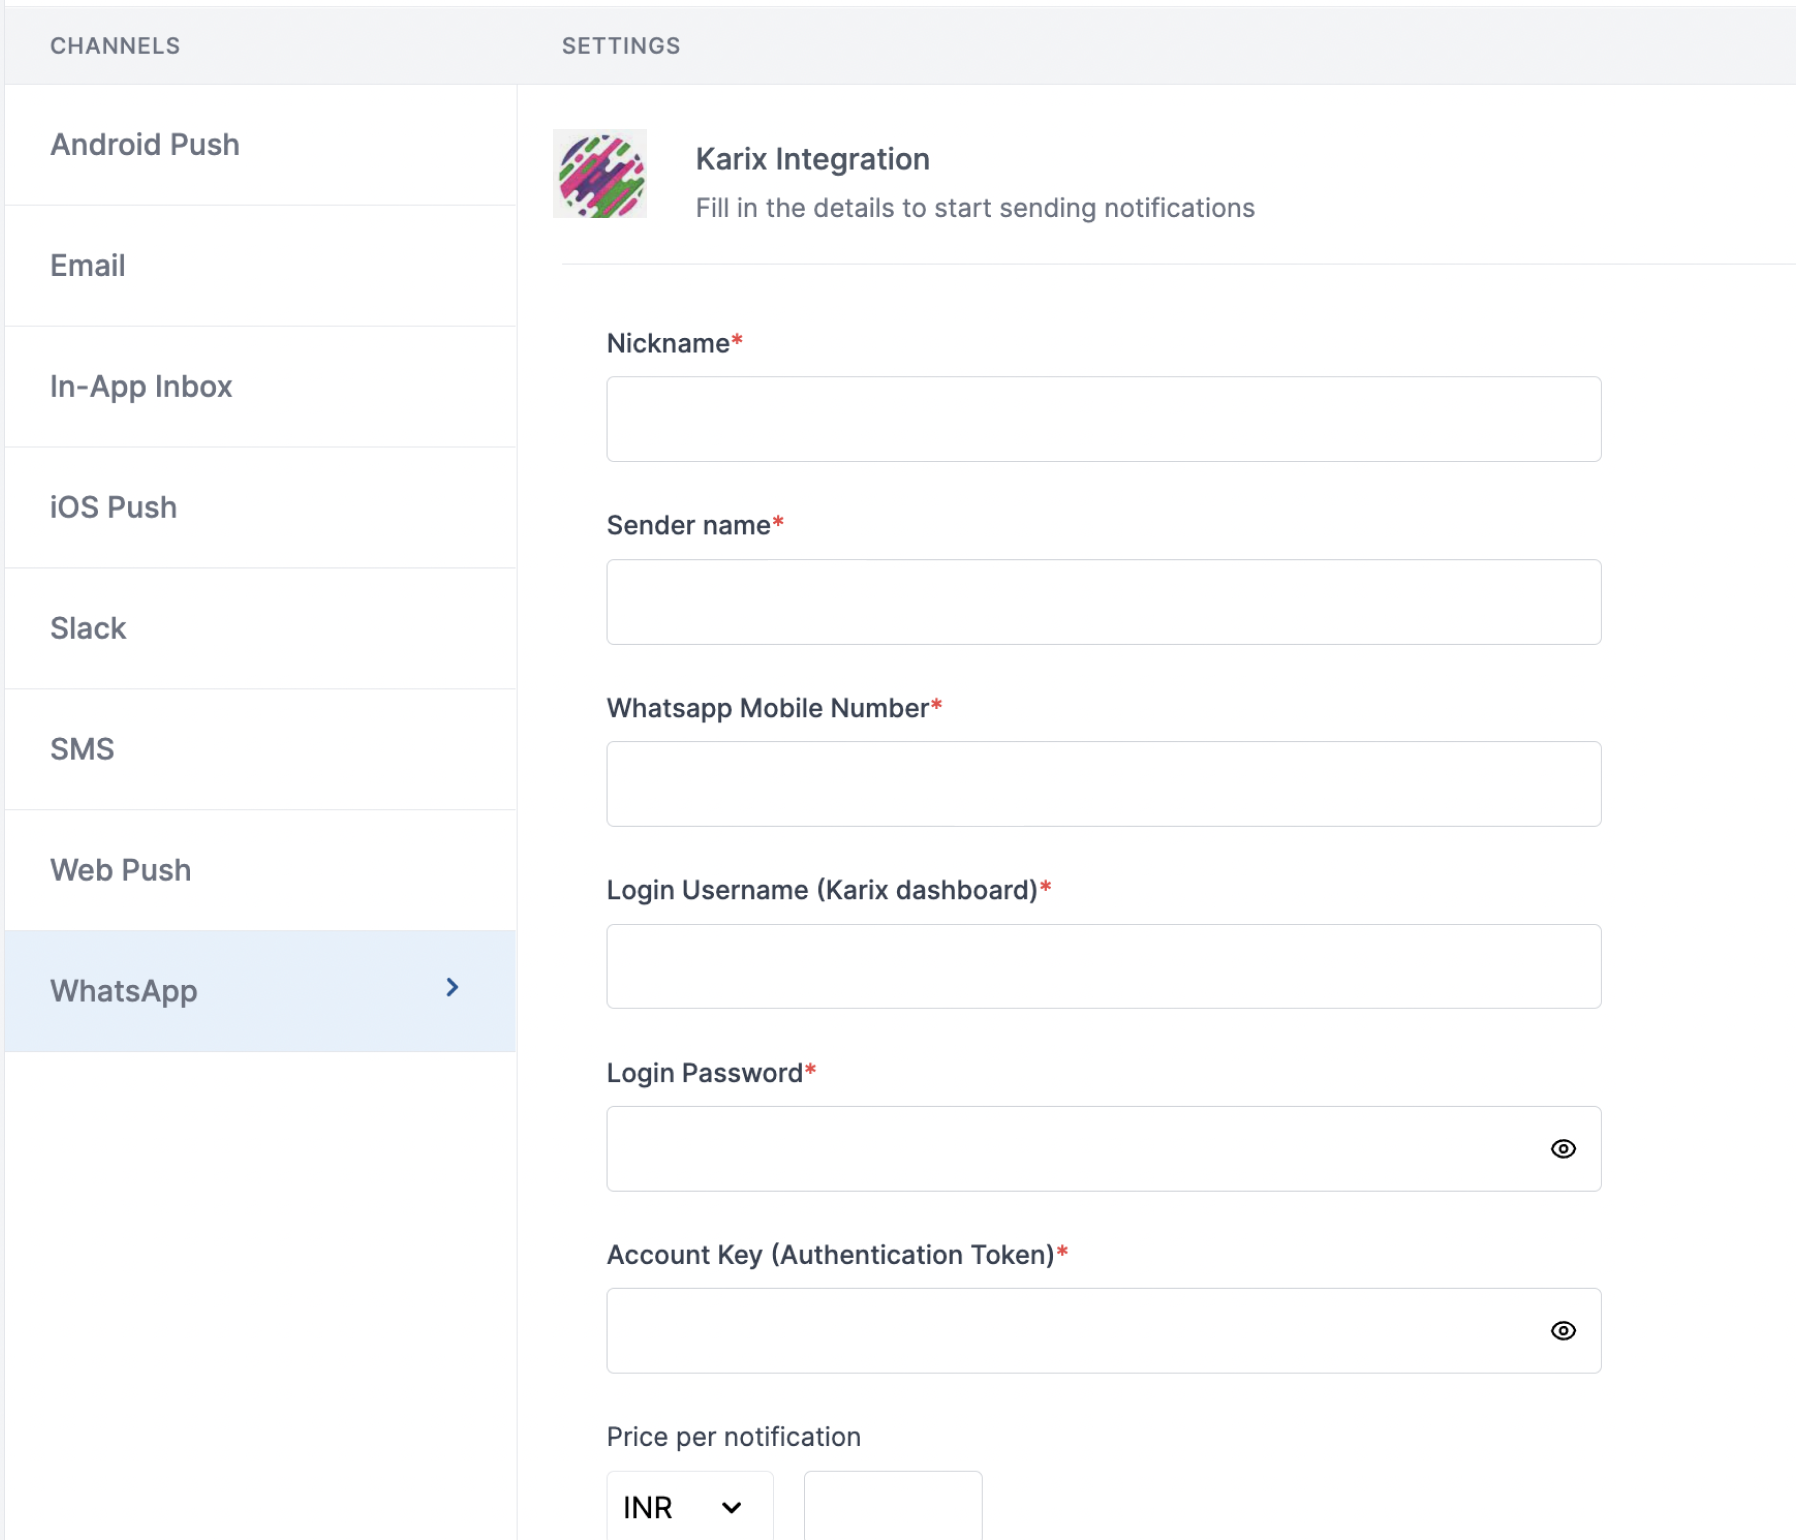 | Form Field | Description |
| ---------------------- | -------------------------------------------------------------------------------------------------------------------------------------------------------------------------------------- |
| Nickname | You can give any name which may help you to identify this account easily |
| Sender name | Sender name of your WhatsApp business account on Karix dashboard. SuprSend uses this information to send WhatsApp on your behalf via your registered WhatsApp number in Karix account. |
| WhatsApp Mobile Number | Mobile number of your WhatsApp business account. SuprSend uses this information to send WhatsApp on your behalf via your registered WhatsApp number |
| Login Username | Username of your Karix WhatsApp dashboard. SuprSend uses this information to upload templates on your behalf on karix dashboard for approval |
| Login Password | Password of your Karix WhatsApp dashboard. SuprSend uses this information to upload templates on your behalf on karix dashboard for approval |
| Account key | You will get this API Key from your Karix account. SuprSend uses this API Key to send WhatsApp on your behalf via your registered Karix account. |
| Price per notification | This is the amount you pay per SMS notification to Karix. It helps us to calculate, estimate and optimise your cost spent on notifications. |
### How to get sender name and Whatsapp mobile number from your Karix account
Login to [Karix managebot account](https://managebot.karix.solutions/bot_builder_gui/#/login) and follow the below steps:
| Form Field | Description |
| ---------------------- | -------------------------------------------------------------------------------------------------------------------------------------------------------------------------------------- |
| Nickname | You can give any name which may help you to identify this account easily |
| Sender name | Sender name of your WhatsApp business account on Karix dashboard. SuprSend uses this information to send WhatsApp on your behalf via your registered WhatsApp number in Karix account. |
| WhatsApp Mobile Number | Mobile number of your WhatsApp business account. SuprSend uses this information to send WhatsApp on your behalf via your registered WhatsApp number |
| Login Username | Username of your Karix WhatsApp dashboard. SuprSend uses this information to upload templates on your behalf on karix dashboard for approval |
| Login Password | Password of your Karix WhatsApp dashboard. SuprSend uses this information to upload templates on your behalf on karix dashboard for approval |
| Account key | You will get this API Key from your Karix account. SuprSend uses this API Key to send WhatsApp on your behalf via your registered Karix account. |
| Price per notification | This is the amount you pay per SMS notification to Karix. It helps us to calculate, estimate and optimise your cost spent on notifications. |
### How to get sender name and Whatsapp mobile number from your Karix account
Login to [Karix managebot account](https://managebot.karix.solutions/bot_builder_gui/#/login) and follow the below steps:
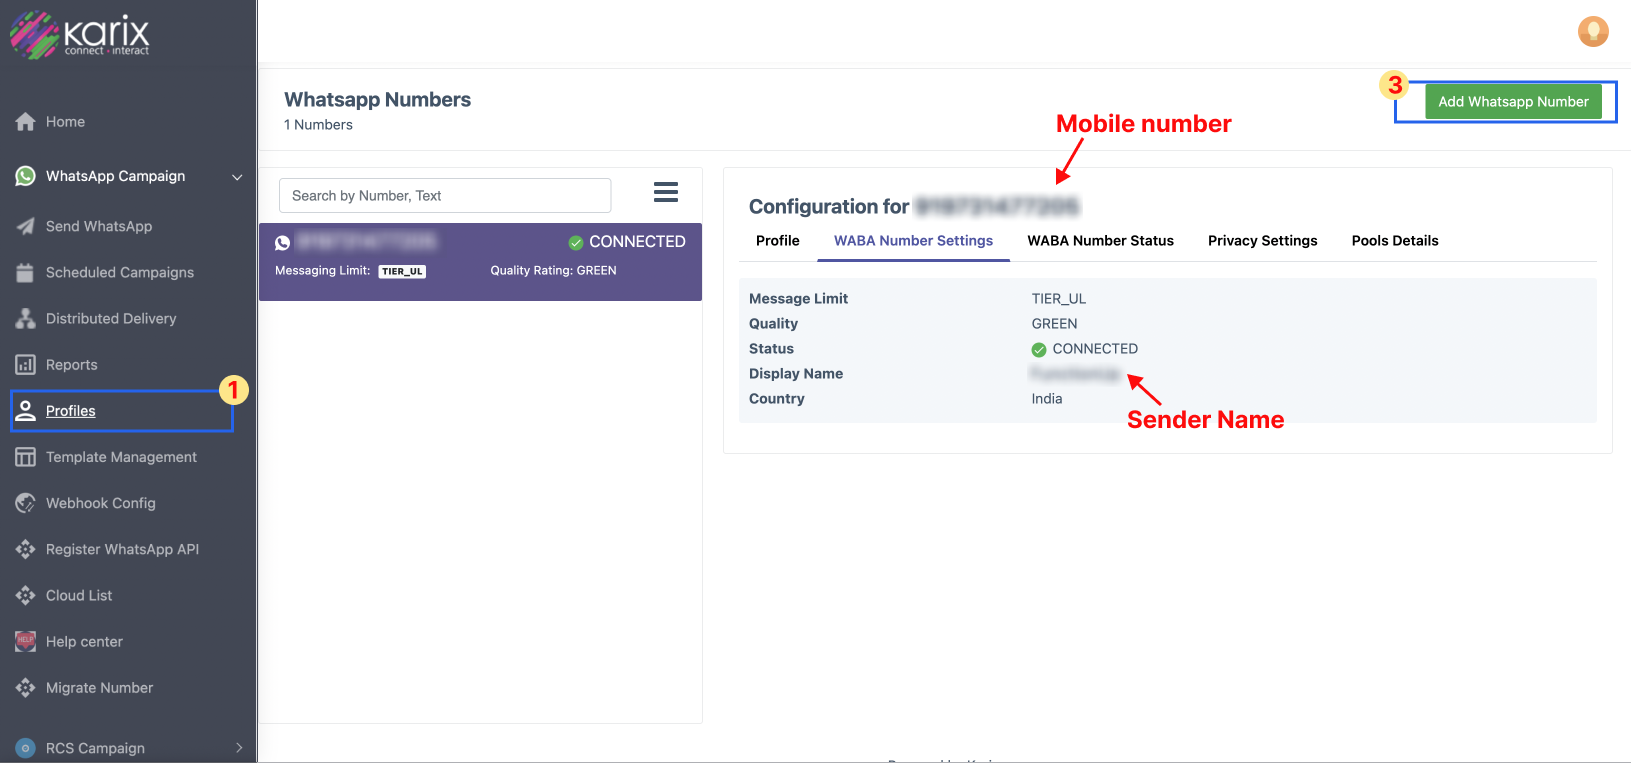
 **"Sync tasks"**
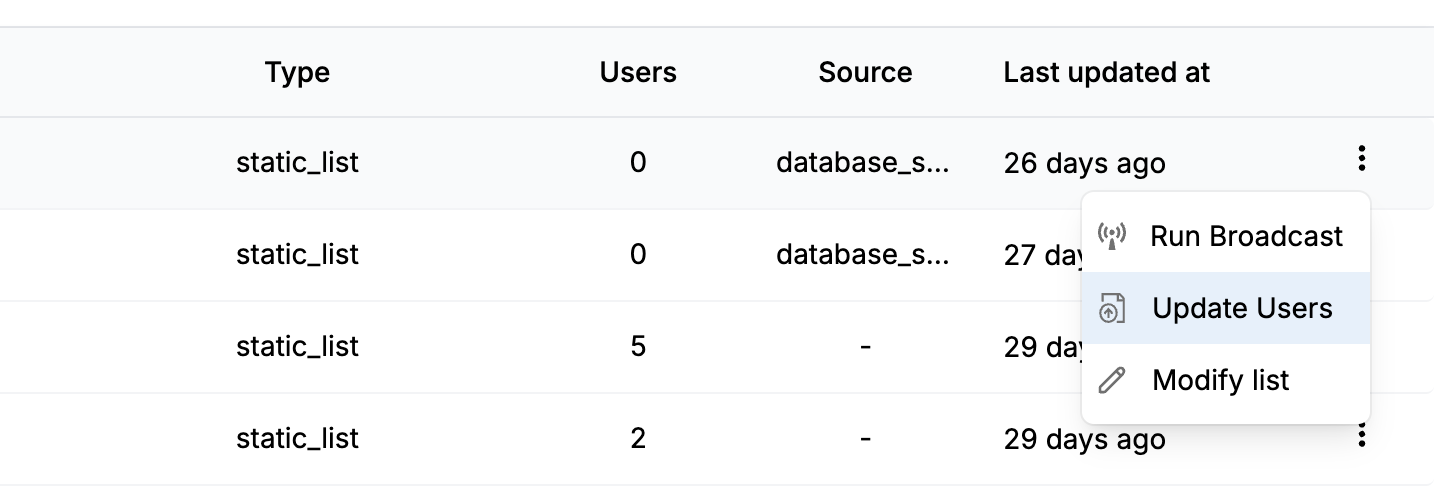 **"database\_sync"**
Next, add the task name and list ID and click on `Add SQL query`. You can only add the list ID of existing lists. If you don't have the list pre-created, [create one](/docs/lists#creating-lists) before setting up the sync.
**"database\_sync"**
Next, add the task name and list ID and click on `Add SQL query`. You can only add the list ID of existing lists. If you don't have the list pre-created, [create one](/docs/lists#creating-lists) before setting up the sync.
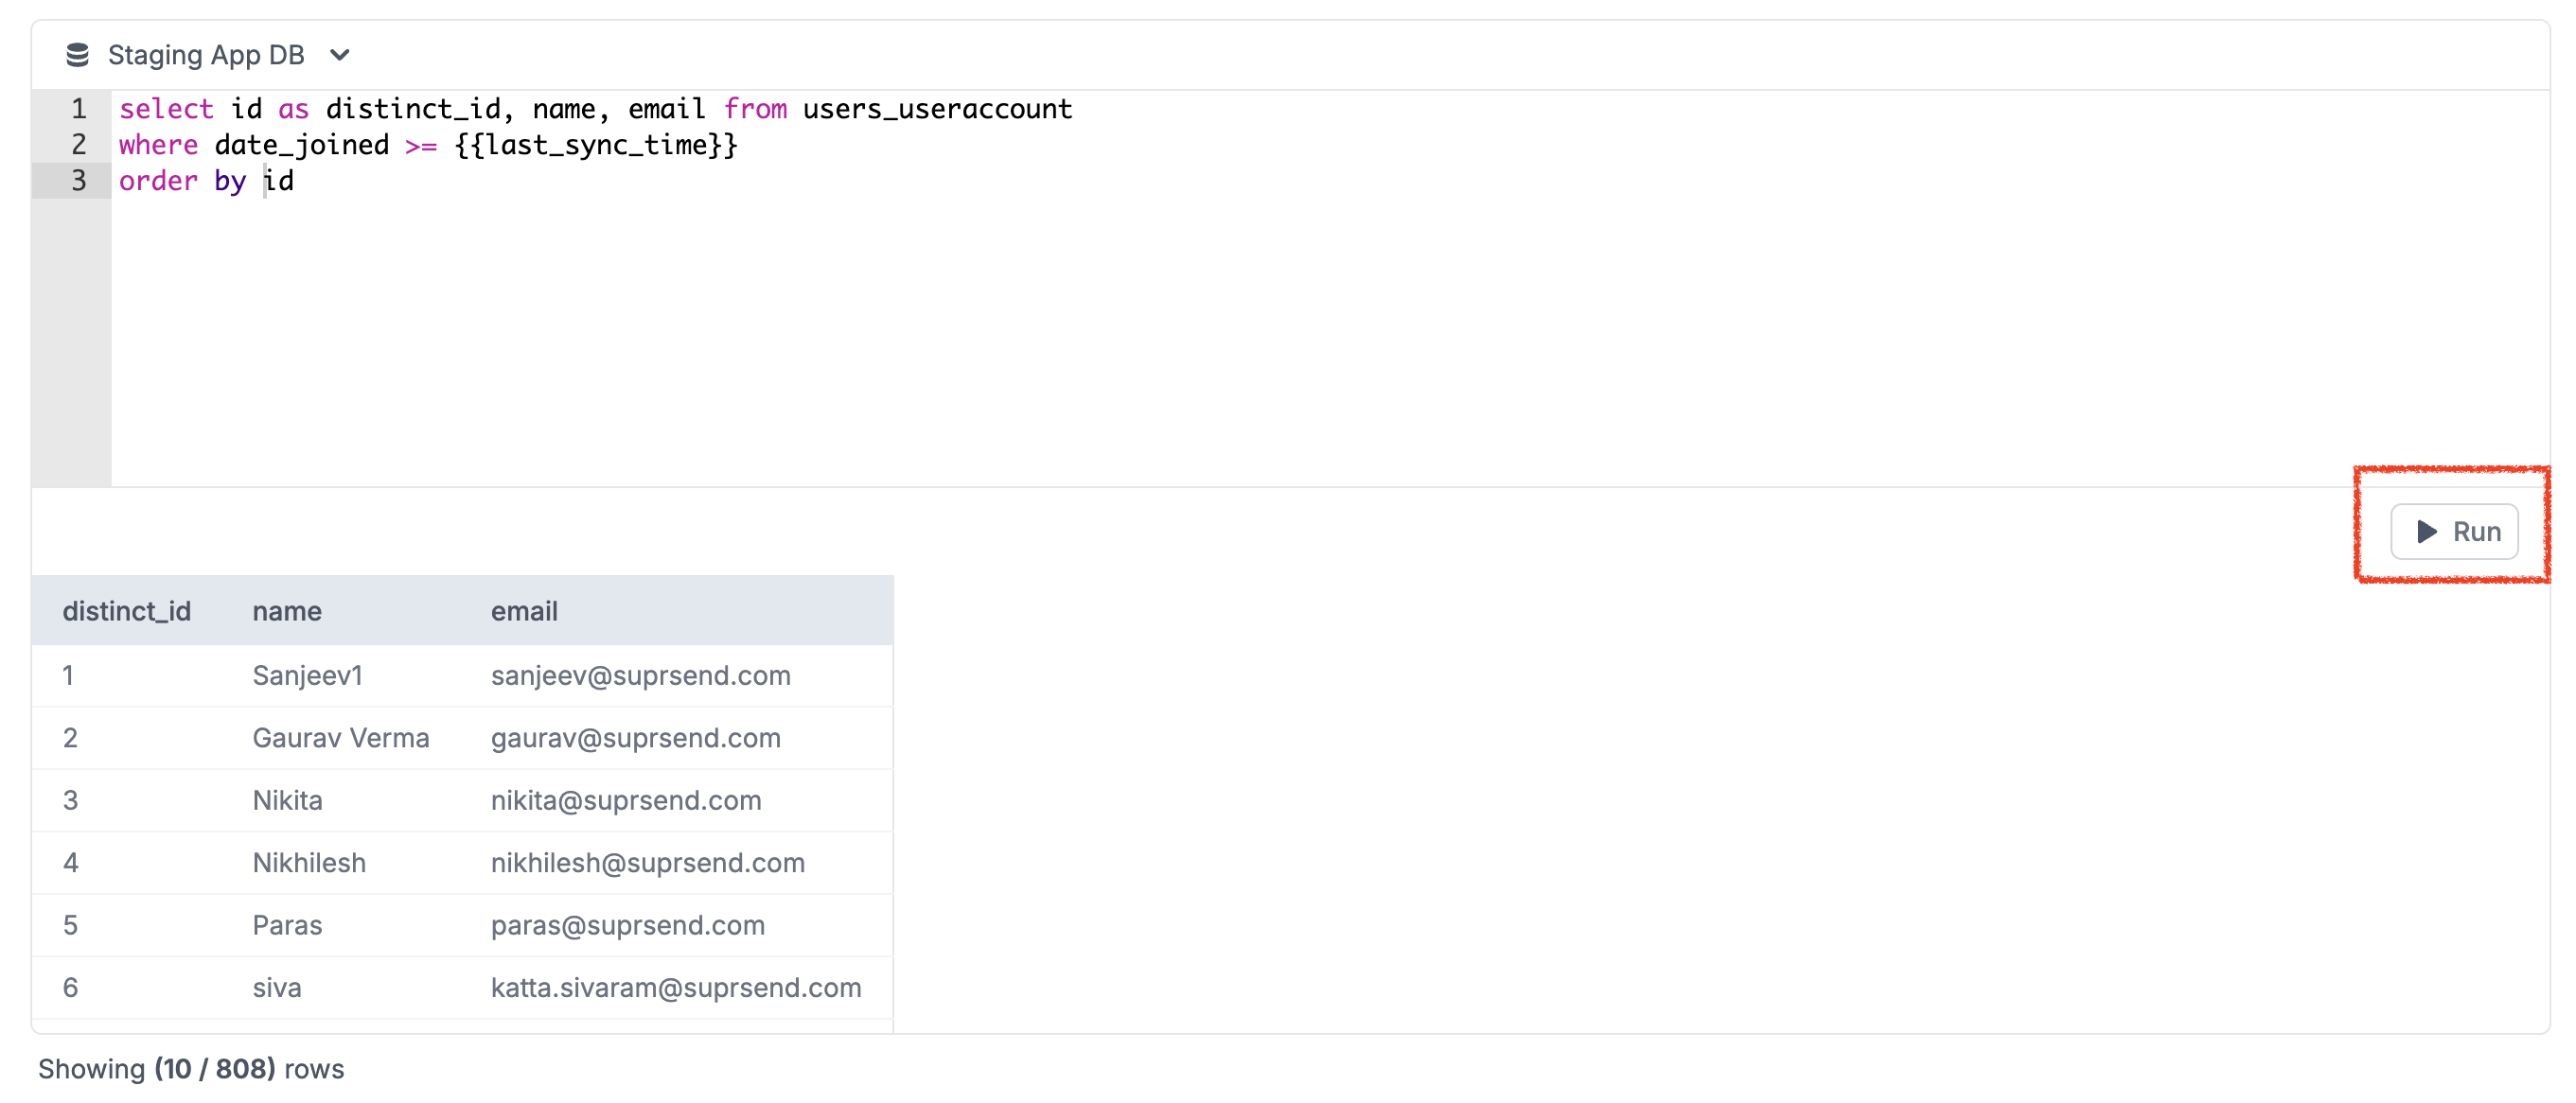 Make sure that your query returns only the rows and columns that you need to update the list or user profile. Each row in your extracted data represents a user that needs to be synced in the list. `distinct_id` is a mandatory column to identify the users to be synced in the list. If you want to update properties in user profile, add one column each for the property that needs to be synced. Avoid using `select *` in your final query since it may overload your database. Though, you can use `select *` while running your query for preview since it puts limit 10 in your query.
Also, use variable to only sync source data that changed since the last successful sync interval.
**Optimizing your query with Last sync time:**
You can use `{{last_sync_time}}` variable in your query to sync only the records that have changed since the last successful sync. This helps you avoid syncing the same records over and over again.
We strongly recommend that you index a column in your database representing the date-time each row was last-updated. When you write your query, you should add a WHERE clause comparing your “last updated” column to the `{{last_sync_time}}`.
The `last_sync_time` is a ISO date-time representing the timestamp of your previous successful sync. Add relevant data type conversion if you use any other date-time format.
Make sure that your query returns only the rows and columns that you need to update the list or user profile. Each row in your extracted data represents a user that needs to be synced in the list. `distinct_id` is a mandatory column to identify the users to be synced in the list. If you want to update properties in user profile, add one column each for the property that needs to be synced. Avoid using `select *` in your final query since it may overload your database. Though, you can use `select *` while running your query for preview since it puts limit 10 in your query.
Also, use variable to only sync source data that changed since the last successful sync interval.
**Optimizing your query with Last sync time:**
You can use `{{last_sync_time}}` variable in your query to sync only the records that have changed since the last successful sync. This helps you avoid syncing the same records over and over again.
We strongly recommend that you index a column in your database representing the date-time each row was last-updated. When you write your query, you should add a WHERE clause comparing your “last updated” column to the `{{last_sync_time}}`.
The `last_sync_time` is a ISO date-time representing the timestamp of your previous successful sync. Add relevant data type conversion if you use any other date-time format.
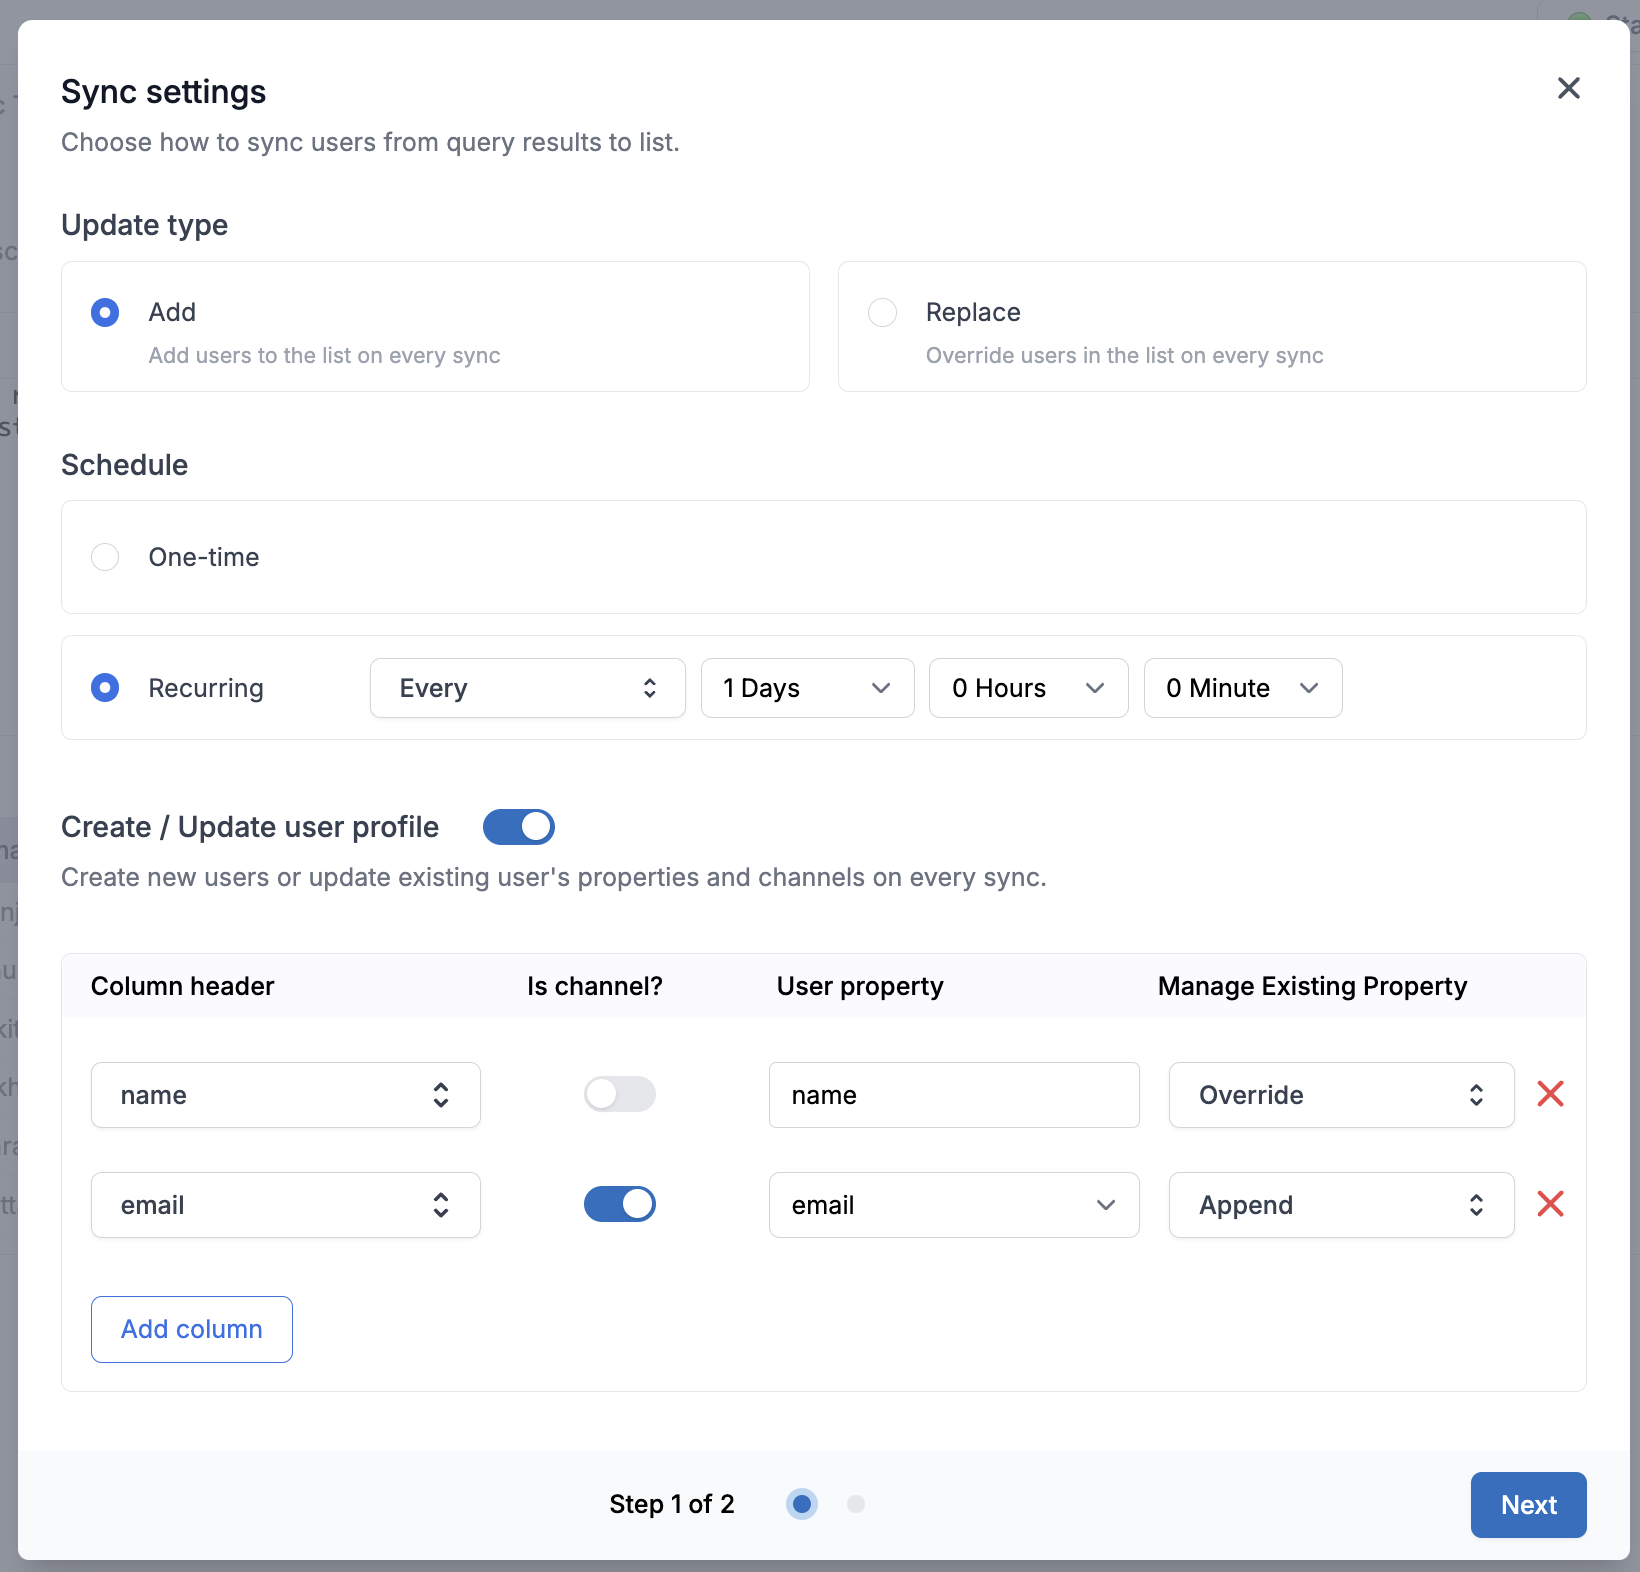 | Field | Description |
| ---------------------------- | ------------------------------------------------------------------------------------------------------------------------------------------------------------------------------------------------------------------------------------------------------------------------------------------------------------------------------------------------------------------------------------------------------------------------------------------------------------------------------------------------------ |
| Update type | - Select `Add` if you want to add users on every sync. E.g., you are maintaining a list of new registrations and your query returns all users registered today. - Select `Replace` if you want to replace the list with a fresh set of users on every sync. E.g., you have a list of all users who made a purchase in the last 30 days. |
| Schedule | - Set `One-time` sync if the list is created for one-time campaigns and will never be used again. - Set `Recurring` sync if your list is used in a cron or you are syncing user profile. You can setup recurring sync as **every** `**day **hour **minute` or add a **cron expression** for a more granular sync frequency like `every monday at 9:00 am`. |
| Create / Update user profile | Enable it if you also want to sync users on every sync. You can also update user properties by mapping columns to the relevant user properties and use it in your template as `{{$user.
| Field | Description |
| ---------------------------- | ------------------------------------------------------------------------------------------------------------------------------------------------------------------------------------------------------------------------------------------------------------------------------------------------------------------------------------------------------------------------------------------------------------------------------------------------------------------------------------------------------ |
| Update type | - Select `Add` if you want to add users on every sync. E.g., you are maintaining a list of new registrations and your query returns all users registered today. - Select `Replace` if you want to replace the list with a fresh set of users on every sync. E.g., you have a list of all users who made a purchase in the last 30 days. |
| Schedule | - Set `One-time` sync if the list is created for one-time campaigns and will never be used again. - Set `Recurring` sync if your list is used in a cron or you are syncing user profile. You can setup recurring sync as **every** `**day **hour **minute` or add a **cron expression** for a more granular sync frequency like `every monday at 9:00 am`. |
| Create / Update user profile | Enable it if you also want to sync users on every sync. You can also update user properties by mapping columns to the relevant user properties and use it in your template as `{{$user.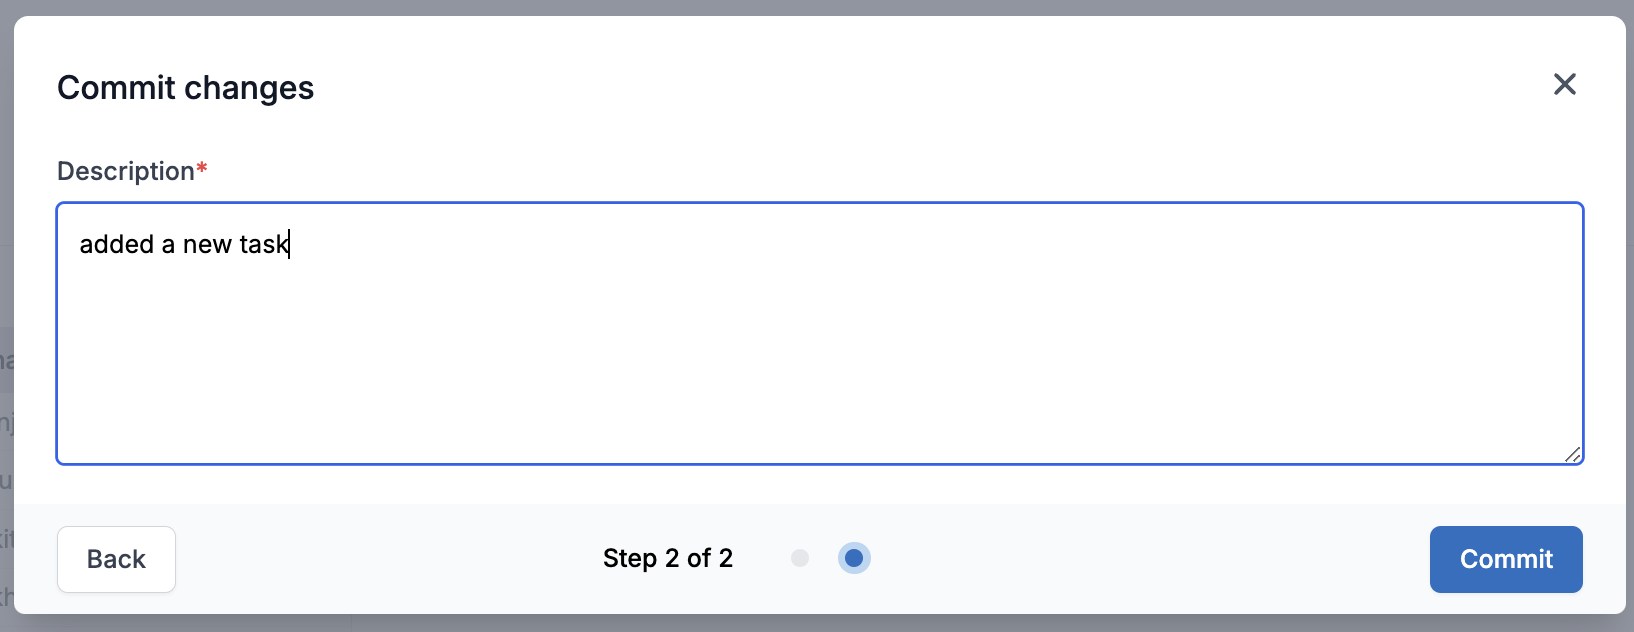 Your sync is now setup and will execute at the interval defined in your sync frequency.
 ## Sync logs
You can see sync logs on [lists -> logs ](https://app.suprsend.com/en/staging/subscribers/subscriber-list/logs/)tab. This page have sync history of all list syncs. So, filter logs on source type to see logs for database sync. Each row in the log represents a sync with relevant information related to the sync like when did the sync start, who updated the sync and the status of the sync.
## Sync logs
You can see sync logs on [lists -> logs ](https://app.suprsend.com/en/staging/subscribers/subscriber-list/logs/)tab. This page have sync history of all list syncs. So, filter logs on source type to see logs for database sync. Each row in the log represents a sync with relevant information related to the sync like when did the sync start, who updated the sync and the status of the sync.
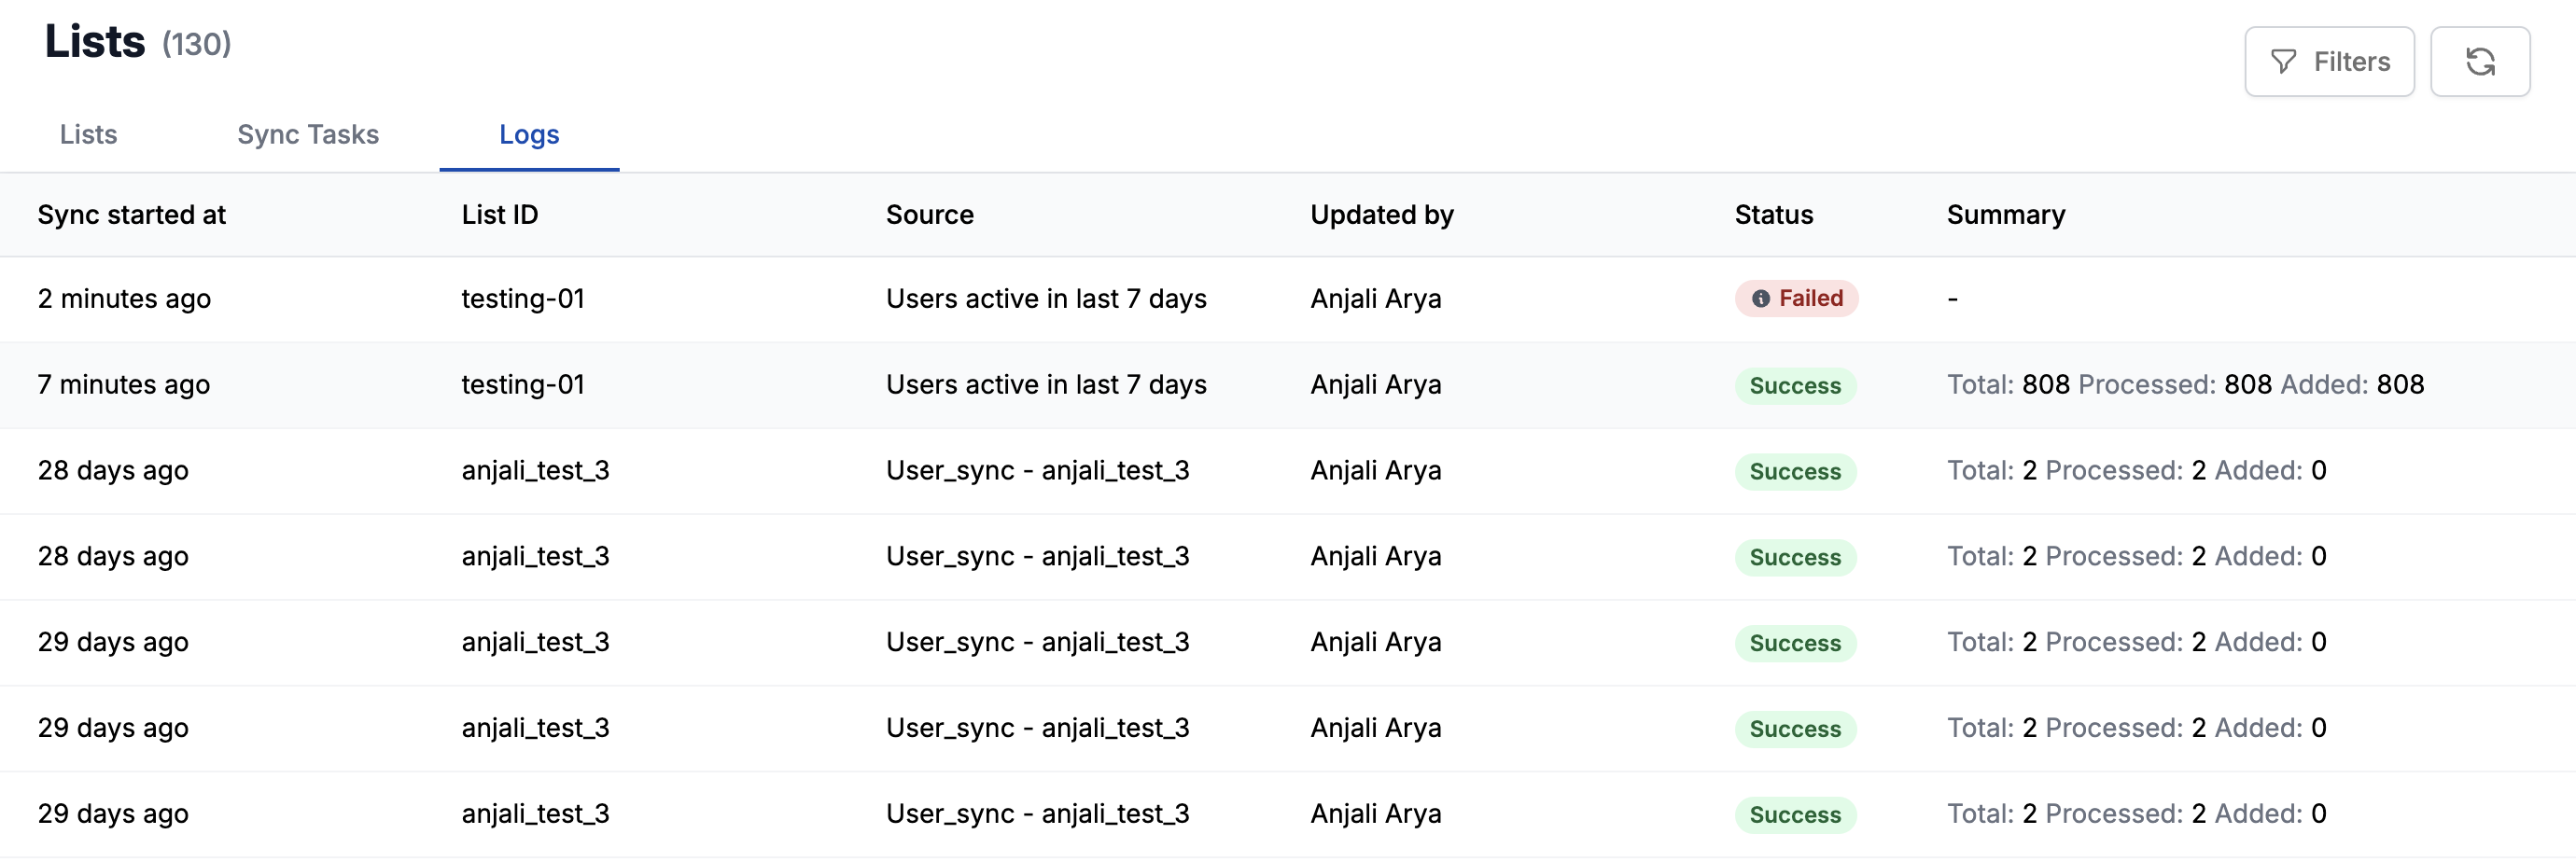 There are 5 types of sync status:
* `Created` - Logs sync has just started.
* `In progress` - Users have started syncing in the list. You'll also see the `%progress` in this case.
* `Success` - Users are successfully synced in the list. You'll see `Total` users returned in the query, `Processed` users and `Added` users. In most cases, `added` user will be equivalent to `total` users but if it less than total users, it would mean one of 2 things:
* Some users were already present in the list and that's why skipped.
* Users were not present in SuprSend subscriber list. You can enable `Create / Update user profile` in your sync settings to avoid this scenario.
* `Ignored` - These are the syncs which were skipped sync the previous sync was still in progress when the next sync interval occurs.
* `Failed` - Sync couldn't be completed due to some errors while running the query, query output doesn't have `distinct_id` column or there was no data returned in your query output. If you see any error which could be internal to SuprSend system, please reach out to our [support](https://suprsendcommunity.slack.com/join/shared_invite/zt-1bs6rbxr8-zI6SyJQd2b~XMpM9uaT1Bw#/shared-invite/email). For failed logs, You can hover on the status or click on the sync to see errors. You can also filter to `Show only error logs`.
There are 5 types of sync status:
* `Created` - Logs sync has just started.
* `In progress` - Users have started syncing in the list. You'll also see the `%progress` in this case.
* `Success` - Users are successfully synced in the list. You'll see `Total` users returned in the query, `Processed` users and `Added` users. In most cases, `added` user will be equivalent to `total` users but if it less than total users, it would mean one of 2 things:
* Some users were already present in the list and that's why skipped.
* Users were not present in SuprSend subscriber list. You can enable `Create / Update user profile` in your sync settings to avoid this scenario.
* `Ignored` - These are the syncs which were skipped sync the previous sync was still in progress when the next sync interval occurs.
* `Failed` - Sync couldn't be completed due to some errors while running the query, query output doesn't have `distinct_id` column or there was no data returned in your query output. If you see any error which could be internal to SuprSend system, please reach out to our [support](https://suprsendcommunity.slack.com/join/shared_invite/zt-1bs6rbxr8-zI6SyJQd2b~XMpM9uaT1Bw#/shared-invite/email). For failed logs, You can hover on the status or click on the sync to see errors. You can also filter to `Show only error logs`.
 ## Version control
All the changes are first saved in the draft version and are only made live once you commit the changes. This allows you to confidently make changes to your query, without affecting any running sync in production. You can also see previous version edits by clicking on the previous versions.
## Version control
All the changes are first saved in the draft version and are only made live once you commit the changes. This allows you to confidently make changes to your query, without affecting any running sync in production. You can also see previous version edits by clicking on the previous versions.
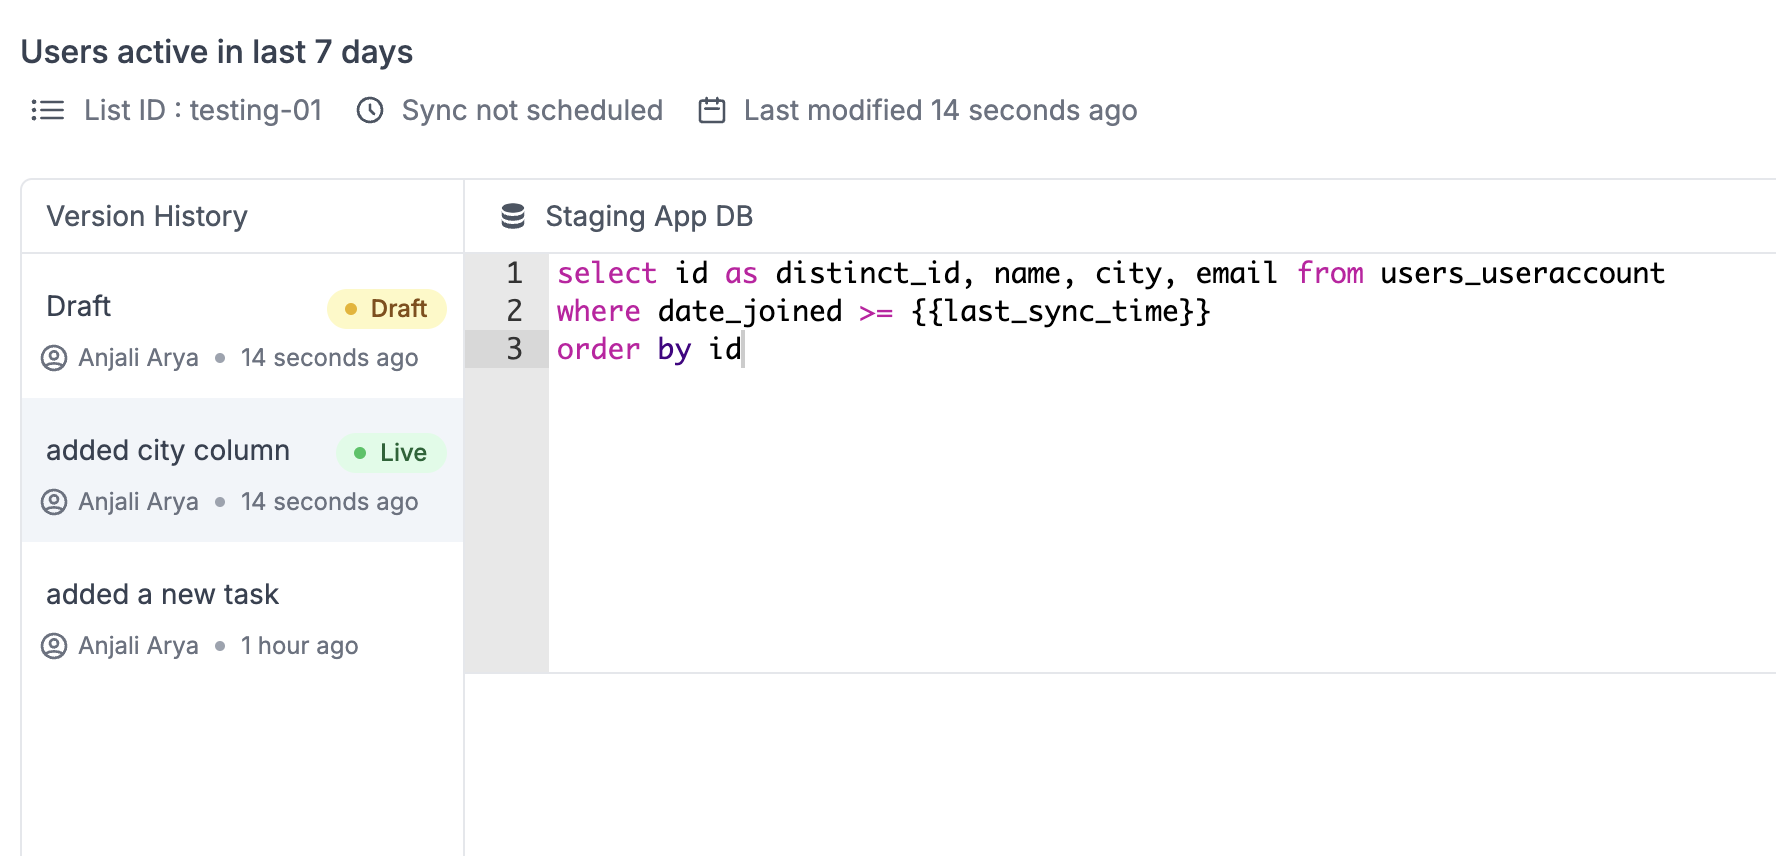 ***
# Manage Lists
Source: https://docs.suprsend.com/docs/lists
Create and manage subscriber lists for bulk notifications and campaigns.
List is a group of subscribers or recipients to whom bulk messages can be sent. e.g., you can create a list of users who signed up in the last 30 days. You can now manage subscriber lists in SuprSend and send campaigns or [broadcasts](/docs/broadcast) to pre-created lists of users without the need to add each user individually when making the API call.
By default, SuprSend creates a list named `all_users`, which automatically includes all users available in your workspace. You can use this list to send campaigns like newsletters and product updates.
## Creating lists
You can create lists using one of the following methods:
***
# Manage Lists
Source: https://docs.suprsend.com/docs/lists
Create and manage subscriber lists for bulk notifications and campaigns.
List is a group of subscribers or recipients to whom bulk messages can be sent. e.g., you can create a list of users who signed up in the last 30 days. You can now manage subscriber lists in SuprSend and send campaigns or [broadcasts](/docs/broadcast) to pre-created lists of users without the need to add each user individually when making the API call.
By default, SuprSend creates a list named `all_users`, which automatically includes all users available in your workspace. You can use this list to send campaigns like newsletters and product updates.
## Creating lists
You can create lists using one of the following methods:
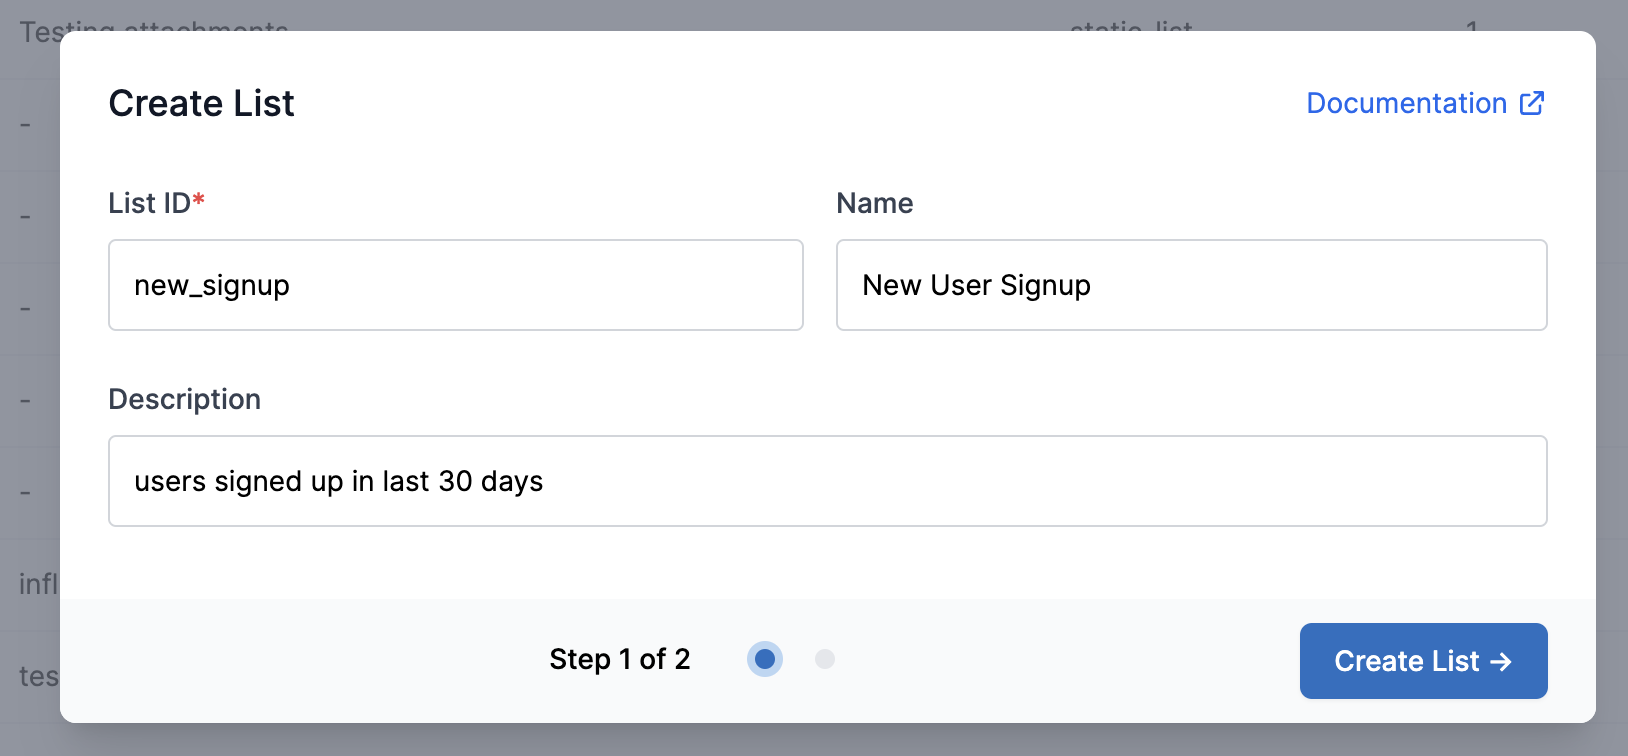 You can also modify list `Name` and `Description` later by clicking on `Modify List` option available in the right side Kebab menu on a list.
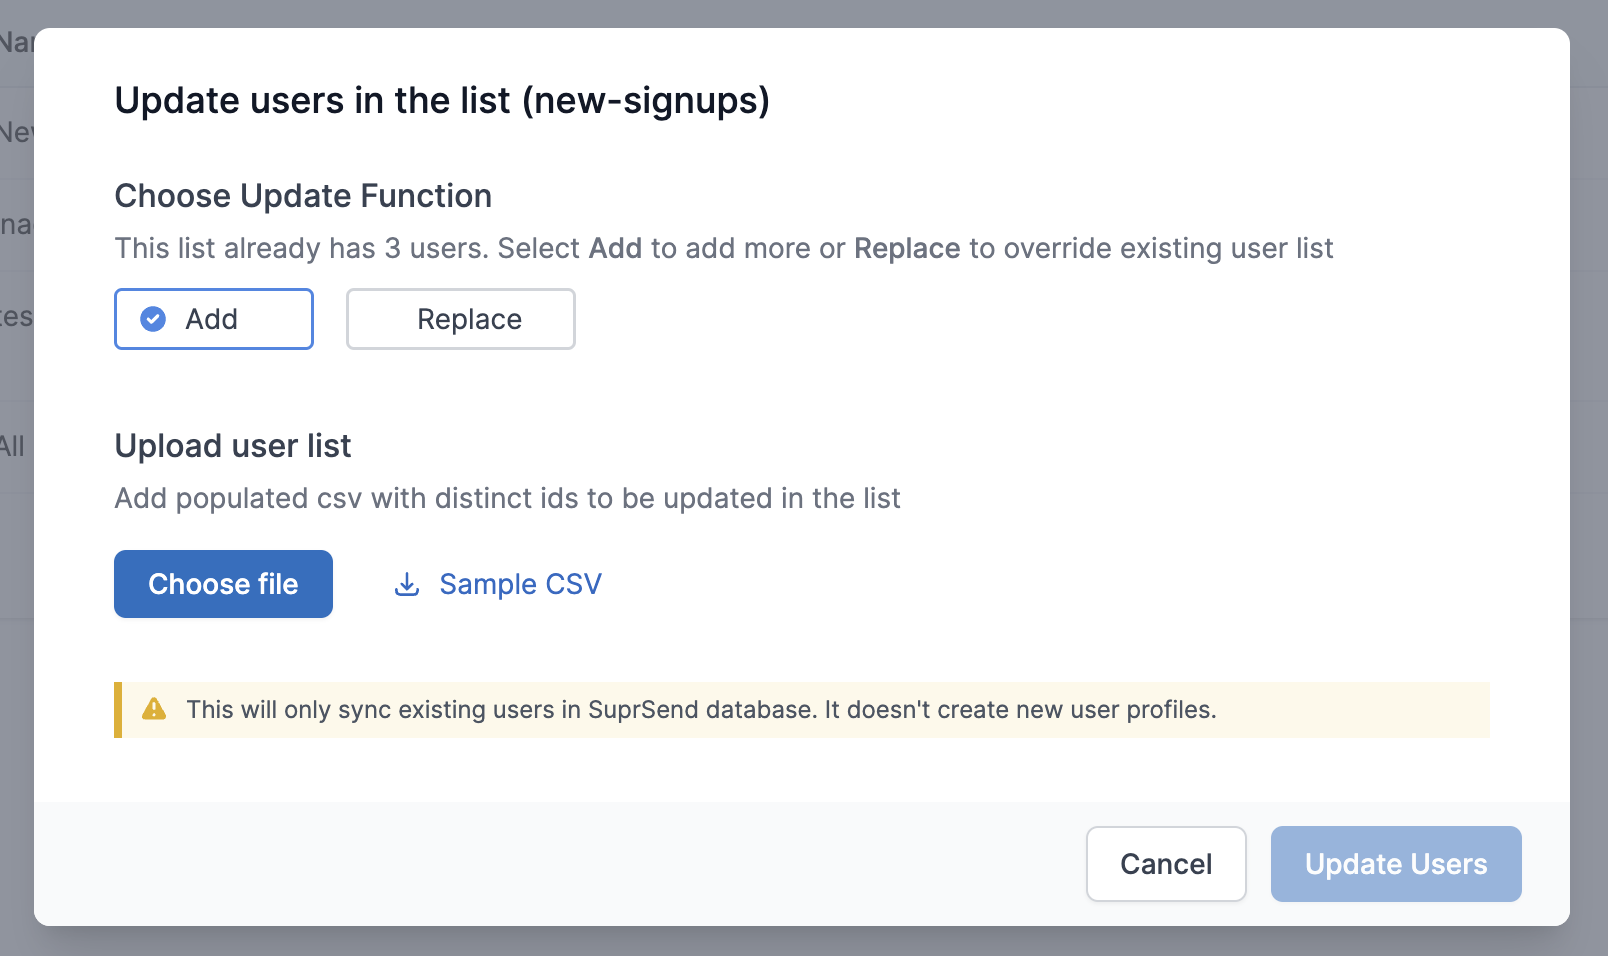 Follow below steps to update users in the list -
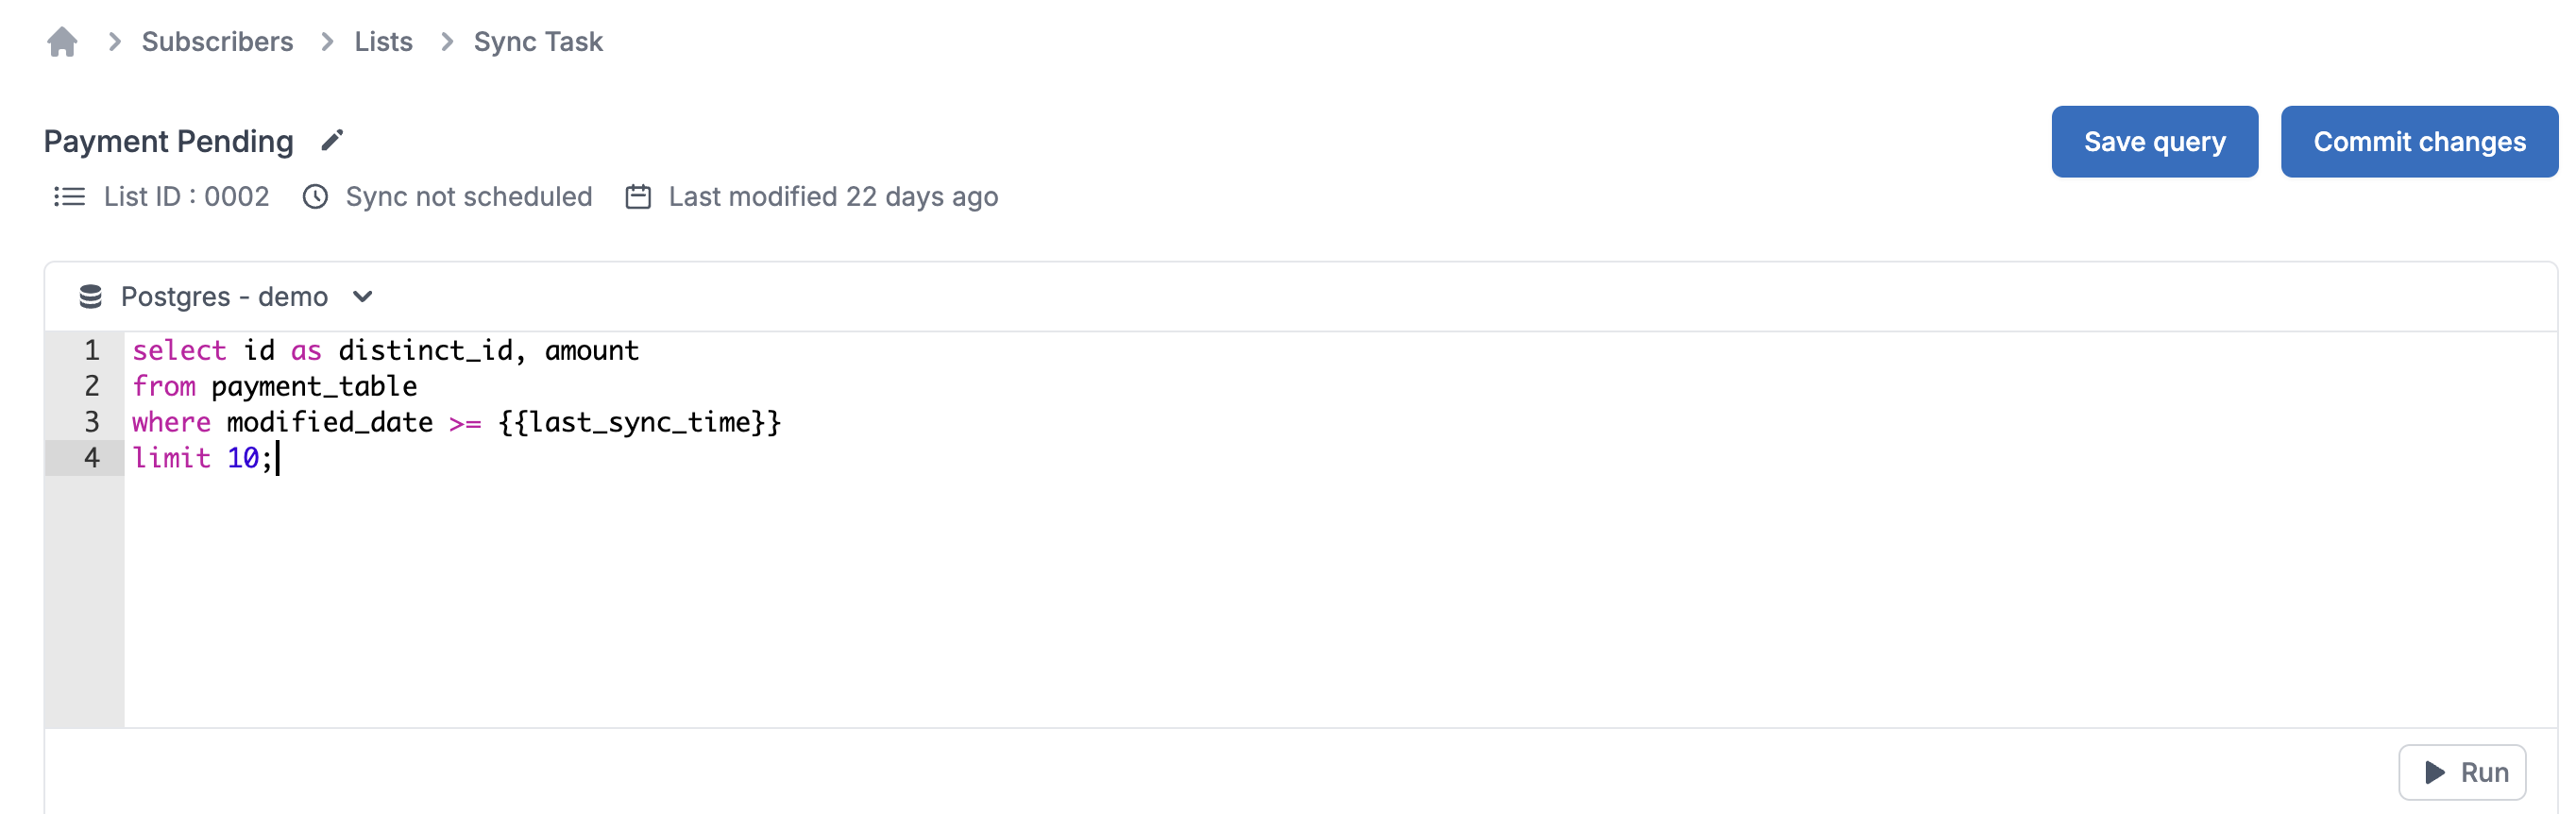
 ## Sending notification to list users
* You can either setup individual workflows for list users based on [list events](/docs/lists#configure-list-events). e.g., if you want to notify job seekers who were active on the platform in the last 7 days but left today.
* The most recommended way to send notification to list users is via [Broadcast](/docs/broadcast). You can schedule broadcast on this list from the dashboard by clicking on "**Run Broadcast**" option or trigger it programmatically via API.We recommend sending broadcasts using promotional category so you don't end up overloading transactional and system queues. Learn more about how to choose the right notification category [here](/docs/notification-category).
## Sending notification to list users
* You can either setup individual workflows for list users based on [list events](/docs/lists#configure-list-events). e.g., if you want to notify job seekers who were active on the platform in the last 7 days but left today.
* The most recommended way to send notification to list users is via [Broadcast](/docs/broadcast). You can schedule broadcast on this list from the dashboard by clicking on "**Run Broadcast**" option or trigger it programmatically via API.We recommend sending broadcasts using promotional category so you don't end up overloading transactional and system queues. Learn more about how to choose the right notification category [here](/docs/notification-category).
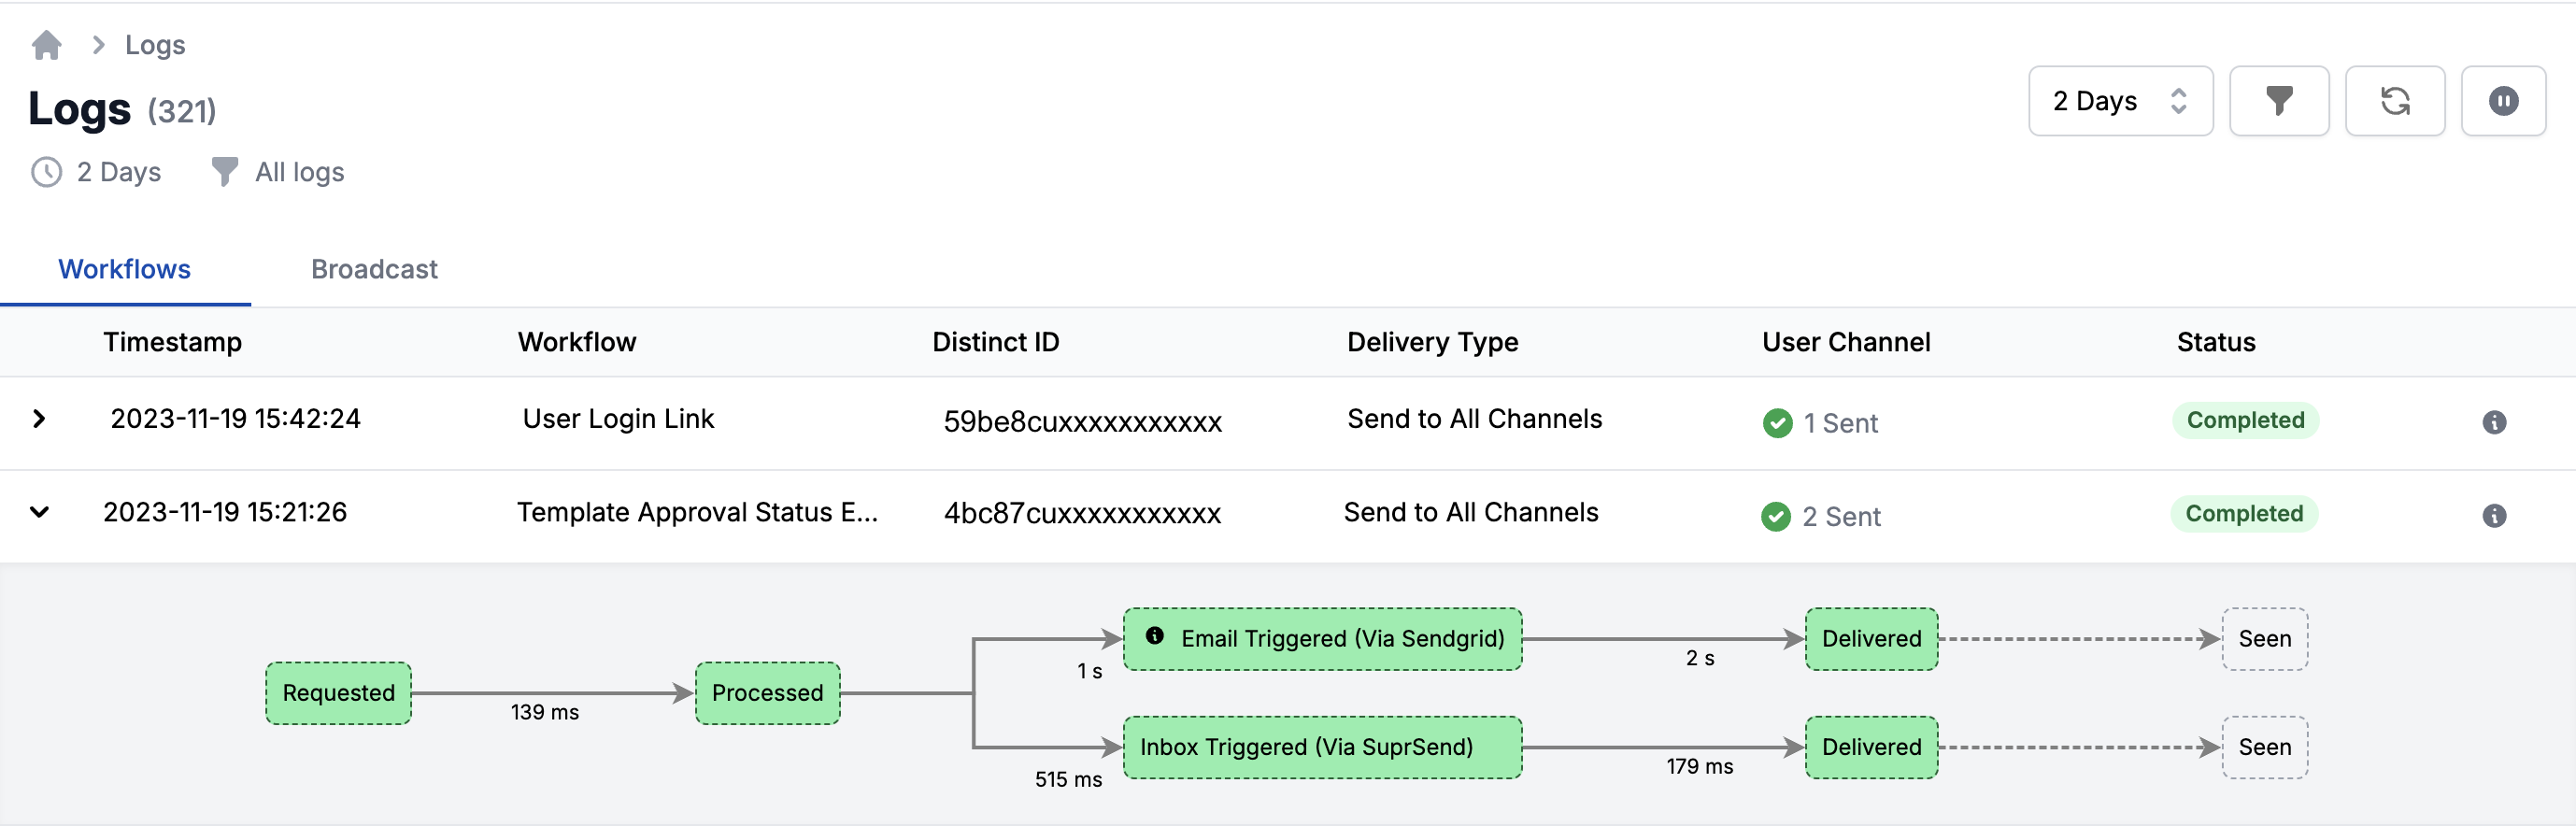 ## Data Structure of Logs
Every workflow request generates a common entry in the log, allowing developers to gain a holistic view of notifications sent across all channels. You can expand the log to track the entire notification flow of each channel, from request to user delivery and engagement (open, seen, and click).
## Data Structure of Logs
Every workflow request generates a common entry in the log, allowing developers to gain a holistic view of notifications sent across all channels. You can expand the log to track the entire notification flow of each channel, from request to user delivery and engagement (open, seen, and click).
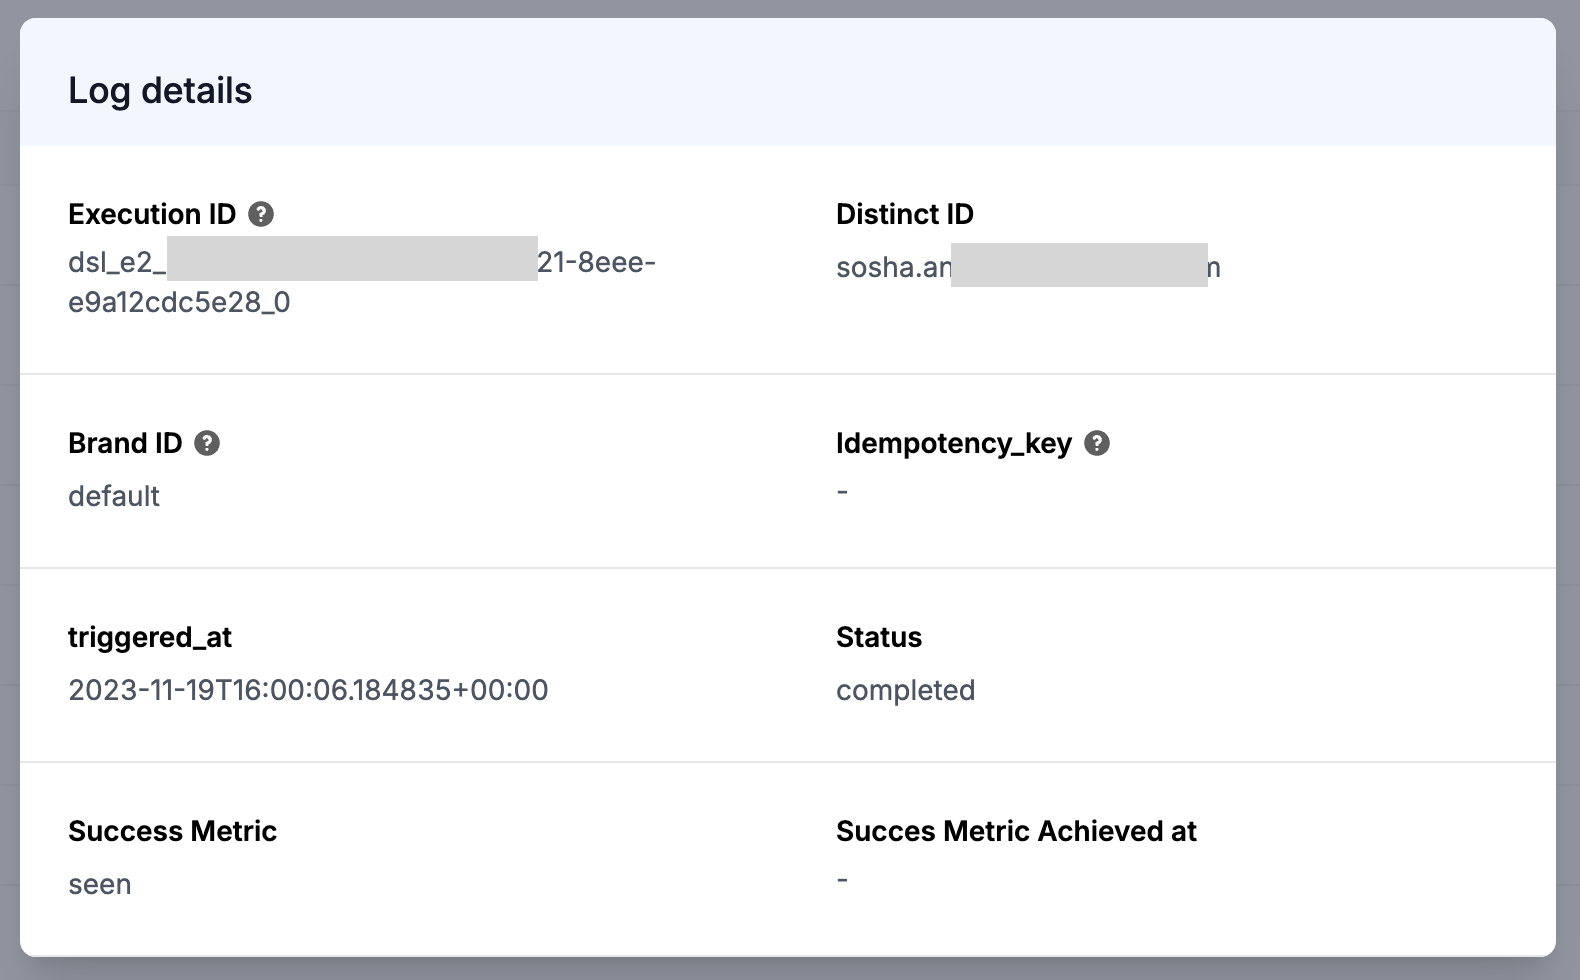 ## Filtering Logs
Pinpoint the required log faster with filters. You can narrow down your logs based on specific criteria such as user `distinct_id`, `worklow name`, `brand_id`, `idempotency_key`, `status` and `date-time`. To filter logs, click on filter icon in the top right side options on logs page. Select `Failure logs` to just filter records with errors.
## Filtering Logs
Pinpoint the required log faster with filters. You can narrow down your logs based on specific criteria such as user `distinct_id`, `worklow name`, `brand_id`, `idempotency_key`, `status` and `date-time`. To filter logs, click on filter icon in the top right side options on logs page. Select `Failure logs` to just filter records with errors.
 ### Date Time Filter
Date Time filter allows you to filter logs for a given time period. By default, logs for last 30 minutes is shown. You can change the filter to see logs for longer time span or select custom filter to see logs older than 2 days.
> Please note that logs retention depends on pricing plan. Check [pricing page](https://www.suprsend.com/pricing) to see log retention timeframe applicable for your plan.
### Date Time Filter
Date Time filter allows you to filter logs for a given time period. By default, logs for last 30 minutes is shown. You can change the filter to see logs for longer time span or select custom filter to see logs older than 2 days.
> Please note that logs retention depends on pricing plan. Check [pricing page](https://www.suprsend.com/pricing) to see log retention timeframe applicable for your plan.
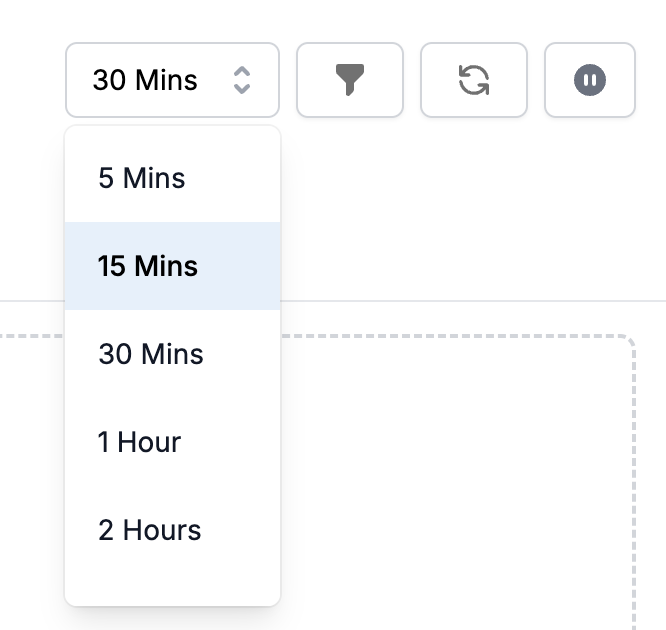
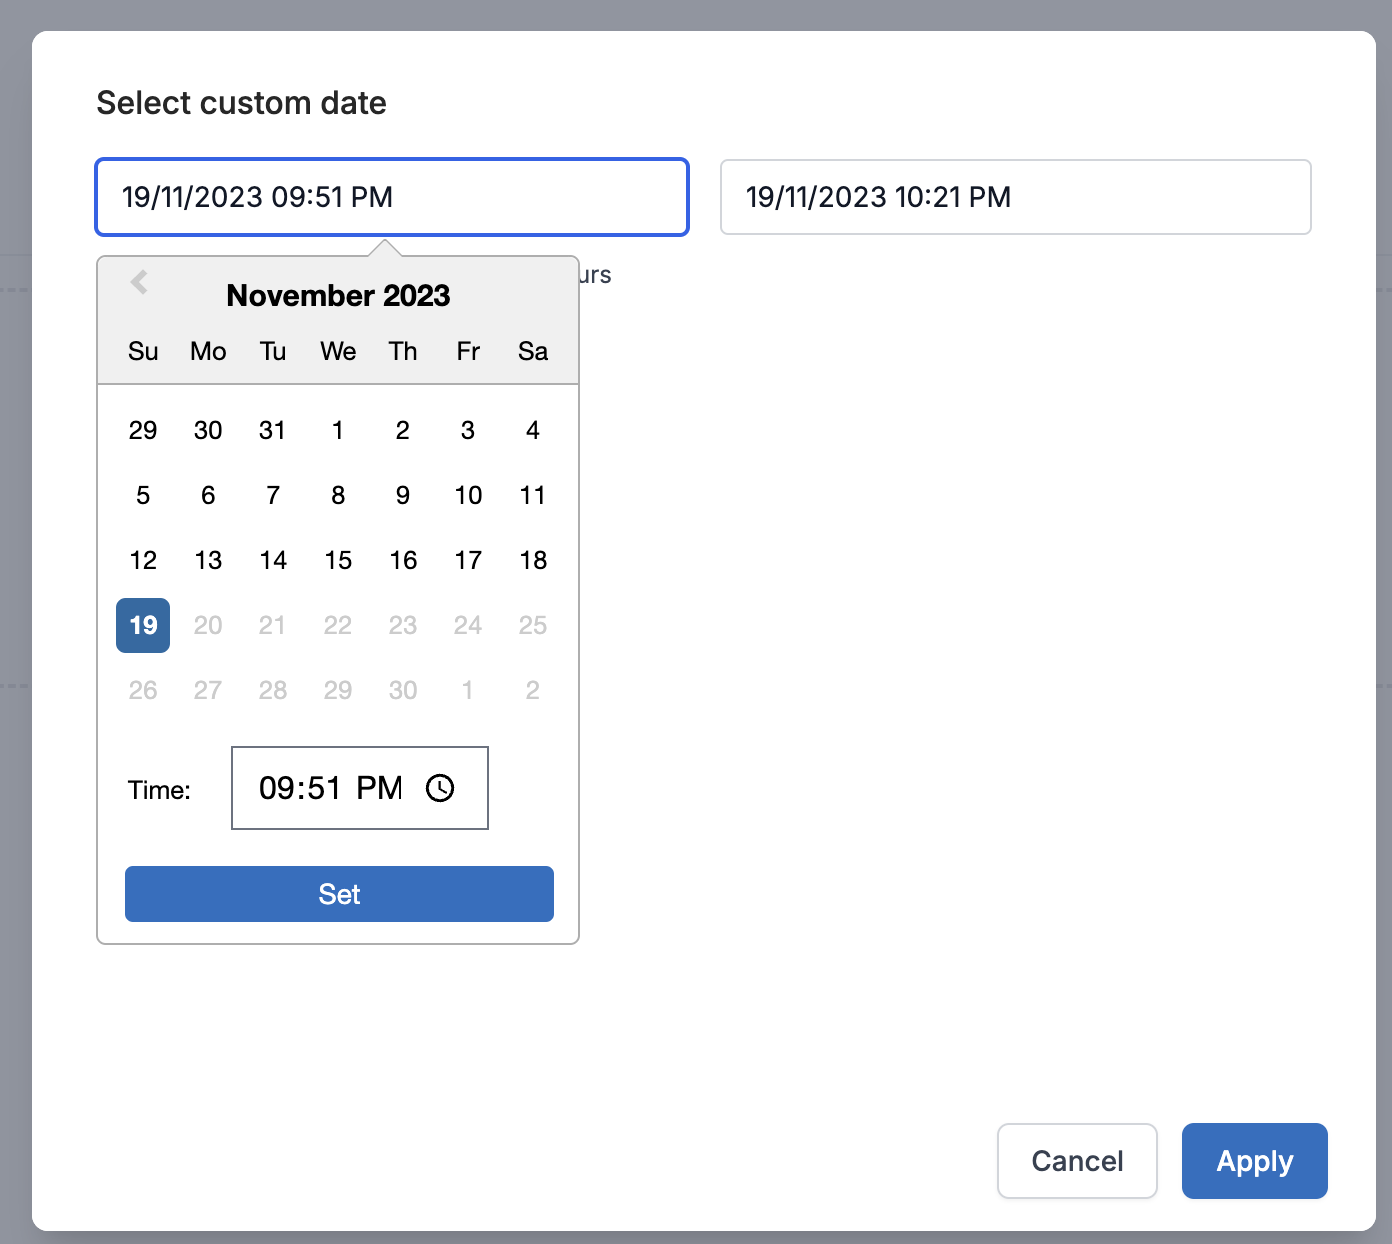 ## Subscriber Logs
You can also get easy reference of workflow logs on subscriber details page. This can be used for user level auditing and compliance checks, allowing you to reference all notifications sent to a user within a specified time period. You can also access subscriber specific logs directly on logs page by filtering on `distinct_id`.
***
# Mailgun
Source: https://docs.suprsend.com/docs/mailgun
Guide to connect your Mailgun account with SuprSend to send email notifications.
This section is a step by step guide to add Mailgun as your email service provider. You can your existing Mailgun account to integrate, or create a new account from [here](https://signup.mailgun.com/new/signup)
## Mailgun integration on SuprSend account
On the SuprSend dashboard, go to vendor page from side panel and click Email -> Mailgun from the list of Vendors. This will open vendor details page as shown below:
## Subscriber Logs
You can also get easy reference of workflow logs on subscriber details page. This can be used for user level auditing and compliance checks, allowing you to reference all notifications sent to a user within a specified time period. You can also access subscriber specific logs directly on logs page by filtering on `distinct_id`.
***
# Mailgun
Source: https://docs.suprsend.com/docs/mailgun
Guide to connect your Mailgun account with SuprSend to send email notifications.
This section is a step by step guide to add Mailgun as your email service provider. You can your existing Mailgun account to integrate, or create a new account from [here](https://signup.mailgun.com/new/signup)
## Mailgun integration on SuprSend account
On the SuprSend dashboard, go to vendor page from side panel and click Email -> Mailgun from the list of Vendors. This will open vendor details page as shown below:
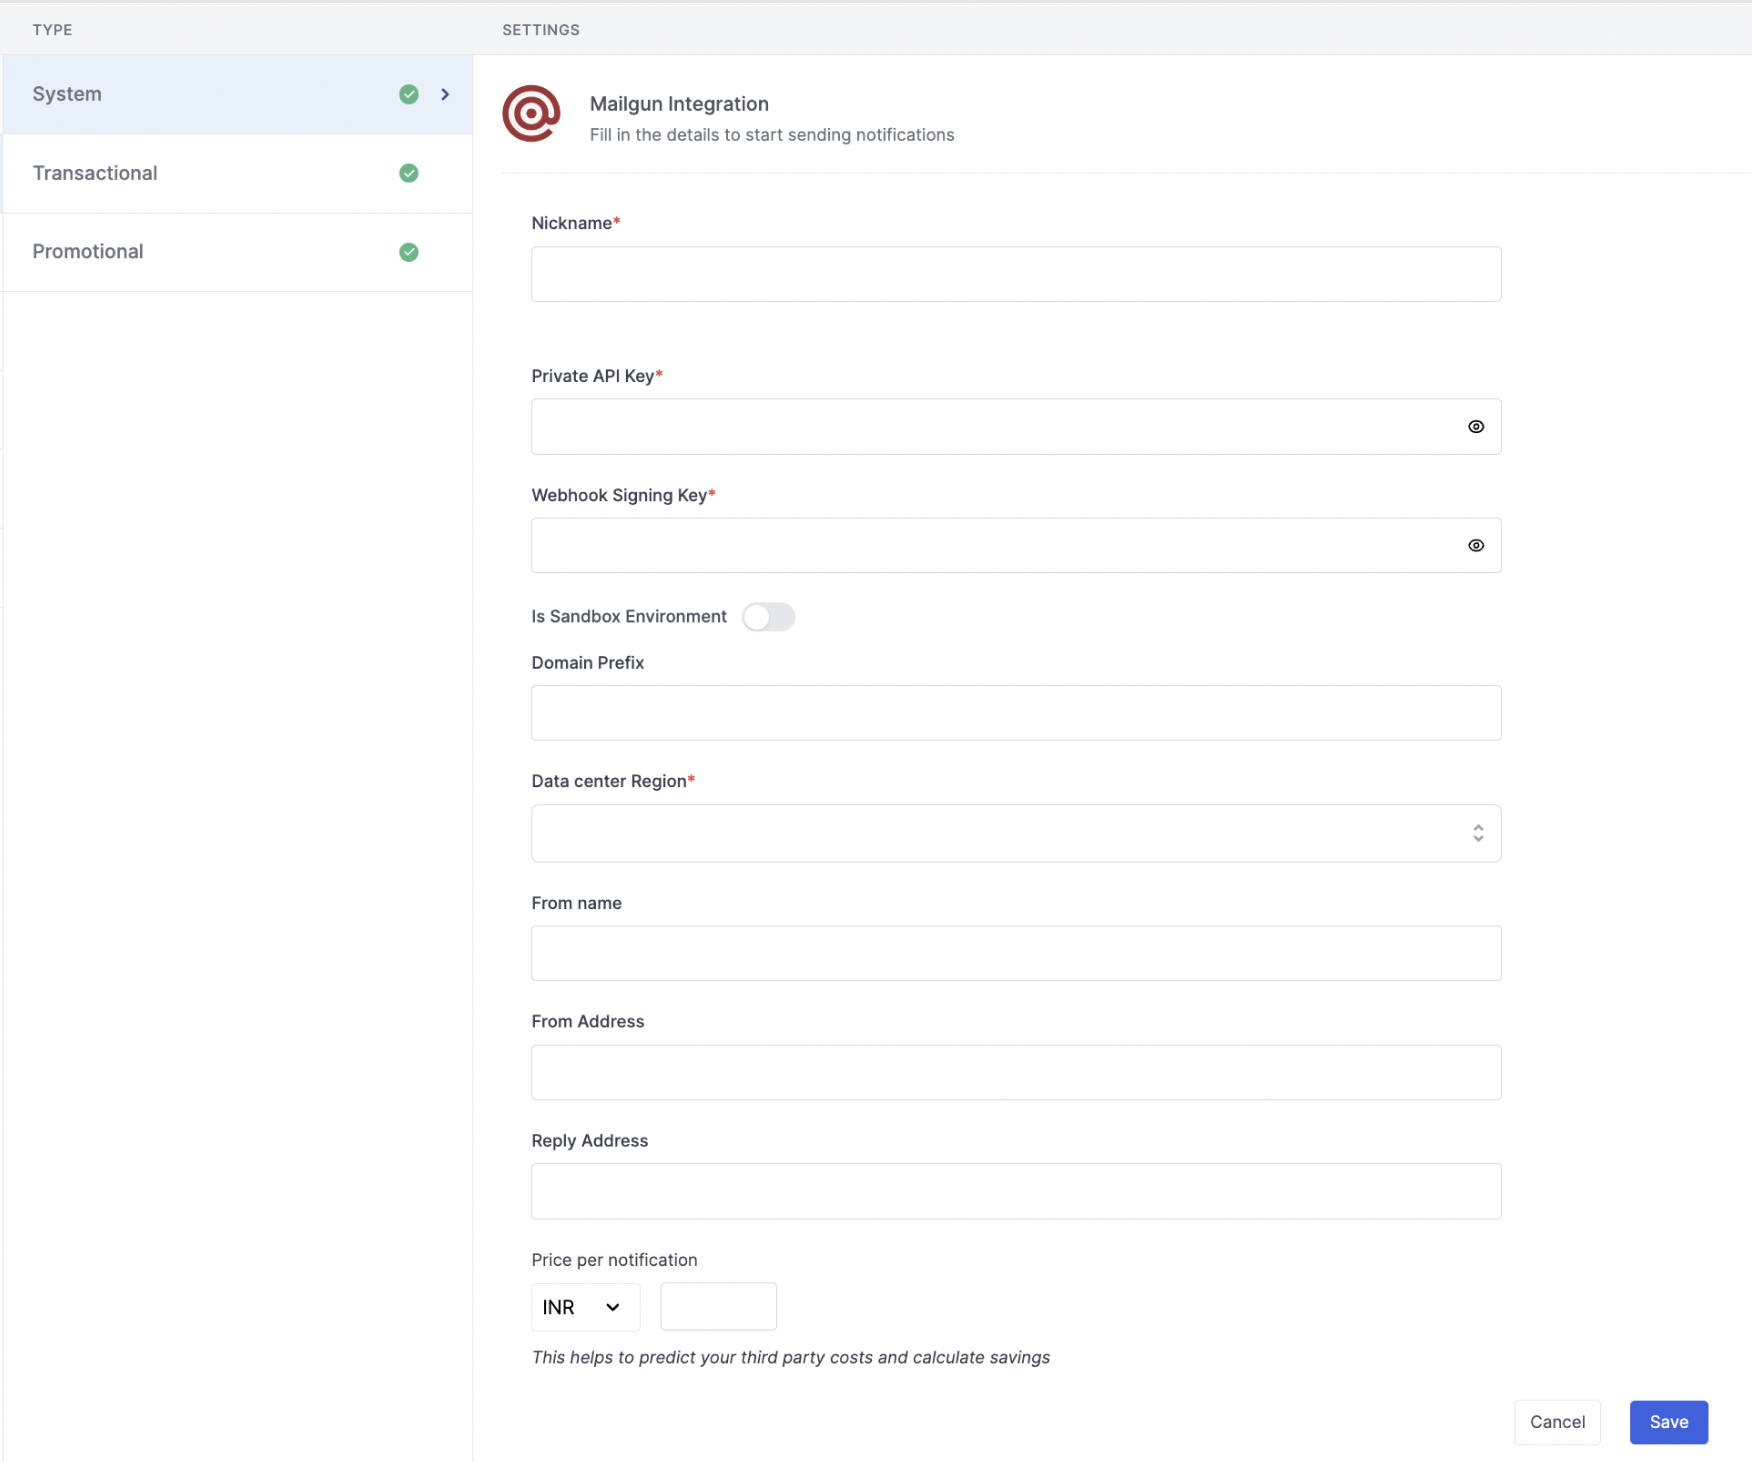 | Form Field | Description |
| ------------------------------ | ------------------------------------------------------------------------------------------------------------------------------------------------------------------------------------------------------------------------------------------------------------------------------------------------------------------------------------------------------------------------------------------------------------------------------------------------------------------- |
| Nickname | You can give any name which may help you to identify this account easily |
| Private API Key | You will get this Private API Key from your Mailgun account. SuprSend uses this API Key to send email on your behalf via your registered Mailgun account. Checkout the [documentation](/docs/mailgun#how-to-get-api-key-from-mailgun-account) on how to get your Mailgun API Keys |
| Webhook Signing Key | You will get this key from your Mailgun account. SuprSend uses this API Key to sign the delivery events received via webhook. Check the [documentation](/docs/mailgun#how-to-get-api-key-from-mailgun-account) on how to get your Mailgun API Keys |
| Is Sandbox environment | Select this if you are using Mailgun sandbox domain for sending emails |
| Domain Prefix / Sandbox Domain | **Sandbox Domain**- Add sandbox domain name if you are using mailgun sandbox domain for sending emails **Domain Prefix**- Prefix of the subdomain names added in mailgun account. e.g. - if your subdomain name is *mg.mydomain.com*, the domain prefix will be *mg* Leave it blank if your root domain is added as the domain in mailgun account like *mydomain.com* Mailgun domain names can be referred from [here](https://app.mailgun.com/app/sending/domains) |
| Data center region | For domain region = EU, select "Europe region" else select "Outside Europe" |
| From Name | Default 'From Name' that email will go from. You can override this in the individual template. *e.g. SuprSend* |
| From Address | Default 'From Email ID' that email will go from. You can override this in the individual template. *e.g. \[[support@suprsend.com](mailto:support@suprsend.com)]\(mailto:[support@suprsend.com](mailto:support@suprsend.com))* |
| Reply Address | Default 'Reply To Email id' on which replies are received. You can override this in the individual template. *e.g. \[[support@suprsend.com](mailto:support@suprsend.com)]\(mailto:[support@suprsend.com](mailto:support@suprsend.com))* |
| Price per notification | This is the amount you pay per email notification to Mailgun. It helps us to calculate, estimate and optimise your cost spent on notifications. |
## How to get API Key from Mailgun account
Once logged in to your Mailgun account, navigate to [API Security](https://app.mailgun.com/settings/api_security) from your profile.
| Form Field | Description |
| ------------------------------ | ------------------------------------------------------------------------------------------------------------------------------------------------------------------------------------------------------------------------------------------------------------------------------------------------------------------------------------------------------------------------------------------------------------------------------------------------------------------- |
| Nickname | You can give any name which may help you to identify this account easily |
| Private API Key | You will get this Private API Key from your Mailgun account. SuprSend uses this API Key to send email on your behalf via your registered Mailgun account. Checkout the [documentation](/docs/mailgun#how-to-get-api-key-from-mailgun-account) on how to get your Mailgun API Keys |
| Webhook Signing Key | You will get this key from your Mailgun account. SuprSend uses this API Key to sign the delivery events received via webhook. Check the [documentation](/docs/mailgun#how-to-get-api-key-from-mailgun-account) on how to get your Mailgun API Keys |
| Is Sandbox environment | Select this if you are using Mailgun sandbox domain for sending emails |
| Domain Prefix / Sandbox Domain | **Sandbox Domain**- Add sandbox domain name if you are using mailgun sandbox domain for sending emails **Domain Prefix**- Prefix of the subdomain names added in mailgun account. e.g. - if your subdomain name is *mg.mydomain.com*, the domain prefix will be *mg* Leave it blank if your root domain is added as the domain in mailgun account like *mydomain.com* Mailgun domain names can be referred from [here](https://app.mailgun.com/app/sending/domains) |
| Data center region | For domain region = EU, select "Europe region" else select "Outside Europe" |
| From Name | Default 'From Name' that email will go from. You can override this in the individual template. *e.g. SuprSend* |
| From Address | Default 'From Email ID' that email will go from. You can override this in the individual template. *e.g. \[[support@suprsend.com](mailto:support@suprsend.com)]\(mailto:[support@suprsend.com](mailto:support@suprsend.com))* |
| Reply Address | Default 'Reply To Email id' on which replies are received. You can override this in the individual template. *e.g. \[[support@suprsend.com](mailto:support@suprsend.com)]\(mailto:[support@suprsend.com](mailto:support@suprsend.com))* |
| Price per notification | This is the amount you pay per email notification to Mailgun. It helps us to calculate, estimate and optimise your cost spent on notifications. |
## How to get API Key from Mailgun account
Once logged in to your Mailgun account, navigate to [API Security](https://app.mailgun.com/settings/api_security) from your profile.
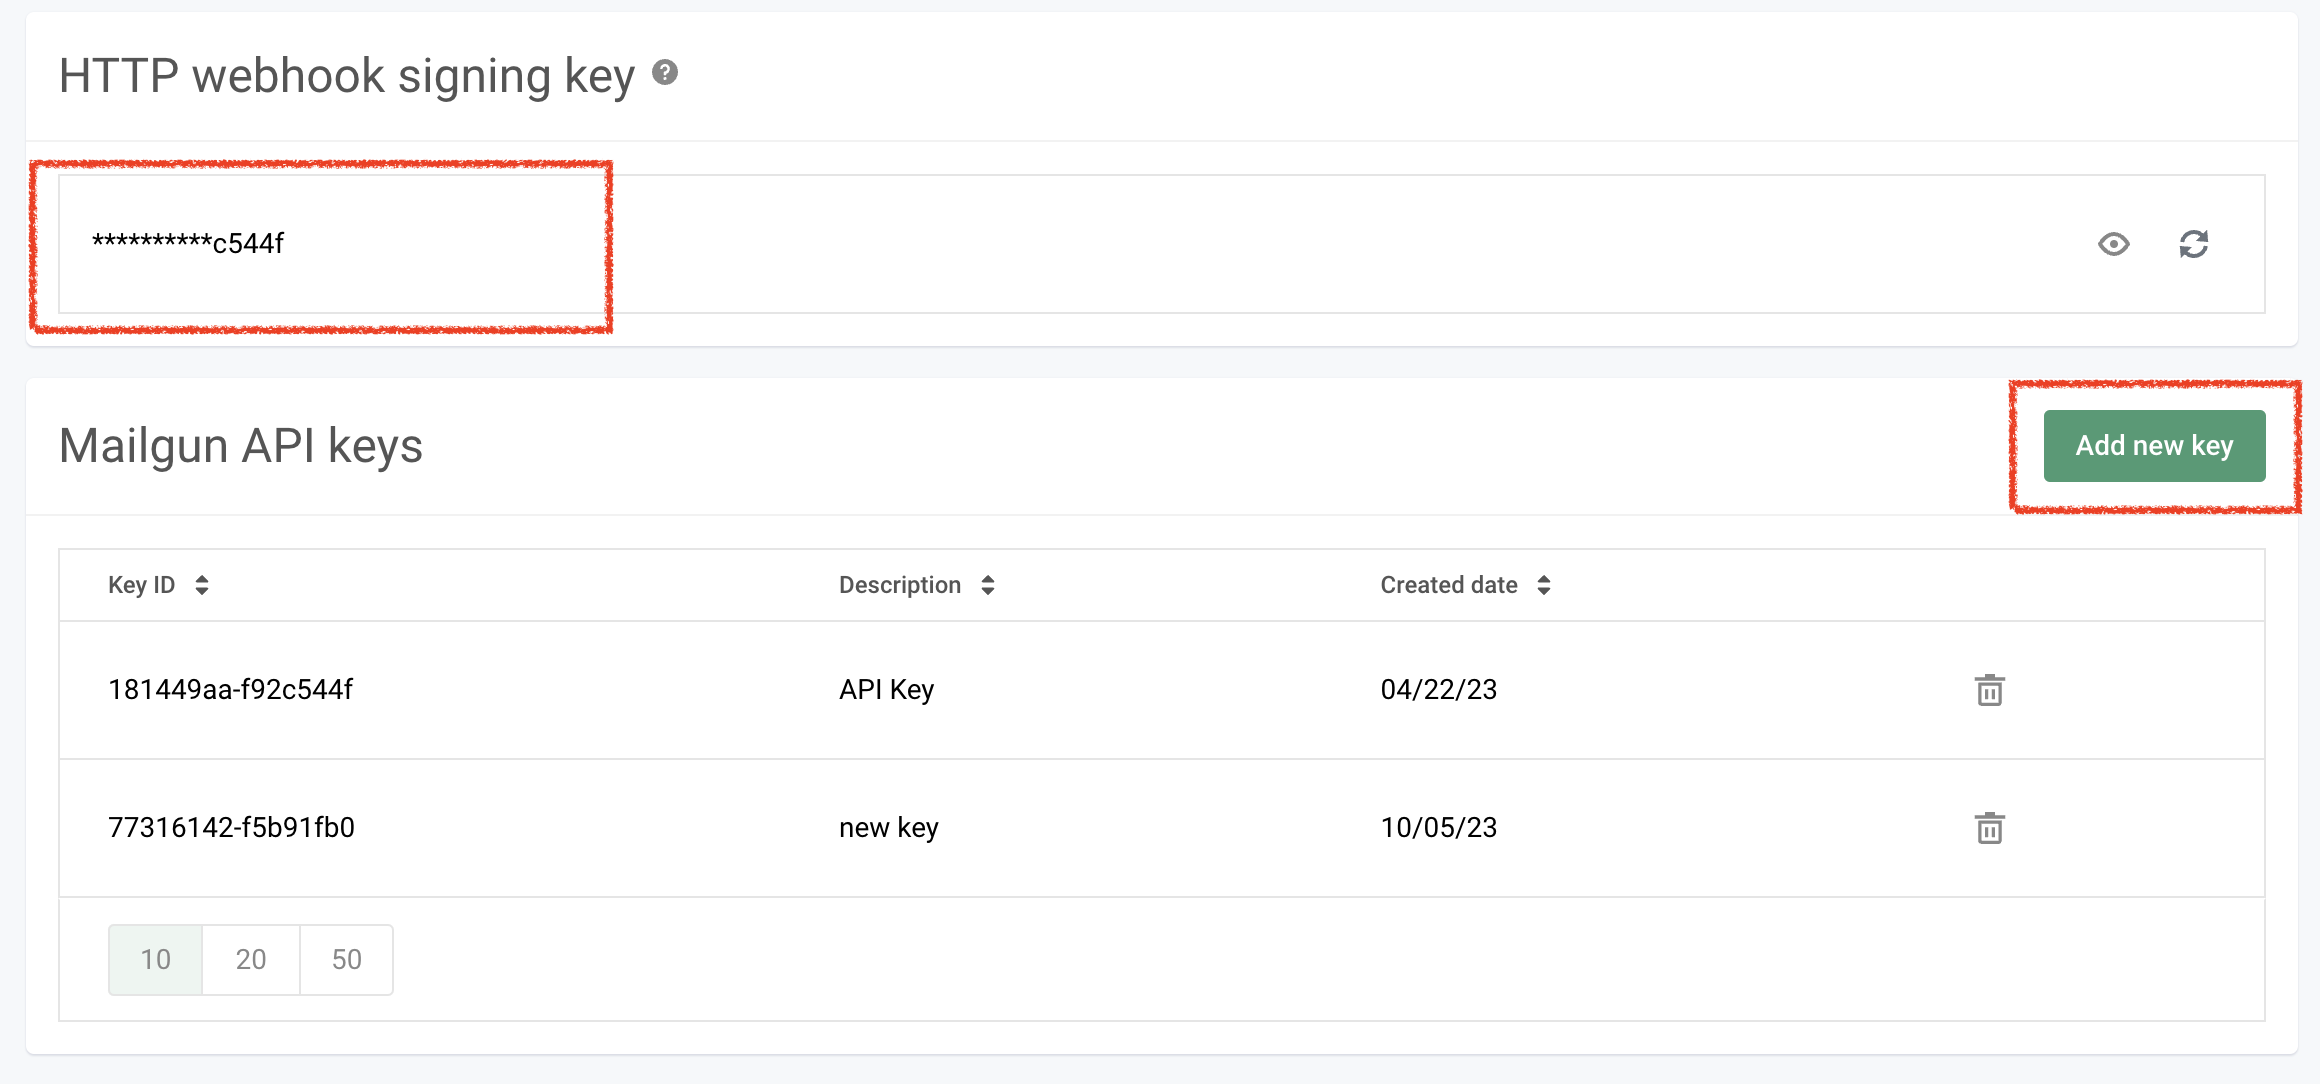 Private API Key can be seen only at the time of creation. You can either use any of your existing keys or **"Add new key"**.
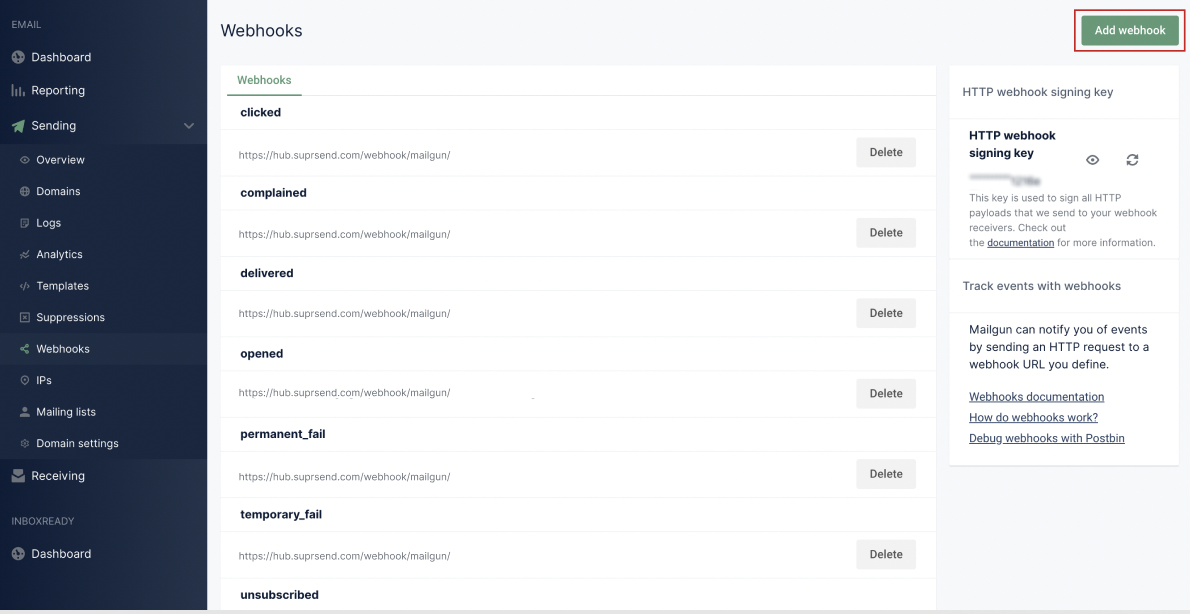 ## How to add Unsubscription link in email
It's recommended to allow recipients to unsubscribe from emails. You can either:
1. **Use your vendor's unsubscribe link** by enabling **Unsubscribes** in *Sending → Domain settings (Tracking section)*. This opts users out of all emails from that vendor.
2. **Use SuprSend’s** [**hosted preference page** ](/docs/user-preferences#hosted-preference-page)for more granular control, allowing users to manage preferences per category while also reducing unnecessary vendor API calls for opt-outs.
## How to add Unsubscription link in email
It's recommended to allow recipients to unsubscribe from emails. You can either:
1. **Use your vendor's unsubscribe link** by enabling **Unsubscribes** in *Sending → Domain settings (Tracking section)*. This opts users out of all emails from that vendor.
2. **Use SuprSend’s** [**hosted preference page** ](/docs/user-preferences#hosted-preference-page)for more granular control, allowing users to manage preferences per category while also reducing unnecessary vendor API calls for opt-outs.
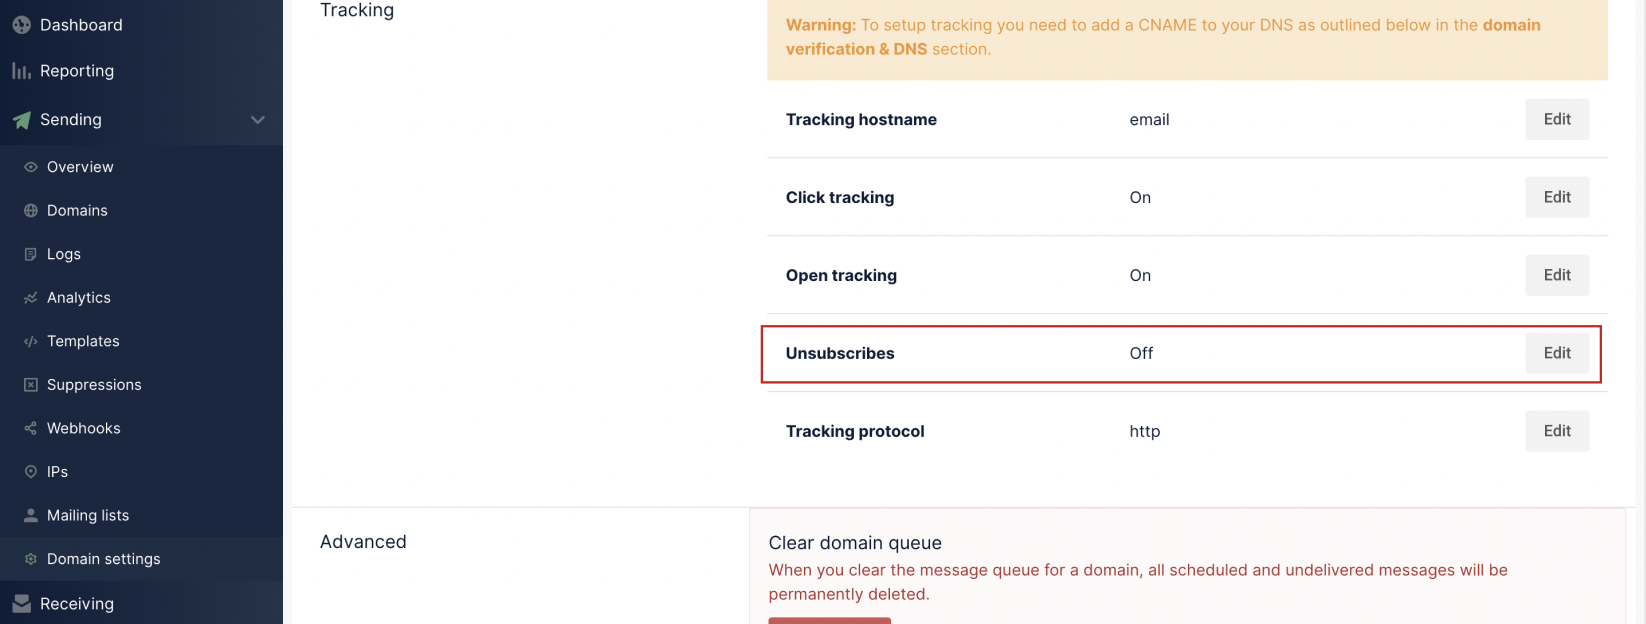 **Why it's important to give unsubscribe option in email?**
First, it is required by the [CAN-Spam Act](https://www.ftc.gov/business-guidance/resources/can-spam-act-compliance-guide-business). Second, if you don’t give them this option, they are more likely to click on the spam complaint button, which will cause more harm than allowing them to unsubscribe. Finally, many ESPs look for unsubscribe links and are more likely to filter your email if they don’t have them.
***
# Mailjet
Source: https://docs.suprsend.com/docs/mailjet
Guide to connect your Mailjet account with SuprSend to send email notifications.
This section is a step by step guide to setup Mailjet as your email service provider You can use your existing Mailjet account to integrate, or create a new account from [here](https://app.mailjet.com/signup?lang=en_US)
## Mailjet integration on SuprSend account
On the SuprSend dashboard, go to vendor page from side panel and click Email -> Mailjet from the list of Vendors. This will open vendor details page as shown below:
**Why it's important to give unsubscribe option in email?**
First, it is required by the [CAN-Spam Act](https://www.ftc.gov/business-guidance/resources/can-spam-act-compliance-guide-business). Second, if you don’t give them this option, they are more likely to click on the spam complaint button, which will cause more harm than allowing them to unsubscribe. Finally, many ESPs look for unsubscribe links and are more likely to filter your email if they don’t have them.
***
# Mailjet
Source: https://docs.suprsend.com/docs/mailjet
Guide to connect your Mailjet account with SuprSend to send email notifications.
This section is a step by step guide to setup Mailjet as your email service provider You can use your existing Mailjet account to integrate, or create a new account from [here](https://app.mailjet.com/signup?lang=en_US)
## Mailjet integration on SuprSend account
On the SuprSend dashboard, go to vendor page from side panel and click Email -> Mailjet from the list of Vendors. This will open vendor details page as shown below:
 | Form Field | Description |
| ---------------------- | ------------------------------------------------------------------------------------------------------------------------------------------------------------------------------------------------------------------------------------------------------------------------------------------------------------------------------------------------------- |
| Nickname | You can give any name which may help you to identify this account easily |
| API Key | You will get from the API Key management section in your Mailjet account settings. This is a mandatory field. SuprSend will use this key to route emails through your Mailjet account. Check the [documentation](/docs/postmark#how-to-get-a-server-token-from-postmark) on how to get your API and Secret Key. |
| Secret Key | Secret generate along with your API Key. You will get this from API Key management section in your Mailjet account settings. This is a mandatory field. SuprSend will use this token to route emails through your Mailjet account. Check [documentation](/docs/postmark#how-to-get-a-server-token-from-postmark) on how to get your API and Secret Key. |
| From Name | Default 'From Name' that email will go from. You can override this in the individual template. \*e.g. \[[support@suprsend.com](mailto:support@suprsend.com)]]\\ |
| From Email | Default 'From Name' that email will go from. You can override this in the individual template. *e.g. [support@suprsend.com](mailto:support@suprsend.com)* From email domain should be verified by Mailjet. |
| Reply Email | Default 'Reply To Email id' on which replies are received. You can override this in the individual template.*e.g. [support@suprsend.com](mailto:support@suprsend.com)* |
| Price per notification | This is the amount you pay per email notification to Mailjet. It helps us to calculate, estimate and optimise your cost spent on notifications. We use this cost to set the order of channels in smart routing where routing rule is `optimize on cost`. |
## How to get API and Secret key from Mailjet
| Form Field | Description |
| ---------------------- | ------------------------------------------------------------------------------------------------------------------------------------------------------------------------------------------------------------------------------------------------------------------------------------------------------------------------------------------------------- |
| Nickname | You can give any name which may help you to identify this account easily |
| API Key | You will get from the API Key management section in your Mailjet account settings. This is a mandatory field. SuprSend will use this key to route emails through your Mailjet account. Check the [documentation](/docs/postmark#how-to-get-a-server-token-from-postmark) on how to get your API and Secret Key. |
| Secret Key | Secret generate along with your API Key. You will get this from API Key management section in your Mailjet account settings. This is a mandatory field. SuprSend will use this token to route emails through your Mailjet account. Check [documentation](/docs/postmark#how-to-get-a-server-token-from-postmark) on how to get your API and Secret Key. |
| From Name | Default 'From Name' that email will go from. You can override this in the individual template. \*e.g. \[[support@suprsend.com](mailto:support@suprsend.com)]]\\ |
| From Email | Default 'From Name' that email will go from. You can override this in the individual template. *e.g. [support@suprsend.com](mailto:support@suprsend.com)* From email domain should be verified by Mailjet. |
| Reply Email | Default 'Reply To Email id' on which replies are received. You can override this in the individual template.*e.g. [support@suprsend.com](mailto:support@suprsend.com)* |
| Price per notification | This is the amount you pay per email notification to Mailjet. It helps us to calculate, estimate and optimise your cost spent on notifications. We use this cost to set the order of channels in smart routing where routing rule is `optimize on cost`. |
## How to get API and Secret key from Mailjet
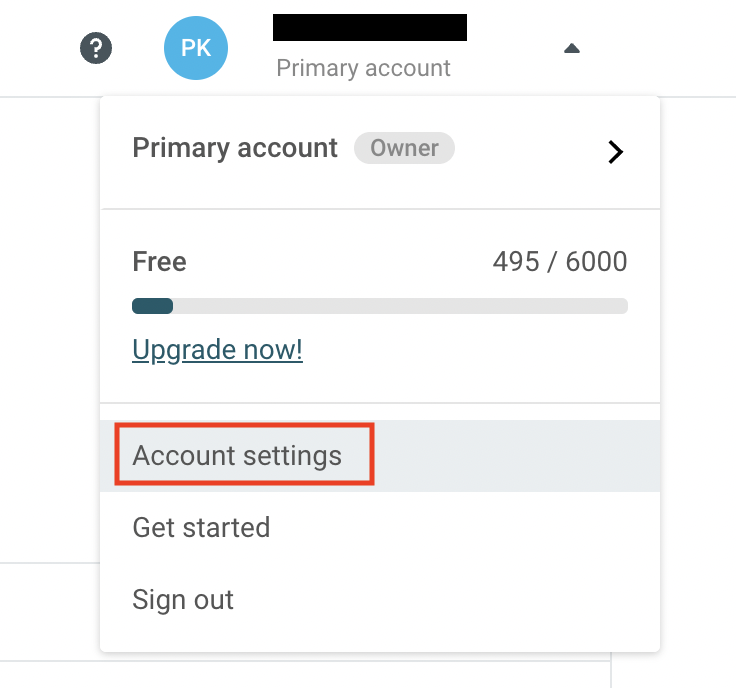
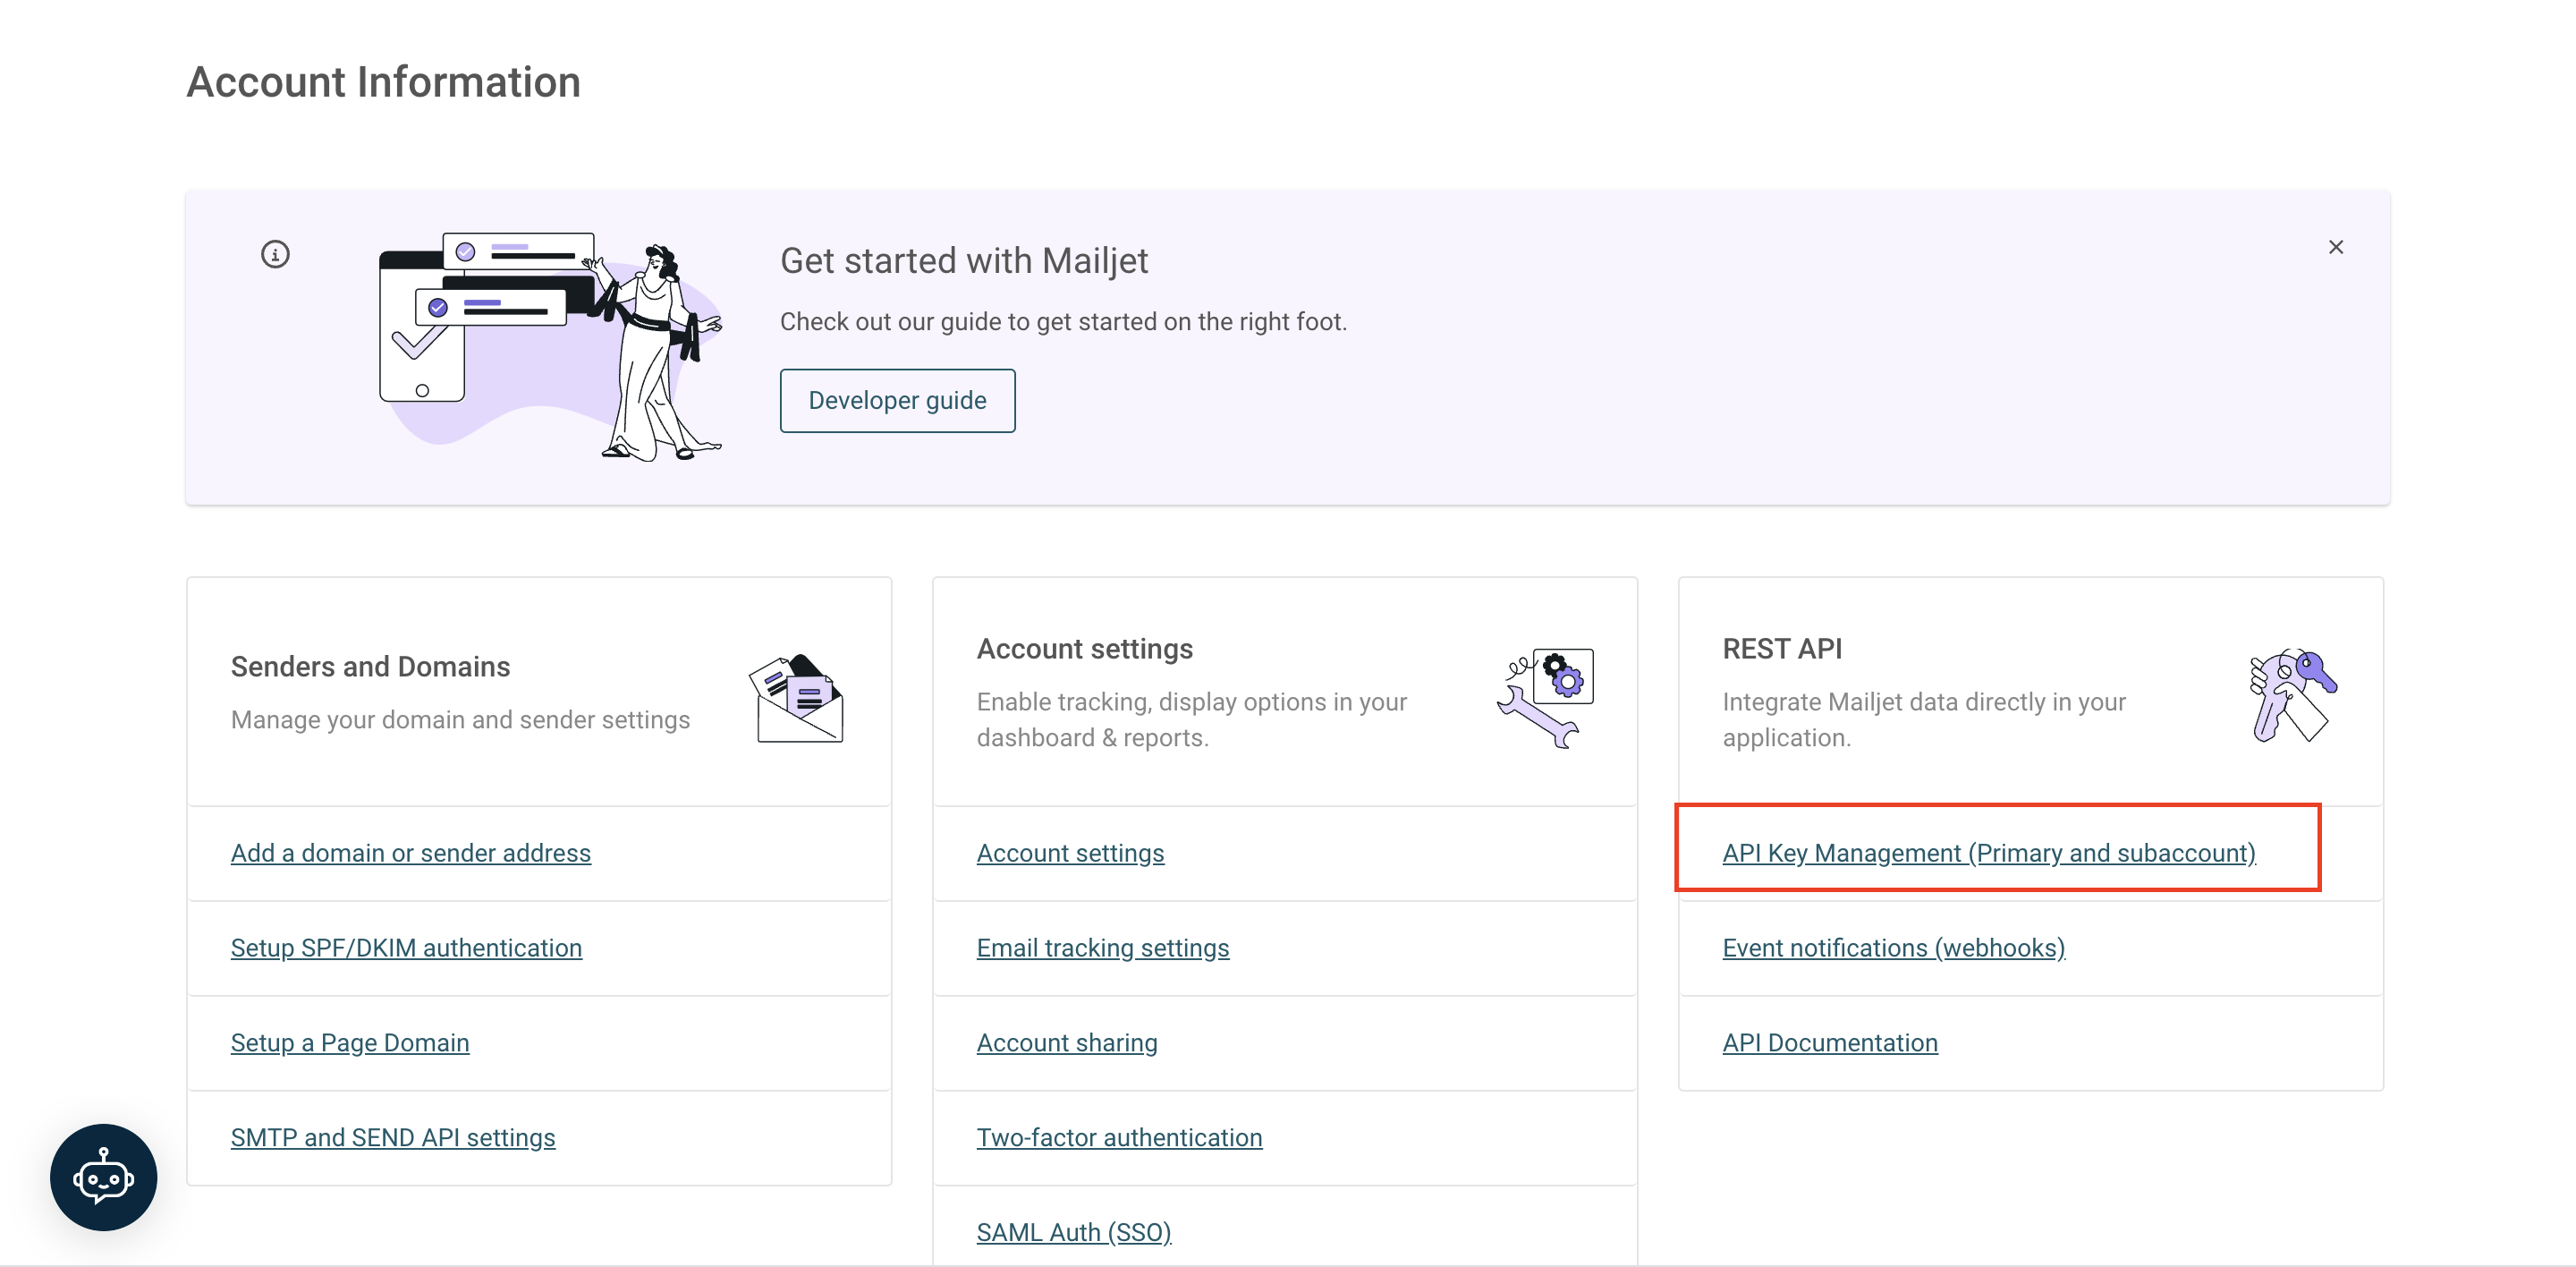
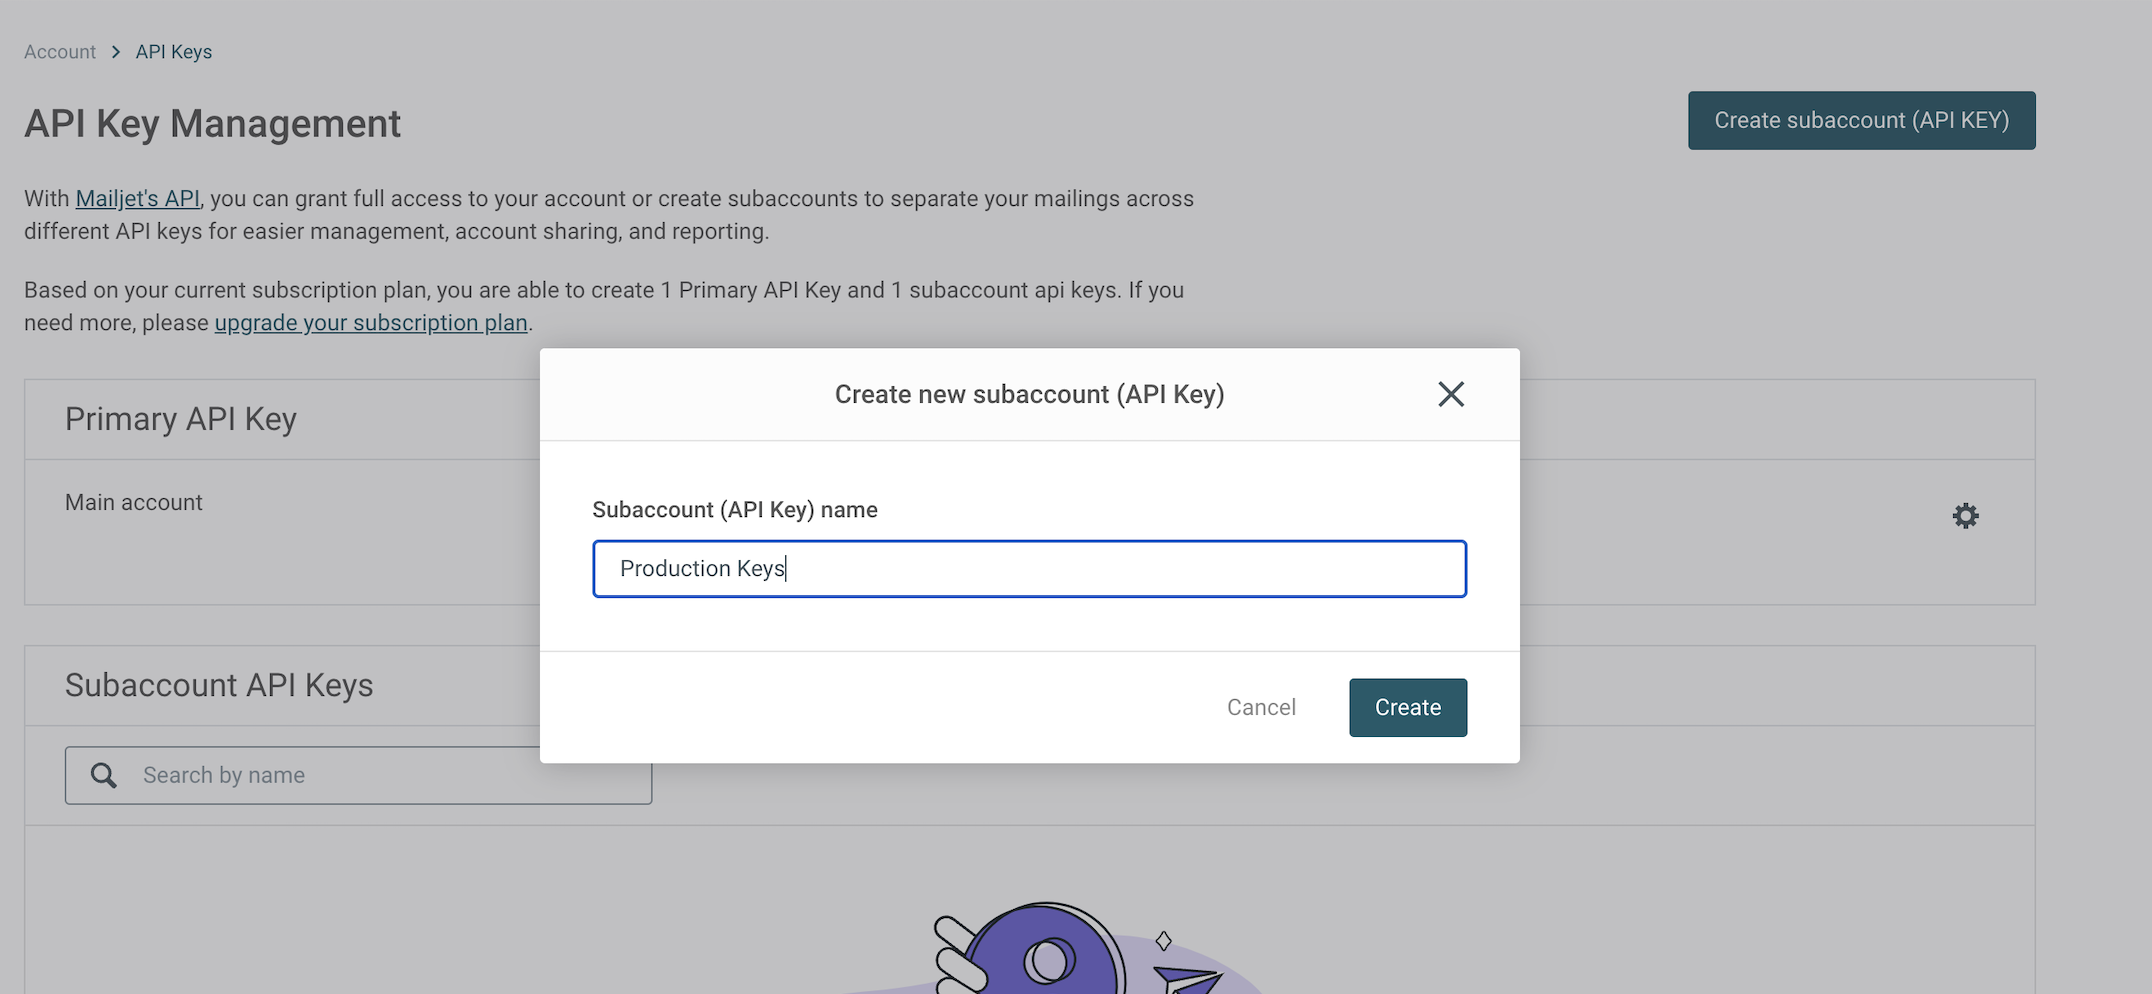
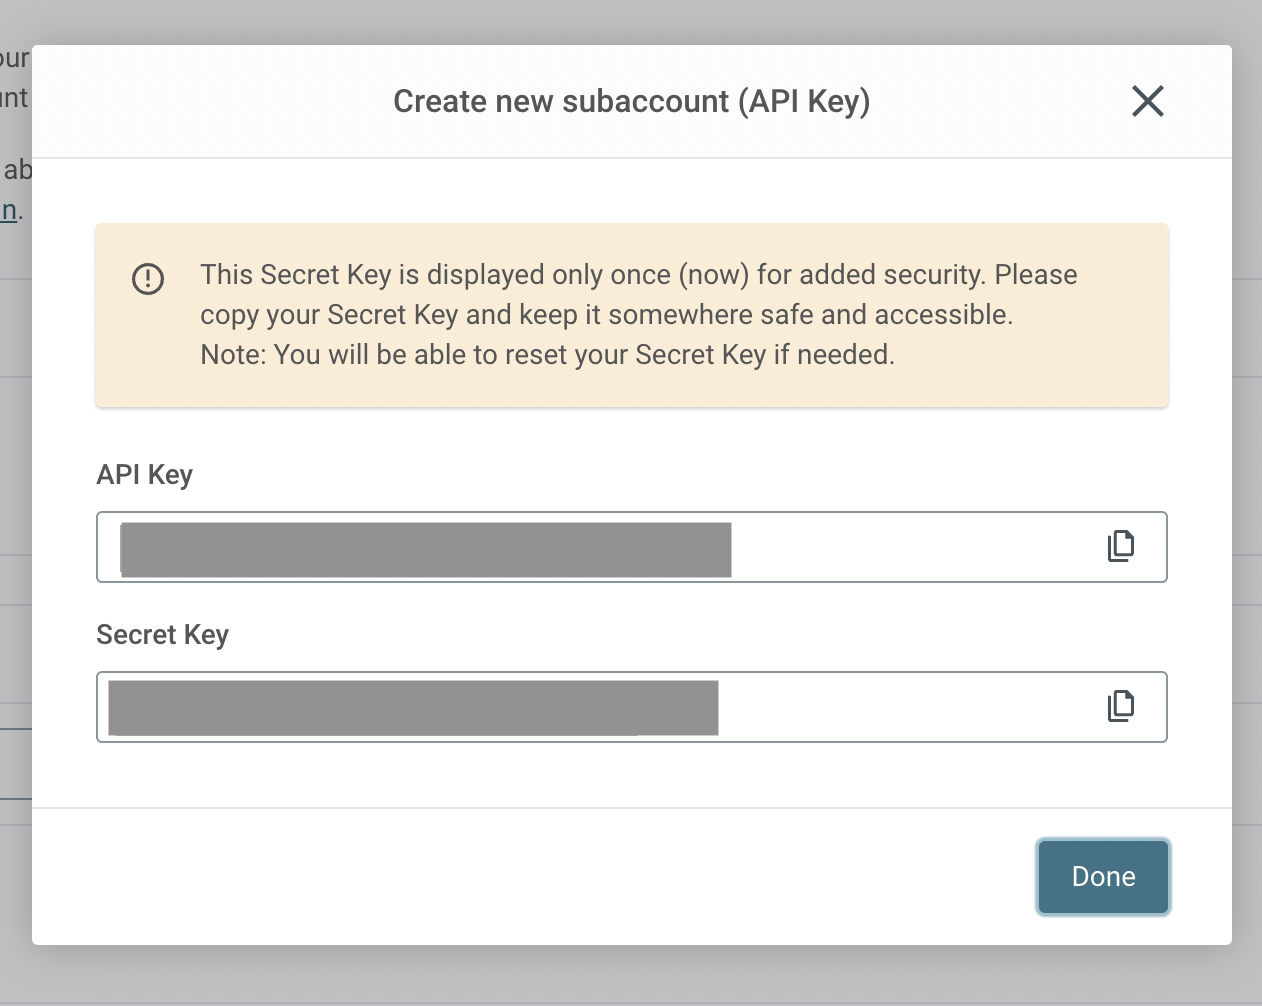
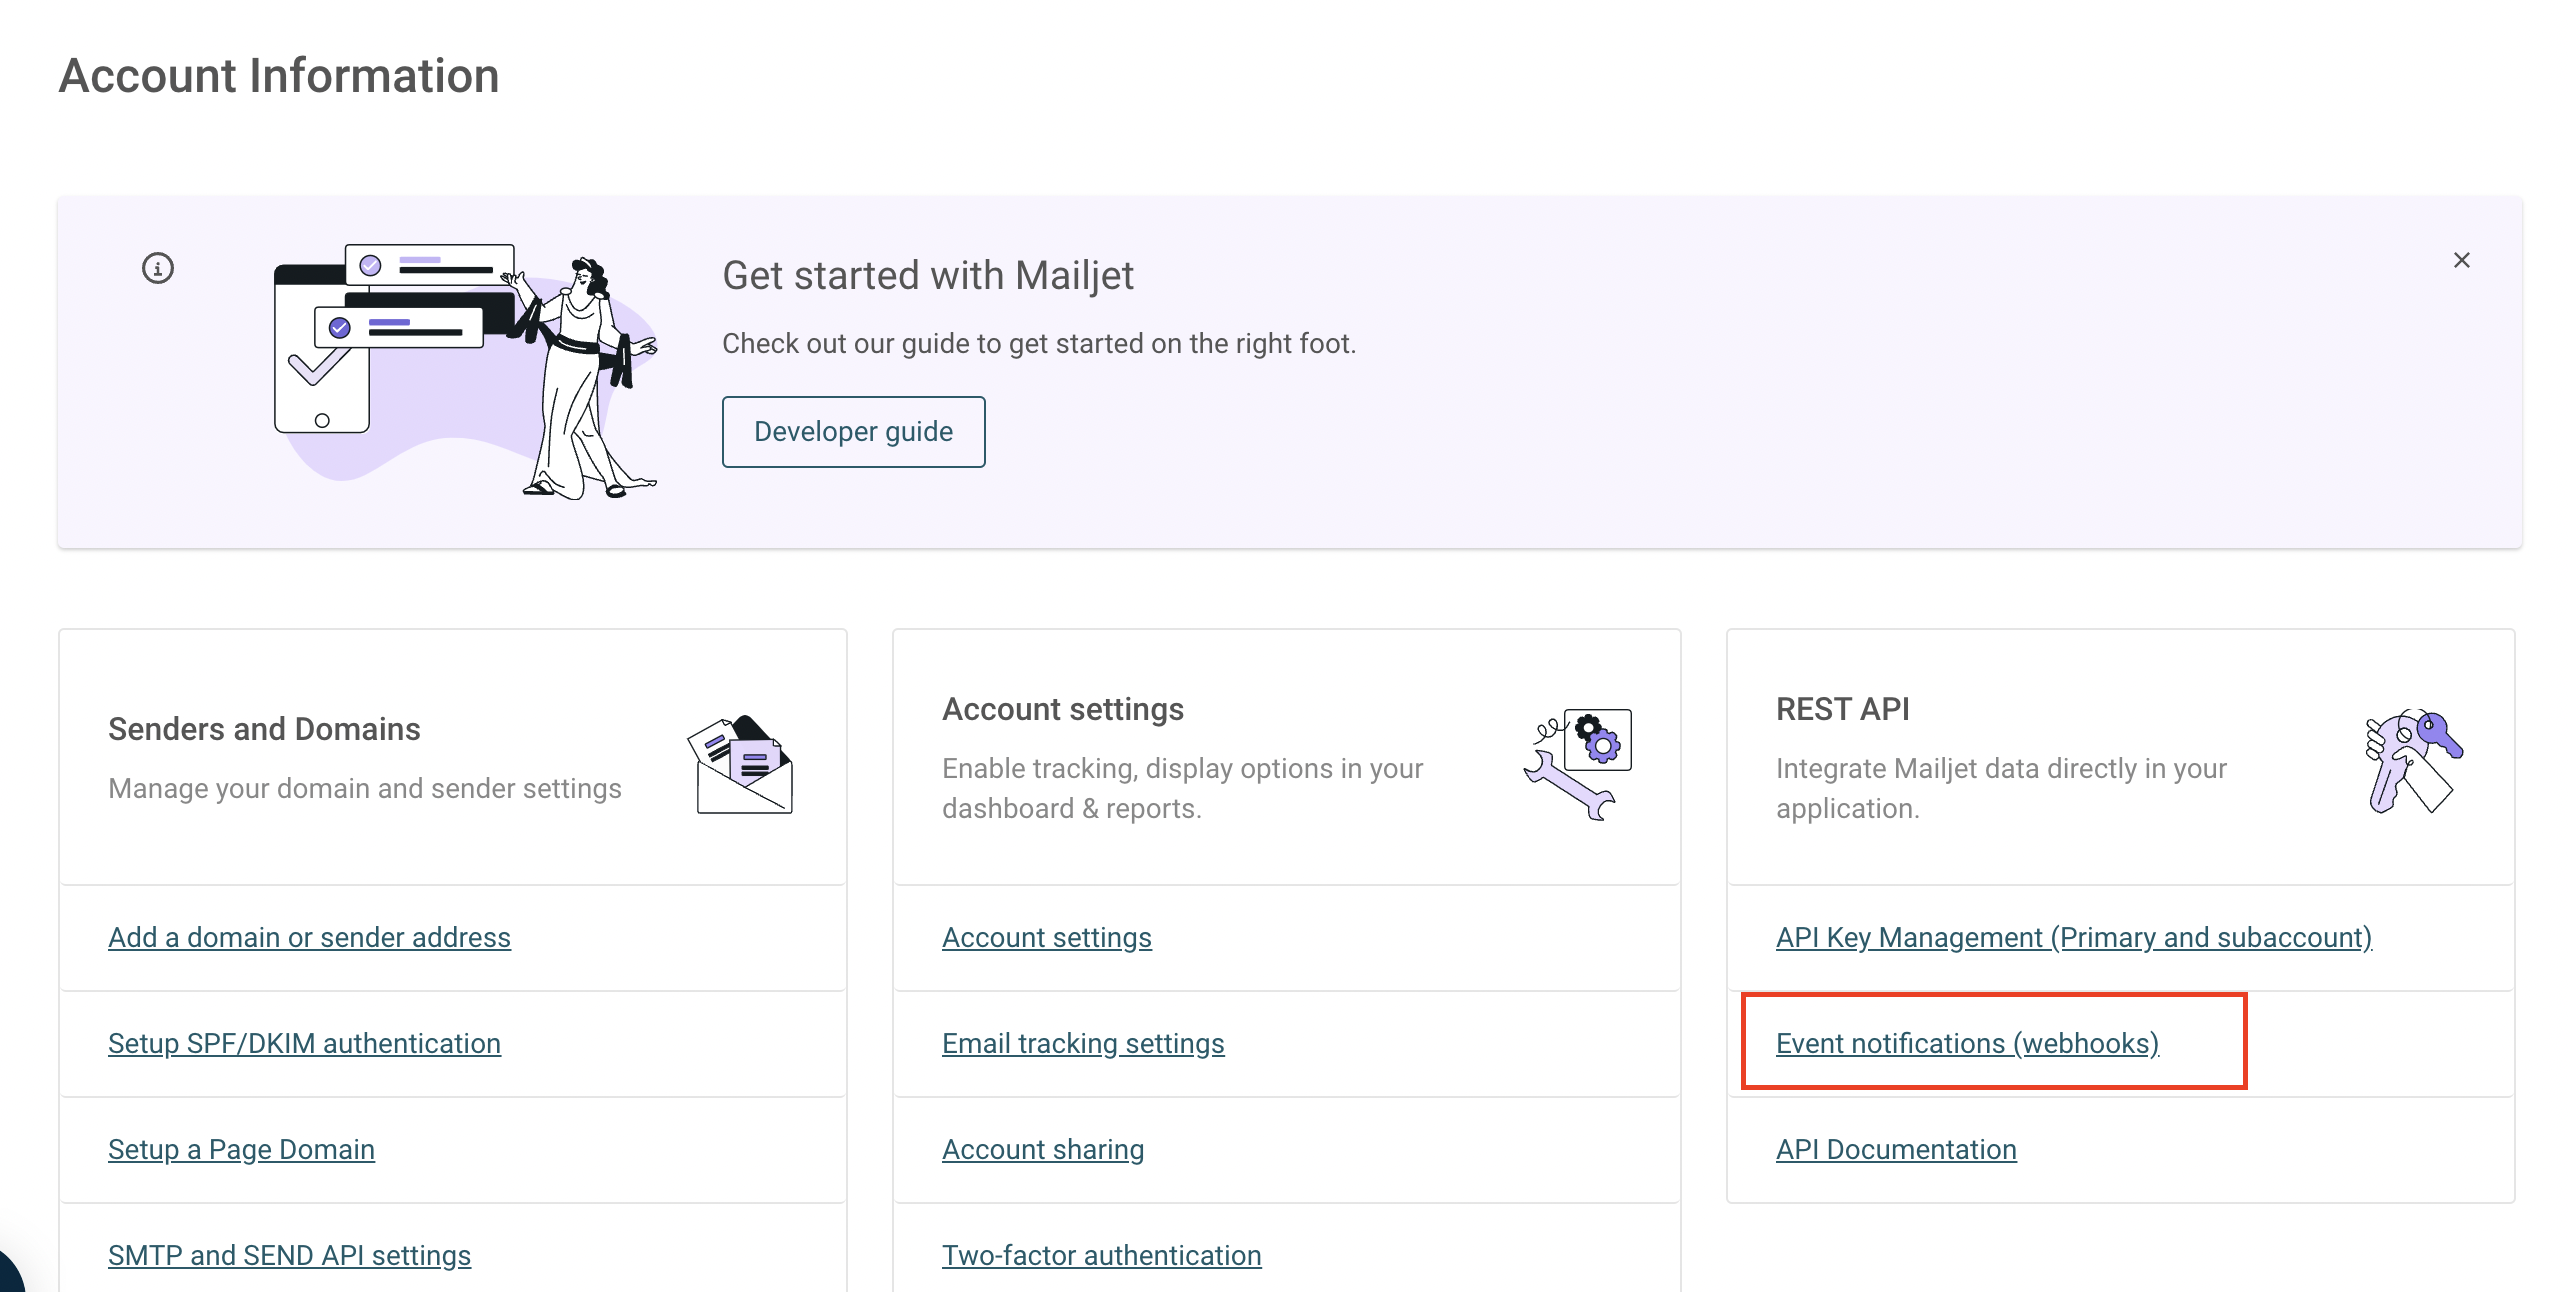
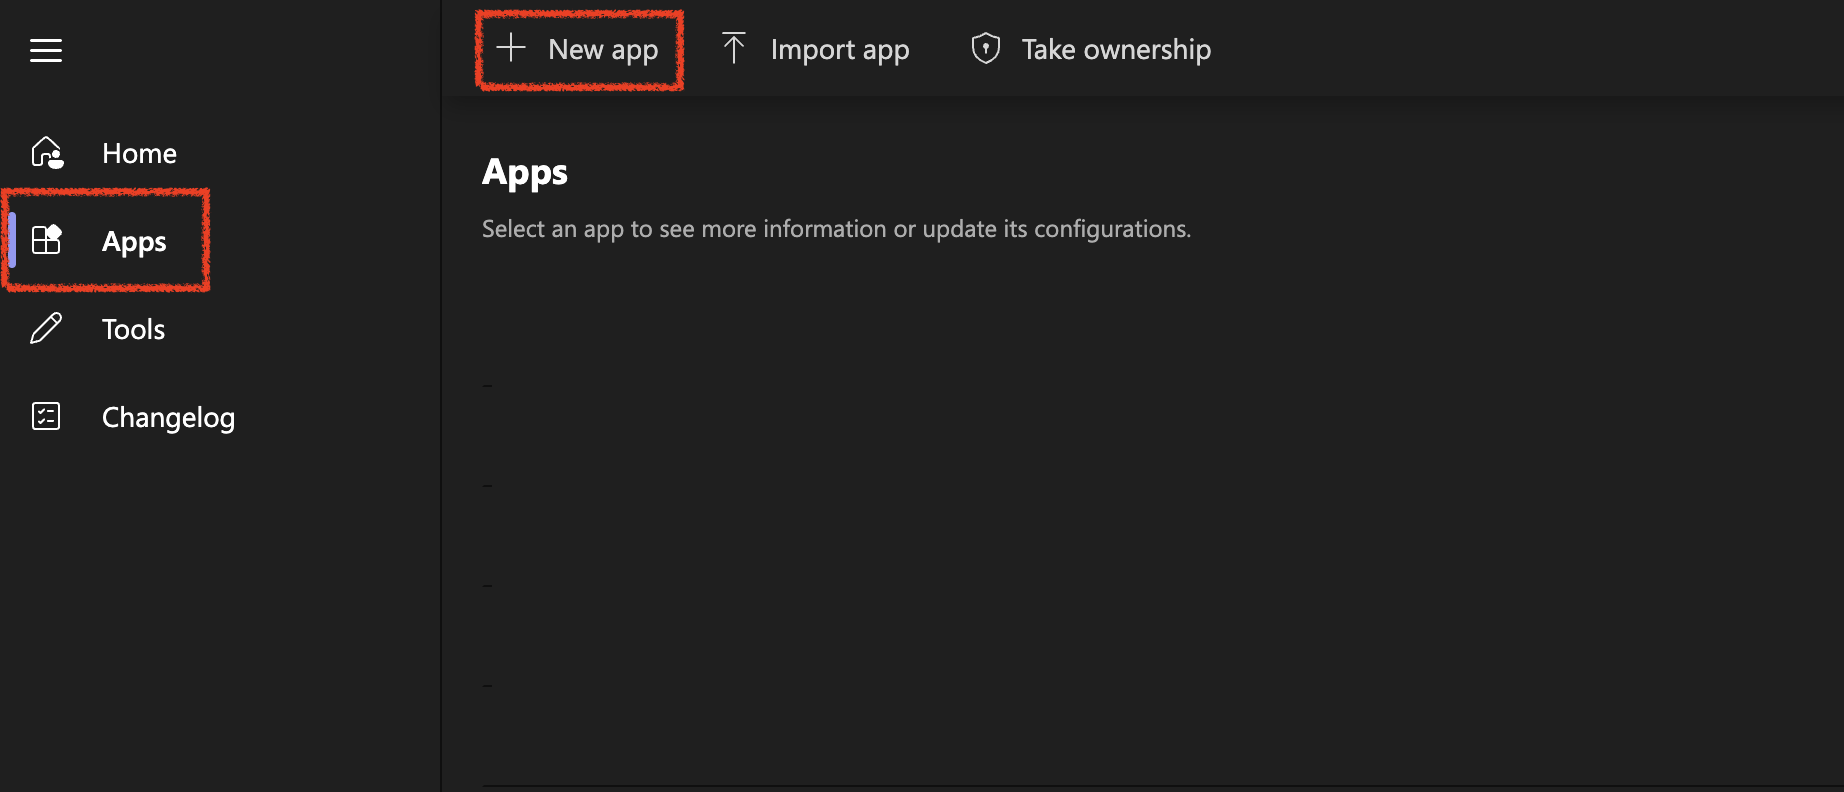
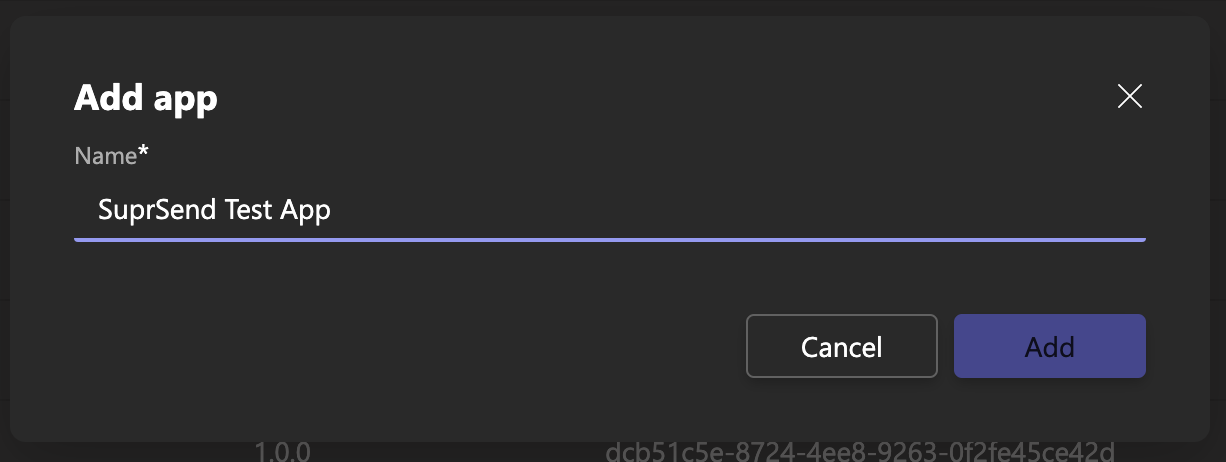 You'll be redirected to a new window where you'll have to add a few information related to your application such as company name, description, website link, URLs to register the App.
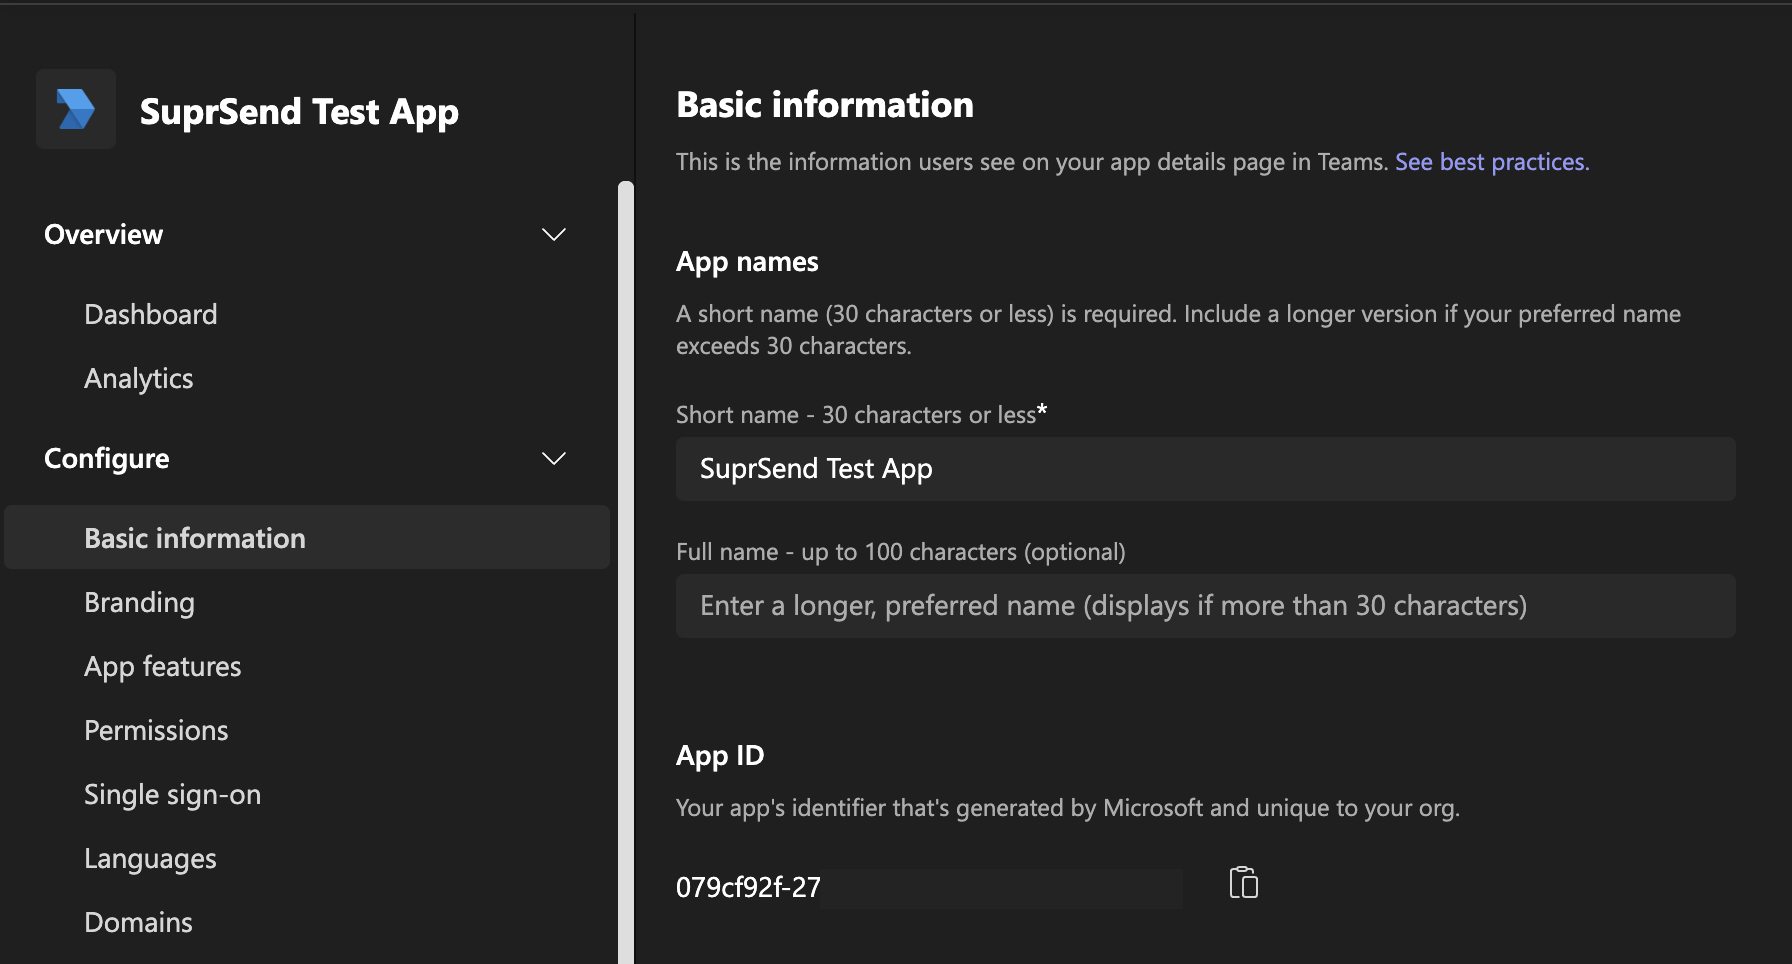
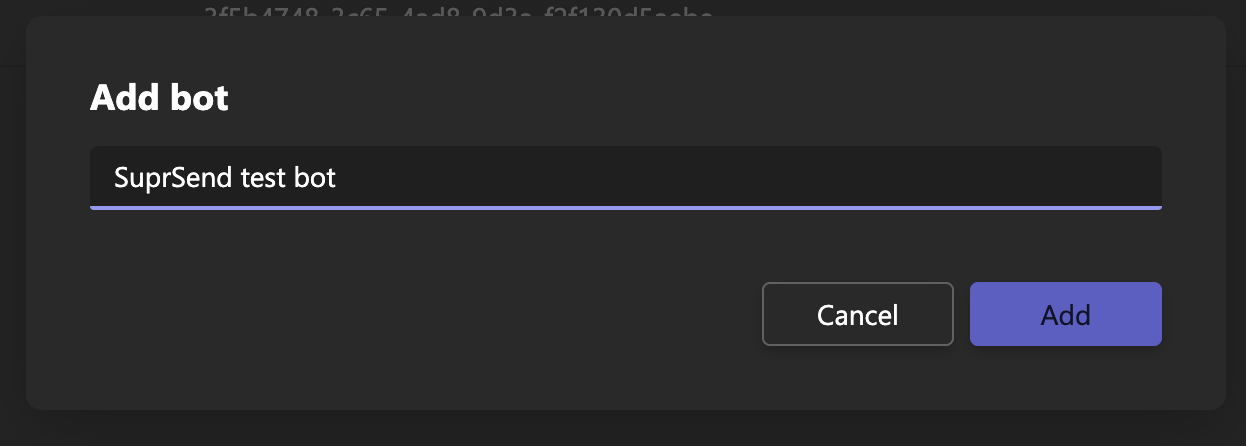 Once the bot is created, you'll land on bot configuration page. Leave the endpoint blank, select "**Microsoft teams**" in the channel and create **client secret** for your bot. Save your bot secret somewhere safe. You'll need this in SuprSend vendor integration form.
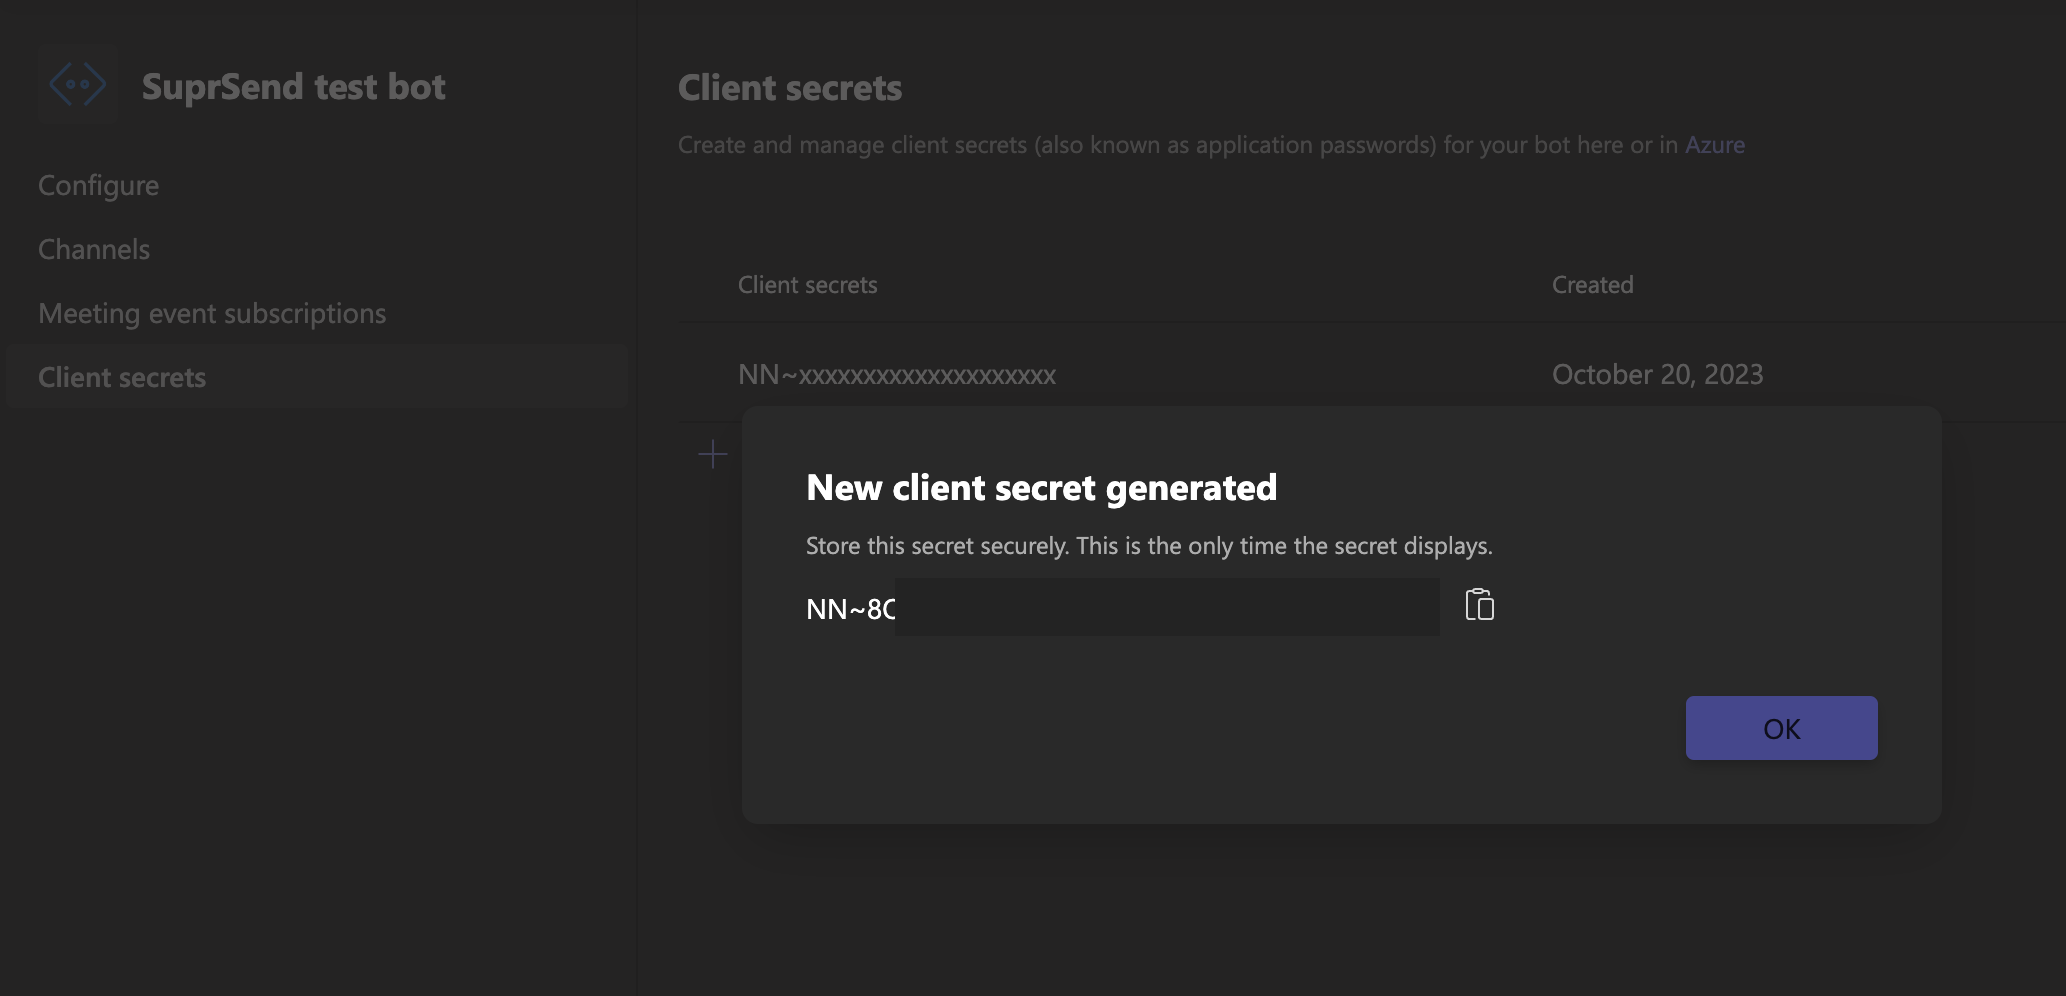

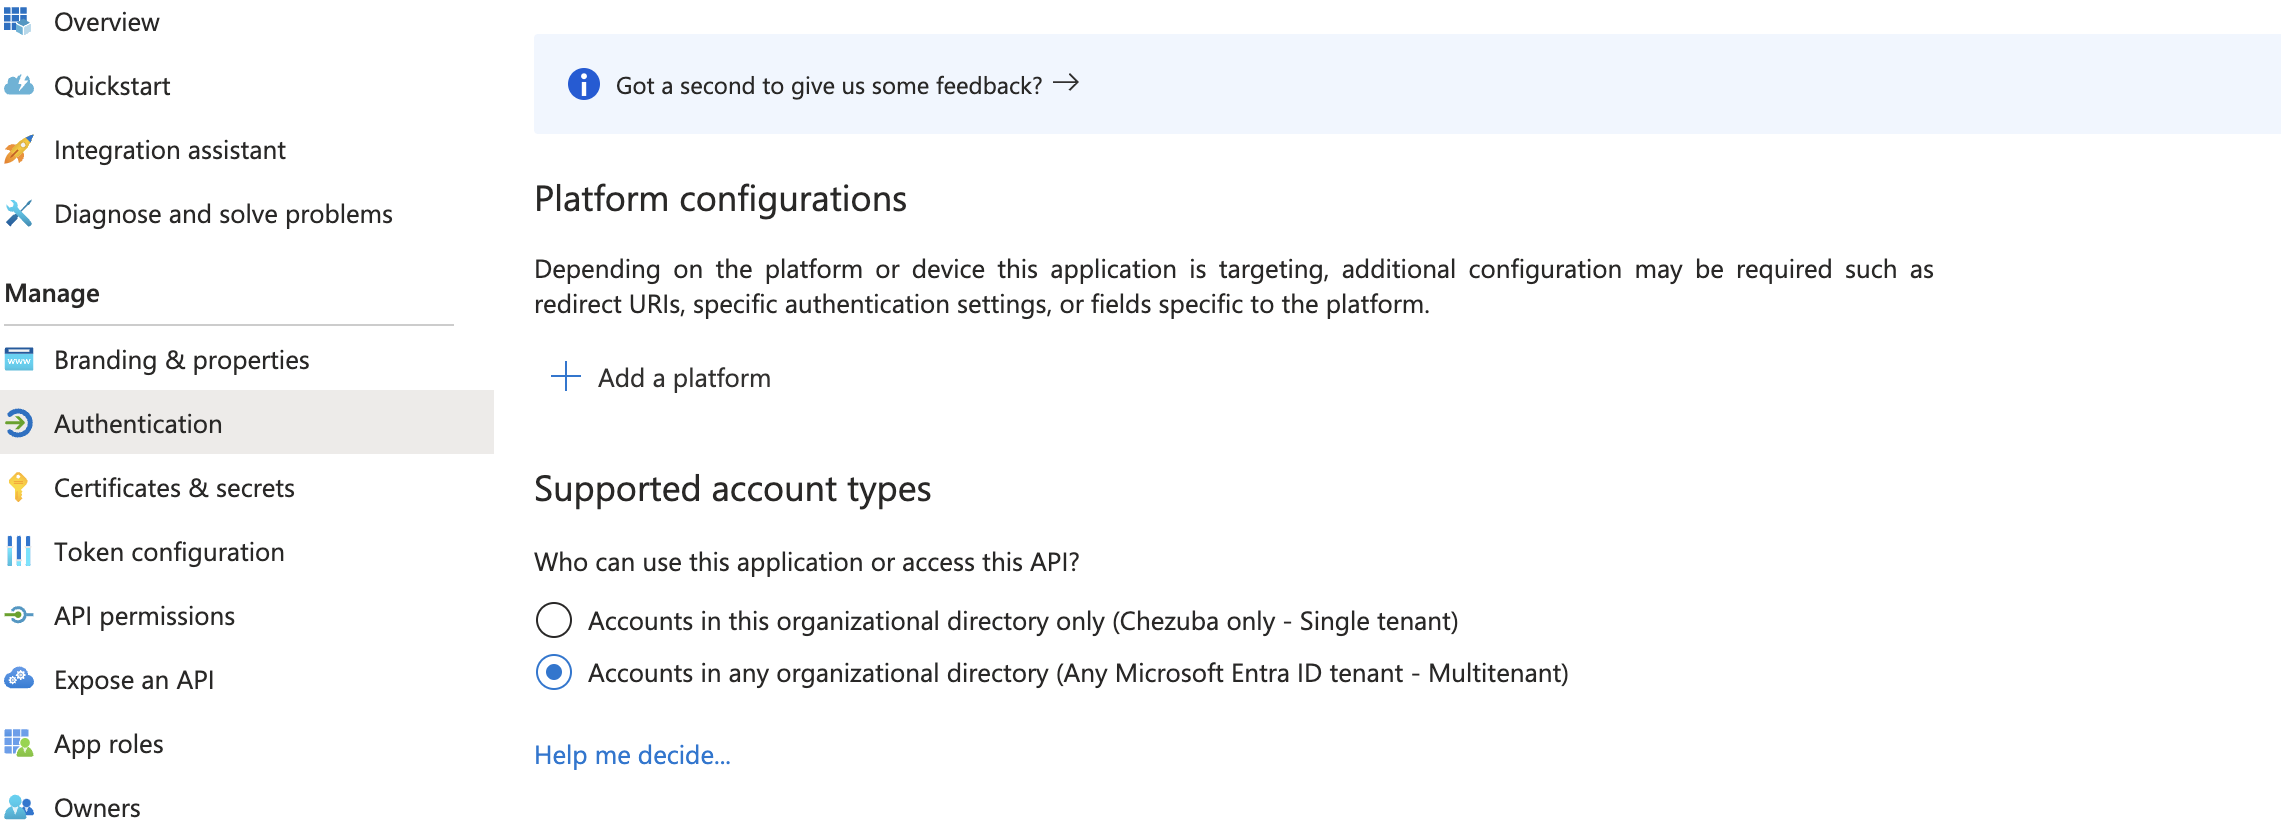
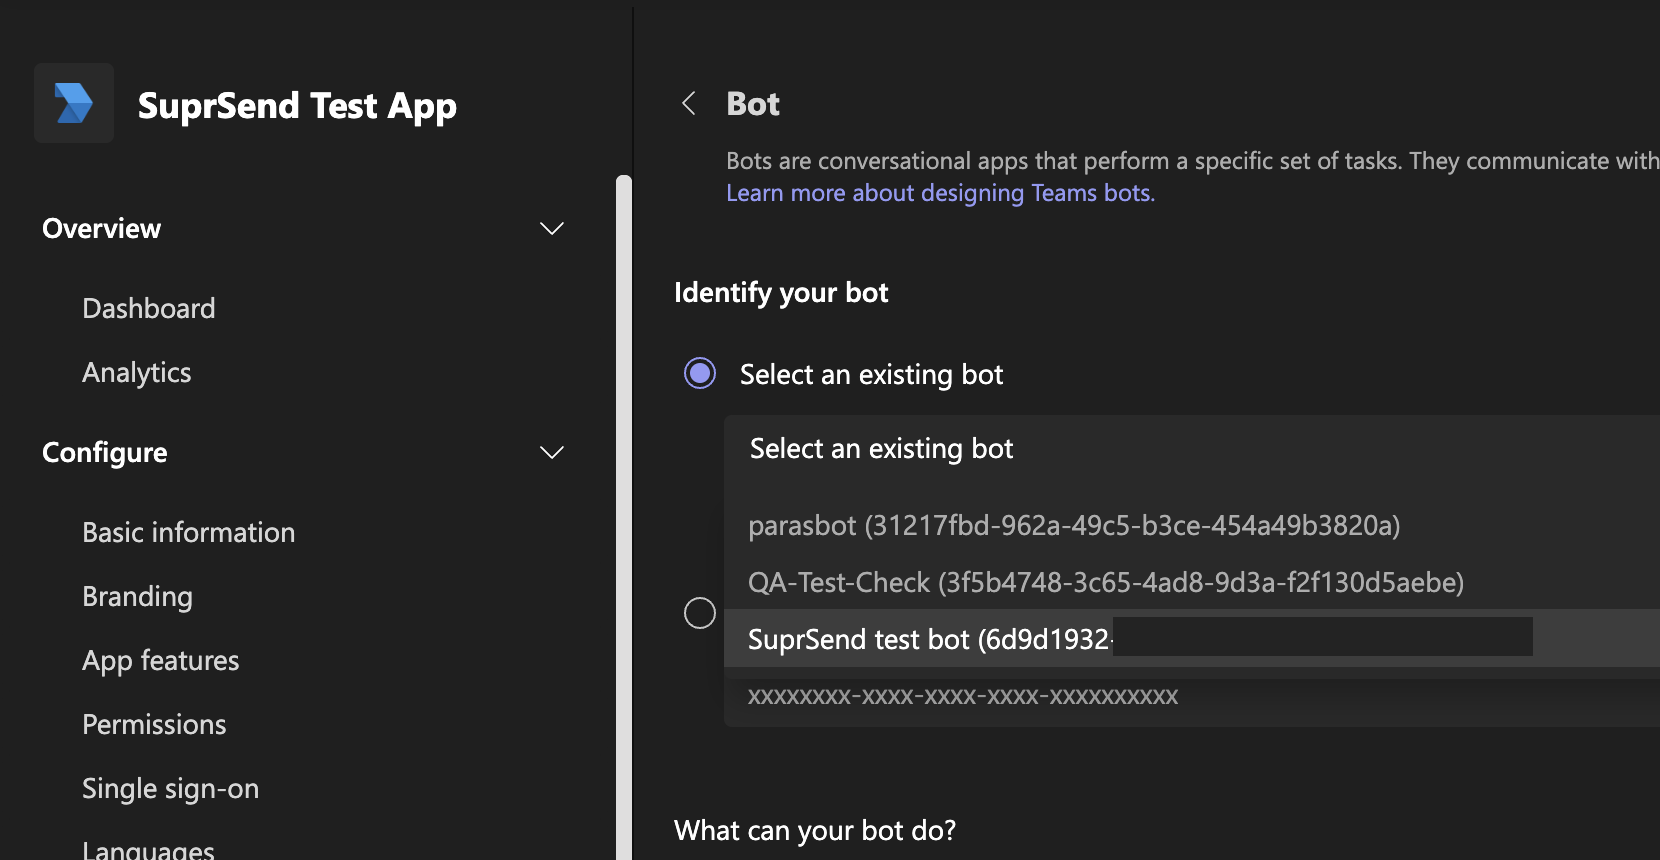
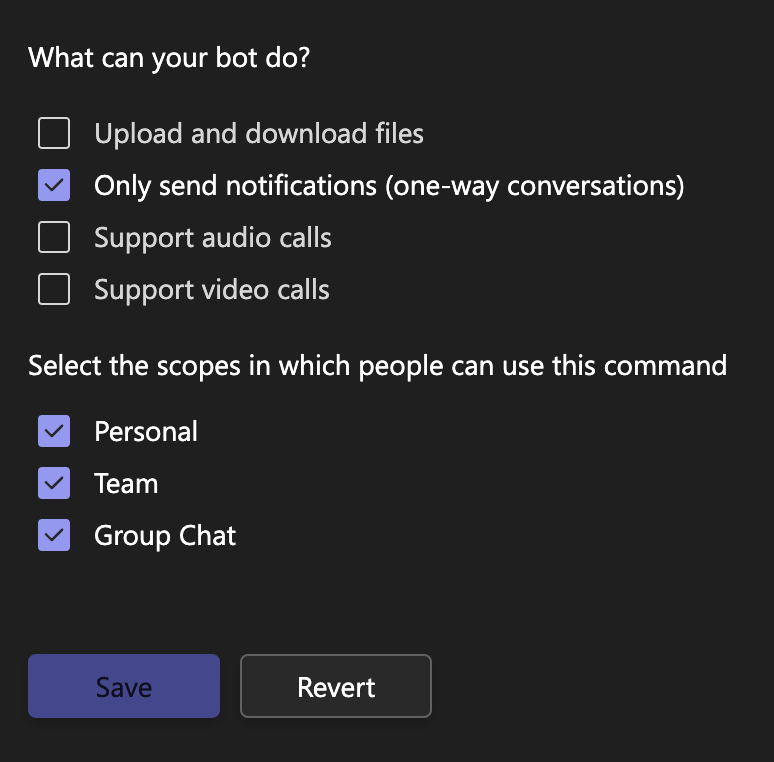 In your App permissions, add below permission.
| Section | Permissions |
| --------------------------------------- | ------------------------------------------------------------------------------------------------------------------------------------ |
| Team Permissions -> Application | `Channel.Create.Group`, `Channel.Delete.Group`, `ChannelMessage.Read.Group`, `ChannelMessage.Send.Group`, `TeamsActivity.Send.Group` |
| Chat/Meeting Permissions -> Application | `ChatMessage.Read.Chat`, `ChatMessage.Send.Chat` |
| User Permissions -> Application | `TeamsActivity.Send.User` |
In your App permissions, add below permission.
| Section | Permissions |
| --------------------------------------- | ------------------------------------------------------------------------------------------------------------------------------------ |
| Team Permissions -> Application | `Channel.Create.Group`, `Channel.Delete.Group`, `ChannelMessage.Read.Group`, `ChannelMessage.Send.Group`, `TeamsActivity.Send.Group` |
| Chat/Meeting Permissions -> Application | `ChatMessage.Read.Chat`, `ChatMessage.Send.Chat` |
| User Permissions -> Application | `TeamsActivity.Send.User` |
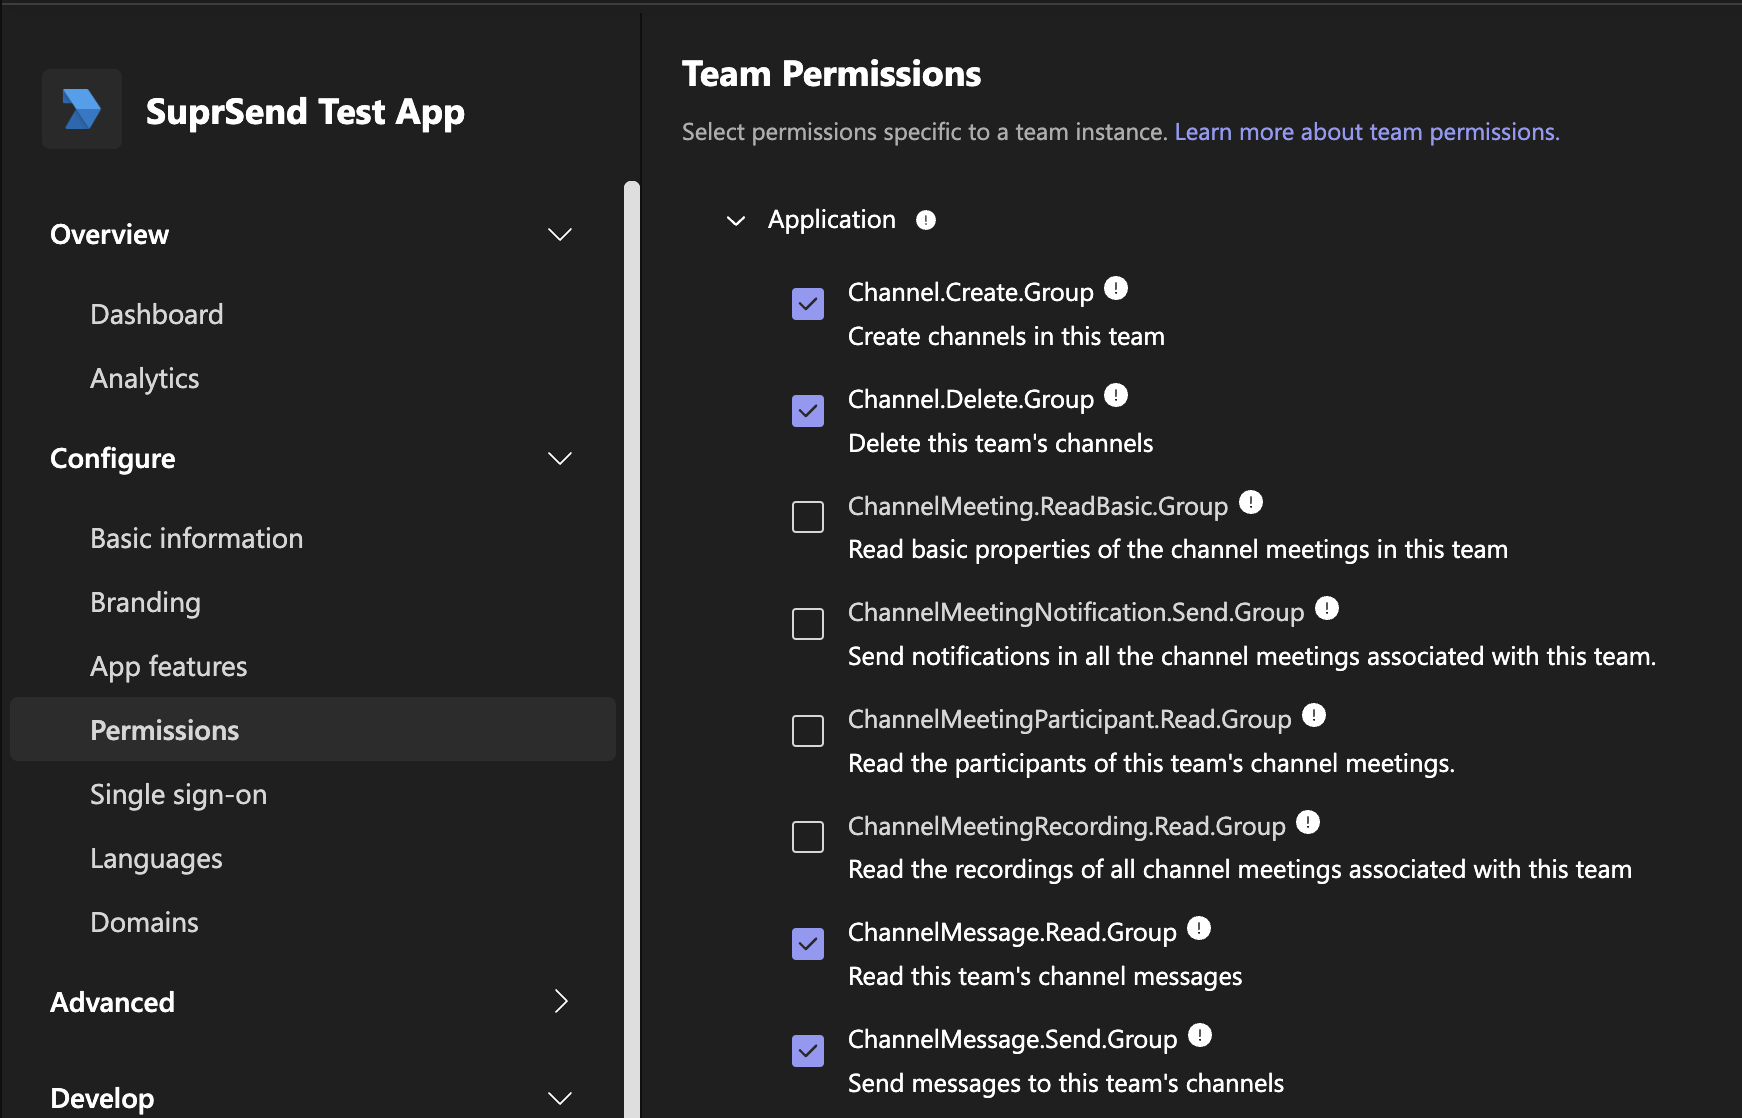
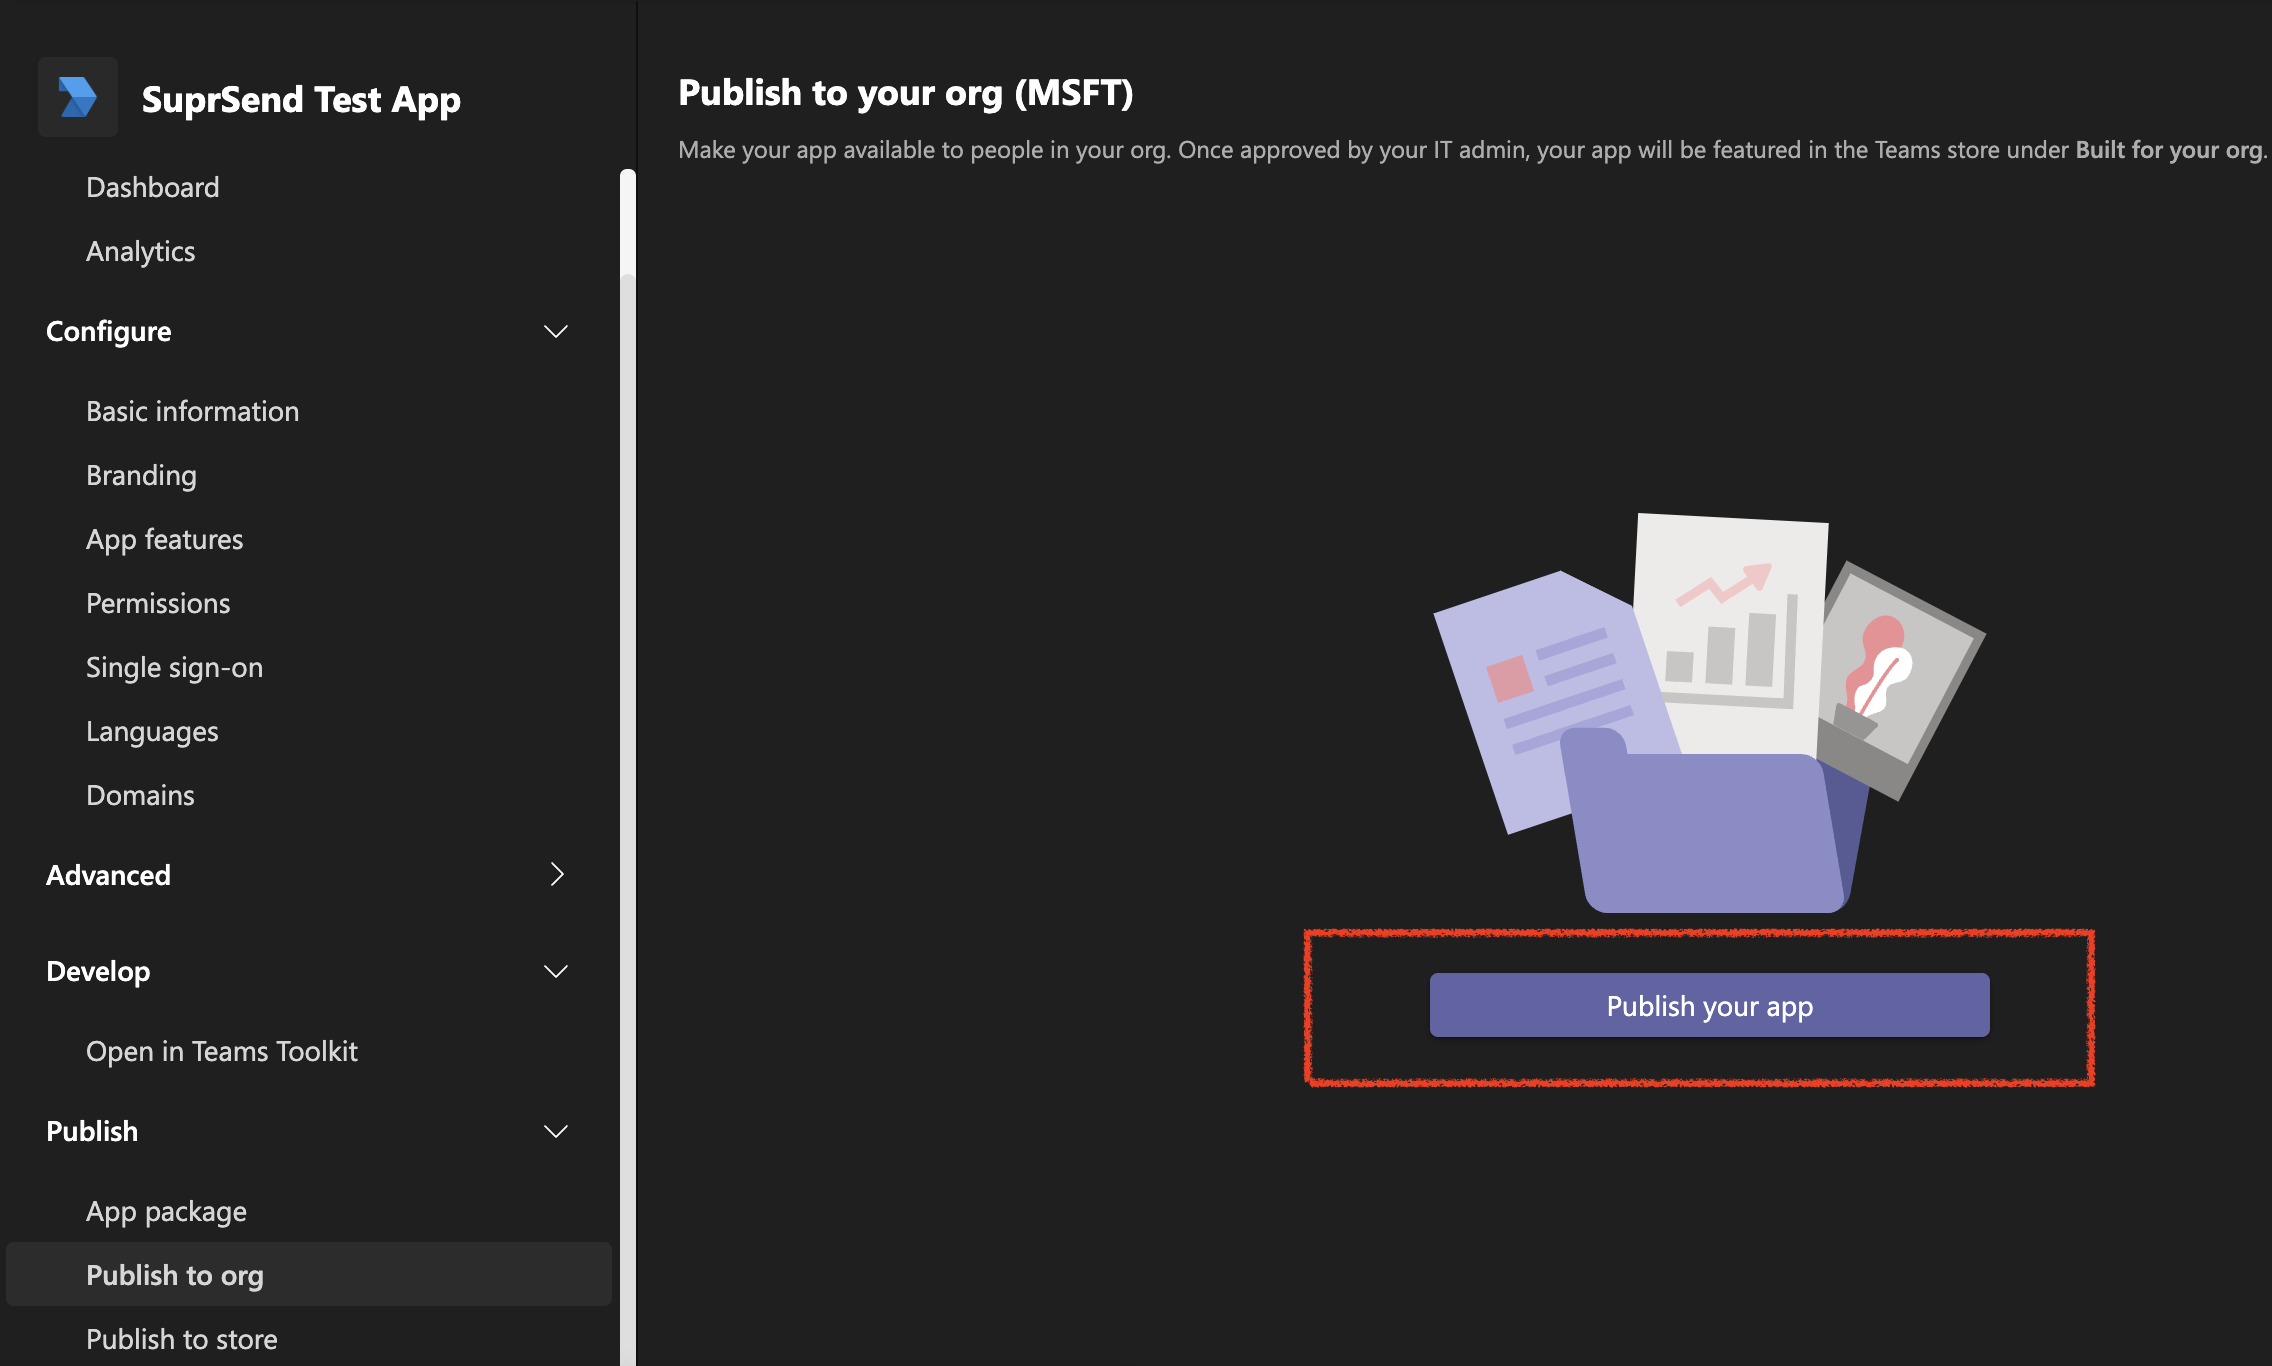 Your admin will have to approve the App for it to go live. For admin approval, go to [admin portal](https://admin.teams.microsoft.com/policies/manage-apps) and publish it again. Your App might take some time to go live once it is published.
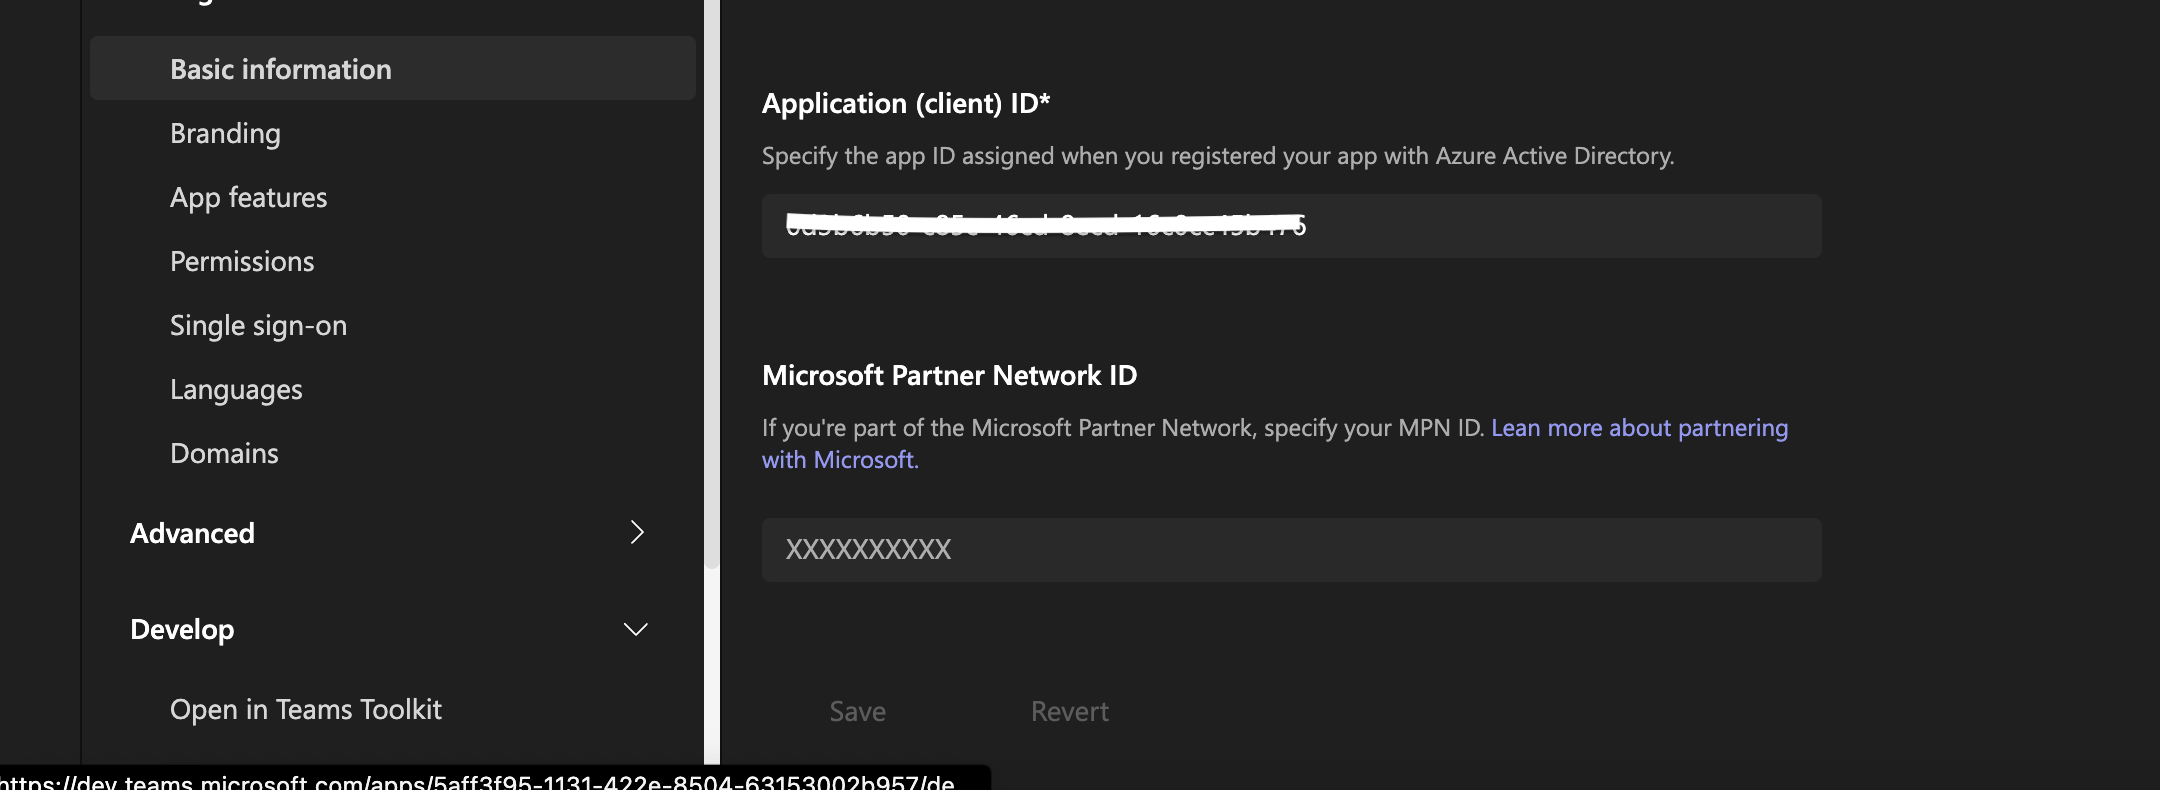 Now go to [https://teams.microsoft.com/](https://teams.microsoft.com/) and **ADD** the app . First, from left panel select Apps with a + sign and then In the section "Built for this organization", there will be an option to Add the app.
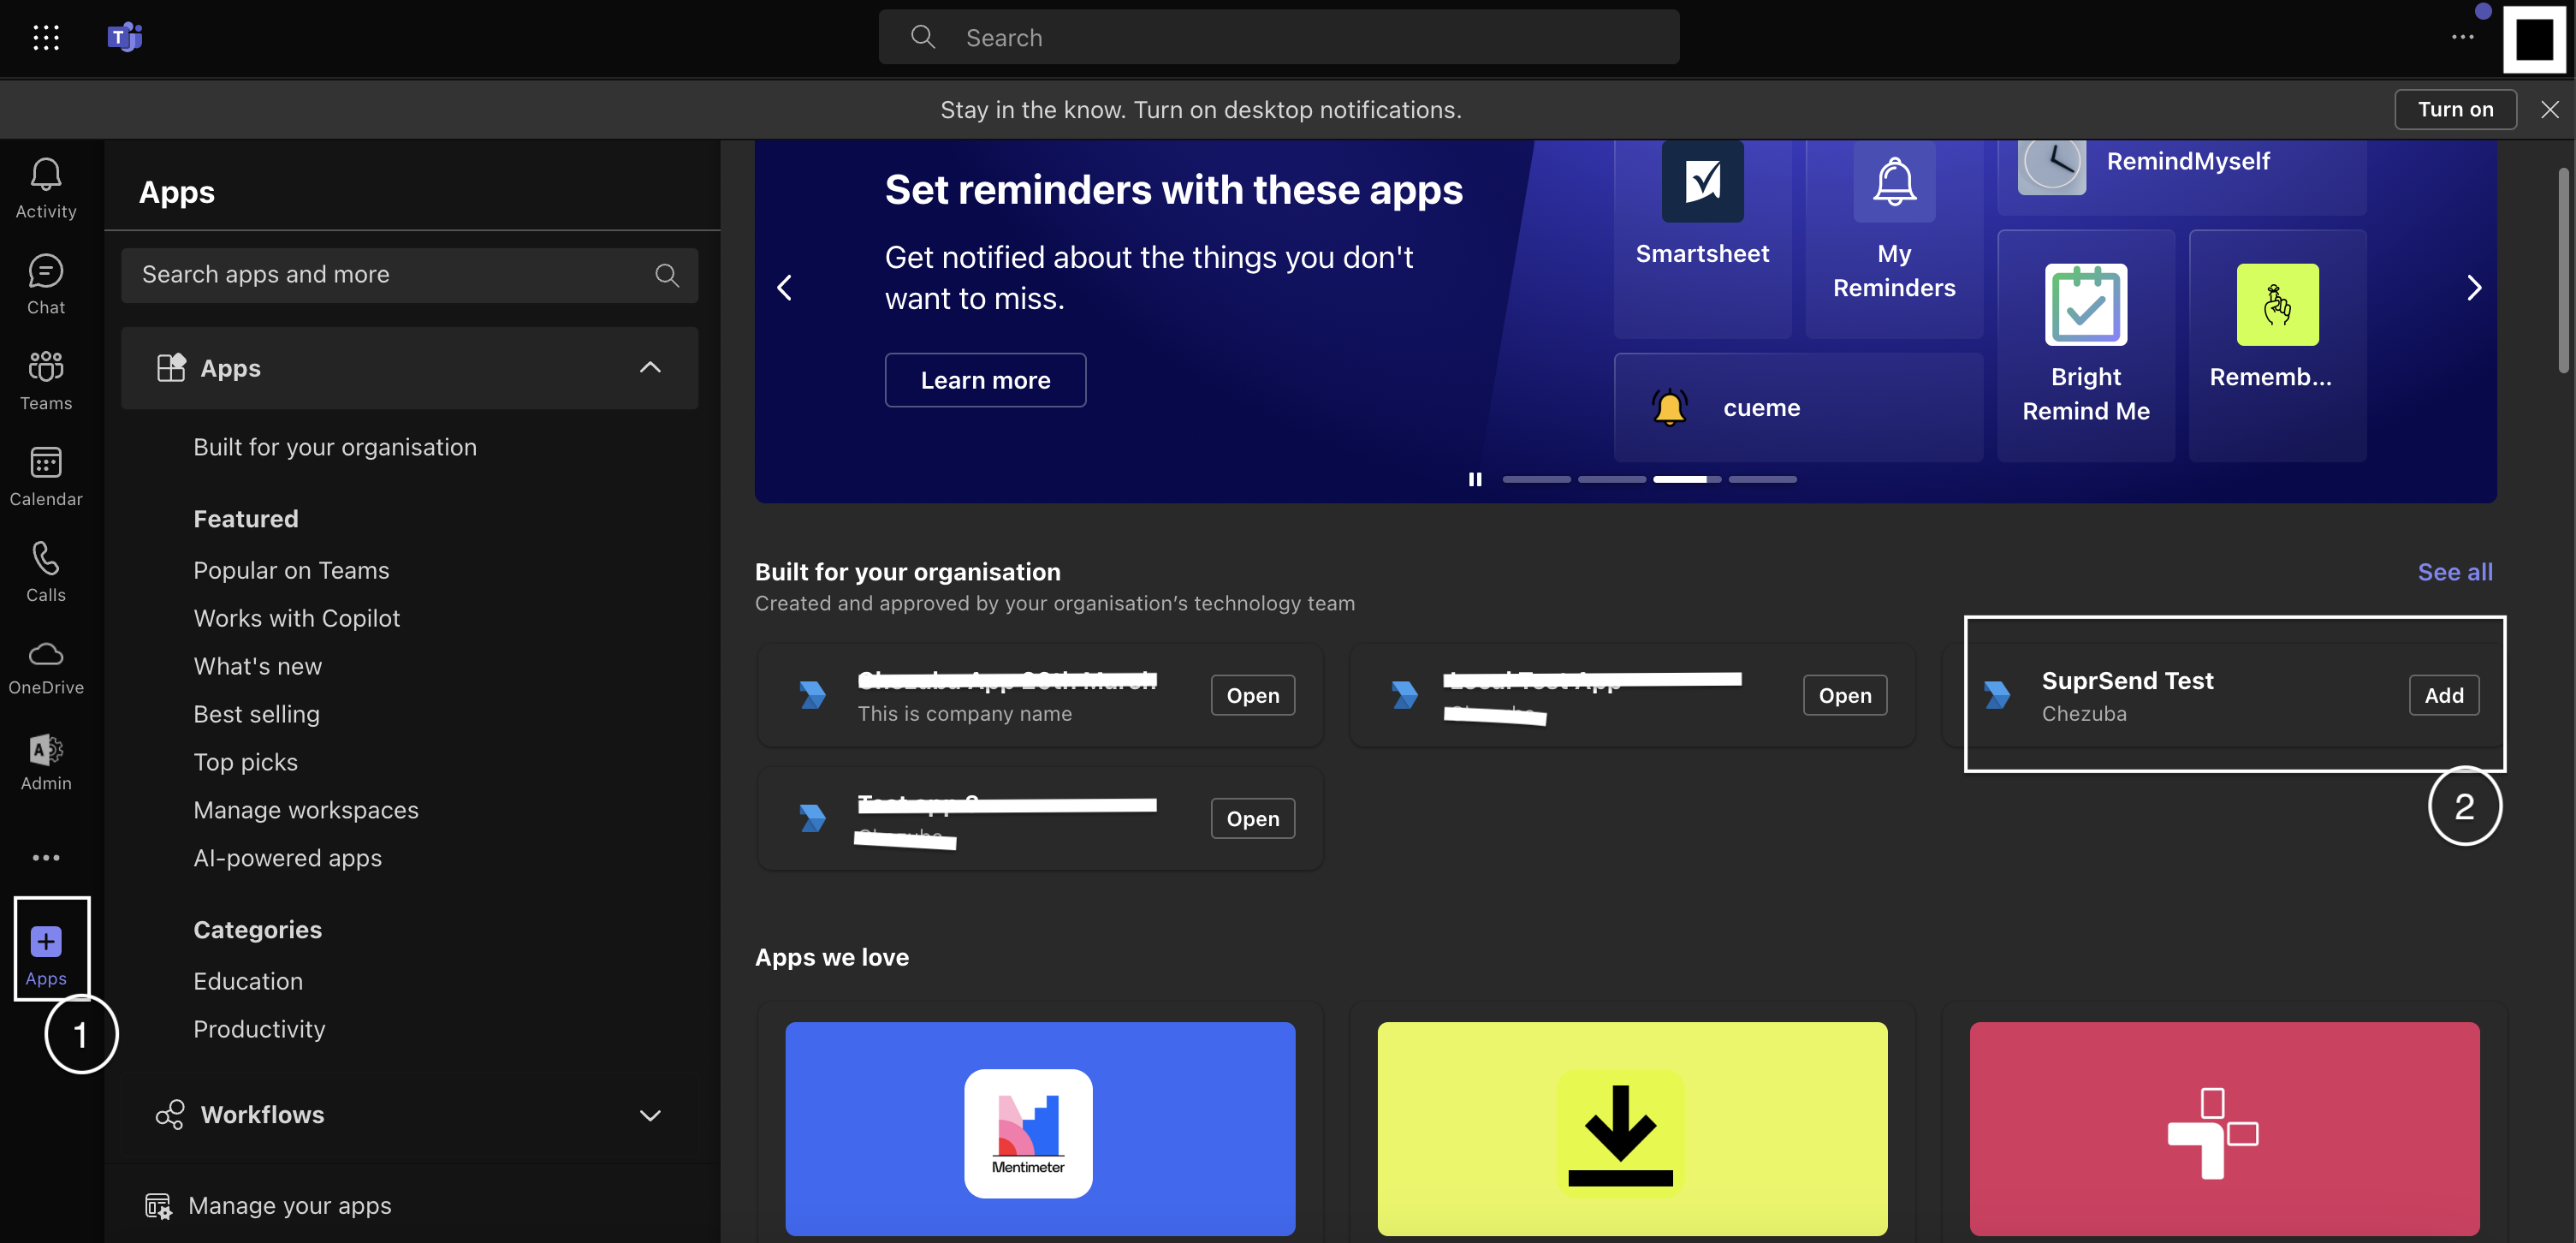
 ## Update teams channel in user or object profile
The information required in the user profile is dependent on the type of message you are sending.
## Update teams channel in user or object profile
The information required in the user profile is dependent on the type of message you are sending.
 You can get **user\_id** by following the steps to [fetch the roster or user profile](https://learn.microsoft.com/en-us/microsoftteams/platform/bots/how-to/get-teams-context?tabs=json#fetch-the-roster-or-user-profile). You'll need authentication token to fetch user profile. You can get this token from SuprSend vendor page after saving the form.
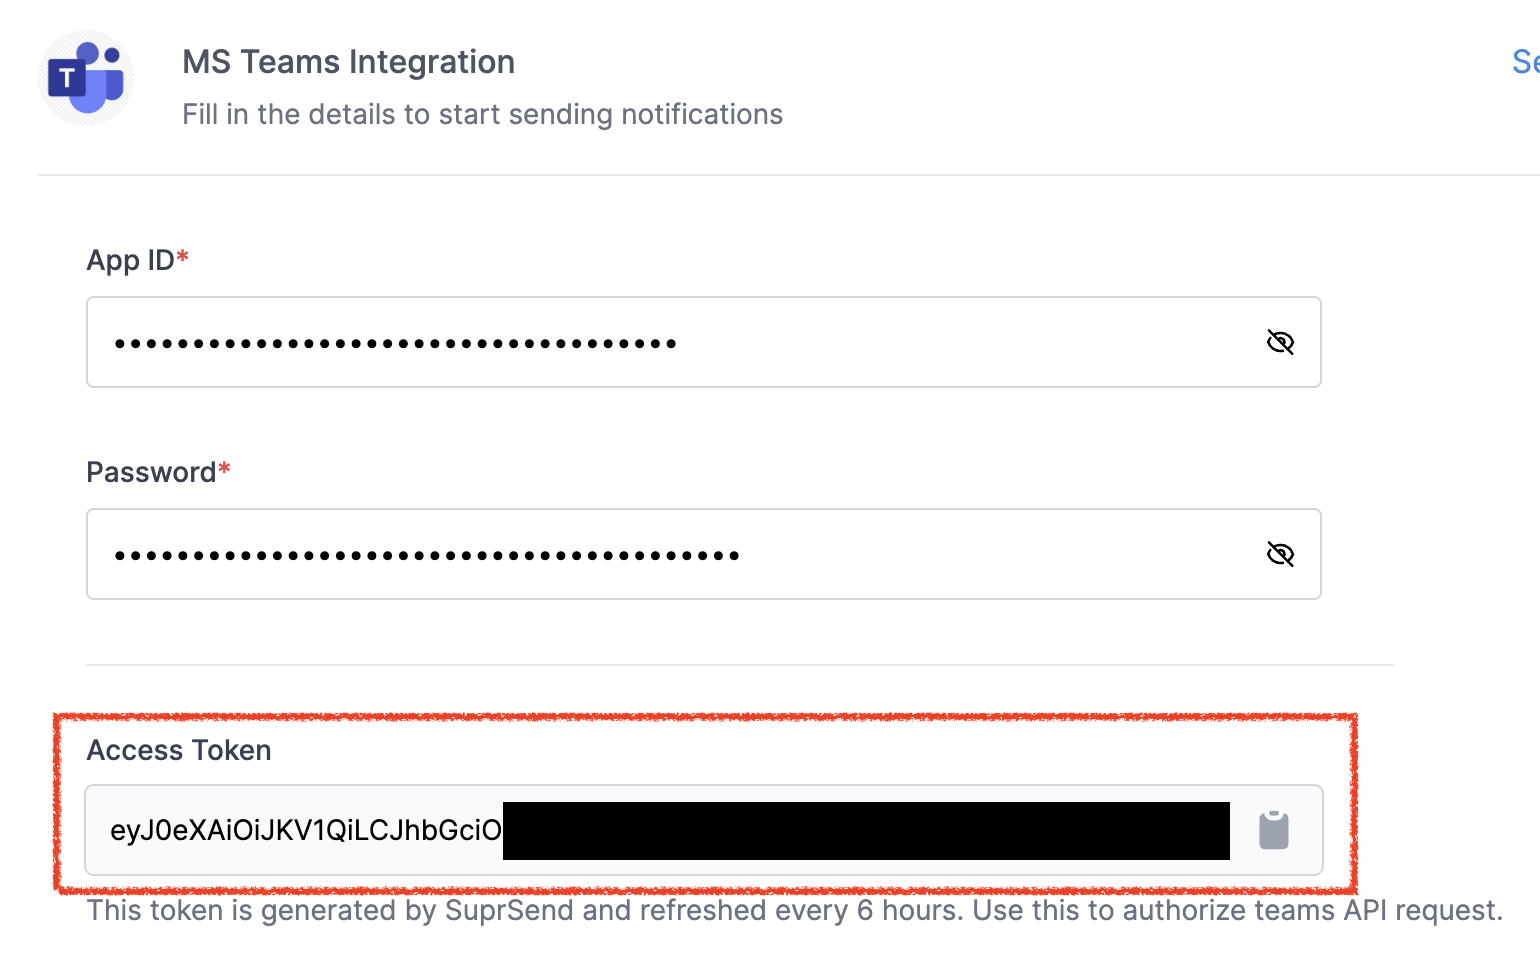
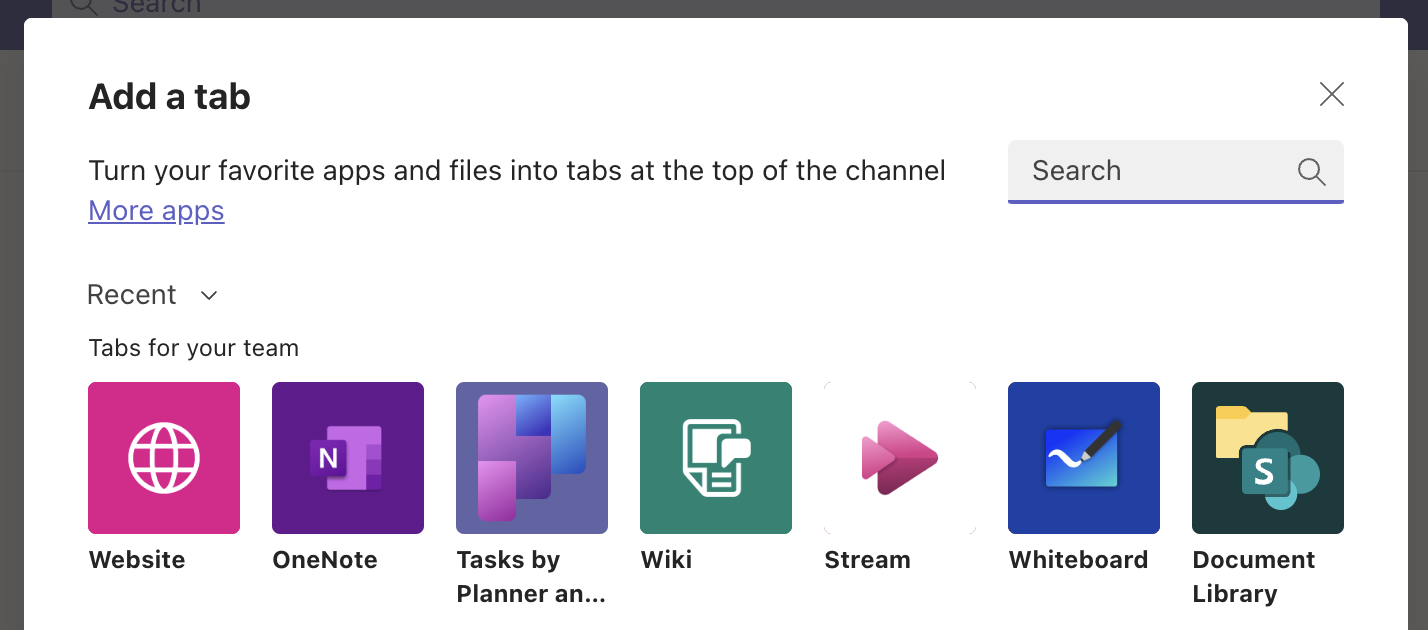 You'll see your App in your organization. Click on the App and **Add to the team**.
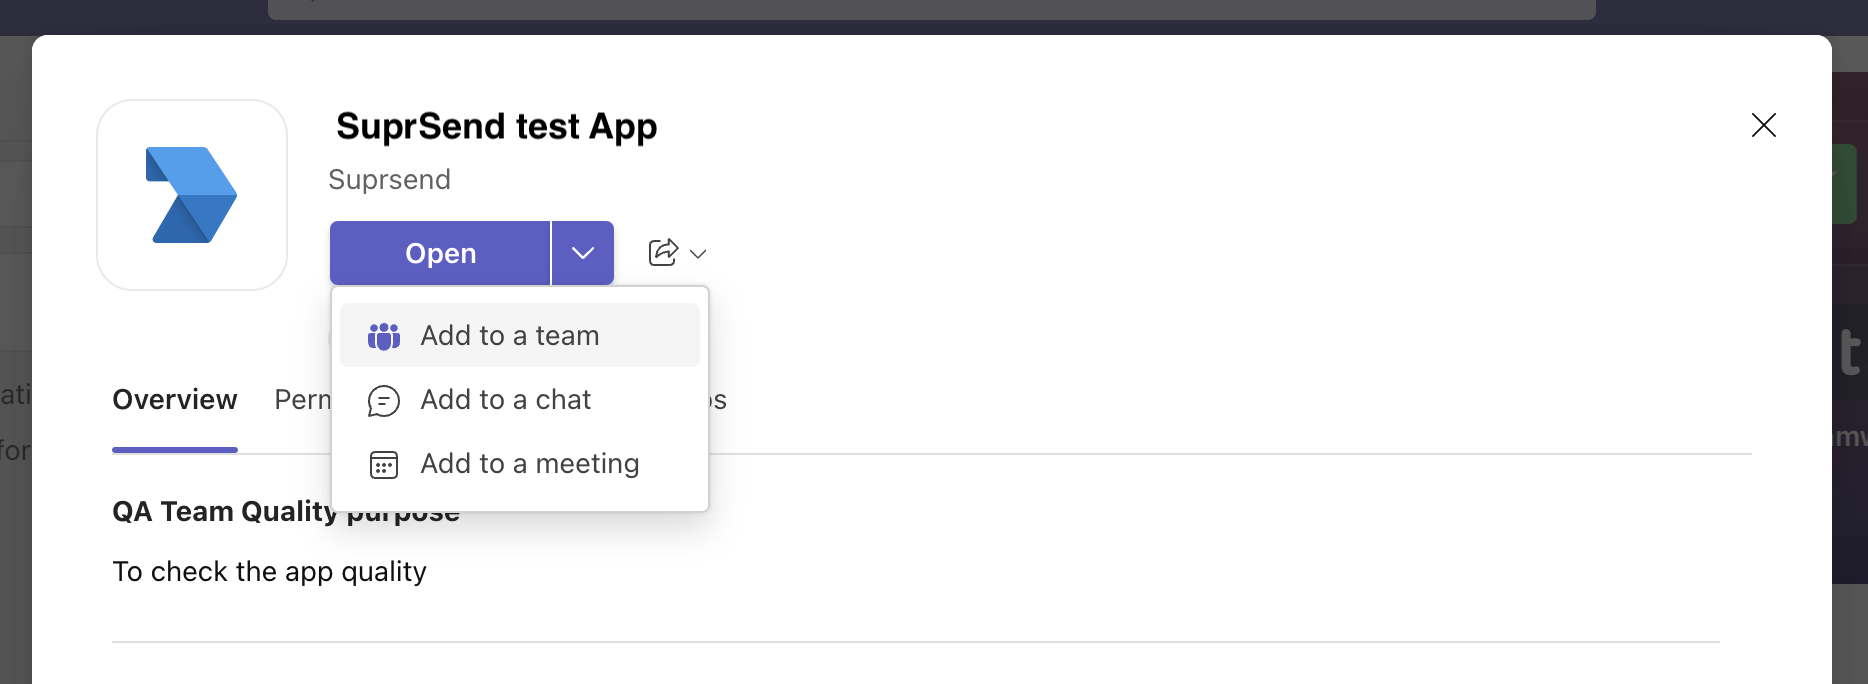 We recommend creating a separate user for identifying channels and not mix it in user profile. You can create a teams channel user with `distinct_id` as `channel_
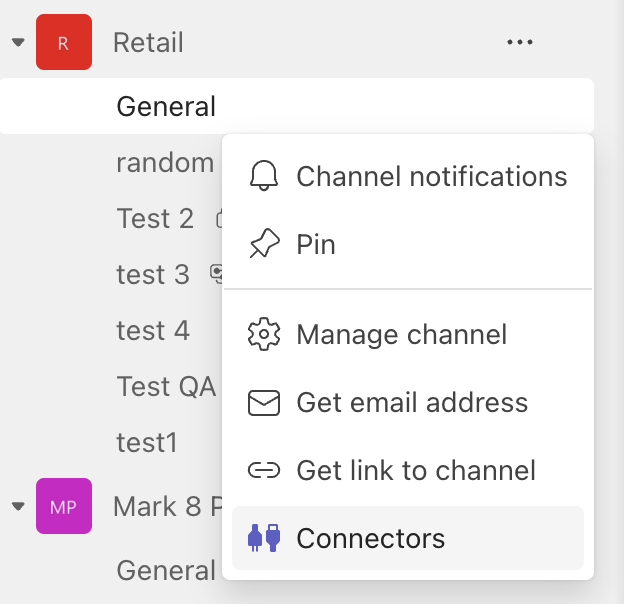 Configure **Incoming webhook** in connectors. Click on create and copy the webhook URL
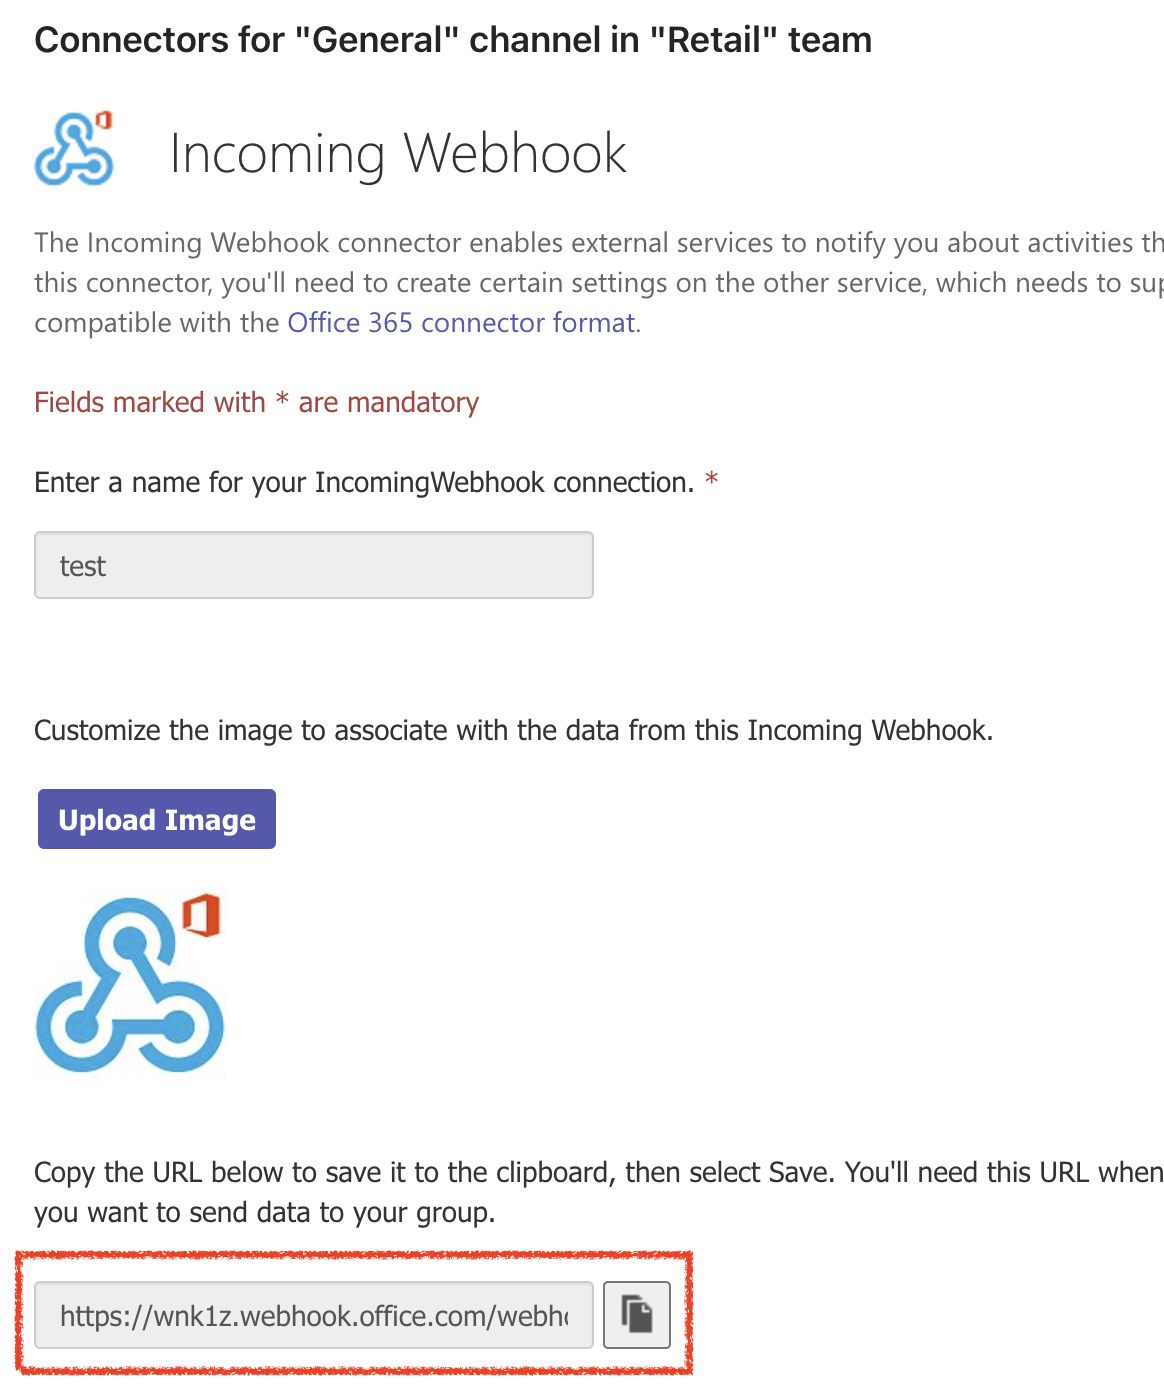
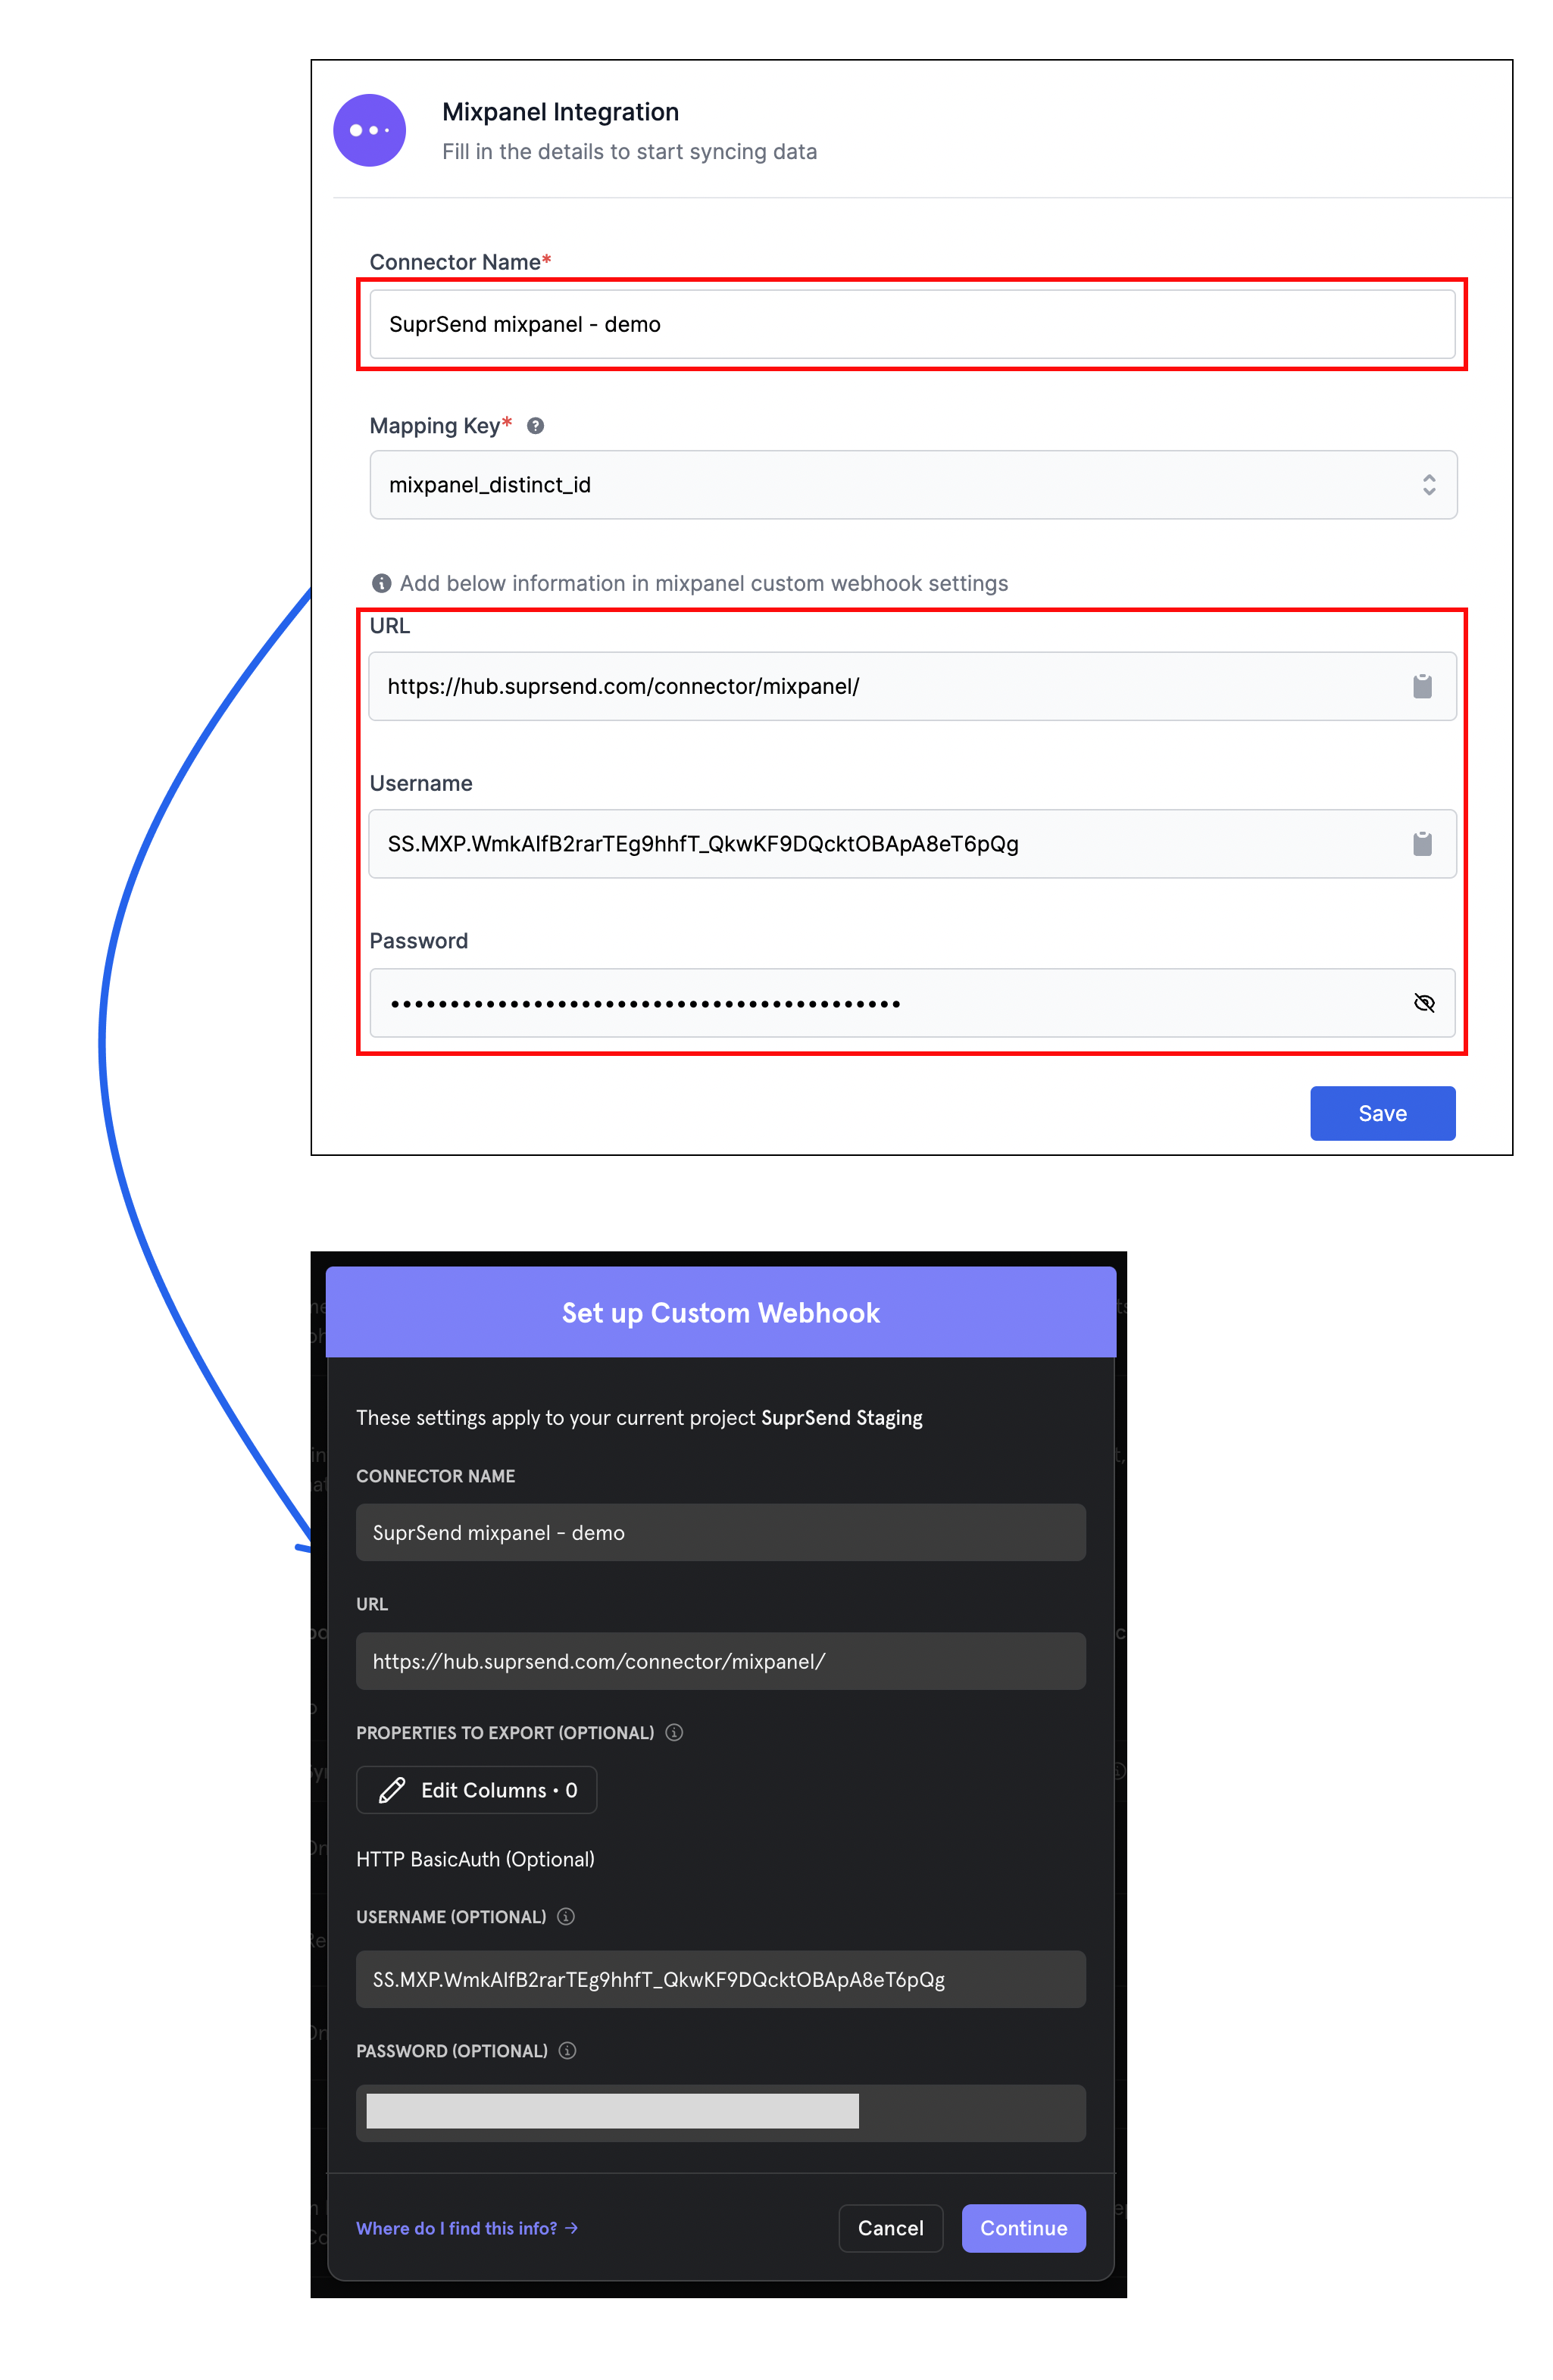 SuprSend webhook is now setup in your Mixpanel account. You can now start exporting user cohorts.
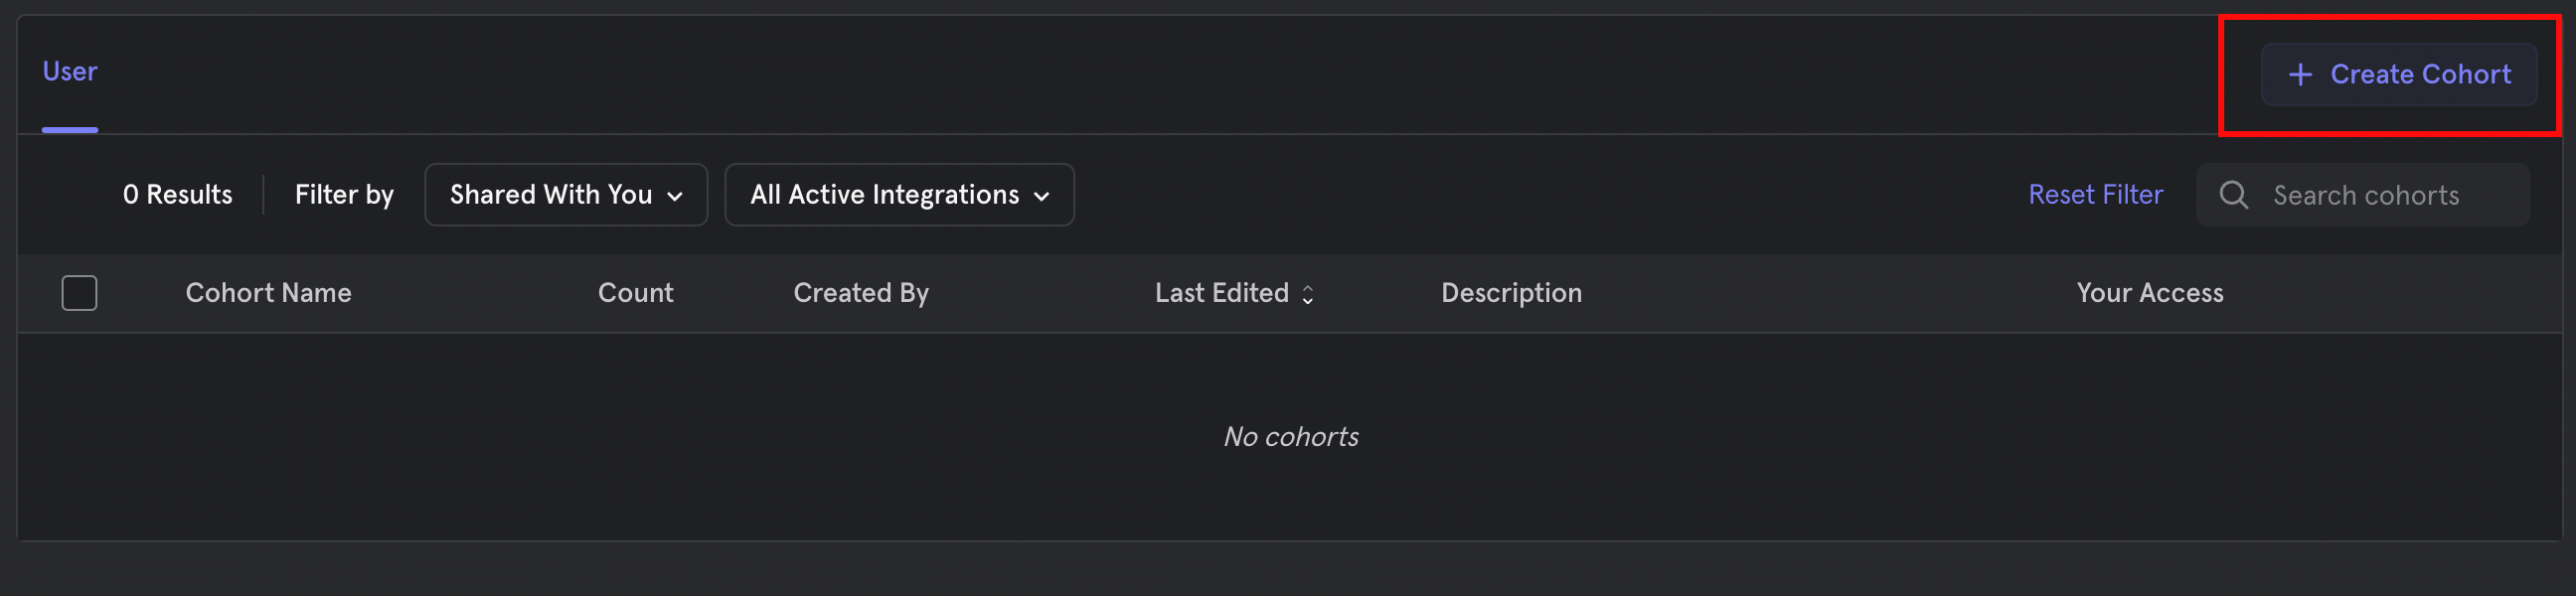
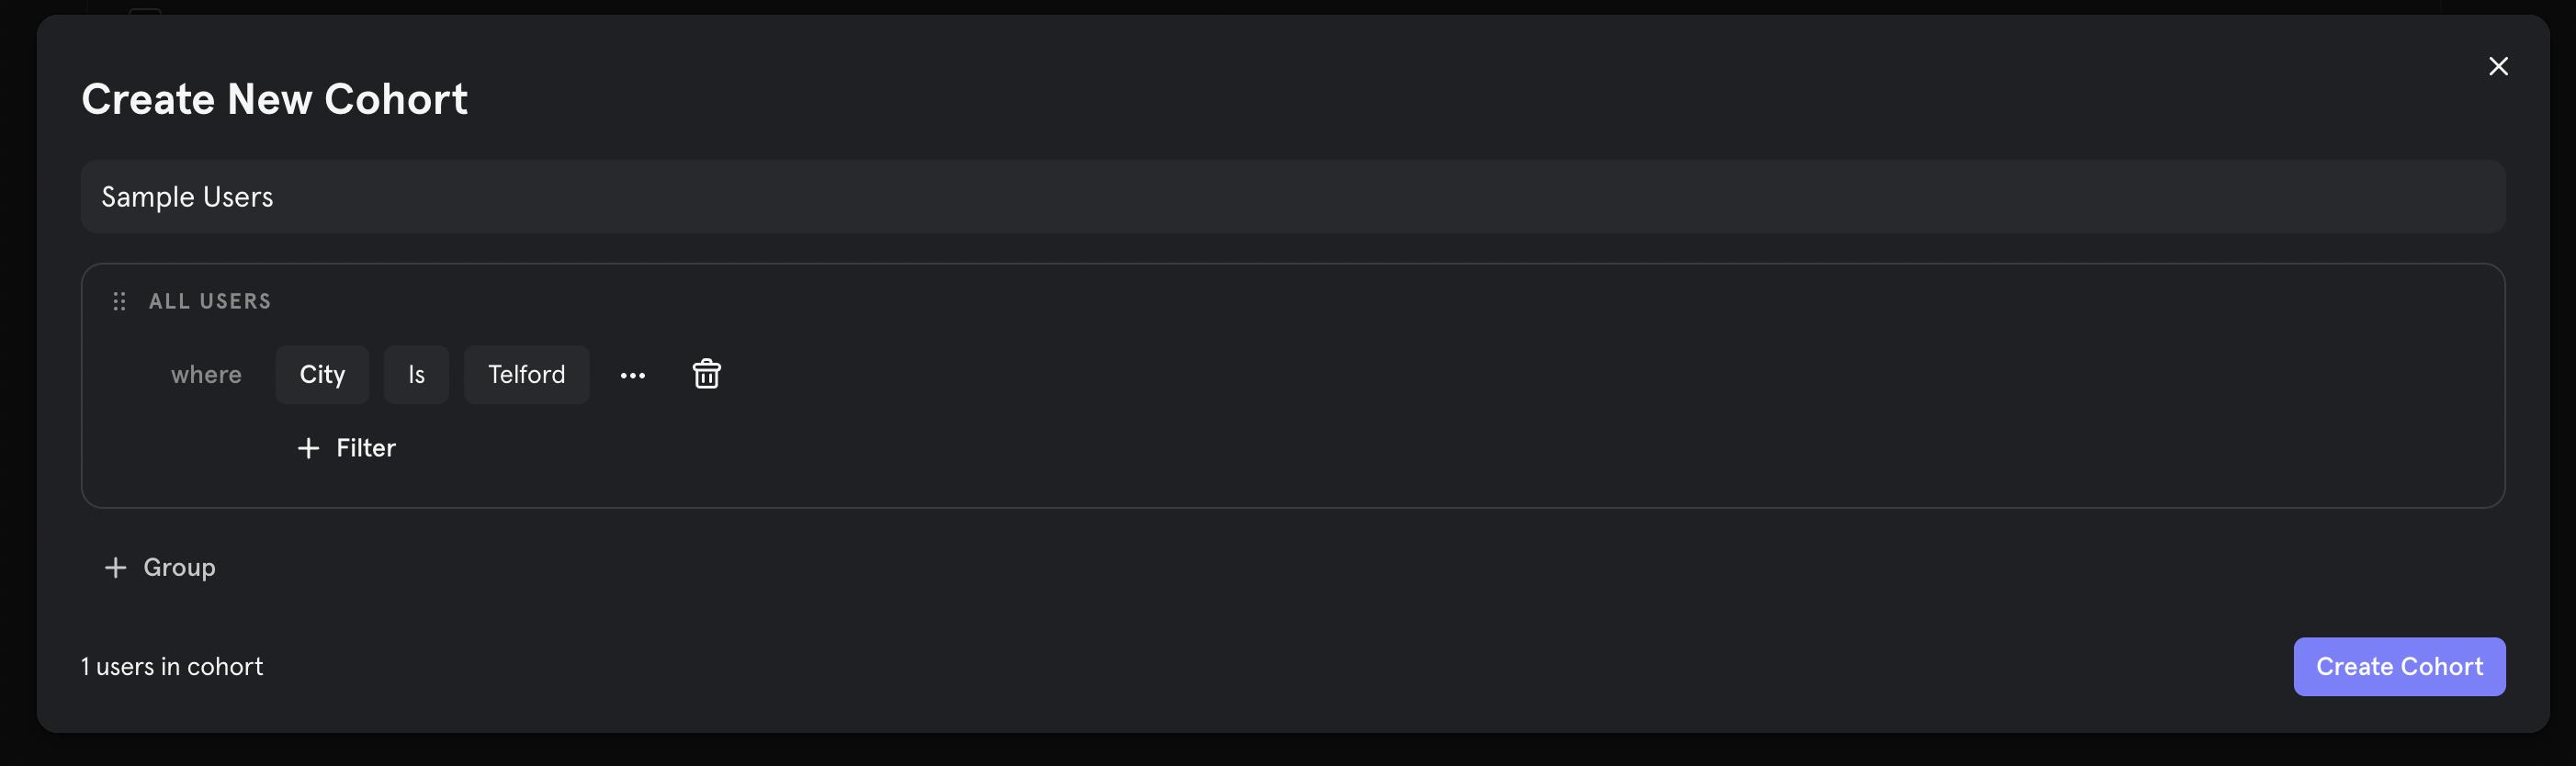
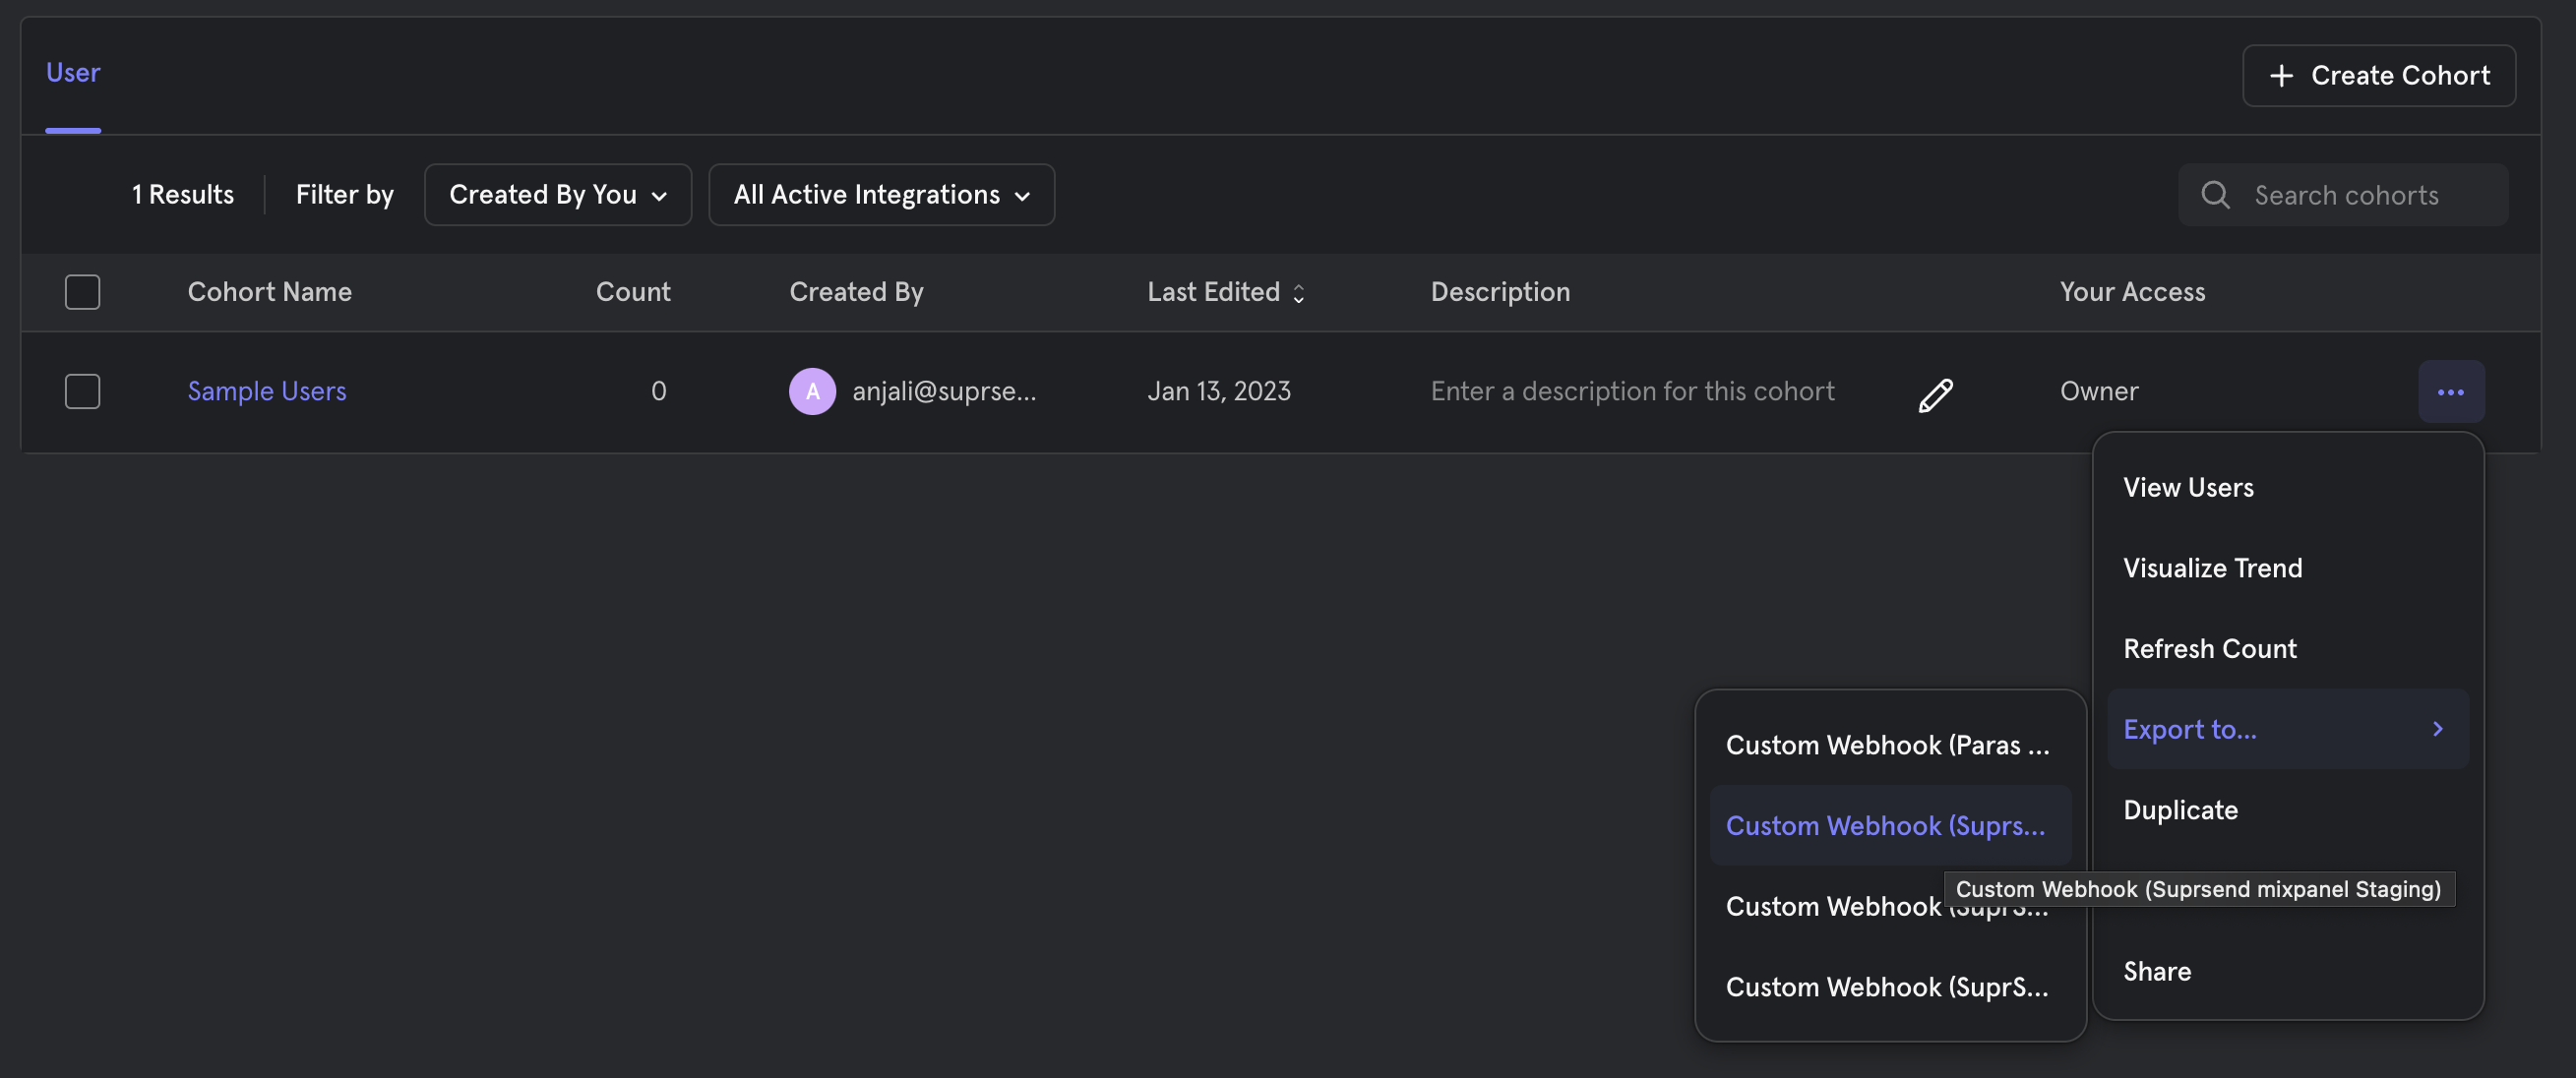 You can setup 2 types of cohort exports - One time and Recurring. We recommend using recurring sync to keep Mixpanel and SuprSend data in sync. Click on Begin Sync to start cohort sync. Data is updated every 30 minutes from sync start time.
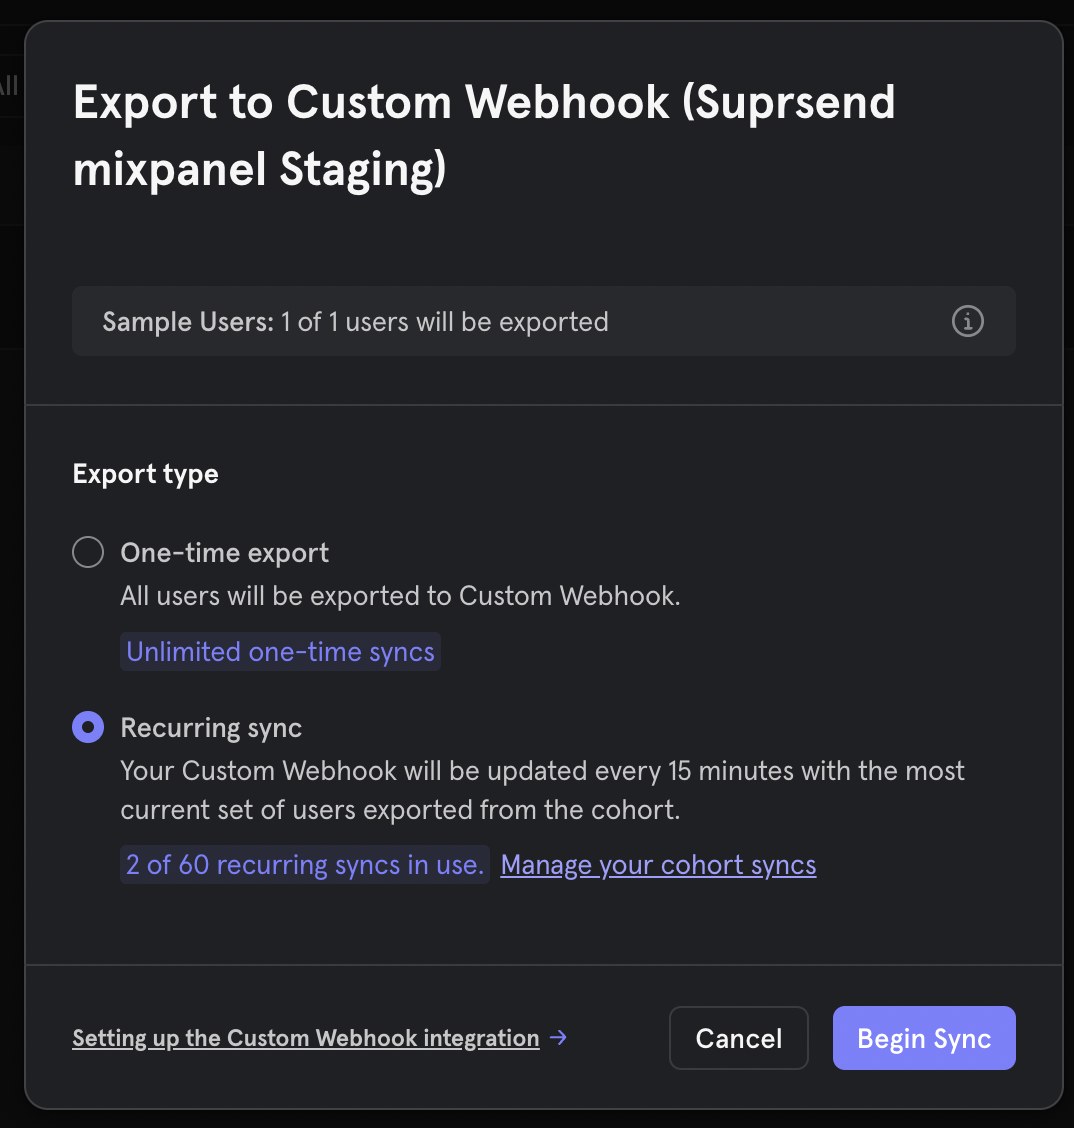 Congratulations! Mixpanel integration is now complete.
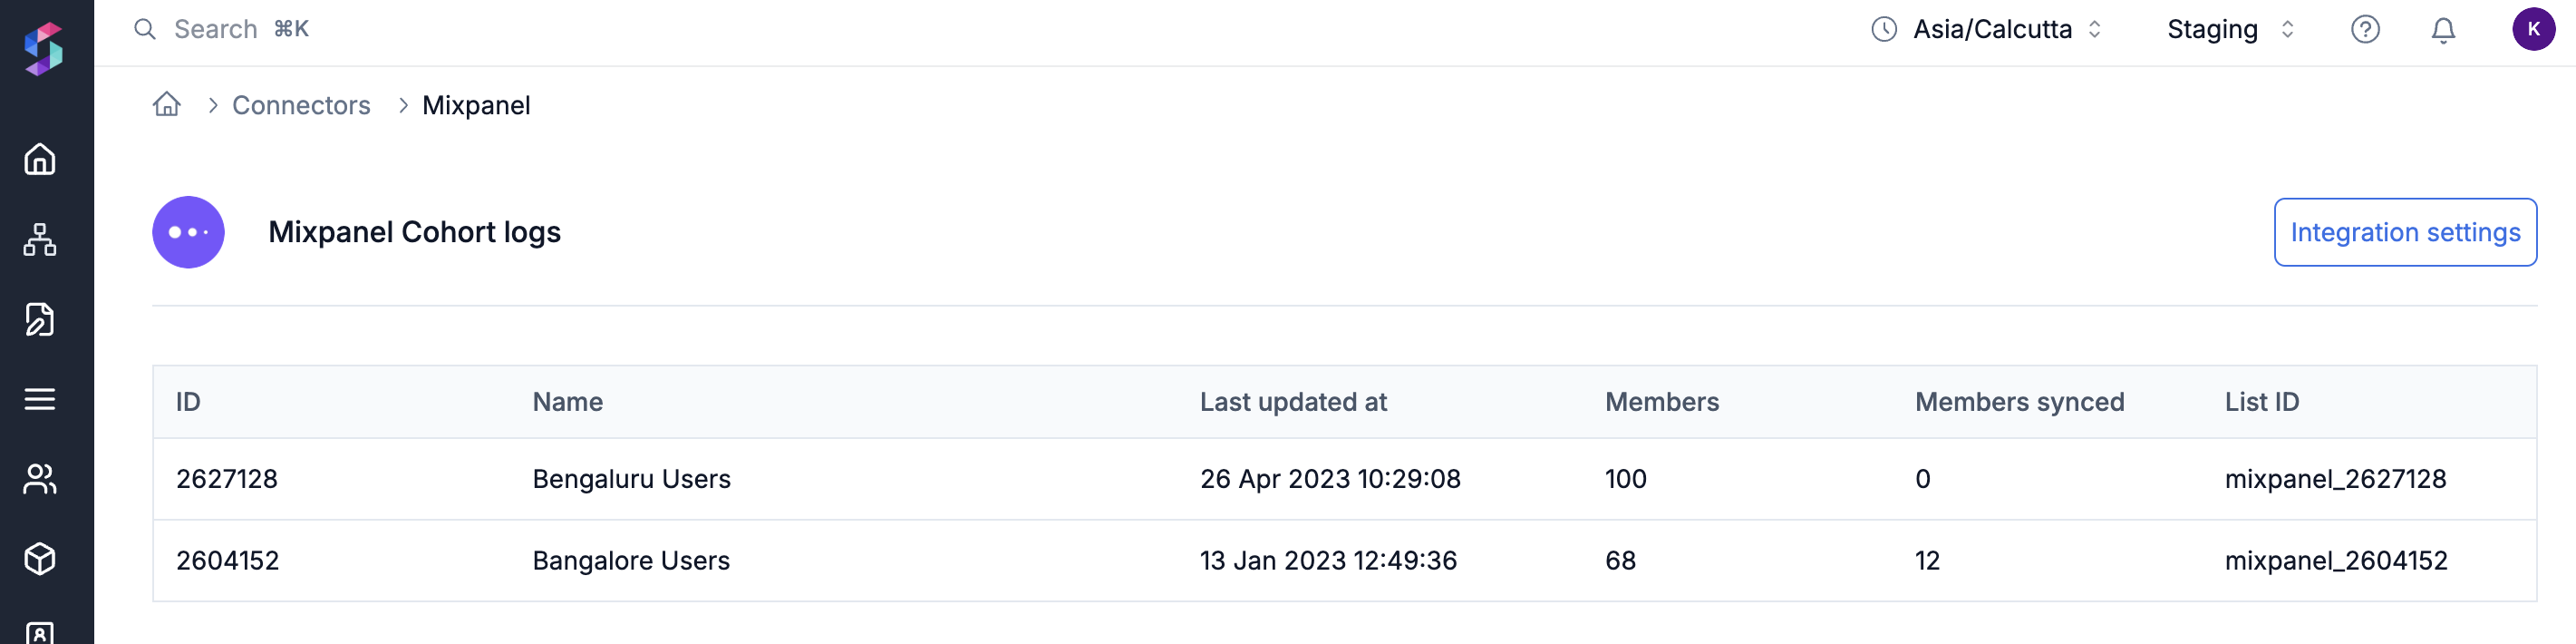 # Mobile Push
Source: https://docs.suprsend.com/docs/mobile-push-quick-start
Quickly set up & send Mobile Push notifications using SuprSend SDK
### Create SuprSend account
Simply [signup](https://auth.suprsend.com/sign-up) on SuprSend to create your account. If you already have your company account setup, ask your admin to invite you to the team.
### Integrate push channel in your application
For `Android` applications, Integrate SuprSend SDK and FCM (service provider for sending android push notifications).
| Language | Documentation | Example |
| :------------------------- | :--------------------------------------------------------------------------------------------------------------------------------------------------------------- | :--------------------------------------------------------------------------- |
| **Native Android** | [Integrate Android SDK](/docs/integrate-android-sdk) and [Integrate FCM](/docs/android-firebase-fcm-push-integration) in native application | - |
| **React Native (Android)** | [Integrate React Native SDK](/docs/react-native-android-integration) and [Integrate FCM](/docs/react-native-androidpush-integration) in react native application | [GitHub](https://github.com/suprsend/suprsend-rn-sdk/tree/main/example) |
| **Flutter (Android)** | [Integrate Flutter SDK](/docs/flutter-android-integration) and [Integrate FCM](/docs/flutter-androidpush-integration) in flutter application | [GitHub](https://github.com/suprsend/suprsend-flutter-sdk/tree/main/example) |
For `iOS` applications, Integrate SuprSend SDK and APNS (service provider for sending iOS Push notifications)
| Language | Documentation | Example |
| :--------------------- | :------------------------------------------------------------------------------------------------------------------------------------------------------------- | :--------------------------------------------------------------------------- |
| **Native iOS** | [Integrate iOS SDK](https://docs.suprsend.com/docs/ios-integration) and [Integrate APNS](https://docs.suprsend.com/docs/ios-apns-push) in native application | - |
| **React Native (iOS)** | [Integrate React Native SDK](/docs/react-native-android-integration) and [Integrate APNS](/docs/react-native-ios-push-integration) in react native application | [GitHub](https://github.com/suprsend/suprsend-rn-sdk/tree/main/example) |
| **Flutter (iOS)** | [Integrate Flutter SDK](/docs/flutter-ios-integration) and [Integrate APNS](/docs/flutter-ios-push-integration) in flutter application | [GitHub](https://github.com/suprsend/suprsend-flutter-sdk/tree/main/example) |
### Start testing in Sandbox workspace
Your SuprSend account includes three default workspaces: Sandbox, Staging, and Production. You can switch between them from the top navigation bar, and create additional workspaces if needed.
1. **Sandbox**
* **Demo Workspace** with pre-configured vendors for quick exploration and POC.
* Includes a sample workflow, a sample user with your registered email and pre-configured channels for quick testing.
* Limitation: Available for a trial period of 30 days.
2. **Staging**
* **Development workspace** used to test notification flows before pushing it to production.
* You can enable [Test Mode](/docs/developer/test-mode) to safely test notification flows without delivering to real users. In Test Mode, notifications is delivered only to designated internal testers. You can also set up a catch-all channel to redirect all notifications intended for non-test users.
3. **Production**
* **Live workspace** for syncing your actual product users and running production workflows.
* We do not recommend making changes directly in your production workspace as it might disrupt your live notifications.
# Mobile Push
Source: https://docs.suprsend.com/docs/mobile-push-quick-start
Quickly set up & send Mobile Push notifications using SuprSend SDK
### Create SuprSend account
Simply [signup](https://auth.suprsend.com/sign-up) on SuprSend to create your account. If you already have your company account setup, ask your admin to invite you to the team.
### Integrate push channel in your application
For `Android` applications, Integrate SuprSend SDK and FCM (service provider for sending android push notifications).
| Language | Documentation | Example |
| :------------------------- | :--------------------------------------------------------------------------------------------------------------------------------------------------------------- | :--------------------------------------------------------------------------- |
| **Native Android** | [Integrate Android SDK](/docs/integrate-android-sdk) and [Integrate FCM](/docs/android-firebase-fcm-push-integration) in native application | - |
| **React Native (Android)** | [Integrate React Native SDK](/docs/react-native-android-integration) and [Integrate FCM](/docs/react-native-androidpush-integration) in react native application | [GitHub](https://github.com/suprsend/suprsend-rn-sdk/tree/main/example) |
| **Flutter (Android)** | [Integrate Flutter SDK](/docs/flutter-android-integration) and [Integrate FCM](/docs/flutter-androidpush-integration) in flutter application | [GitHub](https://github.com/suprsend/suprsend-flutter-sdk/tree/main/example) |
For `iOS` applications, Integrate SuprSend SDK and APNS (service provider for sending iOS Push notifications)
| Language | Documentation | Example |
| :--------------------- | :------------------------------------------------------------------------------------------------------------------------------------------------------------- | :--------------------------------------------------------------------------- |
| **Native iOS** | [Integrate iOS SDK](https://docs.suprsend.com/docs/ios-integration) and [Integrate APNS](https://docs.suprsend.com/docs/ios-apns-push) in native application | - |
| **React Native (iOS)** | [Integrate React Native SDK](/docs/react-native-android-integration) and [Integrate APNS](/docs/react-native-ios-push-integration) in react native application | [GitHub](https://github.com/suprsend/suprsend-rn-sdk/tree/main/example) |
| **Flutter (iOS)** | [Integrate Flutter SDK](/docs/flutter-ios-integration) and [Integrate APNS](/docs/flutter-ios-push-integration) in flutter application | [GitHub](https://github.com/suprsend/suprsend-flutter-sdk/tree/main/example) |
### Start testing in Sandbox workspace
Your SuprSend account includes three default workspaces: Sandbox, Staging, and Production. You can switch between them from the top navigation bar, and create additional workspaces if needed.
1. **Sandbox**
* **Demo Workspace** with pre-configured vendors for quick exploration and POC.
* Includes a sample workflow, a sample user with your registered email and pre-configured channels for quick testing.
* Limitation: Available for a trial period of 30 days.
2. **Staging**
* **Development workspace** used to test notification flows before pushing it to production.
* You can enable [Test Mode](/docs/developer/test-mode) to safely test notification flows without delivering to real users. In Test Mode, notifications is delivered only to designated internal testers. You can also set up a catch-all channel to redirect all notifications intended for non-test users.
3. **Production**
* **Live workspace** for syncing your actual product users and running production workflows.
* We do not recommend making changes directly in your production workspace as it might disrupt your live notifications. Enter the variables in `JSON` format as shown in the screenshot below. This JSON should be the same as passed in your workflow or event request (it is a part of the `data` field for workflow and `properties` field for event).
 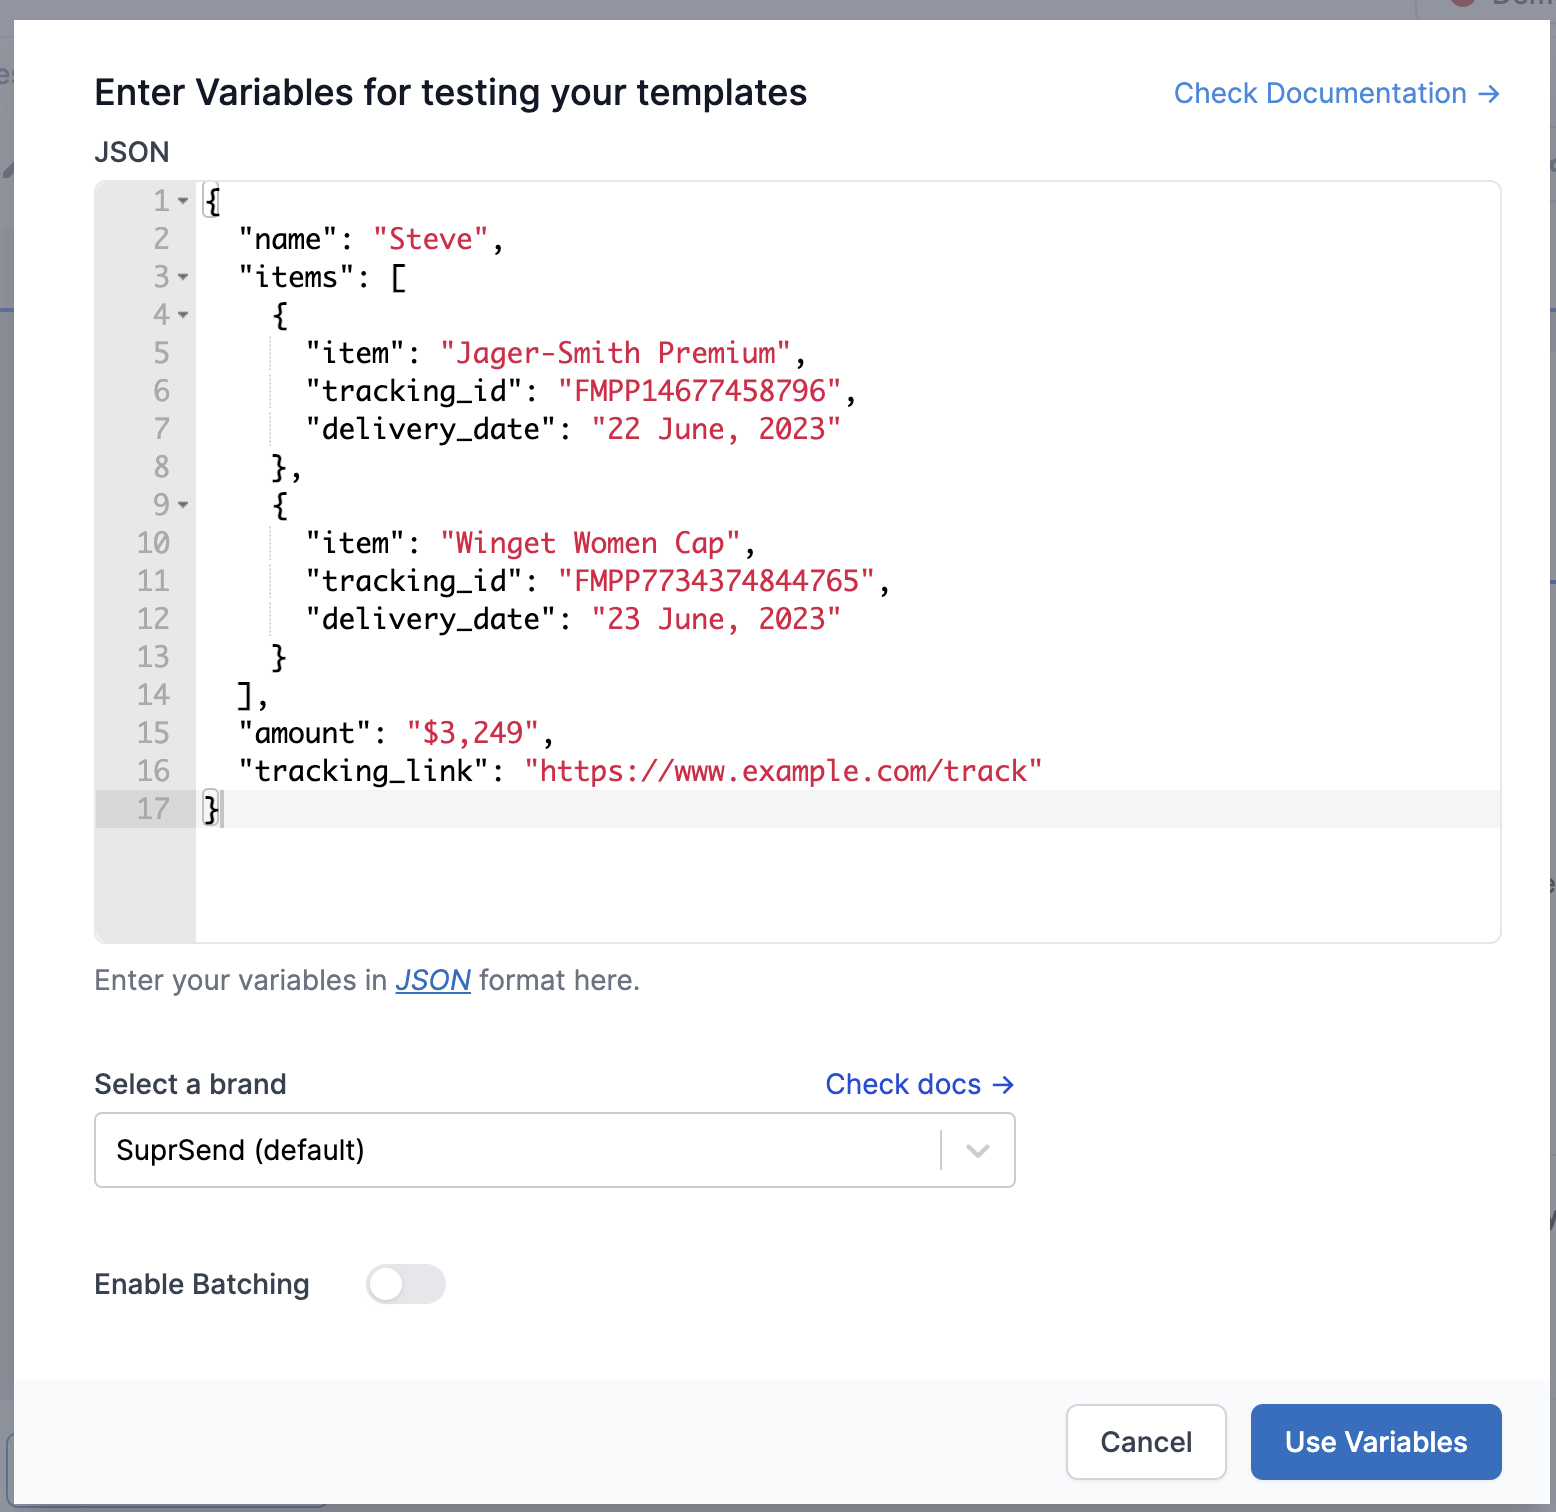 Now, you can use your added sample by adding variables in the template. Type `{{` and you'll start getting auto-suggestions of the variables added in your sample data below the text field. You can select the variable from the dropdown or directly type it in.
As a general rule, all the variables have to be entered within double curly brackets: `{{variable_name}}`. For URLs and links, we recommend using triple curly braces `{{{url}}}`.This is to avoid escaping html entities in handlebars. You can also write transformations like date-time formatting, if-else statement inside your templates using [handlebar helpers](/docs/handlebars-helpers).
Now, you can use your added sample by adding variables in the template. Type `{{` and you'll start getting auto-suggestions of the variables added in your sample data below the text field. You can select the variable from the dropdown or directly type it in.
As a general rule, all the variables have to be entered within double curly brackets: `{{variable_name}}`. For URLs and links, we recommend using triple curly braces `{{{url}}}`.This is to avoid escaping html entities in handlebars. You can also write transformations like date-time formatting, if-else statement inside your templates using [handlebar helpers](/docs/handlebars-helpers).
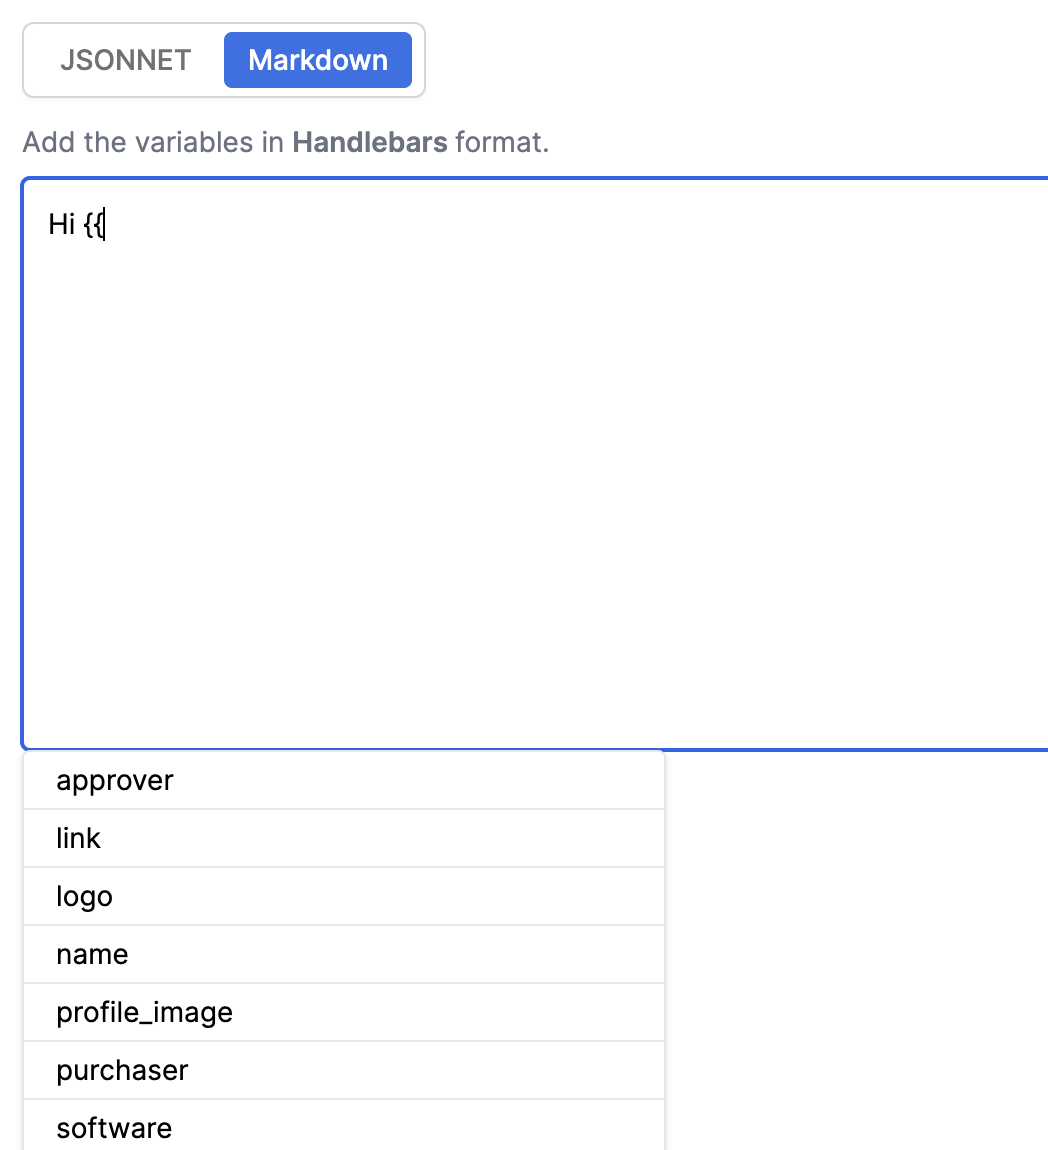 ### Design adaptive card template using JSONNET editor
You can switch to JSONNET editor for advanced formatting and interactive options like buttons, images, and avatars. Microsoft provides support for [adaptive card design](https://adaptivecards.io/designer/) to design such templates using a drag-and-drop editor. You can design your template in the adaptive card designer and copy the JSON payload from your designer into the Teams JSONNET editor.
We have also created some sample templates for a quick start. You can choose one of the samples from the right side options on top of the editor to start editing. We have used some mock data in our examples. Copy-paste the mock data values in the global `Mock Data` button to see the preview.
### Design adaptive card template using JSONNET editor
You can switch to JSONNET editor for advanced formatting and interactive options like buttons, images, and avatars. Microsoft provides support for [adaptive card design](https://adaptivecards.io/designer/) to design such templates using a drag-and-drop editor. You can design your template in the adaptive card designer and copy the JSON payload from your designer into the Teams JSONNET editor.
We have also created some sample templates for a quick start. You can choose one of the samples from the right side options on top of the editor to start editing. We have used some mock data in our examples. Copy-paste the mock data values in the global `Mock Data` button to see the preview.
 Once the variables are declared, you can add them in the template as `data.
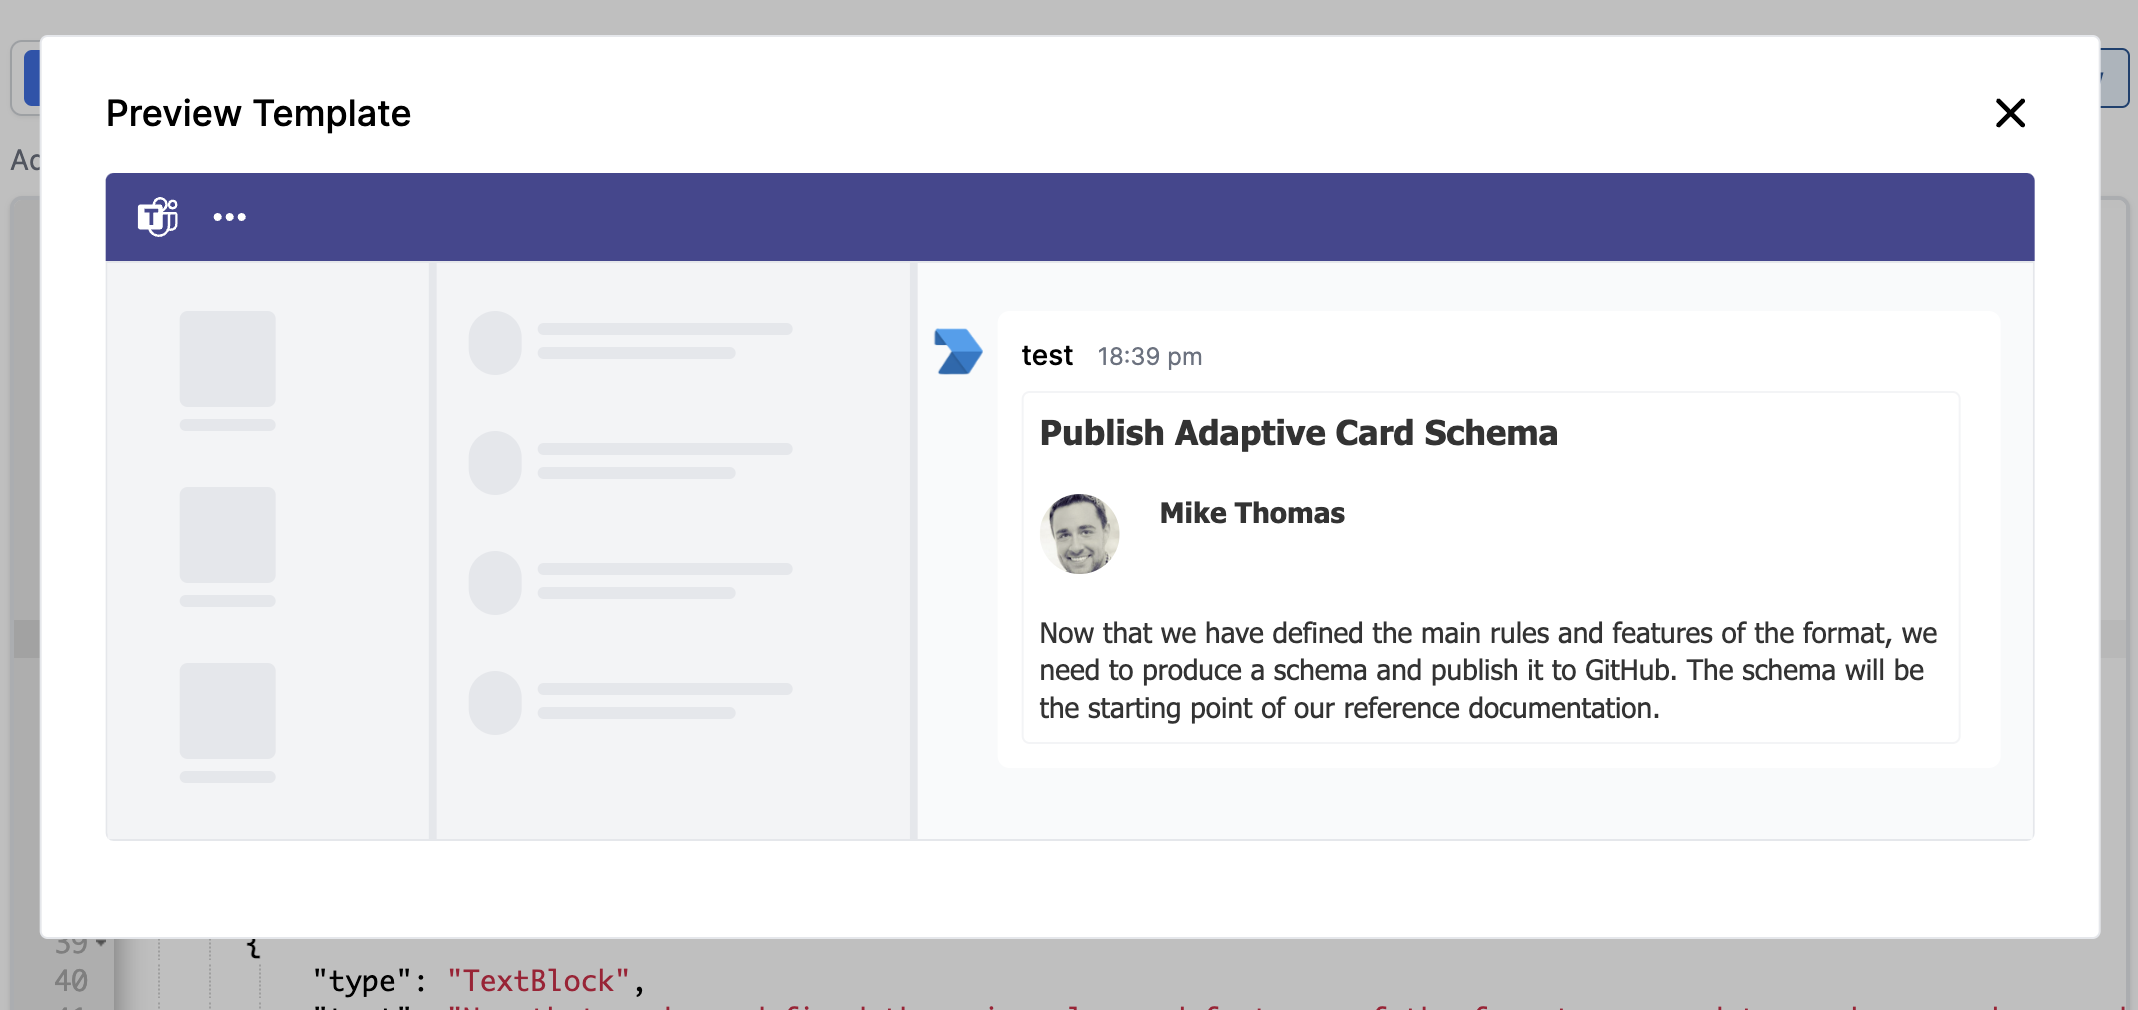 ## Publish the template
Once finalized, you can publish the template by clicking on `Publish template` button on the draft version.
## Publish the template
Once finalized, you can publish the template by clicking on `Publish template` button on the draft version.
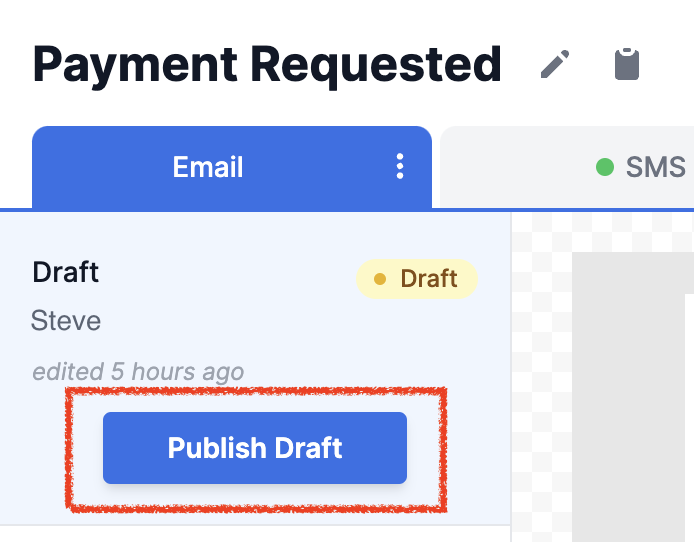 Your template is now ready to be triggered.
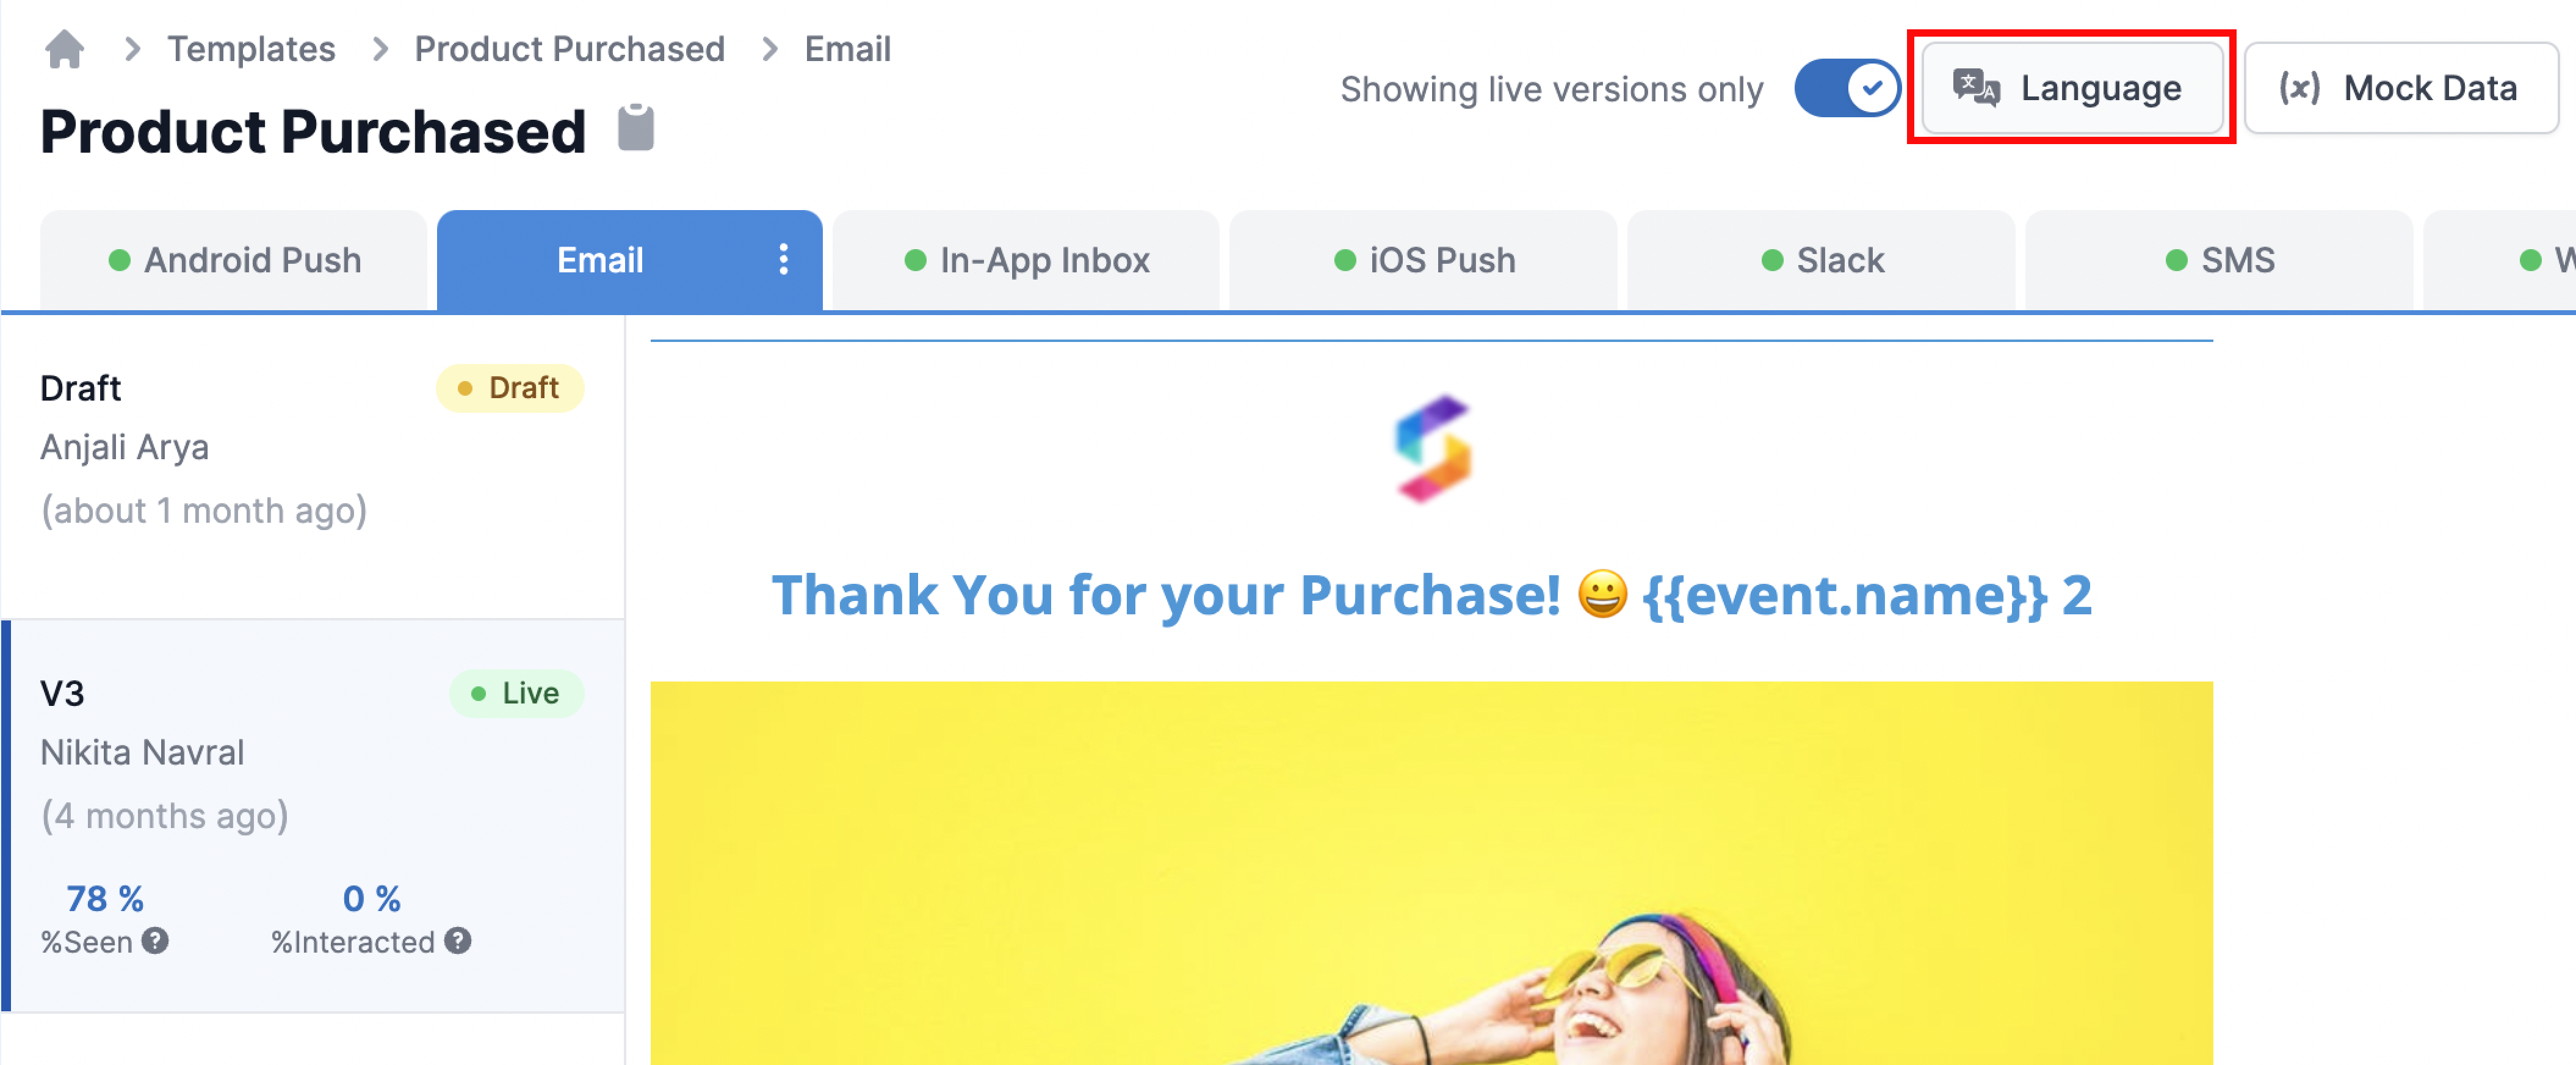 This will open language selection modal. Search the required language, add it and save the changes.
You'll also see `Auto Translate` option on top of the language modal. Enable it if you want SuprSend to translate the English content in your preferred language. [See how auto translation works](/docs/how-auto-translation-works)
This will open language selection modal. Search the required language, add it and save the changes.

You'll also see `Auto Translate` option on top of the language modal. Enable it if you want SuprSend to translate the English content in your preferred language. [See how auto translation works](/docs/how-auto-translation-works)
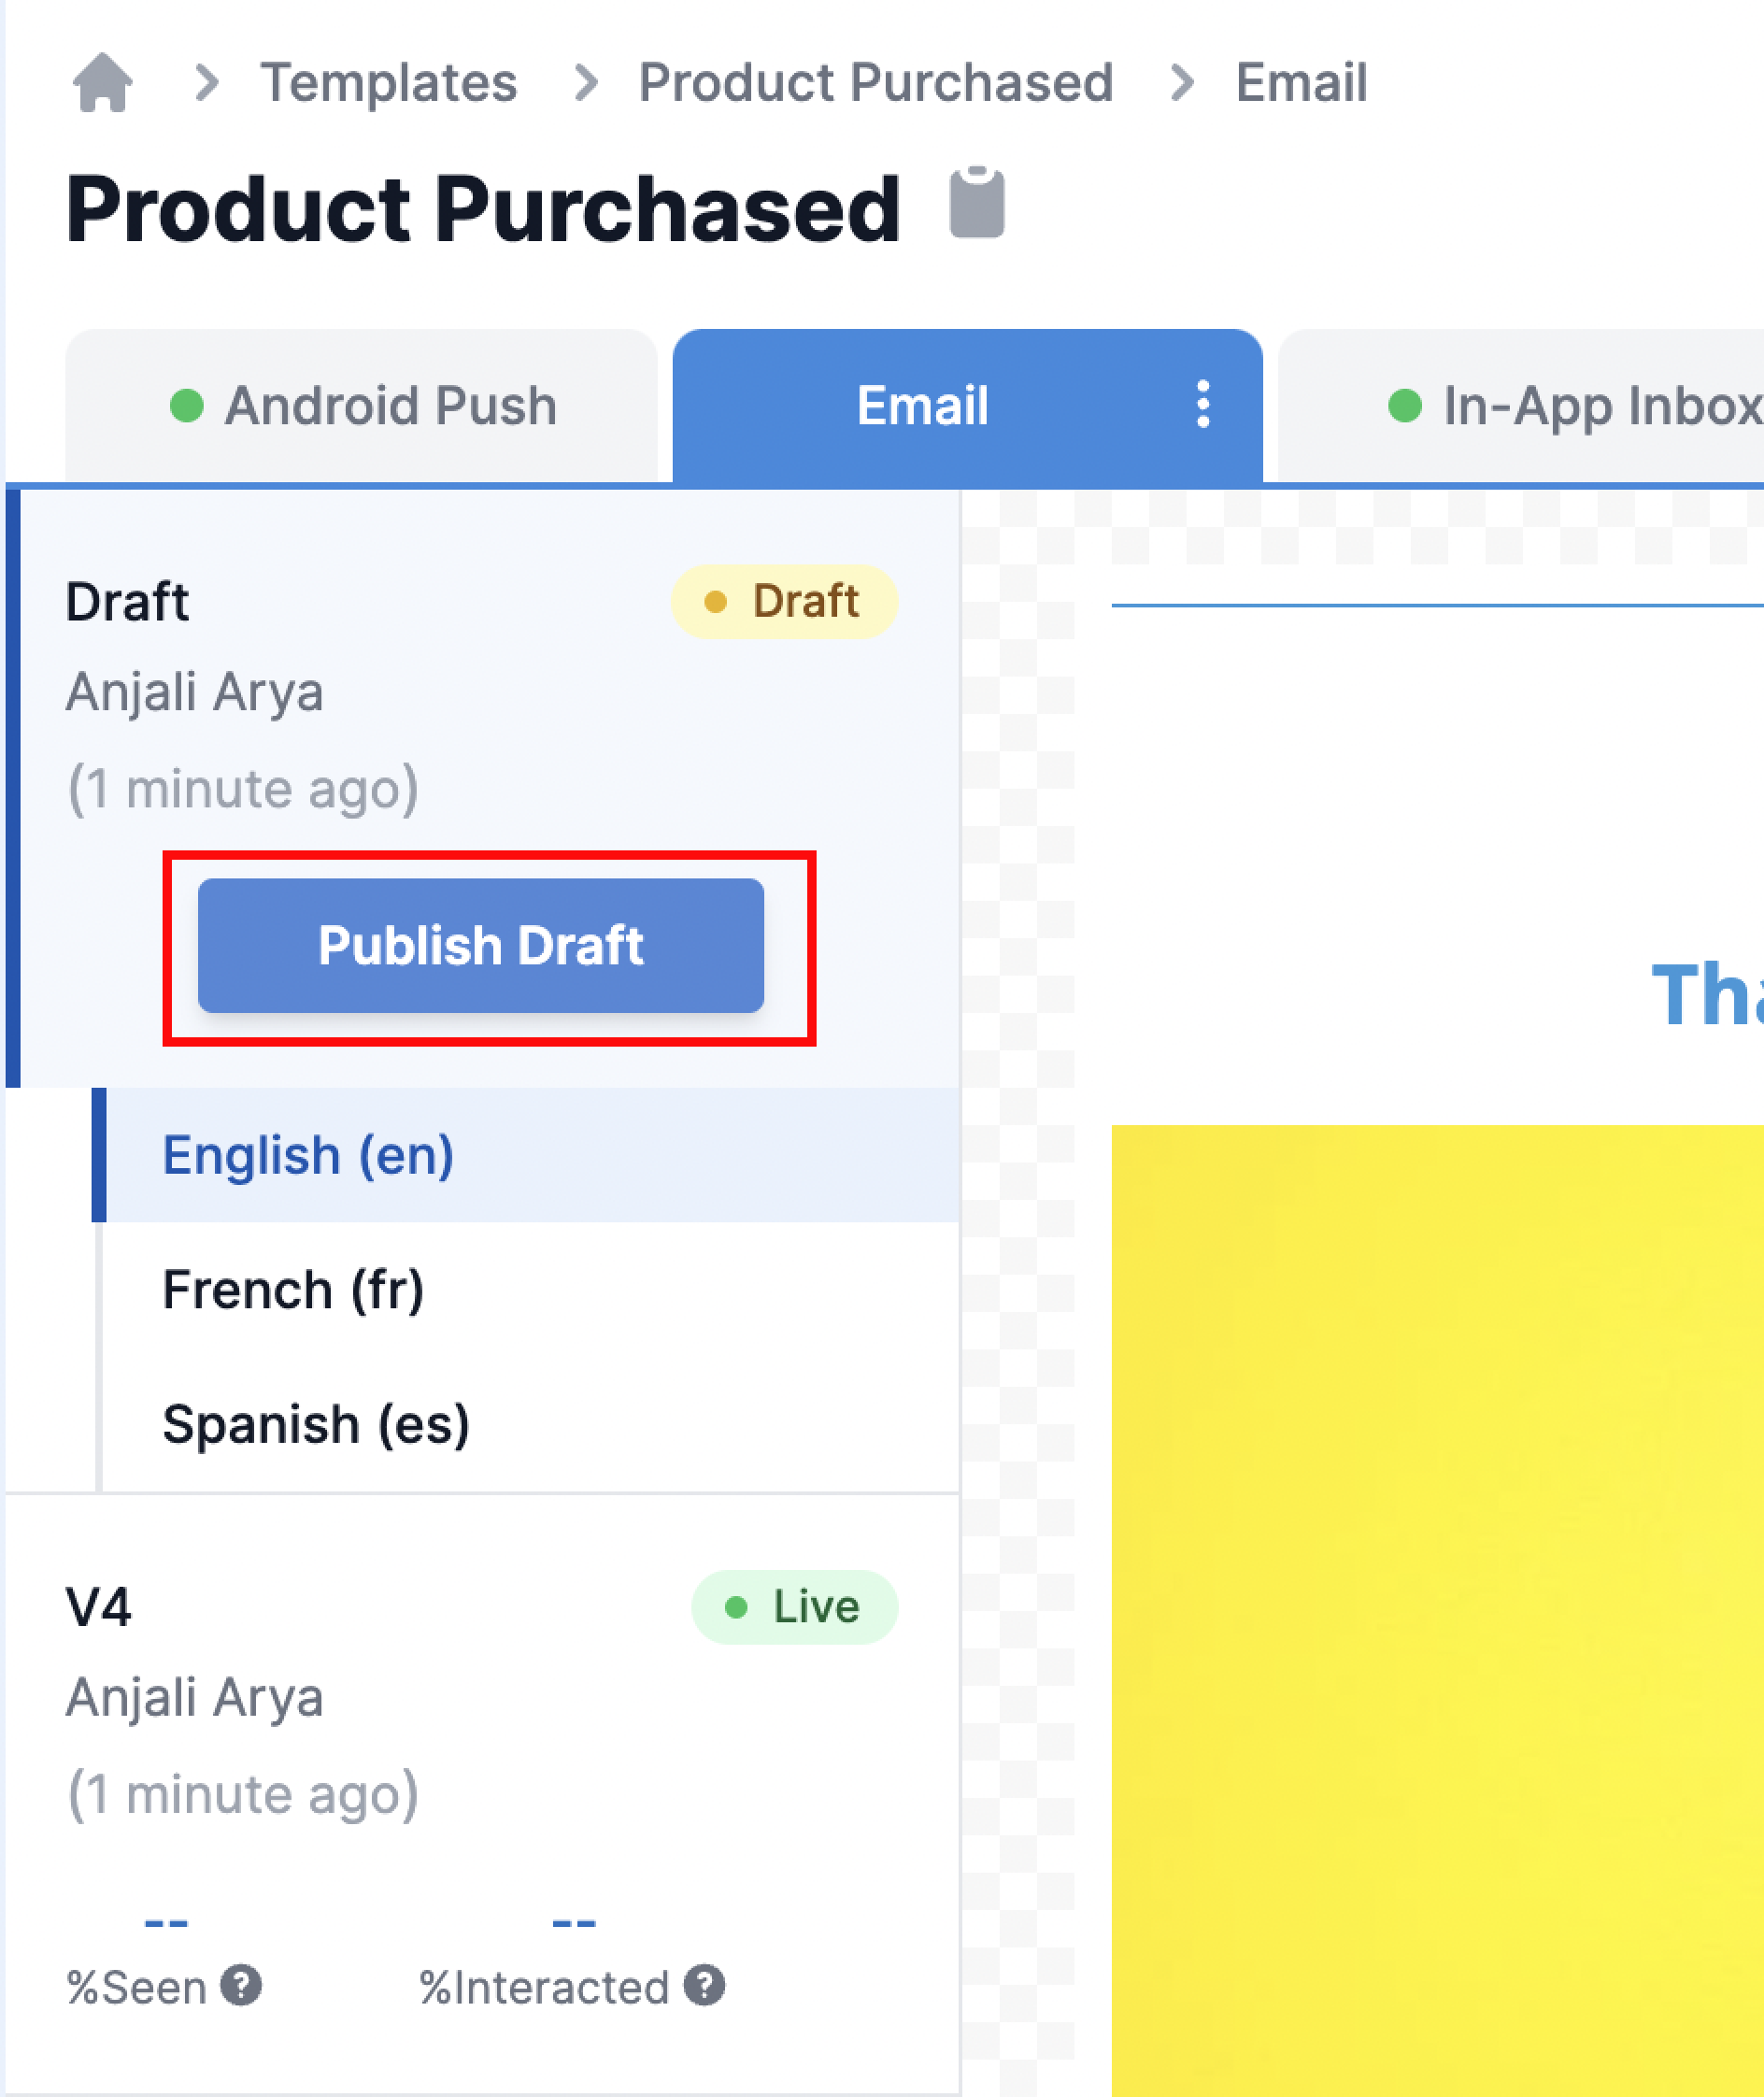 Add a relevant version name and Click on `Next`.
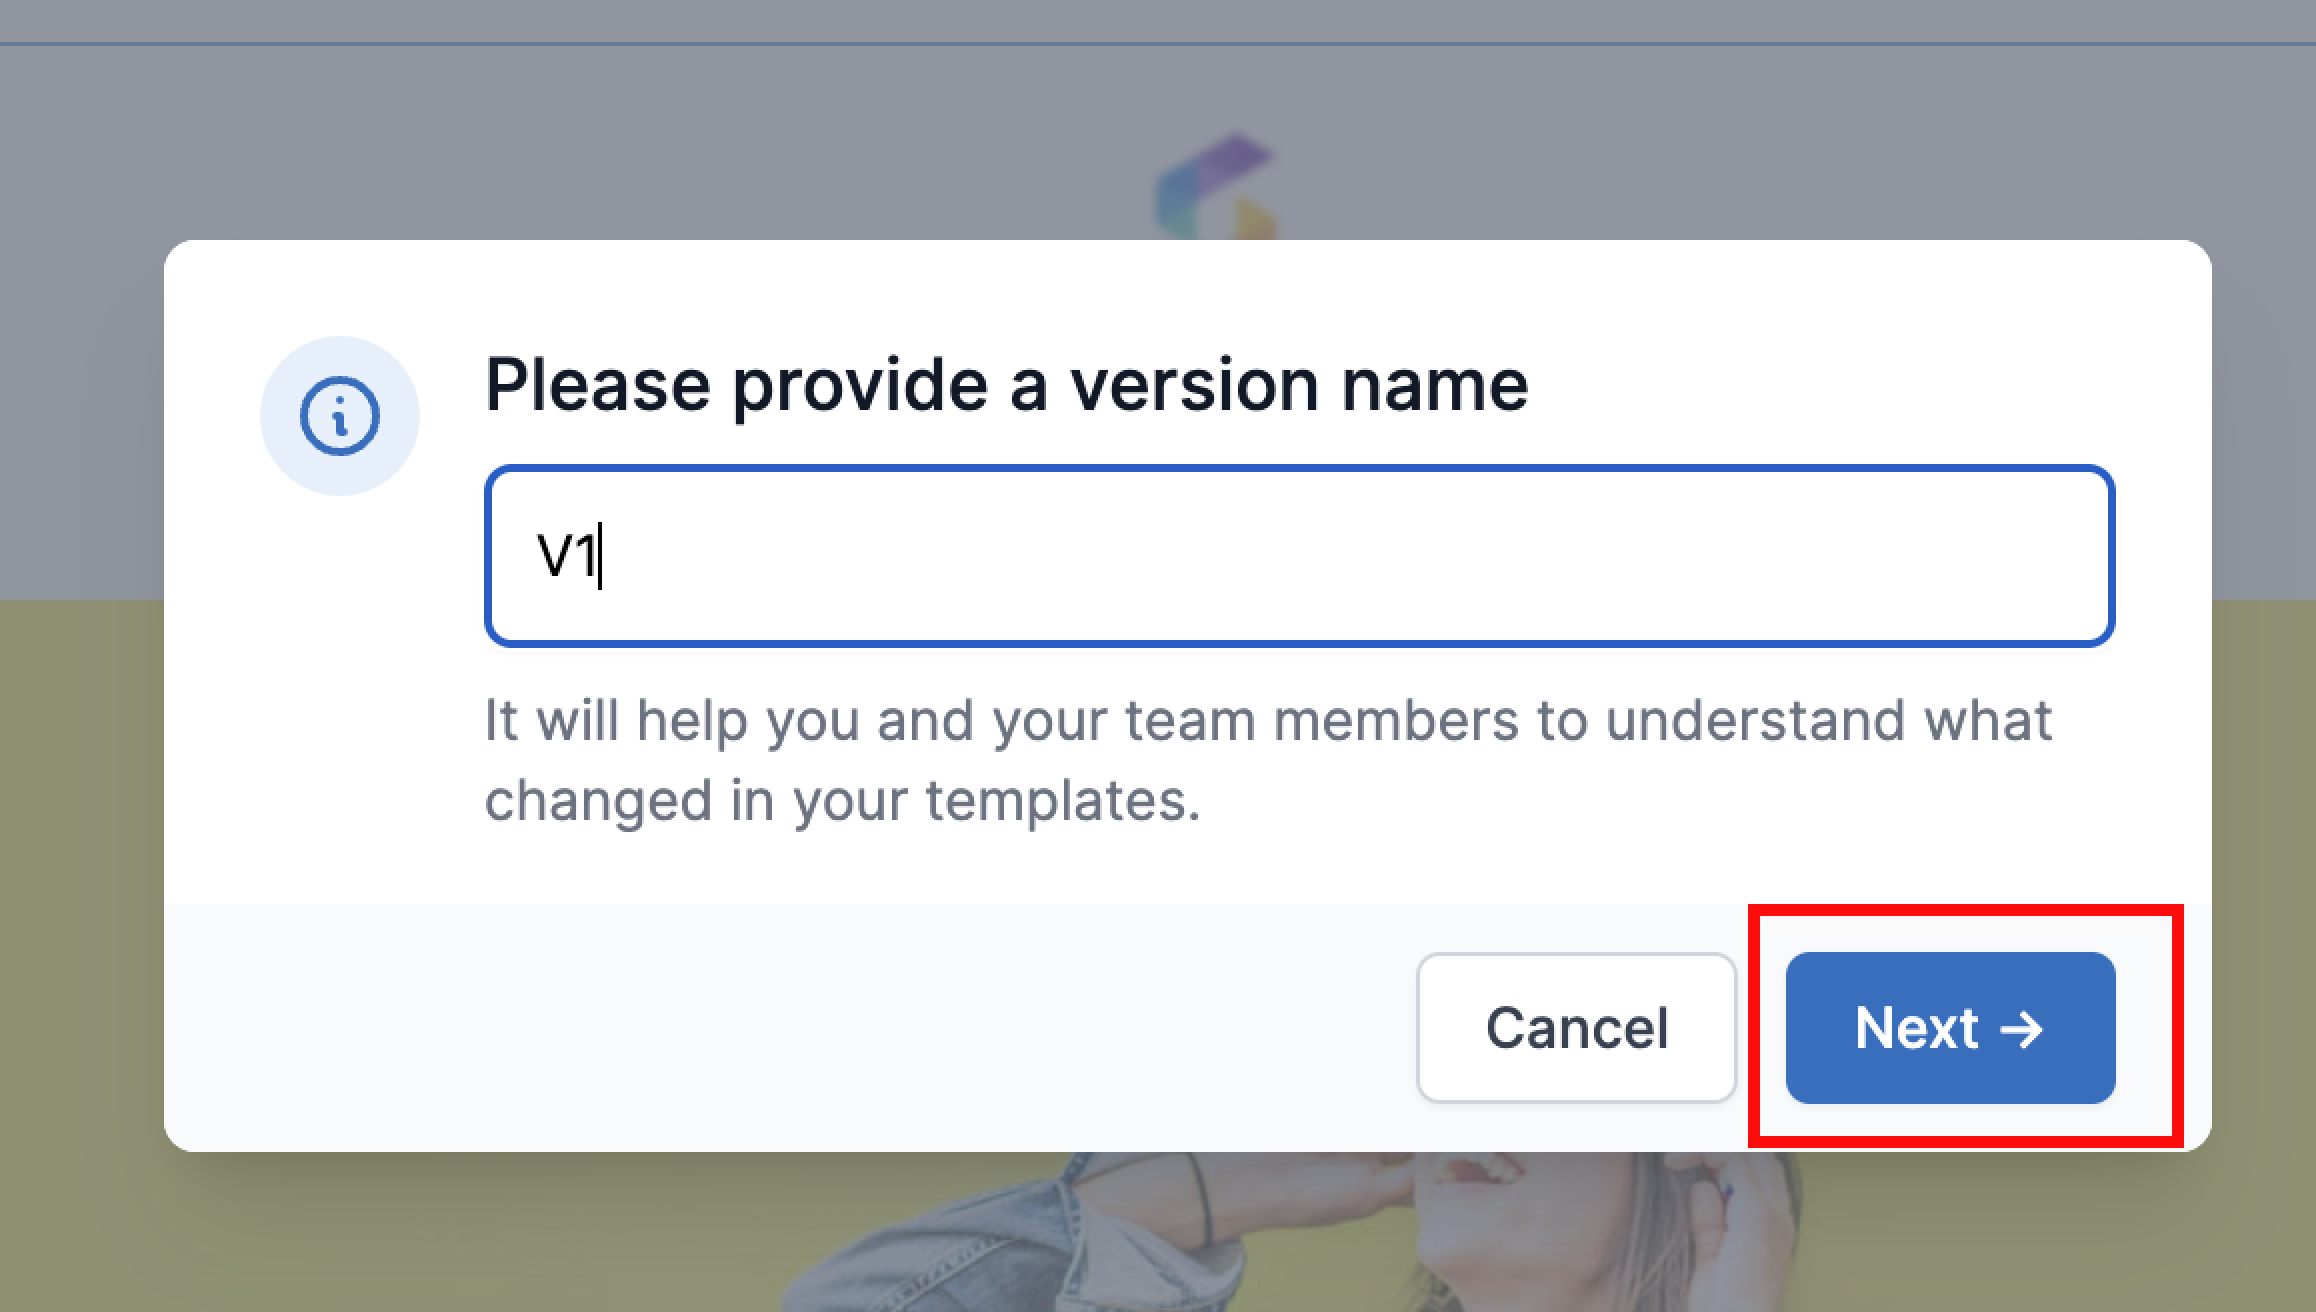 Select the languages that you want to Publish. English language will be published by default.
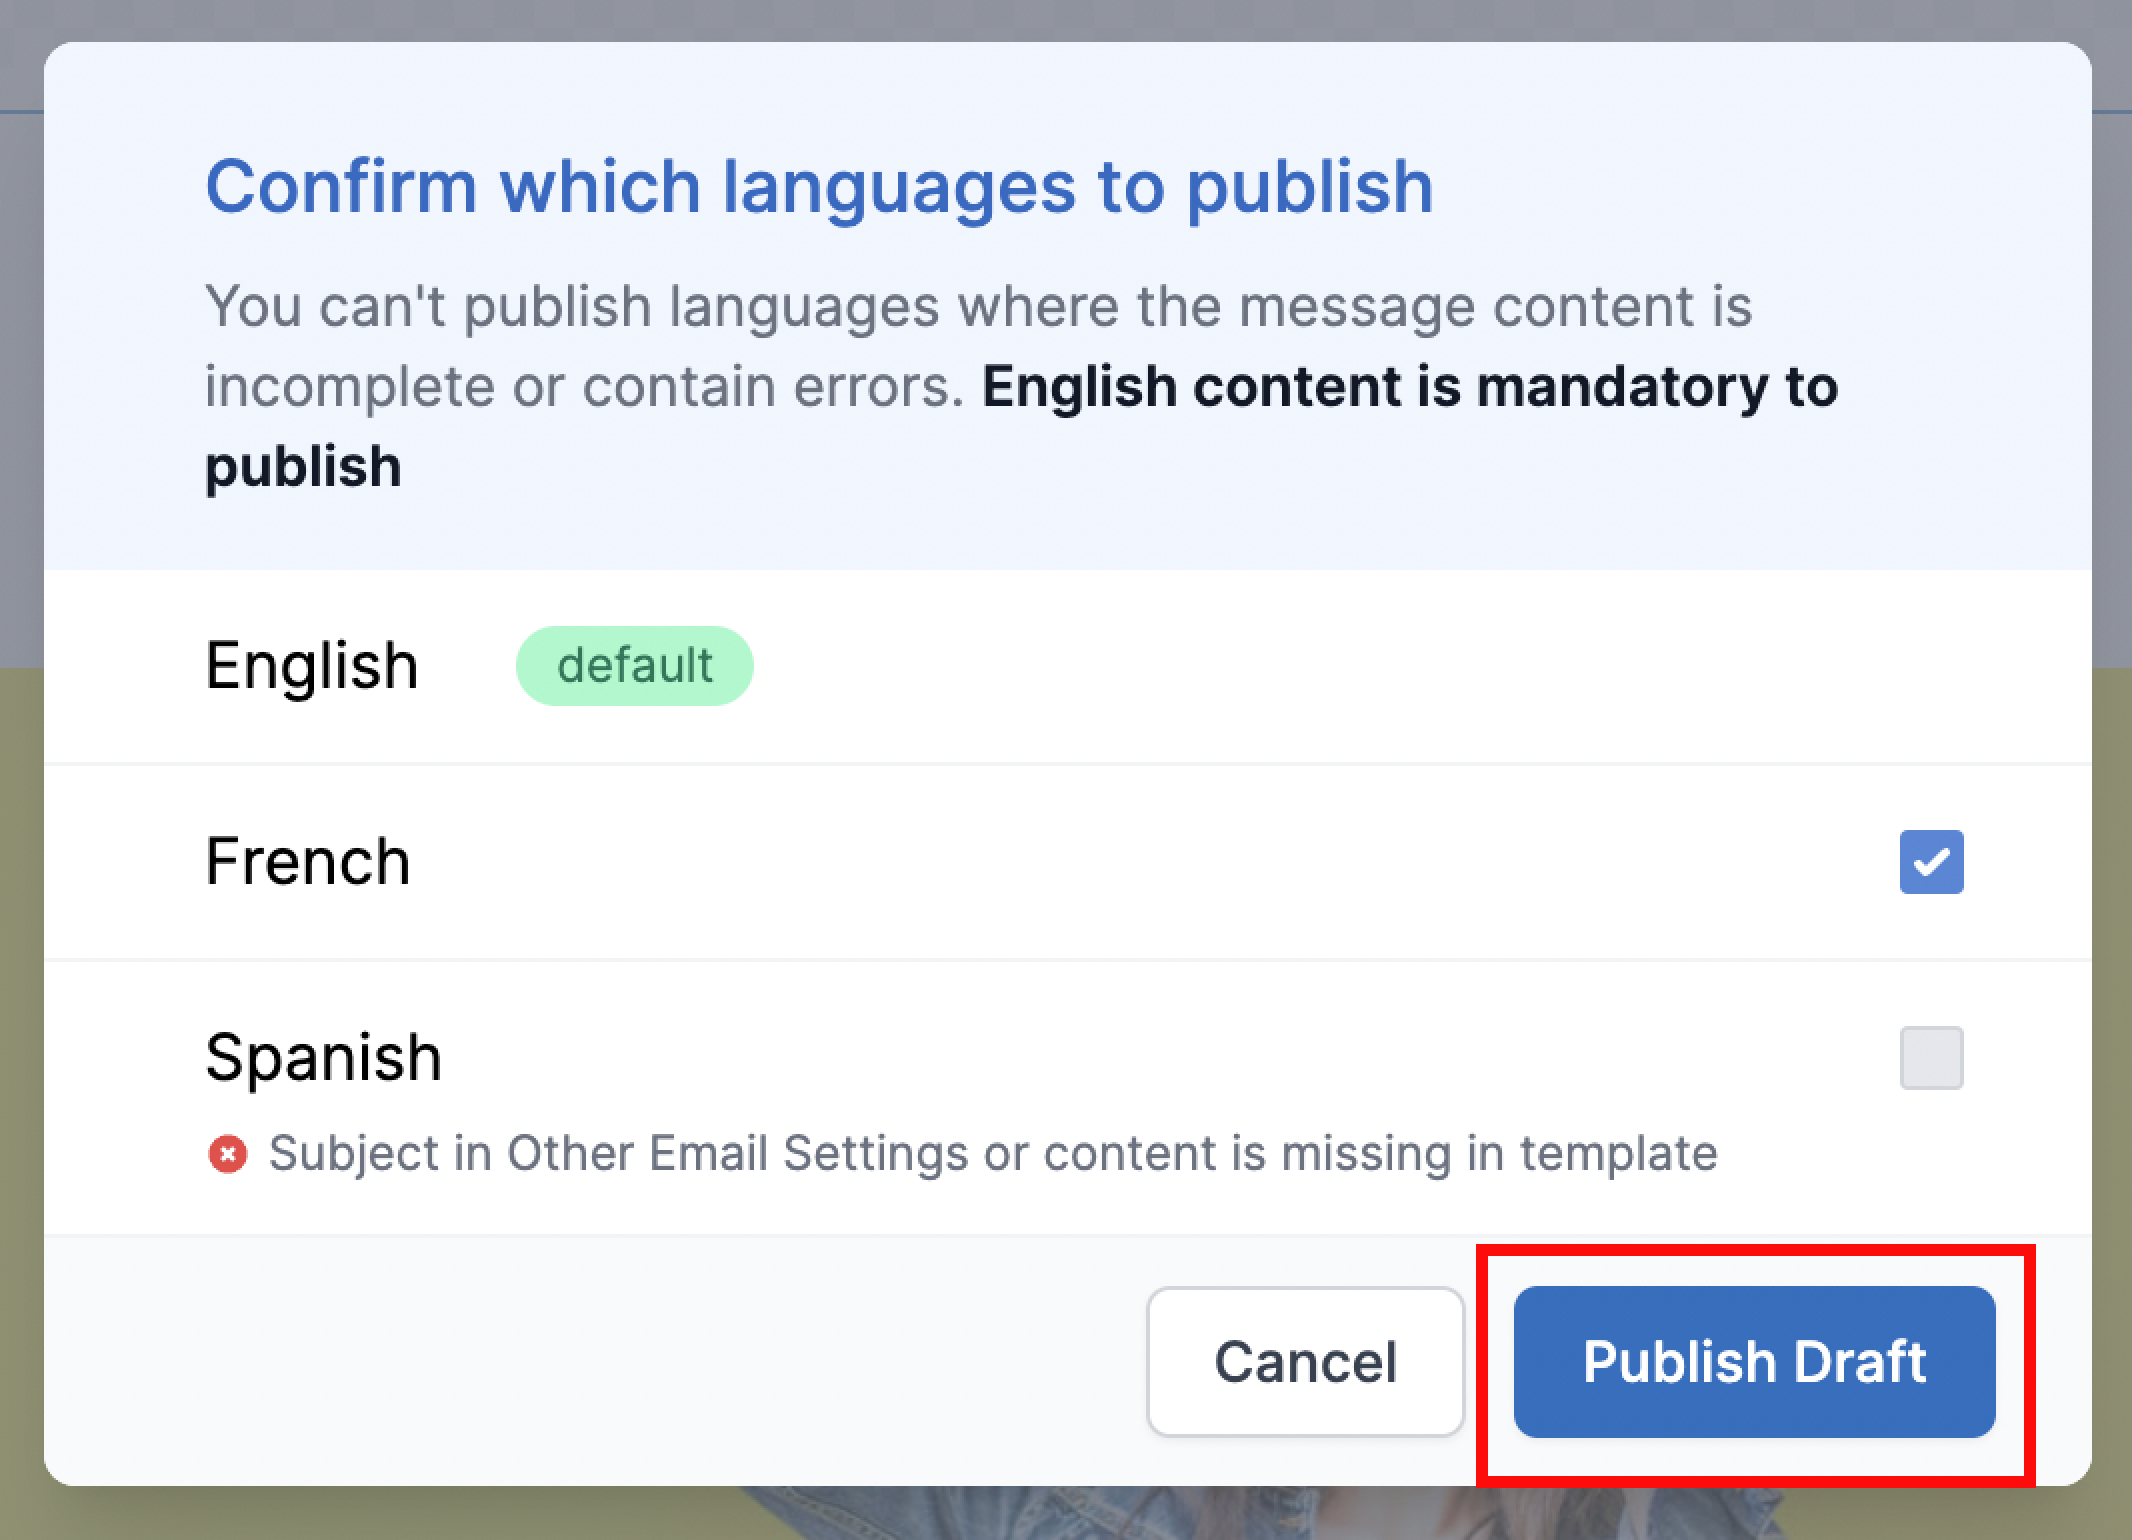
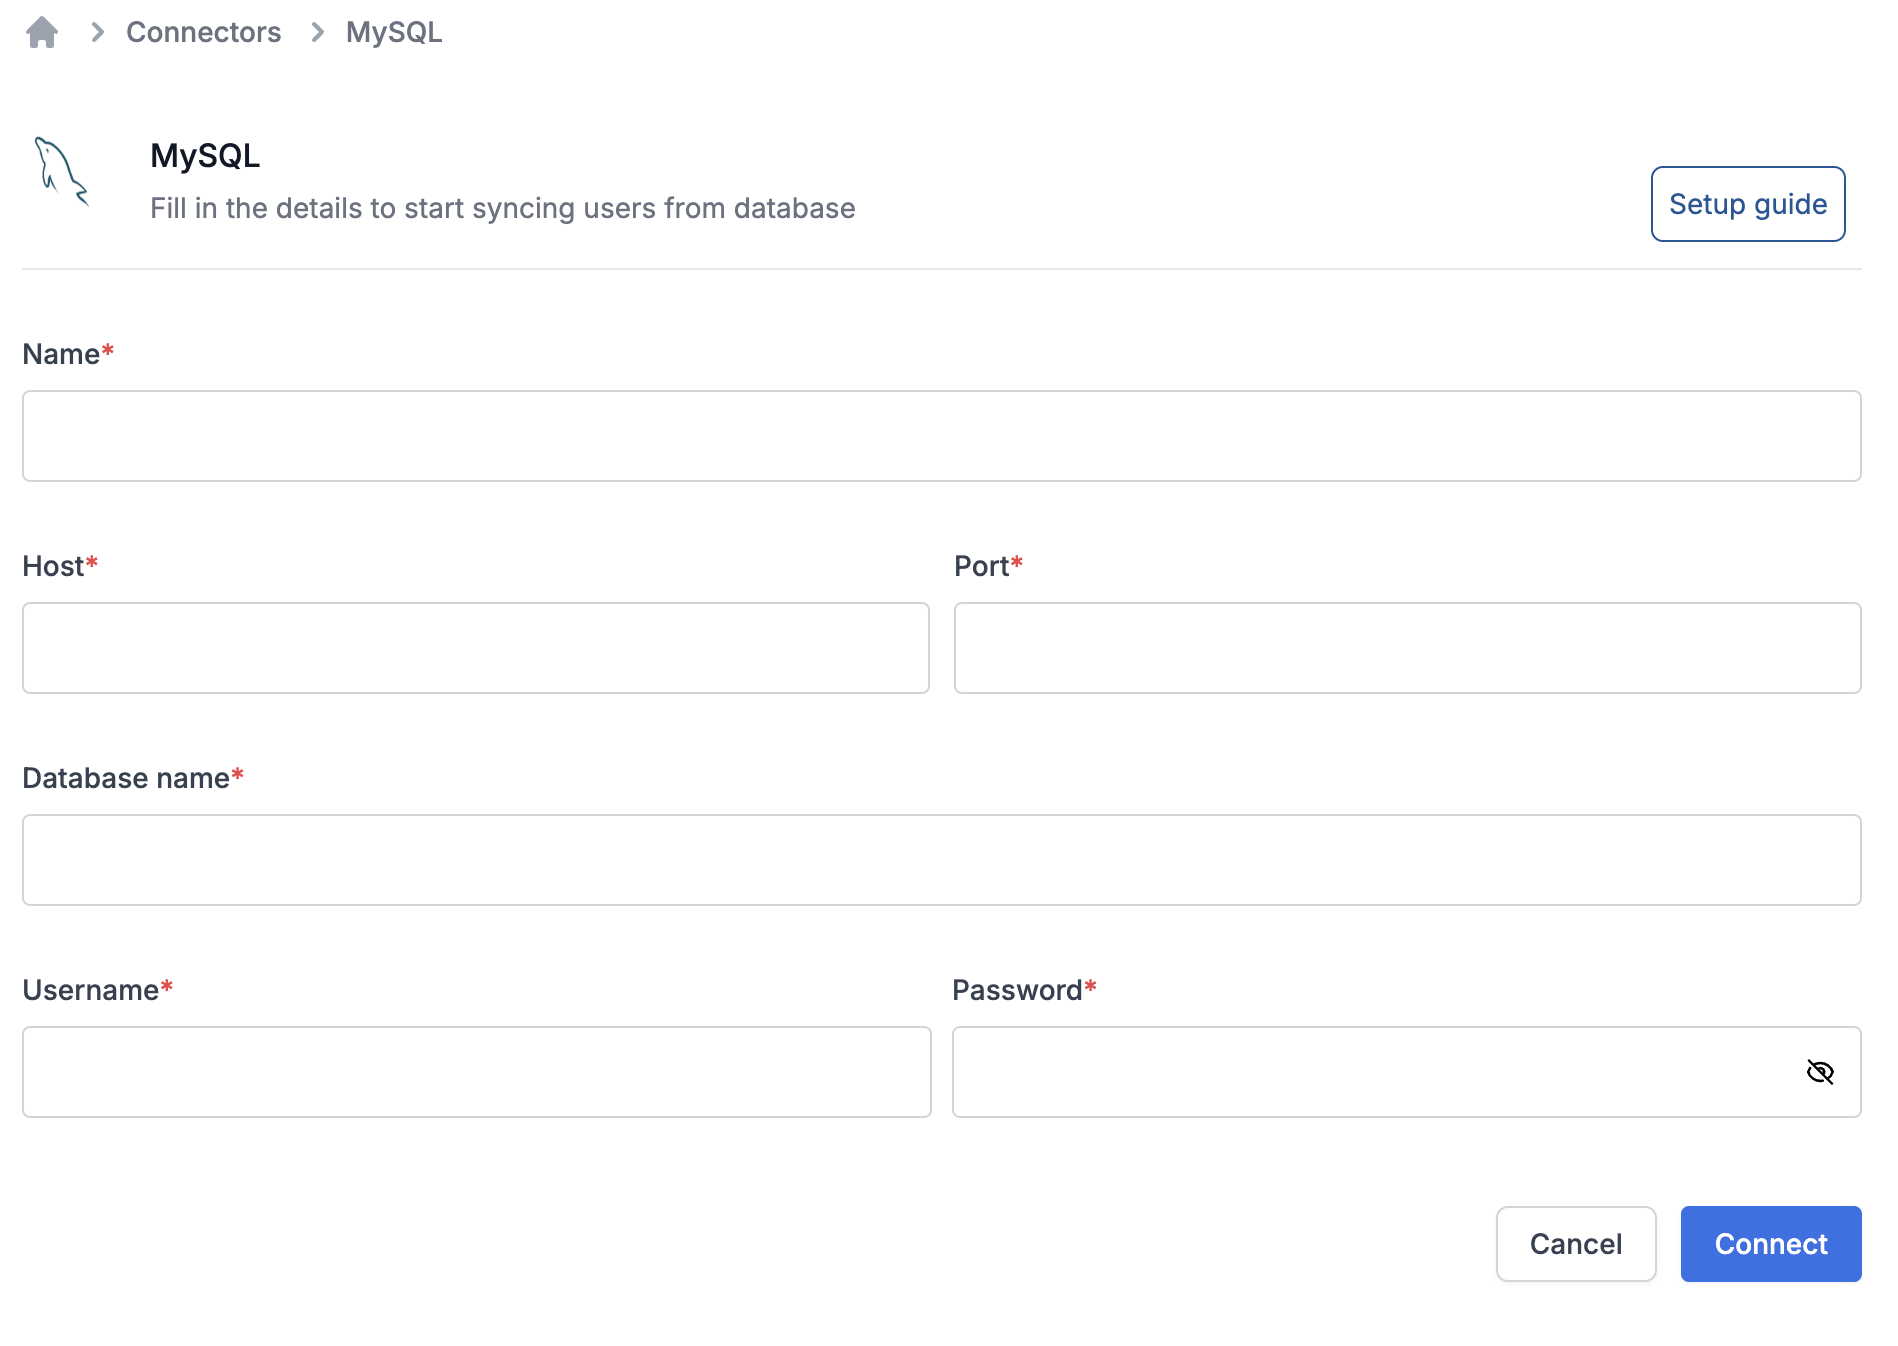 | Field | Description |
| ------------- | ---------------------------------------------------------------------------------------------------------------------------------------------------------------------------------------------------------- |
| Name | A name to uniquely qualify the connection as you'll see it in the connector list on your sync task. You can add the name of database here for easy identification. |
| Host | Host’s IP address or [DNS Name](https://docs.aws.amazon.com/redshift/latest/mgmt/jdbc20-obtain-url.html). |
| Port | The port on which your SQL server is listening for connections. |
| Database Name | Name of database you created for your cluster. |
| Username | Database username created for suprsend sync. We recommend using a user with the minimal privileges here. This user only requires read permissions with access limited to the tables you want to sync from. |
| Password | Database password created for suprsend sync. We recommend using a user with the minimal privileges here. This user only requires read permissions with access limited to the tables you want to sync from. |
After adding the required information, click on "connect" to enable this connection. You'll see the error while connecting in case of incorrect credentials. Once your connection is setup, you'll see it in existing connector list and the connector dropdown on sync task.
## Best Practices
Before you setup your database sync, you should take some measures to ensure the security of your customers’ data and limit performance impacts to your backend database. The following “best practice” suggestions can help you limit the potential for data exposure and minimize performance impacts:
1. **Sync your read-only replica instance**: Do not sync data directly from your main instance. Instead use a read-only data replica to minimize the load and avoid data loss on your main database.
2. **User connected here should have minimal privileges**: You should have a database user with minimal privileges. This person only requires read permissions with access limited to the tables you want to sync from.
3. **Sync only the data that you’ll need**: Limiting your query can improve performance, and minimize the potential to expose sensitive data. Select only the columns you need to either update user profile in SuprSend and to create list sync.
4. **Use \{\{last\_sync\_time}} to limit query results**: Make sure you use the `{{last_sync_time}}` variable in your recurring sync queries. It stores the timestamp of last successful sync in your list. Adding it in your where statement against datetime index can really speed up the query and limit the number of results returned in consecutive syncs. \{\{last\_sync\_time}} is stored in timestamp format. Use relevant cast expression to format it based on your column type.
5. **Limit your sync frequency**: Setup a sync frequency based on how frequently you want to send notifications on that list. If the previous sync is still in progress when the next interval occurs, we’ll skip the operation and catch up your data on the next interval. Skipped syncs show `Ignored` status in the logs. Frequently skipped operations may indicate that you’re syncing too often. You should monitor your first few syncs to ensure that you haven’t impacted your system’s performance.
***
# Netcore
Source: https://docs.suprsend.com/docs/netcore-whatsapp
Guide to connect your Netcore account with SuprSend to send Whatsapp notifications.
This section is a step-by-step guide to set Netcore as your WhatsApp service provider.
## Pre-Requisites
You'll need a Netcore account to complete this tutorial. You can use your existing Netcore account to integrate, or [Create a Netcore account](https://netcorecloud.com/request-demo/)
## Netcore integration on SuprSend account
On the SuprSend dashboard, go to vendor page from side panel and click WhatsApp -> Exotel from the list of Vendors. This will open vendor details page as shown below:
| Field | Description |
| ------------- | ---------------------------------------------------------------------------------------------------------------------------------------------------------------------------------------------------------- |
| Name | A name to uniquely qualify the connection as you'll see it in the connector list on your sync task. You can add the name of database here for easy identification. |
| Host | Host’s IP address or [DNS Name](https://docs.aws.amazon.com/redshift/latest/mgmt/jdbc20-obtain-url.html). |
| Port | The port on which your SQL server is listening for connections. |
| Database Name | Name of database you created for your cluster. |
| Username | Database username created for suprsend sync. We recommend using a user with the minimal privileges here. This user only requires read permissions with access limited to the tables you want to sync from. |
| Password | Database password created for suprsend sync. We recommend using a user with the minimal privileges here. This user only requires read permissions with access limited to the tables you want to sync from. |
After adding the required information, click on "connect" to enable this connection. You'll see the error while connecting in case of incorrect credentials. Once your connection is setup, you'll see it in existing connector list and the connector dropdown on sync task.
## Best Practices
Before you setup your database sync, you should take some measures to ensure the security of your customers’ data and limit performance impacts to your backend database. The following “best practice” suggestions can help you limit the potential for data exposure and minimize performance impacts:
1. **Sync your read-only replica instance**: Do not sync data directly from your main instance. Instead use a read-only data replica to minimize the load and avoid data loss on your main database.
2. **User connected here should have minimal privileges**: You should have a database user with minimal privileges. This person only requires read permissions with access limited to the tables you want to sync from.
3. **Sync only the data that you’ll need**: Limiting your query can improve performance, and minimize the potential to expose sensitive data. Select only the columns you need to either update user profile in SuprSend and to create list sync.
4. **Use \{\{last\_sync\_time}} to limit query results**: Make sure you use the `{{last_sync_time}}` variable in your recurring sync queries. It stores the timestamp of last successful sync in your list. Adding it in your where statement against datetime index can really speed up the query and limit the number of results returned in consecutive syncs. \{\{last\_sync\_time}} is stored in timestamp format. Use relevant cast expression to format it based on your column type.
5. **Limit your sync frequency**: Setup a sync frequency based on how frequently you want to send notifications on that list. If the previous sync is still in progress when the next interval occurs, we’ll skip the operation and catch up your data on the next interval. Skipped syncs show `Ignored` status in the logs. Frequently skipped operations may indicate that you’re syncing too often. You should monitor your first few syncs to ensure that you haven’t impacted your system’s performance.
***
# Netcore
Source: https://docs.suprsend.com/docs/netcore-whatsapp
Guide to connect your Netcore account with SuprSend to send Whatsapp notifications.
This section is a step-by-step guide to set Netcore as your WhatsApp service provider.
## Pre-Requisites
You'll need a Netcore account to complete this tutorial. You can use your existing Netcore account to integrate, or [Create a Netcore account](https://netcorecloud.com/request-demo/)
## Netcore integration on SuprSend account
On the SuprSend dashboard, go to vendor page from side panel and click WhatsApp -> Exotel from the list of Vendors. This will open vendor details page as shown below:
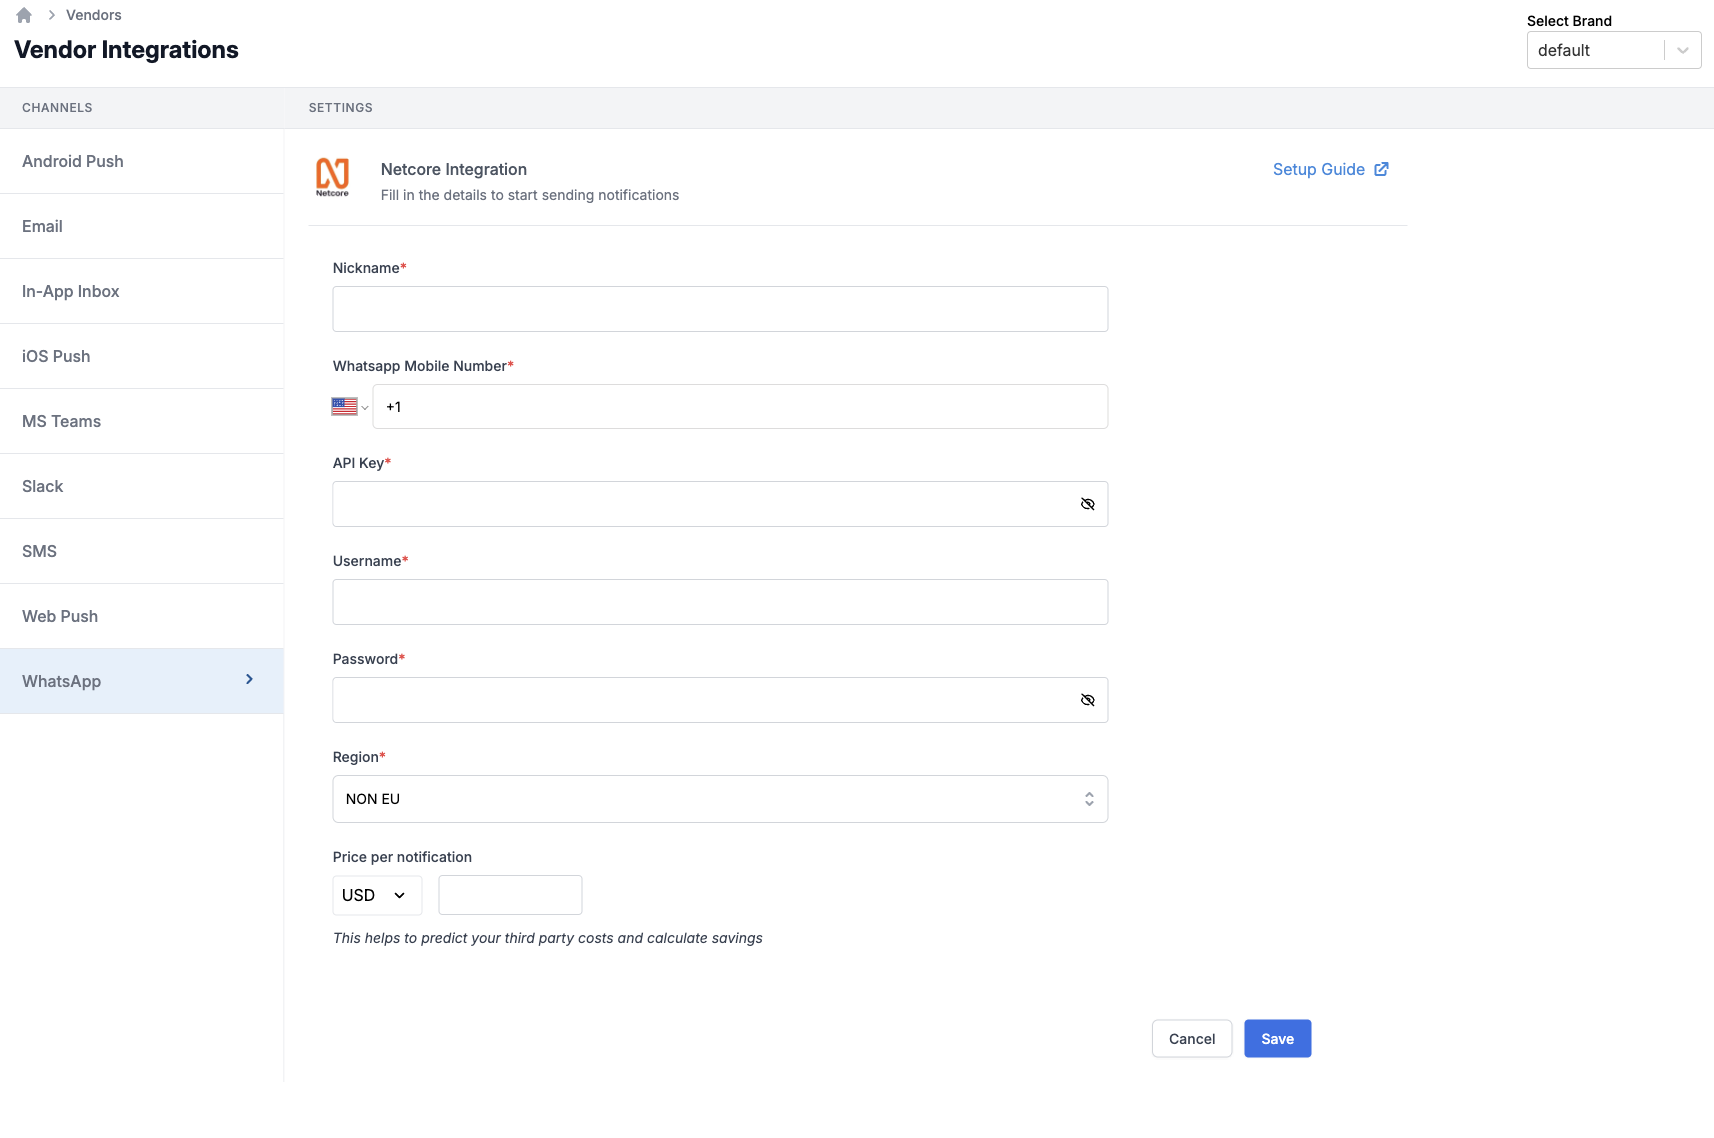 | Form Field | Description |
| ---------------------- | ---------------------------------------------------------------------------------------------------------------------------------------------------------------------- |
| Nickname | You can give any name which may help you to identify this account easily |
| WhatsApp Mobile Number | Mobile number of your WhatsApp business account created on Netcore. SuprSend uses this information to send WhatsApp on your behalf via your registered WhatsApp number |
| API Key | You will get this API Key from your Netcore account. SuprSend uses this API Key to send WhatsApp on your behalf via your registered Netcore account. |
| Username | Username of your Netcore WhatsApp dashboard. SuprSend uses this information to upload templates on your behalf on Netcore dashboard for approval |
| Password | Password of your Netcore WhatsApp dashboard. SuprSend uses this information to upload templates on your behalf on Netcore dashboard for approval |
| Region | NON EU / EU. The region of your WhatsApp account on Netcore. Netcore treats EU and NON EU regions separately. |
| Price per notification | This is the amount you pay per WhatsApp notification to Netcore. It helps us to calculate, estimate and optimise your cost spent on notifications. |
## How to get API Key and mobile number from Netcore
On netcore, go to General Settings from left panel. And In integrate API section you'll find your API Key and WhatsApp Number.
| Form Field | Description |
| ---------------------- | ---------------------------------------------------------------------------------------------------------------------------------------------------------------------- |
| Nickname | You can give any name which may help you to identify this account easily |
| WhatsApp Mobile Number | Mobile number of your WhatsApp business account created on Netcore. SuprSend uses this information to send WhatsApp on your behalf via your registered WhatsApp number |
| API Key | You will get this API Key from your Netcore account. SuprSend uses this API Key to send WhatsApp on your behalf via your registered Netcore account. |
| Username | Username of your Netcore WhatsApp dashboard. SuprSend uses this information to upload templates on your behalf on Netcore dashboard for approval |
| Password | Password of your Netcore WhatsApp dashboard. SuprSend uses this information to upload templates on your behalf on Netcore dashboard for approval |
| Region | NON EU / EU. The region of your WhatsApp account on Netcore. Netcore treats EU and NON EU regions separately. |
| Price per notification | This is the amount you pay per WhatsApp notification to Netcore. It helps us to calculate, estimate and optimise your cost spent on notifications. |
## How to get API Key and mobile number from Netcore
On netcore, go to General Settings from left panel. And In integrate API section you'll find your API Key and WhatsApp Number.
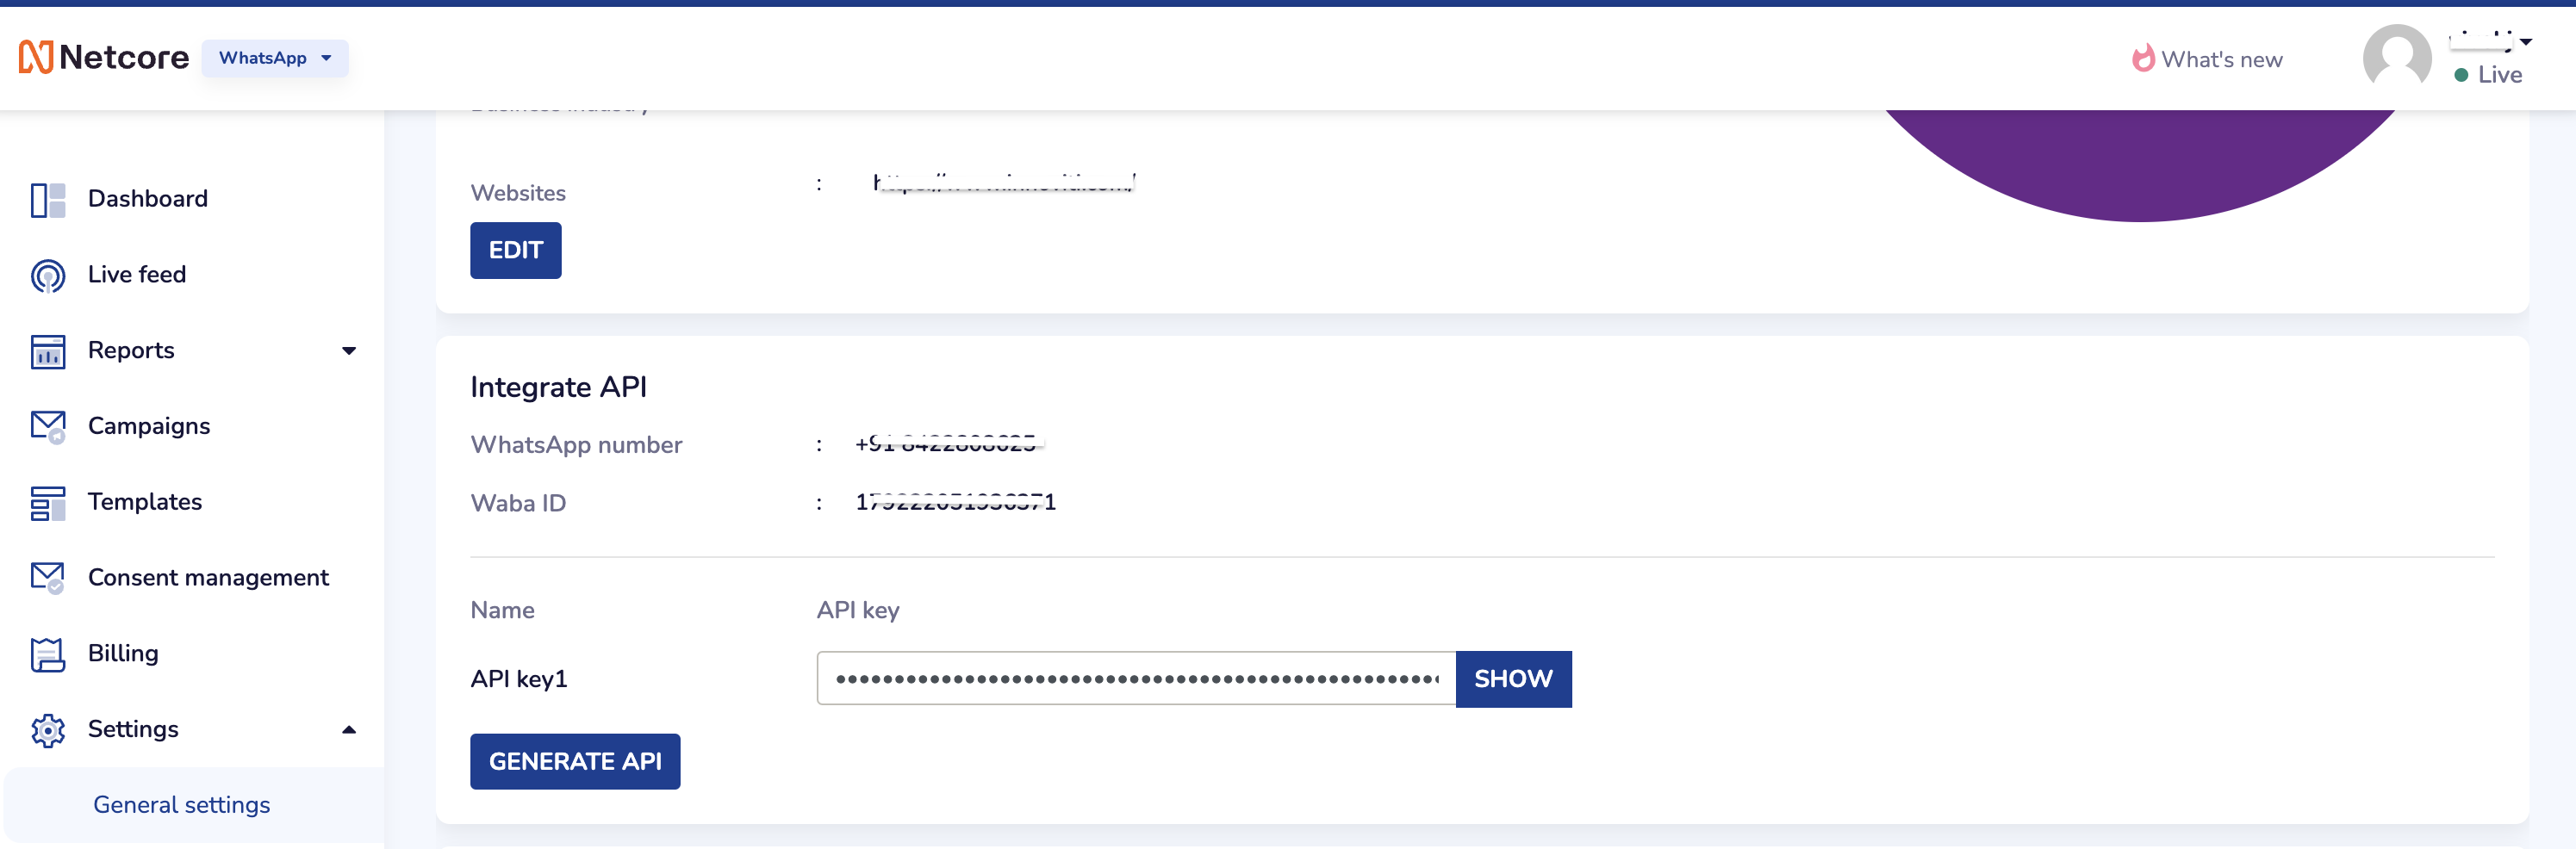 ## Configure callback URL for delivery status & incoming messages tracking
One of the platform advantage of using SuprSend as a central communication system is that it shows notification analytics for all channels in your SuprSend account together.
After saving the vendor configuration, SuprSend will generate 2 callback URL's: one to track delivery status updates of messages and another to track incoming messages.
## Configure callback URL for delivery status & incoming messages tracking
One of the platform advantage of using SuprSend as a central communication system is that it shows notification analytics for all channels in your SuprSend account together.
After saving the vendor configuration, SuprSend will generate 2 callback URL's: one to track delivery status updates of messages and another to track incoming messages.
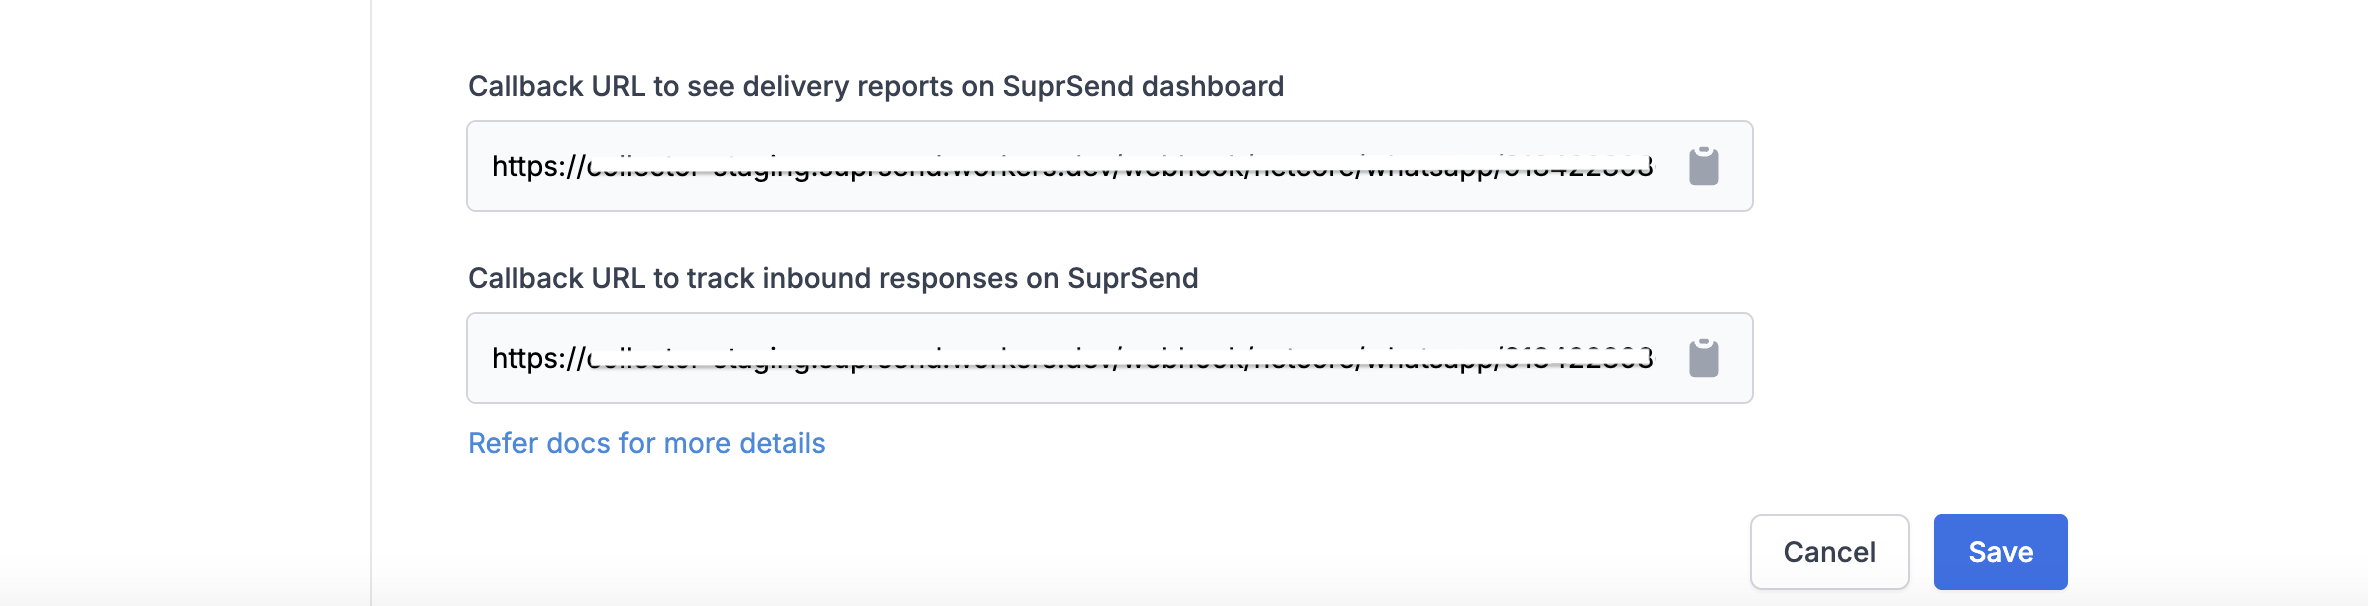 Copy the delivery report URL from SuprSend and configure it on netcore (**General settings -> event webhook**) Copy the inbound URL from SuprSend and configure it on netcore (**General Settings -> Incoming Webhook**)
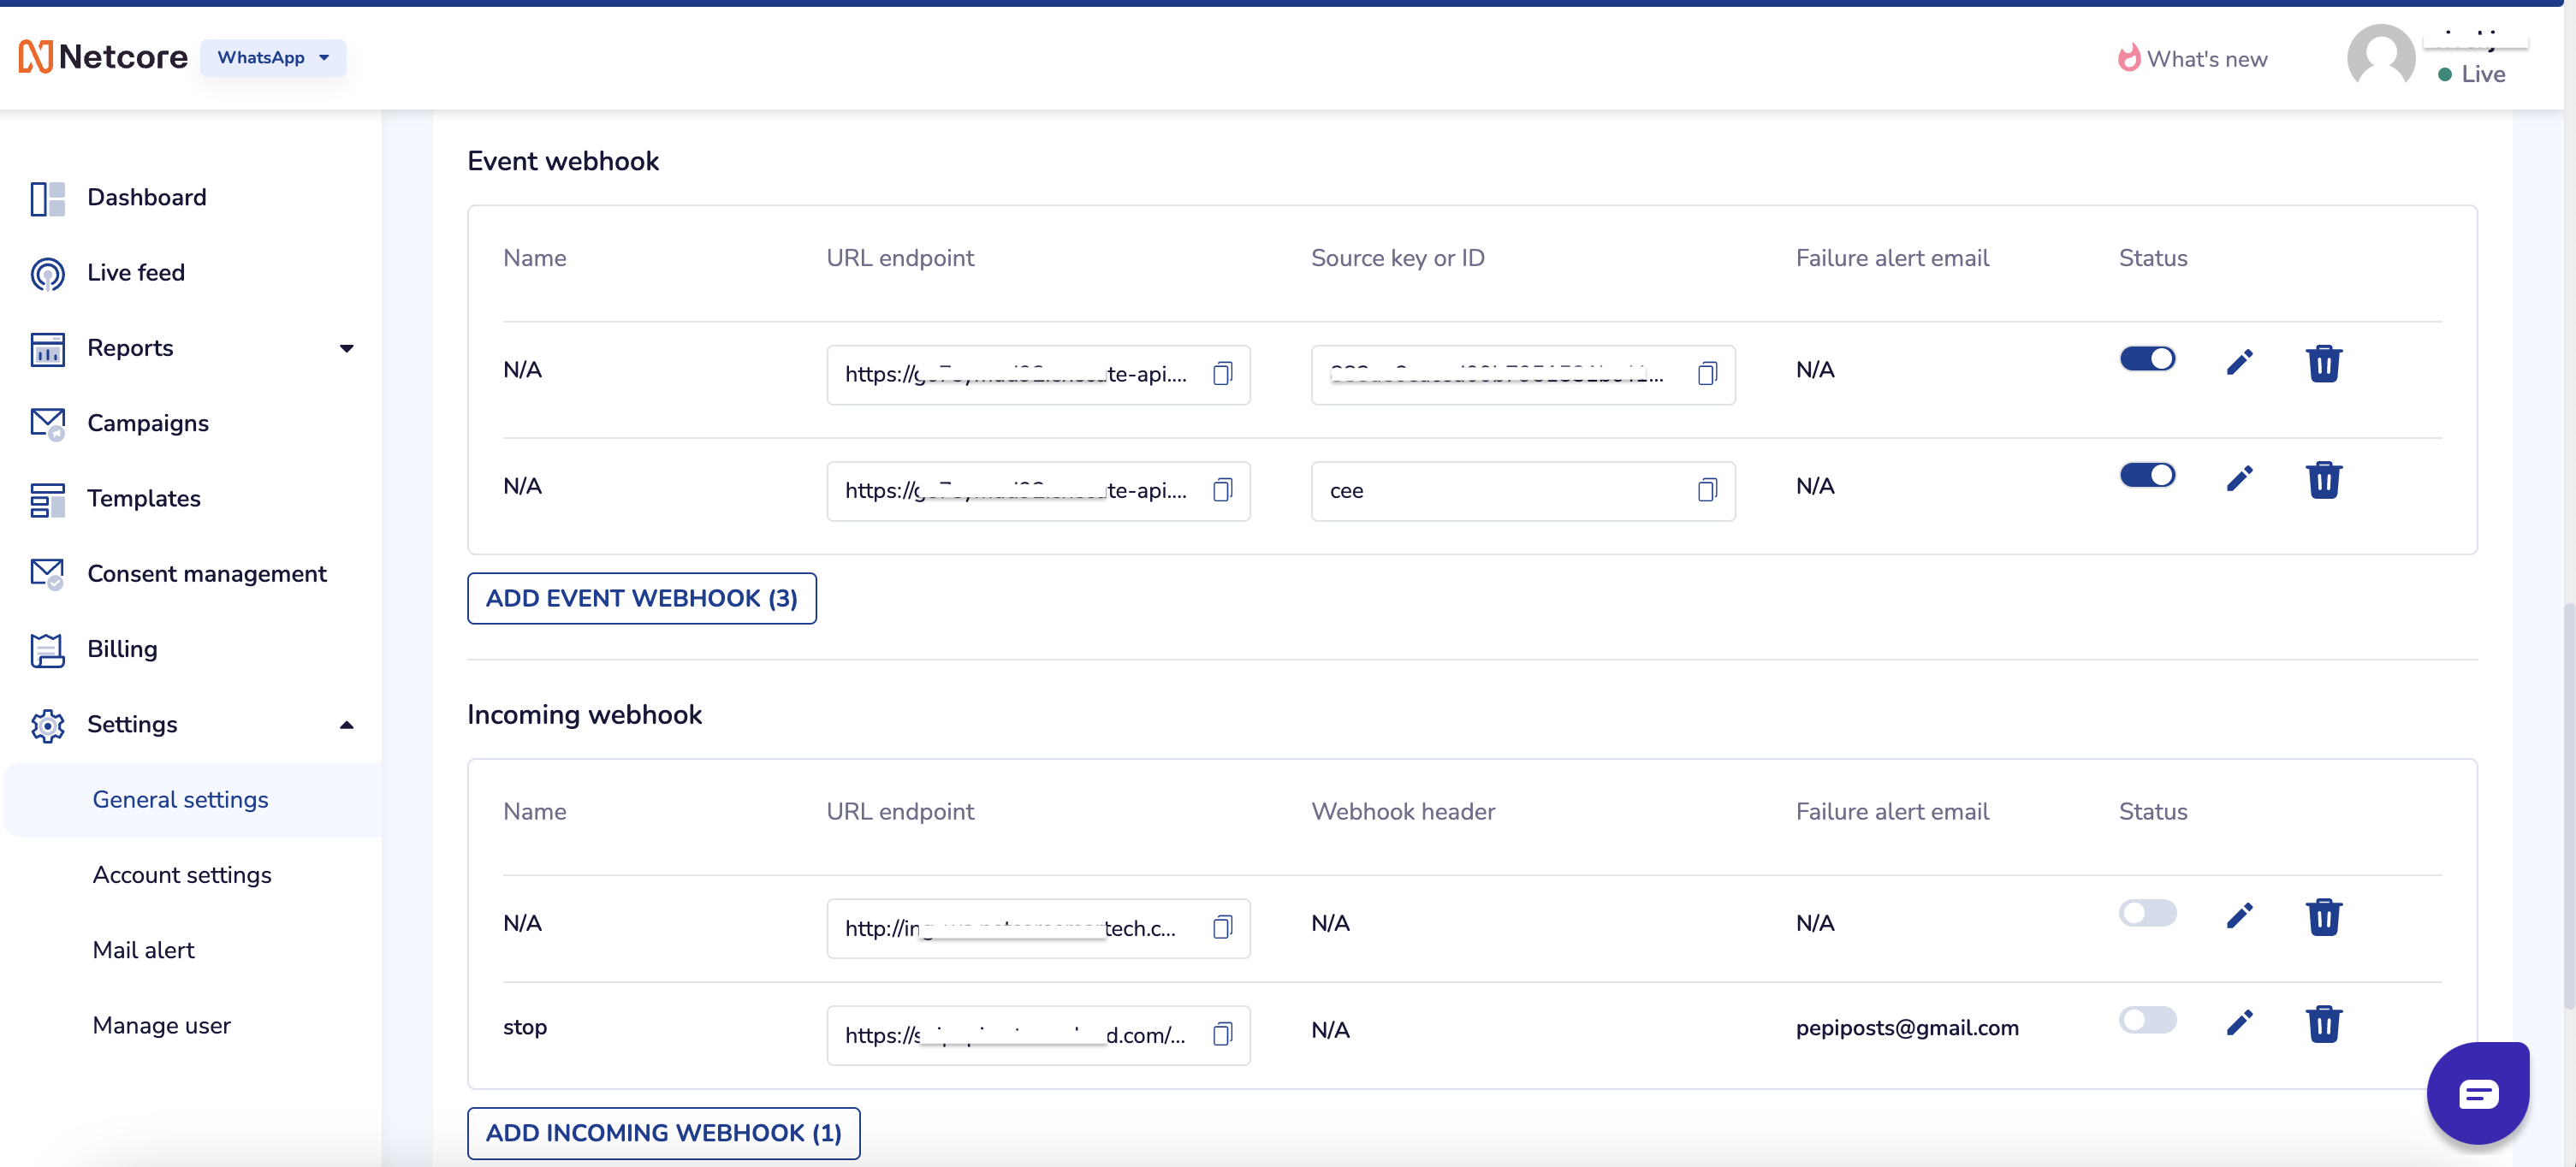 ## Must know:
1. Netcore DOES NOT support variables in header text (for now), please take care of this point while creating templates on SuprSend and on Netcore.
2. Netcore does not have template auto-approval process, hence, the templates need to be created both on SuprSend and on [Netcore platform](https://cpaas.netcorecloud.com/app/settings/template).
3. There can be slight delay in receiving incoming messages and delivery status update webhook response from Netcore.
***
# Broadcast
Source: https://docs.suprsend.com/docs/node-broadcast
Trigger broadcast notifications to a list of users with NodeJS SDK.
## Pre-Requisites
[Create a list of users](/docs/python-lists)
## Trigger broadcast
You can trigger broadcast using `supr_client.subscriber_lists.broadcast()` method.
## Must know:
1. Netcore DOES NOT support variables in header text (for now), please take care of this point while creating templates on SuprSend and on Netcore.
2. Netcore does not have template auto-approval process, hence, the templates need to be created both on SuprSend and on [Netcore platform](https://cpaas.netcorecloud.com/app/settings/template).
3. There can be slight delay in receiving incoming messages and delivery status update webhook response from Netcore.
***
# Broadcast
Source: https://docs.suprsend.com/docs/node-broadcast
Trigger broadcast notifications to a list of users with NodeJS SDK.
## Pre-Requisites
[Create a list of users](/docs/python-lists)
## Trigger broadcast
You can trigger broadcast using `supr_client.subscriber_lists.broadcast()` method.
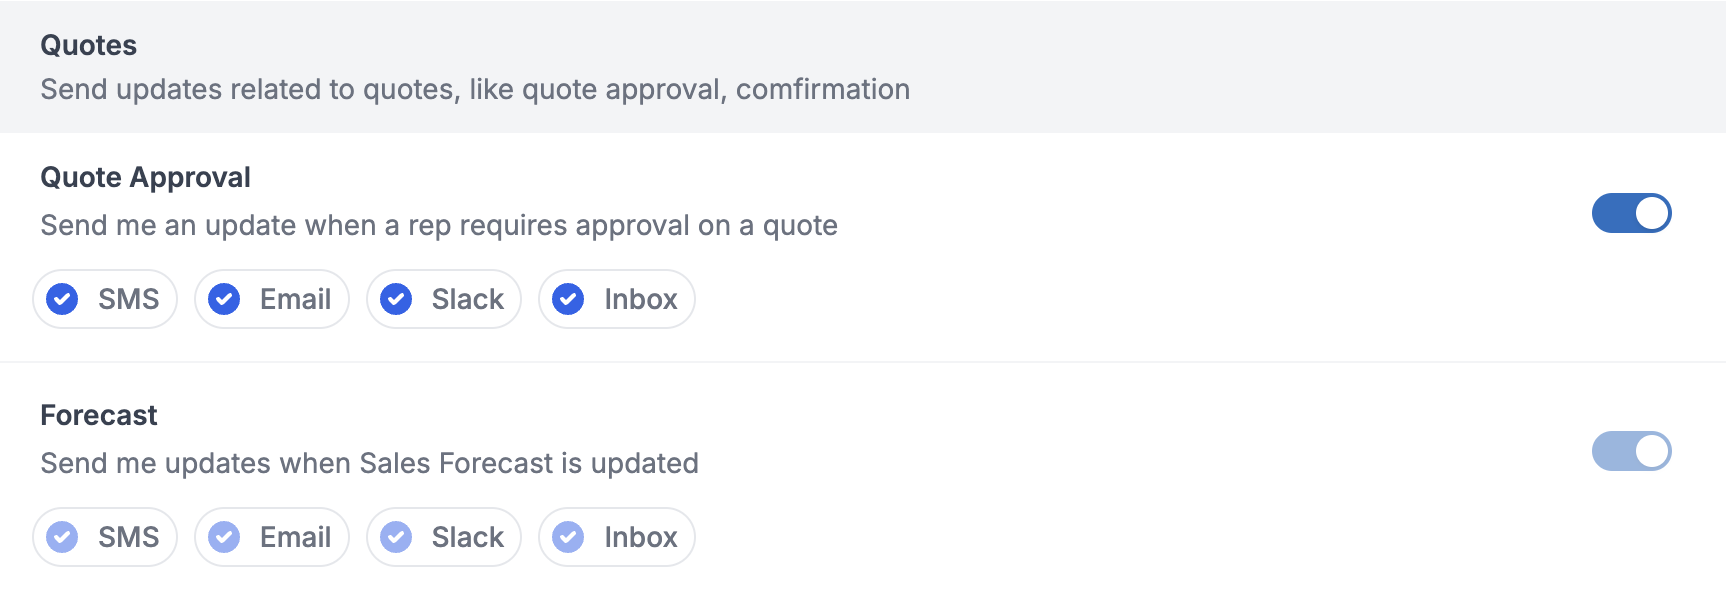
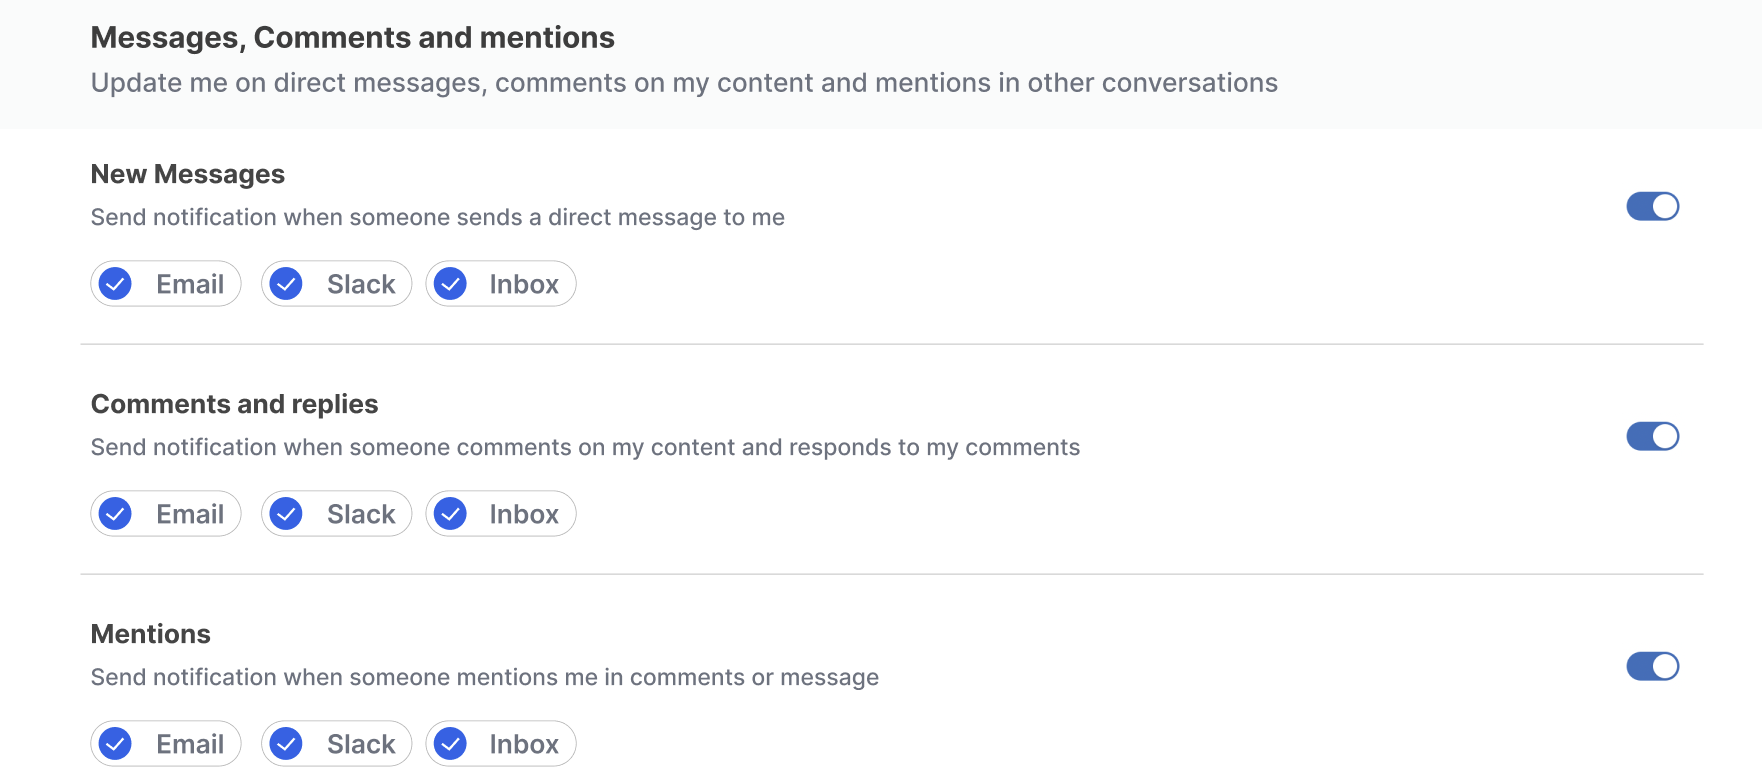 ### Updating section
You can update section in any category by clicking on the `+Section` button in each category
### Updating section
You can update section in any category by clicking on the `+Section` button in each category
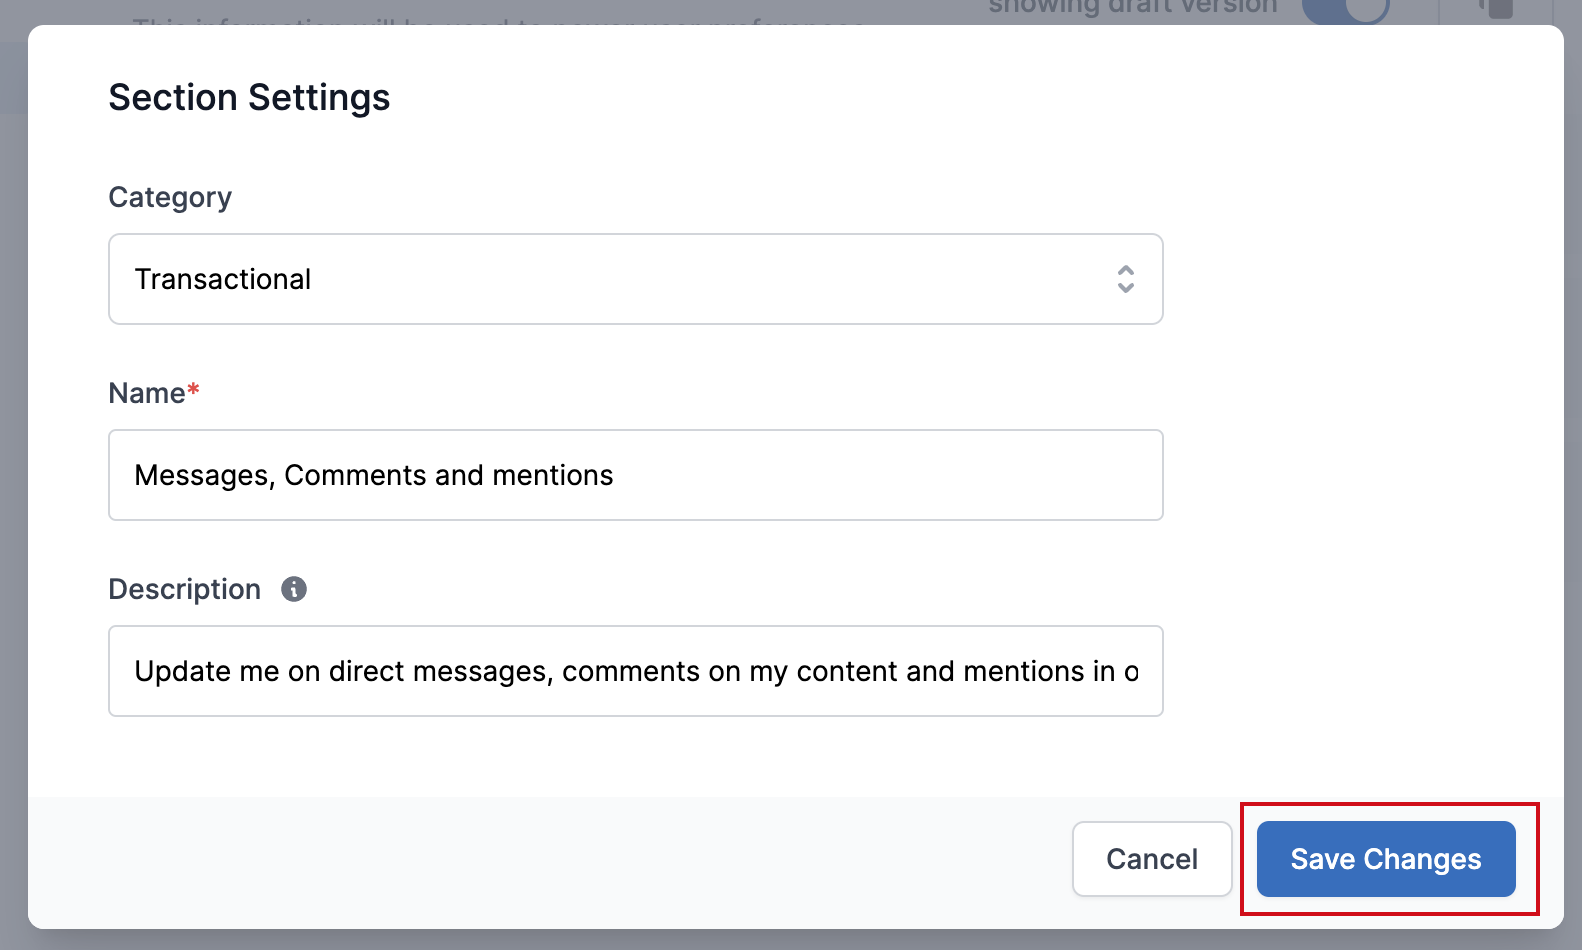 Add name and description for the category and `Save Changes`. You'll see the updated section inside the category and edit it later by clicking on the `Edit` button against that section.
### Updating sub-category
Sub-Category default preferences vary based on the category that you are adding in.
* System category default preference is set to `Can't Unsubscribe` with `All` user channels set as mandatory. Users will not be allowed to update preferences in this category as system notifications are critical notifications and should always be sent to the user.
* Transactional category default preference is set to `Can't Unsubscribe`. We recommend selecting at least one mandatory channel for the transactional category since users should receive notifications on at least one channel corresponding to a transaction. However, you are free to set any default preference in this category.
* Promotional category default preference is set to `ON`. This means that the user will receive notification in this category by default. You can't set this category to `Can't Unsubscribe` as users should always be able to opt-out of marketing-related notifications.
You can update sub-category in any category by clicking on the `+Sub-Category` button in that category.
Add name and description for the category and `Save Changes`. You'll see the updated section inside the category and edit it later by clicking on the `Edit` button against that section.
### Updating sub-category
Sub-Category default preferences vary based on the category that you are adding in.
* System category default preference is set to `Can't Unsubscribe` with `All` user channels set as mandatory. Users will not be allowed to update preferences in this category as system notifications are critical notifications and should always be sent to the user.
* Transactional category default preference is set to `Can't Unsubscribe`. We recommend selecting at least one mandatory channel for the transactional category since users should receive notifications on at least one channel corresponding to a transaction. However, you are free to set any default preference in this category.
* Promotional category default preference is set to `ON`. This means that the user will receive notification in this category by default. You can't set this category to `Can't Unsubscribe` as users should always be able to opt-out of marketing-related notifications.
You can update sub-category in any category by clicking on the `+Sub-Category` button in that category.
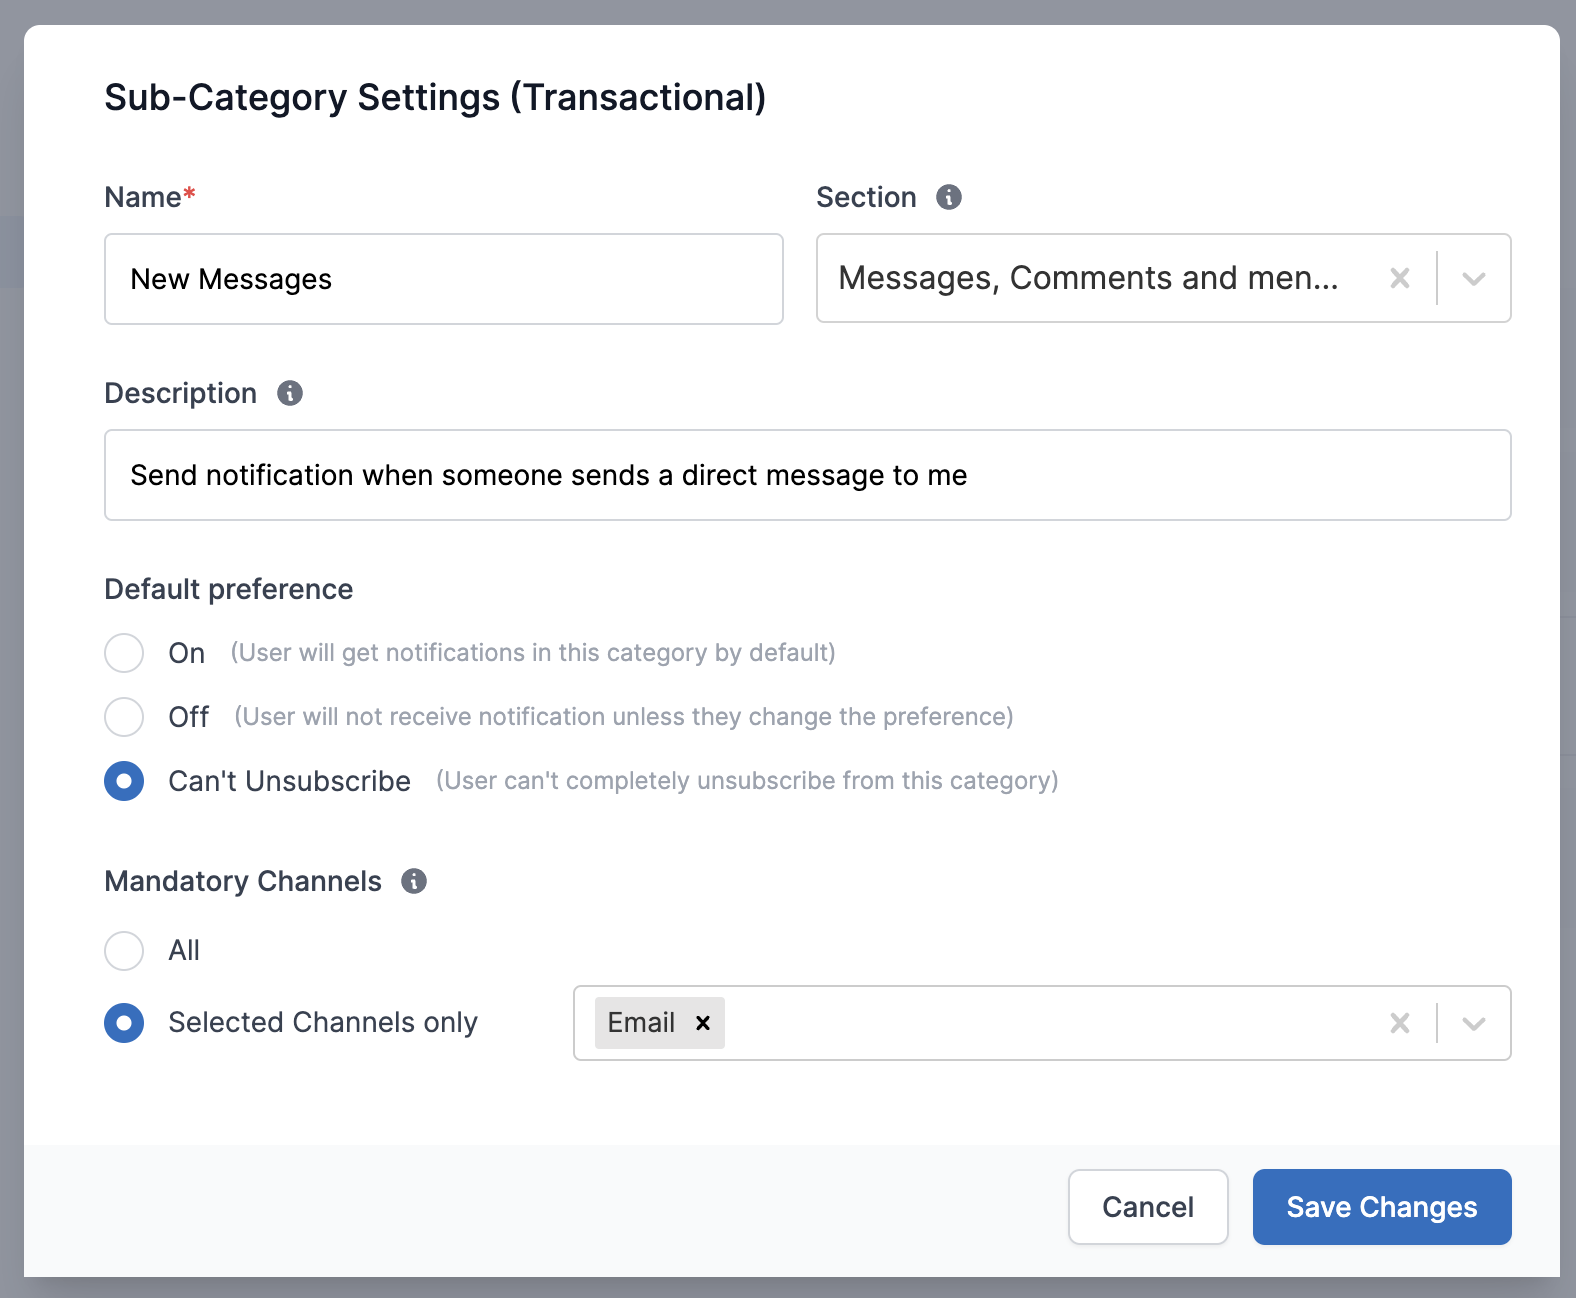 | Field | Obligation | Description |
| ------------------ | ----------- | --------------------------------------------------------------------------------------------------------------------------------------------------------------------------------------------------------------------------------------------------------------------------------------------------------------------------------------------------------------------------------------------------------------------------------------------------------------------------------------------------------------------------------------------------------------------------------------------------------------------------- |
| Name | *Mandatory* | Name of the sub-category to be shown on the user preference page |
| Section | *Optional* | Section in which this sub-category will be grouped into |
| Description | *Optional* | Description of the sub-category to be shown on the user preference page |
| Default Preference | *Mandatory* | Default preference settings for the sub-category. Notifications will be sent to the user based on this preference until the user overrides it - `On` means the user will get notifications on all channels in this sub-category until user opts out from this category or any channel in this category - `Off` means the user will not get notification on all channels in this sub-category until user opts into this category or any channel in this category - `Can't Unsubscribe` means the user can't completely opt-out from this category. Notifications will always be sent on mandatory channels in this category. |
| Mandatory Channels | *Optional* | Mandatory channels from which user `Can't Unsubscribe`. The default selection is `All` but you can change it to `Selected Channels only` to make specific channels mandatory. |
Click on "Save Changes" to save the sub-category. You'll see the updated sub-category inside the section and edit it later by clicking on the pencil icon against that category.
| Field | Obligation | Description |
| ------------------ | ----------- | --------------------------------------------------------------------------------------------------------------------------------------------------------------------------------------------------------------------------------------------------------------------------------------------------------------------------------------------------------------------------------------------------------------------------------------------------------------------------------------------------------------------------------------------------------------------------------------------------------------------------- |
| Name | *Mandatory* | Name of the sub-category to be shown on the user preference page |
| Section | *Optional* | Section in which this sub-category will be grouped into |
| Description | *Optional* | Description of the sub-category to be shown on the user preference page |
| Default Preference | *Mandatory* | Default preference settings for the sub-category. Notifications will be sent to the user based on this preference until the user overrides it - `On` means the user will get notifications on all channels in this sub-category until user opts out from this category or any channel in this category - `Off` means the user will not get notification on all channels in this sub-category until user opts into this category or any channel in this category - `Can't Unsubscribe` means the user can't completely opt-out from this category. Notifications will always be sent on mandatory channels in this category. |
| Mandatory Channels | *Optional* | Mandatory channels from which user `Can't Unsubscribe`. The default selection is `All` but you can change it to `Selected Channels only` to make specific channels mandatory. |
Click on "Save Changes" to save the sub-category. You'll see the updated sub-category inside the section and edit it later by clicking on the pencil icon against that category.
 ***
# Object Subscriptions
Source: https://docs.suprsend.com/docs/object-subscriptions
Learn how to use subscriptions to notify a list of recipients associated with an object.
Subscriptions are an extension to [Objects](/docs/objects) and used to link [recipient/user](/docs/users) with the object. You can use subscriptions to:
* Maintain relationship for a group of users and reuse them in all triggers, without having to compute recipient list in individual workflow triggers.
* Notify all users subscribed to a topic or event when it occurs, with users able to subscribe and unsubscribe as needed. Eg. Notify all users subscribed to an event when the event starts.
* SaaS applications managing notifications for end-users where recipient relationships are coming from an system and event triggers or notification calls are coming from an external systems like CRM or SAP, and the trigger doesn't have information of the users who are subscriber to that trigger.
Objects can have one or more subscribers, and triggering a workflow on an object will automatically propagate notifications to all subscribers, without you needing to maintain this subscription in your database.
## Managing subscriptions
### Add subscription
You can add subscribers by passing an array of existing users or identifying them inline, which will automatically create user profiles in the background. The subscription is an upsert operation, meaning it adds new subscribers to the object but overwrites existing subscriber properties if passed with updated values.
You can subscribe up to 100 subscribers to an object in one go, with no cap on the total number of subscribers an object can have.
[Create/Update Subscription API ->](/reference/add-object-subscription)
***
# Object Subscriptions
Source: https://docs.suprsend.com/docs/object-subscriptions
Learn how to use subscriptions to notify a list of recipients associated with an object.
Subscriptions are an extension to [Objects](/docs/objects) and used to link [recipient/user](/docs/users) with the object. You can use subscriptions to:
* Maintain relationship for a group of users and reuse them in all triggers, without having to compute recipient list in individual workflow triggers.
* Notify all users subscribed to a topic or event when it occurs, with users able to subscribe and unsubscribe as needed. Eg. Notify all users subscribed to an event when the event starts.
* SaaS applications managing notifications for end-users where recipient relationships are coming from an system and event triggers or notification calls are coming from an external systems like CRM or SAP, and the trigger doesn't have information of the users who are subscriber to that trigger.
Objects can have one or more subscribers, and triggering a workflow on an object will automatically propagate notifications to all subscribers, without you needing to maintain this subscription in your database.
## Managing subscriptions
### Add subscription
You can add subscribers by passing an array of existing users or identifying them inline, which will automatically create user profiles in the background. The subscription is an upsert operation, meaning it adds new subscribers to the object but overwrites existing subscriber properties if passed with updated values.
You can subscribe up to 100 subscribers to an object in one go, with no cap on the total number of subscribers an object can have.
[Create/Update Subscription API ->](/reference/add-object-subscription)
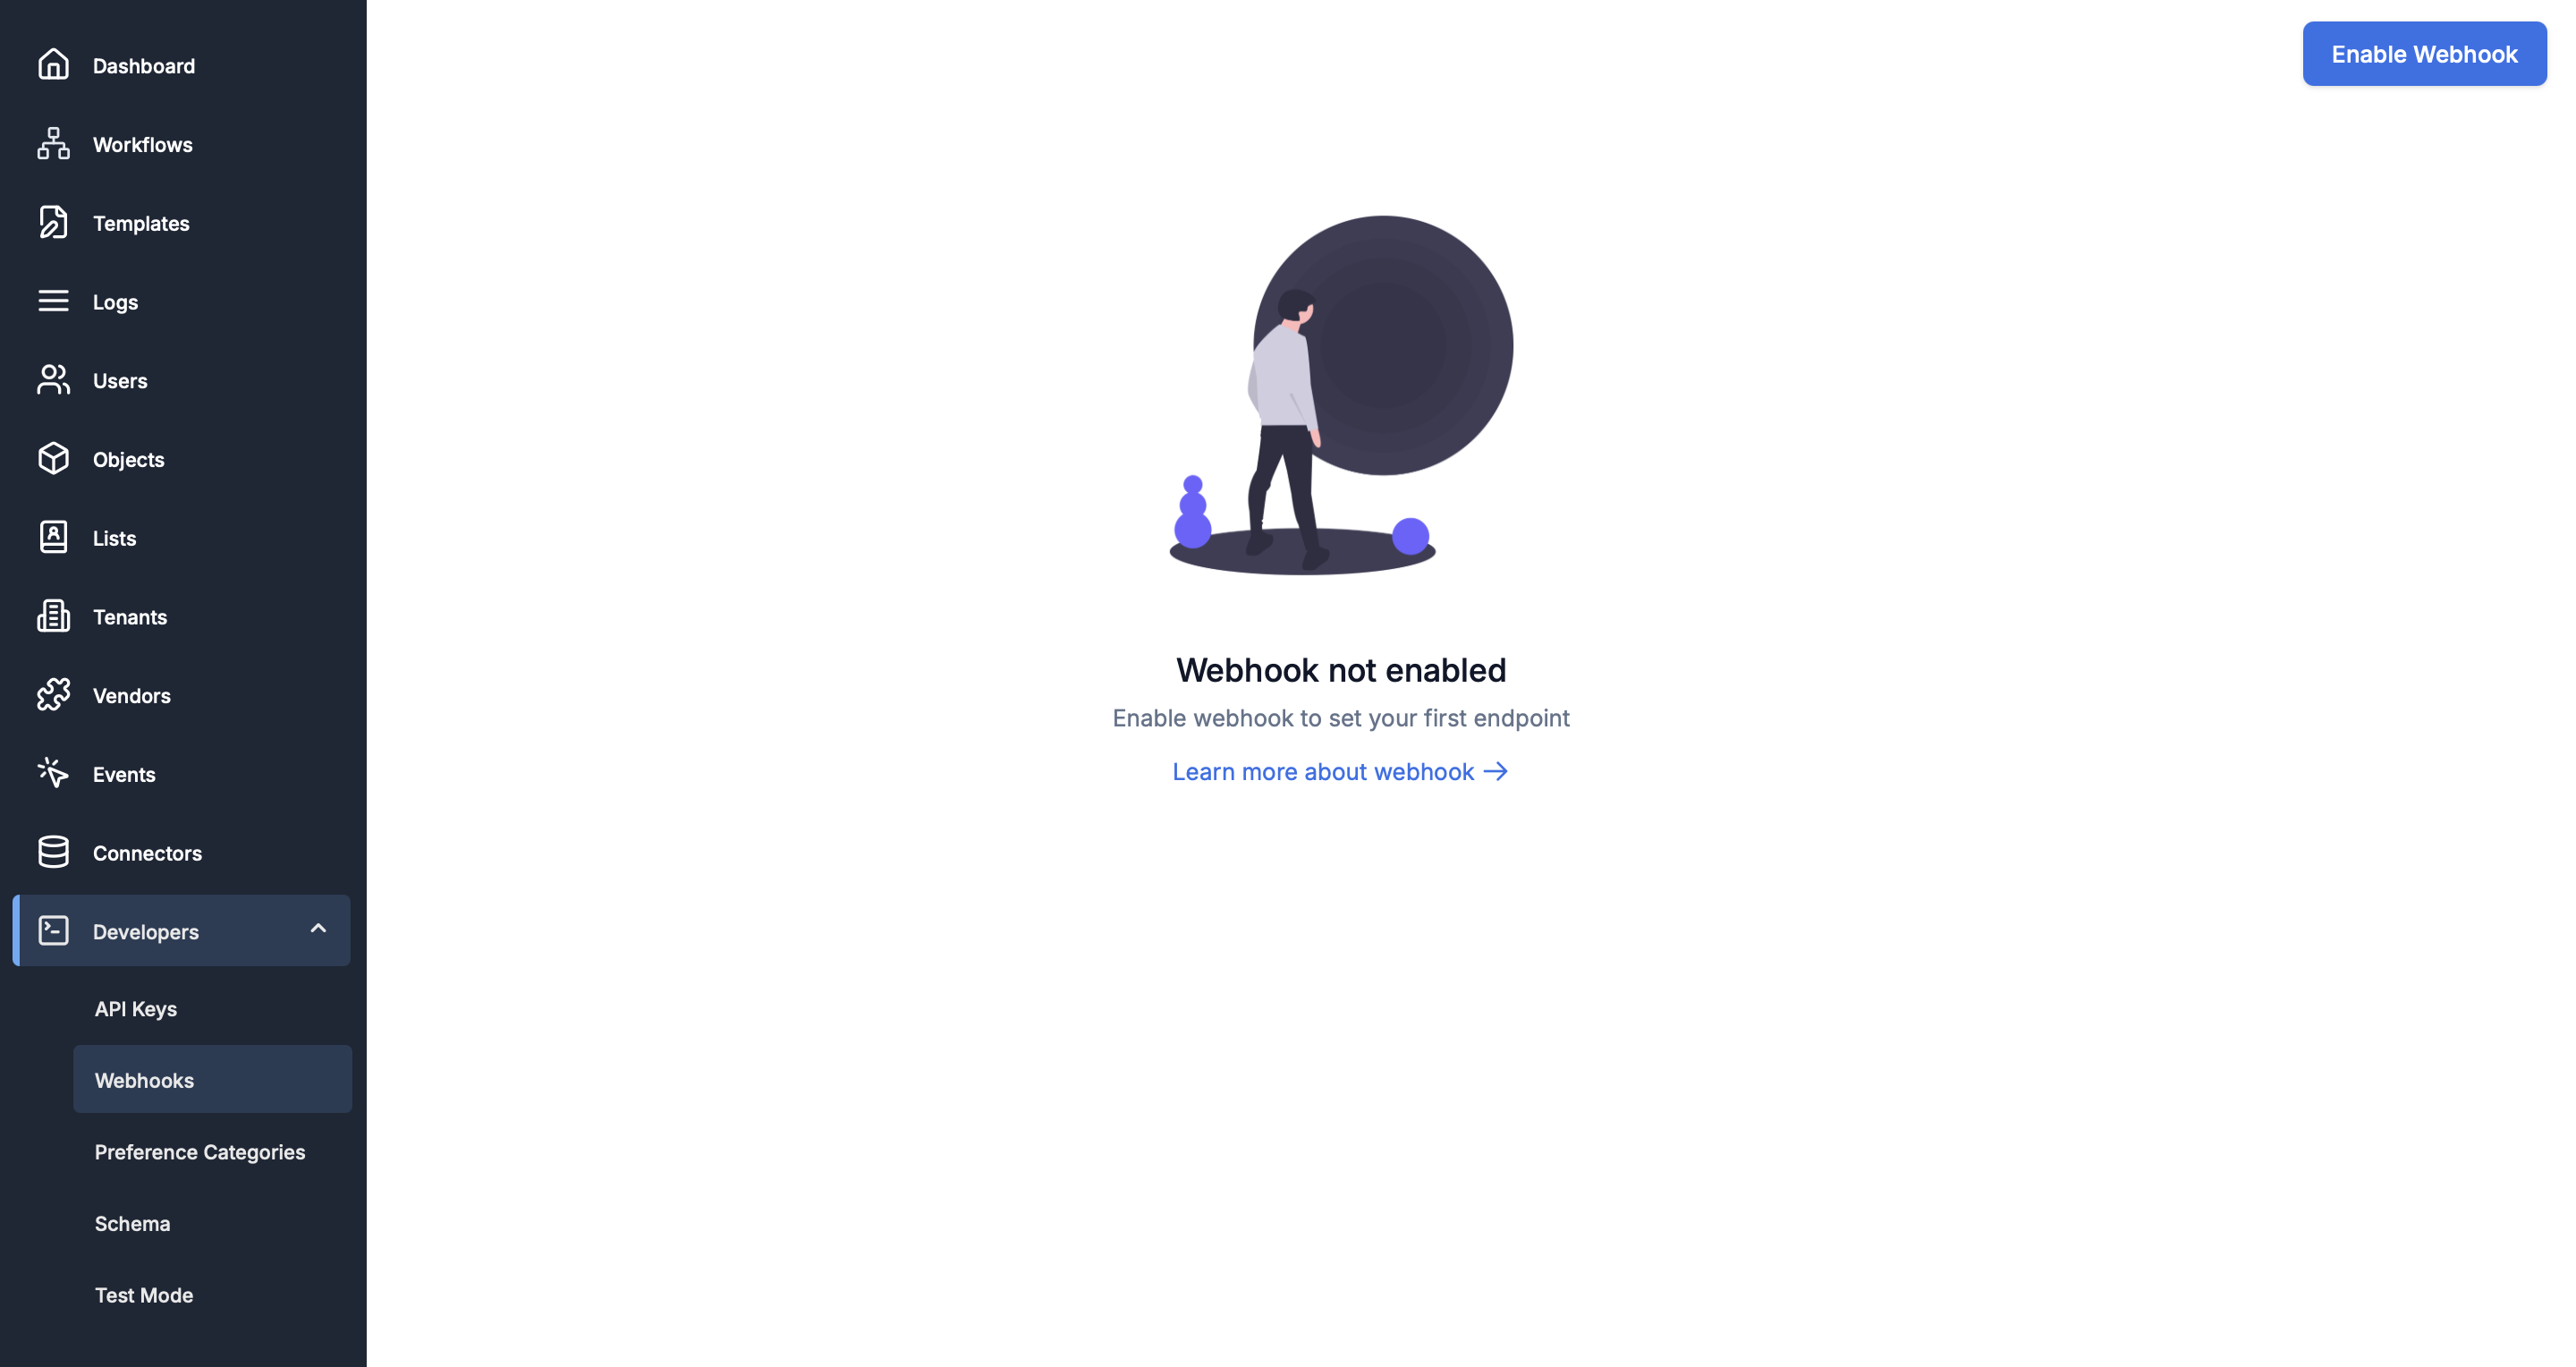 * Once you have enabled webhook, you'll see a screen like below. Click on "Add Endpoint"
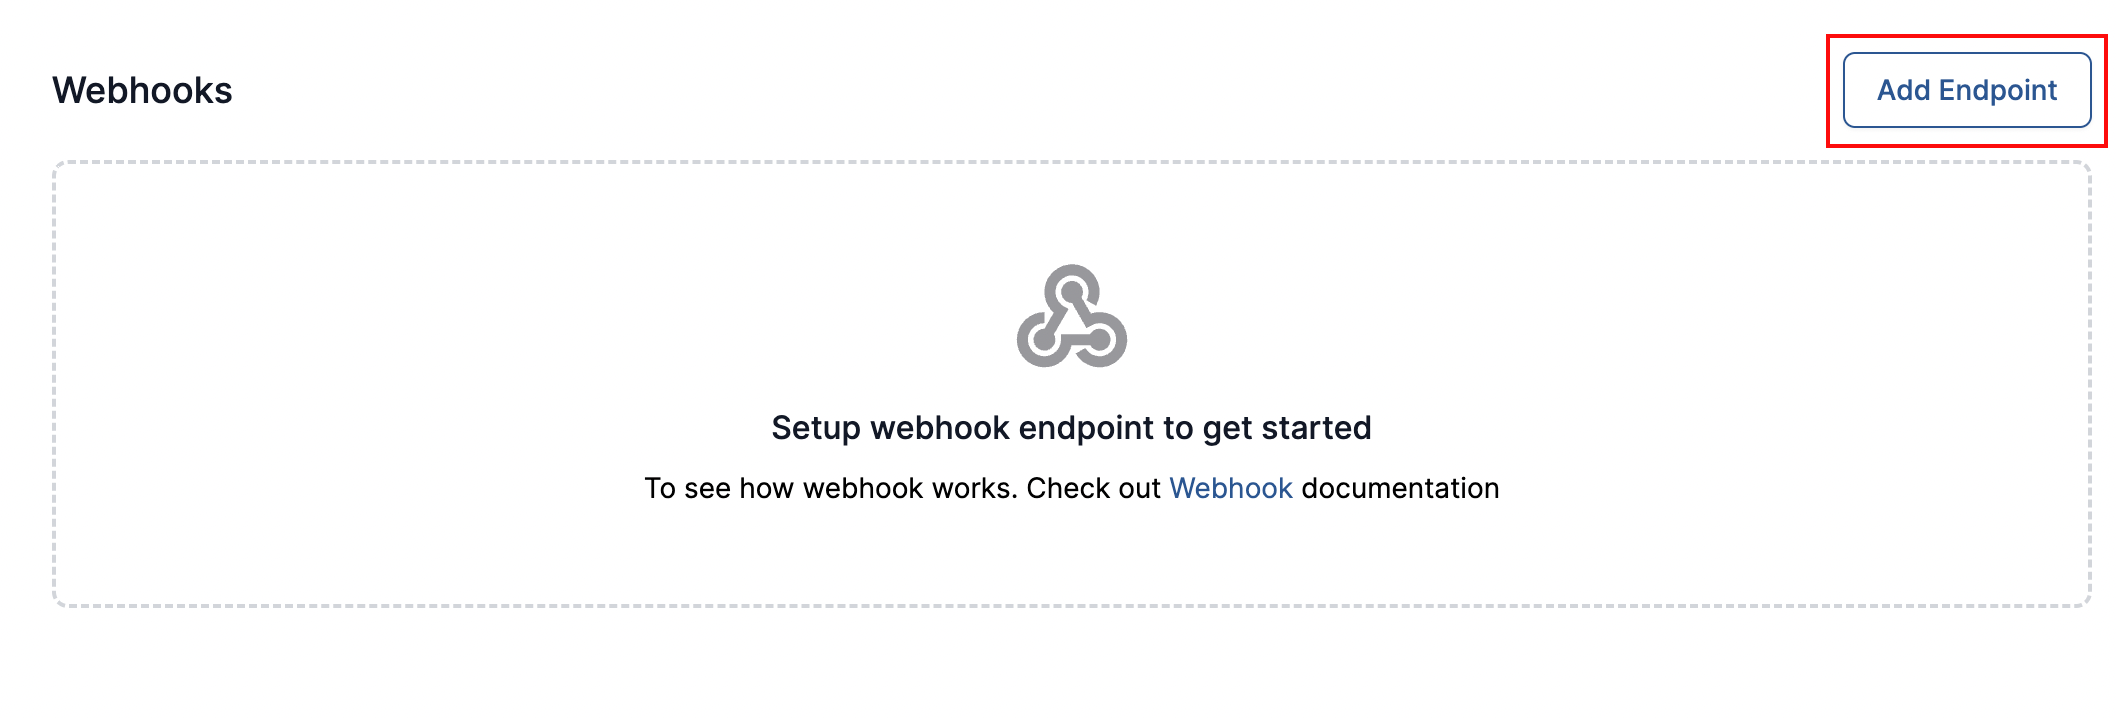 * This will open endpoint settings form. Add the endpoint URL that you have created in the first step and give it a description for your reference. Select the event type that you want to receive on this endpoint for each channel.
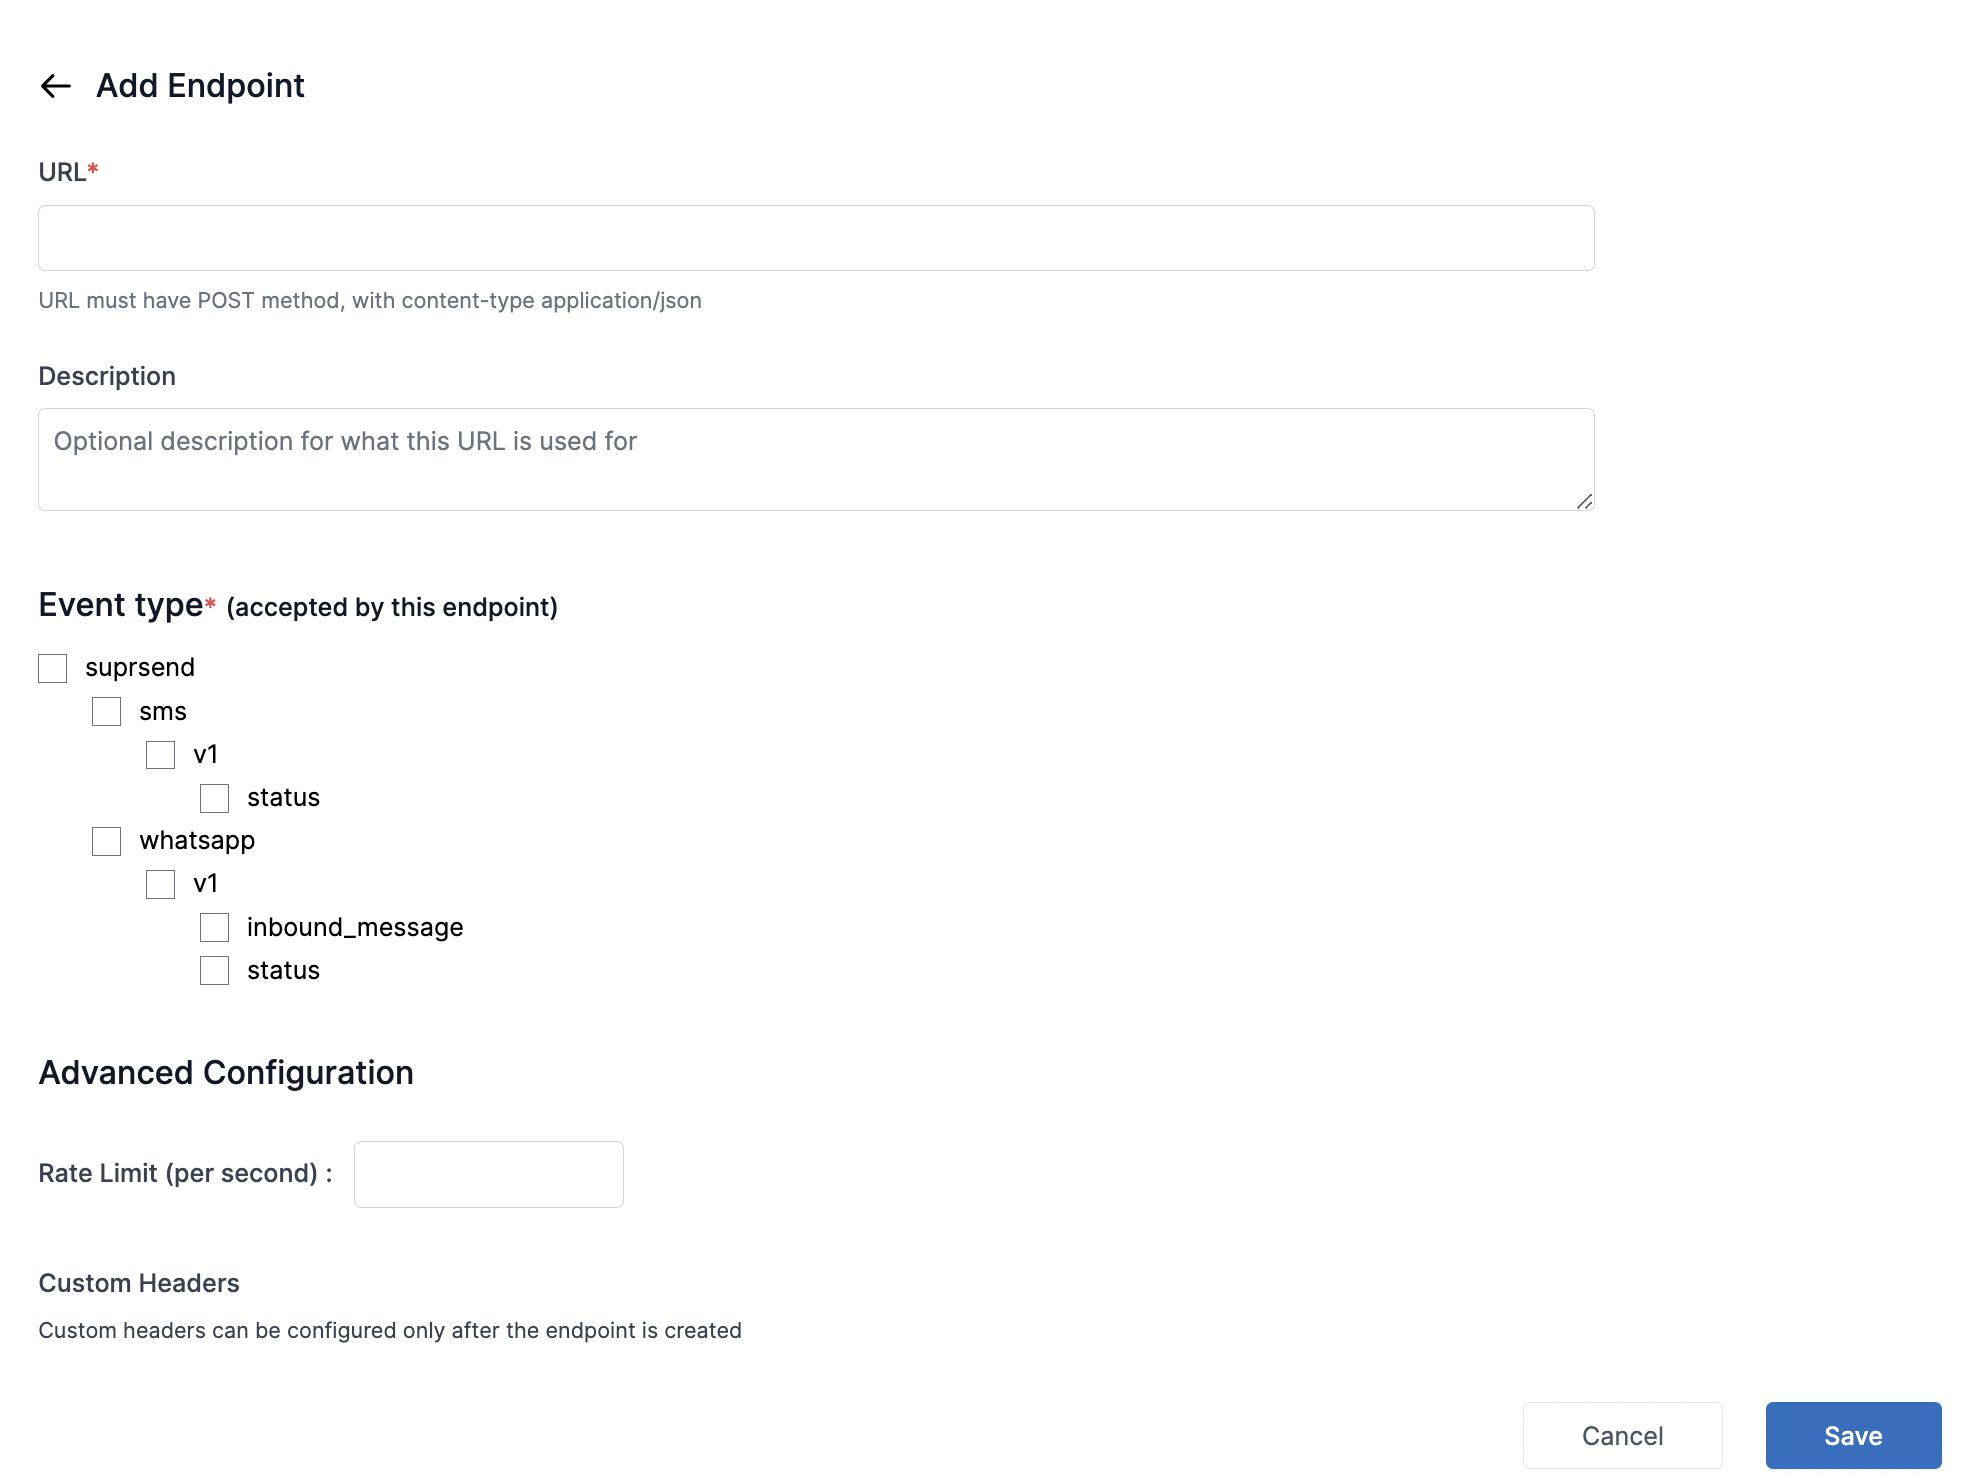 * Here's how an example configuration of enabling status updates for email notification looks like:
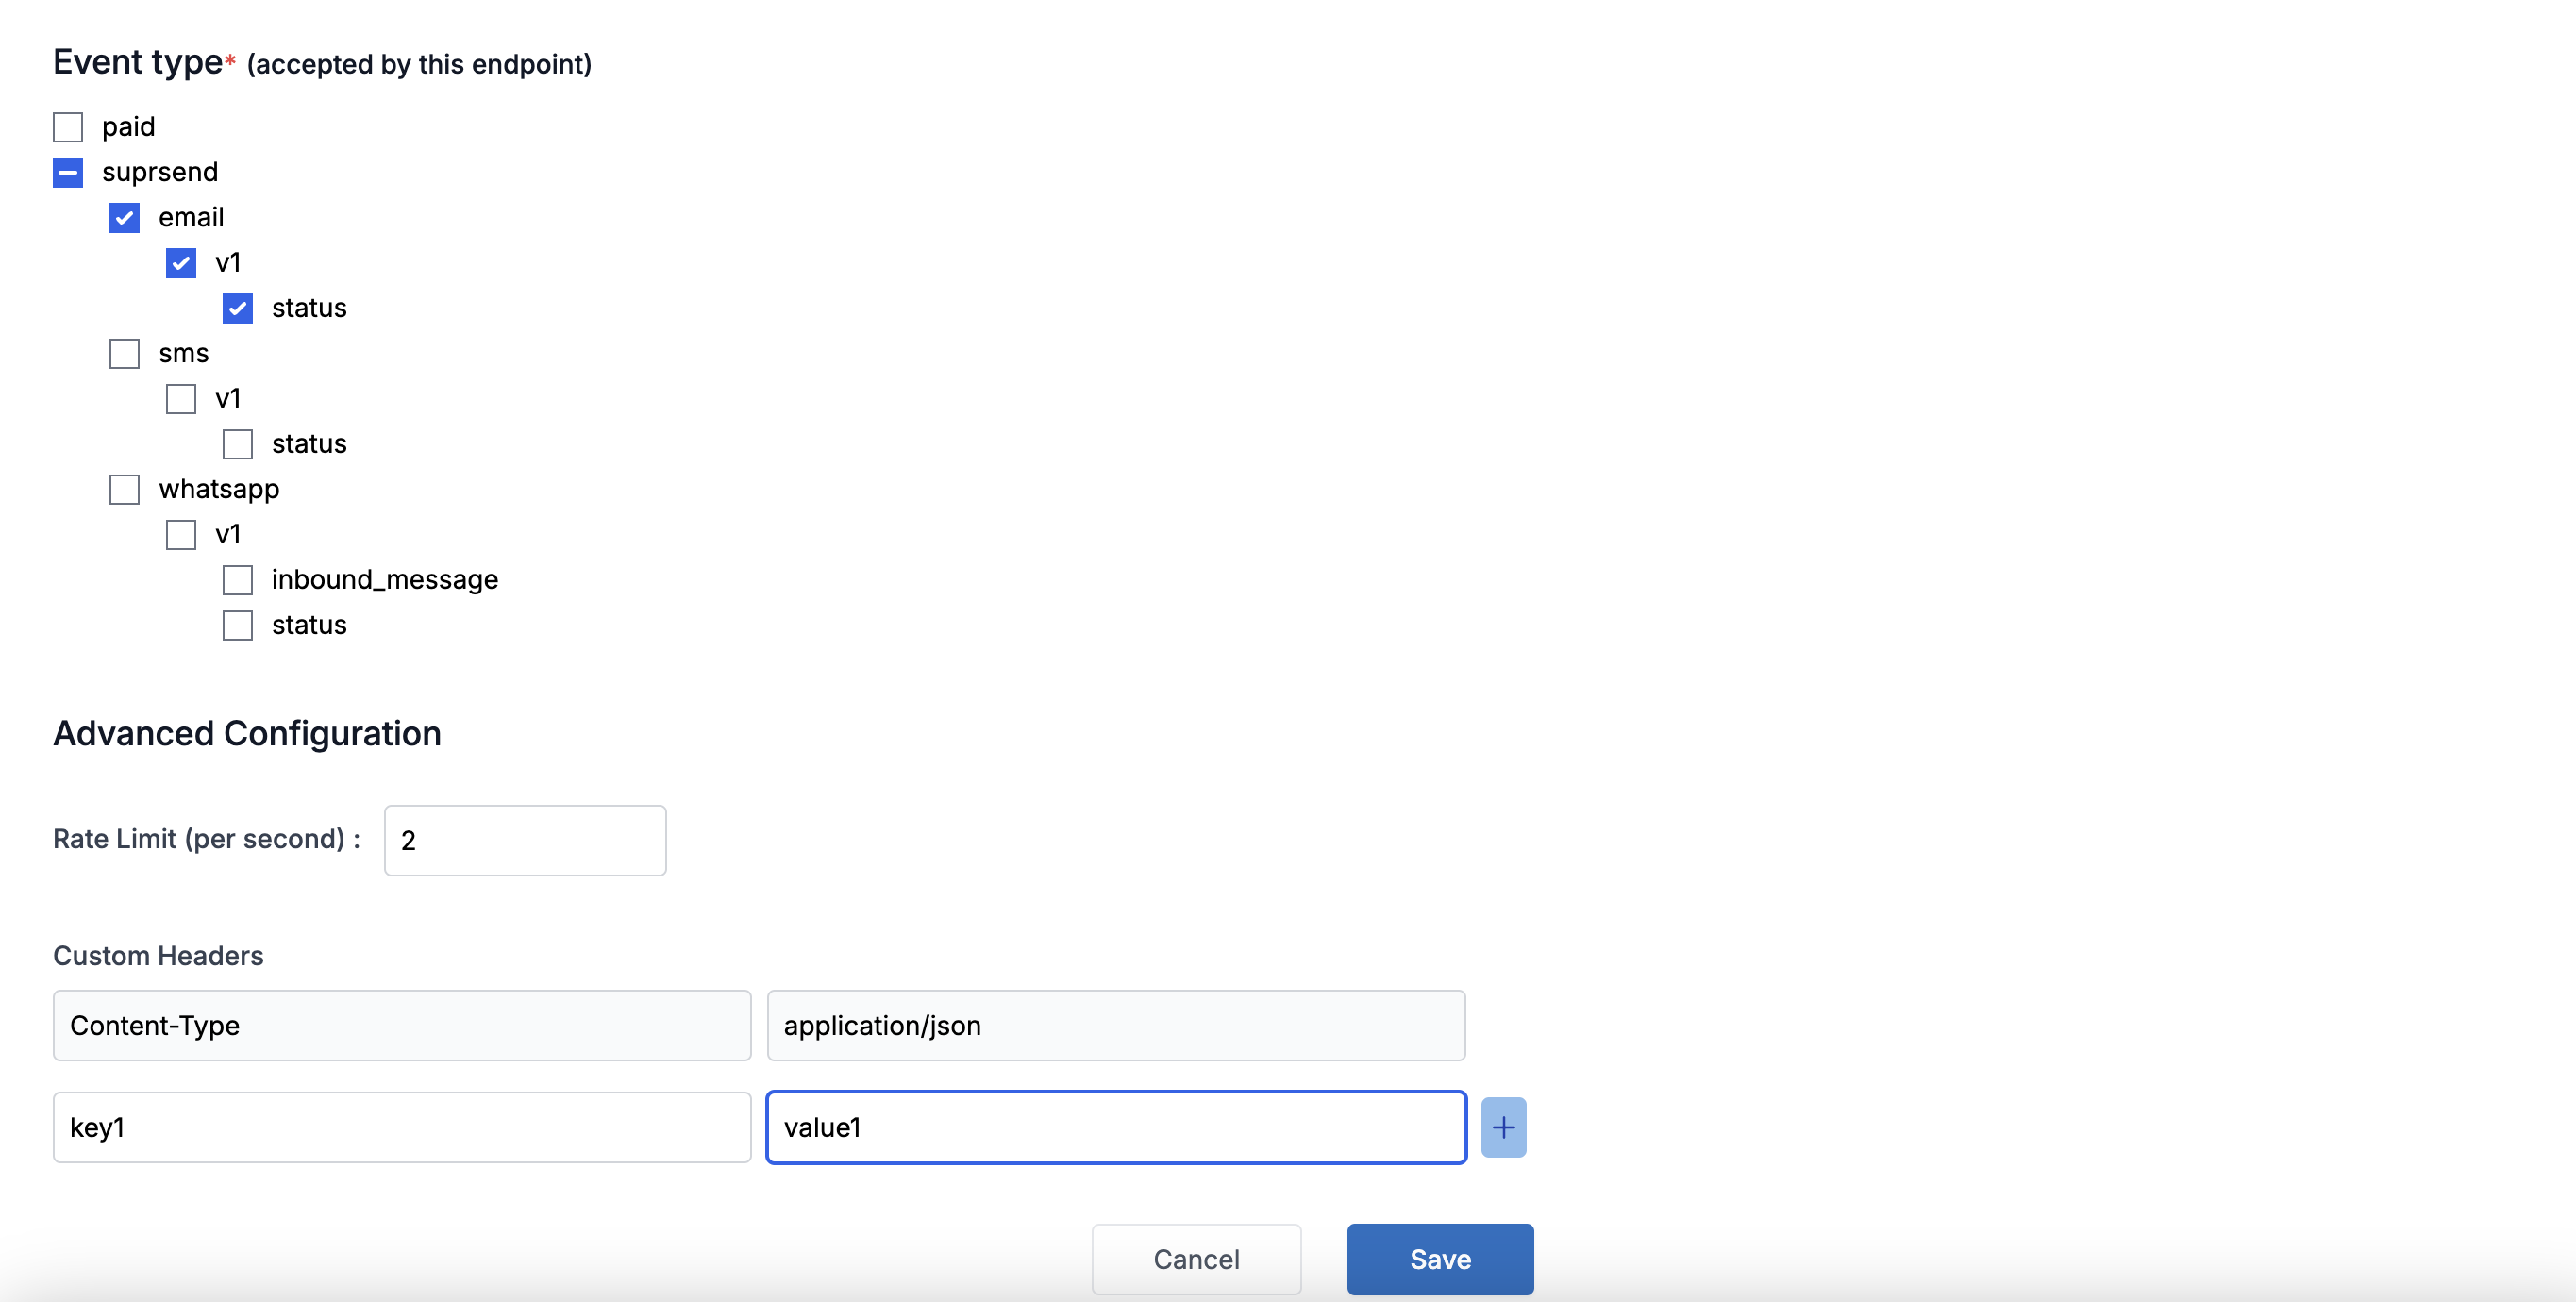 Form Fields and their descriptions:
| Field | Obligation | Description |
| -------------------------------------------- | ----------- | ---------------------------------------------------------------------------------------------------------------------------------------------------------------------------------------------------------------------------- |
| **URL** | *mandatory* | http or https endpoint where you want to receive the webhook requests from SuprSend. Must support POST method and content-type should be application/json |
| **Description** | *optional* | add the reference of what information will be tracked in the given endpoint |
| **Event type** | *mandatory* | What all events should be tracked in this endpoint at each channel level. In case of WhatsApp, inbound\_message = all requests related to user responses and status = notification status such as sent, delivered, seen etc. |
| **Advanced Configuration -> Rate Limit** | *optional* | Number of webhook requests that you want to receive per second on the given endpoint. After the limit is reached, requests will get throttled so to keep a consistent rate under the limit. |
| **Advanced Configuration -> Custom Headers** | *optional* | You'll be able to add custom headers after saving the webhook endpoint. `Content-type = application/json` is set by default. You can use this field to set authentication token in SuprSend request |
Form Fields and their descriptions:
| Field | Obligation | Description |
| -------------------------------------------- | ----------- | ---------------------------------------------------------------------------------------------------------------------------------------------------------------------------------------------------------------------------- |
| **URL** | *mandatory* | http or https endpoint where you want to receive the webhook requests from SuprSend. Must support POST method and content-type should be application/json |
| **Description** | *optional* | add the reference of what information will be tracked in the given endpoint |
| **Event type** | *mandatory* | What all events should be tracked in this endpoint at each channel level. In case of WhatsApp, inbound\_message = all requests related to user responses and status = notification status such as sent, delivered, seen etc. |
| **Advanced Configuration -> Rate Limit** | *optional* | Number of webhook requests that you want to receive per second on the given endpoint. After the limit is reached, requests will get throttled so to keep a consistent rate under the limit. |
| **Advanced Configuration -> Custom Headers** | *optional* | You'll be able to add custom headers after saving the webhook endpoint. `Content-type = application/json` is set by default. You can use this field to set authentication token in SuprSend request |
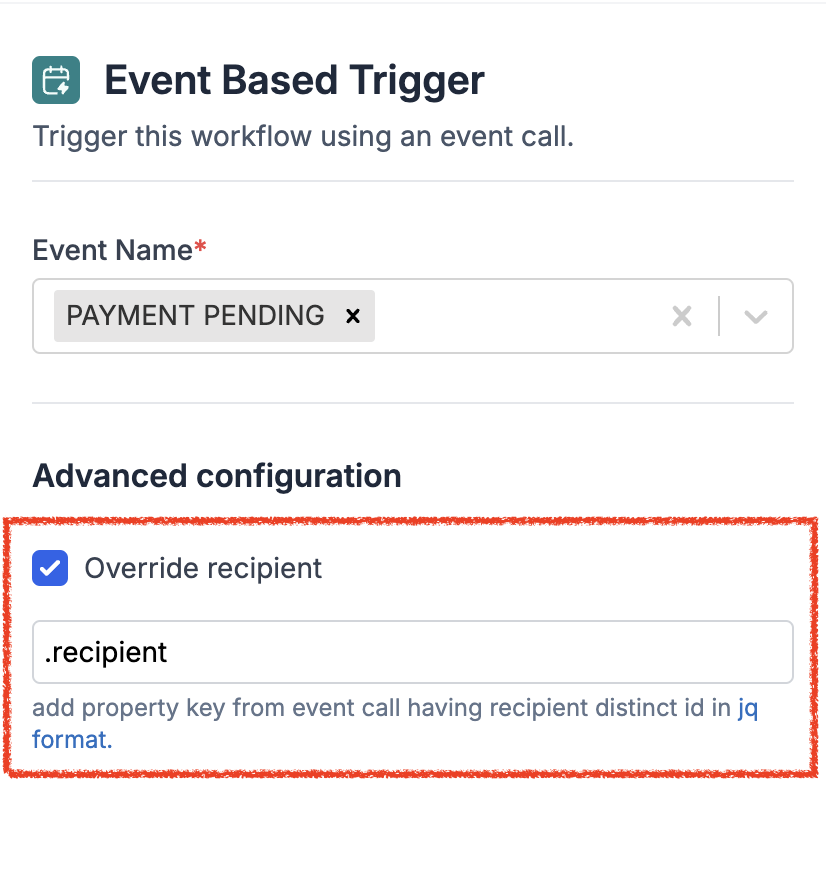 However, there may be situations where you do not want the notification to be sent to the user who initiates the action. For instance, when John shares a document with Olivia for review and Olivia adds comments to the document, you would want to inform John that he has received new comments on the shared document.
To handle such cases, you can override the default recipient with another identifier specified in the event property. e.g., if this is the event call, you can pass `.recipient` in the recipient field to send the notification to `joe@example.com`
However, there may be situations where you do not want the notification to be sent to the user who initiates the action. For instance, when John shares a document with Olivia for review and Olivia adds comments to the document, you would want to inform John that he has received new comments on the shared document.
To handle such cases, you can override the default recipient with another identifier specified in the event property. e.g., if this is the event call, you can pass `.recipient` in the recipient field to send the notification to `joe@example.com`
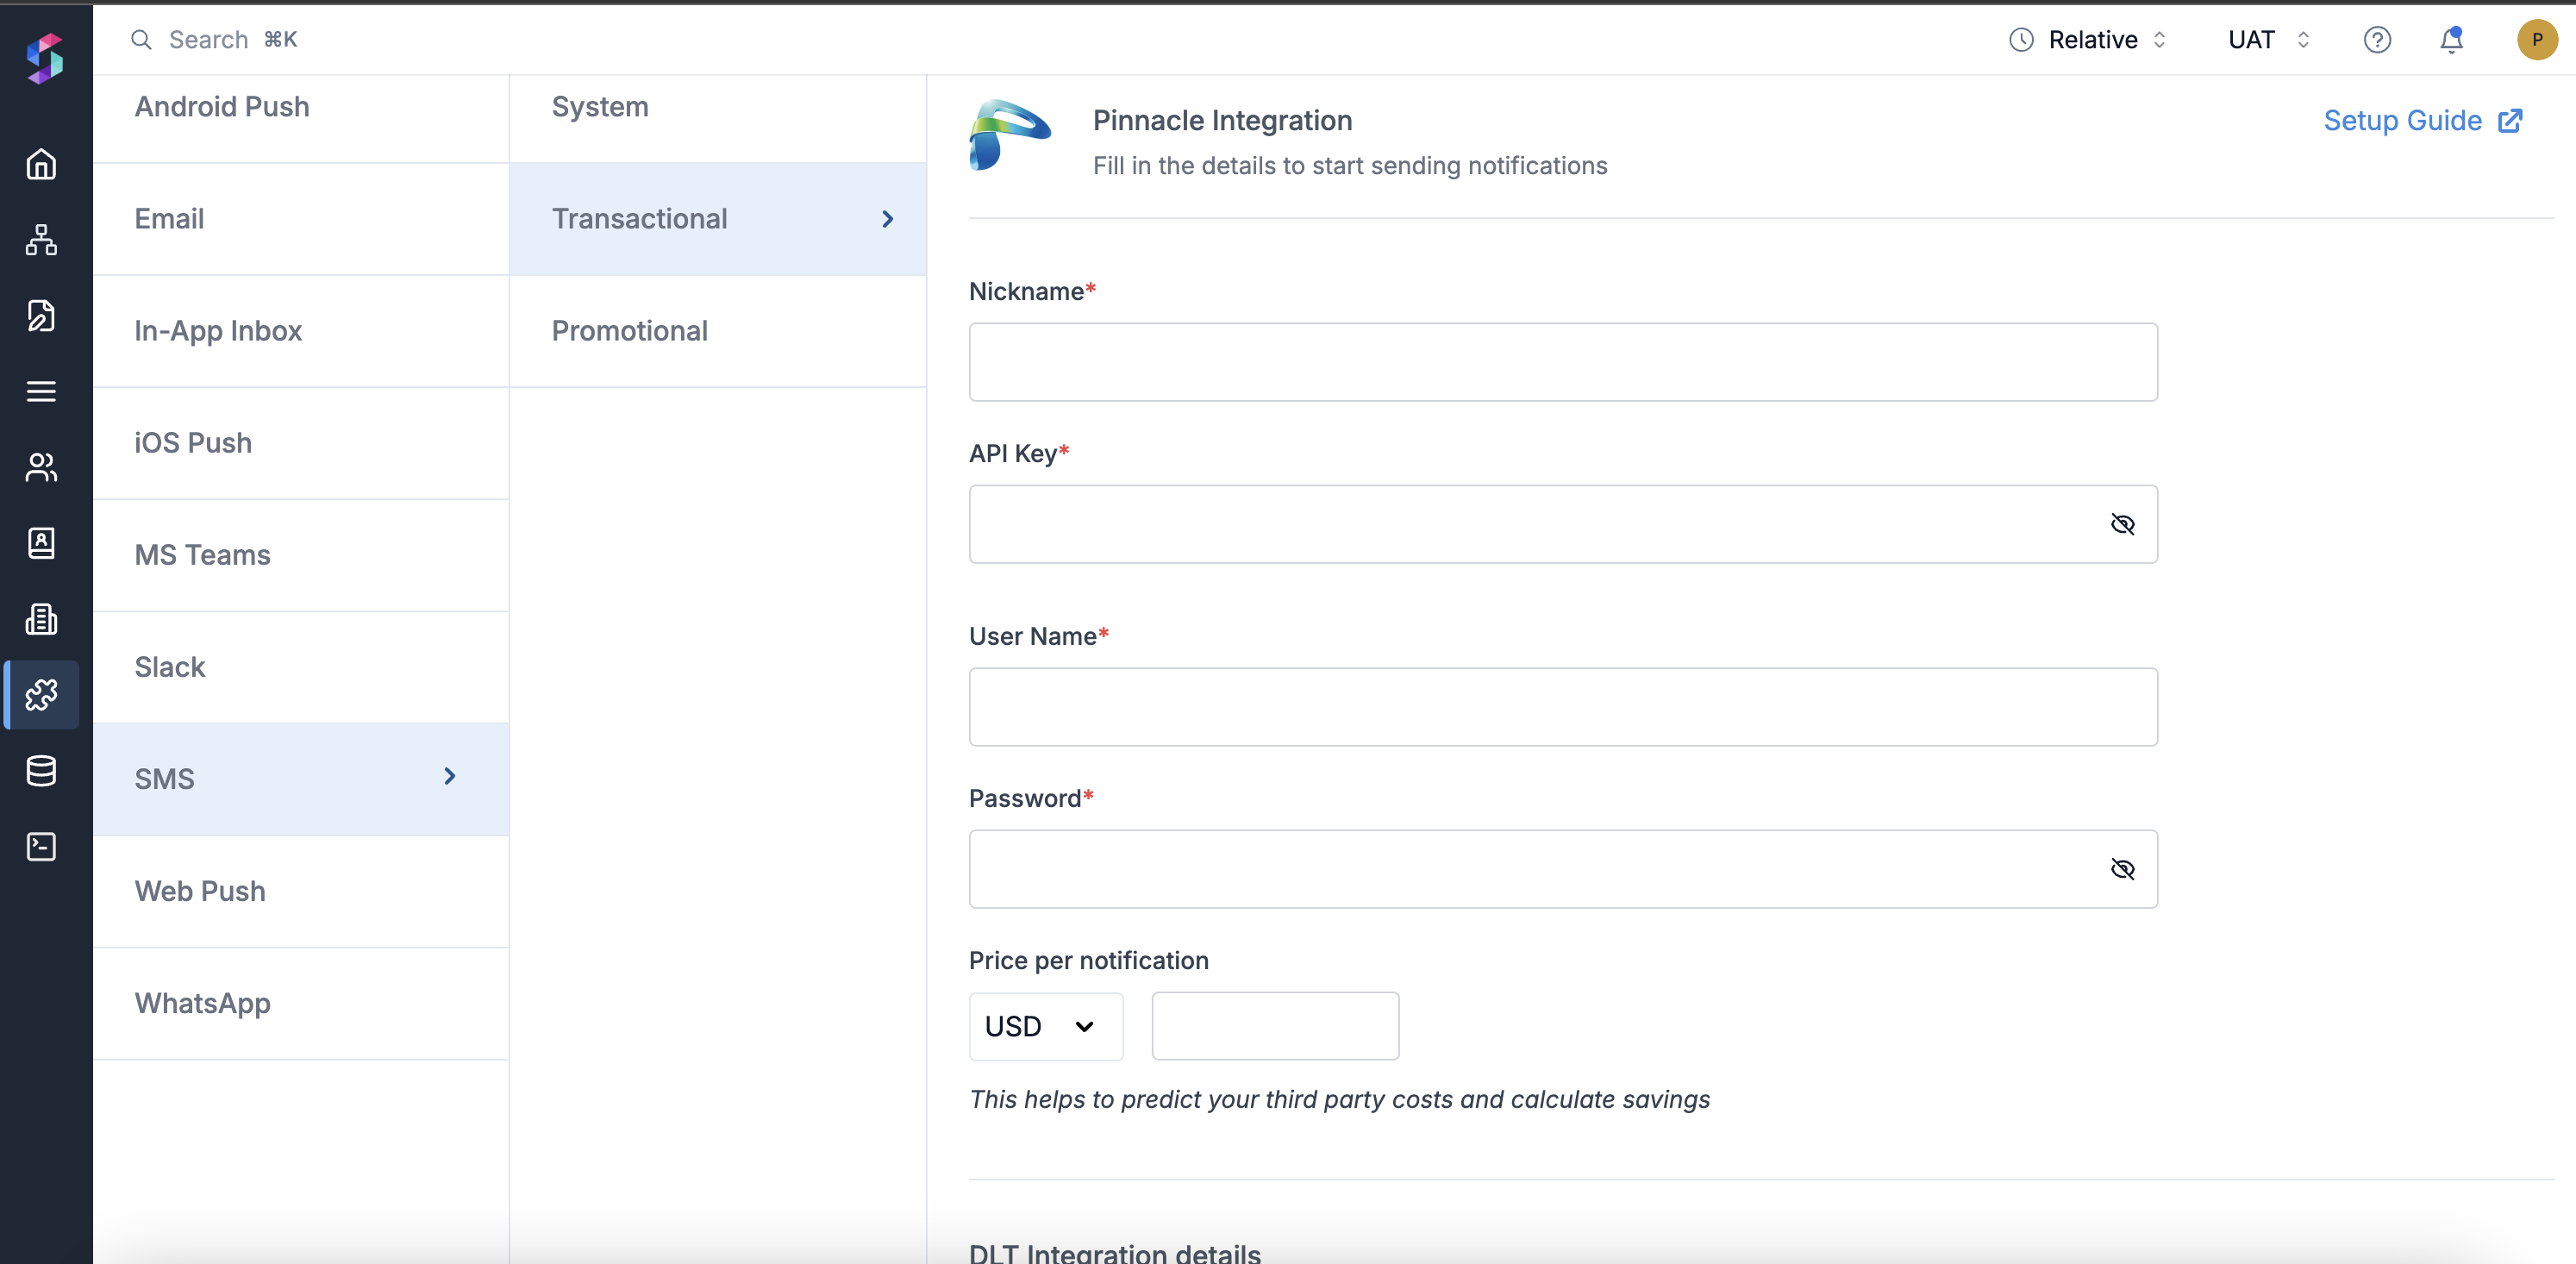 | Form Field | Description |
| ------------------------------------ | --------------------------------------------------------------------------------------------------------------------------------------------------------------------------------------------------------------------------------- |
| Nickname | You can give any name which may help you to identify this account easily |
| API Key | API Key of your Pinnacle account, this can either be obtained by getting in touch with pinnacle support team or by generating it from their dashboard. |
| Username | Username of your Pinnacle SMS account that is also used to login into Pinnacle |
| Password | Password of your Pinnacle account. SuprSend uses this information to send SMS on your behalf via your registered Pinnacle account. |
| Price per notification | This is the amount you pay per SMS notification to Pinnacle. It helps us to calculate, estimate and optimise your cost spent on notifications. |
| DLT Integration -> 'Mobile Operator' | Mobile Operator of your enterprise DLT account |
| DLT Integration -> 'Headers' | 6 digit/character sender id registered for your entity ( *You can get the header details from your DLT portal*) *e.g. SPRSND* Also, you can add multiple headers in the list by just typing the header name and clicking on enter |
| DLT Integration -> 'User Name' | User Name of your DLT platform login. SuprSend uses this info to register template on your behalf through your registered DLT platform. |
| DLT Integration -> 'Password' | Password of your DLT platform login. SuprSend uses this info to register template on your behalf through your registered DLT platform. |
| DLT Integration -> 'Entity ID' | Entity Registration ID linked to your DLT account. You can get the Registration Id from your DLT account homepage. SuprSend uses this info to send messages on your behalf through your registered DLT platform. |
## Setting callback URL in Pinnacle account
One of the platform advantage of using SuprSend as a central communication system is that it shows notification analytics for all channels in your SuprSend account together.
Send a mail to Pinnacle team to enable below webhook URL to your account:
URL: [`https://hub.suprsend.com/webhook/pinnacle/sms/`](https://hub.suprsend.com/webhook/pinnacle/sms/) Request method- POST
Alternatively, this can also be achieved by logging into your pinnacle account through the dashboard as shown below.
| Form Field | Description |
| ------------------------------------ | --------------------------------------------------------------------------------------------------------------------------------------------------------------------------------------------------------------------------------- |
| Nickname | You can give any name which may help you to identify this account easily |
| API Key | API Key of your Pinnacle account, this can either be obtained by getting in touch with pinnacle support team or by generating it from their dashboard. |
| Username | Username of your Pinnacle SMS account that is also used to login into Pinnacle |
| Password | Password of your Pinnacle account. SuprSend uses this information to send SMS on your behalf via your registered Pinnacle account. |
| Price per notification | This is the amount you pay per SMS notification to Pinnacle. It helps us to calculate, estimate and optimise your cost spent on notifications. |
| DLT Integration -> 'Mobile Operator' | Mobile Operator of your enterprise DLT account |
| DLT Integration -> 'Headers' | 6 digit/character sender id registered for your entity ( *You can get the header details from your DLT portal*) *e.g. SPRSND* Also, you can add multiple headers in the list by just typing the header name and clicking on enter |
| DLT Integration -> 'User Name' | User Name of your DLT platform login. SuprSend uses this info to register template on your behalf through your registered DLT platform. |
| DLT Integration -> 'Password' | Password of your DLT platform login. SuprSend uses this info to register template on your behalf through your registered DLT platform. |
| DLT Integration -> 'Entity ID' | Entity Registration ID linked to your DLT account. You can get the Registration Id from your DLT account homepage. SuprSend uses this info to send messages on your behalf through your registered DLT platform. |
## Setting callback URL in Pinnacle account
One of the platform advantage of using SuprSend as a central communication system is that it shows notification analytics for all channels in your SuprSend account together.
Send a mail to Pinnacle team to enable below webhook URL to your account:
URL: [`https://hub.suprsend.com/webhook/pinnacle/sms/`](https://hub.suprsend.com/webhook/pinnacle/sms/) Request method- POST
Alternatively, this can also be achieved by logging into your pinnacle account through the dashboard as shown below.
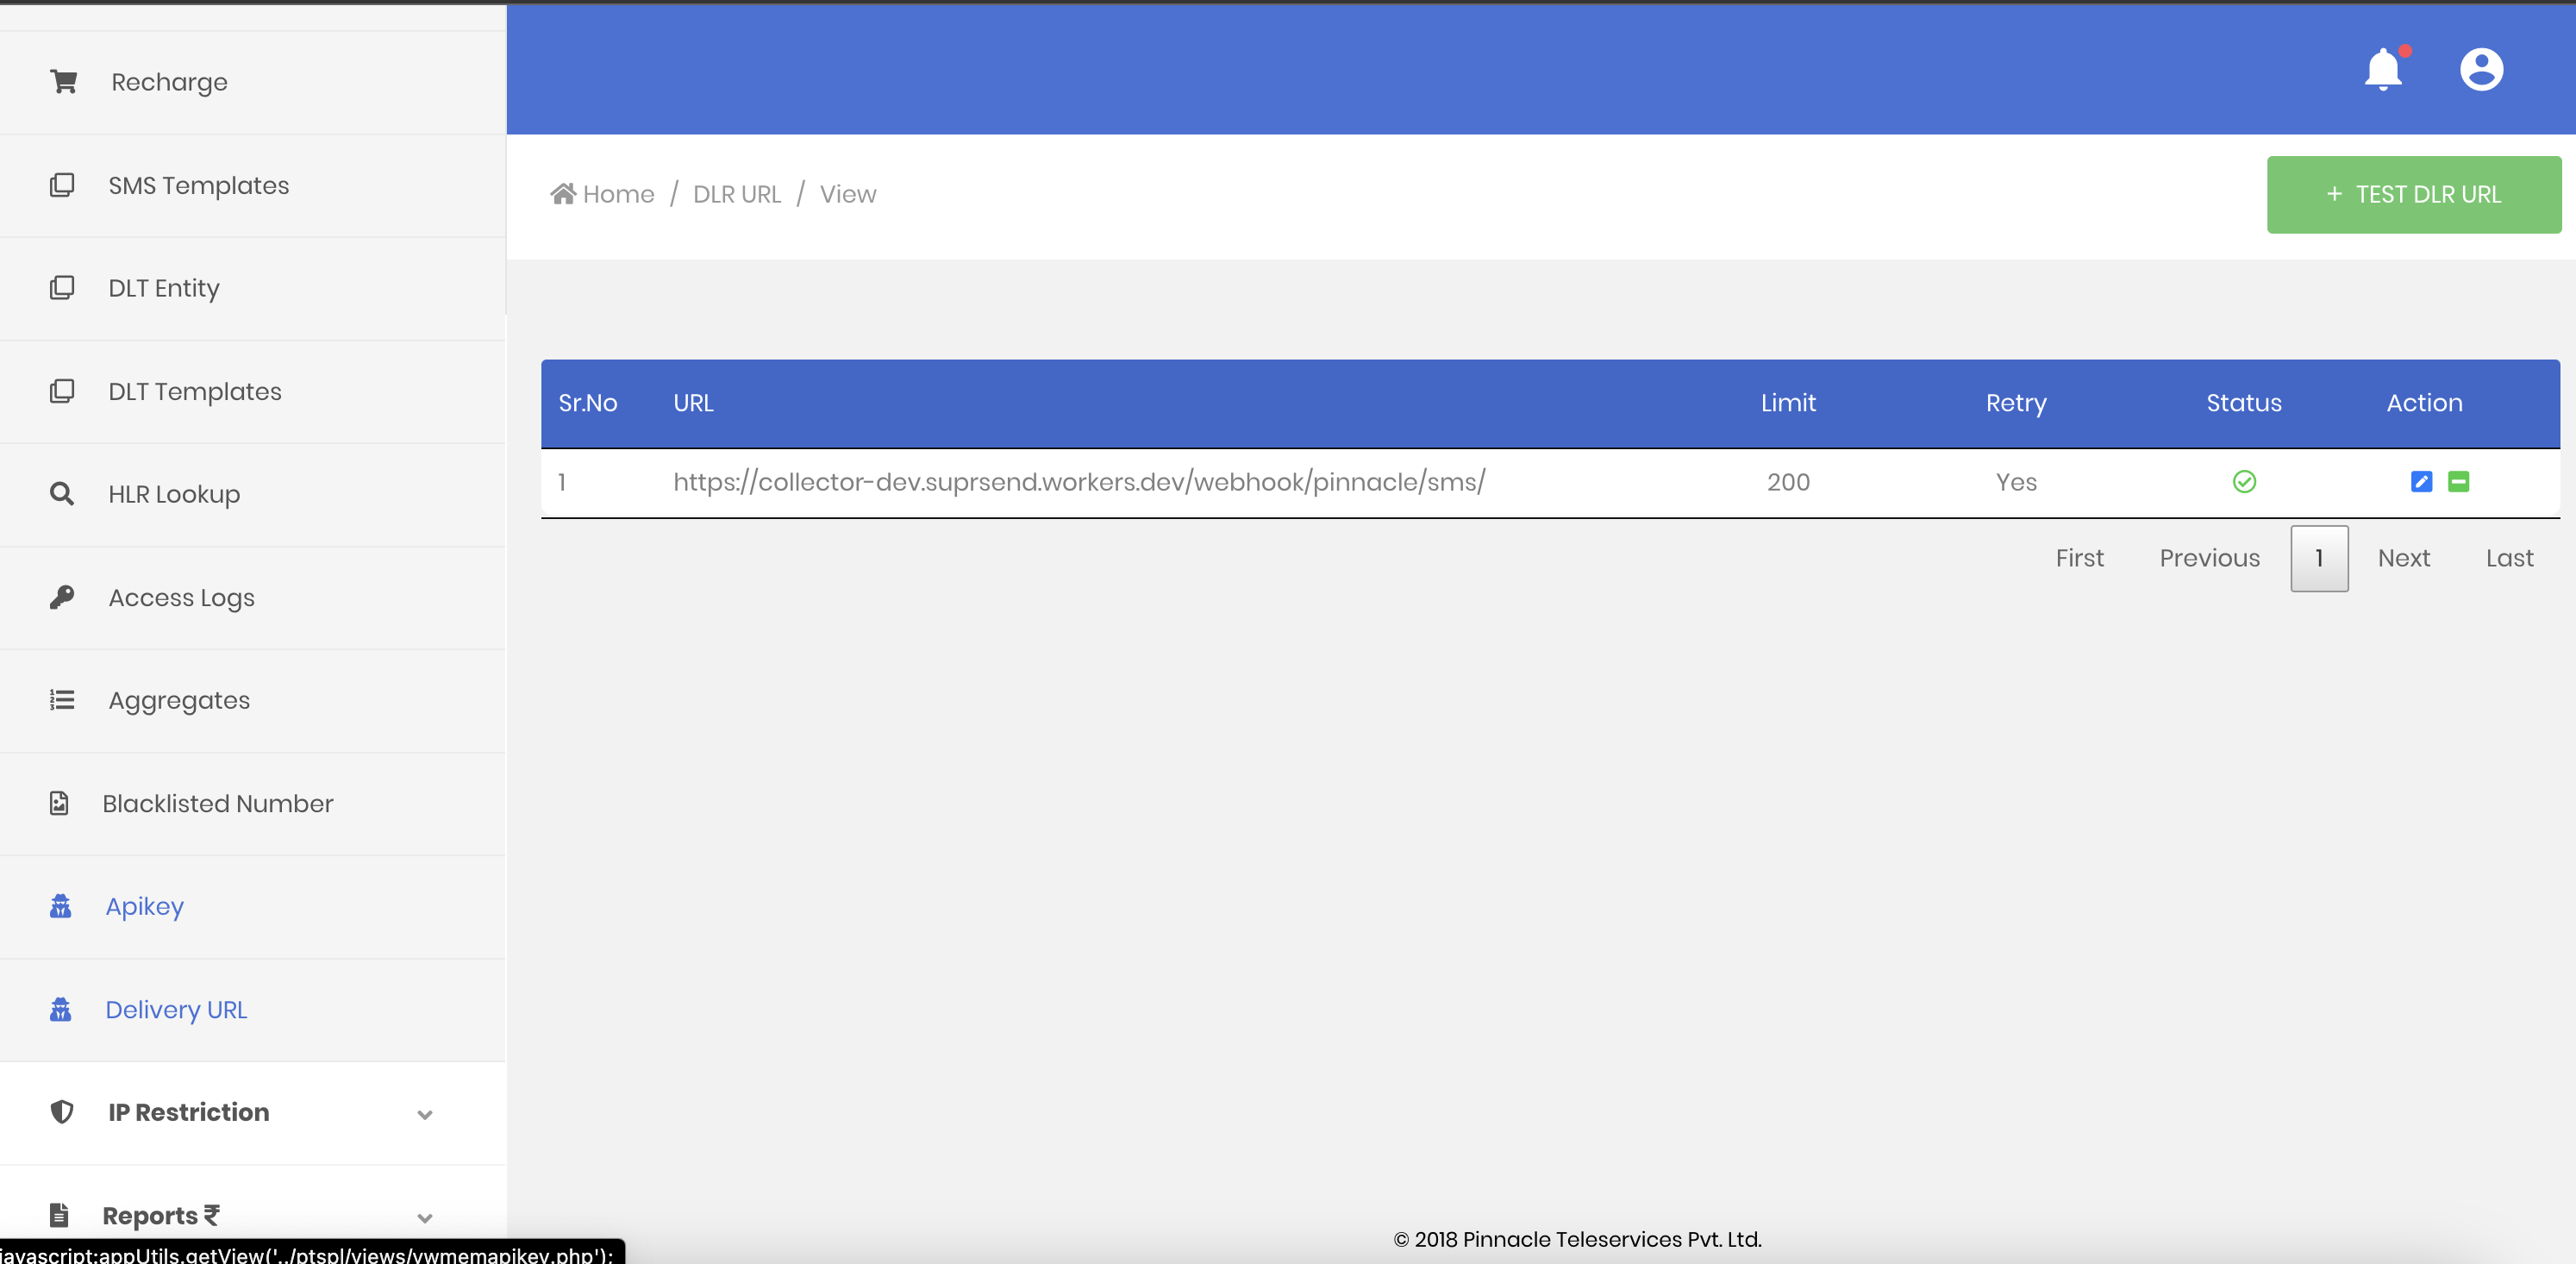 ## How to register headers through Airtel DLT platform
To register header on Airtel DLT platform, you can refer the section: [Sender ID/Mask/Header Registration- DLT Platform](https://enterprise.smsgupshup.com/DLT/senderidRegistration)
***
# Postgres
Source: https://docs.suprsend.com/docs/postgres
Guide to set up Postgres database connection to auto sync subscriber lists.
With this integration, you can directly send notifications on your 360 degree data sitting in your data warehouse. This enables your data teams or product managers to automate user syncing, setup recurring user cohort sync and create [subscriber lists](/docs/lists) on SuprSend. You can then trigger notification to this list using [broadcast](/docs/broadcast) API.
## Getting Started
To start syncing data from your postgres database, you need to add postgres integration on the connector page.
1. Go to [SuprSend dashboard -> Settings -> Connectors](https://app.suprsend.com/en/staging/connectors) page. Here, you'll see the list of available connectors. If you have already setup any connectors in the past, you'll see a list of existing connectors. Click on **"+New Connector"** button to add the connector.
2. Click on Postgres and add your database user’s credentials. All fields in the form are mandatory.
## How to register headers through Airtel DLT platform
To register header on Airtel DLT platform, you can refer the section: [Sender ID/Mask/Header Registration- DLT Platform](https://enterprise.smsgupshup.com/DLT/senderidRegistration)
***
# Postgres
Source: https://docs.suprsend.com/docs/postgres
Guide to set up Postgres database connection to auto sync subscriber lists.
With this integration, you can directly send notifications on your 360 degree data sitting in your data warehouse. This enables your data teams or product managers to automate user syncing, setup recurring user cohort sync and create [subscriber lists](/docs/lists) on SuprSend. You can then trigger notification to this list using [broadcast](/docs/broadcast) API.
## Getting Started
To start syncing data from your postgres database, you need to add postgres integration on the connector page.
1. Go to [SuprSend dashboard -> Settings -> Connectors](https://app.suprsend.com/en/staging/connectors) page. Here, you'll see the list of available connectors. If you have already setup any connectors in the past, you'll see a list of existing connectors. Click on **"+New Connector"** button to add the connector.
2. Click on Postgres and add your database user’s credentials. All fields in the form are mandatory.
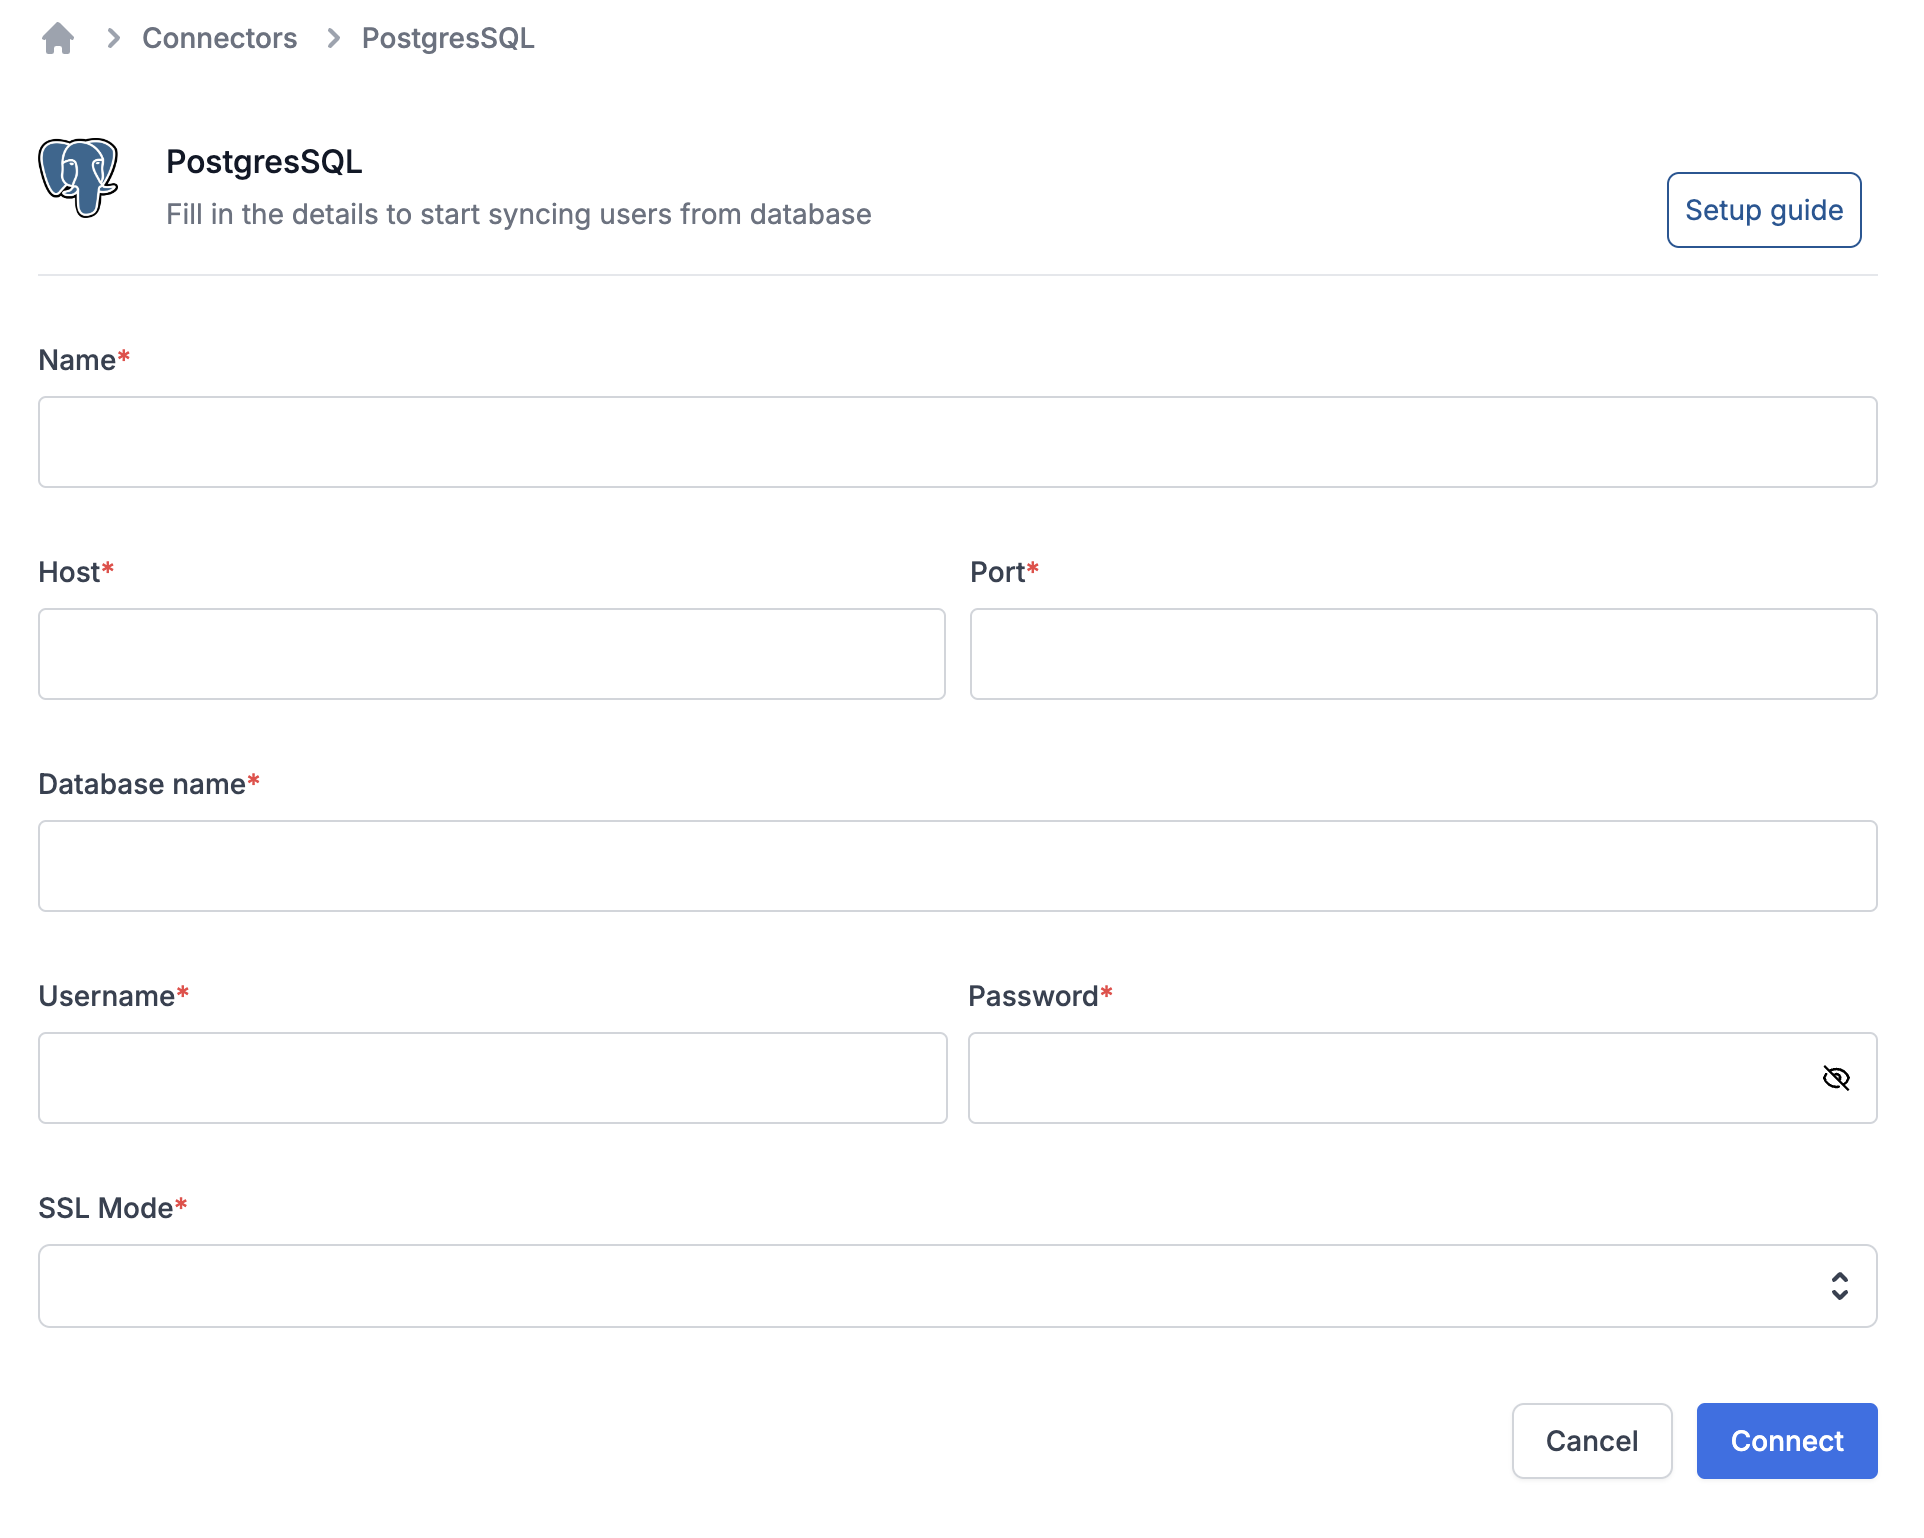 | Field | Description |
| ------------- | ---------------------------------------------------------------------------------------------------------------------------------------------------------------------------------------------------------- |
| Name | A name to uniquely qualify the connection as you'll see it in the connector list on your sync task. You can add the name of database here for easy identification. |
| Host | Host’s IP address or [DNS Name](https://docs.aws.amazon.com/redshift/latest/mgmt/jdbc20-obtain-url.html). |
| Port | The port on which your Amazon Postgres server is listening for connections. |
| Database Name | Name of database you created for your cluster. |
| Username | Database username created for suprsend sync. We recommend using a user with the minimal privileges here. This user only requires read permissions with access limited to the tables you want to sync from. |
| Password | Database password created for suprsend sync. We recommend using a user with the minimal privileges here. This user only requires read permissions with access limited to the tables you want to sync from. |
| SSL Mode | We support both SSL and non-SSL connections. |
After adding the required information, click on "connect" to enable this connection. You'll see the error while connecting in case of incorrect credentials. Once your connection is setup, you'll see it in existing connector list and the connector dropdown on sync task.
## Best Practices
Before you setup your database sync, you should take some measures to ensure the security of your customers’ data and limit performance impacts to your backend database. The following “best practice” suggestions can help you limit the potential for data exposure and minimize performance impacts:
1. **Sync your read-only replica instance**: Do not sync data directly from your main instance. Instead use a read-only data replica to minimize the load and avoid data loss on your main database.
2. **User connected here should have minimal privileges**: You should have a database user with minimal privileges. This person only requires read permissions with access limited to the tables you want to sync from.
3. **Sync only the data that you’ll need**: Limiting your query can improve performance, and minimize the potential to expose sensitive data. Select only the columns you need to either update user profile in SuprSend and to create list sync.
4. **Use \{\{last\_sync\_time}} to limit query results**: Make sure you use the `{{last_sync_time}}` variable in your recurring sync queries. It stores the timestamp of last successful sync in your list. Adding it in your where statement against datetime index can really speed up the query and limit the number of results returned in consecutive syncs. \{\{last\_sync\_time}} is stored in timestamp format. Use relevant cast expression to format it based on your column type.
5. **Limit your sync frequency**: Setup a sync frequency based on how frequently you want to send notifications on that list. If the previous sync is still in progress when the next interval occurs, we’ll skip the operation and catch up your data on the next interval. Skipped syncs show `Ignored` status in the logs. Frequently skipped operations may indicate that you’re syncing too often. You should monitor your first few syncs to ensure that you haven’t impacted your system’s performance.
***
# Postmark
Source: https://docs.suprsend.com/docs/postmark
Guide to connect your Postmark account with SuprSend to send email notifications.
This section is a step by step guide to select Postmark as your email service provider You can use your existing Postmark account to integrate, or create a new account from [here](https://account.postmarkapp.com/sign_up)
## Postmark integration on SuprSend account
On the SuprSend dashboard, go to vendor page from side panel and click Email -> Postmark from the list of Vendors. This will open vendor details page as shown below:
| Field | Description |
| ------------- | ---------------------------------------------------------------------------------------------------------------------------------------------------------------------------------------------------------- |
| Name | A name to uniquely qualify the connection as you'll see it in the connector list on your sync task. You can add the name of database here for easy identification. |
| Host | Host’s IP address or [DNS Name](https://docs.aws.amazon.com/redshift/latest/mgmt/jdbc20-obtain-url.html). |
| Port | The port on which your Amazon Postgres server is listening for connections. |
| Database Name | Name of database you created for your cluster. |
| Username | Database username created for suprsend sync. We recommend using a user with the minimal privileges here. This user only requires read permissions with access limited to the tables you want to sync from. |
| Password | Database password created for suprsend sync. We recommend using a user with the minimal privileges here. This user only requires read permissions with access limited to the tables you want to sync from. |
| SSL Mode | We support both SSL and non-SSL connections. |
After adding the required information, click on "connect" to enable this connection. You'll see the error while connecting in case of incorrect credentials. Once your connection is setup, you'll see it in existing connector list and the connector dropdown on sync task.
## Best Practices
Before you setup your database sync, you should take some measures to ensure the security of your customers’ data and limit performance impacts to your backend database. The following “best practice” suggestions can help you limit the potential for data exposure and minimize performance impacts:
1. **Sync your read-only replica instance**: Do not sync data directly from your main instance. Instead use a read-only data replica to minimize the load and avoid data loss on your main database.
2. **User connected here should have minimal privileges**: You should have a database user with minimal privileges. This person only requires read permissions with access limited to the tables you want to sync from.
3. **Sync only the data that you’ll need**: Limiting your query can improve performance, and minimize the potential to expose sensitive data. Select only the columns you need to either update user profile in SuprSend and to create list sync.
4. **Use \{\{last\_sync\_time}} to limit query results**: Make sure you use the `{{last_sync_time}}` variable in your recurring sync queries. It stores the timestamp of last successful sync in your list. Adding it in your where statement against datetime index can really speed up the query and limit the number of results returned in consecutive syncs. \{\{last\_sync\_time}} is stored in timestamp format. Use relevant cast expression to format it based on your column type.
5. **Limit your sync frequency**: Setup a sync frequency based on how frequently you want to send notifications on that list. If the previous sync is still in progress when the next interval occurs, we’ll skip the operation and catch up your data on the next interval. Skipped syncs show `Ignored` status in the logs. Frequently skipped operations may indicate that you’re syncing too often. You should monitor your first few syncs to ensure that you haven’t impacted your system’s performance.
***
# Postmark
Source: https://docs.suprsend.com/docs/postmark
Guide to connect your Postmark account with SuprSend to send email notifications.
This section is a step by step guide to select Postmark as your email service provider You can use your existing Postmark account to integrate, or create a new account from [here](https://account.postmarkapp.com/sign_up)
## Postmark integration on SuprSend account
On the SuprSend dashboard, go to vendor page from side panel and click Email -> Postmark from the list of Vendors. This will open vendor details page as shown below:
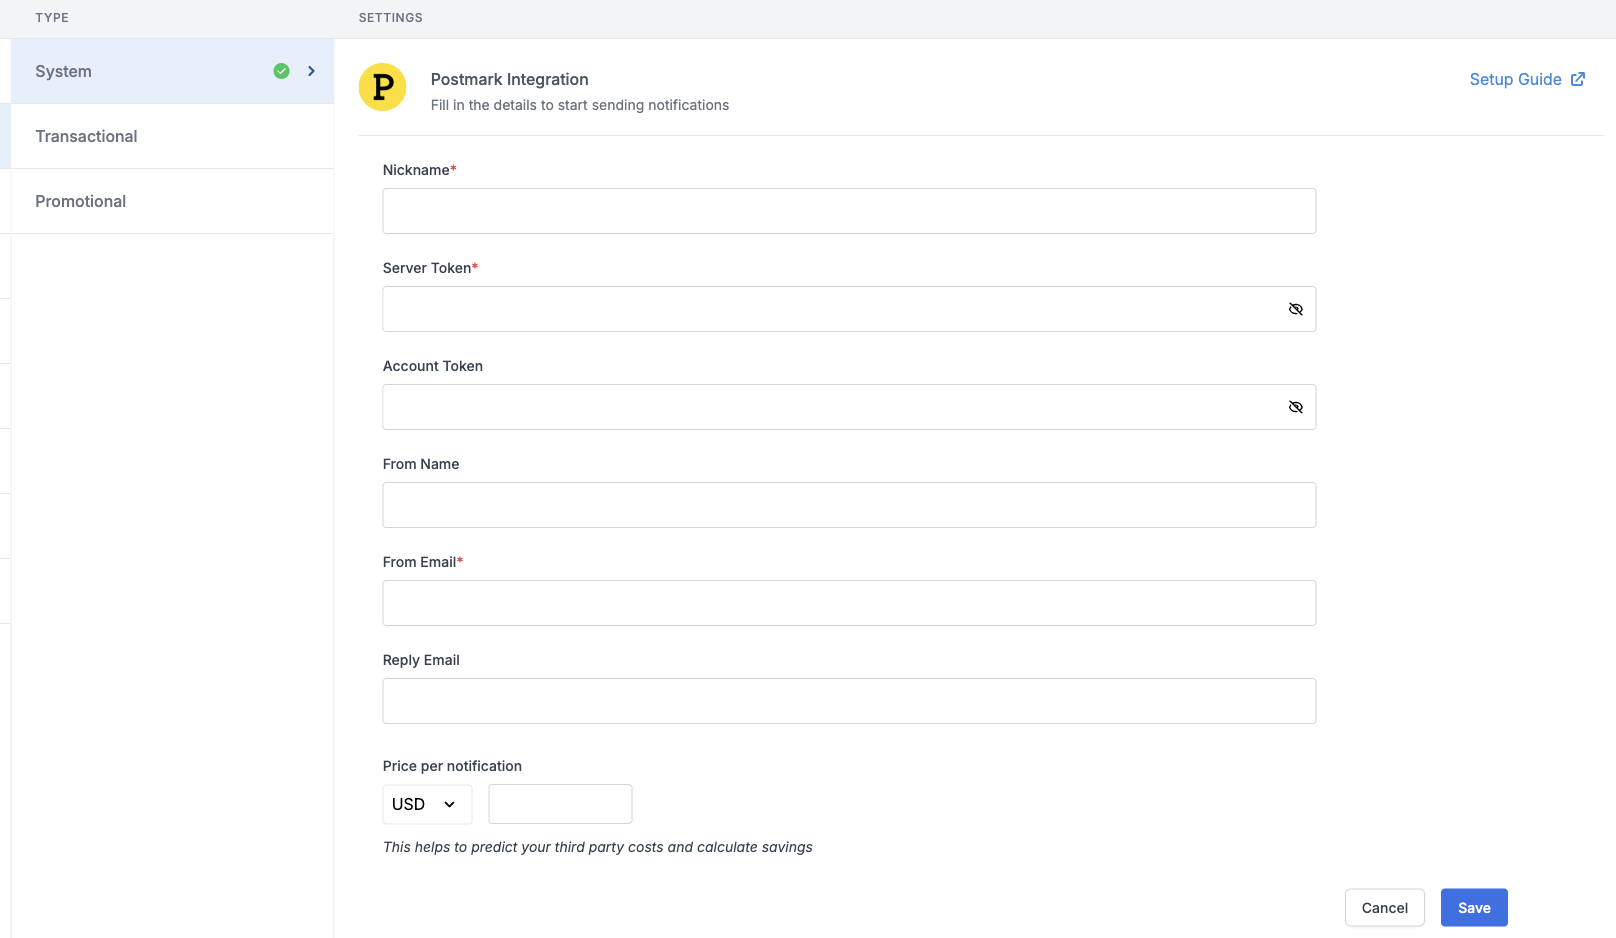 | Form Field | Description |
| ---------------------- | ------------------------------------------------------------------------------------------------------------------------------------------------------------------------------------------------------------------------------------------------------------------------------- |
| Nickname | You can give any name which may help you to identify this account easily |
| Server Token | You will get this server token from your Postmark account. This is a mandatory field. SuprSend will use this token to send mails from your Postmark account. Check the [documentation](/docs/postmark#how-to-get-a-server-token-from-postmark) on how to get your Server Token. |
| Account Token | Account token is used by postmark for account level API access. These tokens cannot be used to access individual server data. It's a non-mandatory field to send emails. |
| From Name | Default 'From Name' that email will go from. You can override this in the individual template. *e.g. SuprSend* |
| From Email | From email for Postmark has to be a verified email by postmark . Check [documentation](/docs/postmark#how-to-verify-email-and-whitelist-domain-on-postmark) on how to verify your email or enable domain whitelisting on Postmark. |
| Reply Email | Default 'Reply To Email id' on which replies are received. You can override this in the individual template. *e.g. [support@suprsend.com](mailto:support@suprsend.com)* |
| Price per notification | This is the amount you pay per email notification to Postmark. It helps us to calculate, estimate and optimise your cost spent on notifications. |
| | |
## How to get a server token from Postmark
1. Login to your Postmark account
2. Go to [servers](https://account.postmarkapp.com/servers) section and select your email server
3. Go to section API Tokens
4. Copy the already generated API token or generate a new token.
| Form Field | Description |
| ---------------------- | ------------------------------------------------------------------------------------------------------------------------------------------------------------------------------------------------------------------------------------------------------------------------------- |
| Nickname | You can give any name which may help you to identify this account easily |
| Server Token | You will get this server token from your Postmark account. This is a mandatory field. SuprSend will use this token to send mails from your Postmark account. Check the [documentation](/docs/postmark#how-to-get-a-server-token-from-postmark) on how to get your Server Token. |
| Account Token | Account token is used by postmark for account level API access. These tokens cannot be used to access individual server data. It's a non-mandatory field to send emails. |
| From Name | Default 'From Name' that email will go from. You can override this in the individual template. *e.g. SuprSend* |
| From Email | From email for Postmark has to be a verified email by postmark . Check [documentation](/docs/postmark#how-to-verify-email-and-whitelist-domain-on-postmark) on how to verify your email or enable domain whitelisting on Postmark. |
| Reply Email | Default 'Reply To Email id' on which replies are received. You can override this in the individual template. *e.g. [support@suprsend.com](mailto:support@suprsend.com)* |
| Price per notification | This is the amount you pay per email notification to Postmark. It helps us to calculate, estimate and optimise your cost spent on notifications. |
| | |
## How to get a server token from Postmark
1. Login to your Postmark account
2. Go to [servers](https://account.postmarkapp.com/servers) section and select your email server
3. Go to section API Tokens
4. Copy the already generated API token or generate a new token.
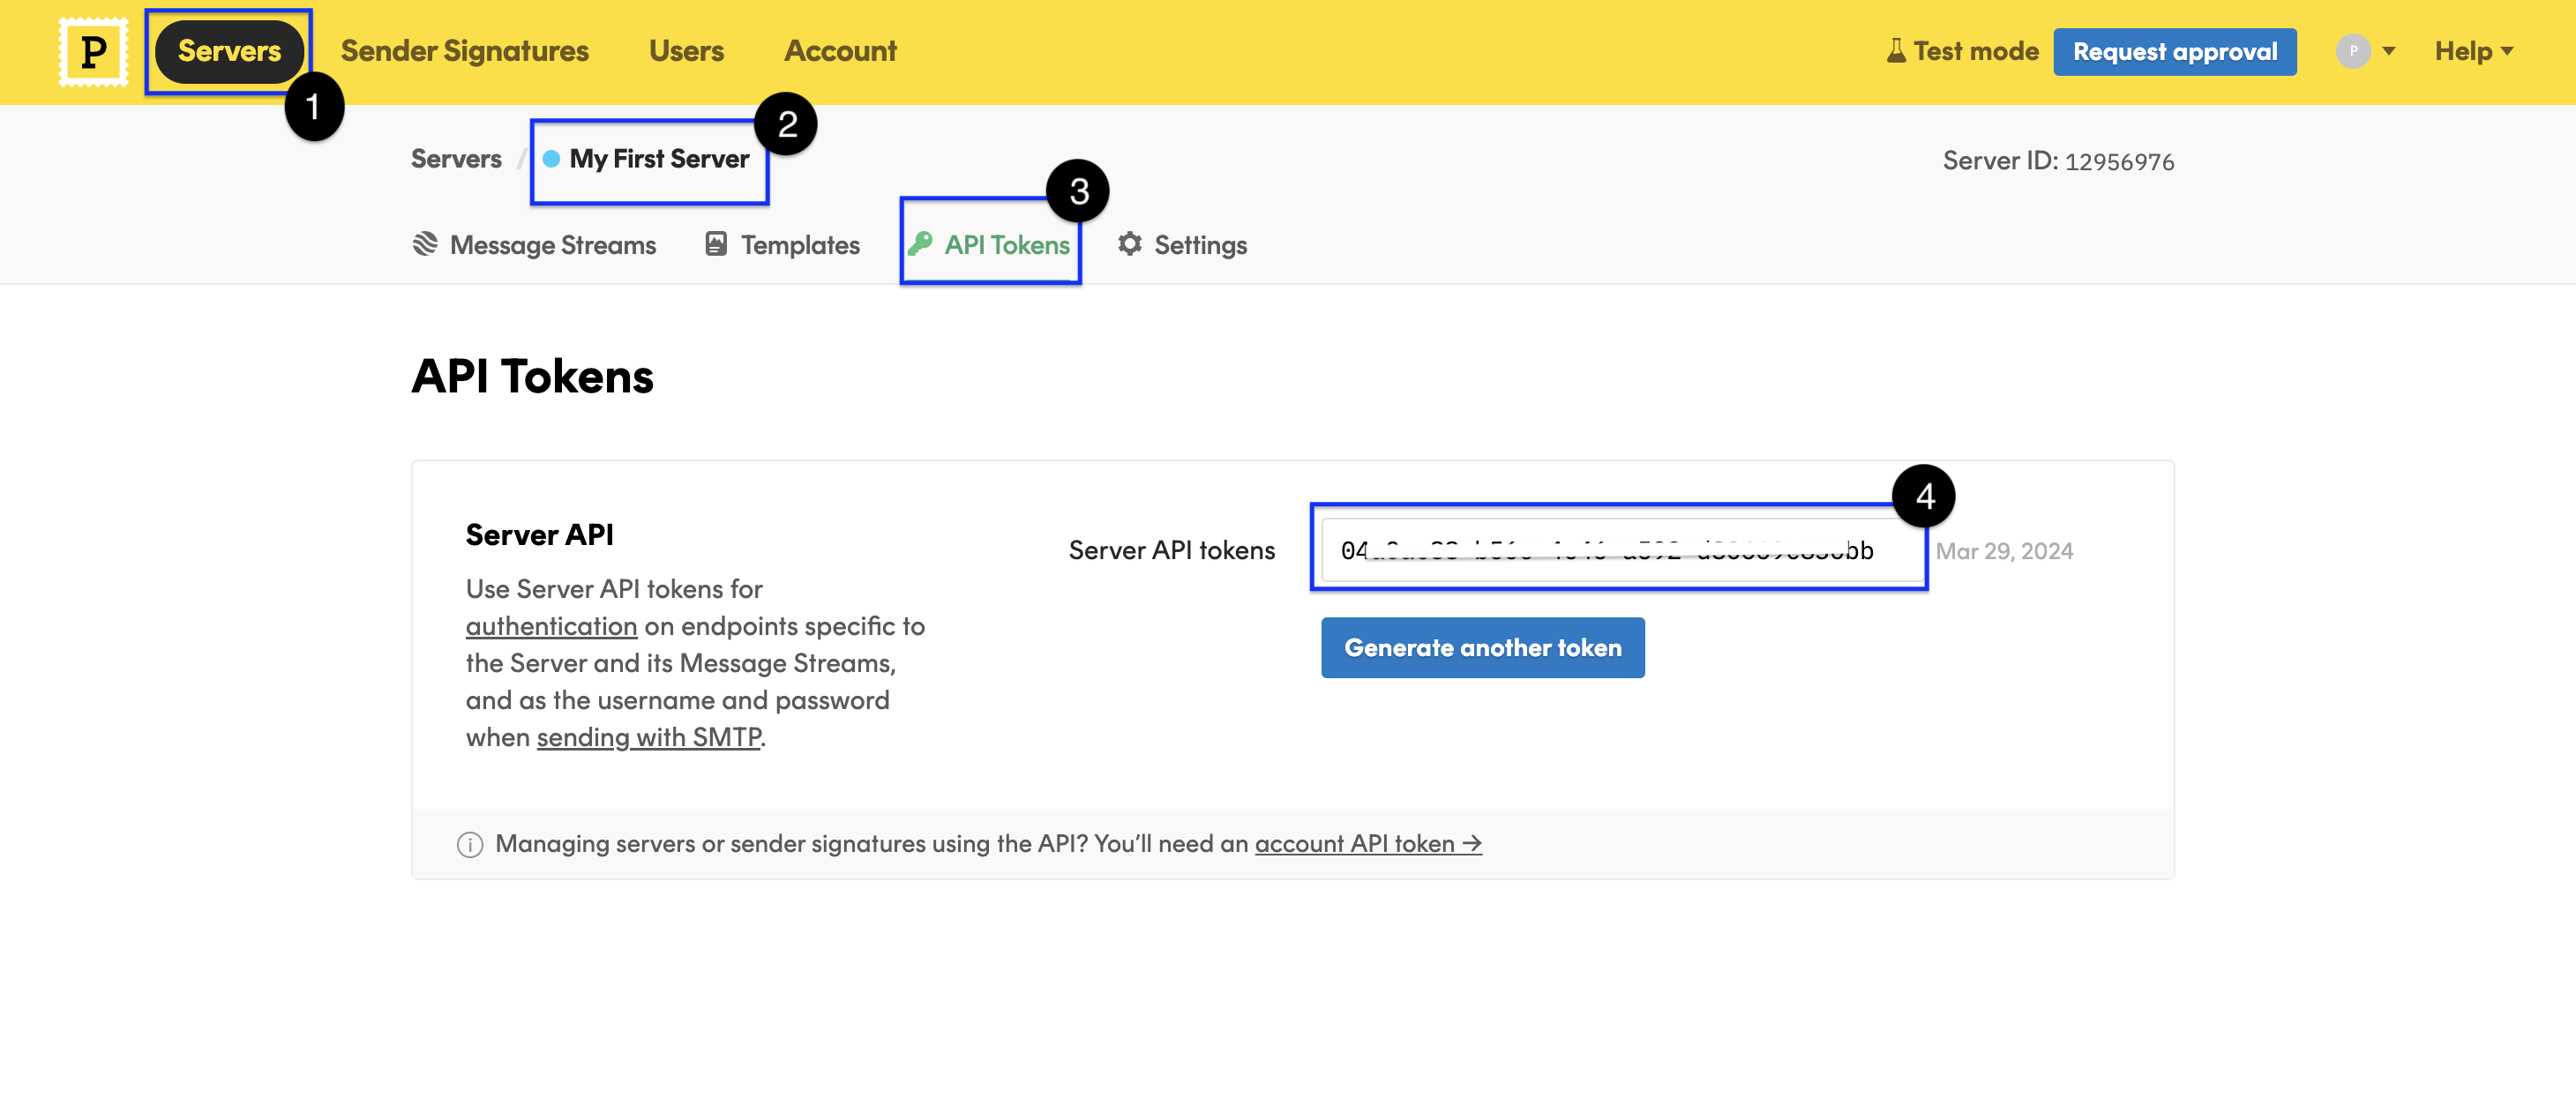 ## How to verify email and whitelist domain on Postmark
Email signature verification is an important step without which Postmark does not allow to send emails from the email added in Postmark account. You can add multiple emails by verifying them individually on Postmark or verify all the emails with your email domain. To do this, follow the steps below:
1. Go to Postmark -> [Sender Signatures](https://account.postmarkapp.com/signature_domains) section
2. Add your email, Postmark will send an email for verifying the added email address, complete the verification
3. Alternatively you can also whitelist all the email addresses in your email domain by adding a DKIM DNS record.
## How to verify email and whitelist domain on Postmark
Email signature verification is an important step without which Postmark does not allow to send emails from the email added in Postmark account. You can add multiple emails by verifying them individually on Postmark or verify all the emails with your email domain. To do this, follow the steps below:
1. Go to Postmark -> [Sender Signatures](https://account.postmarkapp.com/signature_domains) section
2. Add your email, Postmark will send an email for verifying the added email address, complete the verification
3. Alternatively you can also whitelist all the email addresses in your email domain by adding a DKIM DNS record.
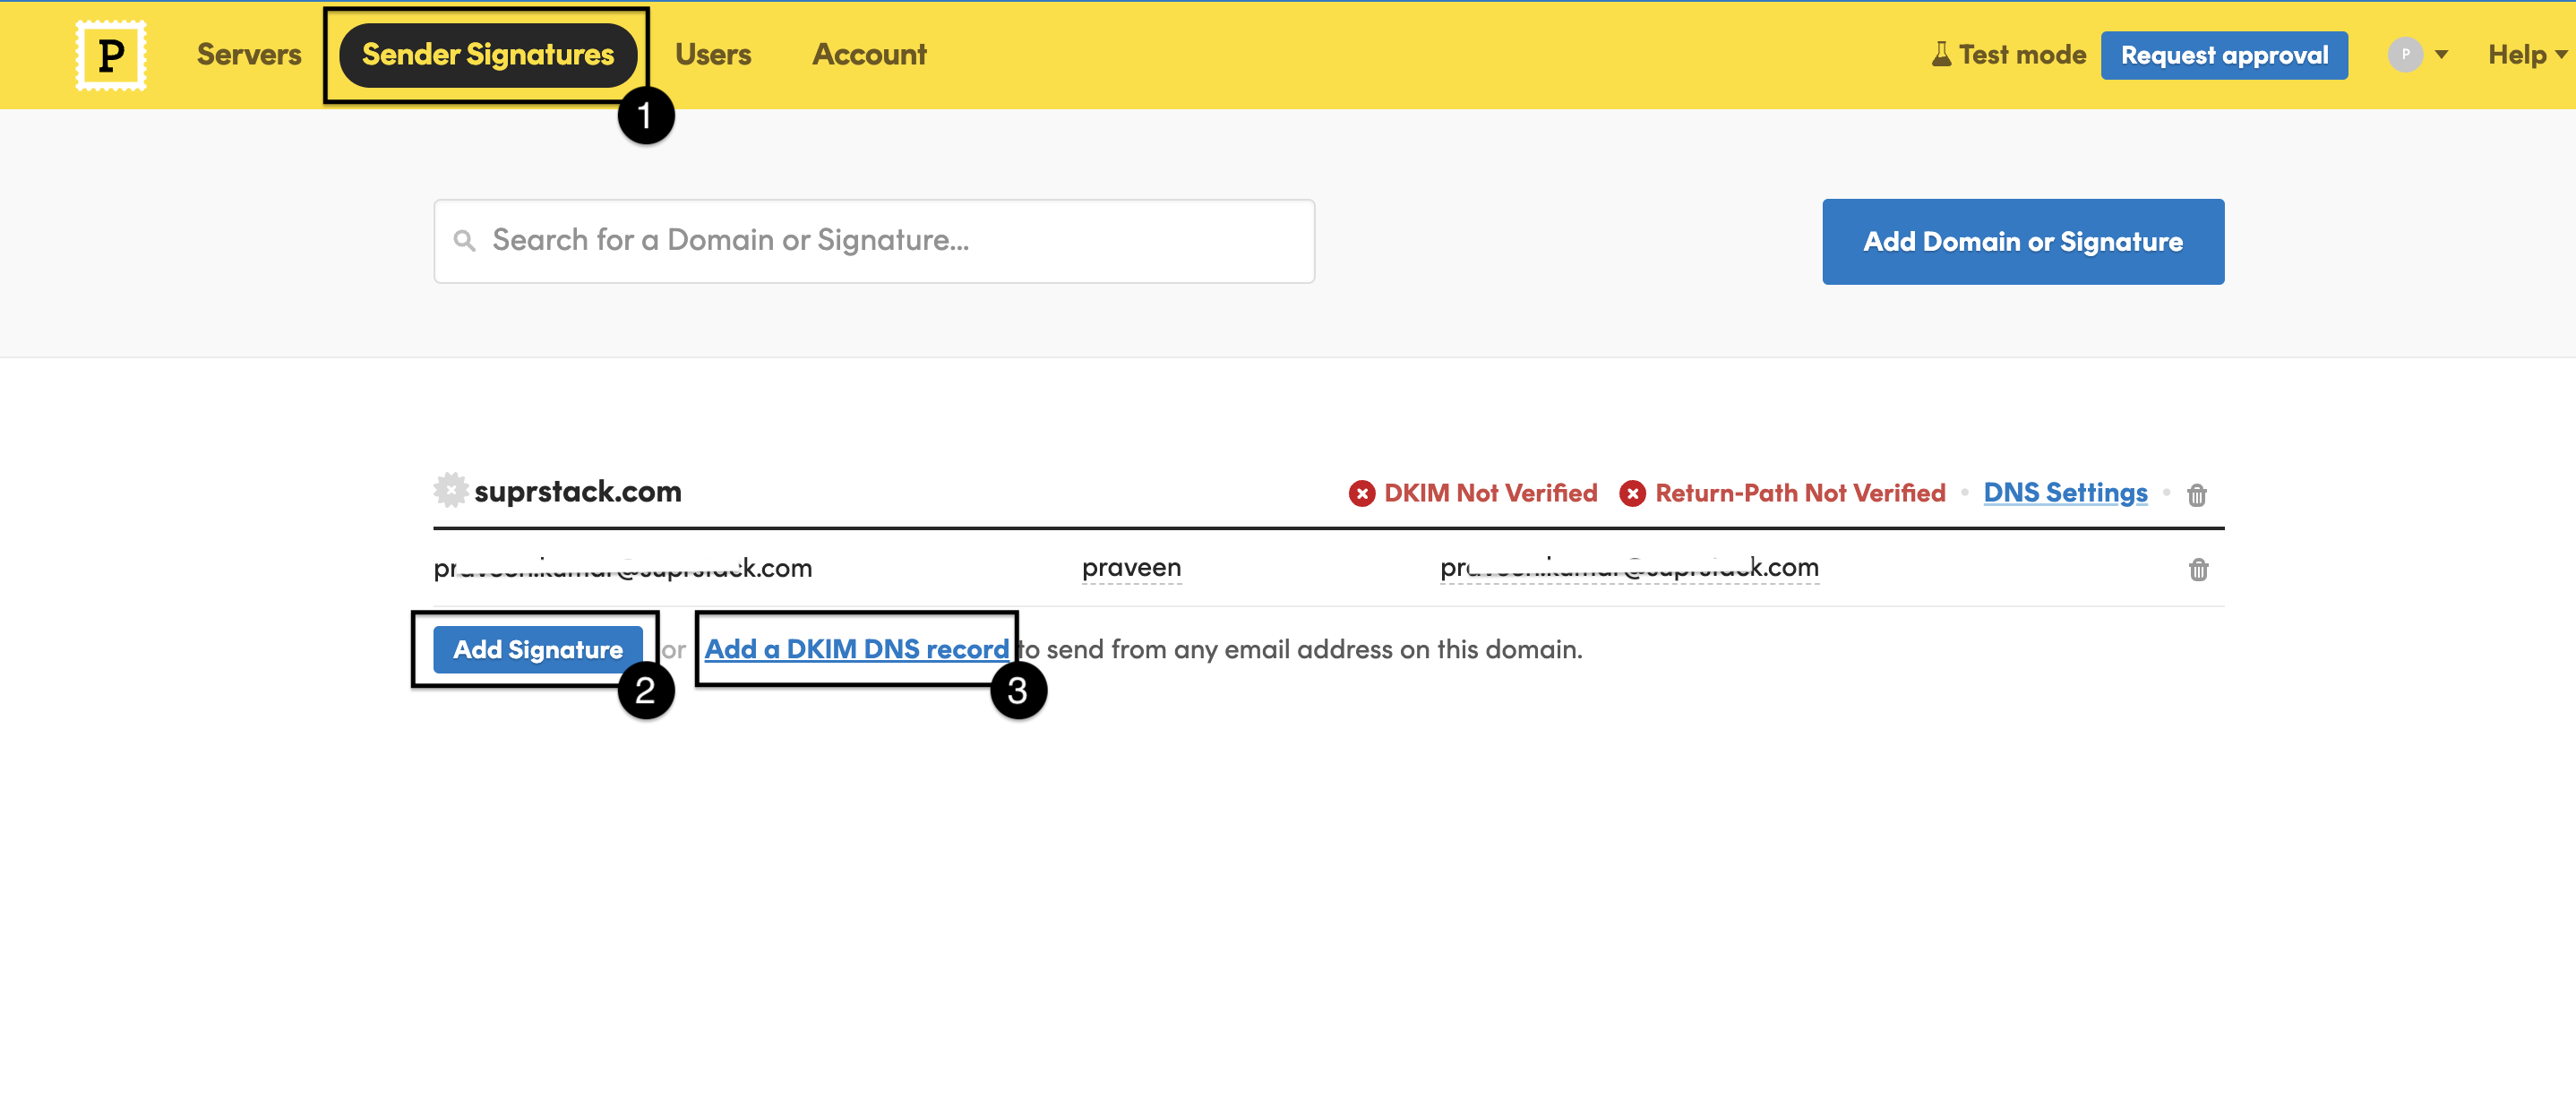 ## Configuring Open/Click tracking for emails on Postmark
SuprSend uses webhooks to update notification statuses on delivery, user actions like open/click or the failure scenarios. This allows SuprSend to power your notification analytics. To allow SuprSend to receive these events via webhook, add SuprSend's webhook URL in your Postmark account.
* Go to Postmark -> servers -> select your server -> select your stream -> webhooks -> add webhook
## Configuring Open/Click tracking for emails on Postmark
SuprSend uses webhooks to update notification statuses on delivery, user actions like open/click or the failure scenarios. This allows SuprSend to power your notification analytics. To allow SuprSend to receive these events via webhook, add SuprSend's webhook URL in your Postmark account.
* Go to Postmark -> servers -> select your server -> select your stream -> webhooks -> add webhook
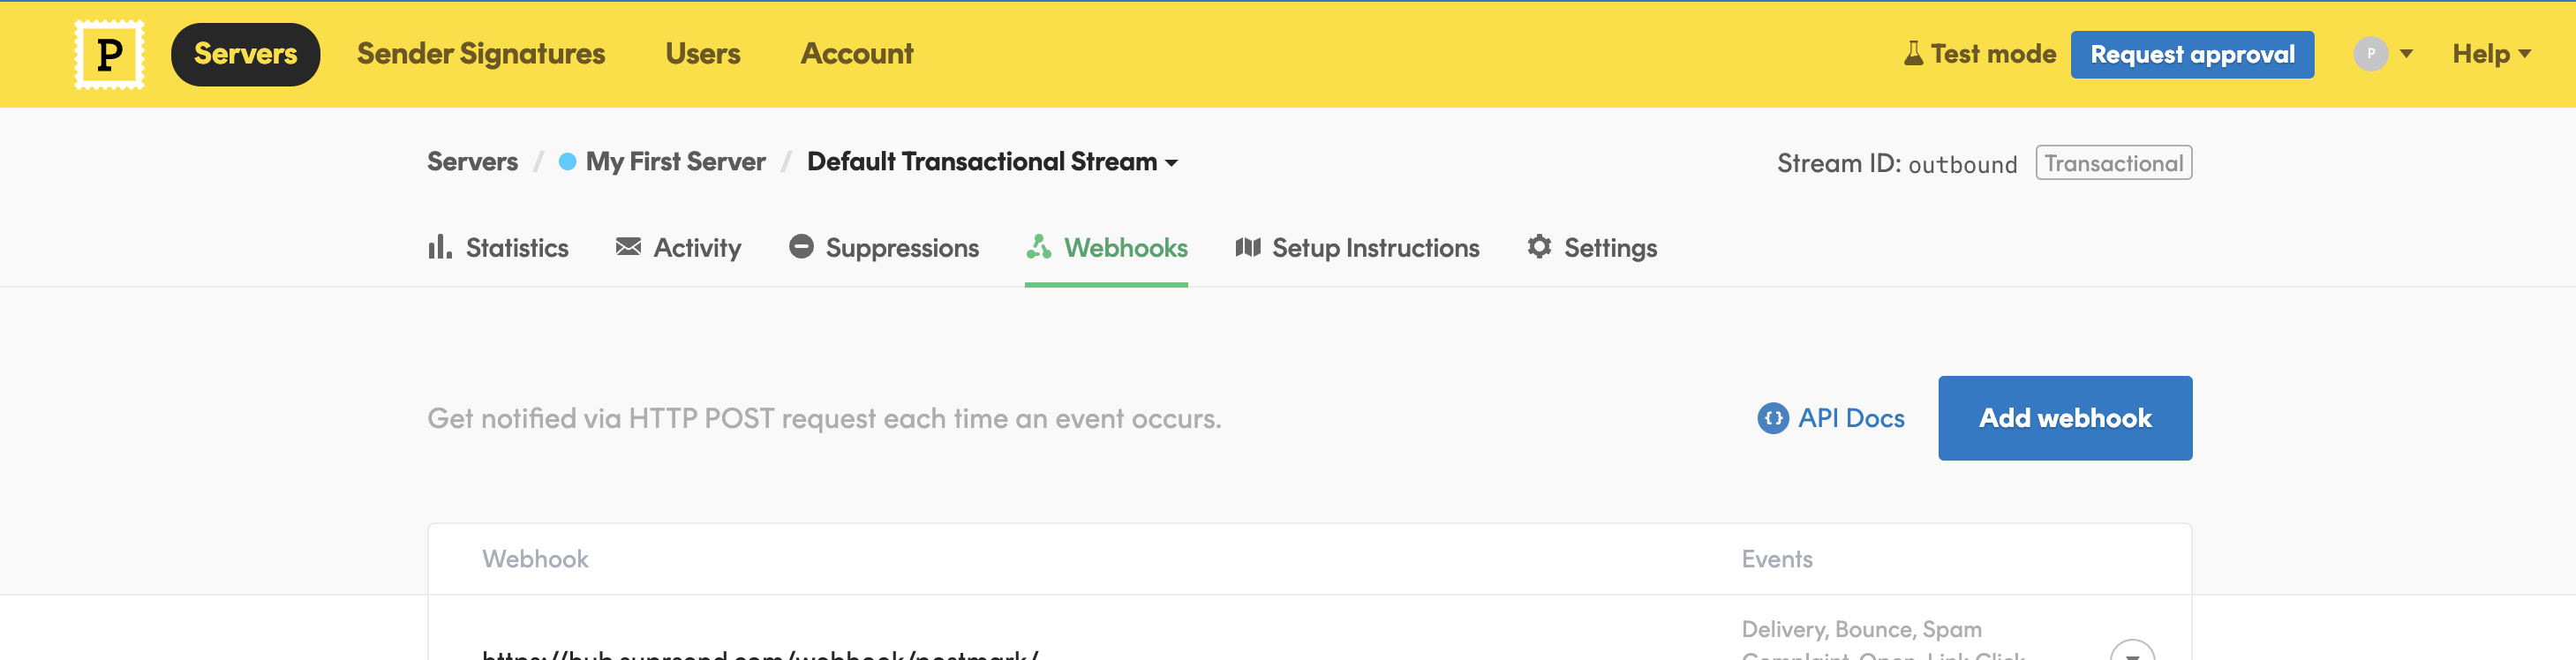 * On **Add webhook**, settings page, add [`https://hub.suprsend.com/webhook/postmark/`](https://hub.suprsend.com/webhook/postmark/) in webhook URL section and enable all events on Postmark.
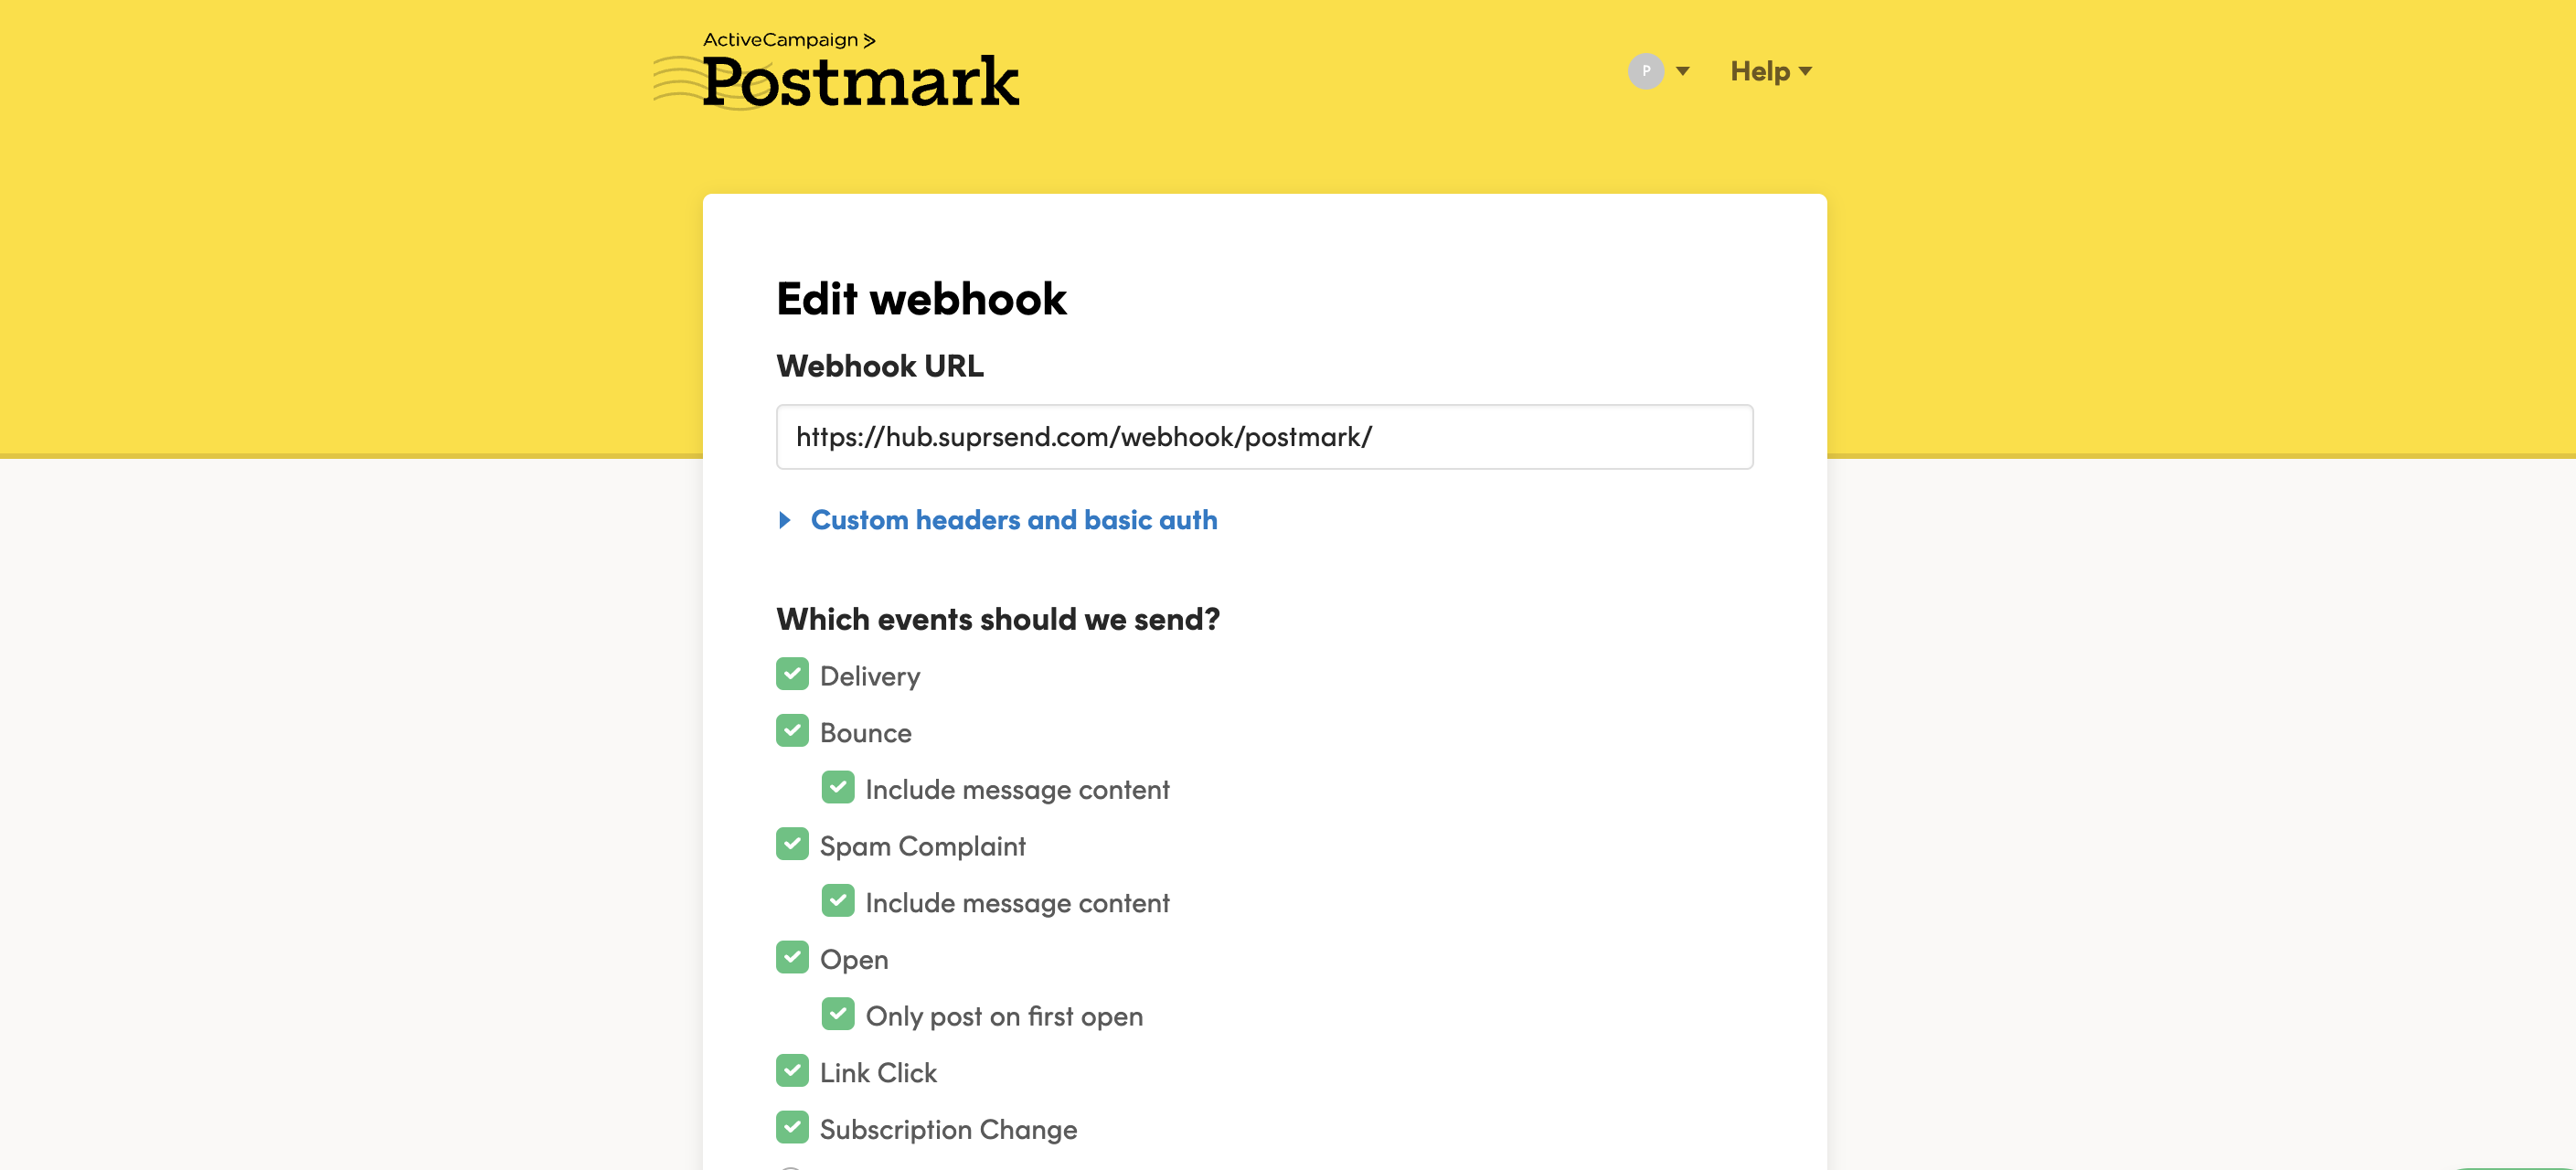 ## How to add Unsubscription link in email
You can directly add unsubscription link in your email using [`$hosted_preference_url`](/docs/user-preferences#hosted-preference-page) variable in your template. This link directs users to the [SuprSend preference page](/docs/user-preferences). With SuprSend preference setting, you have the flexibility to create multiple notification categories based on the type of notifications. This allows users to opt-out of specific notification categories, providing them with granular control over their preferences compared to other email services where they can only opt-out from all marketing communications at once.
**Why it's important to give unsubscribe option in email?**
First, it is required by the [CAN-Spam Act](https://www.ftc.gov/business-guidance/resources/can-spam-act-compliance-guide-business). Second, if you don’t give them this option, they are more likely to click on the spam complaint button, which will cause more harm than allowing them to unsubscribe. Finally, many ESPs look for unsubscribe links and are more likely to filter your email if they don’t have them.
***
# Preferences
Source: https://docs.suprsend.com/docs/preference-react-sdk
Step-by-Step Guide to add SuprSend notification preference centre in react-based websites.
## Integration steps
## How to add Unsubscription link in email
You can directly add unsubscription link in your email using [`$hosted_preference_url`](/docs/user-preferences#hosted-preference-page) variable in your template. This link directs users to the [SuprSend preference page](/docs/user-preferences). With SuprSend preference setting, you have the flexibility to create multiple notification categories based on the type of notifications. This allows users to opt-out of specific notification categories, providing them with granular control over their preferences compared to other email services where they can only opt-out from all marketing communications at once.
**Why it's important to give unsubscribe option in email?**
First, it is required by the [CAN-Spam Act](https://www.ftc.gov/business-guidance/resources/can-spam-act-compliance-guide-business). Second, if you don’t give them this option, they are more likely to click on the spam complaint button, which will cause more harm than allowing them to unsubscribe. Finally, many ESPs look for unsubscribe links and are more likely to filter your email if they don’t have them.
***
# Preferences
Source: https://docs.suprsend.com/docs/preference-react-sdk
Step-by-Step Guide to add SuprSend notification preference centre in react-based websites.
## Integration steps
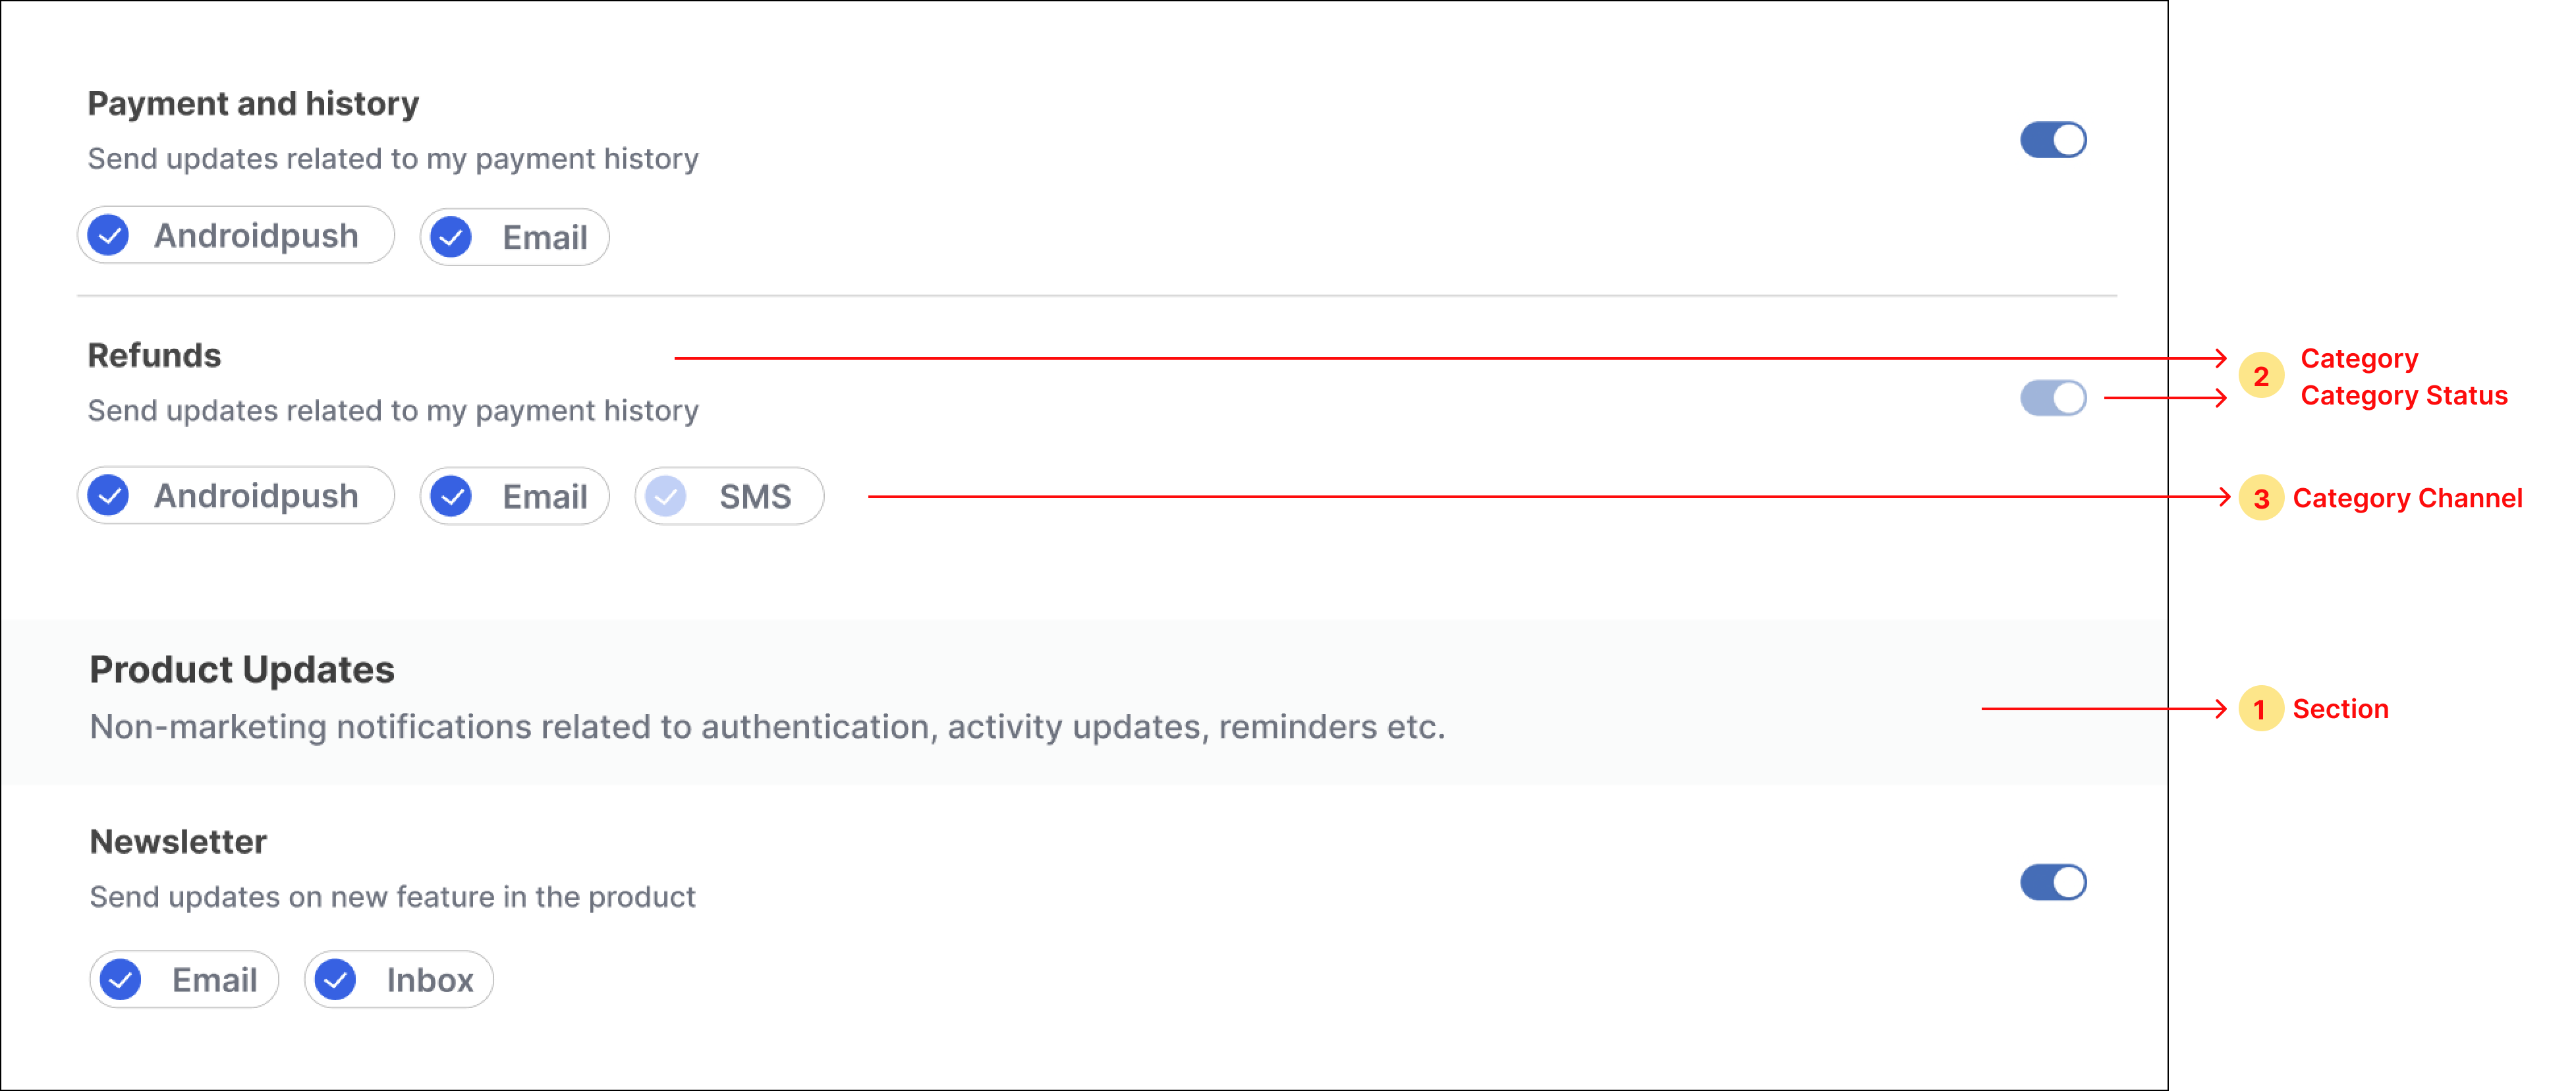 Below are the steps to render category preference UI:
1. Loop through the property ***preferenceData.sections*** for showing sections, show sub-categories inside each section, and show subcategory's channels inside each sub-category.
2. Add a ***switch*** button next to each sub-category for opting in and out of the category. Add ***checkbox*** components in sub-category channels for opting in and out of category-channel. You can use any third-party npm package to import these components or design your own component.
3. To update category preference on the click of the switch button, call **[updateCategoryPreference](https://docs.suprsend.com/docs/js-preferences#update-category-preference)** method and if no error is received in response, update the latest data in the instance property. For preference state `opt-in` set the switch state as **on** and **off** for the `opt-out` state.
Below are the steps to render category preference UI:
1. Loop through the property ***preferenceData.sections*** for showing sections, show sub-categories inside each section, and show subcategory's channels inside each sub-category.
2. Add a ***switch*** button next to each sub-category for opting in and out of the category. Add ***checkbox*** components in sub-category channels for opting in and out of category-channel. You can use any third-party npm package to import these components or design your own component.
3. To update category preference on the click of the switch button, call **[updateCategoryPreference](https://docs.suprsend.com/docs/js-preferences#update-category-preference)** method and if no error is received in response, update the latest data in the instance property. For preference state `opt-in` set the switch state as **on** and **off** for the `opt-out` state.
 4. To update category-channel preference on the click of checkbox next to each channel, call the **[updateChannelPreferenceInCategory](https://docs.suprsend.com/docs/js-preferences#update-channel-preference-in-category)** method. Update the latest data in the instance property if no error is received in response. For preference state `opt-in` set the checkbox state as **checked** and **unchecked** for the `opt-out` state.
 ```typescript category-level-preferences.component.ts theme={"system"}
import { Component, Input } from '@angular/core';
import { PreferenceOptions } from '@suprsend/web-sdk';
import { SuprsendService } from '../suprsend.service';
@Component({
selector: 'app-category-level-preferences',
templateUrl: './category-level-preferences.component.html',
styleUrls: ['./category-level-preferences.component.css'],
})
export class CategoryLevelPreferencesComponent {
@Input() public preferencesData: any;
constructor(private ssService: SuprsendService) {}
async handleCategoryPreferenceChange(e: boolean, subcategory: string) {
const resp =
await this.ssService.ssClient.user.preferences.updateCategoryPreference(
subcategory,
e ? PreferenceOptions.OPT_IN : PreferenceOptions.OPT_OUT
);
if (resp.error) {
console.log(resp.error);
} else {
this.preferencesData = { ...resp.body };
}
}
async handleChannelPreferenceInCategoryChange(
channel: any,
category: string
) {
if (!channel.is_editable) return;
const resp =
await this.ssService.ssClient.user.preferences.updateChannelPreferenceInCategory(
channel.channel,
channel.preference === PreferenceOptions.OPT_IN
? PreferenceOptions.OPT_OUT
: PreferenceOptions.OPT_IN,
category
);
if (resp.status === 'error') {
console.log(resp.error);
} else {
this.preferencesData = { ...resp.body };
}
}
}
```
```typescript category-level-preferences.component.ts theme={"system"}
import { Component, Input } from '@angular/core';
import { PreferenceOptions } from '@suprsend/web-sdk';
import { SuprsendService } from '../suprsend.service';
@Component({
selector: 'app-category-level-preferences',
templateUrl: './category-level-preferences.component.html',
styleUrls: ['./category-level-preferences.component.css'],
})
export class CategoryLevelPreferencesComponent {
@Input() public preferencesData: any;
constructor(private ssService: SuprsendService) {}
async handleCategoryPreferenceChange(e: boolean, subcategory: string) {
const resp =
await this.ssService.ssClient.user.preferences.updateCategoryPreference(
subcategory,
e ? PreferenceOptions.OPT_IN : PreferenceOptions.OPT_OUT
);
if (resp.error) {
console.log(resp.error);
} else {
this.preferencesData = { ...resp.body };
}
}
async handleChannelPreferenceInCategoryChange(
channel: any,
category: string
) {
if (!channel.is_editable) return;
const resp =
await this.ssService.ssClient.user.preferences.updateChannelPreferenceInCategory(
channel.channel,
channel.preference === PreferenceOptions.OPT_IN
? PreferenceOptions.OPT_OUT
: PreferenceOptions.OPT_IN,
category
);
if (resp.status === 'error') {
console.log(resp.error);
} else {
this.preferencesData = { ...resp.body };
}
}
}
```
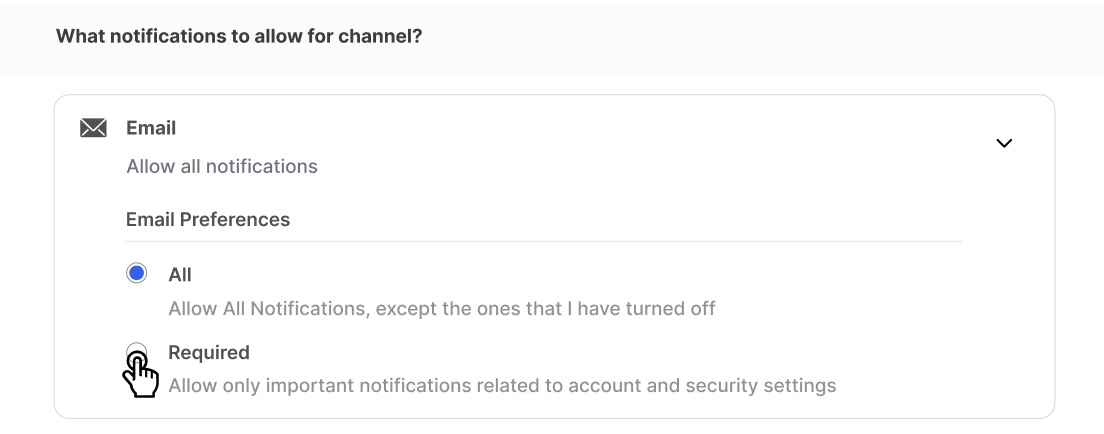 ```typescript channel-level-preferences.component.ts theme={"system"}
import { Component, Input } from '@angular/core';
import { ChannelLevelPreferenceOptions } from '@suprsend/web-sdk';
import { SuprsendService } from '../suprsend.service';
@Component({
selector: 'app-channel-level-preferences',
templateUrl: './channel-level-preferences.component.html',
styleUrls: ['./channel-level-preferences.component.css'],
})
export class ChannelLevelPreferencesComponent {
@Input() public preferencesData: any;
constructor(private ssService: SuprsendService) {}
async handleChange(channel: string, preference: string) {
const preferenceStatus =
preference === 'ALL'
? ChannelLevelPreferenceOptions.ALL
: ChannelLevelPreferenceOptions.REQUIRED;
const resp =
await this.ssService.ssClient.user.preferences.updateOverallChannelPreference(
channel,
preferenceStatus
);
if (resp.status === 'error') {
console.log(resp.error);
} else {
this.preferencesData = { ...resp.body };
}
}
}
```
```typescript channel-level-preferences.component.html theme={"system"}
```typescript channel-level-preferences.component.ts theme={"system"}
import { Component, Input } from '@angular/core';
import { ChannelLevelPreferenceOptions } from '@suprsend/web-sdk';
import { SuprsendService } from '../suprsend.service';
@Component({
selector: 'app-channel-level-preferences',
templateUrl: './channel-level-preferences.component.html',
styleUrls: ['./channel-level-preferences.component.css'],
})
export class ChannelLevelPreferencesComponent {
@Input() public preferencesData: any;
constructor(private ssService: SuprsendService) {}
async handleChange(channel: string, preference: string) {
const preferenceStatus =
preference === 'ALL'
? ChannelLevelPreferenceOptions.ALL
: ChannelLevelPreferenceOptions.REQUIRED;
const resp =
await this.ssService.ssClient.user.preferences.updateOverallChannelPreference(
channel,
preferenceStatus
);
if (resp.status === 'error') {
console.log(resp.error);
} else {
this.preferencesData = { ...resp.body };
}
}
}
```
```typescript channel-level-preferences.component.html theme={"system"}
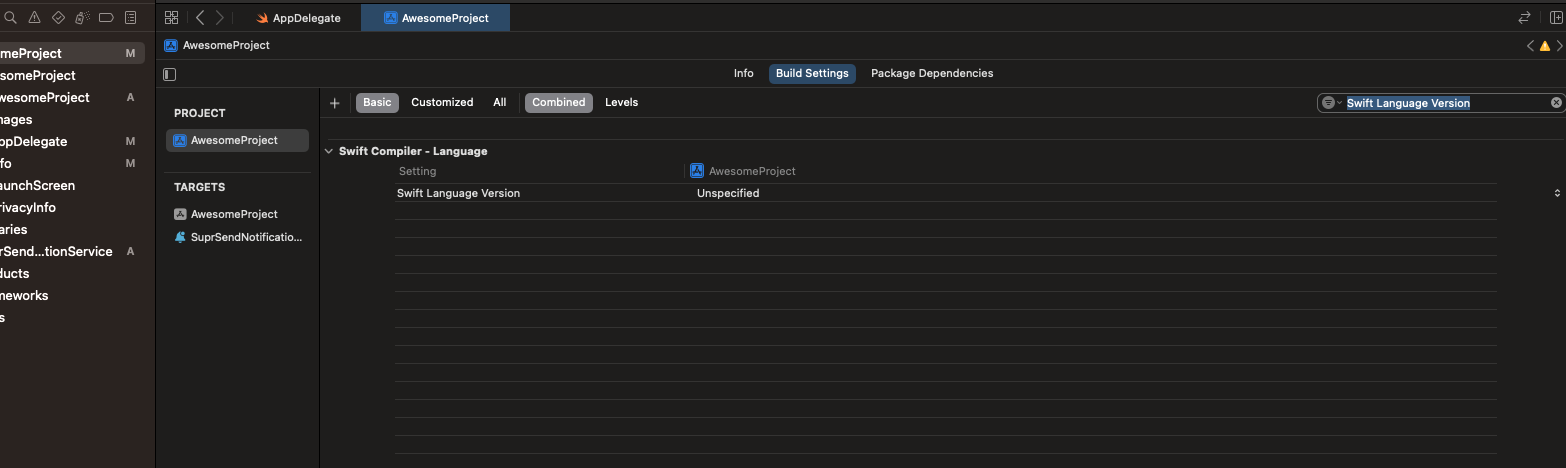 If your project doesn't support swift then its mandatory to add Swift support in your project by following the steps below.
* Open "xcodeworkspace" file inside iOS folder. This will open Xcode.
* Add Swift file to project like shown below.
If your project doesn't support swift then its mandatory to add Swift support in your project by following the steps below.
* Open "xcodeworkspace" file inside iOS folder. This will open Xcode.
* Add Swift file to project like shown below.
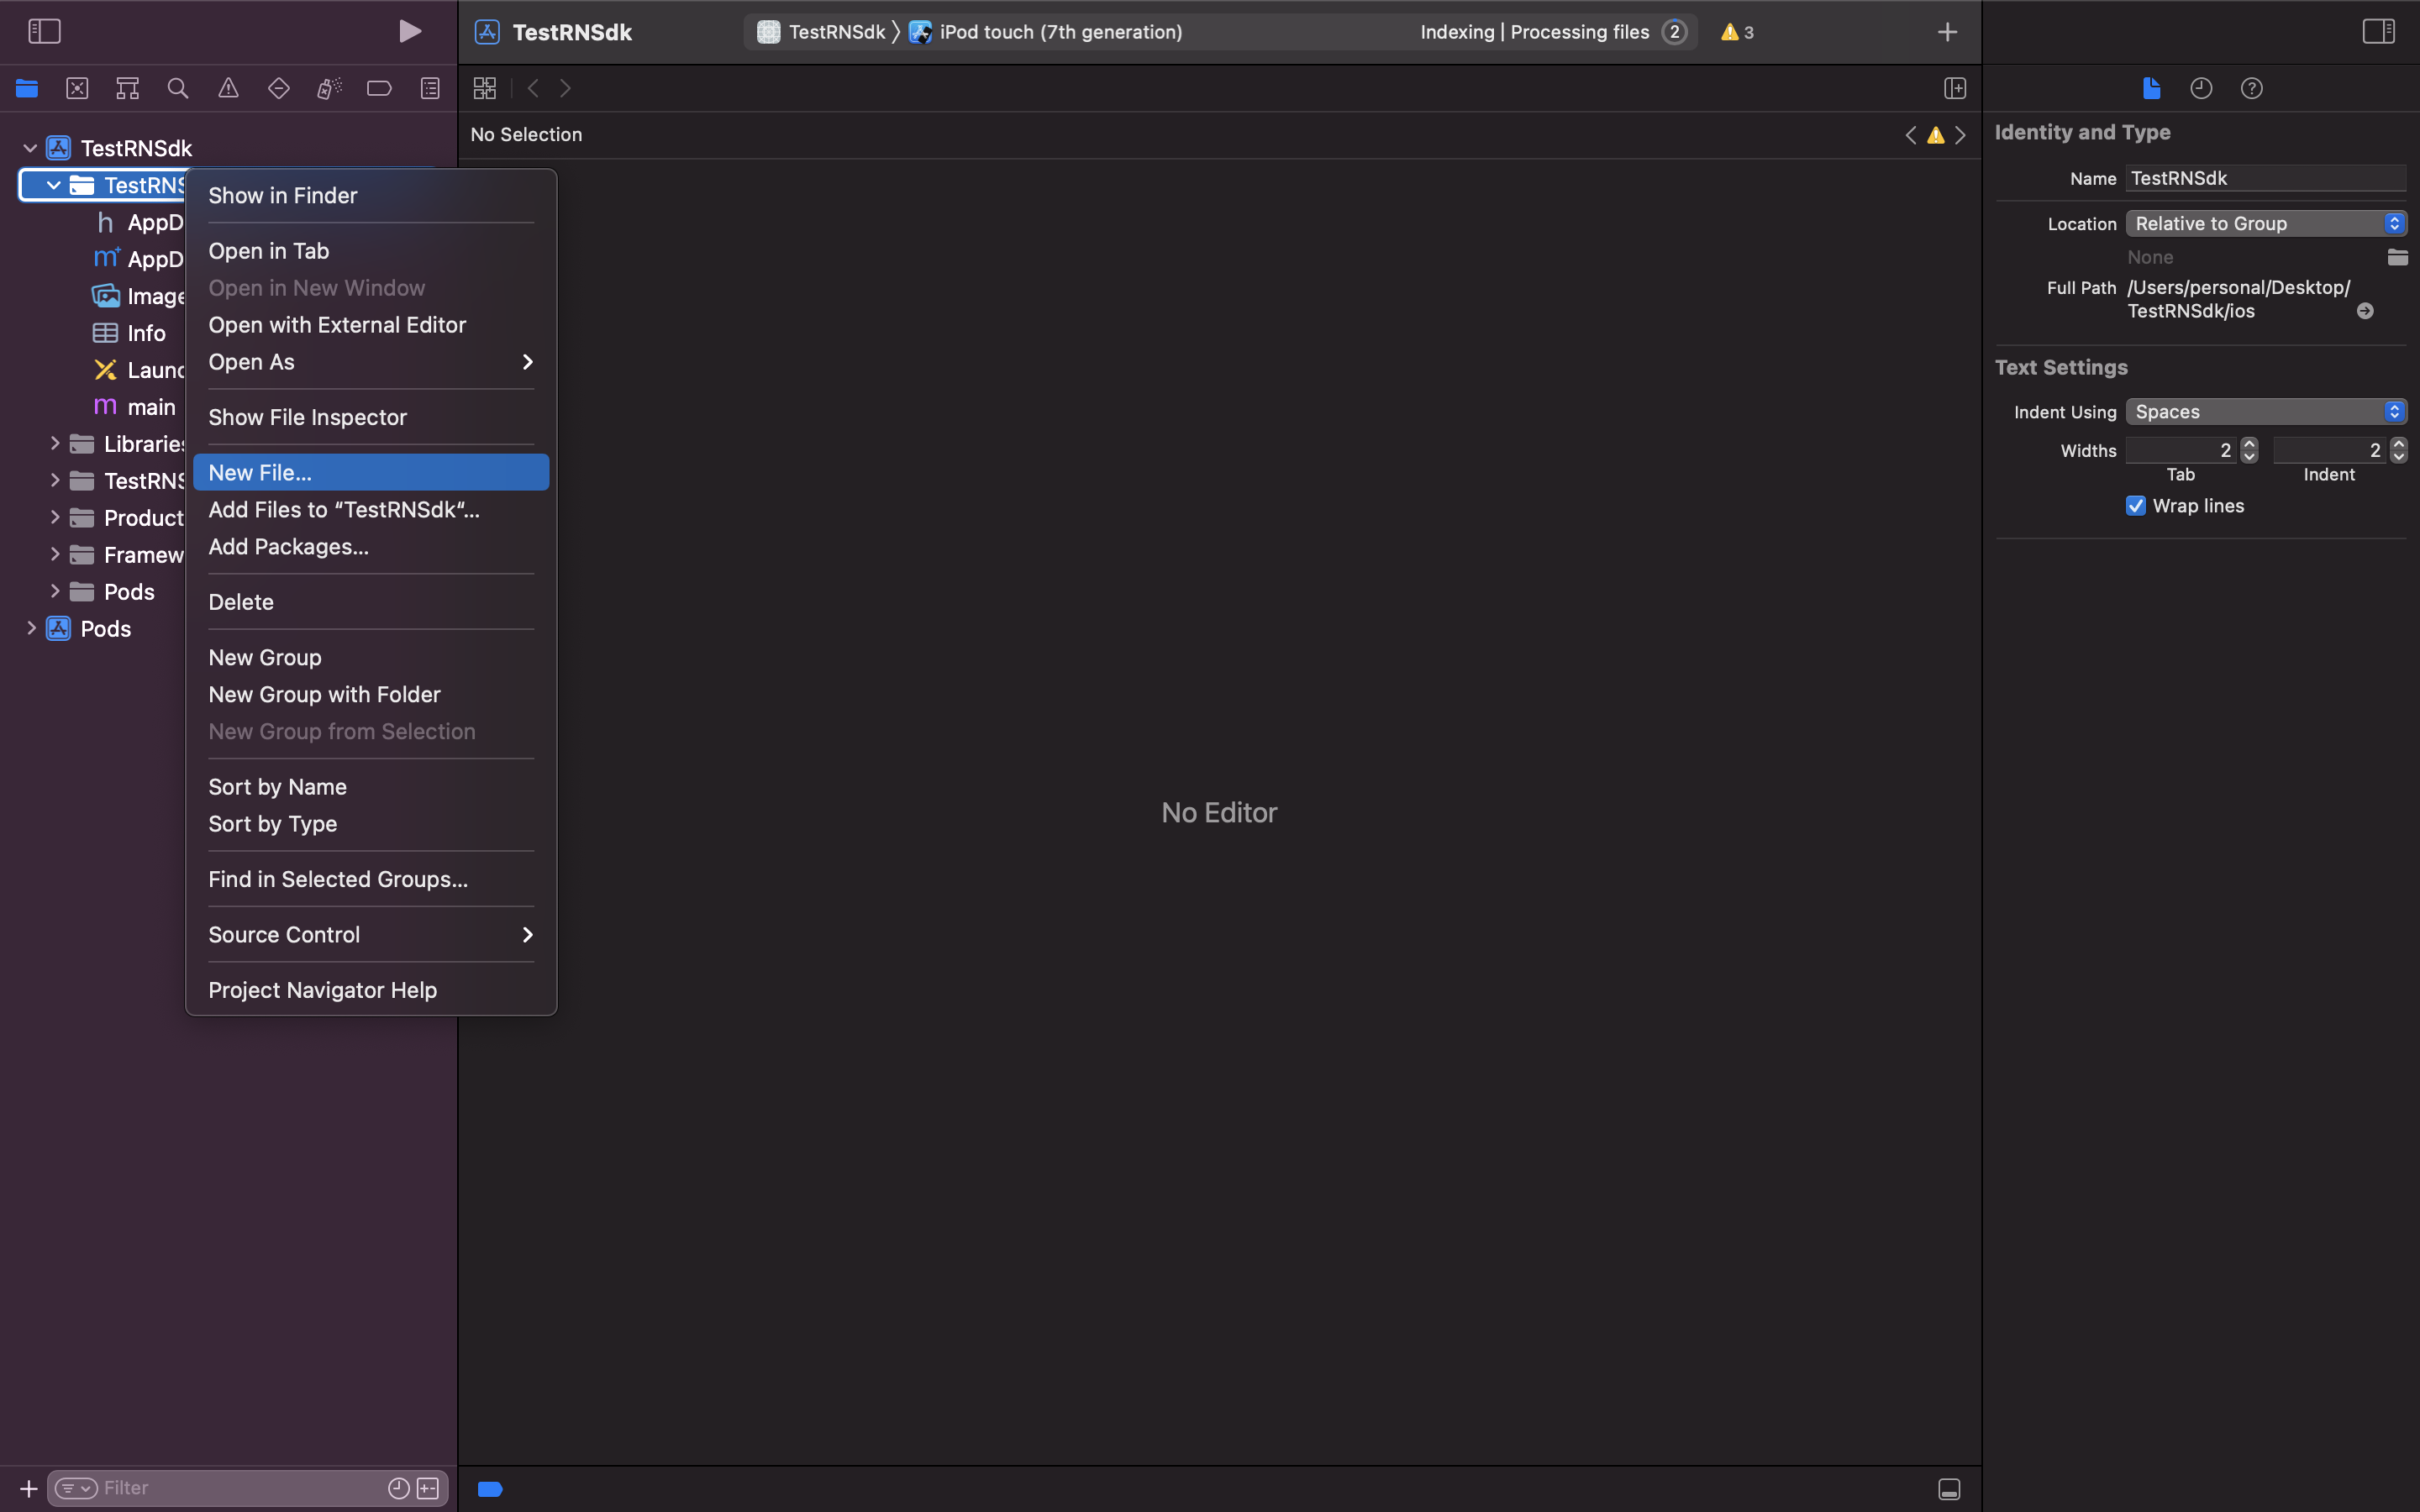 * Select **Swift File** and click on **`Next`** button.
* Now give a suitable name to your file and click Create.
* After that popup will be shown asking to configure Objective-C bridge header. Click on **`Create Bridge Header`**.
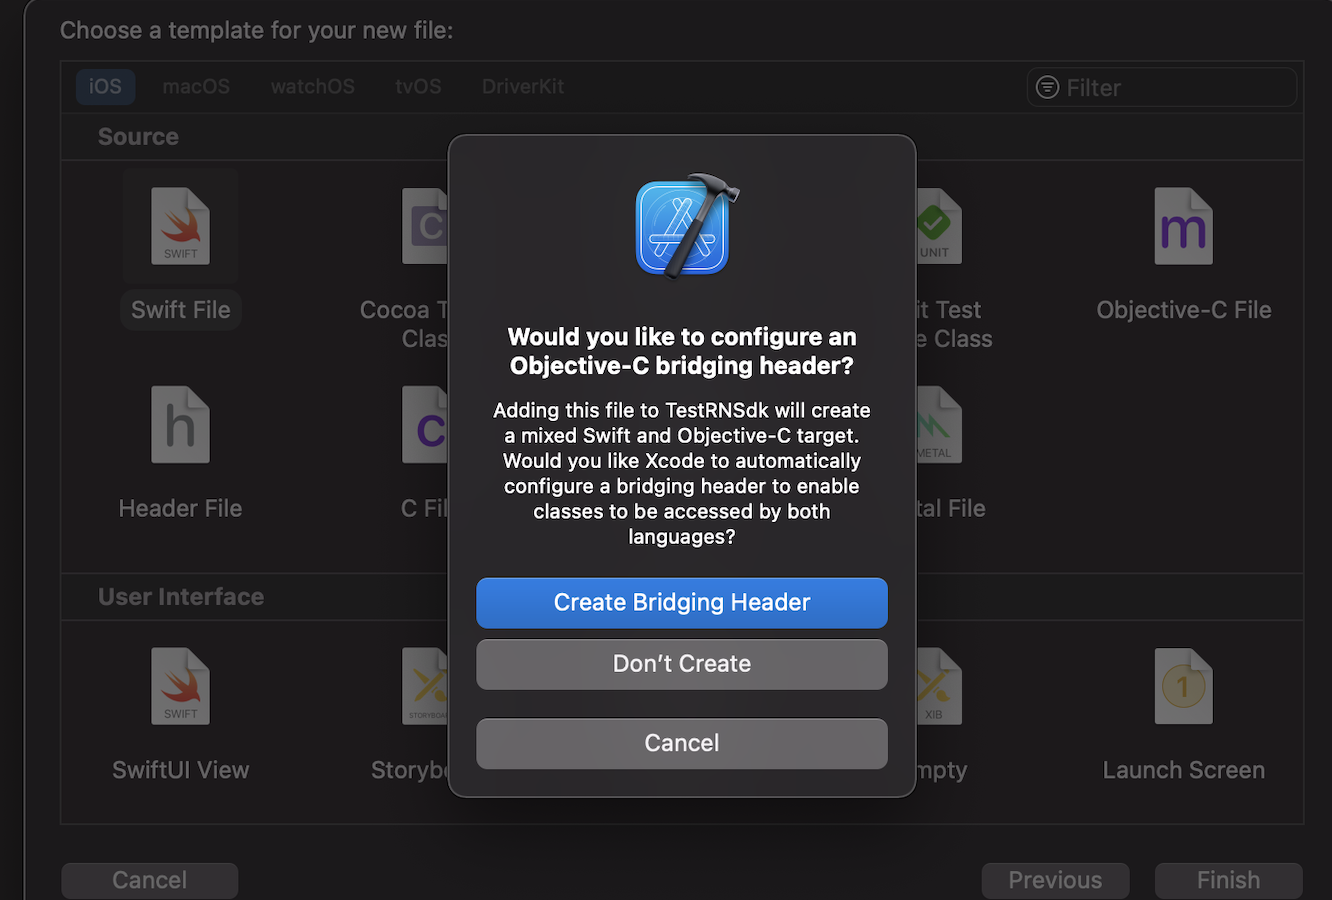
Thats it! your React native iOS project can now understand code written in Swift language.
* Select **Swift File** and click on **`Next`** button.
* Now give a suitable name to your file and click Create.
* After that popup will be shown asking to configure Objective-C bridge header. Click on **`Create Bridge Header`**.

Thats it! your React native iOS project can now understand code written in Swift language.
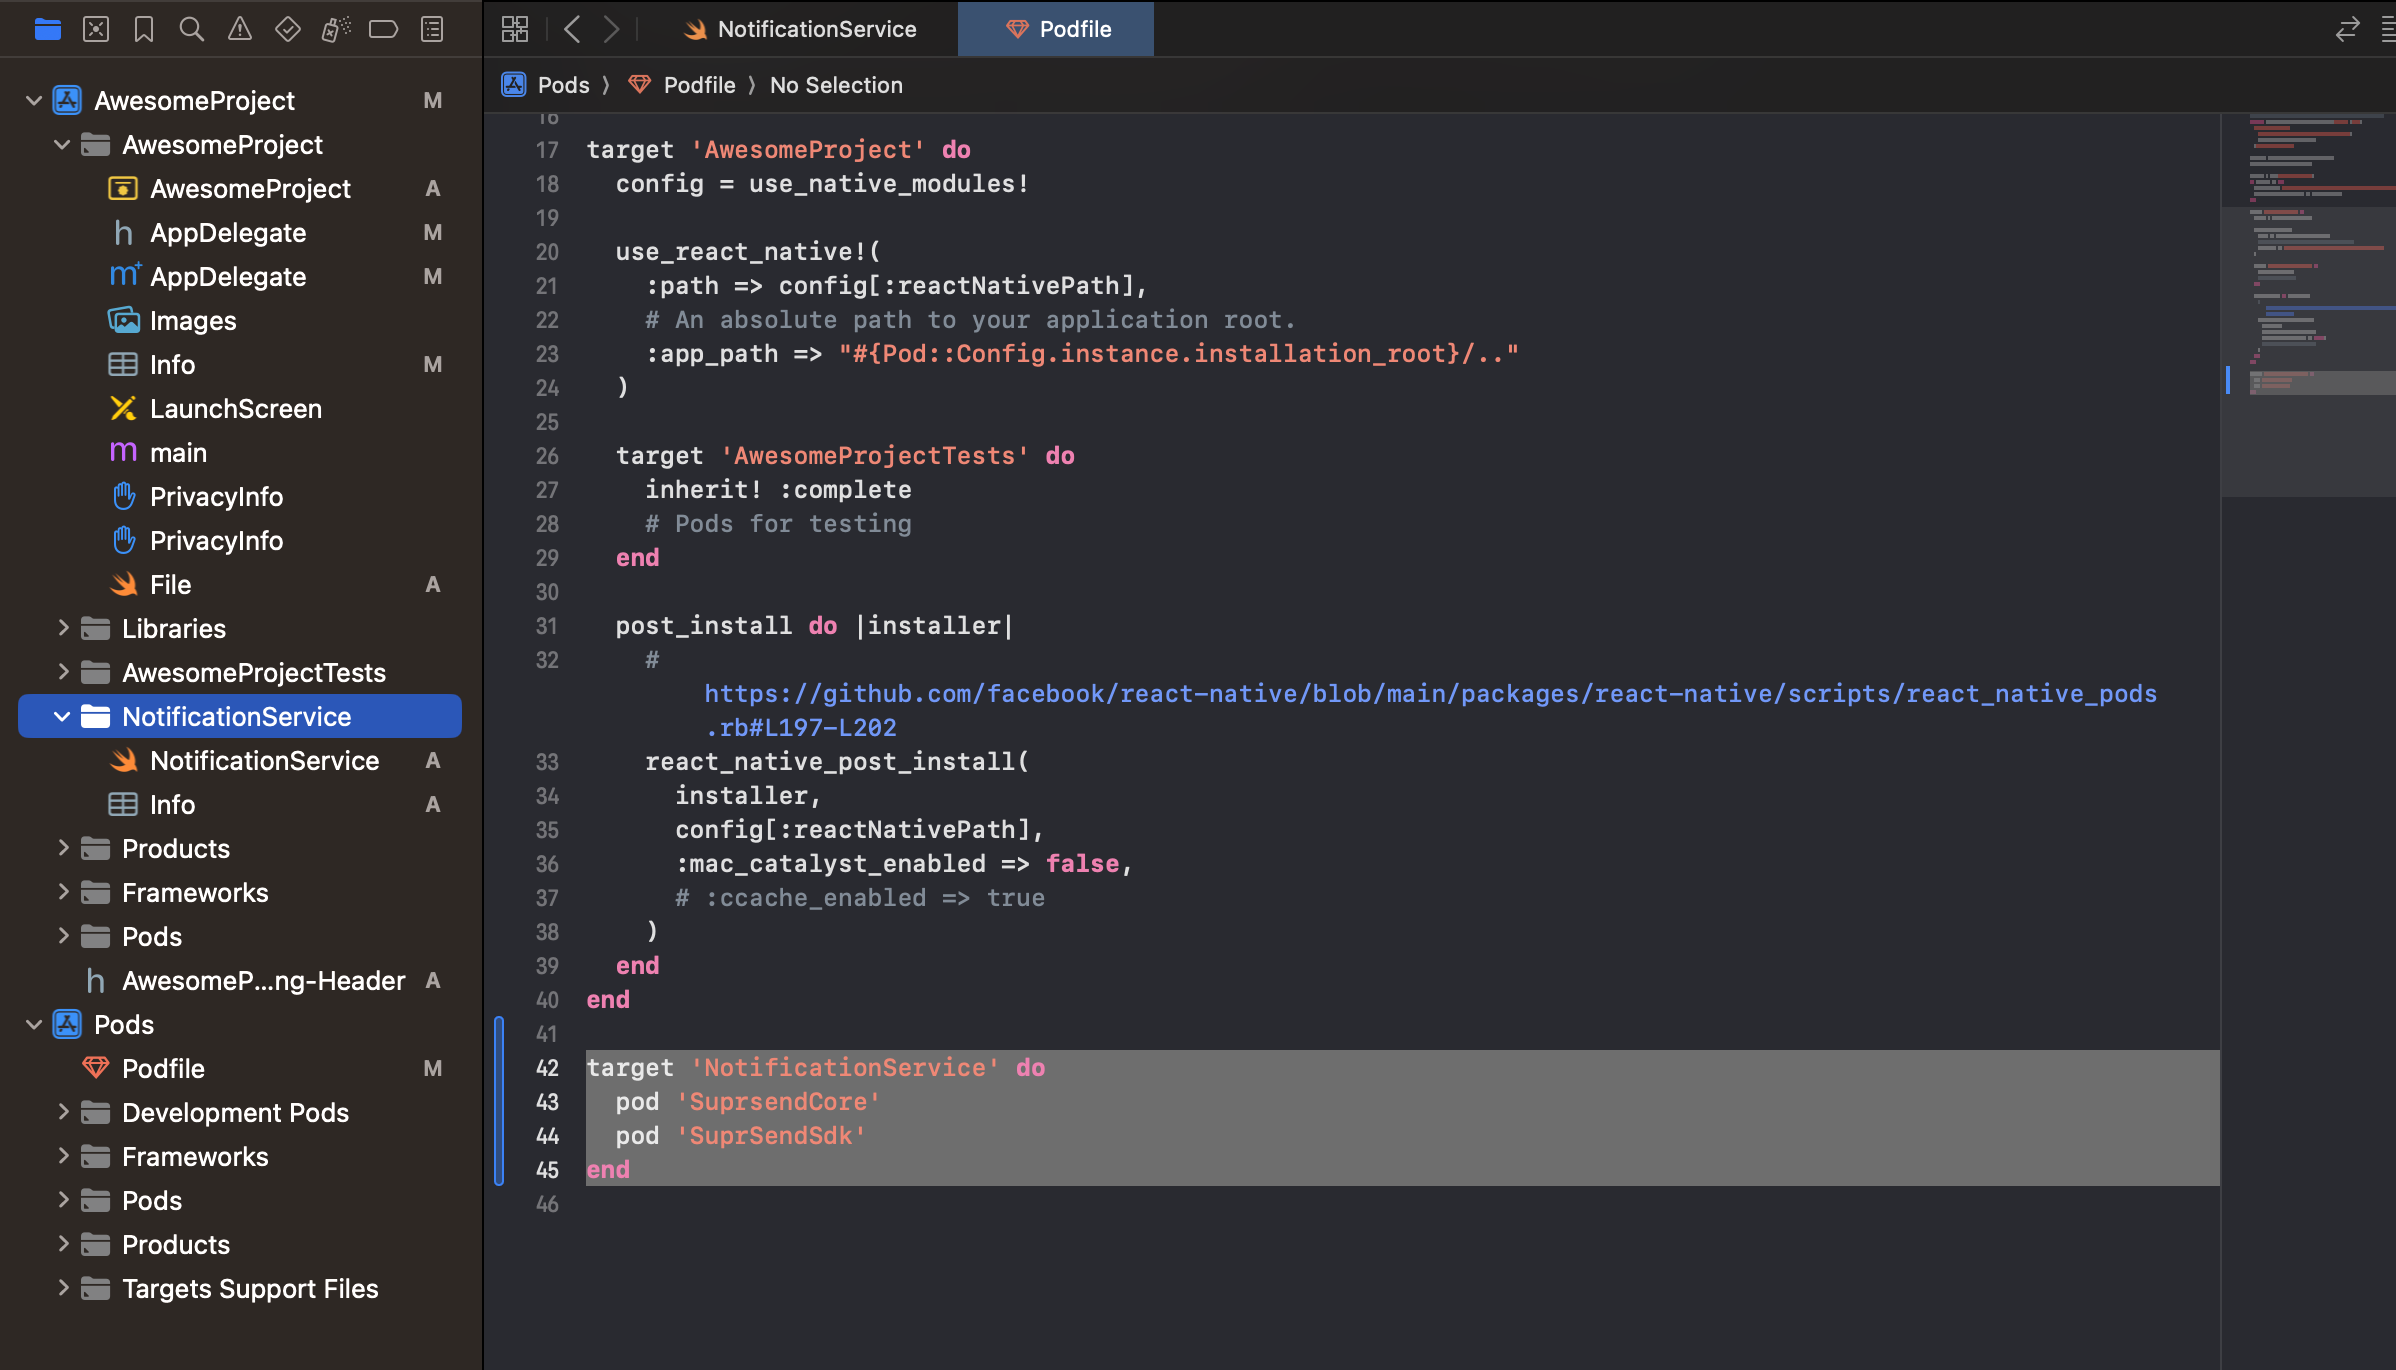 Replace the content in **NotificationService.swift** file with below code. In this snippet on line 11, 12 replace values with your workspace key and workspace secret.
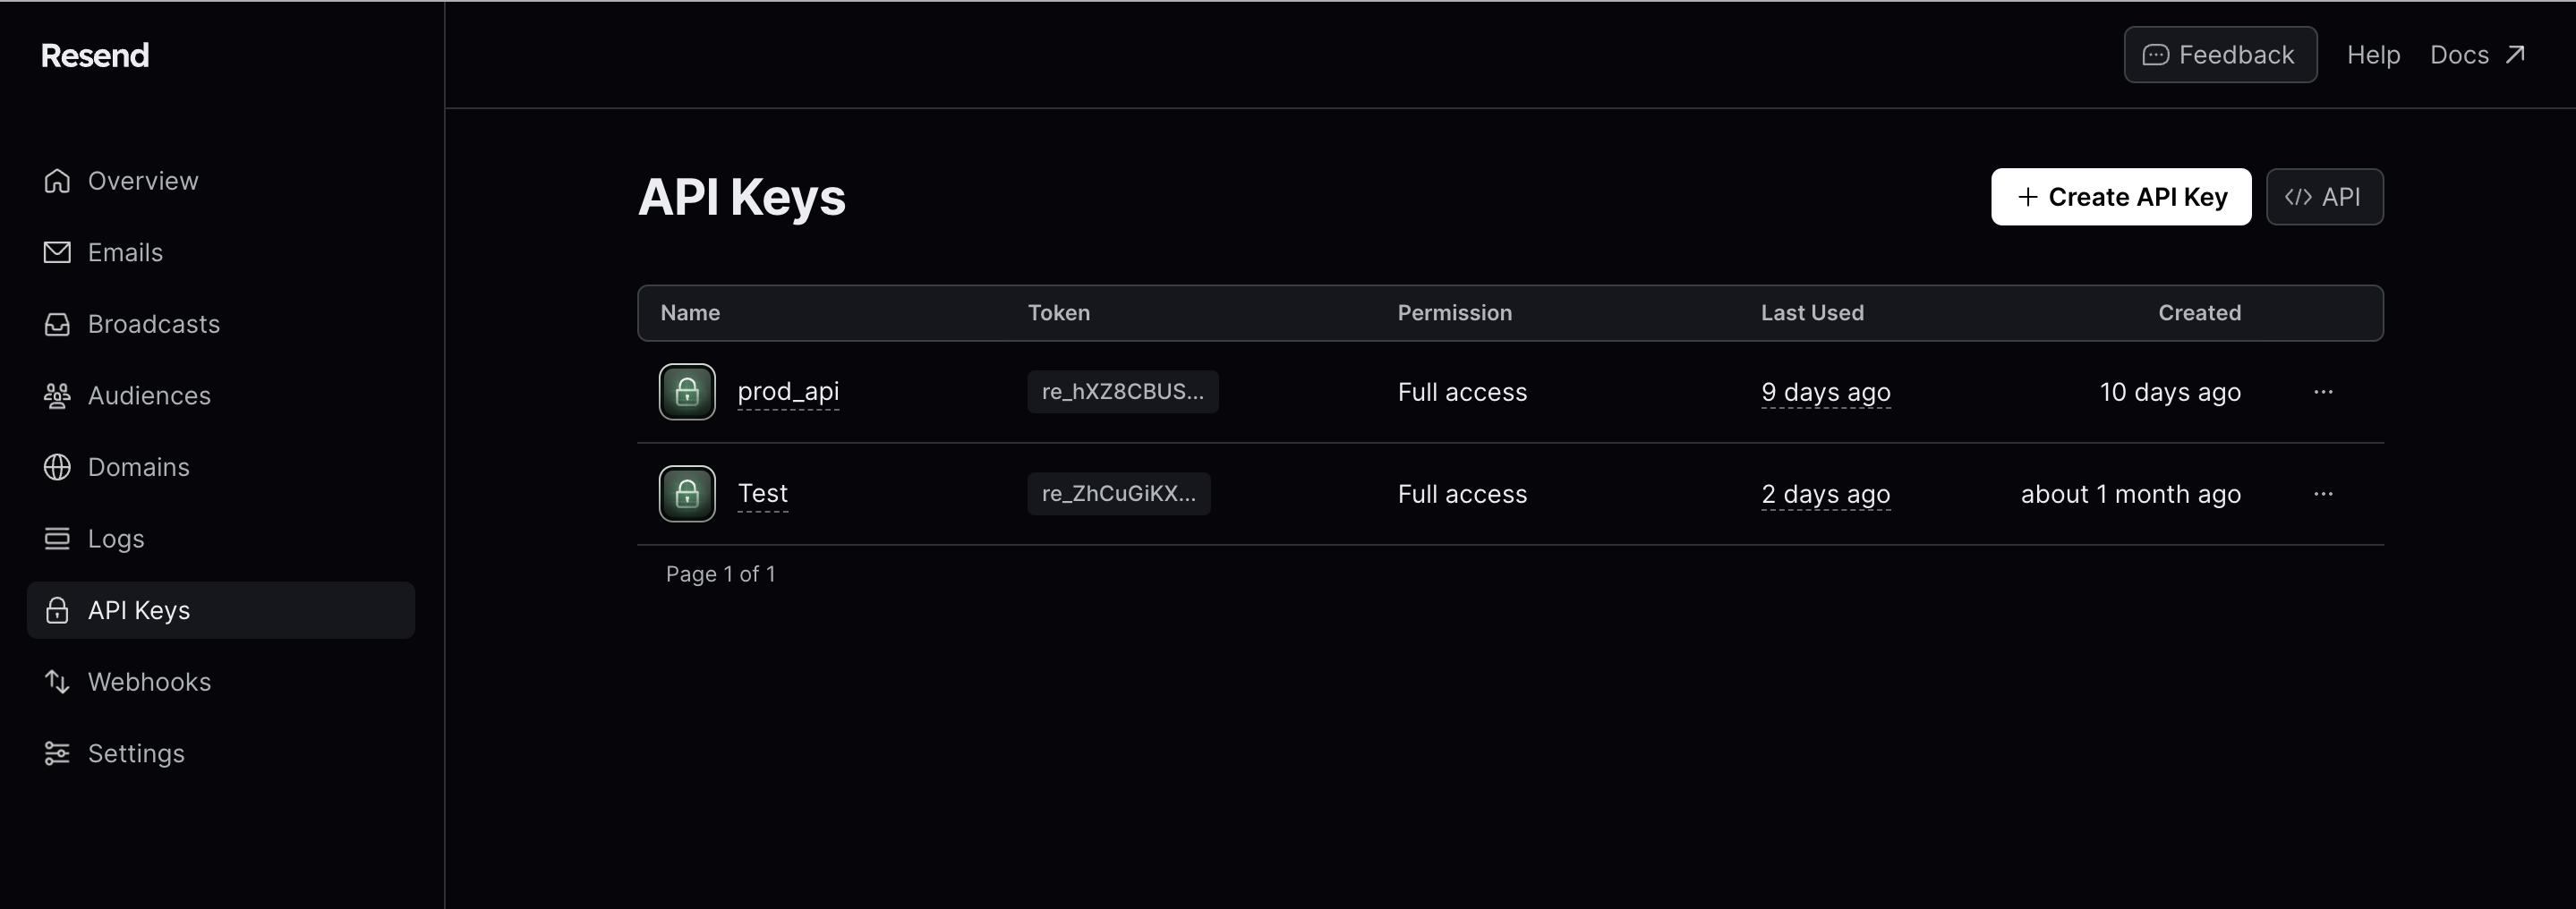 ## Whitelist email domain on Resend
A domain is used to send emails using your own domain. Verifying a domain is a required step because it’s essential to ensuring the deliverability of your emails. You can verify a domain by setting DKIM DNS record.
Go to Domains tab on Resend dashboard to add your domain. Know more about [domain verification here](https://resend.com/docs/dashboard/domains/introduction).
## Configuring Open/Click tracking for emails on Resend
One of the platform advantage of using SuprSend as a central communication system is that it shows notification analytics for all channels in your SuprSend account at a single place.
Go to the webhook tab from side navigation on your resend account and add SuprSend webhook endpoint and select all events to listen.
`URL: `[**`https://hub.suprsend.com/webhook/resend/`**](https://hub.suprsend.com/webhook/resend/)
## Whitelist email domain on Resend
A domain is used to send emails using your own domain. Verifying a domain is a required step because it’s essential to ensuring the deliverability of your emails. You can verify a domain by setting DKIM DNS record.
Go to Domains tab on Resend dashboard to add your domain. Know more about [domain verification here](https://resend.com/docs/dashboard/domains/introduction).
## Configuring Open/Click tracking for emails on Resend
One of the platform advantage of using SuprSend as a central communication system is that it shows notification analytics for all channels in your SuprSend account at a single place.
Go to the webhook tab from side navigation on your resend account and add SuprSend webhook endpoint and select all events to listen.
`URL: `[**`https://hub.suprsend.com/webhook/resend/`**](https://hub.suprsend.com/webhook/resend/)
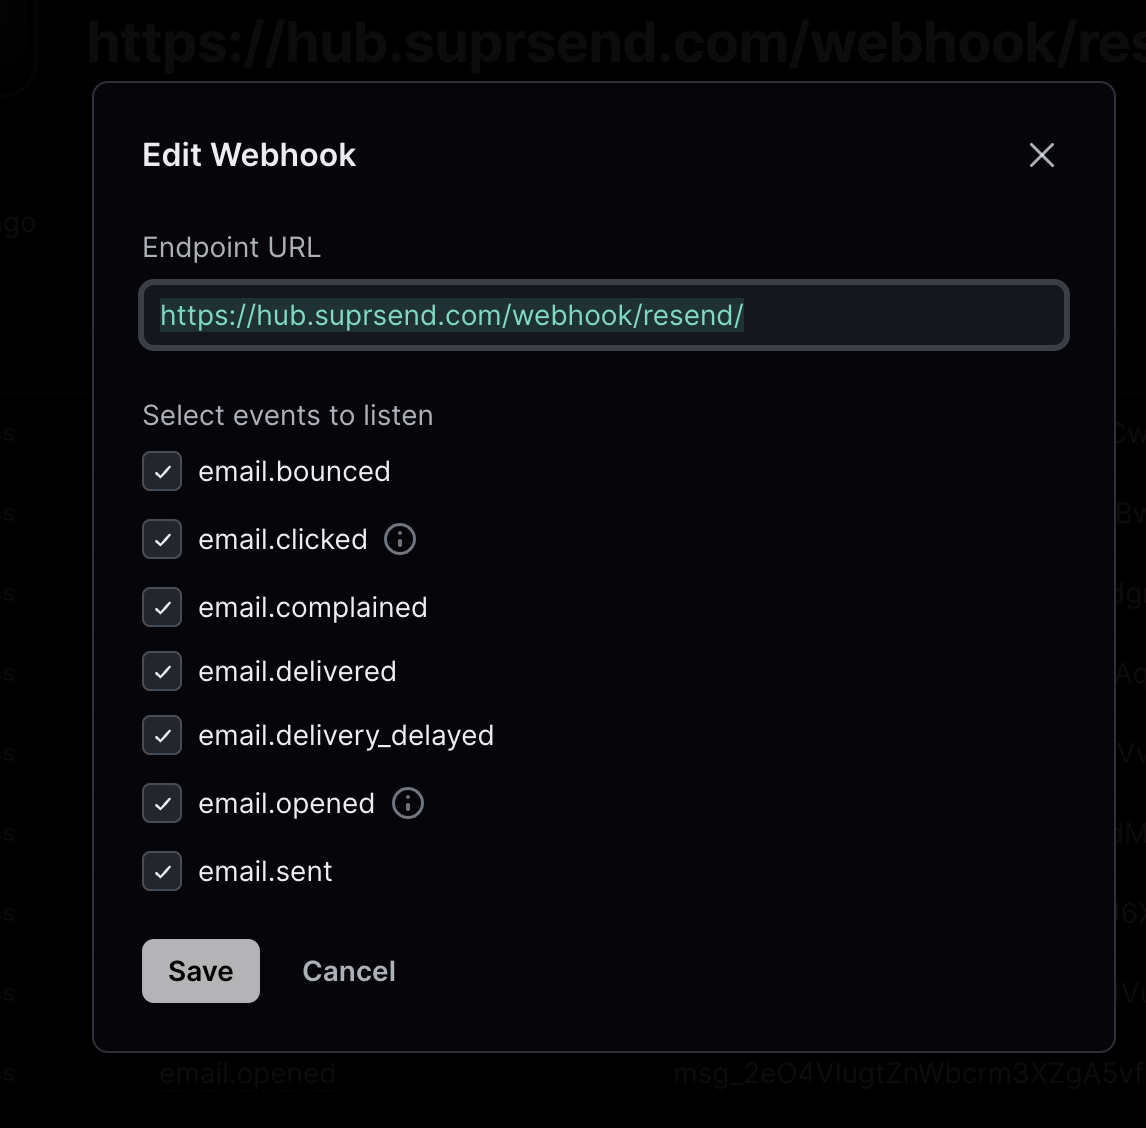 ## How to add Unsubscription link in email
You can directly add unsubscription link in your email using [`$hosted_preference_url`](/docs/user-preferences#hosted-preference-page) variable in your template. This link directs users to the [SuprSend preference page](/docs/user-preferences). With SuprSend preference setting, you have the flexibility to create multiple notification categories based on the type of notifications. This allows users to opt-out of specific notification categories, providing them with granular control over their preferences compared to other email services where they can only opt-out from all marketing communications at once.
**Why it's important to give unsubscribe option in email?**
First, it is required by the [CAN-Spam Act](https://www.ftc.gov/business-guidance/resources/can-spam-act-compliance-guide-business). Second, if you don’t give them this option, they are more likely to click on the spam complaint button, which will cause more harm than allowing them to unsubscribe. Finally, many ESPs look for unsubscribe links and are more likely to filter your email if they don’t have them.
***
# Security
Source: https://docs.suprsend.com/docs/security
Learn how SuprSend handles security- data encryption, access control, network policies, & compliance standards.
At SuprSend, we prioritize the security and privacy of your data. Our comprehensive security measures and adherence to industry standards ensure that your information is protected at every level.
## Security Compliance
Our security measures meet industry standards for data protection and security.
* **SOC 2 Type II Compliance:**
SuprSend has passed independent audits that confirm our systems are secure, reliable, and handle your data with care, not just once, but continuously over time.
* **GDPR Compliance:**
We support EU-data residency options and support GDPR's right to erasure workflows, ensuring compliance with data privacy regulations.
* **HIPAA Compliance:**
SuprSend strictly safeguards sensitive health information, aligning with U.S. healthcare data protection regulations.
* **CPRA Compliance:**
This compliance, an amendment of the earlier California Consumer Privacy Act (CCPA), implies to California residents' privacy rights to correct inaccurate personal information and to limit the use of sensitive personal information for their customer rights. SuprSend strictly adheres to the CPRA standardization.
* **ISO 27001:**
This international standardization continually improves and maintains an Information Security Management System (ISMS). SuprSend, being ISO 27001 complaint, majorly prioritizes confidentiality, integrity, & availability of information through its risk management framework.
## How to add Unsubscription link in email
You can directly add unsubscription link in your email using [`$hosted_preference_url`](/docs/user-preferences#hosted-preference-page) variable in your template. This link directs users to the [SuprSend preference page](/docs/user-preferences). With SuprSend preference setting, you have the flexibility to create multiple notification categories based on the type of notifications. This allows users to opt-out of specific notification categories, providing them with granular control over their preferences compared to other email services where they can only opt-out from all marketing communications at once.
**Why it's important to give unsubscribe option in email?**
First, it is required by the [CAN-Spam Act](https://www.ftc.gov/business-guidance/resources/can-spam-act-compliance-guide-business). Second, if you don’t give them this option, they are more likely to click on the spam complaint button, which will cause more harm than allowing them to unsubscribe. Finally, many ESPs look for unsubscribe links and are more likely to filter your email if they don’t have them.
***
# Security
Source: https://docs.suprsend.com/docs/security
Learn how SuprSend handles security- data encryption, access control, network policies, & compliance standards.
At SuprSend, we prioritize the security and privacy of your data. Our comprehensive security measures and adherence to industry standards ensure that your information is protected at every level.
## Security Compliance
Our security measures meet industry standards for data protection and security.
* **SOC 2 Type II Compliance:**
SuprSend has passed independent audits that confirm our systems are secure, reliable, and handle your data with care, not just once, but continuously over time.
* **GDPR Compliance:**
We support EU-data residency options and support GDPR's right to erasure workflows, ensuring compliance with data privacy regulations.
* **HIPAA Compliance:**
SuprSend strictly safeguards sensitive health information, aligning with U.S. healthcare data protection regulations.
* **CPRA Compliance:**
This compliance, an amendment of the earlier California Consumer Privacy Act (CCPA), implies to California residents' privacy rights to correct inaccurate personal information and to limit the use of sensitive personal information for their customer rights. SuprSend strictly adheres to the CPRA standardization.
* **ISO 27001:**
This international standardization continually improves and maintains an Information Security Management System (ISMS). SuprSend, being ISO 27001 complaint, majorly prioritizes confidentiality, integrity, & availability of information through its risk management framework.
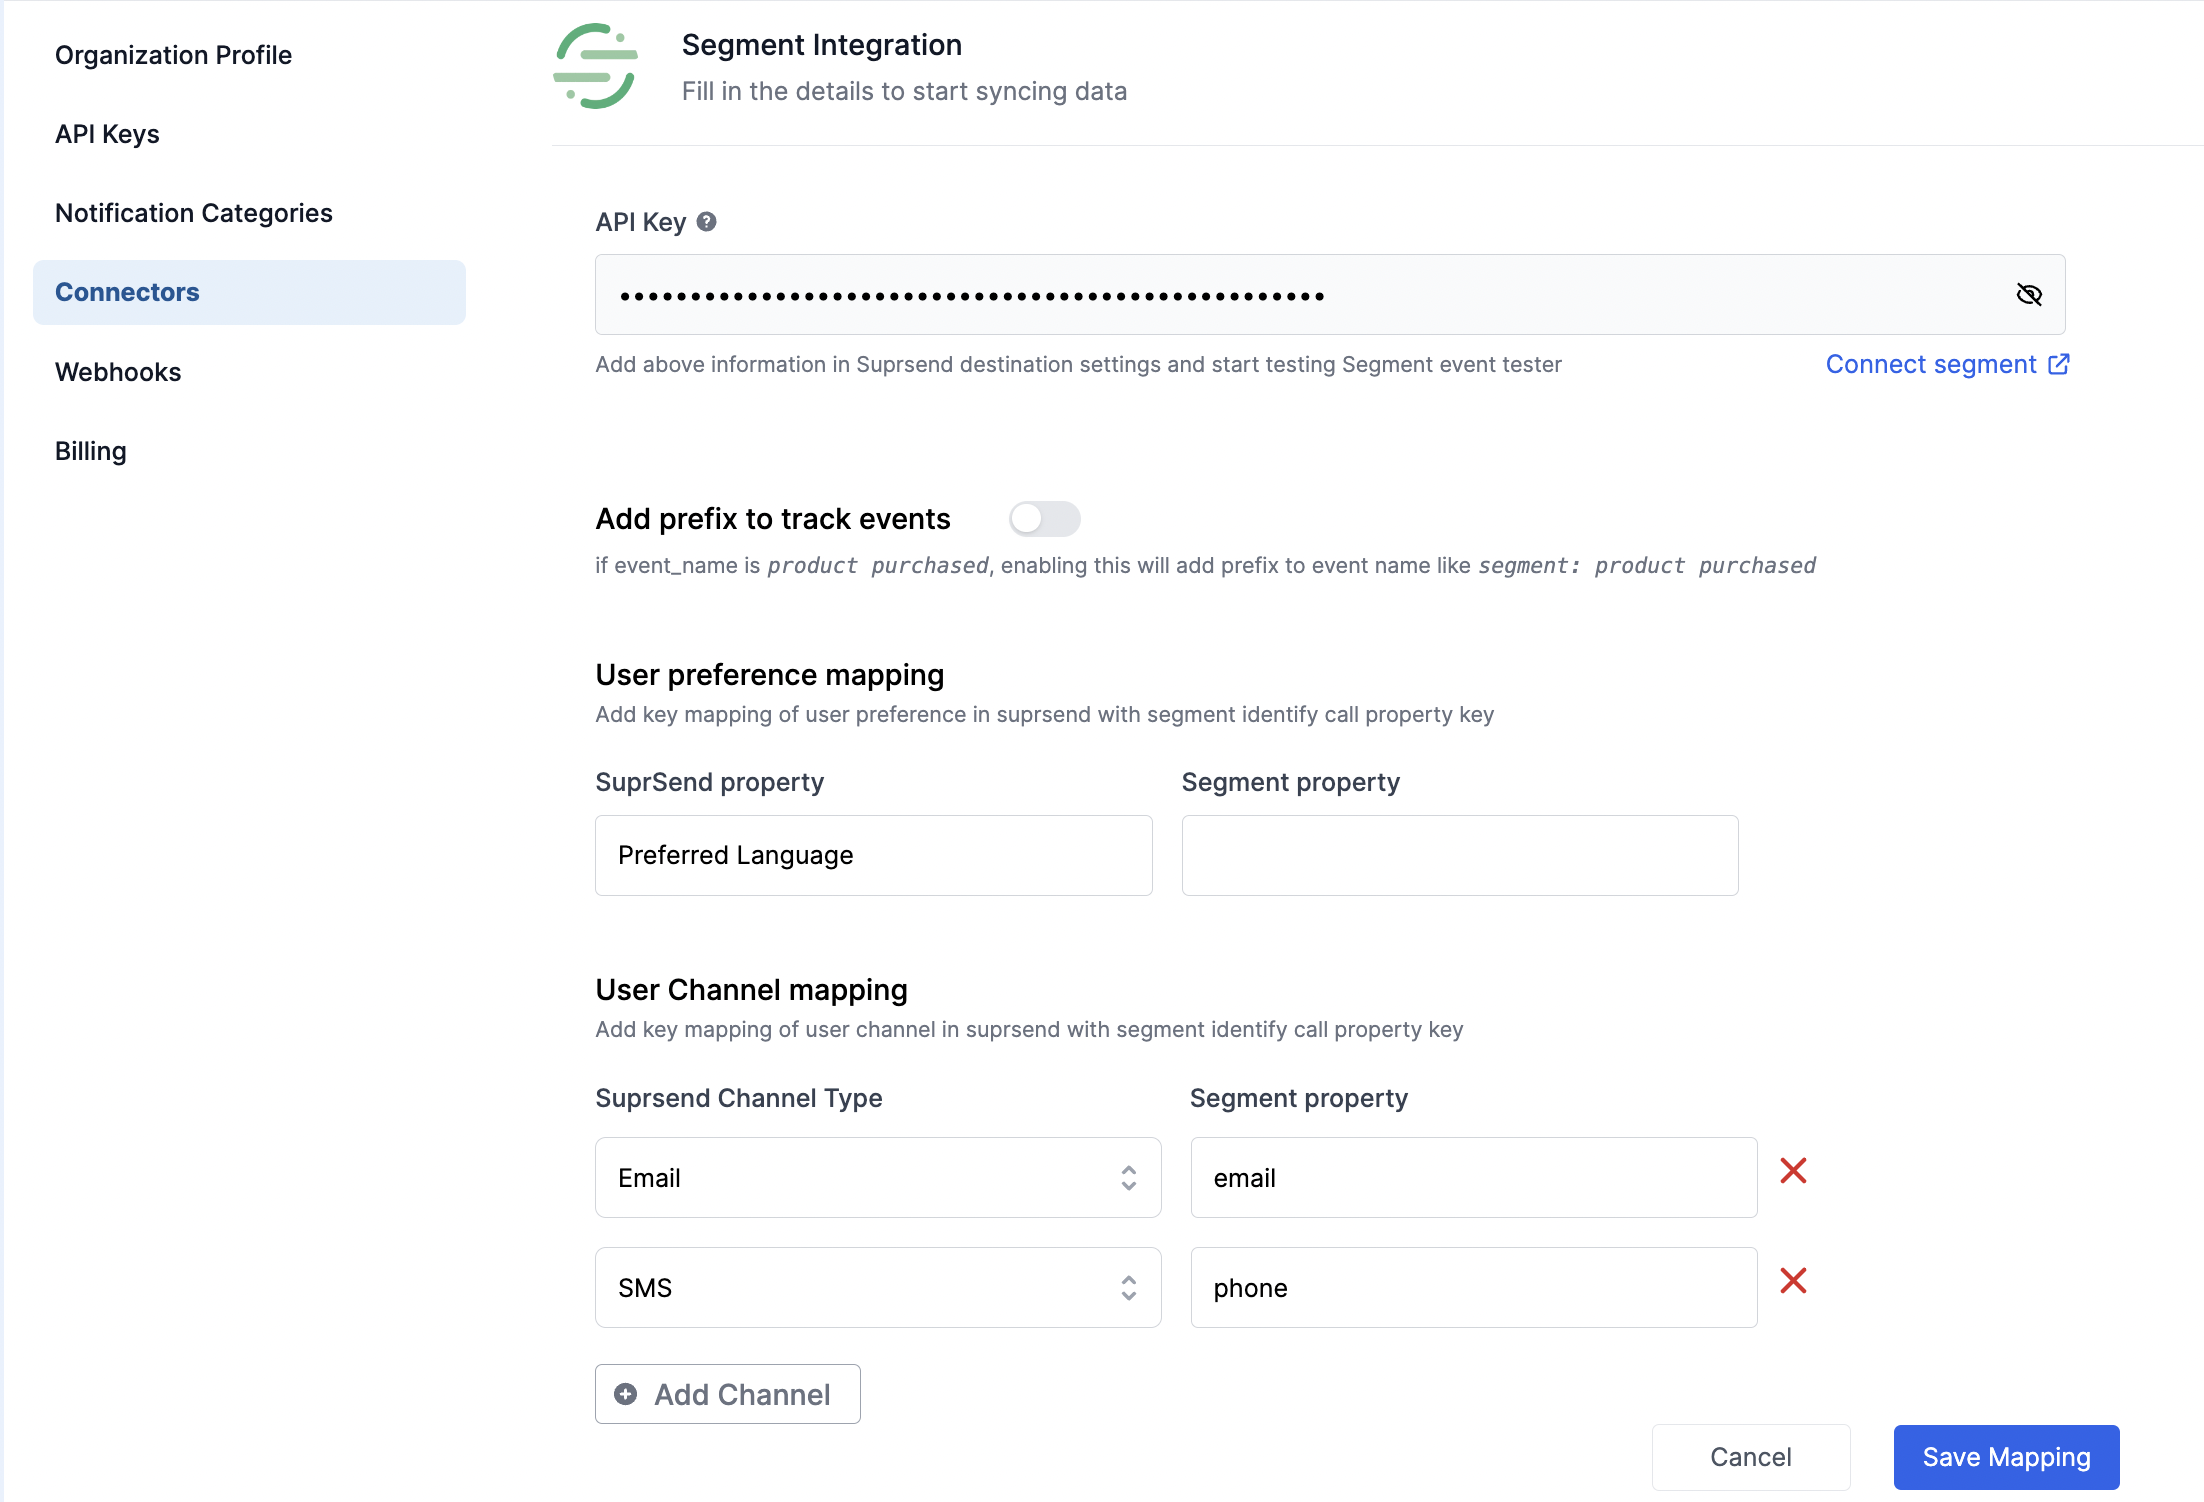 Before beginning the Segment integration, it is important to establish how Segment events and users will be mapped in SuprSend. The following form fields will assist in setting up the desired data mapping within SuprSend:
### 1. Add Prefix to track events
This option allows for distinguishing the events coming from multiple data sources such as SuprSend SDK and Segment, or any other connector. By enabling this feature, a prefix of **`segment : `**will be added to all event names coming from Segment. This is particularly useful for existing Segment and SuprSend users who are passing the same events from both SuprSend SDK and Segment. By default, SuprSend assumes that events coming from all sources are unique and does not add any prefix to the event name.
For example- if the [segment track](https://segment.com/docs/connections/spec/track/) API call looks like this
Before beginning the Segment integration, it is important to establish how Segment events and users will be mapped in SuprSend. The following form fields will assist in setting up the desired data mapping within SuprSend:
### 1. Add Prefix to track events
This option allows for distinguishing the events coming from multiple data sources such as SuprSend SDK and Segment, or any other connector. By enabling this feature, a prefix of **`segment : `**will be added to all event names coming from Segment. This is particularly useful for existing Segment and SuprSend users who are passing the same events from both SuprSend SDK and Segment. By default, SuprSend assumes that events coming from all sources are unique and does not add any prefix to the event name.
For example- if the [segment track](https://segment.com/docs/connections/spec/track/) API call looks like this
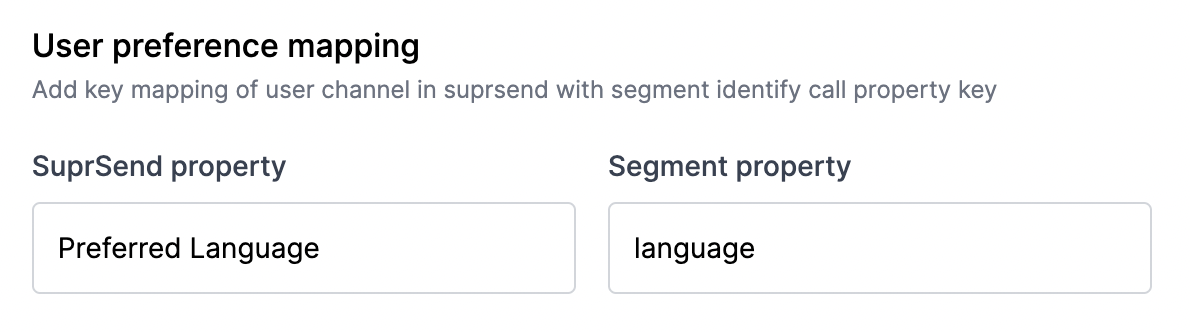

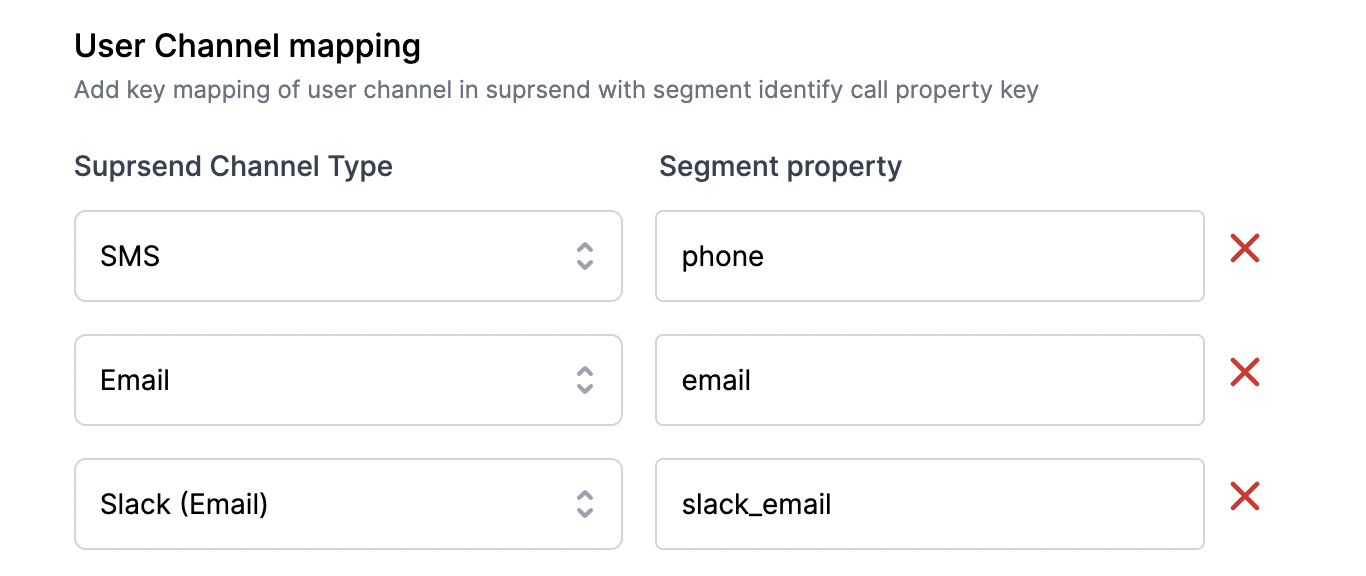 Communication channels in user profile will look like this
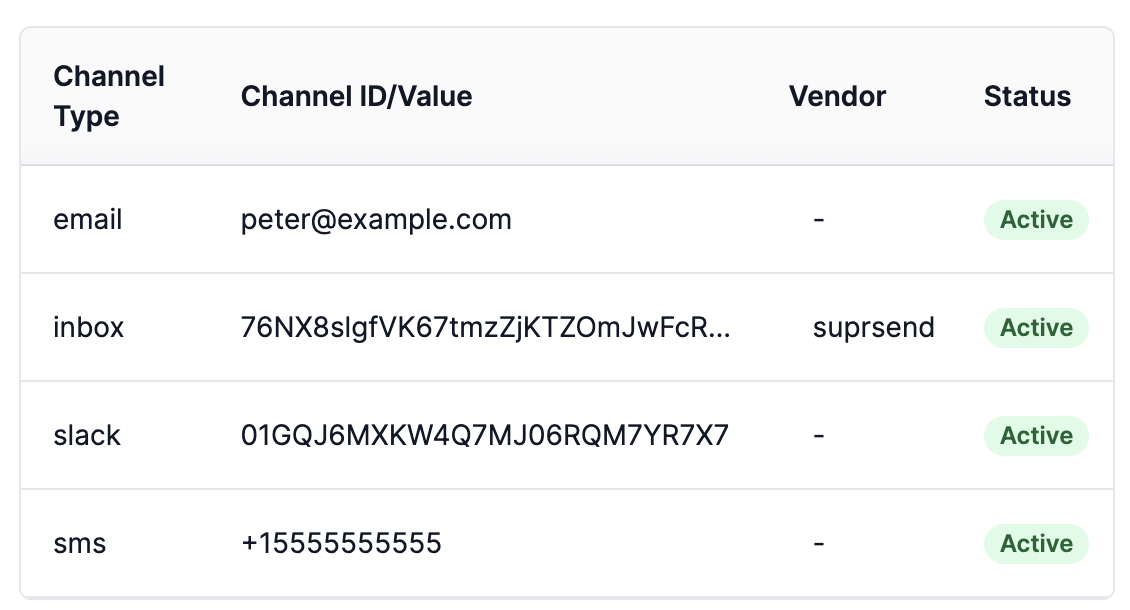 Click on **`Save Mapping`** to save the changes

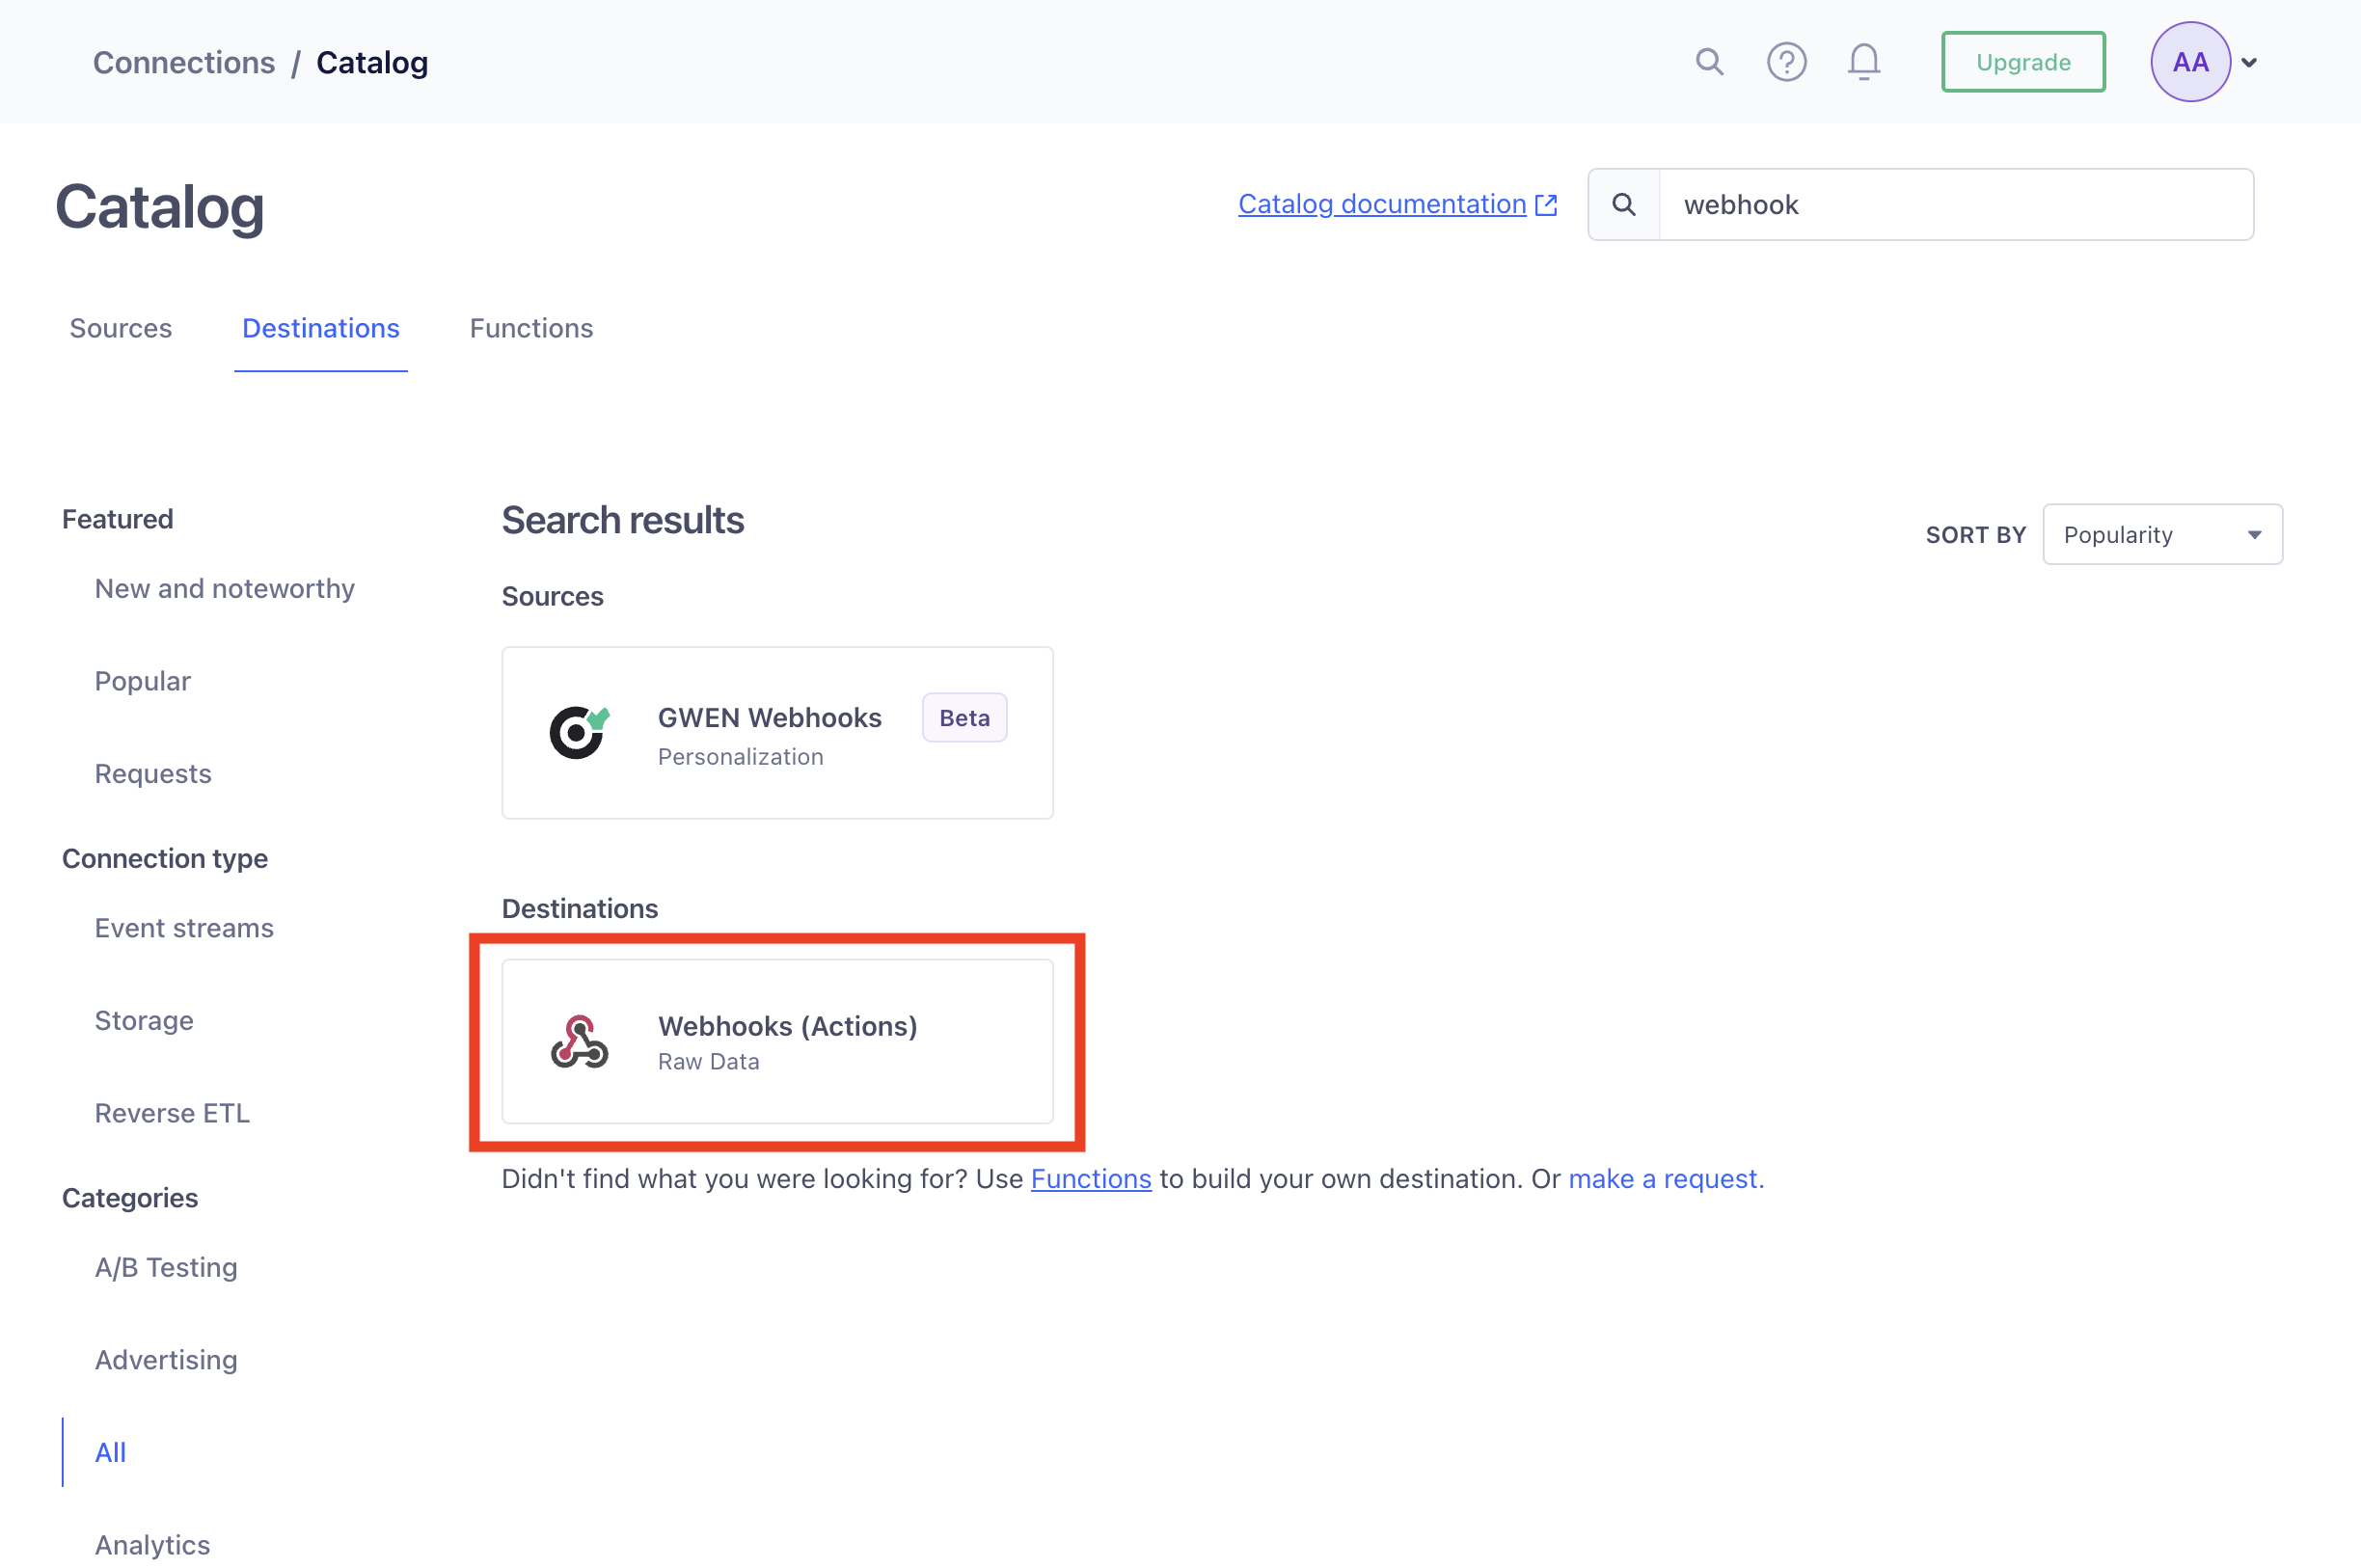
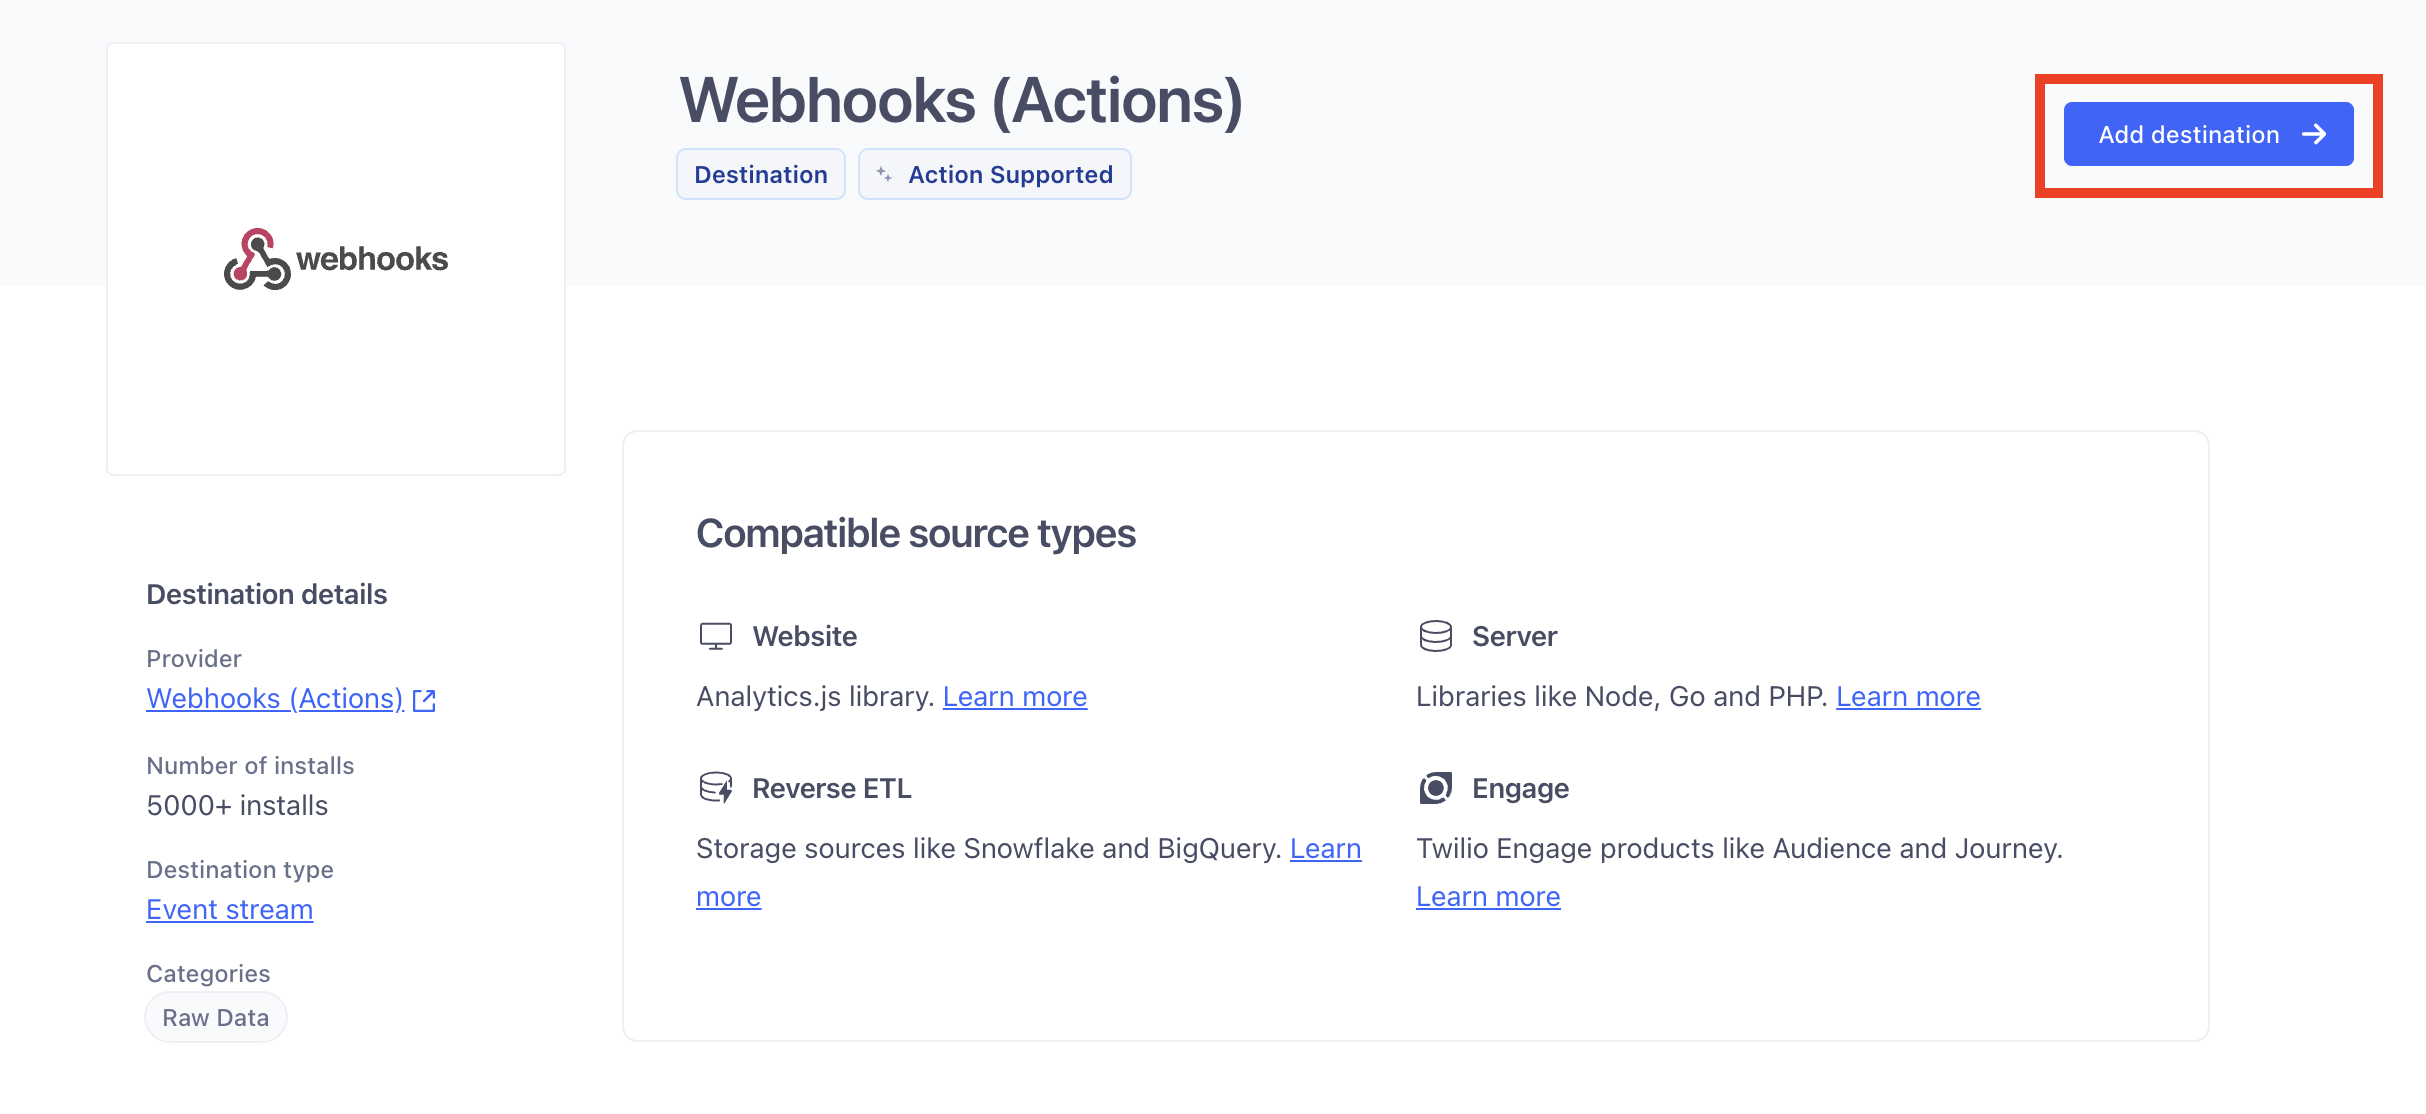
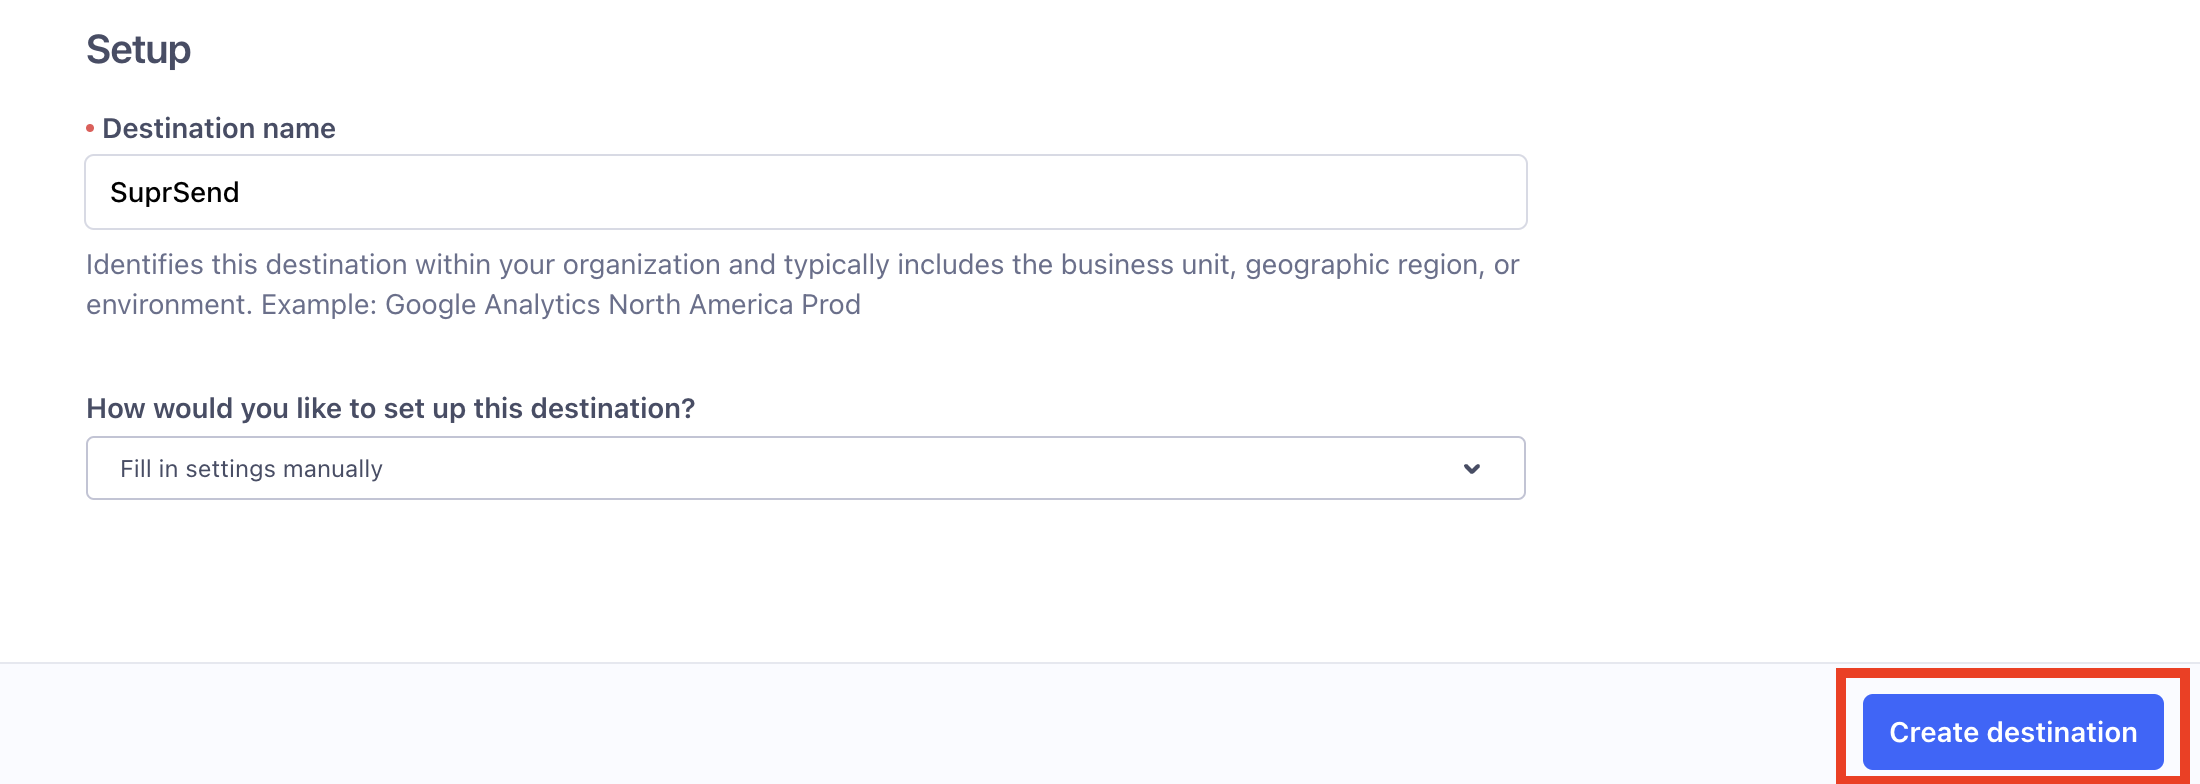
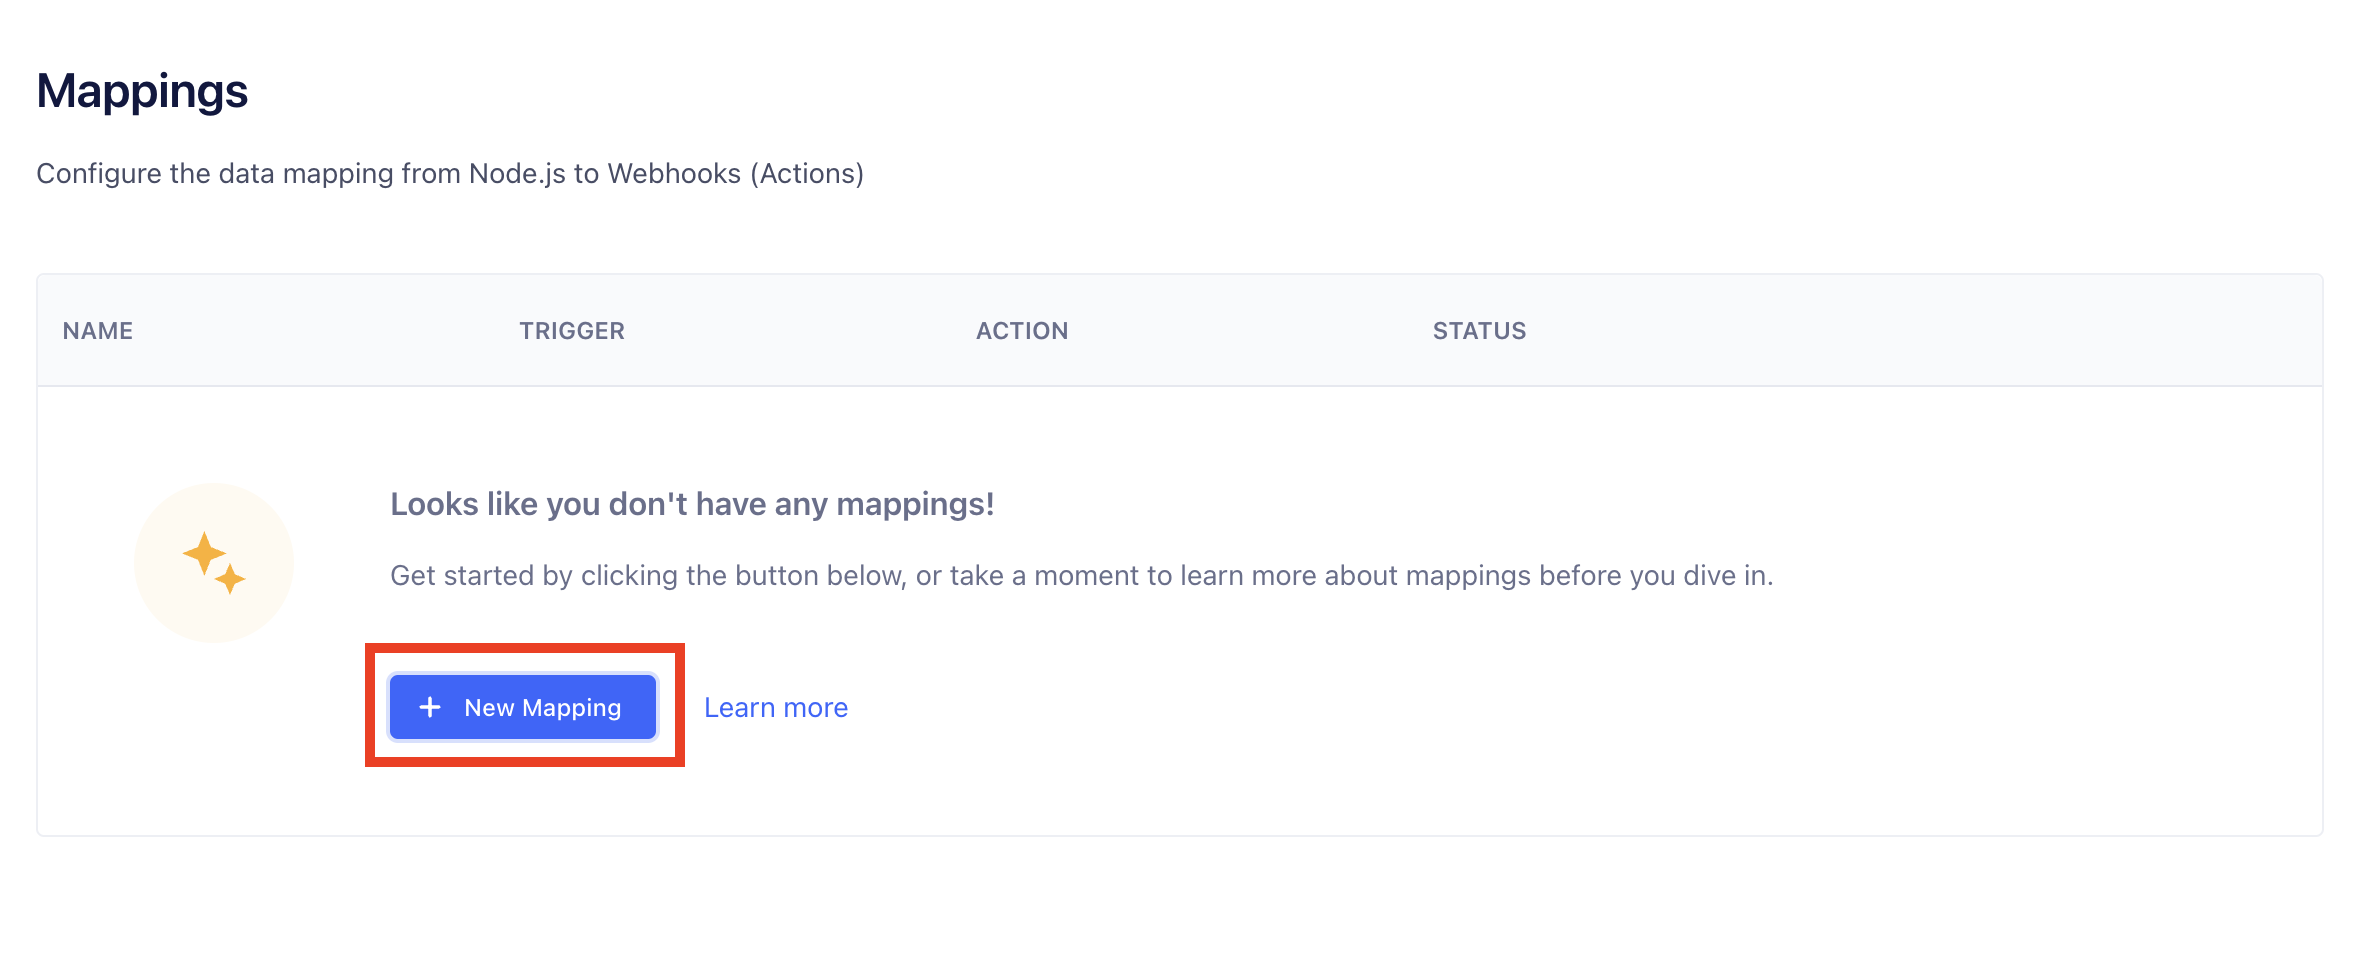
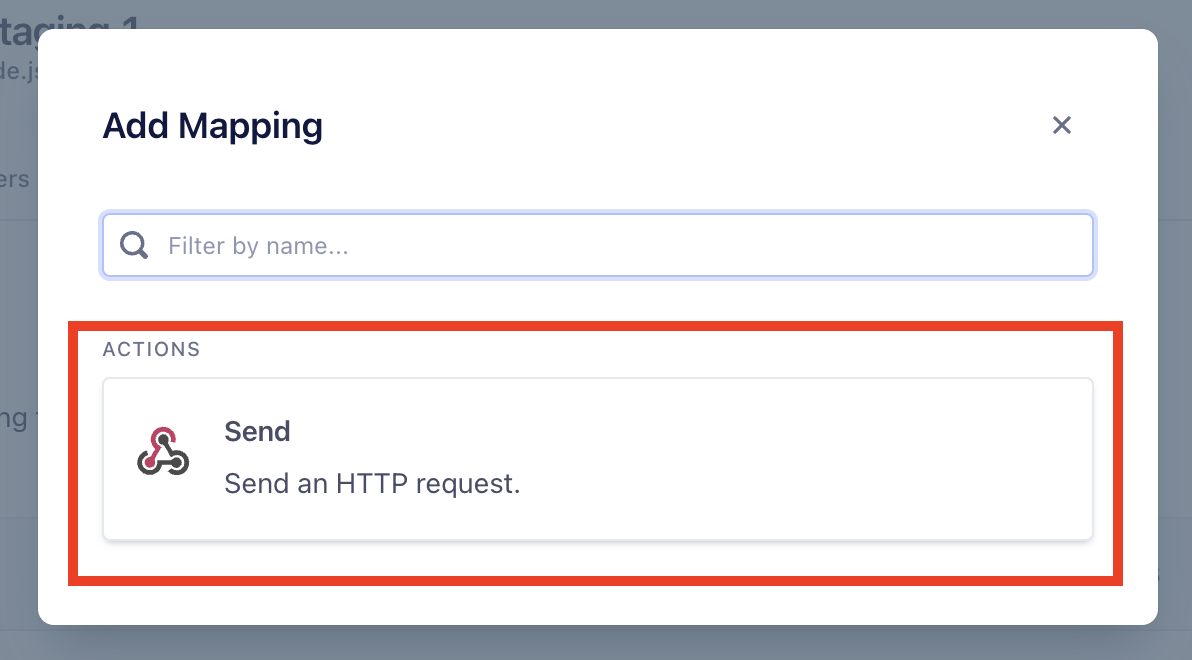

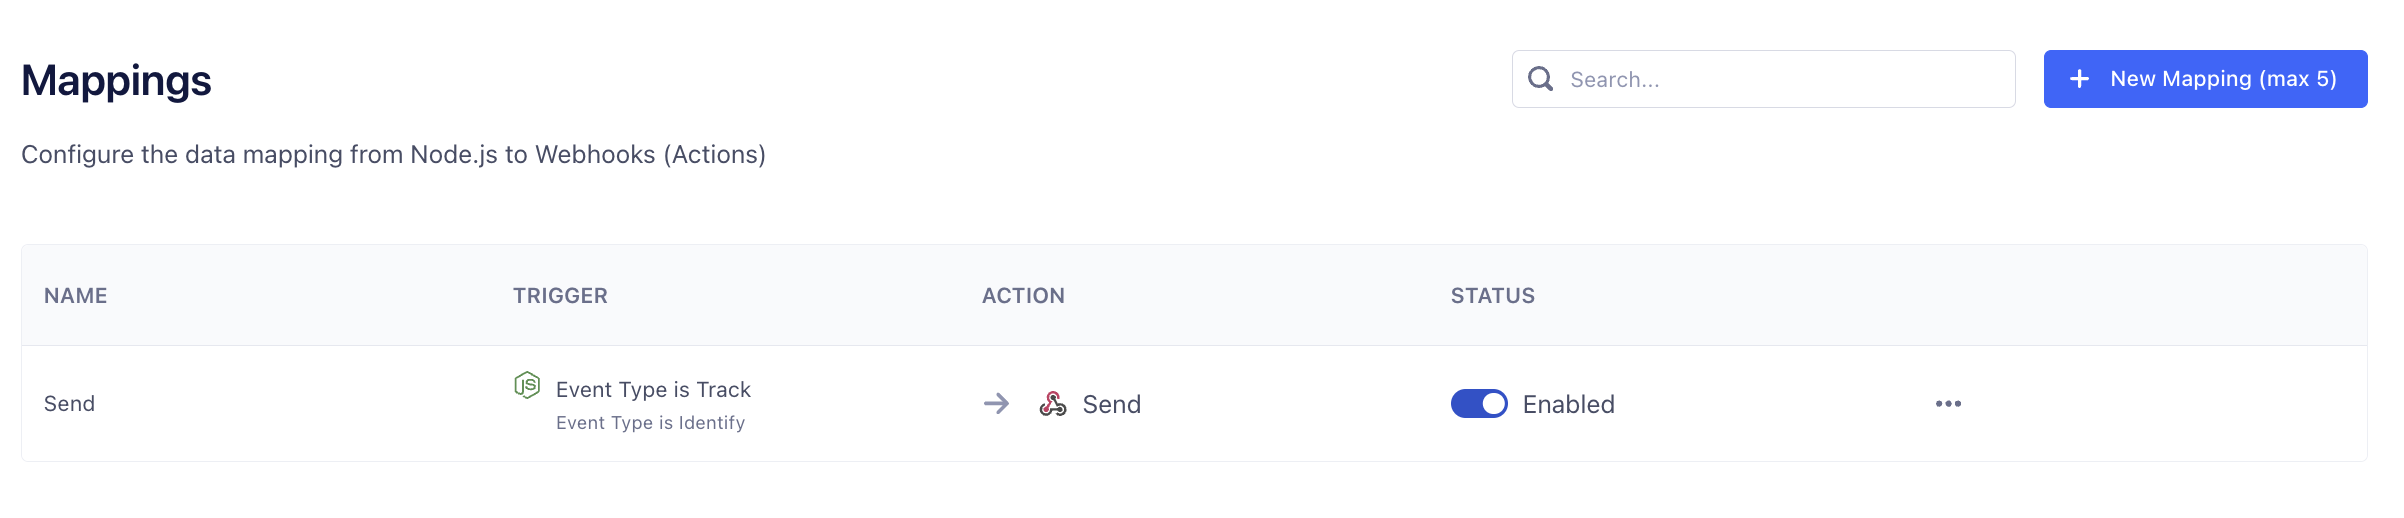

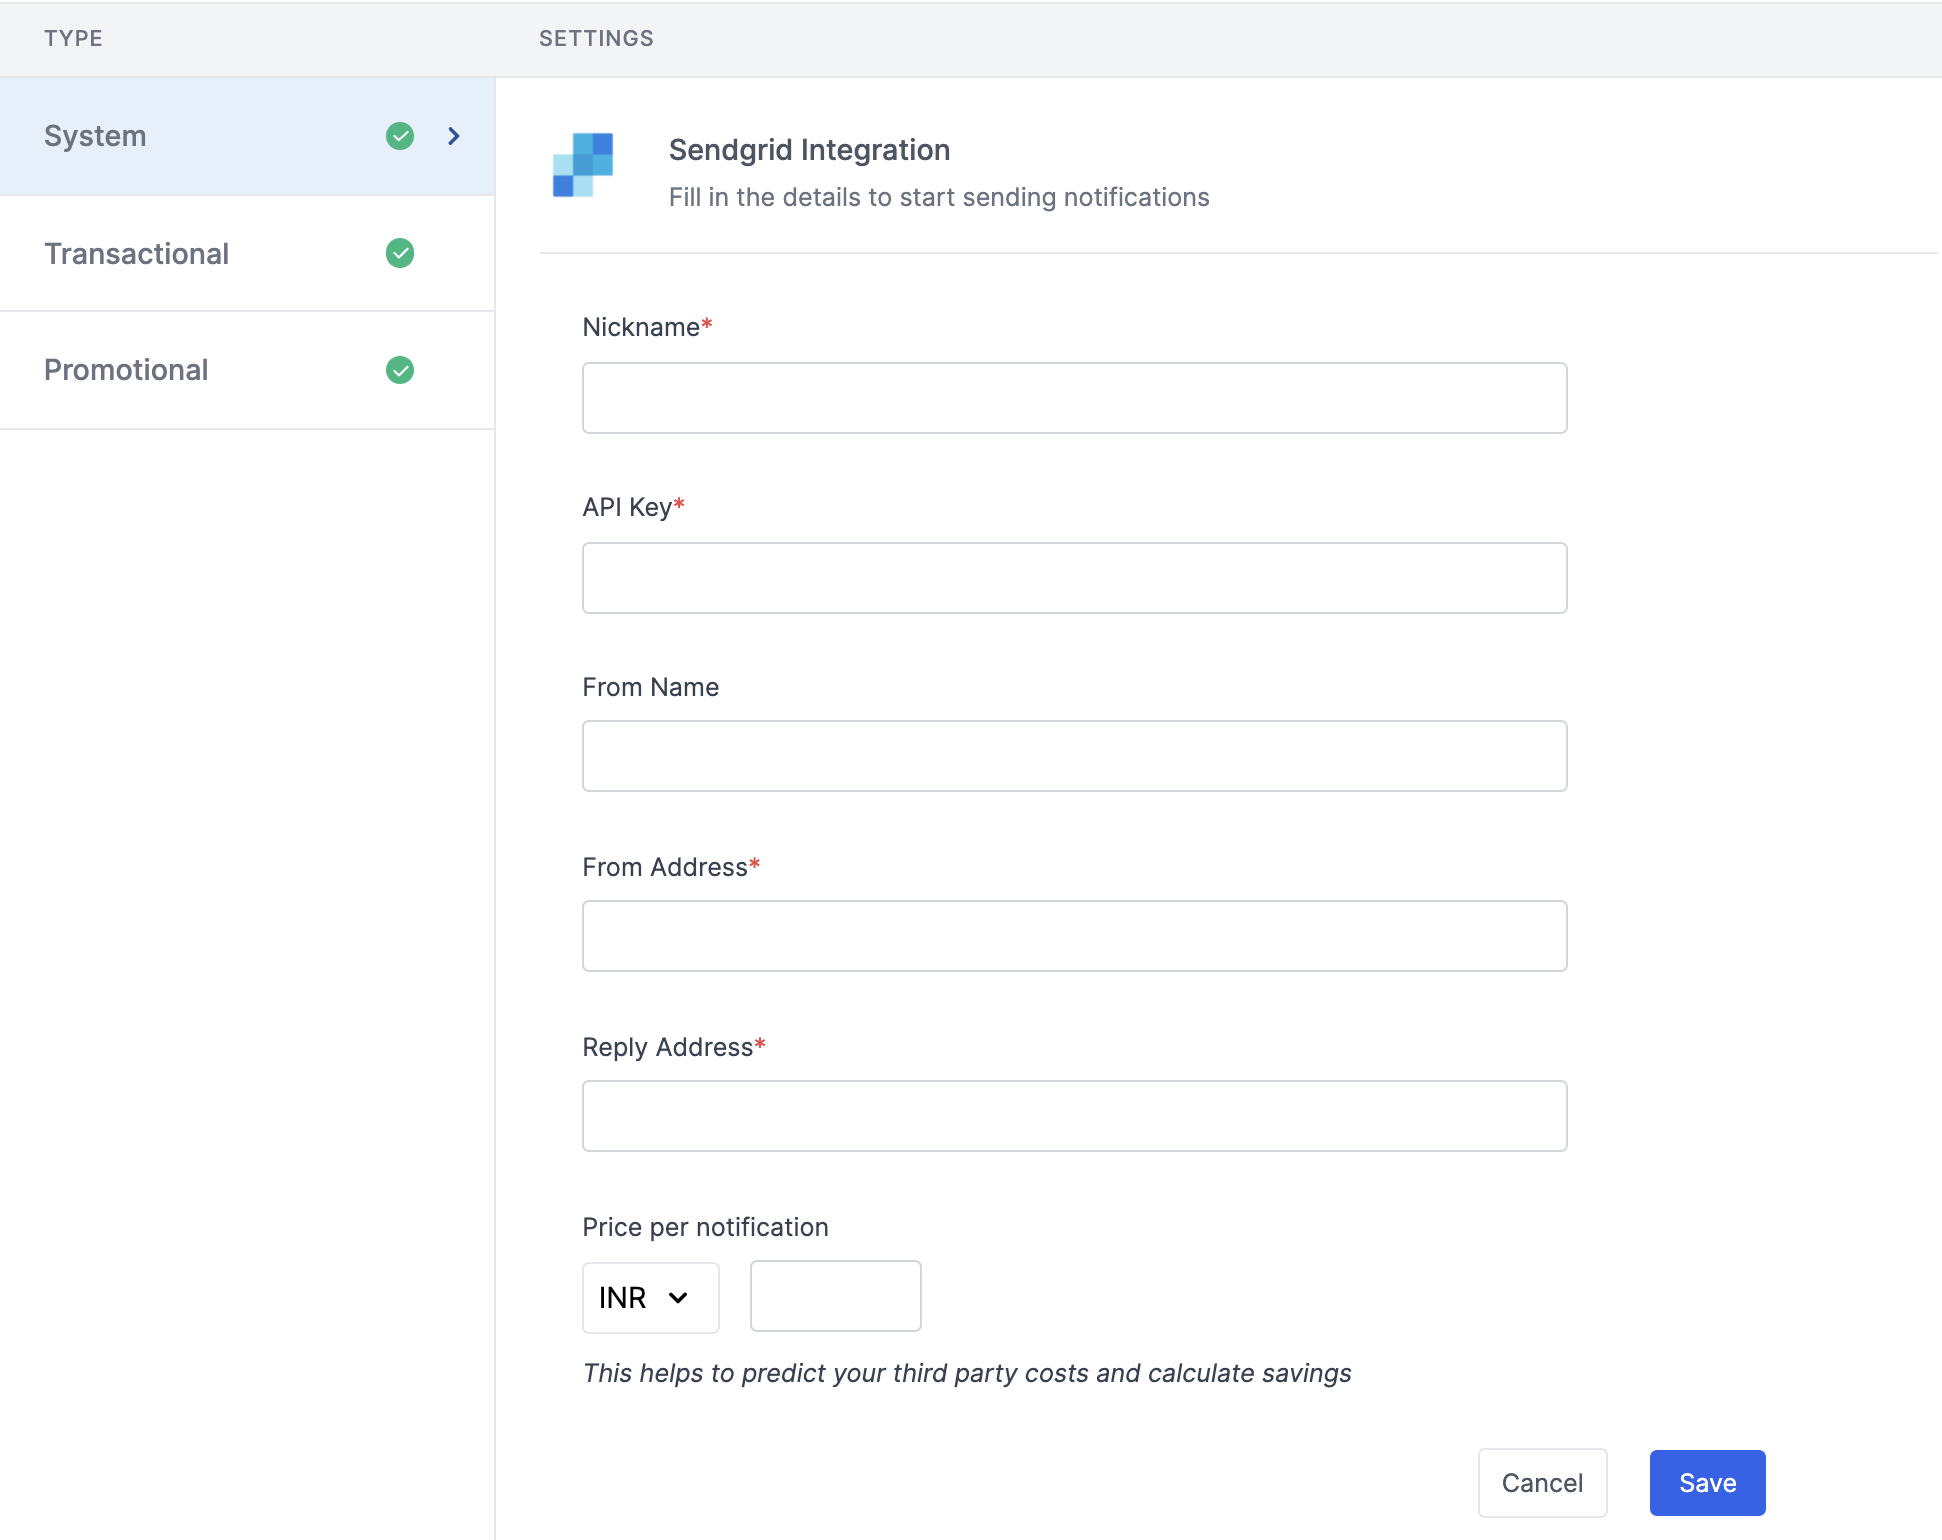 | Form Field | Description |
| ---------------------- | ----------------------------------------------------------------------------------------------------------------------------------------------------------------------- |
| Nickname | You can give any name which may help you to identify this account easily. For example- *Sendgrid \[Production]* |
| API Key | You will get this API Key from your Sendgrid account. SuprSend uses this API Key to send email on your behalf via your registered Sendgrid account. |
| From Name | Default 'From Name' that email will go from. You can override this in the individual template. *e.g. SuprSend* |
| From Address | Default 'From Email ID' that email will go from. You can override this in the individual template. *e.g. [support@suprsend.com](mailto:support@suprsend.com)* |
| Reply Address | Default 'Reply To Email id' on which replies are received. You can override this in the individual template. *e.g. [support@suprsend.com](mailto:support@suprsend.com)* |
| Price per notification | This is the amount you pay per email notification to Sendgrid. It helps us to calculate, estimate and optimise your cost spent on notifications. |
### How to get API Key from Sendgrid account
In order to generate the Sendgrid API Key, you can refer the section: [Create an API Key on Sendgrid](https://docs.sendgrid.com/ui/account-and-settings/api-keys#creating-an-api-key).
## Setting callback URL in Sendgrid account
One of the platform advantage of using SuprSend as a central communication system is that it shows notification analytics for all channels in your SuprSend account together.
Go to Settings->Mail settings -> Event Webhook
Authorization: None
Post URL: [`https://hub.suprsend.com/webhook/sendgrid/`](https://hub.suprsend.com/webhook/sendgrid/)
Deliverability data: select all
Engagement Data: select all
## How to add Unsubscription link in email
It's recommended to allow recipients to unsubscribe from emails. You can either:
1. **Use your vendor's unsubscribe link** by enabling **Unsubscribes** in *Sending → Domain settings (Tracking section)*. This opts users out of all emails from that vendor.
2. **Use SuprSend's** [**hosted preference page** ](/docs/user-preferences#hosted-preference-page)for more granular control, allowing users to manage preferences per category while also reducing unnecessary vendor API calls for opt-outs.
| Form Field | Description |
| ---------------------- | ----------------------------------------------------------------------------------------------------------------------------------------------------------------------- |
| Nickname | You can give any name which may help you to identify this account easily. For example- *Sendgrid \[Production]* |
| API Key | You will get this API Key from your Sendgrid account. SuprSend uses this API Key to send email on your behalf via your registered Sendgrid account. |
| From Name | Default 'From Name' that email will go from. You can override this in the individual template. *e.g. SuprSend* |
| From Address | Default 'From Email ID' that email will go from. You can override this in the individual template. *e.g. [support@suprsend.com](mailto:support@suprsend.com)* |
| Reply Address | Default 'Reply To Email id' on which replies are received. You can override this in the individual template. *e.g. [support@suprsend.com](mailto:support@suprsend.com)* |
| Price per notification | This is the amount you pay per email notification to Sendgrid. It helps us to calculate, estimate and optimise your cost spent on notifications. |
### How to get API Key from Sendgrid account
In order to generate the Sendgrid API Key, you can refer the section: [Create an API Key on Sendgrid](https://docs.sendgrid.com/ui/account-and-settings/api-keys#creating-an-api-key).
## Setting callback URL in Sendgrid account
One of the platform advantage of using SuprSend as a central communication system is that it shows notification analytics for all channels in your SuprSend account together.
Go to Settings->Mail settings -> Event Webhook
Authorization: None
Post URL: [`https://hub.suprsend.com/webhook/sendgrid/`](https://hub.suprsend.com/webhook/sendgrid/)
Deliverability data: select all
Engagement Data: select all
## How to add Unsubscription link in email
It's recommended to allow recipients to unsubscribe from emails. You can either:
1. **Use your vendor's unsubscribe link** by enabling **Unsubscribes** in *Sending → Domain settings (Tracking section)*. This opts users out of all emails from that vendor.
2. **Use SuprSend's** [**hosted preference page** ](/docs/user-preferences#hosted-preference-page)for more granular control, allowing users to manage preferences per category while also reducing unnecessary vendor API calls for opt-outs.
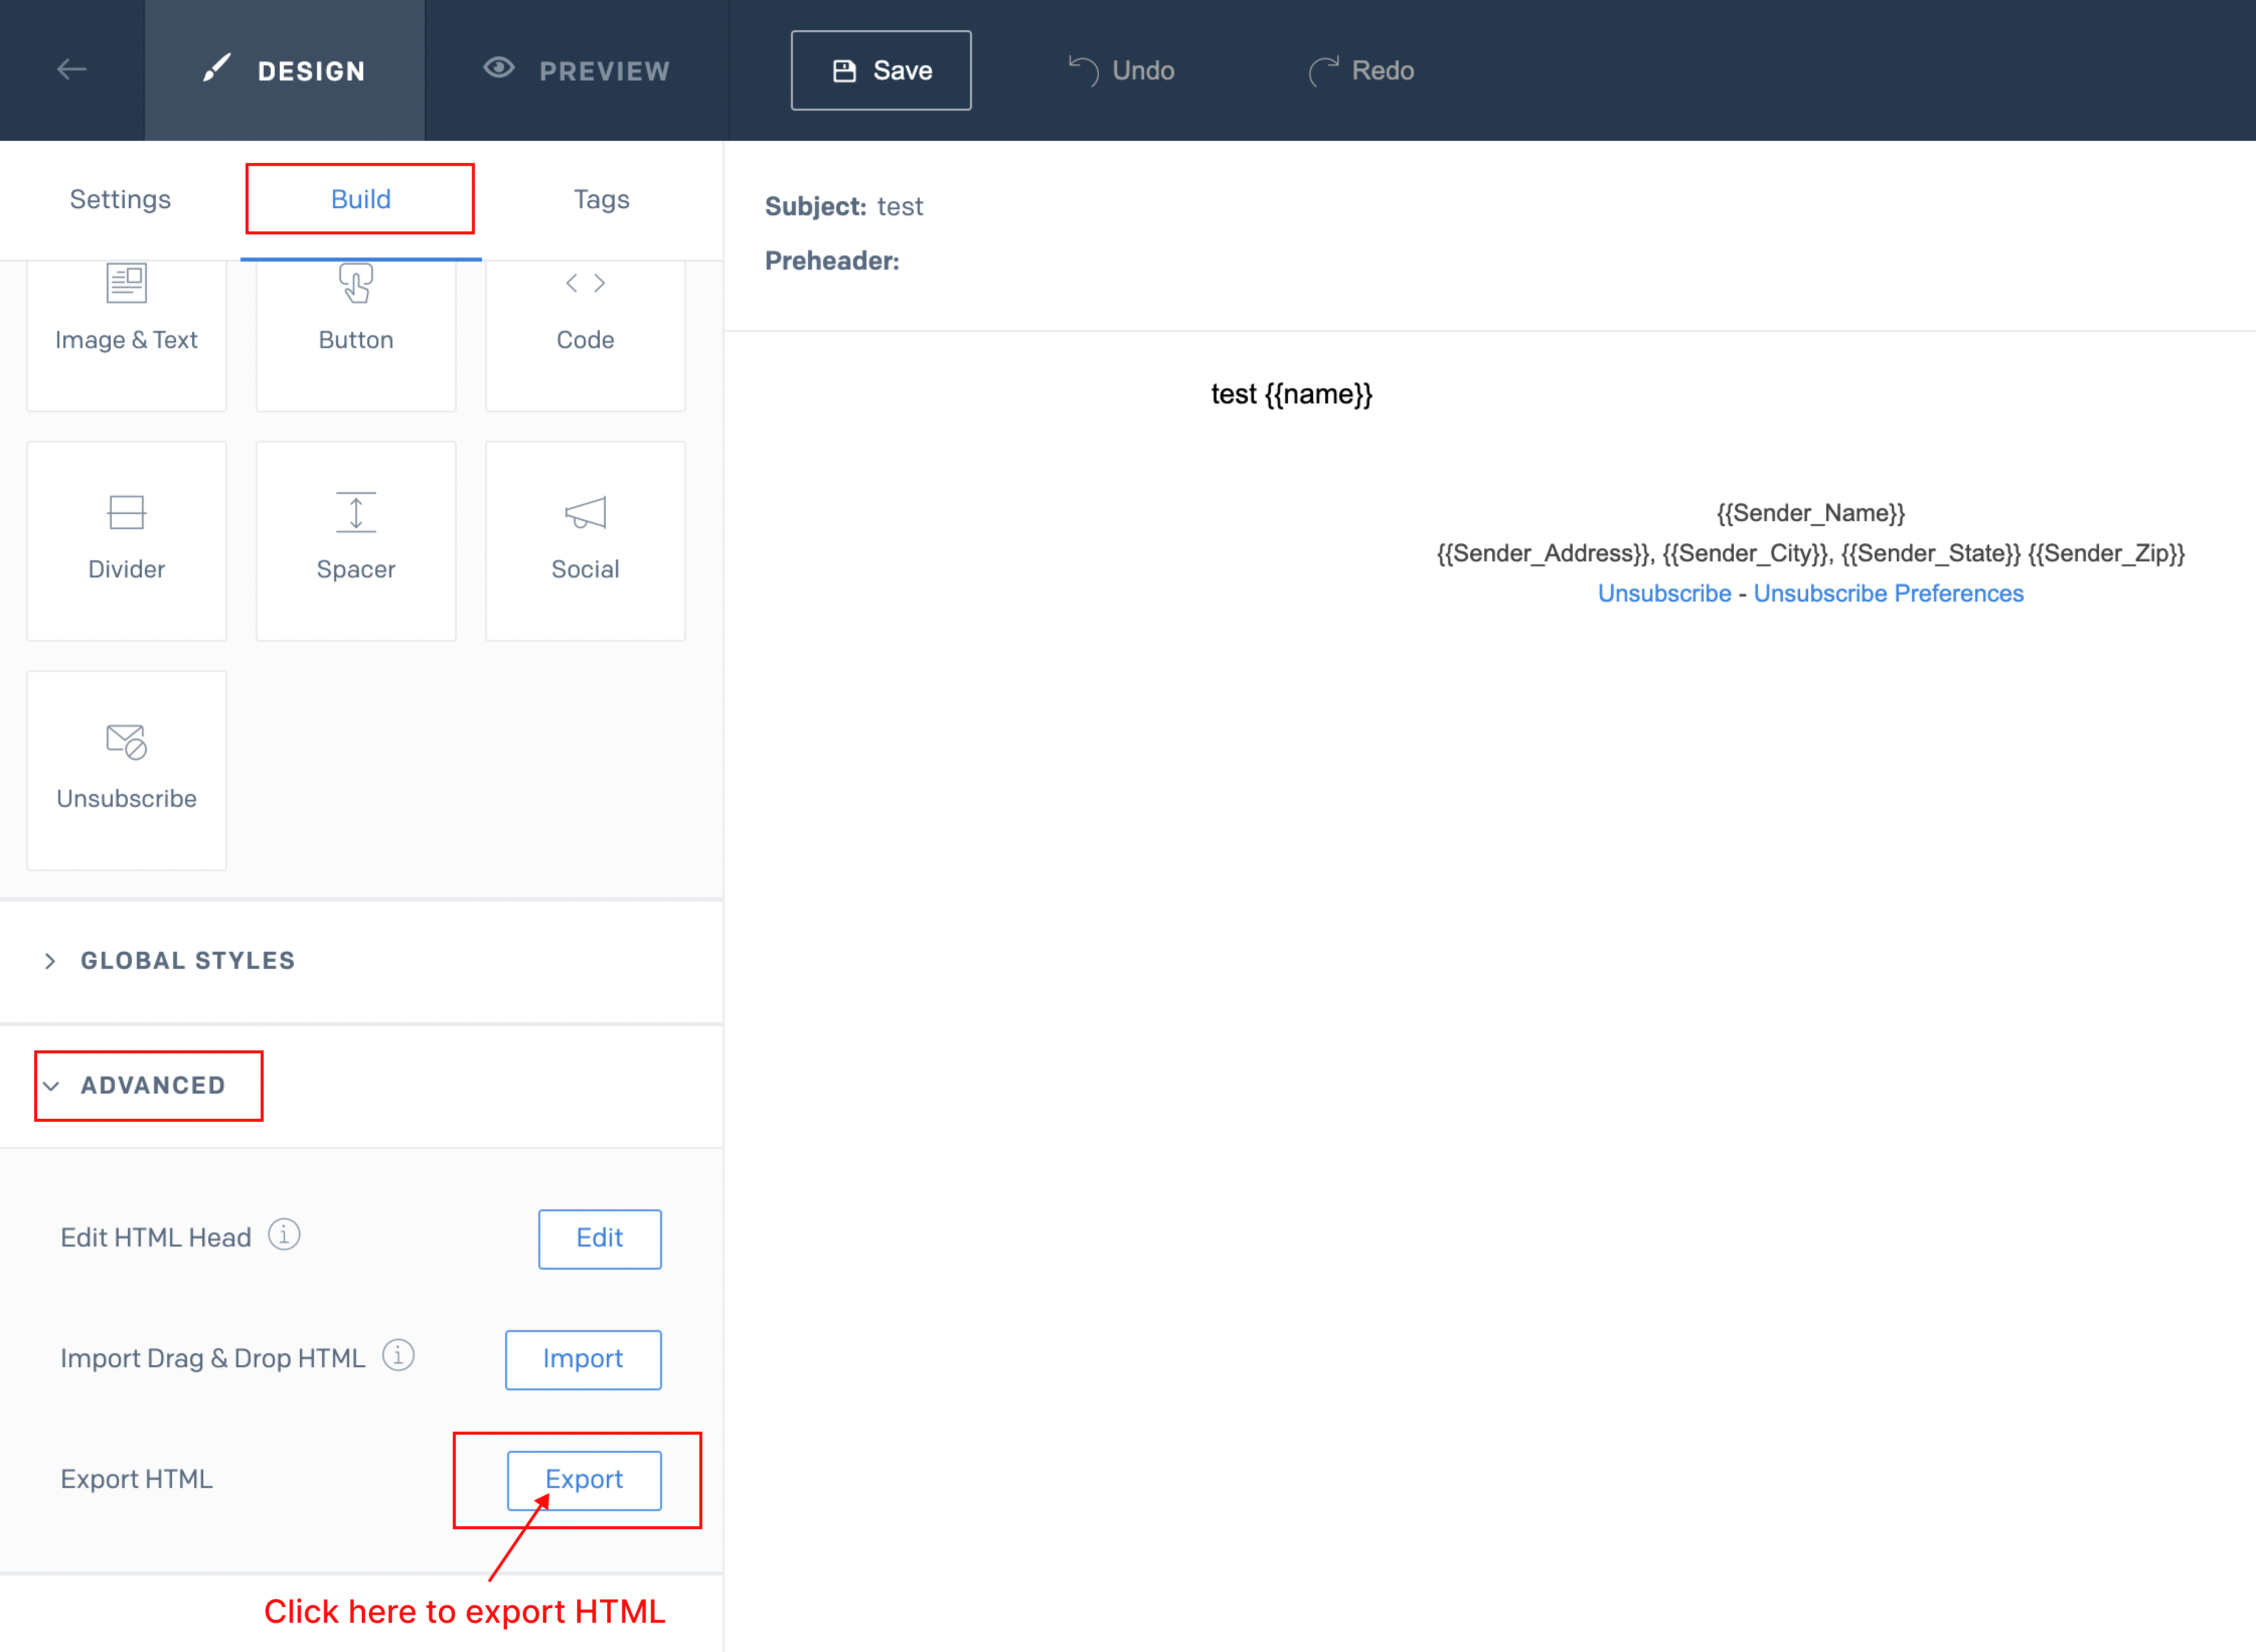
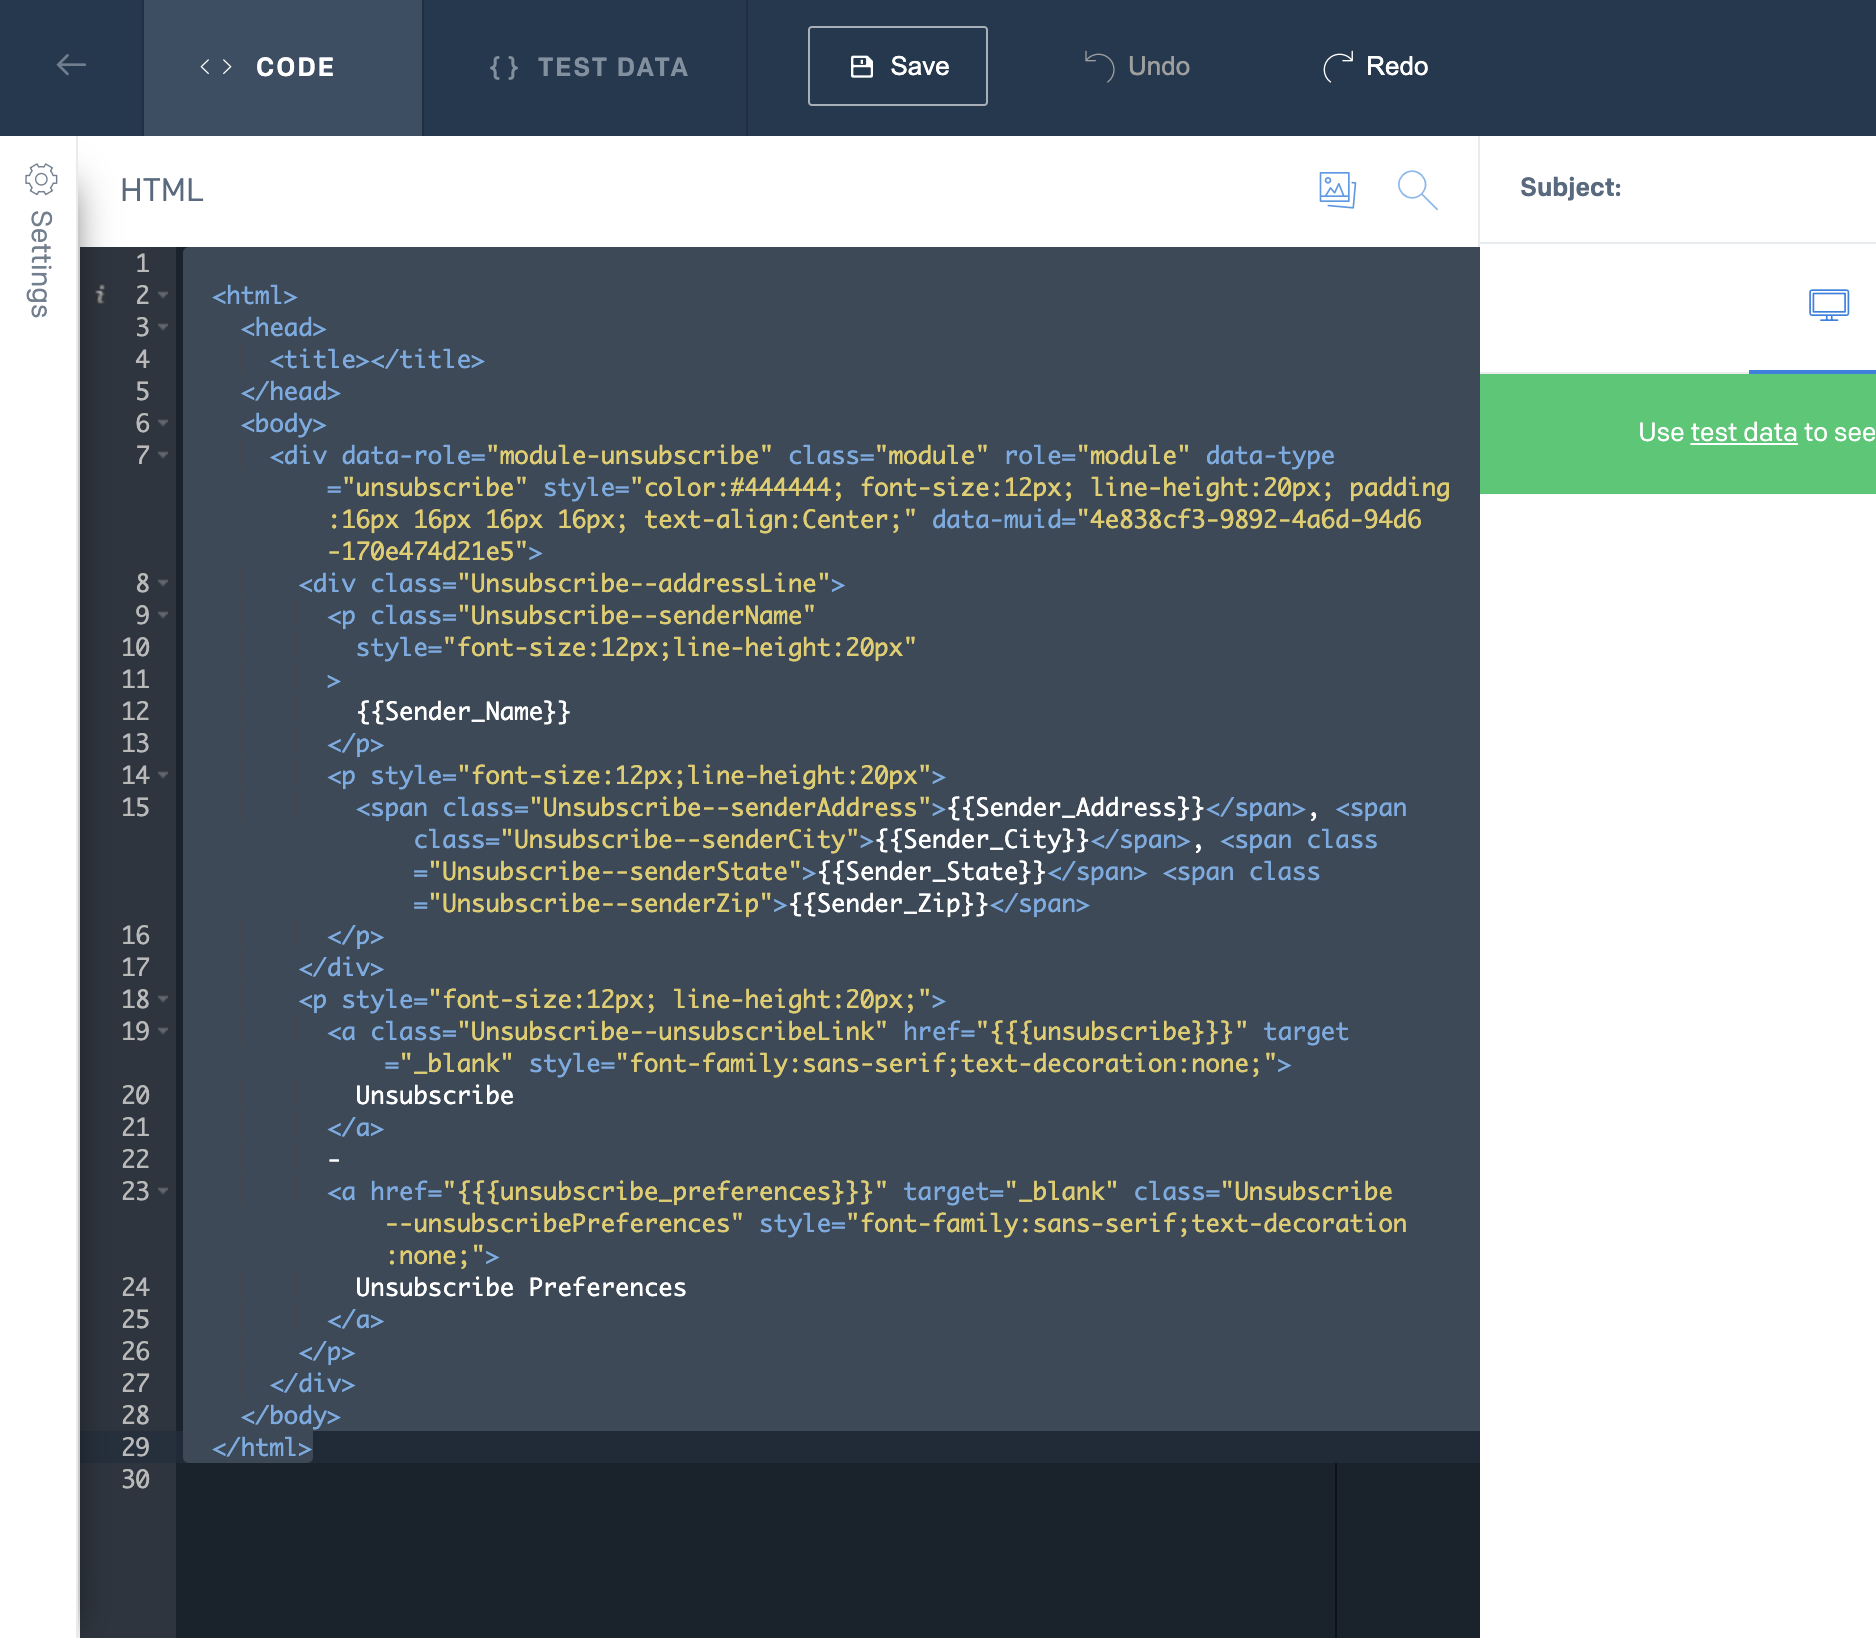
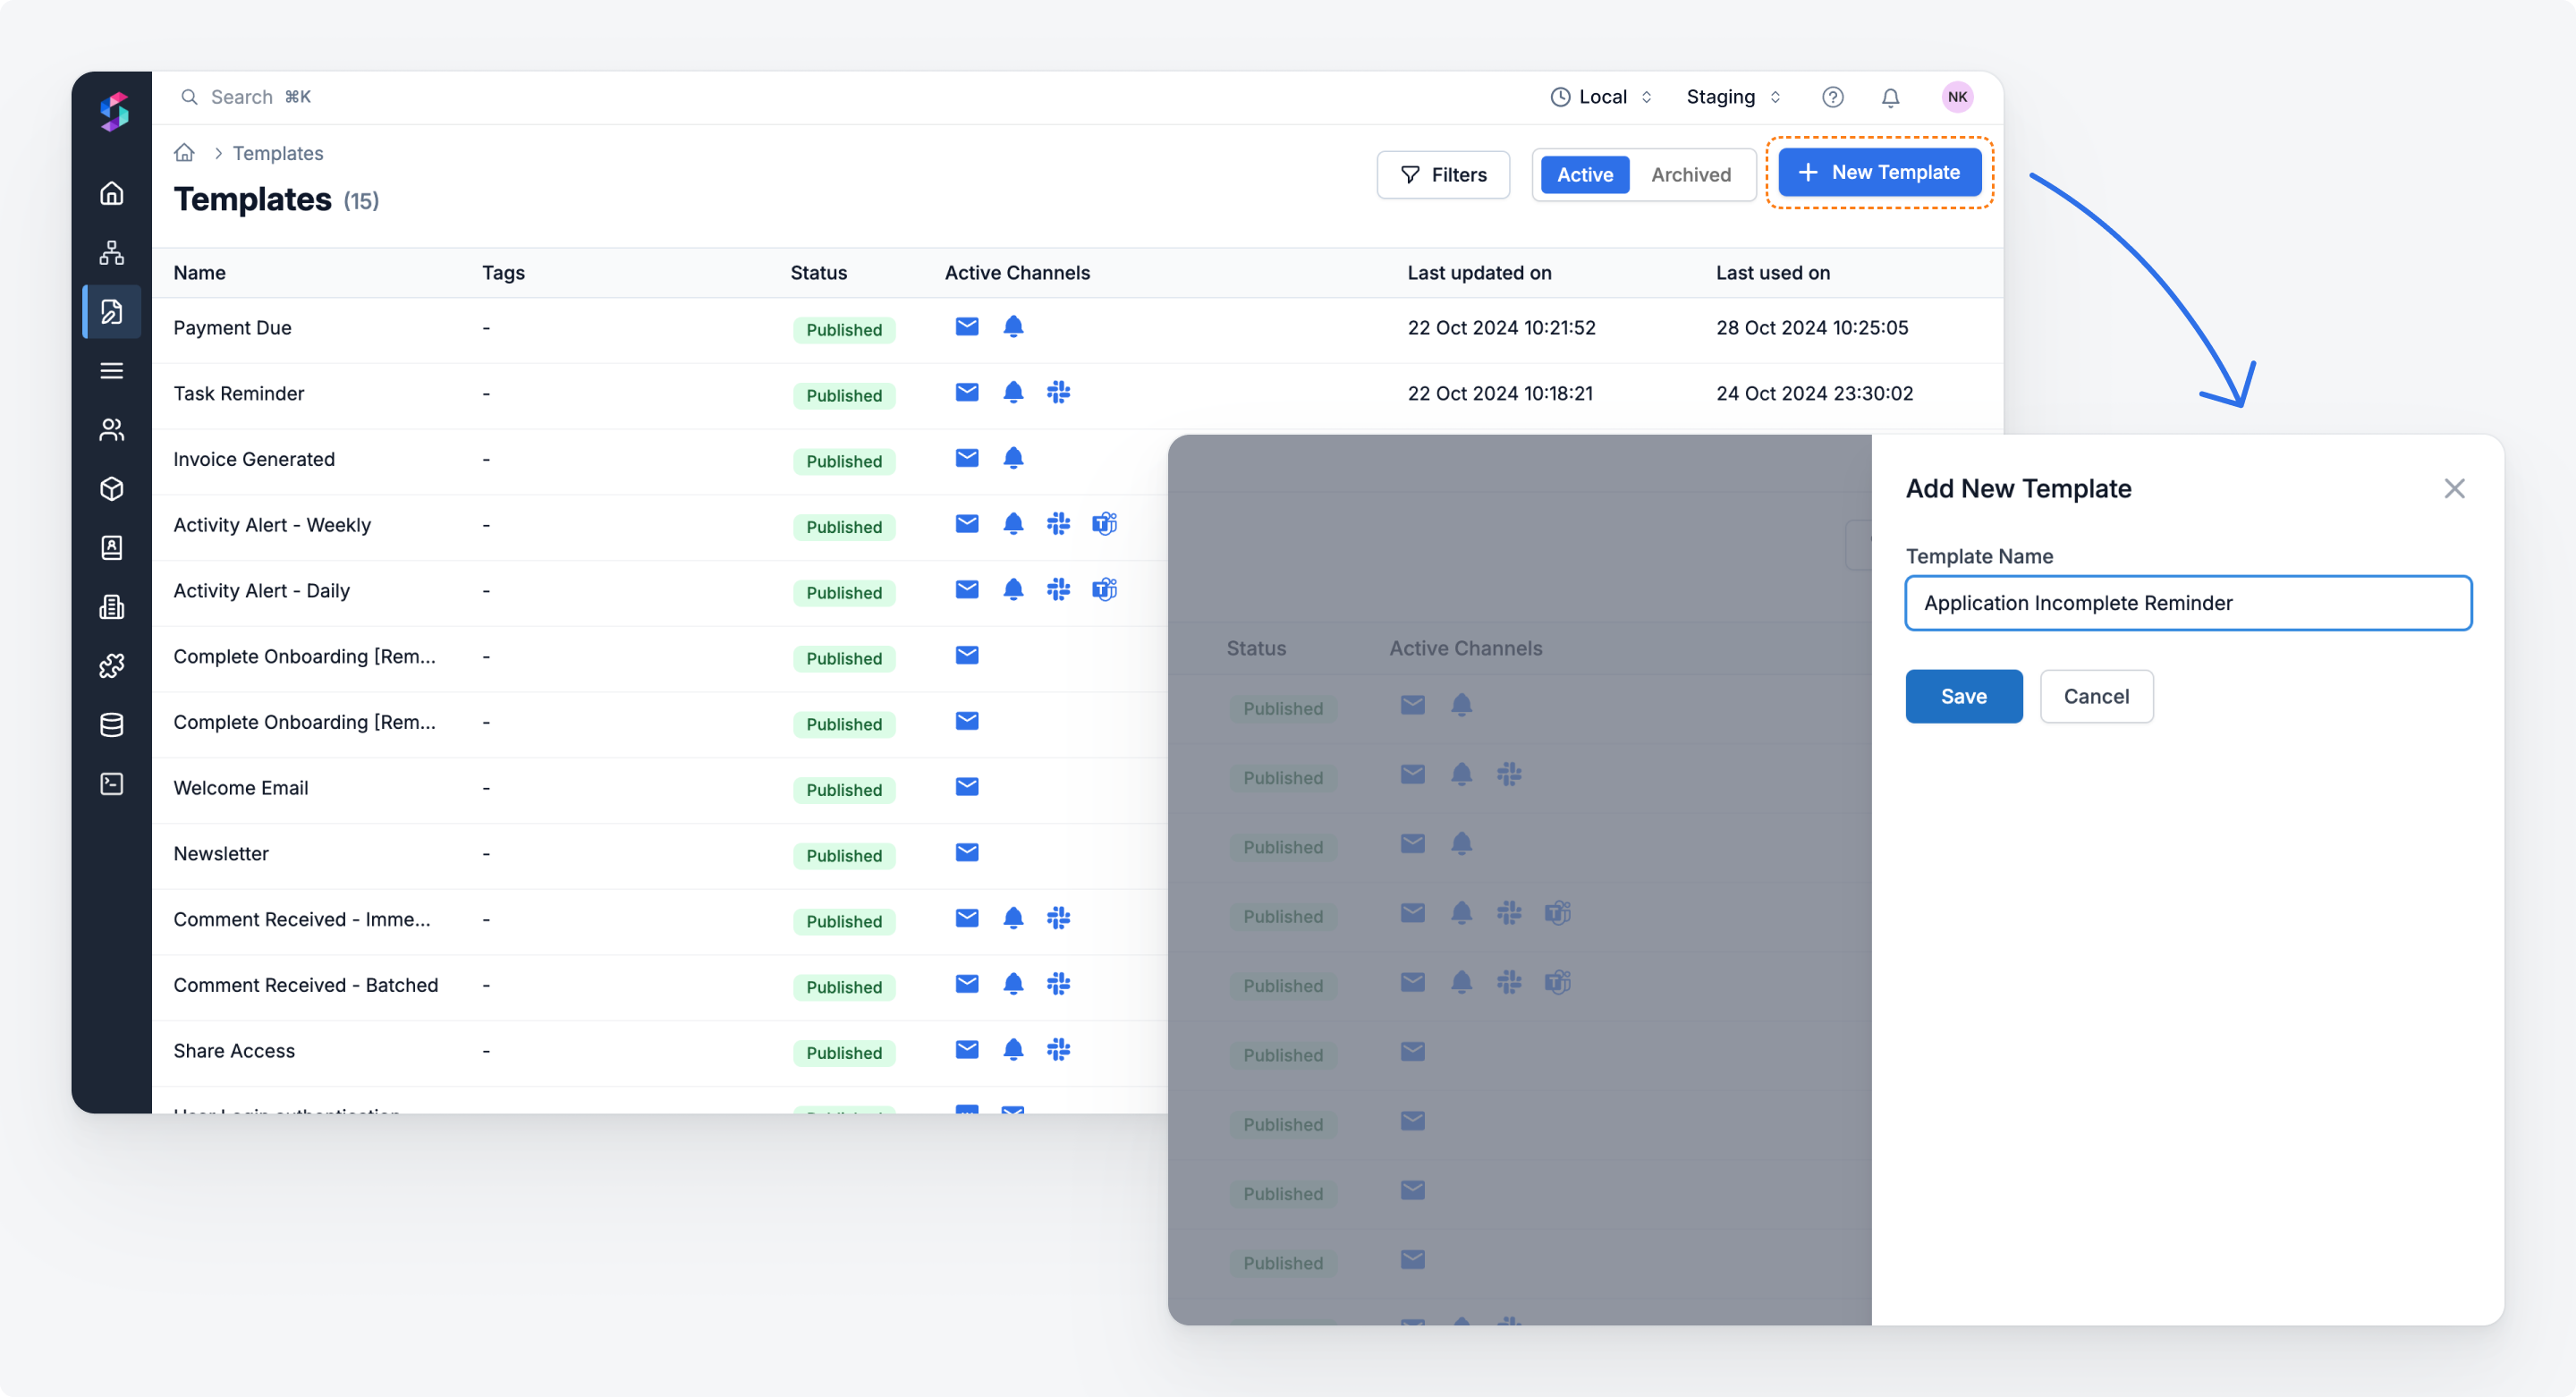 * Go to email editor and click on `Switch to HTML editor` and paste the HTML template downloaded from Sendgrid and click on `Publish`
Make sure to add sample data for all variables before publishing the template. You can add sample data via "Mock data" button on the top right side of template editor. If you using default footer in Sendgrid template, please add below mock data along with other template variables.
* Go to email editor and click on `Switch to HTML editor` and paste the HTML template downloaded from Sendgrid and click on `Publish`

Make sure to add sample data for all variables before publishing the template. You can add sample data via "Mock data" button on the top right side of template editor. If you using default footer in Sendgrid template, please add below mock data along with other template variables.
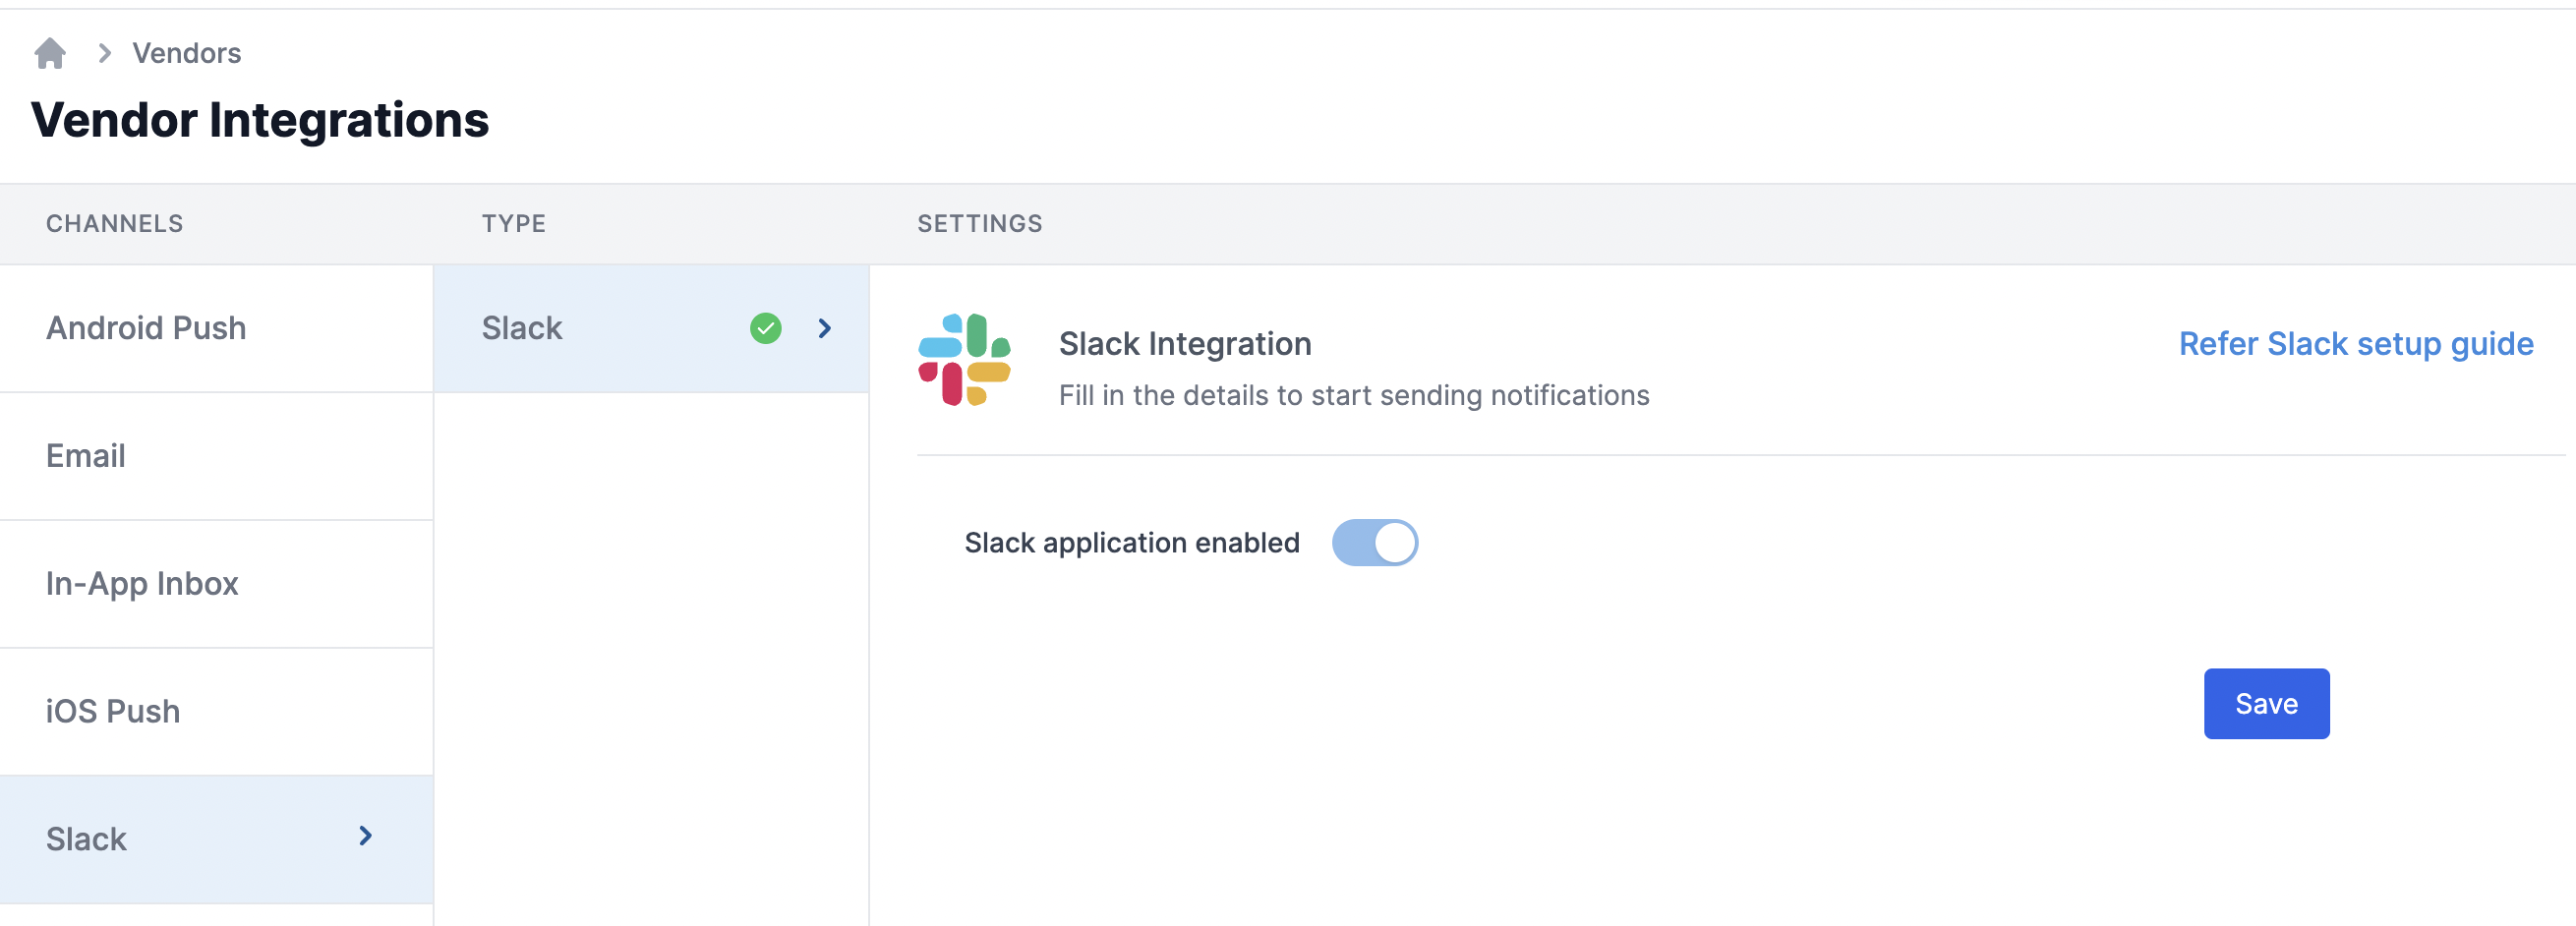 ## Create Slack app
You’ll need to create a Slack app and assign required OAuth Scopes to that App to send notifications via SuprSend. If you have an existing Slack app, you can directly go to [OAuth Scopes](/docs/slack#step-3-assigning-oauth-scopes-to-app).
## Create Slack app
You’ll need to create a Slack app and assign required OAuth Scopes to that App to send notifications via SuprSend. If you have an existing Slack app, you can directly go to [OAuth Scopes](/docs/slack#step-3-assigning-oauth-scopes-to-app).
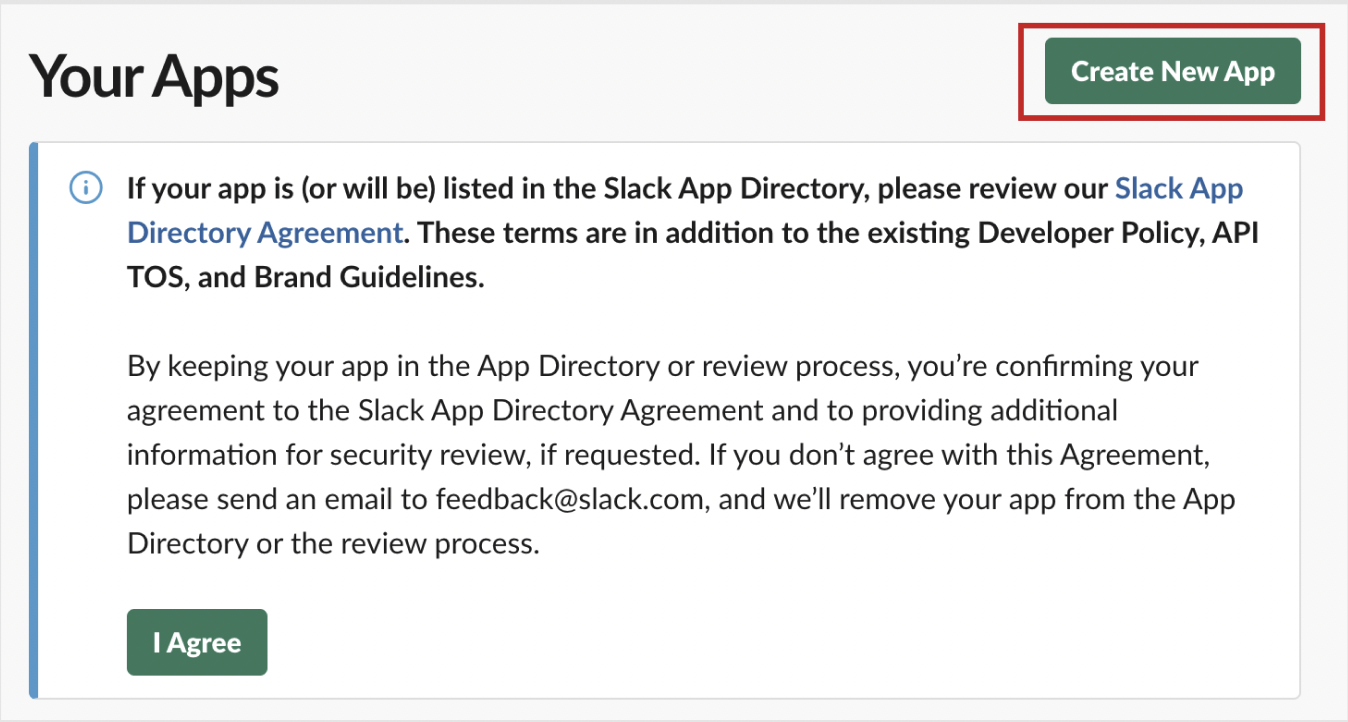
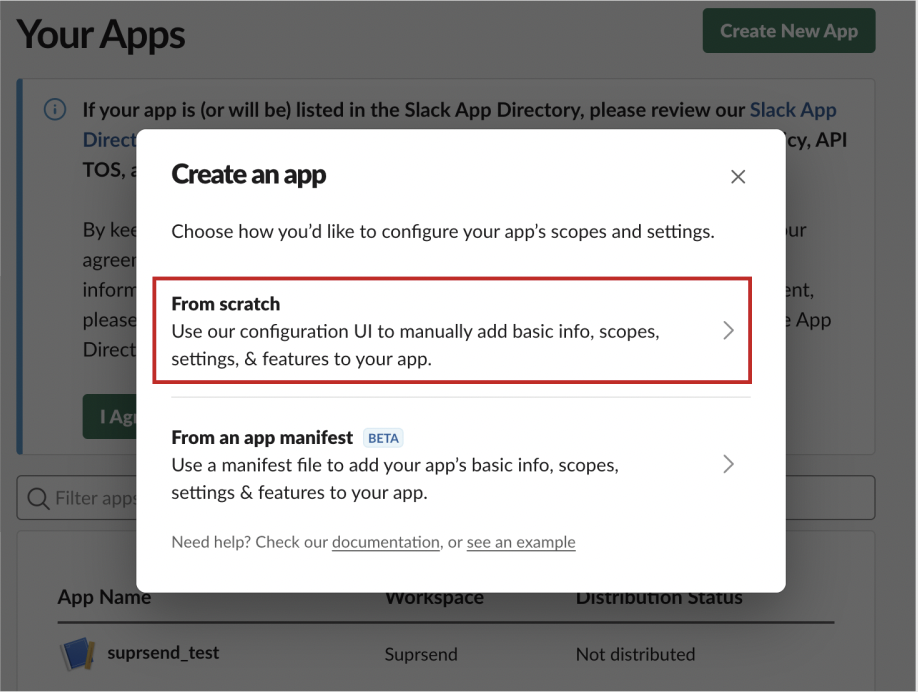
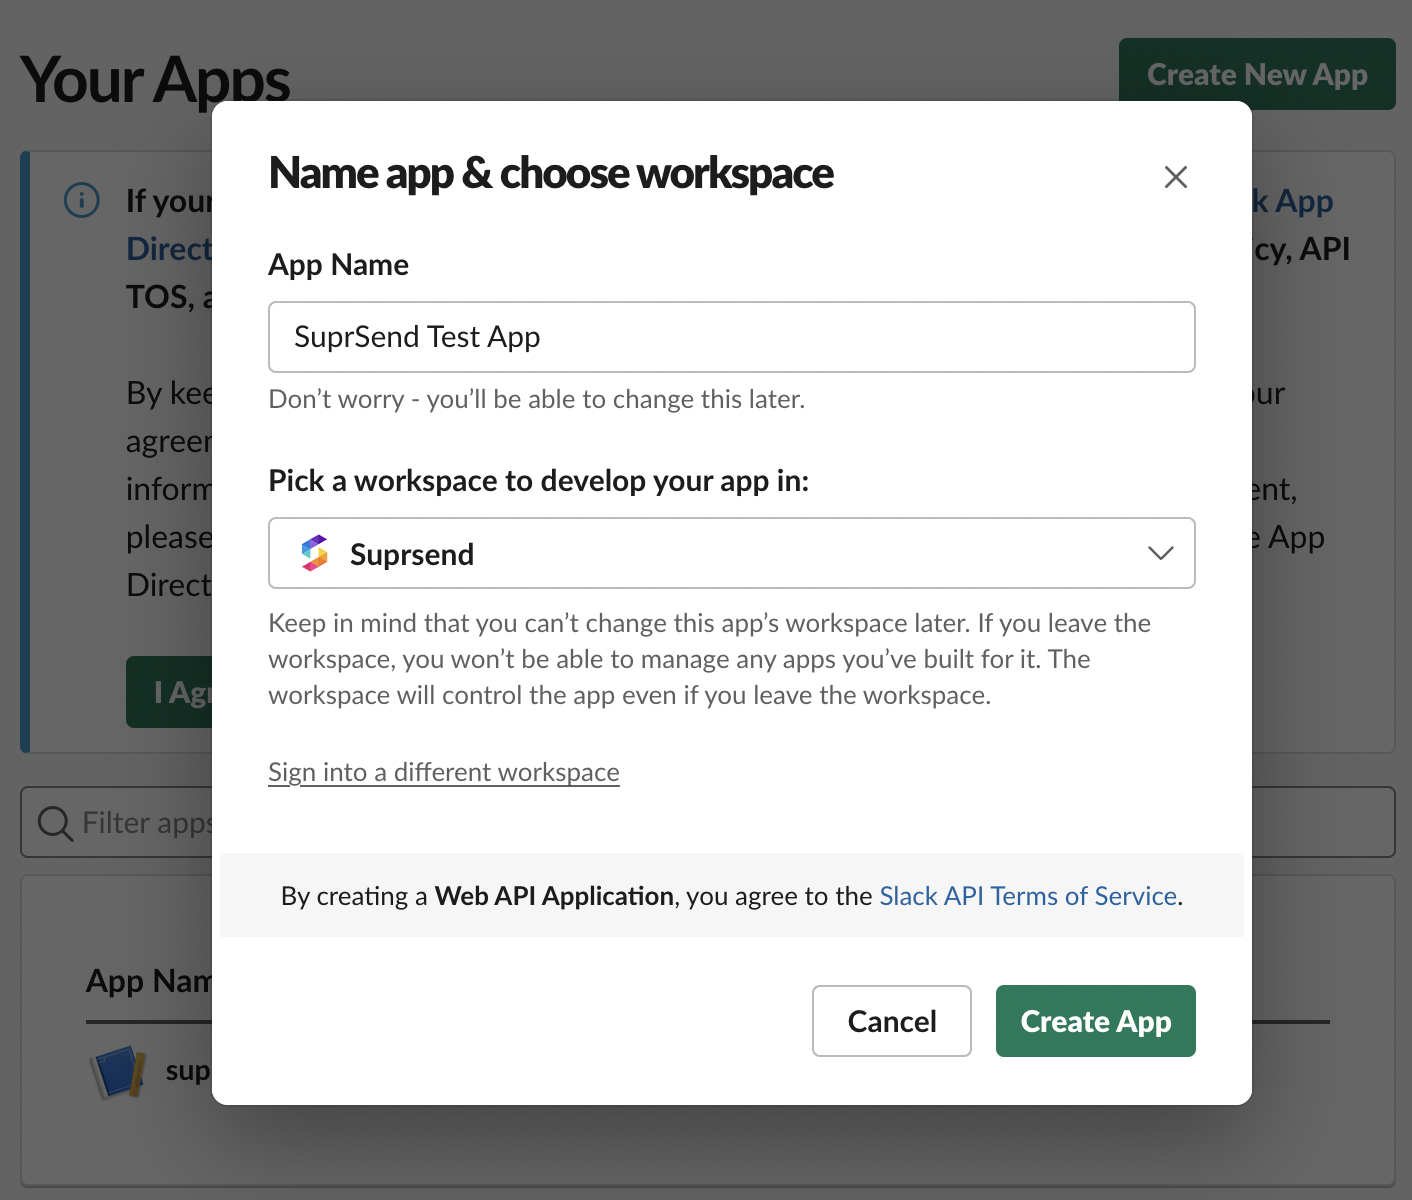
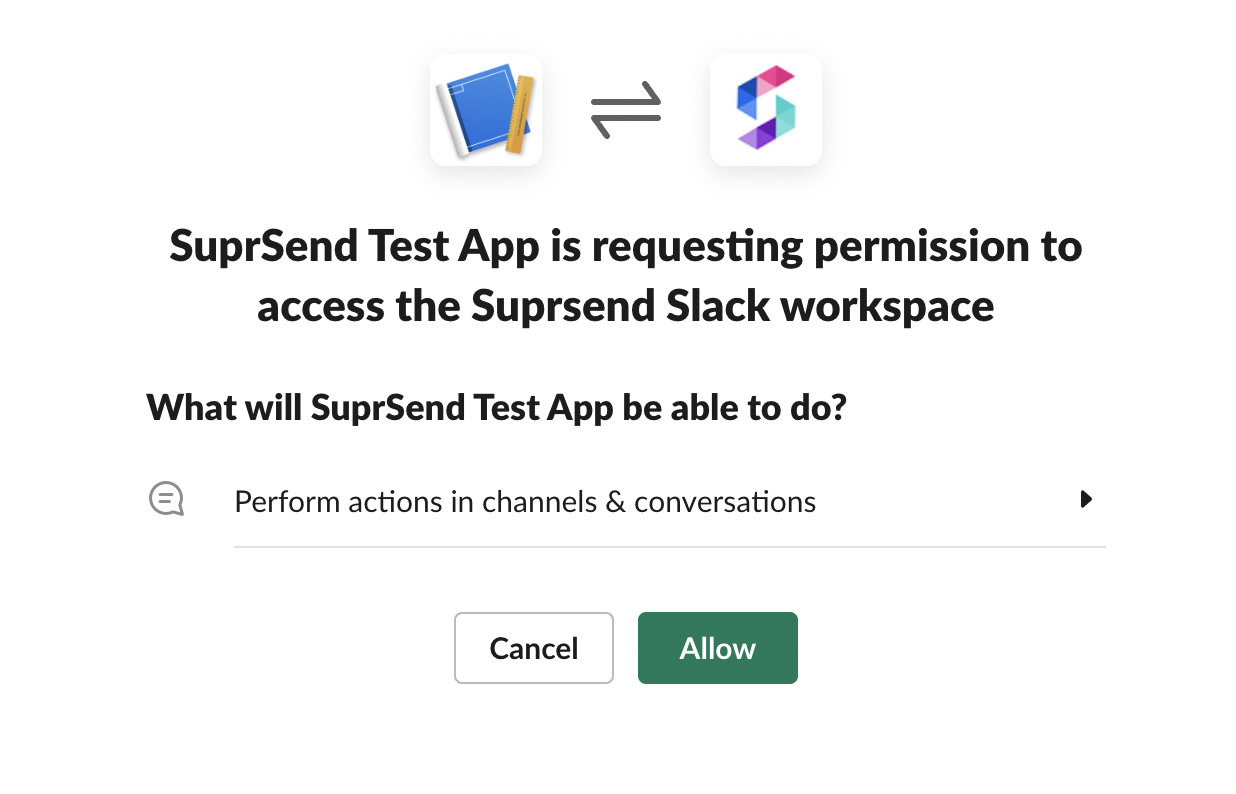 This is how a typical OAuth flow works:
1. You give a button somewhere on your product to add slack channel. The easiest way to enable workspaces to install your app is with the [Add to Slack](https://api.slack.com/docs/slack-button) button. Another way is to give the option to [Sign in with Slack ](https://api.slack.com/authentication/sign-in-with-slack) in your onboarding flow (which is not very common)
2. This will redirect the user to an [authorization link](https://slack.com/oauth/authorize). Refer [OAuth V2](https://api.slack.com/legacy/oauth#send_users) documentation to add slack authorization flow in your product.
3. The user will be asked to give permissions to access their profile information based on the scopes that you define in the OAuth & Permissions sidebar of your [app management page](https://api.slack.com/apps).
We'll need access to following scopes to be able to send direct message to user's Slack workspace.
| scope | obligation | description | |
| ------------------- | ----------- | ---------------------------------------------------------------------------------------------------------------------------------------------------------------------------------------------------------------- | - |
| `chat:write` | *mandatory* | Post messages in approved channels & conversations. At a minimum your app needs this scope to send notifications to a Slack workspace. | |
| `im:write` | *mandatory* | Send direct messages to users in Slack | |
| `chat:write.public` | *mandatory* | Send messages to public channels your Slack app isn't a member of. If your app doesn’t have this scope, you’ll need to use the `conversations.joins` method to join a public channel before sending it messages. | |
| `users:read` | *optional* | To send DM to user's DM | |
| `users:read.email` | *optional* | To send DM to user using their email id | |
Navigate to ***"Features" -> "OAuth & Permissions"*** page from the left sidebar menu. Scroll down to the Scopes section and add the above scopes as Bot Token Scopes.
This is how a typical OAuth flow works:
1. You give a button somewhere on your product to add slack channel. The easiest way to enable workspaces to install your app is with the [Add to Slack](https://api.slack.com/docs/slack-button) button. Another way is to give the option to [Sign in with Slack ](https://api.slack.com/authentication/sign-in-with-slack) in your onboarding flow (which is not very common)
2. This will redirect the user to an [authorization link](https://slack.com/oauth/authorize). Refer [OAuth V2](https://api.slack.com/legacy/oauth#send_users) documentation to add slack authorization flow in your product.
3. The user will be asked to give permissions to access their profile information based on the scopes that you define in the OAuth & Permissions sidebar of your [app management page](https://api.slack.com/apps).
We'll need access to following scopes to be able to send direct message to user's Slack workspace.
| scope | obligation | description | |
| ------------------- | ----------- | ---------------------------------------------------------------------------------------------------------------------------------------------------------------------------------------------------------------- | - |
| `chat:write` | *mandatory* | Post messages in approved channels & conversations. At a minimum your app needs this scope to send notifications to a Slack workspace. | |
| `im:write` | *mandatory* | Send direct messages to users in Slack | |
| `chat:write.public` | *mandatory* | Send messages to public channels your Slack app isn't a member of. If your app doesn’t have this scope, you’ll need to use the `conversations.joins` method to join a public channel before sending it messages. | |
| `users:read` | *optional* | To send DM to user's DM | |
| `users:read.email` | *optional* | To send DM to user using their email id | |
Navigate to ***"Features" -> "OAuth & Permissions"*** page from the left sidebar menu. Scroll down to the Scopes section and add the above scopes as Bot Token Scopes.
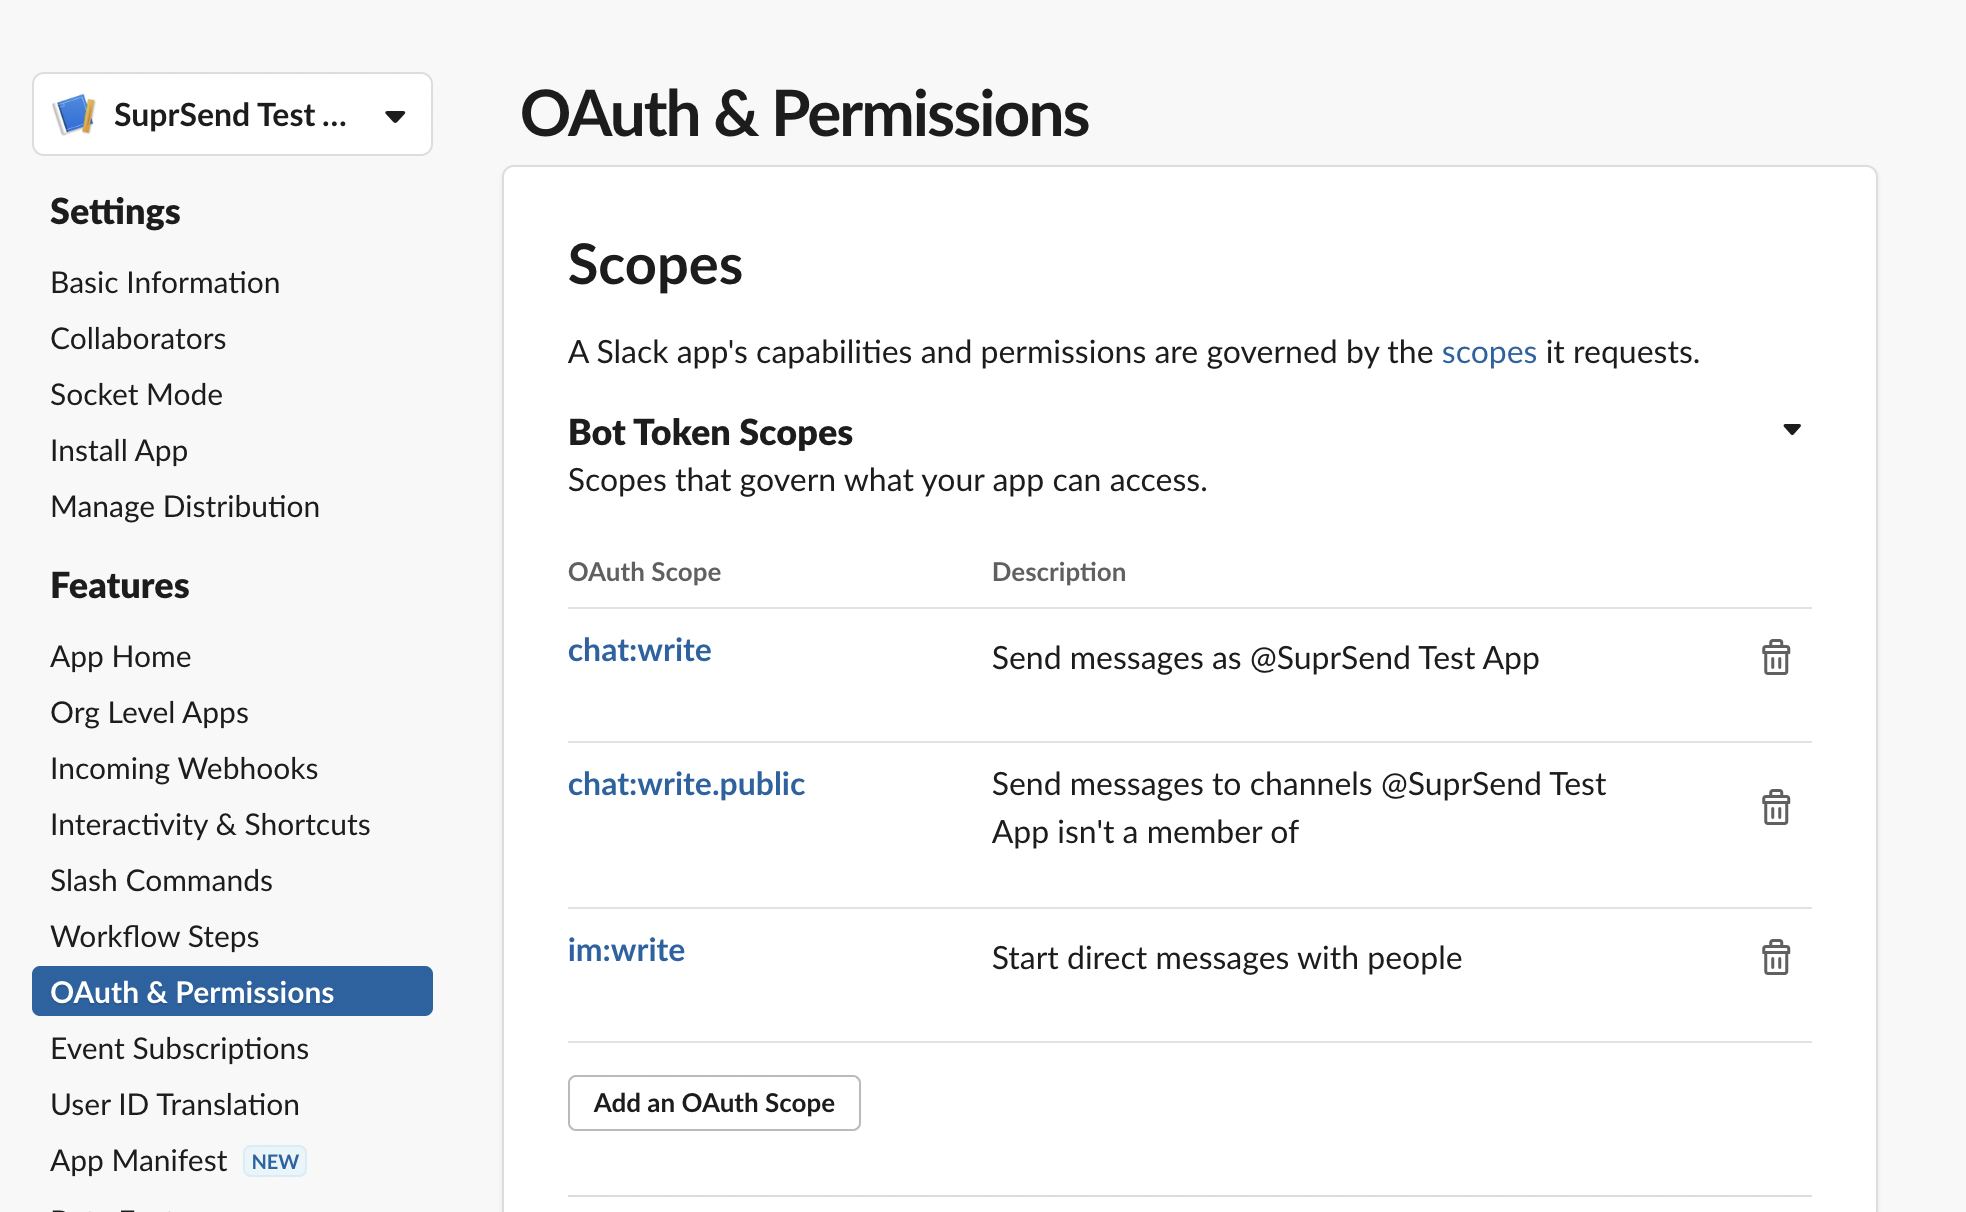
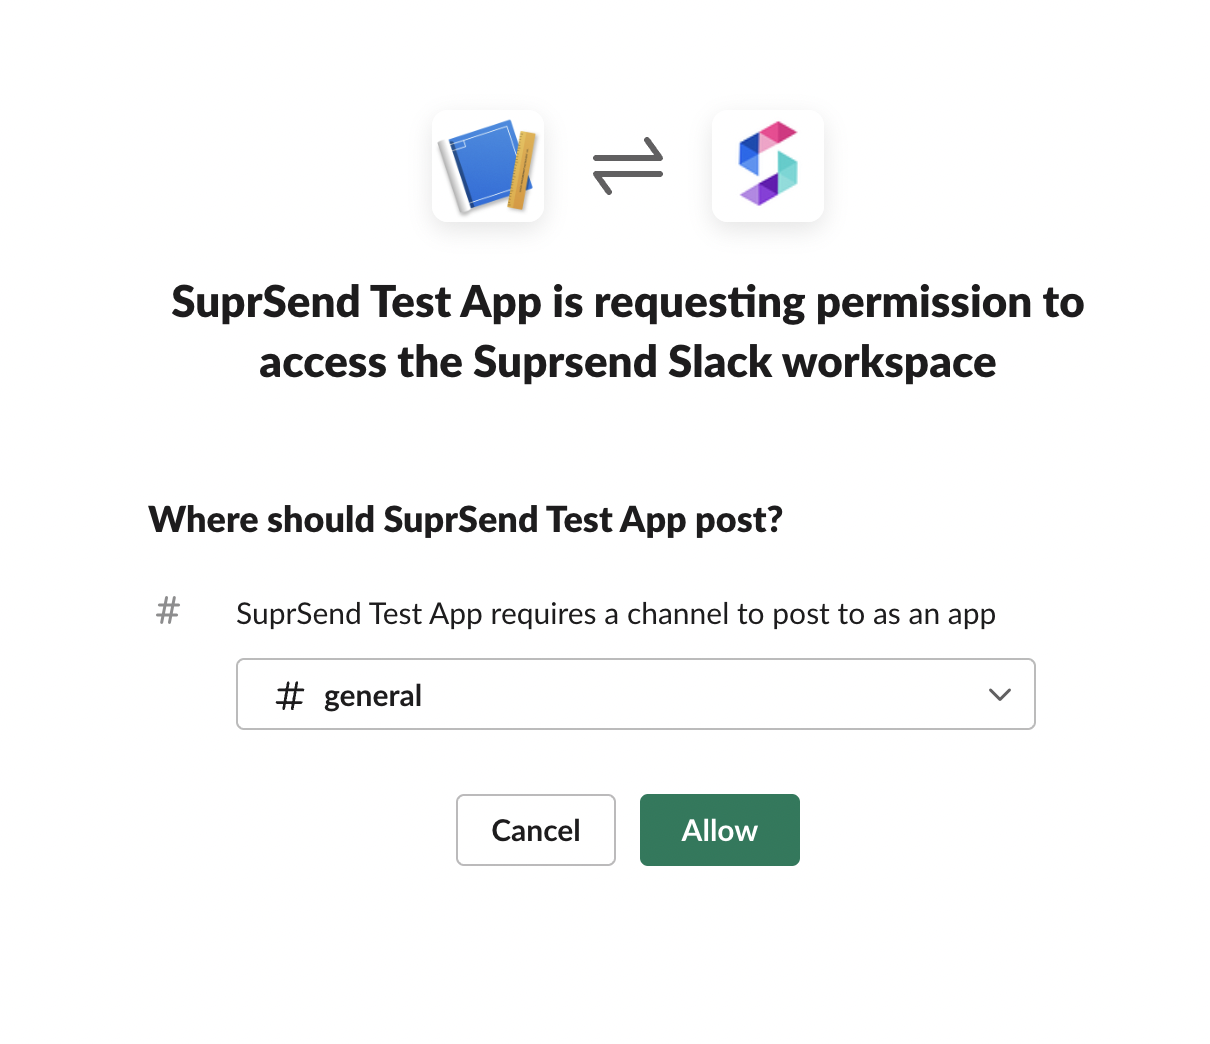 We recommend using [OAuth V2 method](/docs/slack#1-oauth-v2-method) for authentication, since incoming webhook requires your users to explicitly give permission to every channel that you want to send message to and restricts your access to limited channels in users' workspace.
It is best suited for use cases where you want to just update users on a particular channel such as
* Sending announcements and product updates in `#announcement` channel.
* Setting up an internal channel to send a message in case of anomaly detection in a product.
Navigate to ***"Features" -> "Incoming webhooks"*** page from the left sidebar menu to activate incoming webhook. Once enabled, you can use this scope in your [OAuth flow](https://api.slack.com/legacy/oauth#flow) to get user access to send messages on a particular channel
We recommend using [OAuth V2 method](/docs/slack#1-oauth-v2-method) for authentication, since incoming webhook requires your users to explicitly give permission to every channel that you want to send message to and restricts your access to limited channels in users' workspace.
It is best suited for use cases where you want to just update users on a particular channel such as
* Sending announcements and product updates in `#announcement` channel.
* Setting up an internal channel to send a message in case of anomaly detection in a product.
Navigate to ***"Features" -> "Incoming webhooks"*** page from the left sidebar menu to activate incoming webhook. Once enabled, you can use this scope in your [OAuth flow](https://api.slack.com/legacy/oauth#flow) to get user access to send messages on a particular channel
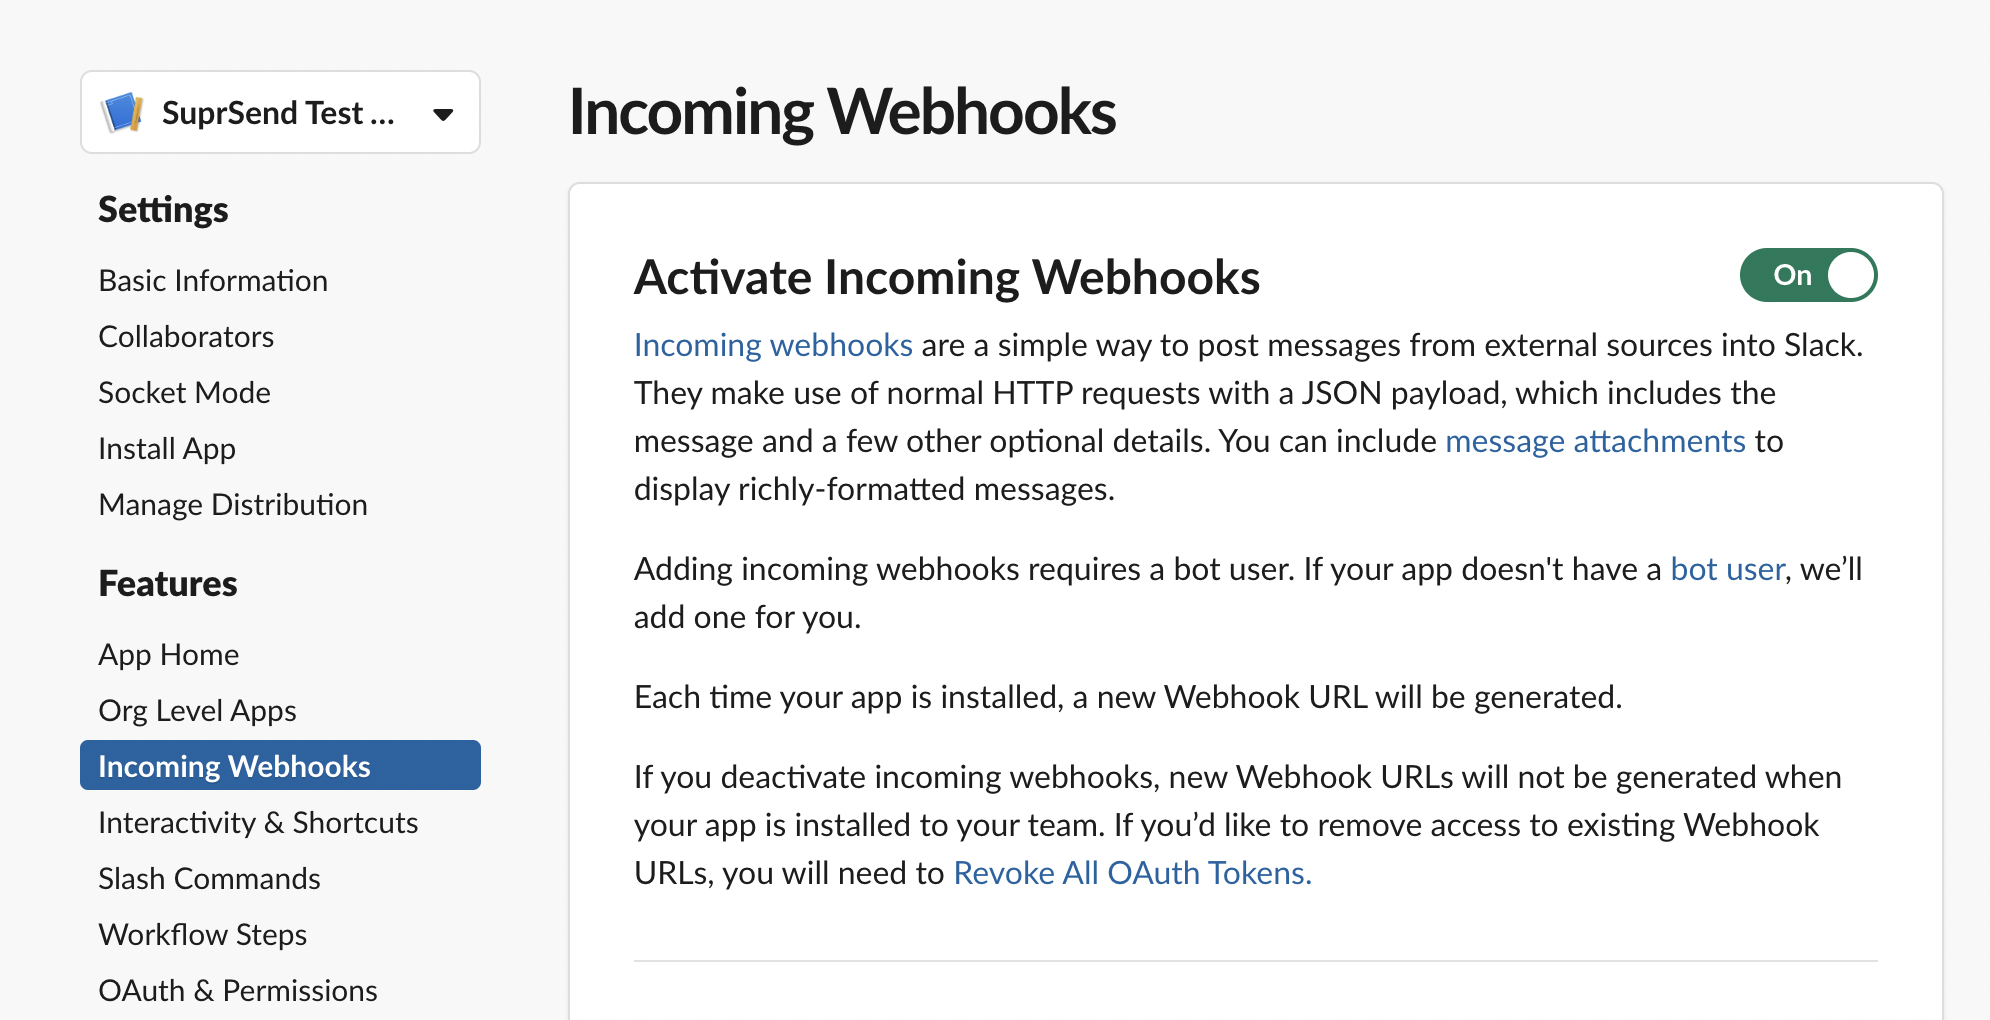
 We recommend creating a separate user for identifying channels and not mix it in user profile. You can create a slack channel user with `distinct_id` as `channel_


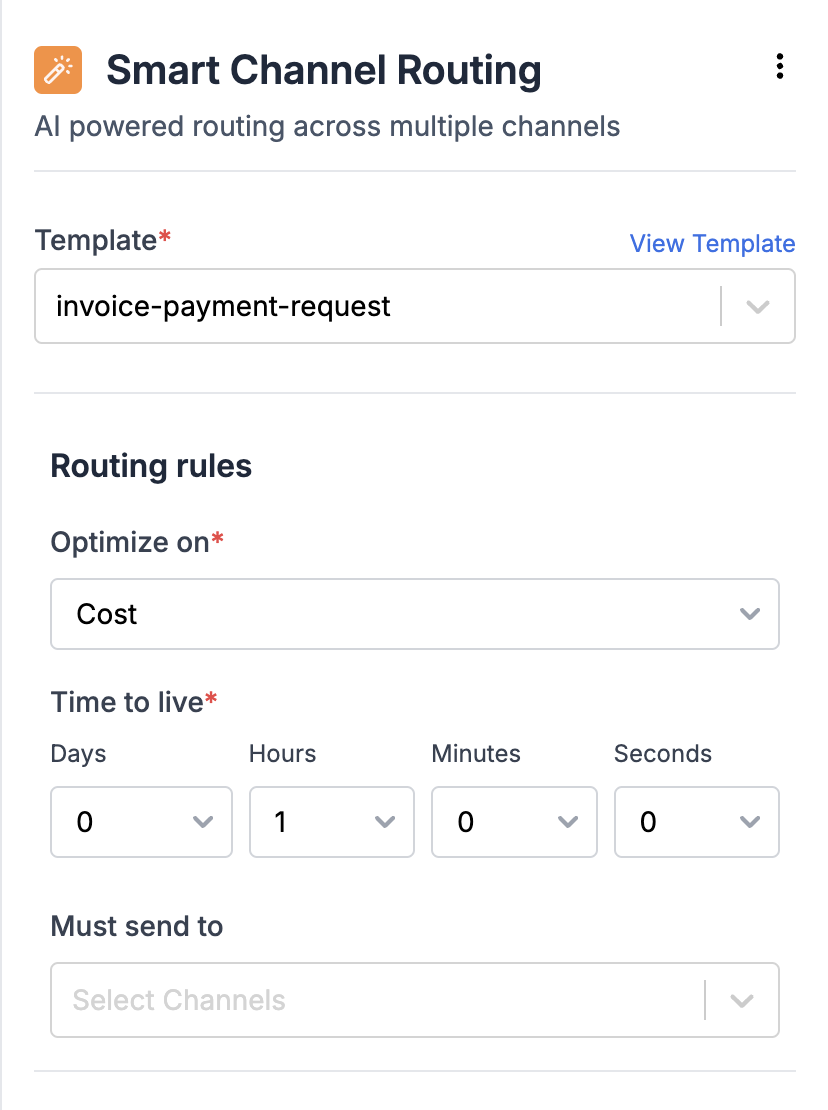 The content of the notification is designed with [templates](/docs/templates). In SuprSend, you can design the content of multiple channels within a single template group.
## How Smart Channel Routing node is executed?
The content of the notification is designed with [templates](/docs/templates). In SuprSend, you can design the content of multiple channels within a single template group.
## How Smart Channel Routing node is executed?
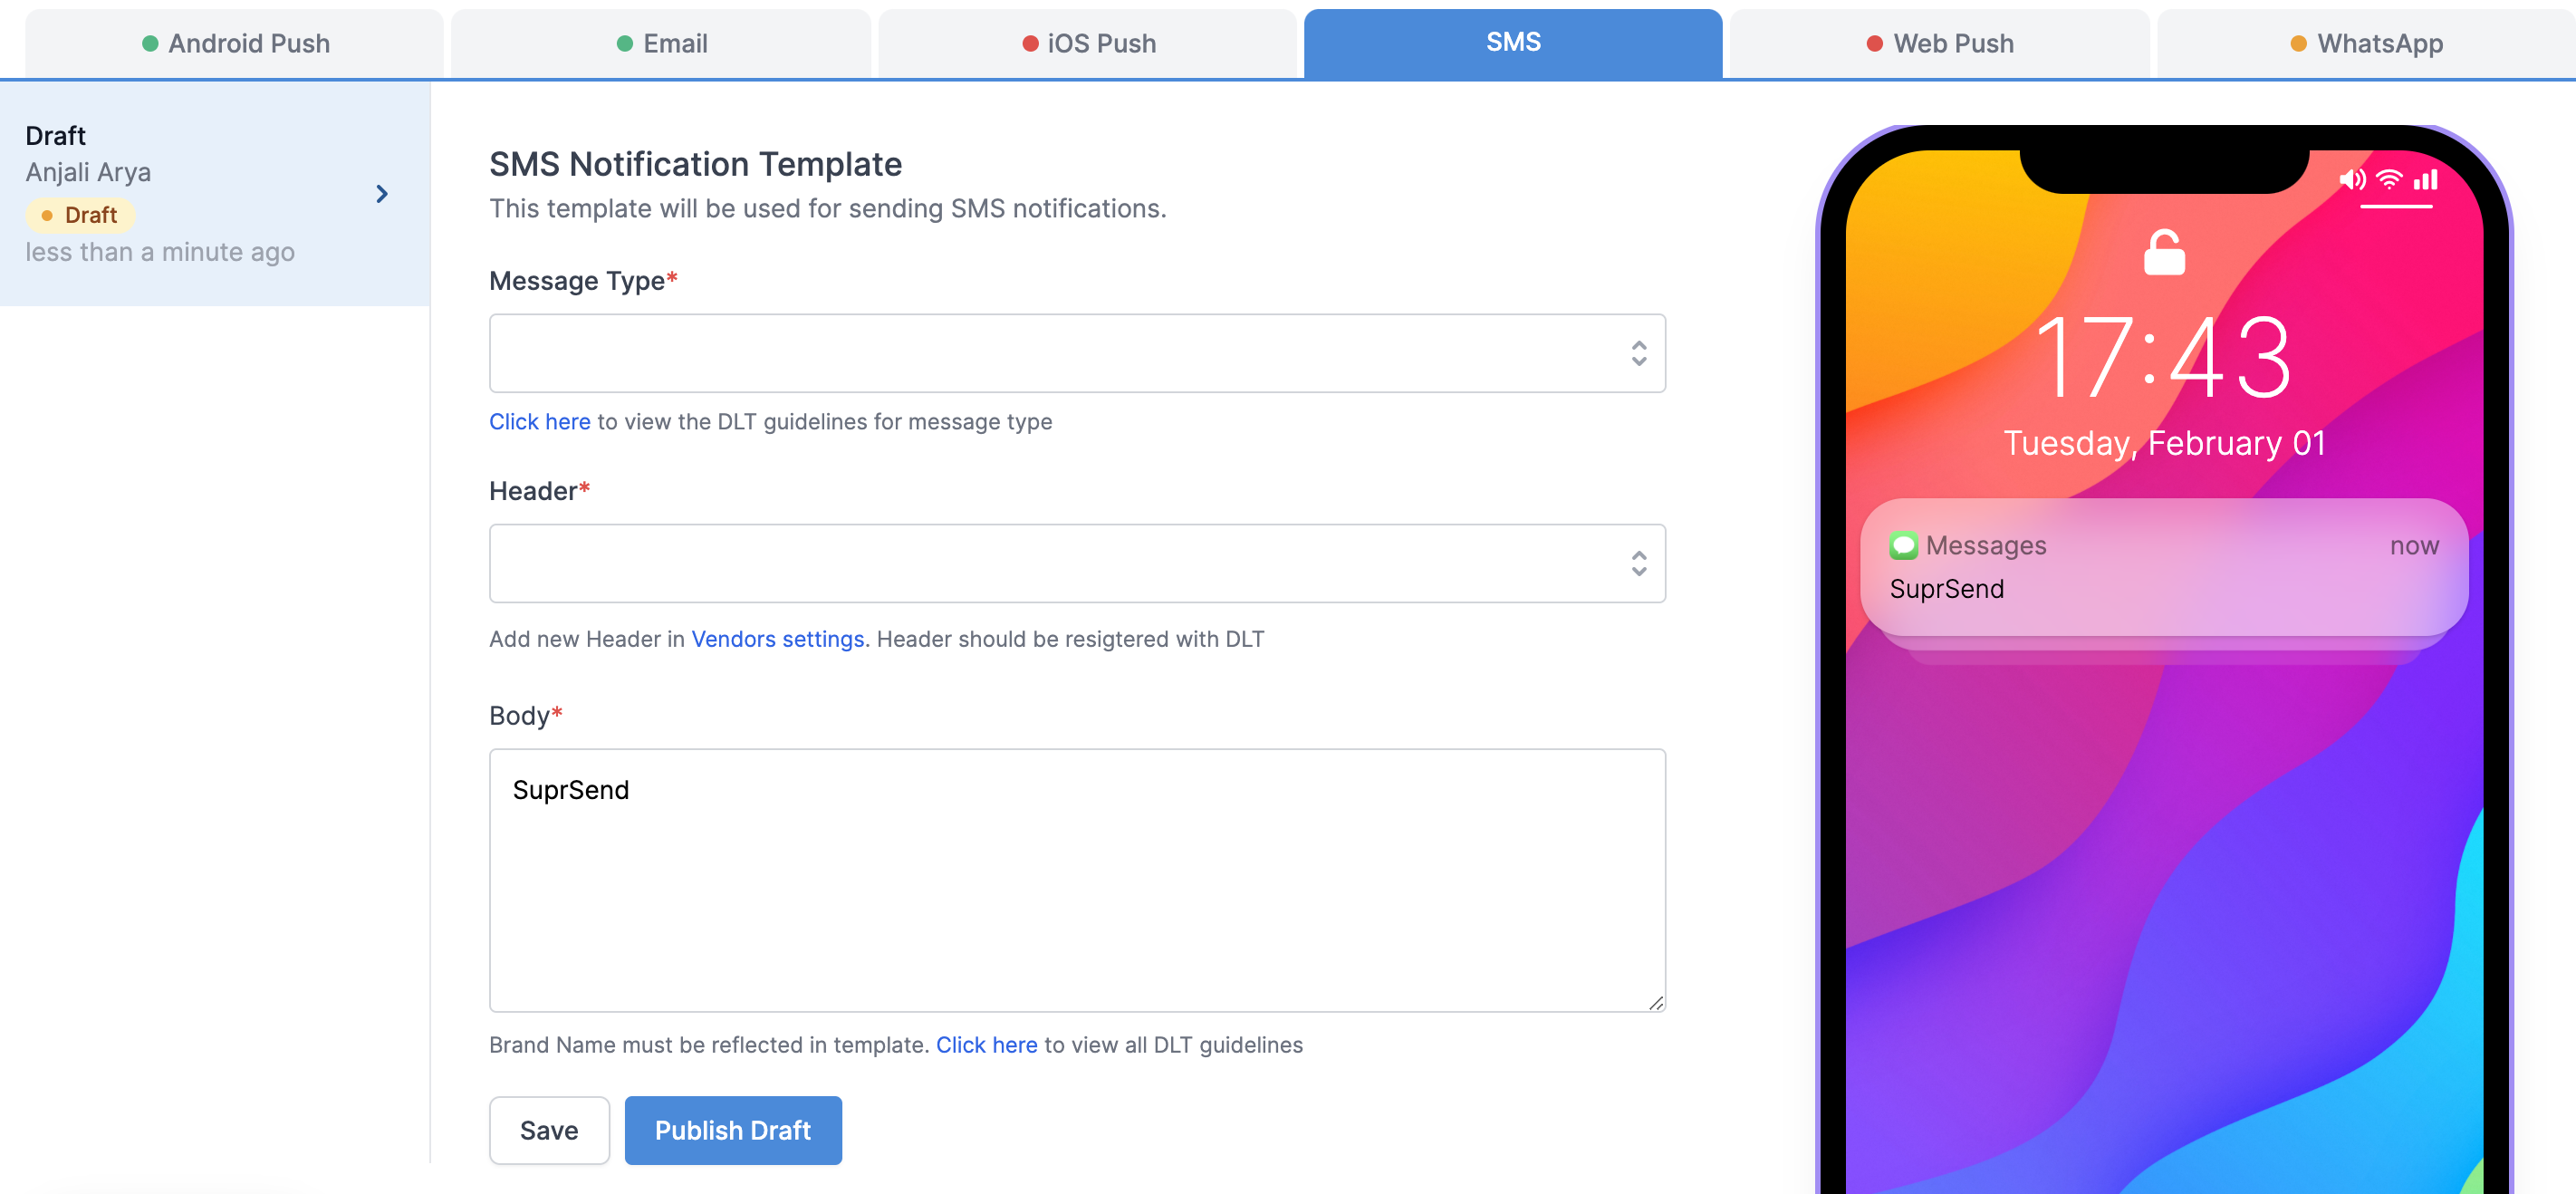 ## SMS fields description
| Field | Description |
| ------------ | ------------------------------------------------------------------------------------------------------------------------------------------------------------------------------------------------------------------------------------------------------------------------------------------------------------------------------------------------------------------------------------------------------------------------------------------------------------------------------------------------------------------------------------------------------------------------------------------------------------------------------------------------------------------------------------------------------------------------------------------------------------------------- |
| Message Type | There are 3 types of message - (1) **Transactional**- Service implicit or Informative messages which are triggered corresponding to a user's action either done at the time of sending the message or based on past data. All other OTPs other than bank OTPs also fall in this category. *e.g.- delivery updates, E-commerce website OTPs etc.* (2) **Promotional**- All the marketing related messages where we have not taken any explicit consent from the user. *e.g.- messages sent to promote or sell a product* (3) **Engagement**- Service Explicit or Engagement messages which are triggered to re-engage the users back to platform like promoting new features and offers. *e.g.- new feature promotion, discount offer messages to existing customers etc.* |
| Header | Header should be registered with DLT. Separate headers would be there for all the message types |
| Body | SMS template added here should follow DLT template guidelines. Click here to view all DLT guidelines |
## SMS fields description
| Field | Description |
| ------------ | ------------------------------------------------------------------------------------------------------------------------------------------------------------------------------------------------------------------------------------------------------------------------------------------------------------------------------------------------------------------------------------------------------------------------------------------------------------------------------------------------------------------------------------------------------------------------------------------------------------------------------------------------------------------------------------------------------------------------------------------------------------------------- |
| Message Type | There are 3 types of message - (1) **Transactional**- Service implicit or Informative messages which are triggered corresponding to a user's action either done at the time of sending the message or based on past data. All other OTPs other than bank OTPs also fall in this category. *e.g.- delivery updates, E-commerce website OTPs etc.* (2) **Promotional**- All the marketing related messages where we have not taken any explicit consent from the user. *e.g.- messages sent to promote or sell a product* (3) **Engagement**- Service Explicit or Engagement messages which are triggered to re-engage the users back to platform like promoting new features and offers. *e.g.- new feature promotion, discount offer messages to existing customers etc.* |
| Header | Header should be registered with DLT. Separate headers would be there for all the message types |
| Body | SMS template added here should follow DLT template guidelines. Click here to view all DLT guidelines |
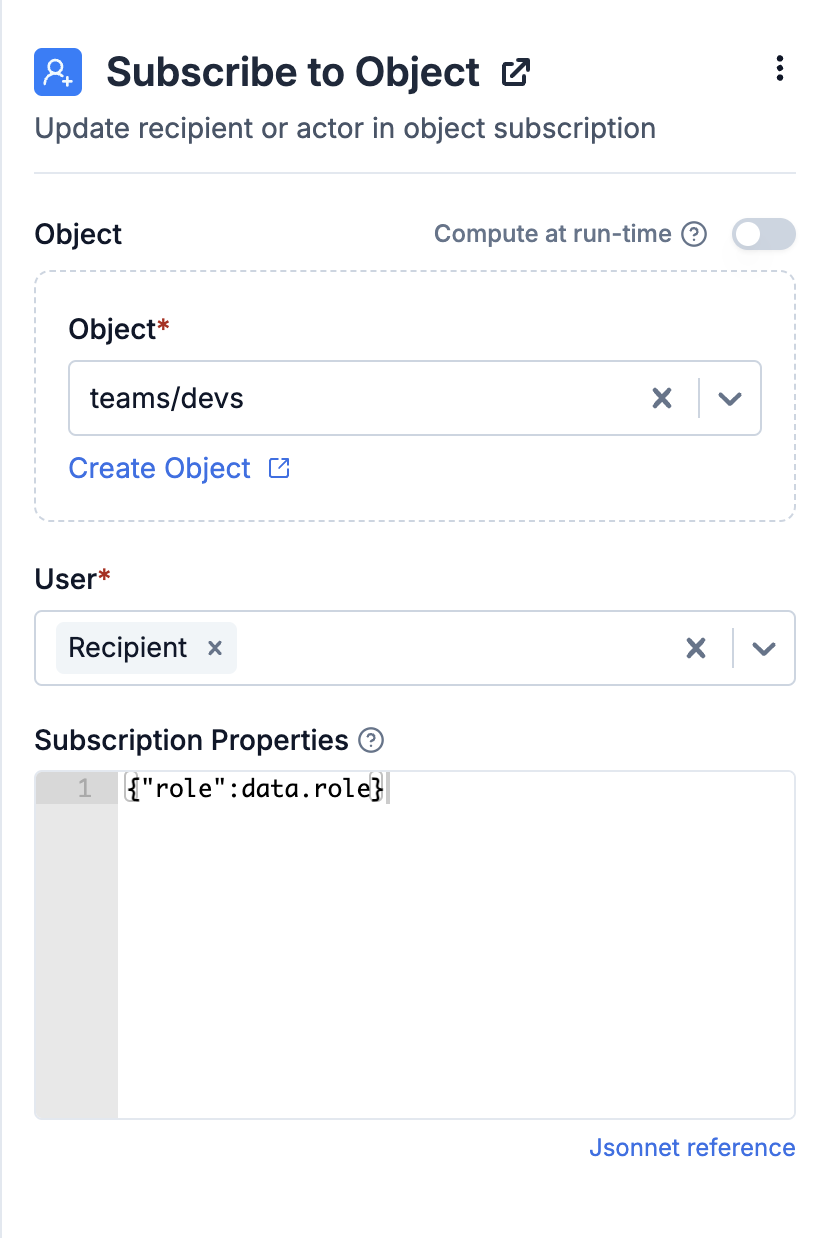 ### Compute and create objects at runtime
You can either add users to a pre-defined object or compute object on the fly using workflow input data. While defining object, both ID and type are mandatory. Type defines the group that object belong to (example, teams, departments). Dynamic object are defined in handlebars format as `{{...}}`.
Computed Object will only be created if `Create object if it doesn't exist` setting is ON.
One common use case of creating object dynamically is when you need to create different objects based on user topic subscription. For example, there are multiple player tournaments happening and you want to create a separate object for each tournament. Object ID in such case can be `{{tournament_id}}` and type `tournaments`.
### Compute and create objects at runtime
You can either add users to a pre-defined object or compute object on the fly using workflow input data. While defining object, both ID and type are mandatory. Type defines the group that object belong to (example, teams, departments). Dynamic object are defined in handlebars format as `{{...}}`.
Computed Object will only be created if `Create object if it doesn't exist` setting is ON.
One common use case of creating object dynamically is when you need to create different objects based on user topic subscription. For example, there are multiple player tournaments happening and you want to create a separate object for each tournament. Object ID in such case can be `{{tournament_id}}` and type `tournaments`.
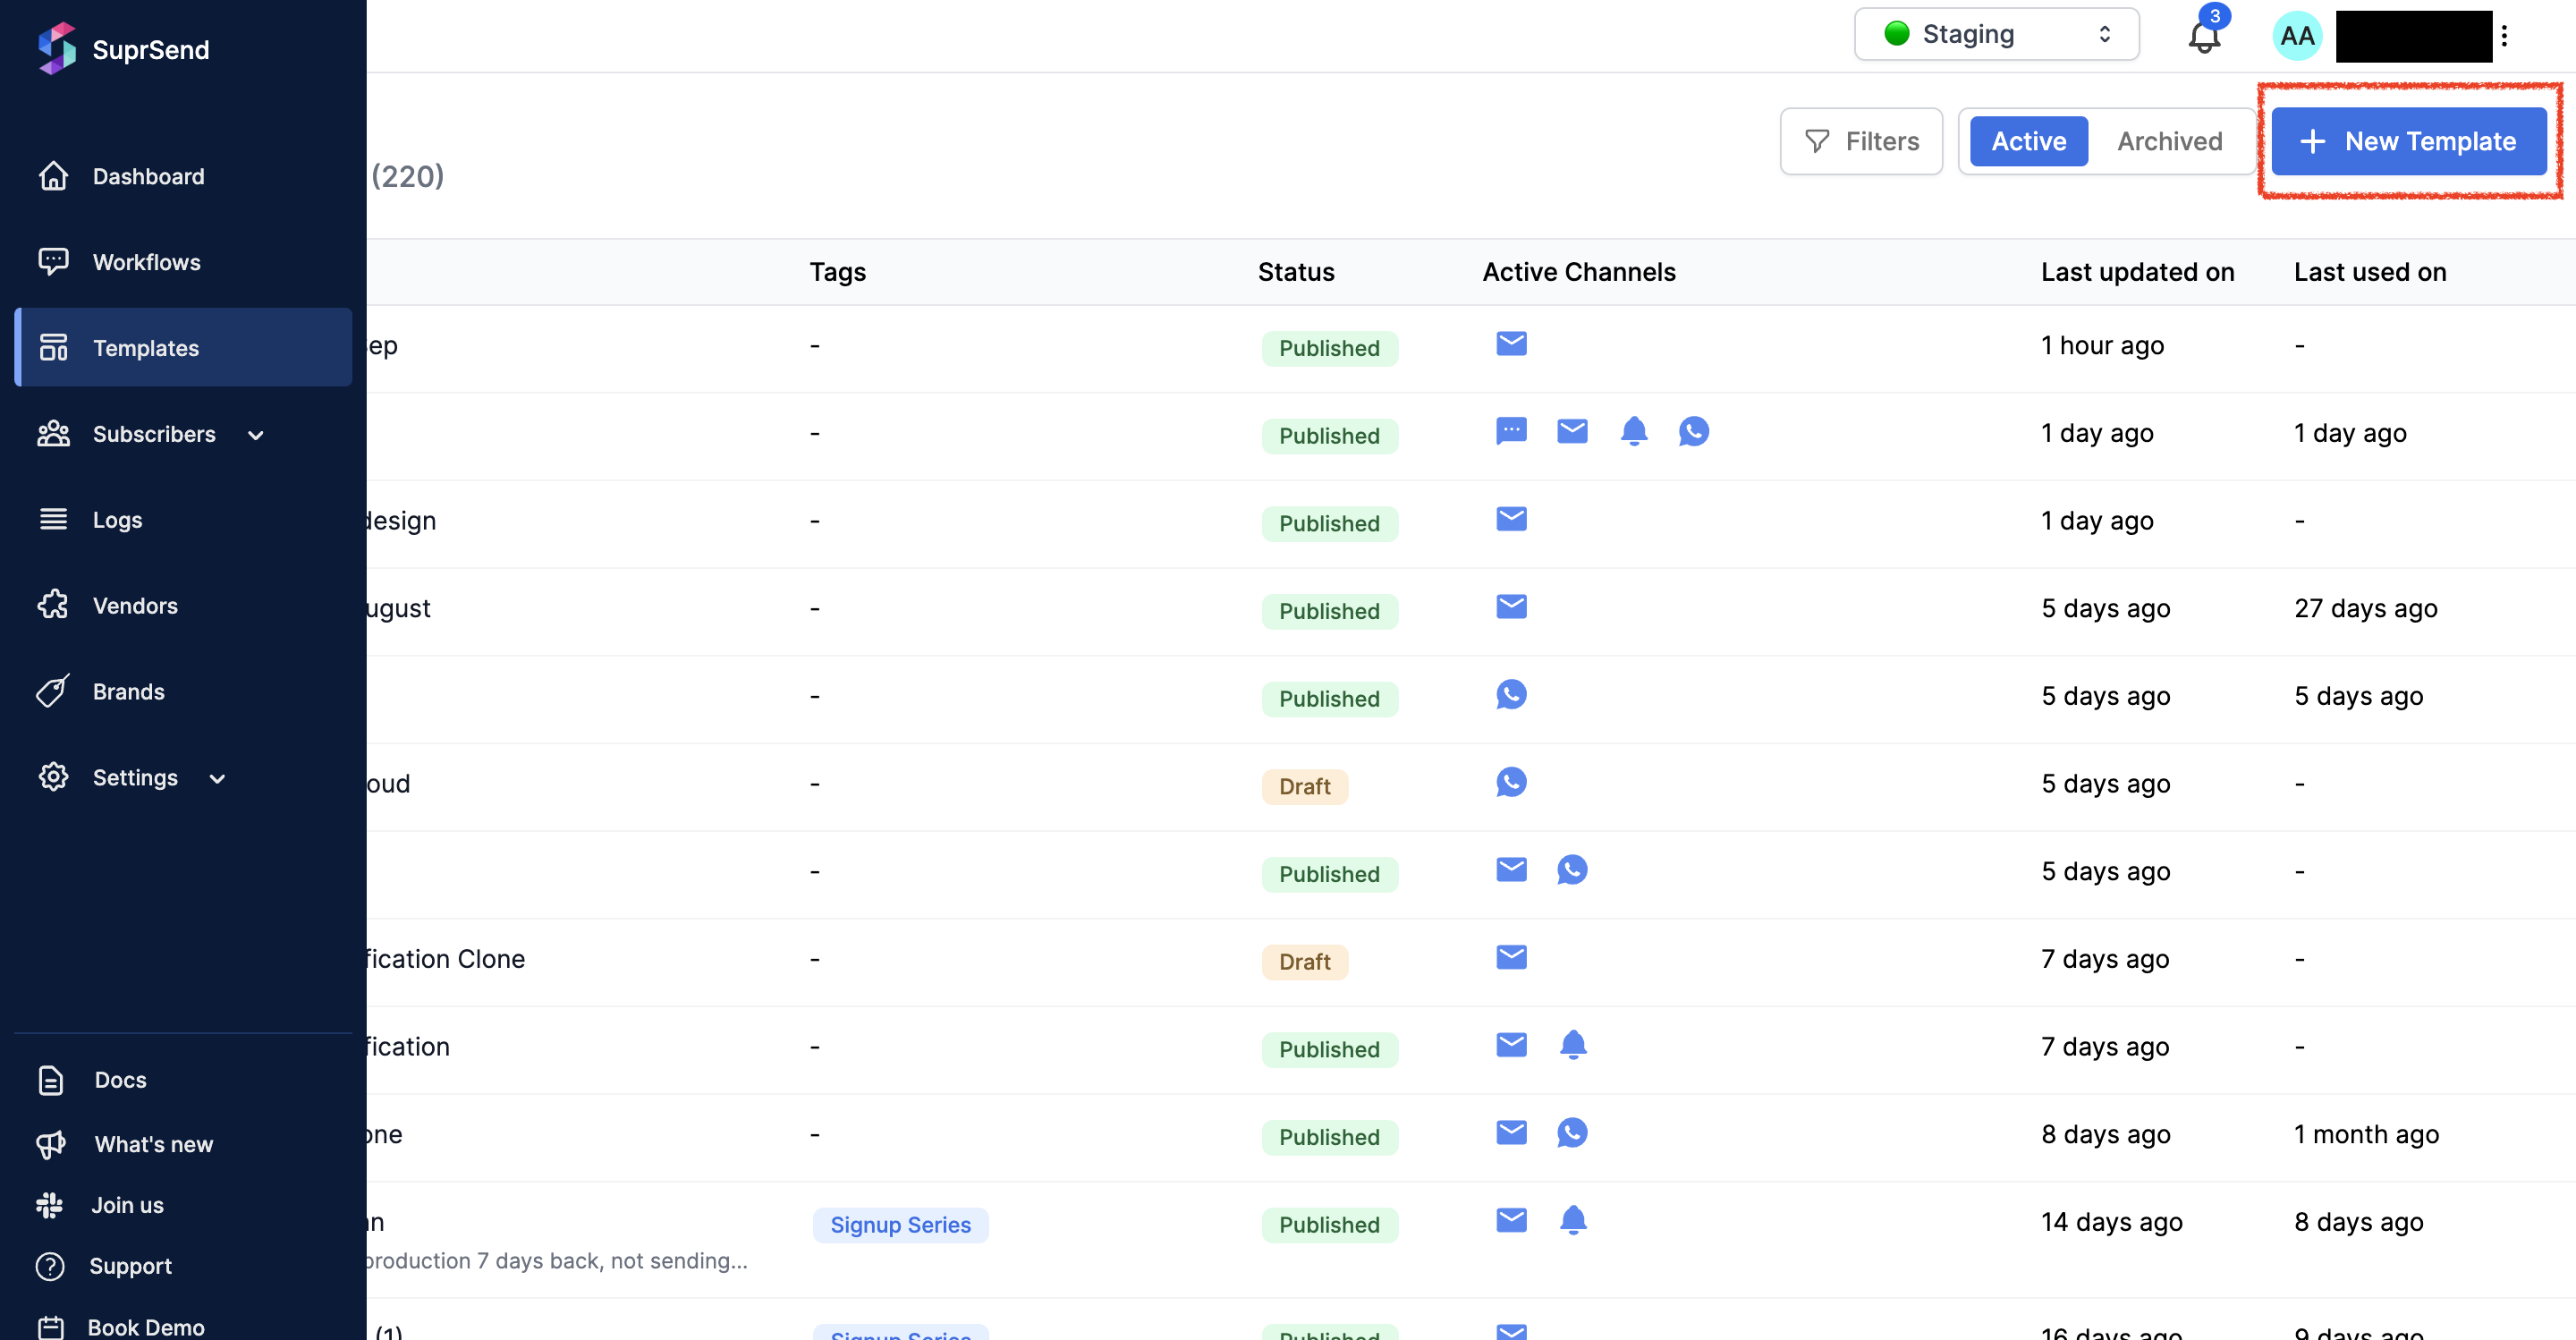 Add a template name and Click on '`Save`'.
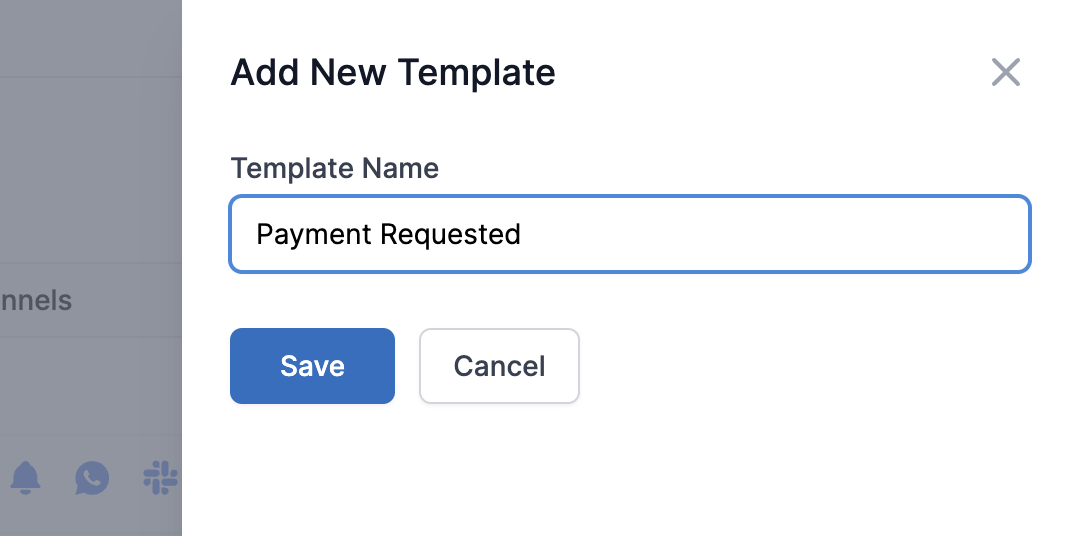 The new Template will be created, which you can see on the top of 'Templates' listing page. Click on the template to start editing.
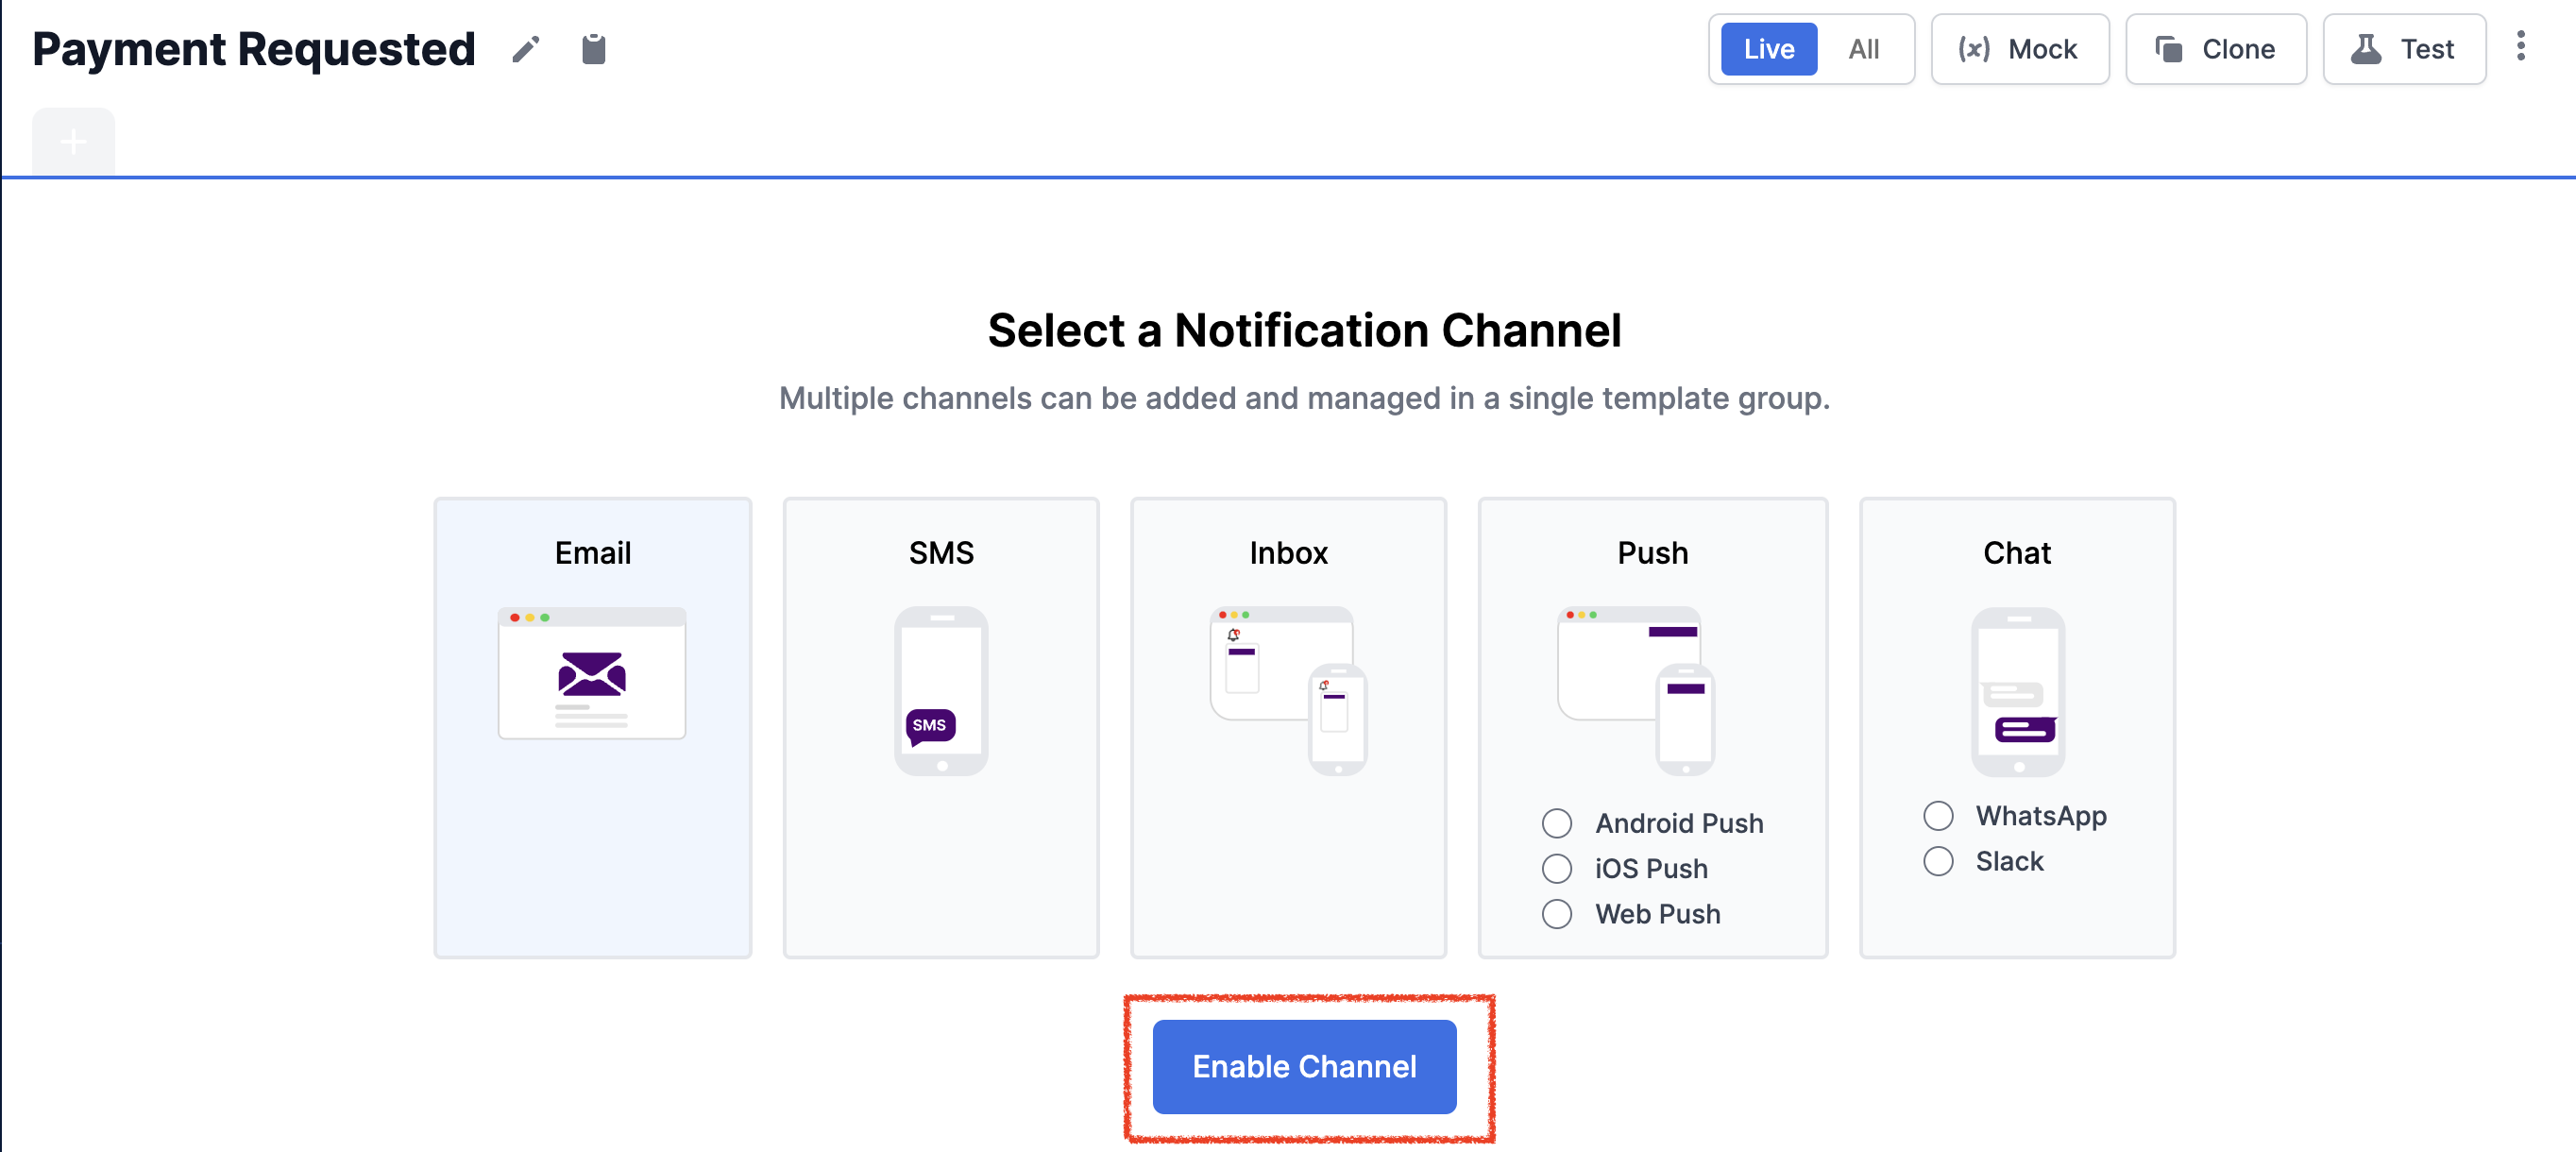
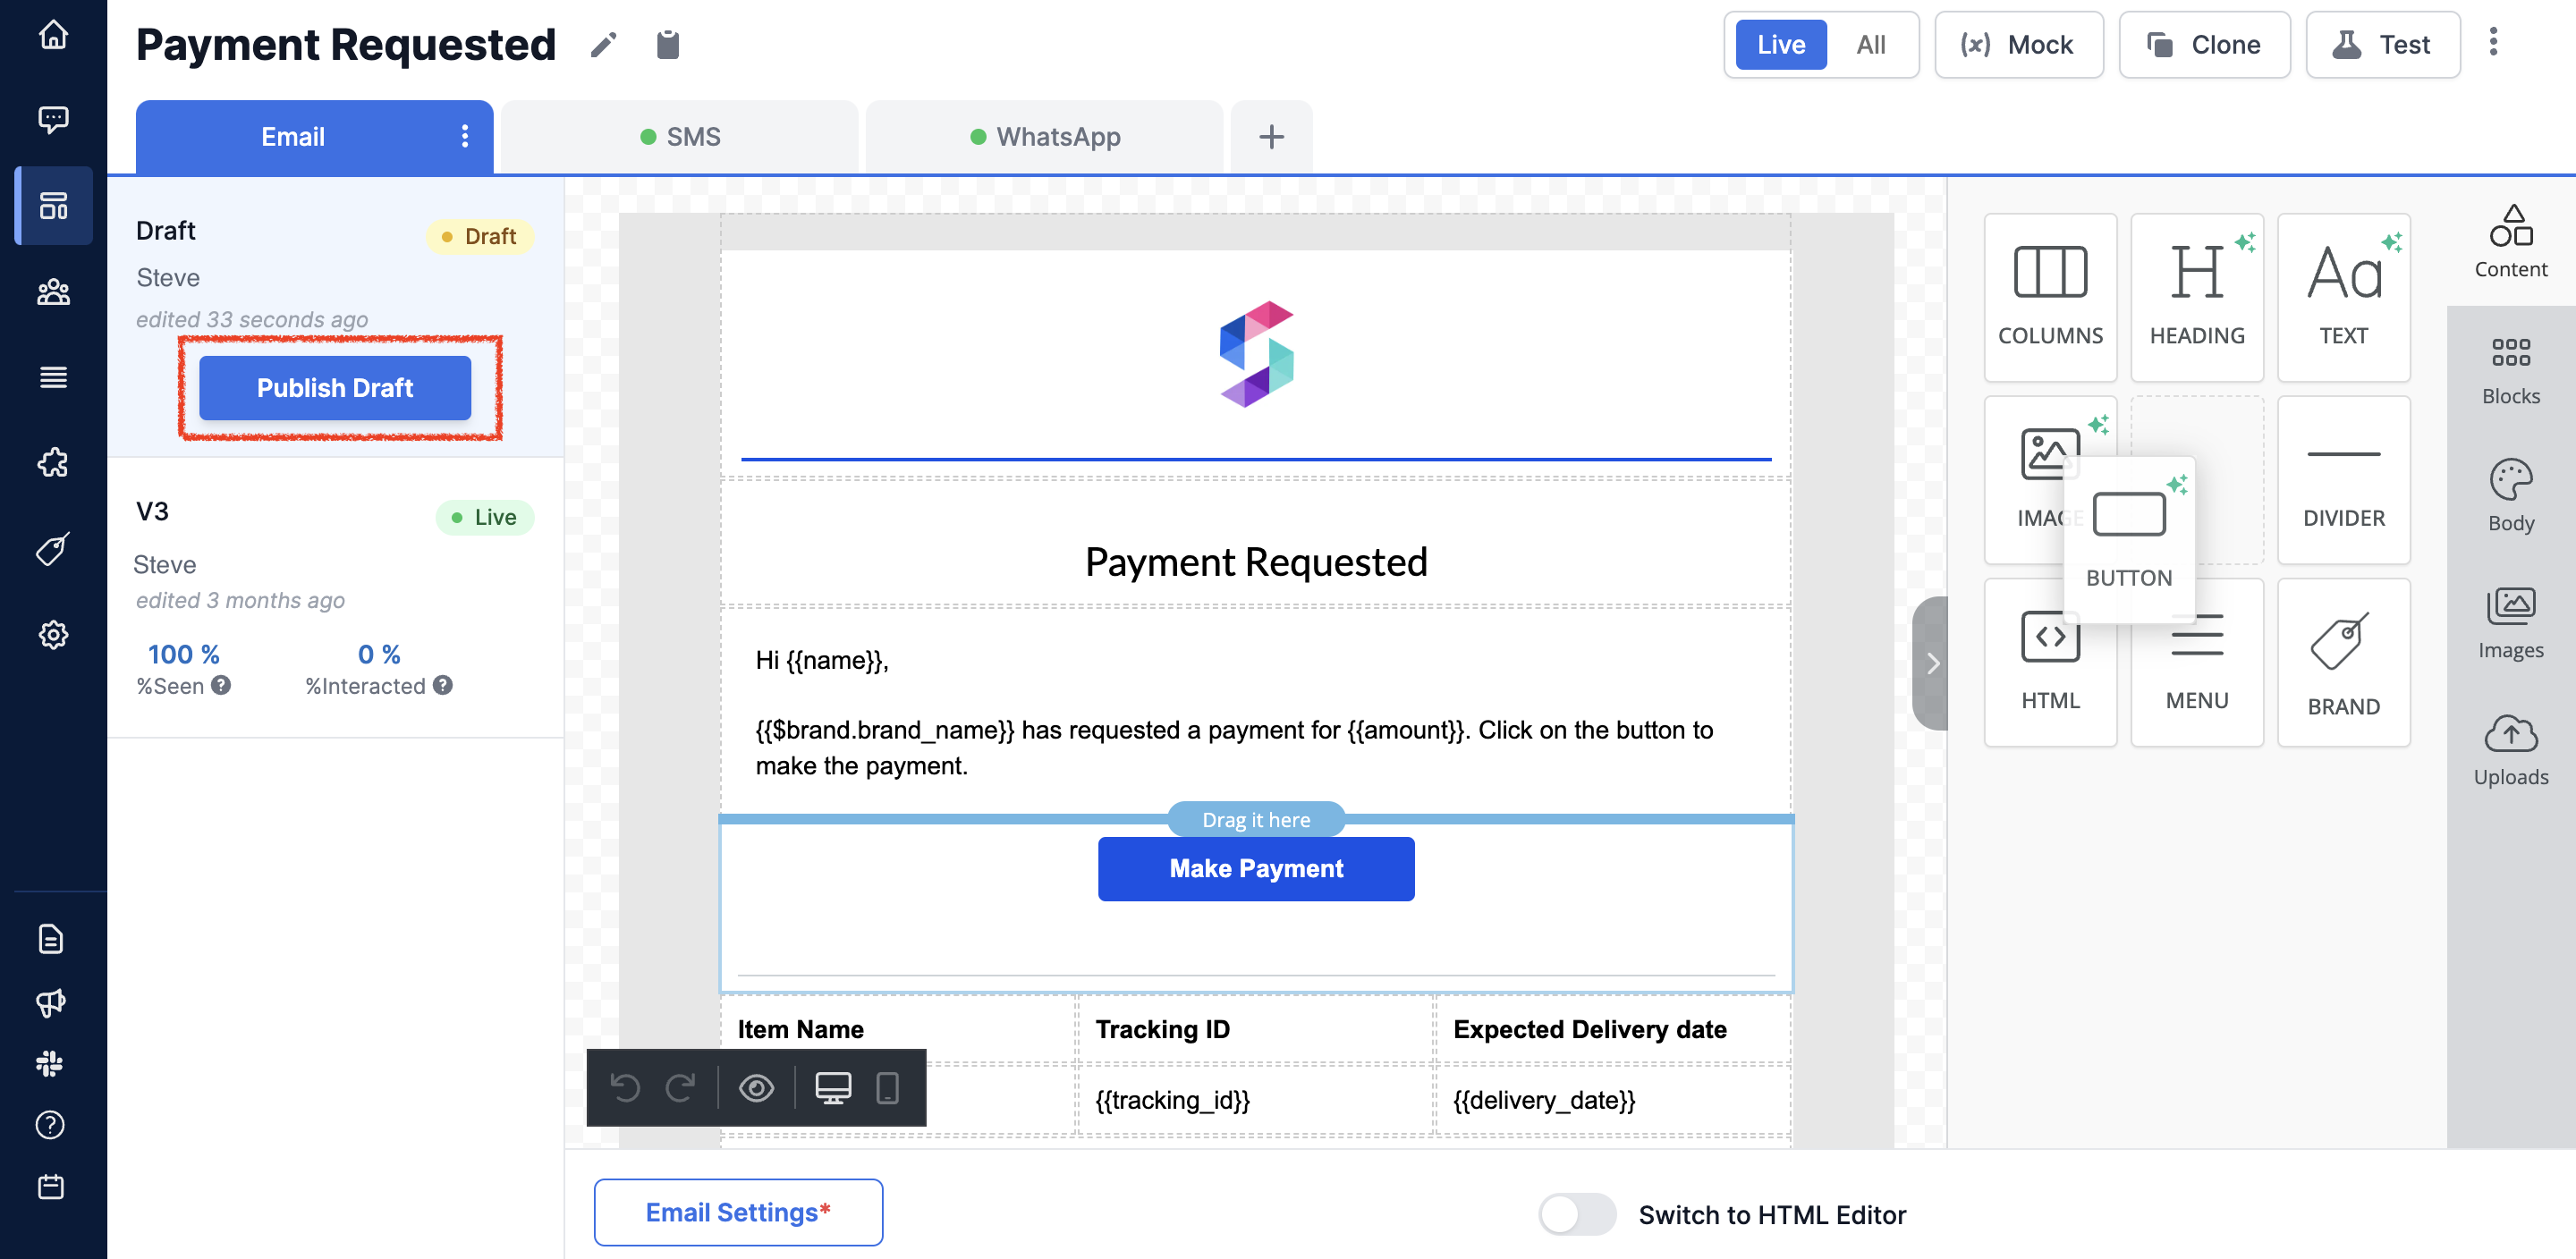
 ### Adding dynamic content
We use as the template variables language. You can learn about [here.](/docs/handlebars-helpers)
1. To add dynamic data, first add the variable data from your event and workflow request in the **mock data**.
### Adding dynamic content
We use as the template variables language. You can learn about [here.](/docs/handlebars-helpers)
1. To add dynamic data, first add the variable data from your event and workflow request in the **mock data**.
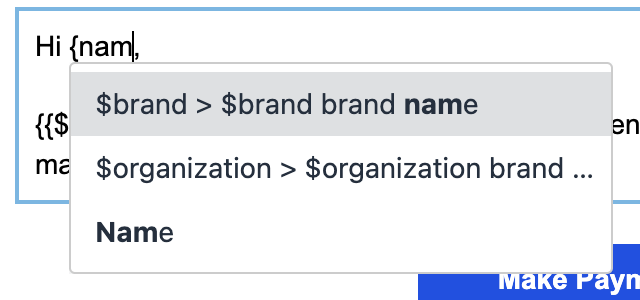 Other than your workflow `data` variables, you can also add other type of variables in your templates like tenant properties. See a full list of possible variables here.
There are slight differences in variable format and placement for different templates. Checkout each channel template documentation for reference.
## Preview and publish
You can see the notification preview on the right side of your editor for most of the channels. Variables in template are replaced with the values from '**mock data'** for preview
**For email**, preview option is available in the bottom left side menu
Other than your workflow `data` variables, you can also add other type of variables in your templates like tenant properties. See a full list of possible variables here.
There are slight differences in variable format and placement for different templates. Checkout each channel template documentation for reference.
## Preview and publish
You can see the notification preview on the right side of your editor for most of the channels. Variables in template are replaced with the values from '**mock data'** for preview
**For email**, preview option is available in the bottom left side menu
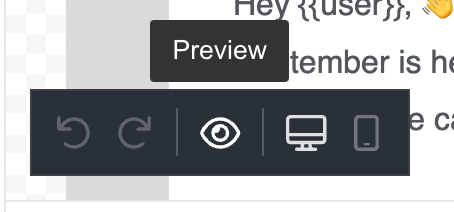 **For Slack**, you can click on '`Load preview`' button to see the preview
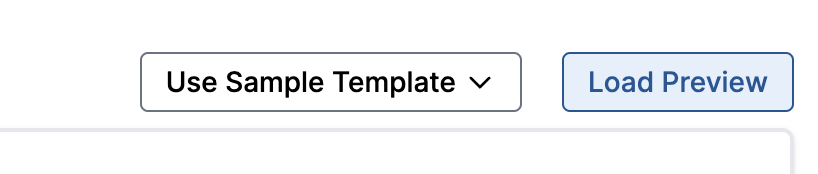 Once finalized, you can publish the template by clicking on '`Publish template`**'** button on the draft version
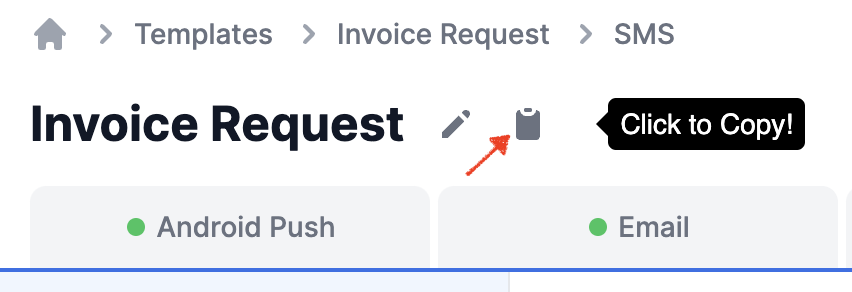 \*\* Edit template name and other details \*\*
You can edit the **template description, name, and add tags** to the template by clicking on the edit icon next to the its name.
* We recommend adding your template trigger logic and other relevant notes pertaining to the notification in the `description` . This is helpful for later reference and note keeping.
* `Tags` are used for better organization of the templates on listing page. You can group similar templates using tags. Tags can then be used to [filter](/docs/templates#view-and-filter-your-template-list) out templates on listing page and also while [fetching templates through API](/reference/get-template-list).
\*\* Edit template name and other details \*\*
You can edit the **template description, name, and add tags** to the template by clicking on the edit icon next to the its name.
* We recommend adding your template trigger logic and other relevant notes pertaining to the notification in the `description` . This is helpful for later reference and note keeping.
* `Tags` are used for better organization of the templates on listing page. You can group similar templates using tags. Tags can then be used to [filter](/docs/templates#view-and-filter-your-template-list) out templates on listing page and also while [fetching templates through API](/reference/get-template-list).
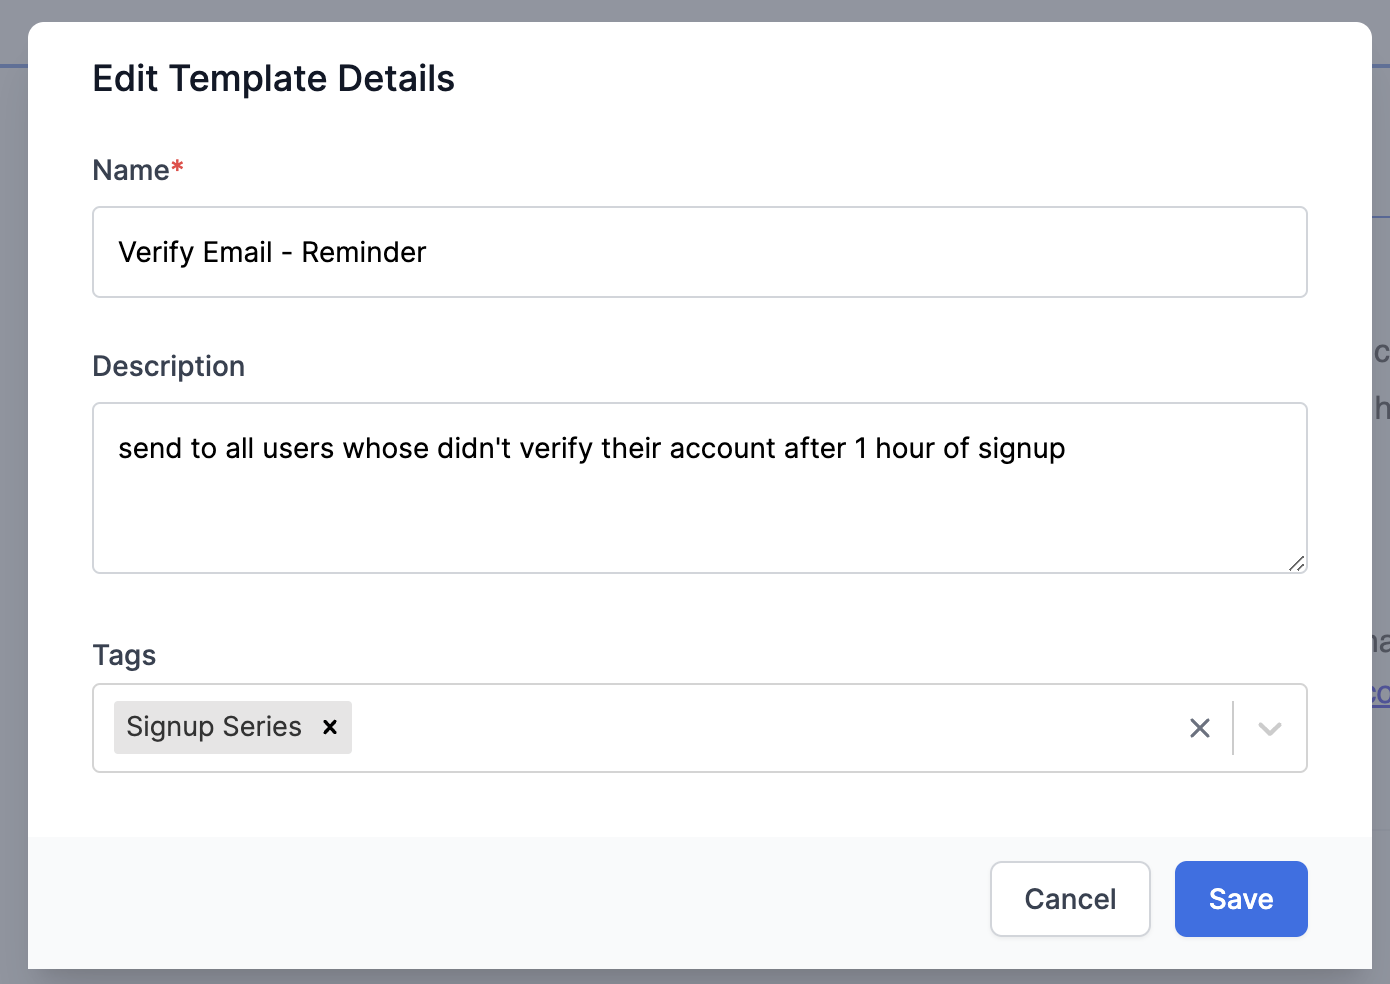 ## Clone template
To avoid designing templates from scratch, you can clone your existing templates and design on top of it.
## Adding multiple languages
SuprSend allows you to create notifications in multiple languages in the same template. Once the languages are added, SuprSend will pick the preferred language from user's profile and send the message as per the user's preferred language. You can add template languages using **Language** option from the top-right corner burger menu. For more details, check [steps and guidelines on adding language](/docs/multi-lingual-template).
## Clone template
To avoid designing templates from scratch, you can clone your existing templates and design on top of it.

## Adding multiple languages
SuprSend allows you to create notifications in multiple languages in the same template. Once the languages are added, SuprSend will pick the preferred language from user's profile and send the message as per the user's preferred language. You can add template languages using **Language** option from the top-right corner burger menu. For more details, check [steps and guidelines on adding language](/docs/multi-lingual-template).
 ## Archive template
You can archive your unused templates by clicking on "Archive" option from the top-right corner burger menu. Templates can't be recovered once archived.
## View and filter your template list
All of your active templates will be visible on the template listing page. You can filter your templates by `channel`, `tag`, `status` or just get the templates which were '**edited by you'**.
## Archive template
You can archive your unused templates by clicking on "Archive" option from the top-right corner burger menu. Templates can't be recovered once archived.
## View and filter your template list
All of your active templates will be visible on the template listing page. You can filter your templates by `channel`, `tag`, `status` or just get the templates which were '**edited by you'**.
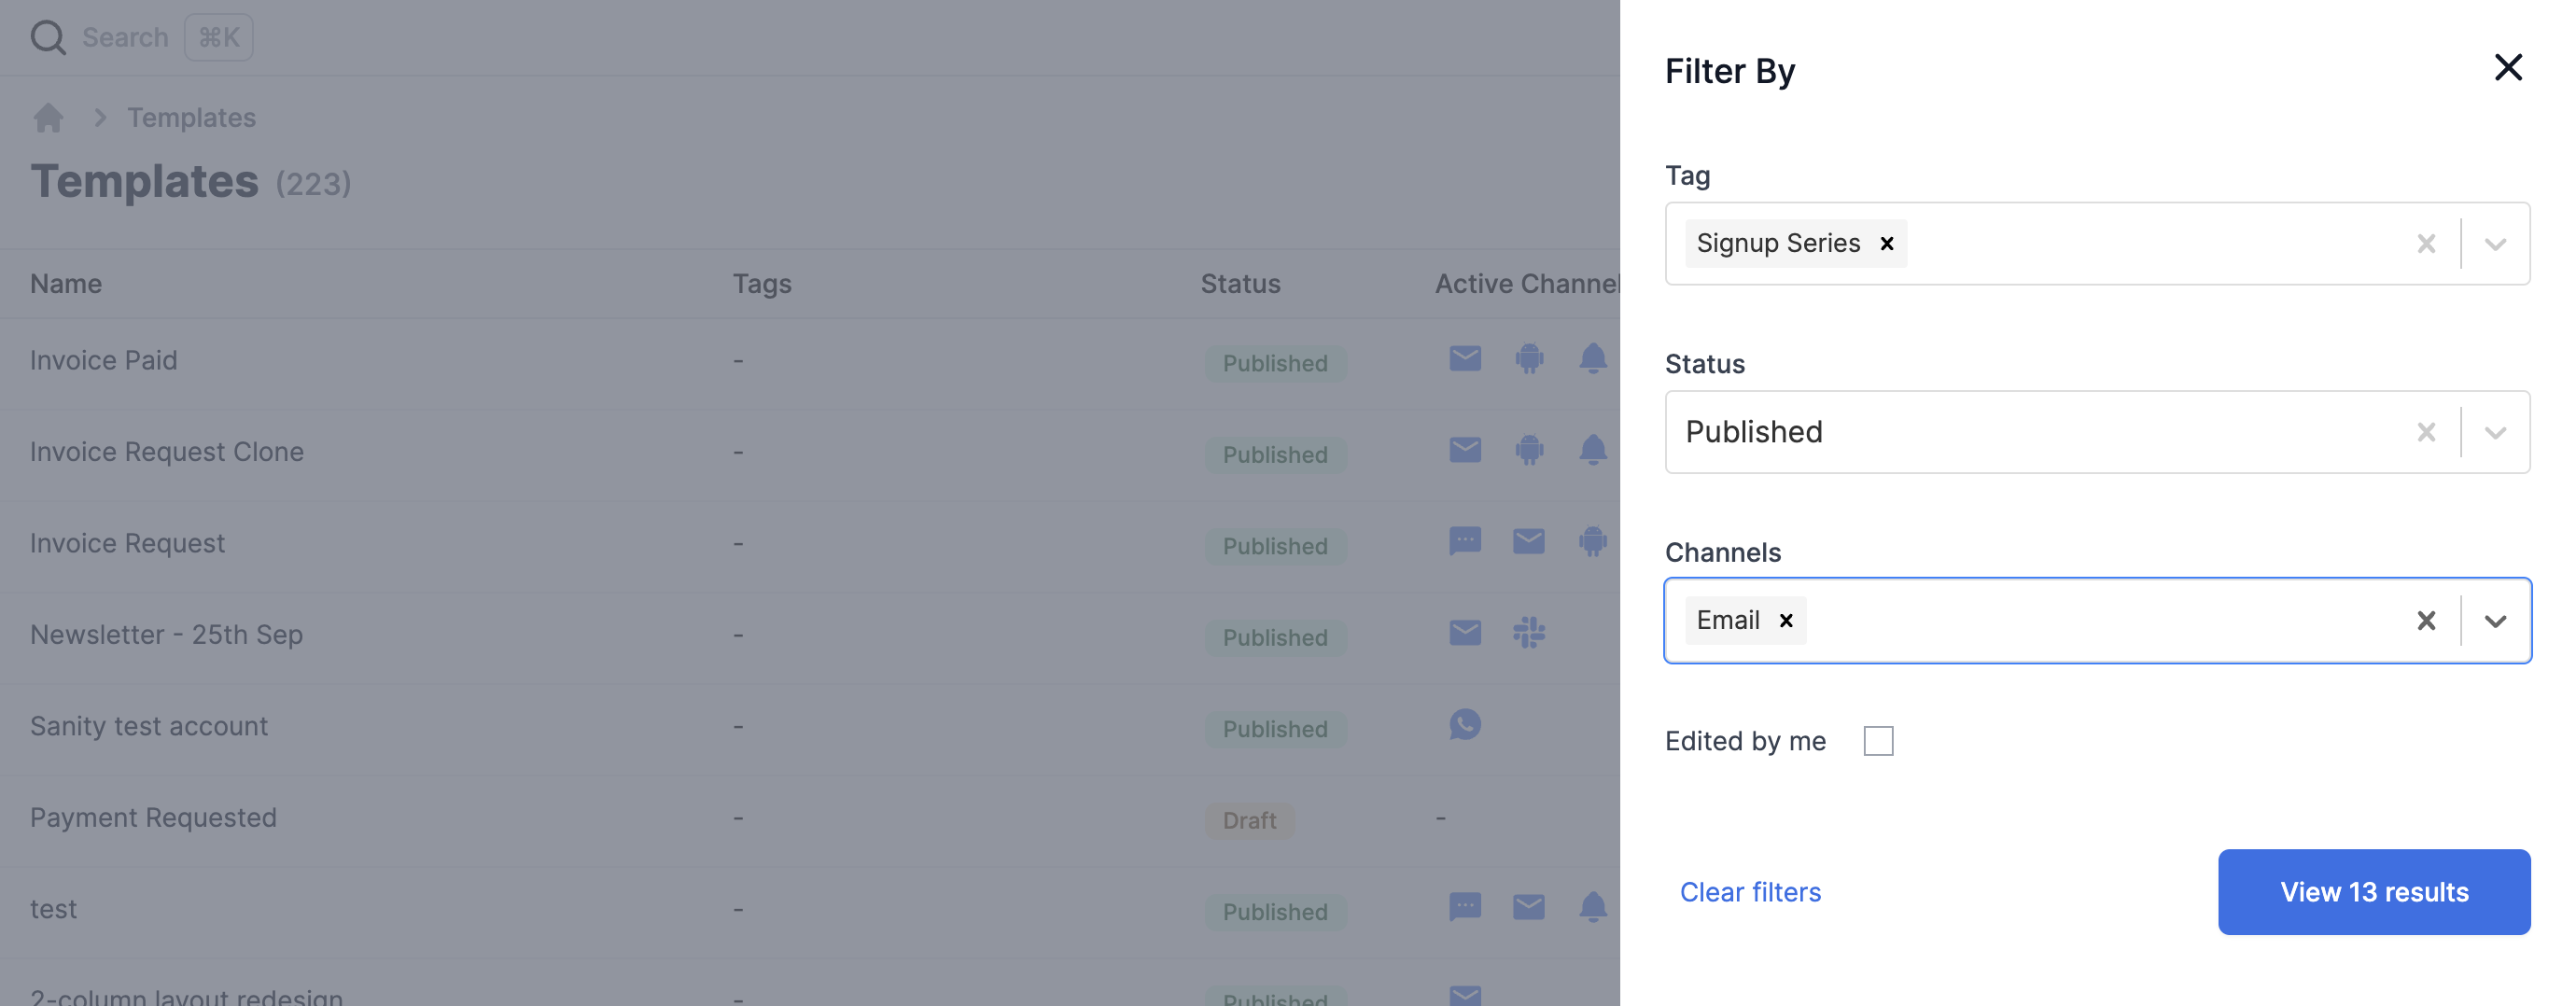 Archived templates can be seen by clicking on `Archived` tab from the top right side options
 # Tenant Preference
Source: https://docs.suprsend.com/docs/tenant-preference
In this guide, learn how to manage preferences for your tenants and its users
Tenants (previously named as brands) represents a segment that user belongs to. It can be organizations, teams within an organization, subsidiary companies or different product lines in the same business. If you're a B2B application or a multi-tenant SaaS product, you can use tenant preferences to allow company admins to set preference for their internal team or allow your customers to set default preferences for their users.
## Company setting preference for tenants
In a multi-tenant architecture, businesses can define which notification categories and channels are applicable to different tenants. For example- if you are a SAAS platform with some paid features and some of your clients have not subscribed to the paid features. You can hide notification categories related to the paid feature for those tenants.
You can disable category overall preference or set channels as opt-out that are not valid for your tenants from [tenant details page on SuprSend dashboard](https://app.suprsend.com/en/staging/tenants/default/tenant_preference). Tenant will not be able to set preferences in the hidden categories and notification will not be sent to tenant's users in hidden categories.
# Tenant Preference
Source: https://docs.suprsend.com/docs/tenant-preference
In this guide, learn how to manage preferences for your tenants and its users
Tenants (previously named as brands) represents a segment that user belongs to. It can be organizations, teams within an organization, subsidiary companies or different product lines in the same business. If you're a B2B application or a multi-tenant SaaS product, you can use tenant preferences to allow company admins to set preference for their internal team or allow your customers to set default preferences for their users.
## Company setting preference for tenants
In a multi-tenant architecture, businesses can define which notification categories and channels are applicable to different tenants. For example- if you are a SAAS platform with some paid features and some of your clients have not subscribed to the paid features. You can hide notification categories related to the paid feature for those tenants.
You can disable category overall preference or set channels as opt-out that are not valid for your tenants from [tenant details page on SuprSend dashboard](https://app.suprsend.com/en/staging/tenants/default/tenant_preference). Tenant will not be able to set preferences in the hidden categories and notification will not be sent to tenant's users in hidden categories.
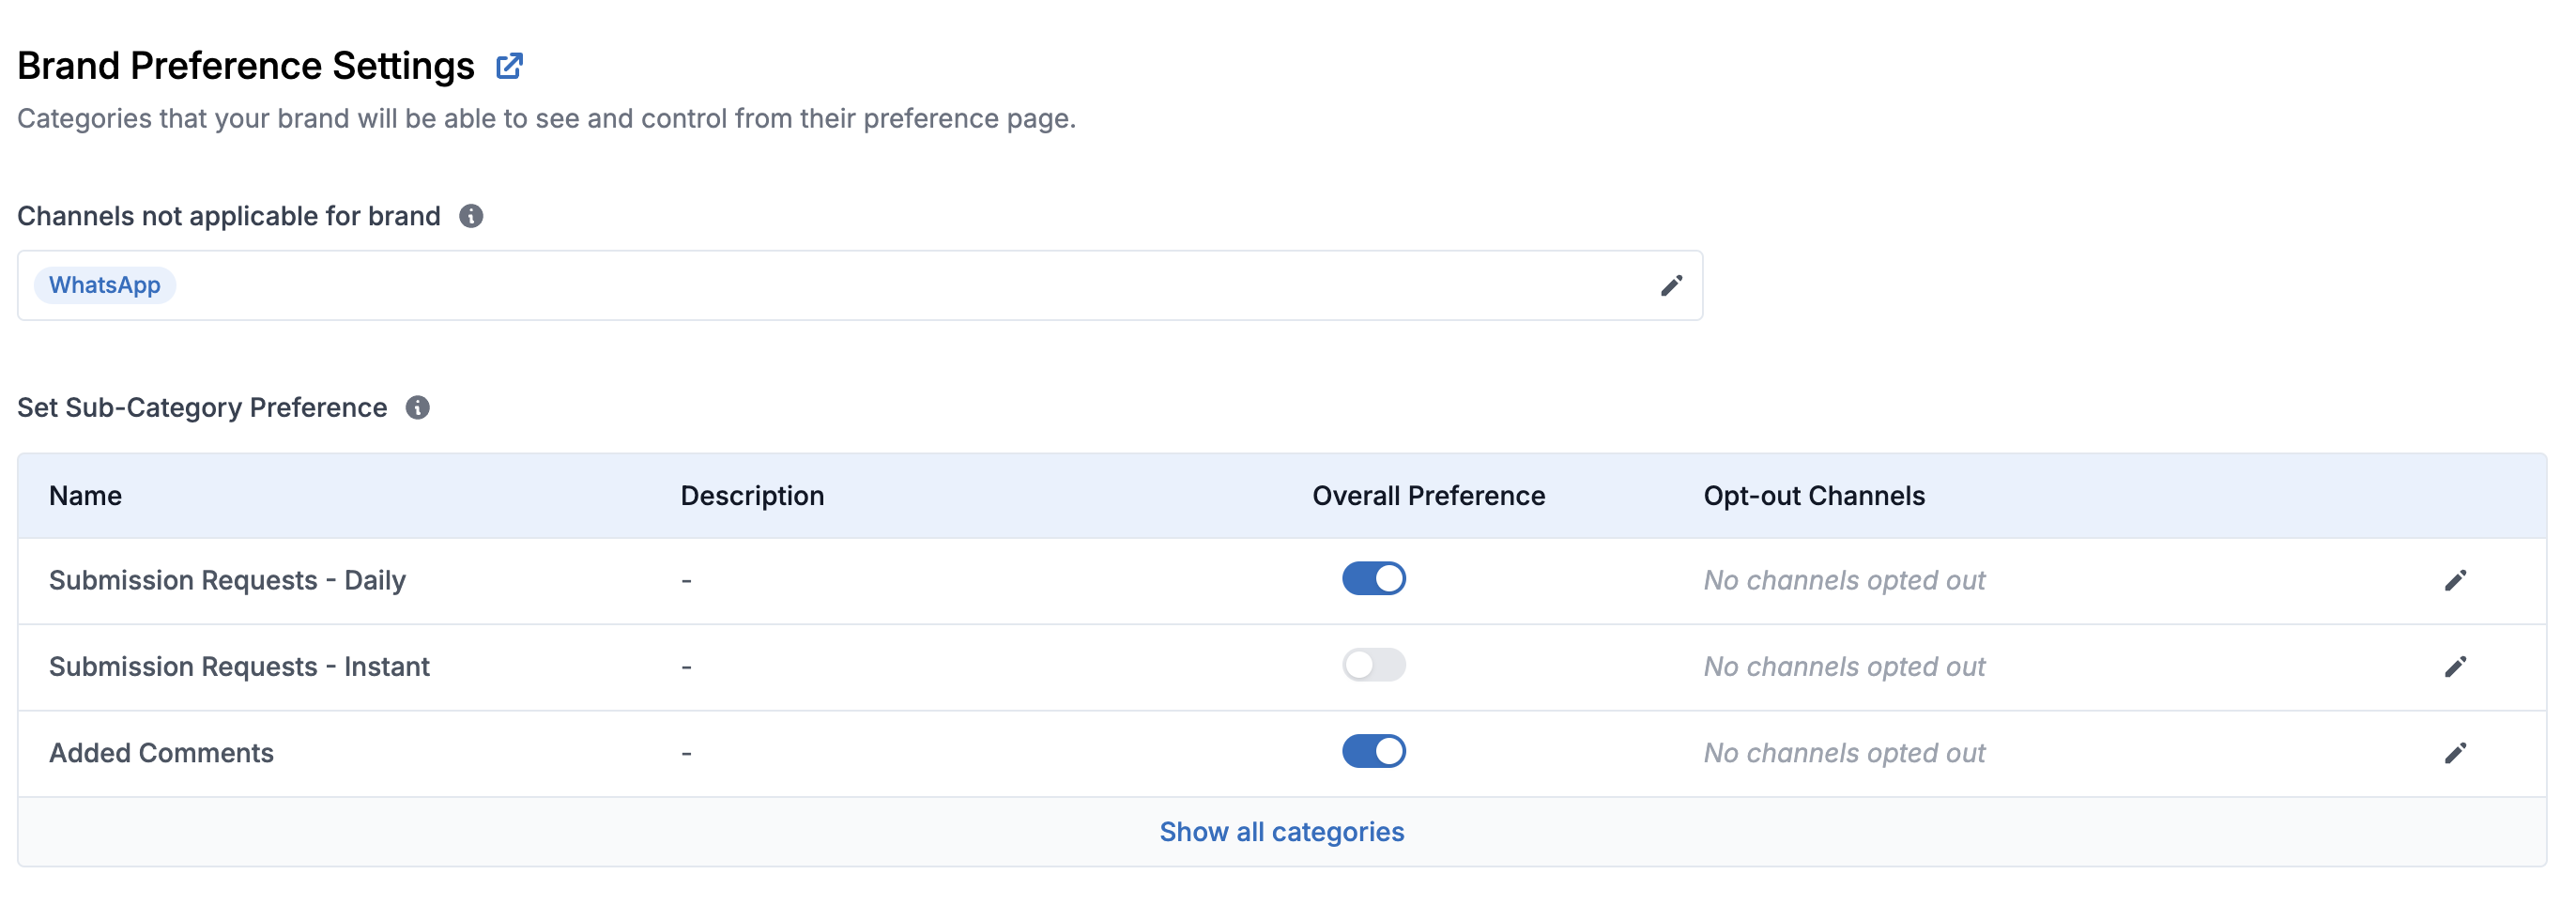 ## Per-tenant default preference
Tenants can set [default preferences](/reference/update-tenant-default-preference) for their end users and hide the categories which are not applicable to their end user. This gives tenants control to choose which notifications are sent to their users or shown to their users for setting preferences.
## Controlling preference UI for users
Turning off categories or channels on tenant from [tenant preference page](https://app.suprsend.com/en/demo/tenants/default/tenant_preference) automatically removes it from user's preference view. Additionally, if tenants wish to further limit the categories visible to their end users, they can do so by setting `visible_to_subscriber` to `false` in the [default tenant preferences](/reference/update-tenant-default-preference).
## Collecting preference from tenant users
You can load user preferences for a tenant by simply passing `tenant_id` in Rest APIs and [preference centre SDK](/docs/embedded-preference-centre). Hosted preference page automatically loads preferences corresponding to the tenant passed in workflow trigger.
## Triggering tenant workflows
You can simply trigger tenant workflow by passing `tenant_id` in your workflow trigger. [Read more about tenant workflows here](/docs/tenant-workflows).
## Tenant level preference evaluation
When a workflow is triggered, preference is evaluated for recipient and tenant before send node. Notification is sent in categories and channels where both tenant and user preferences are `opt_in`.
## Per-tenant default preference
Tenants can set [default preferences](/reference/update-tenant-default-preference) for their end users and hide the categories which are not applicable to their end user. This gives tenants control to choose which notifications are sent to their users or shown to their users for setting preferences.
## Controlling preference UI for users
Turning off categories or channels on tenant from [tenant preference page](https://app.suprsend.com/en/demo/tenants/default/tenant_preference) automatically removes it from user's preference view. Additionally, if tenants wish to further limit the categories visible to their end users, they can do so by setting `visible_to_subscriber` to `false` in the [default tenant preferences](/reference/update-tenant-default-preference).
## Collecting preference from tenant users
You can load user preferences for a tenant by simply passing `tenant_id` in Rest APIs and [preference centre SDK](/docs/embedded-preference-centre). Hosted preference page automatically loads preferences corresponding to the tenant passed in workflow trigger.
## Triggering tenant workflows
You can simply trigger tenant workflow by passing `tenant_id` in your workflow trigger. [Read more about tenant workflows here](/docs/tenant-workflows).
## Tenant level preference evaluation
When a workflow is triggered, preference is evaluated for recipient and tenant before send node. Notification is sent in categories and channels where both tenant and user preferences are `opt_in`.
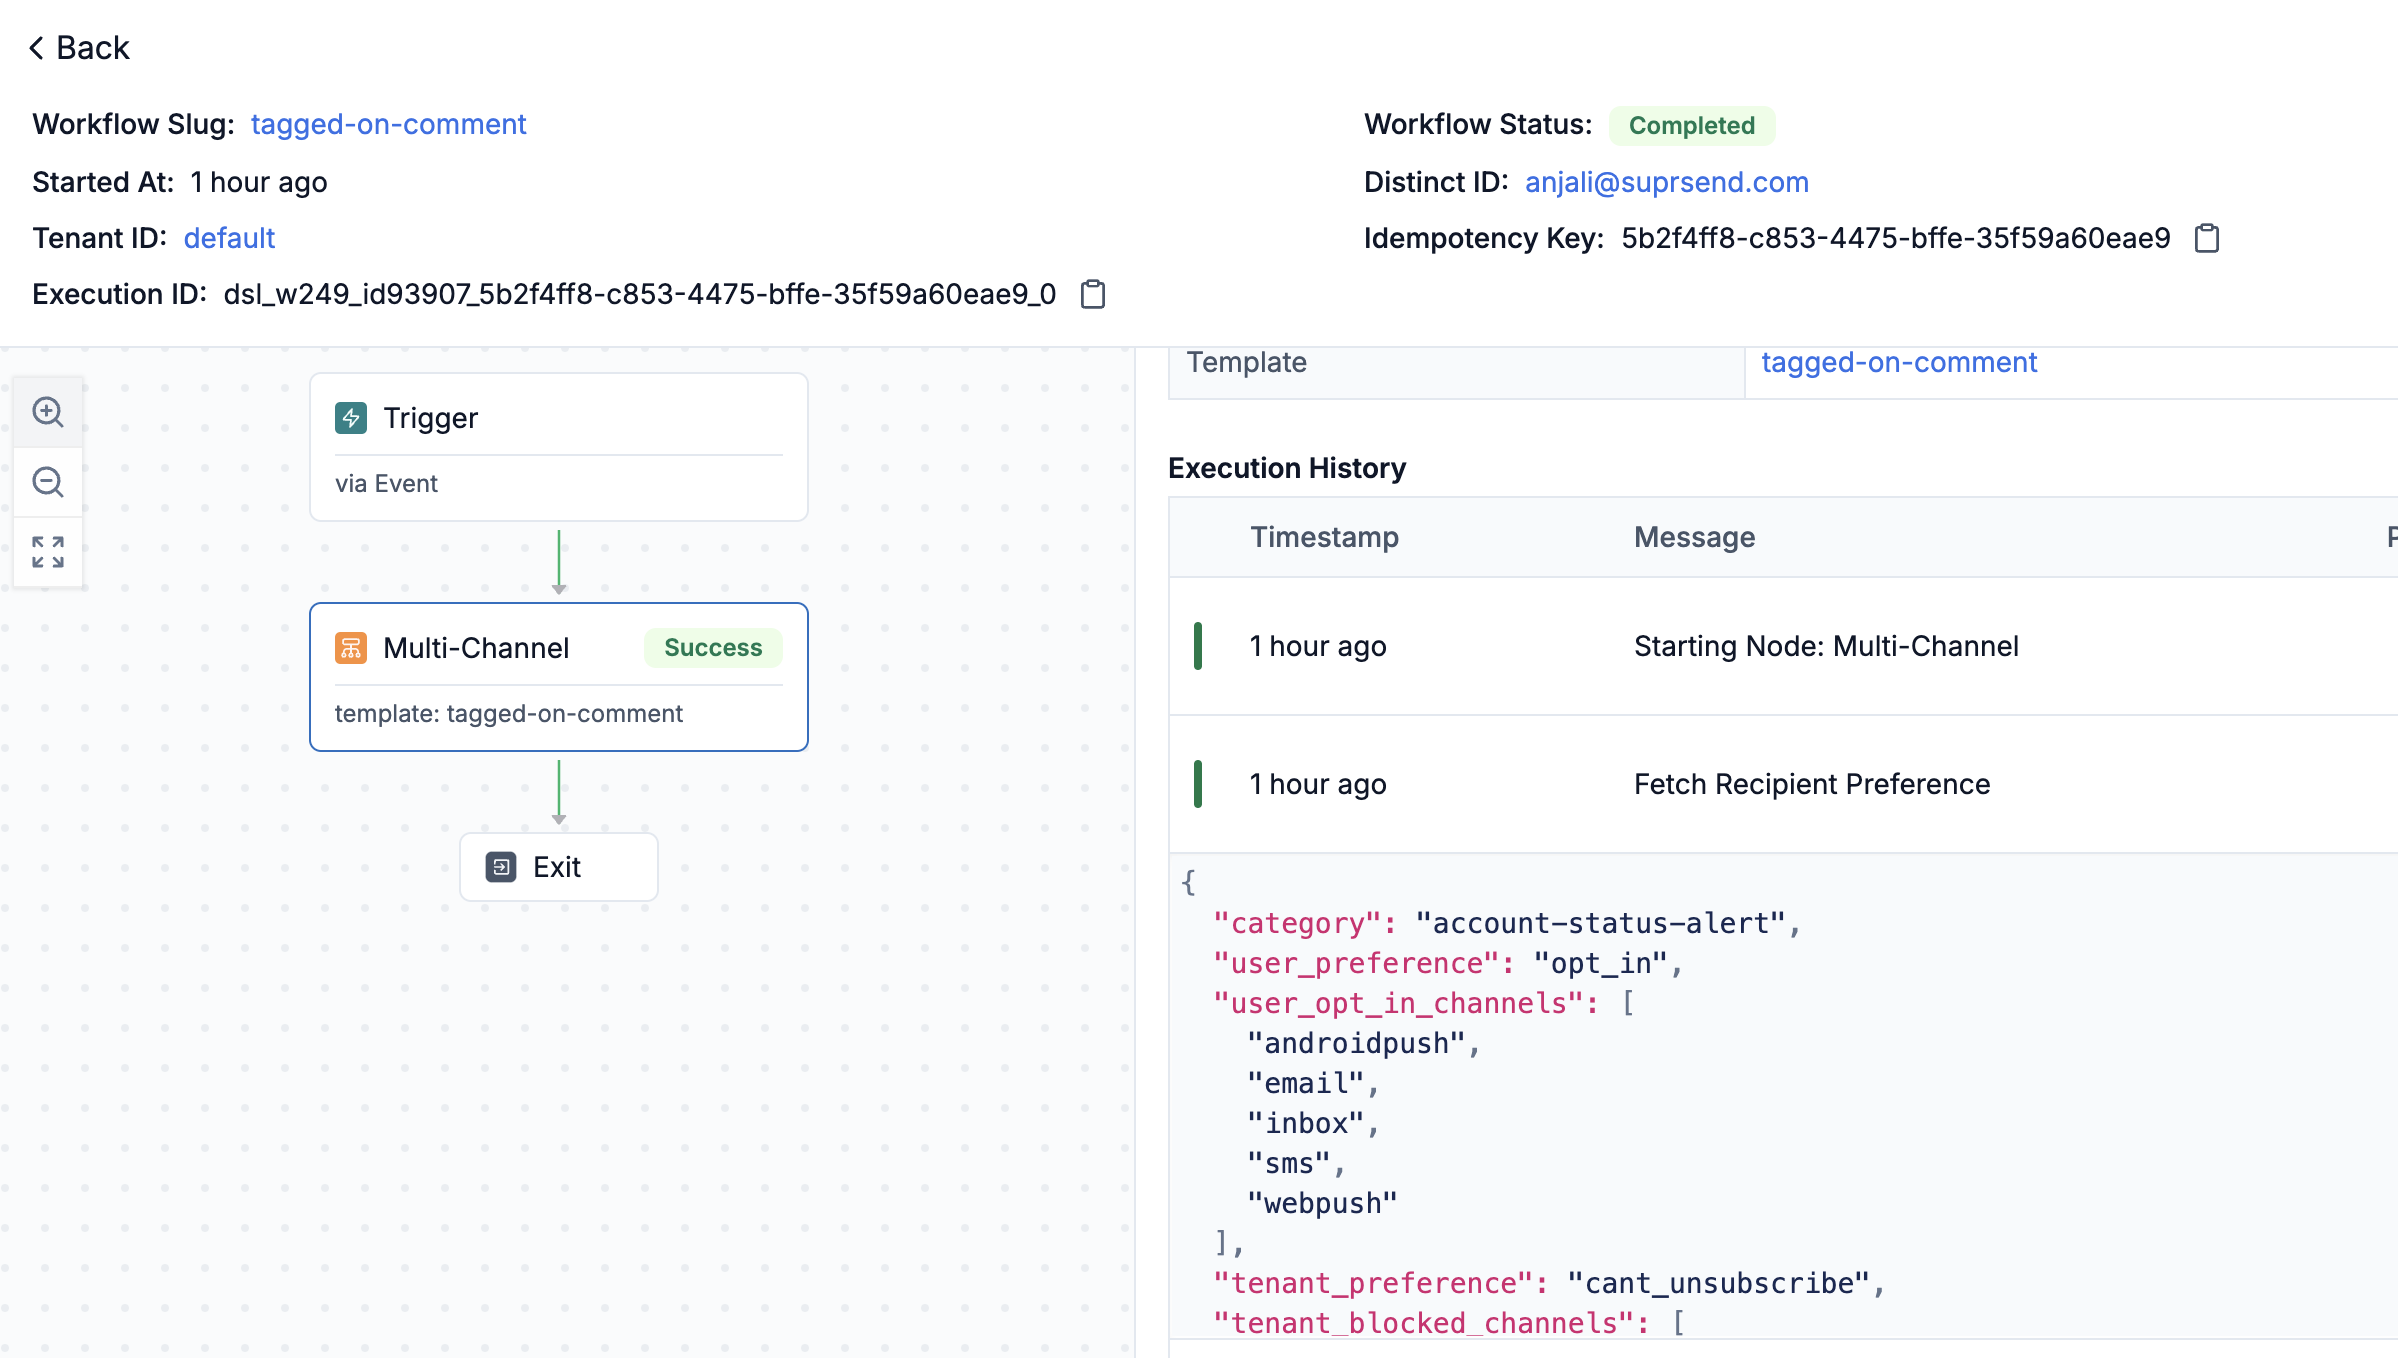 You can also track when user updated their preference by filtering on `Subscriber preference update` in [request logs](https://app.suprsend.com/en/demo/logs/api/?last_n_minutes=1440).
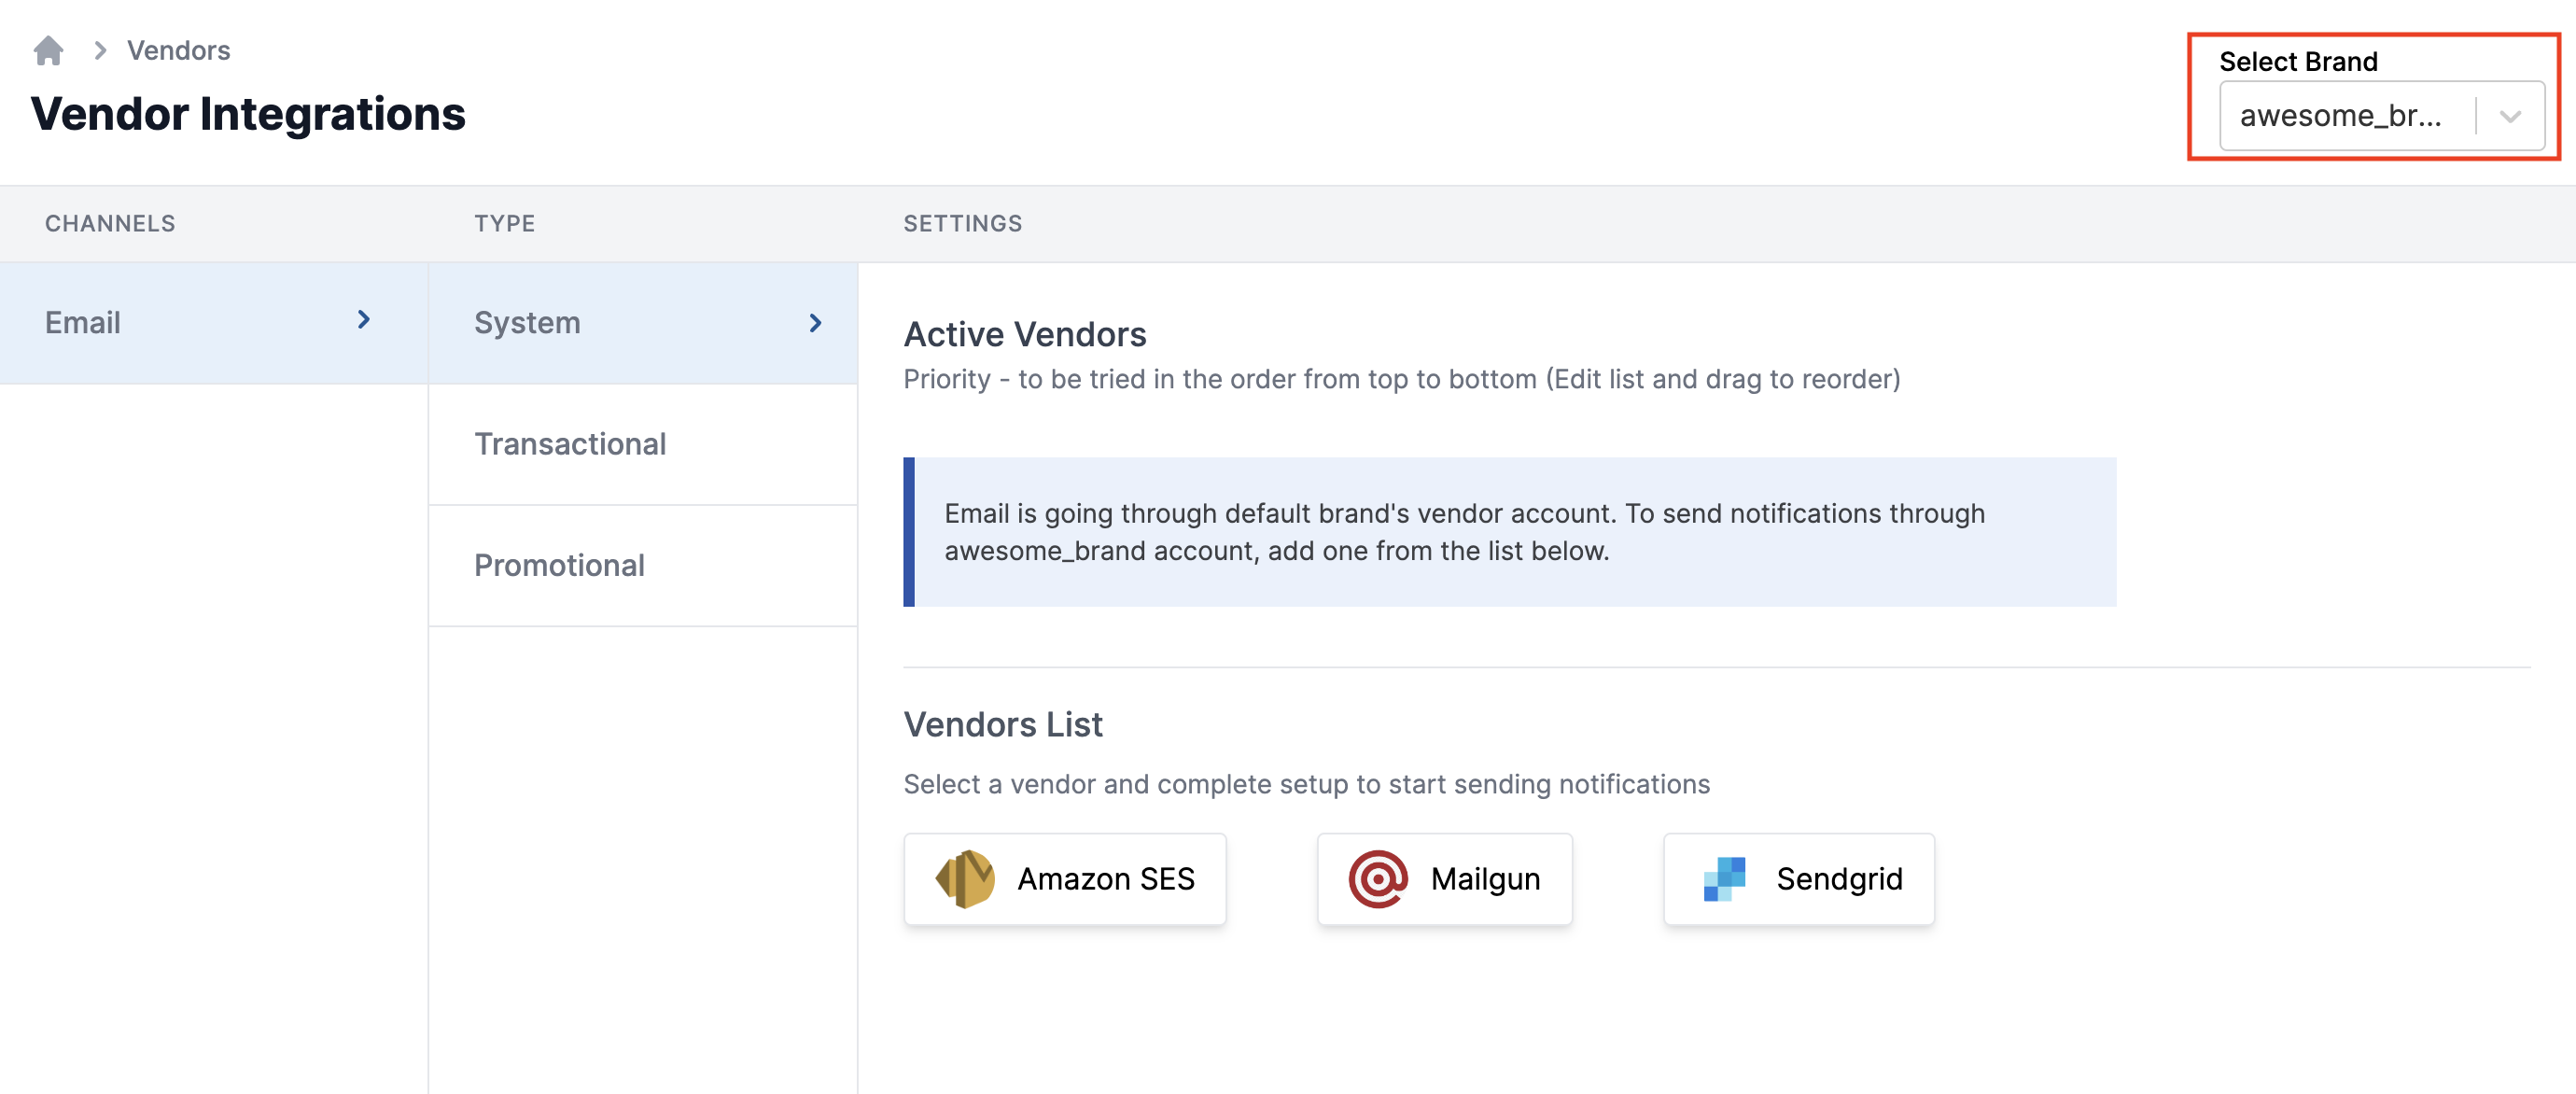 *Currently, this support is extended for Email, SMS and MS Teams Channel. We'll be expanding the functionality soon on other channels as well.*
 This will open a form to add **`tenant id`** and **`tenant name`**. Add the required fields and click on **`Create tenant`**
* **Tenant id** is a unique identifier for your tenant and can't be changed once the tenant is created. You'll have to pass tenant\_id in your workflow / event calls to render tenant level customization in your templates. (if no tenant\_id is passed, default tenant properties are picked). So, add a tenant\_id which is unique and easily identifiable for you.
* **Tenant name** can be your customer company / organization name
This will open a form to add **`tenant id`** and **`tenant name`**. Add the required fields and click on **`Create tenant`**
* **Tenant id** is a unique identifier for your tenant and can't be changed once the tenant is created. You'll have to pass tenant\_id in your workflow / event calls to render tenant level customization in your templates. (if no tenant\_id is passed, default tenant properties are picked). So, add a tenant\_id which is unique and easily identifiable for you.
* **Tenant name** can be your customer company / organization name
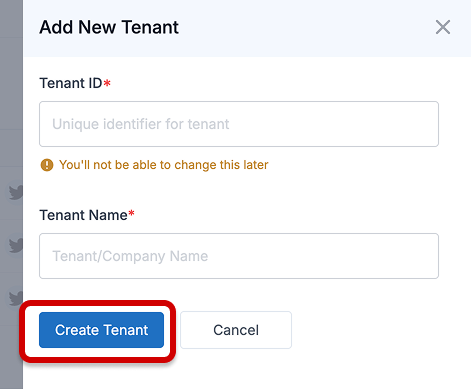 This will open tenant details page. Fill tenant details and Save changes. You can always come back and edit it again later
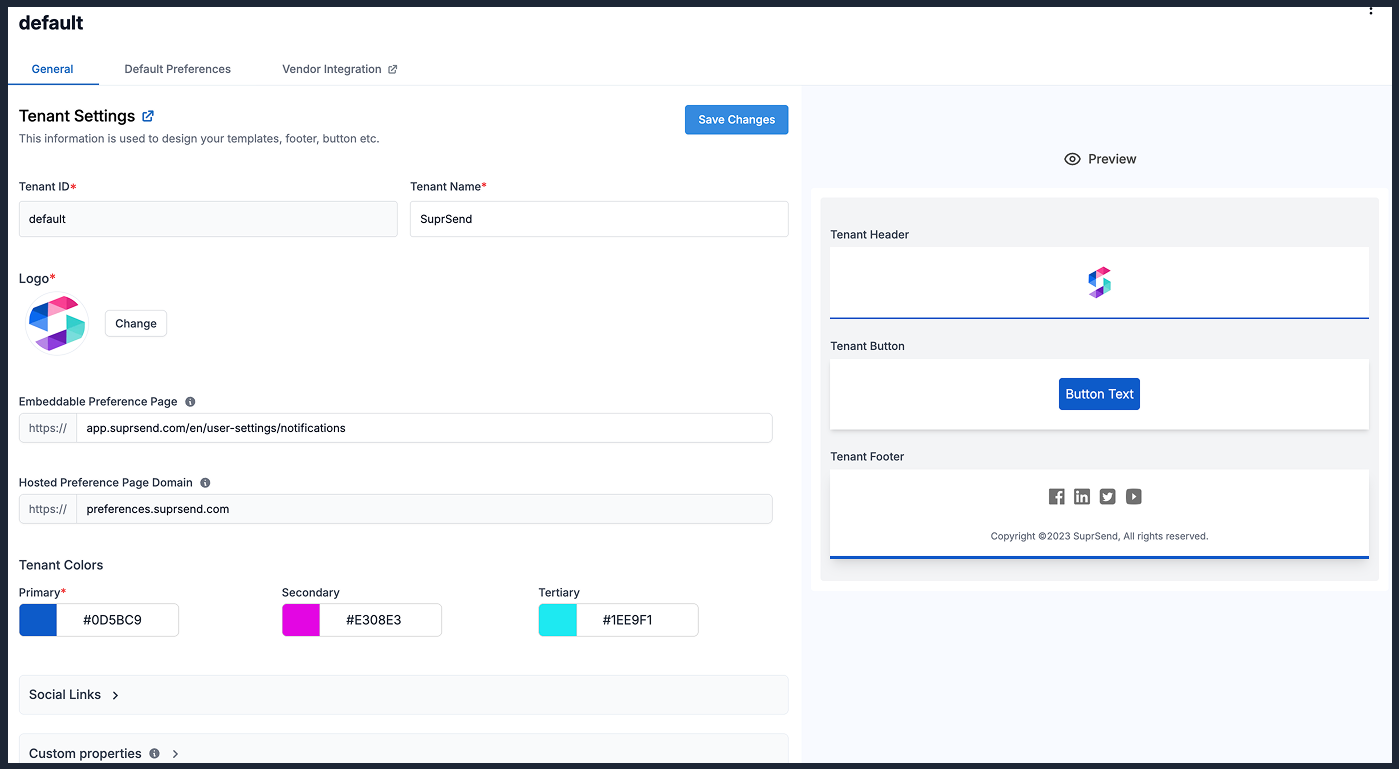 Here are the form fields and its description
| Field | Type | Description |
| ----------------- | ------------------------------------------------------------------------------------------------------------------------------------------------------- | ------------------------------------------------------------------------------------------------------------------------------------------------------------------------------------------------------------------------------------------------------------------------------------------------------------------------------------------------------------------ |
| Tenant ID | string of max character length of 64 characters with allowed characters (\[a-z0-9\_-] that is alphanumeric characters, \_ (underscore) and - (hyphen).) | tenant\_id is used to identify tenant in workflow and event call |
| Tenant Name | single line text | Name of the company / organization |
| Logo | image | Tenant logo. Used to render logo in email tenant header |
| Tenant colors | 6 digit color code | Tenant color settings are mainly used while designing templates. Primary tenant color is used in button, header and footer border in tenant email template. If you don't provide any of the colors for the tenant, SuprSend will assume you want to use the default values, so color settings will automatically be set to the color settings of `default` tenant. |
| Social Links | URL | URLs of social media accounts of the tenant It is used to render social media logos in tenant email footer. if the link is not passed, that logo will not be shown in the footer. |
| Custom Properties | JSON | Custom properties associated with the tenant. The option to add custom properties is currently not available on the dashboard but you can update it using backend SDK or APIs |
You can use [HTTP API](/reference/overview) or manage tenants using one of our backend SDKs:
1. [Update tenant using python SDK](/docs/python-tenants)
2. [Update tenant using node SDK](/docs/node-tenants)
3. [Update tenant using java SDK](/docs/tenants-java)
4. [Update tenant using go SDK](/docs/tenants-go)
## Using tenant components in templates
### 1. Ready-to-use tenant components in email
You can use tenant component in email to add ready-to-use header, footer and buttons in your email template. Tenant component automatically uses tenant logo, social links and primary color to style the email template. You'll find the tenant component in right side content menu in email editor.
Here are the form fields and its description
| Field | Type | Description |
| ----------------- | ------------------------------------------------------------------------------------------------------------------------------------------------------- | ------------------------------------------------------------------------------------------------------------------------------------------------------------------------------------------------------------------------------------------------------------------------------------------------------------------------------------------------------------------ |
| Tenant ID | string of max character length of 64 characters with allowed characters (\[a-z0-9\_-] that is alphanumeric characters, \_ (underscore) and - (hyphen).) | tenant\_id is used to identify tenant in workflow and event call |
| Tenant Name | single line text | Name of the company / organization |
| Logo | image | Tenant logo. Used to render logo in email tenant header |
| Tenant colors | 6 digit color code | Tenant color settings are mainly used while designing templates. Primary tenant color is used in button, header and footer border in tenant email template. If you don't provide any of the colors for the tenant, SuprSend will assume you want to use the default values, so color settings will automatically be set to the color settings of `default` tenant. |
| Social Links | URL | URLs of social media accounts of the tenant It is used to render social media logos in tenant email footer. if the link is not passed, that logo will not be shown in the footer. |
| Custom Properties | JSON | Custom properties associated with the tenant. The option to add custom properties is currently not available on the dashboard but you can update it using backend SDK or APIs |
You can use [HTTP API](/reference/overview) or manage tenants using one of our backend SDKs:
1. [Update tenant using python SDK](/docs/python-tenants)
2. [Update tenant using node SDK](/docs/node-tenants)
3. [Update tenant using java SDK](/docs/tenants-java)
4. [Update tenant using go SDK](/docs/tenants-go)
## Using tenant components in templates
### 1. Ready-to-use tenant components in email
You can use tenant component in email to add ready-to-use header, footer and buttons in your email template. Tenant component automatically uses tenant logo, social links and primary color to style the email template. You'll find the tenant component in right side content menu in email editor.
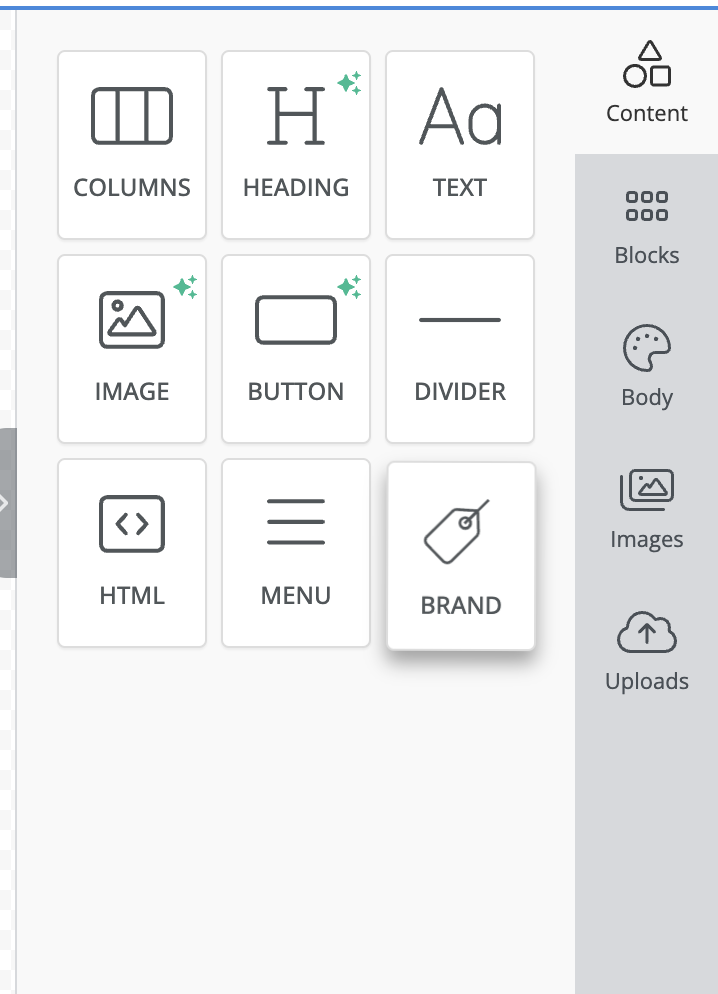 You can add tenant component and change block type to switch between header, footer and buttons
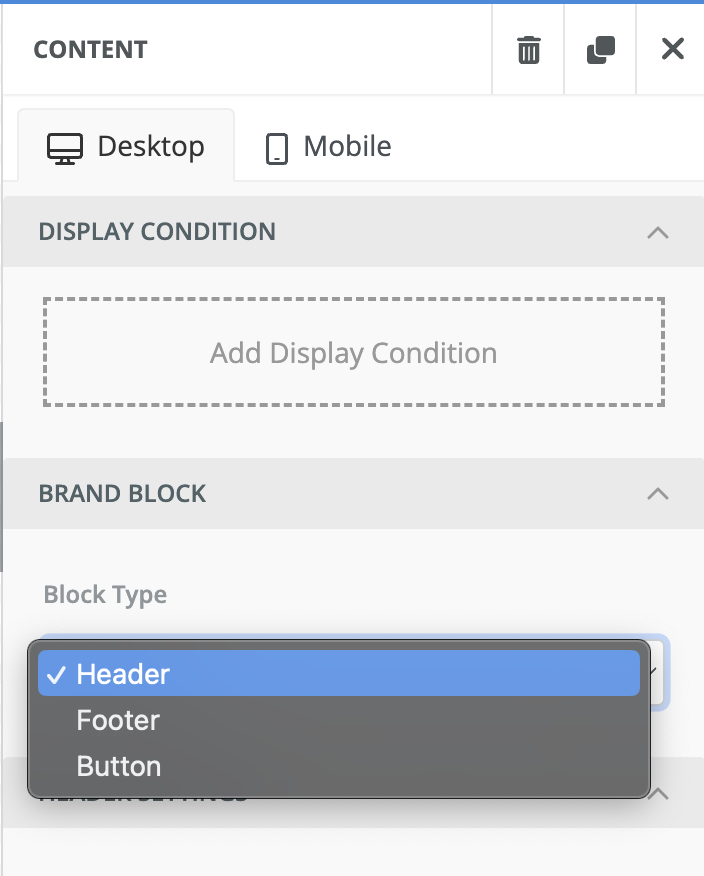 You can change the component using standard customization options like padding, background color etc. to best suit your email template.
### 2. Use Tenant variable for all channels
You can add tenant variables in all channel templates as `$tenant.
You can change the component using standard customization options like padding, background color etc. to best suit your email template.
### 2. Use Tenant variable for all channels
You can add tenant variables in all channel templates as `$tenant.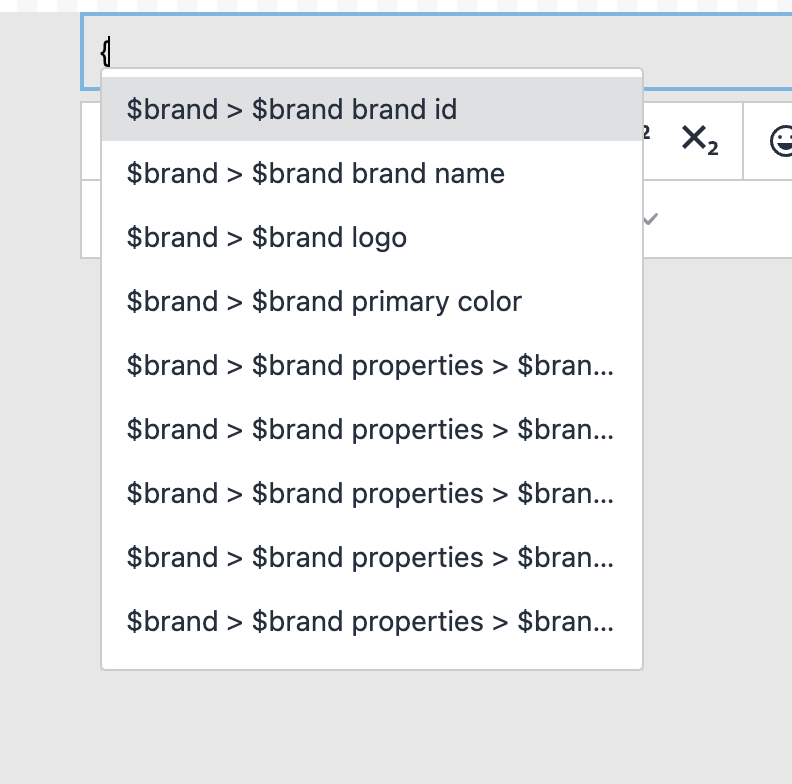 ## Triggering notification for your Tenant
After adding the tenant variables in your template, you can add tenant\_id in your workflow or event trigger to trigger notification for that tenant. This will replace tenant variables with the properties of that tenant at run time.
### 1. Adding tenant\_id in workflow trigger
## Triggering notification for your Tenant
After adding the tenant variables in your template, you can add tenant\_id in your workflow or event trigger to trigger notification for that tenant. This will replace tenant variables with the properties of that tenant at run time.
### 1. Adding tenant\_id in workflow trigger
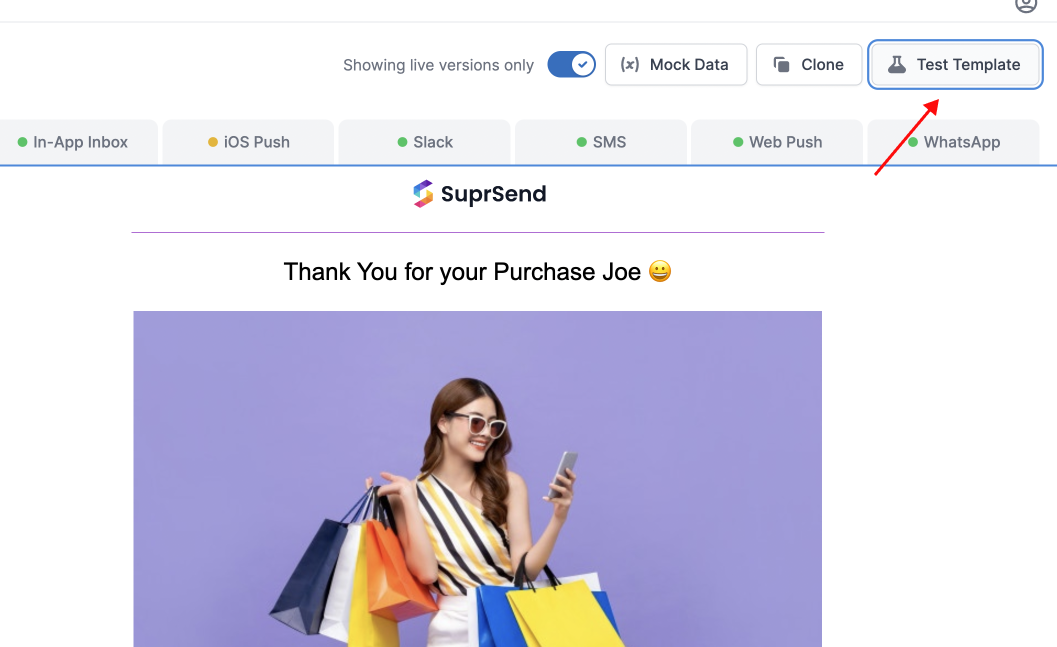
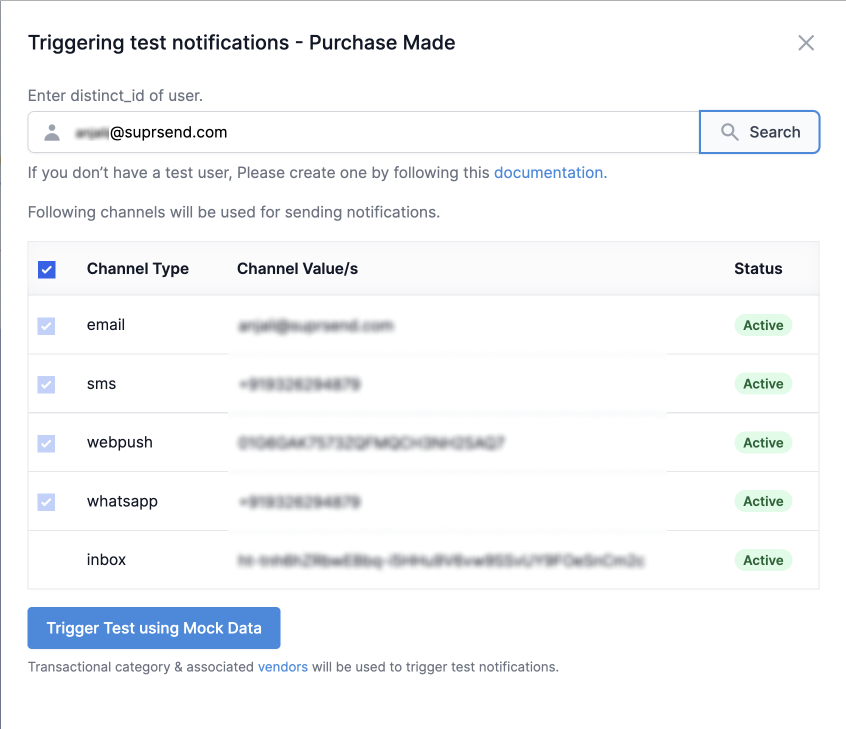
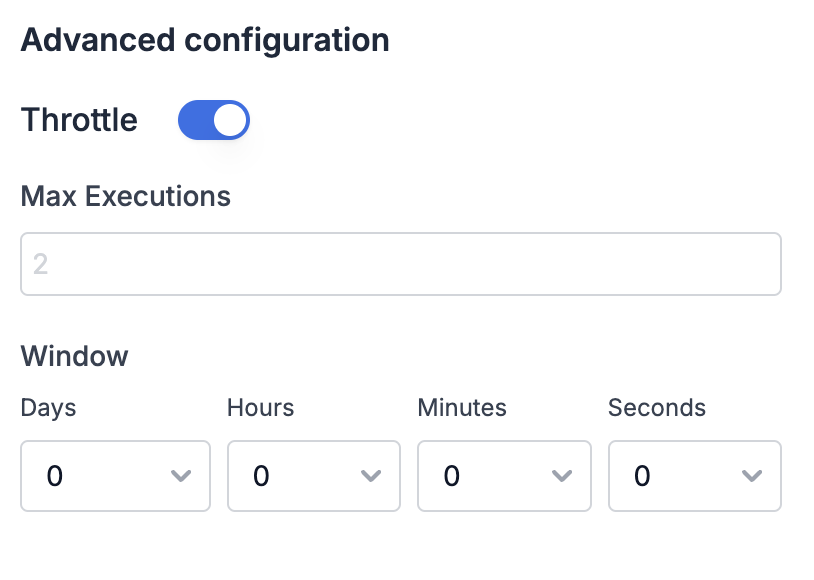 * **Max Executions**
\- Maximum number of workflow executions permitted in the time window.
* **Window**
\- The duration for which the throttle count is maintained. e.g., if max executions is set to 3 and the window is 15 minutes, a maximum of 3 workflows can execute within a 15-minute window. You can define window as
`**d **h **m **s`
.
Now, on each workflow trigger, it checks for the number of workflows executed in the relative window from your trigger and skips the execution if count exceeds `Max executions`.
***
# Time Window
Source: https://docs.suprsend.com/docs/time-window
Use time window in workflow to send notification in a given datetime range and user's timezone.
Time window is used to schedule messages in a fixed time range and user's timezone. e.g., if you want to send messages to users only in their office working hours or only on weekends in their timezone. You can also define different schedule for different channels; e.g. send Inbox messages to users during their working hours and send Email out of their office hours.
## How time window works
Time window introduces a wait until the time window starts and all subsequent steps in the workflow will be delayed by the same time. Let's understand this with below example:
Imagine a workflow that sends alerts when a task status changes. To avoid sending alerts outside of working hours, you set the Time Window to 9:00 AM - 5:00 PM in the recipient's timezone.
* **Trigger**: User updates the task status on July 22 at 9:00 PM UTC.
* **Time Window**: Any day, 9:00 AM - 5:00 PM.
* **Recipient’s Timezone**: Europe/London (UTC+1).
In this case, the workflow will wait for 11 hours (until July 23, 9:00 AM Europe/London) before sending the notification.
* **Max Executions**
\- Maximum number of workflow executions permitted in the time window.
* **Window**
\- The duration for which the throttle count is maintained. e.g., if max executions is set to 3 and the window is 15 minutes, a maximum of 3 workflows can execute within a 15-minute window. You can define window as
`**d **h **m **s`
.
Now, on each workflow trigger, it checks for the number of workflows executed in the relative window from your trigger and skips the execution if count exceeds `Max executions`.
***
# Time Window
Source: https://docs.suprsend.com/docs/time-window
Use time window in workflow to send notification in a given datetime range and user's timezone.
Time window is used to schedule messages in a fixed time range and user's timezone. e.g., if you want to send messages to users only in their office working hours or only on weekends in their timezone. You can also define different schedule for different channels; e.g. send Inbox messages to users during their working hours and send Email out of their office hours.
## How time window works
Time window introduces a wait until the time window starts and all subsequent steps in the workflow will be delayed by the same time. Let's understand this with below example:
Imagine a workflow that sends alerts when a task status changes. To avoid sending alerts outside of working hours, you set the Time Window to 9:00 AM - 5:00 PM in the recipient's timezone.
* **Trigger**: User updates the task status on July 22 at 9:00 PM UTC.
* **Time Window**: Any day, 9:00 AM - 5:00 PM.
* **Recipient’s Timezone**: Europe/London (UTC+1).
In this case, the workflow will wait for 11 hours (until July 23, 9:00 AM Europe/London) before sending the notification.
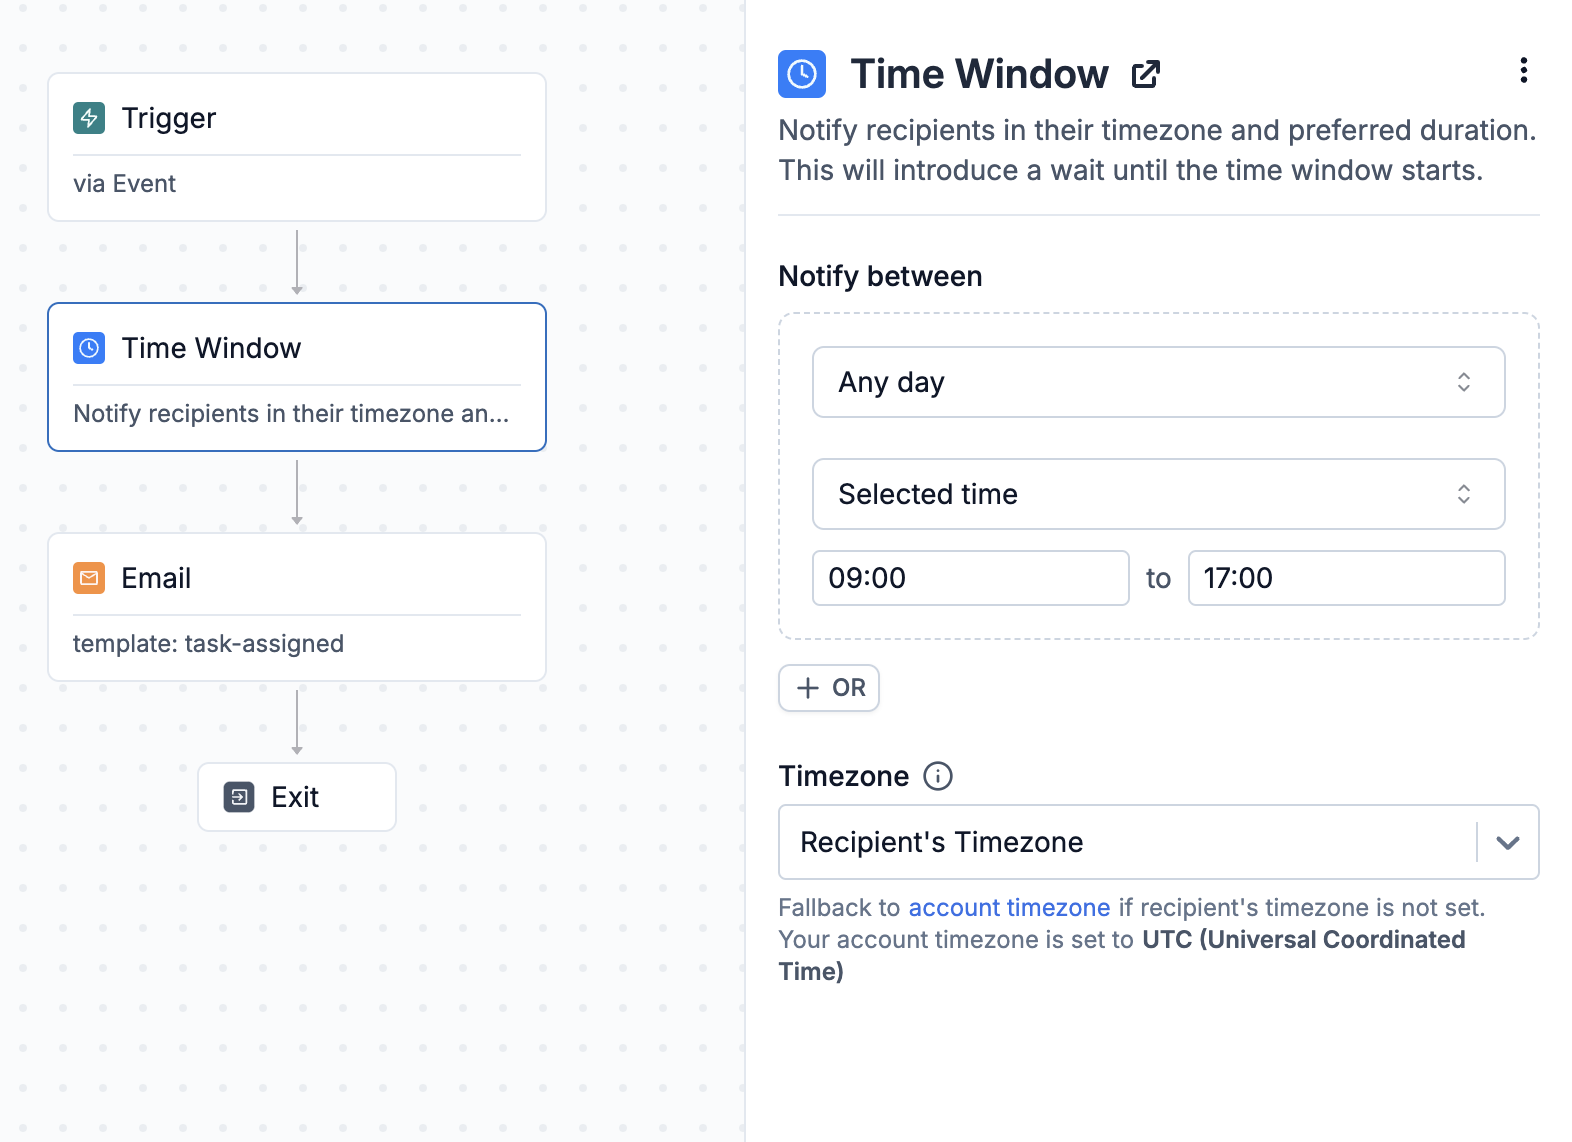 ## Setting up time window
Time window has 3 inputs
1. **Day**: Specify the days of the week or month when the notification should be sent. Options include:
* Every day
* Weekdays (Monday - Friday)
* Selected days of the week (e.g. Mondays and Wednesdays of the week)
* Selected days of the month (e.g. 1st, 3rd, and 5th Mondays of the month or 1st - 5th day of the month).
2. **Time**: Define the time within the selected days when the notification should be sent. This is calculated based on the recipient’s timezone.
3. **Timezone:** Set the timezone for the Time specified. You can set recipient's timezone here which will be dynamically calculated for each recipient. You can set recipient timezone in recipient profile with `$timezone` key in HTTP API or `user.set_timezone()` method from your backend or Frontend SDKs.
Timezones should be in [IANA (TZ identifier)](https://en.wikipedia.org/wiki/List_of_tz_database_time_zones#List) format, such as `America/New_York`.
## Setting up time window
Time window has 3 inputs
1. **Day**: Specify the days of the week or month when the notification should be sent. Options include:
* Every day
* Weekdays (Monday - Friday)
* Selected days of the week (e.g. Mondays and Wednesdays of the week)
* Selected days of the month (e.g. 1st, 3rd, and 5th Mondays of the month or 1st - 5th day of the month).
2. **Time**: Define the time within the selected days when the notification should be sent. This is calculated based on the recipient’s timezone.
3. **Timezone:** Set the timezone for the Time specified. You can set recipient's timezone here which will be dynamically calculated for each recipient. You can set recipient timezone in recipient profile with `$timezone` key in HTTP API or `user.set_timezone()` method from your backend or Frontend SDKs.
Timezones should be in [IANA (TZ identifier)](https://en.wikipedia.org/wiki/List_of_tz_database_time_zones#List) format, such as `America/New_York`.
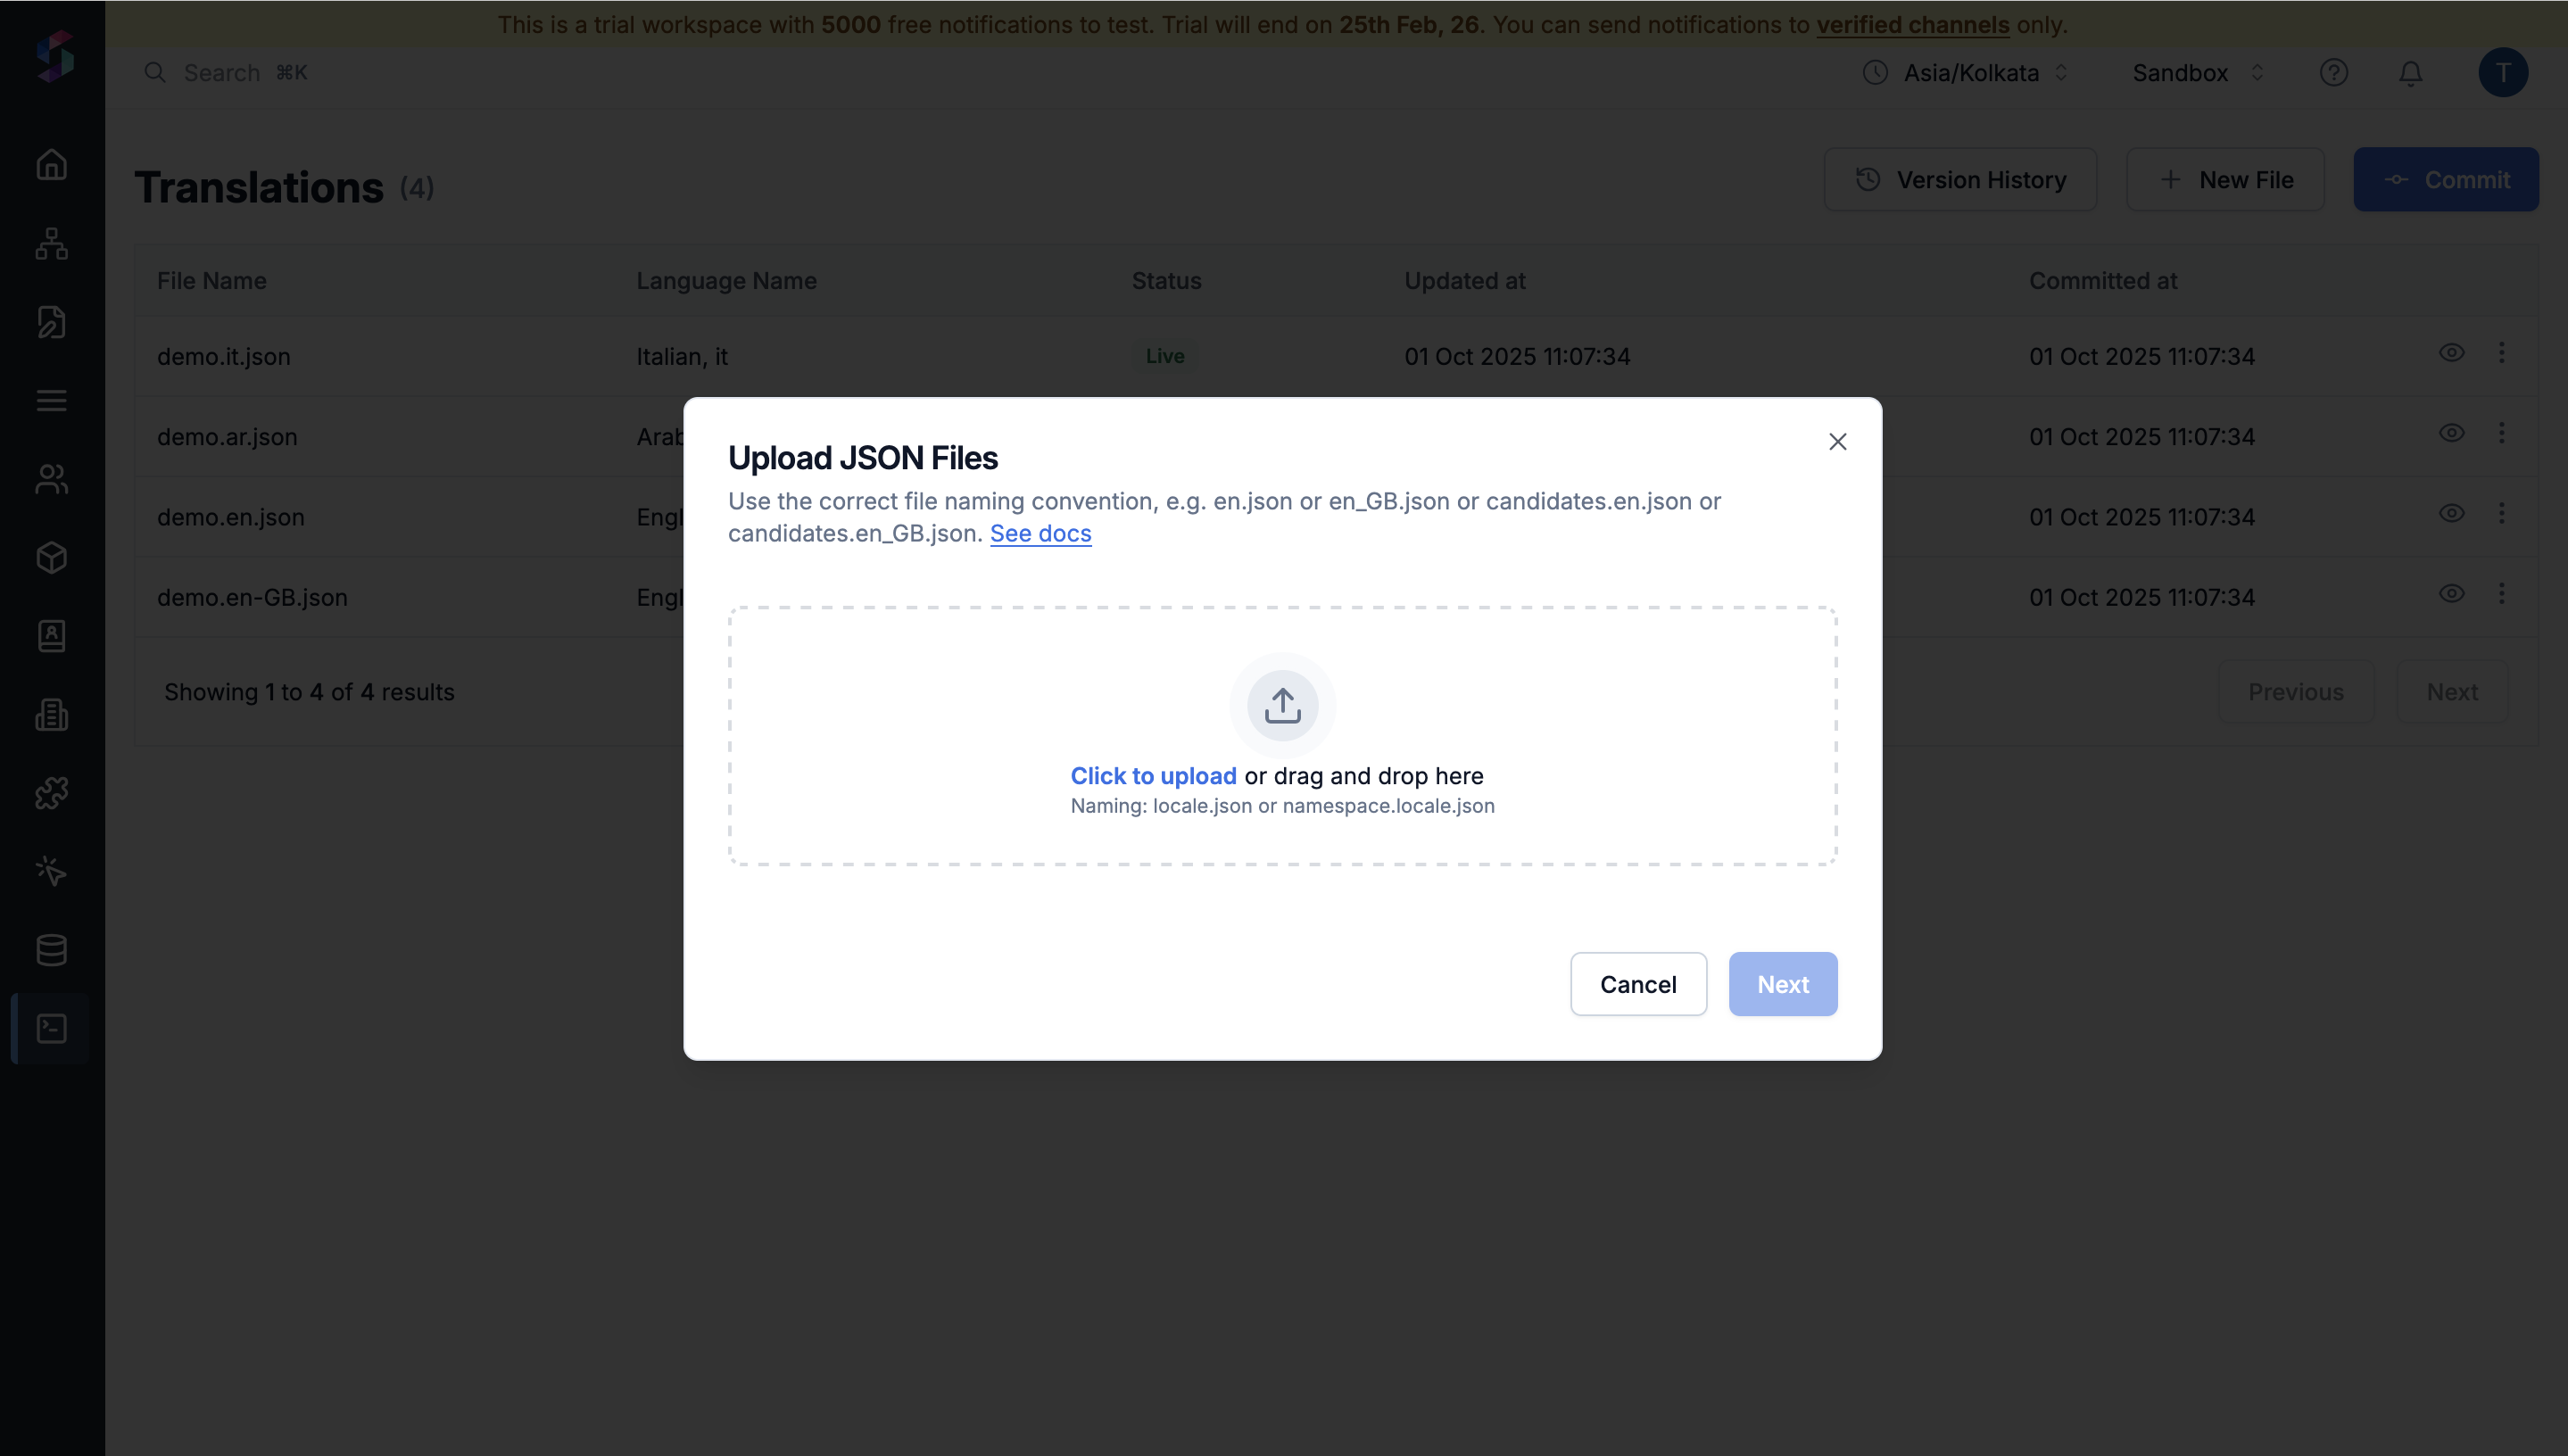 **Commit changes** to make translations live. Learn more about [managing translation files](#managing-translation-files).
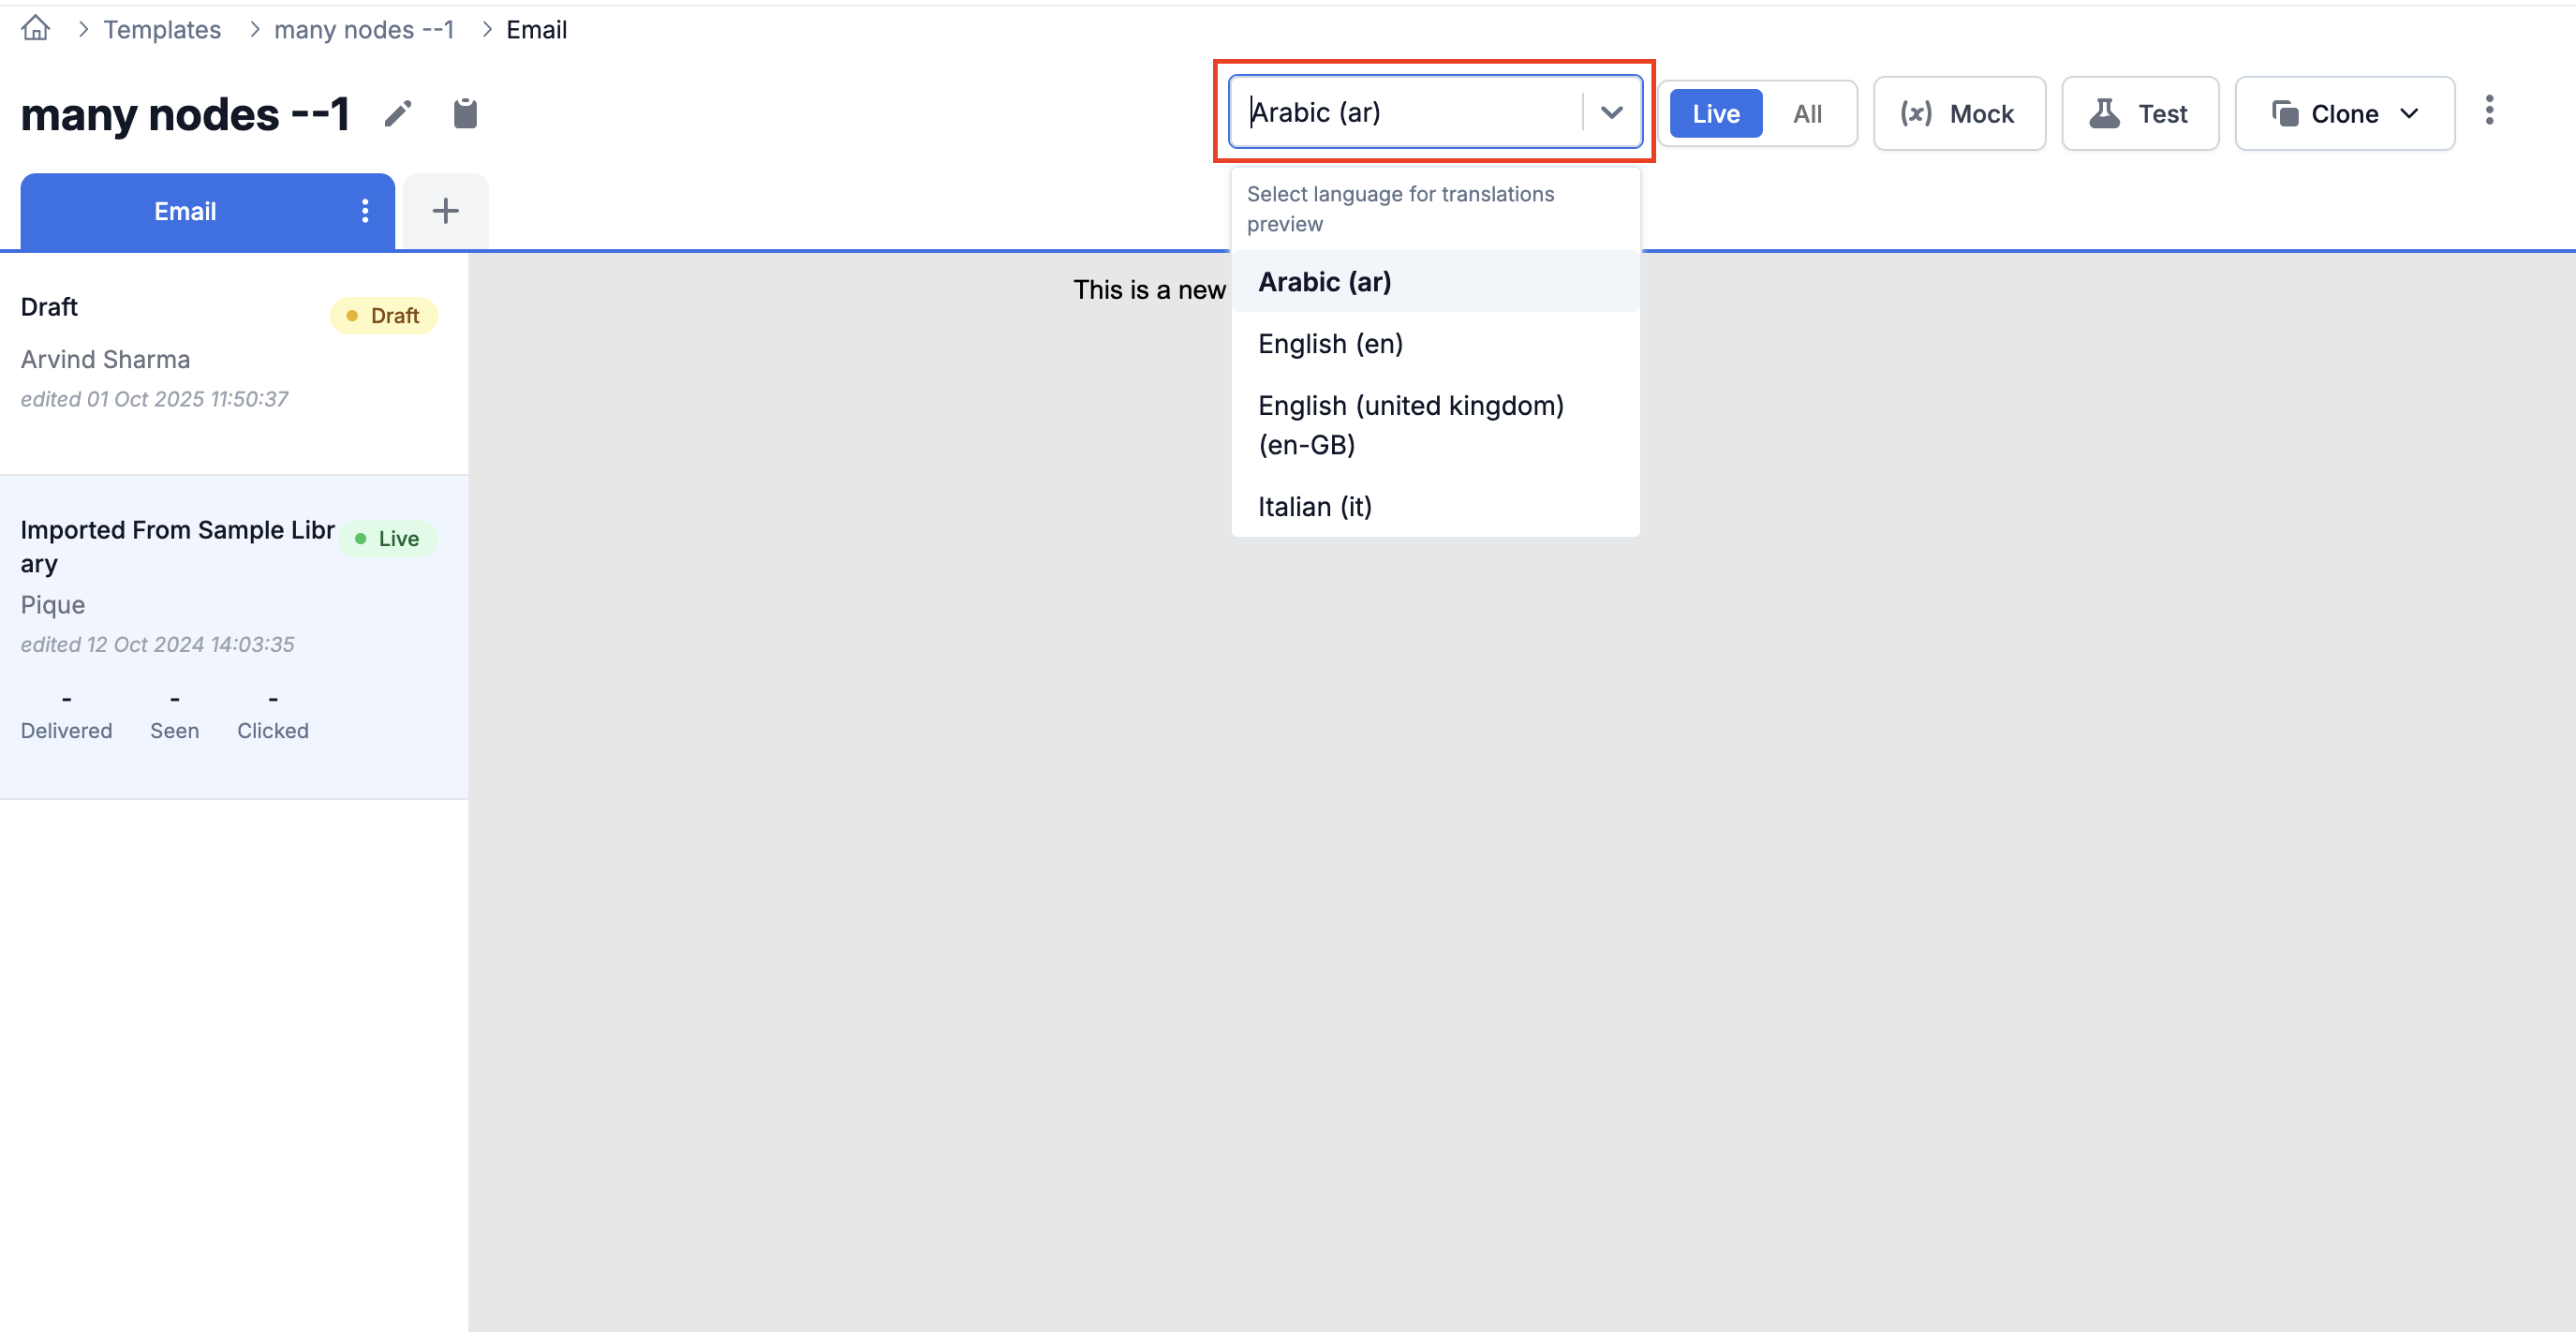 🎉 Notifications will now automatically display in each user's preferred language.
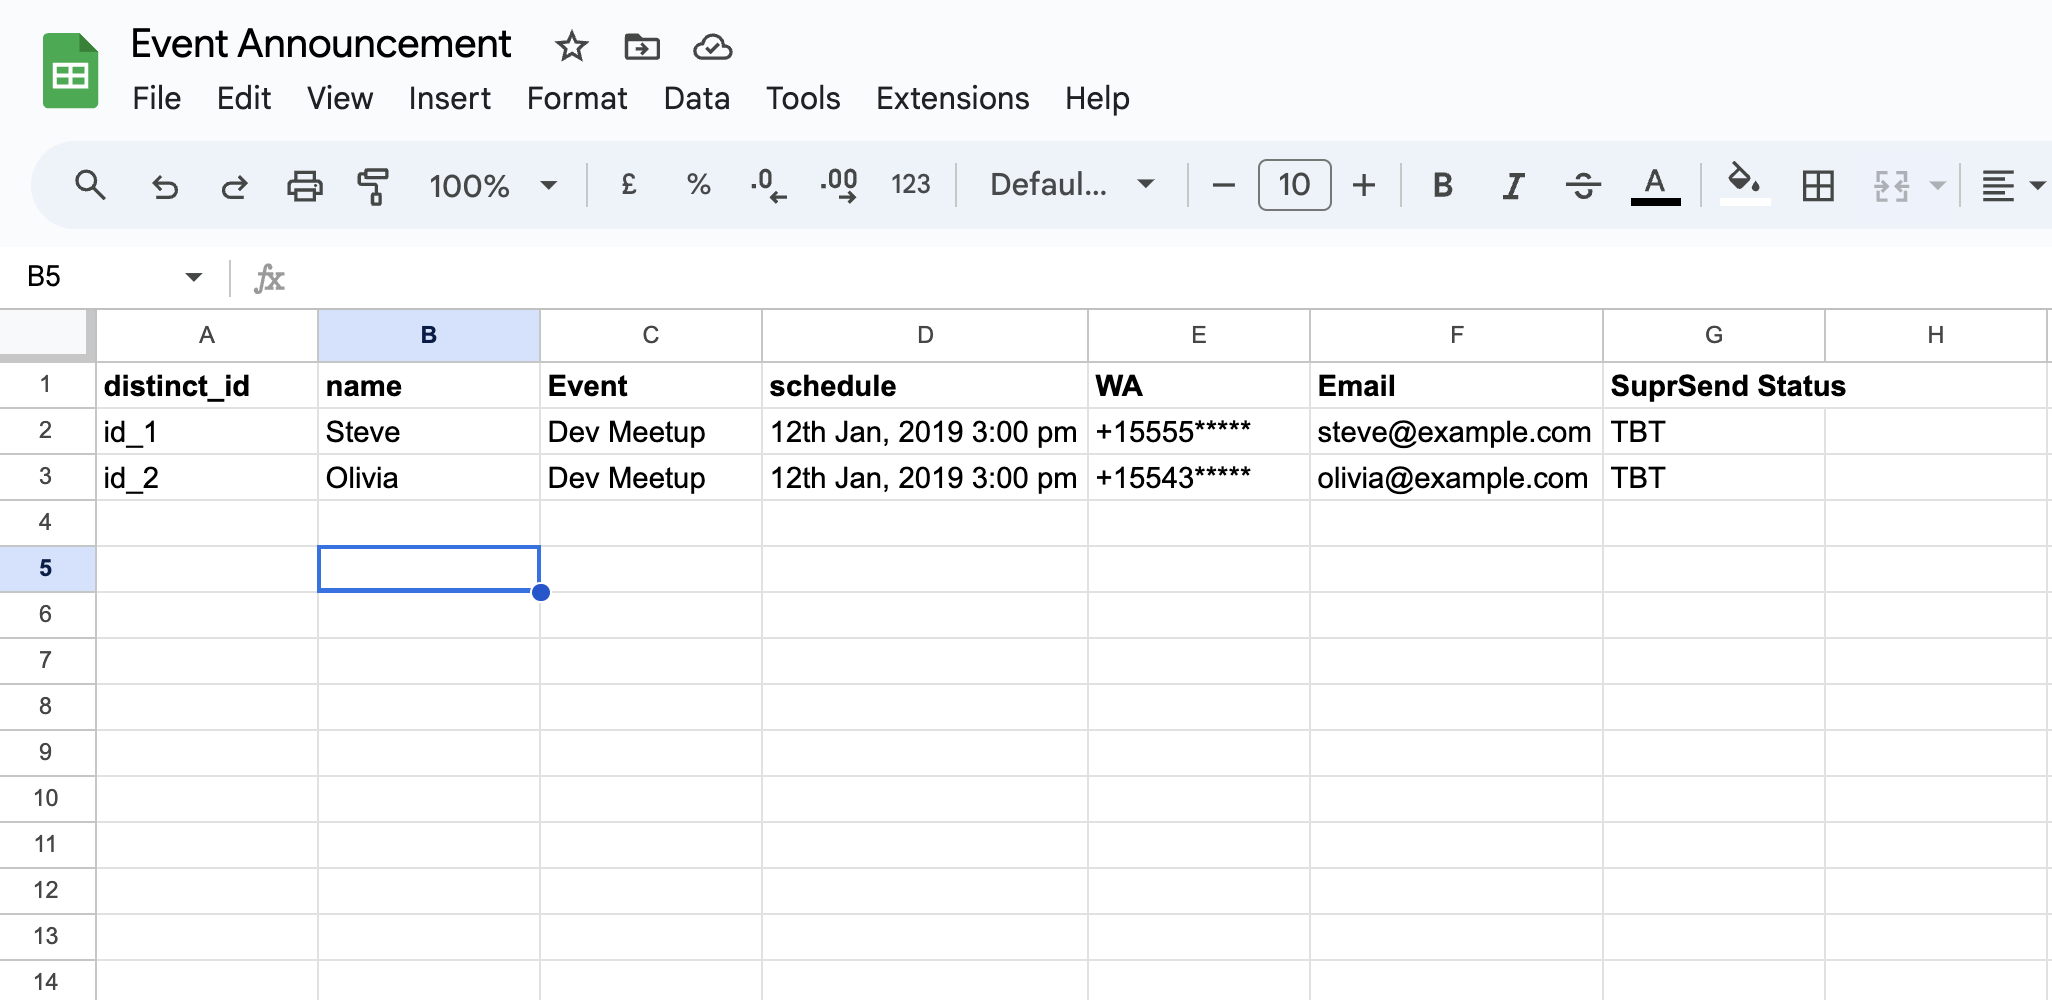
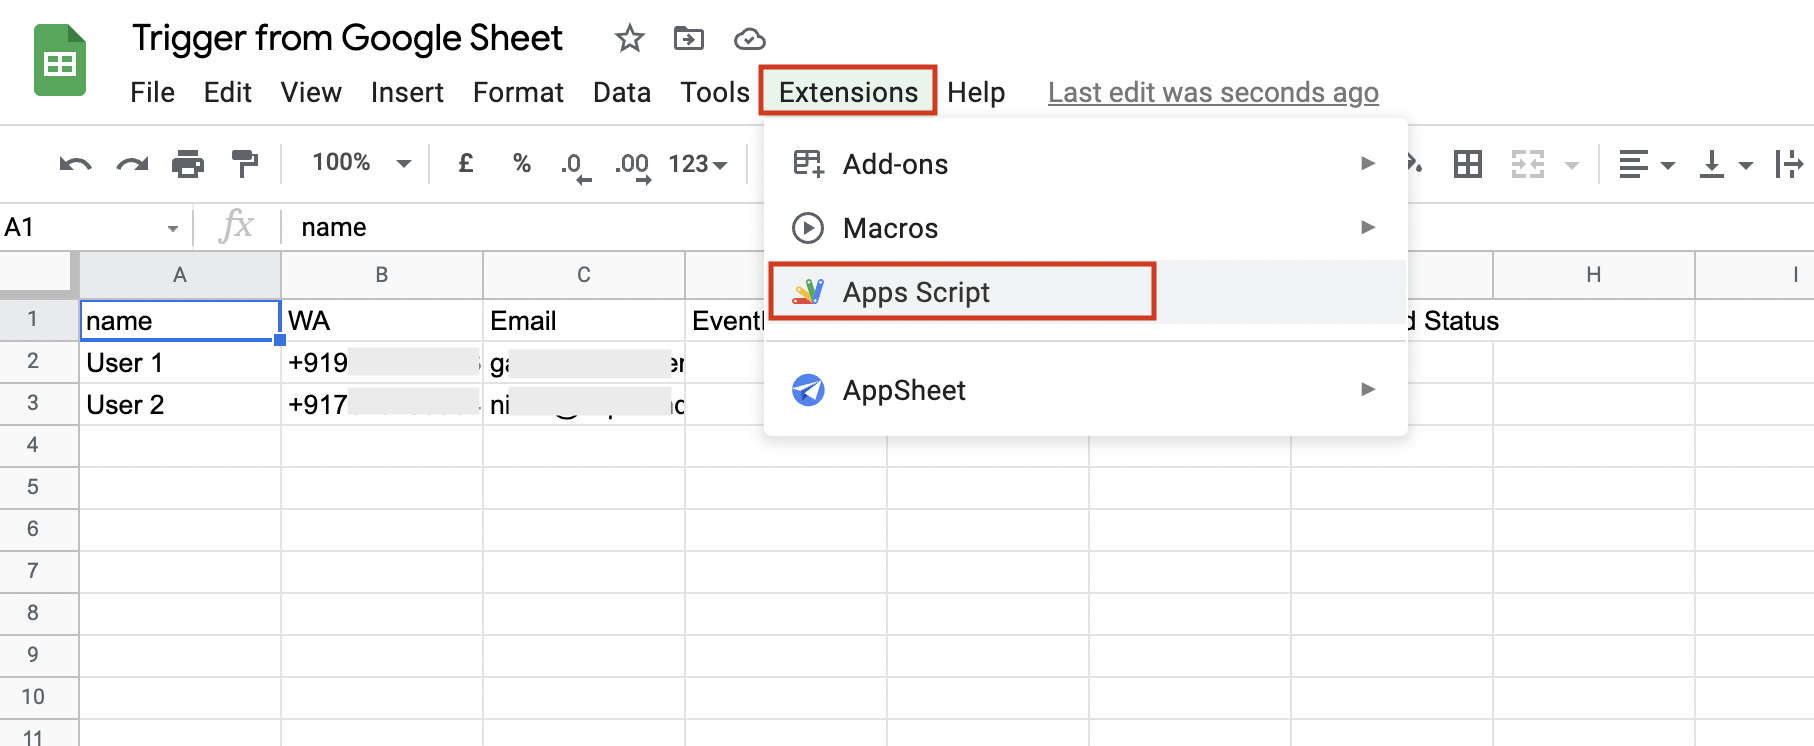
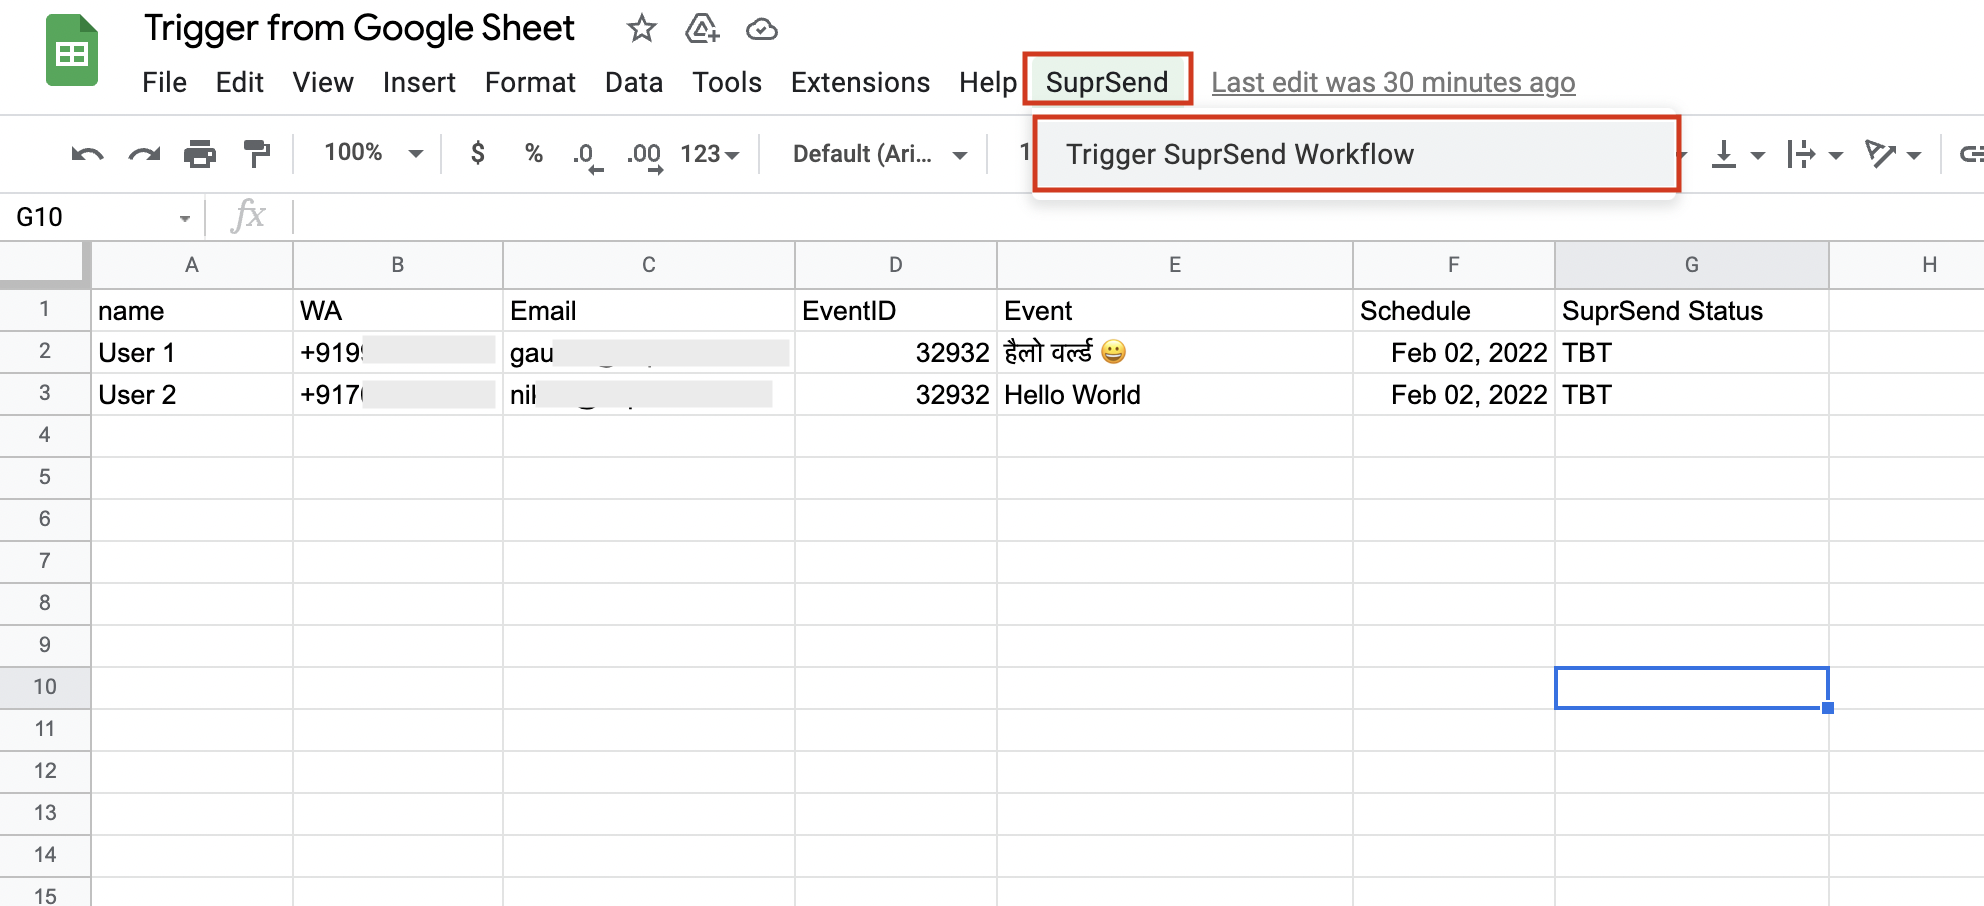

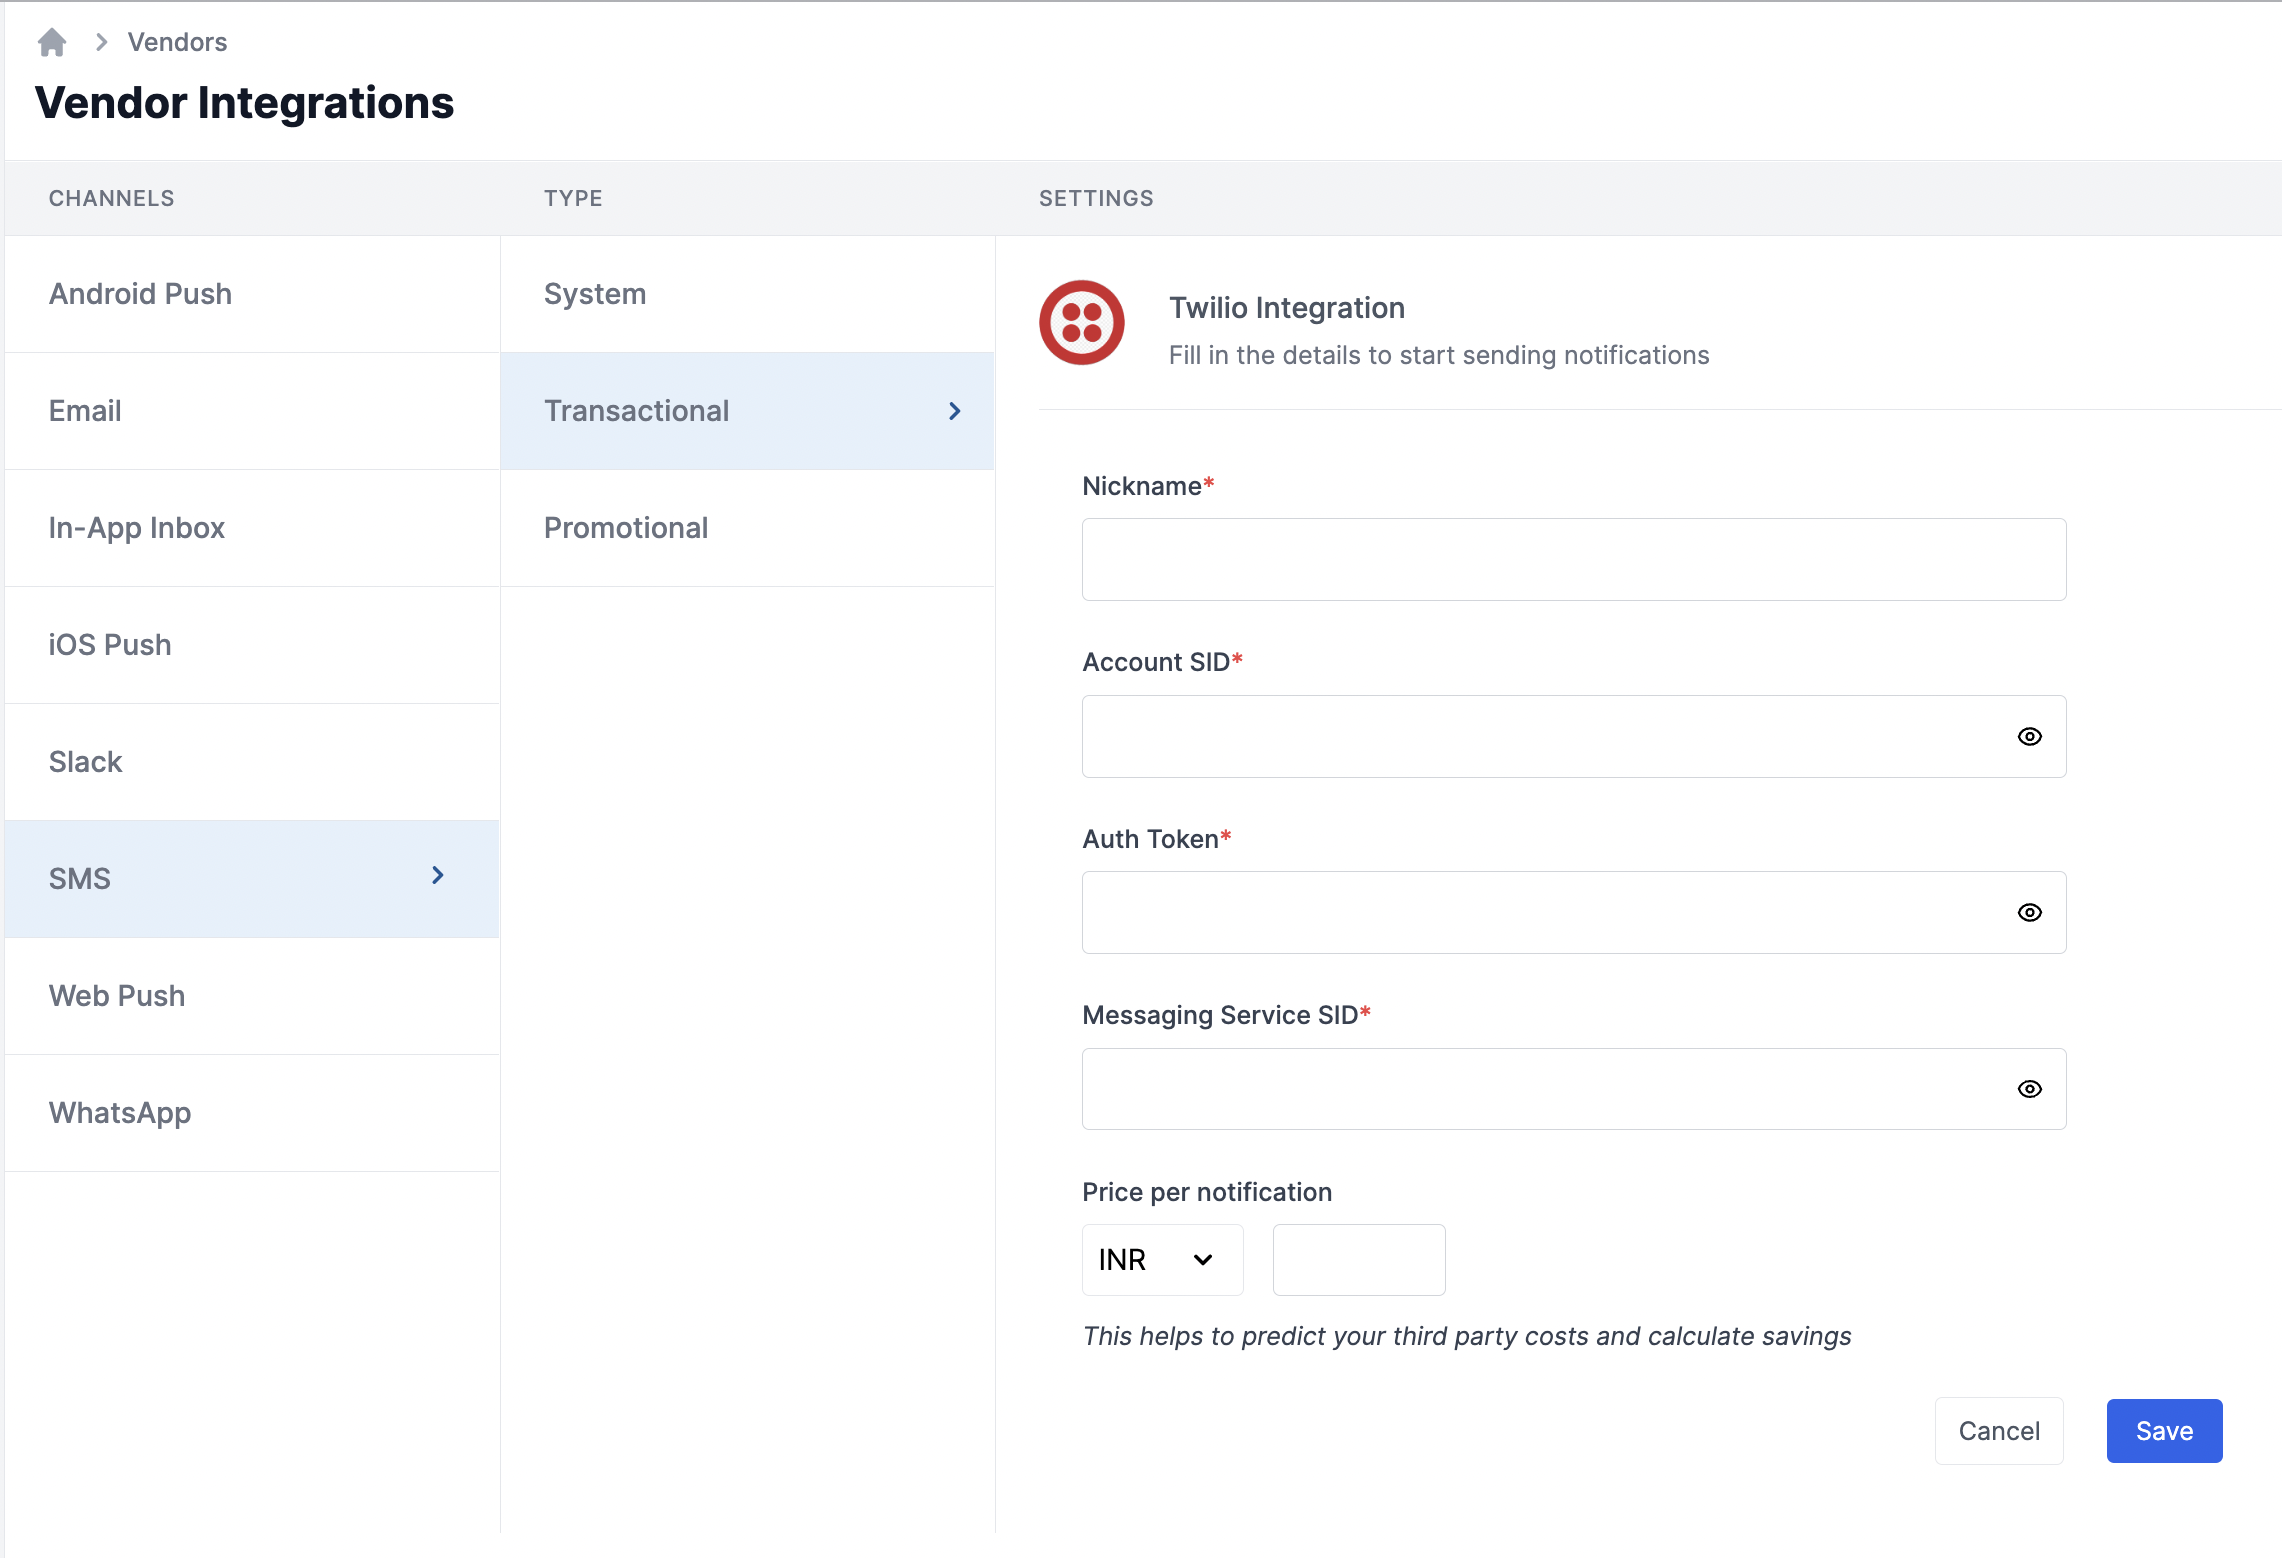 | Form Field | Description |
| ---------------------- | ----------------------------------------------------------------------------------------------------------------------------------------------------------------------------------------------------------------------------------------------------------------------------------------------------------------------------------- |
| Nickname | You can give any name which may help you to identify this account easily |
| Account SID | You will get this API Key from your Twilio dashboard (keys and tokens section). SuprSend uses this information to send SMS on your behalf via your registered Twilio account. |
| Auth Token | You will get the token from your Twilio dashboard (keys and tokens section). SuprSend uses this information to send SMS on your behalf via your registered Twilio account. |
| Messaging service SID | Messaging Service is the container for multiple Twilio message senders (e.g. phone numbers, WhatsApp senders). You'll have to create a messaging service and add your from: twilio number as the sender. [Refer section](/docs/twilio#how-to-get-messaging-service-sid-from-your-twilio-account) to get your messaging service SID. |
| Price per notification | This is the amount you pay per SMS notification to Twilio. It helps us to calculate, estimate and optimise your cost spent on notifications. |
### How to get Account SID and Auth Token from your Twilio account
Login to Twilio account and follow the below steps:
| Form Field | Description |
| ---------------------- | ----------------------------------------------------------------------------------------------------------------------------------------------------------------------------------------------------------------------------------------------------------------------------------------------------------------------------------- |
| Nickname | You can give any name which may help you to identify this account easily |
| Account SID | You will get this API Key from your Twilio dashboard (keys and tokens section). SuprSend uses this information to send SMS on your behalf via your registered Twilio account. |
| Auth Token | You will get the token from your Twilio dashboard (keys and tokens section). SuprSend uses this information to send SMS on your behalf via your registered Twilio account. |
| Messaging service SID | Messaging Service is the container for multiple Twilio message senders (e.g. phone numbers, WhatsApp senders). You'll have to create a messaging service and add your from: twilio number as the sender. [Refer section](/docs/twilio#how-to-get-messaging-service-sid-from-your-twilio-account) to get your messaging service SID. |
| Price per notification | This is the amount you pay per SMS notification to Twilio. It helps us to calculate, estimate and optimise your cost spent on notifications. |
### How to get Account SID and Auth Token from your Twilio account
Login to Twilio account and follow the below steps:

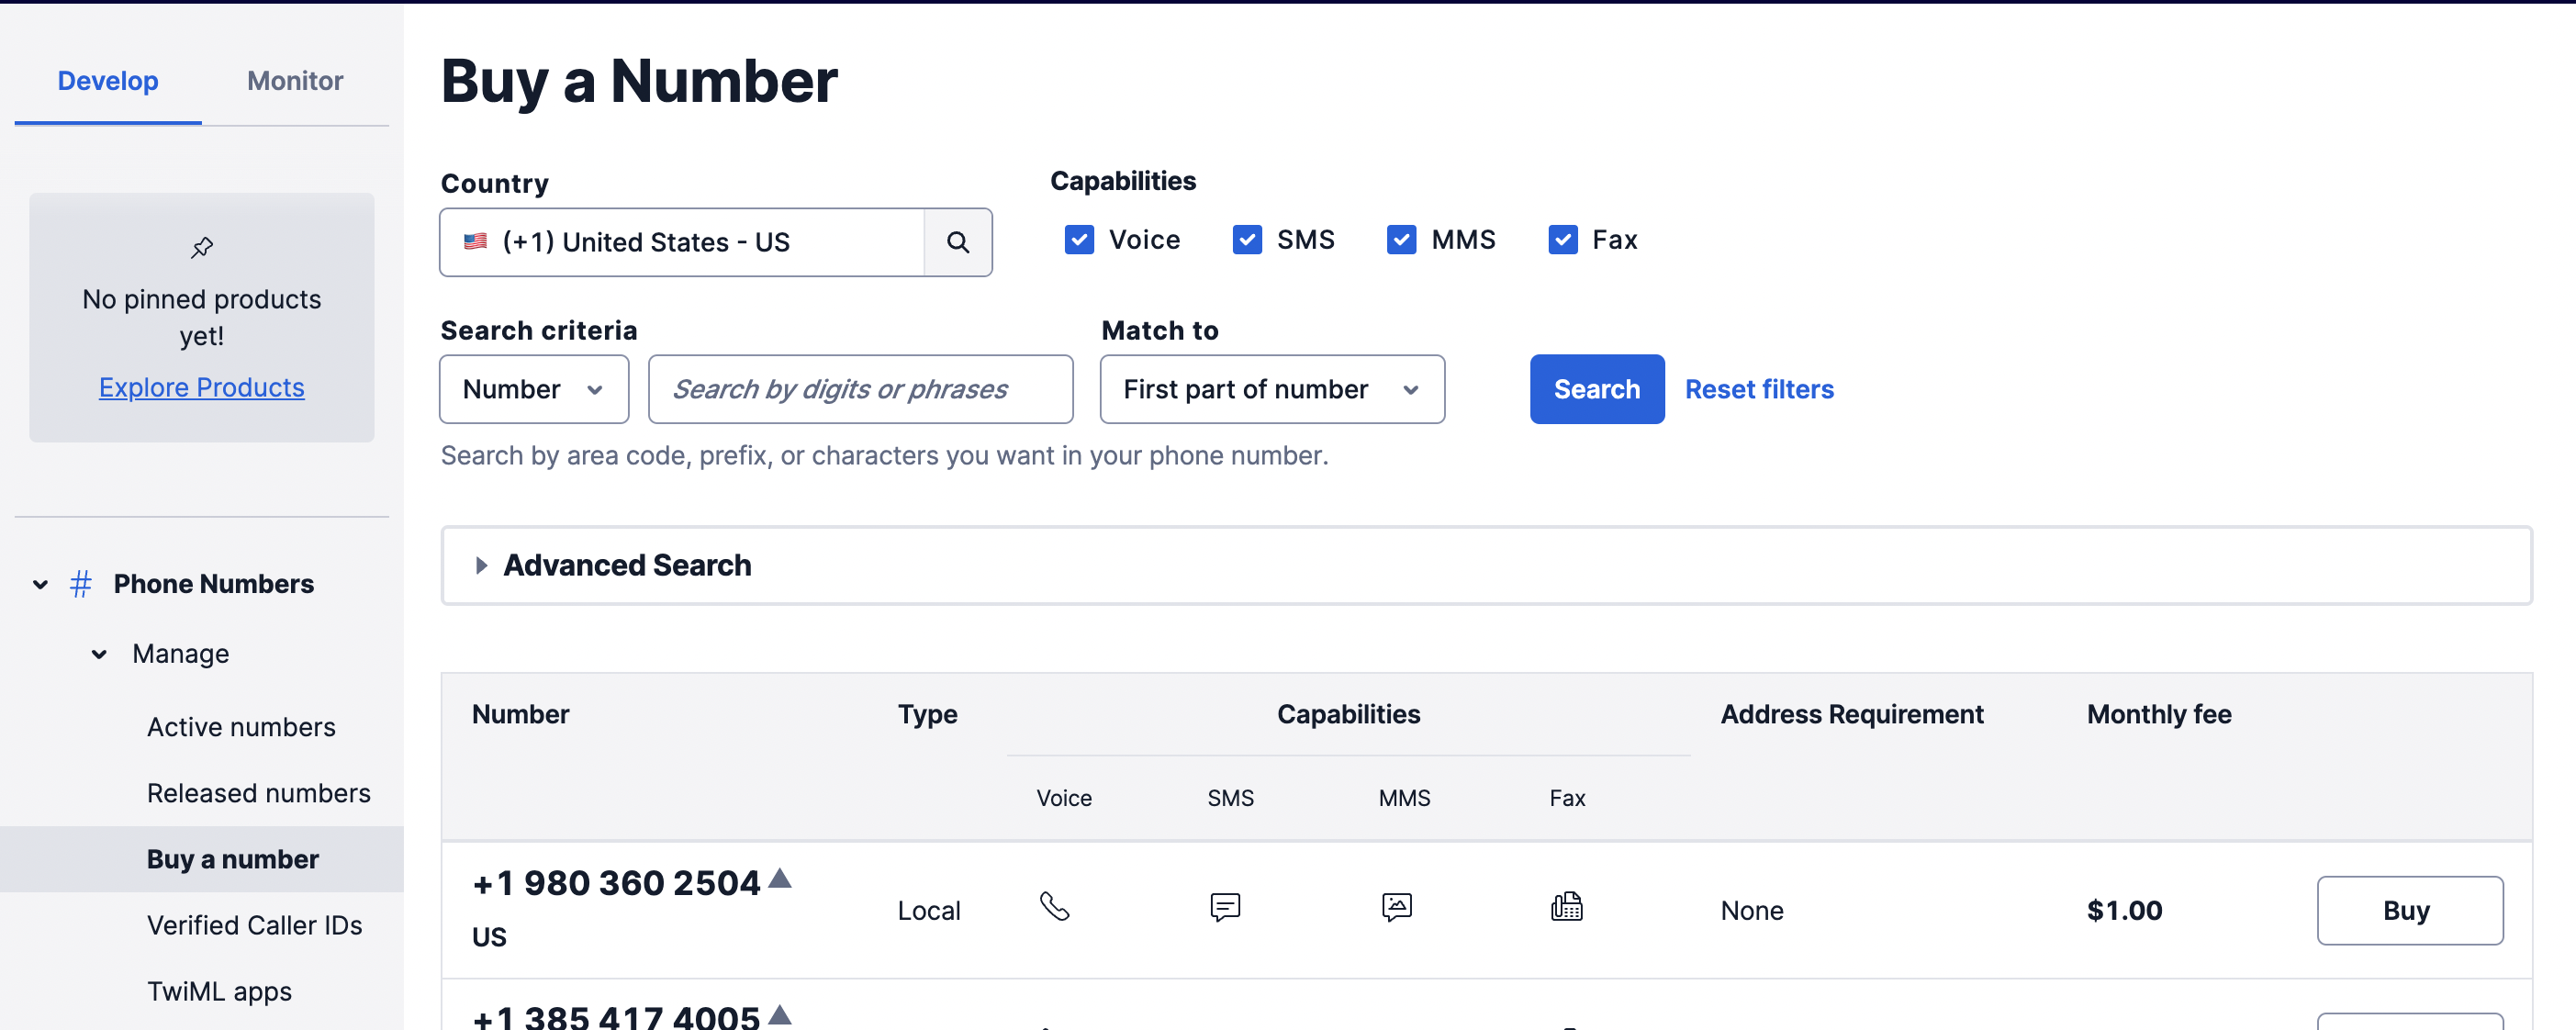 On "Buy a Number" page:
1. Select the relevant country
2. Check the "SMS" box in capabilities section to filter for numbers with SMS capability
3. Click on **Search**. This will load the list of available numbers with SMS capability in your region and the price of each number listed in a table.
4. Select whichever available number appeals to you. Click on "Buy" button next to the mobile number to buy that number.
5. This will open a modal, scroll down and click on "Buy +1 xxx ..." button and then select, "Setup number." This will load a phone number configuration page. We don't need to change anything for this tutorial.
If you are new to Twilio, your trial account is initially funded with enough money to purchase a phone number, so you won't have any expenses while completing this guide.
You may be asked to comply with the regulatory requirements associated with the number-thorough regulatory [documentation](https://www.twilio.com/guidelines/regulatory) is provided by Twilio. Be sure to use your number responsibly and comply with any requirements.
On "Buy a Number" page:
1. Select the relevant country
2. Check the "SMS" box in capabilities section to filter for numbers with SMS capability
3. Click on **Search**. This will load the list of available numbers with SMS capability in your region and the price of each number listed in a table.
4. Select whichever available number appeals to you. Click on "Buy" button next to the mobile number to buy that number.
5. This will open a modal, scroll down and click on "Buy +1 xxx ..." button and then select, "Setup number." This will load a phone number configuration page. We don't need to change anything for this tutorial.
If you are new to Twilio, your trial account is initially funded with enough money to purchase a phone number, so you won't have any expenses while completing this guide.
You may be asked to comply with the regulatory requirements associated with the number-thorough regulatory [documentation](https://www.twilio.com/guidelines/regulatory) is provided by Twilio. Be sure to use your number responsibly and comply with any requirements.
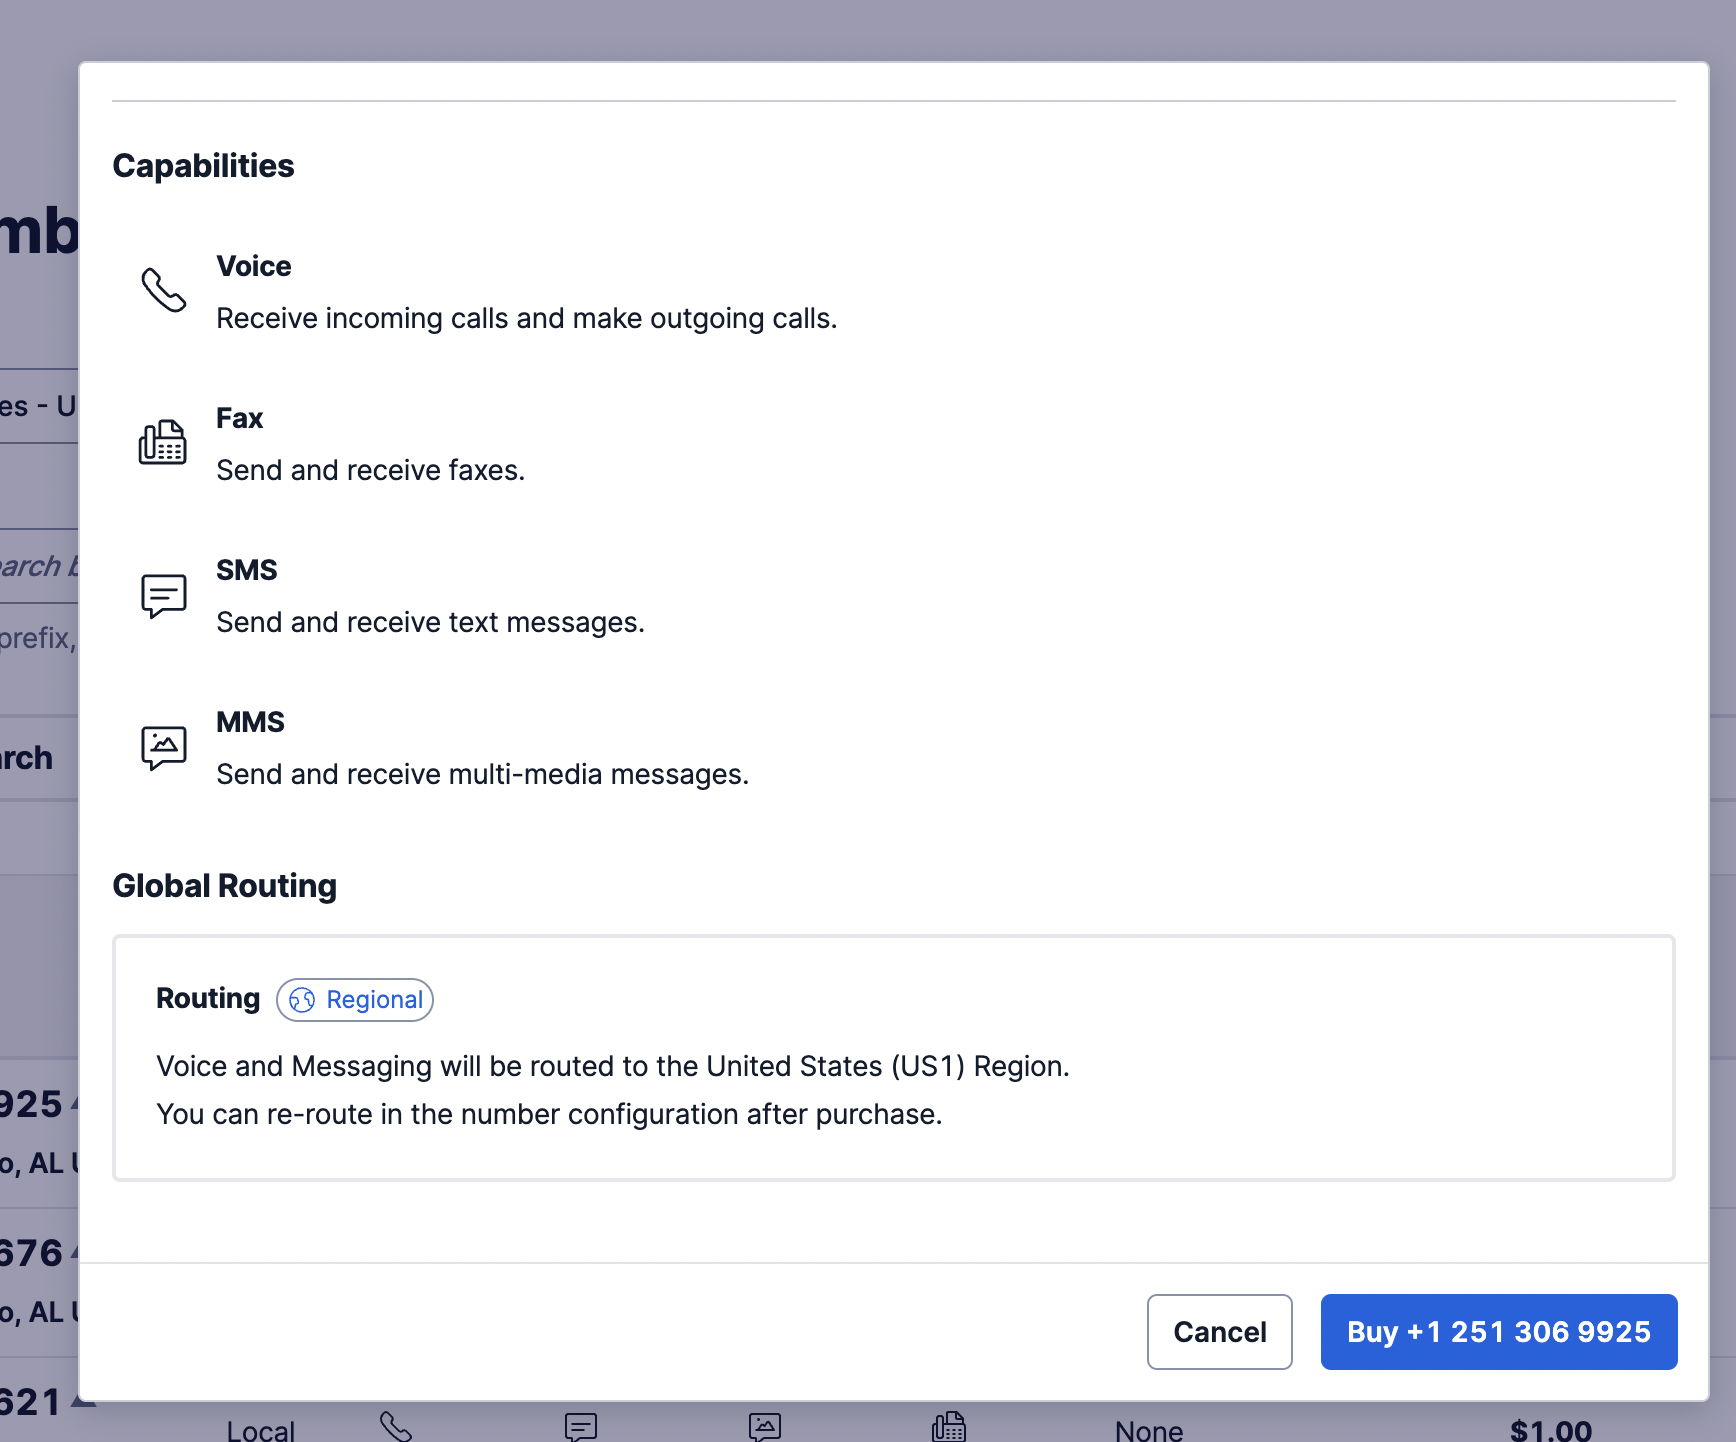 ### Twilio messaging service
Now that we have a phone number, we need to create a Twilio Messaging Service that uses this number. Navigate to the "[Messaging -> "Services"](https://console.twilio.com/us1/develop/sms/services?frameUrl=%2Fconsole%2Fsms%2Fservices%3Fx-target-region%3Dus1)" section on [explore products](https://console.twilio.com/develop/explore) page.
On "Messaging Services" page:
### Twilio messaging service
Now that we have a phone number, we need to create a Twilio Messaging Service that uses this number. Navigate to the "[Messaging -> "Services"](https://console.twilio.com/us1/develop/sms/services?frameUrl=%2Fconsole%2Fsms%2Fservices%3Fx-target-region%3Dus1)" section on [explore products](https://console.twilio.com/develop/explore) page.
On "Messaging Services" page:
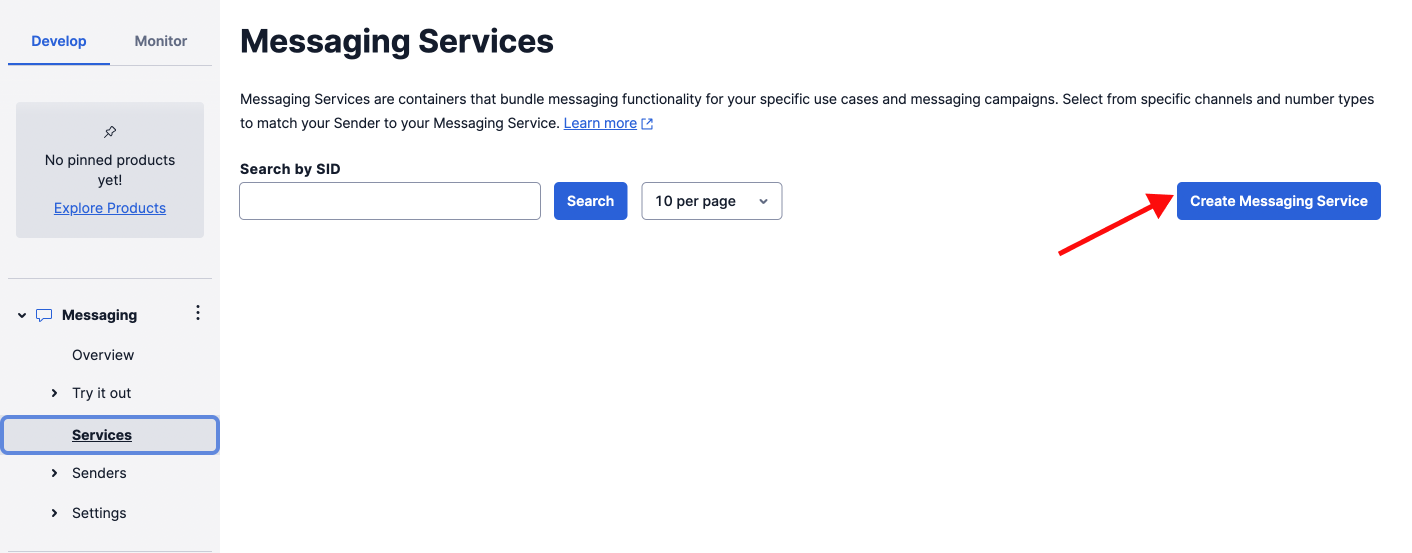
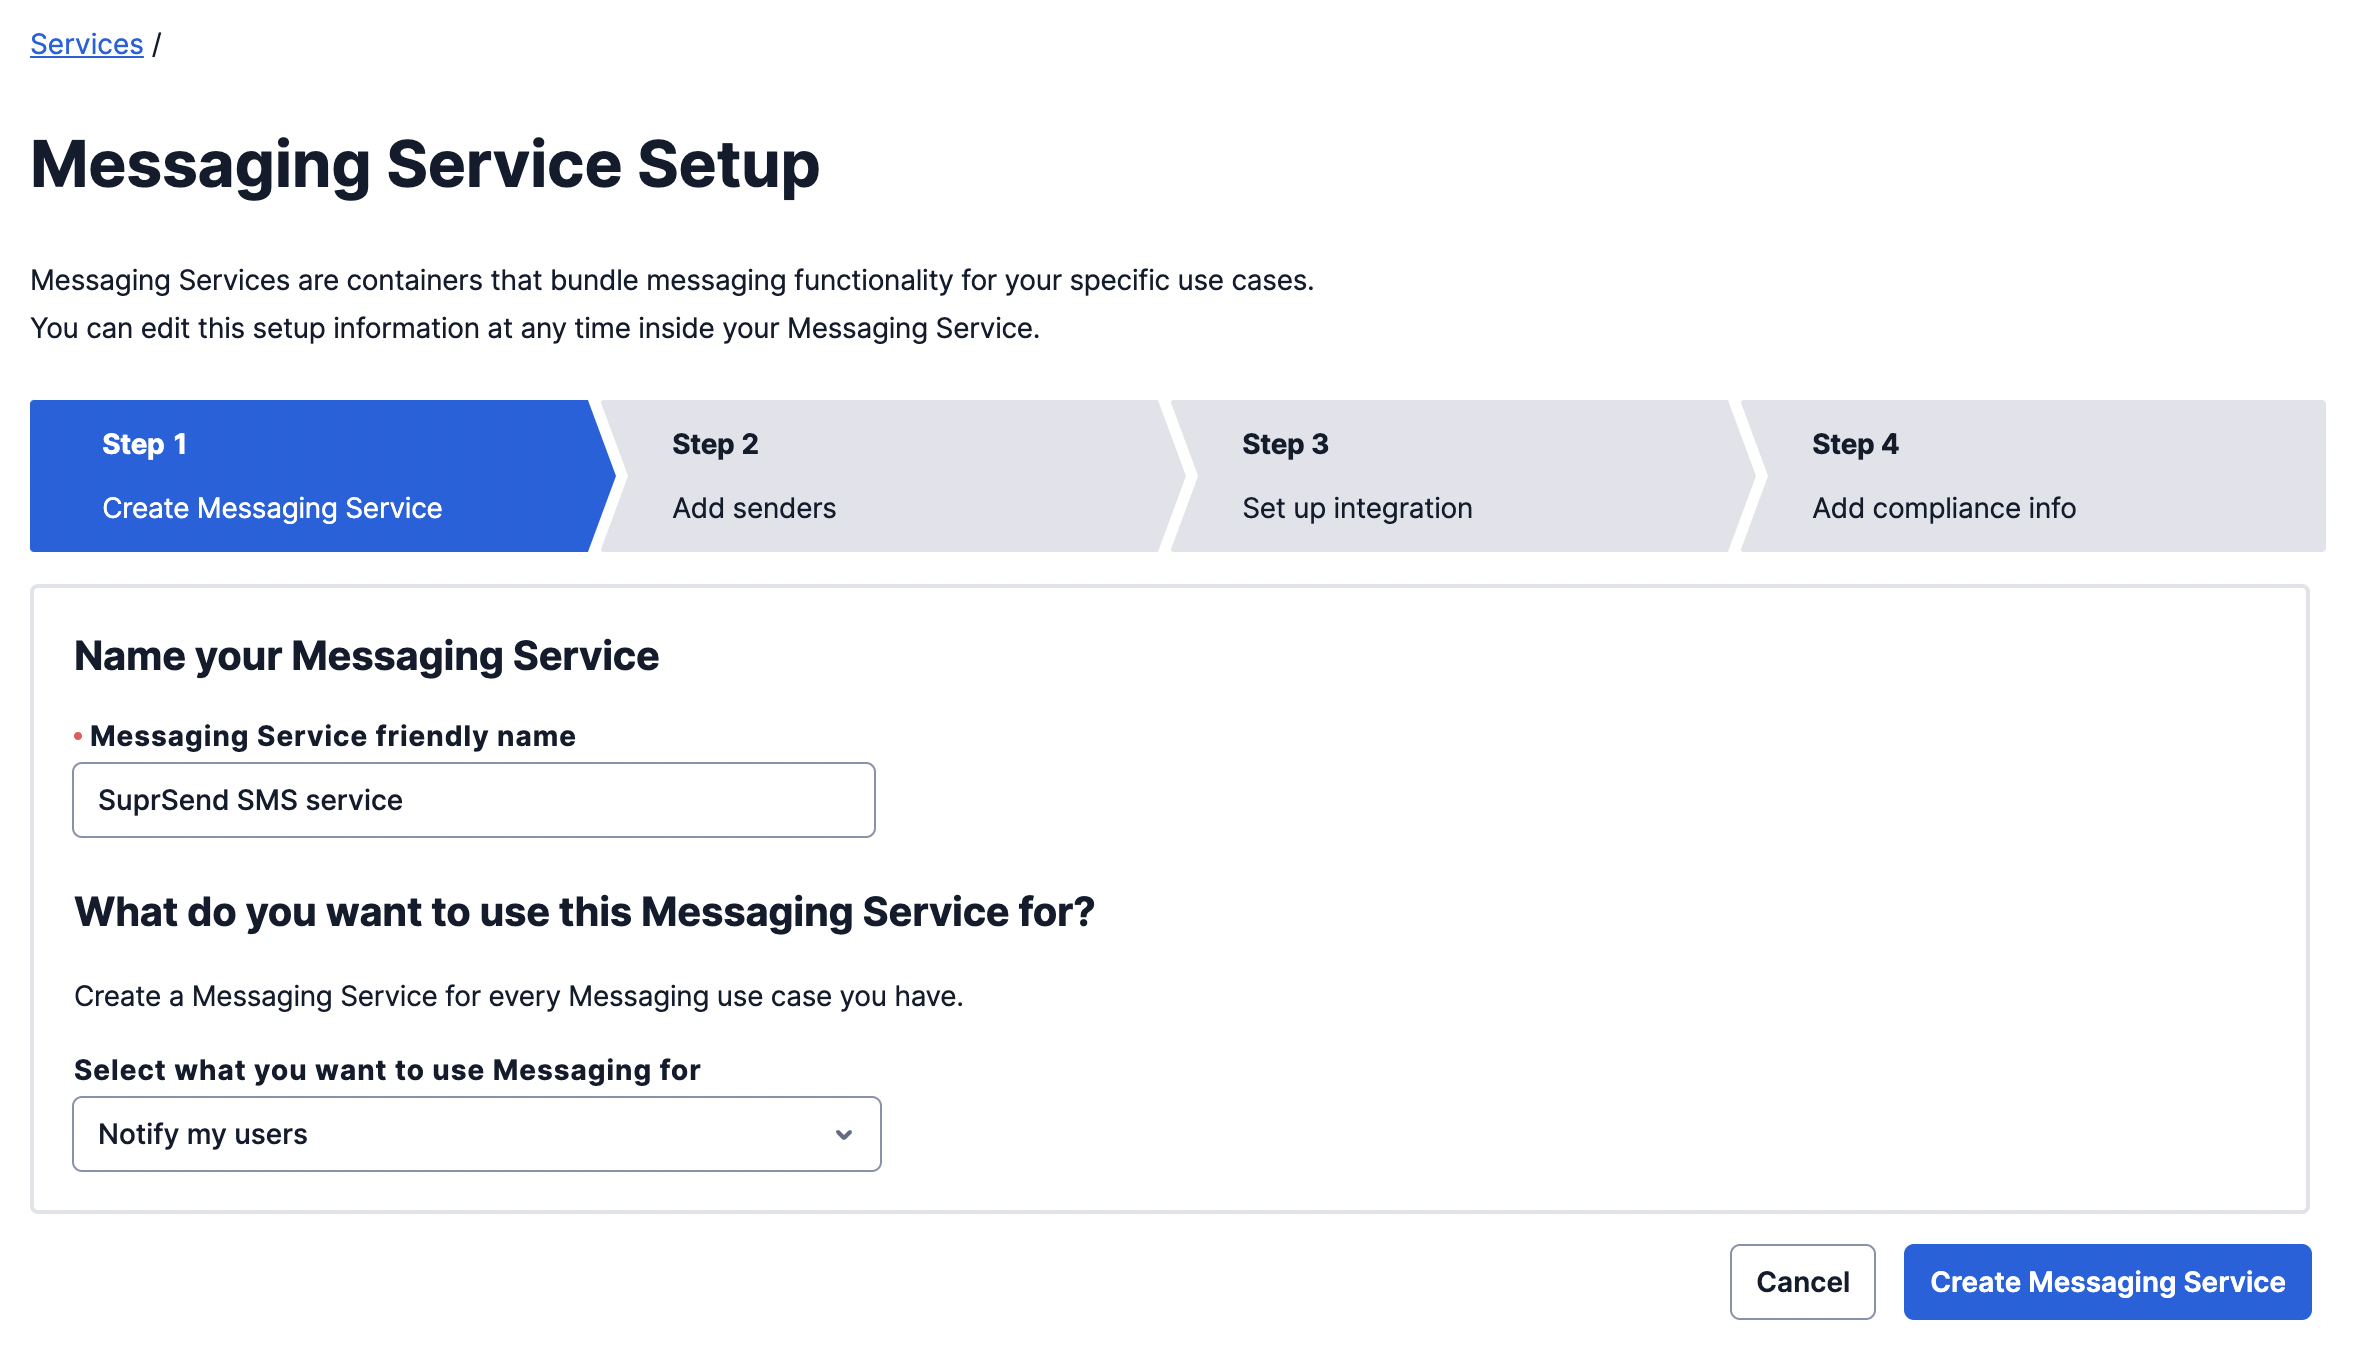
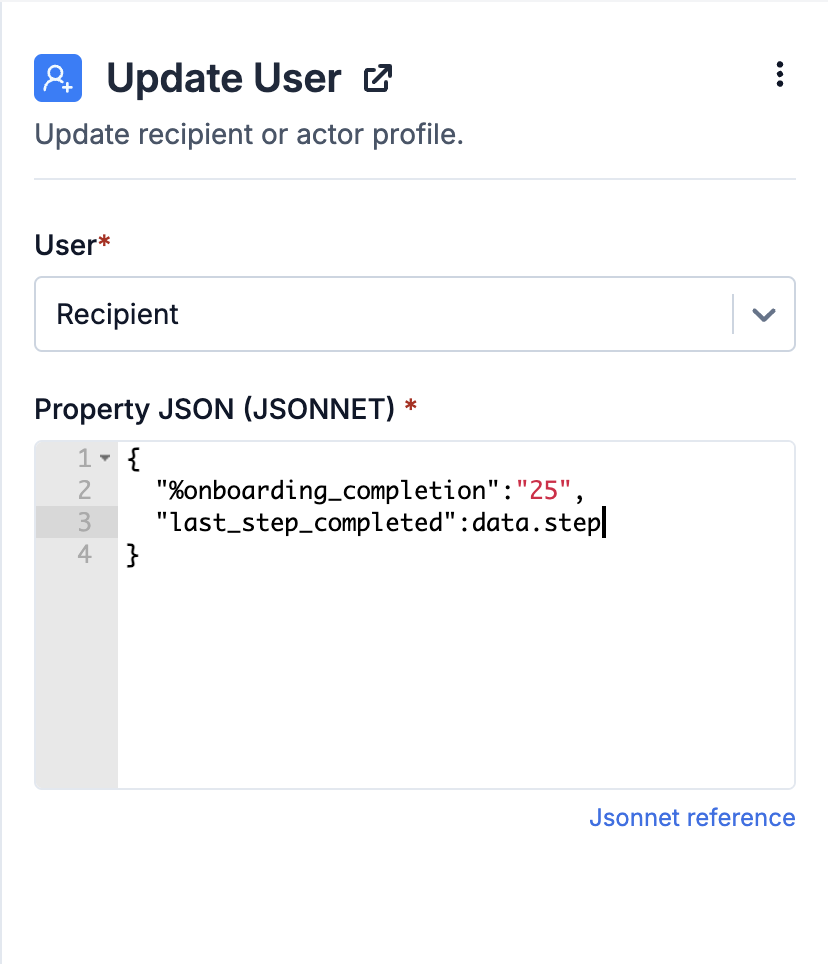 ### Property JSON
User properties are passed in [JSONNET](https://jsonnet.org/ref/language.html) format. You can pass static or dynamic properties. Dynamic properties can refer to all data available at the node's input, including the ones added during workflow execution. e.g., if a profile update node follows a batch, fetch, or webhook node, it can access data modified or added by those nodes. The following data types are supported:
| Data Type | Referring in JSONNET | Description |
| ------------- | ------------------------------------------- | ------------------------------------------------------------------------------------------------------------------------------------------------------------------------------------------------------------------------------------ |
| Input Payload | pass as `data.
### Property JSON
User properties are passed in [JSONNET](https://jsonnet.org/ref/language.html) format. You can pass static or dynamic properties. Dynamic properties can refer to all data available at the node's input, including the ones added during workflow execution. e.g., if a profile update node follows a batch, fetch, or webhook node, it can access data modified or added by those nodes. The following data types are supported:
| Data Type | Referring in JSONNET | Description |
| ------------- | ------------------------------------------- | ------------------------------------------------------------------------------------------------------------------------------------------------------------------------------------------------------------------------------------ |
| Input Payload | pass as `data.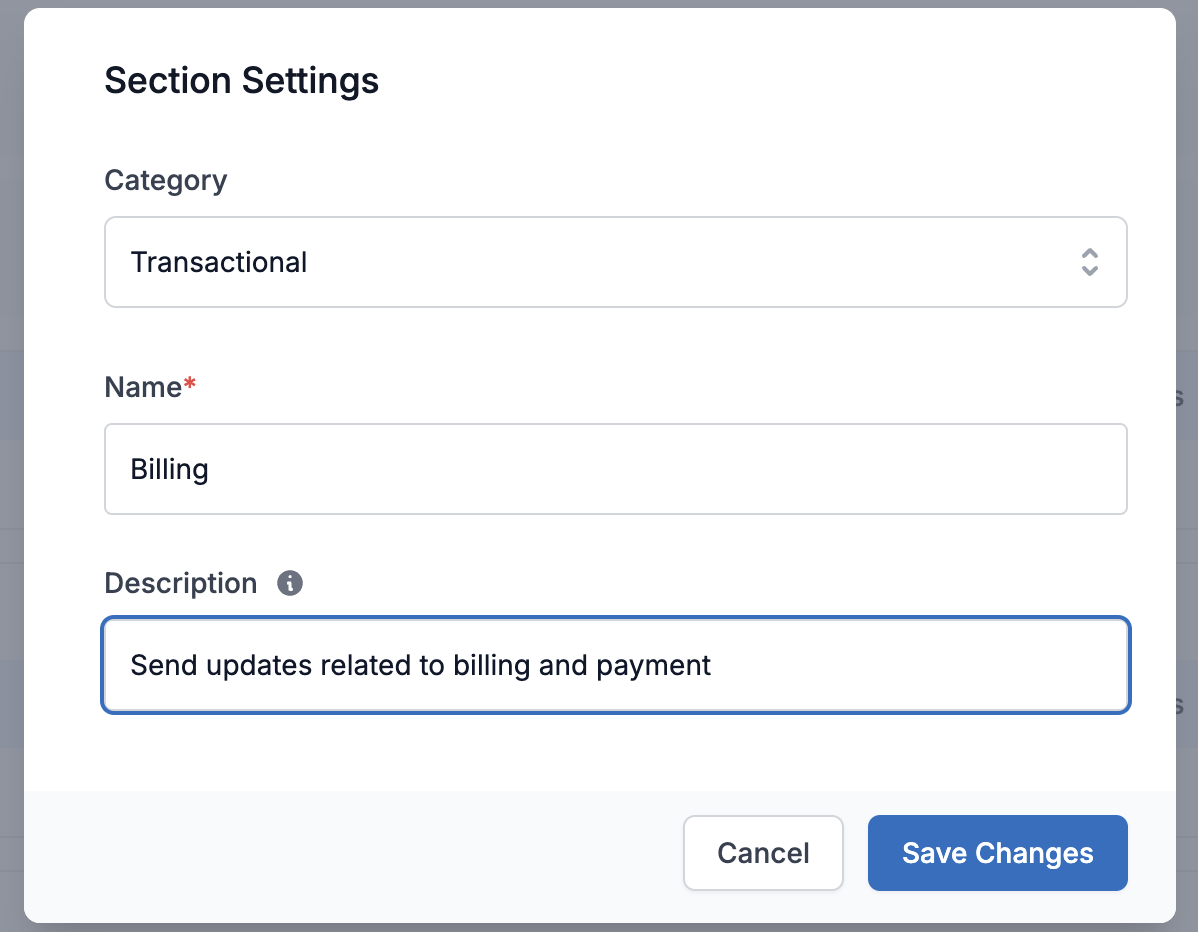
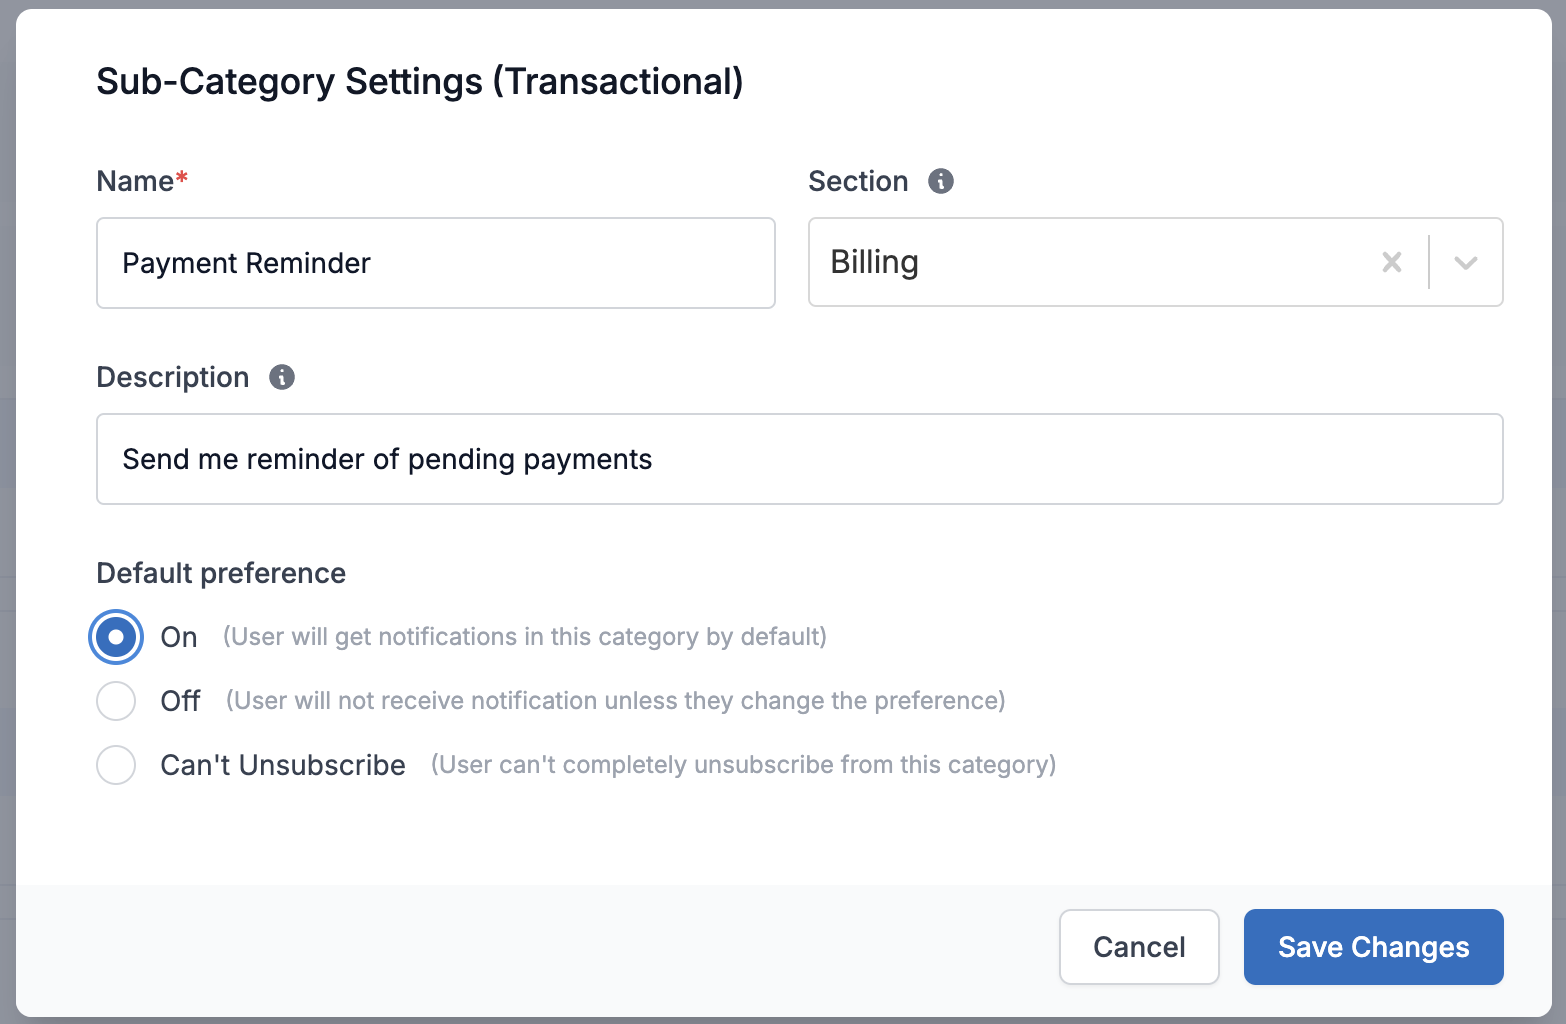 You can update notification categories from the [Developers → Preference categories](https://app.suprsend.com/en/staging/developers/preference-categories) page. Add categories under any of the three predefined root categories:
* **System**: For critical system notifications like OTPs, verification, and authentication. Users can't opt out of this category.
* **Transactional**: Notifications related to user transactions on your platform, such as payment confirmations, delivery statuses, and comments. The default preference for this category opts users in, but you can change it at the individual category level.
* **Promotional**: Marketing notifications like newsletters, announcements, deals, and discounts. The default preference for this category opts users out, but you can change it at the individual category level.
### Set default preferences
If the user hasn't set preferences in a category, the system sends notifications based on default preferences. Default preferences are set in the notification category. The tenant can override the default preferences for their users, either through the [tenant preference API](/reference/update-tenant-default-preference) or from the tenant details page.
You can set following default preferences at category level:
1. **On**: opt-in on all channels
2. **Off**: opt-out on all channels
3. **Can't Unsubscribe**: Use this to prevent users from completely opting out of critical notification categories, such as anomaly alerts or important transactions (e.g., completed trades, payments). Channel `opt-out` of does not block notifications from mandatory channels in this category.
### Map category to notifications
Once set, publish your preference categories to see the latest categories in workflow. You can then map these categories when configuring your workflow for preferences to take effect.
## Capture user preferences
You can capture user preference choice using an out-of-the-box hosted subscription page or by embedding a preference center within your product.
### Hosted Preference Page
Once you publish preference categories, SuprSend automatically generates a dedicated webpage for collecting out-of-the-box user preferences. Users can set channel-specific preferences from the hosted page. e.g., if you add it to your email, the page displays only the relevant preference categories for email, and the user’s selections save for email. Include it in your templates using `{{$hosted_preference_url}}`.
You can update notification categories from the [Developers → Preference categories](https://app.suprsend.com/en/staging/developers/preference-categories) page. Add categories under any of the three predefined root categories:
* **System**: For critical system notifications like OTPs, verification, and authentication. Users can't opt out of this category.
* **Transactional**: Notifications related to user transactions on your platform, such as payment confirmations, delivery statuses, and comments. The default preference for this category opts users in, but you can change it at the individual category level.
* **Promotional**: Marketing notifications like newsletters, announcements, deals, and discounts. The default preference for this category opts users out, but you can change it at the individual category level.
### Set default preferences
If the user hasn't set preferences in a category, the system sends notifications based on default preferences. Default preferences are set in the notification category. The tenant can override the default preferences for their users, either through the [tenant preference API](/reference/update-tenant-default-preference) or from the tenant details page.
You can set following default preferences at category level:
1. **On**: opt-in on all channels
2. **Off**: opt-out on all channels
3. **Can't Unsubscribe**: Use this to prevent users from completely opting out of critical notification categories, such as anomaly alerts or important transactions (e.g., completed trades, payments). Channel `opt-out` of does not block notifications from mandatory channels in this category.
### Map category to notifications
Once set, publish your preference categories to see the latest categories in workflow. You can then map these categories when configuring your workflow for preferences to take effect.
## Capture user preferences
You can capture user preference choice using an out-of-the-box hosted subscription page or by embedding a preference center within your product.
### Hosted Preference Page
Once you publish preference categories, SuprSend automatically generates a dedicated webpage for collecting out-of-the-box user preferences. Users can set channel-specific preferences from the hosted page. e.g., if you add it to your email, the page displays only the relevant preference categories for email, and the user’s selections save for email. Include it in your templates using `{{$hosted_preference_url}}`.
 > This page currently hosts on the SuprSend domain, but you can reach out if you'd prefer it hosted on your own domain.
### Embed in your product
You can load the preference interface inside your product using the ready UI code. SDKs exist in the languages below. Update your product preference page link on the tenant page and render it in templates using `{{$embedded_preference_url}}`.
> This page currently hosts on the SuprSend domain, but you can reach out if you'd prefer it hosted on your own domain.
### Embed in your product
You can load the preference interface inside your product using the ready UI code. SDKs exist in the languages below. Update your product preference page link on the tenant page and render it in templates using `{{$embedded_preference_url}}`.
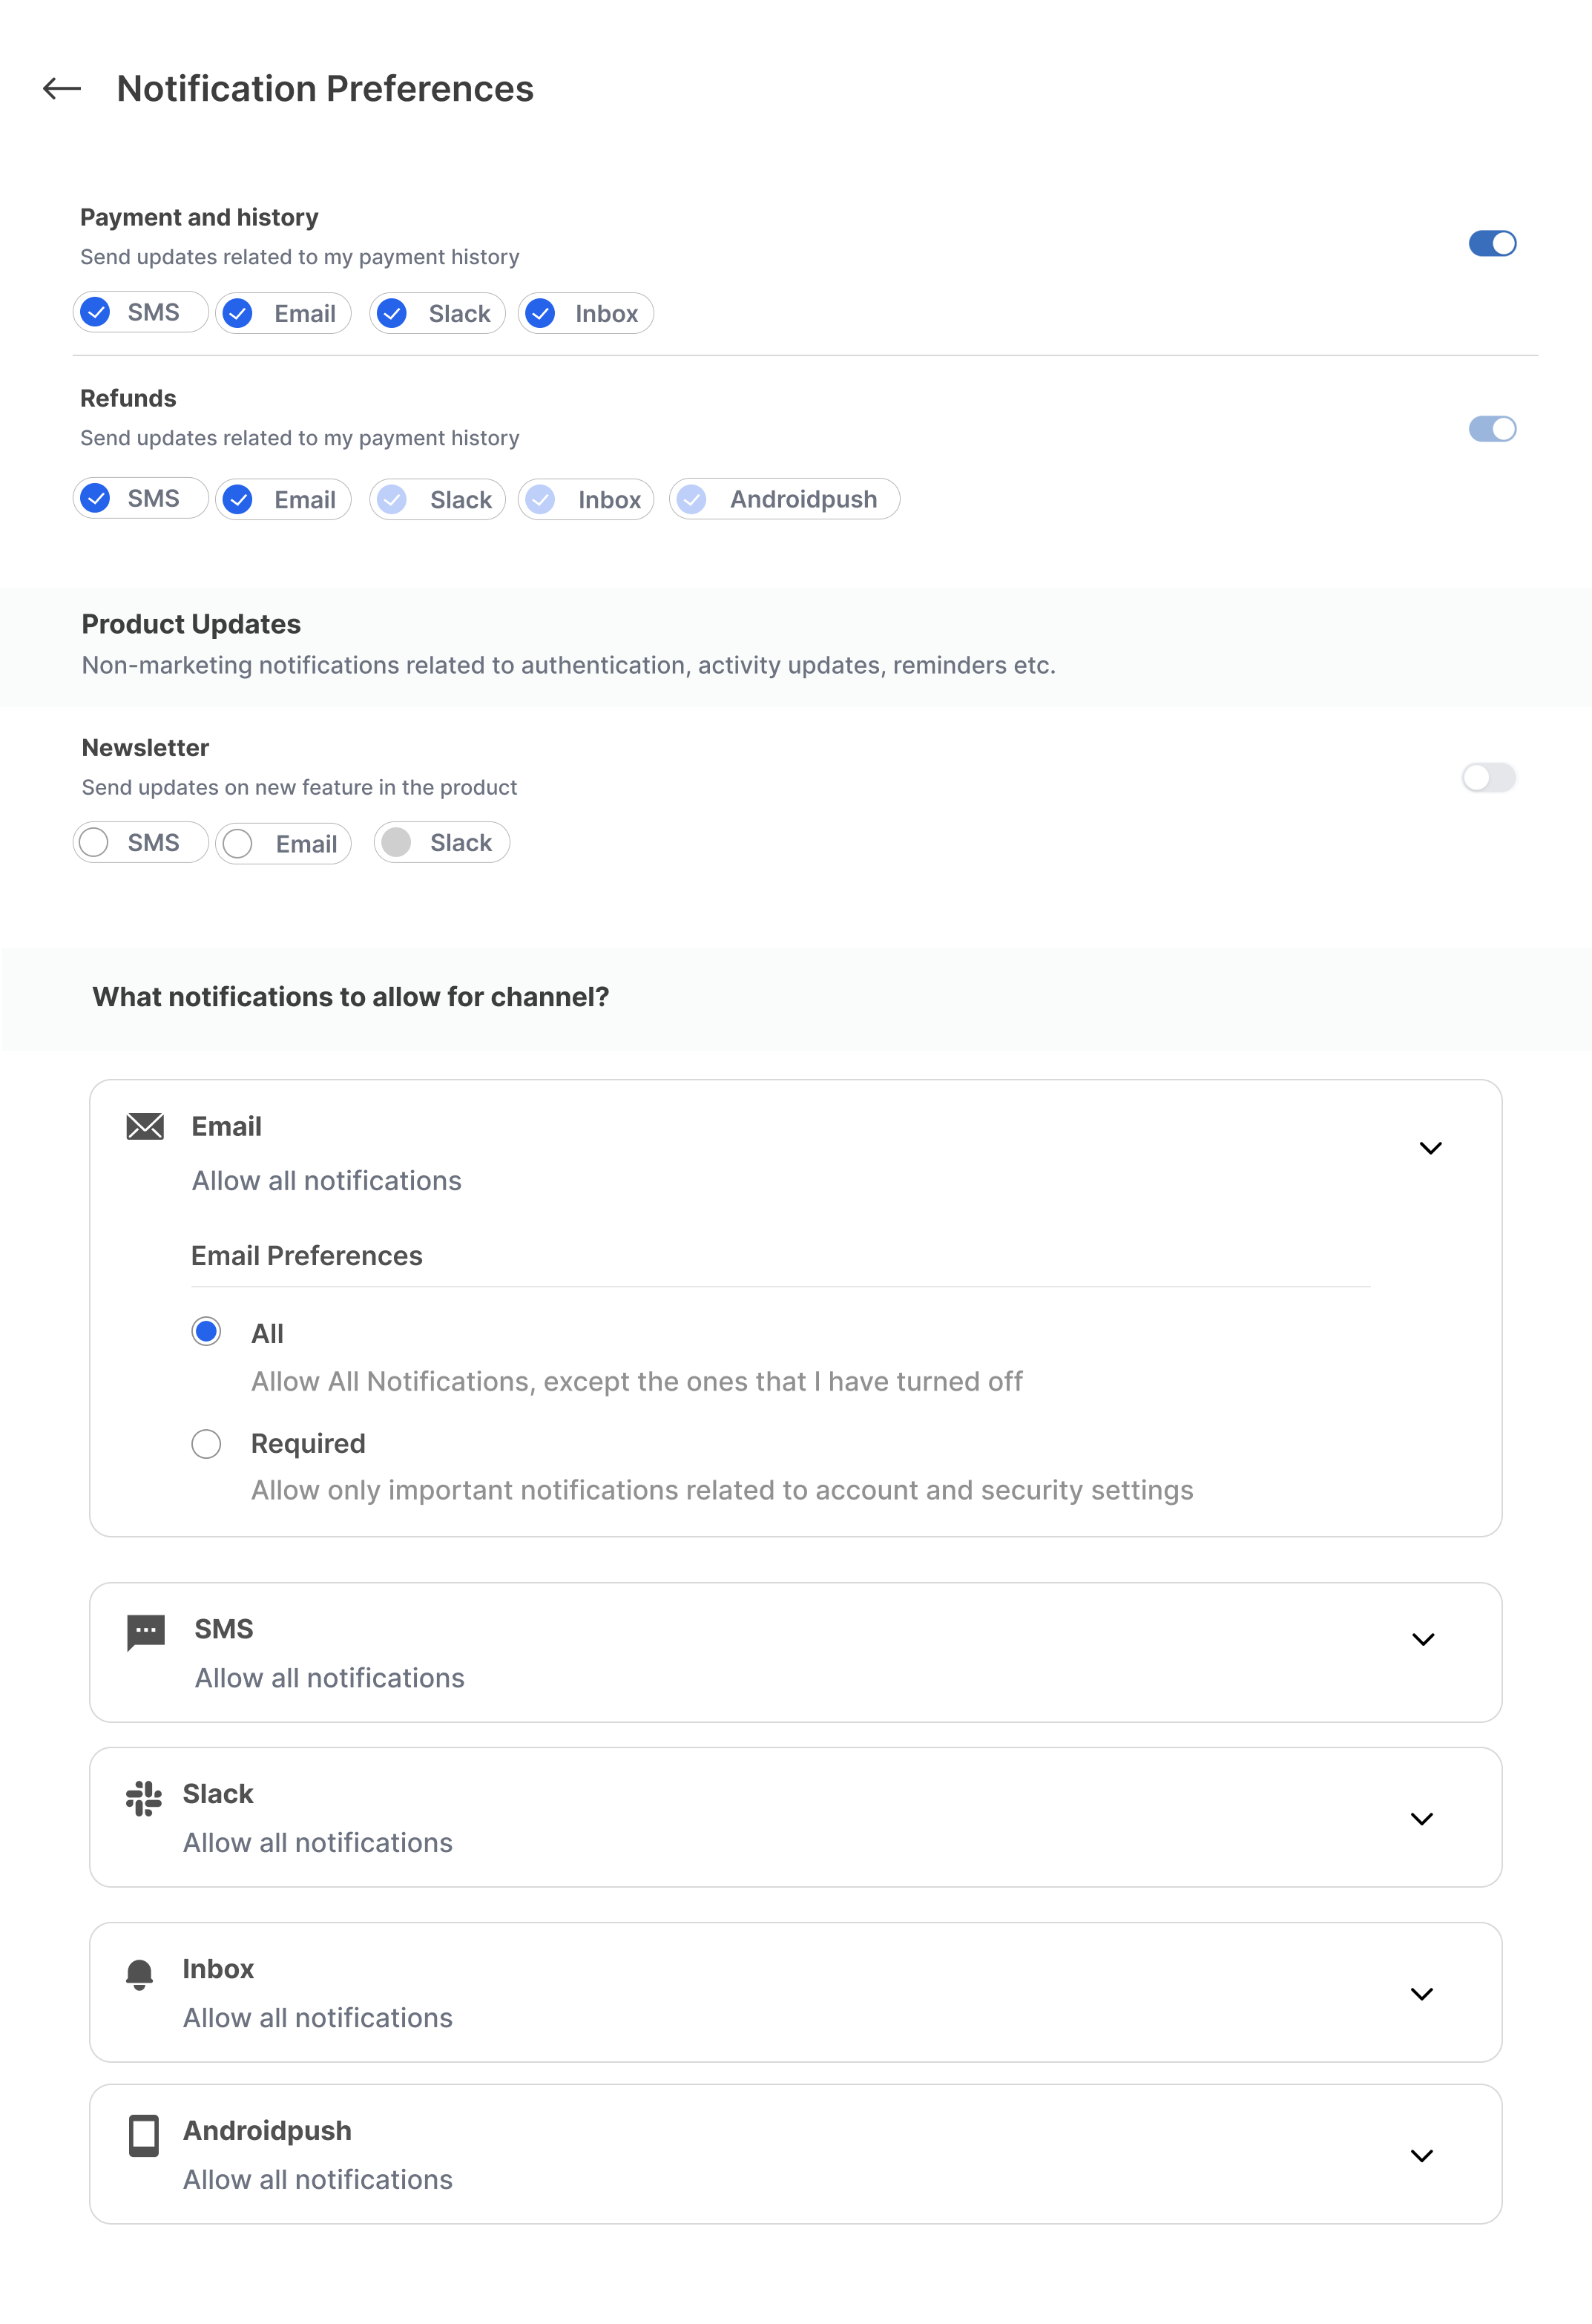 ### Channel specific unsubscription options
Additionally to the preference center within SuprSend, communication channels provide their own opt-out options, which SuprSend manages internally.
### Channel specific unsubscription options
Additionally to the preference center within SuprSend, communication channels provide their own opt-out options, which SuprSend manages internally.
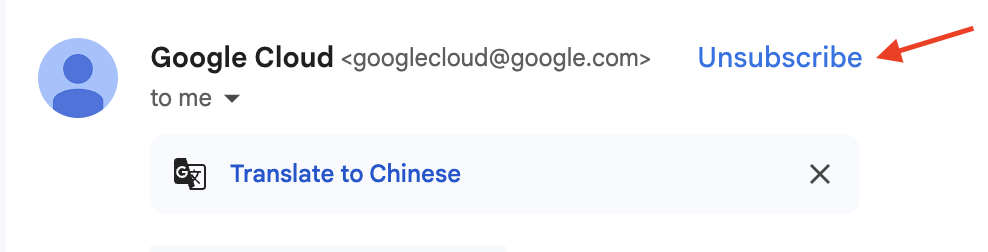
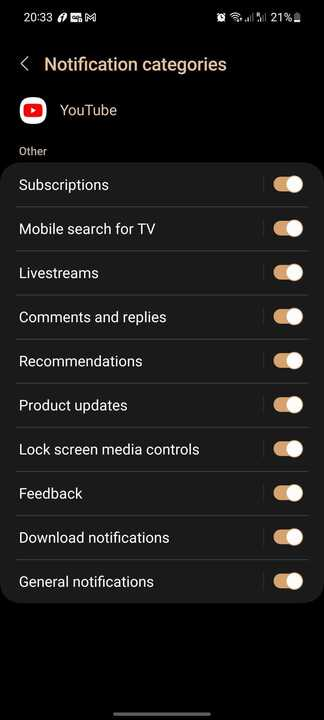
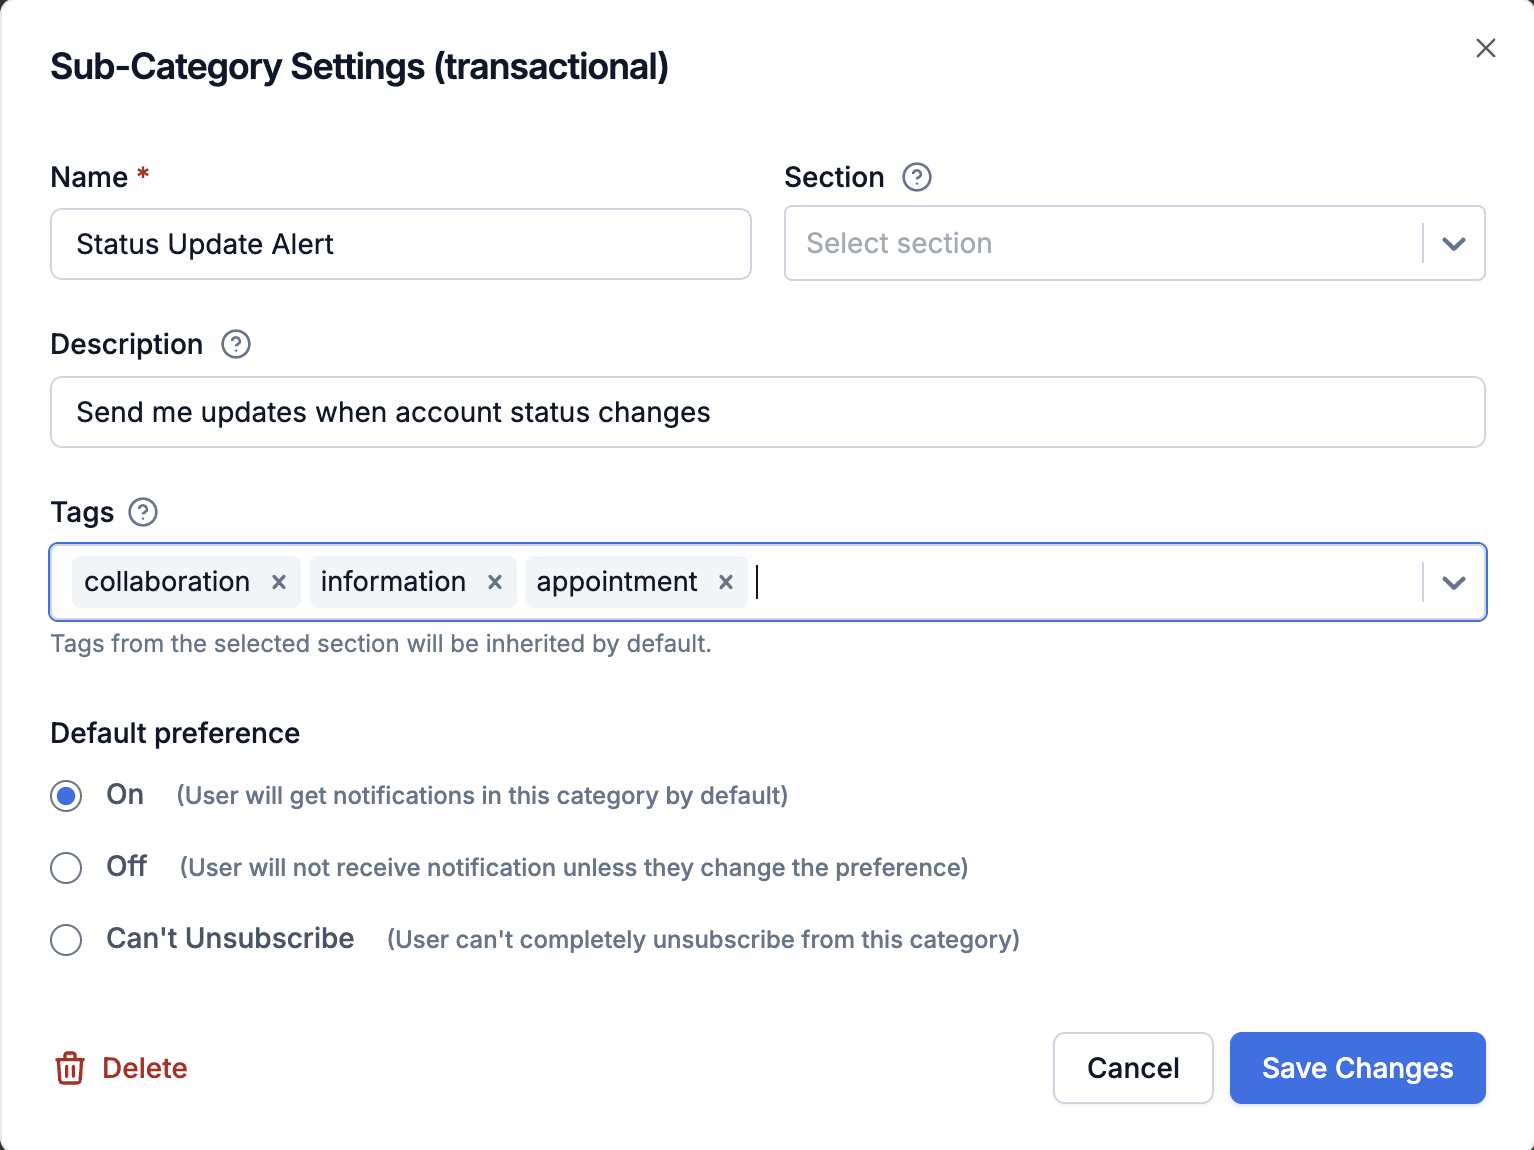
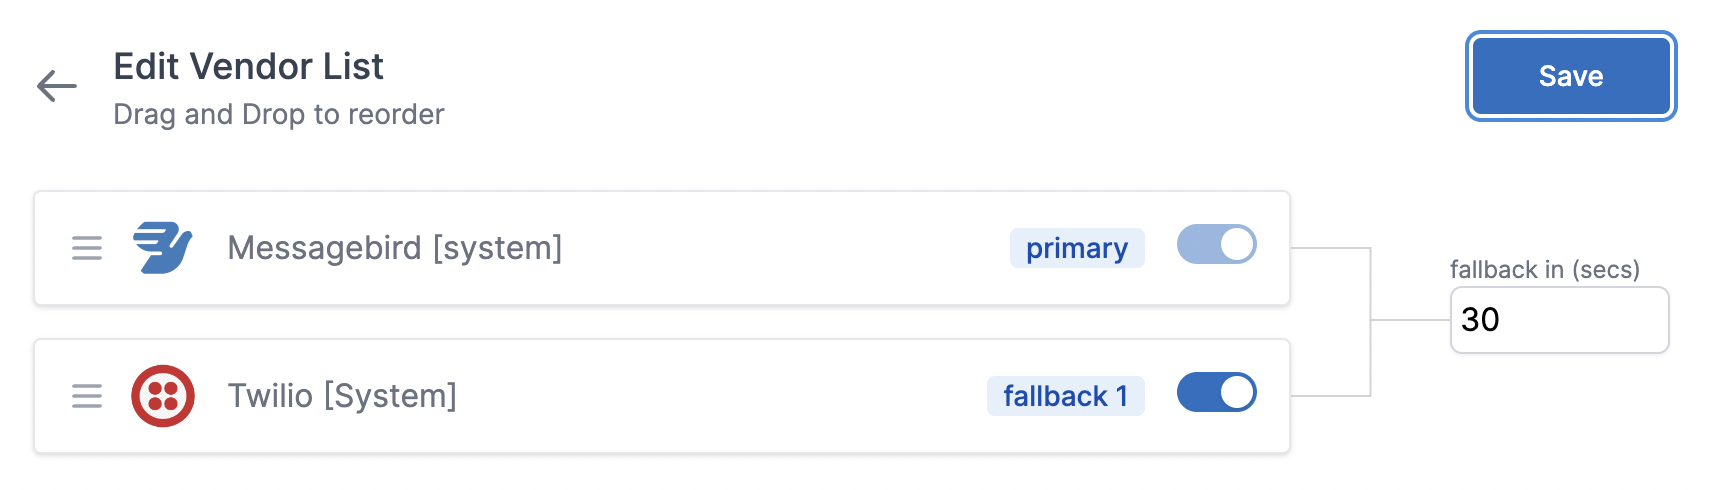 You'll find all the saved vendor configurations in **"Unused Vendor Configuration"**. Enable it to add it in the fallback list.
 Once enabled, you can drag and drop to change the priority of vendors
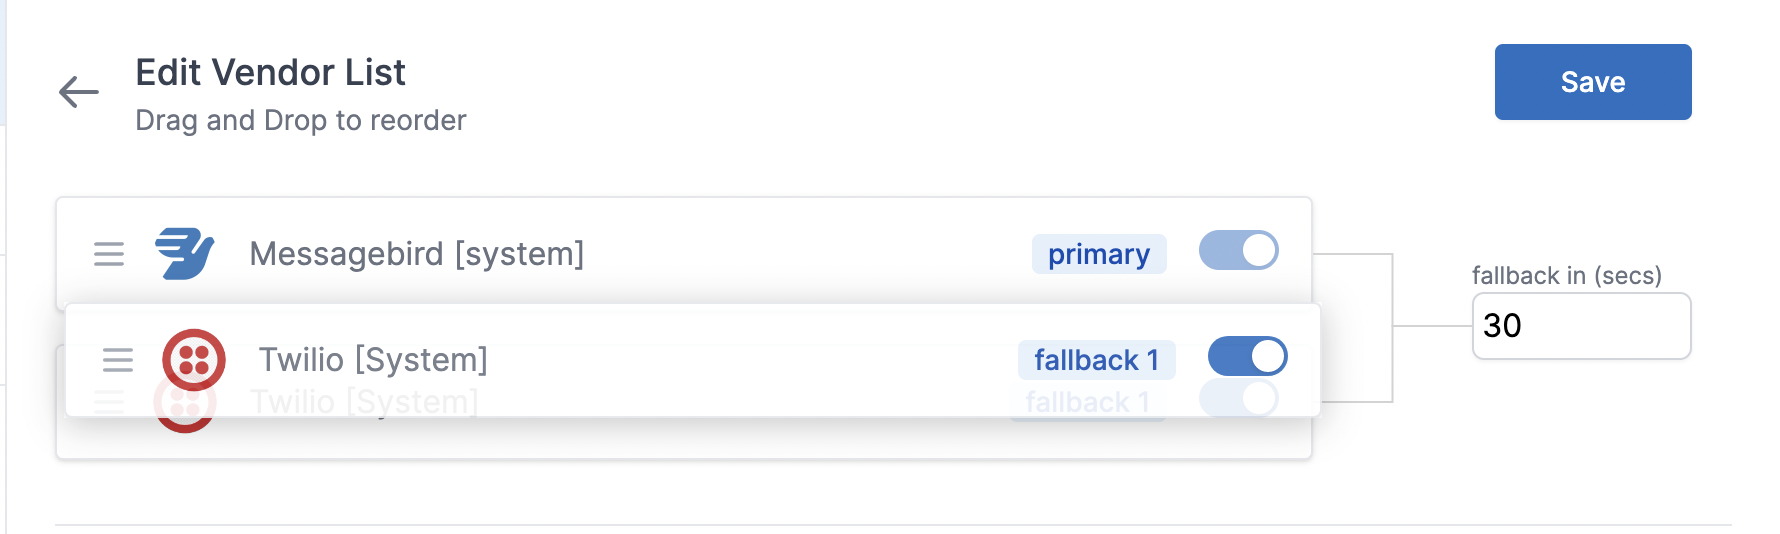 Save the changes after editing.
***
# Overview
Source: https://docs.suprsend.com/docs/vendors
Learn about vendor management in SuprSend to send multi-channel notifications.
You can use SuprSend to send multi-channel notifications with a single API. You just have to add your vendor details on SuprSend [vendor page](https://app.suprsend.com/en/staging/vendors/androidpush/fcm-androidpush) and your communication channel will be active.
SuprSend has done integration with multiple vendors in each communication category.
If you want us to add a new provider to this list, please let us know by writing us at [support@suprsend.com](mailto:support@suprsend.com).
## Add vendor details based on workspaces
You may have different vendor accounts for staging and for production. Hence, we have given an option to add vendors based on your workspaces. Make sure that you add vendor details for each workspace, else communications will fail to deliver.
## Add vendors based on communication category
In some of the communication categories like email and sms. We have given an option to add vendors based on communication category. At SuprSend, we have defined 3 types of communication categories: System, Transactional and Promotional. You can read more about these categories [here](/docs/notification-category).
You can add different vendors for these categories, or have different accounts from the same vendor, depending on your need.
## Sandbox mode
You don't have to add your vendor details in Sandbox environment. For ease of testing, we have integrated SuprSend's vendor accounts in Sandbox environment.
Save the changes after editing.
***
# Overview
Source: https://docs.suprsend.com/docs/vendors
Learn about vendor management in SuprSend to send multi-channel notifications.
You can use SuprSend to send multi-channel notifications with a single API. You just have to add your vendor details on SuprSend [vendor page](https://app.suprsend.com/en/staging/vendors/androidpush/fcm-androidpush) and your communication channel will be active.
SuprSend has done integration with multiple vendors in each communication category.
If you want us to add a new provider to this list, please let us know by writing us at [support@suprsend.com](mailto:support@suprsend.com).
## Add vendor details based on workspaces
You may have different vendor accounts for staging and for production. Hence, we have given an option to add vendors based on your workspaces. Make sure that you add vendor details for each workspace, else communications will fail to deliver.
## Add vendors based on communication category
In some of the communication categories like email and sms. We have given an option to add vendors based on communication category. At SuprSend, we have defined 3 types of communication categories: System, Transactional and Promotional. You can read more about these categories [here](/docs/notification-category).
You can add different vendors for these categories, or have different accounts from the same vendor, depending on your need.
## Sandbox mode
You don't have to add your vendor details in Sandbox environment. For ease of testing, we have integrated SuprSend's vendor accounts in Sandbox environment.
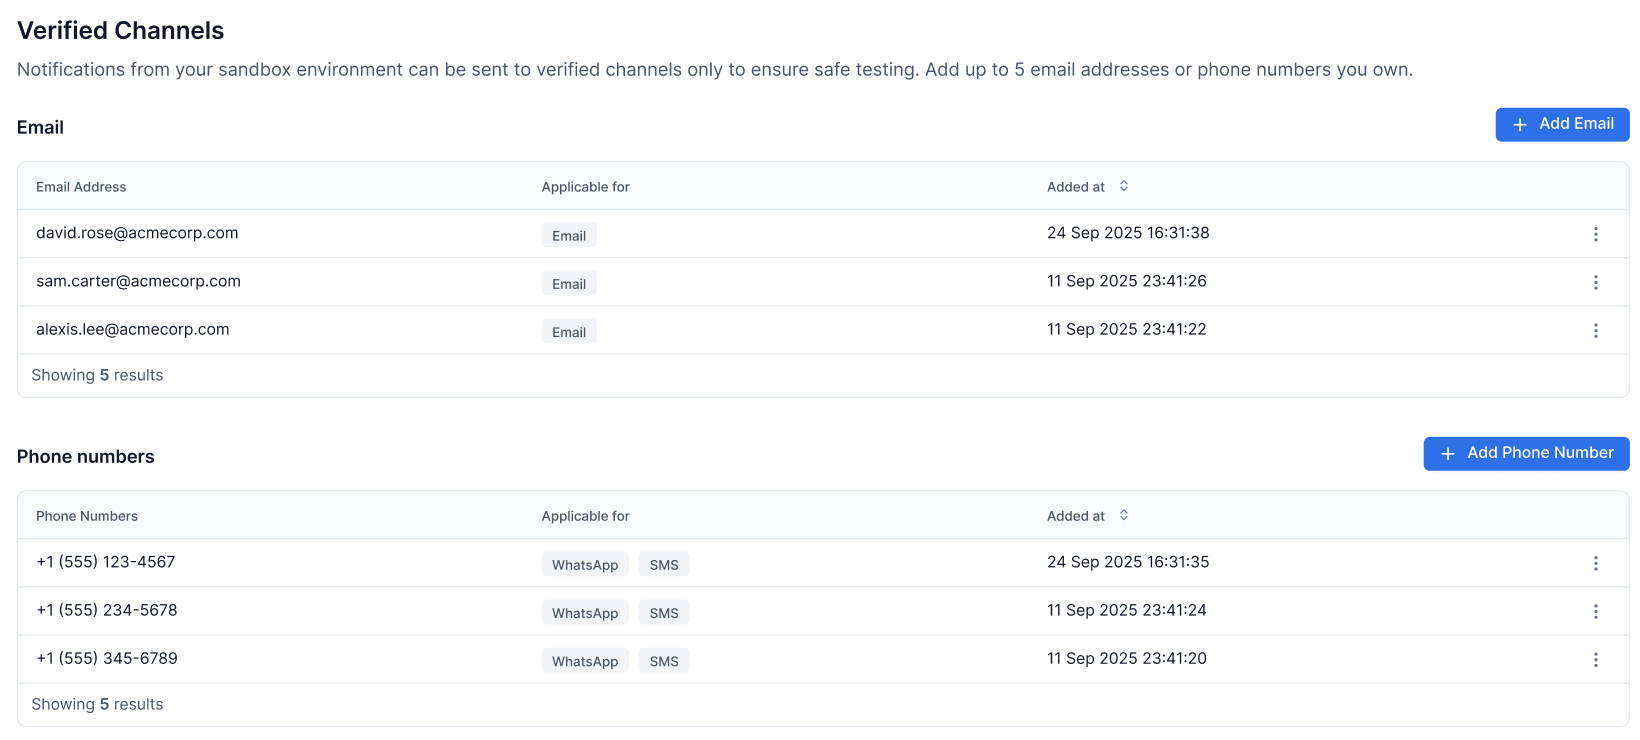 ### Channel limits in Sandbox
To ensure quality testing and prevent spam, notifications in Sandbox have the following limits:
* **Email**: Up to 5 email addresses
* **SMS**: Up to 5 phone numbers
* **WhatsApp**: Up to 5 phone numbers
* **Slack & Teams**: Currently unrestricted
***
# Wait Until
Source: https://docs.suprsend.com/docs/wait-until
Learn to use Wait Until node in workflow to halt until a condition or max time is met.
Wait Until is a conditional branch which halts the workflow until either the branch condition is met or the maximum wait duration is reached. It is most used for cases where sequential notifications need to be sent to users based on certain conditions, such as payment or task reminders.
## How wait until works?
Wait Until has 2 branches- **Condition** and **Max time**. The user proceeds through the branch that is satisfied first.
1. [Condition:](/docs/wait-until#conditions) User proceeds through this path when a condition is met, such as an event being triggered, user properties, or the event properties that initiated the workflow. In case of payment reminder, condition could be the event trigger of `user completing payment`.
2. [Max time:](/docs/wait-until#max-time) This is the maximum time the user can wait for the condition to satisfy until the next step should be executed. If a person reaches the maximum wait time without achieving any other conditions, they'll progress through this branch.
### Channel limits in Sandbox
To ensure quality testing and prevent spam, notifications in Sandbox have the following limits:
* **Email**: Up to 5 email addresses
* **SMS**: Up to 5 phone numbers
* **WhatsApp**: Up to 5 phone numbers
* **Slack & Teams**: Currently unrestricted
***
# Wait Until
Source: https://docs.suprsend.com/docs/wait-until
Learn to use Wait Until node in workflow to halt until a condition or max time is met.
Wait Until is a conditional branch which halts the workflow until either the branch condition is met or the maximum wait duration is reached. It is most used for cases where sequential notifications need to be sent to users based on certain conditions, such as payment or task reminders.
## How wait until works?
Wait Until has 2 branches- **Condition** and **Max time**. The user proceeds through the branch that is satisfied first.
1. [Condition:](/docs/wait-until#conditions) User proceeds through this path when a condition is met, such as an event being triggered, user properties, or the event properties that initiated the workflow. In case of payment reminder, condition could be the event trigger of `user completing payment`.
2. [Max time:](/docs/wait-until#max-time) This is the maximum time the user can wait for the condition to satisfy until the next step should be executed. If a person reaches the maximum wait time without achieving any other conditions, they'll progress through this branch.
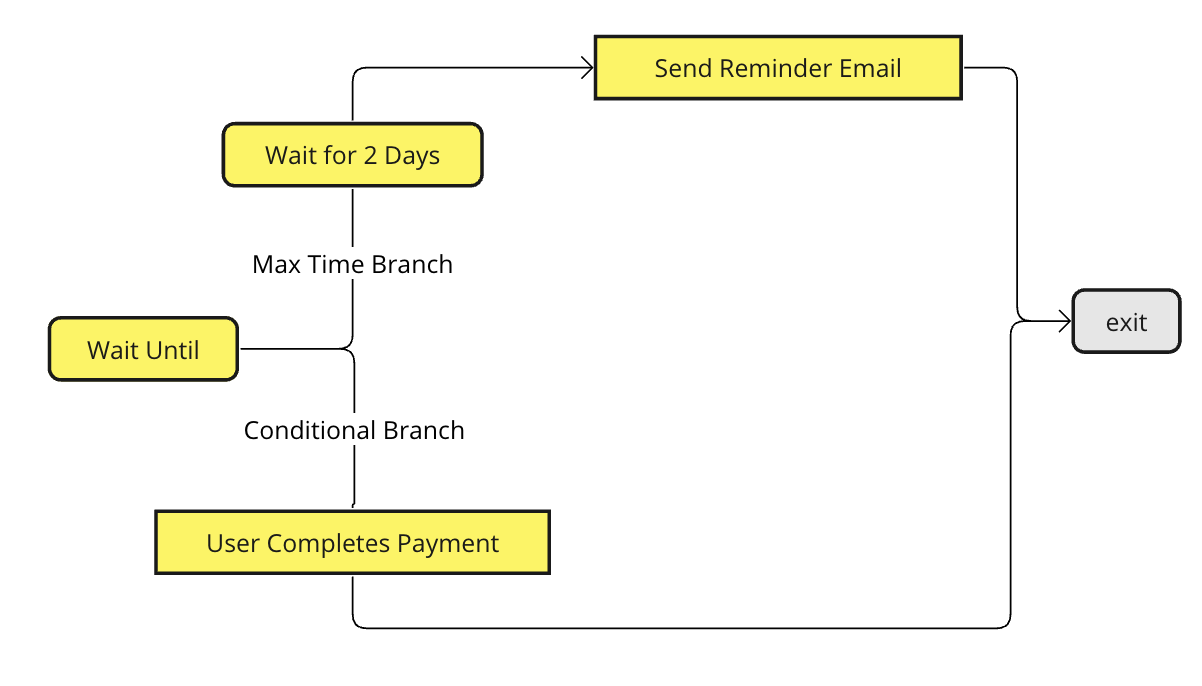
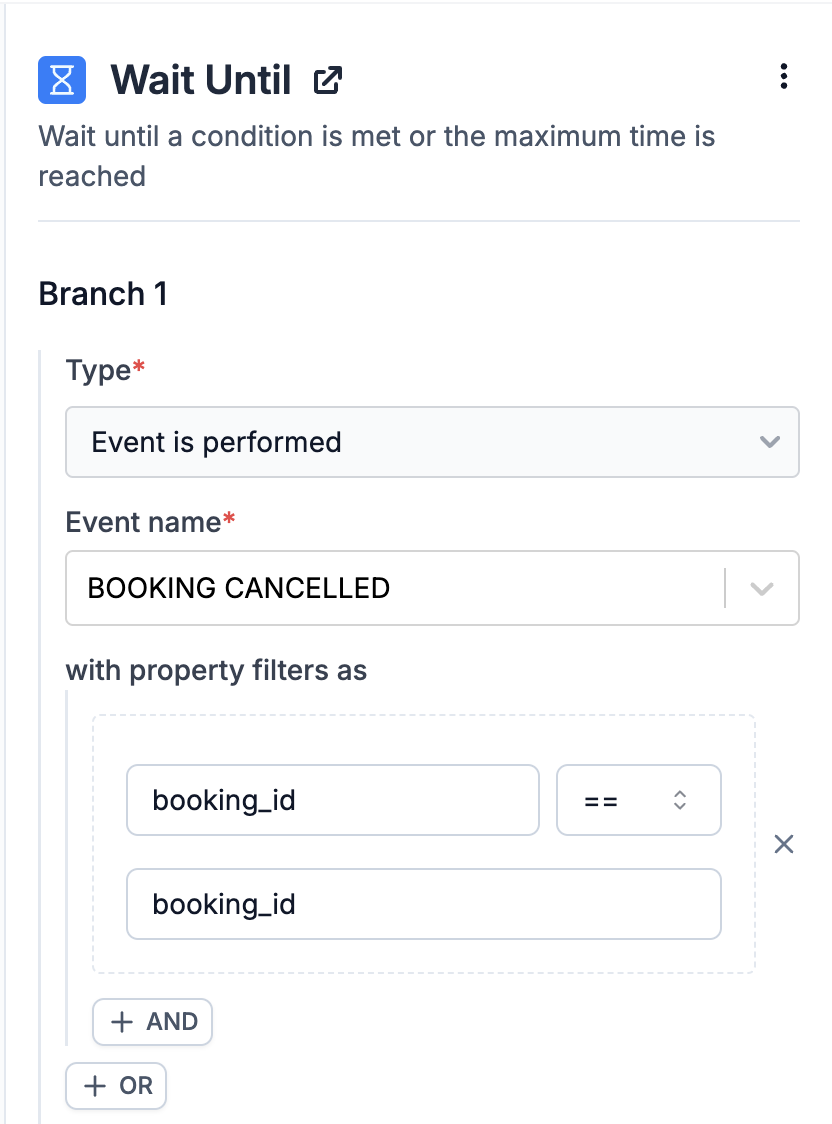 ### Adding filter on event properties
Property condition is constructed as key, operator and value. You can add multiple conditions separated by `AND`, `OR`.
1. **Key:** It is the variable key in your wait until event properties.
2. **Operator:** you can use any of the below operators to compare key and value:
| Operator | Description |
| ---------------- | ---------------------------------------------------------------------------------------------------------------------------------------------------------------------------- |
| `==` | Key **is equal to** value. This is a case-sensitive check. |
| `!=` | Key **is not equal to** value. This is a case-sensitive check. |
| `>` | Key **is greater than** value. Can be applied to integers, float values, or epoch timestamps. |
| `>=` | Key **is greater than or equal to** value. Can be applied to integers, float values, or epoch timestamps. |
| `<` | Key **is less than** value. Can be applied to integers and float values. |
| `<=` | Key **is less than or equal to** value. Can be applied to integers and float values. |
| `contains` | Key should be a substring or a list item in an array. |
| `not contains` | Key should not be a substring or match any list item in an array. |
| `is empty` | Evaluates to `true` if the key is missing, an empty string, or has a `null` value. |
| `is not empty` | Key should be present and should not be an empty string or `null` value. |
| `intersects` | Evaluates to true if **any value** in the left array matches **any value** in the right array. Useful for checking overlaps between arrays. |
| `not intersects` | Evaluates to true if **no values** in the left array match any values in the right array. It could be used in case of checking or filtering out any overlaps between arrays. |
3. **Value:** Value can be fixed (static value) or dynamic (evaluated dynamically from workflow data).
#### Fixed values
Fixed values can be added as:
1. **string**- enclose within double inverted commas as `"string"`
2. **number**- `1`, `1.2`
3. **boolean**- `true`, `false`
#### Dynamic values
Dynamic values are evaluated based on the data available at the node input along with actor, recipient or tenant properties. Refer below table for types of dynamic values and their respective syntax.
| Data Type | Description | Referring this property in condition |
| ----------------- | -------------------------------------------------------------------------------------------------------------------------------------------------------------------------------------------------------------------------------------------------------------------- | ---------------------------------------- |
| **Input Payload** | Includes data from your trigger payload and any data modified or added by nodes such as data transform, batch/digest, or webhook/fetch nodes before the branch node. | Directly specify as `key` with no prefix |
| **Actor** | Actor properties. In the case of an event trigger, `distinct_id` works as both actor and recipient. For an inline workflow trigger, it is the `distinct_id` in the actor object. | Add as `$actor.
### Adding filter on event properties
Property condition is constructed as key, operator and value. You can add multiple conditions separated by `AND`, `OR`.
1. **Key:** It is the variable key in your wait until event properties.
2. **Operator:** you can use any of the below operators to compare key and value:
| Operator | Description |
| ---------------- | ---------------------------------------------------------------------------------------------------------------------------------------------------------------------------- |
| `==` | Key **is equal to** value. This is a case-sensitive check. |
| `!=` | Key **is not equal to** value. This is a case-sensitive check. |
| `>` | Key **is greater than** value. Can be applied to integers, float values, or epoch timestamps. |
| `>=` | Key **is greater than or equal to** value. Can be applied to integers, float values, or epoch timestamps. |
| `<` | Key **is less than** value. Can be applied to integers and float values. |
| `<=` | Key **is less than or equal to** value. Can be applied to integers and float values. |
| `contains` | Key should be a substring or a list item in an array. |
| `not contains` | Key should not be a substring or match any list item in an array. |
| `is empty` | Evaluates to `true` if the key is missing, an empty string, or has a `null` value. |
| `is not empty` | Key should be present and should not be an empty string or `null` value. |
| `intersects` | Evaluates to true if **any value** in the left array matches **any value** in the right array. Useful for checking overlaps between arrays. |
| `not intersects` | Evaluates to true if **no values** in the left array match any values in the right array. It could be used in case of checking or filtering out any overlaps between arrays. |
3. **Value:** Value can be fixed (static value) or dynamic (evaluated dynamically from workflow data).
#### Fixed values
Fixed values can be added as:
1. **string**- enclose within double inverted commas as `"string"`
2. **number**- `1`, `1.2`
3. **boolean**- `true`, `false`
#### Dynamic values
Dynamic values are evaluated based on the data available at the node input along with actor, recipient or tenant properties. Refer below table for types of dynamic values and their respective syntax.
| Data Type | Description | Referring this property in condition |
| ----------------- | -------------------------------------------------------------------------------------------------------------------------------------------------------------------------------------------------------------------------------------------------------------------- | ---------------------------------------- |
| **Input Payload** | Includes data from your trigger payload and any data modified or added by nodes such as data transform, batch/digest, or webhook/fetch nodes before the branch node. | Directly specify as `key` with no prefix |
| **Actor** | Actor properties. In the case of an event trigger, `distinct_id` works as both actor and recipient. For an inline workflow trigger, it is the `distinct_id` in the actor object. | Add as `$actor.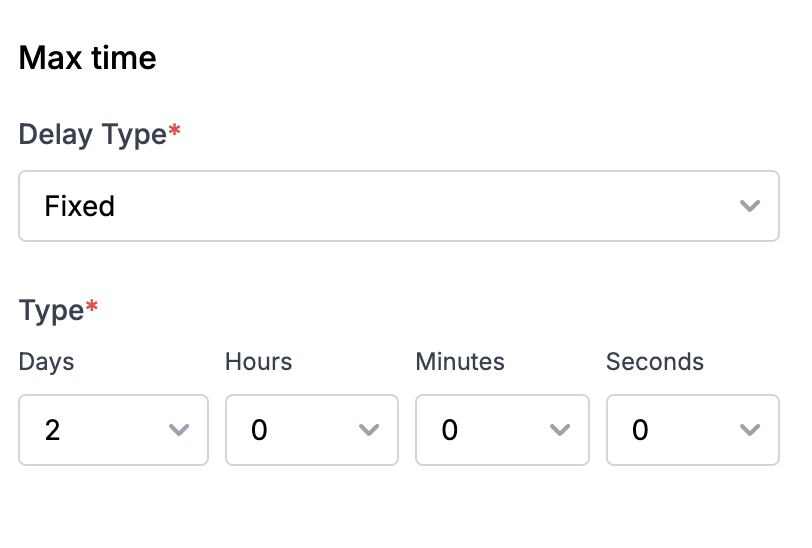 Some examples of fixed delay are:
* Sending multiple payment or activity reminders at predetermined intervals. For instance, sending three payment reminders spaced 2 days apart from the last due date.
* Implementing conditional sends across multiple channels. e.g., sending an approval notification via Inbox and scheduling an email to be sent one hour later if the approval is not received.
[Smart channel routing](/docs/smart-delivery) is a better approach to solve this use case.
### Dynamic delay
In case of dynamic delay, delay duration is computed using the data from your event properties. Dynamic delays are helpful for reminders where the schedule is dictated by the user or when notification needs to be sent before the event or task due date.
Some examples of fixed delay are:
* Sending multiple payment or activity reminders at predetermined intervals. For instance, sending three payment reminders spaced 2 days apart from the last due date.
* Implementing conditional sends across multiple channels. e.g., sending an approval notification via Inbox and scheduling an email to be sent one hour later if the approval is not received.
[Smart channel routing](/docs/smart-delivery) is a better approach to solve this use case.
### Dynamic delay
In case of dynamic delay, delay duration is computed using the data from your event properties. Dynamic delays are helpful for reminders where the schedule is dictated by the user or when notification needs to be sent before the event or task due date.
 Imagine you need to send task completion reminders, where users can specify a reminder frequency, such as every 6 hours until the task is finished. This frequency can differ for each task and user. Dynamic wait times effortlessly adapt to these unique preferences.
You can add duration key as a [JQ-expression](https://jqlang.github.io/jq/manual/). Below are some examples of how to add duration key in JQ format:
1. General format for duration key at parent level is `.duration_key`
2. If the duration key is a nested event property key like shown below, enter it in the format `.reminder.frequency`
Imagine you need to send task completion reminders, where users can specify a reminder frequency, such as every 6 hours until the task is finished. This frequency can differ for each task and user. Dynamic wait times effortlessly adapt to these unique preferences.
You can add duration key as a [JQ-expression](https://jqlang.github.io/jq/manual/). Below are some examples of how to add duration key in JQ format:
1. General format for duration key at parent level is `.duration_key`
2. If the duration key is a nested event property key like shown below, enter it in the format `.reminder.frequency`
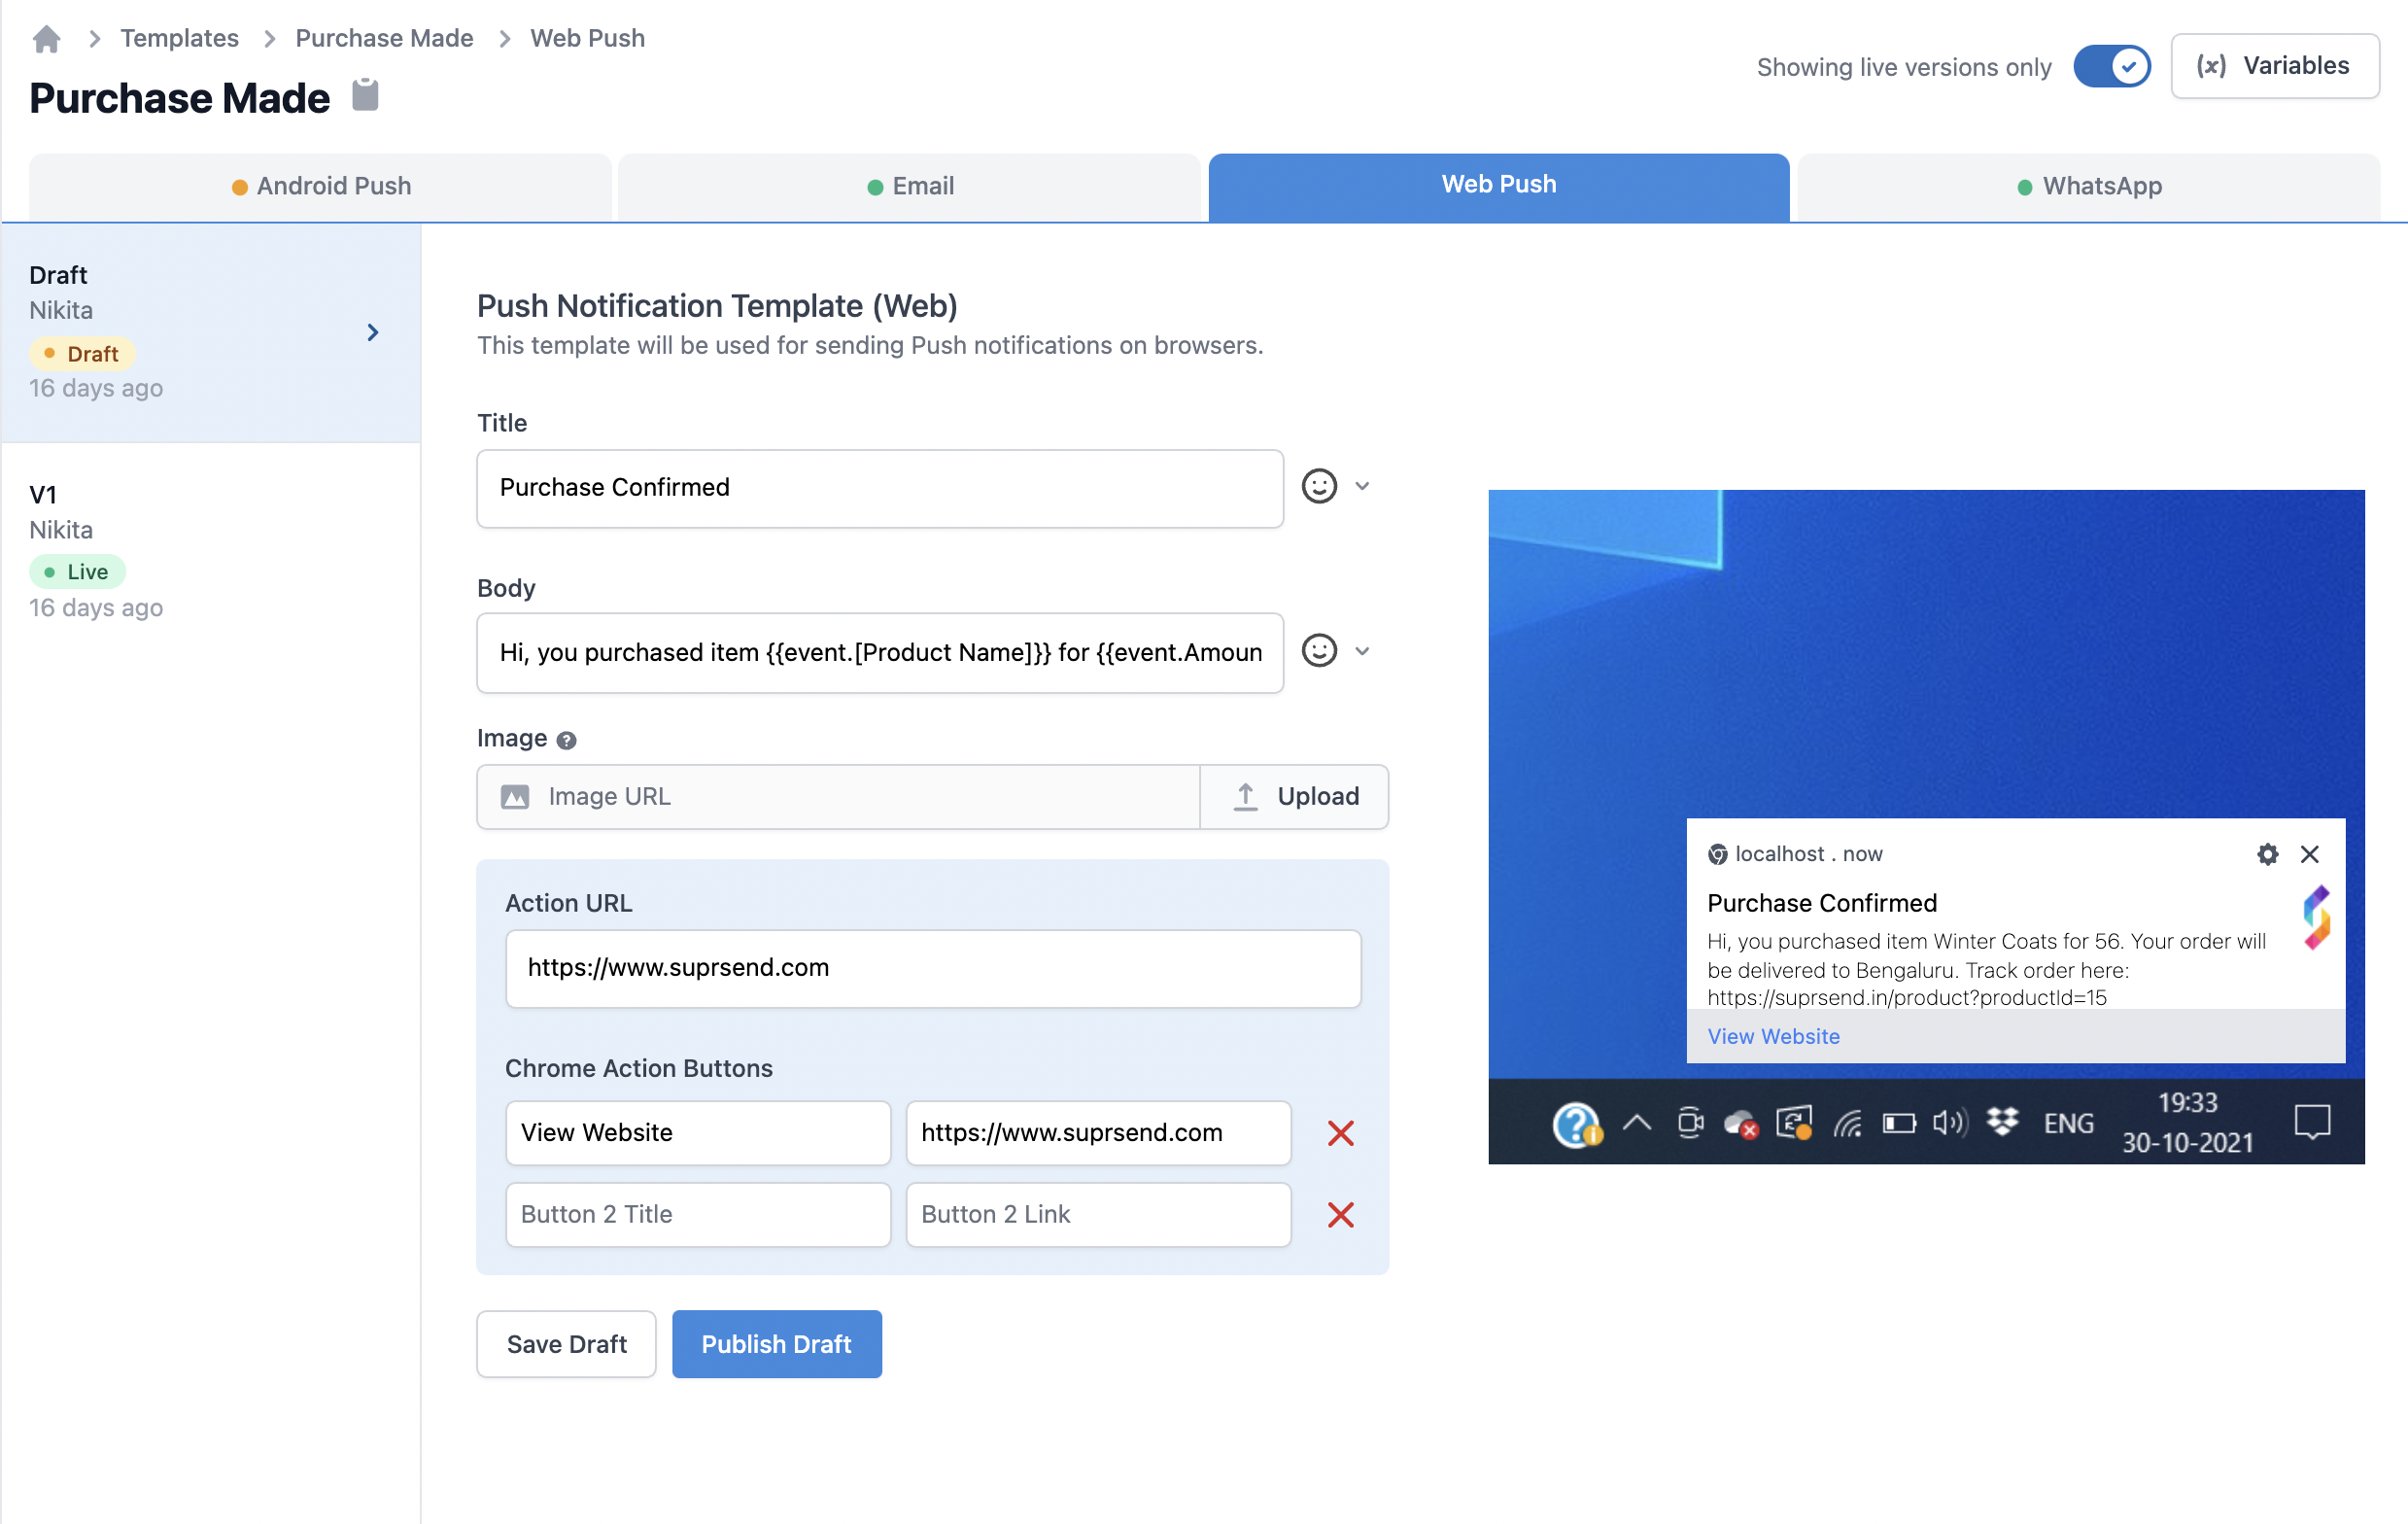 ## Web Push notification fields description
| Field | Description |
| -------------- | --------------------------------------------------------------------------------------------------------------------------------------------------------------------------------------------------------------------------------------------------------------------------------------------------------------------- |
| Title | Small message text box. Note that this field will be displayed in single line only, and very long content can get curtailed. Use `handlebarsjs` to add variables. |
| Large Icon | The small icon will show up to the right of the notification text. SuprSend puts your organisation logo as default in the large icon, which you can set from 'Organisations Tab'. This will be shown by default and cannot be changed. |
| Message | Large message text box. Use `handlebarsjs` to add variables. |
| Image | *Optional* Recommended banner filetypes are `PNG`, `JPG`, `JPEG`. SuprSend will auto-scale your image so that it doesn't get cropped. |
| Action URL | Provide a URL where a user will go when he clicks on the push notification. Use `handlebarsjs` to add variables. |
| Action Buttons | *Optional* Enter up to 3 Button names and URL. You can use variable names using handlebarsjs in both action name and URL. You can give your android deeplink URL as well. The action button name color is picked up from your organisation settings. You cannot change button color in a template once it is created. |
## Adding dynamic content in Web Push
There will always be the case where you would be required to add dynamic content to a template, so as to personalise it for your users. To achieve this, you can add variables in the template, which will be replaced with the dynamic content at the time of sending push. To send actual values to replace variables at the time of communication trigger, use one of our frontend or backend SDKs. Here is a step by step guide on how to add dynamic content in web push:
## Web Push notification fields description
| Field | Description |
| -------------- | --------------------------------------------------------------------------------------------------------------------------------------------------------------------------------------------------------------------------------------------------------------------------------------------------------------------- |
| Title | Small message text box. Note that this field will be displayed in single line only, and very long content can get curtailed. Use `handlebarsjs` to add variables. |
| Large Icon | The small icon will show up to the right of the notification text. SuprSend puts your organisation logo as default in the large icon, which you can set from 'Organisations Tab'. This will be shown by default and cannot be changed. |
| Message | Large message text box. Use `handlebarsjs` to add variables. |
| Image | *Optional* Recommended banner filetypes are `PNG`, `JPG`, `JPEG`. SuprSend will auto-scale your image so that it doesn't get cropped. |
| Action URL | Provide a URL where a user will go when he clicks on the push notification. Use `handlebarsjs` to add variables. |
| Action Buttons | *Optional* Enter up to 3 Button names and URL. You can use variable names using handlebarsjs in both action name and URL. You can give your android deeplink URL as well. The action button name color is picked up from your organisation settings. You cannot change button color in a template once it is created. |
## Adding dynamic content in Web Push
There will always be the case where you would be required to add dynamic content to a template, so as to personalise it for your users. To achieve this, you can add variables in the template, which will be replaced with the dynamic content at the time of sending push. To send actual values to replace variables at the time of communication trigger, use one of our frontend or backend SDKs. Here is a step by step guide on how to add dynamic content in web push:
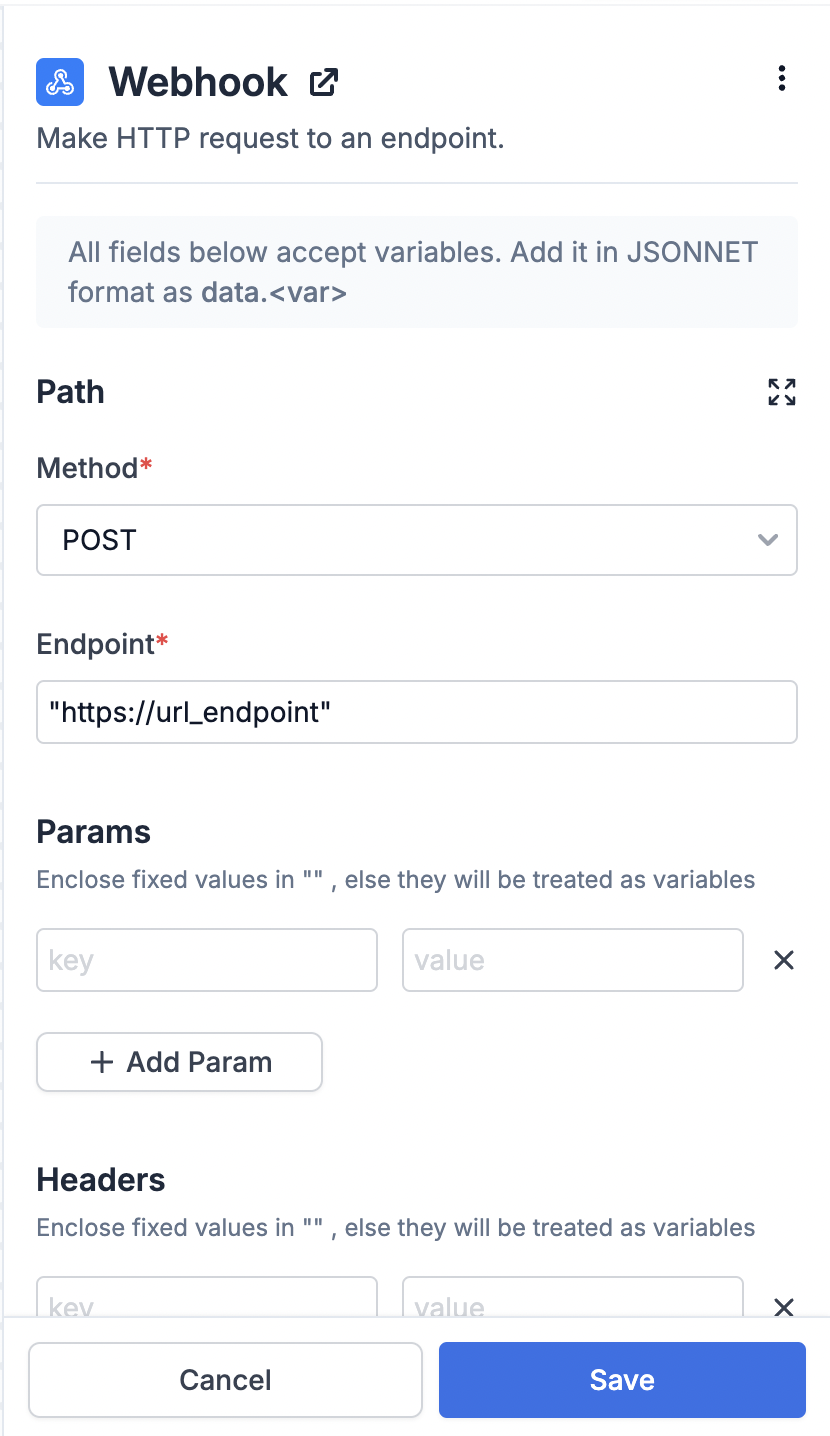 ### Adding variables in Webhook node
Fetch node supports JSONNET rendering language. You can add workflow trigger payload variables as `data.
### Adding variables in Webhook node
Fetch node supports JSONNET rendering language. You can add workflow trigger payload variables as `data.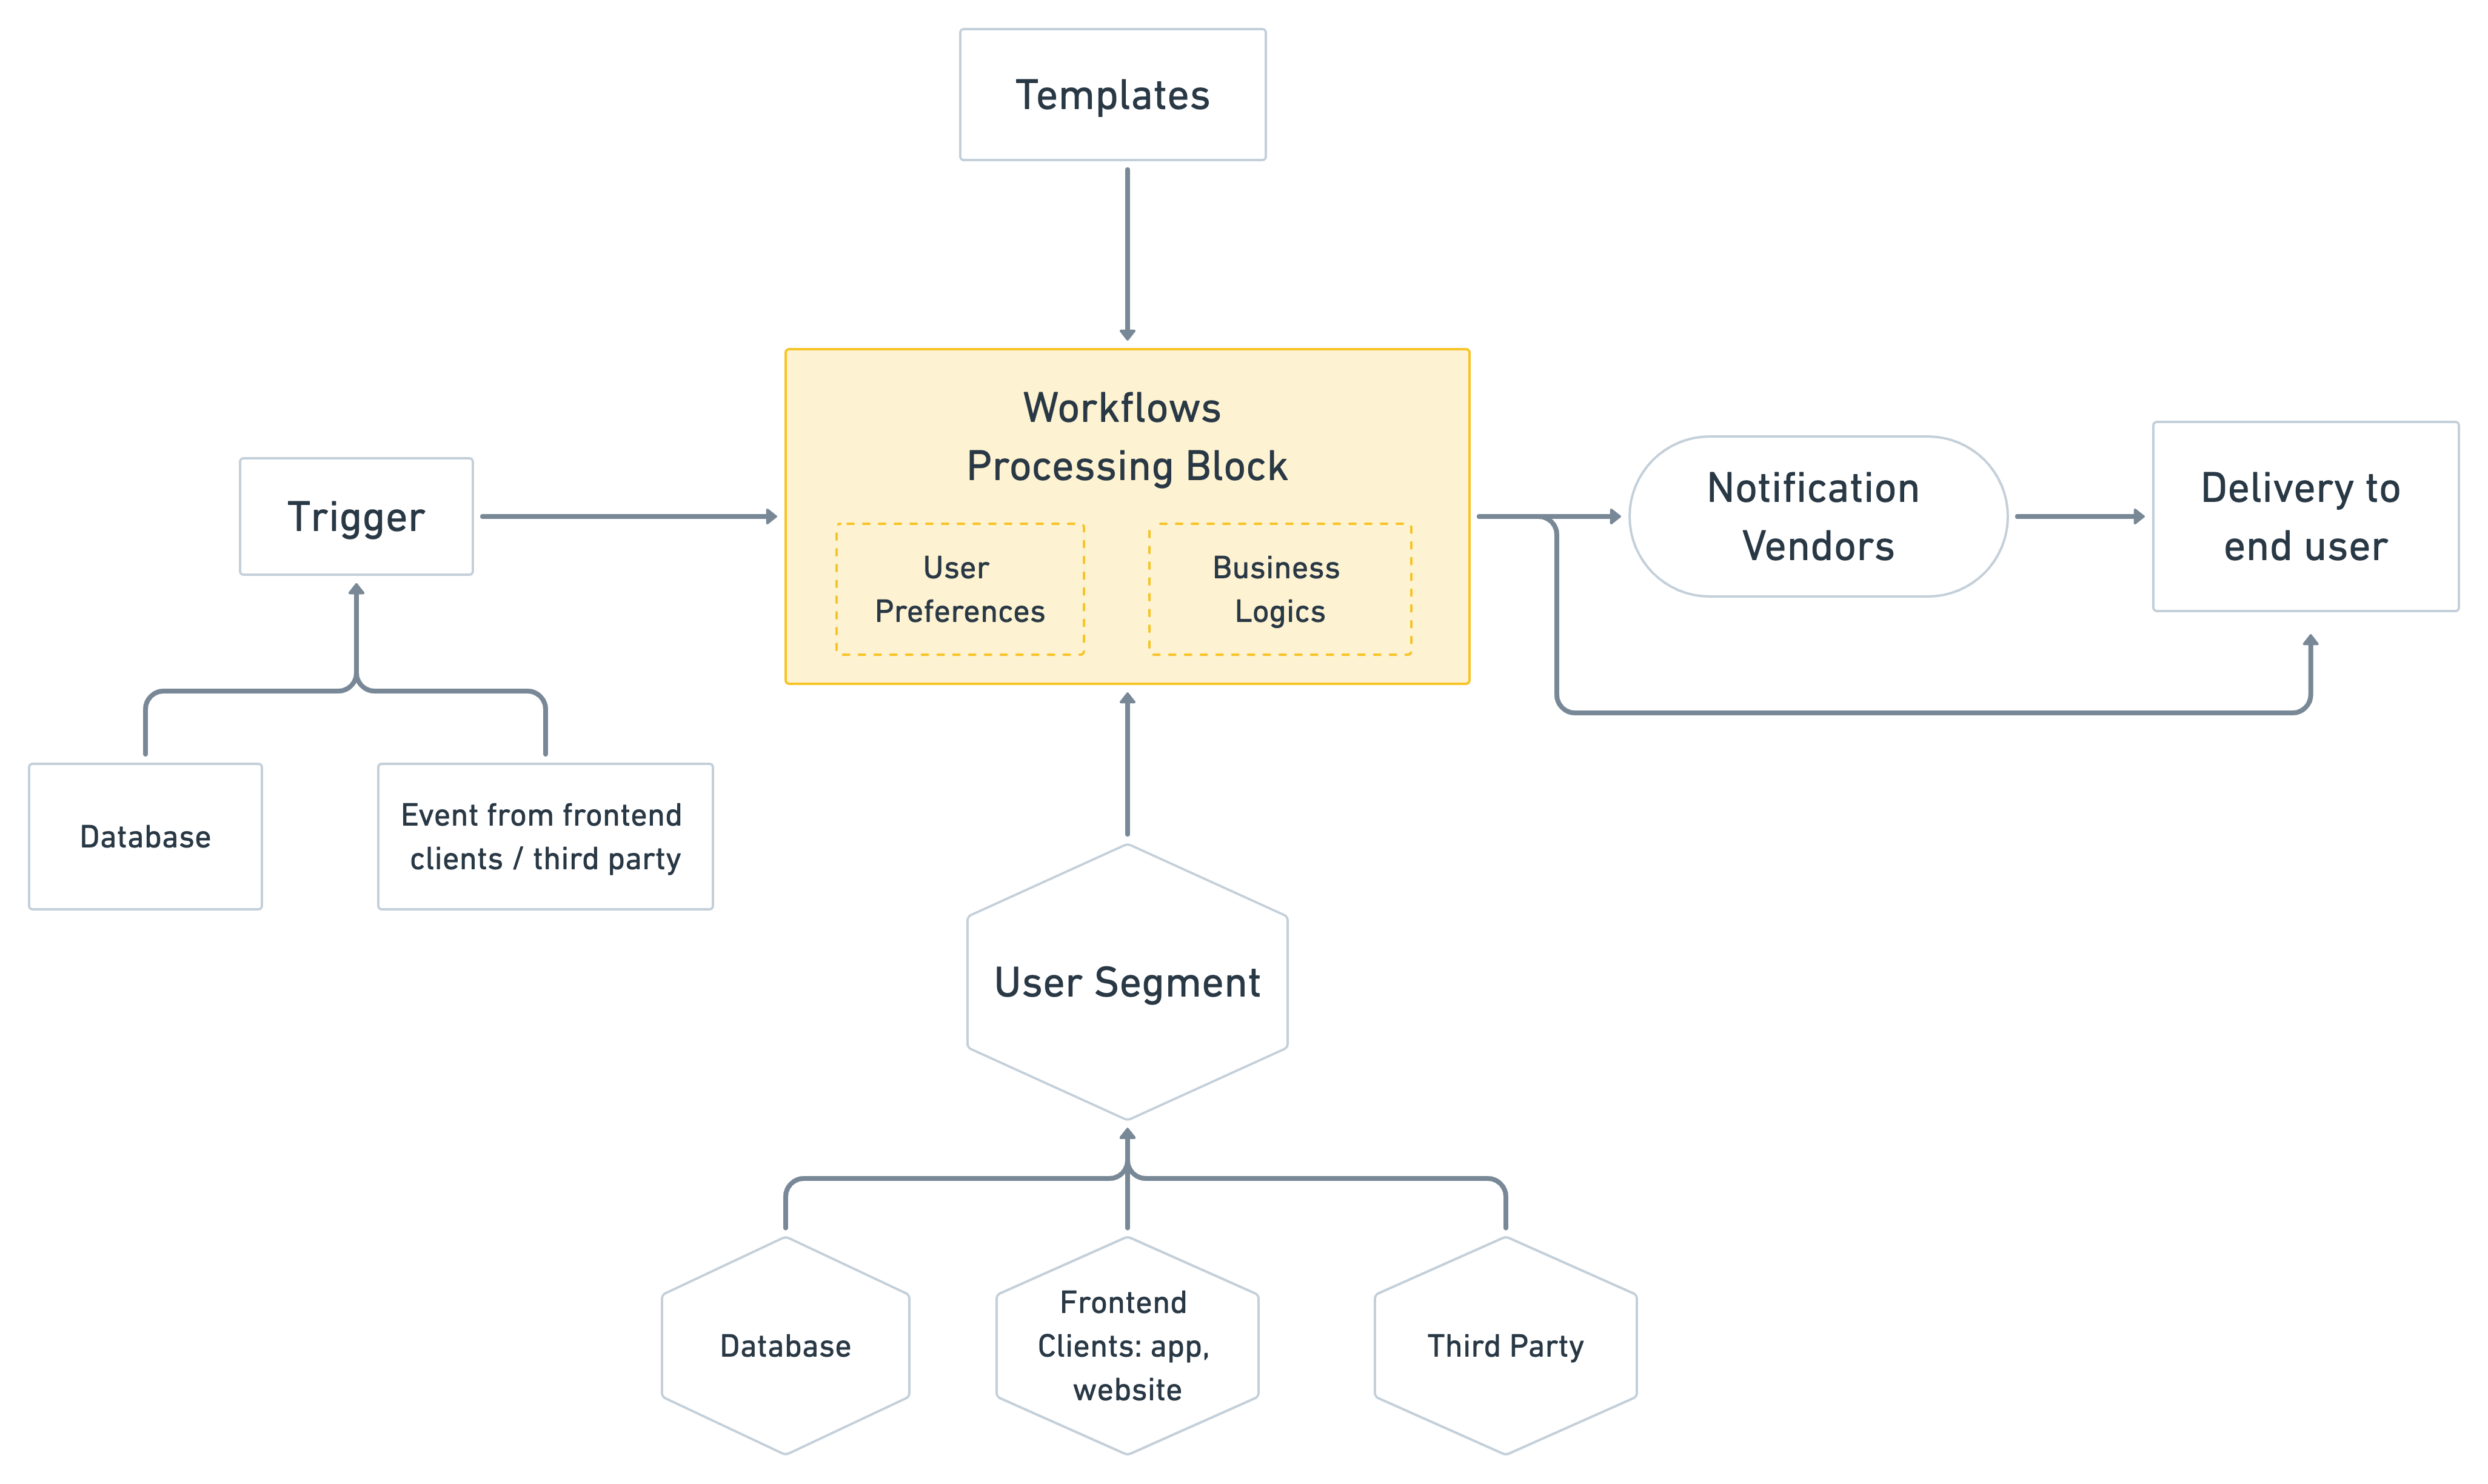 ## How do you trigger notifications?
You can trigger notifications in one of the two ways:
1. Send events to SuprSend from your frontend clients (android app, website, etc) via SuprSend Client SDK, and create a Workflow on SuprSend platform to trigger notification on an event.
2. Create workflow and trigger notification from your backend itself using an omni-channel HTTPS API method, or you can use our Backend SDK.
All the other components (like vendors, templates, optimisation, scaling, etc.) are created and managed on SuprSend platform. You can check the 'Core Concepts' section that lists down the components used in the platform, so you can navigate the platform and use all the features with ease.
## SuprSend APIs
You can try out SuprSend APIs from our [Postman collection](https://www.postman.com/suprsend/workspace/suprsend/collection/27786422-d77a13c1-8f59-406d-9669-078a10d52521)
***
# Whatsapp Cloud API
Source: https://docs.suprsend.com/docs/whatsapp-cloud-api
Integration guide to setup whatsapp notifications on meta using Whatsapp Cloud API.
## Pre-Requisites
**Create Meta Developers account**
* Log in to your Facebook account.
* Click [here](https://developers.facebook.com/) and Get Started.
After completing the verification and accepting terms, you should be able to access [Facebook developers dashboard](
## How do you trigger notifications?
You can trigger notifications in one of the two ways:
1. Send events to SuprSend from your frontend clients (android app, website, etc) via SuprSend Client SDK, and create a Workflow on SuprSend platform to trigger notification on an event.
2. Create workflow and trigger notification from your backend itself using an omni-channel HTTPS API method, or you can use our Backend SDK.
All the other components (like vendors, templates, optimisation, scaling, etc.) are created and managed on SuprSend platform. You can check the 'Core Concepts' section that lists down the components used in the platform, so you can navigate the platform and use all the features with ease.
## SuprSend APIs
You can try out SuprSend APIs from our [Postman collection](https://www.postman.com/suprsend/workspace/suprsend/collection/27786422-d77a13c1-8f59-406d-9669-078a10d52521)
***
# Whatsapp Cloud API
Source: https://docs.suprsend.com/docs/whatsapp-cloud-api
Integration guide to setup whatsapp notifications on meta using Whatsapp Cloud API.
## Pre-Requisites
**Create Meta Developers account**
* Log in to your Facebook account.
* Click [here](https://developers.facebook.com/) and Get Started.
After completing the verification and accepting terms, you should be able to access [Facebook developers dashboard](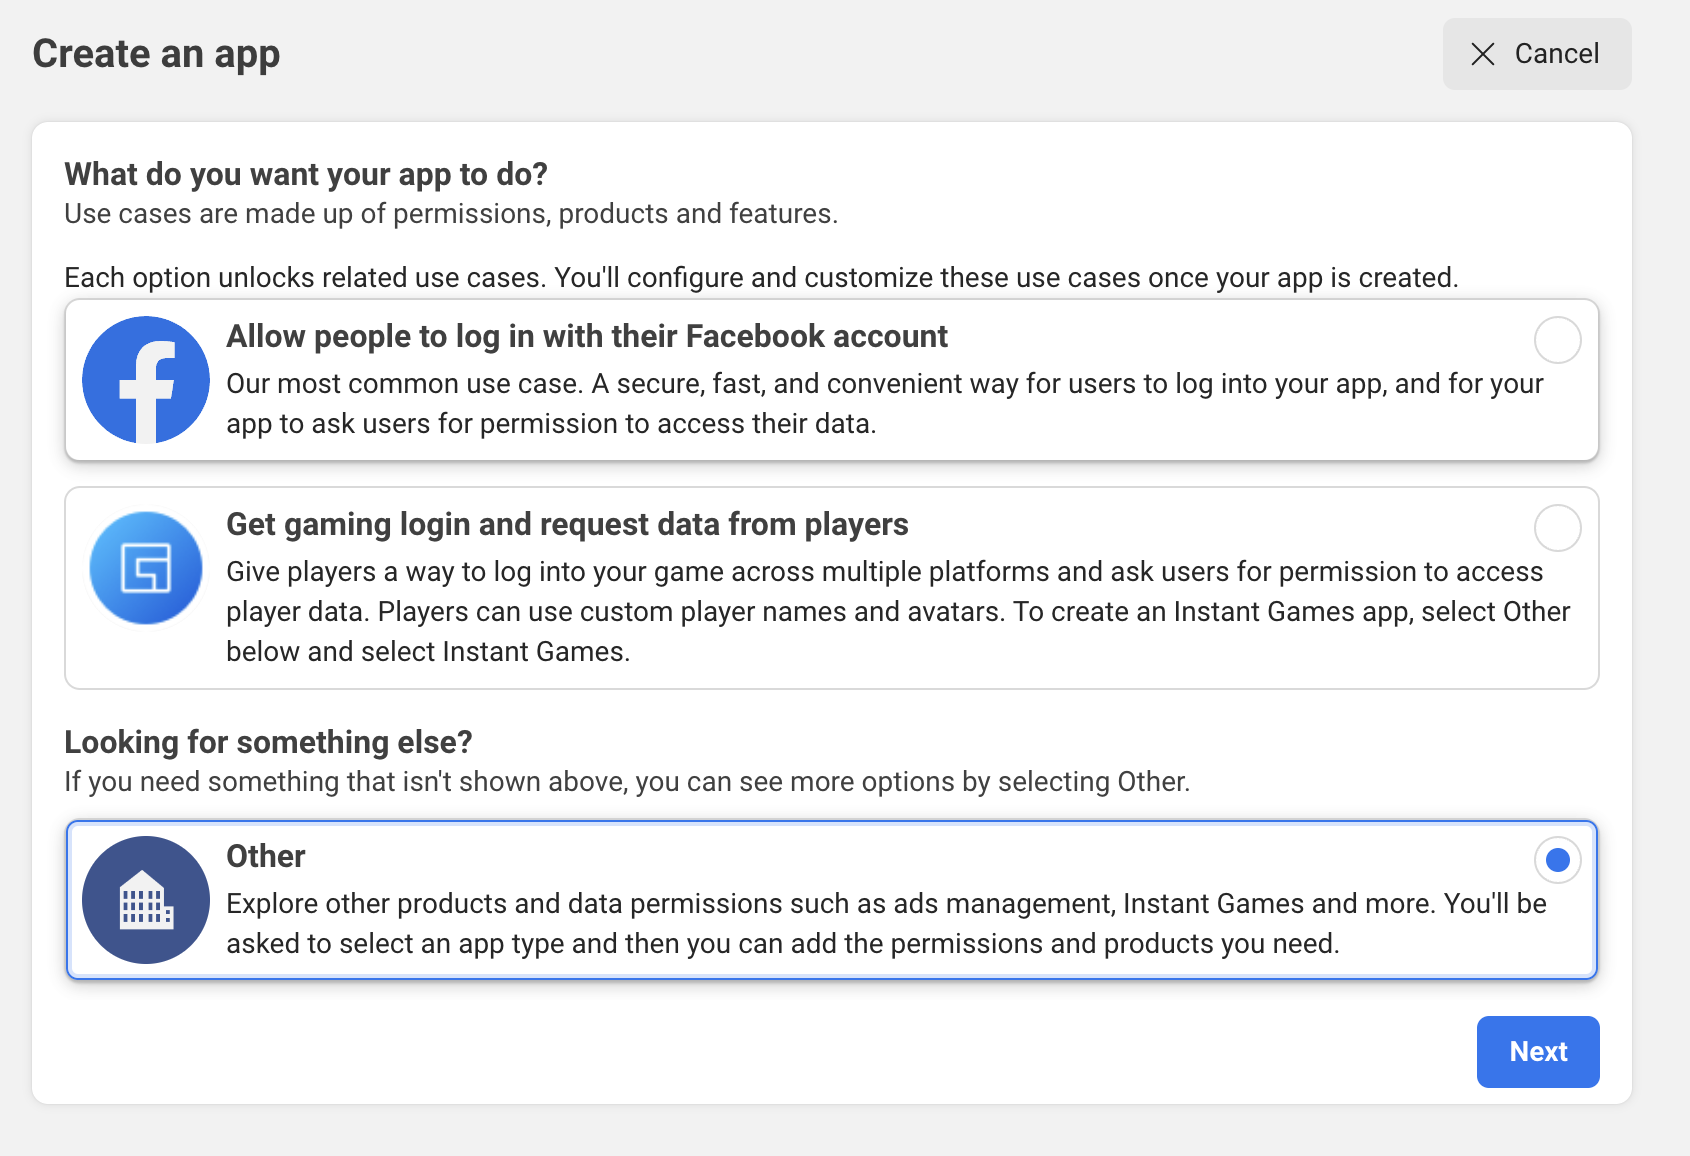 Select app type - **"Business"**
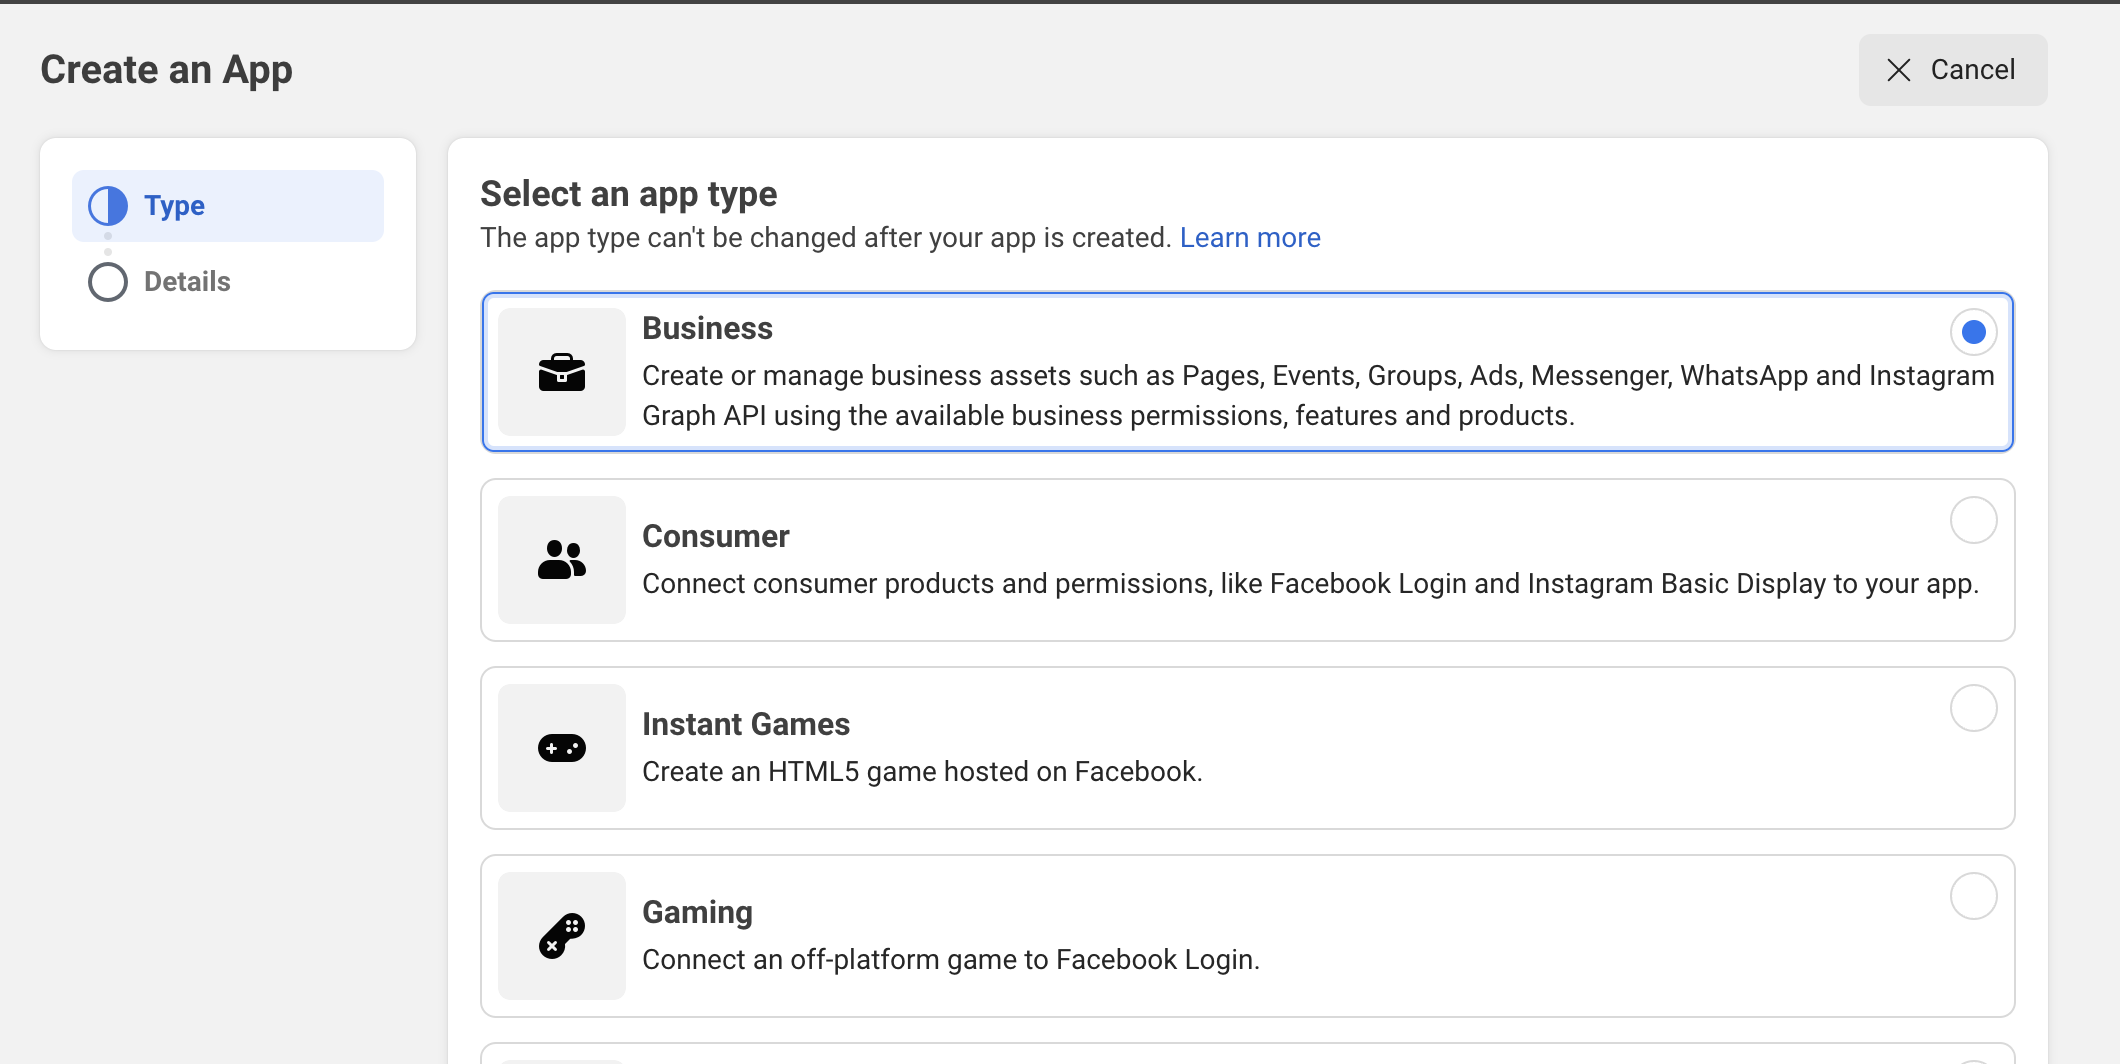 Add App name and create app with your personal details
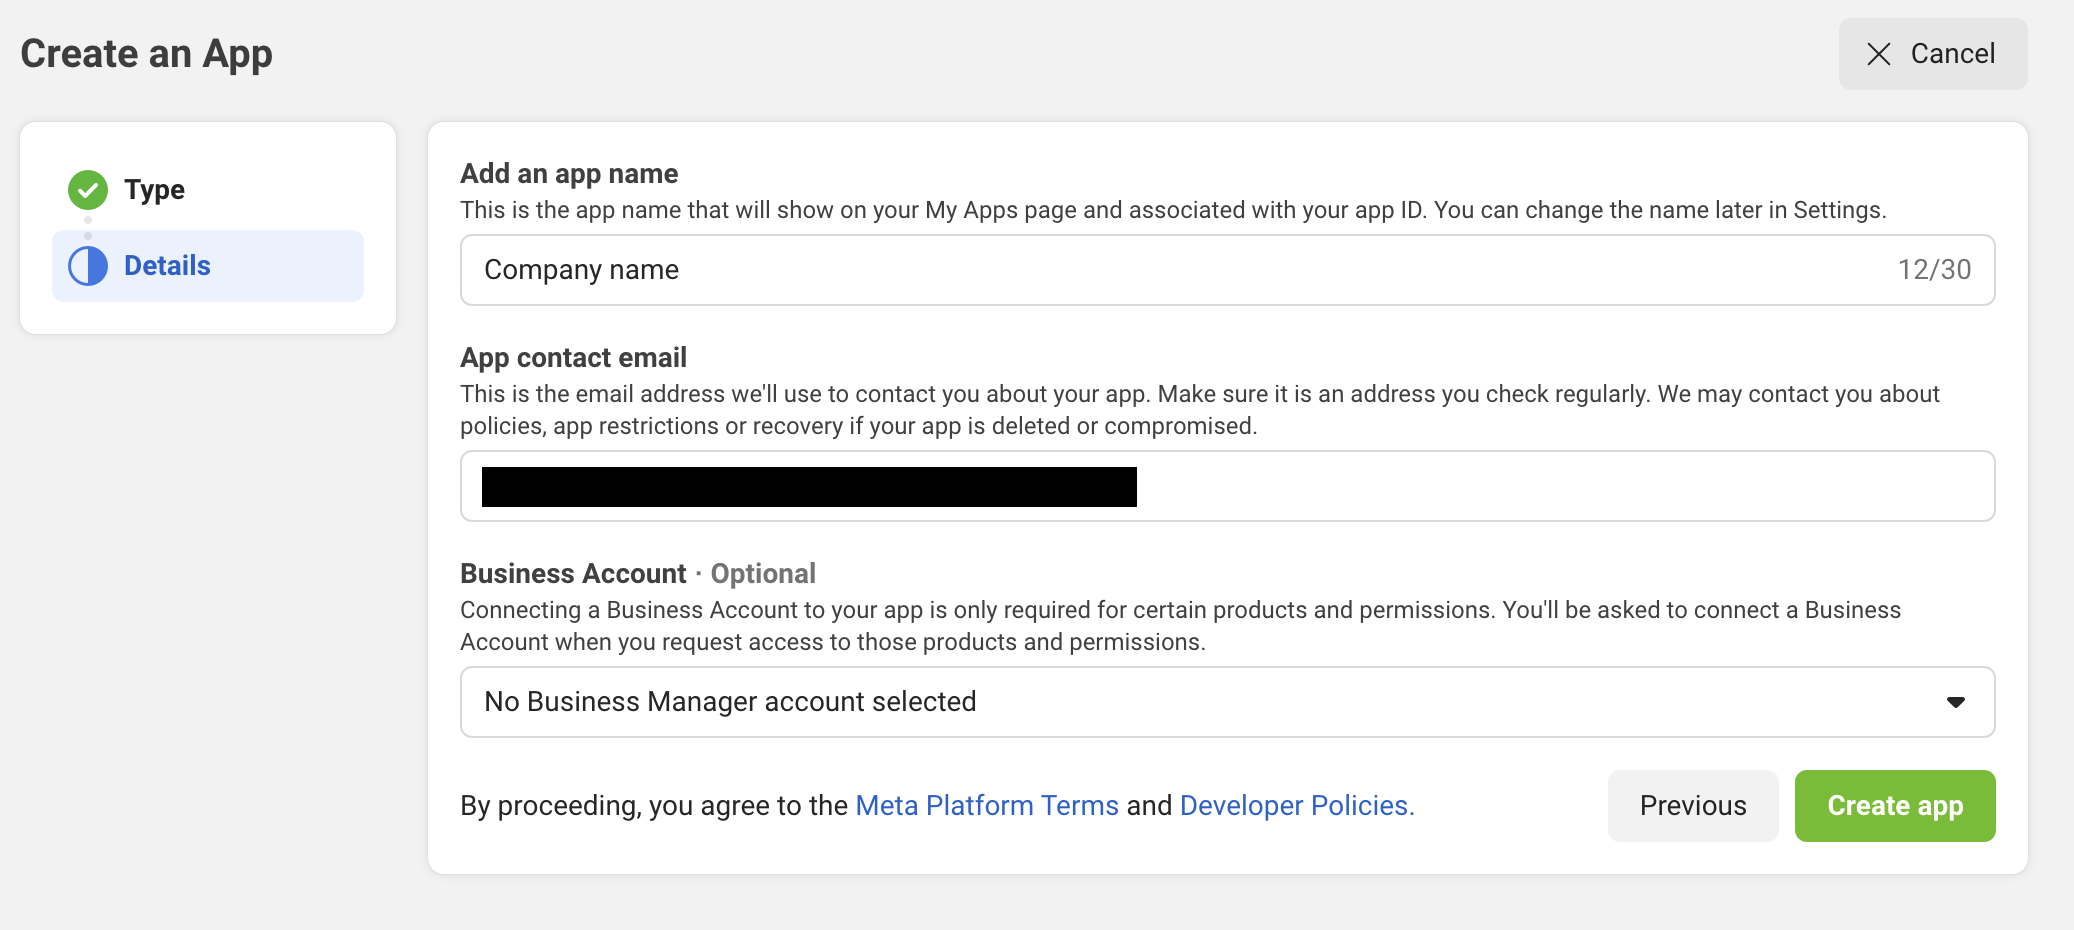
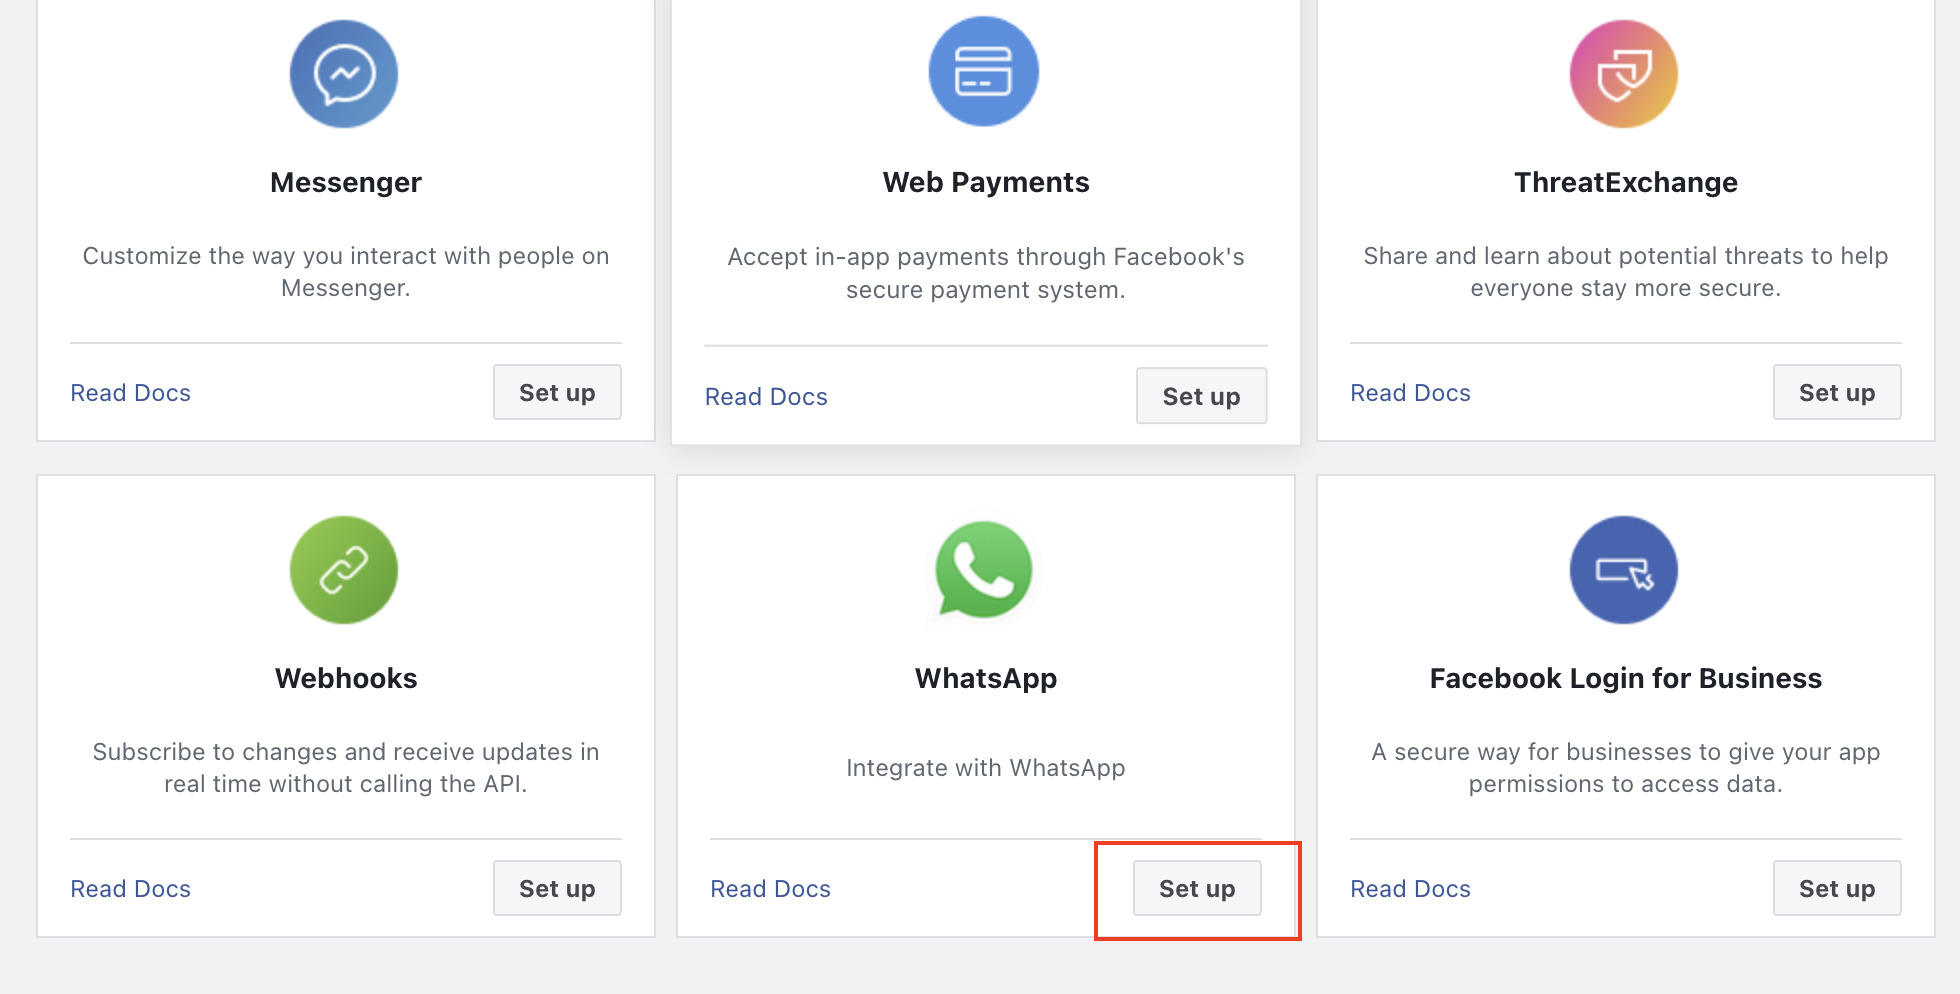 Click on `Continue`. You'll land on the app dashboard.
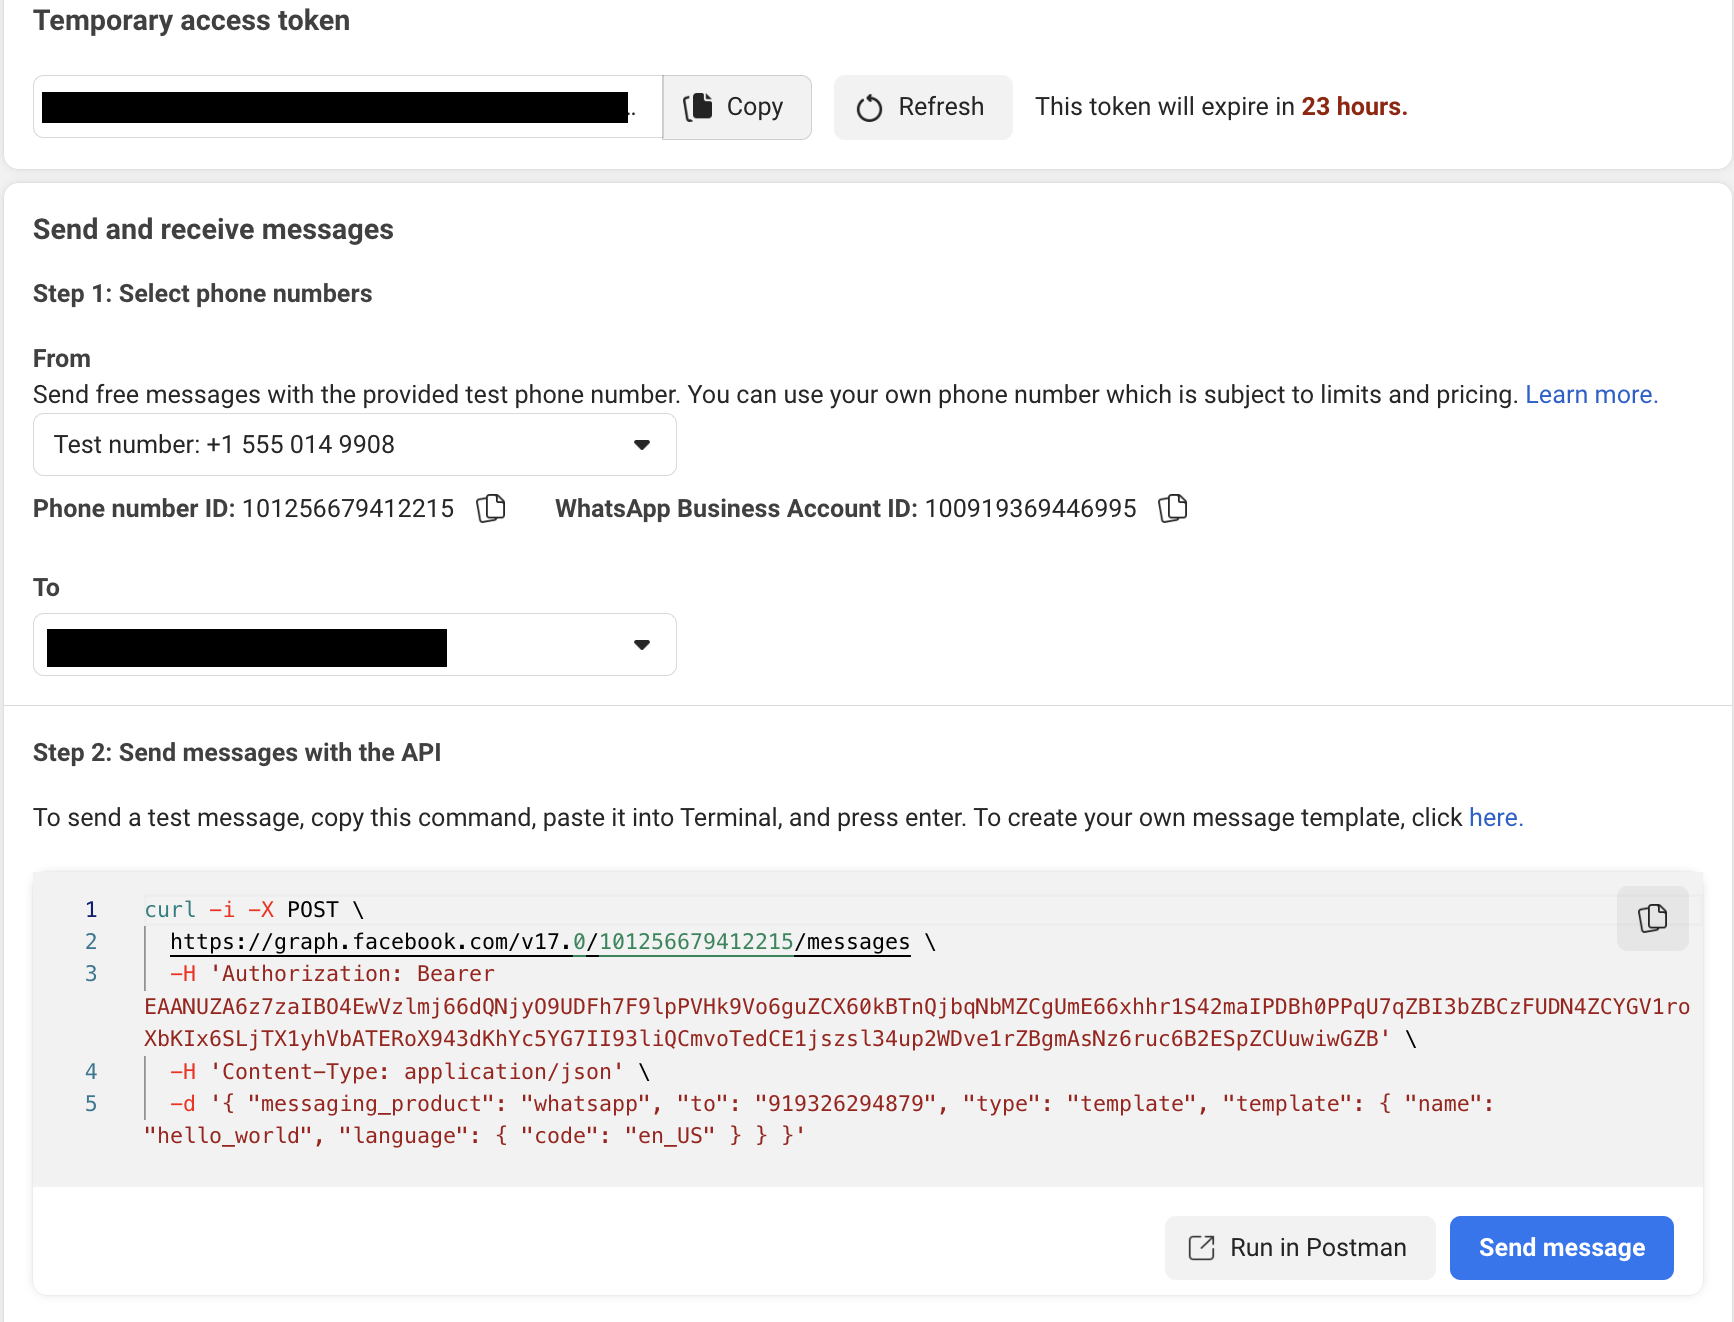

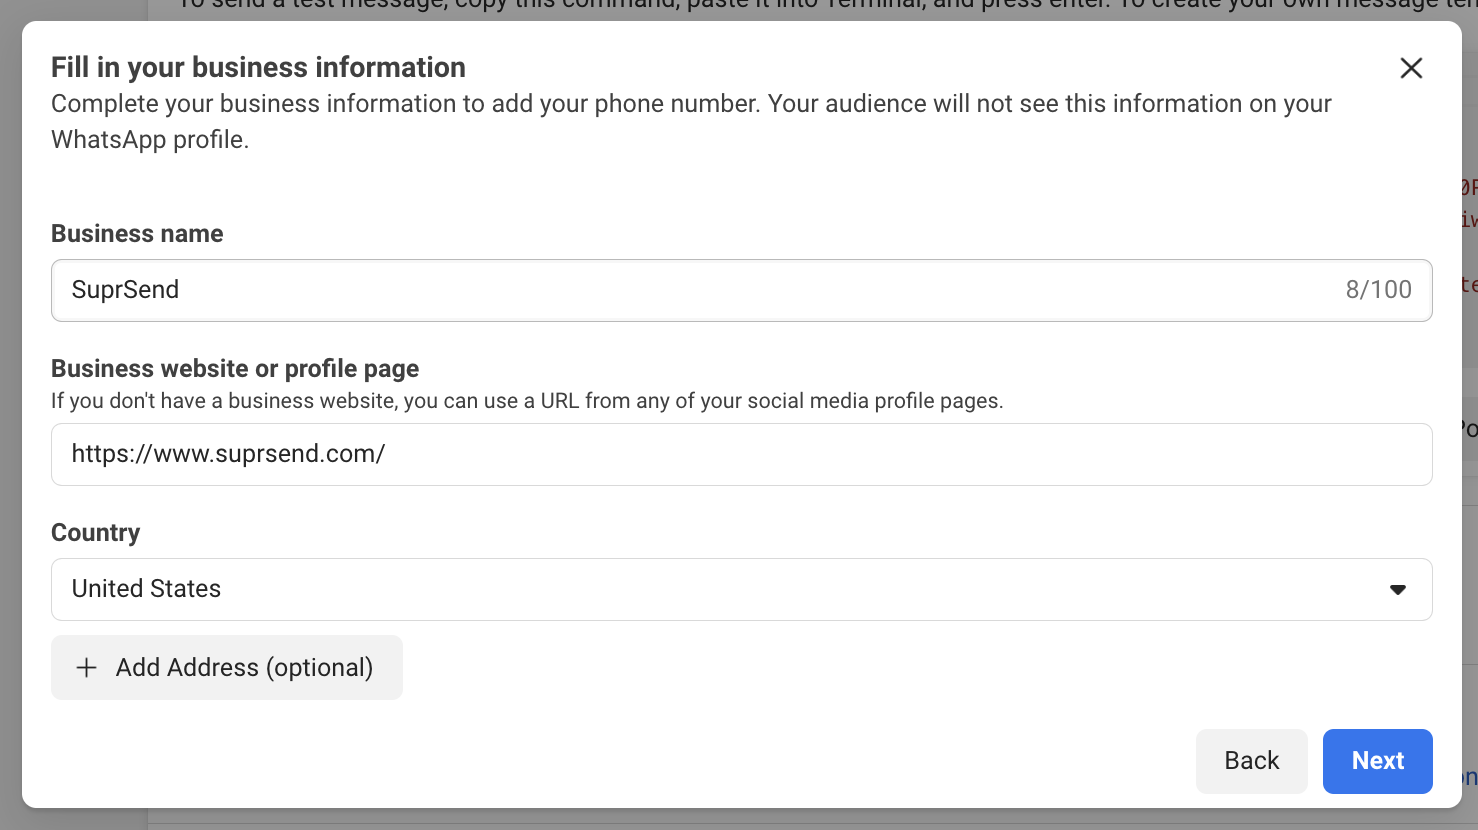 Add your business phone number. This will be the number from which your business communication will go through. If you are using an existing WhatsApp number, [refer doc](https://developers.facebook.com/docs/whatsapp/cloud-api/get-started/migrate-existing-whatsapp-number-to-a-business-account) to migrate the business number.
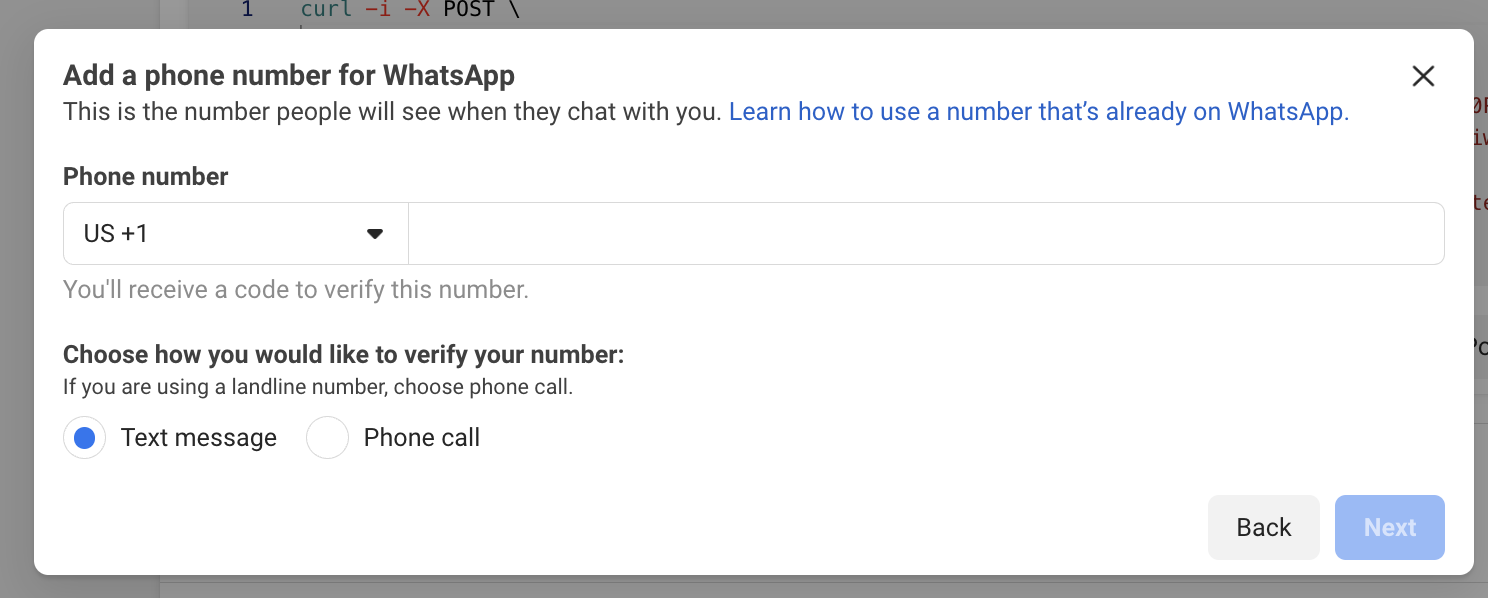 Follow the steps and do not forget to add a payment method to avoid any errors.
Once the phone number is added, copy the `Phone number ID` and `WhatsApp Business Account ID` corresponding to this phone number shown in Step 1 of API Setup
Follow the steps and do not forget to add a payment method to avoid any errors.
Once the phone number is added, copy the `Phone number ID` and `WhatsApp Business Account ID` corresponding to this phone number shown in Step 1 of API Setup

 * Add SuprSend user and give it "`Employee`" access
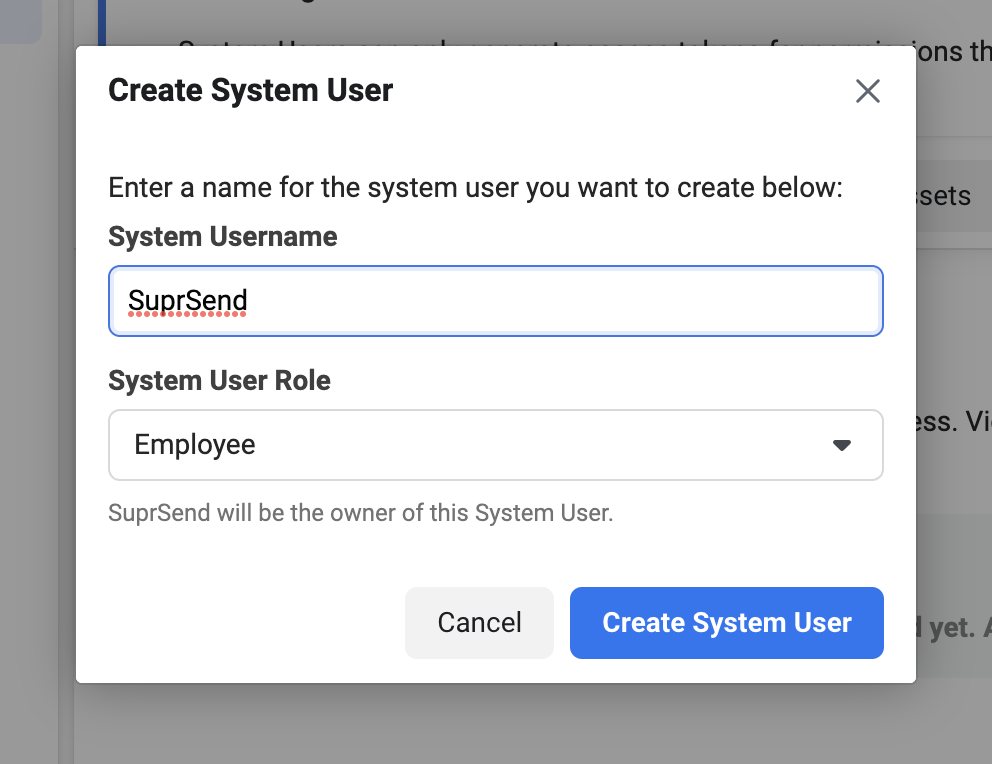
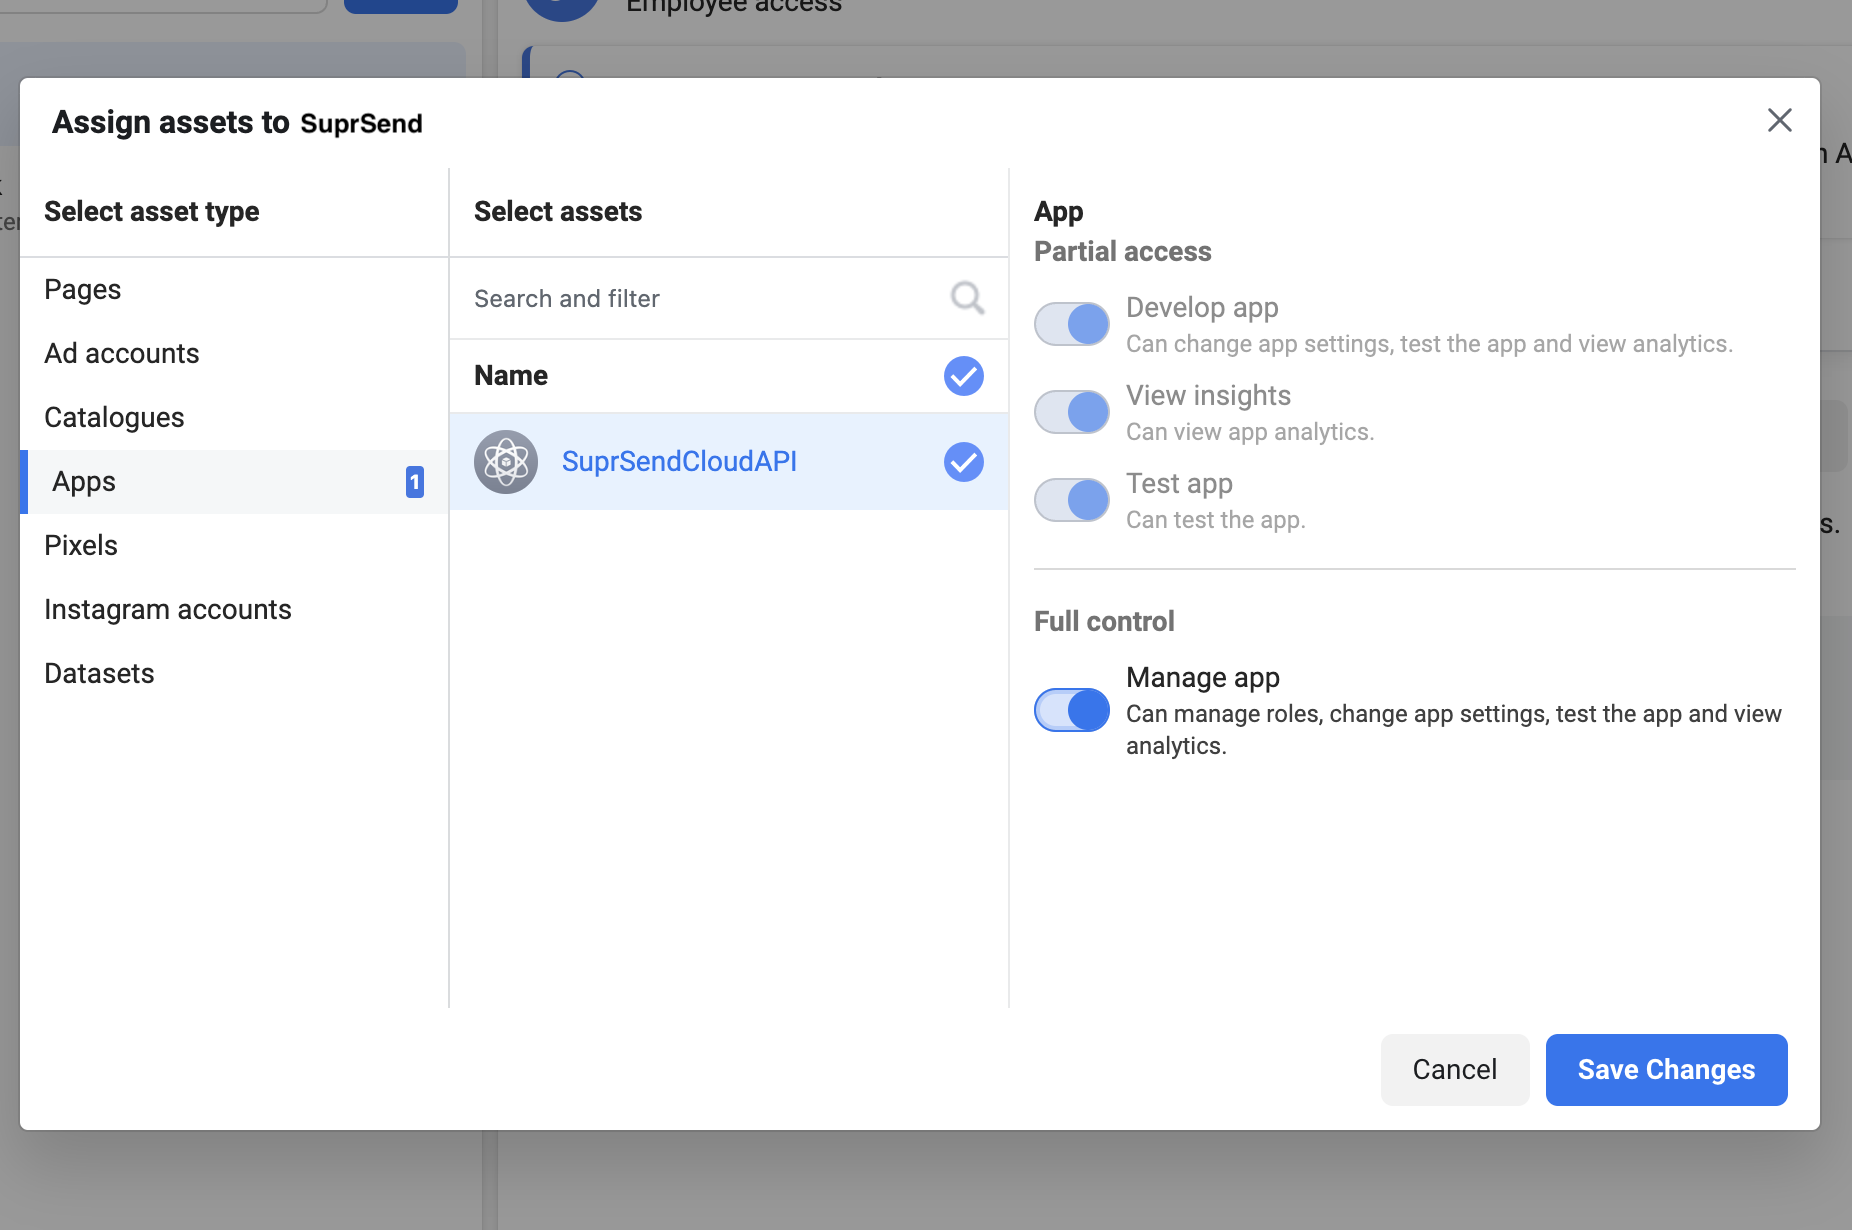 * Now, we'll have to assign the system user to our WhatsApp account.
* To do this from WhatsApp settings page go to WhatsApp accounts -> select your account. Now on the right panel there will be an option to**Assign People**, from there assign the System User that we created above to your account. After it's assigned you'll be able to see in **People** section as shown in the image below.
* Now, we'll have to assign the system user to our WhatsApp account.
* To do this from WhatsApp settings page go to WhatsApp accounts -> select your account. Now on the right panel there will be an option to**Assign People**, from there assign the System User that we created above to your account. After it's assigned you'll be able to see in **People** section as shown in the image below.
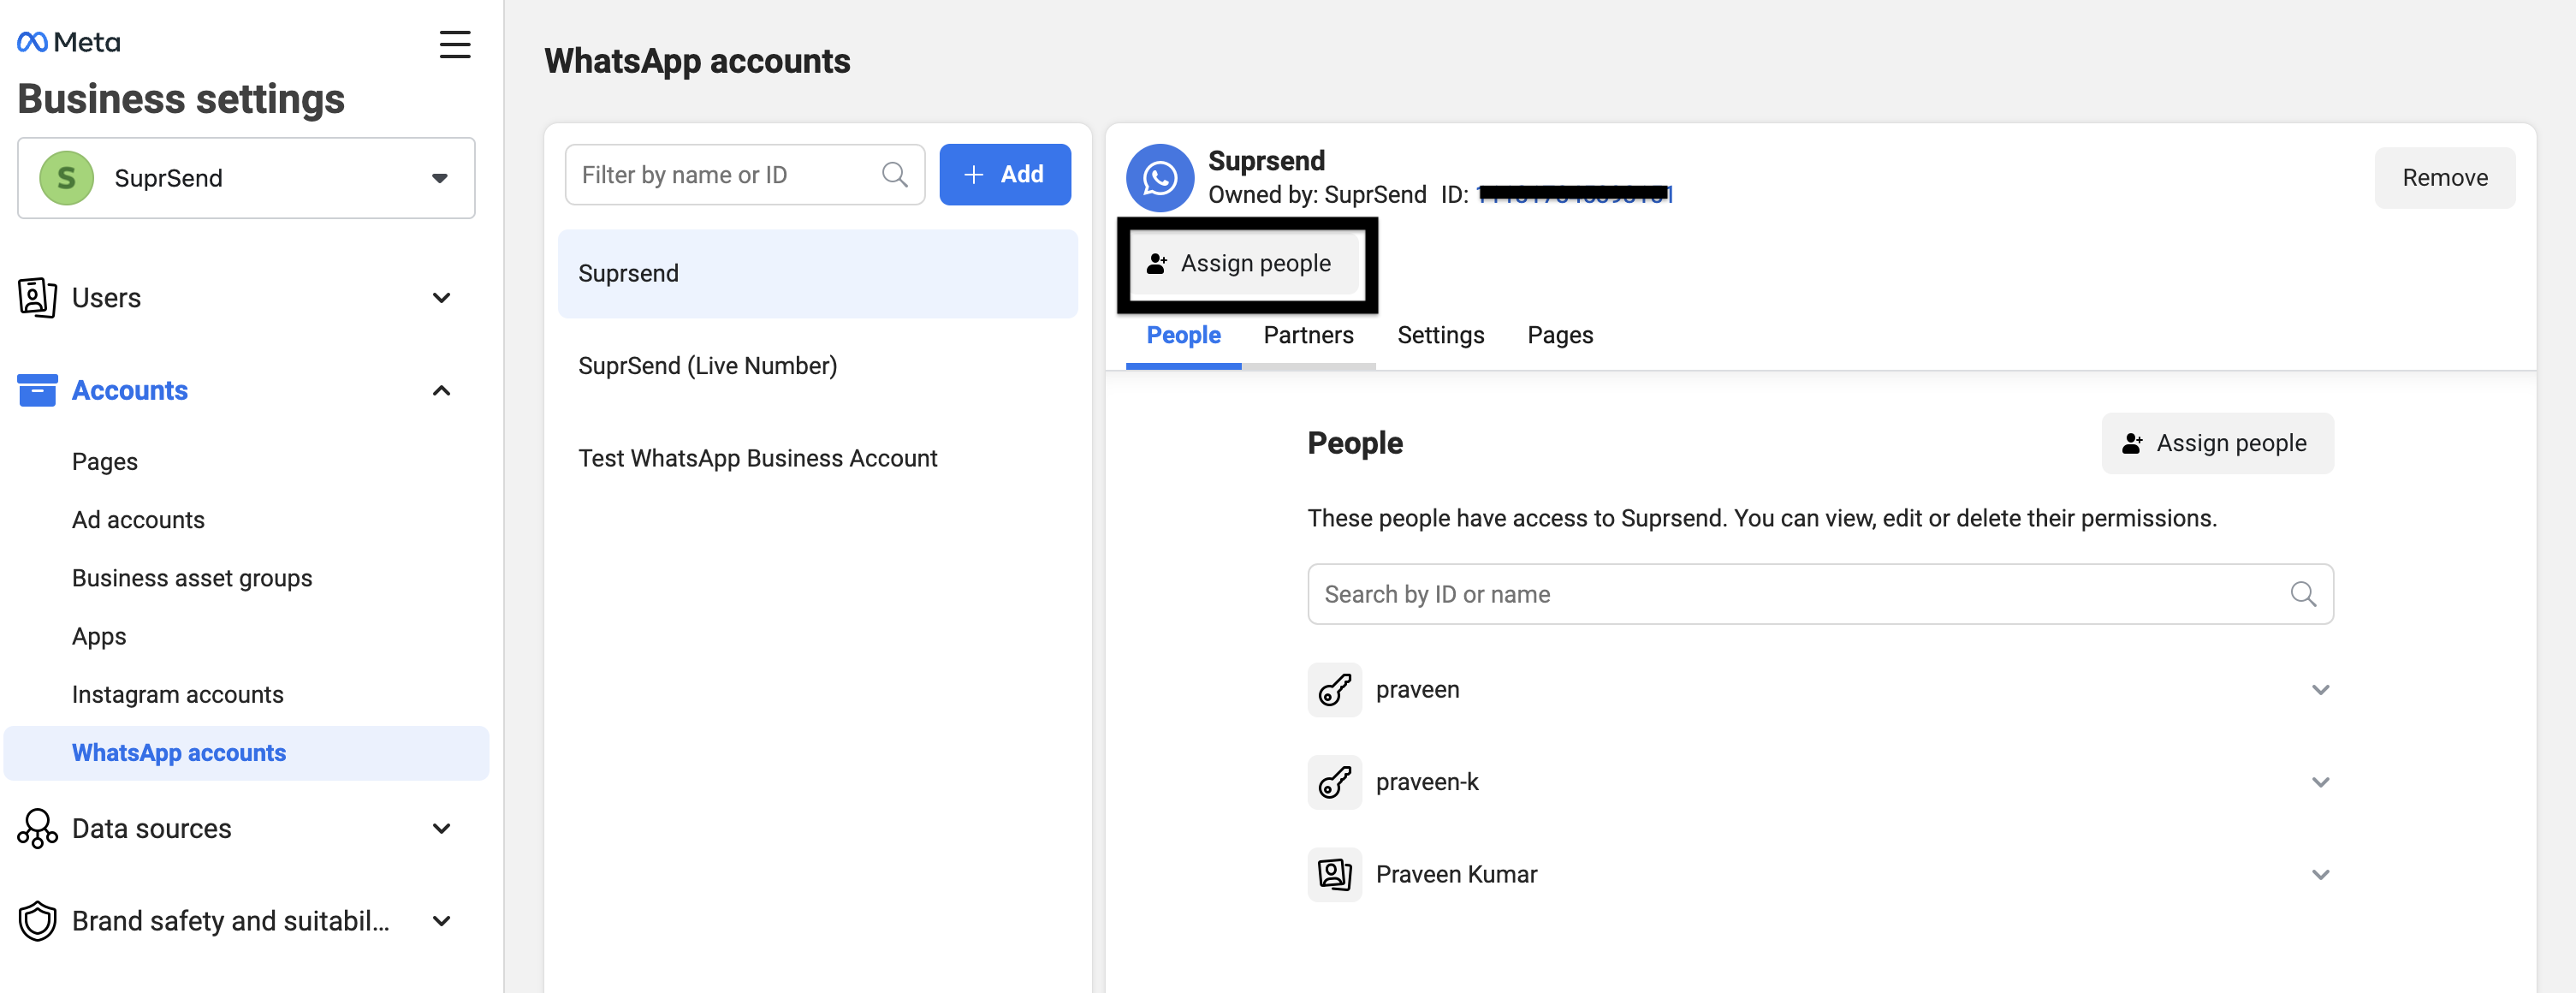
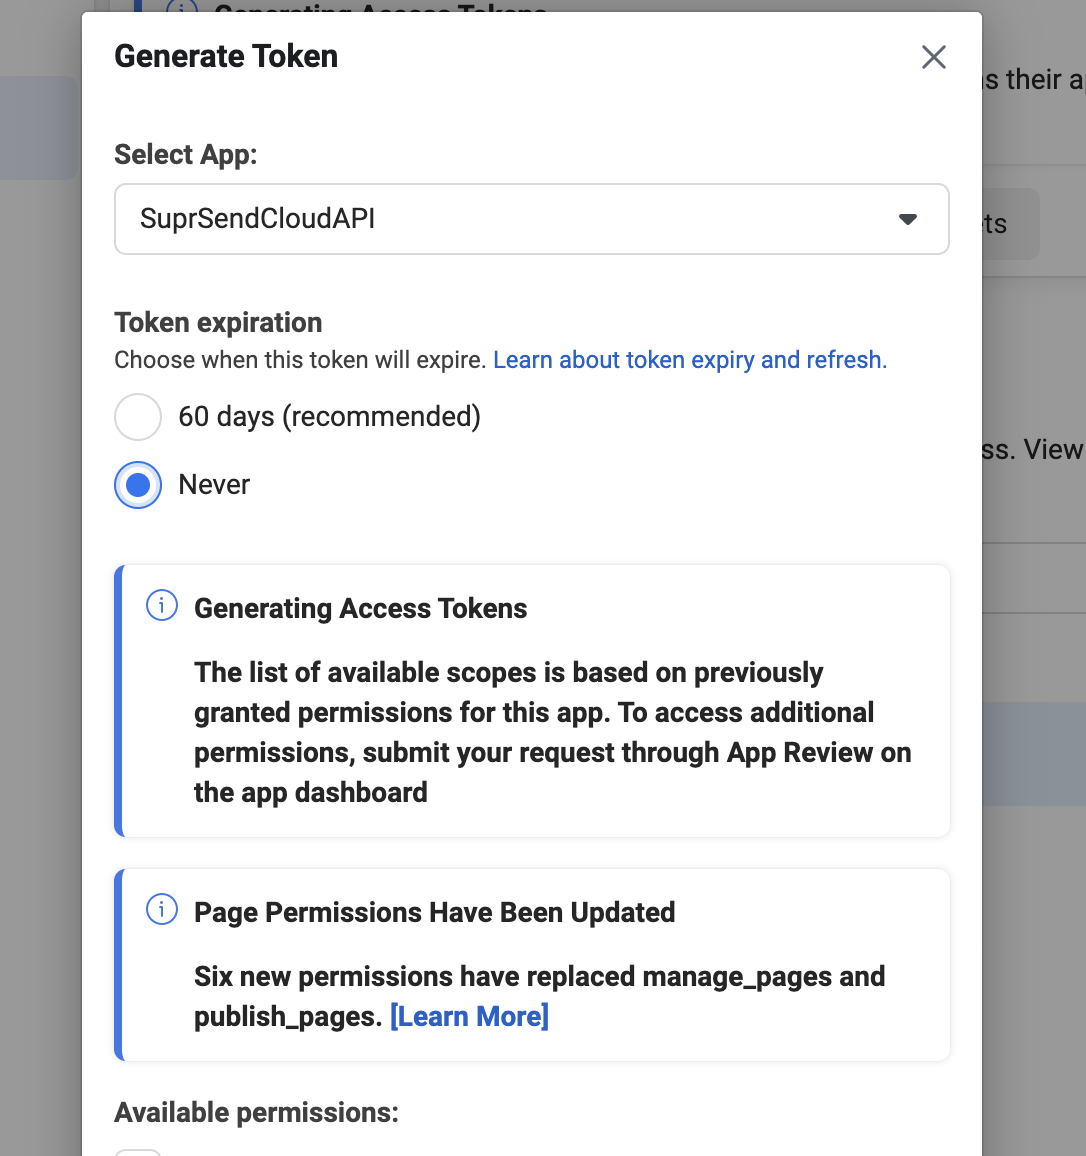
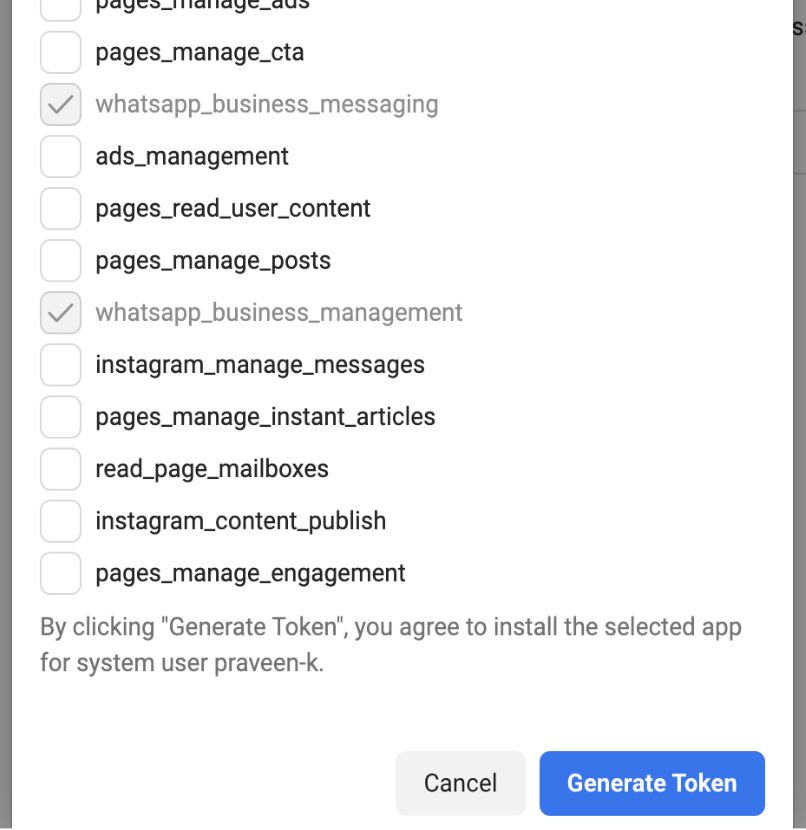

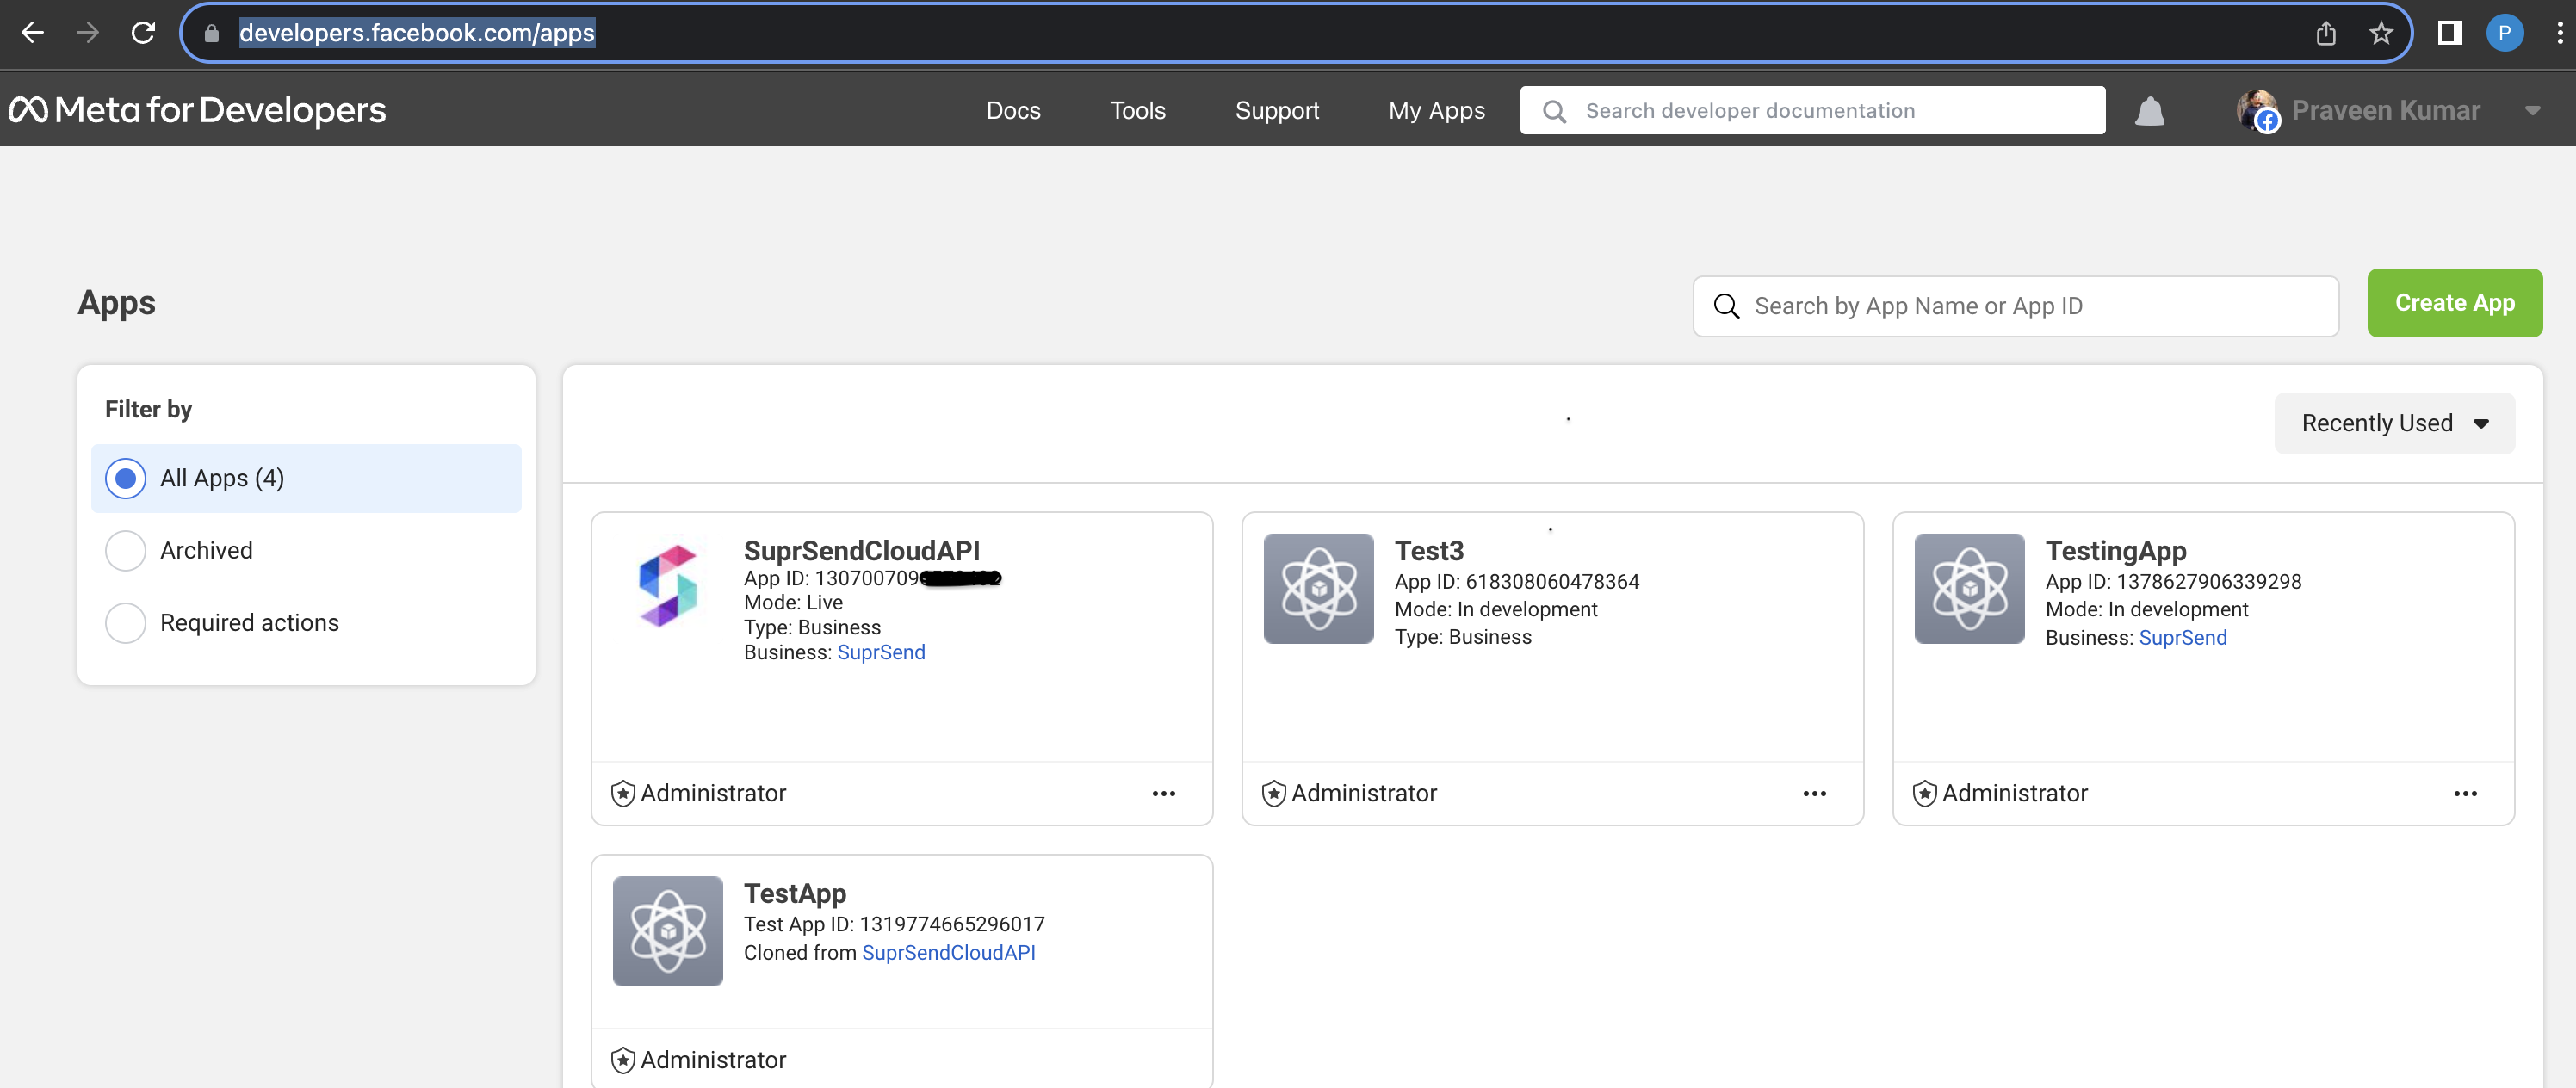
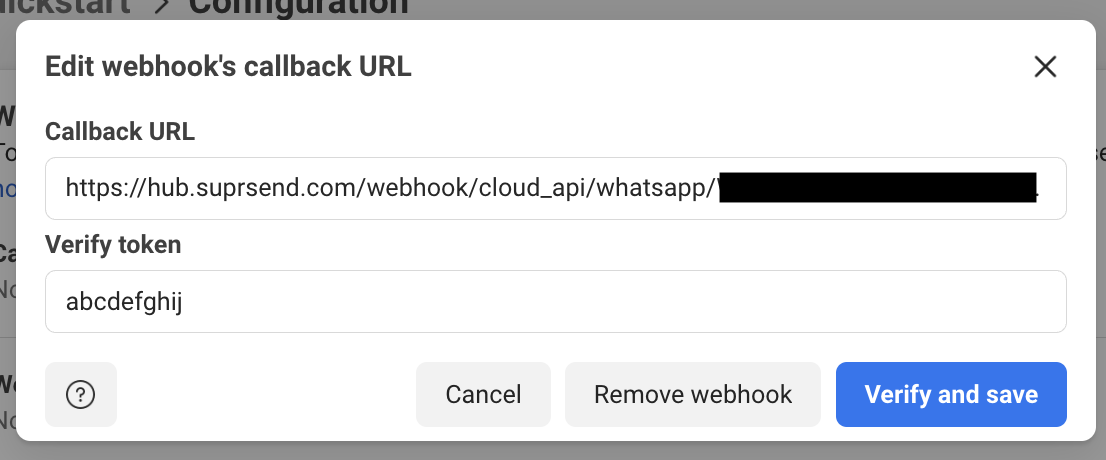 on webhook fields-> manage button, subscribe to all events mentioned.
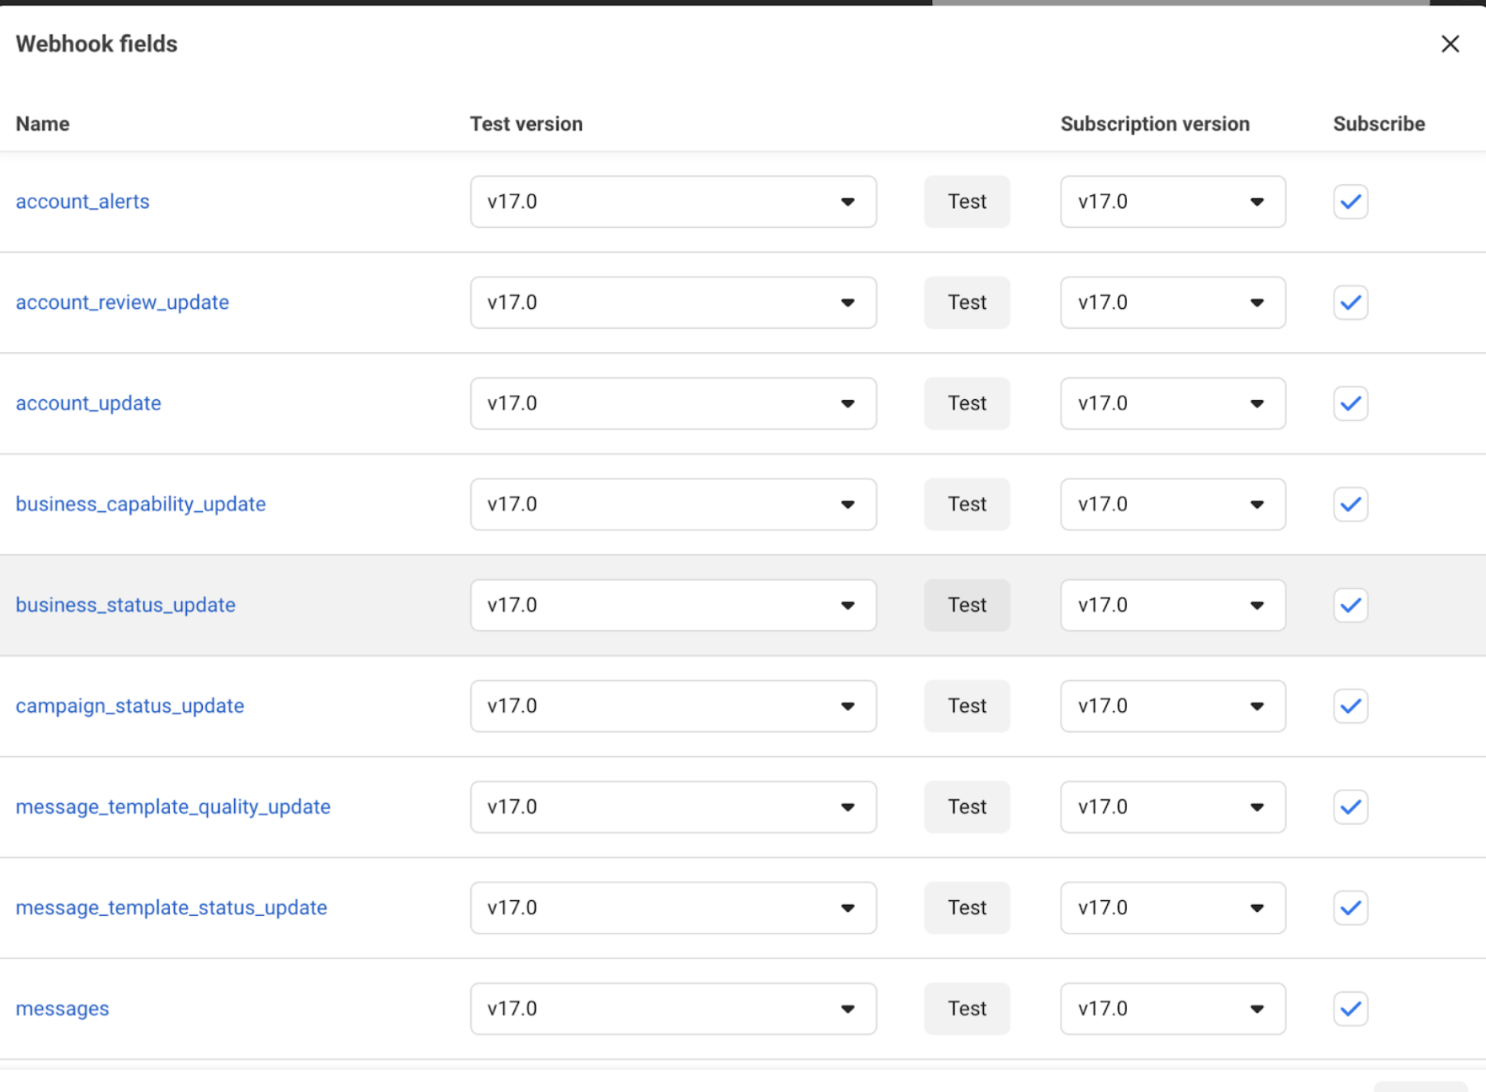 ## Add vendor configuration on SuprSend
On the SuprSend dashboard, go to vendor page from side panel and click WhatsApp -> WhatsApp Cloud API from the list of Vendors. This will open vendor details page as shown below:
## Add vendor configuration on SuprSend
On the SuprSend dashboard, go to vendor page from side panel and click WhatsApp -> WhatsApp Cloud API from the list of Vendors. This will open vendor details page as shown below:
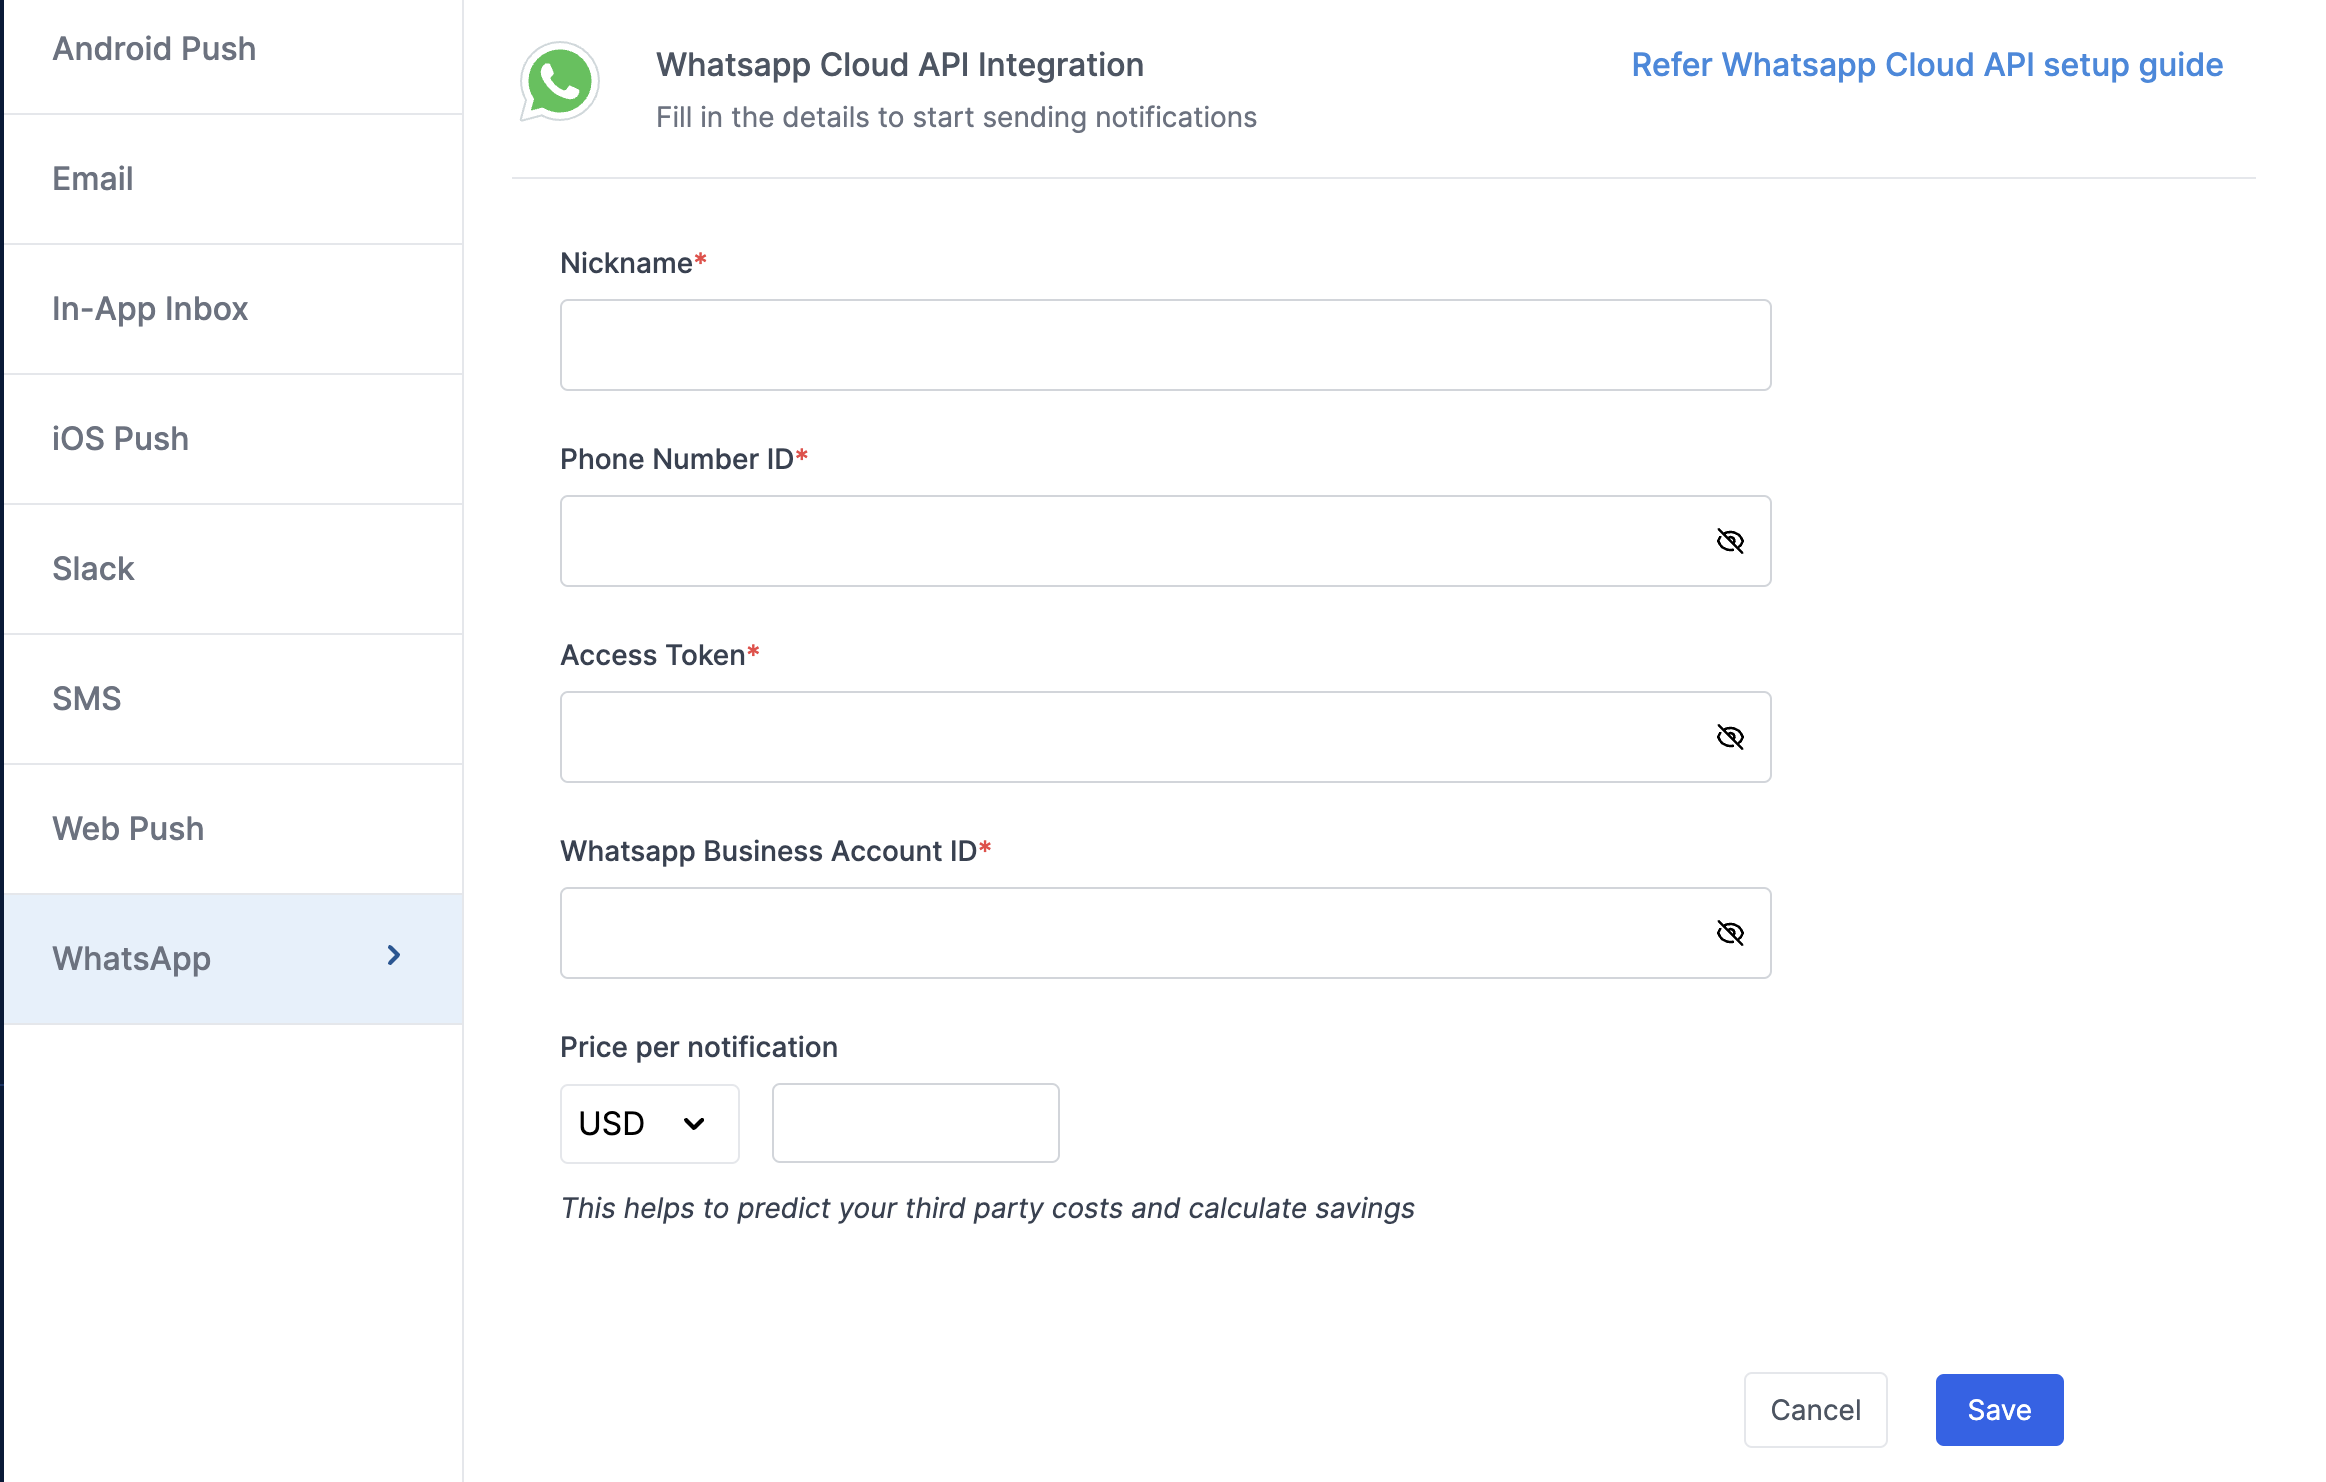 | Form Field | Obligation | Description |
| -------------------------------- | ----------- | -------------------------------------------------------------------------------------------------------------------------------------------------------------------------------------------------------------------------------------------------------------------------------------------------------------------------------------------- |
| **Nickname** | *mandatory* | You can give any name which may help you to identify this account easily |
| **Phone number ID** | *mandatory* | Phone number ID linked to your WhatsApp business number. You can get this from [App dashboard](https://developers.facebook.com/apps) (WhatsApp -> API Setup). [Refer above step](/docs/whatsapp-cloud-api#step-4-add-a-valid-business-phone-number) for more details. |
| **Access token** | *mandatory* | Access token for authenticating the WhatsApp API request. You can generate a new access token by following the [step above](/docs/whatsapp-cloud-api#step-5-generate-access-token). |
| **WhatsApp Business Account ID** | *mandatory* | WABA ID linked to your WhatsApp business number. This will be needs to automate the template approval process for your account. You can get this from [App dashboard](https://developers.facebook.com/apps) (WhatsApp -> API Setup). [Refer above step](/docs/whatsapp-cloud-api#step-4-add-a-valid-business-phone-number) for more details. |
| **App ID** | *mandatory* | App ID linked to your WhatsApp business account. This is used to auto approve your WhatsApp templates. You can get this from [App dashboard](https://developers.facebook.com/apps). Refer step 7 for more details. |
| **Price per notification** | *optional* | This is the amount you pay per WhatsApp notification to Meta. It helps us to calculate, estimate and optimise your cost spent on notifications. |
## Migrate existing phone number to Whatsapp Cloud API
If your WhatsApp business number is already registered with another BSP and you want to migrate it to WhatsApp cloud API, [follow this documentation](https://developers.facebook.com/docs/whatsapp/business-management-api/guides/migrate-phone-to-different-waba/) for migration.
***
# Whatsapp
Source: https://docs.suprsend.com/docs/whatsapp-quick-start
Set up guide to send Whatsapp notifications via SuprSend.
### Create SuprSend account
Simply [signup](https://auth.suprsend.com/sign-up) on SuprSend to create your account. If you already have your company account setup, ask your admin to invite you to the team.
### Start testing in Sandbox workspace
Your SuprSend account includes three default workspaces: Sandbox, Staging, and Production. You can switch between them from the top navigation bar, and create additional workspaces if needed.
1. **Sandbox**
* **Demo Workspace** with pre-configured vendors for quick exploration and POC.
* Includes a sample workflow, a sample user with your registered email and pre-configured channels for quick testing.
* Limitation: Available for a trial period and Whatsapp notifications can be sent only to verified phone numbers (to prevent spam).
2. **Staging**
* **Development workspace** used to test notification flows before pushing it to production.
* You can enable [Test Mode](/docs/developer/test-mode) to safely test notification flows without delivering to real users. In Test Mode, notifications is delivered only to designated internal testers. You can also set up a catch-all channel to redirect all notifications intended for non-test users.
3. **Production**
* **Live workspace** for syncing your actual product users and running production workflows.
* We do not recommend making changes directly in your production workspace as it might disrupt your live notifications.
| Form Field | Obligation | Description |
| -------------------------------- | ----------- | -------------------------------------------------------------------------------------------------------------------------------------------------------------------------------------------------------------------------------------------------------------------------------------------------------------------------------------------- |
| **Nickname** | *mandatory* | You can give any name which may help you to identify this account easily |
| **Phone number ID** | *mandatory* | Phone number ID linked to your WhatsApp business number. You can get this from [App dashboard](https://developers.facebook.com/apps) (WhatsApp -> API Setup). [Refer above step](/docs/whatsapp-cloud-api#step-4-add-a-valid-business-phone-number) for more details. |
| **Access token** | *mandatory* | Access token for authenticating the WhatsApp API request. You can generate a new access token by following the [step above](/docs/whatsapp-cloud-api#step-5-generate-access-token). |
| **WhatsApp Business Account ID** | *mandatory* | WABA ID linked to your WhatsApp business number. This will be needs to automate the template approval process for your account. You can get this from [App dashboard](https://developers.facebook.com/apps) (WhatsApp -> API Setup). [Refer above step](/docs/whatsapp-cloud-api#step-4-add-a-valid-business-phone-number) for more details. |
| **App ID** | *mandatory* | App ID linked to your WhatsApp business account. This is used to auto approve your WhatsApp templates. You can get this from [App dashboard](https://developers.facebook.com/apps). Refer step 7 for more details. |
| **Price per notification** | *optional* | This is the amount you pay per WhatsApp notification to Meta. It helps us to calculate, estimate and optimise your cost spent on notifications. |
## Migrate existing phone number to Whatsapp Cloud API
If your WhatsApp business number is already registered with another BSP and you want to migrate it to WhatsApp cloud API, [follow this documentation](https://developers.facebook.com/docs/whatsapp/business-management-api/guides/migrate-phone-to-different-waba/) for migration.
***
# Whatsapp
Source: https://docs.suprsend.com/docs/whatsapp-quick-start
Set up guide to send Whatsapp notifications via SuprSend.
### Create SuprSend account
Simply [signup](https://auth.suprsend.com/sign-up) on SuprSend to create your account. If you already have your company account setup, ask your admin to invite you to the team.
### Start testing in Sandbox workspace
Your SuprSend account includes three default workspaces: Sandbox, Staging, and Production. You can switch between them from the top navigation bar, and create additional workspaces if needed.
1. **Sandbox**
* **Demo Workspace** with pre-configured vendors for quick exploration and POC.
* Includes a sample workflow, a sample user with your registered email and pre-configured channels for quick testing.
* Limitation: Available for a trial period and Whatsapp notifications can be sent only to verified phone numbers (to prevent spam).
2. **Staging**
* **Development workspace** used to test notification flows before pushing it to production.
* You can enable [Test Mode](/docs/developer/test-mode) to safely test notification flows without delivering to real users. In Test Mode, notifications is delivered only to designated internal testers. You can also set up a catch-all channel to redirect all notifications intended for non-test users.
3. **Production**
* **Live workspace** for syncing your actual product users and running production workflows.
* We do not recommend making changes directly in your production workspace as it might disrupt your live notifications.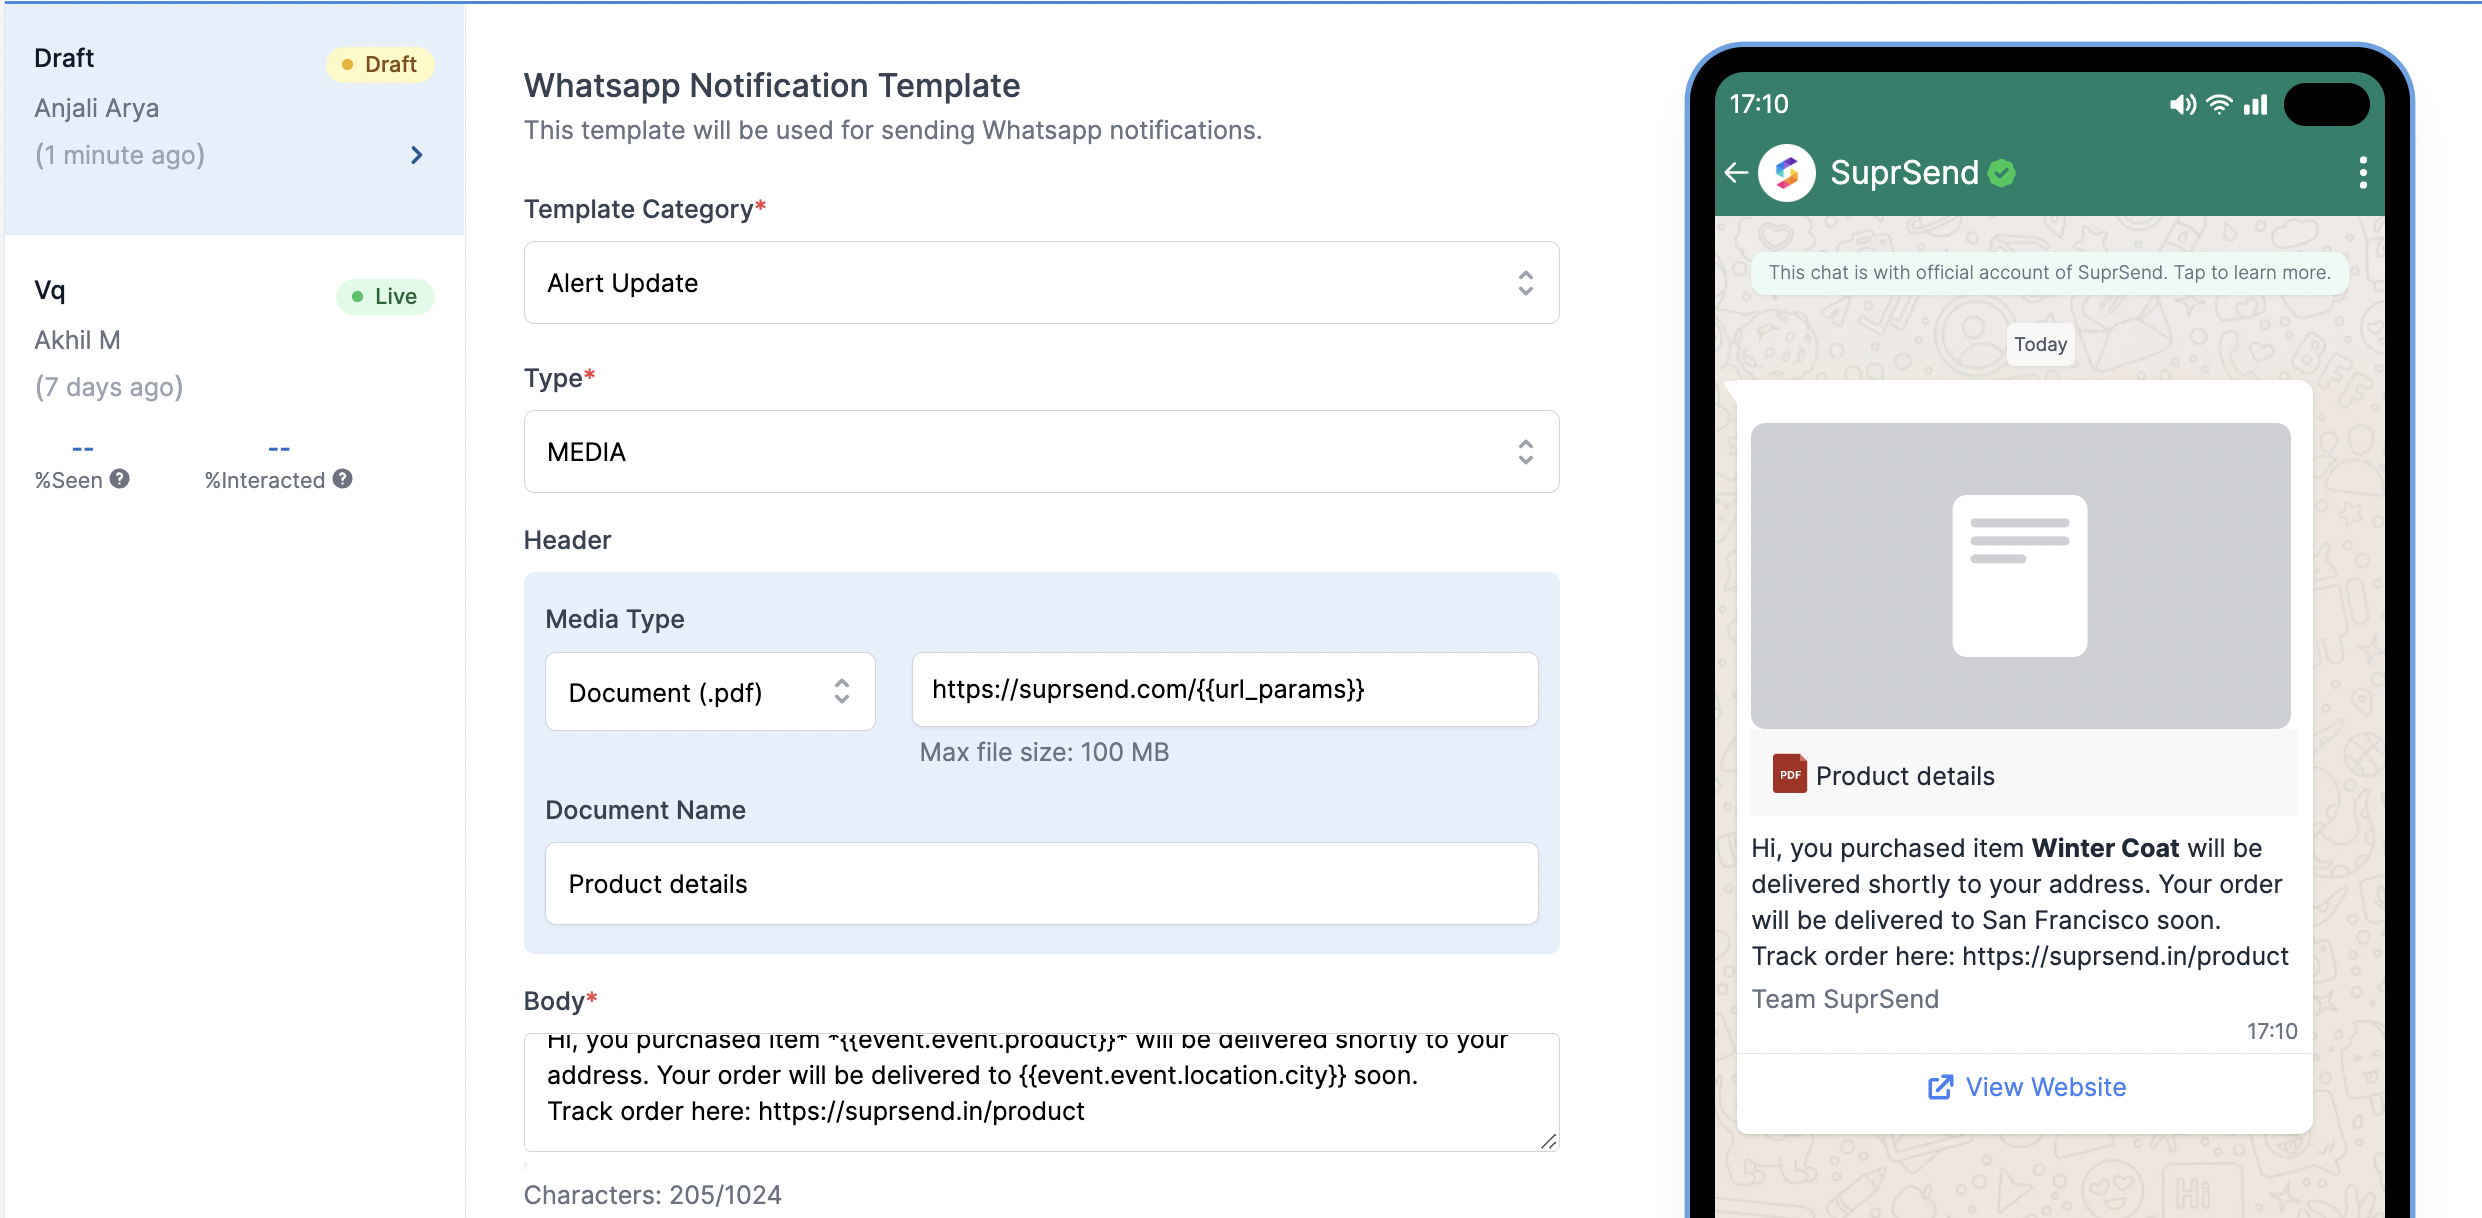 ## WhatsApp fields description
| Field | Description |
| ------------------------------------------- | ------------------------------------------------------------------------------------------------------------------------------------------------------------------------------------------------------------------------------------------------------------------------------------------------------------------------------------------------------------------------------------------------------------- |
| **Template Category** | Category of the template as defined by WhatsApp. Choose the category which is most relevant for your message content. e.g. - if you are sending a message informing the user about his/her doctor appointment, select the category as *Appointment Update*. In case you are not able to find the relevant category for your message, select *Alert Update* |
| **Type** | Type of the message template - `MEDIA/TEXT`. You can select one of the options. |
| **Header** (Type - TEXT) | Header of the message shown in bold in your WhatsApp message Small message text box. You can add up to 60 characters in this field*Emojis are not supported in header* |
| **Header -> Media Type** (Type - MEDIA) | Media type of the header - Document(.pdf) / Image (.jpg, .png) / Video (.mp4). You can select one the media types based on the type of content that you want to add in the message |
| **Header -> Media File URL** (Type - MEDIA) | Add the Public URL of the document that you want to send. You can add dynamic URL by adding variables in the URL link, like this -[http://s3.amazonaws.com/\{\{url\_params}}](http://s3.amazonaws.com/%7B%7Burl_params%7D%7D) or `\{\{url\_link}}` |
| **Header -> Document Name** (Type - MEDIA) | *Valid only for media type - Document (.pdf)* This is the name of the document that will be visible to your user. Will be shown as "Untitled" if not added. You can add variable in media file as \{\{file\_name}} |
| **Body** | Large message text box. Can add multi-line texts. Use handlebarsjs to add variables. |
| **Footer** | Small message text box. You can add up to 60 characters in this field*Variables are not supported in footer* |
| **Buttons** | Button type to be added - Call to Action / Quick Reply. Select **"None"** if you don't require buttons |
| **Action Buttons** | There are 2 types of action buttons that can be added: 1. **Call Phone Number Button**- To initiate a Call Action. 2. **Visit Website Button**- To redirect users to a website. Add the URL where a user will go when they click on this button Only one variable is allowed in "Website URL" at the end of the URL link, like this - [www.suprsend.com/\{\{page}}](http://www.suprsend.com/%7B%7Bpage%7D%7D) |
| **Quick Reply Buttons** | You can add up to 3 quick reply buttons to take user input.*Variables or emojis are not allowed in quick reply button* |
## WhatsApp fields description
| Field | Description |
| ------------------------------------------- | ------------------------------------------------------------------------------------------------------------------------------------------------------------------------------------------------------------------------------------------------------------------------------------------------------------------------------------------------------------------------------------------------------------- |
| **Template Category** | Category of the template as defined by WhatsApp. Choose the category which is most relevant for your message content. e.g. - if you are sending a message informing the user about his/her doctor appointment, select the category as *Appointment Update*. In case you are not able to find the relevant category for your message, select *Alert Update* |
| **Type** | Type of the message template - `MEDIA/TEXT`. You can select one of the options. |
| **Header** (Type - TEXT) | Header of the message shown in bold in your WhatsApp message Small message text box. You can add up to 60 characters in this field*Emojis are not supported in header* |
| **Header -> Media Type** (Type - MEDIA) | Media type of the header - Document(.pdf) / Image (.jpg, .png) / Video (.mp4). You can select one the media types based on the type of content that you want to add in the message |
| **Header -> Media File URL** (Type - MEDIA) | Add the Public URL of the document that you want to send. You can add dynamic URL by adding variables in the URL link, like this -[http://s3.amazonaws.com/\{\{url\_params}}](http://s3.amazonaws.com/%7B%7Burl_params%7D%7D) or `\{\{url\_link}}` |
| **Header -> Document Name** (Type - MEDIA) | *Valid only for media type - Document (.pdf)* This is the name of the document that will be visible to your user. Will be shown as "Untitled" if not added. You can add variable in media file as \{\{file\_name}} |
| **Body** | Large message text box. Can add multi-line texts. Use handlebarsjs to add variables. |
| **Footer** | Small message text box. You can add up to 60 characters in this field*Variables are not supported in footer* |
| **Buttons** | Button type to be added - Call to Action / Quick Reply. Select **"None"** if you don't require buttons |
| **Action Buttons** | There are 2 types of action buttons that can be added: 1. **Call Phone Number Button**- To initiate a Call Action. 2. **Visit Website Button**- To redirect users to a website. Add the URL where a user will go when they click on this button Only one variable is allowed in "Website URL" at the end of the URL link, like this - [www.suprsend.com/\{\{page}}](http://www.suprsend.com/%7B%7Bpage%7D%7D) |
| **Quick Reply Buttons** | You can add up to 3 quick reply buttons to take user input.*Variables or emojis are not allowed in quick reply button* |
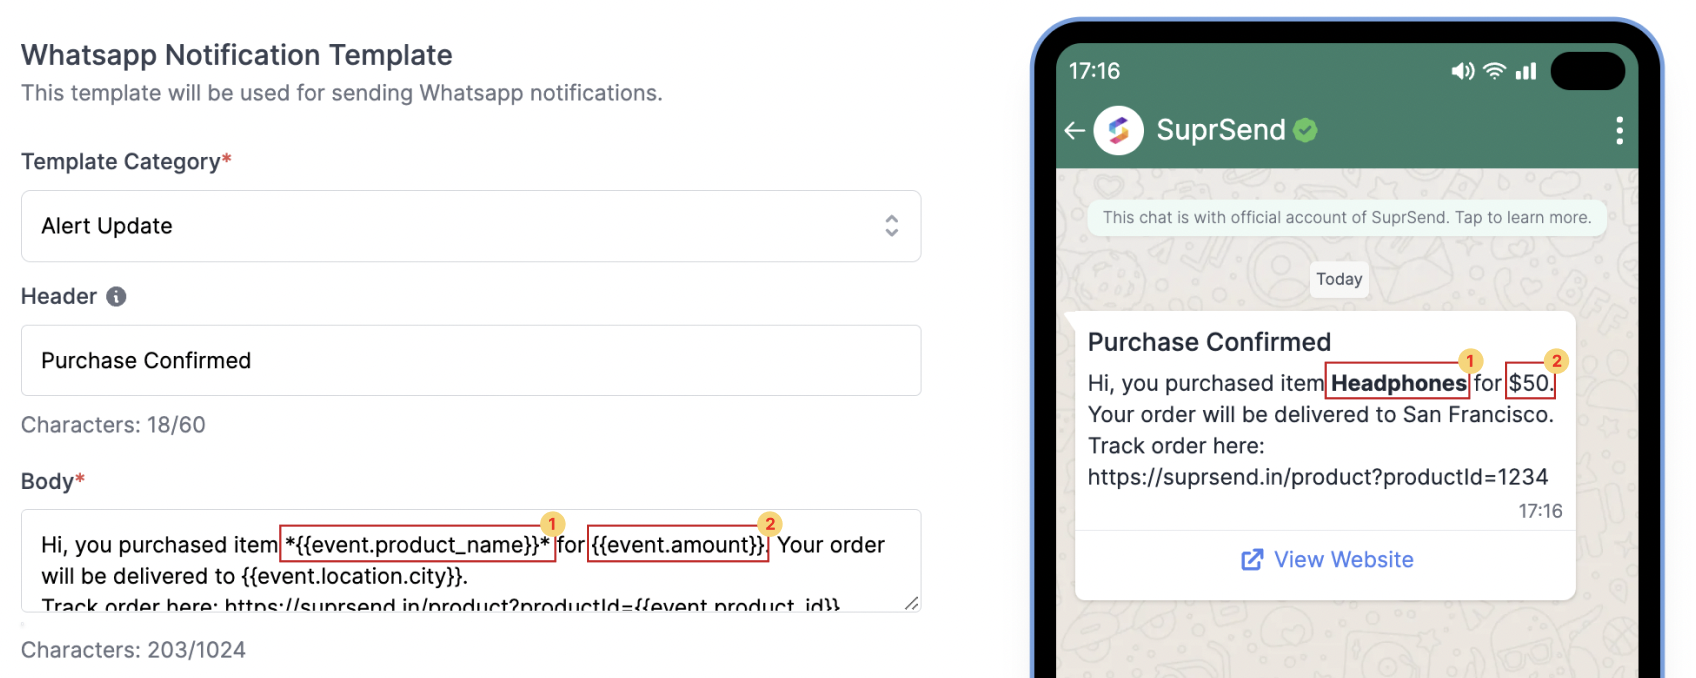
 Creating a single workflow to track the journey linked to a trigger helps simplify tracking the entire flow—e.g., understanding how many users saw the first notification, how many dropped off after the second, which channel performs best, and more. Fewer workflow
 ## Trigger workflow
Workflows created on SuprSend dashboard can [trigger via an event call](/docs/trigger-workflow#event-based-trigger) or via a [direct API call](/docs/trigger-workflow#triggering-workflow-via-api).
## Trigger workflow
Workflows created on SuprSend dashboard can [trigger via an event call](/docs/trigger-workflow#event-based-trigger) or via a [direct API call](/docs/trigger-workflow#triggering-workflow-via-api).
 ## Analyze notification performance
SuprSend provides comprehensive analytics to track the performance of your notifications. You can track delivery, seen, and clicks across all channels in a single graph, identify the best-performing channel, and see how users interact with the notification. You can also retrieve the notification data in your data warehouse for internal analysis and reporting using the [S3 connector](/docs/amazon_s3).
## Analyze notification performance
SuprSend provides comprehensive analytics to track the performance of your notifications. You can track delivery, seen, and clicks across all channels in a single graph, identify the best-performing channel, and see how users interact with the notification. You can also retrieve the notification data in your data warehouse for internal analysis and reporting using the [S3 connector](/docs/amazon_s3).
