Practical guide to designing notification preference centres in SuprSend with eight real-world patterns covering channel opt-ins and multi-tenant setups.
Notification preferences give users control over what they hear from your app, on which channel, and how often. Get them right and users stay engaged - they can mute what’s noisy without losing what matters. Skip them and users will unsubscribe from everything.This guide covers eight preference patterns drawn from real-world use cases, from simple channel opt-in/opt-outs to complex multi-tenant setups. Each section explains what the pattern is, when to use it, how to configure it in SuprSend, and the code to implement it in your app.
New to preferences in SuprSend? Read the User Preferences overview first - it covers how categories, channels, and the preference API response are structured. For multi-tenant setups, see Tenant Preferences.The code examples in this guide use the @suprsend/react SDK. If you want a ready-made preference UI without building from scratch, see the Embedded Preference Centre.
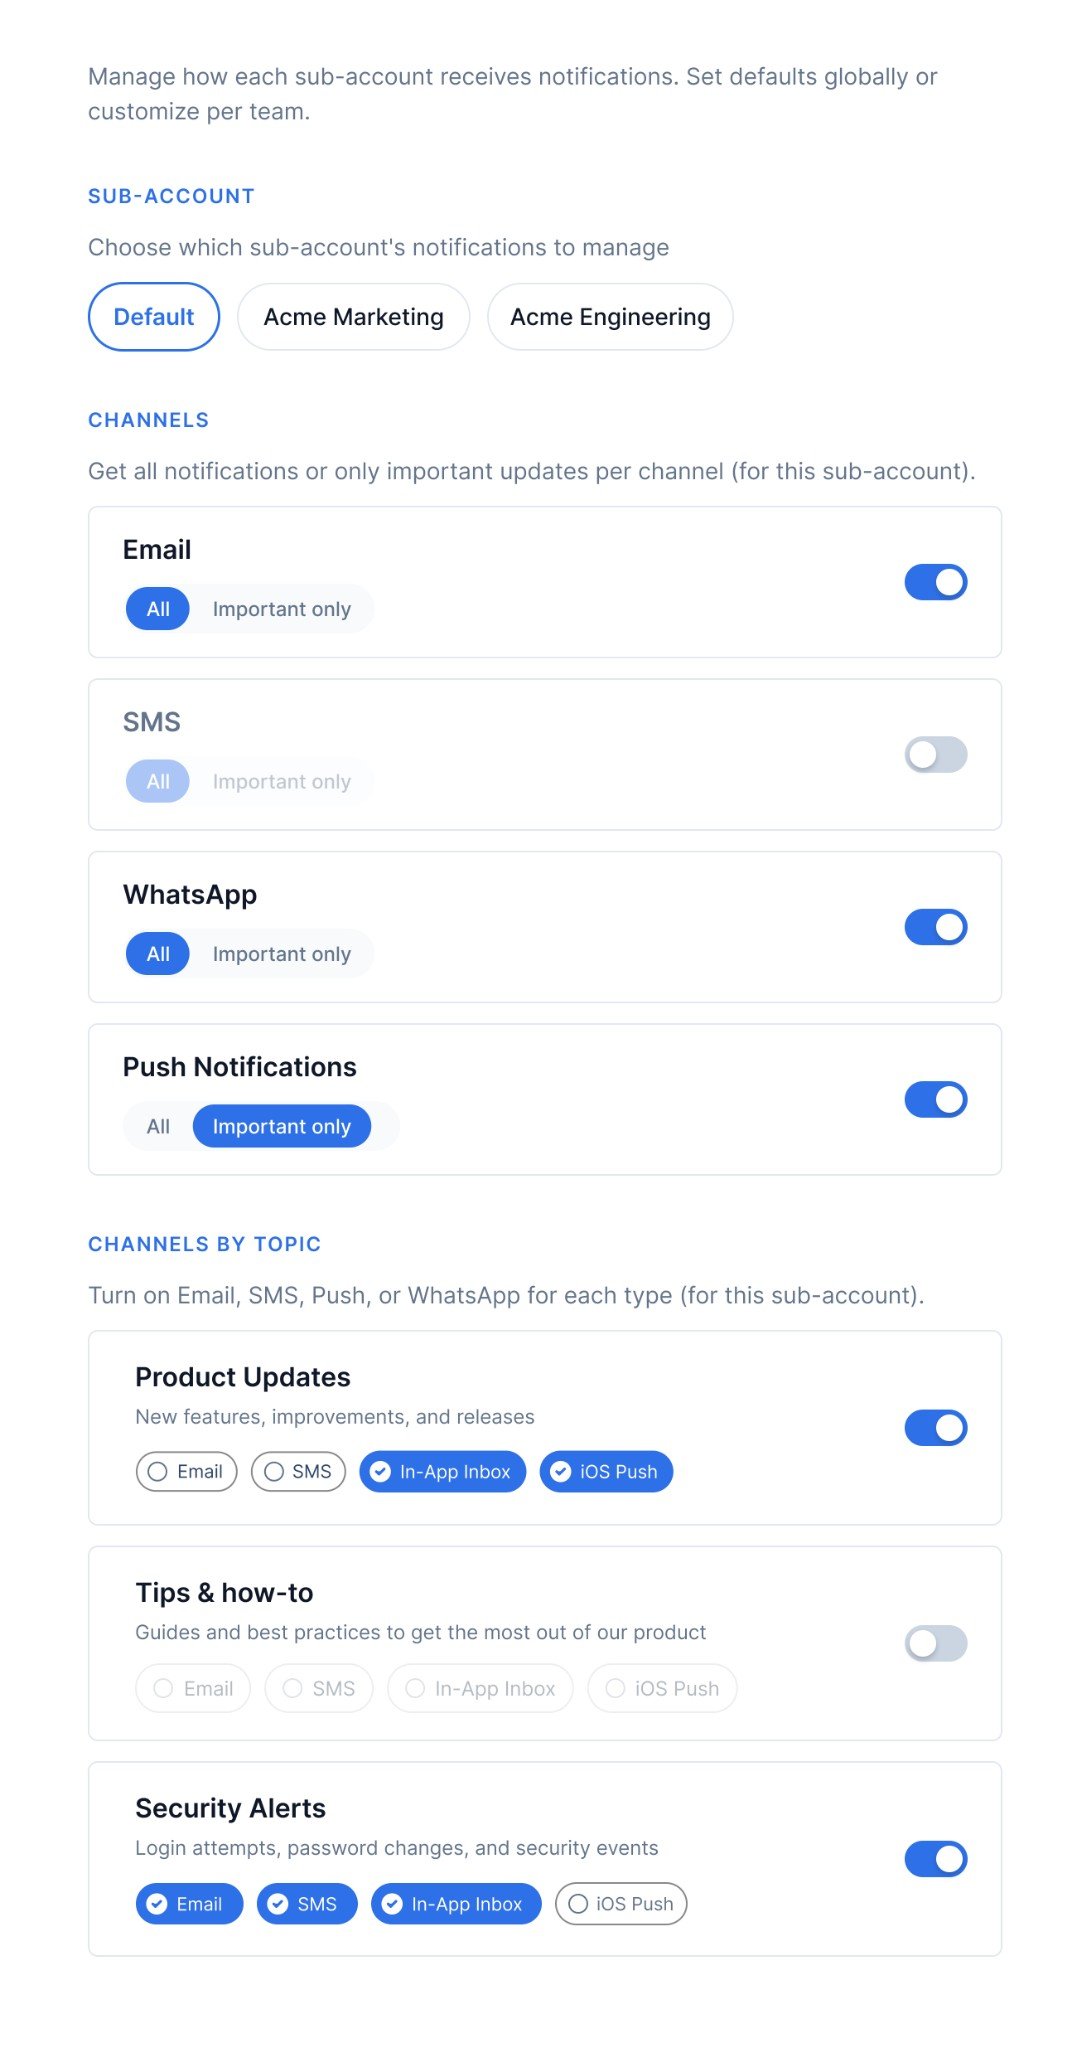
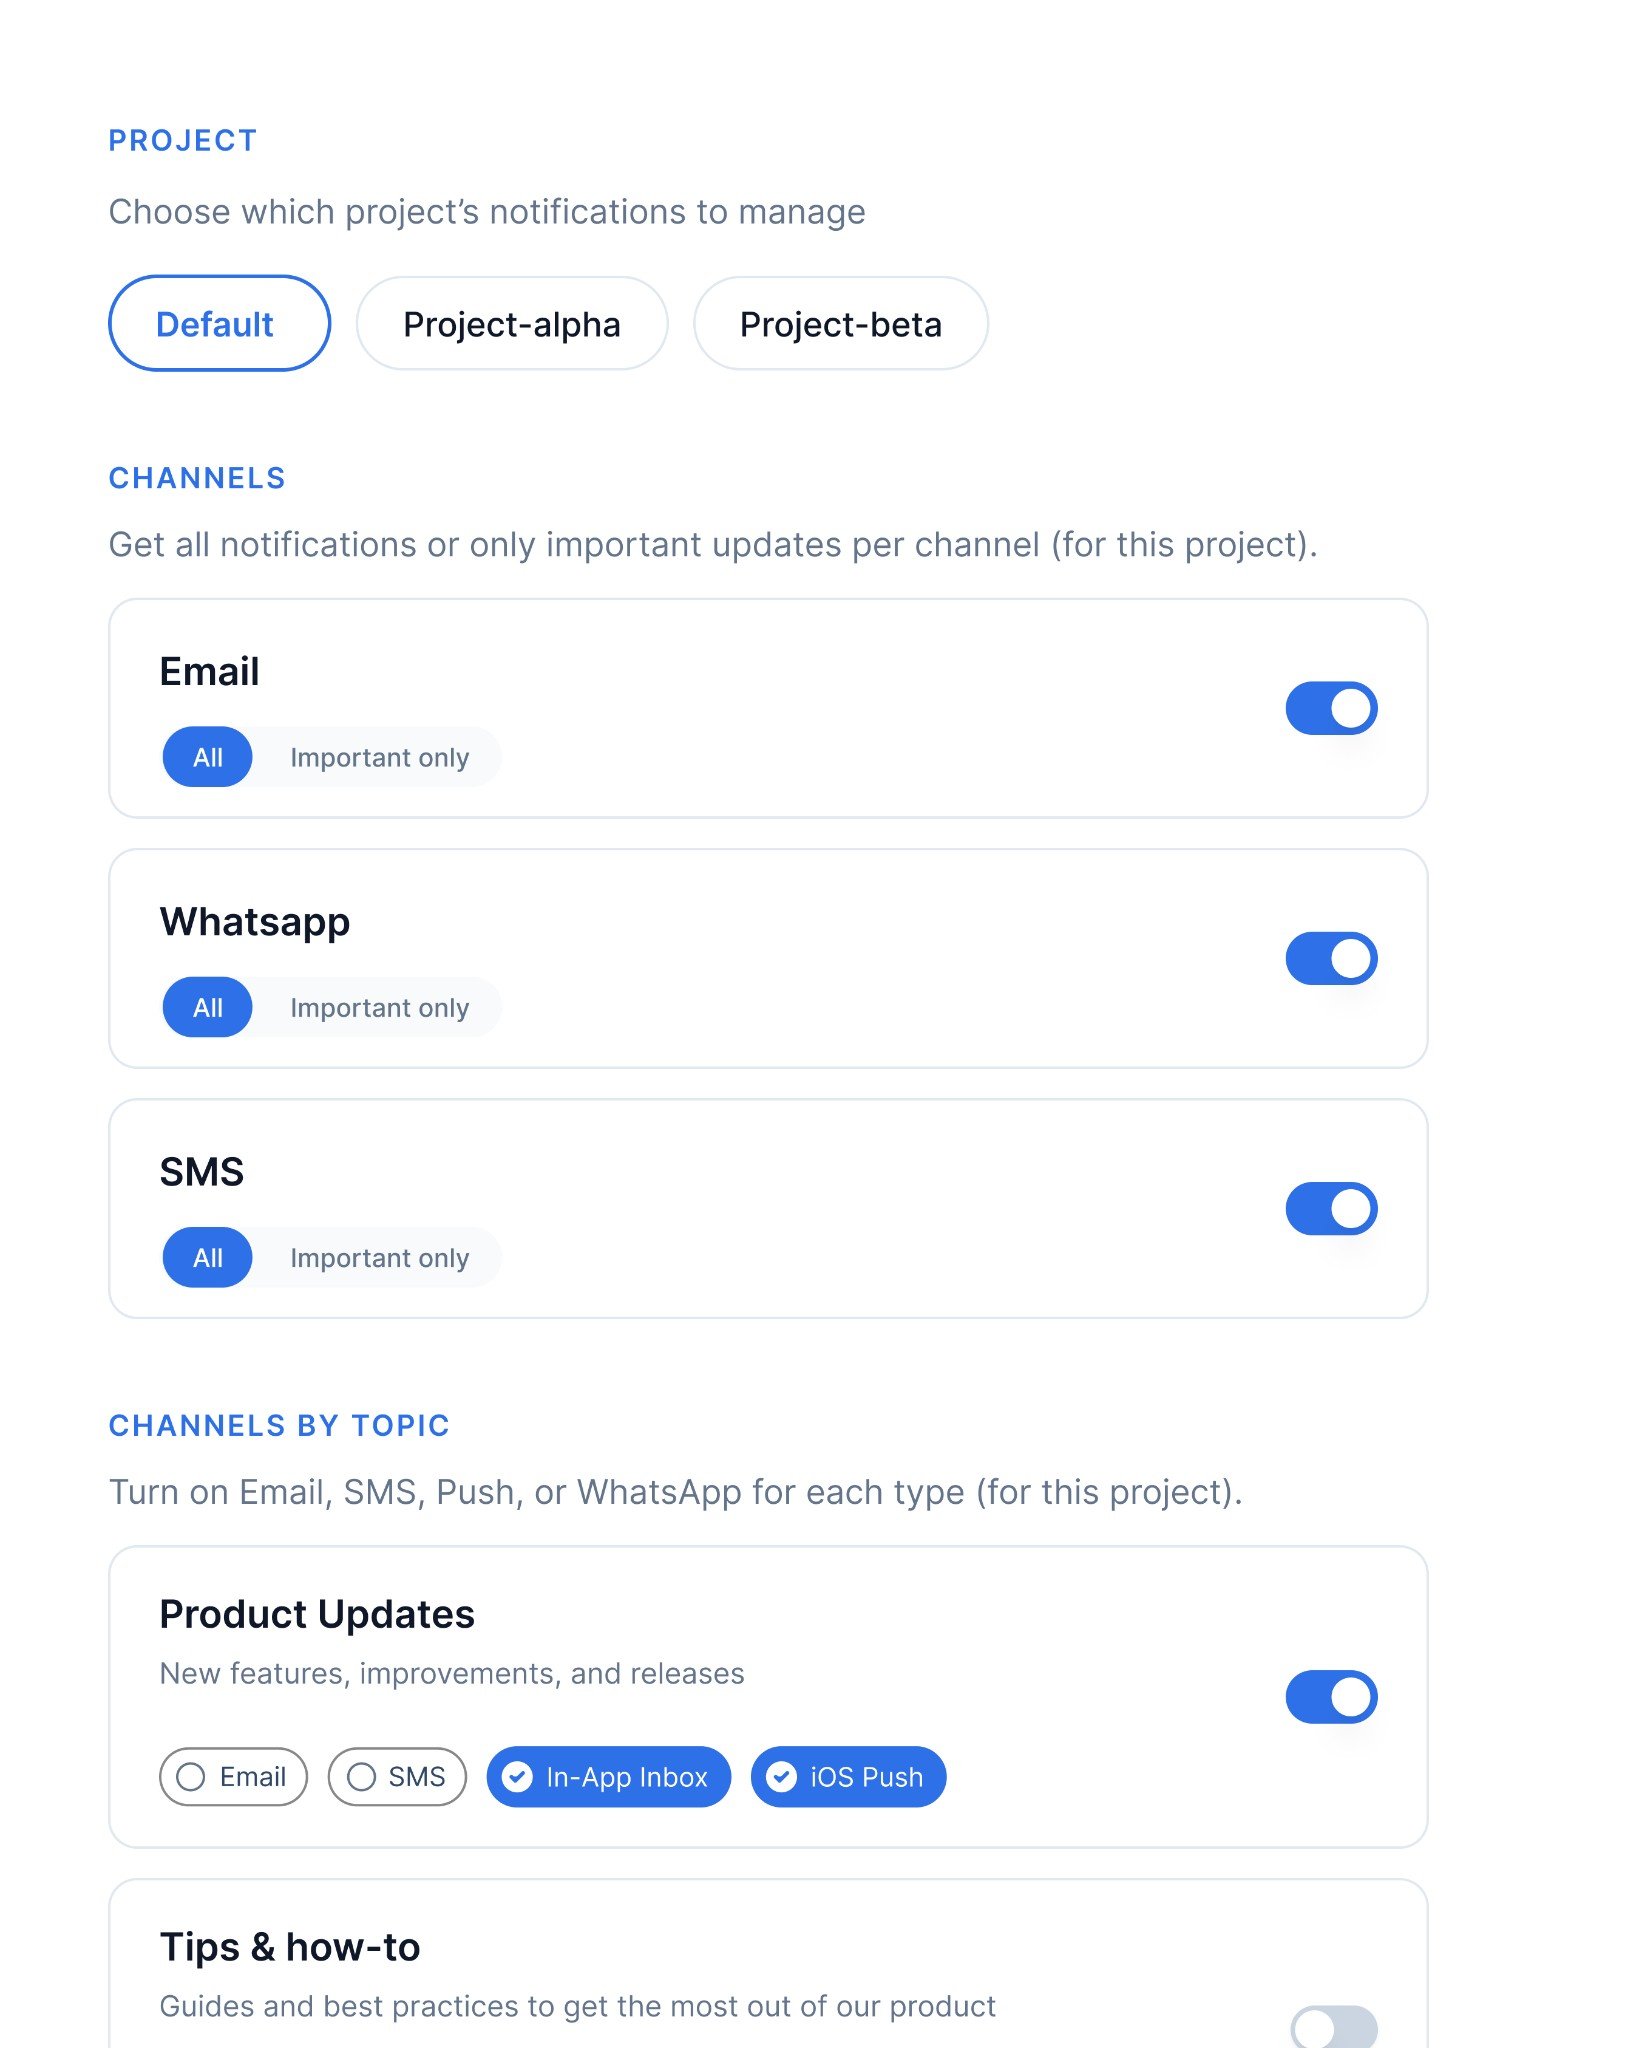
Users control what they receive on each channel. For every channel your app uses (Email, SMS, WhatsApp, Push, etc.), the user picks one of two options:
All - receive all notifications on this channel, except categories they’ve explicitly turned off
Required - receive only notifications from categories marked as mandatory (Can’t Unsubscribe)
Separately, users can also turn individual channels on or off per preference category - for example, keeping Email on for “Product Updates” but turning off WhatsApp for the same category. These are the per-category channel checkboxes shown in the CHANNELS BY TOPIC section of the screenshot.The channel_preferences array in the API response drives the global All / Required control. Each item has a channel name and an is_restricted boolean: false means All, true means Required. The per-category channel preferences live under sections[].subcategories[].channels.
Channel-level preferences
Configure in SuprSend
Go to Developers → Preference categories and select a root-category (System, Transactional, or Promotional)
Optionally, click +Section to create a section (for example “Product”, “Billing”). Sections are used to group sub-categories on the preference page. Section doesn’t have it’s own preference.
Click +Sub-Category, fill in the name, select the section (if set), and set a default preference (On, Off, or Can’t Unsubscribe)
Click Publish Changes
Build in your appCall getPreferences() in your parent component on page load and pass the result down as preferenceData. The response gives you two independent parts:
channel_preferences - render one row per channel with All / Required radio buttons. Read is_restricted to know which is currently selected: false = All, true = Required. Call updateOverallChannelPreference with ChannelLevelPreferenceOptions.ALL or ChannelLevelPreferenceOptions.REQUIRED when the user changes their selection.
sections[].subcategories[].channels - per-category channel checkboxes that let users turn individual channels on or off within a specific notification type. This is covered in detail in Section 2.
import { ChannelLevelPreferenceOptions, useSuprSendClient,} from "@suprsend/react";function ChannelPreferences({ preferenceData, setPreferenceData }) { const suprSendClient = useSuprSendClient(); // Global All vs Required control per channel // is_restricted: false = All, is_restricted: true = Required const handleOverallChannelChange = async (channel, status) => { const resp = await suprSendClient.user.preferences.updateOverallChannelPreference( channel.channel, status // ChannelLevelPreferenceOptions.ALL or ChannelLevelPreferenceOptions.REQUIRED ); if (resp.status !== "error") setPreferenceData({ ...resp.body }); }; return ( <> {/* Global channel controls - one row per channel */} {preferenceData?.channel_preferences?.map((channel, i) => ( <div key={i}> <p>{channel.channel}</p> <p>{channel.is_restricted ? "Allow required notifications only" : "Allow all notifications"}</p> <label> <input type="radio" checked={!channel.is_restricted} onChange={() => handleOverallChannelChange(channel, ChannelLevelPreferenceOptions.ALL)} /> All </label> <label> <input type="radio" checked={channel.is_restricted} onChange={() => handleOverallChannelChange(channel, ChannelLevelPreferenceOptions.REQUIRED)} /> Required </label> </div> ))} </> );}
When to use: Your app sends on multiple channels and users want coarse control over each one. Examples: “Email me everything, but push only for required notifications”, “I only want SMS for critical alerts.” Common in consumer apps, marketplaces, and collaboration tools.
Users turn each notification type on or off individually - for example, keeping “Invoices & receipts” on while turning off “Sales Newsletter” - and optionally choose which channels receive each type.This is the standard notification settings page that most apps need. The response gives you sections (top-level groupings like Product, Billing, Sales) containing subcategories (the individual notification types). Each subcategory has a toggle and a list of channel checkboxes.
Click +Section to create sections (for example “Product”, “Billing”, “Sales”). Sections are used to group sub-categories on the preference page. Section doesn’t have it’s own preference.
Click +Sub-Category for each notification type, select its section (if set), and set a default preference (On, Off, or Can’t Unsubscribe). You can also choose which channels should be opt_in by default in case of On preference.
Click Publish Changes
Build in your appCall getPreferences() in your parent component and pass preferenceData as a prop. Render sections as headings and subcategories as rows, each with a toggle and channel checkboxes below it.Three things to handle carefully:
is_editable: false on a subcategory means the category is set to Can’t Unsubscribe in SuprSend. Disable the toggle - users cannot opt out.
is_editable: false on a channel inside a subcategory means that specific channel is mandatory for that category and cannot be turned off. Disable the channel checkbox independently of the subcategory toggle. A category can have is_editable: true (user can toggle it off) while individual channels within it have is_editable: false (those channels cannot be removed).
channels may be empty or absent (for example when show_opt_out_channels is false for opted-out categories). Use optional chaining (subcategory?.channels?.map(...)) to handle this safely.
All preference updates (updateCategoryPreference, updateChannelPreferenceInCategory, updateOverallChannelPreference) are optimistic - the UI updates immediately and the actual API call happens in the background with a 1-second debounce. Set up these emitter listeners once when loading preferences to handle the confirmed result and catch server-side errors:
// Fires after the background API call succeeds - sync your UI state with confirmed datasuprSendClient.emitter.on("preferences_updated", (preferenceDataResp) => { setPreferenceData({ ...preferenceDataResp.body });});// Fires if the background API call fails - show an error toast or revert the UIsuprSendClient.emitter.on("preferences_error", (errorResp) => { console.log("Error:", errorResp?.error?.message);});
import { PreferenceOptions, useSuprSendClient } from "@suprsend/react";function CategoryPreferences({ preferenceData, setPreferenceData }) { const suprSendClient = useSuprSendClient(); // Toggle a category on or off // value: true = opt_in, false = opt_out const handleCategoryChange = async (subcategory, value) => { const resp = await suprSendClient.user.preferences.updateCategoryPreference( subcategory.category, value ? PreferenceOptions.OPT_IN : PreferenceOptions.OPT_OUT ); if (resp.status !== "error") setPreferenceData({ ...resp.body }); }; // Toggle a specific channel on or off within a category // Skip if is_editable is false - that channel is mandatory for this category const handleChannelInCategoryChange = async (channel, subcategory) => { if (!channel.is_editable) return; const resp = await suprSendClient.user.preferences.updateChannelPreferenceInCategory( channel.channel, channel.preference === PreferenceOptions.OPT_IN ? PreferenceOptions.OPT_OUT : PreferenceOptions.OPT_IN, subcategory.category ); if (resp.status !== "error") setPreferenceData({ ...resp.body }); }; return preferenceData?.sections?.map((section, index) => ( <div key={index}> {/* Render section heading only if it has a name */} {section?.name && <h3>{section.name}</h3>} {section?.subcategories?.map((subcategory, i) => ( <div key={i}> <div> <span>{subcategory.name}</span> <p>{subcategory.description}</p> </div> {/* Disable toggle if is_editable is false - this category is Can't Unsubscribe */} {/* Replace with your own toggle/switch component */} <button disabled={!subcategory.is_editable} onClick={() => handleCategoryChange( subcategory, subcategory.preference !== PreferenceOptions.OPT_IN ) } style={{ opacity: !subcategory.is_editable ? 0.5 : 1, background: subcategory.preference === PreferenceOptions.OPT_IN ? "#2563EB" : "#D1D5DB", borderRadius: "9999px", padding: "2px 8px", border: "none", cursor: !subcategory.is_editable ? "not-allowed" : "pointer", }} > {subcategory.preference === PreferenceOptions.OPT_IN ? "On" : "Off"} </button> {/* Channel checkboxes - channels may be empty or absent, handle with ?. */} <div> {subcategory?.channels?.map((channel, j) => ( <button key={j} disabled={!channel.is_editable} onClick={() => handleChannelInCategoryChange(channel, subcategory)} style={{ opacity: channel.preference === PreferenceOptions.OPT_IN ? 1 : 0.4 }} > {channel.channel} </button> ))} </div> </div> ))} </div> ));}
When to use: The default for most apps - the standard notification settings page. Examples: e-commerce (order updates on, promotions off), SaaS (product updates via email, billing via email + SMS), social apps (comments on, likes off).
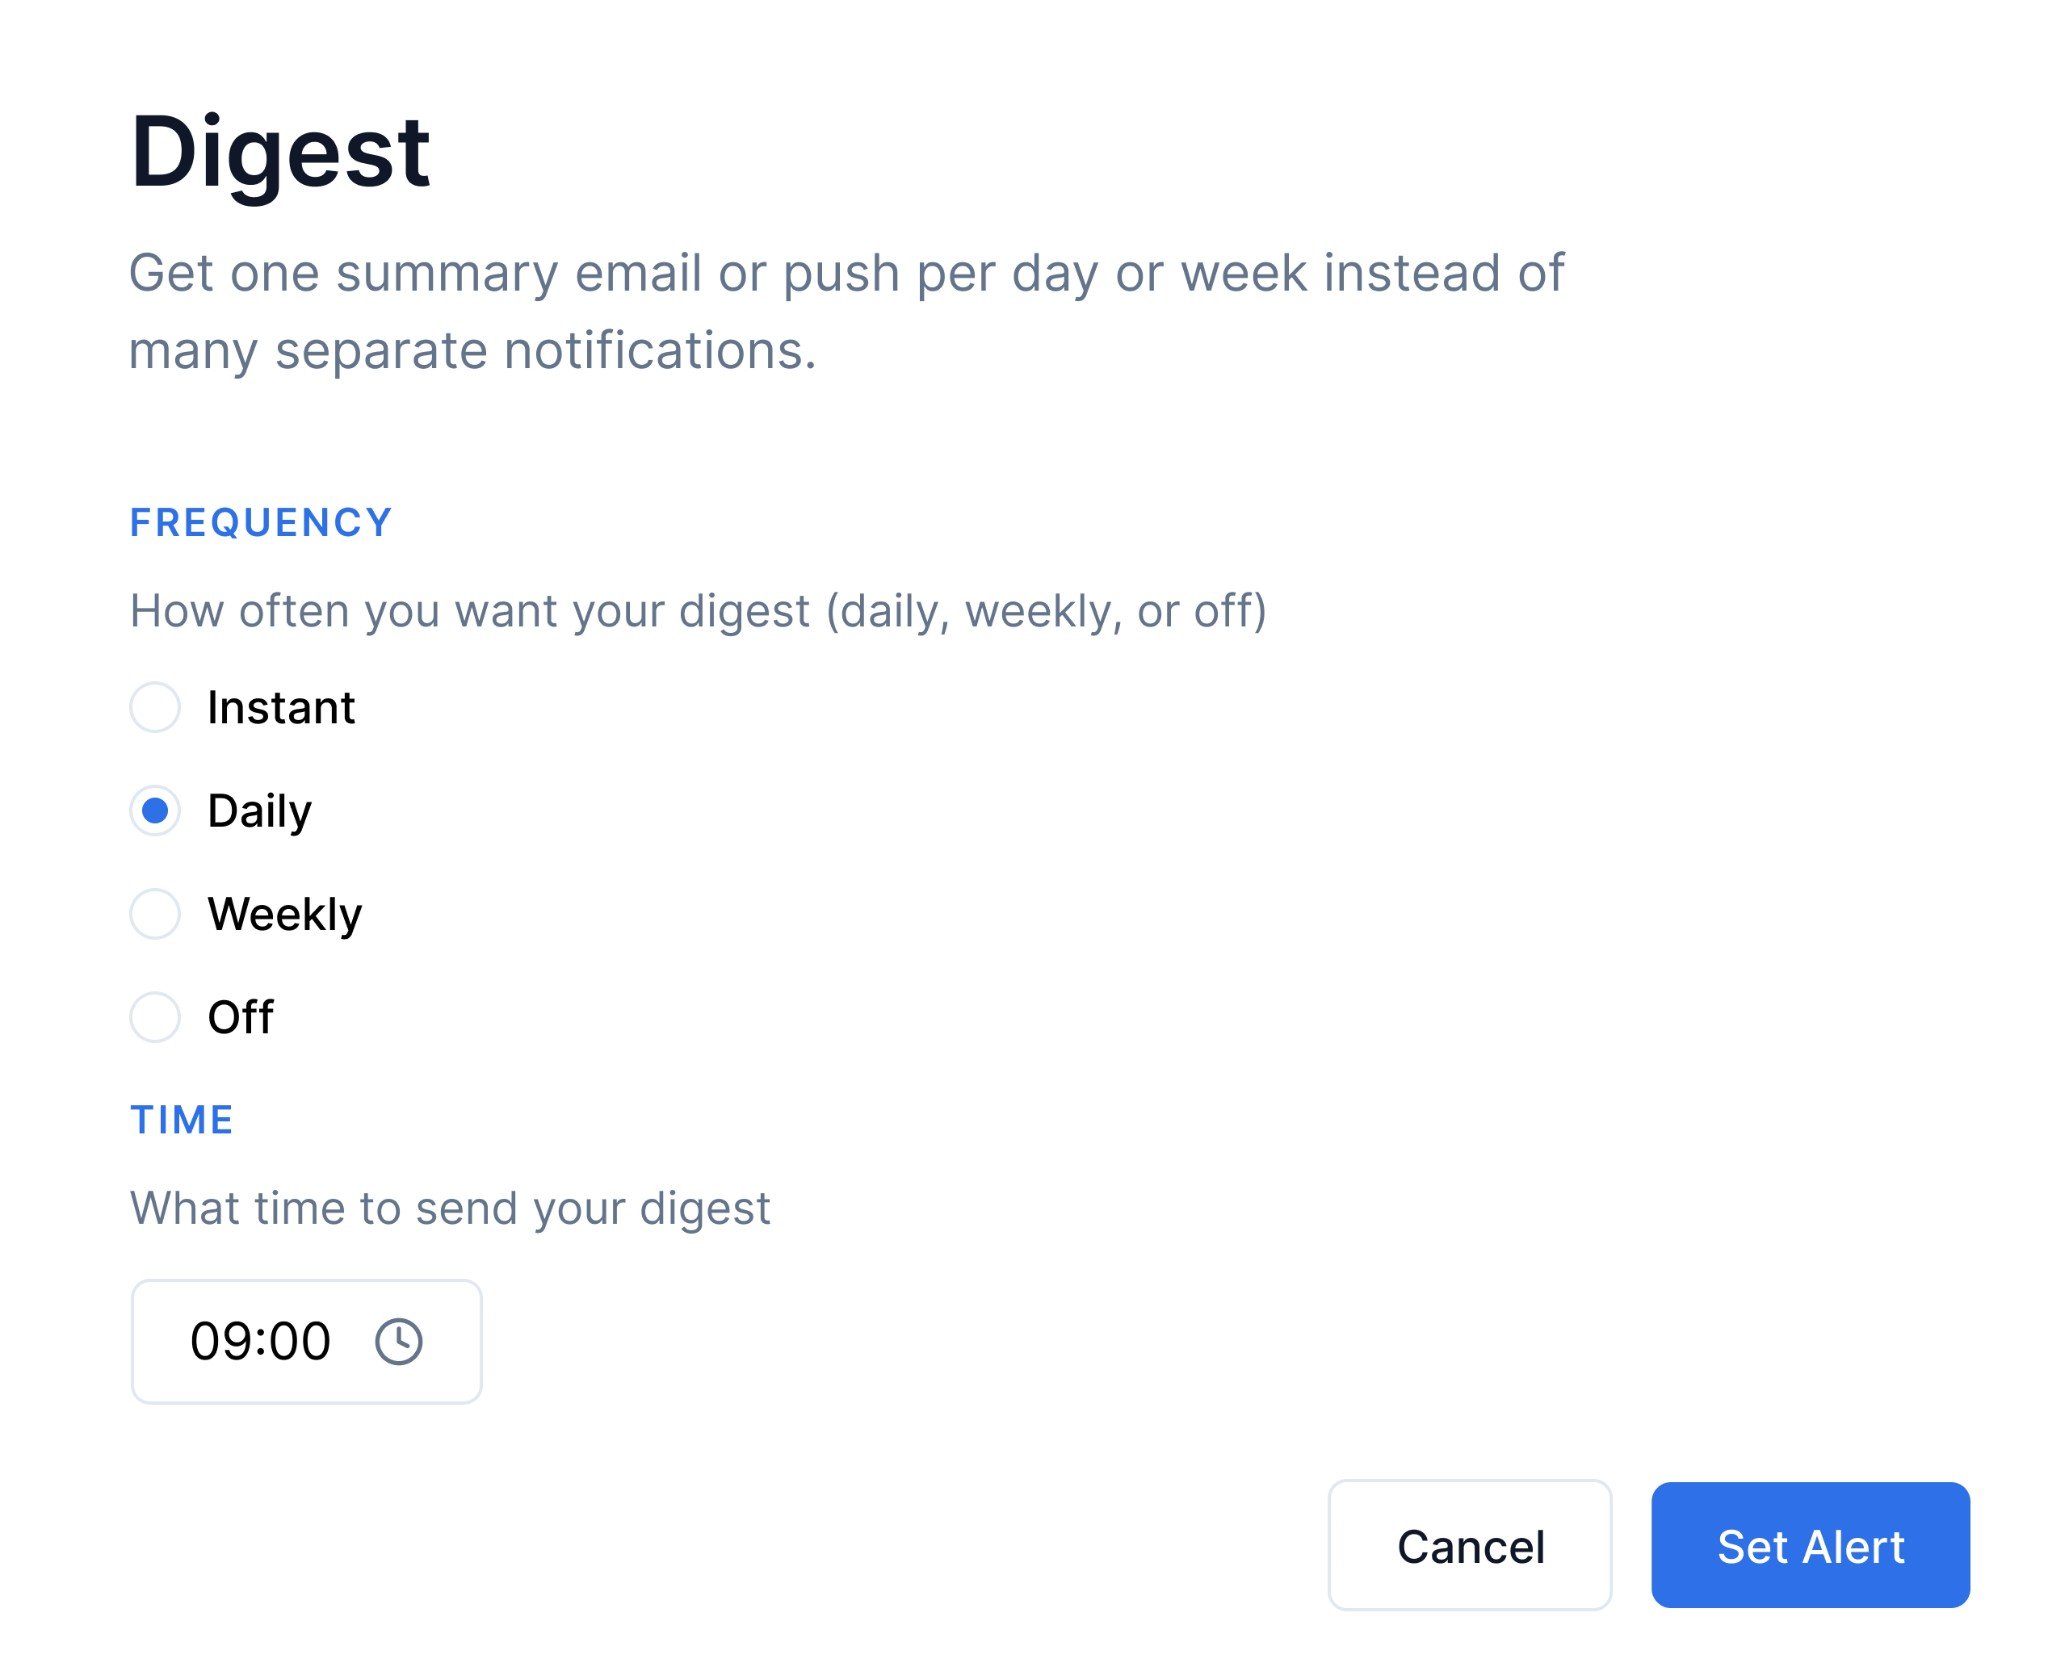
Instead of one notification per event, users choose how often they want a summary - Daily, Weekly, or Off. A user who picks Daily gets one email at 09:00 summarising everything that happened that day instead of a notification for every single event.This works by storing the user’s chosen schedule as a custom property on their profile using user.set(). The workflow’s Digest node reads this property at runtime via a dynamic schedule and fires on the schedule the user set.
Digest preferences
Configure in SuprSend
Go to Developers → Preference categories and create a sub-category for the notification type you want to digest (for example “Activity Summary”). Click +Sub-Category, fill in the name, and set a default preference
Click Publish Changes
In your workflow, add a Digest node and set it to use a dynamic schedule. Point the dynamic schedule key at the user profile property where you store the schedule — for example ."$recipient".digestSchedule.category-slug (where category-slug is the slug of preference category). The Digest node will automatically use whatever schedule the user has saved for that category. See Dynamic schedule
Build in your appShow radio buttons for Daily / Weekly / Off and a time picker for daily and weekly schedules. On save, write the schedule to the user’s profile with user.set().
This is a profile update, not a preference API call. Use suprSendClient.user.set() to save the digest schedule directly to the user’s profile. The workflow’s Digest node reads this property via the dynamic schedule key - not via the preference API.
import { useSuprSendClient } from "@suprsend/react";import { useState } from "react";function DigestPreferences() { const suprSendClient = useSuprSendClient(); const [frequency, setFrequency] = useState("daily"); const [time, setTime] = useState("09:00"); // Save digest schedule as a user profile property, nested under the category slug. // In your workflow, set the Digest node's dynamic schedule key to: // ."$recipient".digestSchedule.category-slug (replace with your category slug) // // Schema fields: // frequency — "daily" | "weekly" | "hourly" | "minutely" | "monthly" // time — "hh:mm" — the time at which the recurring schedule fires and the // batch window closes (for example "09:00" fires daily at 9 AM) // tz_selection — "recipient" uses the recipient's $timezone profile property; // leave empty "" and set tz_fixed for a hard-coded timezone // dtstart — (optional) ISO-8601 datetime with timezone offset for the first // schedule calculation, for example "2024-08-01T10:40:50+00:00". // Defaults to current timestamp if omitted. // // See: https://docs.suprsend.com/docs/digest#dynamic-schedule-send-digest-based-on-user-preference const handleSave = async () => { await suprSendClient.user.set({ digestSchedule: { "category-slug": { // replace with your category slug frequency: frequency, // "daily" | "weekly" - drives when the batch fires time: time, // "09:00" - time the recurring schedule fires (hh:mm) tz_selection: "recipient", // use the recipient's timezone from their profile // dtstart: "2024-08-01T10:40:50+00:00", // optional: ISO-8601 with tz offset }, }, }); }; return ( <div> {["daily", "weekly", "off"].map((option) => ( <label key={option}> <input type="radio" checked={frequency === option} onChange={() => setFrequency(option)} /> {option.charAt(0).toUpperCase() + option.slice(1)} </label> ))} {(frequency === "daily" || frequency === "weekly") && ( <input type="time" value={time} onChange={(e) => setTime(e.target.value)} /> )} <button onClick={handleSave}>Save</button> </div> );}
When to use: Users get too many individual notifications and want a summary instead. Examples: daily activity digest (“Here’s what happened in your workspace today”), weekly analytics reports, aggregated comment or mention notifications.
This guide has three tenant-related patterns. Section 4 is for platform admins restricting what a tenant can access. Section 6 is for tenant admins setting defaults for their own users. Section 8 is for modelling each project as an independent tenant.
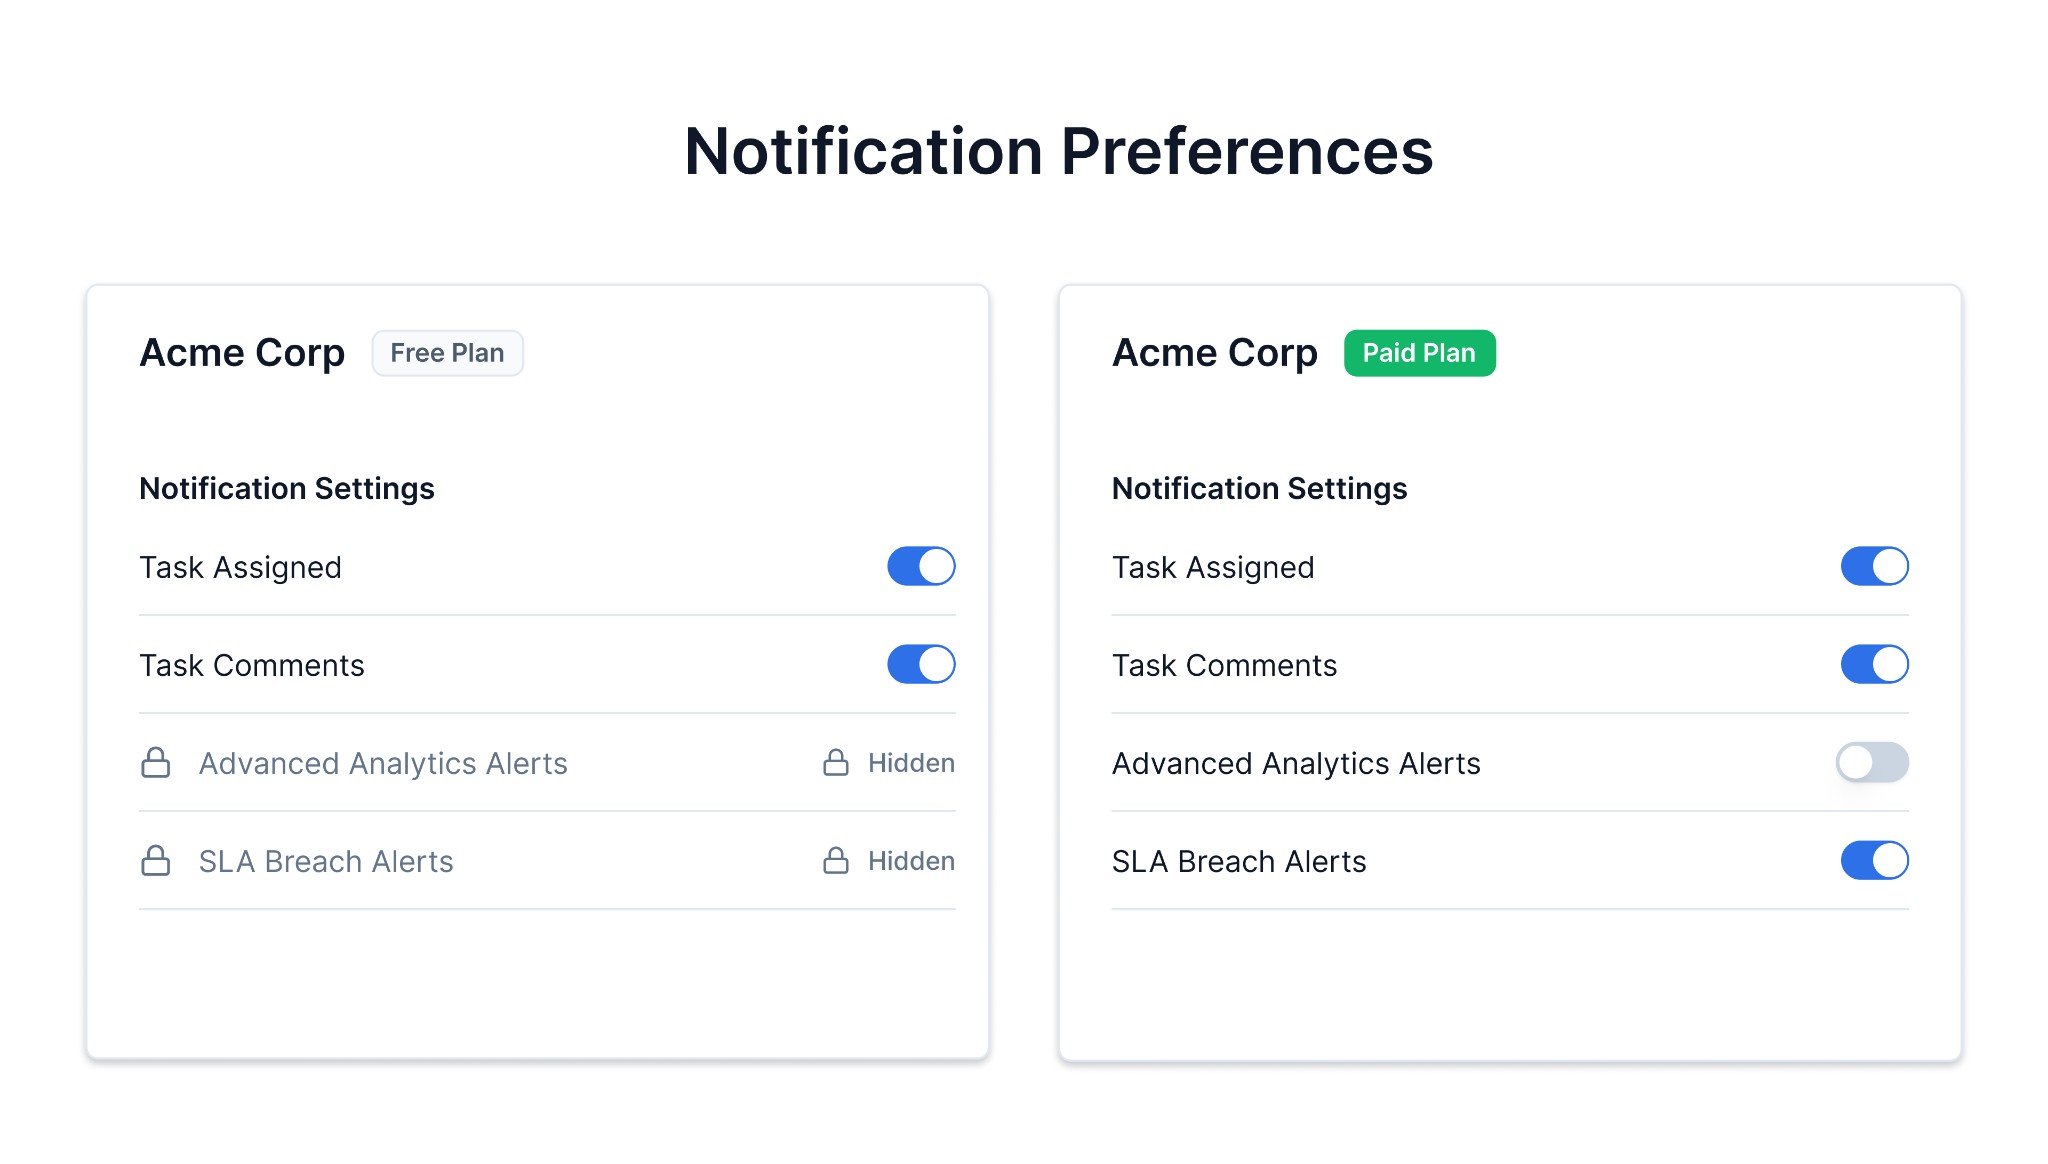
If you’re building a multi-tenant app (for example a SaaS platform with free and paid plans), you probably don’t want every tenant to see the same preference categories. A free-plan tenant shouldn’t see categories for features they haven’t subscribed to.SuprSend lets you handle this with global tenant preferences. As a platform admin, you can opt out specific categories or channels for any tenant. Once you do:
The opted-out categories and channels are removed from getPreferences() responses for all users in that tenant - they won’t see them on the preference page.
Notifications for those categories are not delivered to the tenant’s users.
These are hard overrides - neither the tenant admin’s default preferences nor individual user preferences can re-enable them. See Preference Evaluation for the full resolution order.
Free-plan users see only core categories; paid-plan users see the full set
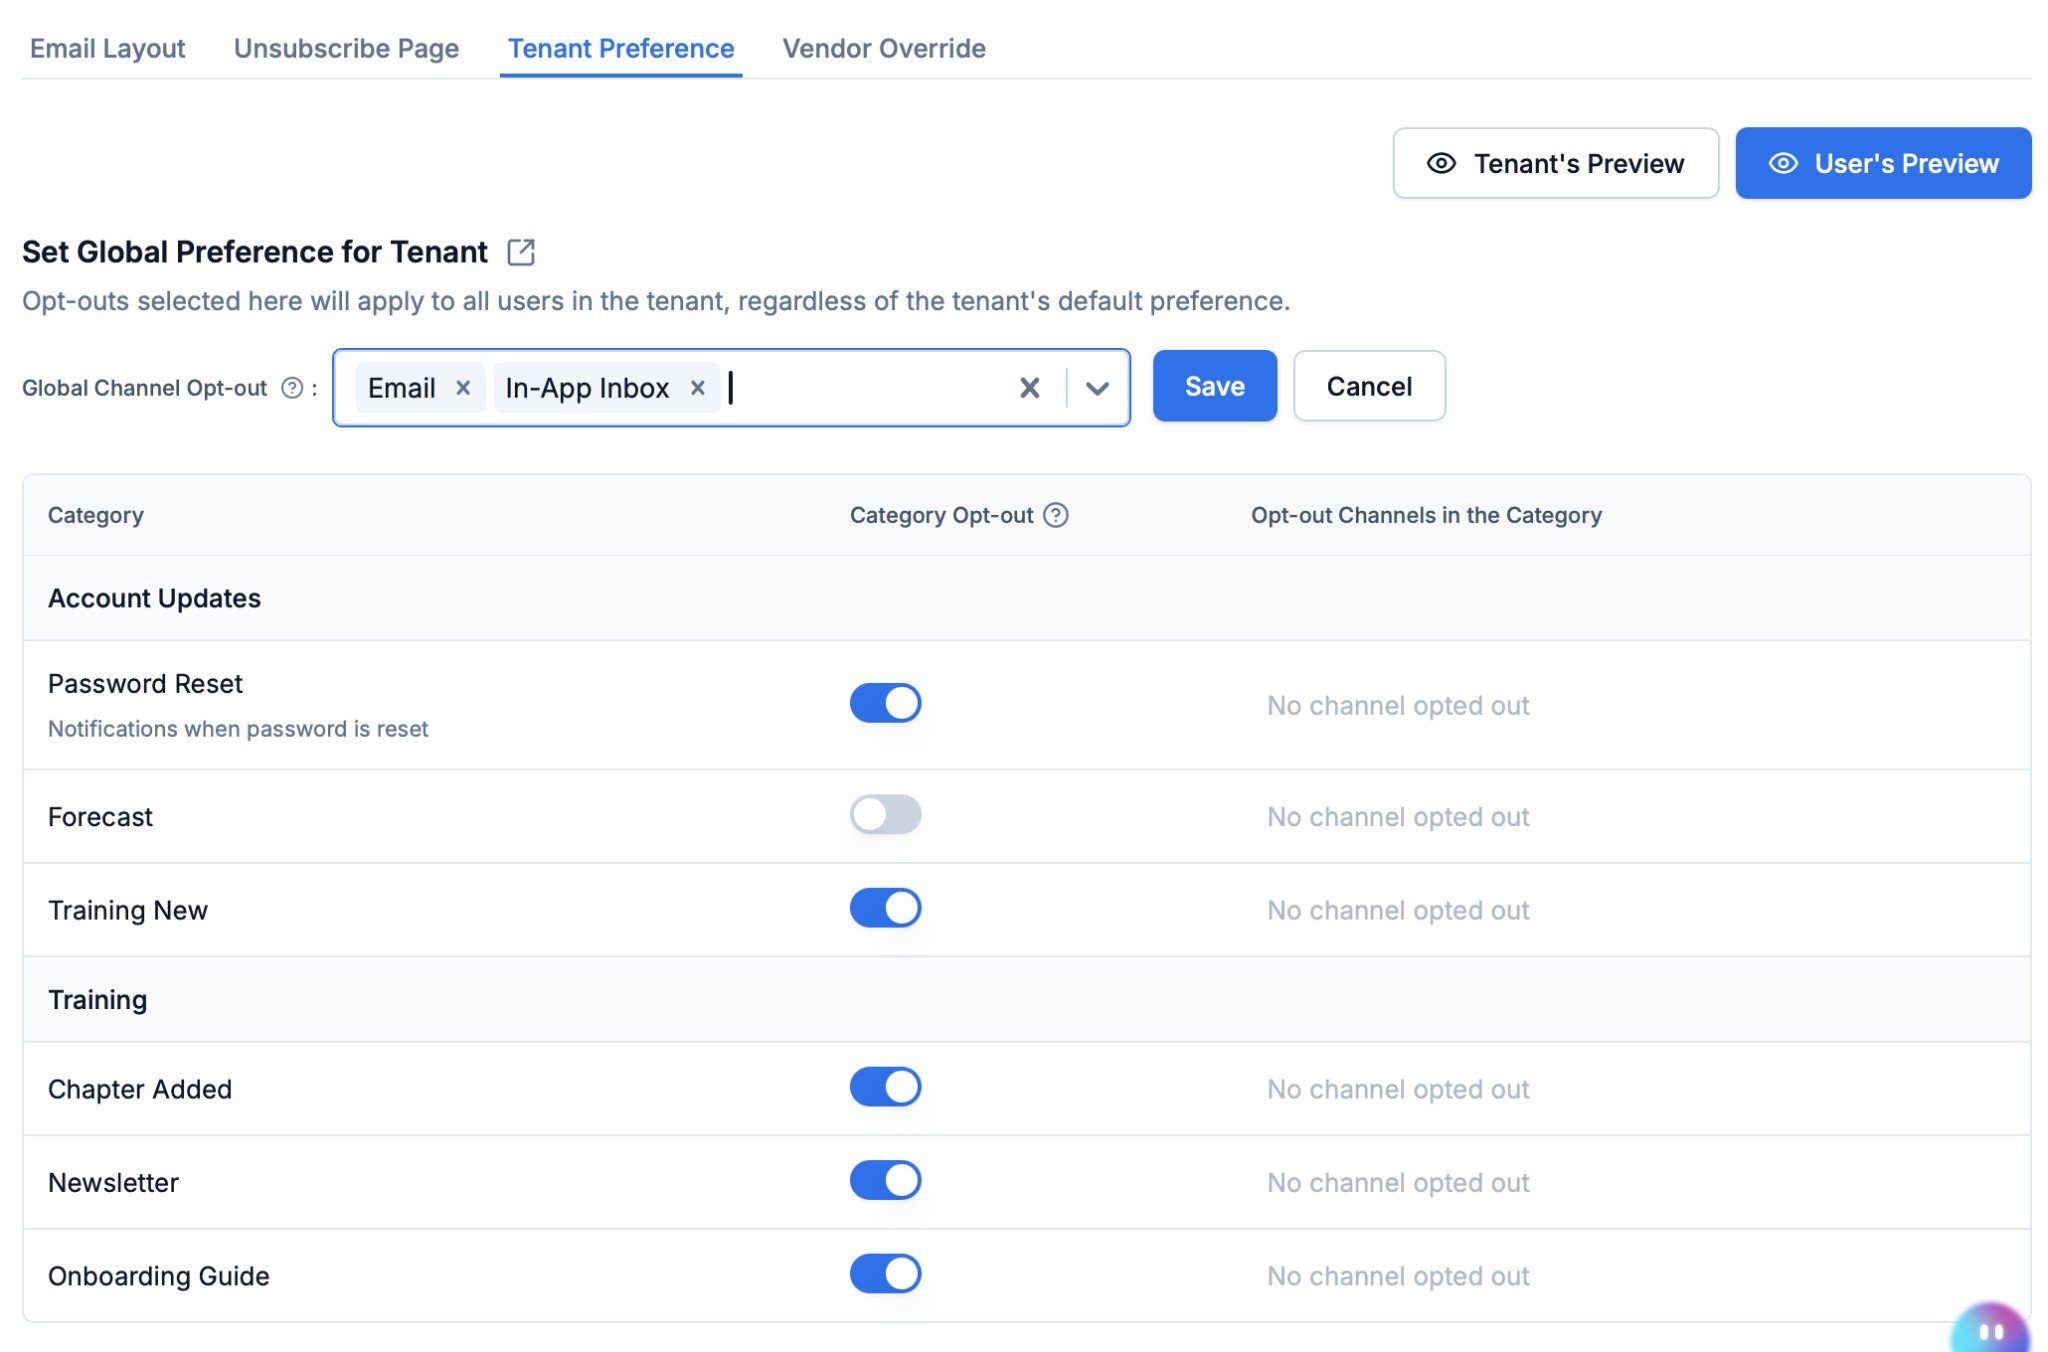
Configure in SuprSendGo to Tenants → select your tenant → Tenant Preference in the SuprSend dashboard. The Set Global Preference for Tenant section gives you three controls:
Global Channel Opt-out — block one or more channels (for example Email, In-App Inbox) across all categories for the tenant. Notifications on blocked channels are never delivered to any user in the tenant.
Category Opt-out — toggle a category off for the tenant. The category is removed from the tenant’s preference API responses and notifications for that category are not delivered.
Opt-out Channels in the Category — block specific channels within a single category (for example disable SMS for “Newsletter” but keep it enabled for other categories).
Global tenant preference page in the SuprSend dashboard
Build in your appPass tenantId to getPreferences(). Categories opted out at the tenant level are excluded from the response server-side - your rendering code stays the same regardless of tenant plan.
When to use: Multi-tenant SaaS where each tenant’s plan determines which notifications are available. Examples: free-plan tenants see only core alert categories, paid tenants see advanced analytics alerts and SLA breach alerts they’ve subscribed to.
5. Filter categories with modules, roles, or departments
Not every user needs to see every preference category. A sales user only cares about Sales Newsletter, Cart & checkout, and New Leads - they don’t need Budget Alerts or Expense Reports. A finance user is the opposite. And in a multi-module product, each module’s alerts should live on its own tab.This uses tags. You assign tags to preference categories or sections in SuprSend, then pass the relevant tag to getPreferences() - SuprSend returns only the matching categories. When a tag is assigned at the section level, it automatically applies to all subcategories under that section via effective_tags.Tags are flexible - they can drive two common patterns:
Automatic filtering by role or department: Your app reads the user’s department/role/team from their profile or session and passes the tag silently. No filter UI is needed.
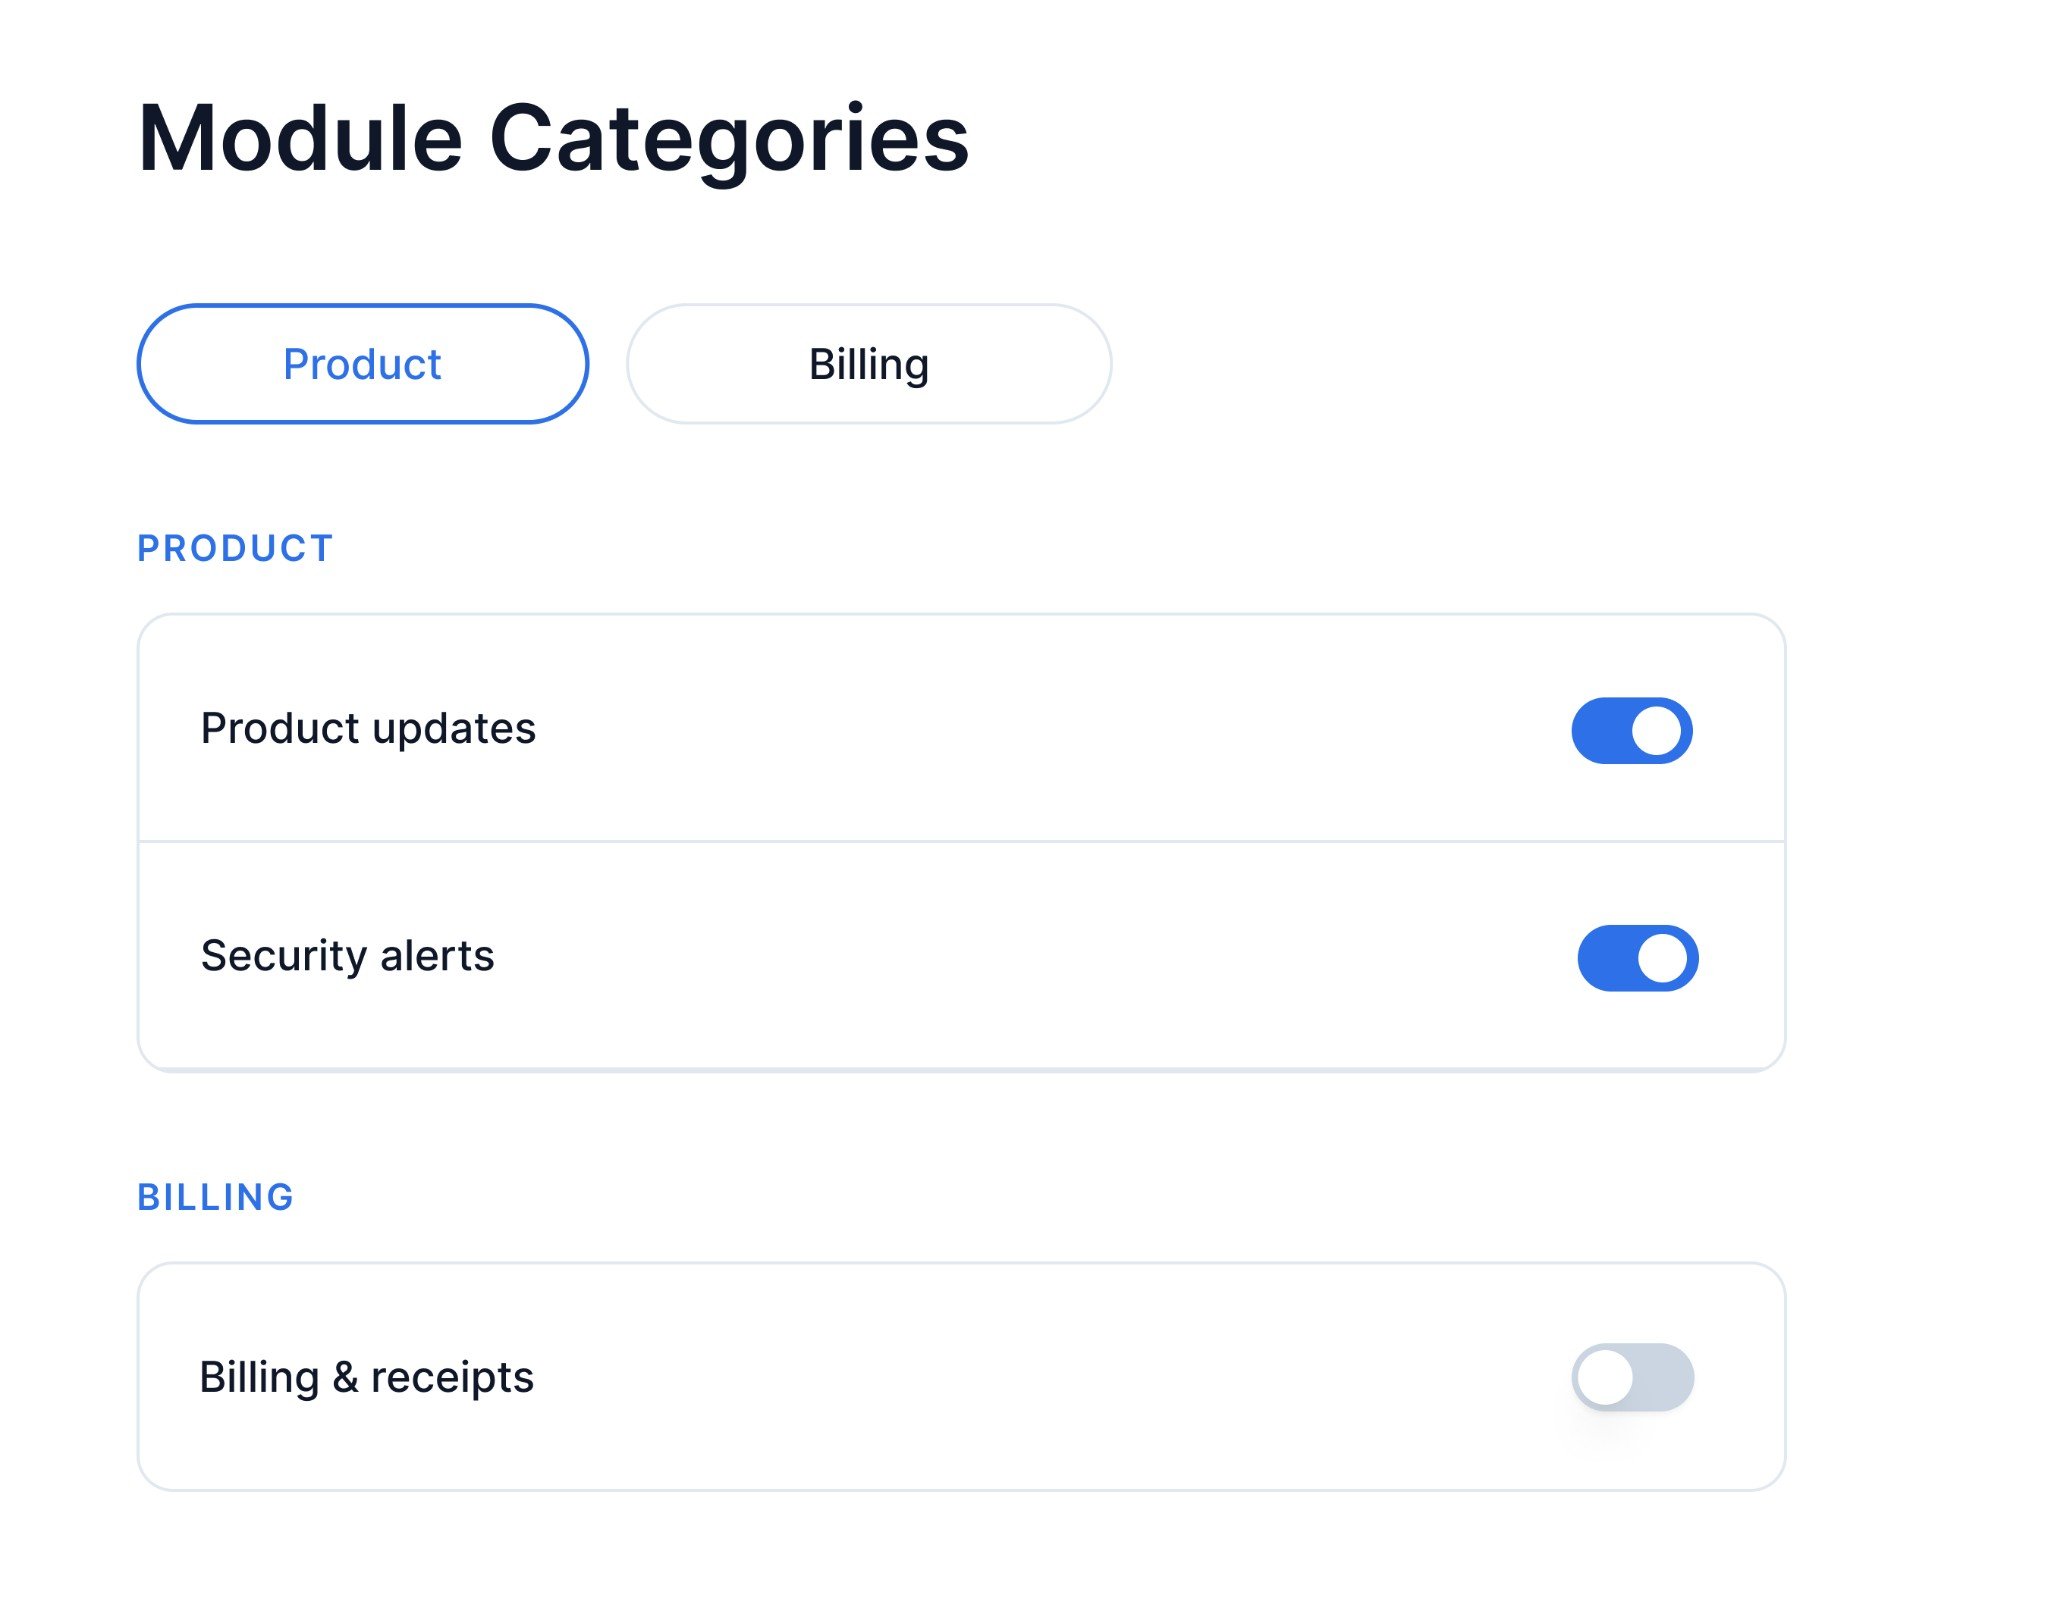
User-selected filtering by module: Your app shows a visible tab selector and re-fetches preferences with the selected tag.
Configure in SuprSendGo to Developers → Preference categories and tag your sections or sub-categories. Two ways to structure this:
Tag per section: Click +Section to create a section (for example “Sales”, “Finance”). Add a tag to the section (for example sales, finance). All sub-categories under that section inherit the tag automatically via effective_tags. Click Publish Changes.
Tag per sub-category: Create a section with all sub-categories under it. Select each sub-category and add its own tag (for example sales, finance, product). Filtering by tag returns that section with only the matching sub-categories.
Build in your appPass the tag to getPreferences() via the tags parameter. Where the tag comes from depends on your use case - either derived from the user’s profile (automatic) or from a tab selector (user-selected). The tags parameter also supports logical filtering for more complex cases - see Filter categories with tags for supported operators (or, and, not, exists).
Automatic (by role/department)
User-selected (by module)
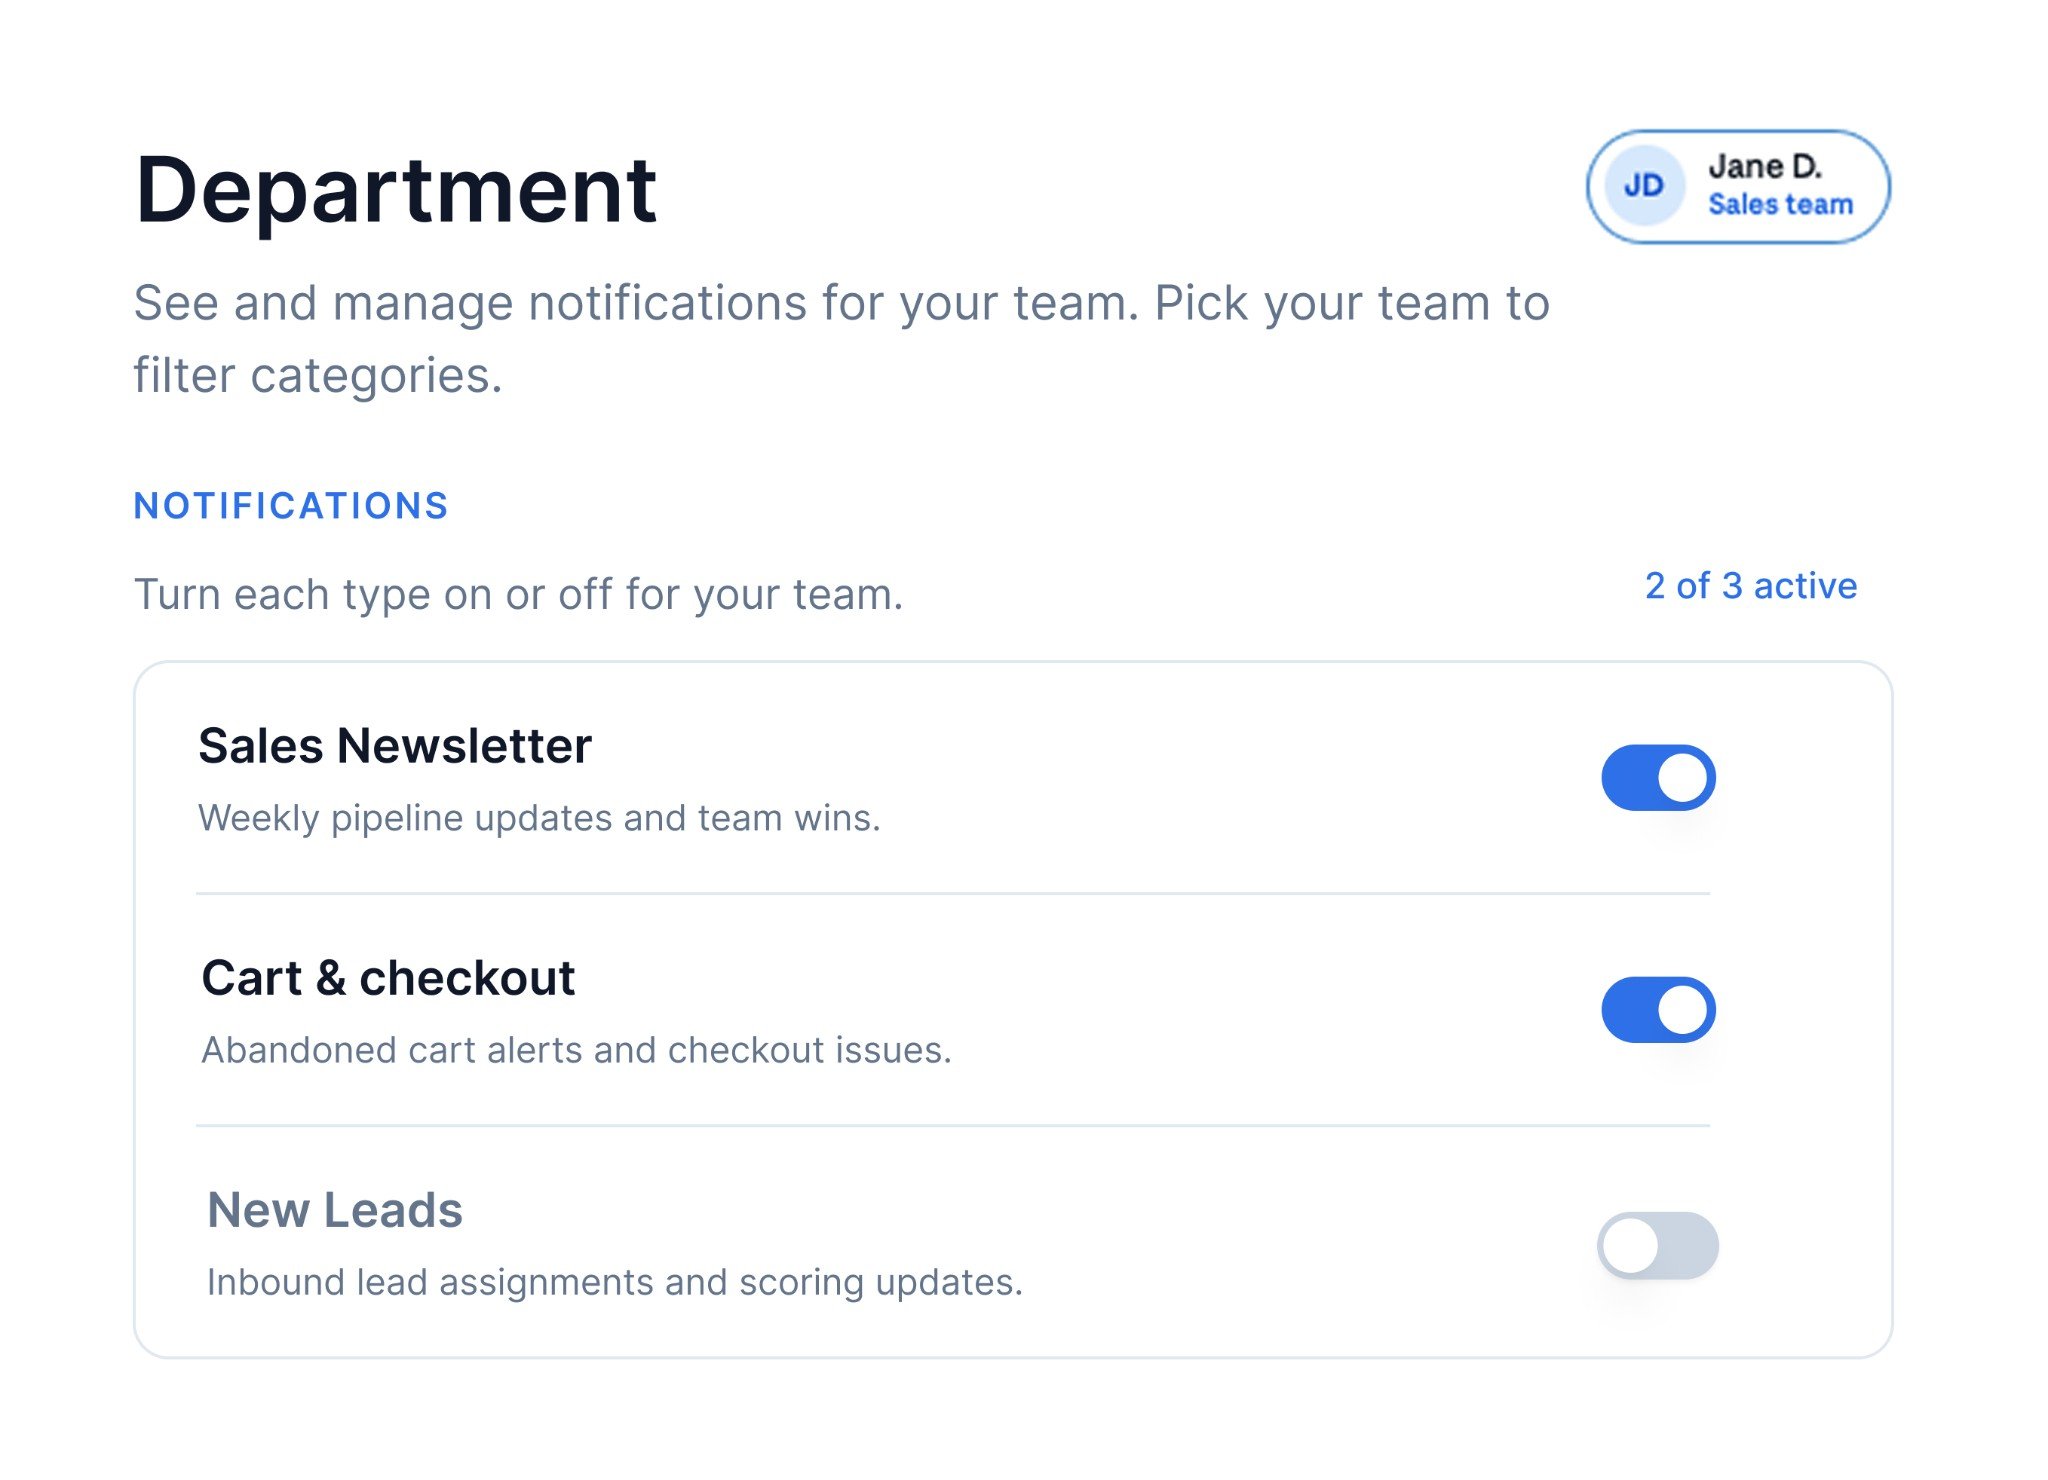
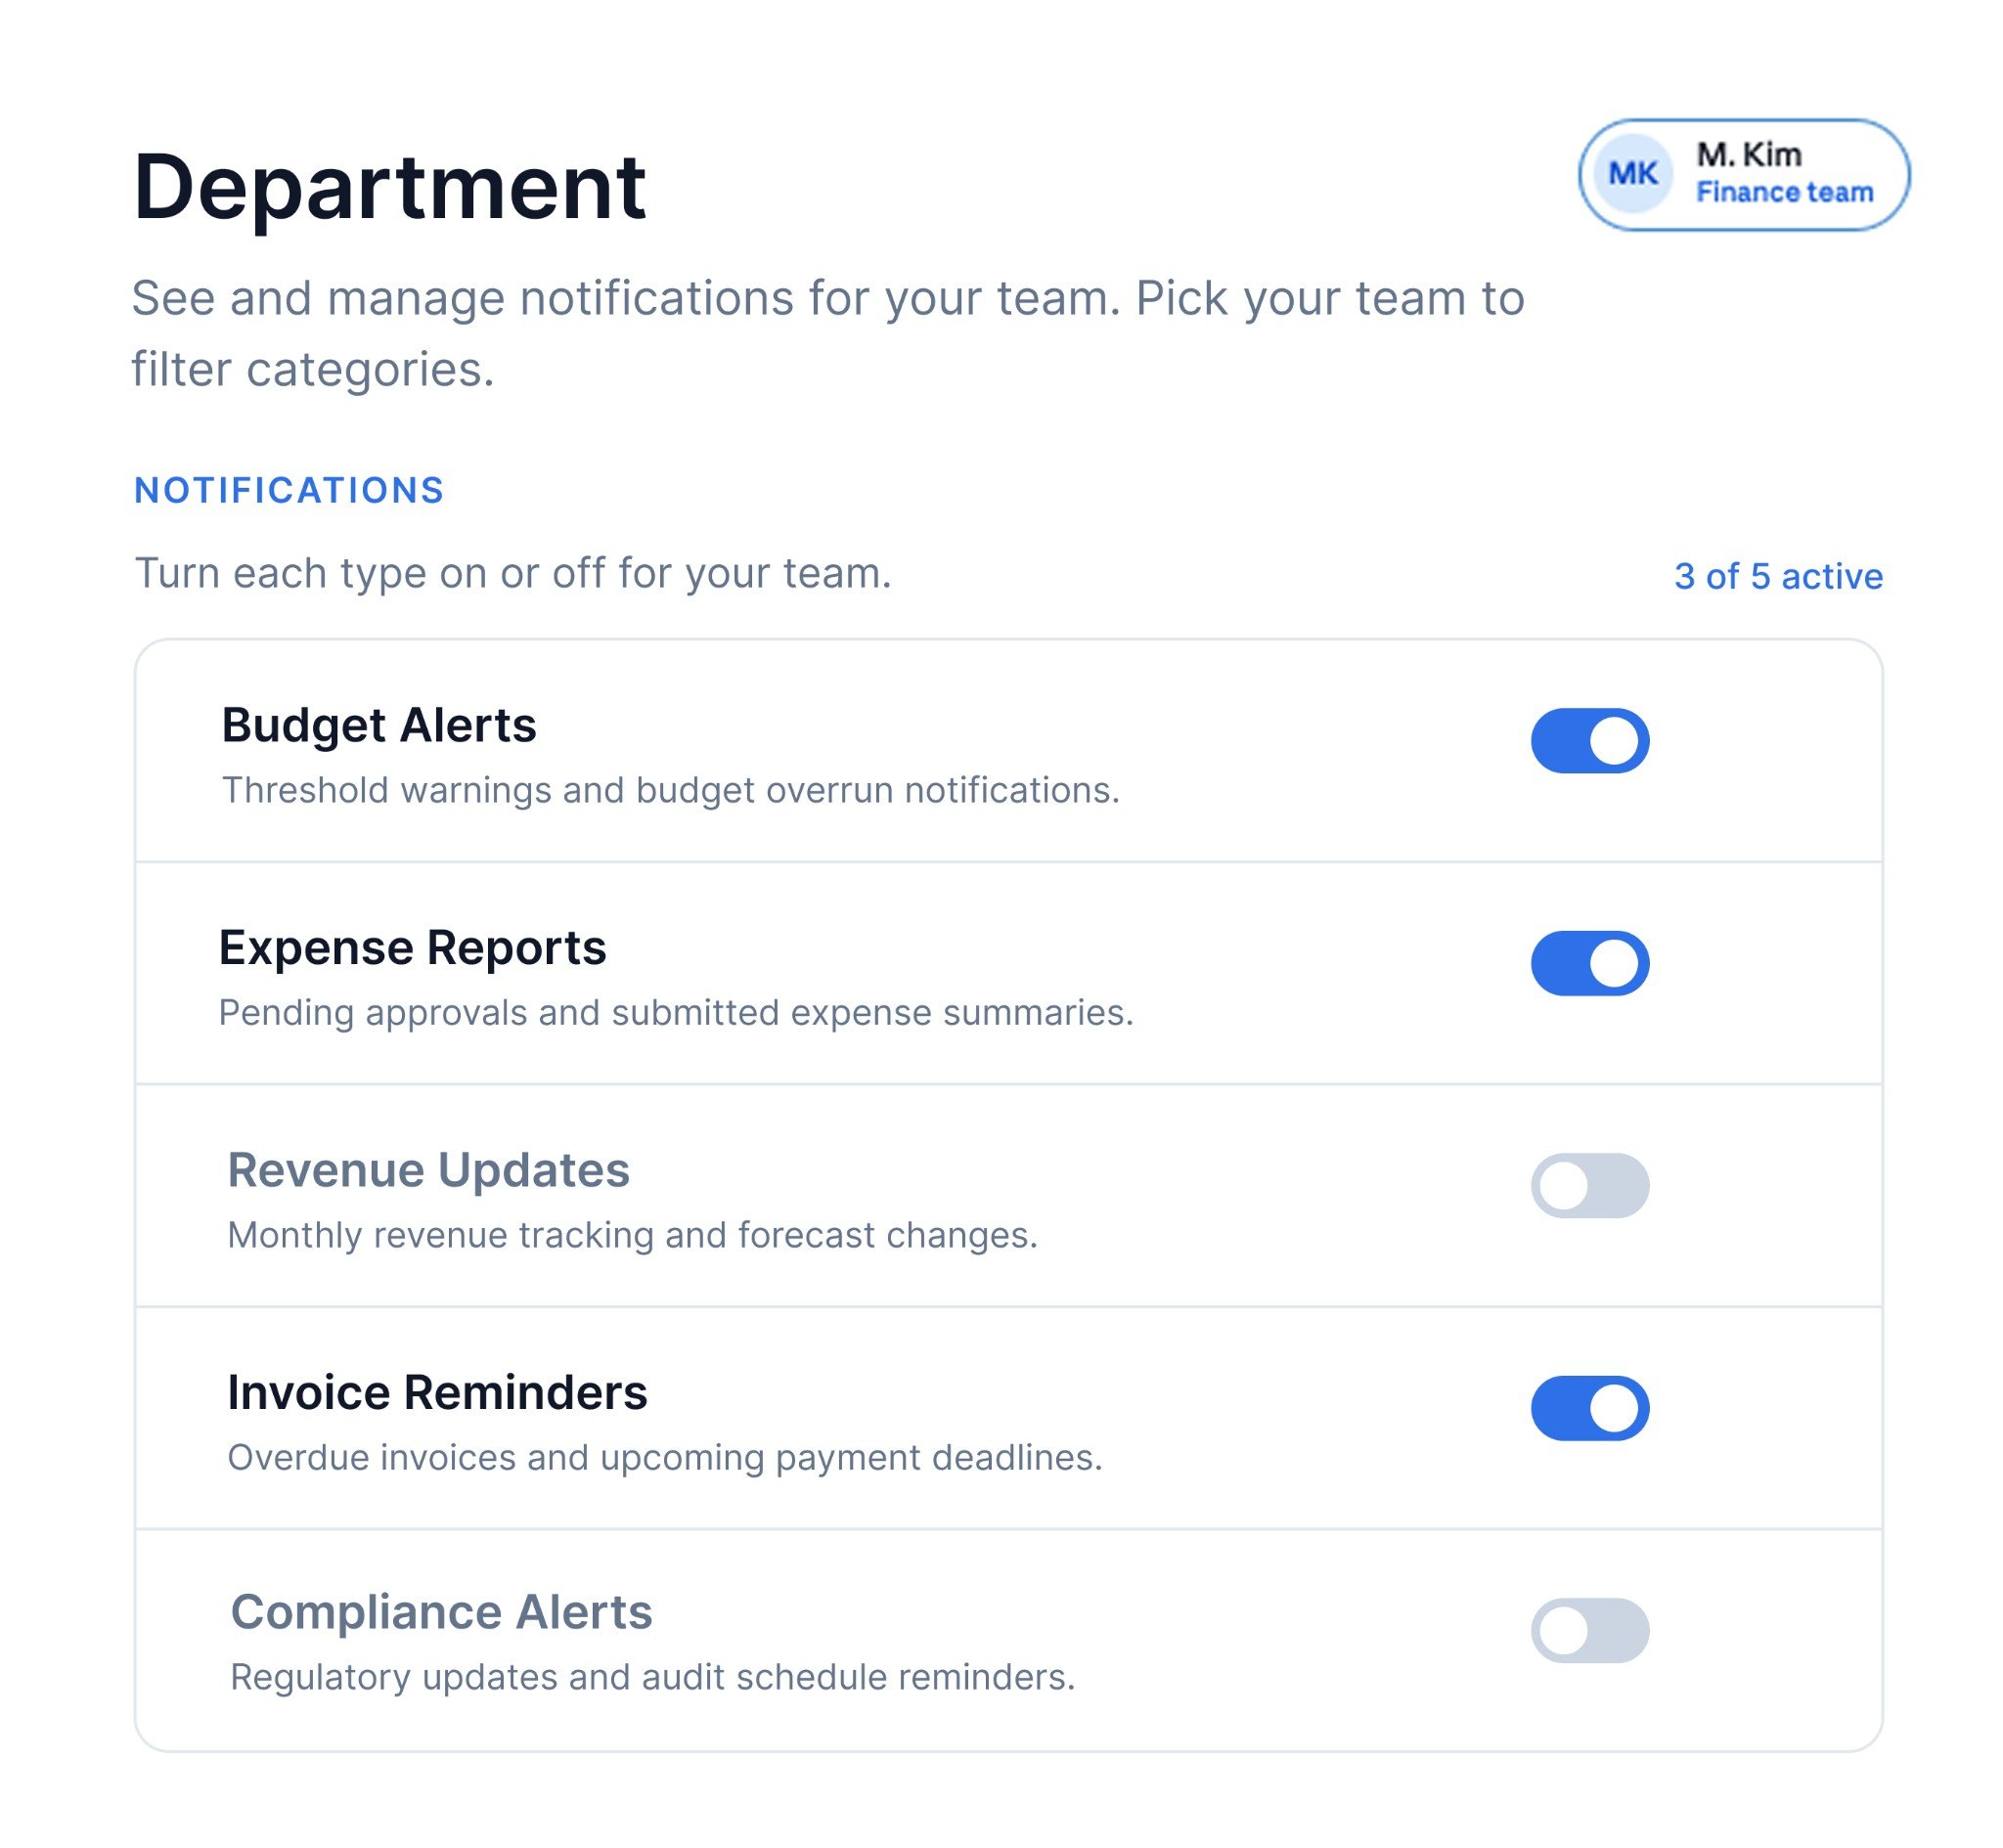
Read the user’s department from their profile or session and pass it as the tag. No filter UI is needed - a sales user automatically sees only sales categories, a finance user sees only finance categories.
Jane D. (Sales team) sees Sales Newsletter, Cart & checkout, and New Leads
M. Kim (Finance team) sees Budget Alerts, Expense Reports, Invoice Reminders, and more
When to use: Users in different roles, departments, or product modules should see only the preference categories relevant to them. Examples: sales users see Sales Newsletter and Cart & checkout; finance users see Budget Alerts and Expense Reports; a multi-module product where users switch between modules to manage alerts separately.
Different from Section 4 (platform admin restricting tenant access). This section is about tenant admins configuring defaults for their own users. For per-project independent preferences, see Section 8.
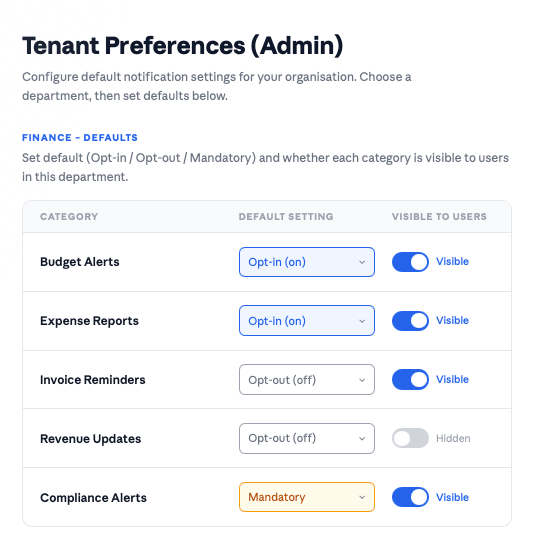
In a B2B product, the person who configures notifications isn’t the end user - it’s generally pre-configured by account admin. This pattern lets tenant admins control which categories are available to their users, what the defaults are, and which channels are enabled - all scoped to their account. End users then see only what their admin has left enabled.The admin view shows a table of categories with a default preference selector (Opt-in / Opt-out / Mandatory) and a toggle per category. The toggle maps directly to visible_to_subscriber in the API.
Tenant admin customizing notification preferences for their organization
Configure in SuprSend
First ensure your preference categories are set up under Developers → Preference categories and published
Provide tenant admins access to configure categories via the Tenant Preference API. They can enable/disable categories, set default On/Off, and control channel availability - all scoped to their tenant
Build in your appBuild an admin settings page that calls the Tenant Preference API. Tenant admins control the following per category:
Default preference (preference: opt_in / opt_out / cant_unsubscribe) - sets whether the category is on, off, or mandatory by default for all users in this tenant. SuprSend evaluates preferences in the order: user preference → tenant default → category default. If a user hasn’t set their own preference, the tenant default applies.
Visibility (visible_to_subscriber: true / false) - controls whether the category appears on the end user’s preference page at all. Set to false to hide and turn off categories that aren’t relevant to this tenant’s users.
Channel controls - mandatory_channels makes specific channels non-unsubscribable (when preference is cant_unsubscribe), opt_in_channels sets which channels are on by default, and blocked_channels disables channels across all categories for the tenant regardless of individual user preferences.
# Set default preference and visibility for a category within a tenantcurl -X PATCH "https://hub.suprsend.com/v1/tenant/{tenant_id}/preference/category/{category}/" \ -H "Authorization: Bearer {workspace_key}:{workspace_secret}" \ -H "Content-Type: application/json" \ -d '{ "preference": "opt_in", "visible_to_subscriber": true }'
For the end-user side, pass tenantId to getPreferences() - the rendering is the same as Section 2.
When to use: B2B or white-label products where each customer organisation’s admin controls the notification experience for their users. Examples: one enterprise customer enables billing + security + product alerts while another only enables billing alerts; a white-label SaaS where each reseller configures the notification defaults for their own users.
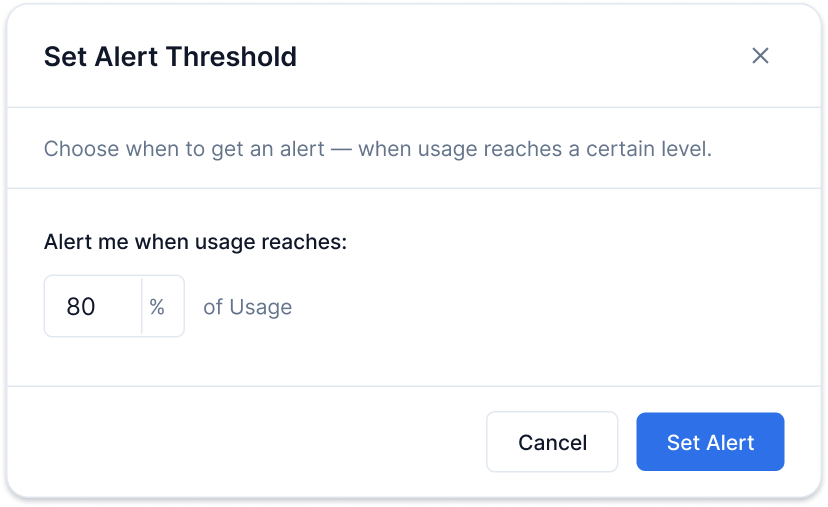
Some notifications are only useful when they cross a user-defined threshold. A storage alert at 1% full is noise; at 80% it’s urgent. Users set their own trigger point, and the workflow only fires when the incoming metric crosses it.The threshold value is a custom user profile property - not a preference setting. The preference controls whether the alert is on or off and which channels it goes to. The threshold controls when the workflow fires.
Threshold alerts
Configure in SuprSend
Go to Developers → Preference categories. Click +Sub-Category, name it (for example “Usage alerts”) and set a default preference. Click Publish Changes
Add a threshold condition in your workflow. You have two options depending on what you want to skip:
Skip a step in the workflow — add a Branch node inside the workflow that checks the threshold (for example usage_percent >= ."$recipient".pref_conditions.usage-alerts.threshold). If the condition isn’t met, the branch doesn’t execute but the rest of the workflow still runs.
Do not execute the workflow — add the threshold check as a trigger condition at the start of the workflow. If the condition isn’t met, the entire workflow is skipped and no notification is sent at all.
Build in your appCall getPreferences() in your parent component and pass preferenceData as a prop. The preference page for this pattern has two independent parts rendered together:
Threshold picker - a number input. Saved via user.set() under pref_conditions.usage-alerts.threshold (replace usage-alerts with your actual category slug).
import { PreferenceOptions, useSuprSendClient } from "@suprsend/react";import { useState } from "react";function ThresholdPreferences({ preferenceData, setPreferenceData }) { const suprSendClient = useSuprSendClient(); const [threshold, setThreshold] = useState(80); // Part 1: Save threshold to user profile - this is a profile update, not a preference call. // In your workflow Branch node, reference the threshold as: // ."$recipient".pref_conditions.usage-alerts.threshold // (replace "usage-alerts" with your actual category slug) const handleThresholdSave = async () => { await suprSendClient.user.set({ pref_conditions: { "usage-alerts": { // replace with your category slug threshold: threshold, // for example 80 means "alert me when usage hits 80%" }, }, }); }; // Part 2: Category on/off - standard preference update const handleCategoryChange = async (category, value) => { const resp = await suprSendClient.user.preferences.updateCategoryPreference( category, value ? PreferenceOptions.OPT_IN : PreferenceOptions.OPT_OUT ); if (resp.status !== "error") setPreferenceData({ ...resp.body }); }; return ( <div> {/* Threshold picker */} <label>Alert me when usage reaches:</label> <input type="number" min={1} max={100} value={threshold} onChange={(e) => setThreshold(Number(e.target.value))} /> <span>% of Usage</span> <button onClick={handleThresholdSave}>Set Alert</button> {/* Category preference - render the "Usage alerts" category with toggle + channels */} {preferenceData?.sections ?.flatMap((s) => s.subcategories || []) .filter((sub) => sub.category === "usage-alerts") .map((sub, i) => ( <div key={i}> {/* Replace with your own toggle/switch component */} <button disabled={!sub.is_editable} onClick={() => handleCategoryChange( sub.category, sub.preference !== PreferenceOptions.OPT_IN ) } style={{ opacity: !sub.is_editable ? 0.5 : 1, background: sub.preference === PreferenceOptions.OPT_IN ? "#2563EB" : "#D1D5DB", borderRadius: "9999px", padding: "2px 8px", border: "none", cursor: !sub.is_editable ? "not-allowed" : "pointer", }} > {sub.preference === PreferenceOptions.OPT_IN ? "On" : "Off"} </button> {sub?.channels?.map((channel, j) => ( <button key={j} disabled={!channel.is_editable} onClick={() => { if (!channel.is_editable) return; suprSendClient.user.preferences .updateChannelPreferenceInCategory( channel.channel, channel.preference === PreferenceOptions.OPT_IN ? PreferenceOptions.OPT_OUT : PreferenceOptions.OPT_IN, sub.category ) .then((resp) => { if (resp.status !== "error") setPreferenceData({ ...resp.body }); }); }} style={{ opacity: channel.preference === PreferenceOptions.OPT_IN ? 1 : 0.4 }} > {channel.channel} </button> ))} </div> ))} </div> );}
When to use: Users need to set their own trigger point for an alert, not just whether to receive it. Examples: cloud storage (“alert me at 80% full”), API rate limits (“notify at 90% of quota”), budget tracking (“warn me when spend hits 75%“).
Different from Section 4 (platform admin restricting tenant access) and Section 6 (tenant admin setting defaults). This section models each project as a separate tenant so preferences are fully independent per project.
Each project needs a completely independent set of preferences - its own category toggles, its own channel settings, its own defaults. Tags won’t work here because tags only filter categories; they don’t give each project its own independent channel-level preferences or defaults.The solution is to model each project as a tenant in SuprSend. Preferences are then scoped per tenant. When the user switches projects, you switch the tenantId passed to getPreferences(), and all reads and writes happen against that project’s tenant.
For each tenant, configure which categories are enabled, what the defaults are, and which channels are available via the Tenant Default Preference API
Ensure your preference categories are published under Developers → Preference categories
Build in your appShow a project selector. When the user picks a project, pass its tenant ID to getPreferences(). Render the full preference UI - channel-level (All / Required per channel) and category-level (toggles + channel checkboxes).
All preference update methods (updateCategoryPreference, updateChannelPreferenceInCategory, updateOverallChannelPreference) are automatically scoped to the tenantId from the most recent getPreferences() call - you do not pass tenantId directly to update methods. This means the SDK tracks one active tenant at a time globally. Avoid making concurrent getPreferences() calls with different tenantId values while updates are in flight - a concurrent fetch would change the active tenant context and cause any in-flight updates to be written against the wrong tenant.
import { PreferenceOptions, ChannelLevelPreferenceOptions, useSuprSendClient,} from "@suprsend/react";import { useState, useEffect } from "react";// Example projects - in production these come from your own dataconst PROJECTS = [ { label: "Project Alpha", tenantId: "project-alpha" }, { label: "Project Beta", tenantId: "project-beta" },];function ProjectPreferences() { const suprSendClient = useSuprSendClient(); const [selectedTenantId, setSelectedTenantId] = useState(PROJECTS[0].tenantId); const [preferenceData, setPreferenceData] = useState(); useEffect(() => { // Switching projects re-fetches preferences scoped to that project's tenant. // The SDK internally tracks this tenantId for all subsequent update calls // until getPreferences() is called again with a different tenantId. suprSendClient.user.preferences .getPreferences({ tenantId: selectedTenantId }) .then((resp) => { if (resp.status !== "error") setPreferenceData({ ...resp.body }); }); }, [selectedTenantId]); // Category toggle - scoped to the tenantId from the last getPreferences() call const handleCategoryChange = async (category, value) => { const resp = await suprSendClient.user.preferences.updateCategoryPreference( category, value ? PreferenceOptions.OPT_IN : PreferenceOptions.OPT_OUT ); if (resp.status !== "error") setPreferenceData({ ...resp.body }); }; // Channel checkbox within a category const handleChannelInCategoryChange = async (channel, subcategory) => { if (!channel.is_editable) return; const resp = await suprSendClient.user.preferences.updateChannelPreferenceInCategory( channel.channel, channel.preference === PreferenceOptions.OPT_IN ? PreferenceOptions.OPT_OUT : PreferenceOptions.OPT_IN, subcategory.category ); if (resp.status !== "error") setPreferenceData({ ...resp.body }); }; // Global All / Required per channel const handleOverallChannelChange = async (channel, status) => { const resp = await suprSendClient.user.preferences.updateOverallChannelPreference( channel.channel, status ); if (resp.status !== "error") setPreferenceData({ ...resp.body }); }; return ( <> {/* Project selector */} {PROJECTS.map(({ label, tenantId }) => ( <button key={tenantId} onClick={() => setSelectedTenantId(tenantId)}> {label} </button> ))} {/* Channel-level preferences (All / Required) */} {preferenceData?.channel_preferences?.map((channel, i) => ( <div key={i}> <p>{channel.channel}</p> <label> <input type="radio" checked={!channel.is_restricted} onChange={() => handleOverallChannelChange(channel, ChannelLevelPreferenceOptions.ALL)} /> All </label> <label> <input type="radio" checked={channel.is_restricted} onChange={() => handleOverallChannelChange(channel, ChannelLevelPreferenceOptions.REQUIRED)} /> Required </label> </div> ))} {/* Category preferences */} {preferenceData?.sections?.map((section, i) => ( <div key={i}> {section?.name && <h3>{section.name}</h3>} {section?.subcategories?.map((sub, j) => ( <div key={j}> <span>{sub.name}</span> {/* Replace with your own toggle/switch component */} <button disabled={!sub.is_editable} onClick={() => handleCategoryChange( sub.category, sub.preference !== PreferenceOptions.OPT_IN ) } style={{ opacity: !sub.is_editable ? 0.5 : 1, background: sub.preference === PreferenceOptions.OPT_IN ? "#2563EB" : "#D1D5DB", borderRadius: "9999px", padding: "2px 8px", border: "none", cursor: !sub.is_editable ? "not-allowed" : "pointer", }} > {sub.preference === PreferenceOptions.OPT_IN ? "On" : "Off"} </button> {sub?.channels?.map((channel, k) => ( <button key={k} disabled={!channel.is_editable} onClick={() => handleChannelInCategoryChange(channel, sub)} style={{ opacity: channel.preference === PreferenceOptions.OPT_IN ? 1 : 0.4 }} > {channel.channel} </button> ))} </div> ))} </div> ))} </> );}
When to use: Each project or sub-account needs completely independent preferences - its own defaults, its own channel settings, everything separate. Examples: an ad platform where each ad account has independent budget alert settings; a cloud hosting provider where production, staging, and dev each have separate alert preferences.