
@suprsend/react SDK. The same user.preferences.* methods exist in the JavaScript web SDK, with equivalents for Angular, iOS, and Expo. Each pattern also shows the matching REST API call - use it from your backend (it needs your workspace secret) or from platforms without an SDK. Digest schedules and condition properties (Sections 3-6) are REST-only today. If you want a ready-made preference UI without building from scratch, see the Embedded Preference Centre.1. Channel opt-in / opt-out
Users control what they receive on each channel. For every channel your app uses (Email, SMS, WhatsApp, Push, etc.), the user picks one of two options:- All - receive all notifications on this channel, except categories they’ve explicitly turned off
- Required - receive only notifications from categories marked as mandatory (Can’t Unsubscribe)
channel_preferences array in the API response drives the global All / Required control. Each item has a channel name and an is_restricted boolean: false means All, true means Required. The per-category channel preferences live under sections[].subcategories[].channels.
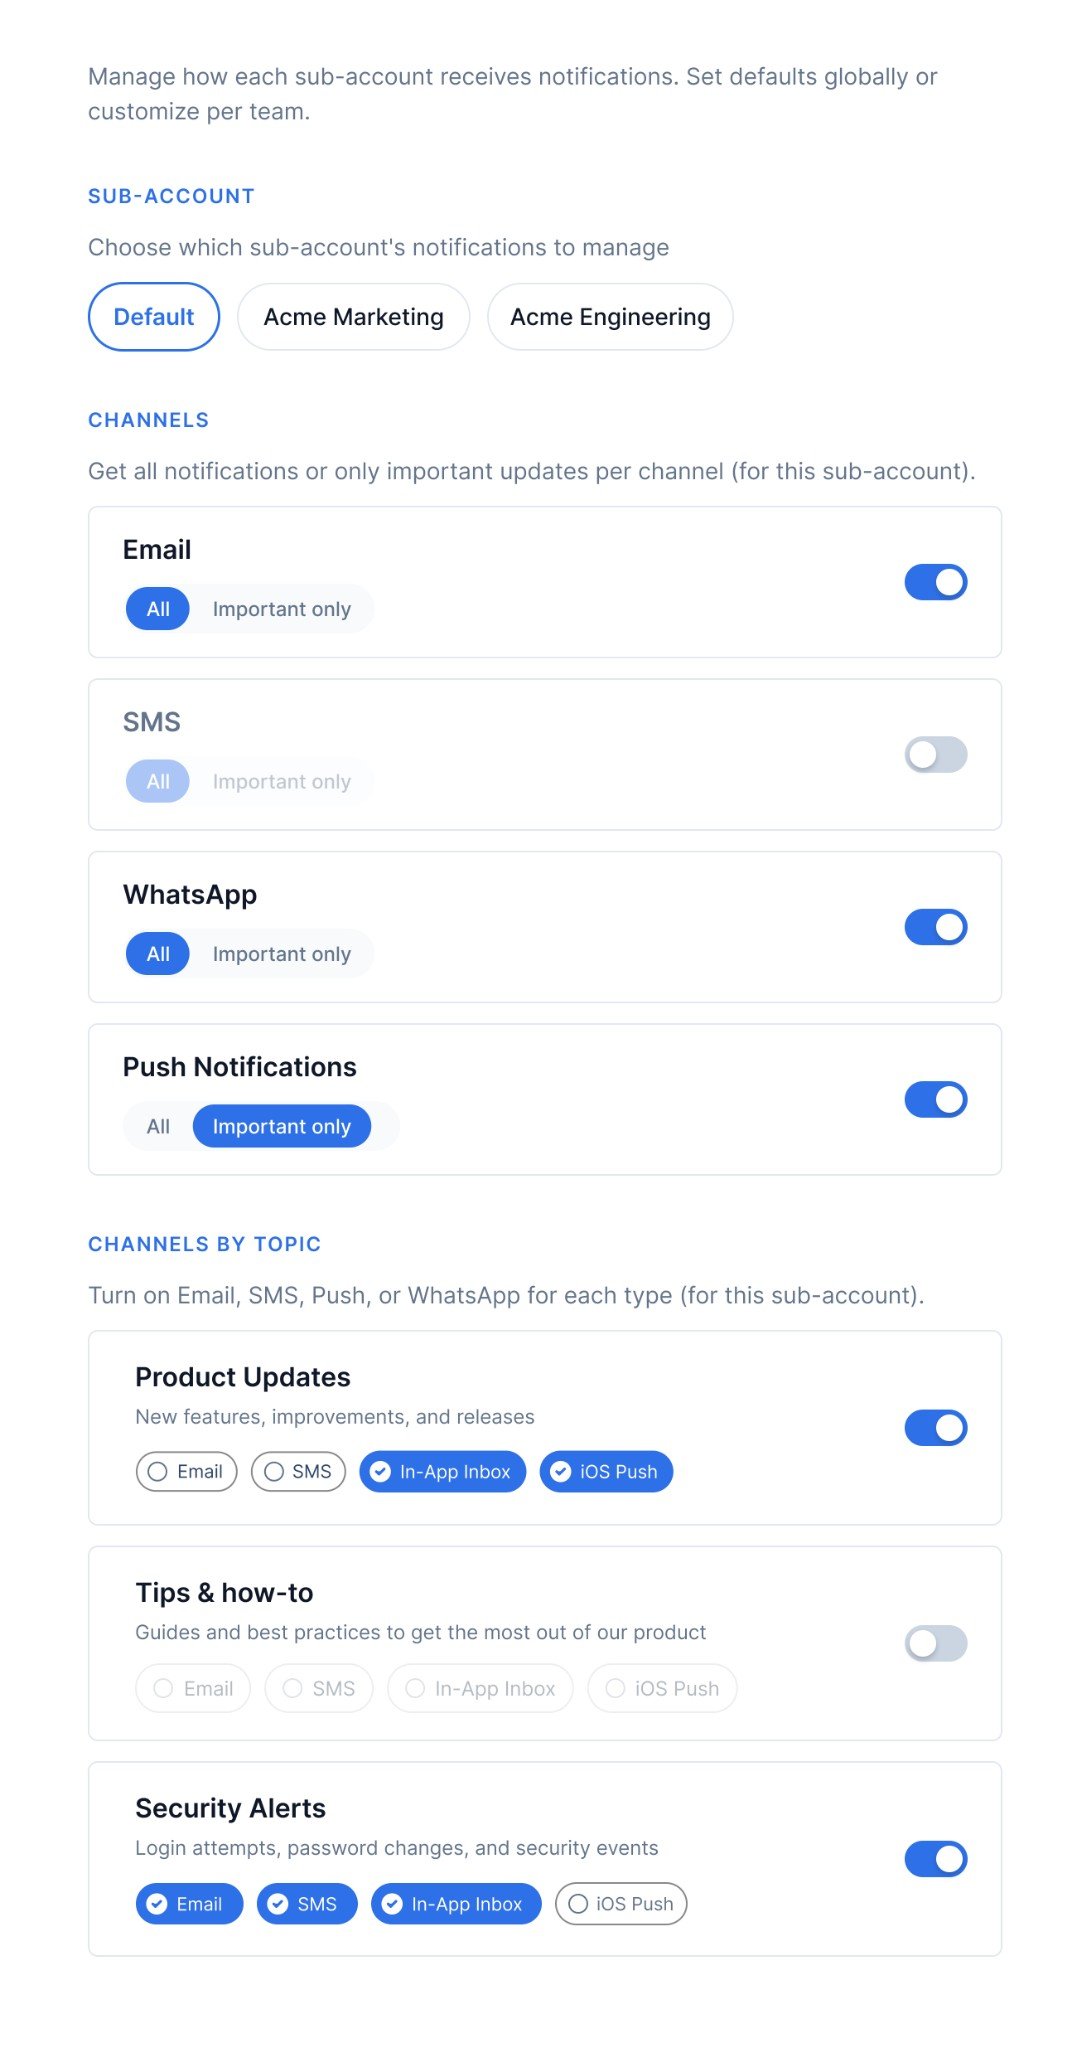
Example app UI - global channel controls (mockup, not the SuprSend dashboard)
- Go to Developers → Preference categories and select a root-category (System, Transactional, or Promotional)
- Optionally, click
+Sectionto create a section (for example “Product”, “Billing”). Sections are used to group sub-categories on the preference page. Section doesn’t have it’s own preference. - Click
+Sub-Category, fill in the name, select the section (if set), and set a default preference (On, Off, or Can’t Unsubscribe) - Click
Publish Changes
getPreferences() in your parent component on page load and pass the result down as preferenceData. The response gives you two independent parts:
channel_preferences- render one row per channel with All / Required radio buttons. Readis_restrictedto know which is currently selected:false= All,true= Required. CallupdateOverallChannelPreferencewithChannelLevelPreferenceOptions.ALLorChannelLevelPreferenceOptions.REQUIREDwhen the user changes their selection.sections[].subcategories[].channels- per-category channel checkboxes that let users turn individual channels on or off within a specific notification type. This is covered in detail in Section 2.
2. Preference category toggles
Users turn each notification type on or off individually - for example, keeping “Invoices & receipts” on while turning off “Sales Newsletter” - and optionally choose which channels receive each type. This is the standard notification settings page that most apps need. The response gives you sections (top-level groupings like Product, Billing, Sales) containing subcategories (the individual notification types). Each subcategory has a toggle and a list of channel checkboxes.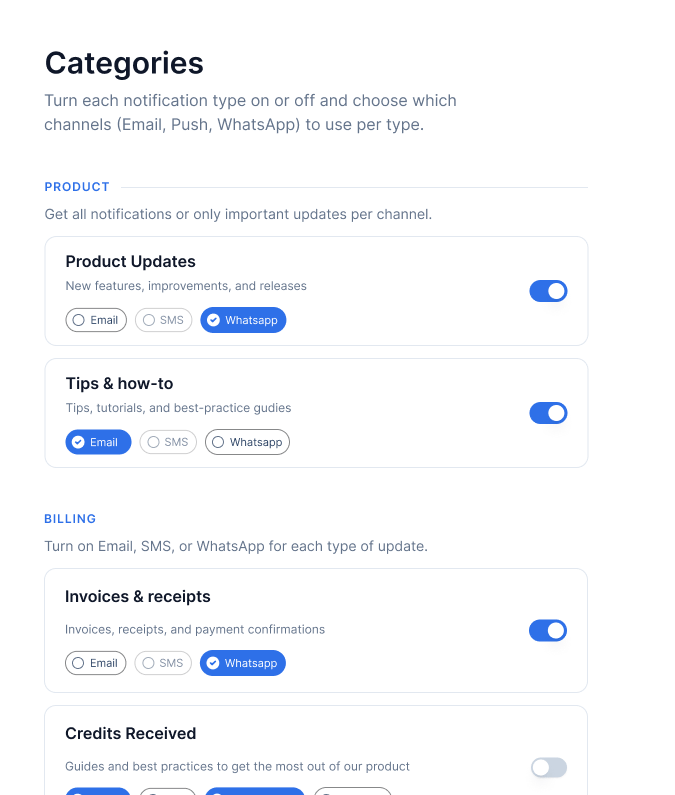
Example app UI - category toggles with per-category channels (mockup)
- Go to Developers → Preference categories and select a root-category
- Click
+Sectionto create sections (for example “Product”, “Billing”, “Sales”). Sections are used to group sub-categories on the preference page. Section doesn’t have it’s own preference. - Click
+Sub-Categoryfor each notification type, select its section (if set), and set a default preference (On, Off, or Can’t Unsubscribe). You can also choose which channels should be opt_in by default in case ofOnpreference. - Click
Publish Changes
getPreferences() in your parent component and pass preferenceData as a prop. Render sections as headings and subcategories as rows, each with a toggle and channel checkboxes below it.
Three things to handle carefully:
is_editable: falseon a subcategory means the category is set to Can’t Unsubscribe in SuprSend. Disable the toggle - users cannot opt out.is_editable: falseon a channel inside a subcategory means that specific channel is mandatory for that category and cannot be turned off. Disable the channel checkbox independently of the subcategory toggle. A category can haveis_editable: true(user can toggle it off) while individual channels within it haveis_editable: false(those channels cannot be removed).channelsmay be empty or absent (for example whenshow_opt_out_channelsisfalsefor opted-out categories). Use optional chaining (subcategory?.channels?.map(...)) to handle this safely.
updateCategoryPreference, updateChannelPreferenceInCategory, updateOverallChannelPreference) are optimistic - the UI updates immediately and the actual API call happens in the background with a 1-second debounce. Set up these emitter listeners once when loading preferences to handle the confirmed result and catch server-side errors:3. Digest schedules and condition properties
The first two patterns only need a category and its channels. The next three use two more settings that live on a sub-category, next to its default preference:Publish Changes.
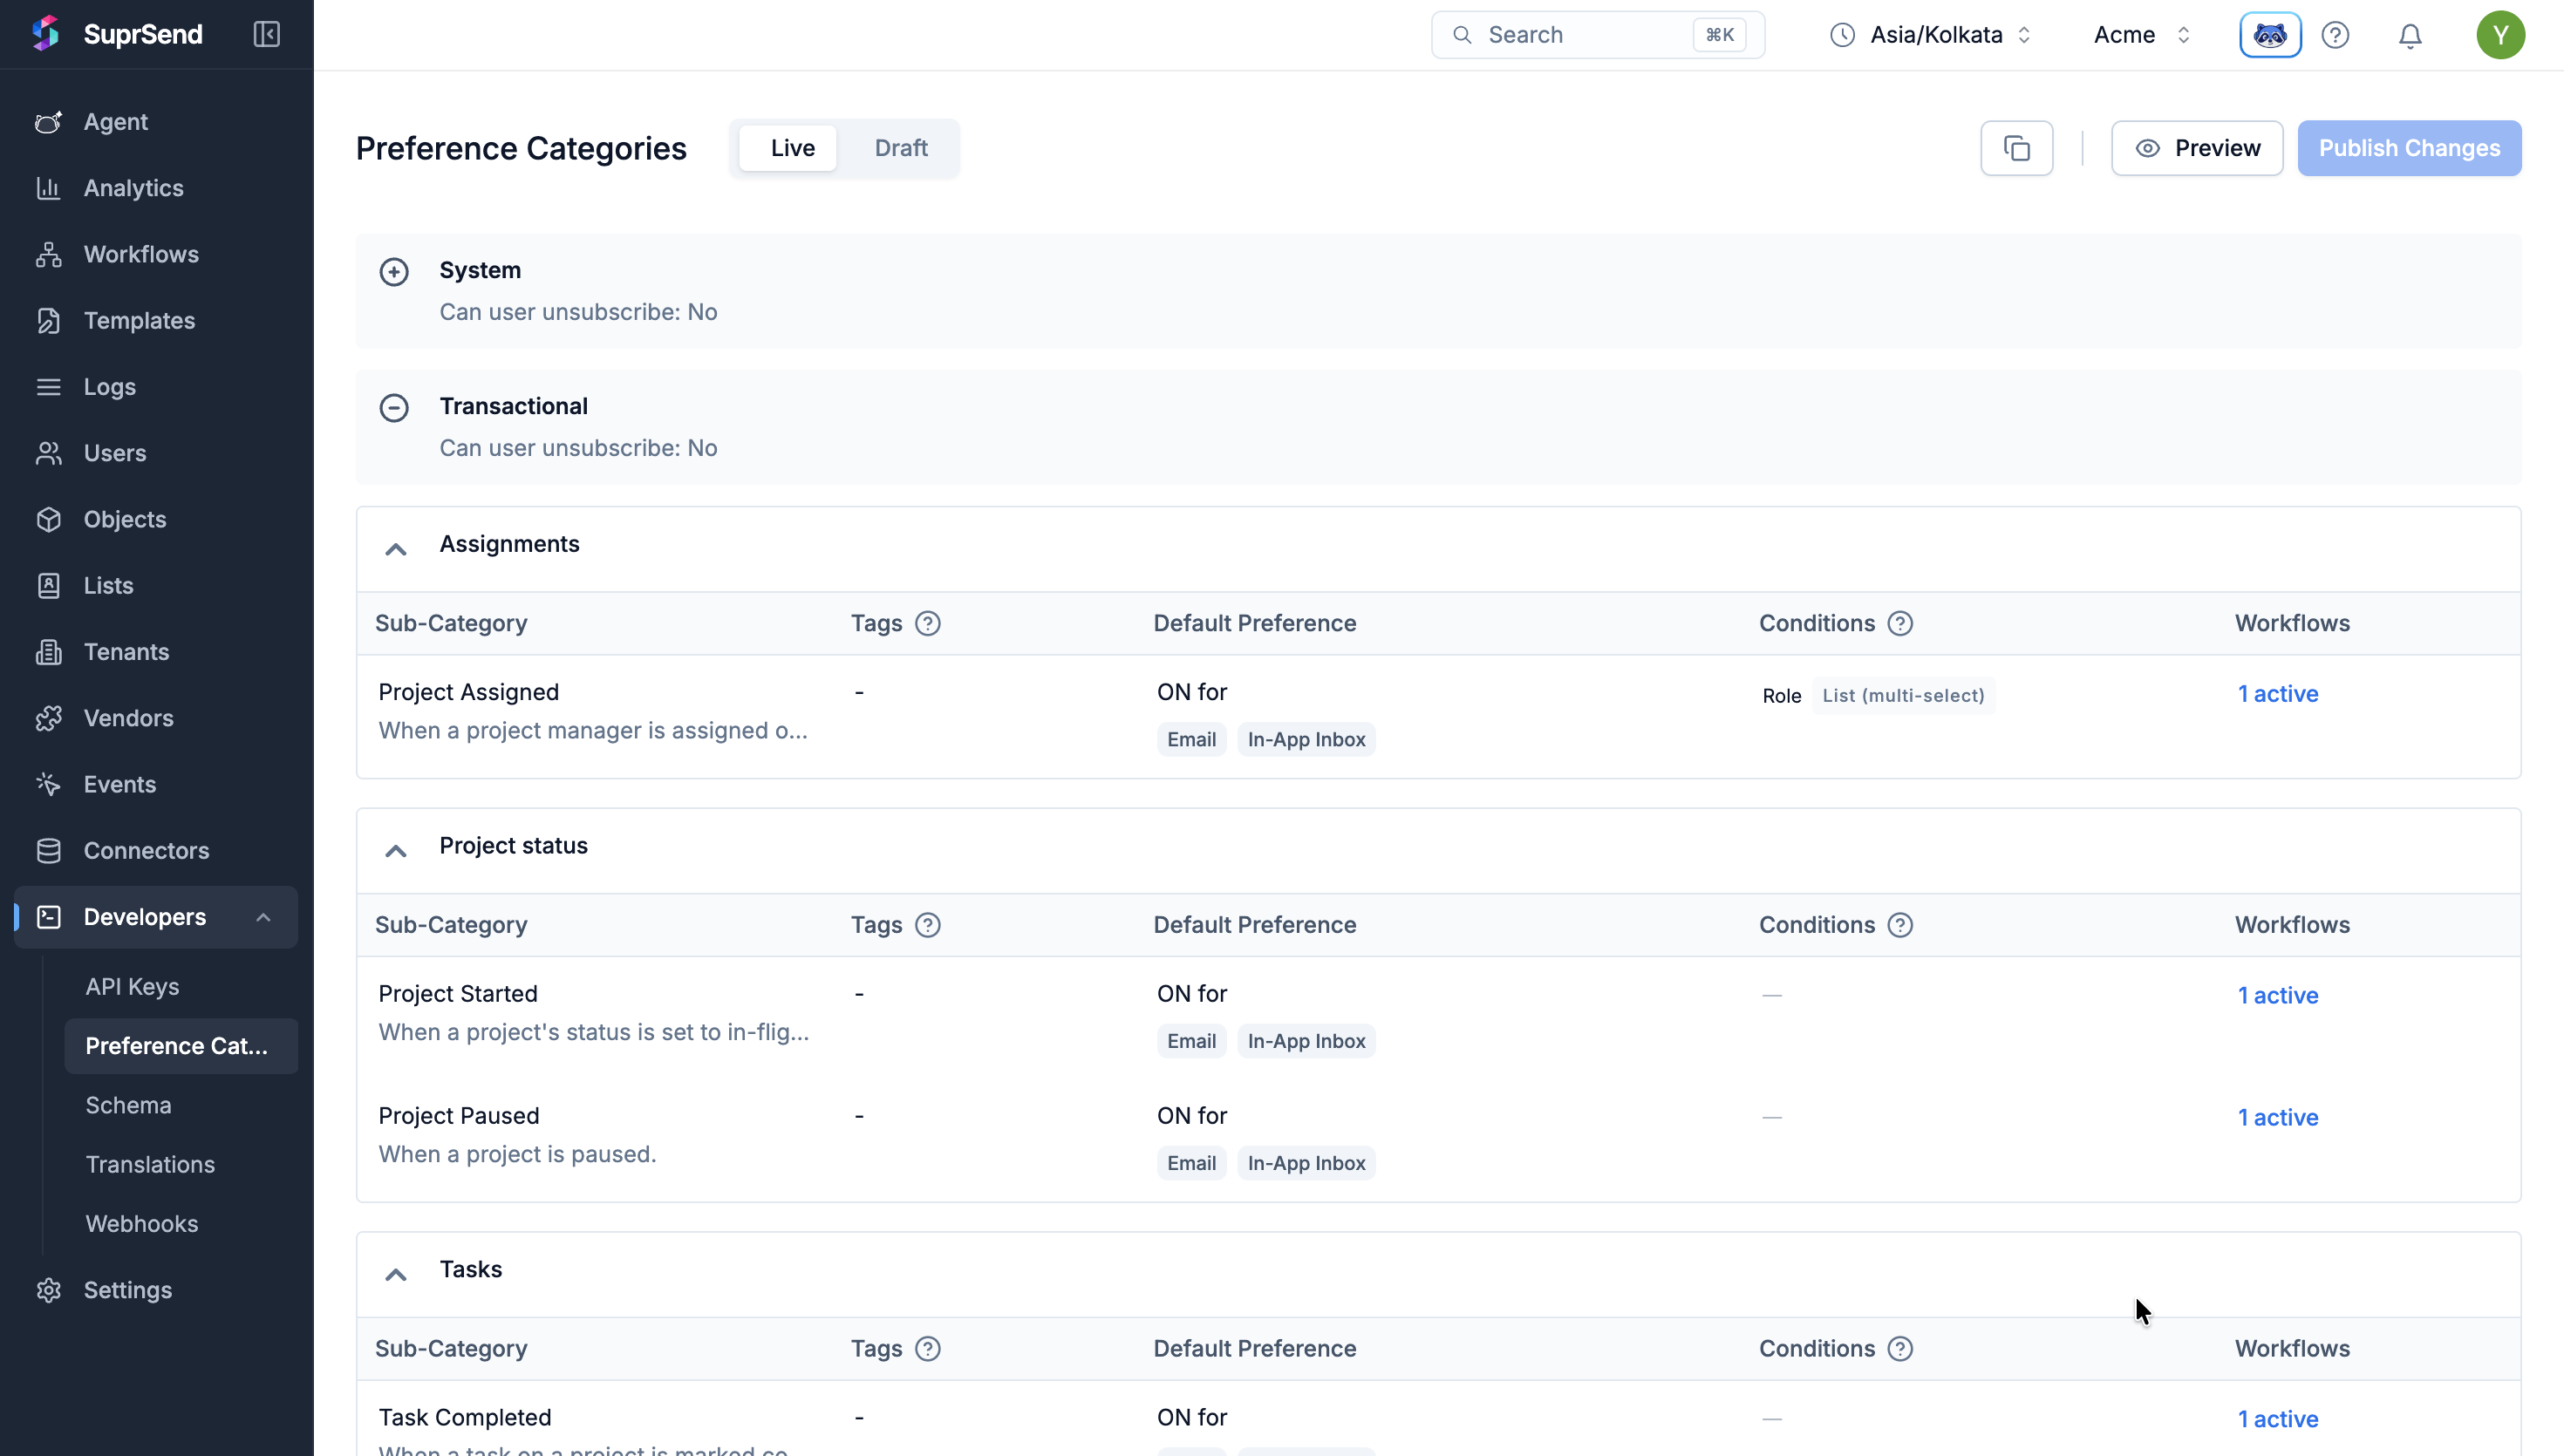
Sub-categories in the SuprSend dashboard - the Conditions column shows condition properties configured on each
- They resolve through the same three layers. At trigger time, SuprSend uses the recipient’s own value if set, else the tenant default, else the category default. Tenant admins can override the defaults for their users.
- They travel in the preference API. Each sub-category in the get preference response carries
digest_schedule_options,digest_schedule, and apropertiesarray. Users change them through the update category preference API - only fields markededitableaccept overrides;lockedfields stay fixed. - You control the input type. A condition property is typed:
integer,string,string_choice(single-select),list_choice(multi-select), or dynamic list variants - up to 25 per sub-category.
4. Digest frequency
Instead of one notification per event, users choose how often they want a summary - Instant, Daily, or Weekly. A user who picks Daily gets one email at 09:00 summarising everything that happened that day instead of a notification for every single event. This is the digest schedule from Section 3: you define the cadence options on the sub-category, the user picks one on the preference page, and the workflow’s Digest node batches each recipient’s notifications on whatever schedule they resolve to - in the recipient’s timezone.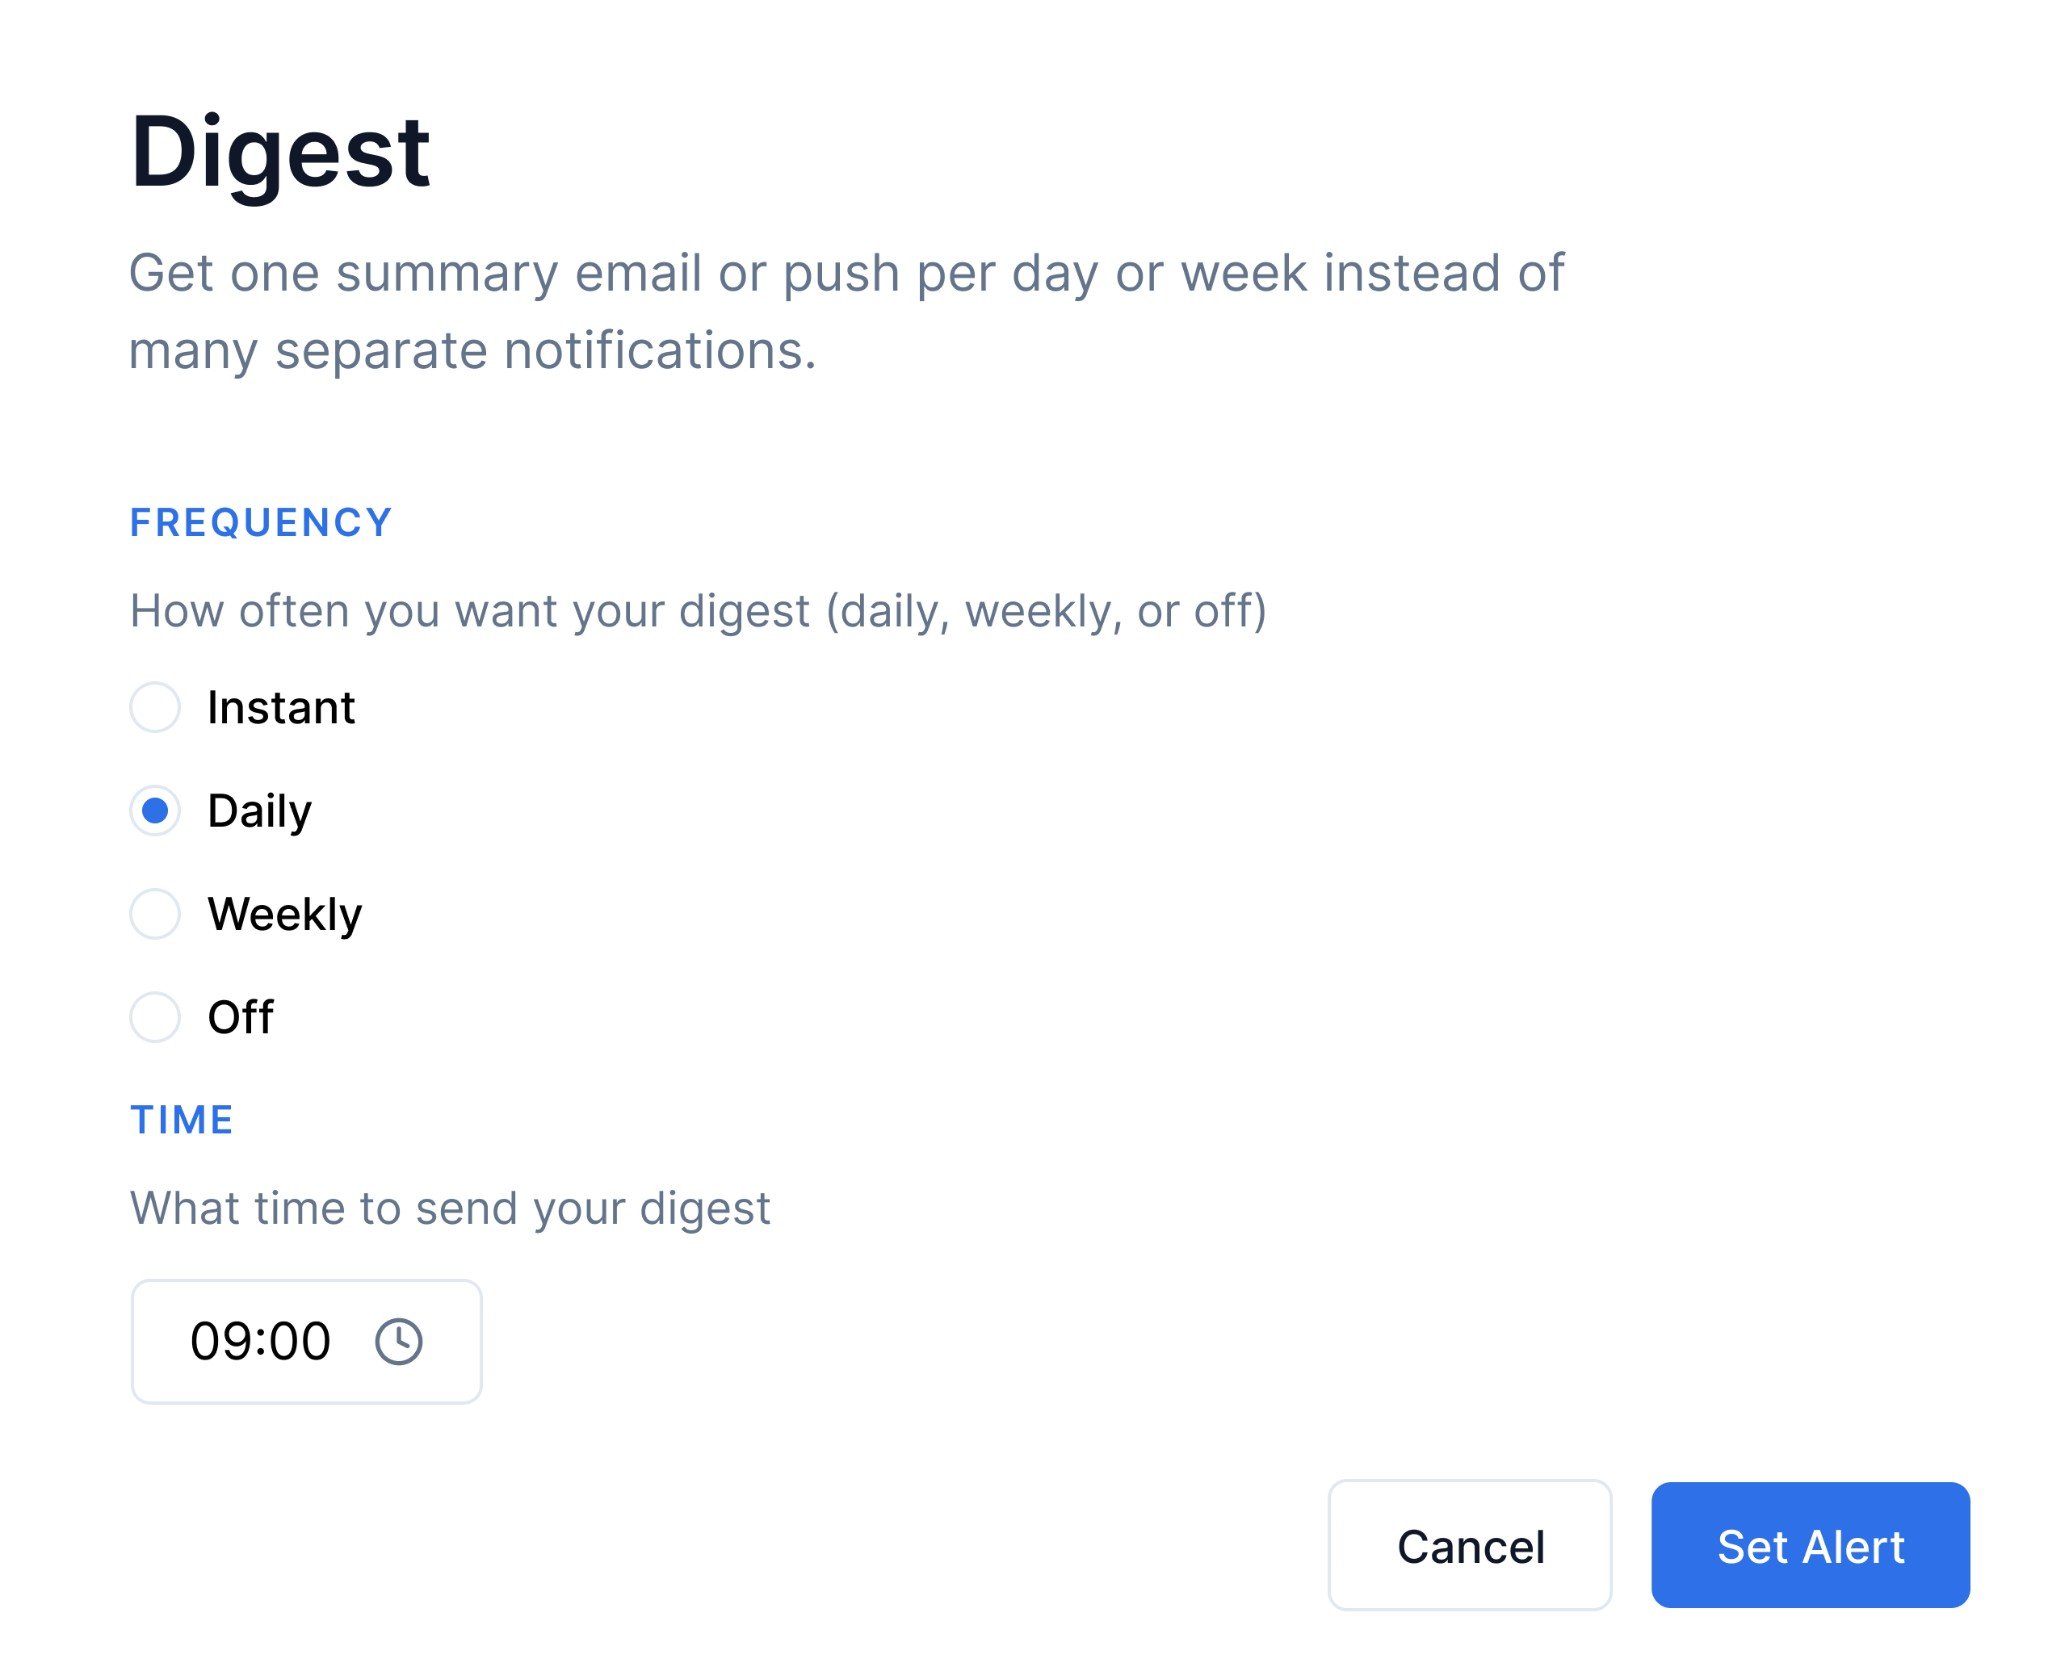
Example app UI - digest frequency selector (mockup)
Enable a digest schedule on the sub-category
- Label - what the user sees (“Daily”).
- Frequency and interval -
instantly,hourly,daily,weekly, ormonthly; interval multiplies it (interval 2 + weekly = every 2 weeks). - Time / weekdays / month days - when the batch fires. Each field has an edit policy: editable (the user can change it) or locked.
Publish Changes.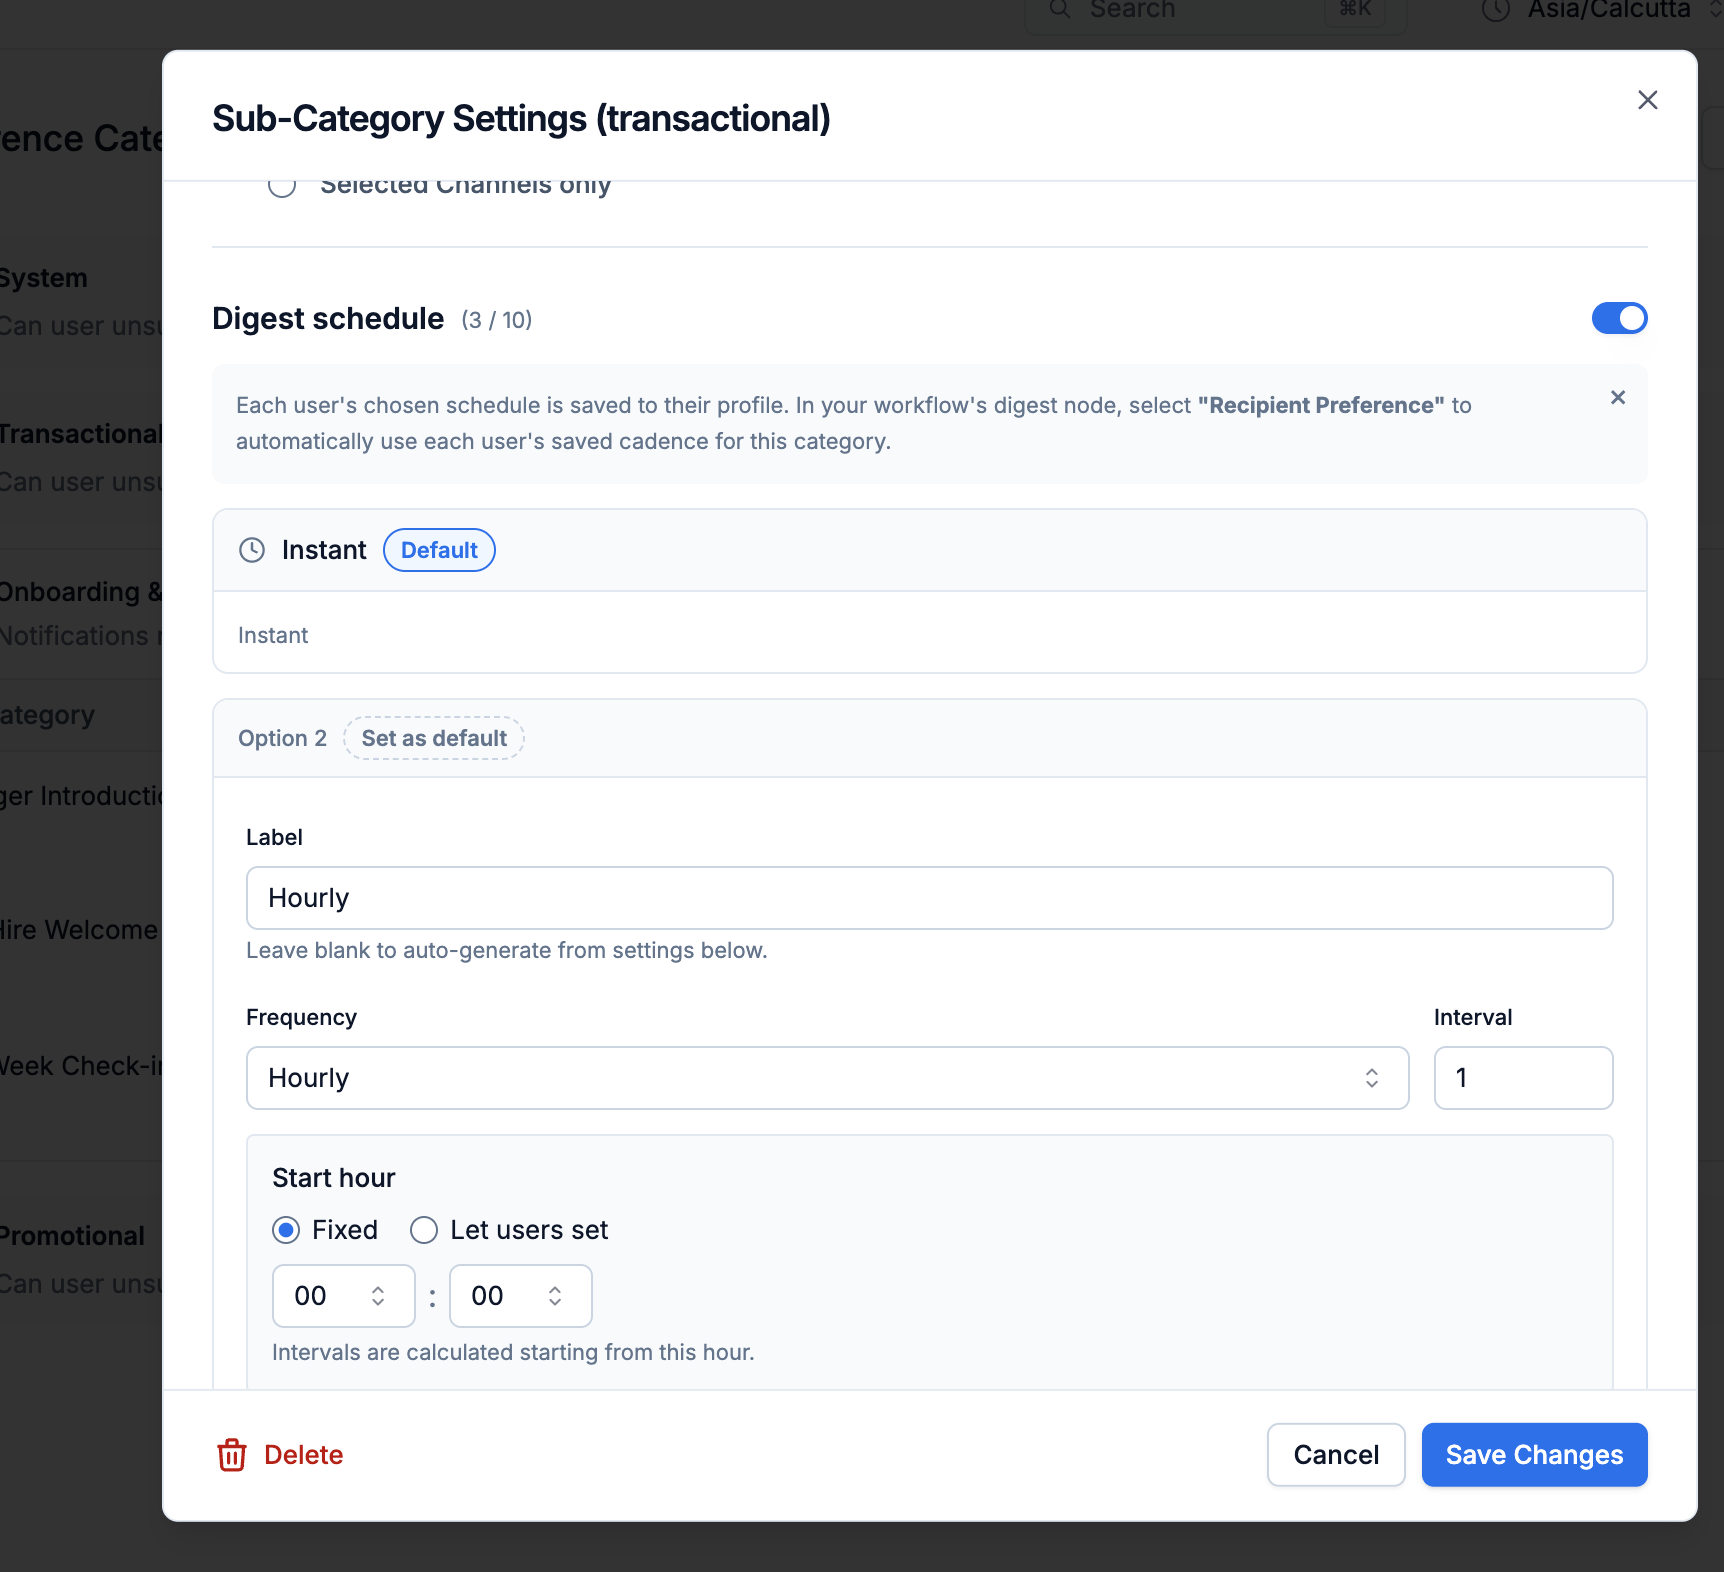
Digest schedule settings on a sub-category (SuprSend dashboard)
Point the workflow's Digest node at the category
category_digest_schedule in the management API). SuprSend batches notifications on the option each recipient selected - or the default, if they haven’t picked one.digest_schedule_options lists the options, digest_schedule is the recipient’s resolved choice. Show the options as radio buttons, add a time picker where time.edit_policy is "editable", and save with the update category preference API. This API uses your workspace secret, so call it from your backend.
id and the fields whose edit policy is editable. Pass "digest_schedule": null to clear the user’s choice and fall back to the tenant or category default.
5. User-defined alert threshold
Some notifications are only useful past a user-defined threshold. A storage alert at 1% full is noise; at 80% it’s urgent. Users set their own trigger point, and the workflow only fires when the incoming metric crosses it. The threshold is a condition property (Section 3) on the sub-category. The category preference still controls whether the alert is on and which channels it uses; the condition property controls when the workflow fires.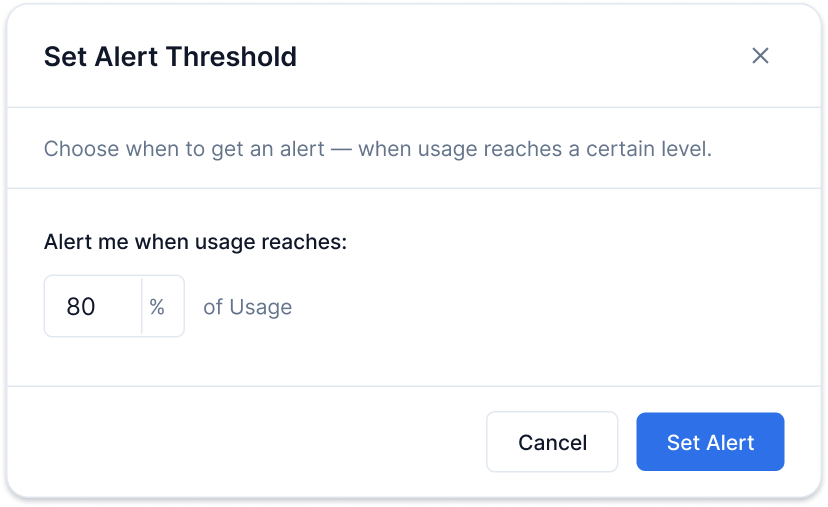
Example app UI - threshold input (mockup)
Add a condition property to the sub-category
+Sub-Category, name it (for example “Usage alerts”), and add a condition property: key threshold, value type integer, a default value (say 80), and edit policy editable so users can change it. Click Publish Changes.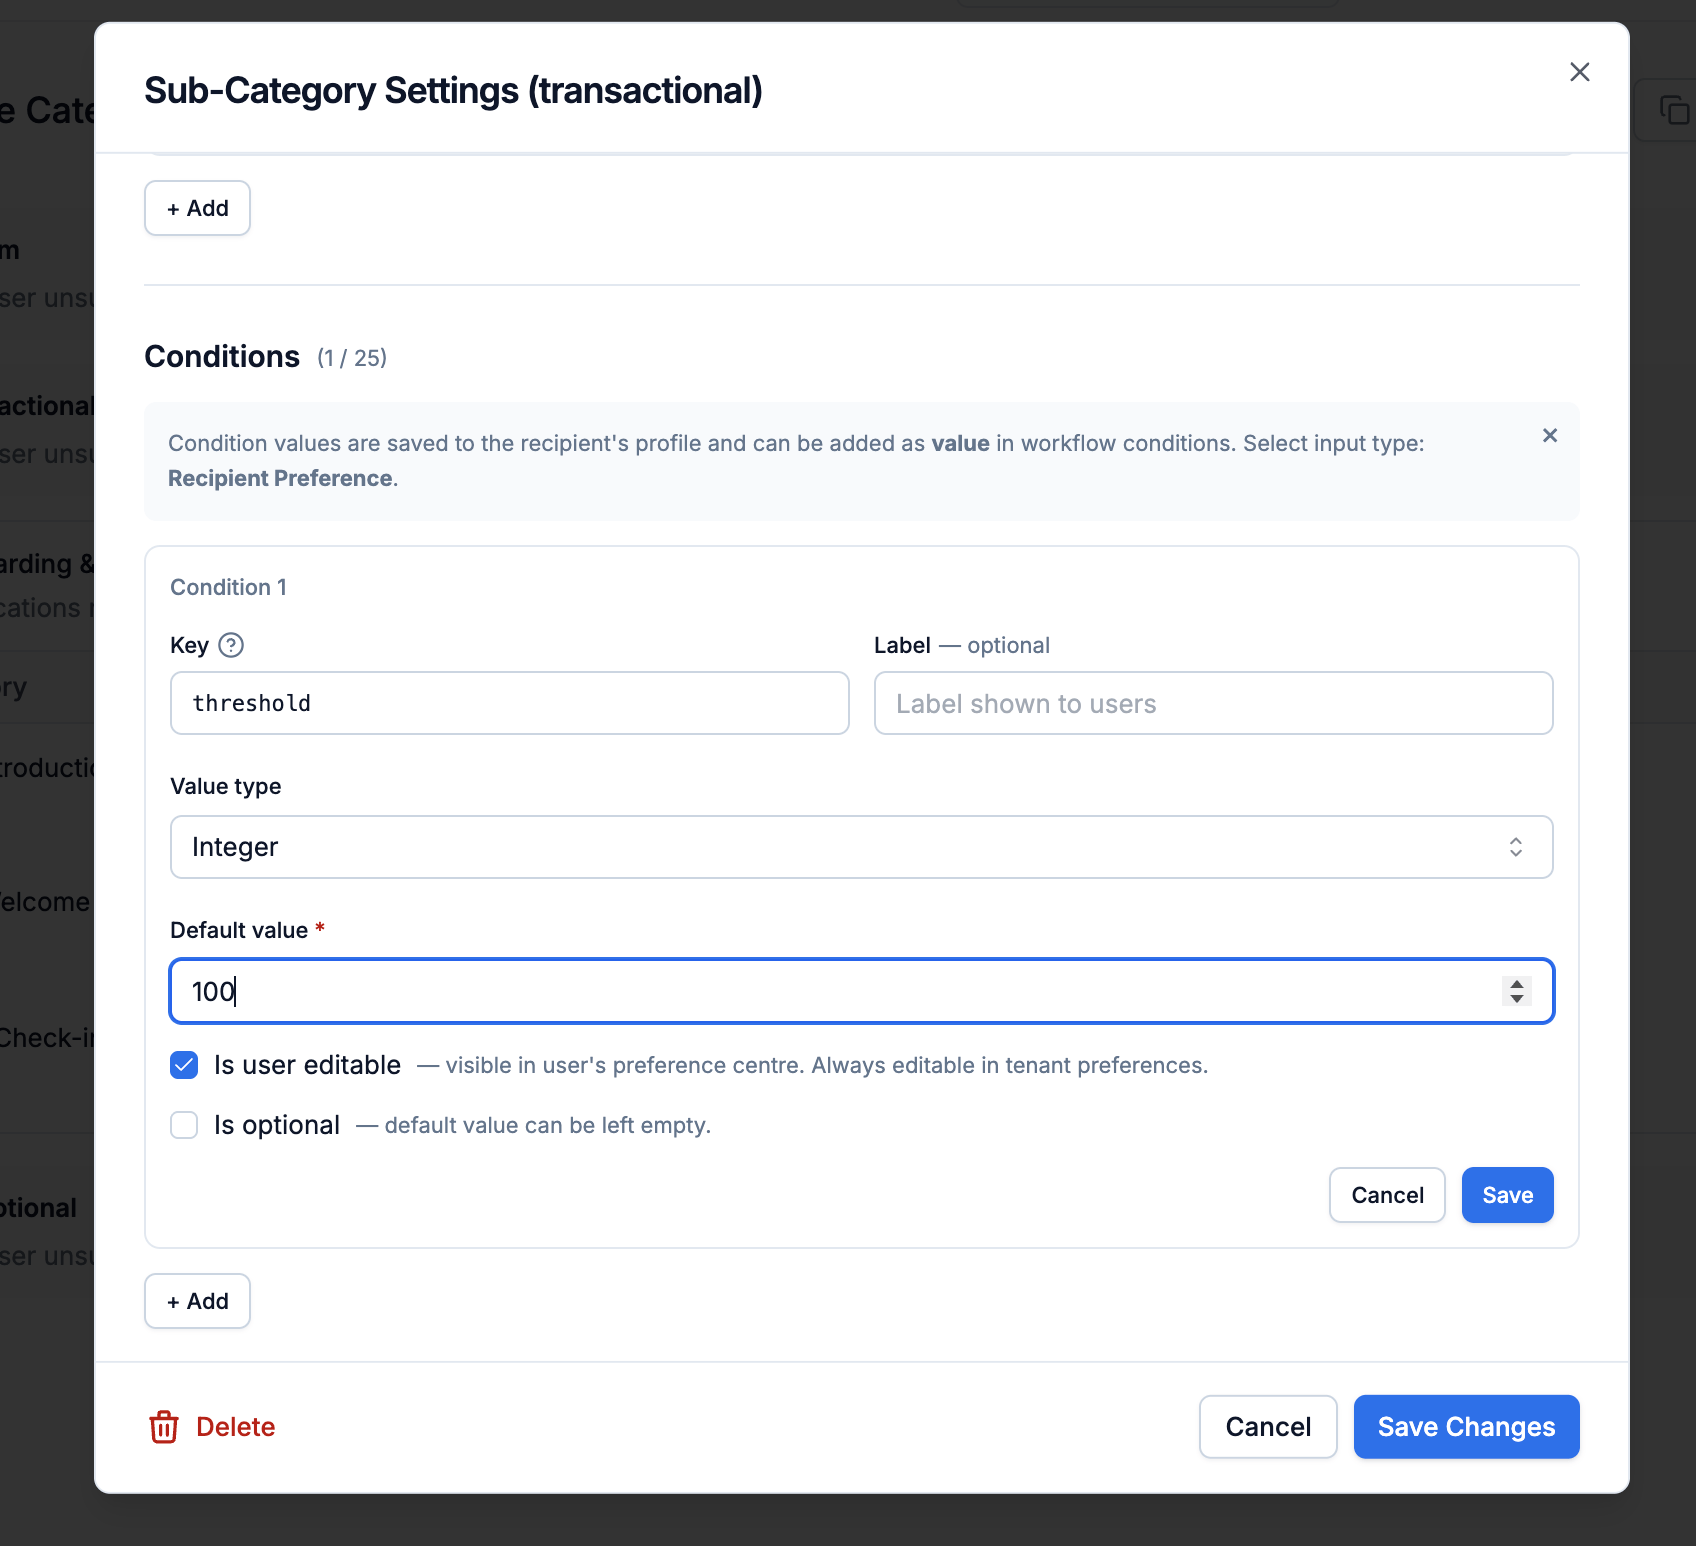
Condition property settings on a sub-category (SuprSend dashboard)
Reference it in the workflow
$category.properties.threshold. Two places to put the check, depending on what you want to skip:- Skip the whole workflow - add it as a trigger condition:
usage_percent >= $category.properties.threshold. If it fails, nothing runs for that recipient. - Skip one step - put the same expression on a Branch node. The branch decides that step; the rest of the workflow still runs.
null at runtime - handle that case in your branch logic.properties array in the preference response gives you the input to render and the user’s current value. Save changes with the update category preference API from your backend. The category’s toggle and channel checkboxes work exactly as in Section 2.
6. Target recipients by role
In B2B apps, who receives a notification is a setting too. An admin decides that budget alerts go to project managers, adds one stakeholder who must always get them, and excludes a contractor who never should. The workflow triggers once for the whole team; each member is kept or dropped by rules the admin controls.role(list_choice) - the roles that receive this notification.include(list_dynamic) - users who always receive it, whatever their role.except(list_dynamic) - users who never do.
$recipient.subscription.role reads the role stored on the user’s object subscription.
Because these are preference-layer values, they resolve like any other preference: an admin sets the category defaults, a tenant admin can override them per tenant, and whether individual users can edit them depends on each property’s edit policy. Most apps expose them on admin screens, not the end-user preference page.
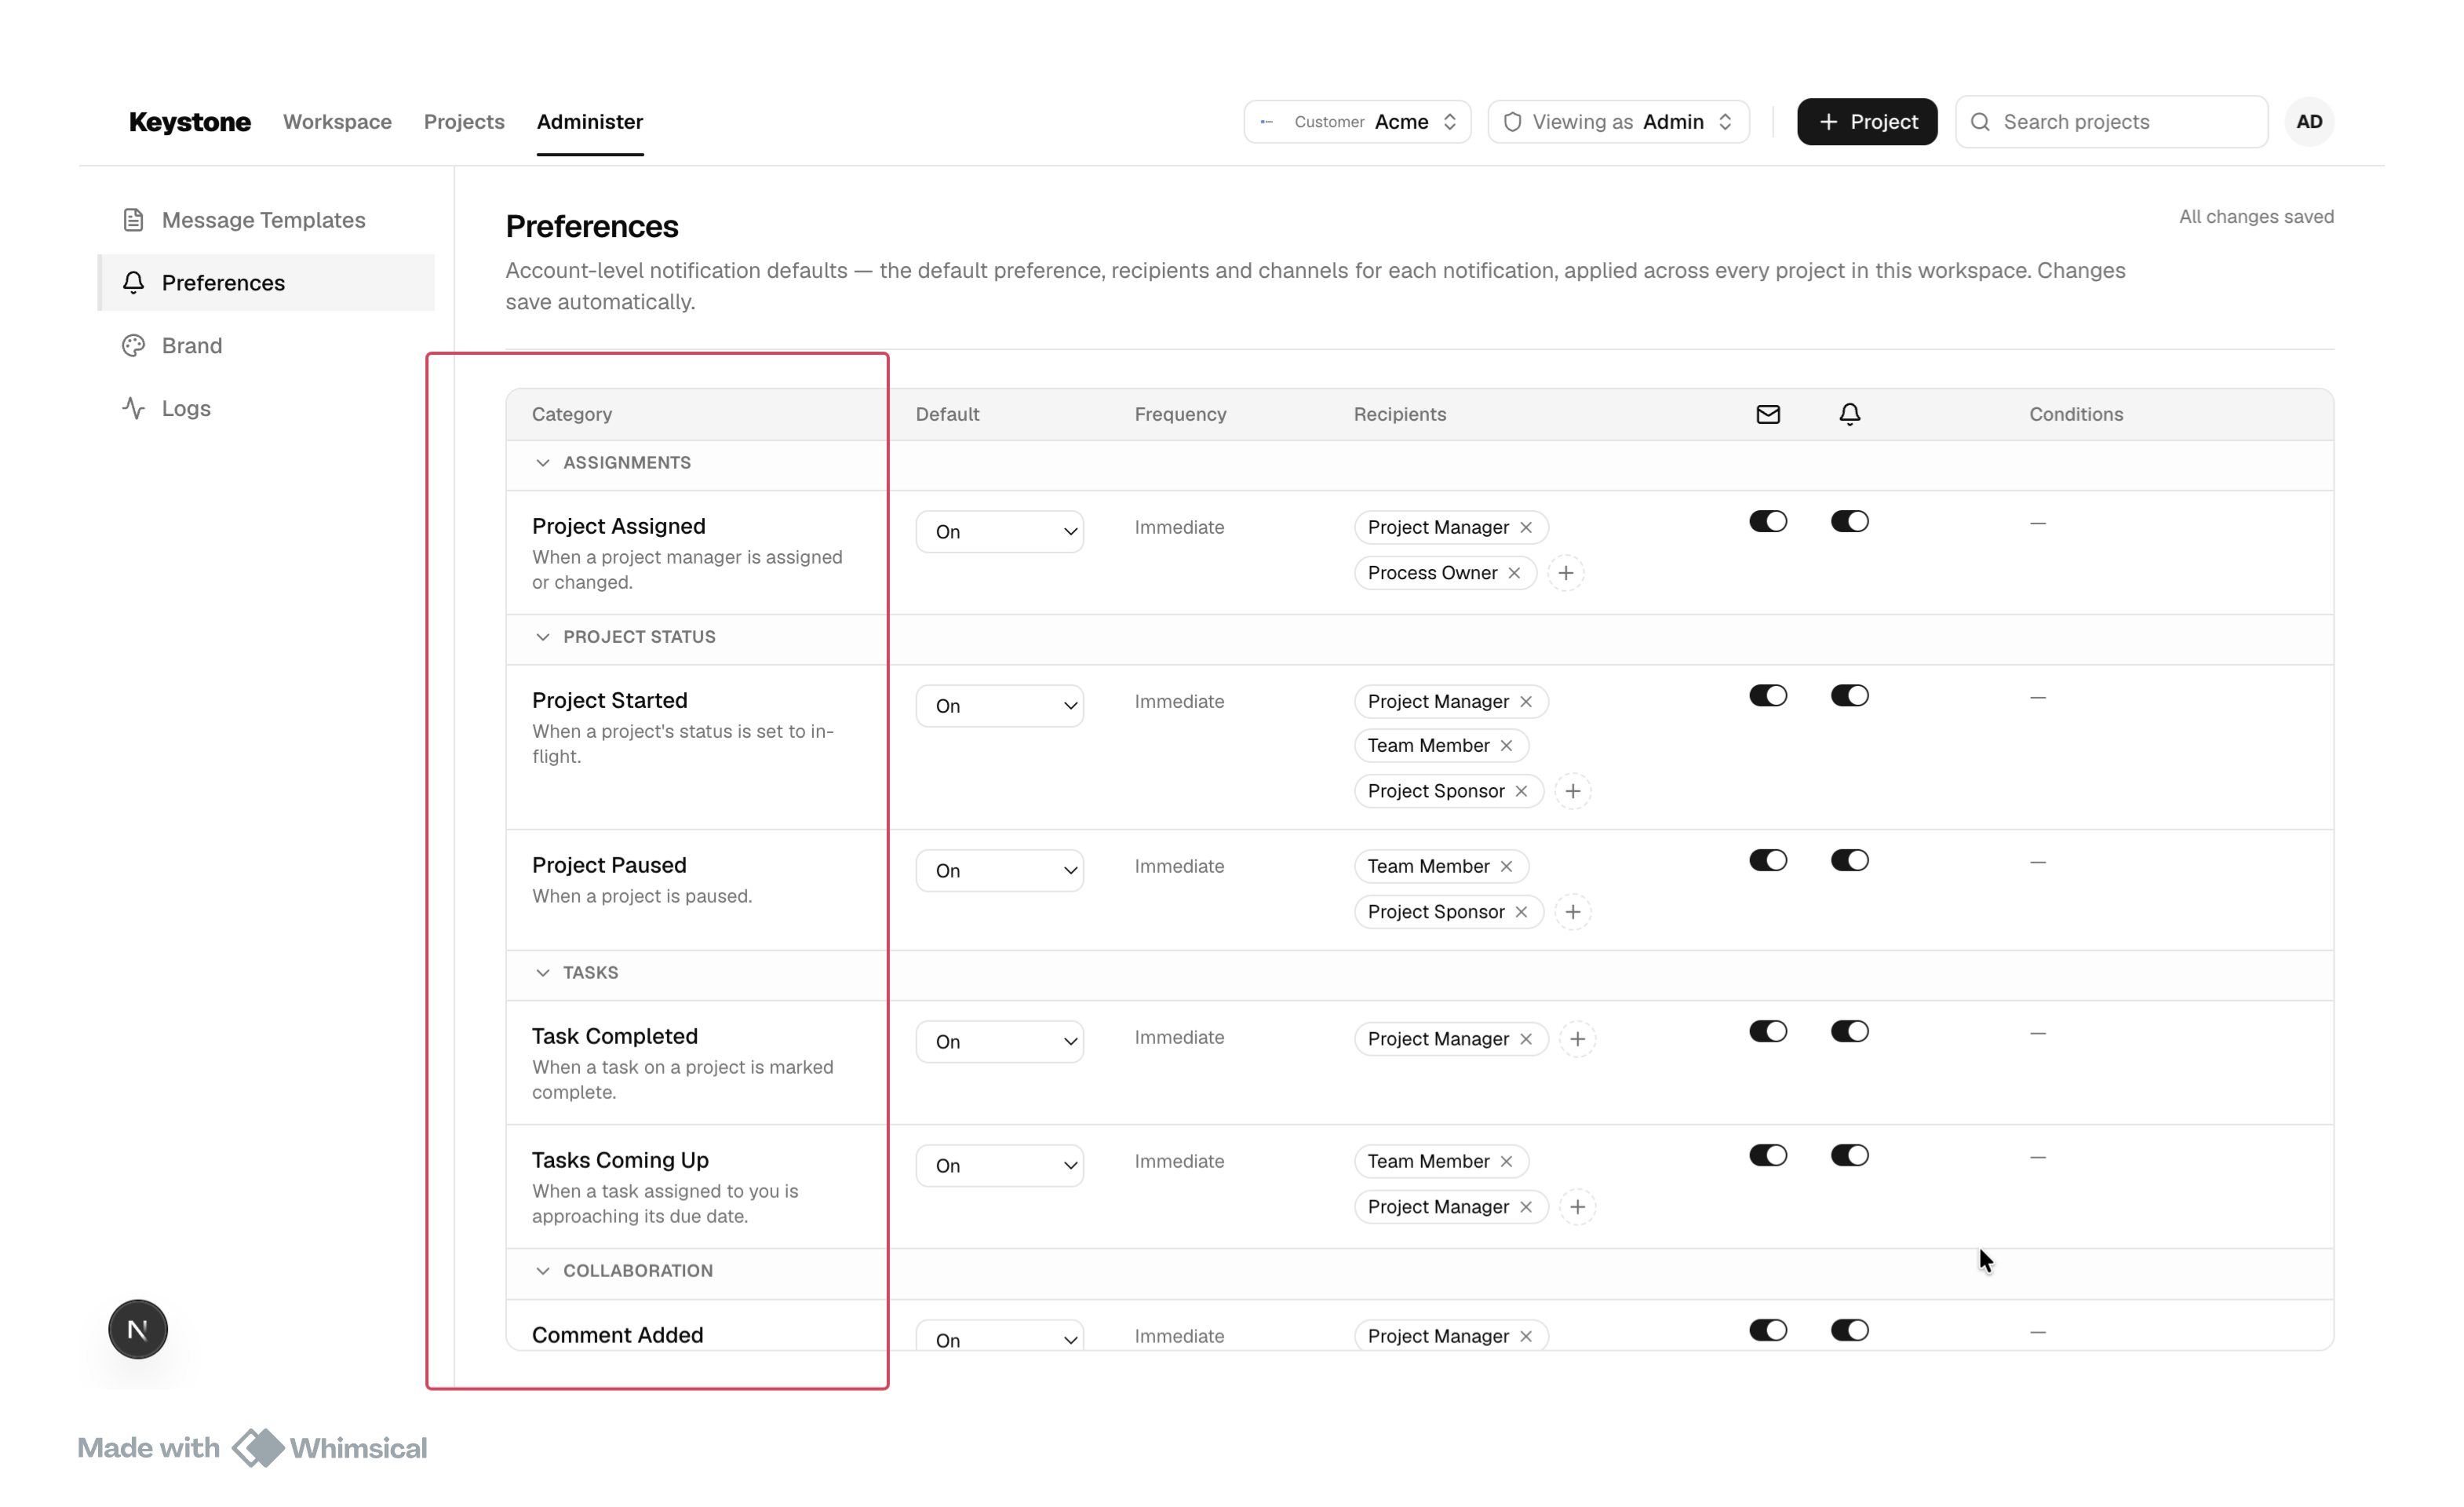
Example admin UI (mockup from Keystone) - default recipients per notification, backed by role, include, and except
7. Filter categories with modules, roles, or departments
Not every user needs to see every preference category. A sales user only cares about Sales Newsletter, Cart & checkout, and New Leads - they don’t need Budget Alerts or Expense Reports. A finance user is the opposite. And in a multi-module product, each module’s alerts should live on its own tab. This uses tags. You assign tags to preference categories or sections in SuprSend, then pass the relevant tag togetPreferences() - SuprSend returns only the matching categories. When a tag is assigned at the section level, it automatically applies to all subcategories under that section via effective_tags.
Tags are flexible - they can drive two common patterns:
- Automatic filtering by role or department: Your app reads the user’s department/role/team from their profile or session and passes the tag silently. No filter UI is needed.
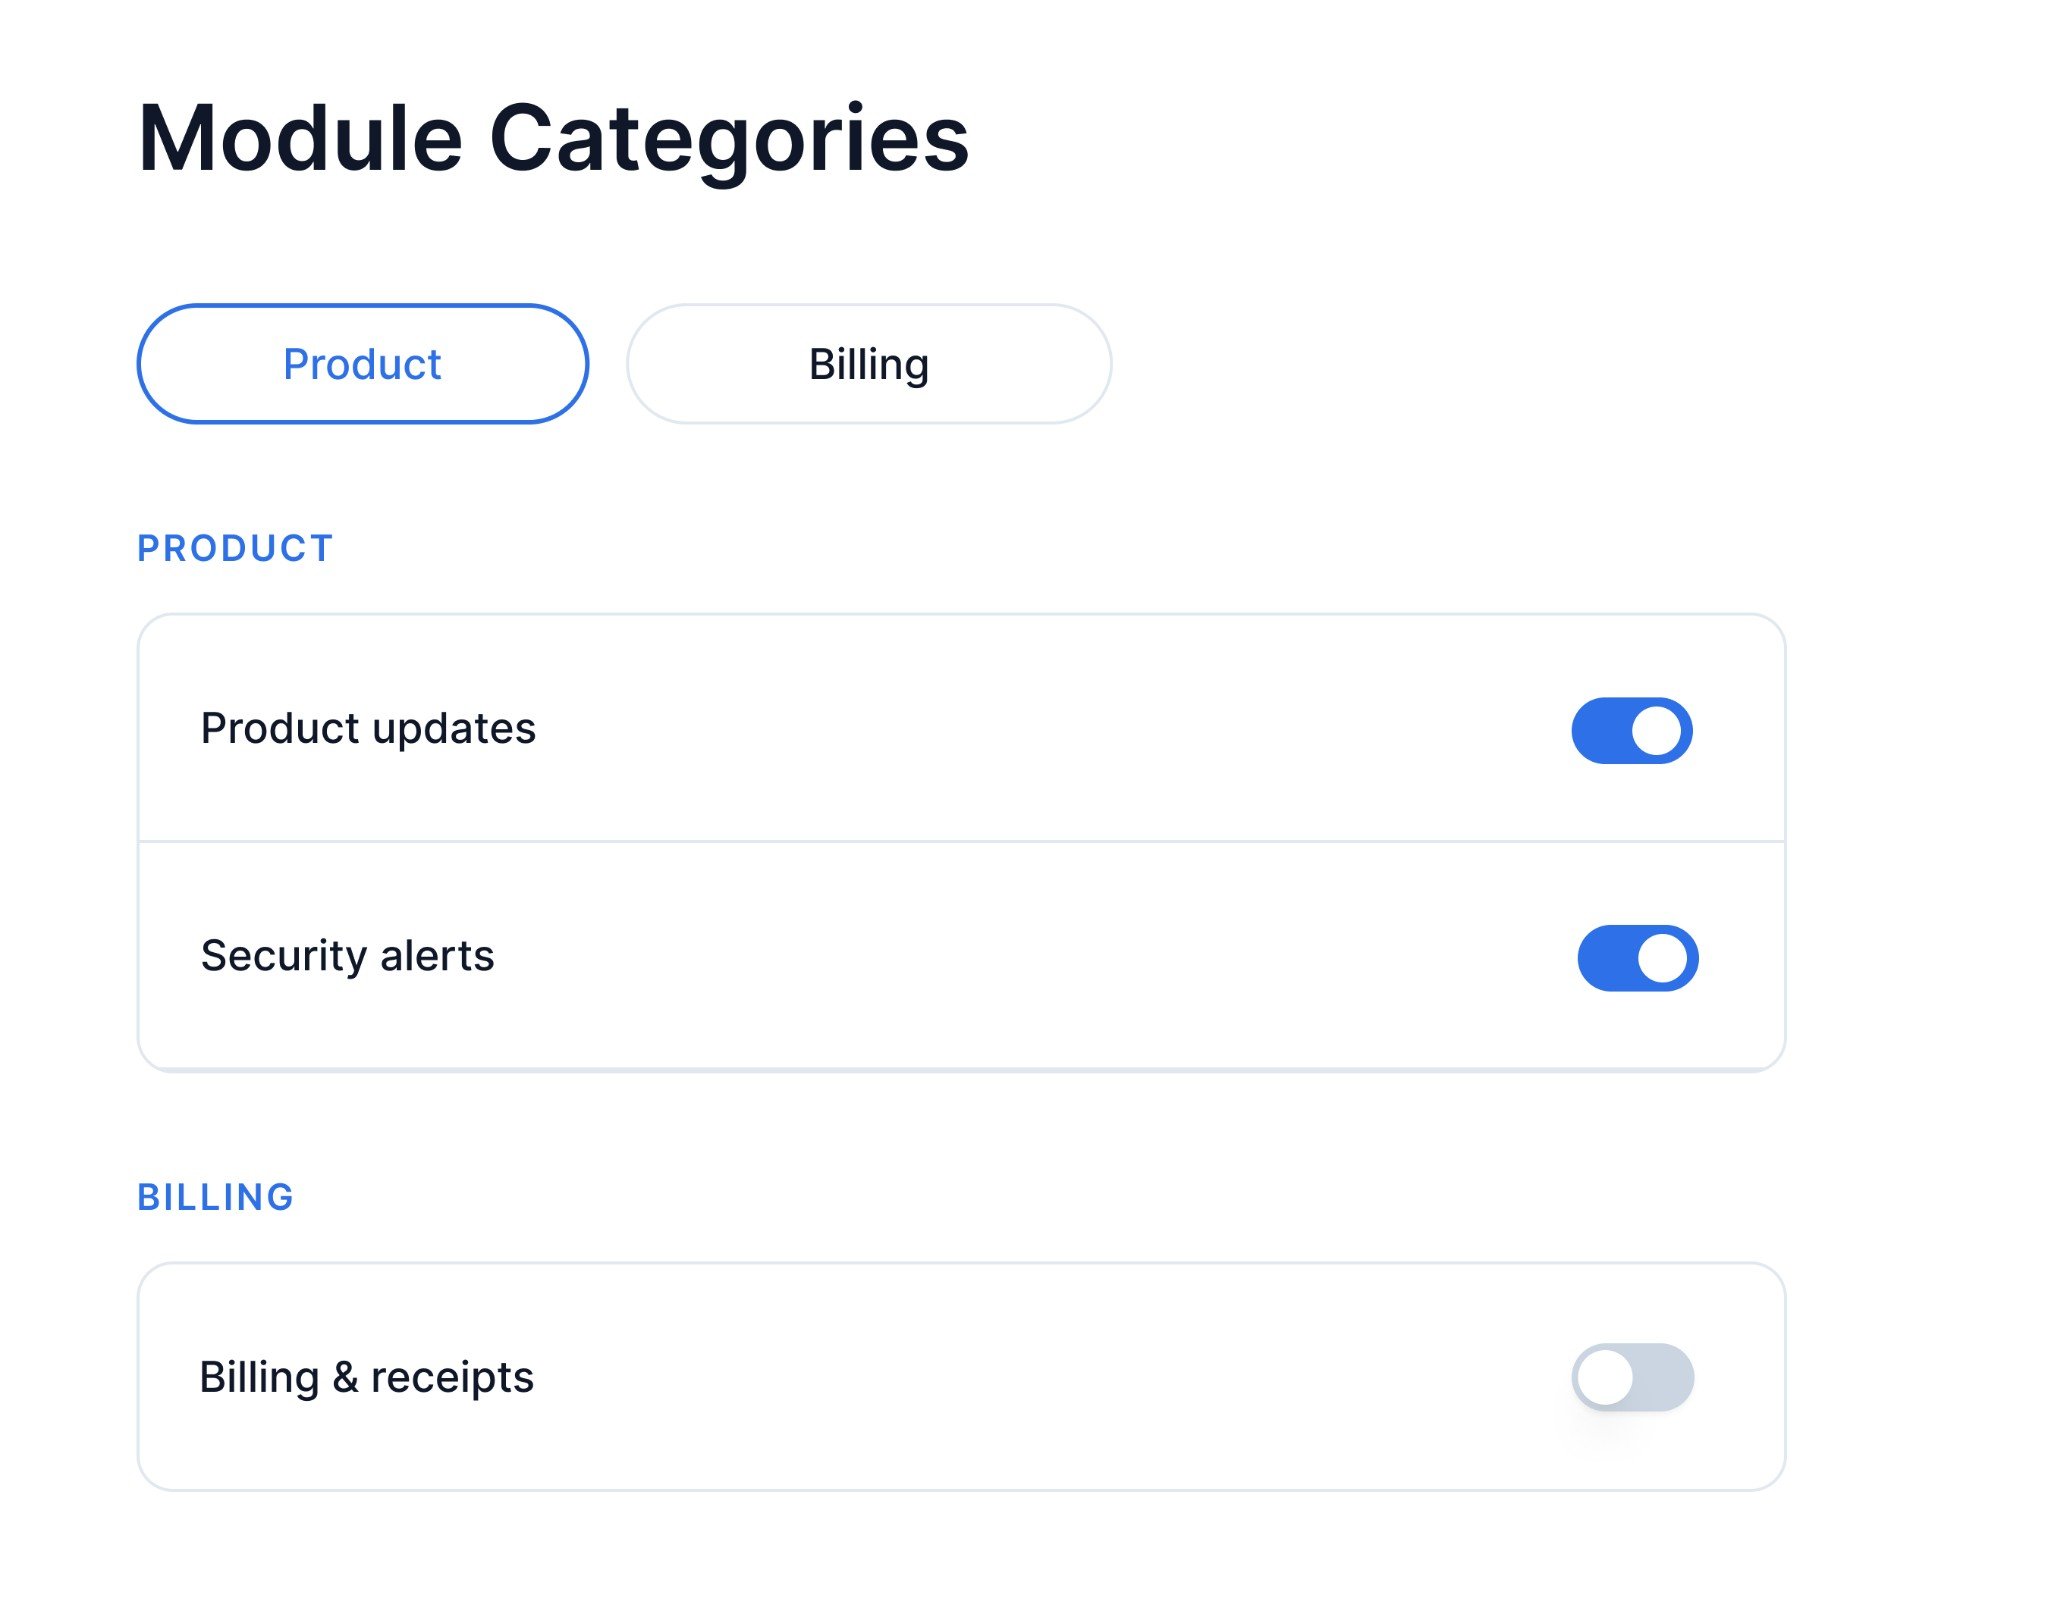
- User-selected filtering by module: Your app shows a visible tab selector and re-fetches preferences with the selected tag.
- Tag per section: Click
+Sectionto create a section (for example “Sales”, “Finance”). Add a tag to the section (for examplesales,finance). All sub-categories under that section inherit the tag automatically viaeffective_tags. ClickPublish Changes. - Tag per sub-category: Create a section with all sub-categories under it. Select each sub-category and add its own tag (for example
sales,finance,product). Filtering by tag returns that section with only the matching sub-categories.
getPreferences() via the tags parameter. Where the tag comes from depends on your use case - either derived from the user’s profile (automatic) or from a tab selector (user-selected). The tags parameter also supports logical filtering for more complex cases - see Filter categories with tags for supported operators (or, and, not, exists).
- Automatic (by role/department)
- User-selected (by module)
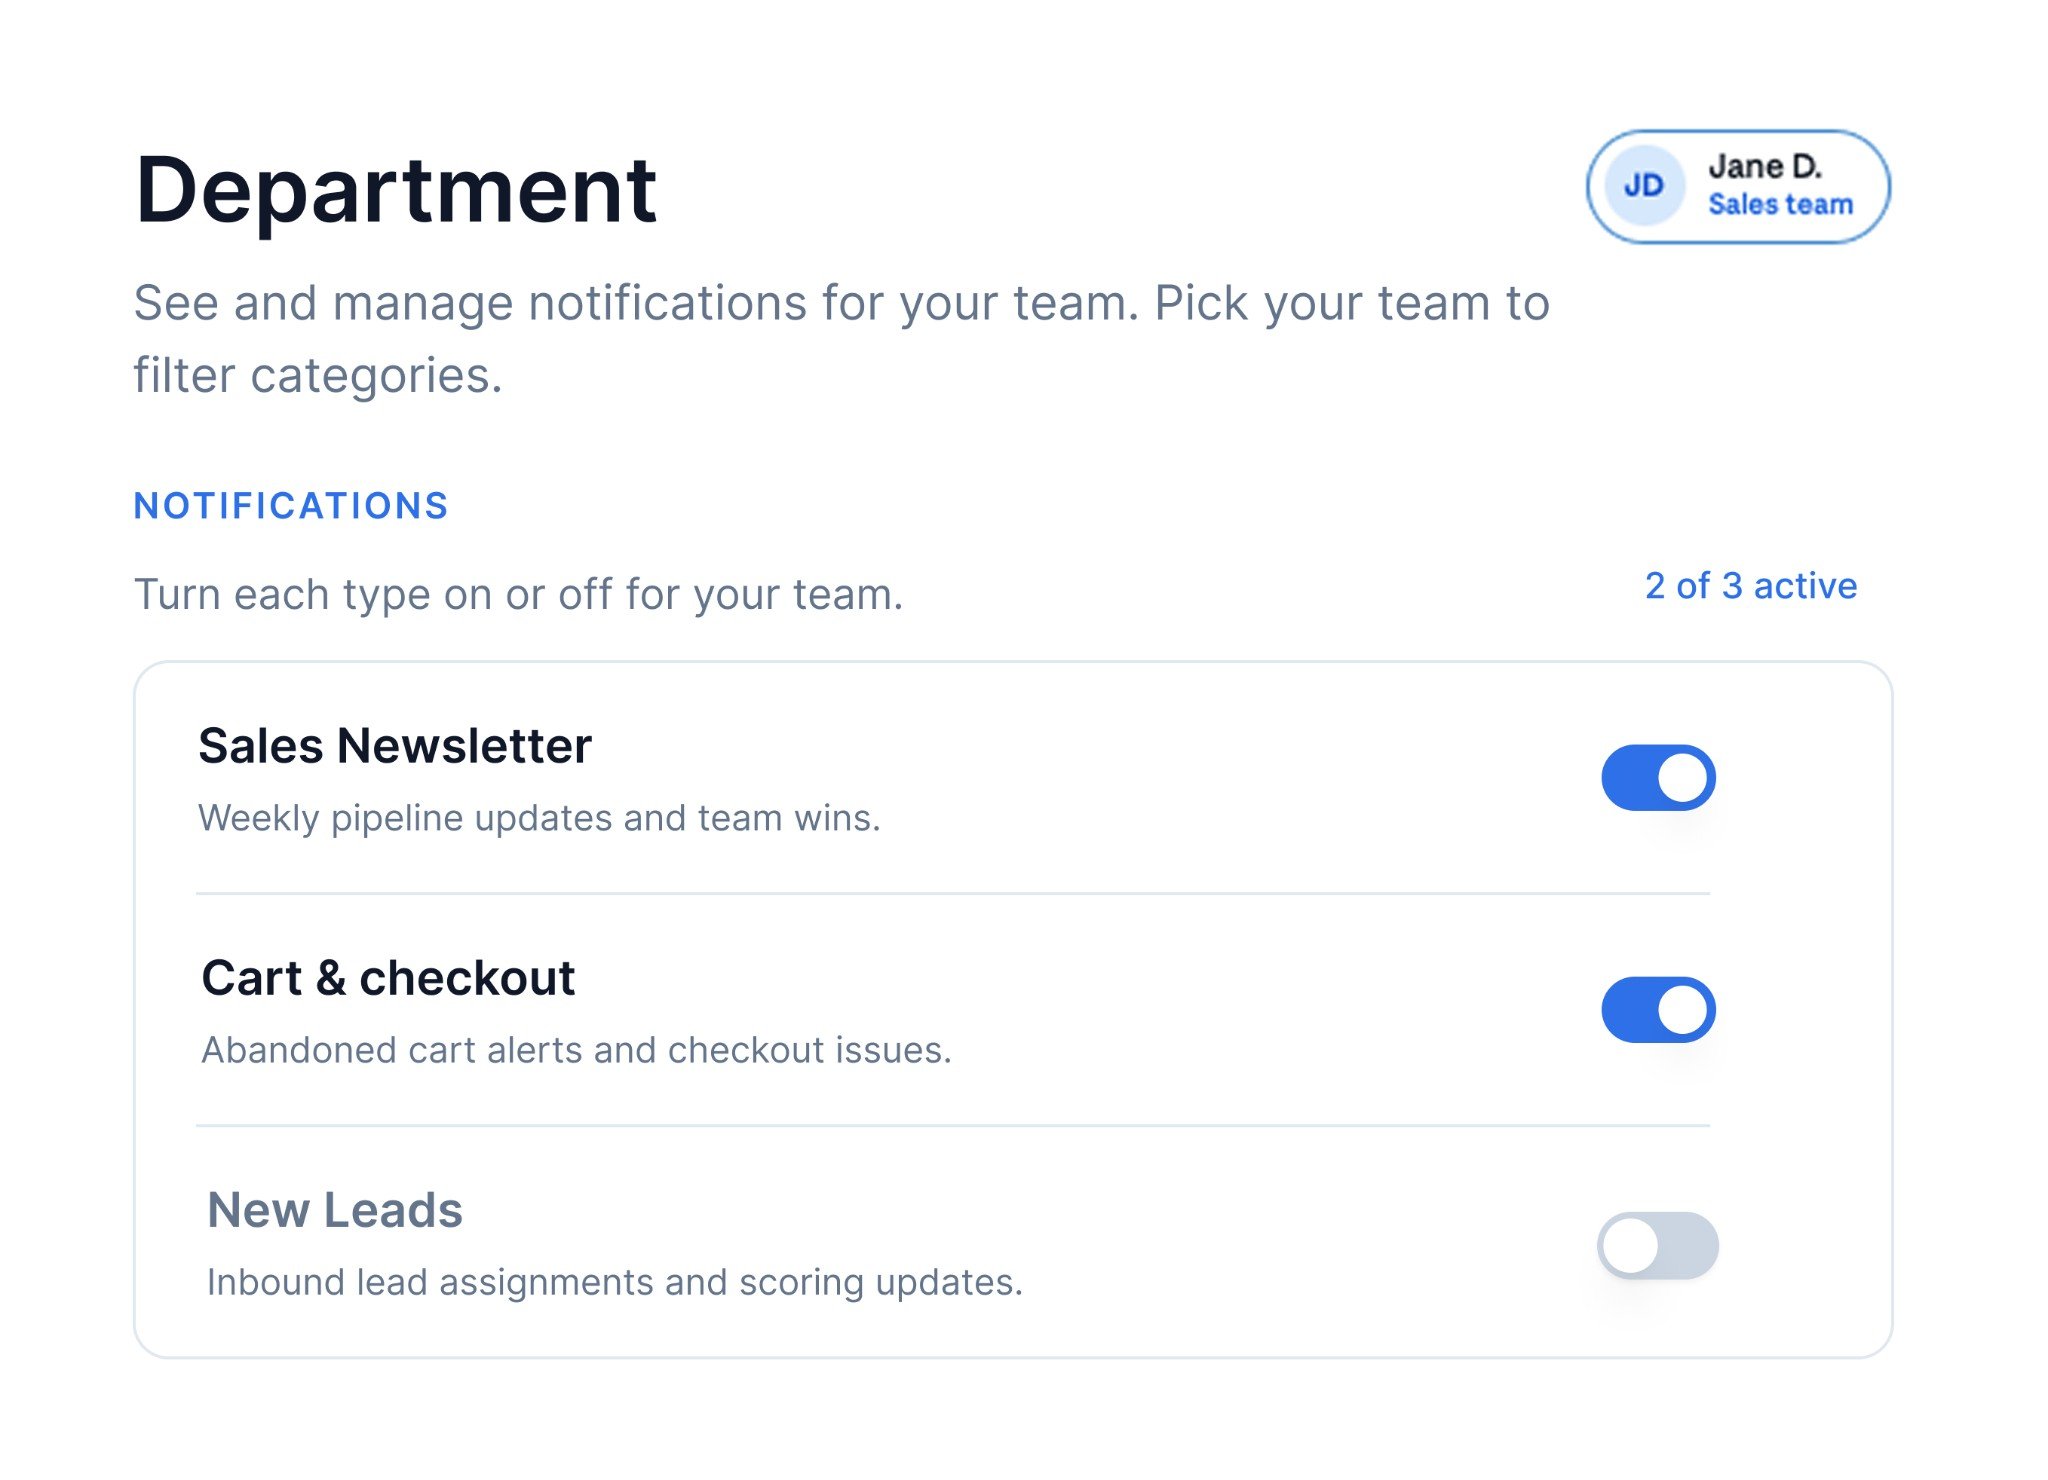
Example app UI (mockup) - Jane D. (Sales team) sees Sales Newsletter, Cart & checkout, and New Leads
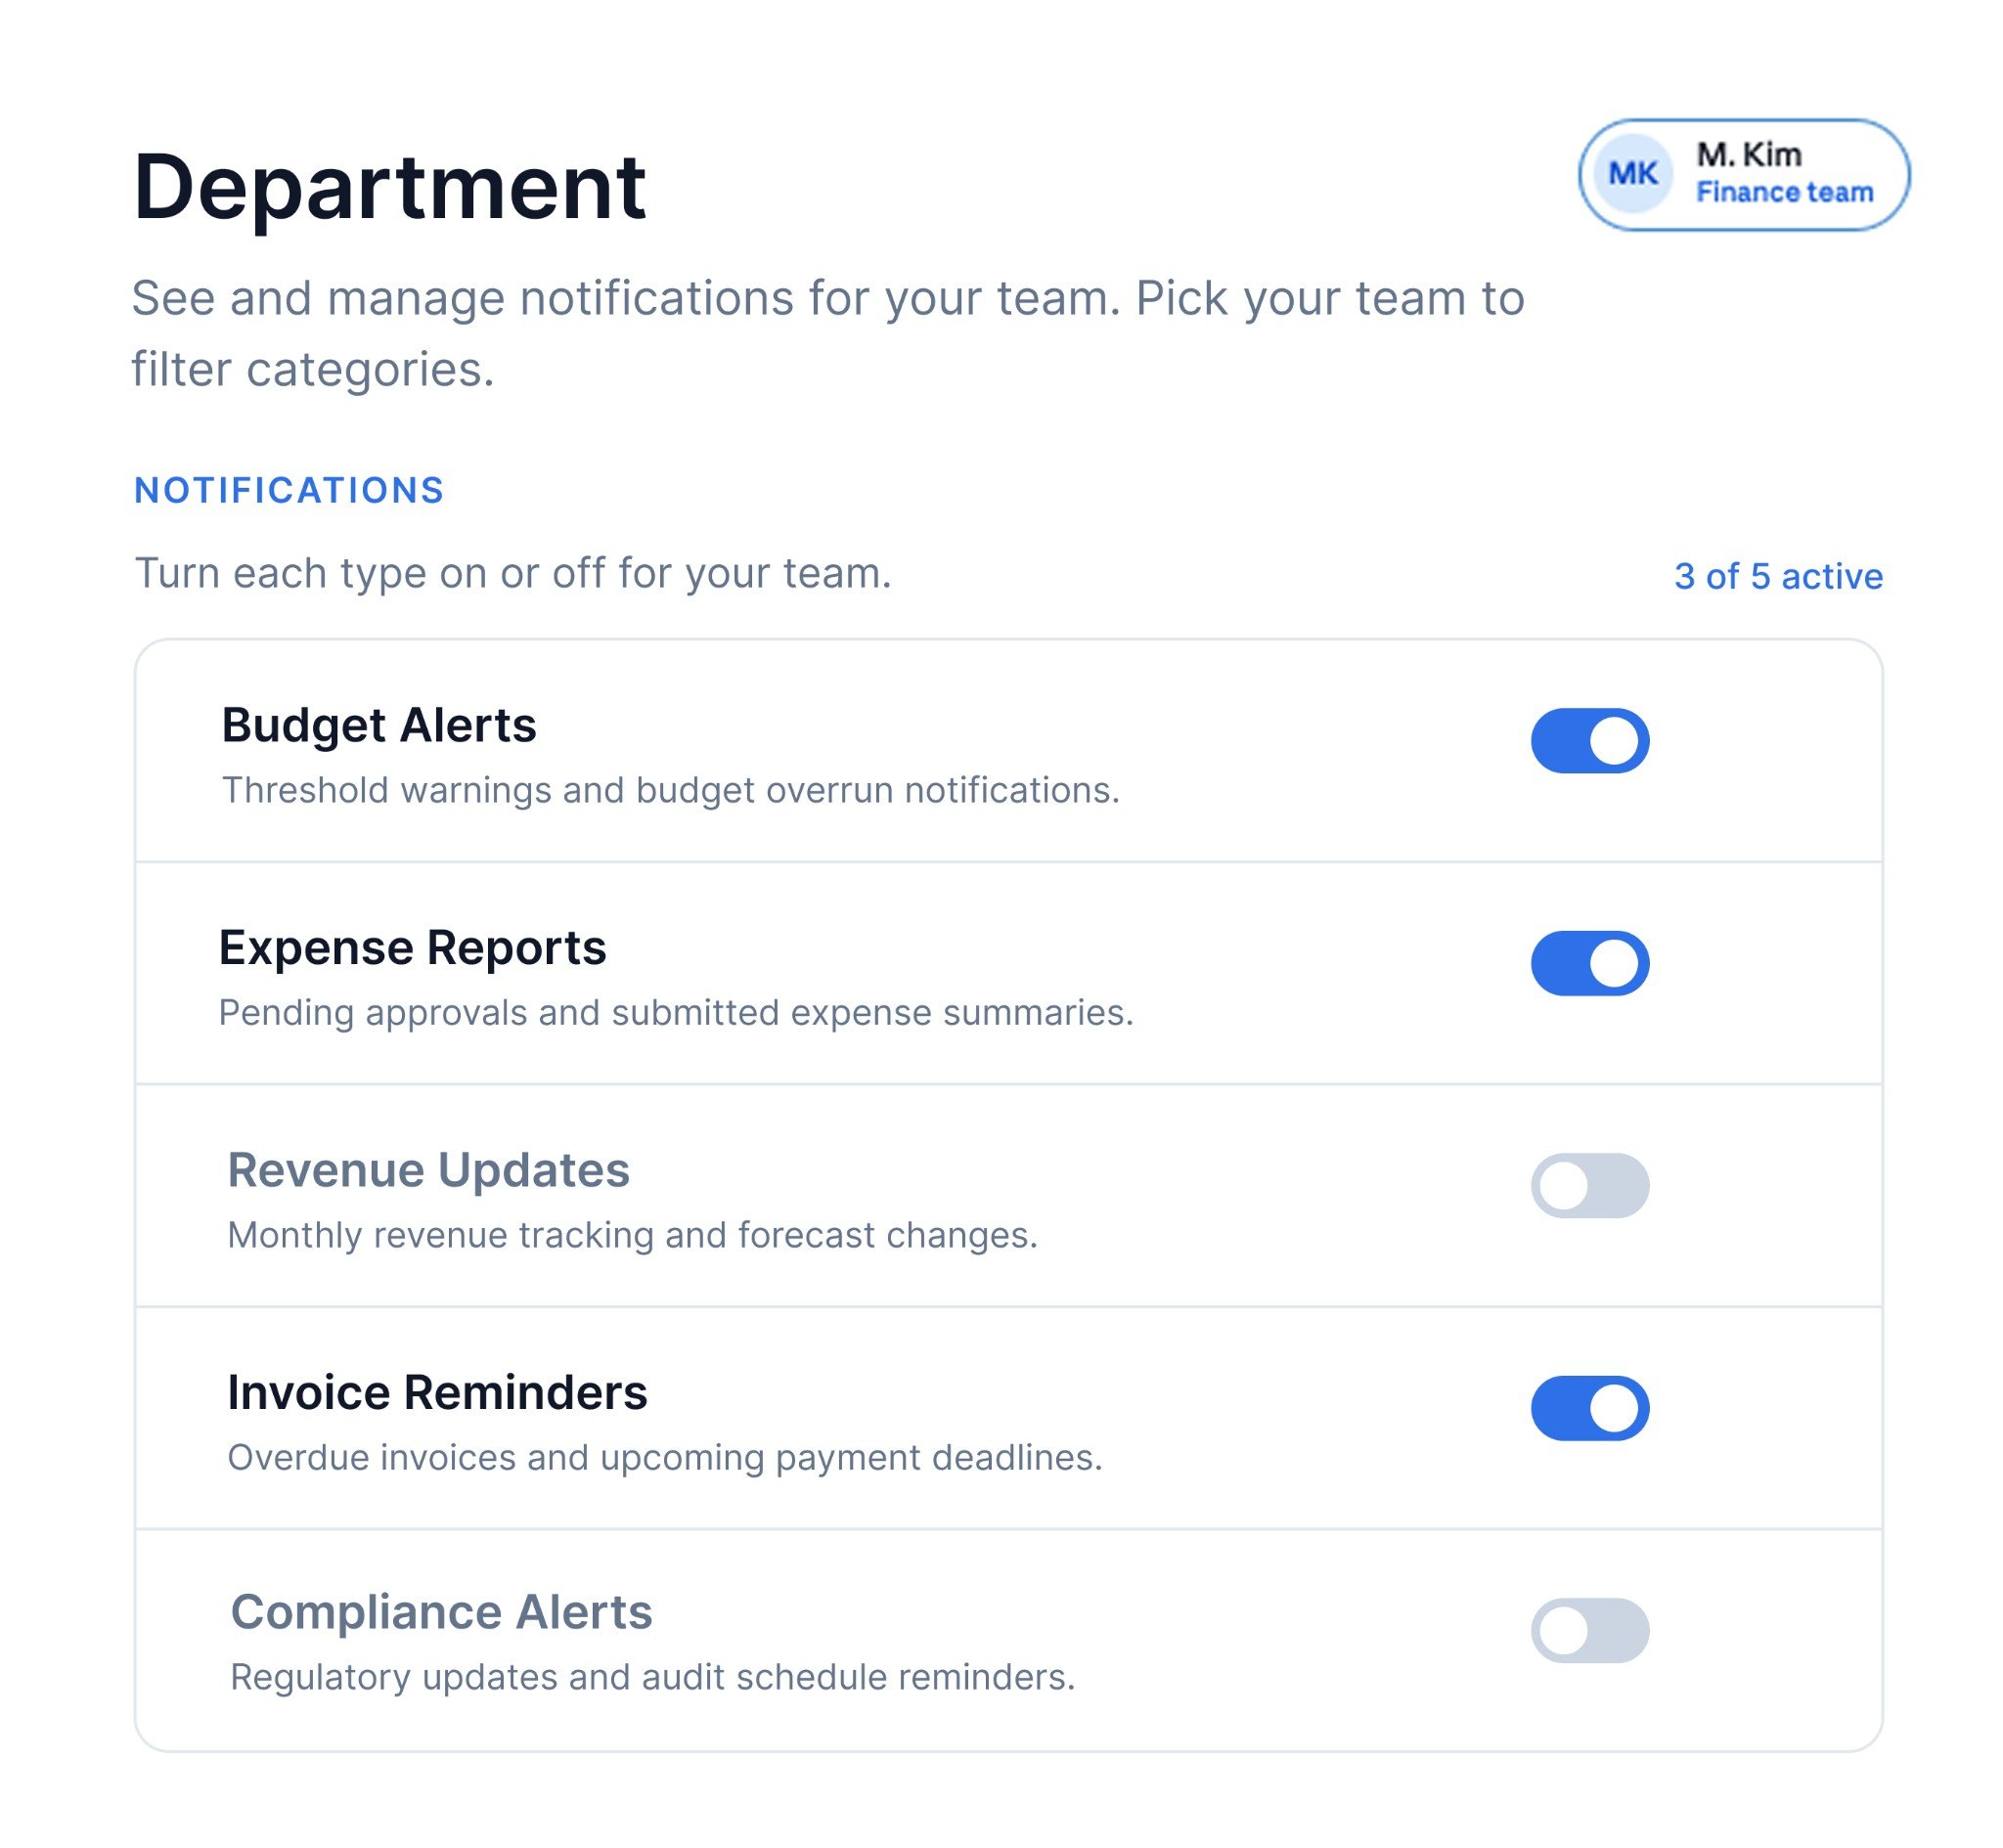
Example app UI (mockup) - M. Kim (Finance team) sees Budget Alerts, Expense Reports, Invoice Reminders, and more
tags query parameter on the get user preference API - a single tag, or a JSON expression with or / and / not / exists:
8. Tenant admin controls
visible_to_subscriber in the API.
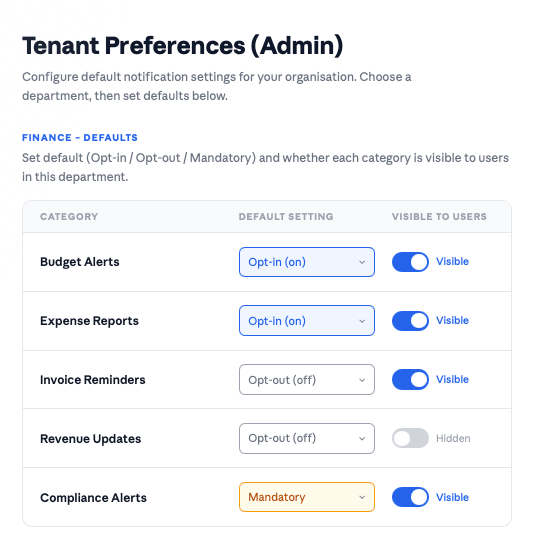
Example admin UI (mockup) - tenant admin sets defaults and visibility for their organization
- First ensure your preference categories are set up under Developers → Preference categories and published
- Provide tenant admins access to configure categories via the Tenant Preference API. They can enable/disable categories, set default On/Off, and control channel availability - all scoped to their tenant
- Default preference (
preference: opt_in / opt_out / cant_unsubscribe) - sets whether the category is on, off, or mandatory by default for all users in this tenant. SuprSend evaluates preferences in the order: user preference → tenant default → category default. If a user hasn’t set their own preference, the tenant default applies. - Visibility (
visible_to_subscriber: true / false) - controls whether the category appears on the end user’s preference page at all. Set tofalseto hide and turn off categories that aren’t relevant to this tenant’s users. - Channel controls -
mandatory_channelsmakes specific channels non-unsubscribable (when preference iscant_unsubscribe),opt_in_channelssets which channels are on by default, andblocked_channelsdisables channels across all categories for the tenant regardless of individual user preferences.
tenantId to getPreferences() - the rendering is the same as Section 2.
9. Hide categories by tenant plan
- The opted-out categories and channels are removed from
getPreferences()responses for all users in that tenant - they won’t see them on the preference page. - Notifications for those categories are not delivered to the tenant’s users.
- These are hard overrides - neither the tenant admin’s default preferences nor individual user preferences can re-enable them. See Preference Evaluation for the full resolution order.
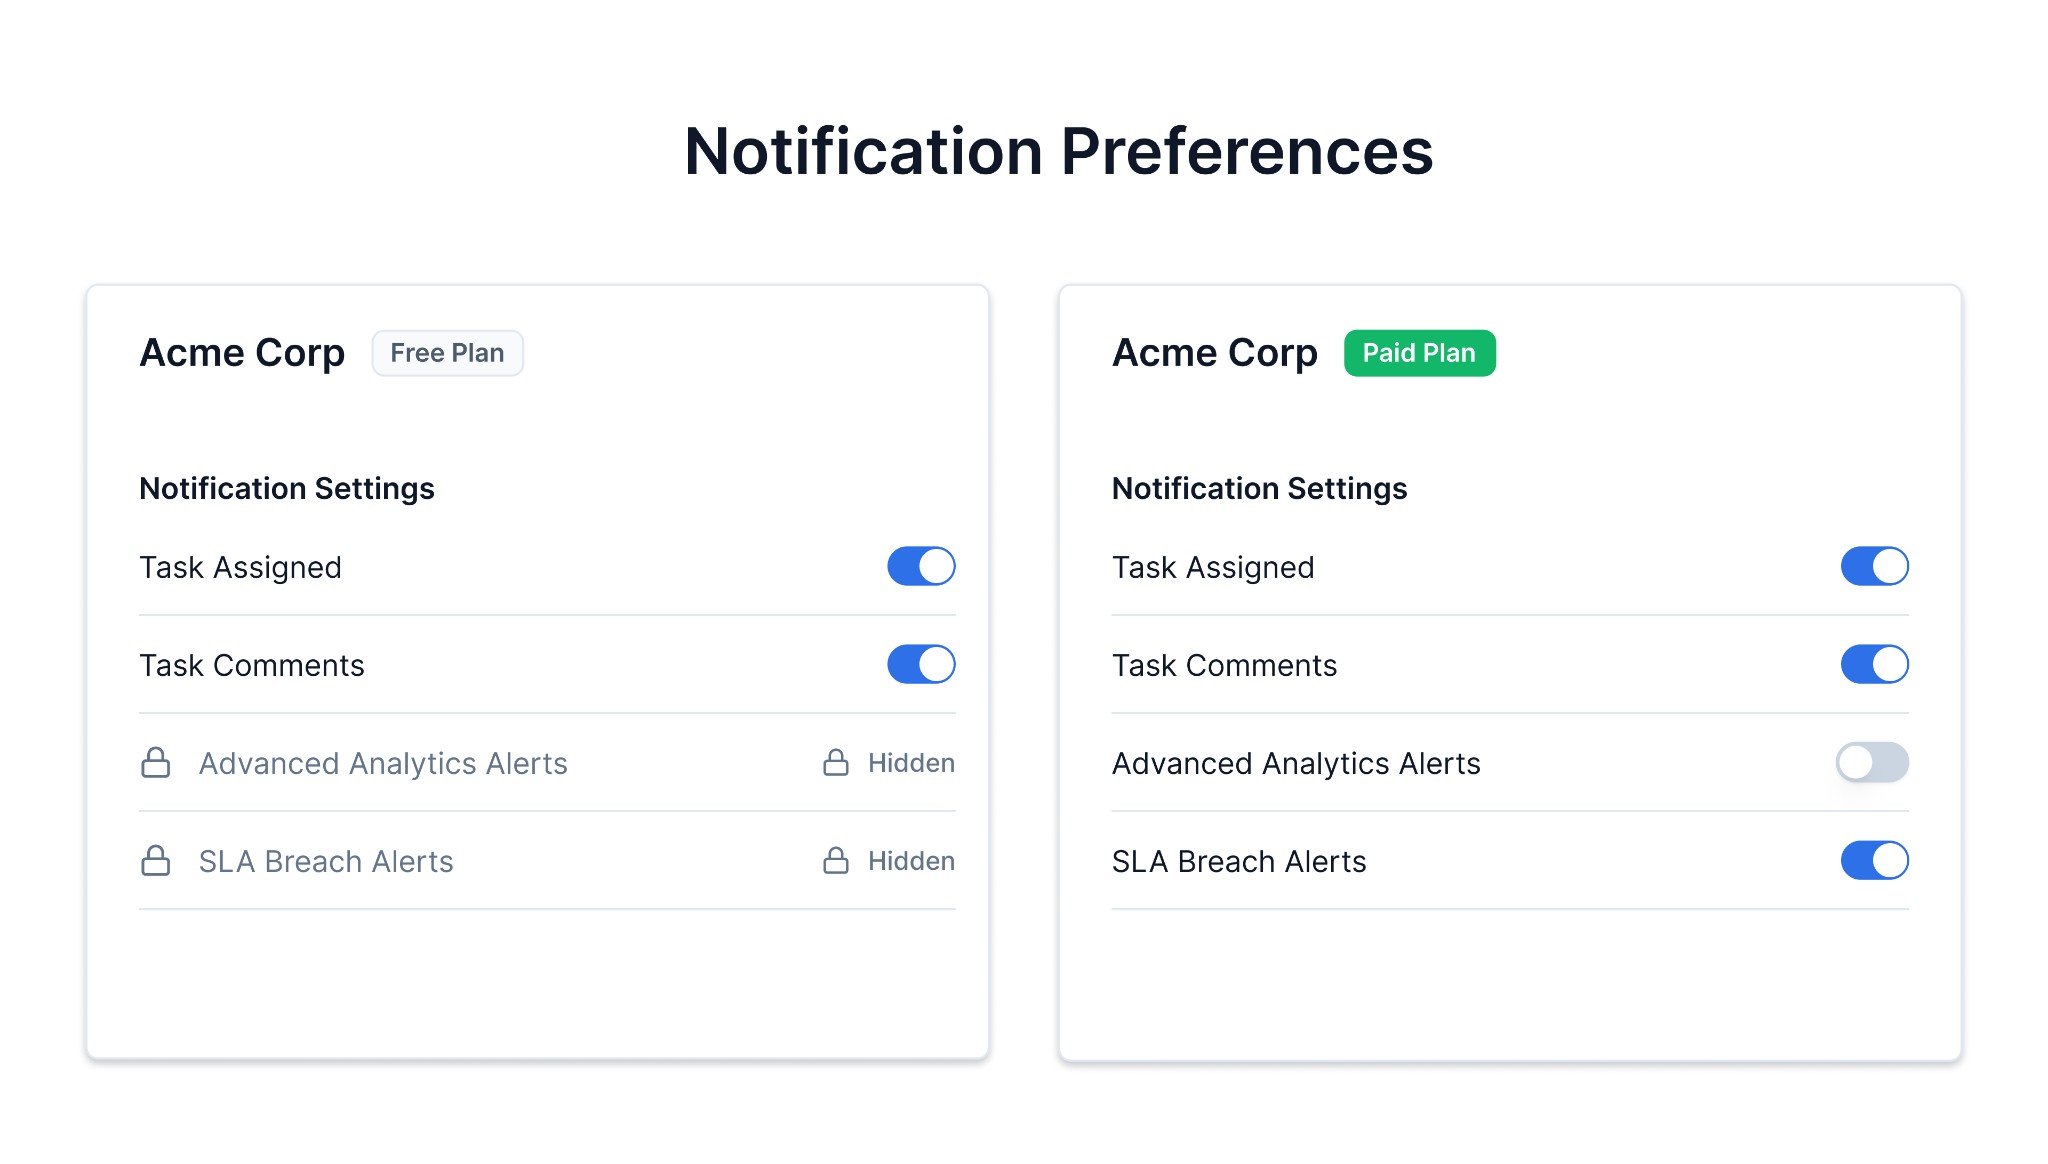
Example app UI (mockup) - free-plan users see only core categories; paid-plan users see the full set
- Global Channel Opt-out — block one or more channels (for example Email, In-App Inbox) across all categories for the tenant. Notifications on blocked channels are never delivered to any user in the tenant.
- Category Opt-out — toggle a category off for the tenant. The category is removed from the tenant’s preference API responses and notifications for that category are not delivered.
- Opt-out Channels in the Category — block specific channels within a single category (for example disable SMS for “Newsletter” but keep it enabled for other categories).
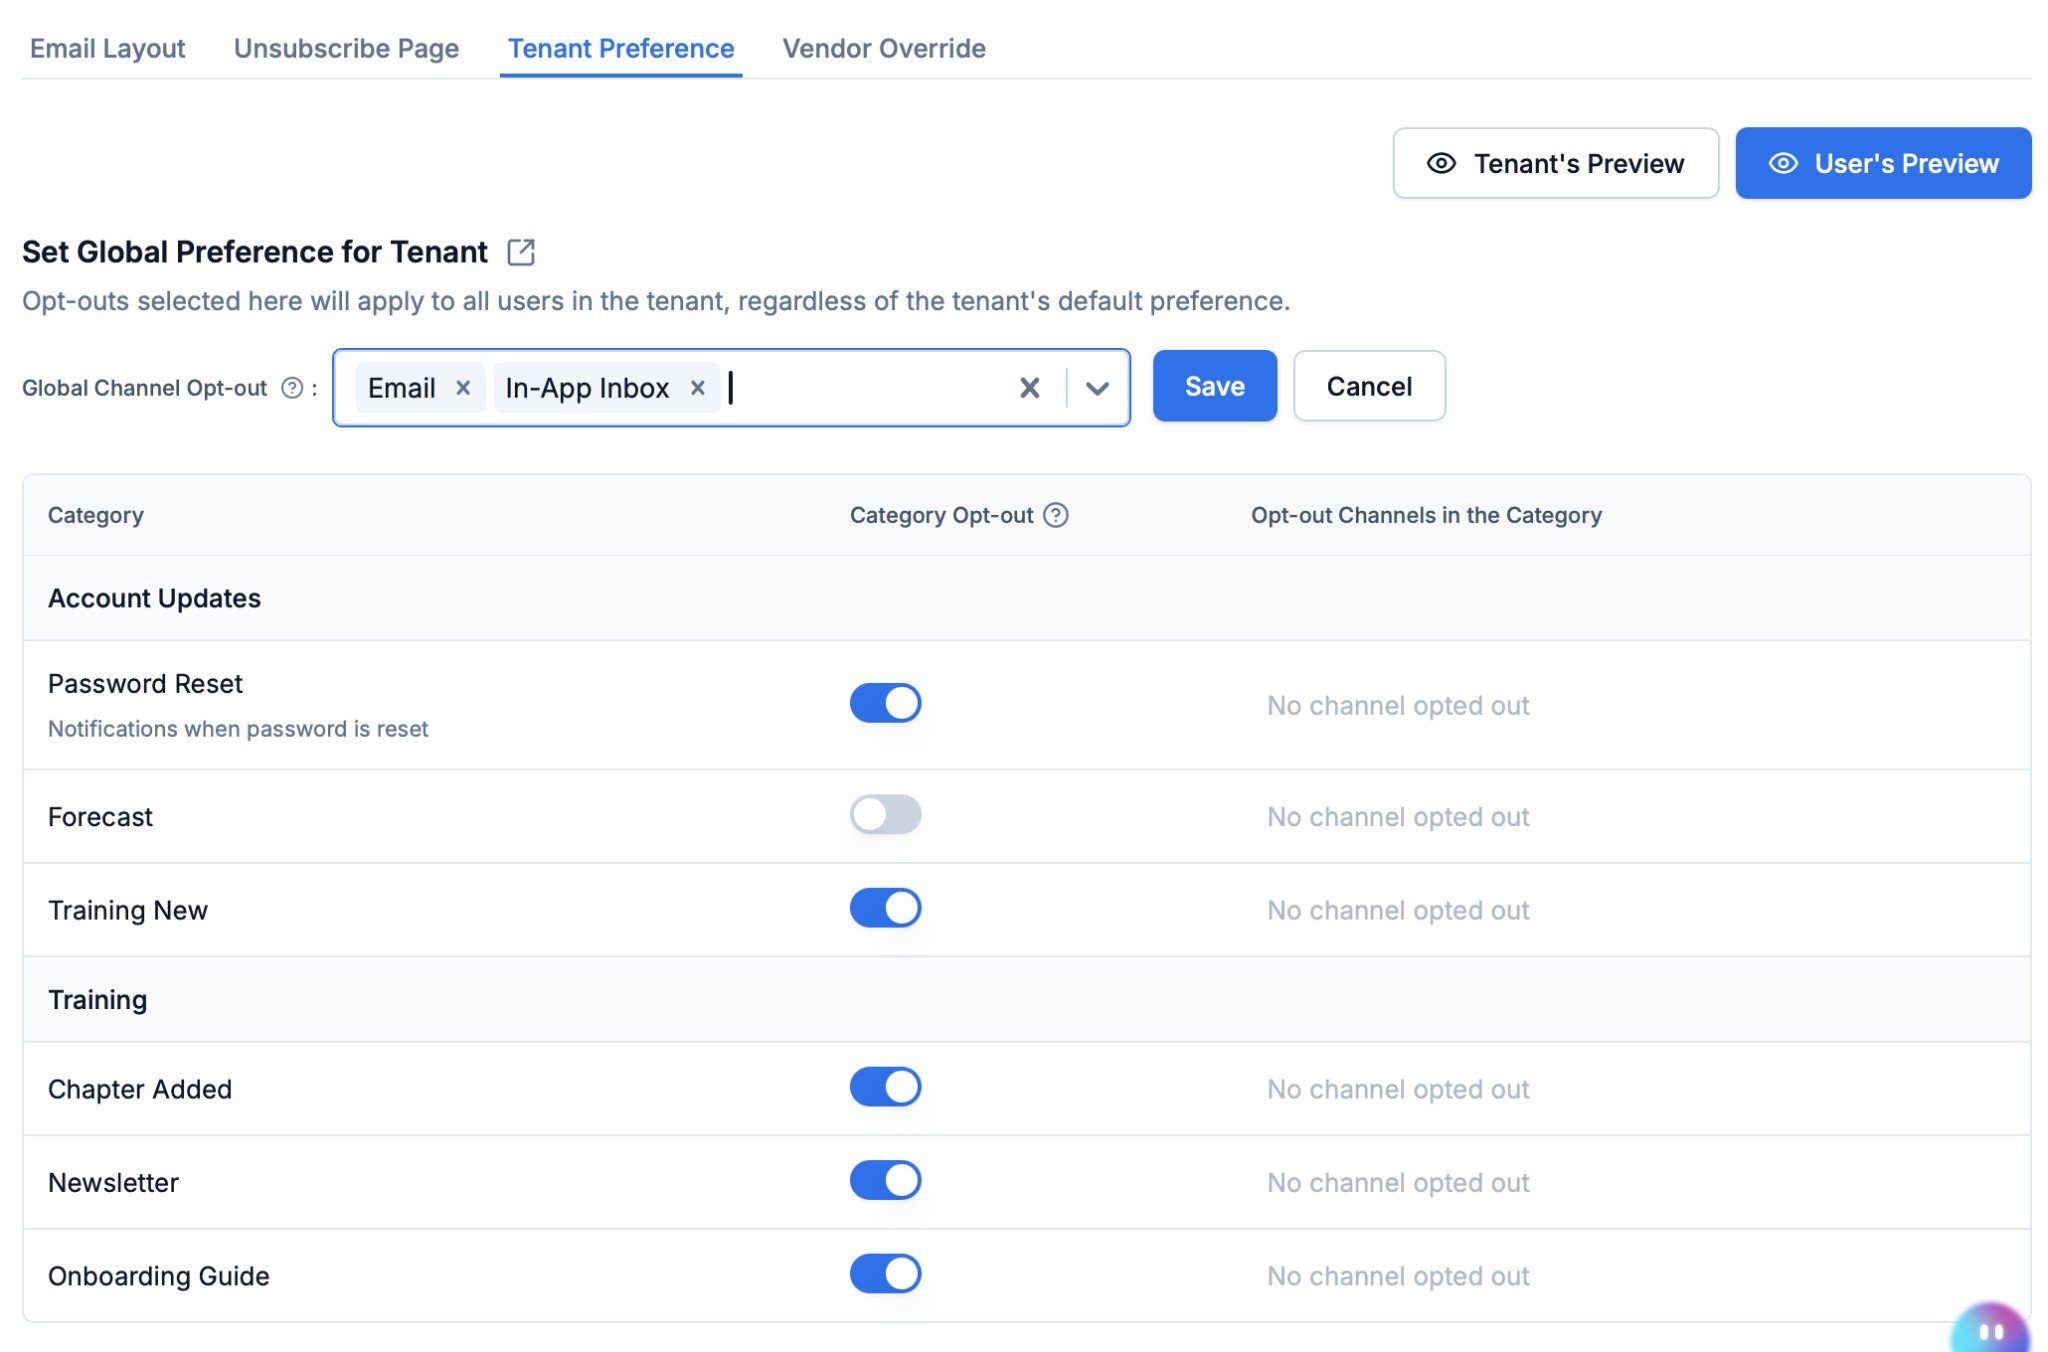
Global tenant preference page in the SuprSend dashboard
tenantId to getPreferences(). Categories opted out at the tenant level are excluded from the response server-side - your rendering code stays the same regardless of tenant plan.
10. Per-project preferences
tenantId passed to getPreferences(), and all reads and writes happen against that project’s tenant.
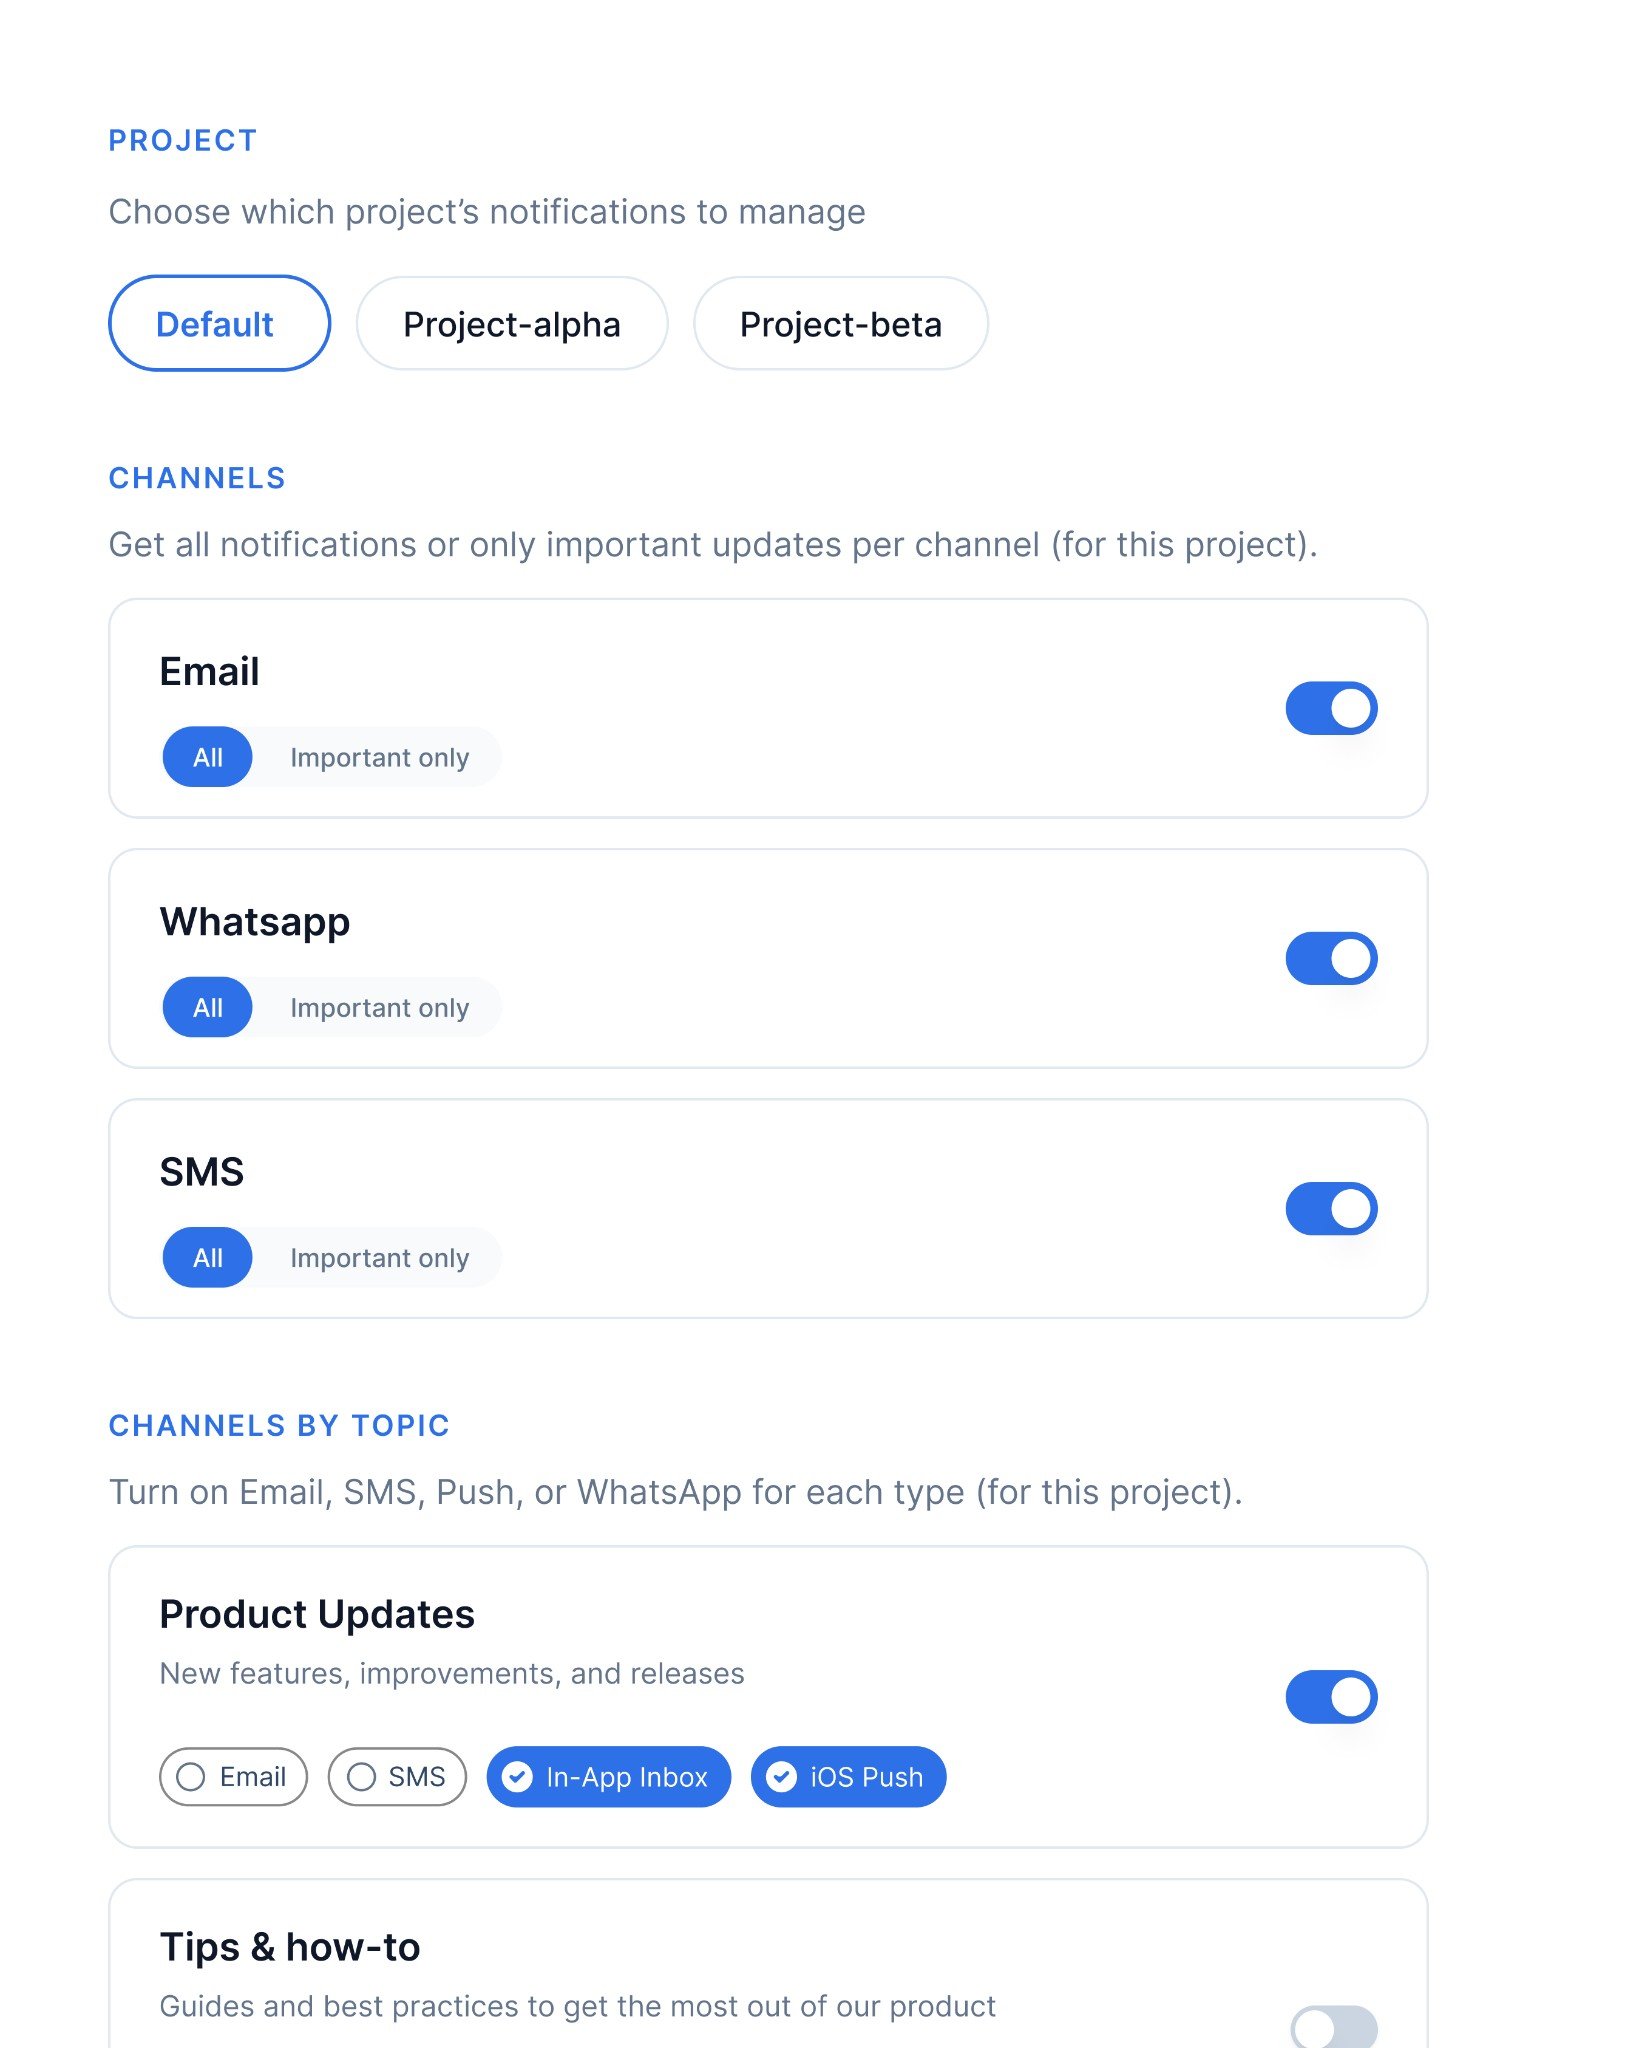
Example app UI (mockup) - independent preferences per project
- Create one tenant per project in SuprSend (via Tenants in the dashboard or the Tenants API). You can also create tenants via API
- For each tenant, configure which categories are enabled, what the defaults are, and which channels are available via the Tenant Default Preference API
- Ensure your preference categories are published under Developers → Preference categories
getPreferences(). Render the full preference UI - channel-level (All / Required per channel) and category-level (toggles + channel checkboxes).
tenantId - they apply to the active tenant: the one set at identify, or overridden by the most recent getPreferences({ tenantId }) call. So fetch a project’s preferences before writing to it, and keep one active project at a time. The tenantId must also match the scope.tenant_id in the user’s JWT token, or the call fails. On the REST API, scope every call explicitly with the tenant_id query parameter instead.Worked example: Keystone
Keystone is the project-management app from the multi-tenant B2B guide: each customer gets a workspace, and each project is both a tenant (for settings and preferences) and an object (whose subscribers are the project team). Its notification settings combine most of the patterns above, so two of its categories are worth reading end to end. Budget Alert - conditions. The sub-category carries four condition properties:role, cost (the budget threshold), include, and except. The workflow triggers on the project object, and its trigger conditions keep a recipient if any of these OR groups pass:
- Their role is in
role, the project’s cost exceedscost, and they’re not inexcept - They’re in
include - The recipient is the project object itself - the
$recipient.$type == "object"fan-out guard from Section 6
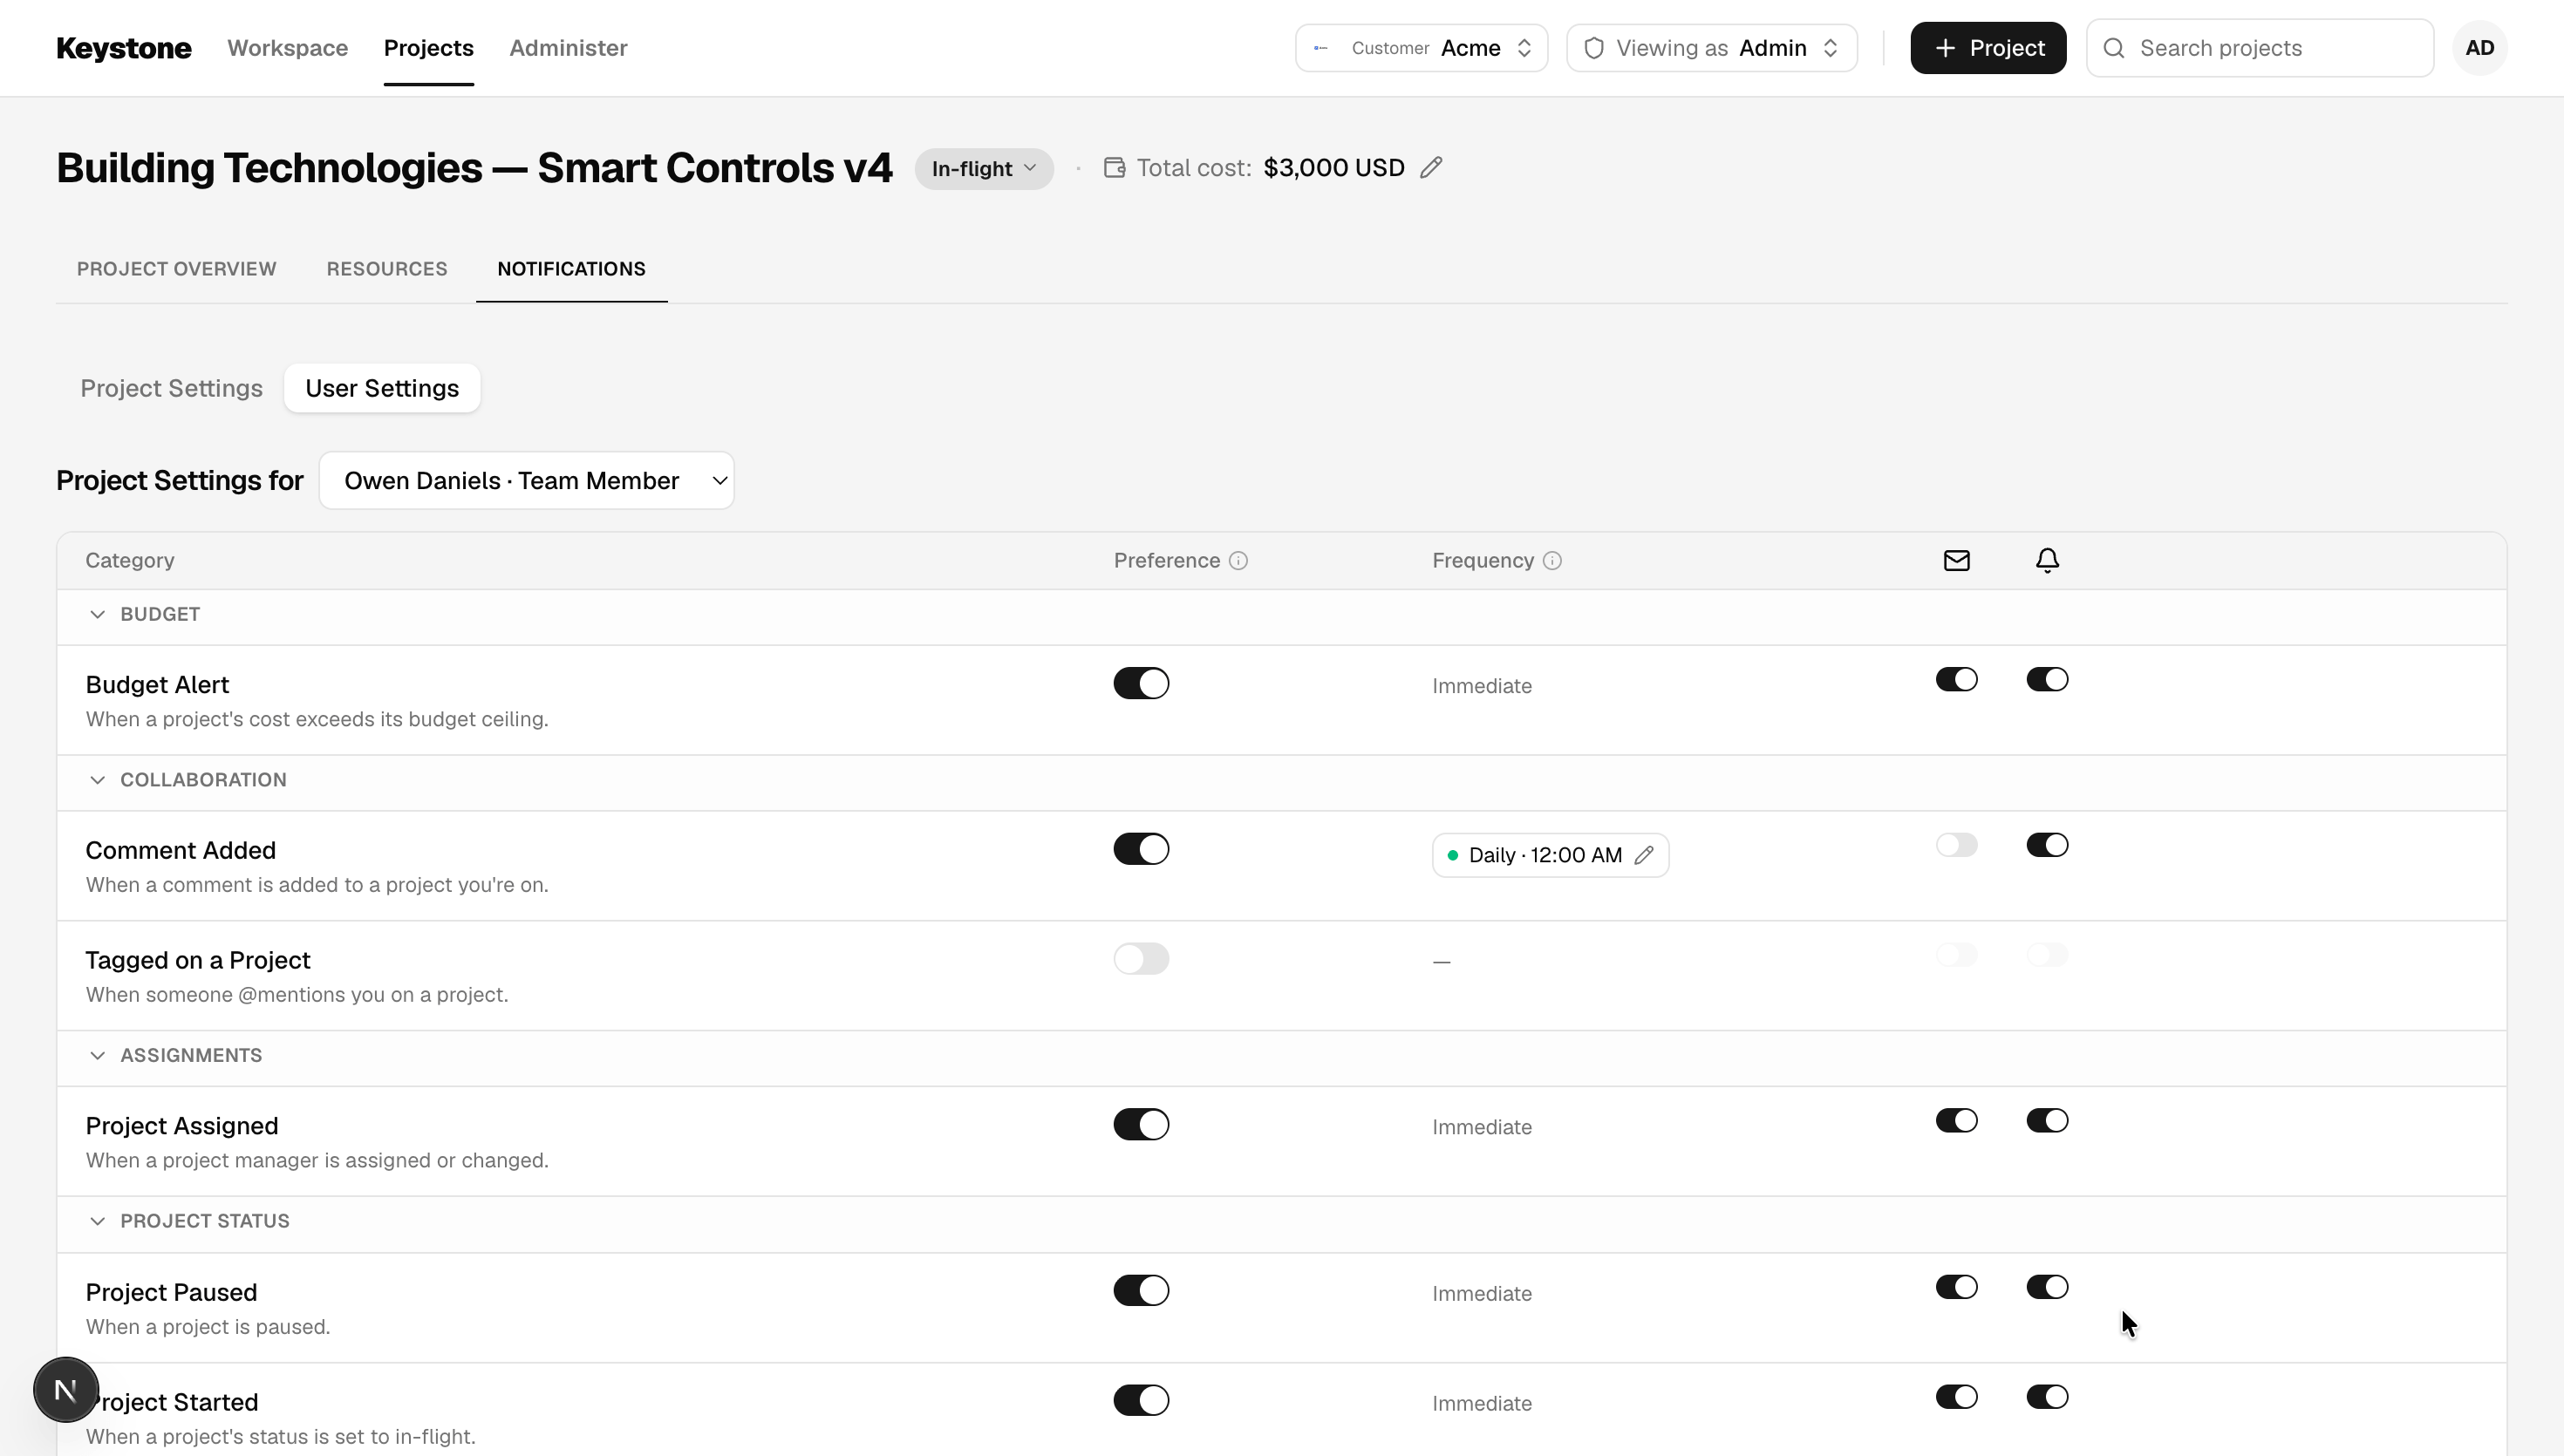
Keystone's project notification settings - category toggle, digest frequency, and channel toggles, all from one preference API response
- A user’s own settings per project - update category preference API, scoped by
tenant_id - A project’s defaults, edited by admins and project managers - tenant preference API
- Account-wide defaults - create/update category API