Amazon SES
This section is a step by step guide to select Amazon SES as your email service provider.
This guide assumes you have access to AWS console and have necessary permissions. If you don't have an AWS account, then you can create here (https://aws.amazon.com/resources/create-account/).
Amazon SES integration on SuprSend account
Follow below steps to integrate your Amazon SES account with SuprSend
Step 1. Create AWS IAM user
To send email through SES, you need an IAM user (Access-Key-ID and Secret-Access-Key) with necessary permission. To ceate an IAM user, refer to this documentation
- Create an IAM user (with Programmatic access).
- Attach Policy
AmazonSESFullAccessto this user. - Copy and save the
Access-key-IDandSecret-Access-Keysecurely. You'll need to add this information on SuprSend vendor integration page
An AWS SES resource resides in a particular region. Make a note of which aws-region you are going to use for sending emails. In this guide, we'll assume aws-region :ap-south-1 for all illustrative purposes.
Step 2. Create SES Verified Identity
Open AWS SES console. Go to Verified Identities tab. You can add an email-address or a domain/subdomain as an identity. Follow this documentation to understand what an identity is and how to create and verify one.
Step 3. Create Configuration Set
Configuration-set is a ruleset applied to send-email. In configuration-set you can specify to track events (e.g. send, delivery, open, click, bounce, complaint etc.) and send these to an event destination.
Refer to the documentation on how to create configuration sets.
In SES console, go to Configuration sets
- Click
create setbutton to create a new configuration-set - Give it a name (e.g.
ses_suprsend_configset) - Select your Sending IP-pool (you can leave
defaultif you don't have a dedicated-IP-pool) - Click
Create setbutton.
Step 4. Manange Event destinations
After creating configuration-set, you'll see a tab "Event Destinations". Email-sending events (send, delivery, open, click, bounce, complaint etc.) will end up in the events destination.
Reference documentation:
Setup SNS event destination for event Publishing
Steps to follow for setting up event destination and enable event tracking:
- Go to
Event Destinationstab and clickAdd destinationIn "Select event types" step, clickSelect allbutton to received all the events to destination. - Click Next
- In "Specify destination" step.
- Select Destination Type:
Amazon SNS. - Enter a destination Name (e.g
ses_suprsend_configset_destination) - Make sure
Event publishingis markedEnabled. - Select an SNS topic from the dropdown (or create a new topic) for events destination.
- To create a topic, click
Create SNS topic. In the popup, put "Topic Name" and "Display Name" - Click Create.
- Now from the dropdown, select the topic you just created.
- Select Destination Type:
- Click Next.
- In the "Review" step, verify the info.
- Click "Add destination".
Now that you've created a configuration-set to send emails and have specified to receive its events to an SNS-topic, next step is to give SuprSend permission to subscribe to this SNS-topic.
AWS provides functionality where a different AWS account (in this case SuprSend) can subscribe to an SNS-topic in your account. For more details, checkout https://docs.aws.amazon.com/sns/latest/dg/sns-send-message-to-sqs-cross-account.html
Step 5. Give SuprSend permission to Subscribe to SNS topic.
Go to AWS SNS Console and open Topics list. Click on the topic that you created in the earlier step.
- Click Edit.
- On the edit page, expand the "Access Policy" section. The policy looks something like below. You'll notice that the current policy gives
sns:Publishpermission to your SES account.
 	 {
	  "Version": "2008-10-17",
	  "Statement": [
	    {
	      "Sid": "stmt1651045546197",
	      "Effect": "Allow",
	      "Principal": {
	        "Service": "ses.amazonaws.com"
	      },
	      "Action": "sns:Publish",
	      "Resource": "arn:aws:sns:topic_region:111122223333:topic_name",
	      "Condition": {
	      	"StringEquals": {
	          "AWS:SourceAccount": "111122223333"
	        },
	        "StringLike": {
	          "AWS:SourceArn": "arn:aws:ses:*"
	        }
	      }
	    }
	  ]
	}
- Next you need to add a policy to give
sns:Subscribepermission to SuprSend (Account: 924219879248). Add below json inside theStatementlist: (replace the "Resource" value with your "Resource" value)
{
    "Effect":"Allow",
    "Principal":{
        "AWS":"924219879248"
    },
    "Action":"sns:Subscribe",
    "Resource":"arn:aws:sns:topic_region:111122223333:topic_name"
}
- So in effect, the whole policy would look like
	{
	  "Version": "2008-10-17",
	  "Statement": [
	    {
	      "Sid": "stmt1651045546197",
	      "Effect": "Allow",
	      "Principal": {
	        "Service": "ses.amazonaws.com"
	      },
	      "Action": "sns:Publish",
	      "Resource": "arn:aws:sns:topic_region:111122223333:topic_name",
	      "Condition": {
	      	"StringEquals": {
	          "AWS:SourceAccount": "111122223333"
	        },
	        "StringLike": {
	          "AWS:SourceArn": "arn:aws:ses:*"
	        }
	      }
	    },
	    {
		    "Effect":"Allow",
		    "Principal":{
		      "AWS":"924219879248"
		    },
		    "Action":"sns:Subscribe",
		    "Resource":"arn:aws:sns:topic_region:111122223333:topic_name"
		}
	  ]
	}
- Click Save.
Step 6. Fill Vendor settings page on Suprsend
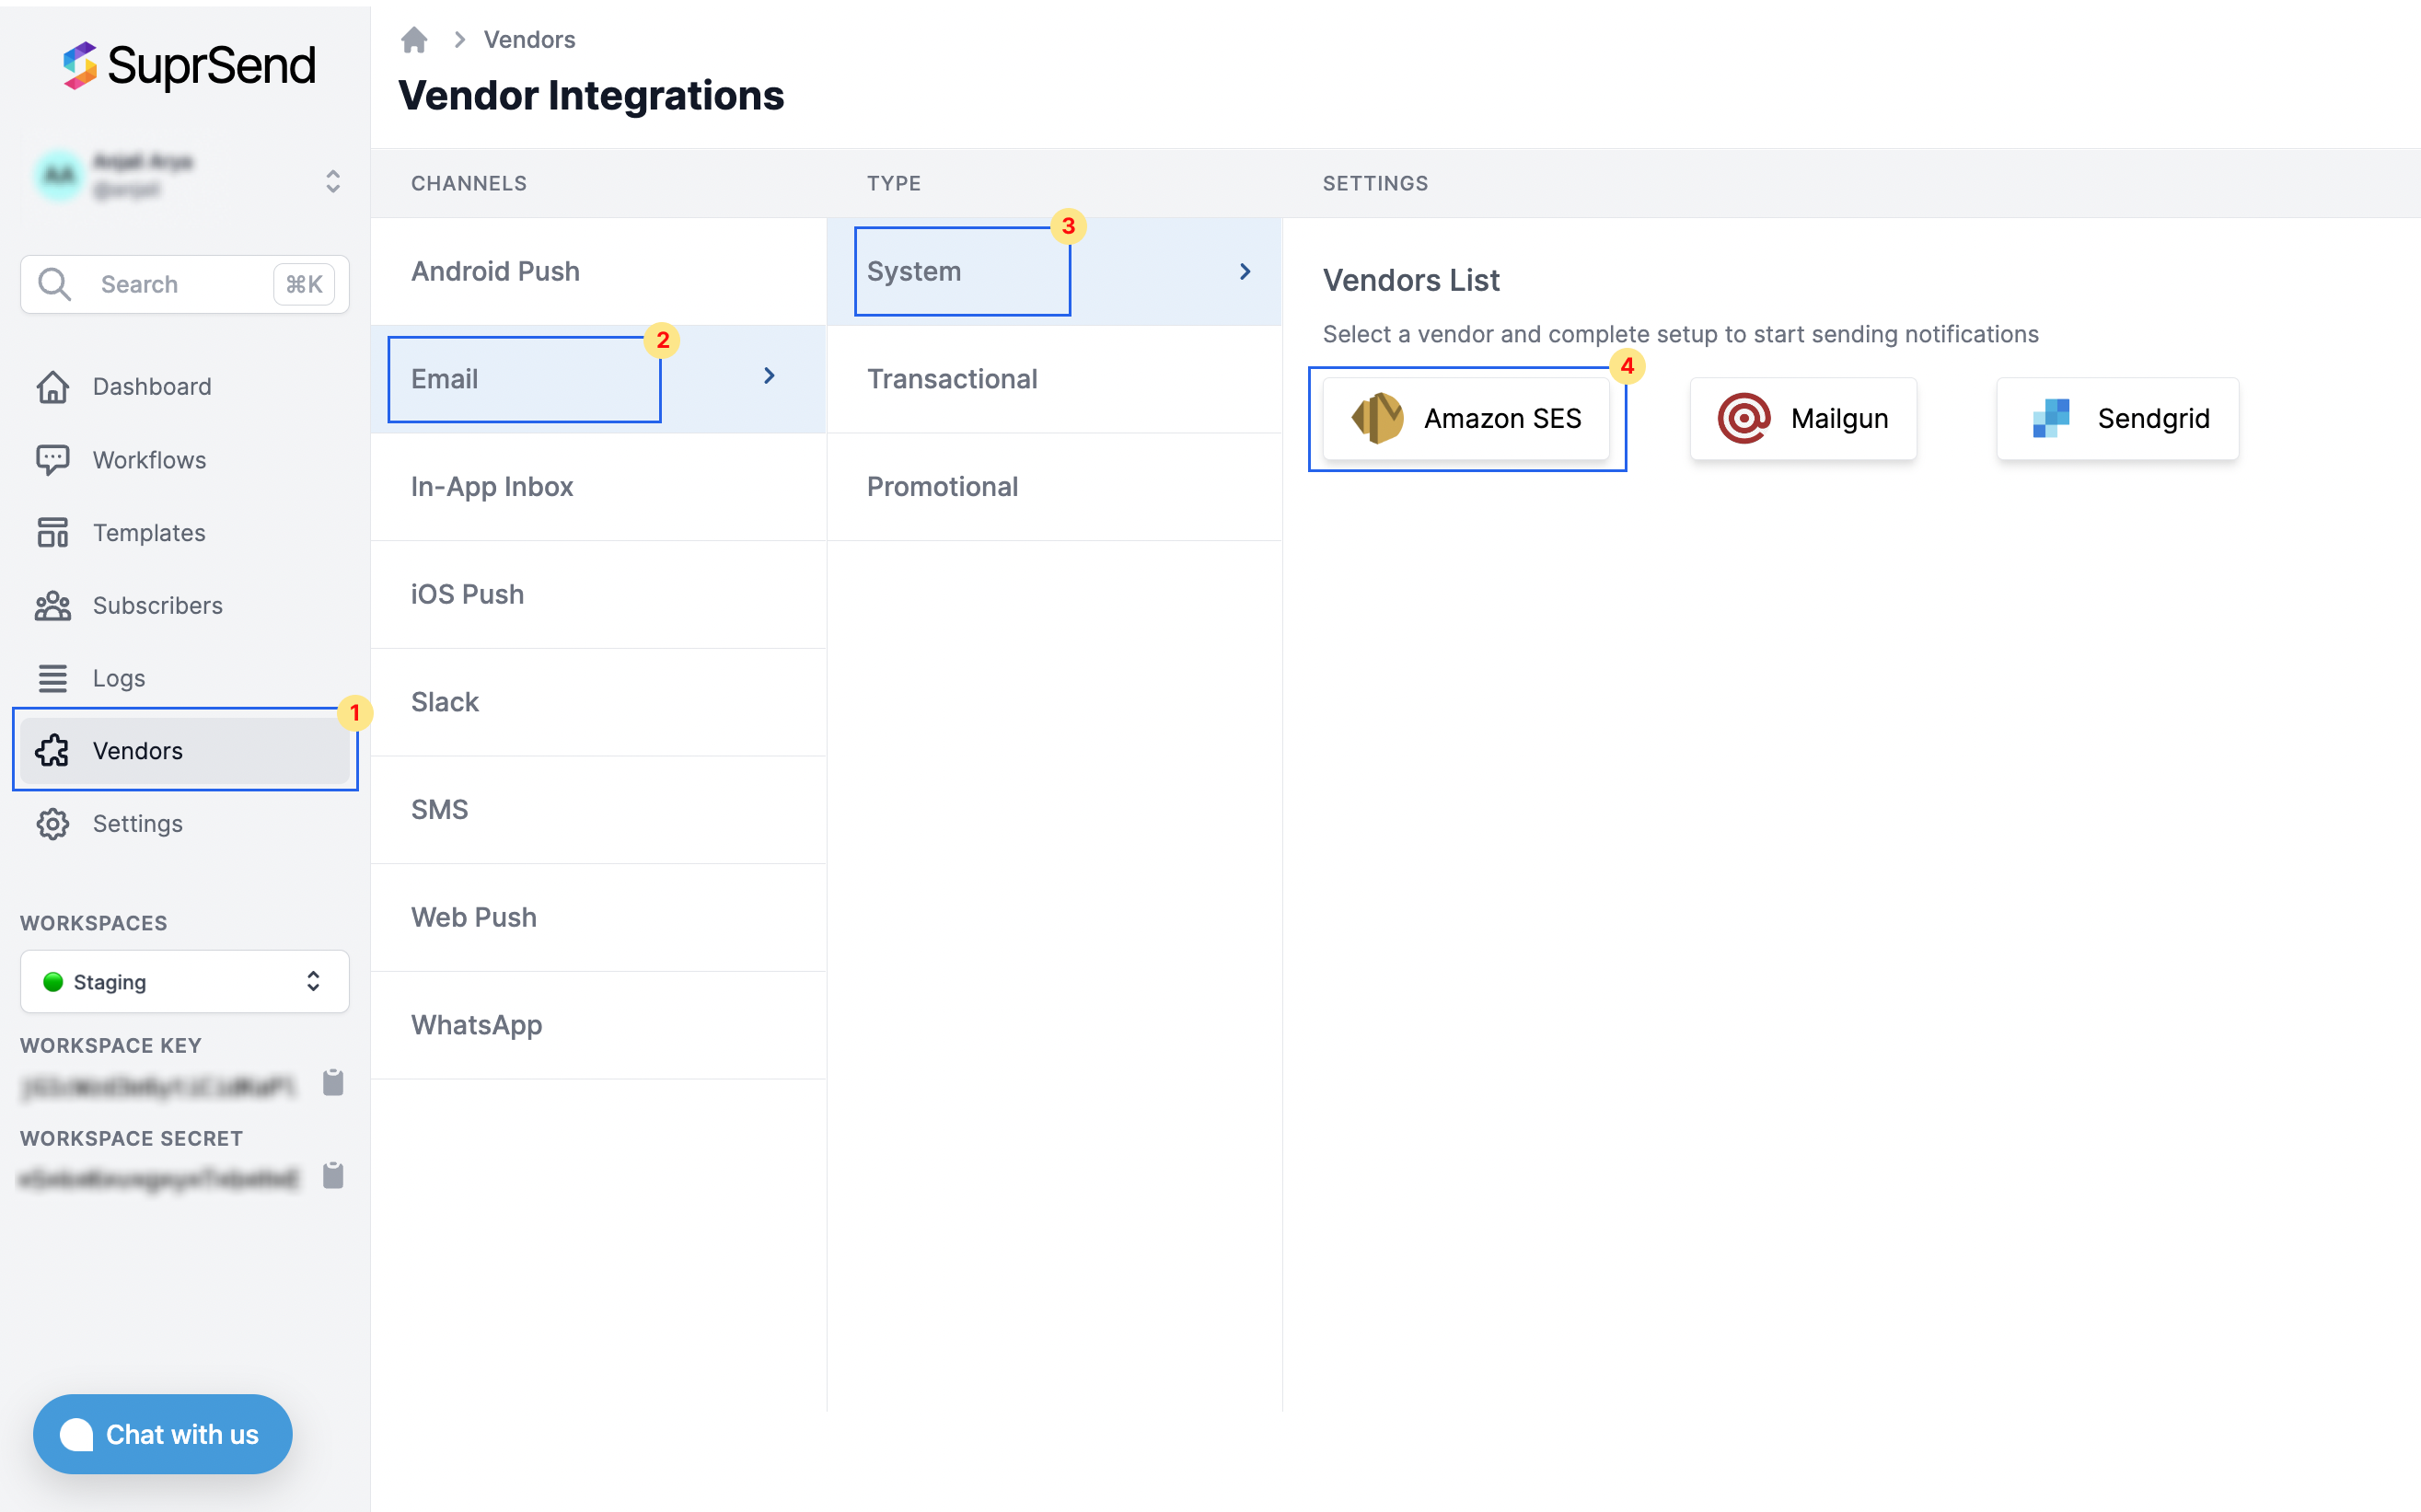
On the SuprSend dashboard, follow the steps as below:
- Select Vendors from the left panel
- Select 'Email' as the channel from the list
- Select the communication category from the list - System, Transactional, Promotional
- Select 'Amazon SES' from the list of Vendors

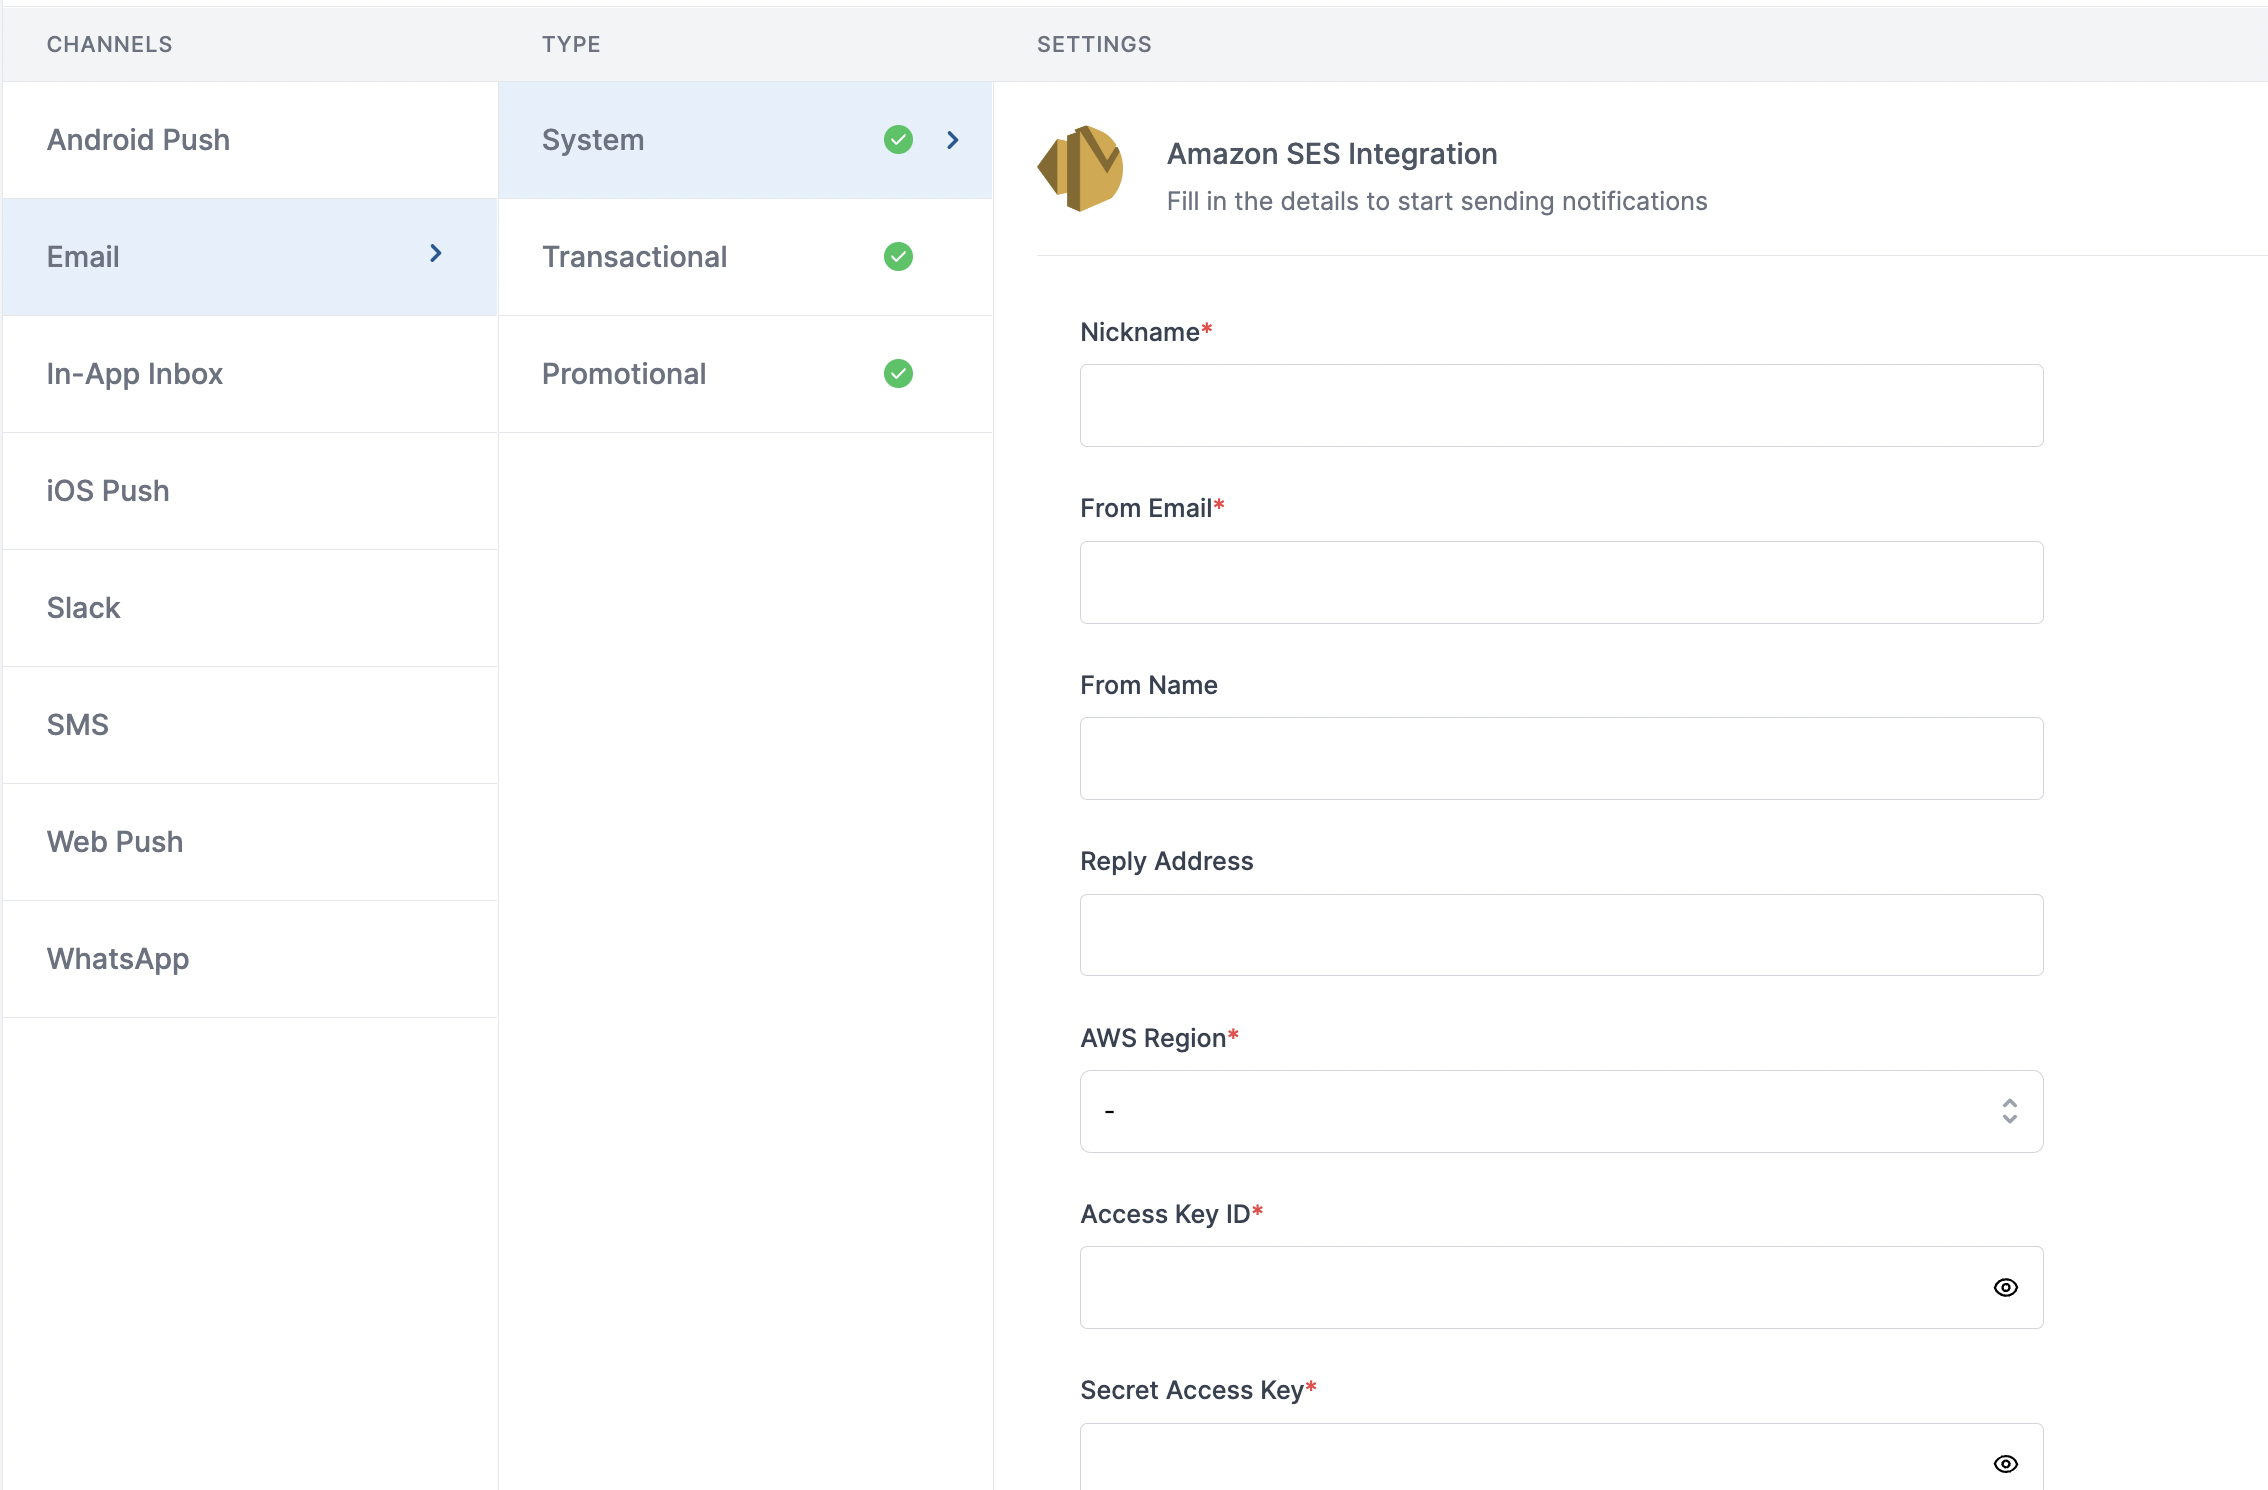
On the Vendor Settings page, enter the details in the vendor form:

| Form Field | Description |
|---|---|
| Nickname | You can give any name which may help you to identify this account easily. For example - AWS SES [Production] |
| From Email | Default 'From Email ID' that email will go from. You can override this in the individual template. eg. [email protected] |
| From Name | Default 'From Name' that email will go from. You can override this in the individual template. eg. SuprSend |
| Reply Address | Default 'Reply To Email id' on which replies are received. You can override this in the individual template. eg. [email protected] |
| AWS region | aws-region you are going to use for sending emails. |
| Access Key ID | Access key ID of the IAM user with full access. Refer step to create a new IAM user and generate access key. |
| Secret Access Key | Secret-Access-Key of the IAM user with full access. Refer step to create a new IAM user and generate access key. |
| Configuration Set | Configuration-set is used to track email events (e.g. send, delivery, open, click, bounce, complaint etc.). Refer Step to define configuration set. |
| SNS Topic ARN | This is the destination where the tracked events will be sent. Configuration set defines what events to be tracked and setting the topic allows SuprSend to receive these events. Follow step 4 & 5 to setup SNS topic and give SuprSend permission to subscribe to it. |
| Price per notification | This is the amount you pay per email notification to AWS. It helps us to calculate, estimate and optimise your cost spent on notifications. |
Setting Amazon SES event tracking
One of the platform advantage of using SuprSend as a central communication system is that it shows notification analytics for all channels in your SuprSend account together. For enabling event tracking at SuprSend (such as delivery, opened, blocked, spam etc.), you'll have to "sns:Subscribe" action to SuprSend.
Once you've given "sns:Subscribe" Action permission (to SuprSend AWS Account) on your SNS-topic, suprsend will attempt to create a subscription on that topic.
Once subscription succeeds, you should see successfully "Subscribed" to topic when you visit the Vendor settings page. Email Tracking should start working
Updated 12 months ago
Next step is to design an email template. If you have already designed an email template, you can move onto creating a workflow
