This is a quick setup guide to start sending email notifications with SuprSend.
1. Create SuprSend account
Simply signup on SuprSend to create your account. If you already have your company account setup, ask your admin to invite you to the team.
2. Start testing in Sandbox workspace
You'll see 3 workspaces in your SuprSend account: Sandbox, Staging and Production. Workspaces can be switched from top navigation bar.
- Sandbox is setup for quick testing with sample workflow, a sample user with your registered email and pre-configured channels for quick testing. It's ideal for quick exploration and testing and is available for limited period.
- Staging is your development workspace. You'll do all your iterations and testing in this workspace before pushing it to production.
- Production workspace is where you'll configure your live notifications and sync your actual product users. We do not recommend making changes directly in your production workspace. It will safeguard you from accidentally sending a test notification to your production users.
3. Create a workflow
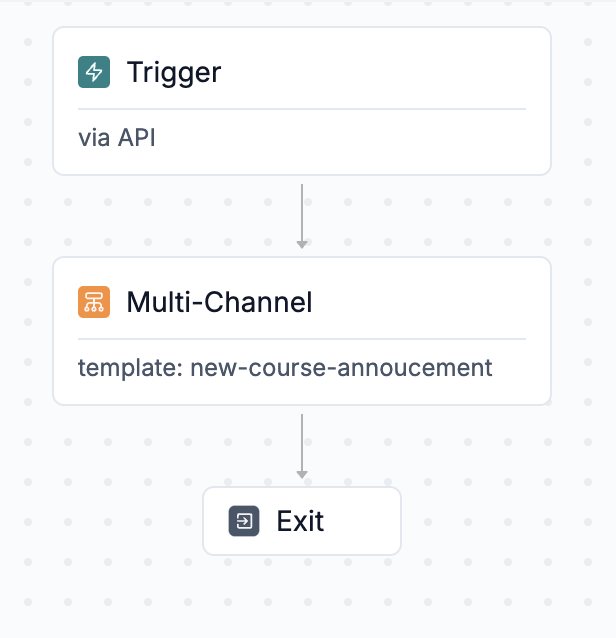
Workflow houses the automation logic of your notification. Each workflow starts with a trigger, processes the defined logic, and sends one or more messages to the end user. You can create a workflow from SuprSend dashboard by clicking on "+ Create workflow" button on the workflows tab.

To design a workflow, you need:
- A Trigger point - Trigger initiates the workflow. You can initiate it
- Using the direct workflow API, where you can include recipient channel information, preferences, and actor details directly in the trigger.
- By emitting an event (note: the recipient needs to be pre-created for event-based triggers).
- Delivery node - Delivery nodes represent the channels where users will receive notifications. You can use multi-channel nodes to send messages across multiple channels, though it’s generally better to use smart channel routing to notify users sequentially rather than bombarding them on all channels at once.
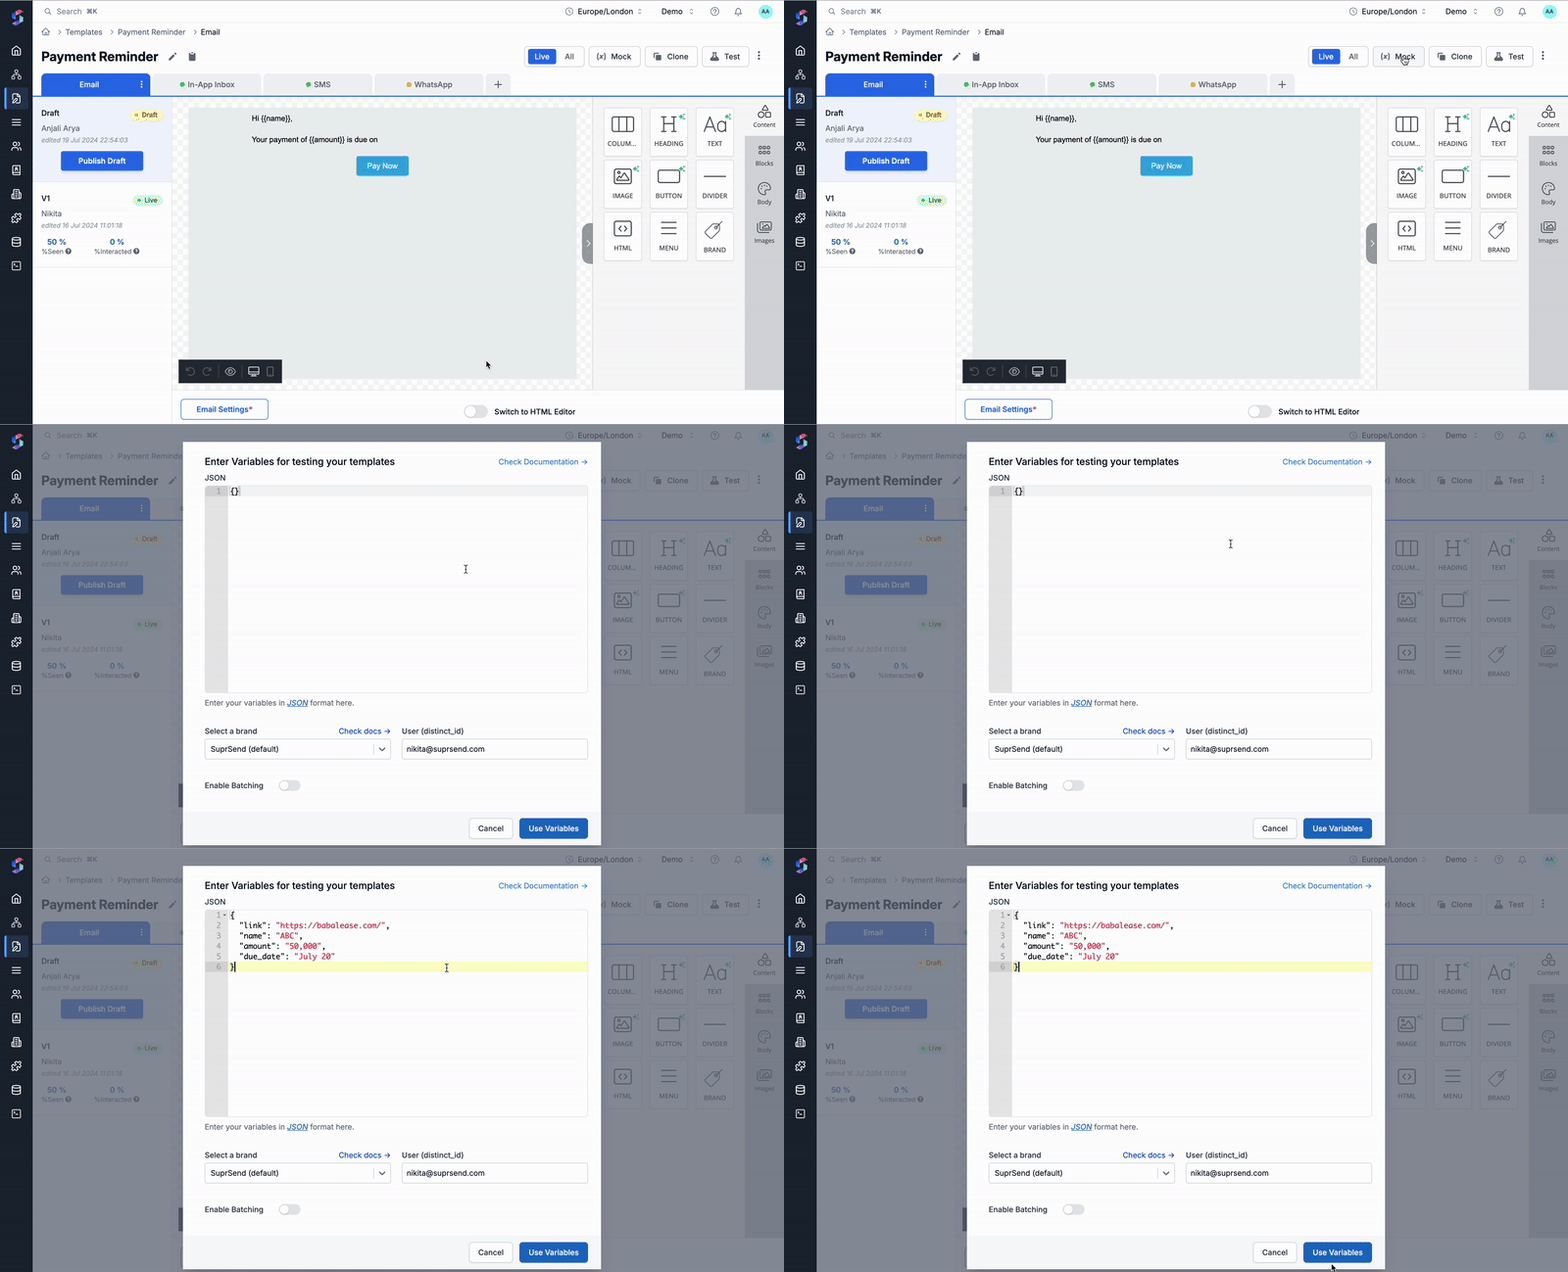
- Template in delivery node contains the content of the notification. You can add both static and dynamic content sourced from user properties or trigger payloads. We use handlebars as our email templating language. You can add dynamic content as
{{var}}. Add trigger data in the mock to get variable auto-suggestions during editing.
Ensure to publish the template before using it in a workflow. Learn more about how to design email template here.

- Functional nodes (Optional) - These are the logic nodes in the workflow. You can use it to add delay, batch multiple notifications in a summary or add conditional branches in the workflow. Check out all workflow nodes here.
4. Trigger the workflow
You can trigger a test workflow directly from dashboard by clicking on "Test" button in your workflow editor or "Commit" changes to trigger it from your code. We follow Git like versioning for workflow changes, so you need to commit your changes to trigger new workflow via the API. You can check all methods of triggering workflow here.
To trigger a workflow, you need:
- Recipient - End user who would be notified in the workflow run. Recipient is uniquely identified by
distinct_idwithin SuprSend and must have the relevant channel identity set in their profile. You can define recipient inline in case of API based trigger or create user profile first for event based trigger.
In Sandbox environment, a sample user with your registered email ID is pre-created for testing. You can always add more users or edit existing user profile from subscriber page on UI. - Data or Event Properties - This will be used to render dynamic content in the template (added in template mock) or variables in the workflow configuration.
We'll be triggering the workflow with direct API trigger for quick testing. You can check all trigger methods here.
Sample Payload for API based trigger
You can get workspace key, secret or API key for trigger from Settings tab -> API keys
curl --request POST \
     --url https://hub.suprsend.com/trigger/ \
     --header 'Authorization: Bearer __api_key__' \
     --header 'accept: application/json' \
     --header 'content-type: application/json' \
     --data '
{
  "workflow": "_workflow_slug_",
  "recipients": [
      {
        "distinct_id": "0gxxx9f14-xxxx-23c5-1902-xxxcb6912ab09",
        "$email":["[email protected]"],
        "name":"recipient_1"
      }
    ],
  "data":{
      "first_name": "User",
      "invoice_amount": "$5000",
      "invoice_id":"Invoice-1234"
    }
 }
'
from suprsend import Event
from suprsend import WorkflowTriggerRequest

supr_client = Suprsend("_workspace_key_", "_workspace_secret_")

# Prepare workflow payload
w1 = WorkflowTriggerRequest(
  body={
    "workflow": "_workflow_slug_",
    "recipients": [
      {
        "distinct_id": "0gxxx9f14-xxxx-23c5-1902-xxxcb6912ab09",
        "$email":["[email protected]"],
        "name":"recipient_1"
      }
    ],
    "data":{
      "first_name": "User",
      "invoice_amount": "$5000",
      "invoice_id":"Invoice-1234"
    }
  },
    idempotency_key = "_unique_identifier_of_the_request_"
  )

# Trigger workflow
response = supr_client.workflows.trigger(w1)
print(response)
const {Suprsend, WorkflowTriggerRequest} = require("@suprsend/node-sdk");
const supr_client = new Suprsend("_workspace_key_", "_workspace_secret_");

// Prepare workflow payload
const body = {
    "workflow": "_workflow_slug_",
    "recipients": [
      {
        "distinct_id": "0gxxx9f14-xxxx-23c5-1902-xxxcb6912ab09",
        "$email":["[email protected]"],
        "name":"recipient_1"
      }
    ],
    "data":{
      "first_name": "User",
      "invoice_amount": "$5000",
      "invoice_id":"Invoice-1234"
    }
}
const w1 = new WorkflowTriggerRequest(body, {
    idempotency_key: "_unique_identifier_of_the_request_"})

// Trigger workflow
const response = supr_client.workflows.trigger(w1);
response.then(res => console.log("response", res));
package main

import (
  "log"
  suprsend "github.com/suprsend/suprsend-go"
)

// Initialize SDK
func main() {
  suprClient, err := suprsend.NewClient("_workspace_key_", "_workspace_secret_")
  if err != nil {
    log.Println(err)
  }
  _ = suprClient
  triggerWorkflowAPI(suprClient)
}

func triggerWorkflowAPI(suprClient *suprsend.Client) {

  // Create WorkflowRequest body
  wfReqBody := map[string]interface{}{
    "workflow": "_workflow_slug_",
    "recipients": []map[string]interface{}{
      {
        "distinct_id":  "0gxxx9f14-xxxx-23c5-1902-xxxcb6912ab09",
        "$email": []string{"[email protected]"},
        "name":"recipient_1",
      },
    },
    // # data can be any json / serializable python-dictionary
    "data": map[string]interface{}{
      "first_name":    "User",
      "invoice_amount": "$5000",
      "invoice_id":"Invoice-1234",
      "spend_amount":  "$10",
    },
  }

  w1 := &suprsend.WorkflowTriggerRequest{
    Body: wfReqBody,
    IdempotencyKey: "_unique_identifier_of_the_request_",
  }
  // Call Workflows.Trigger to send request to Suprsend
  resp, err := suprClient.Workflows.Trigger(w1)
  if err != nil {
    log.Fatalln(err)
  }
  log.Println(resp)
}
package test;

import java.io.IOException;
import java.io.UnsupportedEncodingException;
import java.util.Arrays;

import org.json.JSONArray;
import org.json.JSONObject;

import suprsend.Suprsend;
import suprsend.SuprsendException;
import suprsend.WorkflowTriggerRequest;

public class Workflow {

  public static void main(String[] args) throws Exception {
    WorkflowTrigger();
  }

  private static void WorkflowTrigger() throws SuprsendException, UnsupportedEncodingException {
    Suprsend suprClient = Helper.getClientInstance();
    // payload
    JSONObject body = getWorkflowBody();
    String idempotencyKey = "_unique_request_identifier";
    WorkflowTriggerRequest wf = new WorkflowTriggerRequest(body, idempotencyKey, tenantId);
    //
    JSONObject resp = suprClient.workflows.trigger(wf);
    System.out.println(resp);
  }

  private static JSONObject getWorkflowBody() {
    JSONObject body = new JSONObject()
      .put("workflow", "__workflow_slug__")
      .put("recipients", new JSONArray()
           .put(new JSONObject()
                .put("distinct_id", "0gxxx9f14-xxxx-23c5-1902-xxxcb6912ab09")
                .put("$email", Arrays.asList("[email protected]"))
                .put("name", "recipient_1")
               ))
      .put("data", new JSONObject()
           .put("first_name", "User")
           .put("invoice_amount", "$5000")
           .put("invoice_id", "Invoice-1234")
          );

    return body;
  }
}
5. Check logs to see the status of your sent notification
Once triggered, you can monitor the request and it's status on the "Requests" tab, and view step-by-step debugging of each execution on the "Execution" tab inside workflow.
6. Test with your Email vendor
You have to bring your own vendor to setup email notification in staging and production workspaces. However, you can test your workflows in Sandbox where sample vendors are pre-added. You can clone workflows from one workspace to another. All you have to do is fill in the vendor form for your respective vendor and you are good to go.
7. Push to Production
In SuprSend, each environment is isolated, meaning workflows, users, and vendors are configured separately in testing and production workspaces. Follow this go live checklist to setup things in production once you are done testing.
What's next?
- Invite other team members - You can invite other collaborators from your team to your SuprSend account from Account Settings -> Teams page.
- Go through our best practices around system usage and API setup.
- Check out workflow documentation to learn how to design advanced notification usecases.
- For deeper integration with SuprSend, check out the core concepts and learn more about our flagship features - In-app Inbox and Preferences to deliver a delightful user experience.
- Here are some blogs that may come in handy to improve your email deliverability and engagement:
- The Ultimate Guide to Improving Email Deliverability for Product Teams in 2024
- A Developer's Guide to SPF, DKIM, and DMARC to Authenticate Their Emails
- How to Identify Email Spam Rate with Google Postmaster in the Next 60 Seconds?
- 5 Actionable Tips To Reduce Email Spam Rates In 1 Week (Without Changing Domains)
- If you are tracking your users and events in a third party data platform like Segment, you can setup email notifications with SuprSend in a no-code manner without having to integrate any SuprSend SDK.
Updated 8 months ago
