React Native
Setup Guide to Suprsend's React Native SDK
Overview
This document contains SDK setup process for both Android and iOS device. Further, we'll cover basic and advanced methods to track user properties, events and push tokens from frontend clients. With the help of this SDK, you will be able to send Communication directly from your app, and render push notifications on both android and iOS devices.
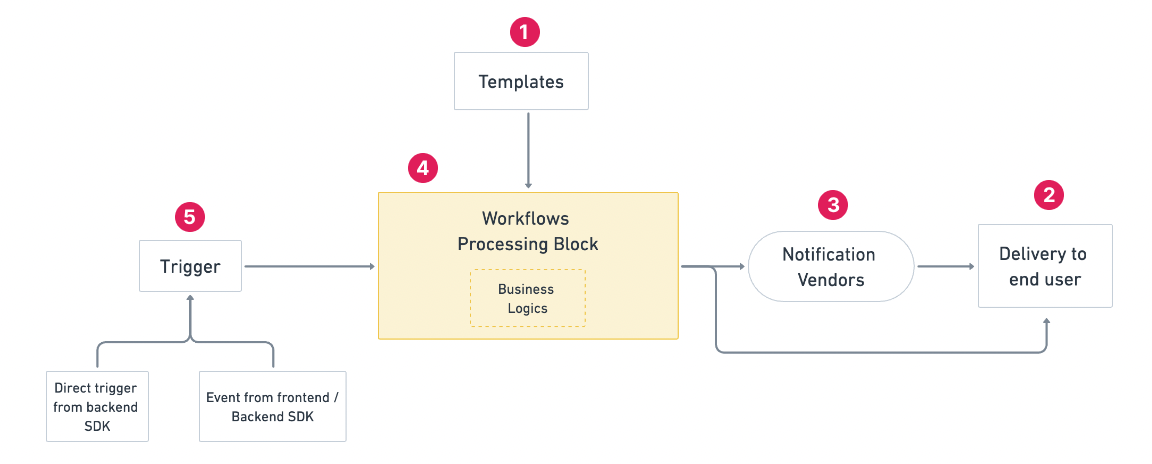
For a better understanding of how to trigger a communication using your frontend SDK, we first need to understand how SuprSend sends communications to the end users. This is what a typical communication flow looks like

SuprSend Communication flow
Communications are made up of 5 major components - templates, vendors, end users, trigger and workflows. All of these components are defined below:
1. Template
Template contains the message content that needs to be sent. You can manage your templates on the SuprSend dashboard. This gives you the flexibility of making changes in the message content without changing anything in the code. Message content corresponding to multiple channels (like email, SMS etc.) are grouped under the single template name. You can create a template on SuprSend dashboard by following our Templates documentation
2. Users
Users are your end recipients who need to be notified. Users are identified by a unique identifier distinct_id inside your workflows. Message will be sent to all the active channels in a user profile. For example - if your template contains message corresponding to email and SMS channel wherein your user profile has information related to only email channel, only email will be sent to that user. We'll learn more about how to add a user and their channel preferences in this document
3. Vendors
Vendors are the channel providers through which your messages will be routed. You just have to add your vendor configurations on SuprSend platform and start sending the notification. Messages will always be routed through the default vendor configurations set on SuprSend dashboard. You can configure your vendors by following our vendor configurations guides
4. Workflow
Workflow combines all the communication elements (like user, trigger, template, vendor, etc) and adds a business logic to it to determine how / when the notification should be triggered. Read more about workflows here
5. Trigger
Trigger initiates the workflow. There are two ways in which you can trigger a workflow:
- From API: Configure all the workflow components (users, template name, business logic etc) including the business logic in an API payload and trigger workflow through API.
- Event-based trigger: where you design the workflow on Suprsend platform and pass event from API as a trigger point.
For most usecases, event-based triggers are recommended as most of the workflow elements are not tied to the code, and can be easily modified through SuprSend dashboard without changing anything in the code.
What is covered next in this documentation
In this documentation , we'll cover:
- How to integrate react native SDK in android application
- How to integrate react native SDK in iOS application
- How to create User profile and add user channel preferences to it
- How to send and track events for triggering event based workflows
- How to render android push notification using firebase
- How to render iOS push notification
You can now follow the detailed integration steps metioned in the above documentation links.
Sample App
If you face any issues with Android or iOS setup, please refer to the example folder in the SDK Github repository. You will find an example application with the SuprSend integration already setup along with push notification support
Updated 12 months ago
Next step is to integrate react native SDK in your application
