Overview
Learn how to design multi-channel and multi-stakeholder workflows
Prerequisites
Understanding the basics of workflows
Creating a new workflow
You can create a new workflow by clicking on +Create Workflow button on the workflow page. It will open a modal, where you'll need to input a name and category for the workflow. It's crucial to choose a relevant name initially, as it will determine the related workflow slug, which cannot be modified later. While creating the workflow, you can select any notification category and adjust it later if needed.
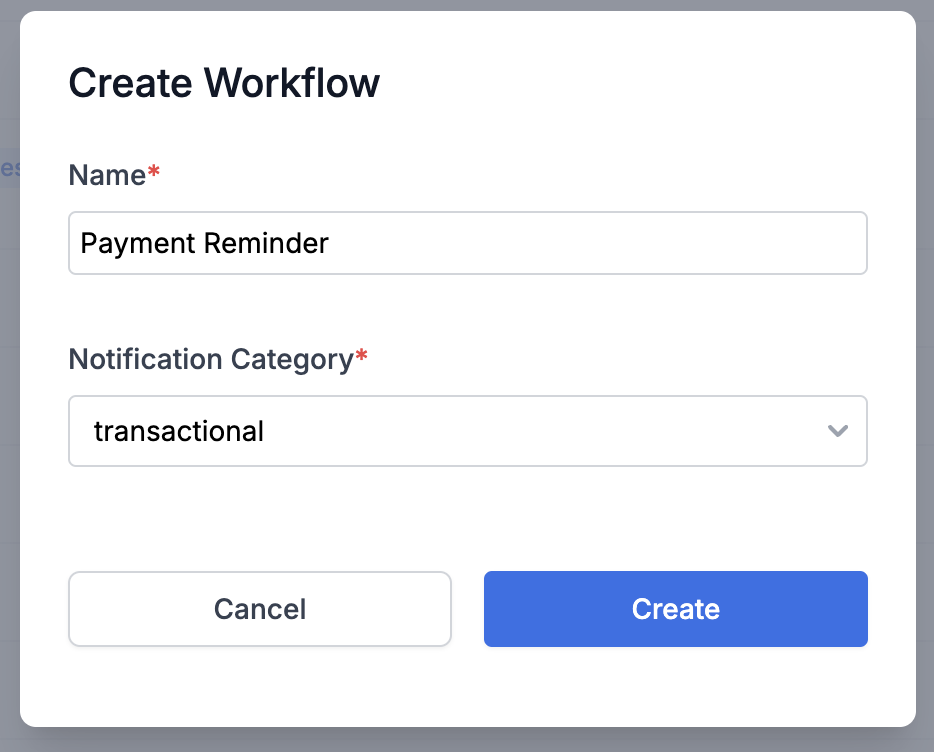
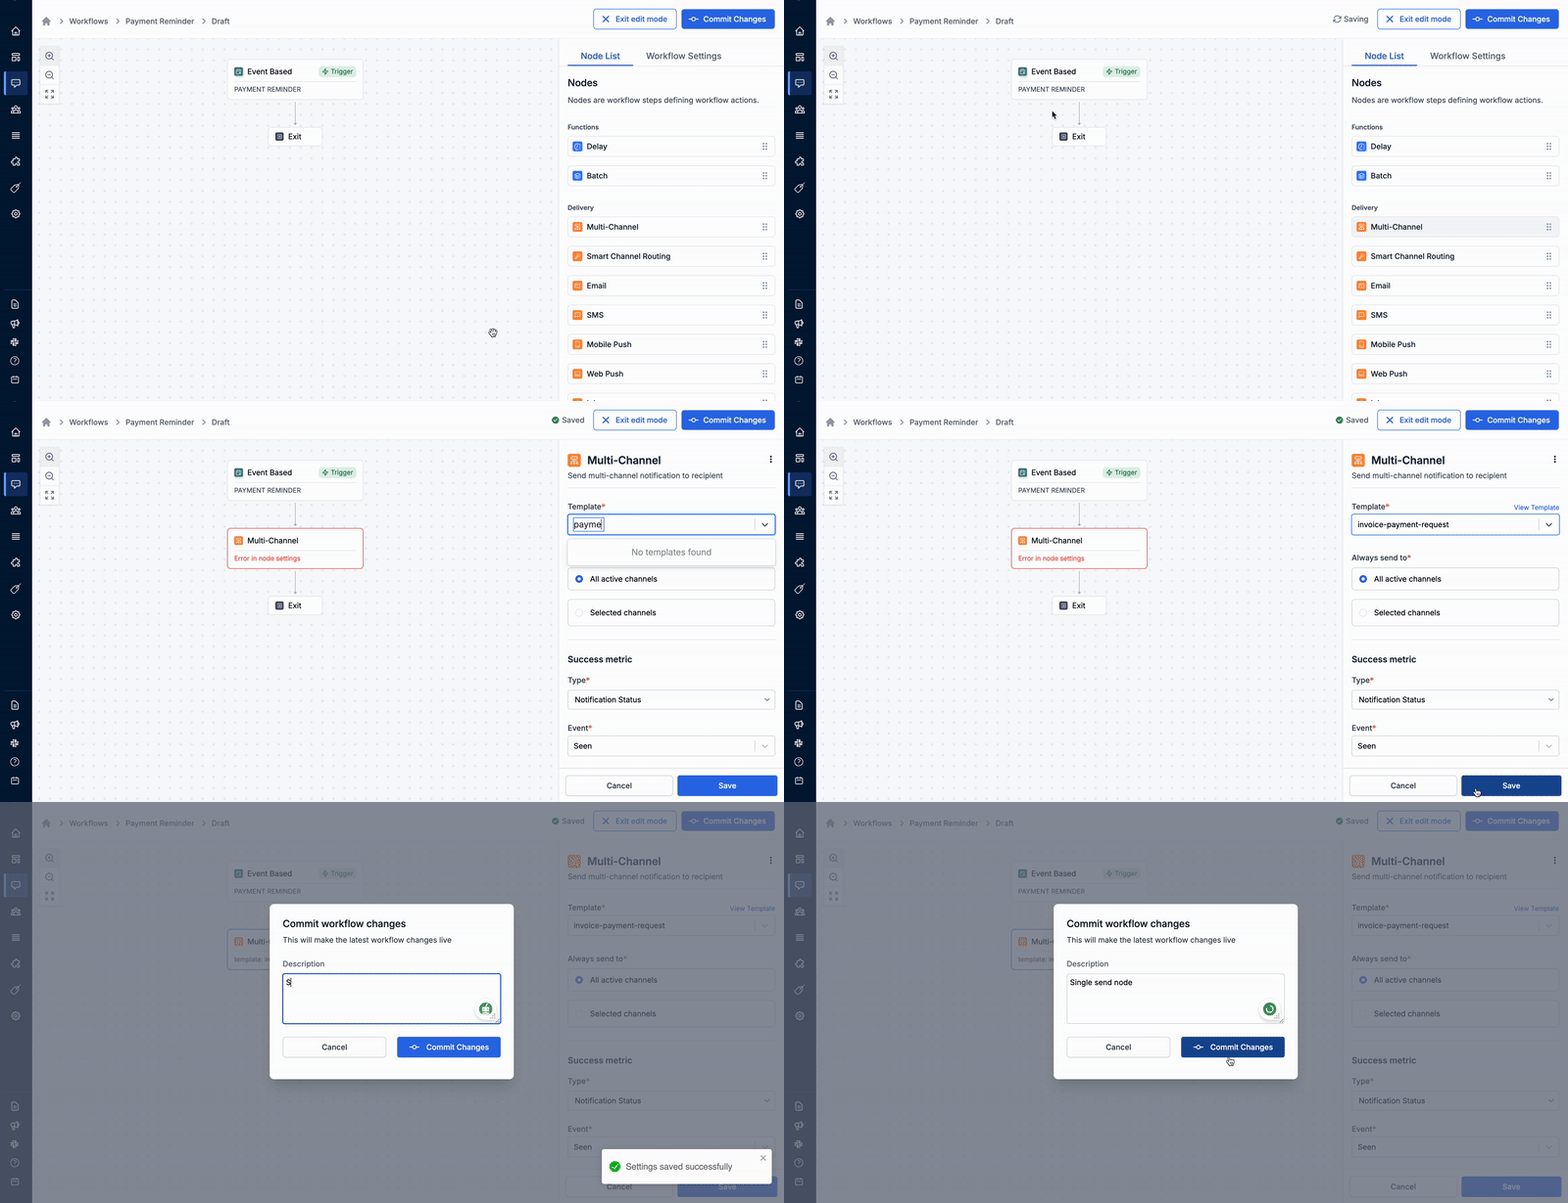
After entering the required details, click on Create button to create a new workflow in draft state. You'll see the created workflow on top of the listing page, click on it to start editing. Now, add relevant nodes to your workflow and edit workflow settings. Once you've finalized your edits, remember to commit changes to make the workflow live. If you don't want to make your changes live right away, you can exit edit mode and come back later to commit the changes. Rest assured, your modifications will remain saved in the draft state until finalized.
Designing workflow
Workflows allow you to create complex notifications with a series of steps, determining whom to notify, when, and via which notification channels. Here, we'll detail how to create a multi-step workflow on SuprSend dashboard and trigger it from your codebase. A workflow is made of three on themajor steps (referred to as nodes of the workflow).
1. Trigger Node
It is the first step of your workflow and contains information about the event that triggers the workflow run. To initiate a workflow run, make the event call with the following data:
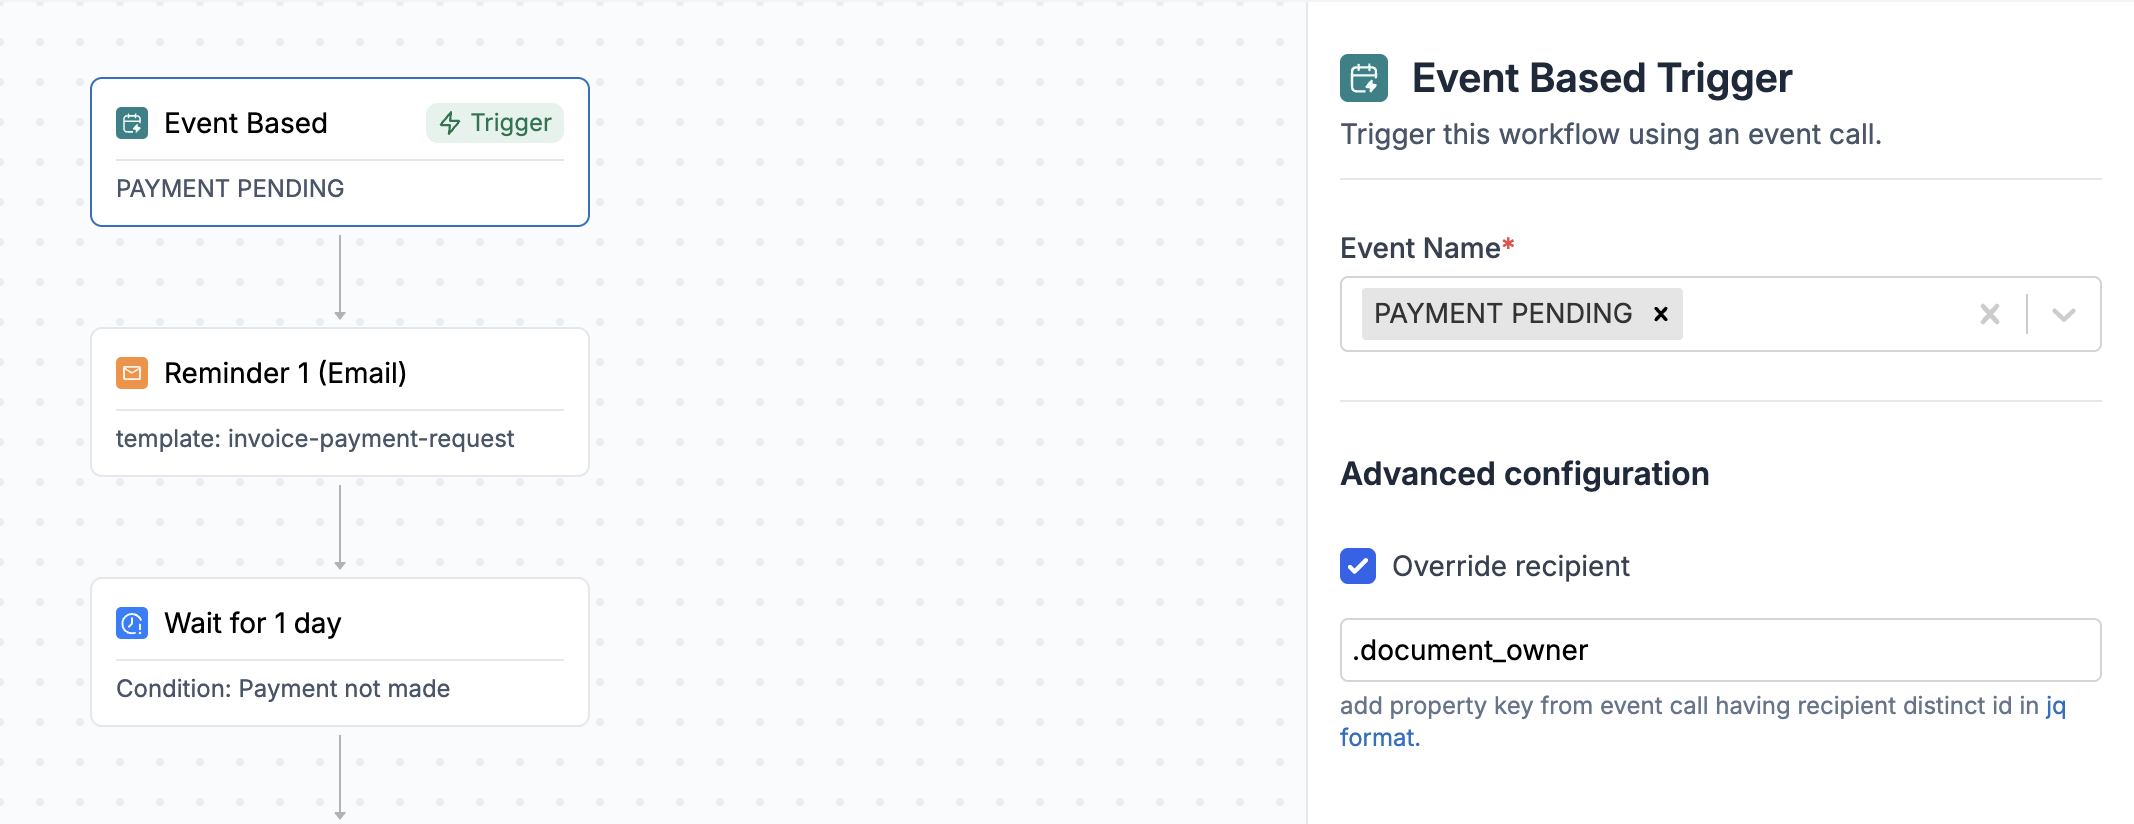
event name- Name of the event defined in the workflow trigger.properties- Properties should have data corresponding to variables added in the template content or data required to render dynamic fields in workflow nodes like override channels, dynamic delay windows, etc.distinct_id- Unique identifier of the user who performs the event and needs to be notified. You can also override recipient to notify other users who have not performed the event. For instance, notify the document owner of the new comments added by a commentor or inform the finance team when a new expense ticket is raised.
You can trigger events using one of our SDKs or directly integrate with your CDP platforms, like Segment, where you currently track your events.
2. Function Nodes
Functions are logical steps in your workflow. We currently support the following functions:
-
Delay: wait for a time before proceeding to the next node.
-
Batch: aggregate multiple triggers into a single batch and send a single consolidated notification.
-
Time Window: send notification in a given time schedule.
We are adding more functions to support the complex notification usecases. Have a use case in mind? Reach out to us in our Slack community, and we'll prioritize it.
3. Branch Nodes
Branches split the workflow execution into parallel flows. We currently support the following branch:
- Wait Until: wait until a condition is met or a specific time interval is reached.
4. Delivery Nodes
These nodes are the final steps in the workflow, responsible for delivering notifications to users. You can either configure single channel nodes to send notification on one of the channels (Email, SMS, Whatsapp, Inbox, Mobile push, Web push, Slack and Teams) or add a multi-channel node to send notification across multiple channels at once.
If you want to send multi-channel notifications, we recommend using smart channel routing to ensure that notifications are delivered sequentially on multiple channels rather than bombarding users on all channels at once. In case of smart routing, notifications are sent with a delay on channels until user engages with the notification on one of the channels. This way, you can achieve the uptick in engagement (delivery, seen and interaction rate) without unnecessary noise and also save cost of paid notification channels.
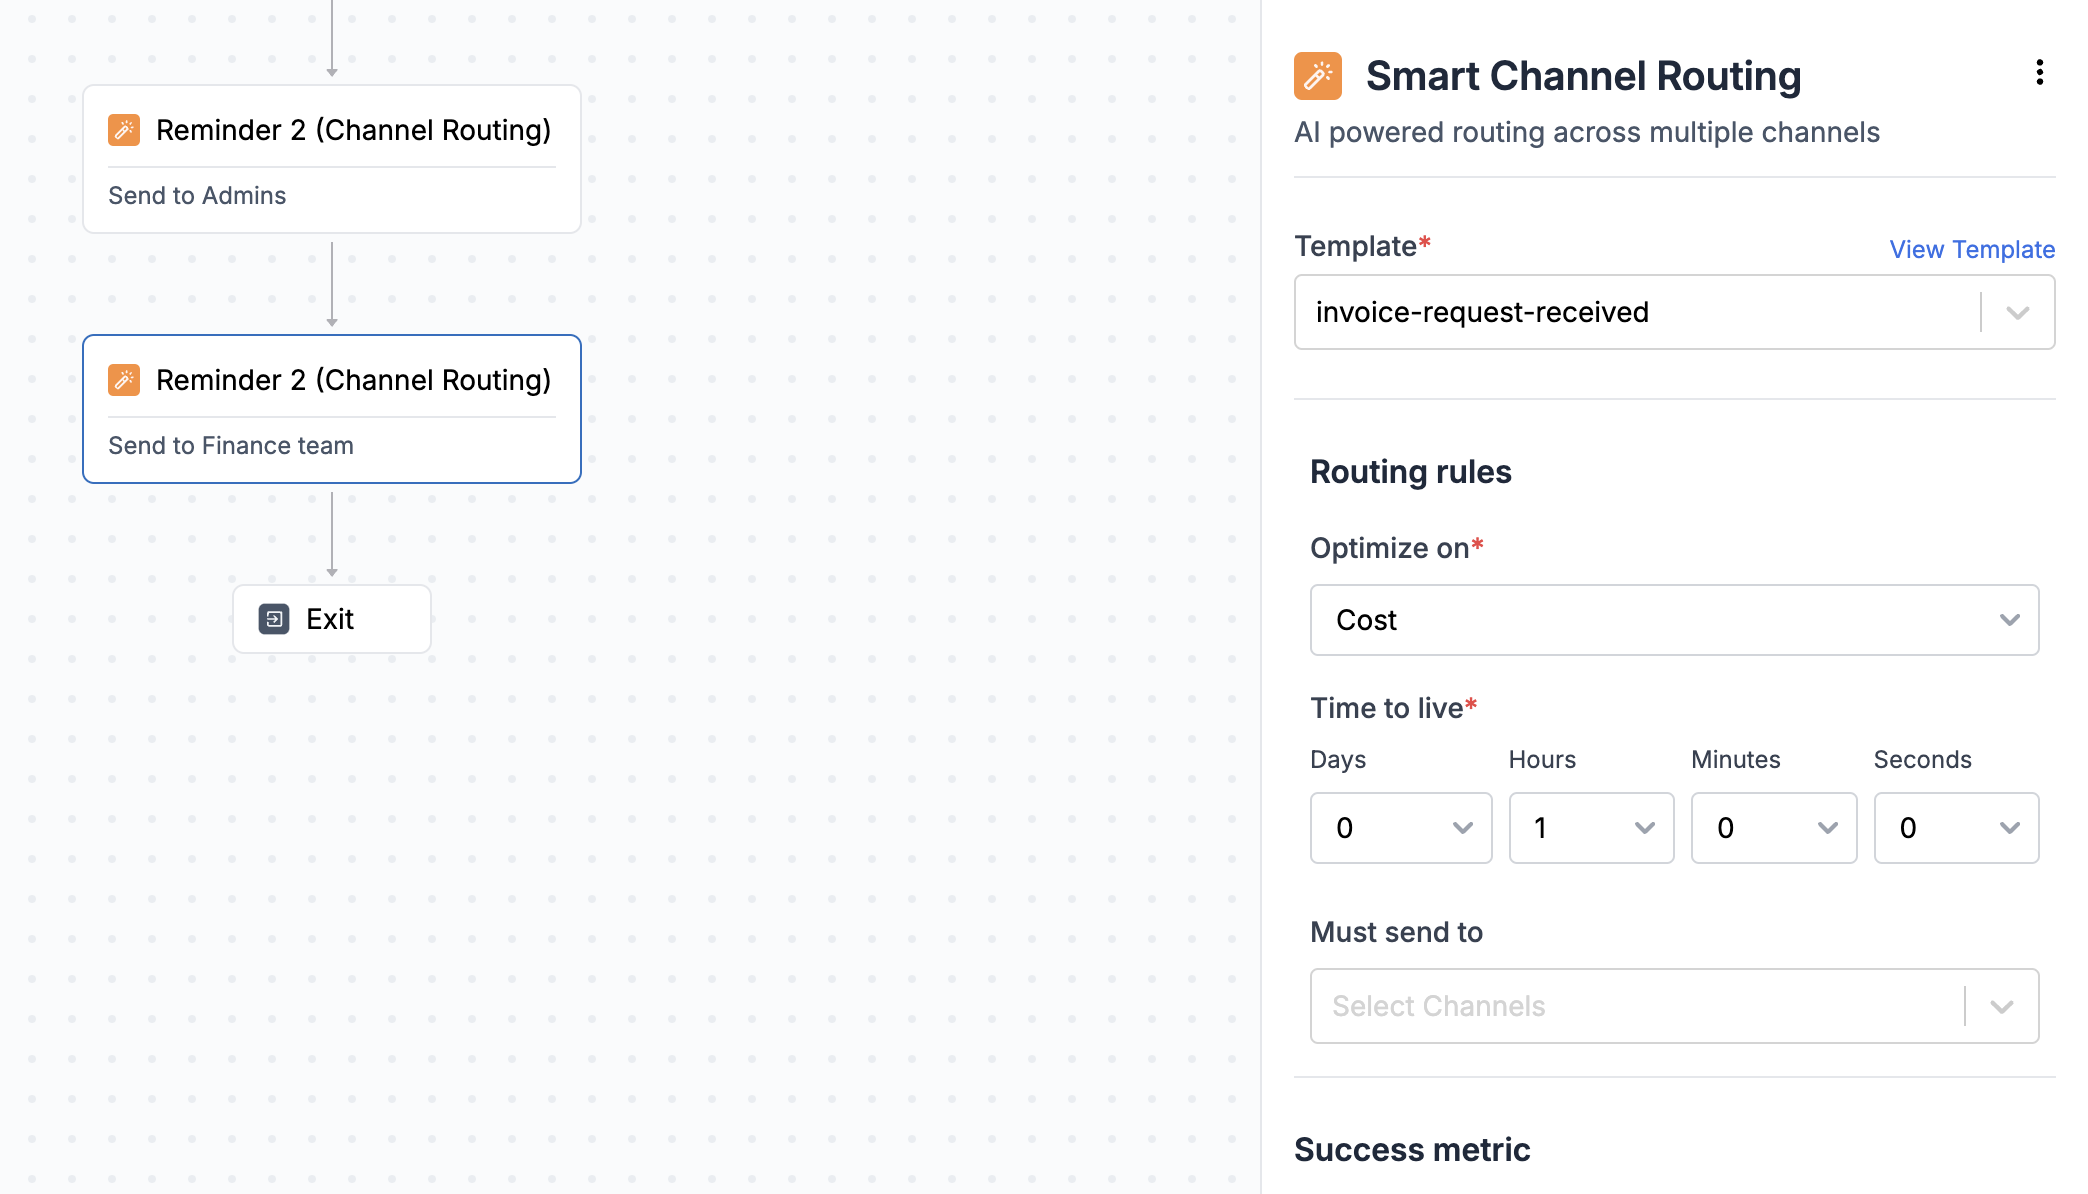
Smart Channel Routing configured to send reminder across Email and Inbox
Notification content is picked from the template, and only published and live templates can be added to the delivery node. Therefore, it's essential to design the template before configuring this node.
When the workflow reaches this node, it looks for active channels in the template and user profile, and send the notification to active user channels whose template content is live. User preferences are also taken into account at this stage. If the user has opted out of the given notification category or channel, it will be skipped, and corresponding errors can be seen on the logs page.
Workflow Settings
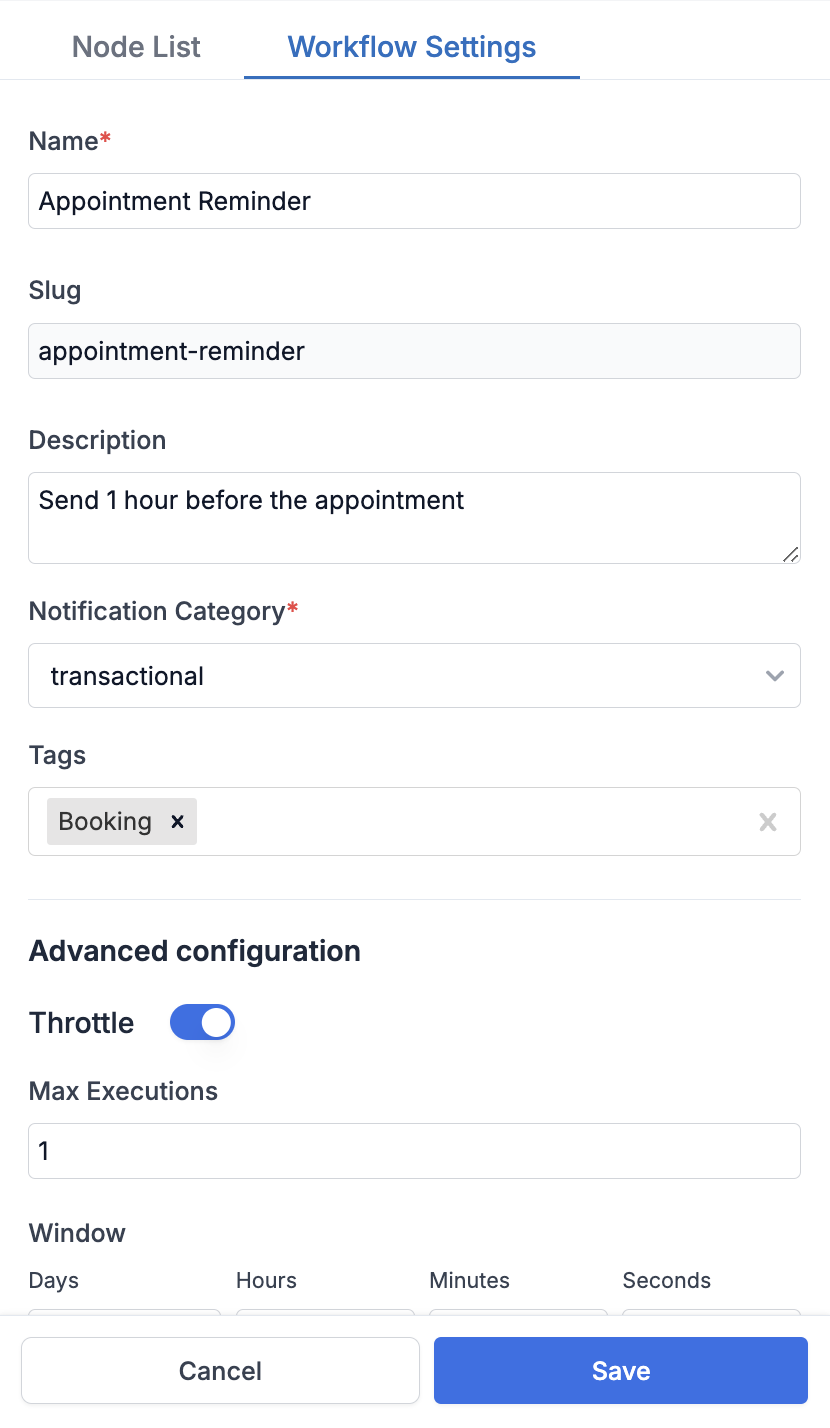
This is where basic workflow details like name, description and tags go. You can also define workflow-level conditions like throttle here. Below is a list of workflow configurations and their descriptions:
| Field | Obligation | Description |
|---|---|---|
| Name | mandatory | Unique name of the workflow. The workflow name should be easily identifiable for your reference at a later stage. For example - Appointment Reminder. You can also use event name as your workflow name if there is only one workflow linked to that event. |
| Description | optional | You can use this field to add more details about your workflow like the notification logic. For example - Send 1 hour before the appointment |
| Notification Category | mandatory | Notification category is used to group related workflows together and are also used for users to set their preferences across a group of workflows. There are 3 notification categories by default transactional (user action based alerts), promotional (marketing notifications) and system (time sensitive notifications like OTP and authentication codes). |
| Tags | optional | Tags are used to group related workflows together. For example, all booking related workflows can be tagged as Booking. |
| Throttle | optional | You can use throttle to limit the number of workflow executions per user in a given time window. Know more about throttle here |
Change Node name and Description
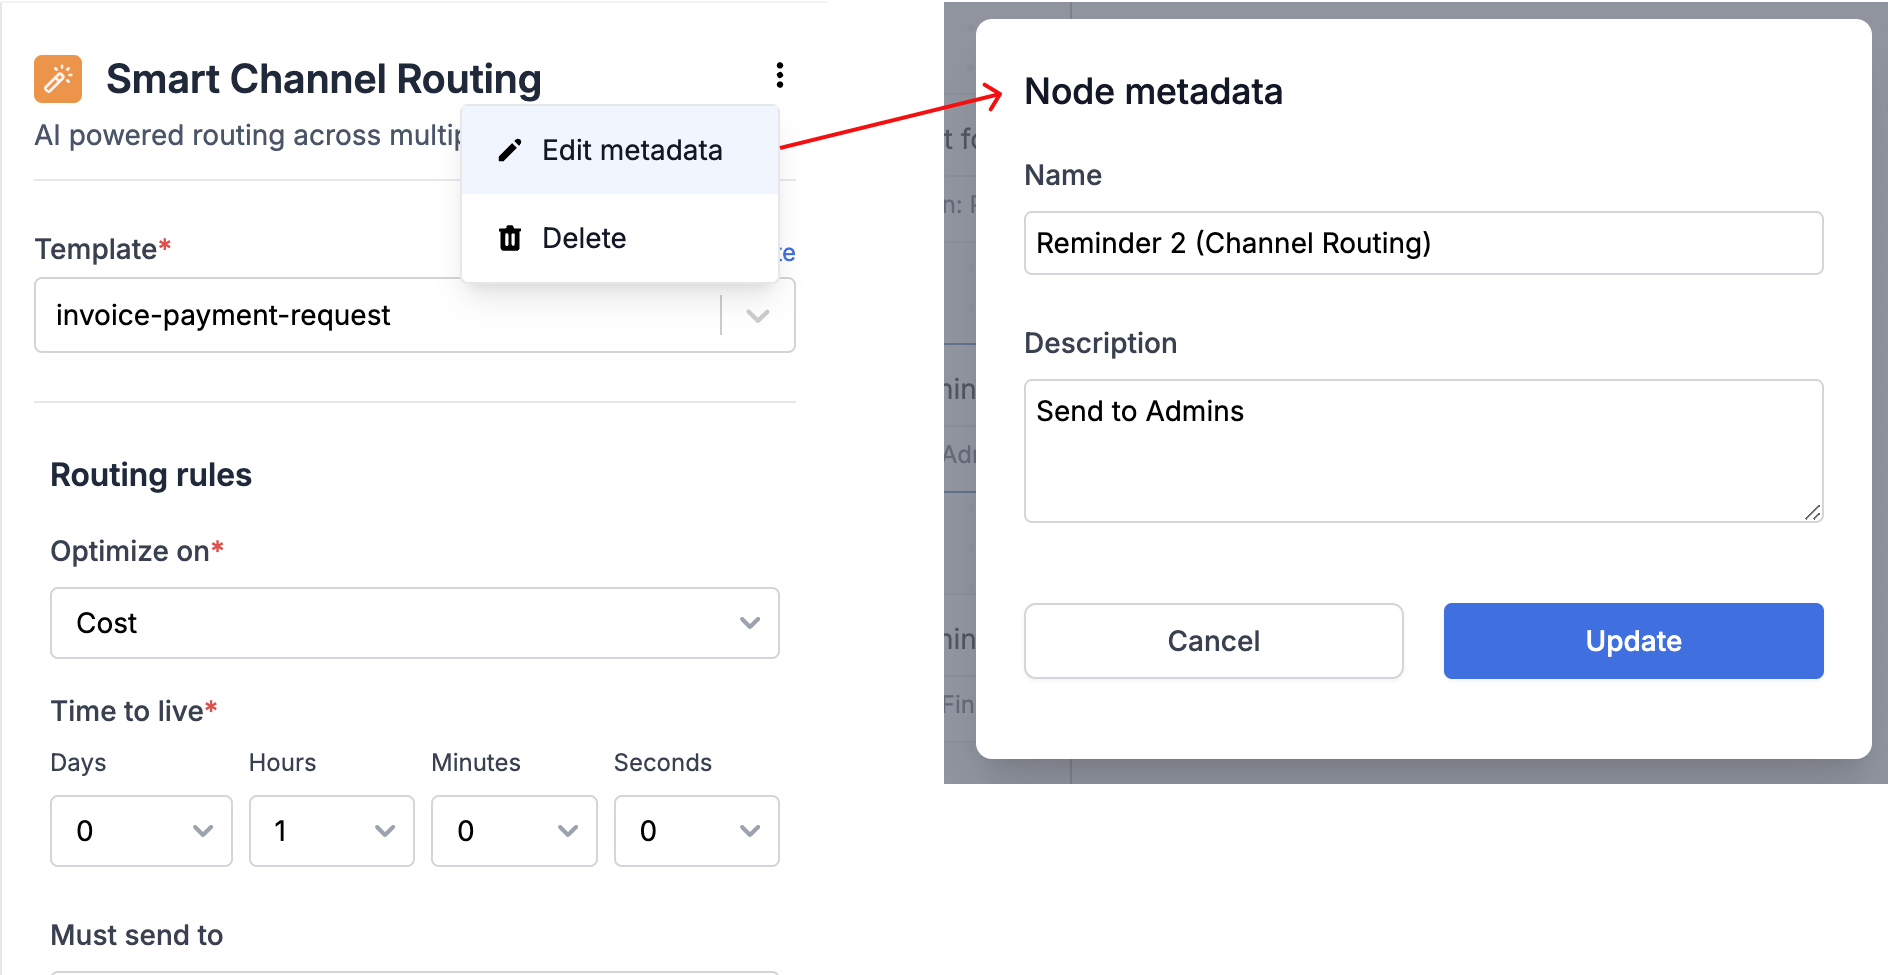
To modify the name and description of a node, click on the edit metadata option from the burger menu on your node form. Choose a descriptive name that clarifies the function of the step, and we suggest including node type in the name for easier identification. In the description field, provide a concise explanation of the logic and important elements of the node. For instance, in a send node, you can specify the template being used or provide details about the list of users who will be notified if it differs from the actor.
Delete Node
If you want to remove a node from the workflow, click on the delete option from the burger menu on your node form to delete it.
Cloning a workflow
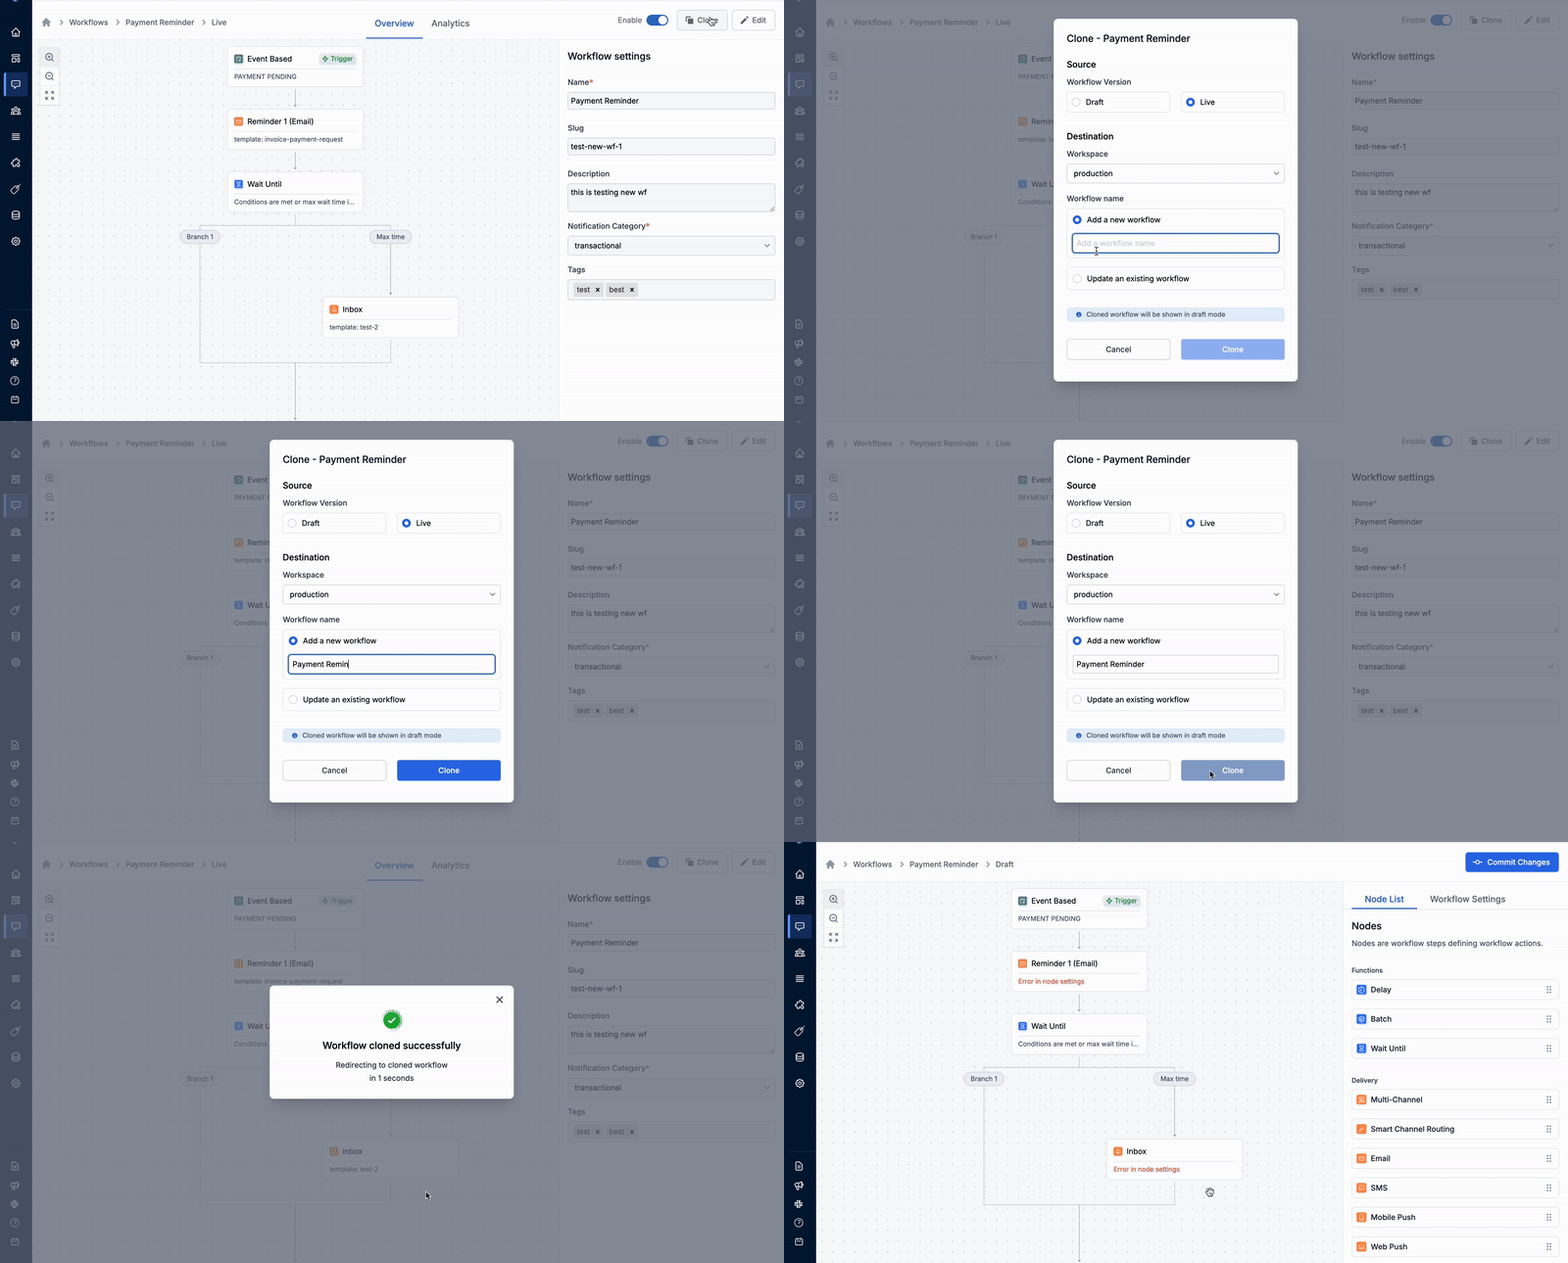
We recommend designing and testing workflows in staging workspace first before pushing it to production. You can use clone functionality to duplicate workflows across workspaces or to avoid creating similar workflows from scratch.
To clone a workflow, just click the clone button on workflow details page in view mode. Please note that you won't see this option while editing the workflow.
Once cloned, your workflow will appear as a draft in your chosen destination. You can then commit it to make it live.
Updated 11 months ago
Next, start building your notification by adding relevant nodes to the workflow
