Sync a SuprSend List from your data warehouse by writing SQL — on a schedule you set, with the option to create users and update their profile properties and channels at the same time.
Connect your data warehouse to SuprSend and sync a List’s membership by writing a SQL query. The query runs on the schedule you choose, so the list stays in sync with your source of truth without any code. In the same pass, you can also create users who don’t yet exist in SuprSend and update their profile properties or channels — powering personalized broadcasts and workflows.
Database sync needs an active database connection. If you haven’t added one, see Setup database connection first.
A sync task is a SQL query plus a schedule. When the schedule fires, SuprSend runs the query, adds or replaces the list membership from the result, and — if you enable it — creates any users who don’t yet exist and updates each user’s profile properties and channels from other columns your query returns.
Go to Lists → + New List and set a list_id (required — unique within the workspace; lowercase letters, digits, and underscores only), plus an optional name and description.
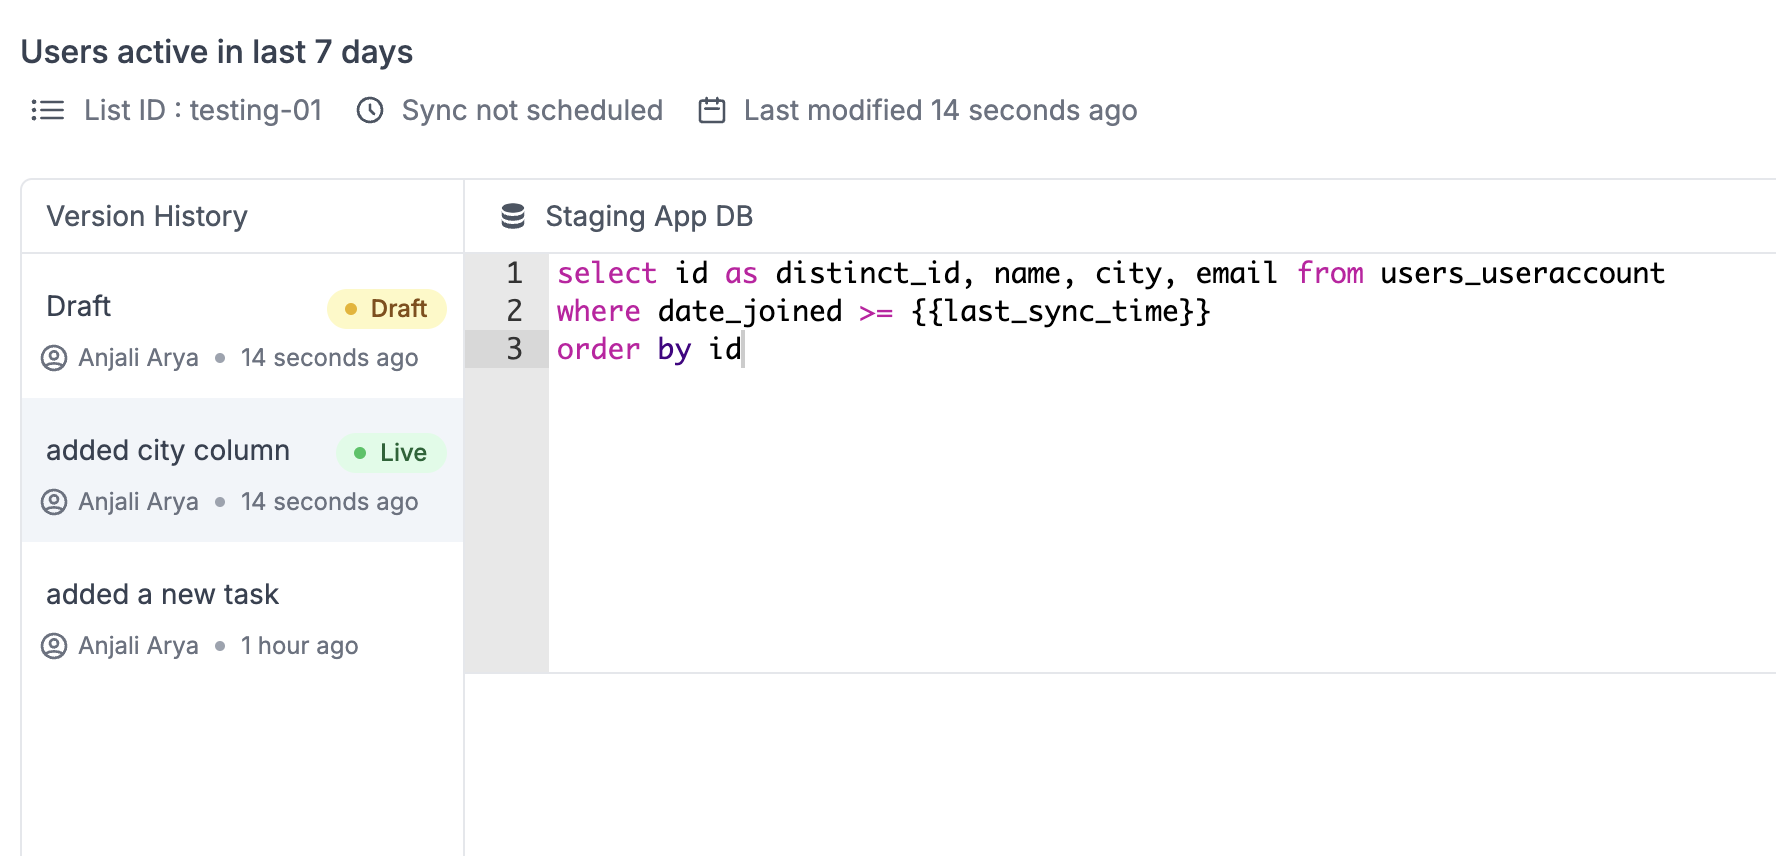
Open the list from the Lists page. On the User Sync Query tab, click Setup Sync to launch the query editor.
Empty User Sync Query tab — click Setup Sync to start.
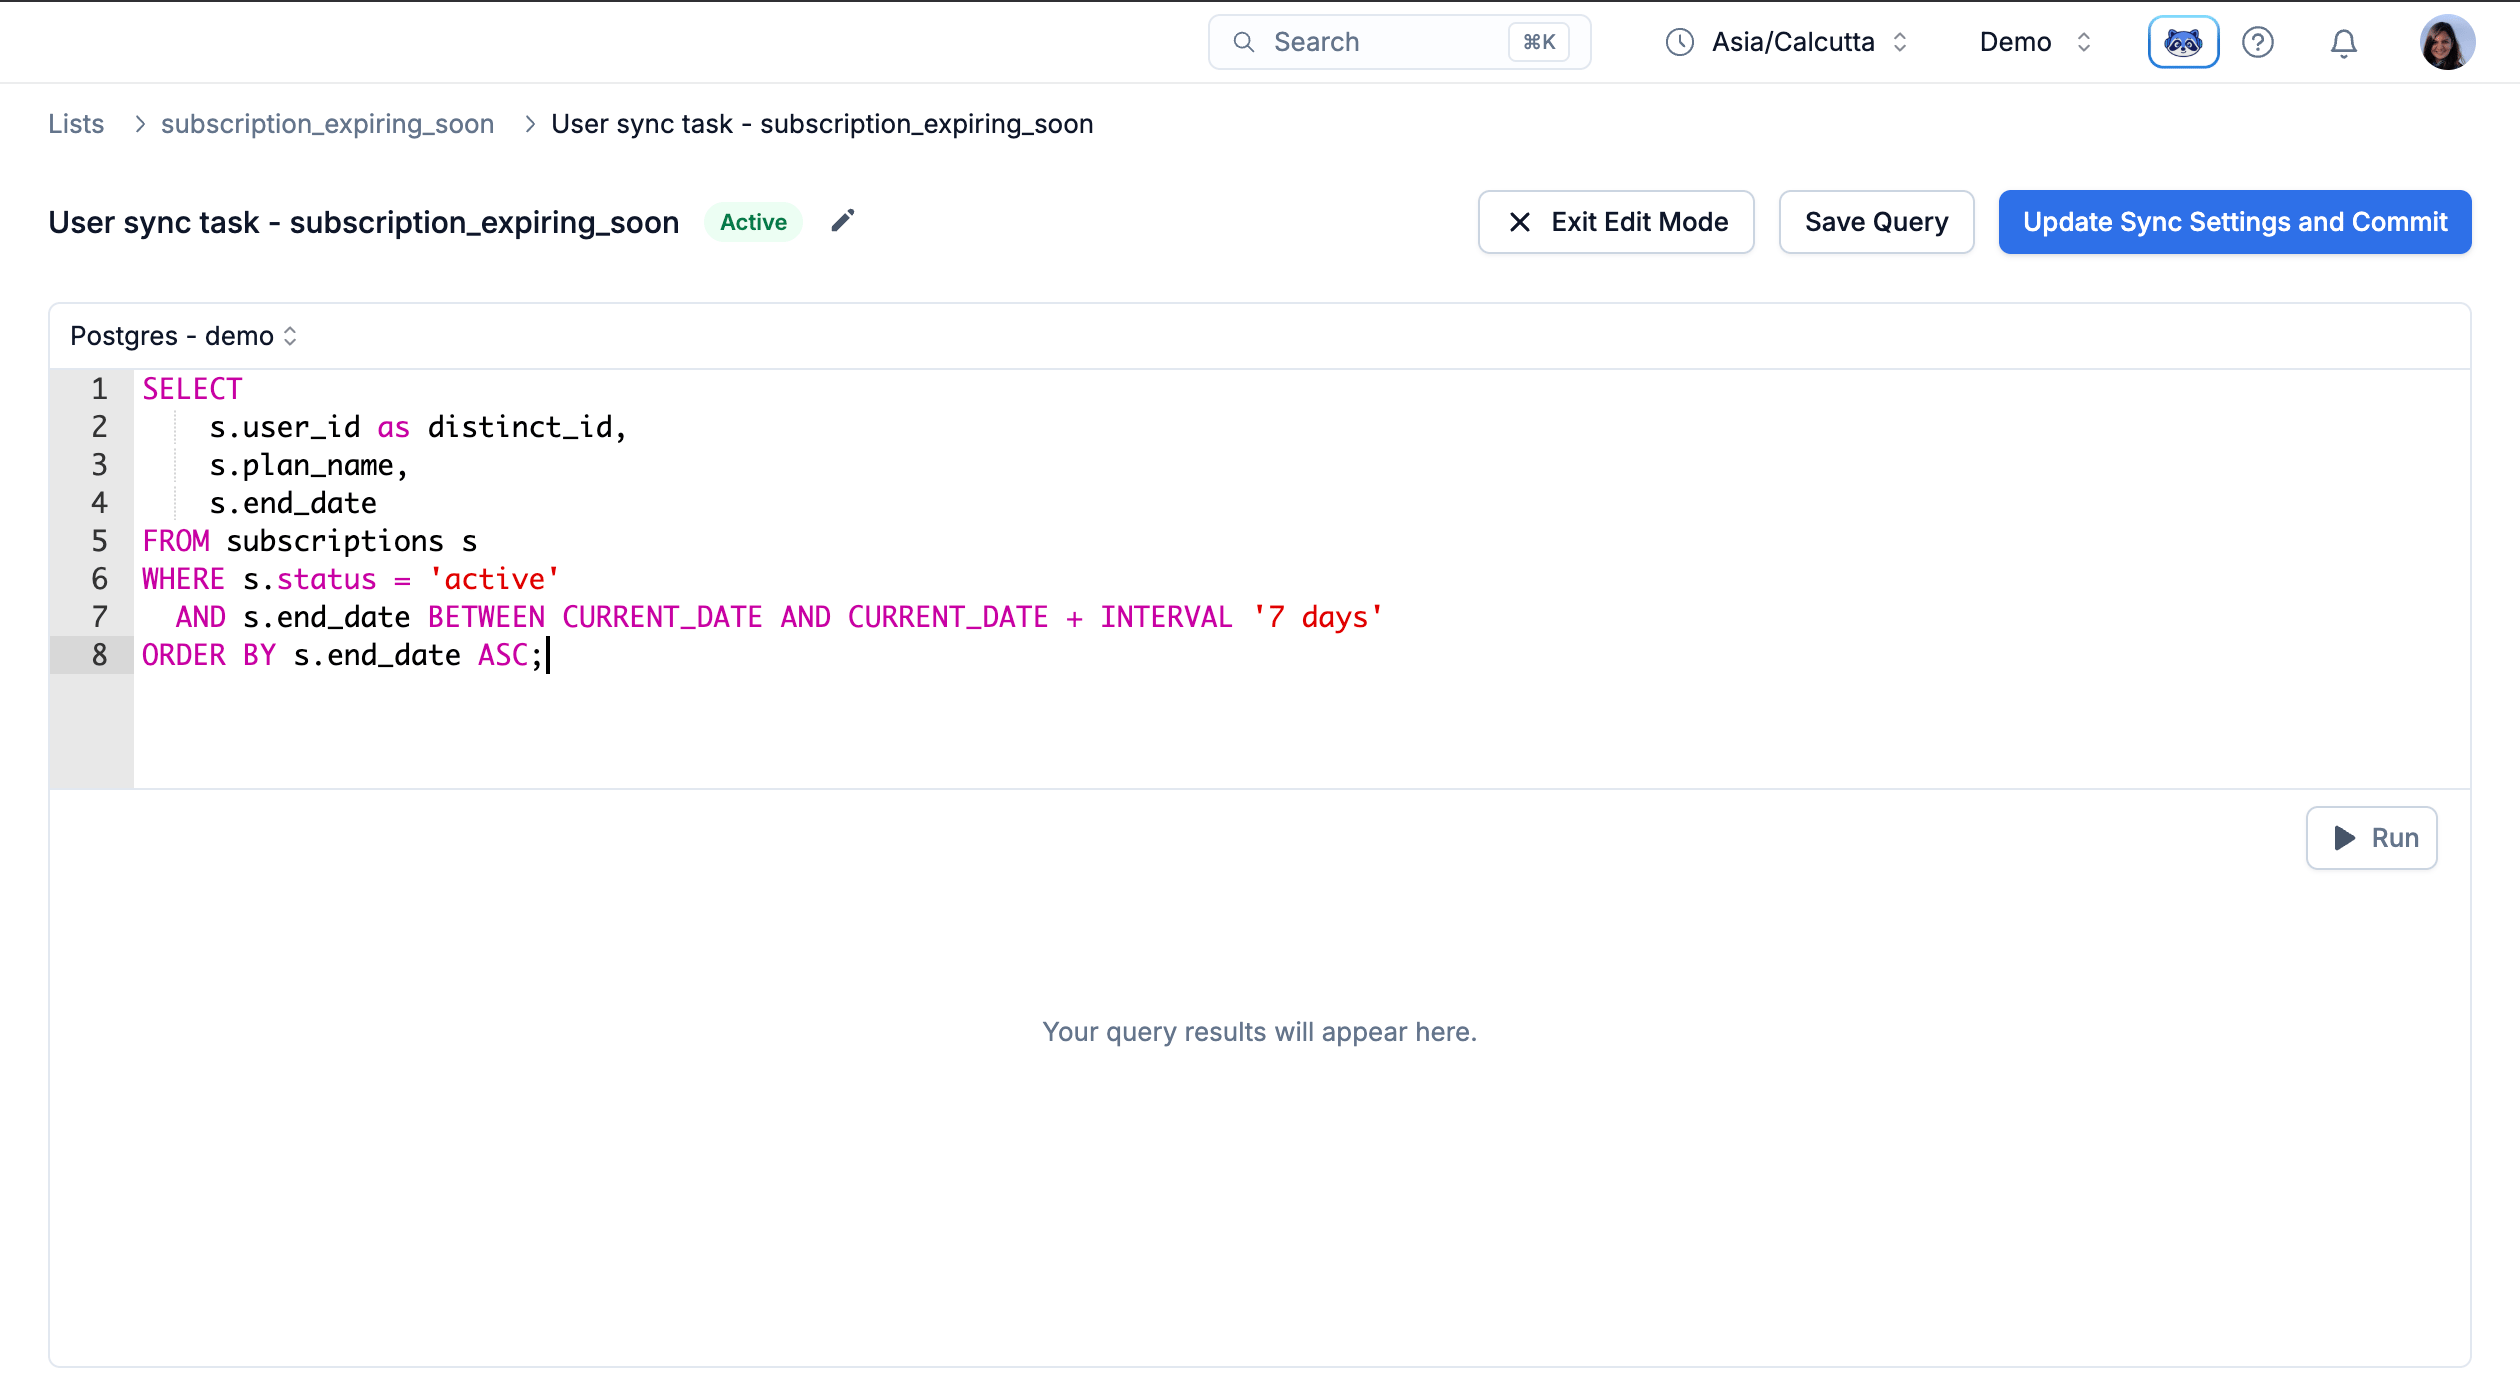
Pick your database connection from the dropdown at the top of the editor, then write the query that returns the users to sync. If you haven’t added a connection yet, add it from this screen — see database connection for the setup.
Query editor with connection selector, SQL input, and preview panel.
Keep these rules in mind as you write the query:
Return distinct_id — your SELECT must include this column; it’s how SuprSend identifies each user. Any additional columns can be mapped to a user property or channel in the next step.
Preview, then save — click Run to preview the first 10 rows and confirm the query pulls what you expect, then click Save Query to persist the draft.
Select only what you need — avoid SELECT * in the committed query. The preview limits to 10 rows, but the live sync would return all rows and columns and can take longer to run.
Mind column-name case — mappings are case-sensitive, so Email, email, and EMAIL are three different columns. Pick one form and stick with it.
Format channel columns - make sure that you format the channel values correctly otherwise they’d be dropped while syncing in user profile.
For recurring syncs, use the {{last_sync_time}} template variable to fetch only rows that changed since the previous successful run. This keeps queries fast and avoids re-processing the same rows on every sync.{{last_sync_time}} is an ISO 8601 timestamp. Add a WHERE clause against an indexed “last updated” column in your source table, and cast the variable if your column uses a different format.
Once the preview looks right, click Update Sync Settings and Commit.
1
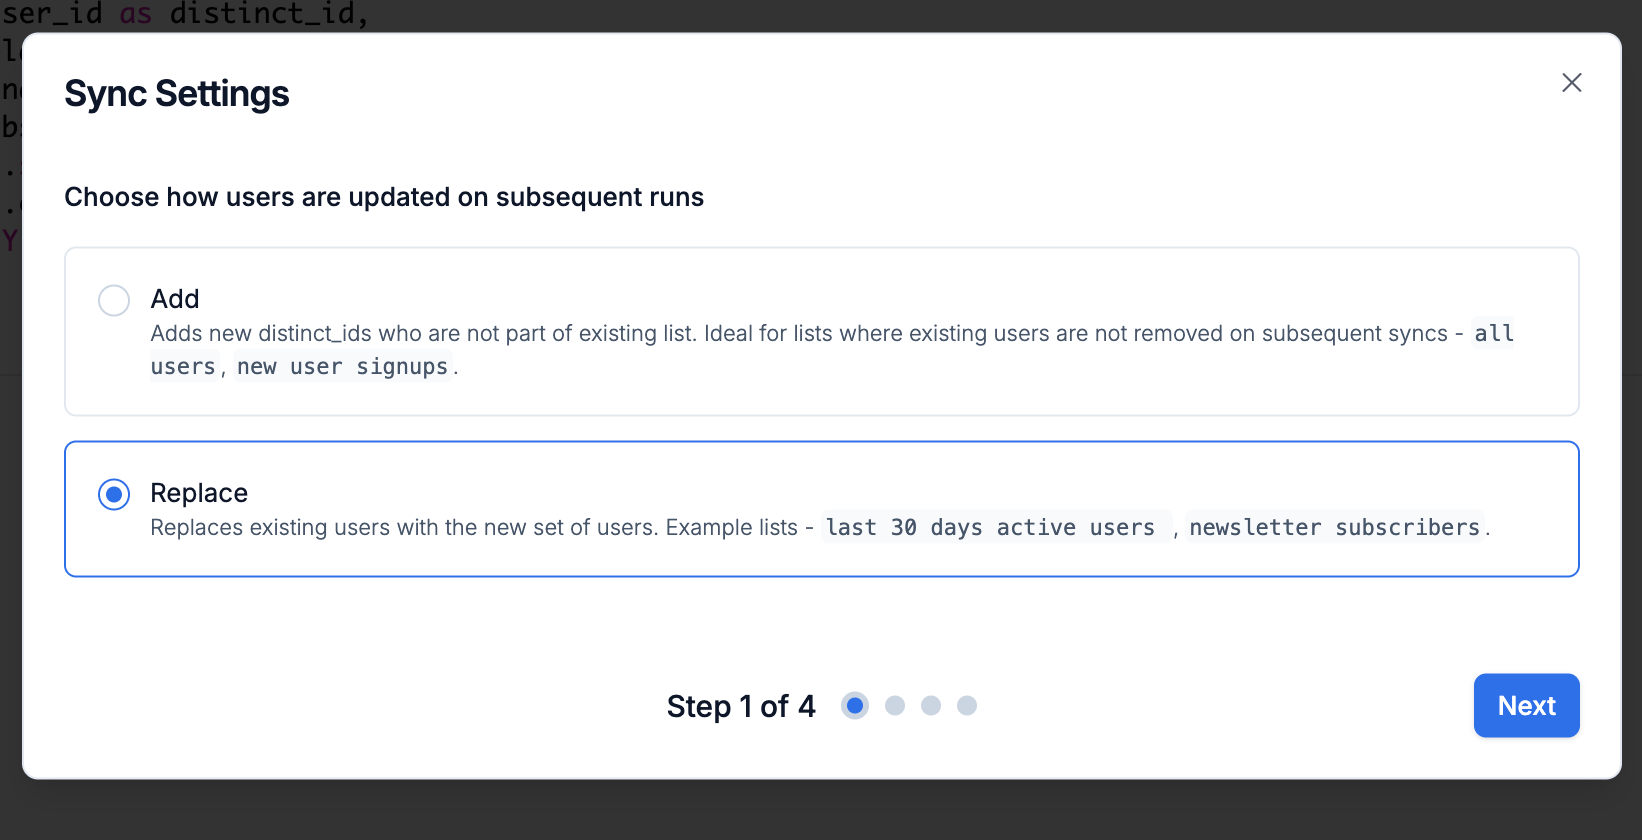
Choose the update type
Pick how users returned by the query merge with the current list membership on every run.
Step 1 — choose Add or Replace for how the list membership is updated.
Option
When to use
Add
Appends only new distinct_ids to the list; existing users are never removed. Use when the list is additive — membership only ever accumulates. For example, users who signed up or users who ever made a purchase.
Replace
Swaps the current membership for exactly the rows the query returns. Use when the query is the full definition of the audience — e.g. “last 30 days active users”, “newsletter subscribers”.
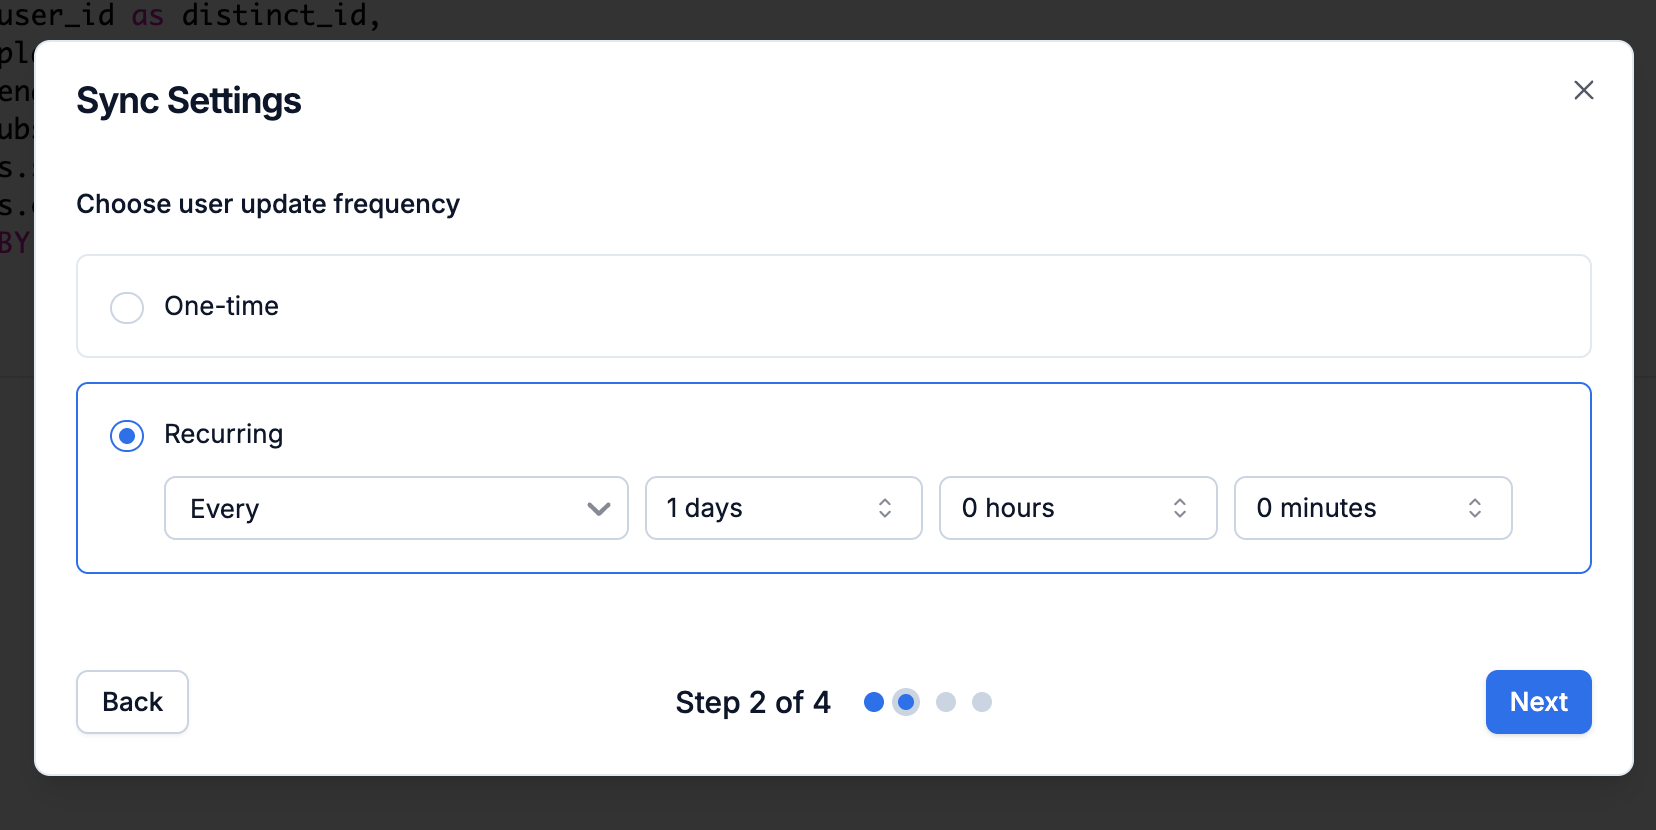
2
Choose the update frequency
Set how often the sync runs.
Step 2 — pick One-time or Recurring, then set the interval.
Option
Description
One-time
Runs the query exactly once, either immediately after commit or at a later timestamp.
Recurring
Repeats on a schedule — either an interval you build from the Every / days / hours / minutes selectors (e.g. every 1 day, every 6 hours, every 30 minutes), or a cron expression for more precise timing (e.g. 0 9 * * 1 for every Monday at 9:00 am).
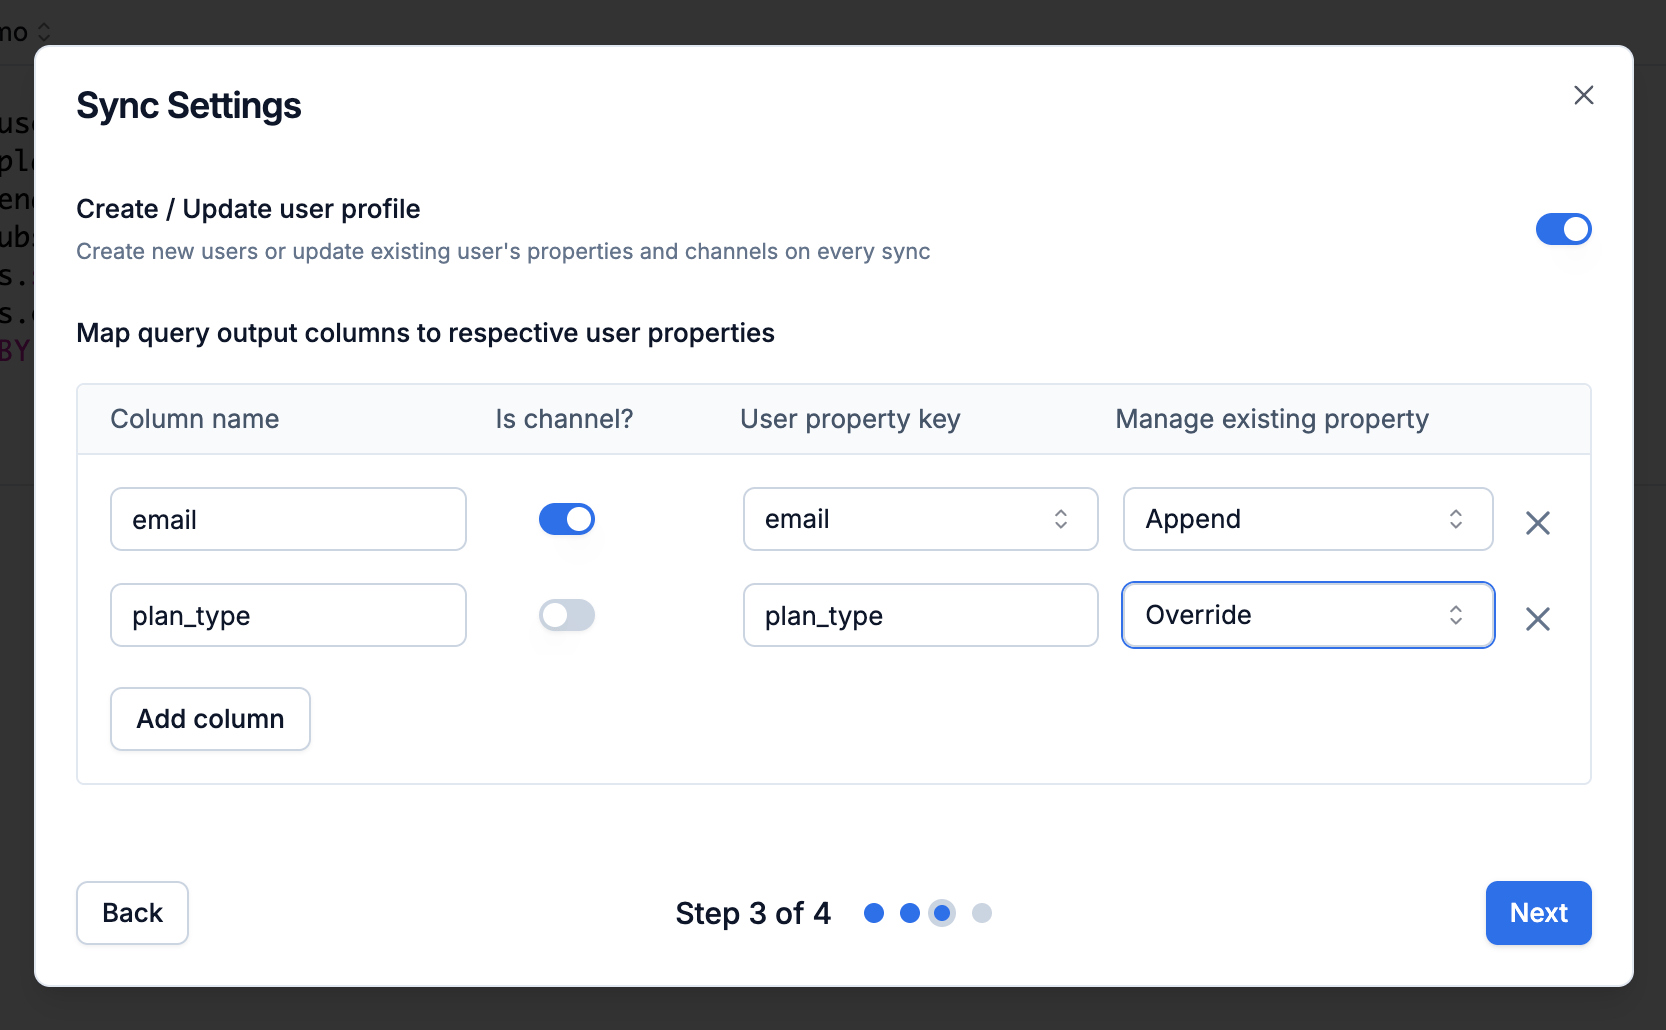
3
Map columns to user profile
Turn on Create / Update user profile to create users who don’t yet exist in SuprSend and to sync your extra columns as user properties or channels. Reference the properties later in templates as {{$recipient.<property_key>}}.
Step 3 — map query output columns to user properties and channels.
Add one row per column you want to sync:
Field
Description
Column name
The exact column name (case-sensitive) from your query output.
Is channel?
Toggle on if the column value is a channel (email, sms, whatsapp). Phone columns must be in E.164 format.
User property key
The property key to store the value under — can differ from the column name. For channels, pick from the list of available channels.
Manage existing property
Override — replace the value on every sync. Don’t Override — set only if the property isn’t already set (useful for one-time properties like signup_date). Append — build up an array across syncs. Channel columns are always appended.
4
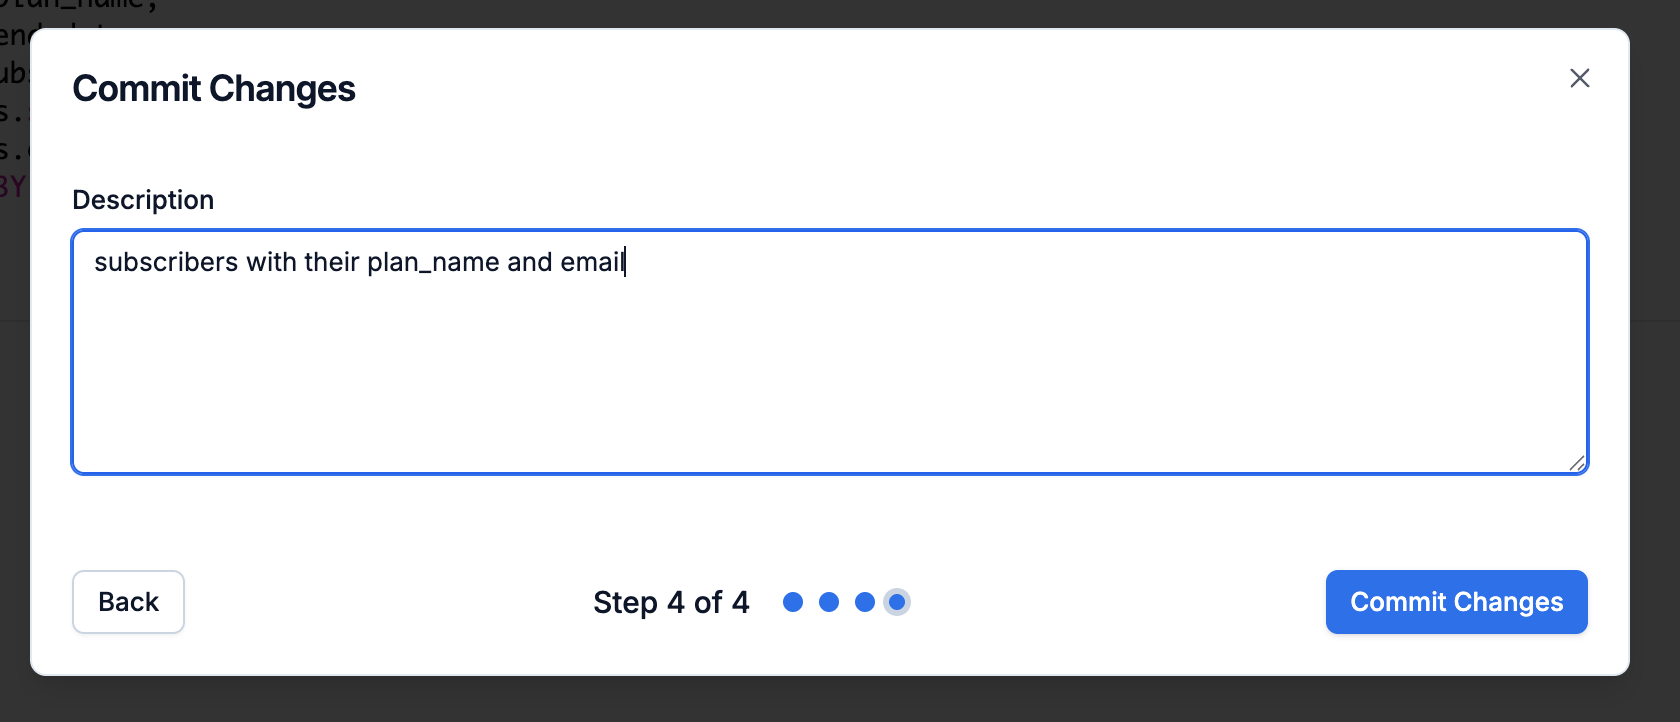
Commit changes
Add a description so the change is easy to identify in version history, then click Commit Changes.
Step 4 — describe what changed in this version and commit.
Your sync is now live. It’ll run at the configured interval and the list will refresh as your source data changes.
A sync is enabled the moment you commit it. Toggle it off from the switch next to the edit button — the query stops running but the sync configuration stays intact, so you can turn it back on later.
Click Sync Now in the user sync task header to trigger an immediate run outside the scheduled interval — useful for testing a new query, backfilling after fixing a source-data issue, or refreshing the list before a broadcast. The manual run uses the currently committed query and settings, honours {{last_sync_time}} from the previous successful run, and appears in Sync Logs like any other run.
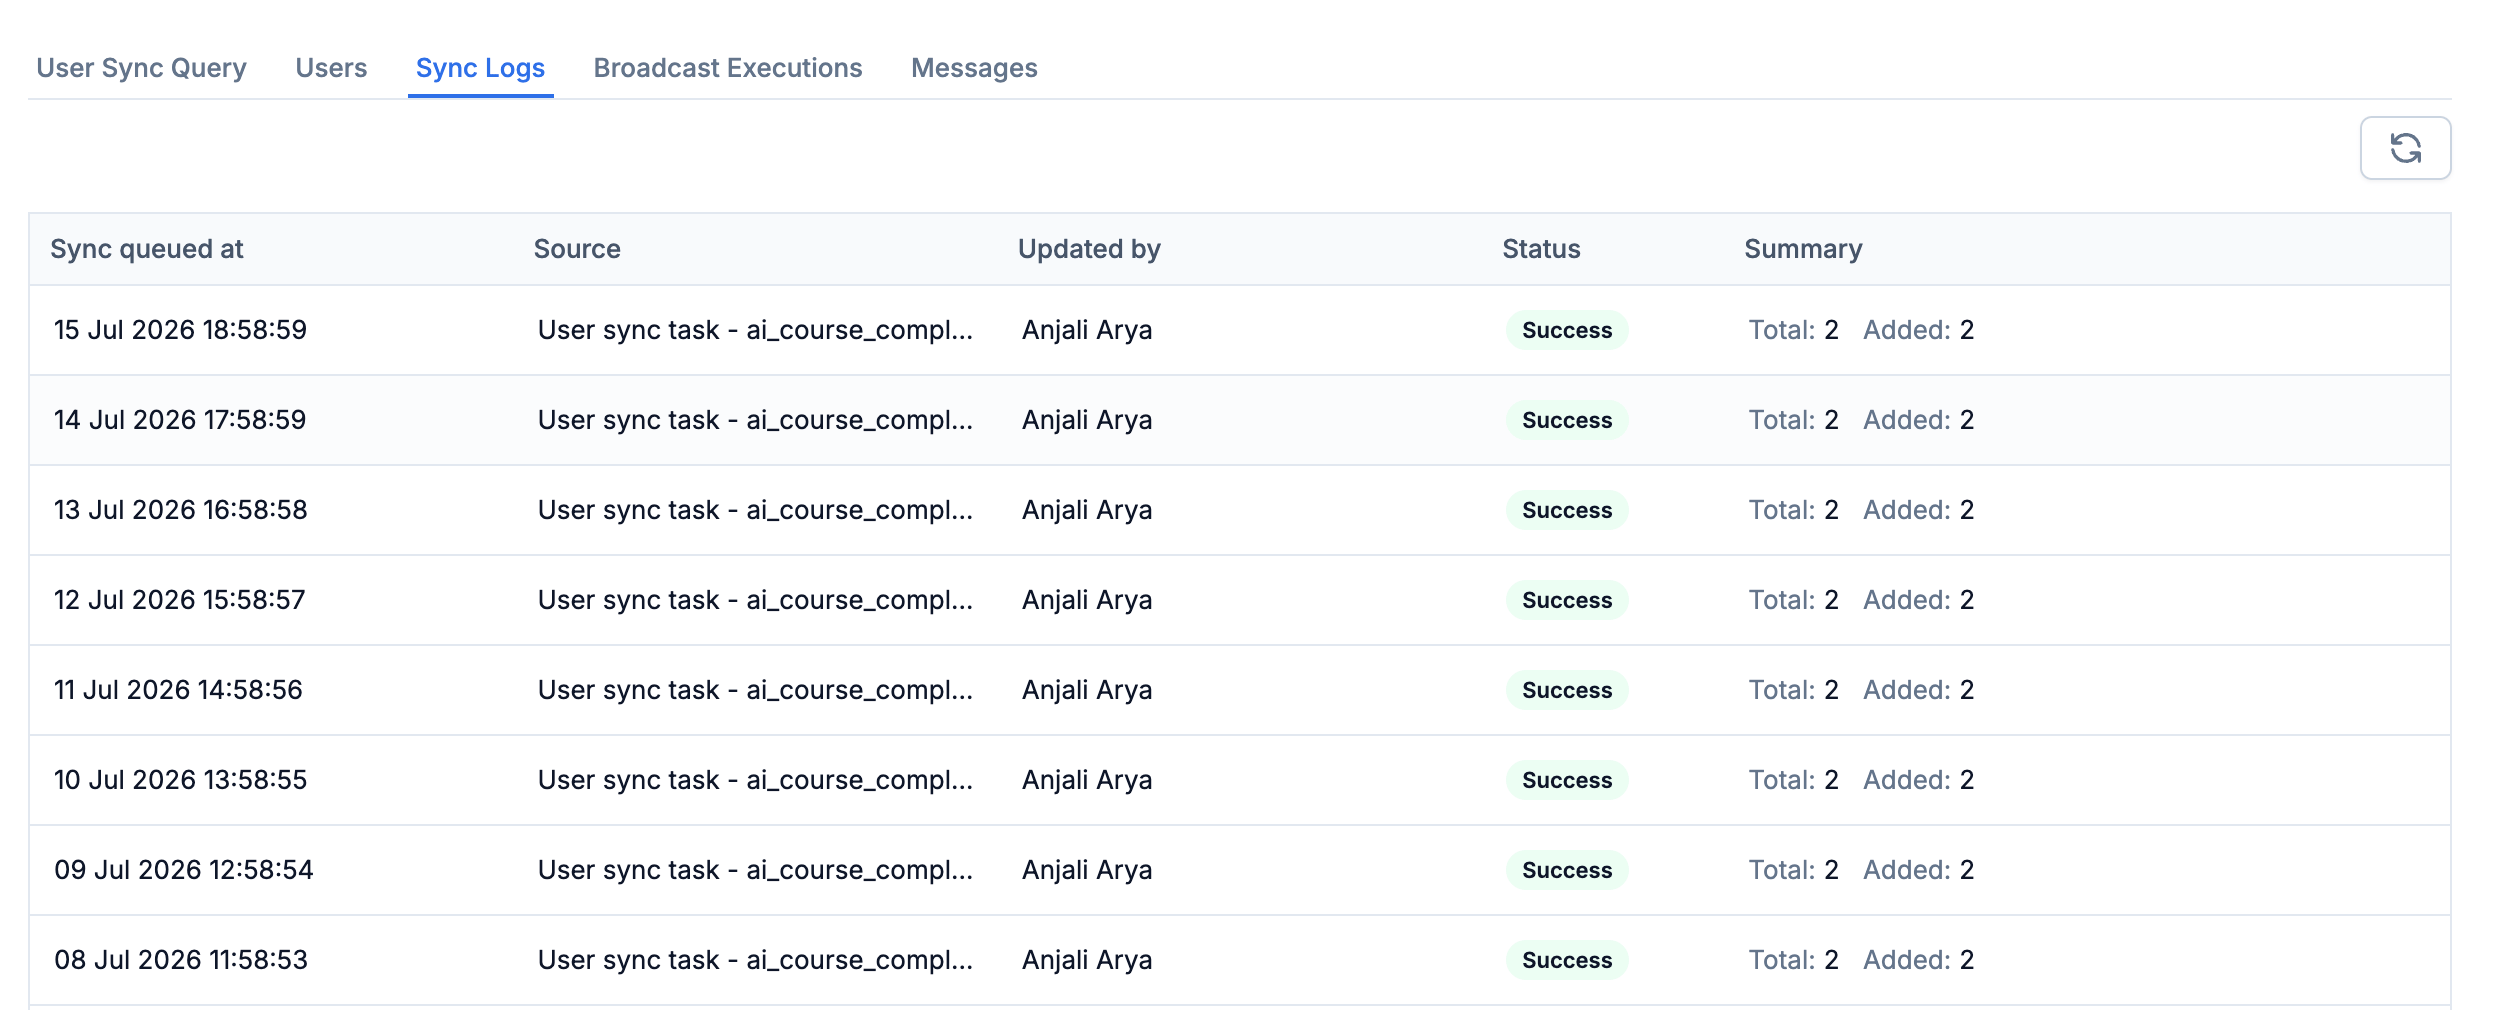
Every run appears on the Sync Logs tab of the list. Each row shows when the sync was queued, the source task, who last edited it, the status, and a summary with Total and Added counts.
Status
Meaning
Created
The run is queued but hasn’t started yet.
In progress
Users are being added to the list. You’ll see a % progress on the row.
Success
The run completed. The summary shows Total and Added — see below for how they differ.
Ignored
Skipped because the previous run was still in progress when this one was due to start.
Failed
The run couldn’t complete — usually a query error, a missing distinct_id column, or an empty result set. Hover the status or open the sync to see the error, or filter to Show only error logs.
Total — the number of users the query returned in this run.
Added — the number of users actually added to the list after the run finished.
Added can be lower than Total for two reasons:
The user is already in the list. Duplicate distinct_ids from earlier runs aren’t added again, so they count toward Total but not Added.
The user doesn’t exist in SuprSend and user sync is off. When Create / Update user profile is off in sync settings, rows whose distinct_id doesn’t already exist in SuprSend are skipped. Turn it on to auto-create those users so Added matches Total.
If the error looks internal to SuprSend, reach out on our Slack community.
Every change to the query or settings is saved as a draft first. Only Commit changes publishes it as the live version — the running sync keeps using the previous version until then. Browse and roll back to older versions from the version history.
Your query must return a column literally named distinct_id (lowercase). If your source uses a different name, alias it: SELECT user_id AS distinct_id FROM users.
Sync failed: empty result set
The query returned zero rows. Check your WHERE clause — a common cause is a {{last_sync_time}} filter that’s too restrictive on the first run, when there is no previous sync time. Run the preview to confirm the query returns data.
Users showed up in the list, but their properties didn't update
Column names are case-sensitive in the profile mapping. If your query returns Email but the mapping is email, the value won’t be applied. Re-check that the mapping matches the query output exactly.
SMS or WhatsApp channels aren't syncing
Phone numbers must be in E.164 format (+<country-code><number>). If your database stores raw numbers, prepend the country code in the query — CONCAT('+91', phone_number) in MySQL or '+91' || phone_number in PostgreSQL.
Runs are being marked 'Ignored'
A run is skipped when the previous run is still in progress. Either lengthen the sync interval, or tighten the query with a {{last_sync_time}} filter so each run processes fewer rows.