Trigger Workflow from API

Guide to configure and trigger workflow from API

You can follow the steps mentioned in the documentation below or refer to our quick code recipe


Pre-requisites

  1. Integrate Node SDK
  2. Create Template on SuprSend platform

Trigger Workflow from API

You can trigger workflow from node SDK by using supr_client.trigger_workflow method. Import Workflow class before calling this method

const { Workflow } = require("@suprsend/node-sdk")

// Prepare Workflow body
const workflow_body = {
  "name": "workflow_name",
  "template": "template_slug",
  "notification_category": "notification_category", //notification category transactional/promotional/system
  "delay": "time_delay",  // time delay after which the first notification will be sent
  "trigger_at": "date string in ISO 8601", // to trigger scheduled notifications

  "users": [
    {
      "distinct_id": "distinct_id", // unique identifier of the user
      // if $channels is present, communication will be triggered on mentioned channels only.
      // "$channels": ["email"],

      // User communication channel can be added as [optional]:
      // "$email":["[email protected]"],
      // "$whatsapp":["+15555555555"],
      // "$sms":["+15555555555"],
      // "$androidpush": [{"token": "__android_push_token__", "provider": "fcm", "device_id": ""}],  
      // "$iospush":[{"token": "__ios_push_token__", "provider": "apns", "device_id": ""}],
      // "$slack": {
      //"email": "[email protected]",
      //"access_token": "xoxb-XXXXXXXX"
      //}   --- slack using email

      // "$slack": {
      // "user_id": "U/WXXXXXXXX",
      // "access_token": "xoxb-XXXXXX"
      //} --- slack using member_id

      //"$slack": {
      //"channel": "CXXXXXXXX",
      //"access_token": "xoxb-XXXXXX"
      //} --- slack channel

      //"$slack": {
      //"incoming_webhook": {
      //"url": "https://hooks.slack.com/services/TXXXXXXXXX/BXXXXXXXX/XXXXXXXXXXXXXXXXXXX"
      //}
      //} --- slack incoming webhook

      // "$ms_teams": {
      //"tenant_id": "c1981ab2-9aaf-xxxx-xxxx",
      //"service_url": "https://smba.trafficmanager.net/amer",
      //"conversation_id": "19:c1524d7c-a06f-456f-8abe-xxxx"
      //} --- MS teams user or channel using conversation_id

      // "$ms_teams": {
      //"tenant_id": "c1981ab2-9aaf-xxxx-xxxx",
      //"service_url": "https://smba.trafficmanager.net/amer",
      //"user_id": "29:1nsLcmJ2RKtYH6Cxxxx-xxxx"
      //} --- MS teams user using user_id

      // "$ms_teams": {
      //  "incoming_webhook": {
      //  "url": "https://wnk1z.webhook.office.com/webhookb2/XXXXXXXXX"
      // }
      //} --- MS teams incoming webhook

    }
  ],

  // delivery instruction [optional]. how should notifications be sent, and whats the success metric
  "delivery": {
    "smart": <boolean_value>,
    "success": "success_metric",
    "time_to_live": "TTL duration", // will be applicable for smart = TRUE
    "mandatory_channels": [] // list of mandatory channels e.g ["email"], will be applicable for smart = TRUE
},
      // data can be any json
      "data": {
        "key":"value",
          "nested_key": {
            "nested_key1": "some_value_1",
              "nested_key2": {
                "nested_key3": "some_value_3",
              },
          }
      }
} 

const wf = new Workflow(workflow_body, {brand_id="default", idempotency_key="__uniq_request_id__"})
// Trigger workflow
const response = supr_client.trigger_workflow(wf); // returns promise
response.then((res) => console.log("response", res));


For configuring a workflow from backend, you can pass following properties in your method

ParameterDescriptionFormatObligation
nameIt is the unique name of the workflow. You can see workflow-related analytics on the workflow page (how many notifications were sent, delivered, clicked or interacted). The workflow name should be easily identifiable for your reference at a later stagetextMandatory
templateIt is the unique slug name of the template created on SuprSend platform. You can get this slug name by clicking on the clipboard icon next to the Template name on SuprSend templates page.
It is the same for all channels
slug nameMandatory
notification_categoryYou can understand more about them in the 'Notification Category' documentationsystem / transactional / promotionalMandatory
delayWorkflow will be halted for the time mentioned in delay, and become active once the delay period is over.XXdXXhXXmXXs or if its number (n) then delay is in seconds (n)Optional
trigger_atTrigger workflow on a specific date-timedate string in ISO 8601
eg. "2021-08-27T20:14:51.643Z"
Optional
usersArray object of target users.

Atleast 1 user mandatory.

distinct_id for each user mandatory

Channel information is non-mandatory (If you have already sent channel information via backend or Frontend SDK (on app or website))

Notification will be sent to only the channels defined in workflow if channel information is added
"users":
[
{
"distinct_id": "value",
"$channels": [],
channel_information_dict #(optional)
],
Mandatory
deliverydelivery instructions for the workflow. You can set Smart Delivery preference by setting "smart":true

By default, delivery instruction will be "delivery": {
"smart": false,
"success": "seen"
}
delivery: {
"smart": True/False,
"success": "seen/interaction/",
"time_to_live": "",
"mandatory_channels": [] # list of mandatory channels e.g gation",

}
Optional
dataJSON.
To replace the variables in the template. Templates use handlebarsjs(doc:hadlebarsjs-guide) language
"data":
{ "key": {
"key": "value",
"key": "value"
}
},
Optional
brand_idBrand_id of the tenant to trigger notification on behalf of your tenantsstringOptional
idempotency_keyunique key in the request call for idempotent requestsstringOptional

2878

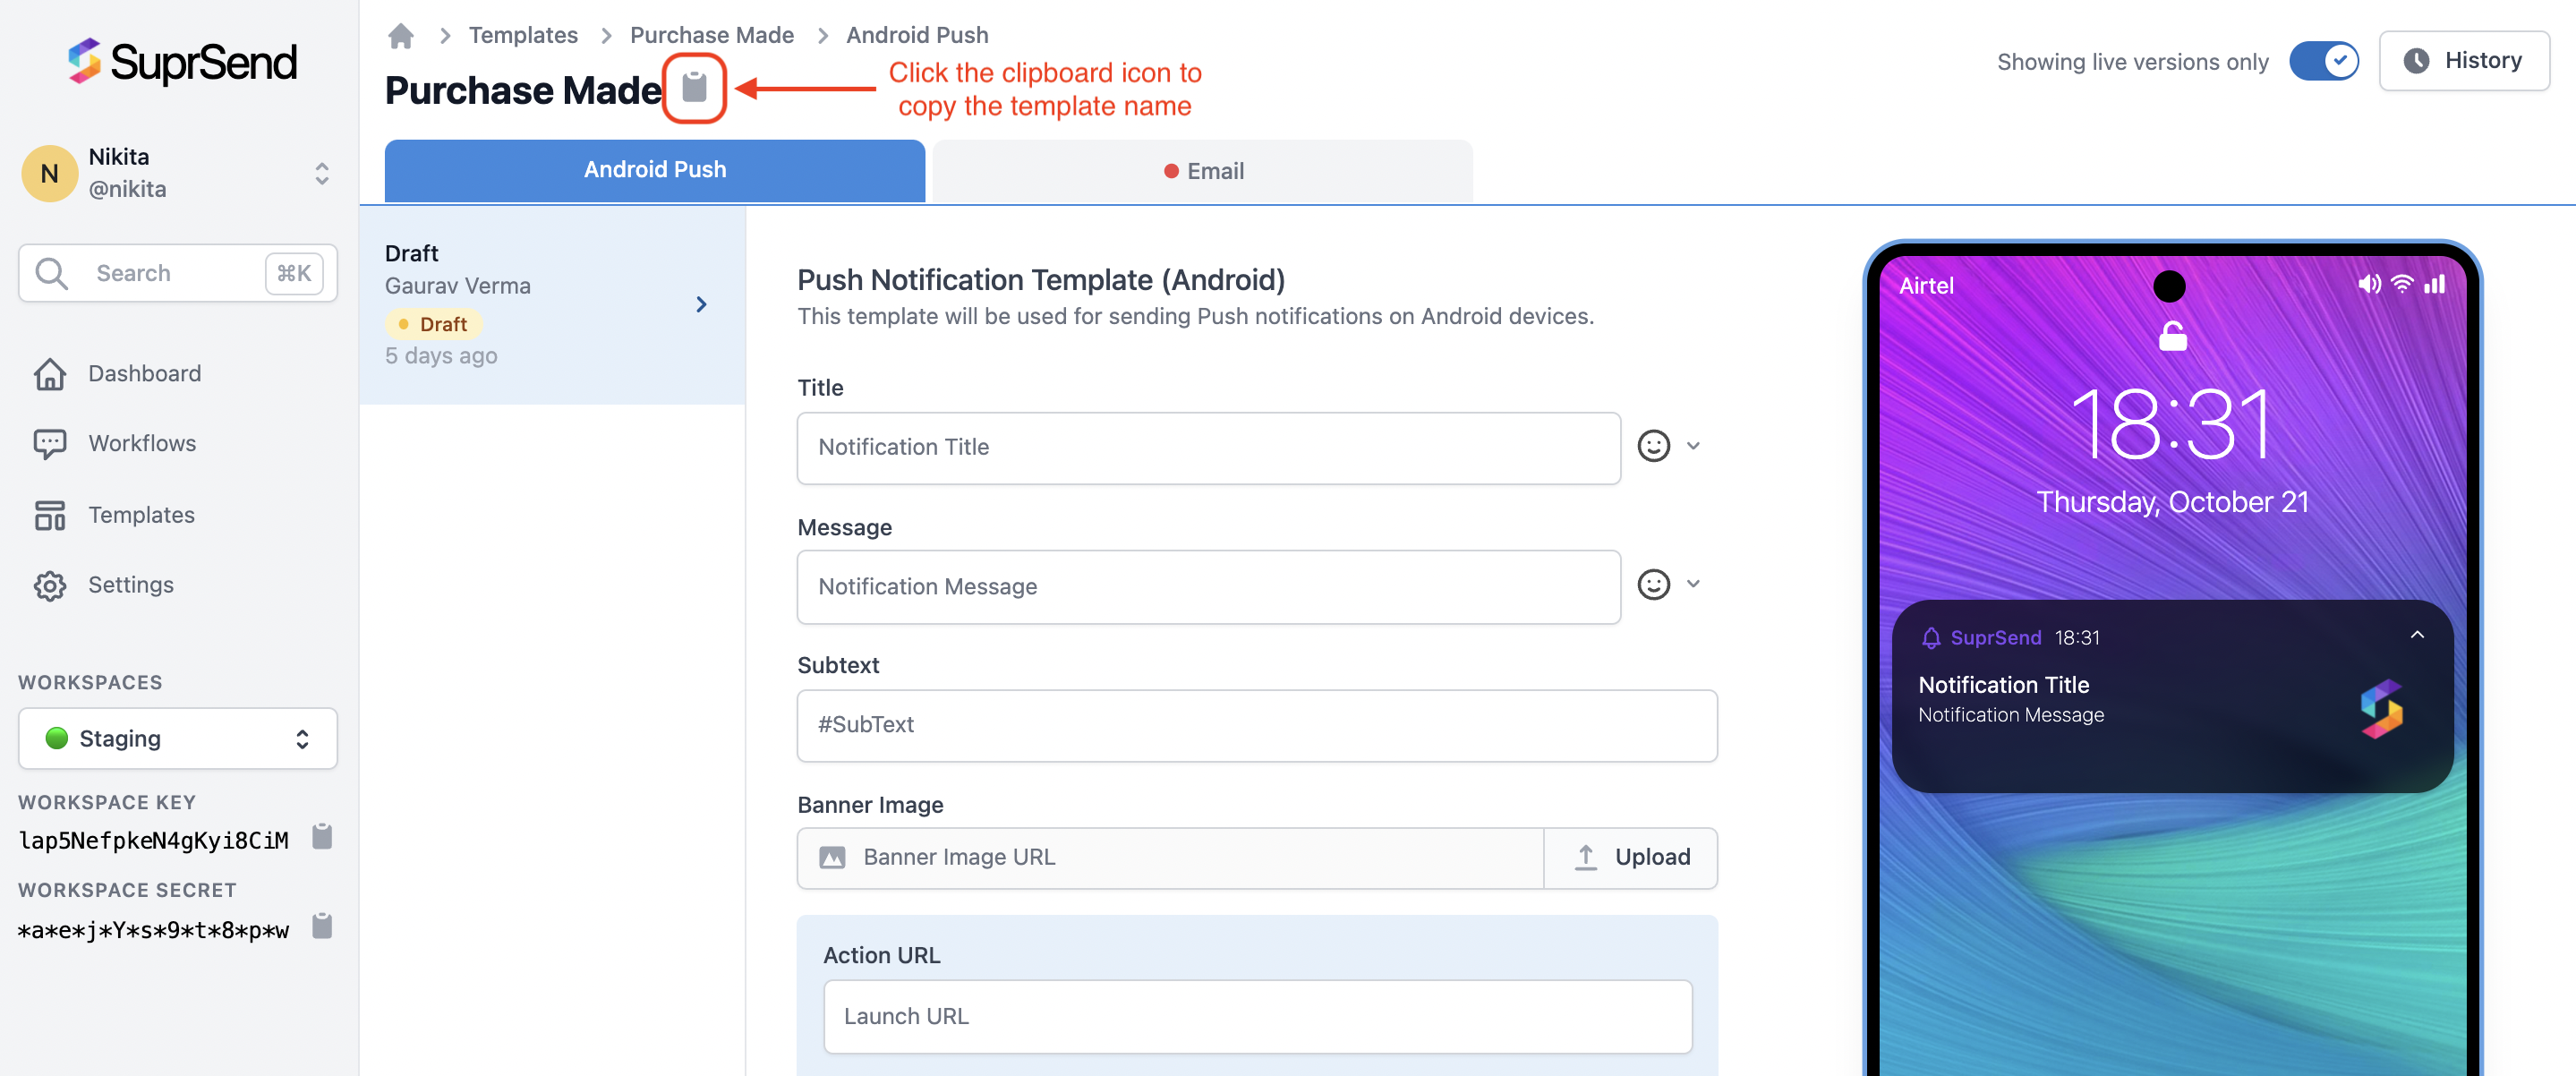
To find the template slug name on SuprSend platform, click on the clipboard icon on Templates page.
Templates > Template Details Page


Smart Delivery

Multi-channel strategy is indeed important to increase the effectiveness of communications (eg. it improves overall delivery rate, seen rate and interactions), but it comes with a side effect. While the intention is right to reach out to your users on multiple channels, it sometimes leads to user bombarding. Example, you have created templates for 4 channels, when a notification is triggered, it goes to all the channels together. For a user who has already seen the message or interacted with the message on 1 channel, rest of the channels are just noise. Needless to say, it is also a cost to the company.

SuprSend Workflows handle this via Smart Delivery. For any workflow, you can turn Smart Delivery on /off in your API call, along with few additional details:

All delivery options:

"delivery" : {
    "smart": true/false,
    "success": "seen/interaction/<some-user-defined-success-event>",
    "time_to_live": "<TTL duration>",
    "mandatory_channels": [] // list of mandatory channels e.g ["email"]
}

Where

  • smart (boolean) - whether to optimize for number of notifications sent?

    • Possible values: true / false
    • Default value: false
    • If false, then notifications are sent on all channels at once.
    • If true, then notifications are sent one-by-one (on regular interval controlled by time_to_live)
      on each channel until given success-metric is achieved.
  • success - what is your measurement of success for this notification?

    • Possible values: seen / interaction / <some-user-defined-success-event>
    • Default value: seen
    • If seen: If notification on any of the channels is seen by user, consider it a success.
    • If interaction: If notification on any of the channels is clicked/interacted by the user, consider it a success.
    • If <some-user-defined-success-event>: If certain event is done by user within the event-window (1 day), consider it a success.
      • currently, event-window is not configurable. default set to 1d (1 day).
        success-event must happen within this event-window since notification was sent.
  • time_to_live - What's your buffer-window for sending notification.

    • applicable when smart=true, otherwise ignored
    • Default value: 1h (1 hour)
    • format: [xx]d[xx]h[xx]m[xx]s
      • d stands for days. value boundary: 0 <= d
      • h stands for hours. value boundary: 0 <= h <= 23
      • m stands for minutes. value boundary: 0 <= m <= 59
      • s stands for seconds. value boundary: 0 <= s <= 59
    • notification on each channel will be sent with time-interval of [time_to_live / (number_of_channels - 1)] apart.
  • mandatory_channels - Channels on which notification has to be sent immediately (irrespective of notification-cost).

    • applicable when smart=True, otherwise ignored
    • Default value: [] (empty list)
    • possible channels: email, sms, whatsapp, androidpush, iospush etc.

If delivery instruction is not provided, then default value is:

delivery: {
    "smart": false,
    "success": "seen"
}

How Smart Delivery Works?

  • When you turn on Smart Delivery, Workflows pick up mandatory channels provided and triggers notification on them immediately. If there are no mandatory channels provided, workflows order channels in low-to-high cost basis, and trigger notification on first channel in the order immediately. Cost is picked up from the value entered in Vendor Settings page. Eg. FCM has 0 cost and it will be picked up first. If cost is not mentioned, it is considered 'zero' for order-calculation purpose.
  • Now for rest of the channels, workflows will trigger on them one by one with some interval between them. This time interval is calculated from time_to_live you have defined: time-interval = [time_to_live / (number_of_channels - 1)]. Eg. if you provide 4 channels and your message is relevant for 1 hour (ie. time_to_live = 1 hour), first channel will be triggered immediately, and the rest 3 will be triggered in every 20 minutes.
  • In between the channel triggers, workflows will listen to the response, and check whether the success defined is met or not. If it is met, rest of the channel triggers are not attempted. If success is not met, the process will continue until all channels are exhausted.

Add file attachment in email

To add one or more Attachments to a Notification (viz. Email, Whatsapp), call wf_instance.add_attachment() for each file with local-path. Ensure that file_path is proper, otherwise it will raise FileNotFoundError.

const { Workflow } = require("@suprsend/node-sdk")

const workflow_body = {...}
const wf_instance = new Workflow(workflow_body)

// this snippet can be used to add attachment to workflow
const file_path = "/home/user/billing.pdf"
wf_instance.add_attachment(file_path)

Attachment structure

The add_attachment(...) call appends below structure to data->'$attachments'

{
    "filename": "billing.pdf",
    "contentType": "application/pdf",
    "data": "Q29uZ3JhdHVsYXRpb25zLCB5b3UgY2FuIGJhc2U2NCBkZWNvZGUh",
}

Where:

filename - name of file.
contentType - MIME-type of file content.
data - base64-encoded content of file.


Triggering workflow for custom brand

If you handle communications to end users on behalf of your customers and want to send custom notifications for each brand, you can do that with the help of brands. Just pass the brand_id of your customer brand in your dynamic workflow instance like shown below and the properties of that brand will be used to replace brand variables in your template.

const { Workflow } = require("@suprsend/node-sdk")

// Prepare Workflow body
const workflow_body = {...}

const wf = new Workflow(workflow_body, {brand_id="default"})

// Trigger workflow
const response = supr_client.trigger_workflow(wf); // returns promise
response.then((res) => console.log("response", res));


Idempotent requests

SuprSend supports idempotency to ensure that requests can be retried safely without duplicate processing. If Suprsend receives and processes a request with an idempotency_key, it will skip processing requests with same idempotency_key for next 24 hours. You can use this key to track webhooks related to workflow notifications.

To make an idempotent request, pass idempotency_key in the workflow instance. Idempotency key should be unique that you generate for each request. You may use any string up to 255 characters in length as an idempotency key. Ensure that you don’t add any space in start and end of the key as it will be trimmed.

Here are some common approaches for assigning idempotency keys:

  • Generate a random UUID for each request.
  • Construct the idempotency key by combining relevant information about the request. This can include parameters, identifiers, or specific contextual details that are meaningful within your application. For example, you could concatenate the user ID, action, and timestamp to form an idempotency key like user147-new-comment-1687437670
  • Request-specific Identifier: If your request already contains a unique identifier, such as an order ID or a job ID, you can use that identifier directly as the idempotency key.

Sample Workflow body

Below is a sample workflow body with all the possible configurations for your reference. You can copy paste the content in a js file and replace the values with the actual values

const { Workflow } = require("@suprsend/node-sdk")

// Prepare Workflow body
const workflow_body = {
  "name": "Purchase Workflow",
  "template": "purchase-made",
  "notification_category": "transactional",
  //"delay": "1m",
  //"trigger_at": "2021-08-27T20:14:51.643Z",

  "users": [
    {
      "distinct_id": "0f988f74-6982-41c5-8752-facb6911fb08",
      "$email": ["[email protected]"],
      "$androidpush": [{"token": "__android_push_token__", "provider": "fcm", "device_id": ""}],
      "$slack": [{
        "email":"[email protected]"
      }]
    }
  ],
  // delivery instruction. how should notifications be sent, and whats the success metric
  "delivery": {
    "smart": True,
    "success": "seen",
    "time_to_live": "1h", // optional field
    "mandatory_channels": [] // list of mandatory channels e.g ["email"]
  },
  // data can be any json
  "data": {
    "first_name": "Joe",
    "spend_amount": "$10",
    "nested_key_example": {
      "nested_key1": "some_value_1",
      "nested_key2": {
        "nested_key3": "some_value_3",
      },
    }
  }
}

const wf = new Workflow(workflow_body)
// Trigger workflow
const response =  supr_client.trigger_workflow(wf) // returns promise
response.then((res) => console.log("response", res));

👍

+CountryCode Required for SMS and Whatsapp

For setting $sms and $whatsapp, +<countrycode> is mandatory to send along with phone number. Eg: +1 for US


Response structure

When you call supr_client.trigger_workflow, the SDK internally makes an HTTP call to SuprSend Platform to register this request, and you'll immediately receive a response indicating the acceptance status.

Note: The actual processing/execution of workflow happens asynchronously.

// Response structure
{
    "success": true, // if true, request was accepted.
    "status": "success",
    "status_code": 202,  // http status code
    "message": "Accepted",
}

{
    "success": false, // error will be present in message
    "status": "fail",
    "status": 400, // http status code
    "message": "error message",
}

What happens once you get 20x response

Once your request is accepted, you can check the status of your request in the ' SuprSend Logs' section. In the background, a workflow is created with the given workflow name.


Bulk API for triggering multiple workflows.

Bulk API allows you to send multiple workflow requests in a single call. There isn't any limit on number-of-records that can be added to bulk_workflows instance.

Use .append() on bulk_workflows instance to add however-many-records to call in bulk.

const { Workflow } = require("@suprsend/node-sdk")

const bulk_ins = supr_client.bulk_workflows.new_instance()

// one or more workflow instances
const workflow1 = new Workflow({...}) // body must be a proper workflow request json/dict
const workflow2 = new Workflow({...}) // body must be a proper workflow request json/dict

// --- use .append on bulk instance to add one or more records
bulk_ins.append(workflow1)
bulk_ins.append(workflow2)
// OR
bulk_ins.append(workflow1, workflow2)

// -------
const response = bulk_ins.trigger()
response.then((res) => console.log("response", res));


How SuprSend Processes the bulk API request

  • On calling bulk_ins.trigger(), the SDK internally makes one-or-more Callable-chunks.
  • Each callable-chunk contains a subset of records, the subset calculation is based on each record's bytes-size and max allowed chunk-size, chunk-length etc.
  • For each callable-chunk SDK makes an HTTP call to SuprSend to register the request.

Response

// Response structure
{
  status: "success",
  total: 10, // number of records sent in bulk
  success: 10, // number of records succeeded
  failure: 0, // number of records failed
  failed_records: [],
  warnings: []
}

{
  status: "fail",
  total: 10, // number of records sent in bulk
  success: 0, // number of records succeeded
  failure: 10, // number of records failed
  failed_records: [{"record": {...}, "error": "error_str", "code": 500}],
  warnings: []
}

{
  status: "partial",
  total: 10, // number of records sent in bulk
  success: 6, // number of records succeeded
  failure: 4, // number of records failed
  failed_records: [{"record": {...}, "error": "error_str", "code": 500}],
  warnings: []
}


Limitation

A single workflow body size must not exceed 800KB (800 * 1024 bytes). If size exceeds this limit, SDK raises Error.