Email HTML Editor with code and live preview
HTML Editor
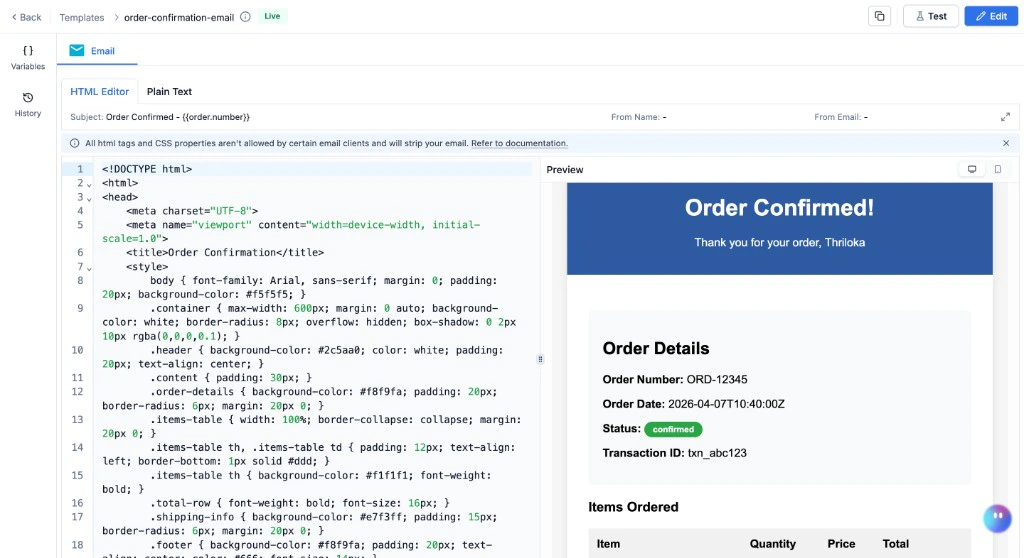
For full control, switch to the HTML tab. Write or paste HTML directly - the live preview renders on the right. Supports Handlebars variables inside the HTML ({{order_id}}, {{{tracking_url}}}).
HTML Editor
Design Editor
The drag-and-drop editor builds responsive emails by default - layouts adapt to mobile automatically. No media queries needed. (If you use the HTML Editor instead, responsive behaviour depends on your code.) The bottom toolbar has Undo / Redo, a Preview button (eye icon) for a full rendered preview, and a Desktop / Mobile toggle to check how the email looks on each device. The right sidebar has five panels: Content (drag blocks), Blocks (saved reusable rows), Body (global defaults), Images (free stock photos from Unsplash, Pexels, Pixabay), and Uploads (your own uploaded images - hosted by SuprSend, available across all templates).Body defaults (set these first)
Before adding content, configure the Body panel (right sidebar) - these are the global defaults that apply to every block unless overridden.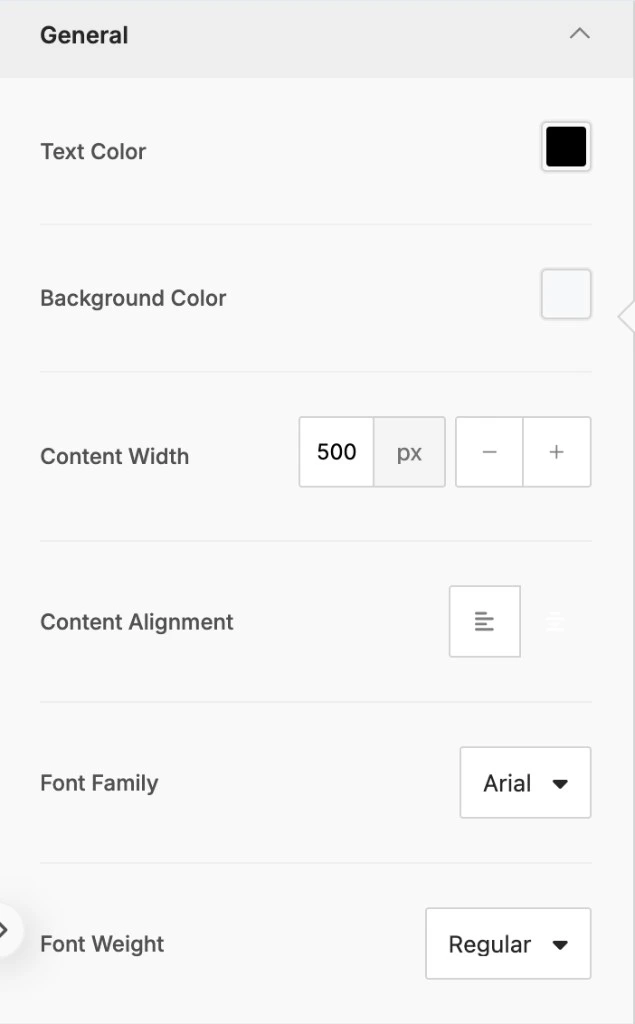
Body panel - General settings
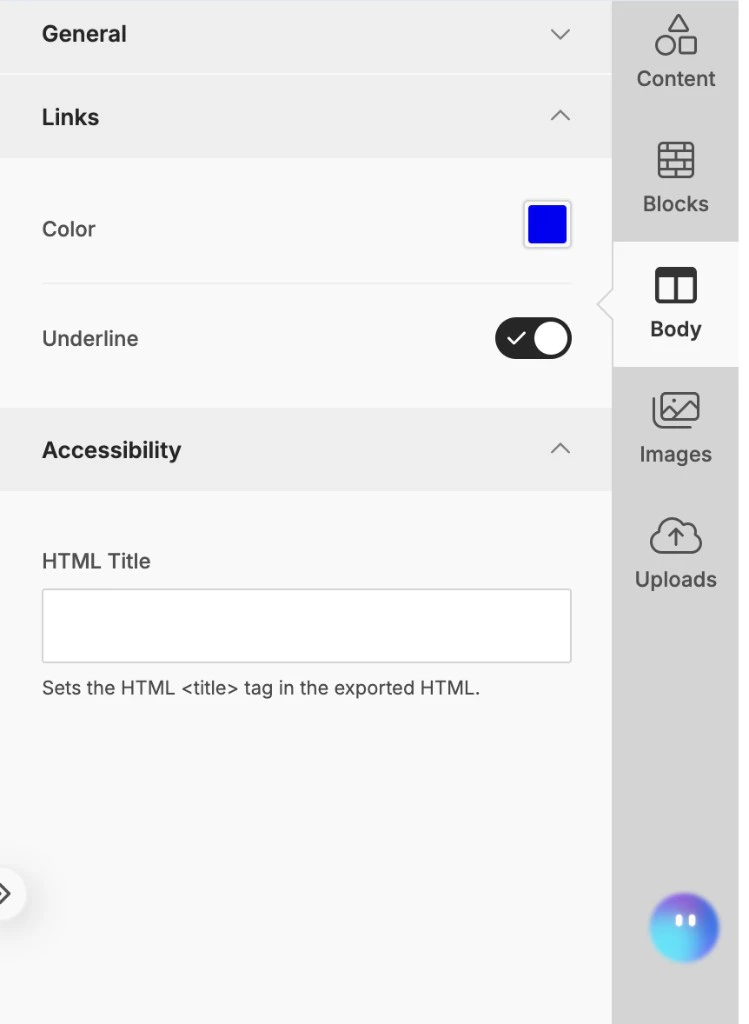
Body panel - Links
Content blocks
Drag blocks from the Content panel into a row. Click any block to see its settings. Heading - for section titles. Renders as h1, h2, h3, or h4 depending on the font size you set. Use the rich toolbar for bold, italic, colour, and alignment. Paragraph - body text. Rich toolbar for bold, italic, underline, links, lists, and merge tags. Supports Handlebars variables inline. Button - CTA button. Set the URL (supports variables like{{{action_url}}}), background colour, text colour, border radius (for rounded corners). Width is auto by default - turn auto off and set a fixed pixel width for consistent sizing across clients. If you want tenant-branded buttons, use the Tenant block instead.
Image - three ways to add: upload directly, paste a public URL, or browse the Images panel (free stock photos). The Image URL field supports variables (e.g., {{product_image_url}}). Always set Alt Text - it can be static (“Product image”) or dynamic ({{product_name}}). Alt text shows when images are blocked and helps accessibility.
Divider - horizontal line separator. Configure colour, thickness, width percentage, and padding.
HTML - raw HTML block for custom code. Supports Handlebars variables inside the HTML. Useful for custom tables, embedded widgets, or code from external tools.
Table - data table for order line items, pricing breakdowns, comparison grids. Cell contents support variables.
Menu - horizontal navigation links (header or footer). Configure labels, URLs, separator character, font, and alignment.
Tenant - pre-built branded header, footer, or button that auto-renders each tenant’s logo, colours, and links. See Tenant branding.
Rows and columns
Emails are structured as rows containing columns. Drag the Columns block to add a row with your preferred layout (1-col, 2-col, 3-col, asymmetric).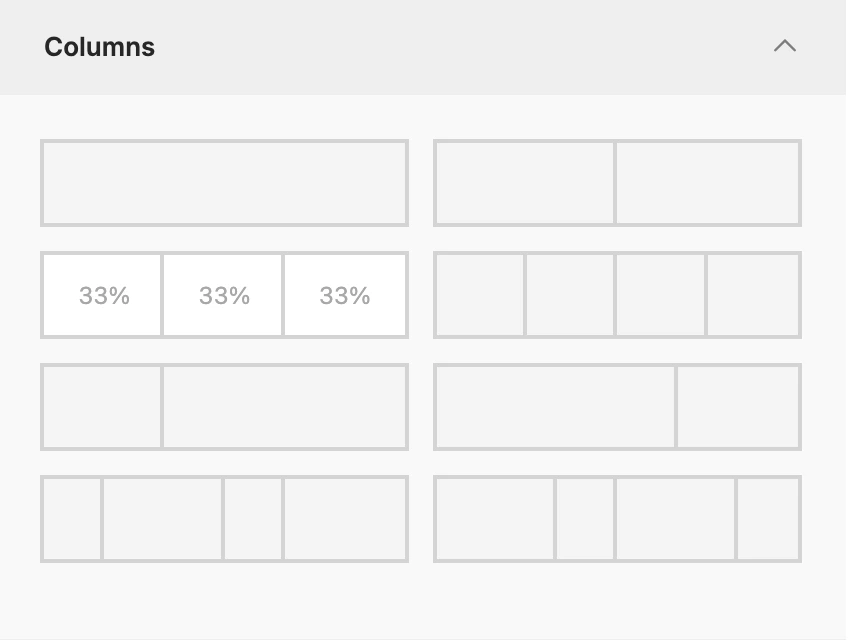
Column layout presets
Merge Tags (dynamic lists)
Merge Tags let you associate a row with an array variable - the row repeats for each item at send time. This is how you build order line items, product lists, or batched notification digests.- Declare an array in the Variables panel (Input Payload).
- Click a row - an array association icon appears in the bottom-left.
- Select your array. The row turns green.
- Inside that row, use Merge Tags or
{{to insert array item variables (e.g.,{{product_name}},{{price}}).
Merge Tags only appear in the toolbar when variables are defined in the Variables panel.
Display conditions
Show or hide any row or block based on runtime data - e.g., show a “Pro” badge only for premium users, or a tenant-specific banner.- Select the row or block.
- Expand Display Condition in the settings panel.
- Set Property, Operator, and Value. Combine with + AND or + OR.
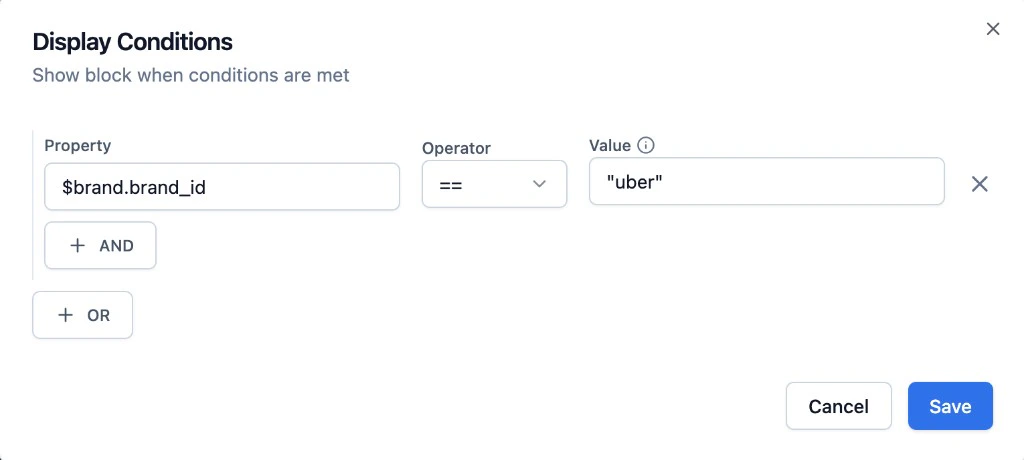
Display Conditions
==, ===, !=, !==, >, <, >=, <=.
Saved blocks
Save any row as a reusable block - click the save icon in the row header, name it, and it appears in the Blocks panel for all templates. Saved blocks work at the row level only (not individual columns or blocks). Saved blocks are a copy-on-insert - editing the saved block later doesn’t update templates that already use it.Tenant branding
The Tenant block auto-renders a branded header, footer, or button using the tenant’s profile (logo, colours, address). Select a tenant in the Variables panel to preview. For custom control beyond the Tenant block, use$brand variables directly:
{{$brand.logo}},{{$brand.primary_color}},{{$brand.secondary_color}}{{$brand.brand_name}},{{$brand.properties.address}}{{$brand.$hosted_preference_url}}- unsubscribe link
Adding dynamic content
Variables in email use Handlebars syntax -{{variable_name}} for regular values, {{{variable}}} for URLs with special characters.
In the Design Editor - use the Merge Tags button in the text toolbar to insert variables from a dropdown. Or type {{ in any text field for auto-suggestions. Variables work in text blocks, button URLs, image URLs, alt text, and HTML blocks.
In the HTML Editor - write Handlebars directly in the HTML source. Variables render in the live preview.
Set up your variable data in the Variables panel ({} tab in the left sidebar) before using them. See The Variables panel for details on Input Payload, Recipient, Tenant, and Actor.
Plain Text
Plain text is always sent alongside HTML - you don’t choose between them. It’s the fallback for recipients who block HTML, and improves deliverability (spam filters score multi-part emails higher).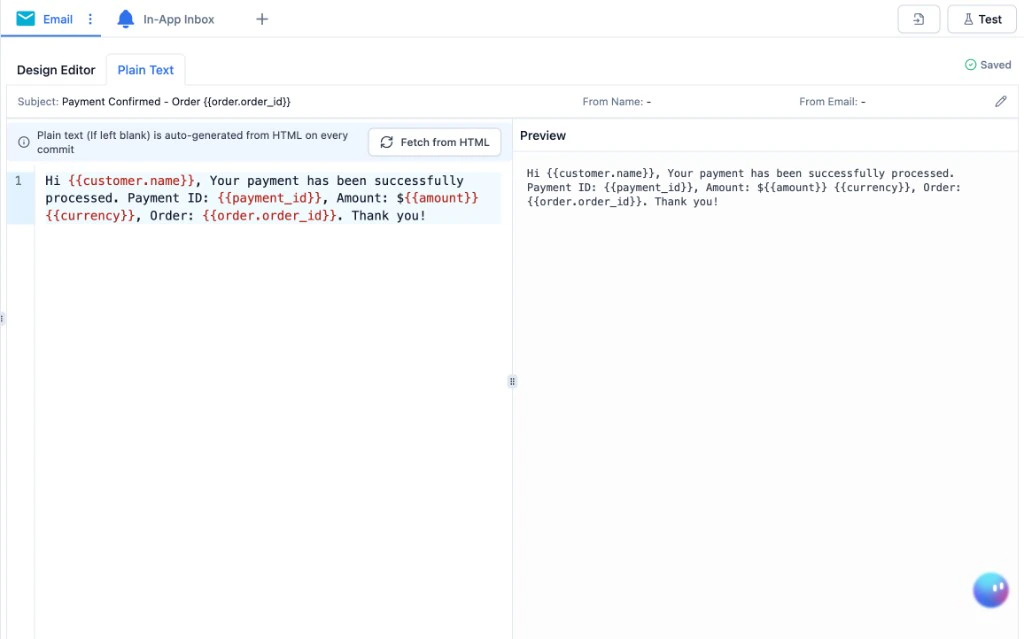
Plain Text editor
Email Markup (JSON-LD)
Email Markup adds rich interactive features directly in the Gmail inbox - no need to open the email. Add JSON-LD to the Email Markup JSON field in Email Settings. Supports Handlebars variables. Common use cases:- Order tracking - delivery status card with tracking link
- Event RSVP - one-click Yes/No/Maybe buttons in the inbox
- Flight boarding pass - flight details, departure, arrival
- Review request - star rating directly in the inbox
- Invoice/receipt - order summary with line items and total
Email settings
Before previewing or committing, configure subject, sender, and preheader. Click the pencil icon above the editor to open Email Settings.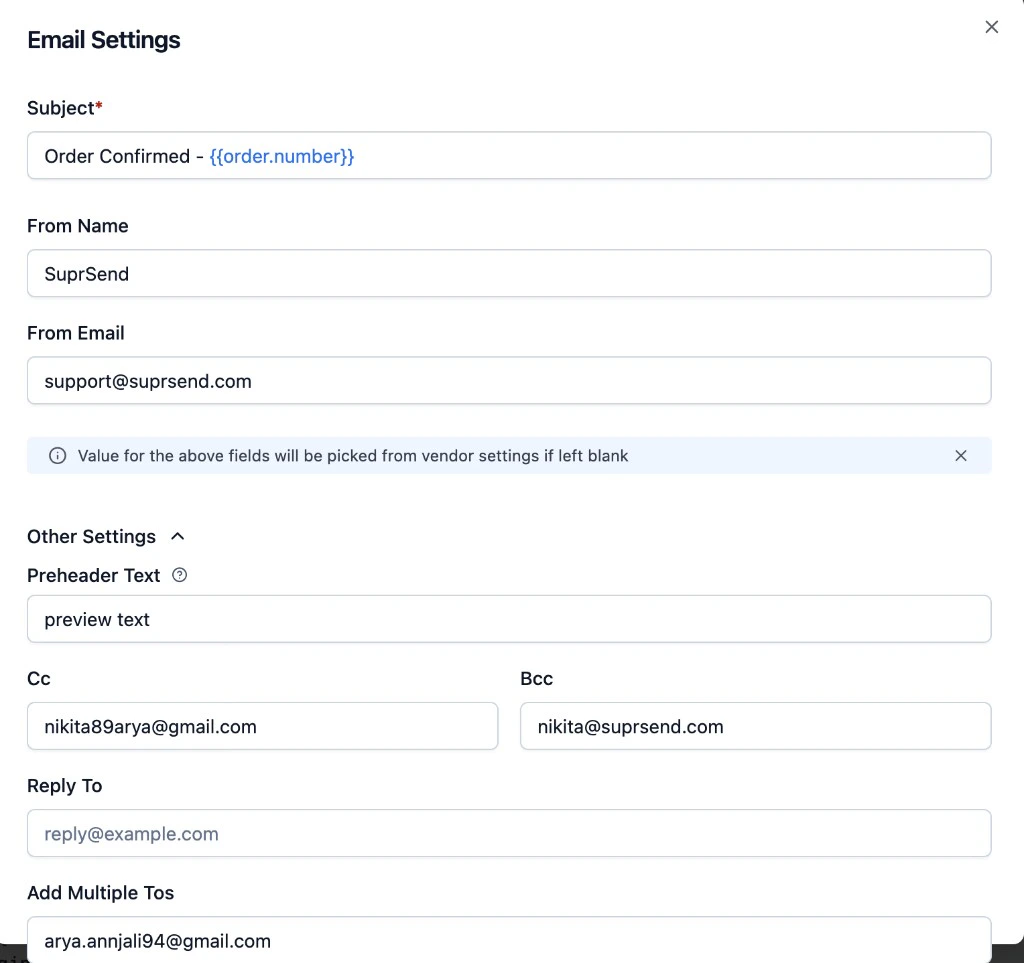
Email Settings panel
{{order_id}}.
From Name / From Email - display name and sender address. Left blank = picked from your vendor settings. Domain must be verified.
Preheader - preview text next to the subject in the inbox. If blank, email clients pull the first body text (often unhelpful). Set this explicitly. 40–140 characters.
CC / BCC / Reply To / Add Multiple Tos - all optional, all support variables.
Preview and test
Use the eye icon in the bottom toolbar for a full preview. Toggle Desktop / Mobile to check responsive behaviour. Click Test (top-right) to send a real email. See Testing for the full guide.Commit
Click Commit to publish. The commit snapshots: editor content, Plain Text, and all Email Settings.- Design Editor, HTML Editor, and Plain Text all save independently. Whatever editor is open at the time you commit - that version gets committed and published. Always verify you’re on the right tab before committing.
- If Plain Text is blank, it’s auto-generated from HTML at commit time.
Frequently asked questions
Which fonts work reliably across email clients?
Which fonts work reliably across email clients?
Web-safe fonts that render everywhere: Arial, Helvetica, Georgia, Times New Roman, Verdana, Tahoma, Courier New. Google Fonts and custom fonts may fall back to system defaults in Outlook and many webmail clients. Apple Mail is the most permissive. If you need a specific custom font, contact support to get it uploaded.
Design Editor or HTML - which gets committed?
Design Editor or HTML - which gets committed?
Whichever tab is active when you click Commit. They save independently. Always verify you’re on the right tab before committing.
What happens if Plain Text is blank?
What happens if Plain Text is blank?
SuprSend auto-generates it from the HTML on every commit. Click Fetch from HTML to preview what it looks like. Once you edit the plain text manually, auto-generation stops.
Can I use variables in image URLs and alt text?
Can I use variables in image URLs and alt text?
Yes. The Image URL field supports variables like
{{product_image_url}}. Alt text also supports variables - use {{product_name}} for dynamic alt text or a static string for fixed descriptions.Why does my email look different in Gmail vs Outlook?
Why does my email look different in Gmail vs Outlook?
Each email client has different CSS support. Gmail strips
<style> blocks; Outlook uses Word’s rendering engine (no border-radius, max-width, div layouts). Use inline styles, table-based layouts, and web-safe fonts. Check Can I Email for specifics.Can I use Handlebars inside the HTML block?
Can I use Handlebars inside the HTML block?
Yes. The HTML content block in the Design Editor supports Handlebars variables - write them directly in the HTML source.
How do Saved Blocks work?
How do Saved Blocks work?
Save any row as a reusable block from the row header. Saved blocks are available in the Blocks panel across all templates. They’re a copy-on-insert - editing the original doesn’t update existing templates. Saved blocks work at the row level only, not individual columns or content blocks.