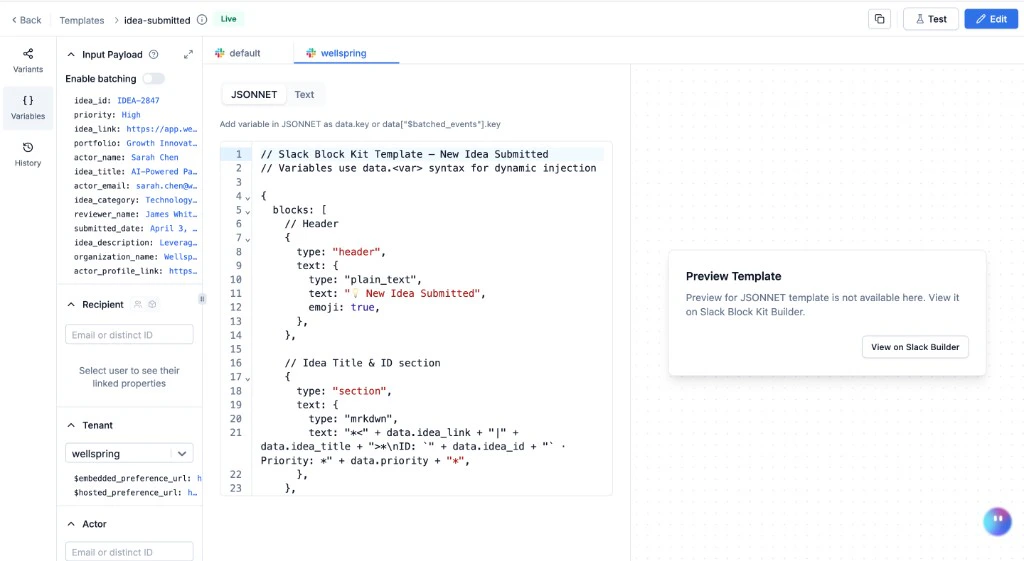
Slack editor with JSONNET and live preview
To send Slack notifications, you need a Slack vendor integrated with SuprSend. See Slack vendor integration for setup.
Slack fields
Text mode - a single text field. Supports Handlebars variables ({{variable_name}}). Use triple braces {{{url}}} for URLs with special characters.
JSONNET mode - a code editor that outputs Slack Block Kit JSON. Variables use data.key syntax (not Handlebars). Design visually in the Block Kit Builder first, then adapt the JSON into JSONNET. See the full JSONNET reference for syntax, examples, and debugging.
You can switch between Text and JSONNET at any time. Content is saved independently for each mode.
Adding dynamic content
In Text mode - type{{ for auto-suggestions. Standard Handlebars syntax:
{{order_id}}- top-level variable{{order.address.city}}- nested variable{{{tracking_url}}}- URL (avoid escaping){{$recipient.name}}- recipient property{{$brand.brand_name}}- tenant property
data.key syntax. See JSONNET variable reference for the full table.
For conditionals, loops, and helpers in Text mode, see Handlebars Helpers.
Preview and test
Text mode - the right panel shows a Slack message preview. It does not update automatically - refresh the page to see the latest changes. JSONNET mode - preview is not available in the editor. Click View on Slack Builder to render and validate your Block Kit output in Slack’s Block Kit Builder. Click Test in the top-right corner to send a real Slack message. This uses the live version - commit your changes before testing. See Testing a Template for the full guide.Commit
Click Commit in the top bar to publish the current draft as a new live version. Add an optional description for versioning.Common patterns
Thread-aware notifications
Thread-aware notifications
Slack automatically threads messages sent to the same channel with the same
thread_ts. Pass a consistent thread_ts in your trigger payload to keep related messages threaded.Mentioning users
Mentioning users
Use
<@SLACK_USER_ID> to @mention a user. Pass the ID as a variable: <@{{assignee_slack_id}}>.Linking to resources
Linking to resources
Slack uses
<URL|display text> syntax. In JSONNET: "*<" + data.url + "|" + data.title + ">*".Emoji
Emoji
Use
:emoji_name: syntax (for example, :white_check_mark:, :warning:).Frequently asked questions
Text or JSONNET - which should I use?
Text or JSONNET - which should I use?
Start with Text for simple alerts and status updates. Switch to JSONNET when you need buttons, images, structured layouts, or batched event lists.
How do I validate my Block Kit JSON?
How do I validate my Block Kit JSON?
Click View on Slack Builder in the JSONNET editor. Slack silently drops invalid blocks instead of showing errors - always validate before committing.
Why isn't my Slack template rendering?
Why isn't my Slack template rendering?
The most common reason is missing the
{"blocks": [...]} wrapper. The SuprSend JSONNET editor only accepts the object form - a bare array ([{...}]) will not work. Wrap all your blocks inside a top-level object with a blocks key.What's the message length limit?
What's the message length limit?
Slack truncates messages over 4000 characters. For batched notifications with many items, show the top 5-10 and add a “View all” button.
What formatting does Slack support?
What formatting does Slack support?
Slack uses
mrkdwn, not standard Markdown. Bold: *text*, italic: _text_, strikethrough: ~text~, code: triple backticks.What happens if a variable is missing at send time?
What happens if a variable is missing at send time?
SuprSend discards the Slack notification for that user. Other channels in the same template group are still sent.