Design Template
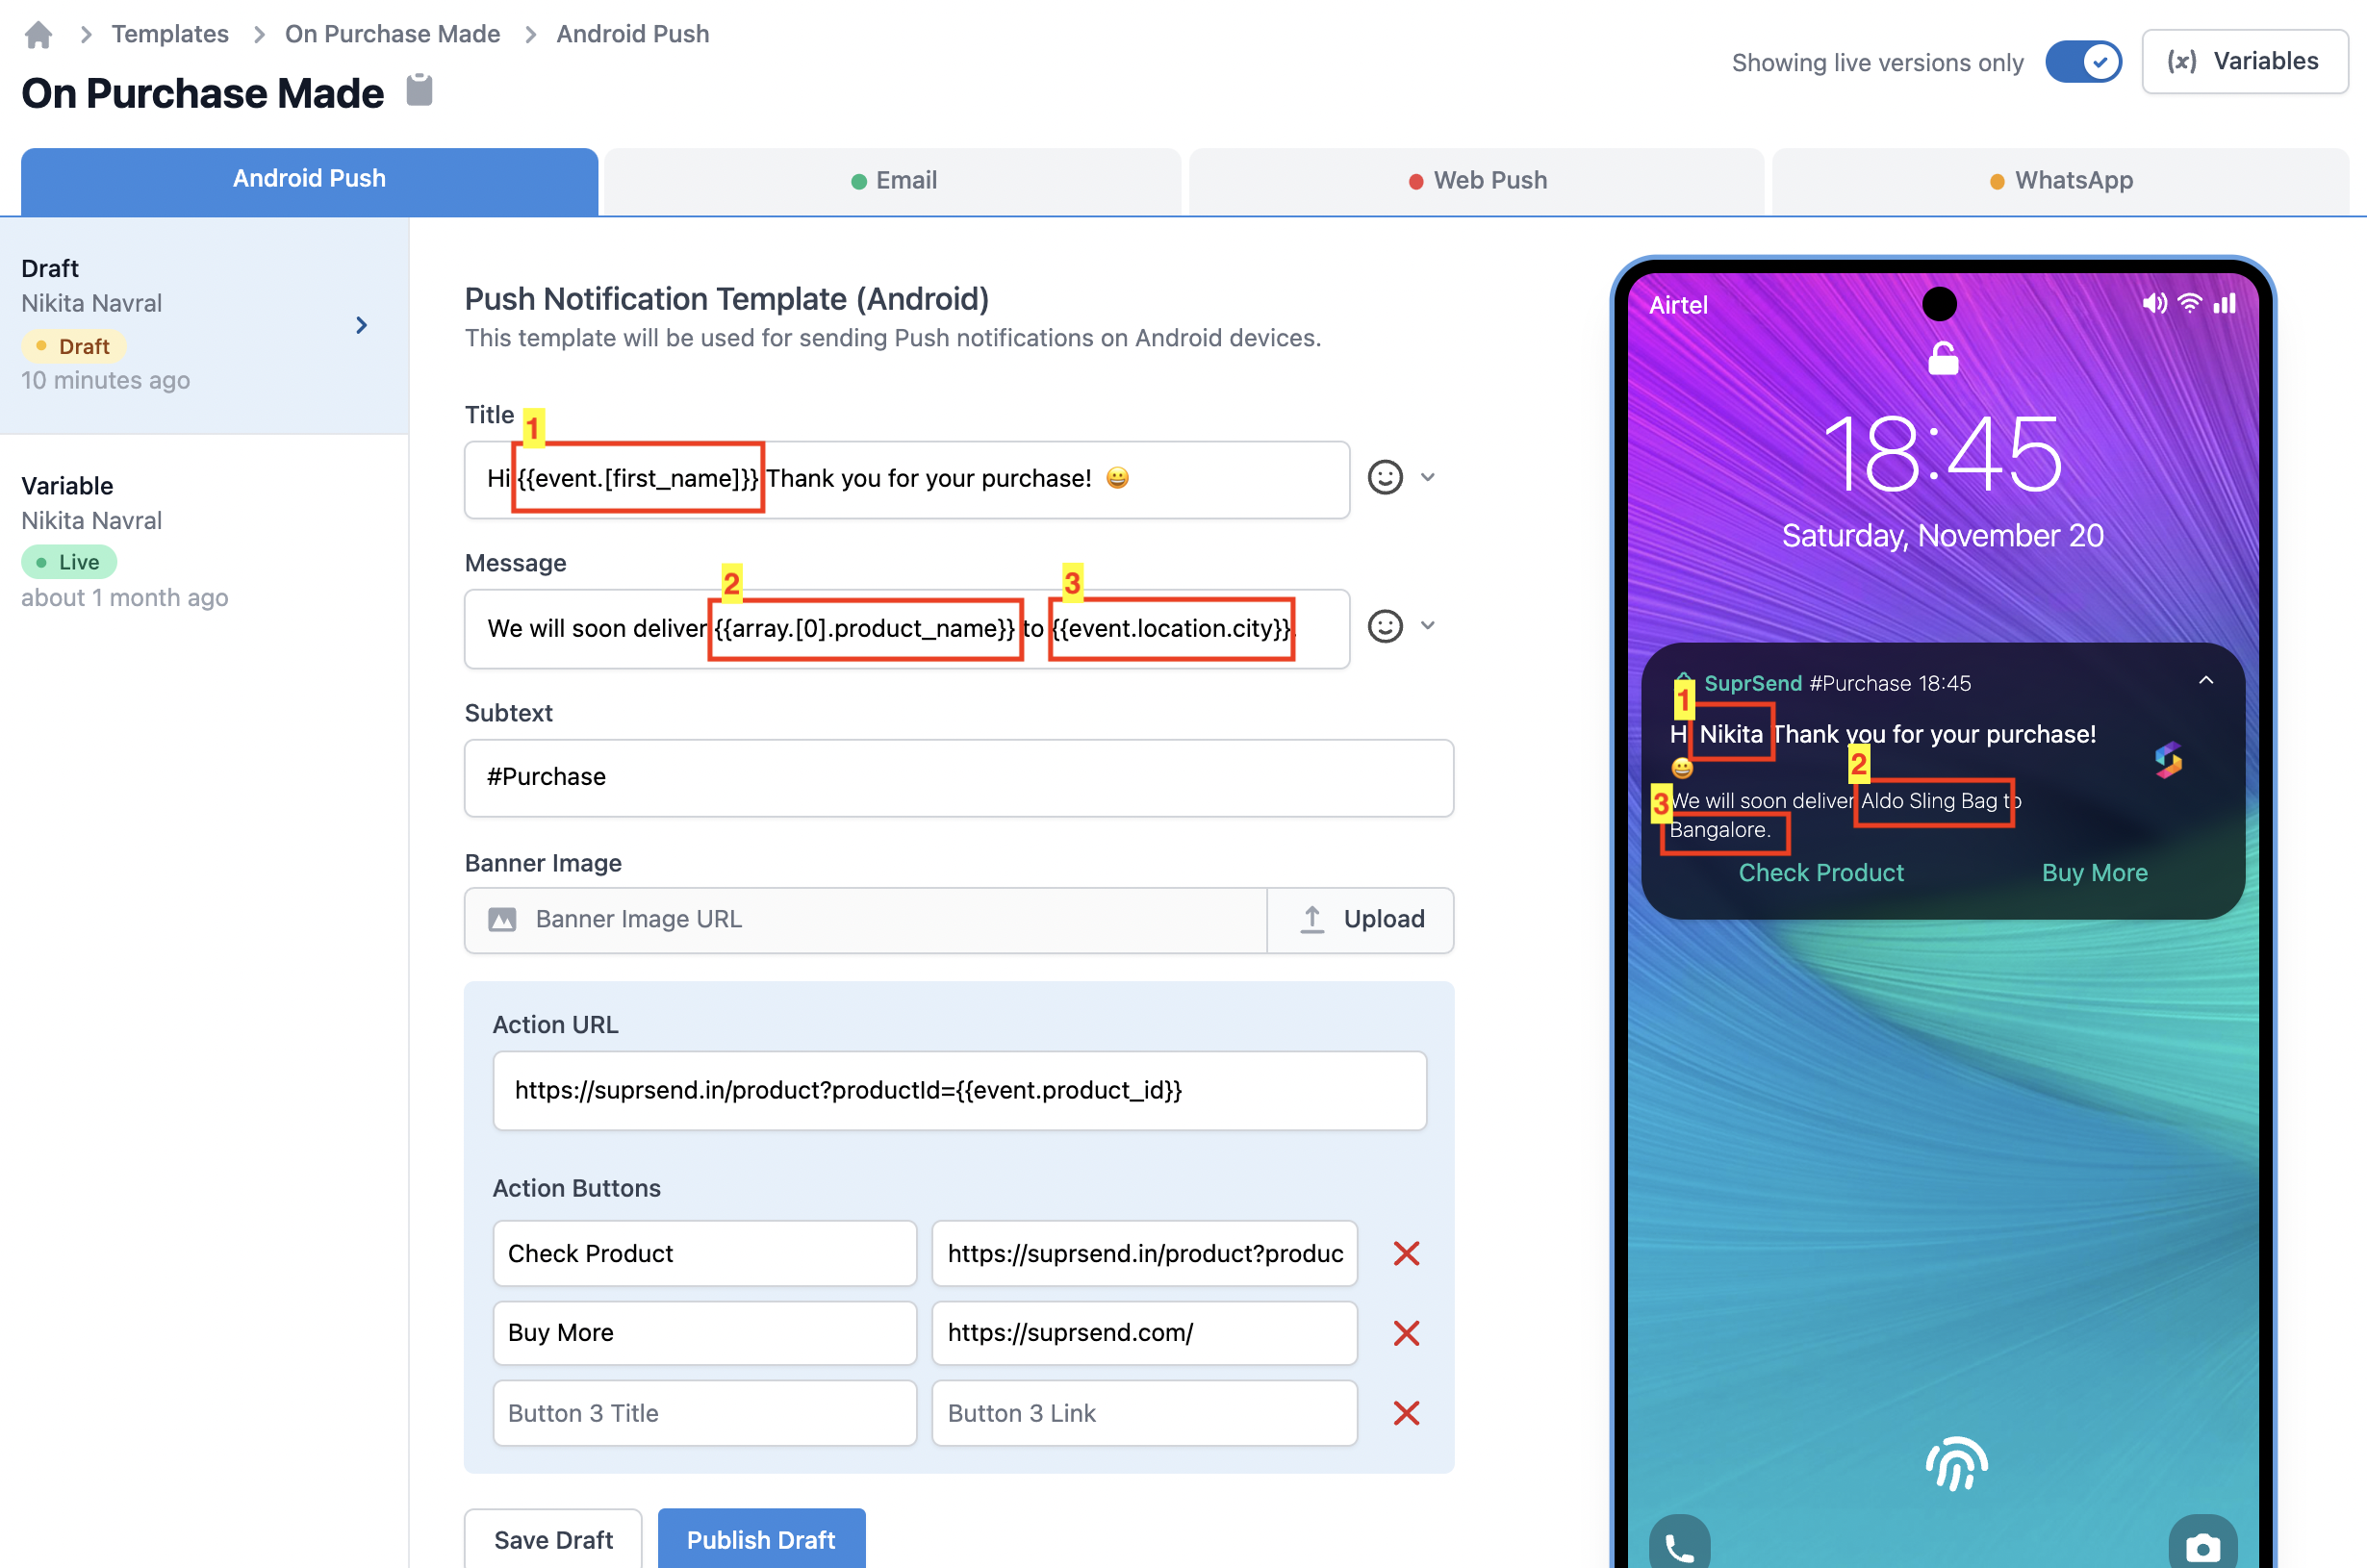
You can design template with a simple form editor tool. You can add variables withHandlebars language. You can check how the message will look in the preview section on the right side. Once designed, you can save the push notification template by clicking on Save Draft.
When you are ready, you can Publish Draft by providing a name to the version. This will become the Live version, and will be used whenever the associated workflow is triggered.
Android Push notification fields description
| Field | Description |
|---|---|
| Title | Small message text box. Note that this field will be displayed in single line only, and very long content can get curtailed. Use handlebars to add variables. |
| Small Icon | Small icon is displayed on the top status bar as well as the notification itself. Developer needs to set this to your logo in your app. Default shown is bell icon. The color used is your brand color set in ‘Organisation Settings’ |
| Large Icon | The large icon will show up to the left of the notification text on Android 4.0.3 - 6.0 devices, and shows on the right for Android 7.0+ devices. SuprSend puts your organisation logo as default in the large icon, which you can set from ‘Organisations Tab’. |
| Message | Large message text box. Use handlebars to add variables. |
| Subtext | Optional Subtext appears on top, next to your brand name. |
| Banner Image | Optional For dynamic images: Banner filetypes: PNG, JPG, JPEG. Recommended aspect ratio: 2:1 Recommended maximum size: 700 KB For static images (that are uploaded): -SuprSend will auto-scale your image so that it doesn’t get cropped -SuprSend will optimise the image size so that it is loaded faster on low internet connections. |
| Action URL | Provide a URL where a user will go when he clicks on the push notification. You can give your android deeplink URL as well. |
| Action Buttons | Optional Enter up to 3 Button names and URL. You can use variable names using handlebars in both action name and URL. You can give your android deeplink URL as well. The action button name color is picked up from your organisation settings. You cannot change button color in a template once it is created. |
Android Push Advanced Configurations (Optional)
| Field | Type | Description |
|---|---|---|
| Silent | Boolean | With Silent “ON”, users won’t see this message on their device. Instead, these notifications trigger background activities within the application using the notification payload. For instance, they could be utilized to send breaking news alerts or notify users that the latest episode of their favorite TV show is available for offline viewing. Silent notifications are particularly useful for delivering sporadic but time-sensitive content, where immediate access is crucial and the delay associated with background fetches may not be tolerable. |
| Timeout | Numeric | You can use timeout if you want your notifications to auto-dismiss after a certain time period in case your user has not interacted with that notification. You can add time in seconds in this field. |
| Sticky Notifications | Boolean | With Sticky Notifications “ON”, the user will not be able to dismiss the notification by left swiping on the notification tray. However, notification will be removed from the tray if the user has clicked on the notification |
| Notification group | Single line Text | Add a group name to the notification if you want your notifications to be stacked together in the tray. Notifications belonging to the same group will be stacked together. |
| App icon (Small icon) | Single line Text | Small icon name without extension. The small icon is displayed on the top status bar and on the left side of notification header. By default SuprSend will show a bell icon, however you can customize this to show your app icon instead. |
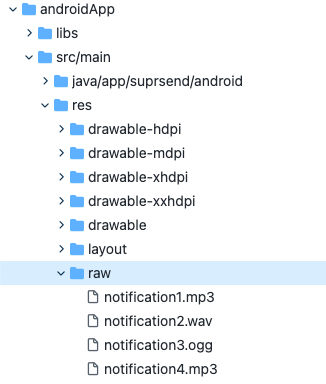
| Sound | Single line Text | Sound file name without extension or with extension. This is used to play custom sound on notification delivery. If left blank, the default notification sound of the device will be played. To set custom sound, you’ll have to add raw sound file in your android app folder |
| Custom key-value pair | key-value pair | You can use this field to send custom key-value pairs to users’ device. This is generally used for storing and retrieving data for caching, app metadata, or user settings. You can combine it with silent notification if the purpose is to update data in user’s applications without notifying them. Both key and value is passed as string in the notification payload. e.g., if you are passing this json: {"foo":1, "bar:1}. It will be passed as "json": "{\"foo\":1,\"bar\":1}" in the payload. You can add variables in both key and value to programmatically pass custom data based on your event or workflow input. Please note that your app’s backend must be able to process custom key-value pairs for the data payload to function properly. |
Required- Supported SDK version for app icon and sound:
- App icon functionality is supported in Android native and react native version 0.1.8 and above.
- Custom Sound is supported in Android native and react native version 2.2.0 and above.
Adding dynamic content in Android Push
There will always be the case where you would be required to add dynamic content to a template, so as to personalise it for your users. To achieve this, you can add variables in the template, which will be replaced with the dynamic content at the time of sending push. To send actual values to replace variables at the time of communication trigger, use one of our frontend or backend SDKs. Here is a step by step guide on how to add dynamic content in android push:Declaring Variables in the global 'Variables' button:
If you are at this stage, it is assumed that you have declared the variables along with sample values in the global Mock data button. To see how to declare variables before using them in designing templates, refer to this section in the Templates documentation.
Using variables in the templates:
Once the variables are declared, you can use them while designing the android push template. We support
handlebars to add variables in the template. As a general rule, all the variables have to be entered within double curly brackets: {{variable_name}}If you have declared the variables in the global ‘Variables’ button, then they will come as auto-suggestions when you type a curly bracket {. This will remove the chances of error like variable mismatch at the time of template rendering.Note that you will be able to enter a variable name even when you have not declared it inside the ‘Variables’ button. To manually enter the variable name, follow the handlerbars guide here.Below are some examples of how to enter variables in the template design. For illustration, we are using the same sample variable names that we declared in the ‘Templates’ section:-
To enter a nested variable, enter in the format
{{var1.var2.var3}}. Eg. to refer to city in the example above, you need to enter{{event.location.city}} -
To refer to an array element, enter in format
{{var1.[_index_].var2}}. Eg. to refer toproduct_nameof the first element of the arrayarray, enter{{array.[0].product_name}}` -
If you have any space in the variable name, enclose it in square bracket
{{event.[first name]}}
-
Make sure you have entered the variable name and the sample value in the
Variablesbutton. -
Make sure you have entered the correct variable name in the template, as per the
handlebarsguideline.
How to change the small icon for a notification?
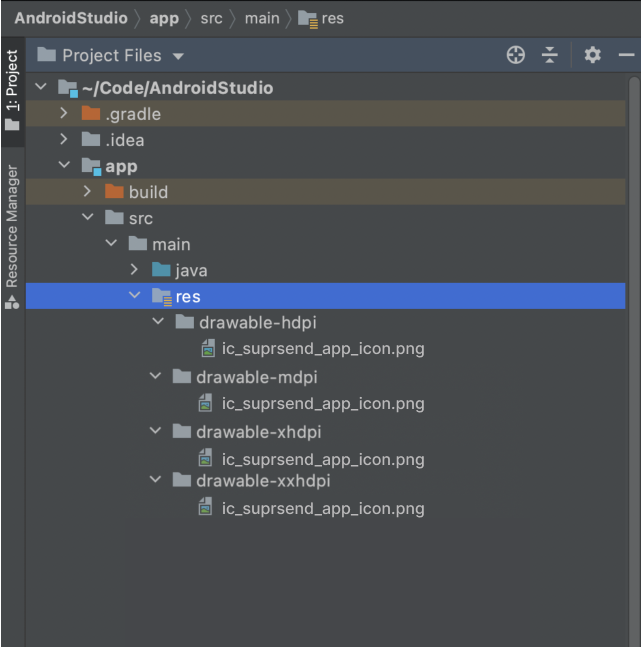
To show a small app icon in your notification, you’ll have to add a small icon in the drawable folder of application modules. You can either use a vector drawable or a png image. We recommend naming this file asic_suprsend_app_icon
Option A. Adding a vector drawable
Option A. Adding a vector drawable
You can add a vector drawable icon to the default drawable folder of your application module(androidApp/src/main/res/drawable/). Check out a sample vector drawable link.
Option B. Adding a png icon for small icon
Option B. Adding a png icon for small icon
You can add a icon in .png format. To render this png icon as a small icon in your push notification, you will have to create icons of below sizes and place them in their respective folders. Refer below table:
Follow below steps to add icons in .png format
| Density (dp) | Size (px) |
|---|---|
| MDPI | 24x24 |
| HDPI | 36x36 |
| XHDPI | 48x48 |
| XXHDPI | 72x72 |
| XXXHDPI | 96x96 |
Generate icon
Option A. Using Android Asset Studio (Recommended)To quickly generate small icons with the correct settings, you can use Android Asset Studio.Option B. Manually create iconsIf you prefer to create your own icons, you must make your icons for all sizes and make the small ones in white with a transparent background.
Create project paths
Make sure the following paths exist in your
Your project should look similar to this depending on your SDK. Sample png drawable link
App -> main folder, create any folders you are missing. Place images of each size in their respective folders.| SDK | File path |
|---|---|
| Android Native | res/drawable-mdpi/ (24x24) res/drawable-hdpi/ (36x36) res/drawable-xhdpi/ (48x48) res/drawable-xxhdpi/ (72x72) res/drawable-xxxhdpi/ (96x96) |
| React Native | android/app/src/main/res/drawable-mdpi/ (24x24) android/app/src/main/res/drawable-hdpi/ (36x36) android/app/src/main/res/drawable-xhdpi/ (48x48) android/app/src/main/res/drawable-xxhdpi/ (72x72) android/app/src/main/res/drawable-xxxhdpi/ (96x96) |

How to add a custom sound file in your android project?
From Android O onwards, notification sound became a property of notification channel and is only set at the time of new category creation (Notification channel is identified as notification category in SuprSend). This means that for a user when you first time send the notification in a particular category, the sound is set for that category and even if you change the sound in your template, the sound in that category will not change. The updated sound will play for the user either if you send notification in a new category or user uninstalls and re-installs the app. For devices on android version before O, the sound will be set at individual notification level and whenever you change the sound on a template, it will play the new sound for user. Leaving the sound field blank will play the default notification sound on the device. To change the notification sound you will have to add the sound file to the raw folder of your android app.Please keep the file name in lower case and avoid using space in the file name instead you can use underscore(_) in place of spaceE.g.- notification.mp3, notificationMusic.mp3,notification_music.mp3

