{{variable_name}}).
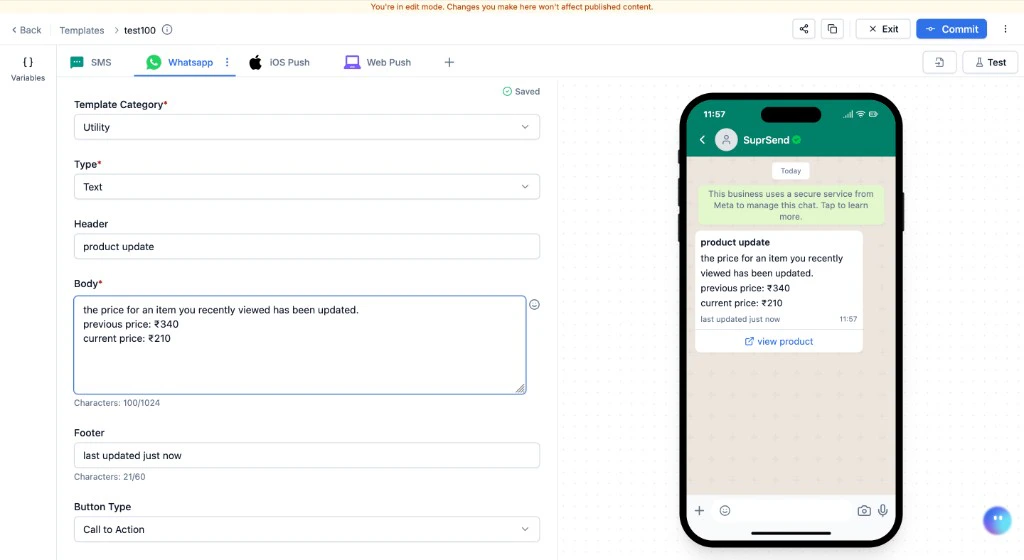
WhatsApp editor with live device preview
To send WhatsApp messages, you need a WhatsApp vendor integrated with SuprSend. See WhatsApp vendor integrations for the vendor list and setup.
WhatsApp fields
Template Category - every WhatsApp template must be categorised. See Choosing the right category below. Type -Text or Media. Determines the header format.
Header (Text type) - bold text shown above the body. Max 60 characters. Emojis are not supported. Supports Handlebars variables.
Header (Media type) - choose a media format: Image (.jpg, .png - recommended 800x418 px, max 5 MB), Video (.mp4 - max 16 MB, under 30s), or Document (.pdf - max 100 MB, set a descriptive filename). Provide a public URL - supports dynamic URLs with variables like {{media_url}}. Fully dynamic media URLs are treated as one variable.
Body - main message content. Max 1024 characters. Multi-line, supports Handlebars variables and WhatsApp formatting (*bold*, _italic_, ~strikethrough~). HTML and Markdown do not work.
Footer — short text below the body in lighter font. Max 60 characters. Variables are not supported. For Marketing templates, include opt-out language (for example, “Reply STOP to opt out”) — improves approval rates.
Buttons - choose Call to Action, Quick Reply, or None.
- Call to Action — up to 2 buttons. Visit Website redirects to a URL (Static or Dynamic — one variable at the end only, for example
https://yourapp.com/product/{{id}}). Call Phone Number initiates a call. - Quick Reply — up to 3 tap-to-reply buttons. Variables and emojis are not allowed in button text.
WhatsApp Call to Action button configuration
Adding dynamic content
You can add variables in the template to personalise it for each recipient. Variables are replaced with actual data at send time.1
Add variables in the Variables panel
Add sample data in the Variables panel (Input Payload section) on the left side of the editor. This powers auto-suggestions and the live preview. For the full guide, see Adding dynamic content.
2
Use variables in the template
Type
{{ in any field - matching variables appear as auto-suggestions. You can also type variable names manually following Handlebars syntax.Examples using this sample data:- Nested variable:
{{event.location.city}}→ renders asSan Francisco - Variable with space in name:
{{event.[first name]}}
- The variable is defined in the Variables panel.
- The variable name matches the Handlebars syntax exactly.
When SuprSend submits your template to Meta for approval, named Handlebars variables like
{{order_id}} are automatically converted to Meta’s positional format ({{1}}, {{2}}). You always write named variables - SuprSend handles the conversion.Preview and test
The right panel shows a live WhatsApp conversation preview, updated in real time as you fill in fields. Variables render using data from the Variables panel. Click Test in the top-right corner to send a real WhatsApp message. This uses the live version - commit and get approval before testing. See Testing a Template for the full guide.Commit
Click Commit in the top bar to publish the current draft. The template enters Approval Pending state - SuprSend submits it to Meta automatically. You’ll be notified when approved or rejected. Once approved, the version goes Live and is used for all subsequent workflow triggers.Approval flow
Every WhatsApp template must be approved by Meta before it can be sent. This applies globally, not just in specific regions.1
Design and commit
Author the template content and click Commit. The version enters Approval Pending state.
2
Meta reviews the template
SuprSend submits the template to Meta automatically. Most templates are approved within minutes to hours (up to 24 hours in some cases).
3
Live or revise
On approval, the version goes Live. On rejection, it returns to Draft for revision.
Choosing the right category
WhatsApp enforces different rules and pricing for each category. Choosing the wrong category is the most common reason for rejection.Formatting WhatsApp messages
WhatsApp has its own text formatting syntax. HTML and Markdown do not work.Common scenarios
Utility - order shipped
Utility - order shipped
Marketing - flash sale
Marketing - flash sale
Authentication - OTP
Authentication - OTP
Best practices
- Avoid rejection - don’t mix categories, avoid placeholder-heavy text with no clear purpose, and don’t use URL shorteners in the body.
- Variable placement - ensure each variable has a clear example value in the Variables panel. WhatsApp uses these during approval review.
- Template pausing - WhatsApp may pause templates with low quality scores (high block/report rates). Monitor quality in the vendor portal.
Frequently asked questions
Why was my WhatsApp template rejected?
Why was my WhatsApp template rejected?
Common reasons: content doesn’t match the selected category, too many variables without clear context, URL shorteners in the body, or example values that don’t make sense. Review the WhatsApp Template Guidelines and resubmit.
How long does approval take?
How long does approval take?
Most templates are approved within minutes to hours. In some cases, up to 24 hours. SuprSend handles submission automatically - you’ll be notified when the status changes.
Can I edit a template after it's approved?
Can I edit a template after it's approved?
No. To make changes, edit in draft mode and commit again. The new version goes through approval separately.
What happens if WhatsApp pauses my template?
What happens if WhatsApp pauses my template?
The template stops being sent until the quality score recovers. Fix the content and monitor in your vendor portal (for example, WhatsApp Business Manager).
Can I send WhatsApp in multiple languages?
Can I send WhatsApp in multiple languages?
Yes - use template variants. Each language variant goes through approval separately. The default variant acts as the fallback.
Can I test a template before approval?
Can I test a template before approval?
No. WhatsApp templates can only be tested after they are committed and approved by Meta. The Test button uses the live (approved) version.
What happens if a variable is missing at send time?
What happens if a variable is missing at send time?
SuprSend discards the WhatsApp notification for that user. Other channels in the same template group are still sent.