Customize Inbox
How to change the default inbox theme
End of Support for
@suprsend/react-inbox: Migrate to@suprsend/reactDevelopment of the @suprsend/react-inbox SDK has been discontinued in favour of the new @suprsend/react SDK. Please refer the migration guide for instructions on transitioning to the new SDK.
The inbox component is highly customizable. For most parts in Inbox, we also support custom components using render props. This is how the default inbox looks like with its components marked in order.
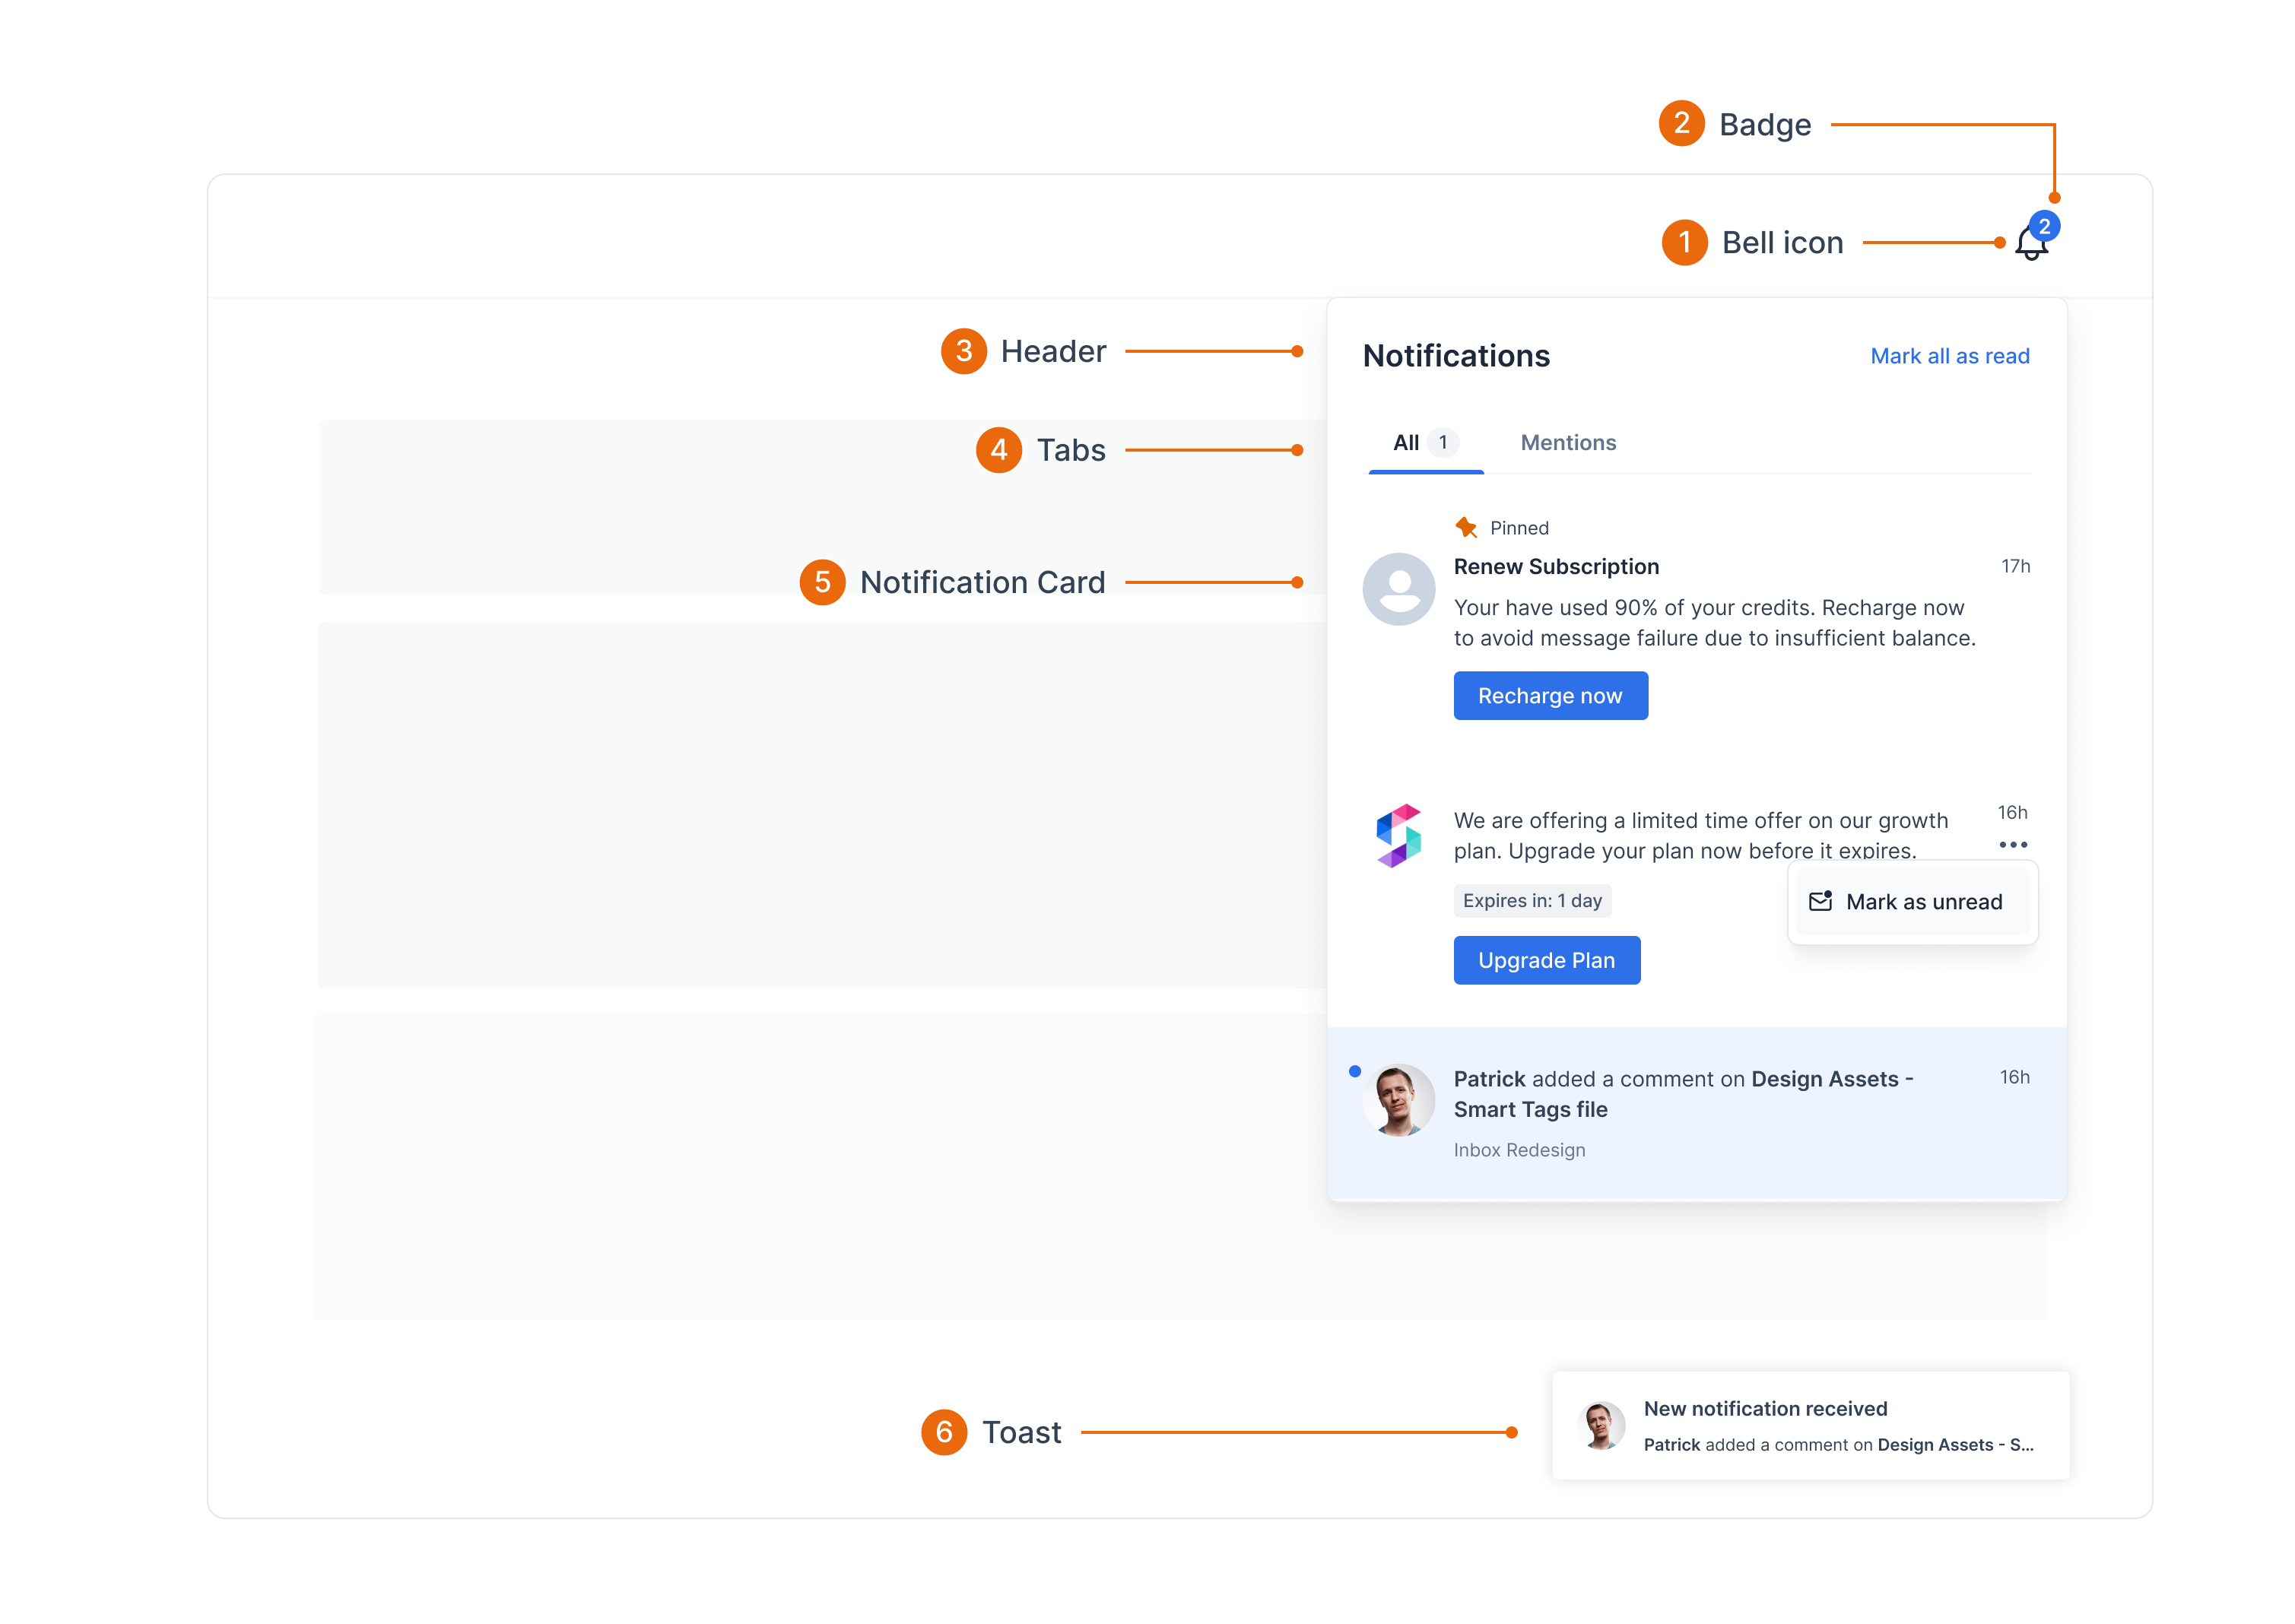
Apart from props provided in initialization section SuprSendInbox also takes other props for customization.
interface ISuprSendInbox {
  ....
  themeType?: 'light' | 'dark'
  hideInbox?: boolean
  hideToast?: boolean
  hideAvatar?: boolean
  noNotificationsComponent?: () => JSX.Element
  notificationComponent?: ({notificationData: any}) => JSX.Element
  bellComponent?: () => JSX.Element
  badgeComponent?: ({ count: number | null }) => JSX.Element
  loaderComponent?: () => JSX.Element
  tabBadgeComponent?: ({ count: number }) => JSX.Element
  notificationClickHandler?: (notificationData: any) => void
  primaryActionClickHandler?: (notificationData: any) => void
  secondaryActionClickHandler?: (notificationData: any) => void
  theme?: Dictionary  // check ThemeExample tab for full details
  popperPosition?: 'top' | 'bottom' | 'left' | 'right'
  toastProps?: {
    duration?: number,
    position?:'top-left'| 'top-right'| 'top-center'| 'bottom-left'| 'bottom-right'| 'bottom-center',
    limit?: number
    toastComponent?: ({notificationData: any}) => JSX.Element
  }
}
const darkColors = {
  primary: '#2E70E8',
  primaryText: '#EFEFEF',
  secondaryText: '#CBD5E1',
  border: '#3A4A61',
  main: '#1D2635',
  error: '#F97066'
}

const sampleDarkTheme = {
  bell: { color: '#fff' },
  badge: { backgroundColor: darkColors.primary },
  header: {
    container: {
      backgroundColor: darkColors.main,
      borderBottom: `0.5px solid ${darkColors.border}`,
      boxShadow: '0 0 5px 0 rgba(0, 0, 0, 0.5)'
    },
    headerText: { color: darkColors.primaryText },
    markAllReadText: { color: darkColors.primary }
  },
  tabs: {
    color: darkColors.primaryText,
    unselectedColor: darkColors.secondaryText + 'D9',
    bottomColor: darkColors.primary,
    badgeColor: 'rgba(100, 116, 139, 0.5)',
    badgeText: darkColors.primaryText
  },
  notificationsContainer: {
    container: {
      backgroundColor: darkColors.main,
      borderColor: darkColors.border
    },
    noNotificationsText: {
      color: darkColors.primaryText
    },
    noNotificationsSubtext: {
      color: darkColors.secondaryText
    },
    loader: { color: darkColors.primary }
  },
  notification: {
    container: {
      borderBottom: `1px solid ${darkColors.border}`,
      readBackgroundColor: darkColors.main,
      unreadBackgroundColor: '#273244',
      hoverBackgroundColor: '#2D3A4D'
    },
    pinnedText: {
      color: darkColors?.secondaryText
    },
    pinnedIcon: {
      color: 'red'
    },
    headerText: { color: darkColors.primaryText },
    bodyText: {
      color: darkColors.secondaryText,
      blockquoteColor: 'rgba(100, 116, 139, 0.5)',
      tableBorderColor: 'rgba(100, 116, 139, 0.5)',
    },
    unseenDot: { backgroundColor: darkColors.primary },
    createdOnText: { color: darkColors.secondaryText },
    subtext: { color: '#94a3b8' },
    actions: [
      { container: { backgroundColor: darkColors.primary } },
      {
        container: {
          borderColor: darkColors.border,
          backgroundColor: 'transparent',
          hoverBackgroundColor: darkColors.main
        },
        text: { color: darkColors.secondaryText }
      }
    ],
    expiresText: {
      backgroundColor: 'rgba(100, 116, 139, 0.5)',
      color: darkColors.secondaryText,
      expiringBackgroundColor: 'rgba(217, 45, 32, 0.15)',
      expiringColor: darkColors.error
    },
    actionsMenuIcon: {
      color: darkColors.secondaryText,
      hoverBackgroundColor: 'rgba(100, 116, 139, 0.5)'
    },
    actionsMenu: {
      backgroundColor: darkColors.main,
      borderColor: darkColors.border
    },
    actionsMenuItem: { hoverBackgroundColor: 'rgba(100, 116, 139, 0.2)' },
    actionsMenuItemIcon: { color: darkColors.secondaryText },
    actionsMenuItemText: {
      color: darkColors.secondaryText
    }
  },
  toast: {
    container: {
      backgroundColor: darkColors.main,
      borderColor: darkColors.border
    },
    headerText: { color: darkColors.primaryText },
    bodyText: {
      color: darkColors.secondaryText,
      blockquoteColor: darkColors.border,
      tableBorderColor: darkColors.border,
    }
  }
}
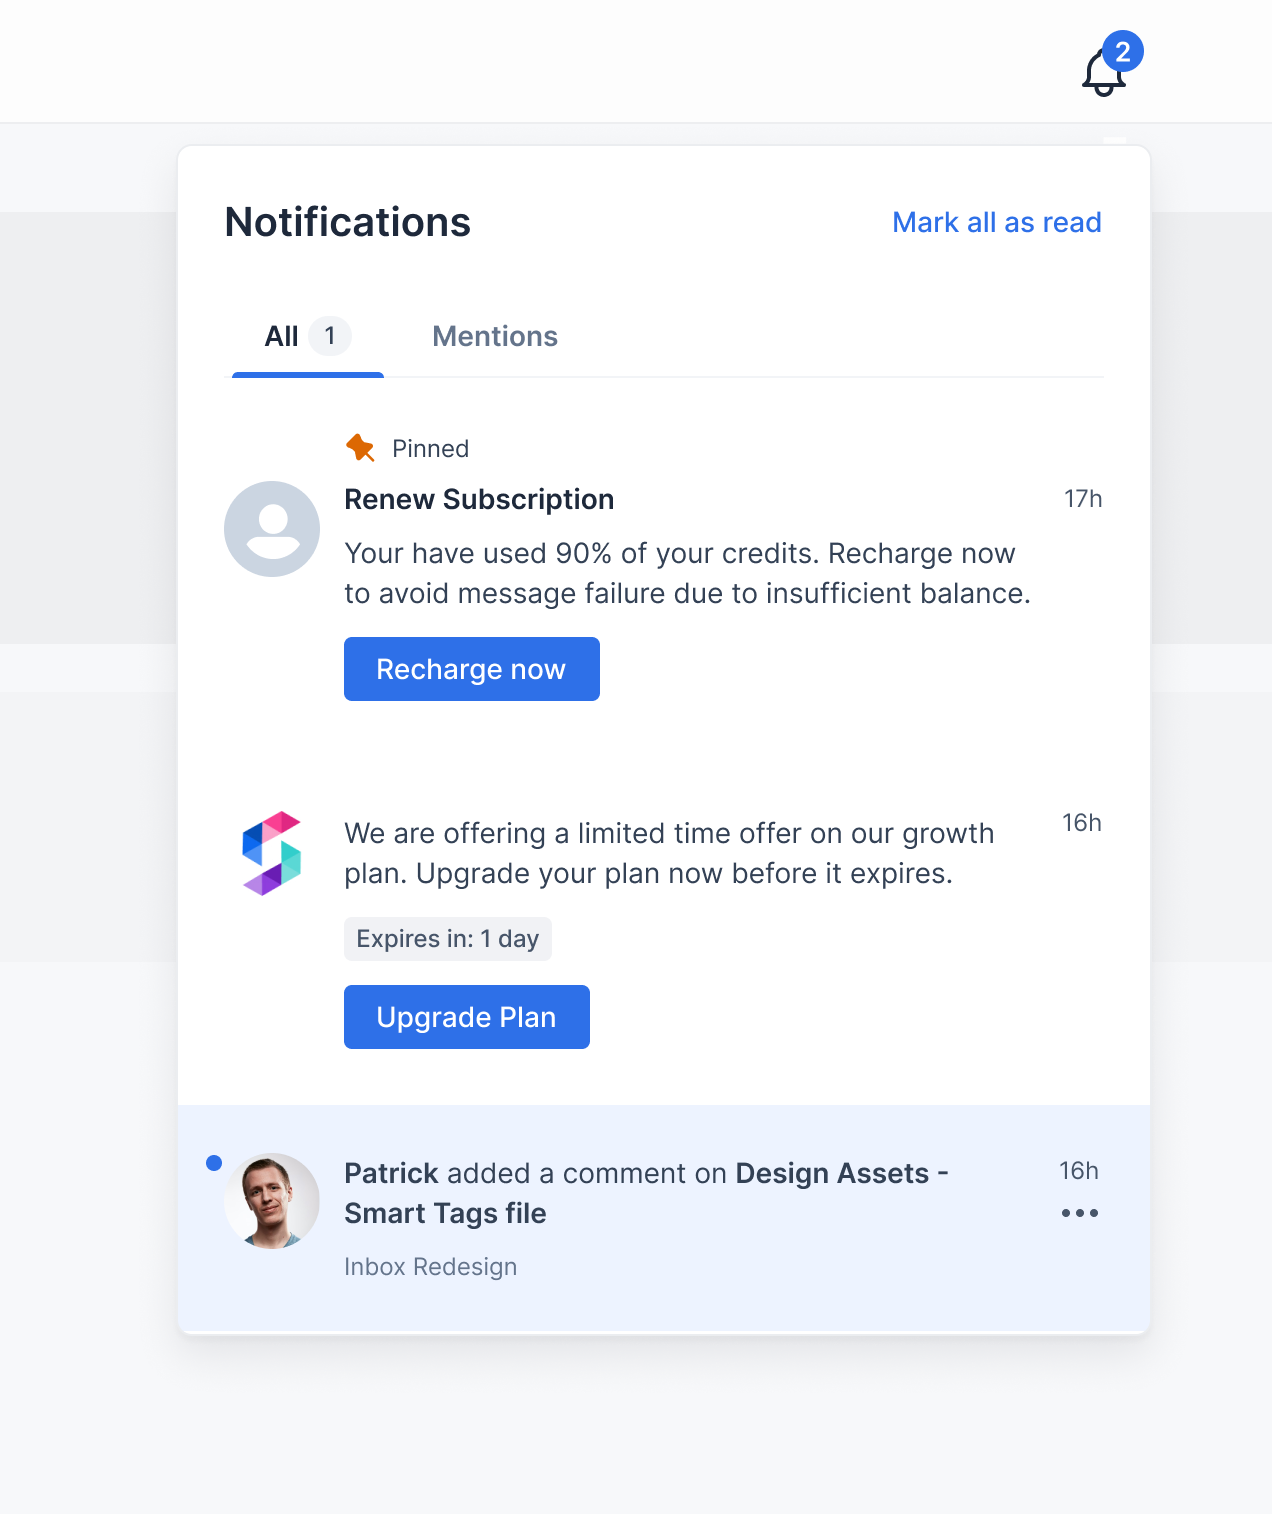
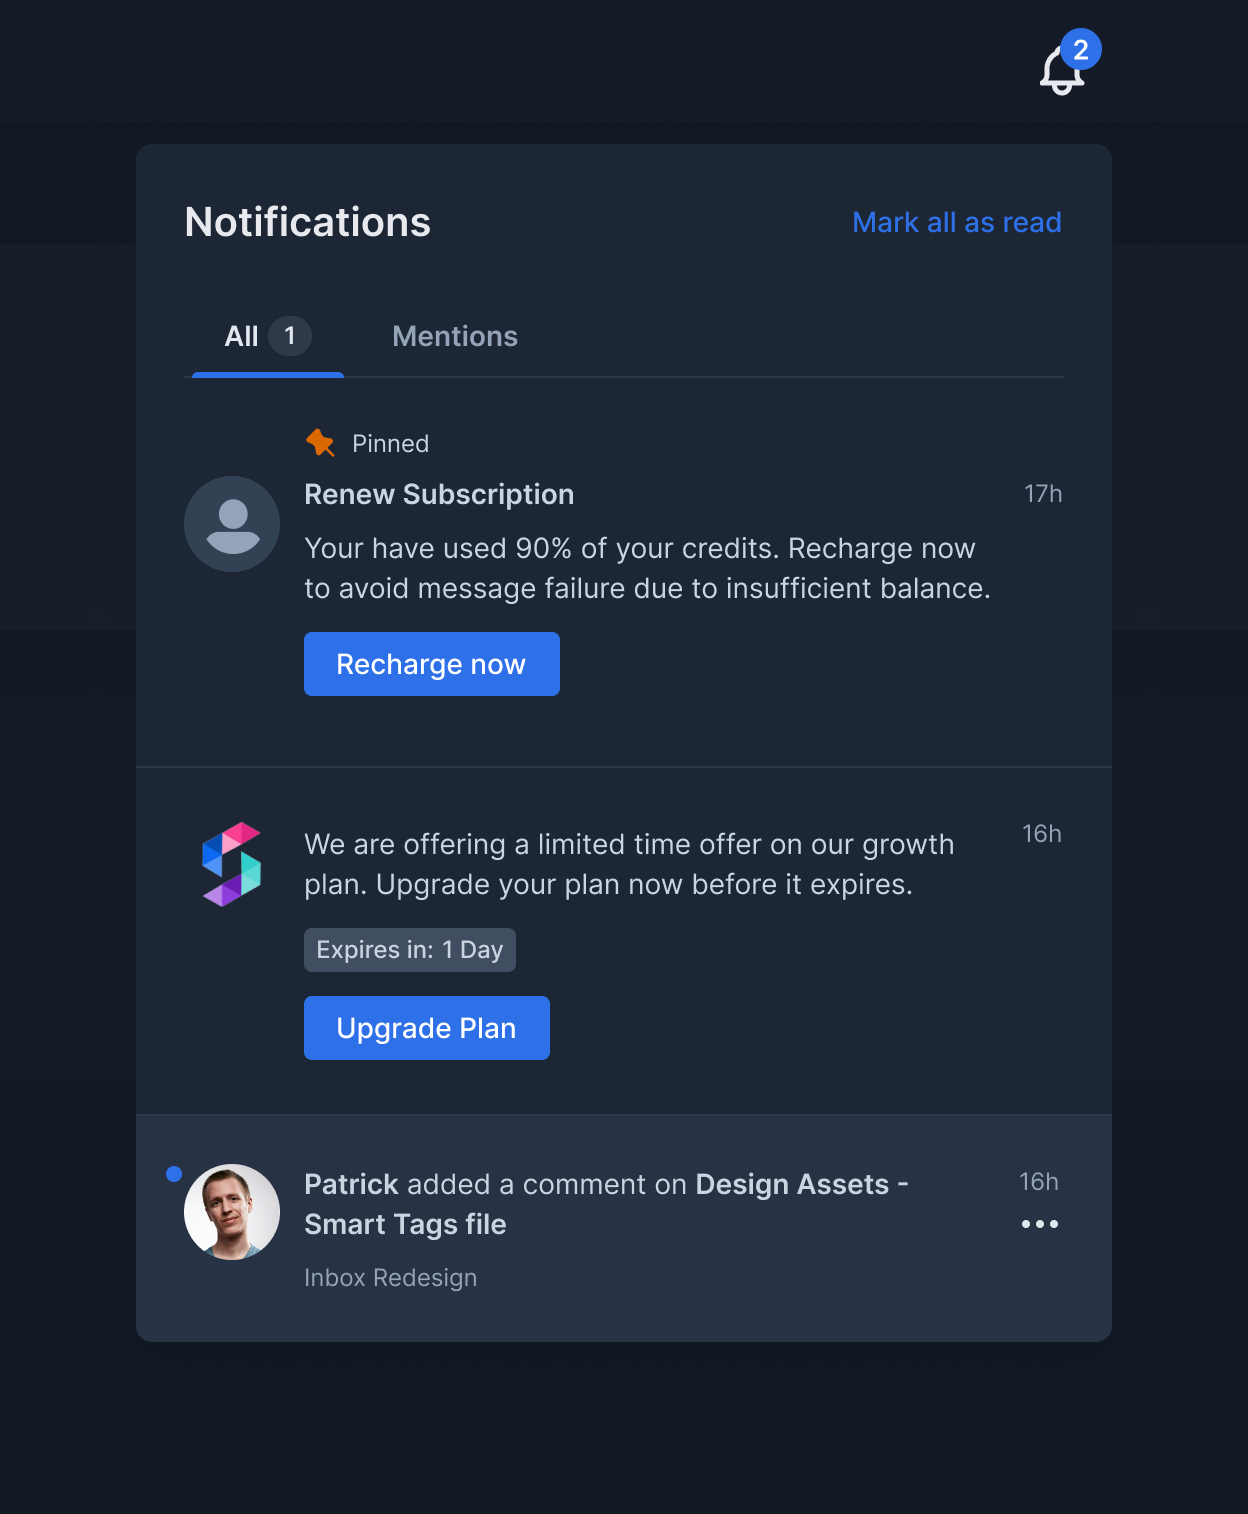
Customizing Theme
<SuprsendInbox themeType="light / dark" />
| Light Theme | Dark Theme |
|---|---|
 |  |
Customizing Bell Icon
You can also customize the color of the existing bell icon or add your own component.
<SuprsendInbox
  bellComponent?: React.FunctionComponent
  theme?: { bell?: React.CSSProperties }
/>
<SuprsendInbox
  bellComponent={() => <p>MyBell</p>}
  theme={{ bell: { color: 'blue' }}}
/>
| Property | Example |
|---|---|
| Bell color | theme={{ bell: { color: 'blue' } }} |
Customizing Badge (Counter)
This element shows the number of unseen notifications on Bell. You can change style of existing badge or pass custom badge component.
<SuprsendInbox
  badgeComponent?: React.FunctionComponent<{ count: Number }>
  theme?: { badge?: React.CSSProperties }
/>
<SuprsendInbox
  badgeComponent={(count) => <p>{count}</p>}
  theme={{ badge: { backgroundColor: 'pink', color: 'black', margin: '0px' }}}
/>
| Property | Example |
|---|---|
| Background color | theme={{ badge: { backgroundColor: 'pink'}}} |
| Text color | theme={{ badge: { color: 'black' }}} |
Customizing Header
This is the heading of the Notifications Inbox.
<SuprsendInbox
  theme?: {
    header?: {
      container?: React.CSSProperties
      headertext?: React.CSSProperties
      markAllReadText?: React.CSSProperties
    }
  }
/>
<SuprsendInbox
  theme={{
    header: {
      container: { backgroundColor: 'grey' },
      headertext: {color: 'black'},
      markAllReadText: {color: 'red'}
    }
  }}
/>
| Property | Example |
|---|---|
| Background color | theme={{ header: { container: { backgroundColor: 'grey' }}}} |
| Text color | theme={{ header: { headertext: { color: '#333333' }}}} |
| Mark all read text color | theme={{ header: { markAllReadText: { color: 'red' }}}} |
Adding custom Header component
You can add Custom component on right side of Header, this will replace Mark all as read text and add any JSX you pass as component in that place. You can even add custom icons like setting or preferences in that JSX and navigate user to that pages.
<SuprsendInbox headerRightComponent={({ markAllRead:()=>void, closeInboxPopup:()=>void }) => React.FunctionComponent} />
<SuprsendInbox headerRightComponent={({ markAllRead, closeInboxPopup }) => <p onClick={()=>{markAllRead()}}>Custom Read All</p>} />
Customizing Tabs

You can customise style of tabs component.
<SuprsendInbox theme?: { tabs?: React.CSSProperties } />
| Property | Example |
|---|---|
| Selected tab text color | theme={{ tabs: {color: 'red'}} |
| Unselected tab text color | theme={{ tabs: {unselectedColor: 'red'}} |
| Selected tab bottom border | theme={{ tabs: {bottomColor: 'red'}} |
Customizing Tab Badge (Counter)
To hide unread counter badge on Tabs use showUnreadCountOnTabs flag.
You can also customise counter style.
| Property | Example |
|---|---|
| Tab badge background color | theme={{ tabs: {badgeColor: 'red'}} |
| Tab badge text color | theme={{ tabs: {badgeText: 'red'}} |
You can Pass own component for unread counter on tab.
<SuprsendInbox tabBadgeComponent={({ count }) => <p>{count}</p>} />
Customizing Notification Card
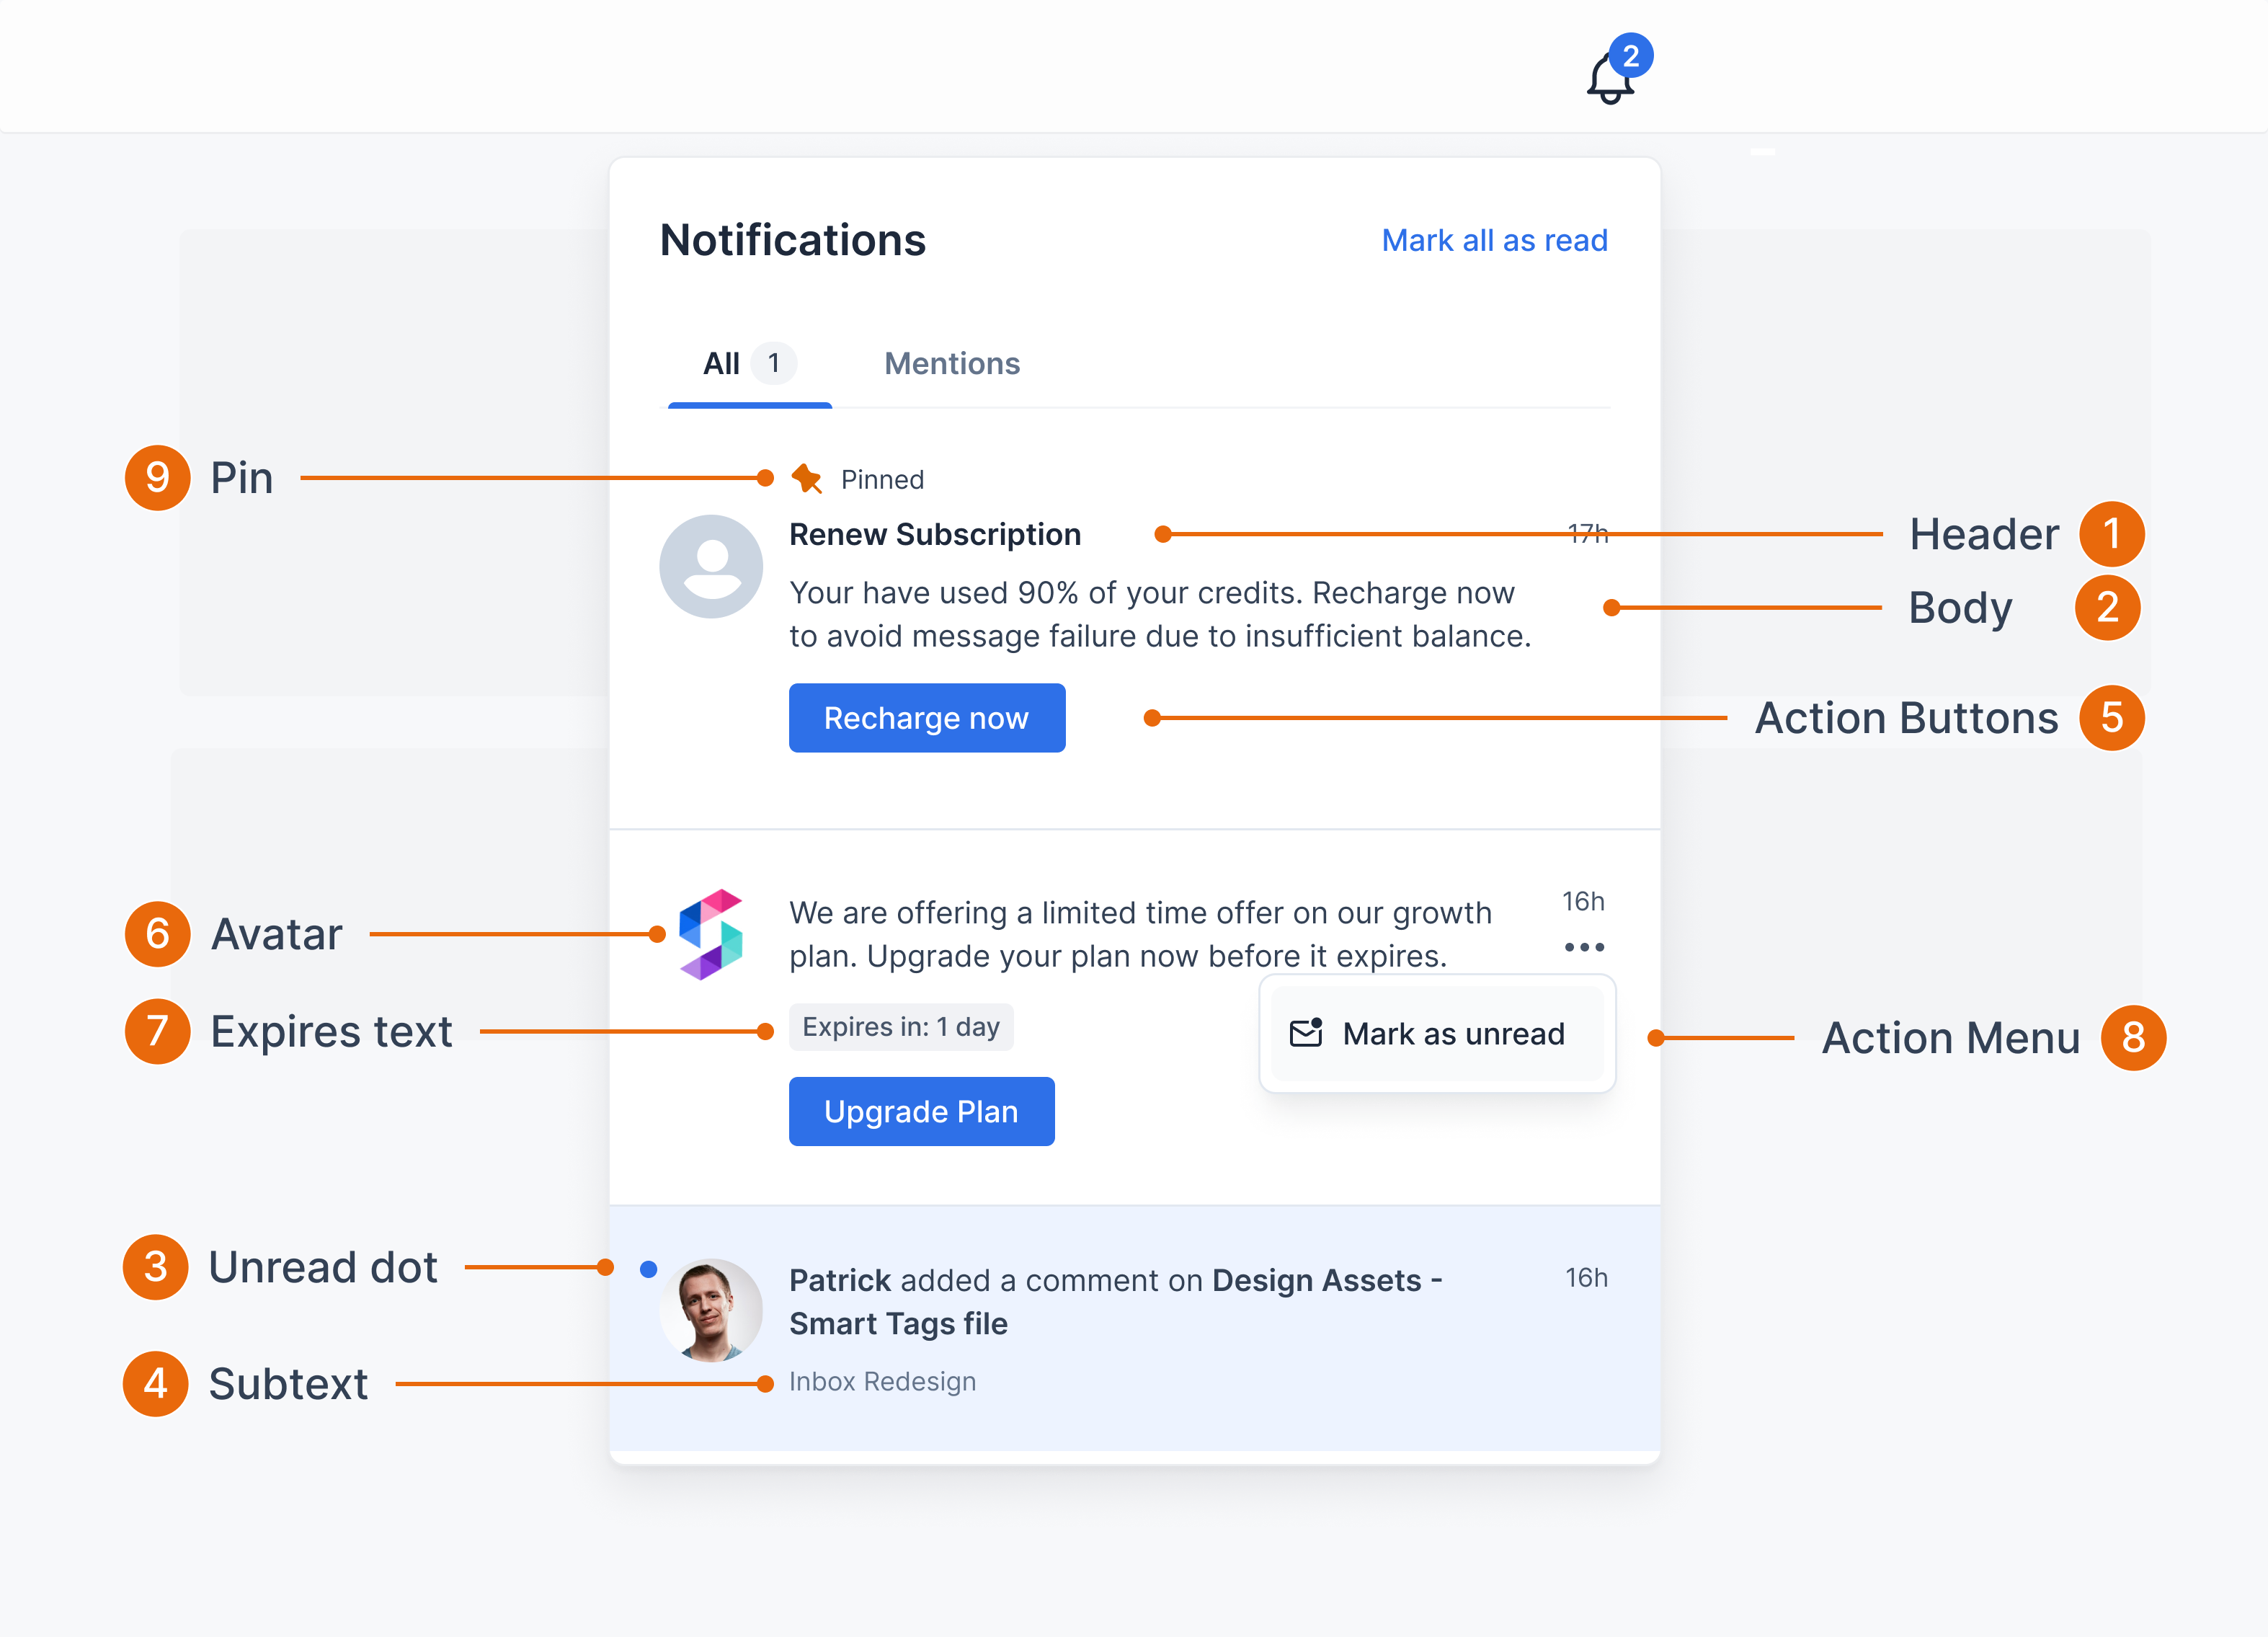
The style of notification depends on its state. It can be read or unread. The unread state just has an unseen dot on the card. These are all the components of a notification card.
<SuprsendInbox
  theme?: {
    notification?: {
      container?: React.CSSProperties
      headerText?: React.CSSProperties
      bodyText?: React.CSSProperties
      unseenDot?: React.CSSProperties
    }
  }
/>
<SuprsendInbox
  theme={{
    notification: {
      container: { readBackgroundColor: 'gray' },
      headerText: { color: 'red' },
      bodyText: { color: 'blue' },
      unseenDot: { backgroundColor: 'red' }
    }
  }}
/>
Background (Container)
| Property | Example |
|---|---|
| Read state notification background color | theme={{ notification: { container: { readBackgroundColor: 'gray' }}} |
| UnRead state notification background color | theme={{ notification: { container: { unreadBackgroundColor: 'gray' }}} |
| Notification hover background color | theme={{ notification: { container: { hoverBackgroundColor: 'gray' }}} |
Header Text
| Property | Example |
|---|---|
| Text color | theme={{ notification: { headerText: { color: '#333333' }}}} |
Body Text
The body text field supports markdown. You can add bold, italic, bold italic, blockquotes, ordered and unordered lists etc. Body text also has supports HTML syntax.
| Property | Example |
|---|---|
| Text color | theme={{ notification: { bodyText: { color: '#333333' }}}} |
| Blockquote color | theme={{ notification: { bodyText: { blockquoteColor: 'red'}}} |
| Link color | theme={{ notification: { bodyText: { linkColor: 'red'}}} |
| Table border color | theme={{ notification: { bodyText: { tableBorderColor: 'red'}}} |
Unread Dot
| Property | Example |
|---|---|
| Background color | theme={{ notification: { unseenDot: { backgroundColor: 'gray' }}}} |
SubText
| Property | Example |
|---|---|
| Color | theme={{ notification: { subtext: { color: 'red' }}}} |
Action Buttons
There are 2 types of buttons, Primary and Secondary. You can customize the styles of both buttons.
| Property | Example |
|---|---|
| Primary button color | theme={{ notification: { actions: [{ container: { backgroundColor: 'red' } }] } }} |
| Primary button hover color | theme={{ notification: { actions: [{ container: { hoverBackgroundColor: 'red' } }] } }} |
| Primary button text color | theme={{ notification: { actions: [{text:{color:"yellow"} }] } }} |
| Secondary button color | theme={{ notification: { actions: [{<first button style>}, { container: { backgroundColor: 'red' } }] } }} |
| Secondary button hover color | theme={{ notification: { actions: [{<first button style>}, { container: { hoverBackgroundColor: 'red' } }] } }} |
| Secondary button text color | theme={{ notification: { actions: [{<primary_button_style>}, {text:{color:"yellow"} }] } }} |
Action Button Custom Click Handlers
You could override the custom action button click logic to add your own logic using primaryActionClickHandler and secondaryActionClickHandler.
<SuprsendInbox
  primaryActionClickHandler?: (notificationData: any) => void
  secondaryActionClickHandler?: (notificationData: any) => void
/>
Avatar
To hide the avatar in the notification card pass hideAvatar={true} in SuprsendInbox component. By default its value will be false.
Expires Text
If expiry and show expiry timer is enabled then you can customize the style of expiring badge using below properties
| Property | Example |
|---|---|
| Background color | theme={{ notification: { expiresText: { backgroundColor: 'red' } } }} |
| Color | theme={{ notification: { expiresText: { color: 'red' } } }} |
| Expiring background color | theme={{ notification: { expiresText: { expiringBackgroundColor: 'red' } } }} |
| Expiring color | theme={{ notification: { expiresText: { expiringColor: 'red' } } }} |
Pinned Text
| Property | Example |
|---|---|
| Color | theme={{ notification: { pinnedText: { color: 'red' } } }} |
Pinned Icon
| Property | Example |
|---|---|
| Color | theme={{ notification: { pinnedIcon: { color: 'red' } } }} |
Actions Menu
Actions Menu Icon
This is horizontal 3 dots on notification card which on clicked opens menu of options like read/ unread/ archive etc
| Property | Example |
|---|---|
| Color | theme={{ notification: { actionsMenuIcon: { color: 'red' } } }} |
| Hover background color | theme={{ notification: { hoverBackgroundColor: { color: 'red' } } }} |
Actions Menu Container
This is menu that is opened when 3 dots icon is clicked on notification card.
| Property | Example |
|---|---|
| Background color | theme={{ notification: { actionsMenu: { backgroundColor: 'red' } } }} |
| Border color | theme={{ notification: { actionsMenu: { borderColor: 'red' } } }} |
Actions Menu Item
Style of every option item in notification actions menu can be customized.
| Property | Example |
|---|---|
| Hover background color | theme={{ notification: { actionsMenuItem: { hoverBackgroundColor: 'red' } } }} |
Actions Menu Item Icon
Style of icon in option item in notification actions menu can be customized.
| Property | Example |
|---|---|
| Color | theme={{ notification: { actionsMenuItemIcon: { color: 'red' } } }} |
Actions Menu Item Text
Style of text in option item in notification actions menu can be customized.
| Property | Example |
|---|---|
| Color | theme={{ notification: { actionsMenuItemText: { color: 'red' } } }} |
Custom Notification Card Component
You can either customize the CSS properties of the default notification card as mentioned above or create your own notification card. To toggle between mark read and mark unread action you could use seen_on field in notificationData like given in example.
<SuprsendInbox
  notificationComponent?: React.FunctionComponent<{ notificationData: Object, markRead:(clickEvent?:any)=>void, markUnRead:(clickEvent?:any)=>void, markArchived:(clickEvent?:any)=>void }>
/>
<SuprsendInbox
  notificationComponent={({ notificationData, markRead, markUnRead, markArchived }) => (
    <div>
    	<p>{JSON.stringify(notificationData)}</p>
        {notificationData.seen_on? <p onClick={(e)=>{markUnRead(e)}}>Mark UnRead</p> : <p onClick={(e)=>{markRead(e)}}>Mark Read</p>}
     </div>
  )}
/>
Set Custom Click Handler
If you add a URL or deep-link in action URL or buttons, the default handling is to open the URL when a user clicks on the notification. However, you can set a custom click handler by setting the click handler function.
Example: You can open a modal using a notification click handler.
<SuprsendInbox notificationClickHandler?: Function<notificationData> />
<SuprsendInbox
  notificationClickHandler={(notificationData) => {
    console.log('notification clicked', notificationData)
  }}
/>
Customizing Inbox Popup Position
Popup position w.r.t bell icon can be adjusted using the popperPosition property. The default position is bottom ie.., the inbox notifications popup list will be shown bottom of the bell icon.
<SuprsendInbox popperPosition="top" / "bottom" / "left" / "right" />
Customizing Toast
Toast appears when a new inbox notification is received when the user is active on the platform. You can customize the content shown on the toast and its styling or hide the toast altogether as per your requirement. We use react-toastify for toast notifications. This is the default toast.

Show / Hide Toast
You can hide the toast by passing hideToast={false}. By default, it is set to true.
<SuprsendInbox hideToast:boolean />
Change Toast Position
By default, a toast message appears on the bottom-right corner of the screen on the desktop and the bottom-center on mobile. You can change this using below property.
<SuprsendInbox
  toastProps?: {
    position?:'top-left'| 'top-right'| 'top-center'| 'bottom-left'| 'bottom-right'| 'bottom-center'
  }
/>
Change Toast Duration
By default, toast stays on screen for 3 seconds. You can customize this duration.
<SuprsendInbox toastProps?: { duration: number } /> // in milliseconds
Change Toast Notifications Limit
By default, 3 toast notifications are shown at max. You can customize this limit.
<SuprsendInbox toastProps?: { limit: number } />
Custom Toast Content Component
By default, toast shows the header and body text of the notification. You can also pass your own component.
<SuprsendInbox
  toastProps?: {
    toastComponent?: React.FunctionComponent<{ notificationData: object }>
  }
/>
<SuprsendInbox
  toastProps={{ toastComponent: ({ notificationData }) => <p>New Notification received</p> }}
/>
Customize Toast Style
You can customize style of existing toast notification.
<SuprsendInbox
  theme?: {
    toast: {
      container?: React.CSSProperties
      headerText?: React.CSSProperties
      bodyText?: React.CSSProperties
    }
/>
<SuprsendInbox
  theme={{
    toast: {
      container: { backgroundColor: 'red' },
      headerText: { color: 'white' },
      bodyText: { color: 'white' }
    }
  }}
/>
Customize Toast Background
| Property | Example |
|---|---|
| Background color | theme={{ toast: { container: { backgroundColor: 'gray' } }}} |
Customize Toast Header Text
| Property | Example |
|---|---|
| Text color | theme={{ toast: { headerText: {color: '#333333'} }}} |
Customize Toast Body Text
| Property | Example |
|---|---|
| Text color | theme={{ toast: { bodyText: {color: '#333333'} }}} |
| Blockquote color | theme={{ toast: { bodyText: {blockquoteColor: '#333333'} }}} |
| Link color | theme={{ toast: { bodyText: {linkColor: '#333333'} }}} |
Customizing Empty Inbox screen
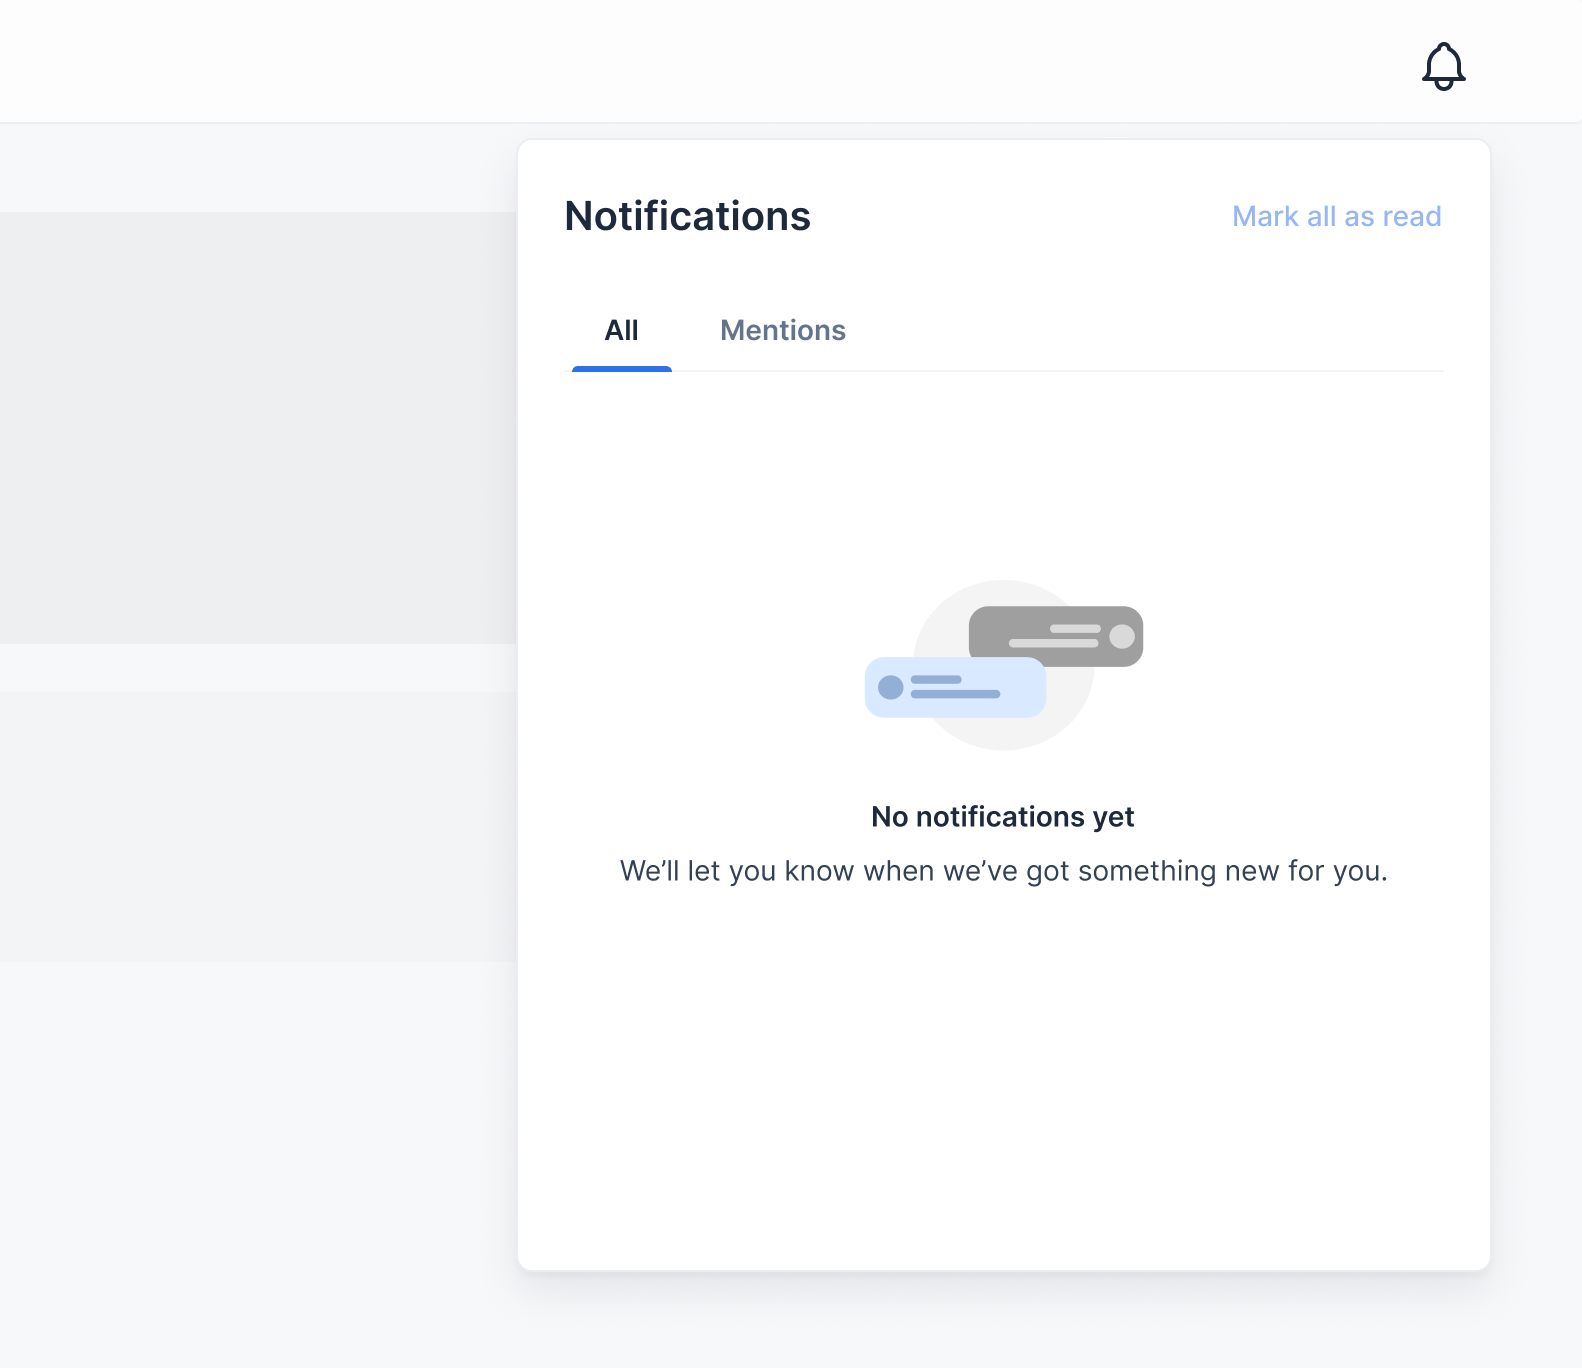
Customize Existing Empty Screen Style
<SuprsendInbox
  theme?: {
    notificationsContainer?: {
      noNotificationsText?: React.CSSProperties,
      noNotificationsSubtext?: React.CSSProperties
    }
/>
<SuprsendInbox
  theme={{
    notificationsContainer: {
      noNotificationsText: { backgroundColor: 'blue', color: 'white' }
      noNotificationsSubtext: { backgroundColor: 'blue', color: 'white' }
    }
  }}
/>
| Property | Example |
|---|---|
| Background color | theme={{ notificationsContainer: { noNotificationsText: { backgroundColor: 'blue' } }}} |
| Text color | theme={{ notificationsContainer: { noNotificationsText: { color: 'gray'} } }} |
Custom Empty Screen Component
You can show your own custom component instead.
<SuprsendInbox noNotificationsComponent?: React.FunctionComponent />
<SuprsendInbox noNotificationsComponent={() => <p>No Notifications</p>} />
Updated 2 months ago
